> ## Documentation Index
> Fetch the complete documentation index at: https://moengage.com/docs/llms.txt
> Use this file to discover all available pages before exploring further.
# OAuth 2.0 Overview
> Authenticate to the MoEngage Public APIs with short-lived OAuth 2.0 access tokens: create a key, generate a token, call the APIs, and refresh before expiry.
OAuth 2.0 authenticates your application to the MoEngage Public APIs with a short-lived access token instead of an API key sent on every call. You exchange your credentials once for an access token, send that token on your API requests until the token expires, and then refresh the token without sending your API key again.
This article covers the end-to-end integration: creating an OAuth 2.0 API key, generating an access token, calling the APIs, and refreshing the access token before the token expires.
## Authentication Flow
| Stage | Action | Reference |
| - | - | - |
| 1. Create a key | You create an API key with **Authentication Type** set to **OAuth 2.0**. | [API Key Dashboard](/docs/user-guide/settings/account/api-and-api-keys/api-key-dashboard) |
| 2. Generate a token | You exchange `client_id` and `client_secret` for an access token and a refresh token. | [Generate Access Token](/docs/api/oauth/generate-access-token) |
| 3. Call the APIs | You send the access token in the `Authorization` header as a Bearer token. | [Step 3: Call the MoEngage Public APIs](#step-3-call-the-moengage-public-apis) |
| 4. Refresh the token | You exchange the refresh token for a new access token before the current access token expires. | [Refresh Access Token](/docs/api/oauth/refresh-access-token) |
The OAuth parameters map to dashboard values as follows:
| Parameter | Dashboard Value |
| - | - |
| `client_id` | The parameter holds your Workspace ID, which the API key dashboard always displays. |
| `client_secret` | The parameter holds your API key value, which the dashboard displays only once, when you create the key. |
| `access_token` | The parameter holds a short-lived JWT that you send on every API call. |
| `refresh_token` | The parameter holds a long-lived token that you exchange for new access tokens. The refresh token is valid for 30 days. |
## Prerequisites
Before you begin, ensure that you meet the following requirements:
* You have access to **Settings** > **Account** > **API keys** in the MoEngage dashboard.
* You have identified the data center that hosts your workspace. Your dashboard URL indicates the data center. For more information, refer to [Data Centers](/docs/api/introduction#data-centers). If you are unsure which data center hosts your workspace, contact MoEngage Support.
## OAuth Base URLs
OAuth requests go to the OAuth host for your data center, and requests to the Public APIs go to your REST API host. Replace `{dc}` in the examples on this page with your data center number.
| Data Center | OAuth Base URL |
| - | - |
| DC-01 | `https://oauth2-01.moengage.com` |
| DC-02 | `https://oauth2-02.moengage.com` |
| DC-03 | `https://oauth2-03.moengage.com` |
| DC-04 | `https://oauth2-04.moengage.com` |
| DC-05 | `https://oauth2-05.moengage.com` |
| DC-06 | `https://oauth2-06.moengage.com` |
| DC-101 | `https://oauth2-101.moengage.com` |
## Step 1: Create an OAuth 2.0 API Key
On the left navigation menu in the MoEngage dashboard, go to **Settings** > **Account** > **API keys**.
Click **+ Create new key**.
Enter a descriptive name in the **Key name** box, for example `orders-integration`.
Under **Authentication Type**, select **OAuth 2.0**.
In the **Access token expiration (in minutes)** box, enter how long each access token stays valid. The value must be between 5 and 60 minutes, and the default is 15 minutes.
Under **Select APIs for access**, select the API groups that the key calls. The key accesses only the endpoints that you select in this list.
Click **Create key**. The dashboard then displays your Workspace ID and the API key value.
Copy the API key immediately. MoEngage displays the API key only once and cannot retrieve the API key afterwards. If you lose the API key, regenerate the key. Regenerating a key invalidates the previous key.
The **Create new key** dialog maps to the OAuth parameters as follows:
| Dashboard Field | Use the Field As | Notes |
| - | - | - |
| Workspace ID | `client_id` | The dashboard always displays the Workspace ID. |
| API key | `client_secret` | The dashboard displays the API key only once, when you create the key. |
| Authentication Type | Not applicable | The value must be **OAuth 2.0**, or token generation fails with `ER012`. |
| Select APIs for access | Not applicable | The selection determines which APIs the key calls. |
| Access token expiration (in minutes) | Not applicable | The value must be between 5 and 60 minutes. The default is 15 minutes. |
To call the Segmentation APIs or Inform, create a Basic Auth key instead. For the API groups that OAuth 2.0 keys support, and for the steps to edit, regenerate, and archive keys, refer to [API Key Dashboard](/docs/user-guide/settings/account/api-and-api-keys/api-key-dashboard).
## Step 2: Generate an Access Token
Exchange your `client_id` and `client_secret` for an access token and a refresh token. Send the request body in form-encoded format (`application/x-www-form-urlencoded`). A JSON body returns `415 Unsupported Media Type`.
```bash Generate Access Token theme={null}
curl --request POST \
--url https://oauth2-{dc}.moengage.com/v1/oauth/token \
--header 'Content-Type: application/x-www-form-urlencoded' \
--data grant_type=client_credentials \
--data client_id=YOUR_WORKSPACE_ID \
--data client_secret=YOUR_API_KEY
```
Store both the access token and the refresh token. The refresh token removes the need to send your API key again for the next 30 days.
To run the request and to review every parameter, response field, and error code, refer to [Generate Access Token](/docs/api/oauth/generate-access-token).
### Determine the Token Expiry
The `expires_in` field in the response gives the access token's lifetime in seconds, counted from the moment MoEngage issues the token. Schedule your refresh from that value. The lifetime reflects the **Access token expiration (in minutes)** set on the API key.
## Step 3: Call the MoEngage Public APIs
Send the access token in the `Authorization` header as a Bearer token.
```bash Call an API with an Access Token theme={null}
curl --request POST \
--url https://api-{dc}.moengage.com/v1/customer/YOUR_WORKSPACE_ID \
--header 'Authorization: Bearer YOUR_ACCESS_TOKEN' \
--header 'Content-Type: application/json' \
--data '{ "type": "customer", "customer_id": "user_12345" }'
```
For the endpoints that your key can call, refer to [API Documentation](/docs/api/introduction). For per-endpoint request limits and payload size caps, refer to [Rate Limits](/docs/api/rate-limits).
### Authentication Errors
When authentication fails, the response carries a `MOENGAGE-AUTH-ERROR-CODE` header.
| HTTP | `MOENGAGE-AUTH-ERROR-CODE` | Cause | Resolution |
| - | - | - | - |
| `401` | `ER008` | The access token has expired. | Refresh the access token. Refer to [Step 4: Refresh the Access Token](#step-4-refresh-the-access-token). |
| `403` | `ER007` | The access token is valid, but the endpoint falls outside the key's scope. | Add the endpoint to the key's API access on the dashboard. |
| `401` | `ER003` or `ER004` | The access token is malformed or altered. | Request a new access token. Refer to [Generate Access Token](/docs/api/oauth/generate-access-token). |
| `401` | `ER022` | The request sent credentials in more than one place. | Send the access token only in the `Authorization` header. |
## Step 4: Refresh the Access Token
Before the access token expires, exchange the refresh token for a new access token. The refresh request does not use your API key. Send the request body in form-encoded format (`application/x-www-form-urlencoded`), as in Step 2.
```bash Refresh Access Token theme={null}
curl --request POST \
--url https://oauth2-{dc}.moengage.com/v1/oauth/refresh \
--header 'Content-Type: application/x-www-form-urlencoded' \
--data grant_type=refresh_token \
--data client_id=YOUR_WORKSPACE_ID \
--data refresh_token=YOUR_REFRESH_TOKEN
```
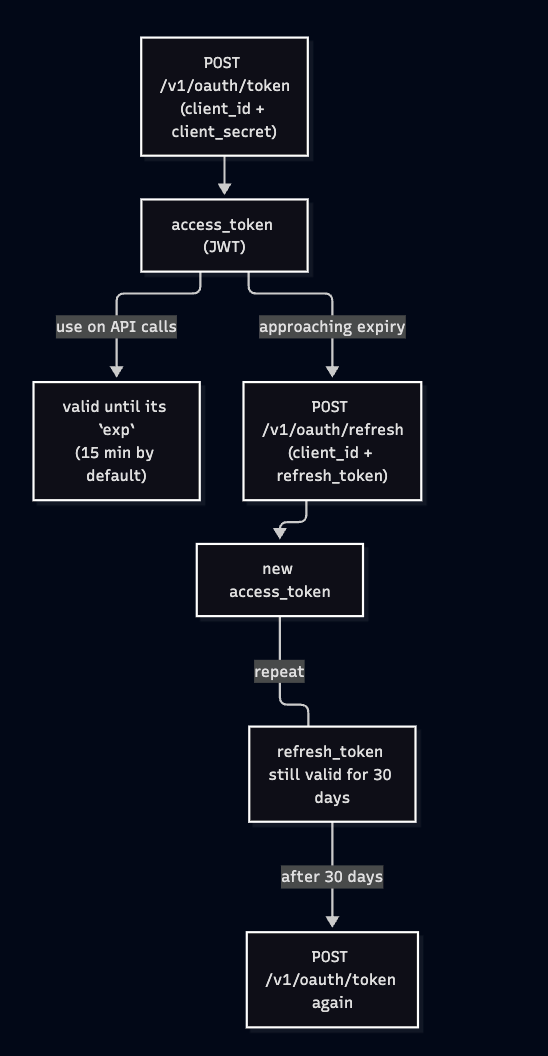
A refresh returns a new access token and preserves your existing refresh token. Continue using that refresh token until the token reaches its 30-day expiry, and then generate a new access token with your `client_id` and `client_secret`.
To run the request and to review every parameter, response field, and error code, refer to [Refresh Access Token](/docs/api/oauth/refresh-access-token).
## Token Lifecycle
 | Token | Lifetime | Renewed By |
| - | - | - |
| Access token | The lifetime is between 5 and 60 minutes, and you set the lifetime on the API key. The default is 15 minutes. | [Refresh Access Token](/docs/api/oauth/refresh-access-token) |
| Refresh token | The lifetime is fixed at 30 days. | [Generate Access Token](/docs/api/oauth/generate-access-token) |
## Rate Limits
The [token endpoint](/docs/api/oauth/generate-access-token) and the [refresh endpoint](/docs/api/oauth/refresh-access-token) share the following limits:
| Limit | Window |
| - | - |
| 30 requests | Per 10 minutes |
| 5 requests | Per minute |
Both limits apply per `client_id` and `client_secret` pair. A `429` response includes a `Retry-After` header that gives the number of seconds to wait.
Access tokens are reusable for their full lifetime. Generate one access token and reuse the token until the token approaches expiry. Generating an access token for every API request exceeds the rate limit.
These limits cover the OAuth endpoints only. For the limits and payload size caps on the Public APIs that you call with the access token, refer to [Rate Limits](/docs/api/rate-limits).
## Recommended Practices
* **Reuse the access token** for its full lifetime. Do not request a new access token for every API call.
* **Refresh proactively**, a few minutes before the access token expires, instead of waiting for an `ER008`. Use `expires_in` to schedule the refresh.
* **Handle `ER010` as a fallback.** When a refresh returns `ER010`, generate a new access token with your `client_id` and `client_secret`.
* **Store the API key securely.** Treat the API key as a credential. Do not commit the key to source control or expose the key in client-side code.
* **Honor `Retry-After`** on a `429` response instead of retrying immediately.
## Integration Checklist
Confirm the following points before you move your integration to production:
* The OAuth base URL matches your data center.
* The OAuth 2.0 API key carries the API access that your integration requires.
* Your application stores the Workspace ID and the API key securely.
* The token endpoint returns an access token and a refresh token.
* A Public API call succeeds with the access token.
* Your application reads the token expiry from the `expires_in` field.
* The refresh endpoint returns a new access token.
* Your application refreshes the access token before the token expires.
* The `ER010` fallback path re-authenticates with `client_id` and `client_secret`.
* Your application honors `Retry-After` on a `429` response.
## Related Articles
Request an access token and a refresh token with the client credentials grant.
Exchange a refresh token for a new access token.
Create, scope, edit, regenerate, and archive API keys.
Review the data centers, base URLs, authentication methods, and error handling that apply across the MoEngage REST APIs.
## Contact Support
Contact MoEngage Support with your Workspace ID, the endpoint you called, the HTTP status, and the `error_type` or `MOENGAGE-AUTH-ERROR-CODE` from the response. To raise a ticket, refer to [Raise a Support Ticket](/docs/user-guide/contact-support/raise-a-support-ticket-through-moengage-dashboard).
Do not include your API key, access token, or refresh token in a support request.
This documentation is built and hosted on [Mintlify](https://mintlify.com), a developer documentation platform.
| Token | Lifetime | Renewed By |
| - | - | - |
| Access token | The lifetime is between 5 and 60 minutes, and you set the lifetime on the API key. The default is 15 minutes. | [Refresh Access Token](/docs/api/oauth/refresh-access-token) |
| Refresh token | The lifetime is fixed at 30 days. | [Generate Access Token](/docs/api/oauth/generate-access-token) |
## Rate Limits
The [token endpoint](/docs/api/oauth/generate-access-token) and the [refresh endpoint](/docs/api/oauth/refresh-access-token) share the following limits:
| Limit | Window |
| - | - |
| 30 requests | Per 10 minutes |
| 5 requests | Per minute |
Both limits apply per `client_id` and `client_secret` pair. A `429` response includes a `Retry-After` header that gives the number of seconds to wait.
Access tokens are reusable for their full lifetime. Generate one access token and reuse the token until the token approaches expiry. Generating an access token for every API request exceeds the rate limit.
These limits cover the OAuth endpoints only. For the limits and payload size caps on the Public APIs that you call with the access token, refer to [Rate Limits](/docs/api/rate-limits).
## Recommended Practices
* **Reuse the access token** for its full lifetime. Do not request a new access token for every API call.
* **Refresh proactively**, a few minutes before the access token expires, instead of waiting for an `ER008`. Use `expires_in` to schedule the refresh.
* **Handle `ER010` as a fallback.** When a refresh returns `ER010`, generate a new access token with your `client_id` and `client_secret`.
* **Store the API key securely.** Treat the API key as a credential. Do not commit the key to source control or expose the key in client-side code.
* **Honor `Retry-After`** on a `429` response instead of retrying immediately.
## Integration Checklist
Confirm the following points before you move your integration to production:
* The OAuth base URL matches your data center.
* The OAuth 2.0 API key carries the API access that your integration requires.
* Your application stores the Workspace ID and the API key securely.
* The token endpoint returns an access token and a refresh token.
* A Public API call succeeds with the access token.
* Your application reads the token expiry from the `expires_in` field.
* The refresh endpoint returns a new access token.
* Your application refreshes the access token before the token expires.
* The `ER010` fallback path re-authenticates with `client_id` and `client_secret`.
* Your application honors `Retry-After` on a `429` response.
## Related Articles
Request an access token and a refresh token with the client credentials grant.
Exchange a refresh token for a new access token.
Create, scope, edit, regenerate, and archive API keys.
Review the data centers, base URLs, authentication methods, and error handling that apply across the MoEngage REST APIs.
## Contact Support
Contact MoEngage Support with your Workspace ID, the endpoint you called, the HTTP status, and the `error_type` or `MOENGAGE-AUTH-ERROR-CODE` from the response. To raise a ticket, refer to [Raise a Support Ticket](/docs/user-guide/contact-support/raise-a-support-ticket-through-moengage-dashboard).
Do not include your API key, access token, or refresh token in a support request.
This documentation is built and hosted on [Mintlify](https://mintlify.com), a developer documentation platform.