> ## Documentation Index
> Fetch the complete documentation index at: https://moengage.com/docs/llms.txt
> Use this file to discover all available pages before exploring further.
# Set Up iOS Notification Extensions for Rich Push and Impression Tracking
> Required configuration to enable push impression tracking and rich media notifications on iOS. Skipping this results in missing impression metrics and rich push failures.
All steps in this guide are performed in Xcode, open your iOS project by launching `ios/Runner.xcworkspace` in Xcode before proceeding.
This guide describes how to integrate MoEngage service and content extensions into your iOS application. These extensions enable notification impression tracking, support for rich media (images, GIFs, and video), and the use of rich push notification templates.
## Integrating service and content extensions
Without these extensions, MoEngage cannot track push impressions, [rich media](https://www.moengage.com/docs/user-guide/campaigns-and-channels/mobile-push/notification-features-and-behavior/gifs-in-push-notifications) notifications fall back to plain text, and [rich push templates](https://www.moengage.com/docs/user-guide/campaigns-and-channels/mobile-push/create/push-templates) render with fallback template.
| Use Case | Service Extension (Step 2) | Content Extension (Step 3) | MoEngageRichNotification (Step 4) | Integrator Tool Flag |
| :--------------------------------------- | :------------------------- | :------------------------- | :-------------------------------- | :------------------------------------- |
| Push impression tracking | ✅ Required | — | — | (default) |
| Rich media in push (images, GIFs, video) | ✅ Required | — | ✅ Required | (default) |
| MoEngage rich push templates (carousel) | ✅ Required | ✅ Required | ✅ Required | `--enable-push-notification-templates` |
### Step 1: Prerequisites
Before proceeding, ensure the following are in place:
* Ensure you are using MoEngage Flutter SDK version [10.6.0](/release-notes/sdks/flutter#core-10-6-0) or above to utilize the extension integrator tool.
* **SDK initialization:** Initialize the MoEngage SDK using [file-based initialization](/developer-guide/flutter-sdk/sdk-integration/sdk-initialization/file-based-initialization).
* **App Group configuration:** Define an App Group in your configuration using the `AppGroupName` key (for example, `group.com.organization.app`).
* Add this App Group to the **Signing & Capabilities** in Xcode.
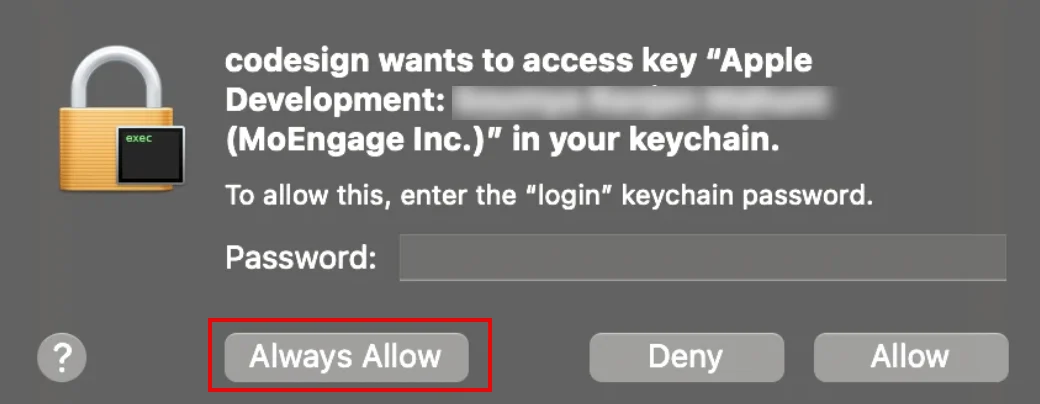
 * After integration is complete, you may be prompted to access the keychain for code signing. Click **Always Allow.**
 ### Step 2: Configure the service extension
The service extension tracks notification impressions and downloads rich media content.
1. [Create an App Identifier](https://developer.apple.com/help/account/identifiers/register-an-app-id): Use the format `[appBundleId].[serviceExtensionName].`
1. Replace `[appBundleId]` with your application’s specific bundle identifier
2. Replace `[serviceExtensionName]` with your chosen name (which defaults to *MoEngageNotificationService*). For example *:* If your app bundle identifier is `com.org.app` and your extension is named `NotificationService`, the identifier is `com.org.app.NotificationService`.
If you already have an existing Notification Service Extension, you can reuse it — you do not need to create a new one. Pass its name using the `--notification-service-extension-name` flag when configuring the [Run Script Phase in Step 5](#step-5-integrate-the-extension-integrator-tool). The tool will inject the necessary MoEngage logic without overwriting your custom code.
2. Select the service extension identifier created from step-1, open the **Capabilities** tab, add [**App Groups**](https://developer.apple.com/help/account/identifiers/register-an-app-group). Enter the name matching your `AppGroupName` key.
### Step 2: Configure the service extension
The service extension tracks notification impressions and downloads rich media content.
1. [Create an App Identifier](https://developer.apple.com/help/account/identifiers/register-an-app-id): Use the format `[appBundleId].[serviceExtensionName].`
1. Replace `[appBundleId]` with your application’s specific bundle identifier
2. Replace `[serviceExtensionName]` with your chosen name (which defaults to *MoEngageNotificationService*). For example *:* If your app bundle identifier is `com.org.app` and your extension is named `NotificationService`, the identifier is `com.org.app.NotificationService`.
If you already have an existing Notification Service Extension, you can reuse it — you do not need to create a new one. Pass its name using the `--notification-service-extension-name` flag when configuring the [Run Script Phase in Step 5](#step-5-integrate-the-extension-integrator-tool). The tool will inject the necessary MoEngage logic without overwriting your custom code.
2. Select the service extension identifier created from step-1, open the **Capabilities** tab, add [**App Groups**](https://developer.apple.com/help/account/identifiers/register-an-app-group). Enter the name matching your `AppGroupName` key.
 3. **Generate provisioning profile:** On the [Apple Developer Portal](https://developer.apple.com/account/resources/profiles/list), [create a new provisioning profile](https://developer.apple.com/help/account/provisioning-profiles/create-an-app-store-provisioning-profile) for the identifier created in step 1, and download it. To download it in Xcode, click **Xcode** in the menu bar, choose **Settings**.
 4. Switch to the **Apple Accounts** section, and select your Apple developer account. On your Apple Accounts page, select **Download Manual Profiles**.
 If you don't need rich push templates, you can skip Steps 3 and 4 and move directly to [Step 5: Integrate the extension integrator tool](#step-5-integrate-the-extension-integrator-tool).
### Step 3: Configure the content extension (Optional)
The content extension is required only if you intend to use MoEngage rich push notification templates.
1. [Create an App Identifier](https://developer.apple.com/help/account/identifiers/register-an-app-id): Use the format `[appBundleId].[contentExtensionName].`
1. Replace `[appBundleId]` with your application’s specific bundle identifier
2. Replace `[contentExtensionName]` with your chosen name (which defaults to *MoEngageNotificationContent*). For example\_:\_ If your app bundle identifier is `com.org.app` and your extension is named `NotificationContent`, the identifier is `com.org.app.NotificationContent`.
2. Select the content extension identifier, open the **Capabilities** tab, add [**App Groups**](https://developer.apple.com/help/account/identifiers/register-an-app-group). Enter the name matching your `AppGroupName` key.
3. **Generate provisioning profile:** On the [Apple Developer Portal](https://developer.apple.com/account/resources/profiles/list), [create a new provisioning profile](https://developer.apple.com/help/account/provisioning-profiles/create-an-app-store-provisioning-profile) for the identifier created in step 1, and download it. To download it in Xcode, click **Xcode** in the menu bar, choose **Settings**.
If you don't need rich push templates, you can skip Steps 3 and 4 and move directly to [Step 5: Integrate the extension integrator tool](#step-5-integrate-the-extension-integrator-tool).
### Step 3: Configure the content extension (Optional)
The content extension is required only if you intend to use MoEngage rich push notification templates.
1. [Create an App Identifier](https://developer.apple.com/help/account/identifiers/register-an-app-id): Use the format `[appBundleId].[contentExtensionName].`
1. Replace `[appBundleId]` with your application’s specific bundle identifier
2. Replace `[contentExtensionName]` with your chosen name (which defaults to *MoEngageNotificationContent*). For example\_:\_ If your app bundle identifier is `com.org.app` and your extension is named `NotificationContent`, the identifier is `com.org.app.NotificationContent`.
2. Select the content extension identifier, open the **Capabilities** tab, add [**App Groups**](https://developer.apple.com/help/account/identifiers/register-an-app-group). Enter the name matching your `AppGroupName` key.
3. **Generate provisioning profile:** On the [Apple Developer Portal](https://developer.apple.com/account/resources/profiles/list), [create a new provisioning profile](https://developer.apple.com/help/account/provisioning-profiles/create-an-app-store-provisioning-profile) for the identifier created in step 1, and download it. To download it in Xcode, click **Xcode** in the menu bar, choose **Settings**.
 4. Switch to the **Apple Accounts** section, and select your Apple developer account. On your Apple Accounts page, select **Download Manual Profiles**.
### Step 4: Integrate MoEngageRichNotification (Optional)
Integrate `MoEngageRichNotification` if you need to support either of the following push notification features:
* **Rich media** — display images, GIFs, or video in the notification banner
* **Rich push templates** — render interactive notification layouts such as carousel
This step is mandatory if you have integrated the content extension mentioned in Step 3.
To install the `MoEngageRichNotification` through SPM, perform the following steps:
1. Navigate to **File > Add Package**.
2. Enter the repository URL:
* `https://github.com/moengage/apple-sdk.git`
3. Select the **master** branch or a specific version and select **Add Package**.
4. Target the package to your application.
**Information** CocoaPods is being deprecated. MoEngage recommends using Swift Package Manager for all new integrations. For more info, refer [here](/developer-guide/ios-sdk/sdk-integration/basic/sdk-integration).
1. Add the following line to your `Podfile` inside your app target.
The `moengage_flutter` package already brings in `MoEngage-iOS-SDK` via autolinking — you only need to add the `RichNotification` subspec.
```ruby lines wrap theme={null}
pod 'MoEngage-iOS-SDK/RichNotification'
```
2. Run pod install:
```ruby lines wrap theme={null}
pod repo update
pod install
```
### Step 5: Integrate the extension integrator tool
Automate the extension configuration by adding a custom script to your build process.
1. In Xcode, select your application target, go to **Build Phases**, and click **+** to add a **New Run Script Phase**.
4. Switch to the **Apple Accounts** section, and select your Apple developer account. On your Apple Accounts page, select **Download Manual Profiles**.
### Step 4: Integrate MoEngageRichNotification (Optional)
Integrate `MoEngageRichNotification` if you need to support either of the following push notification features:
* **Rich media** — display images, GIFs, or video in the notification banner
* **Rich push templates** — render interactive notification layouts such as carousel
This step is mandatory if you have integrated the content extension mentioned in Step 3.
To install the `MoEngageRichNotification` through SPM, perform the following steps:
1. Navigate to **File > Add Package**.
2. Enter the repository URL:
* `https://github.com/moengage/apple-sdk.git`
3. Select the **master** branch or a specific version and select **Add Package**.
4. Target the package to your application.
**Information** CocoaPods is being deprecated. MoEngage recommends using Swift Package Manager for all new integrations. For more info, refer [here](/developer-guide/ios-sdk/sdk-integration/basic/sdk-integration).
1. Add the following line to your `Podfile` inside your app target.
The `moengage_flutter` package already brings in `MoEngage-iOS-SDK` via autolinking — you only need to add the `RichNotification` subspec.
```ruby lines wrap theme={null}
pod 'MoEngage-iOS-SDK/RichNotification'
```
2. Run pod install:
```ruby lines wrap theme={null}
pod repo update
pod install
```
### Step 5: Integrate the extension integrator tool
Automate the extension configuration by adding a custom script to your build process.
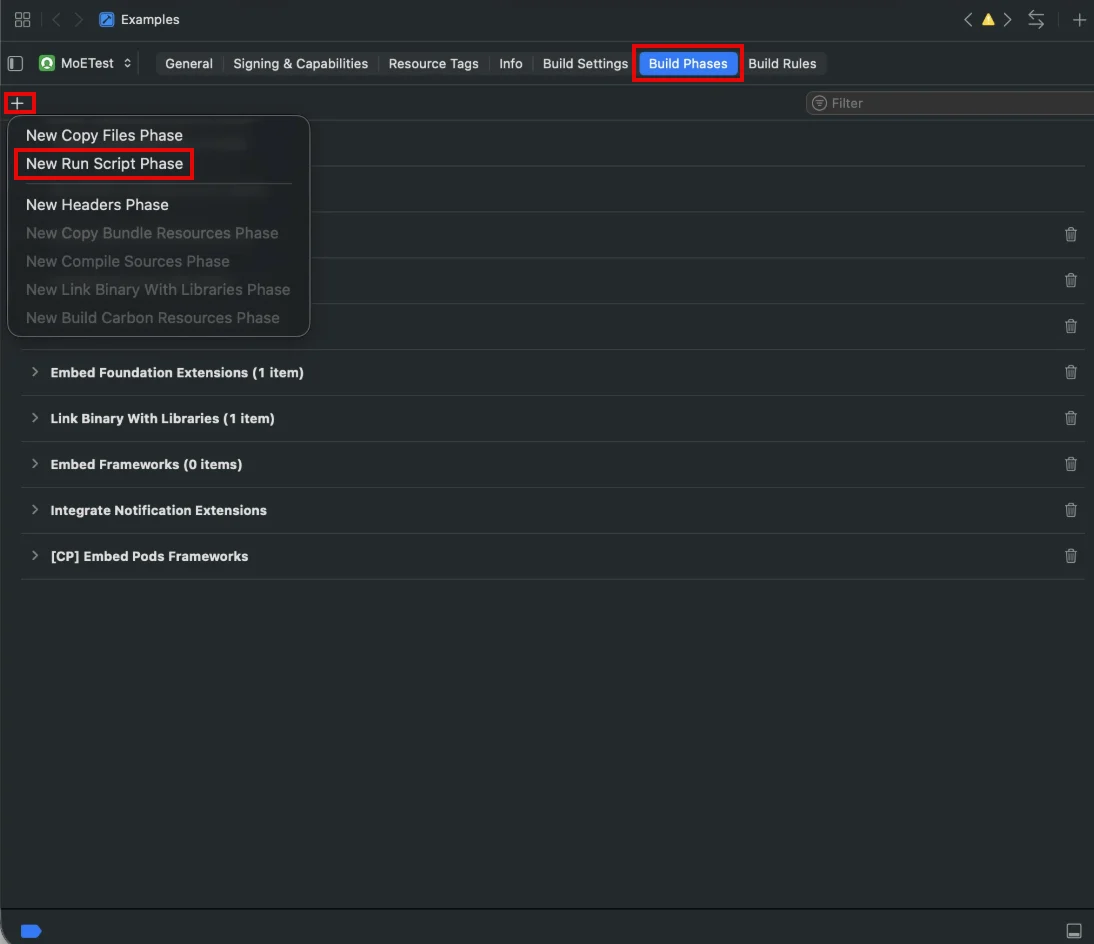
1. In Xcode, select your application target, go to **Build Phases**, and click **+** to add a **New Run Script Phase**.
 2. Add the following paths to the **Input Files** section:
* `$(BUILT_PRODUCTS_DIR)/$(INFOPLIST_PATH)`
* `$(INSTALL_DIR)/$(INFOPLIST_PATH)`
2. Add the following paths to the **Input Files** section:
* `$(BUILT_PRODUCTS_DIR)/$(INFOPLIST_PATH)`
* `$(INSTALL_DIR)/$(INFOPLIST_PATH)`
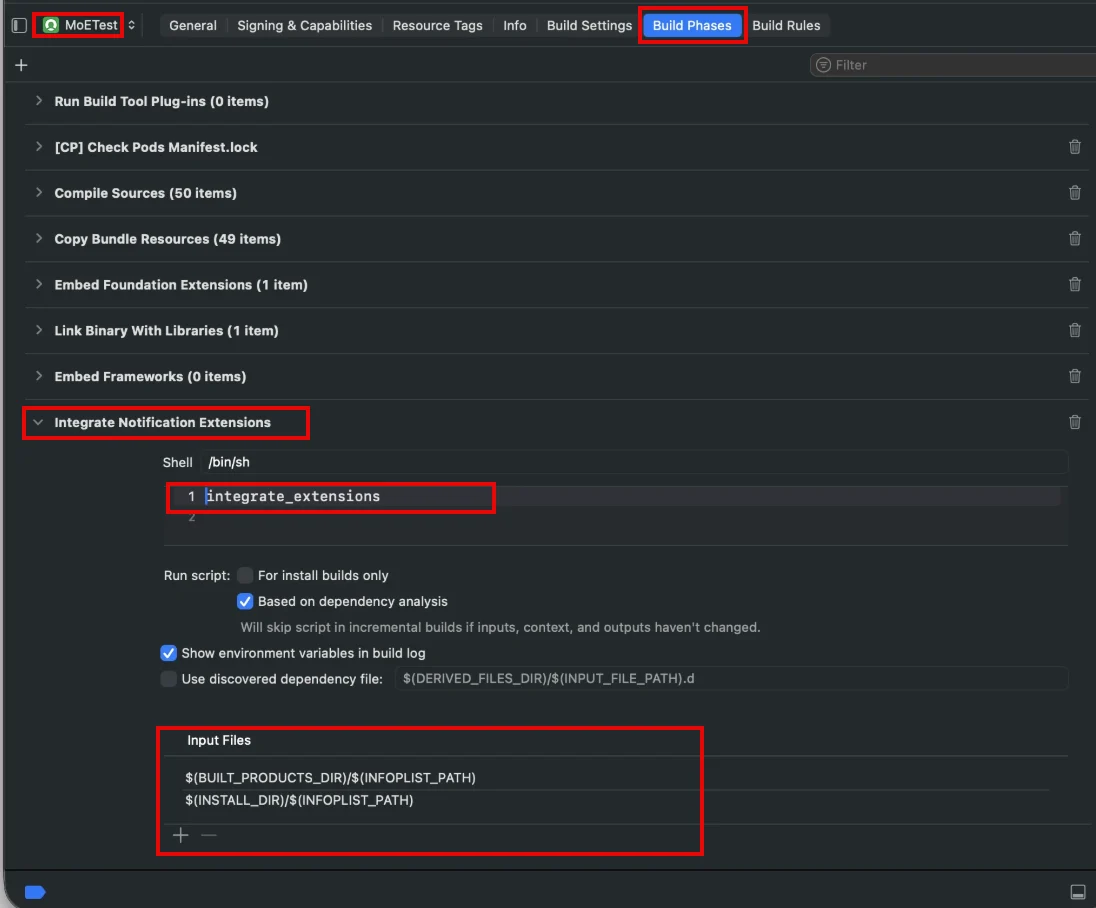 3. Enter the command relevant to your dependency manager, replacing **integrate\_extensions** in above image.
If you have already added a script phase and configured the input files, you can simply update the run command as described below.
```bash Swift Package Manager (SPM) lines wrap theme={null}
${OBJROOT}/../../SourcePackages/artifacts/apple-sdk/moengage-extensions-integration/moengage-extensions-integration.artifactbundle/moengage-extensions-integration/bin/moengage-extensions-integration $OPTIONS
```
```bash CocoaPods lines wrap theme={null}
${PODS_ROOT}/MoEngageExtensionsIntegration/moengage-extensions-integration.artifactbundle/moengage-extensions-integration/bin/moengage-extensions-integration $OPTIONS
```
#### Available options
Replace `$OPTIONS` with one or more of the following:
| Option | Description |
| :--------------------------------------------------------------------- | :---------------------------------------------------------------------------------------------------------------------------------------------------------------------------- |
| `--enable-push-notification-templates` | Required if the content extension from Step 3 is used. |
| `--notification-service-extension-name $CUSTOM_SERVICE_EXTENSION_NAME` | Sets a custom name for the service extension. Use this when migrating to this tool from a custom service extension implementation. (Default: `MoEngageNotificationService`). |
| `--notification-content-extension-name $CUSTOM_CONTENT_EXTENSION_NAME` | Sets a custom name for the content extension. Use this when migrating to this tool from a custom content extension implementation. (Default: `MoEngageNotificationContent`). |
### Example Command (SPM)
For integrating a service extension named `NotificationService` and a content extension named `NotificationContent`, the complete command for SPM would be:
```bash Swift Package Manager (SPM) lines wrap theme={null}
${OBJROOT}/../../SourcePackages/artifacts/apple-sdk/moengage-extensions-integration/moengage-extensions-integration.artifactbundle/moengage-extensions-integration/bin/moengage-extensions-integration --enable-push-notification-templates --notification-service-extension-name NotificationService --notification-content-extension-name NotificationContent
```
4. **Disable sandboxing:** In your application target **Build Settings**, set **USER\_SCRIPT\_SANDBOXING** to **No**.
3. Enter the command relevant to your dependency manager, replacing **integrate\_extensions** in above image.
If you have already added a script phase and configured the input files, you can simply update the run command as described below.
```bash Swift Package Manager (SPM) lines wrap theme={null}
${OBJROOT}/../../SourcePackages/artifacts/apple-sdk/moengage-extensions-integration/moengage-extensions-integration.artifactbundle/moengage-extensions-integration/bin/moengage-extensions-integration $OPTIONS
```
```bash CocoaPods lines wrap theme={null}
${PODS_ROOT}/MoEngageExtensionsIntegration/moengage-extensions-integration.artifactbundle/moengage-extensions-integration/bin/moengage-extensions-integration $OPTIONS
```
#### Available options
Replace `$OPTIONS` with one or more of the following:
| Option | Description |
| :--------------------------------------------------------------------- | :---------------------------------------------------------------------------------------------------------------------------------------------------------------------------- |
| `--enable-push-notification-templates` | Required if the content extension from Step 3 is used. |
| `--notification-service-extension-name $CUSTOM_SERVICE_EXTENSION_NAME` | Sets a custom name for the service extension. Use this when migrating to this tool from a custom service extension implementation. (Default: `MoEngageNotificationService`). |
| `--notification-content-extension-name $CUSTOM_CONTENT_EXTENSION_NAME` | Sets a custom name for the content extension. Use this when migrating to this tool from a custom content extension implementation. (Default: `MoEngageNotificationContent`). |
### Example Command (SPM)
For integrating a service extension named `NotificationService` and a content extension named `NotificationContent`, the complete command for SPM would be:
```bash Swift Package Manager (SPM) lines wrap theme={null}
${OBJROOT}/../../SourcePackages/artifacts/apple-sdk/moengage-extensions-integration/moengage-extensions-integration.artifactbundle/moengage-extensions-integration/bin/moengage-extensions-integration --enable-push-notification-templates --notification-service-extension-name NotificationService --notification-content-extension-name NotificationContent
```
4. **Disable sandboxing:** In your application target **Build Settings**, set **USER\_SCRIPT\_SANDBOXING** to **No**.
 ## Migrating to the extension integrator tool
To migrate from an existing manual implementation to the integrator tool, refer [here](/developer-guide/flutter-sdk/sdk-integration/Integrating-MoEngage-service-and-content-extensions/Migrating-to-the-extension-integrator-tool).
## Troubleshooting and FAQs
Review the build logs for detailed information.
## Migrating to the extension integrator tool
To migrate from an existing manual implementation to the integrator tool, refer [here](/developer-guide/flutter-sdk/sdk-integration/Integrating-MoEngage-service-and-content-extensions/Migrating-to-the-extension-integrator-tool).
## Troubleshooting and FAQs
Review the build logs for detailed information.
 Common causes include:
* **Incorrect Integration:** The setup does not follow the [Integrating Service & Content Extension](/developer-guide/ios-sdk/sdk-integration/basic/Integrating-MoEngage-service-and-content-extensions) guide.
* **Missing Configuration:** The `Info.plist` is missing required MoEngage configuration options.
* **App Group Mismatch:** The `AppGroupName` provided in `Info.plist` is not included in the service and content extension bundle identifier capabilities or the application entitlements.
* **Environment Mismatch:** The provisioning profile was not created for the specific build environment (e.g., using a Development profile when generating an App Store build).
* **Custom Directory Issues:** Provisioning profiles are not stored in default Xcode directories. Use the [additional configuration build settings](#how-do-i-handle-multiple-build-environments-devstaginprod-with-the-tool) to pass custom paths.
* **Certificate Issues:** Missing or incorrect certificate configuration during the generation of the provisioning profile.
* **Expired Profiles:** The provisioning profile has expired. This requires re-generating and re-downloading the profile.
No, The Service Extension is mandatory for tracking notification impressions and downloading rich media (images/GIFs/video). The Content Extension is only required if you intend to use MoEngage's interactive *Rich Push Templates* (e.g., carousels or custom button layouts).
iOS extensions run in a separate sandbox from your main application. The **App Group** creates a shared container that allows the MoEngage SDK in the main app to share authentication tokens, user data, and local storage with the extension. Without it, the extension cannot verify the user or track impressions correctly.
The **Extension Integrator Tool** needs to access the project’s built products and provisioning profiles located in system folders outside the standard Xcode sandbox. If `ENABLE_USER_SCRIPT_SANDBOXING` is set to **Yes**, the script will be blocked, resulting in a "Permission Denied" error during the build phase.
Additional build settings can be used to provide specific configuration inputs to the integrator tool for both local and CI builds.
* **`MOENGAGE_EXTENSION_PROFILES_SEARCH_PATHS`:** Use this to provide additional folders to scan for your provisioning profiles. By default, the tool scans standard Xcode directories:
* `~/Library/Developer/Xcode/UserData/Provisioning Profiles`
* `~/Library/MobileDevice/Provisioning Profiles` If your provisioning profiles are not present in these folders, add additional paths with this build setting.
* **`MOENGAGE_NOTIFICATION_SERVICE_EXTENSION_PROFILE`:** Provide the explicit provisioning profile filename for the Notification Service Extension. The tool will use this filename instead of searching for a provisioning profile. The profile must be present in one of the folders above. Use this option if the tool is not able to pick the right provisioning profile.
* **`MOENGAGE_NOTIFICATION_CONTENT_EXTENSION_PROFILE`:** Provide the explicit provisioning profile filename for the Notification Content Extension. The tool will use this filename instead of searching for a provisioning profile. The profile must be present in one of the folders above. Use this option if the tool is not able to pick the right provisioning profile.
This usually stems from one of three technical gaps:
1. **App Group Mismatch:** Ensure the `AppGroupName` string in your `Info.plist` matches the Entitlements file exactly.
2. **Payload Timeout:** iOS gives extensions \~30 seconds to download media. If your assets are too large or the network is slow, it will fail over to plain text.
Yes, but be careful with the SPM path in Step 5. The path `${OBJROOT}/../../SourcePackages/...` assumes a standard Xcode structure. If your CI environment (like Jenkins or Bitrise) uses a custom build directory, you may need to provide the absolute path to the `moengage-extensions-integration` binary.
Common causes include:
* **Incorrect Integration:** The setup does not follow the [Integrating Service & Content Extension](/developer-guide/ios-sdk/sdk-integration/basic/Integrating-MoEngage-service-and-content-extensions) guide.
* **Missing Configuration:** The `Info.plist` is missing required MoEngage configuration options.
* **App Group Mismatch:** The `AppGroupName` provided in `Info.plist` is not included in the service and content extension bundle identifier capabilities or the application entitlements.
* **Environment Mismatch:** The provisioning profile was not created for the specific build environment (e.g., using a Development profile when generating an App Store build).
* **Custom Directory Issues:** Provisioning profiles are not stored in default Xcode directories. Use the [additional configuration build settings](#how-do-i-handle-multiple-build-environments-devstaginprod-with-the-tool) to pass custom paths.
* **Certificate Issues:** Missing or incorrect certificate configuration during the generation of the provisioning profile.
* **Expired Profiles:** The provisioning profile has expired. This requires re-generating and re-downloading the profile.
No, The Service Extension is mandatory for tracking notification impressions and downloading rich media (images/GIFs/video). The Content Extension is only required if you intend to use MoEngage's interactive *Rich Push Templates* (e.g., carousels or custom button layouts).
iOS extensions run in a separate sandbox from your main application. The **App Group** creates a shared container that allows the MoEngage SDK in the main app to share authentication tokens, user data, and local storage with the extension. Without it, the extension cannot verify the user or track impressions correctly.
The **Extension Integrator Tool** needs to access the project’s built products and provisioning profiles located in system folders outside the standard Xcode sandbox. If `ENABLE_USER_SCRIPT_SANDBOXING` is set to **Yes**, the script will be blocked, resulting in a "Permission Denied" error during the build phase.
Additional build settings can be used to provide specific configuration inputs to the integrator tool for both local and CI builds.
* **`MOENGAGE_EXTENSION_PROFILES_SEARCH_PATHS`:** Use this to provide additional folders to scan for your provisioning profiles. By default, the tool scans standard Xcode directories:
* `~/Library/Developer/Xcode/UserData/Provisioning Profiles`
* `~/Library/MobileDevice/Provisioning Profiles` If your provisioning profiles are not present in these folders, add additional paths with this build setting.
* **`MOENGAGE_NOTIFICATION_SERVICE_EXTENSION_PROFILE`:** Provide the explicit provisioning profile filename for the Notification Service Extension. The tool will use this filename instead of searching for a provisioning profile. The profile must be present in one of the folders above. Use this option if the tool is not able to pick the right provisioning profile.
* **`MOENGAGE_NOTIFICATION_CONTENT_EXTENSION_PROFILE`:** Provide the explicit provisioning profile filename for the Notification Content Extension. The tool will use this filename instead of searching for a provisioning profile. The profile must be present in one of the folders above. Use this option if the tool is not able to pick the right provisioning profile.
This usually stems from one of three technical gaps:
1. **App Group Mismatch:** Ensure the `AppGroupName` string in your `Info.plist` matches the Entitlements file exactly.
2. **Payload Timeout:** iOS gives extensions \~30 seconds to download media. If your assets are too large or the network is slow, it will fail over to plain text.
Yes, but be careful with the SPM path in Step 5. The path `${OBJROOT}/../../SourcePackages/...` assumes a standard Xcode structure. If your CI environment (like Jenkins or Bitrise) uses a custom build directory, you may need to provide the absolute path to the `moengage-extensions-integration` binary.