> ## Documentation Index
> Fetch the complete documentation index at: https://moengage.com/docs/llms.txt
> Use this file to discover all available pages before exploring further.
# JWT認証
> FlutterアプリケーションにJWT認証を実装して、MoEngageのデータ収集を保護します。
## 概要
JWT(JSON Web Token)認証は、ユーザーの身元を安全に検証するための標準的な方法です。JWT認証を実装することで、MoEngageでのデータ収集プロセスに重要なセキュリティレイヤーを追加できます。
この機能により、識別済みユーザーに代わって送信されるデータが本物であり、改ざんされていないことが保証されます。このセキュリティは、お客様自身のサーバーで暗号署名されたトークンを必須とすることで実現され、不正なユーザーが正規のユーザーになりすますことを防ぎます。
**前提条件**
実装を開始する前に、以下の要件を満たしていることを確認してください。
* JWT認証機能を利用するには、アプリケーションでMoEngage Flutter Coreプラグインのバージョン ***11.0.0*** 以上を使用している必要があります。
* 公開鍵の管理や機能の適用設定を構成するために、MoEngageダッシュボードへのアクセス権が必要です。適用設定の詳細については、[こちらを参照してください](/docs/ja/user-guide/settings/account/security/sdk-authentication#step-2-select-an-enforcement-mode)。
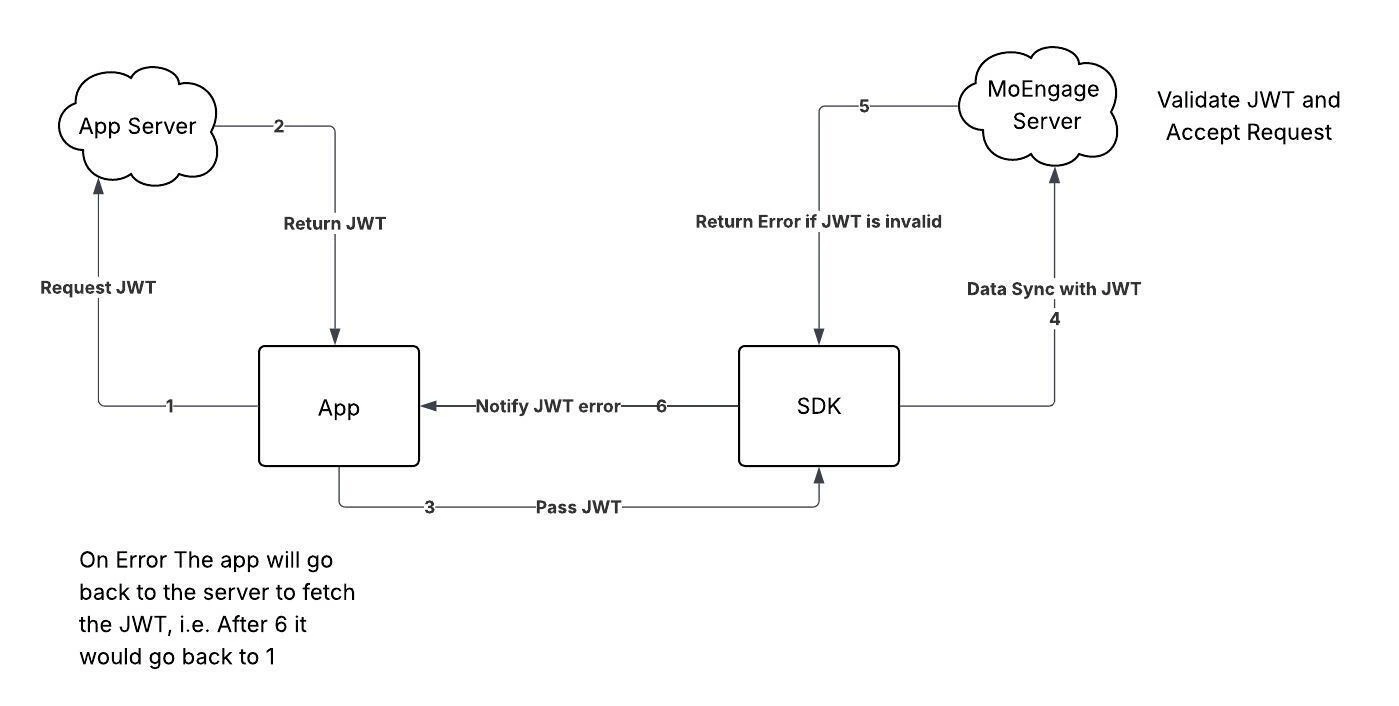
次の図は、アプリケーション、お客様のサーバー、MoEngage SDK、およびMoEngageサーバー間のやり取りを示しています。
 ## 統合
FlutterアプリケーションにJWT認証を統合するには、以下の手順を実行します。
### ステップ1:JWT認証を有効にする
各プラットフォームのネイティブSDK初期化時にJWT認証を有効にします。アプリケーションで使用している初期化方法に合った手順に従ってください。ステップ2と3はどちらの方法でも同じです。
[config generator](https://app-cdn.moengage.com/sdk/integration/config/index.html) を使用して設定ファイルを生成する場合は、**Enable JWT Authorisation** を **Yes** に設定してください。生成されたファイルには、以下で説明するキーが含まれます。
#### Android
**手動初期化**
***MoEngage.Builder*** オブジェクトで ***NetworkAuthorizationConfig*** プロパティを設定します。詳細については、[Android SDKの初期化](/docs/ja/developer-guide/flutter-sdk/sdk-integration/sdk-initialization/manual-initialization/android-sdk-initialization)を参照してください。
```kotlin Kotlin wrap theme={null}
import com.moengage.core.DataCenter
import com.moengage.core.MoEngage
import com.moengage.core.config.NetworkAuthorizationConfig
import com.moengage.core.config.NetworkRequestConfig
import com.moengage.flutter.MoEInitializer
val moEngage = MoEngage.Builder(this, "YOUR_WORKSPACE_ID", DataCenter.DATA_CENTER_X)
.configureNetworkRequest(NetworkRequestConfig(NetworkAuthorizationConfig(isJwtEnabled = true)))
MoEInitializer.initialiseDefaultInstance(context = this, builder = moEngage)
```
```java Java wrap theme={null}
import com.moengage.core.DataCenter;
import com.moengage.core.MoEngage;
import com.moengage.core.config.NetworkAuthorizationConfig;
import com.moengage.core.config.NetworkRequestConfig;
import com.moengage.flutter.MoEInitializer;
MoEngage.Builder builder = MoEngage.builder(this, "YOUR_WORKSPACE_ID", DataCenter.getDataCenterX())
.configureNetworkRequest(new NetworkRequestConfig(new NetworkAuthorizationConfig(true)));
MoEInitializer.initialiseDefaultInstance(this, builder);
```
**ファイルベースの初期化**
`moengage.xml` 設定ファイルに次のキーを追加します。詳細については、[ファイルベースの初期化](/docs/ja/developer-guide/flutter-sdk/sdk-integration/sdk-initialization/file-based-initialization/file-based-initialization#android-configuration-reference)を参照してください。
```xml moengage.xml theme={null}
true
```
#### iOS
**手動初期化**
***MoEngageSDKConfig*** オブジェクトで ***networkConfig*** プロパティを設定します。詳細については、[iOS SDKの初期化](/docs/ja/developer-guide/flutter-sdk/sdk-integration/sdk-initialization/manual-initialization/ios-sdk-initialization)を参照してください。
```swift Swift wrap theme={null}
let sdkConfig = MoEngageSDKConfig(appId: "YOUR_WORKSPACE_ID", dataCenter: .YOUR_DATA_CENTER)
sdkConfig.networkConfig = MoEngageNetworkRequestConfig(authorizationConfig: MoEngageNetworkAuthorizationConfig(isJwtEnabled: true))
MoEngageInitializer.sharedInstance.initializeDefaultInstance(sdkConfig, launchOptions: launchOptions)
```
```objectivec Objective-C wrap theme={null}
MoEngageSDKConfig* sdkConfig = [[MoEngageSDKConfig alloc] initWithAppId:@"YOUR_WORKSPACE_ID" dataCenter:YOUR_DATA_CENTER];
sdkConfig.networkConfig = [[MoEngageNetworkRequestConfig alloc] initWithAuthorizationConfig:[[MoEngageNetworkAuthorizationConfig alloc] initWithIsJwtEnabled:YES]];
[[MoEngageInitializer sharedInstance] initializeDefaultInstance:sdkConfig launchOptions:launchOptions];
```
**ファイルベースの初期化**
`Info.plist` の `MoEngage` ディクショナリに次のキーを追加します。詳細については、[ファイルベースの初期化](/docs/ja/developer-guide/flutter-sdk/sdk-integration/sdk-initialization/file-based-initialization/file-based-initialization#ios-configuration-reference)を参照してください。
```xml Info.plist theme={null}
IsJwtEnabled
```
### ステップ2:JWTをSDKに渡す
JWTのライフサイクル管理はアプリケーション側の責任です。推奨されるフローは、ユーザーのログイン時にトークンを取得し、そのトークンをSDKに渡すことです。また、以降のアプリ起動時にトークンの有効期限が切れていないかを確認し、必要に応じて新しいトークンを取得してください。
***MoEngageFlutter*** オブジェクトの ***passAuthenticationDetails()*** メソッドを使用して、SDKにトークンを提供します。
```dart Dart wrap theme={null}
import 'package:moengage_flutter/moengage_flutter.dart';
final MoEngageFlutter _moengagePlugin = MoEngageFlutter(YOUR_WORKSPACE_ID);
_moengagePlugin.passAuthenticationDetails(
AuthenticationDetailsRequest(
authenticationType: AuthenticationType.jwt,
data: JwtAuthenticationData(
token: 'YOUR_JWT_TOKEN',
userIdentifier: 'USER_IDENTIFIER',
),
),
);
```
詳細については、[クラスと列挙型](#classes-and-enums)を参照してください。
### ステップ3:コールバックハンドラーを登録して認証エラーを処理する
SDKは、MoEngageサーバーから返されたトークン検証エラーをコールバックを通じて通知します。認証が失敗したときにアプリケーションが新しいトークンを取得して提供できるよう、***setAuthenticationErrorCallbackHandler()*** を使用してハンドラーを登録してください。このメソッドは、`typedef` が `AuthenticationErrorCallbackHandler(AuthenticationErrorData data)` である関数を受け取ります。
アプリケーションが常にコールバックを受信できるように、ルートウィジェットの `initState()` などのグローバルスコープでハンドラーを登録してください。
```dart Dart wrap theme={null}
import 'package:moengage_flutter/moengage_flutter.dart';
final MoEngageFlutter _moengagePlugin = MoEngageFlutter(YOUR_WORKSPACE_ID);
_moengagePlugin.setAuthenticationErrorCallbackHandler(_onAuthenticationError);
void _onAuthenticationError(AuthenticationErrorData data) {
if (data.authenticationType == AuthenticationType.jwt) {
final JwtAuthenticationErrorData errorData =
data.data as JwtAuthenticationErrorData;
final JwtErrorCode jwtError = errorData.code;
final String message = errorData.message;
// Take appropriate action based on jwtError.
// For example, fetch a new token and call passAuthenticationDetails() again.
}
}
```
コールバックの受信を停止するには、同じメソッドに `null` を渡します。
```dart Dart wrap theme={null}
_moengagePlugin.setAuthenticationErrorCallbackHandler(null);
```
詳細については、[クラスと列挙型](#classes-and-enums)を参照してください。
## クラスと列挙型
以下のクラスと列挙型は、このガイドで説明しているJWT認証メソッドで使用されるデータ構造を定義しています。トークンペイロードの作成やエラー処理の際に使用してください。
```dart Dart wrap theme={null}
// Payload accepted by passAuthenticationDetails().
class AuthenticationDetailsRequest {
AuthenticationDetailsRequest({
required this.authenticationType,
required this.data,
});
AuthenticationType authenticationType;
AuthenticationDetails data; // For JWT, use JwtAuthenticationData.
}
// Authentication scheme used to authenticate the SDK's network requests.
enum AuthenticationType { jwt }
// JWT specific authentication payload.
final class JwtAuthenticationData extends AuthenticationDetails {
JwtAuthenticationData({
required this.token,
required this.userIdentifier,
});
String token;
String userIdentifier;
}
// Payload delivered to AuthenticationErrorCallbackHandler.
class AuthenticationErrorData {
AuthenticationErrorData({
required this.platform,
required this.accountMeta,
required this.authenticationType,
required this.data,
});
Platforms platform;
AccountMeta accountMeta;
AuthenticationType authenticationType;
AuthenticationErrorDetails data; // For JWT, use JwtAuthenticationErrorData.
}
// JWT specific error details.
final class JwtAuthenticationErrorData extends AuthenticationErrorDetails {
JwtAuthenticationErrorData({
required this.code,
required this.token,
required this.userIdentifier,
required this.message,
});
JwtErrorCode code;
String token;
String userIdentifier;
String message;
}
// Reason the JWT authentication failed.
enum JwtErrorCode {
timeConstraintFailure,
decryptionFailed,
headerTypeIncompatible,
payloadContentMissing,
invalidSignature,
identifierMismatch,
unknown,
tokenNotAvailable,
}
```
**情報**
* 認証エラーによりAPIリクエストが失敗した場合、アプリケーションが新しいトークンを提供するまで、SDKはリクエストを再試行しません。
* 1つのセッション内で認証が10回連続して失敗すると、SDKは次のセッションが始まるまでデータ同期の試行を停止します。このカウンターは、同期が成功するとリセットされます。
* ユーザーのログアウト時にJWTエラーによりデータ同期が失敗した場合、保留中のデータは削除され、再試行は行われません。
## 統合
FlutterアプリケーションにJWT認証を統合するには、以下の手順を実行します。
### ステップ1:JWT認証を有効にする
各プラットフォームのネイティブSDK初期化時にJWT認証を有効にします。アプリケーションで使用している初期化方法に合った手順に従ってください。ステップ2と3はどちらの方法でも同じです。
[config generator](https://app-cdn.moengage.com/sdk/integration/config/index.html) を使用して設定ファイルを生成する場合は、**Enable JWT Authorisation** を **Yes** に設定してください。生成されたファイルには、以下で説明するキーが含まれます。
#### Android
**手動初期化**
***MoEngage.Builder*** オブジェクトで ***NetworkAuthorizationConfig*** プロパティを設定します。詳細については、[Android SDKの初期化](/docs/ja/developer-guide/flutter-sdk/sdk-integration/sdk-initialization/manual-initialization/android-sdk-initialization)を参照してください。
```kotlin Kotlin wrap theme={null}
import com.moengage.core.DataCenter
import com.moengage.core.MoEngage
import com.moengage.core.config.NetworkAuthorizationConfig
import com.moengage.core.config.NetworkRequestConfig
import com.moengage.flutter.MoEInitializer
val moEngage = MoEngage.Builder(this, "YOUR_WORKSPACE_ID", DataCenter.DATA_CENTER_X)
.configureNetworkRequest(NetworkRequestConfig(NetworkAuthorizationConfig(isJwtEnabled = true)))
MoEInitializer.initialiseDefaultInstance(context = this, builder = moEngage)
```
```java Java wrap theme={null}
import com.moengage.core.DataCenter;
import com.moengage.core.MoEngage;
import com.moengage.core.config.NetworkAuthorizationConfig;
import com.moengage.core.config.NetworkRequestConfig;
import com.moengage.flutter.MoEInitializer;
MoEngage.Builder builder = MoEngage.builder(this, "YOUR_WORKSPACE_ID", DataCenter.getDataCenterX())
.configureNetworkRequest(new NetworkRequestConfig(new NetworkAuthorizationConfig(true)));
MoEInitializer.initialiseDefaultInstance(this, builder);
```
**ファイルベースの初期化**
`moengage.xml` 設定ファイルに次のキーを追加します。詳細については、[ファイルベースの初期化](/docs/ja/developer-guide/flutter-sdk/sdk-integration/sdk-initialization/file-based-initialization/file-based-initialization#android-configuration-reference)を参照してください。
```xml moengage.xml theme={null}
true
```
#### iOS
**手動初期化**
***MoEngageSDKConfig*** オブジェクトで ***networkConfig*** プロパティを設定します。詳細については、[iOS SDKの初期化](/docs/ja/developer-guide/flutter-sdk/sdk-integration/sdk-initialization/manual-initialization/ios-sdk-initialization)を参照してください。
```swift Swift wrap theme={null}
let sdkConfig = MoEngageSDKConfig(appId: "YOUR_WORKSPACE_ID", dataCenter: .YOUR_DATA_CENTER)
sdkConfig.networkConfig = MoEngageNetworkRequestConfig(authorizationConfig: MoEngageNetworkAuthorizationConfig(isJwtEnabled: true))
MoEngageInitializer.sharedInstance.initializeDefaultInstance(sdkConfig, launchOptions: launchOptions)
```
```objectivec Objective-C wrap theme={null}
MoEngageSDKConfig* sdkConfig = [[MoEngageSDKConfig alloc] initWithAppId:@"YOUR_WORKSPACE_ID" dataCenter:YOUR_DATA_CENTER];
sdkConfig.networkConfig = [[MoEngageNetworkRequestConfig alloc] initWithAuthorizationConfig:[[MoEngageNetworkAuthorizationConfig alloc] initWithIsJwtEnabled:YES]];
[[MoEngageInitializer sharedInstance] initializeDefaultInstance:sdkConfig launchOptions:launchOptions];
```
**ファイルベースの初期化**
`Info.plist` の `MoEngage` ディクショナリに次のキーを追加します。詳細については、[ファイルベースの初期化](/docs/ja/developer-guide/flutter-sdk/sdk-integration/sdk-initialization/file-based-initialization/file-based-initialization#ios-configuration-reference)を参照してください。
```xml Info.plist theme={null}
IsJwtEnabled
```
### ステップ2:JWTをSDKに渡す
JWTのライフサイクル管理はアプリケーション側の責任です。推奨されるフローは、ユーザーのログイン時にトークンを取得し、そのトークンをSDKに渡すことです。また、以降のアプリ起動時にトークンの有効期限が切れていないかを確認し、必要に応じて新しいトークンを取得してください。
***MoEngageFlutter*** オブジェクトの ***passAuthenticationDetails()*** メソッドを使用して、SDKにトークンを提供します。
```dart Dart wrap theme={null}
import 'package:moengage_flutter/moengage_flutter.dart';
final MoEngageFlutter _moengagePlugin = MoEngageFlutter(YOUR_WORKSPACE_ID);
_moengagePlugin.passAuthenticationDetails(
AuthenticationDetailsRequest(
authenticationType: AuthenticationType.jwt,
data: JwtAuthenticationData(
token: 'YOUR_JWT_TOKEN',
userIdentifier: 'USER_IDENTIFIER',
),
),
);
```
詳細については、[クラスと列挙型](#classes-and-enums)を参照してください。
### ステップ3:コールバックハンドラーを登録して認証エラーを処理する
SDKは、MoEngageサーバーから返されたトークン検証エラーをコールバックを通じて通知します。認証が失敗したときにアプリケーションが新しいトークンを取得して提供できるよう、***setAuthenticationErrorCallbackHandler()*** を使用してハンドラーを登録してください。このメソッドは、`typedef` が `AuthenticationErrorCallbackHandler(AuthenticationErrorData data)` である関数を受け取ります。
アプリケーションが常にコールバックを受信できるように、ルートウィジェットの `initState()` などのグローバルスコープでハンドラーを登録してください。
```dart Dart wrap theme={null}
import 'package:moengage_flutter/moengage_flutter.dart';
final MoEngageFlutter _moengagePlugin = MoEngageFlutter(YOUR_WORKSPACE_ID);
_moengagePlugin.setAuthenticationErrorCallbackHandler(_onAuthenticationError);
void _onAuthenticationError(AuthenticationErrorData data) {
if (data.authenticationType == AuthenticationType.jwt) {
final JwtAuthenticationErrorData errorData =
data.data as JwtAuthenticationErrorData;
final JwtErrorCode jwtError = errorData.code;
final String message = errorData.message;
// Take appropriate action based on jwtError.
// For example, fetch a new token and call passAuthenticationDetails() again.
}
}
```
コールバックの受信を停止するには、同じメソッドに `null` を渡します。
```dart Dart wrap theme={null}
_moengagePlugin.setAuthenticationErrorCallbackHandler(null);
```
詳細については、[クラスと列挙型](#classes-and-enums)を参照してください。
## クラスと列挙型
以下のクラスと列挙型は、このガイドで説明しているJWT認証メソッドで使用されるデータ構造を定義しています。トークンペイロードの作成やエラー処理の際に使用してください。
```dart Dart wrap theme={null}
// Payload accepted by passAuthenticationDetails().
class AuthenticationDetailsRequest {
AuthenticationDetailsRequest({
required this.authenticationType,
required this.data,
});
AuthenticationType authenticationType;
AuthenticationDetails data; // For JWT, use JwtAuthenticationData.
}
// Authentication scheme used to authenticate the SDK's network requests.
enum AuthenticationType { jwt }
// JWT specific authentication payload.
final class JwtAuthenticationData extends AuthenticationDetails {
JwtAuthenticationData({
required this.token,
required this.userIdentifier,
});
String token;
String userIdentifier;
}
// Payload delivered to AuthenticationErrorCallbackHandler.
class AuthenticationErrorData {
AuthenticationErrorData({
required this.platform,
required this.accountMeta,
required this.authenticationType,
required this.data,
});
Platforms platform;
AccountMeta accountMeta;
AuthenticationType authenticationType;
AuthenticationErrorDetails data; // For JWT, use JwtAuthenticationErrorData.
}
// JWT specific error details.
final class JwtAuthenticationErrorData extends AuthenticationErrorDetails {
JwtAuthenticationErrorData({
required this.code,
required this.token,
required this.userIdentifier,
required this.message,
});
JwtErrorCode code;
String token;
String userIdentifier;
String message;
}
// Reason the JWT authentication failed.
enum JwtErrorCode {
timeConstraintFailure,
decryptionFailed,
headerTypeIncompatible,
payloadContentMissing,
invalidSignature,
identifierMismatch,
unknown,
tokenNotAvailable,
}
```
**情報**
* 認証エラーによりAPIリクエストが失敗した場合、アプリケーションが新しいトークンを提供するまで、SDKはリクエストを再試行しません。
* 1つのセッション内で認証が10回連続して失敗すると、SDKは次のセッションが始まるまでデータ同期の試行を停止します。このカウンターは、同期が成功するとリセットされます。
* ユーザーのログアウト時にJWTエラーによりデータ同期が失敗した場合、保留中のデータは削除され、再試行は行われません。