> ## Documentation Index
> Fetch the complete documentation index at: https://moengage.com/docs/llms.txt
> Use this file to discover all available pages before exploring further.
# プッシュテンプレート
> MoEngage で Notification Content Extension を使用して、展開されたプッシュ通知の外観をカスタマイズします。
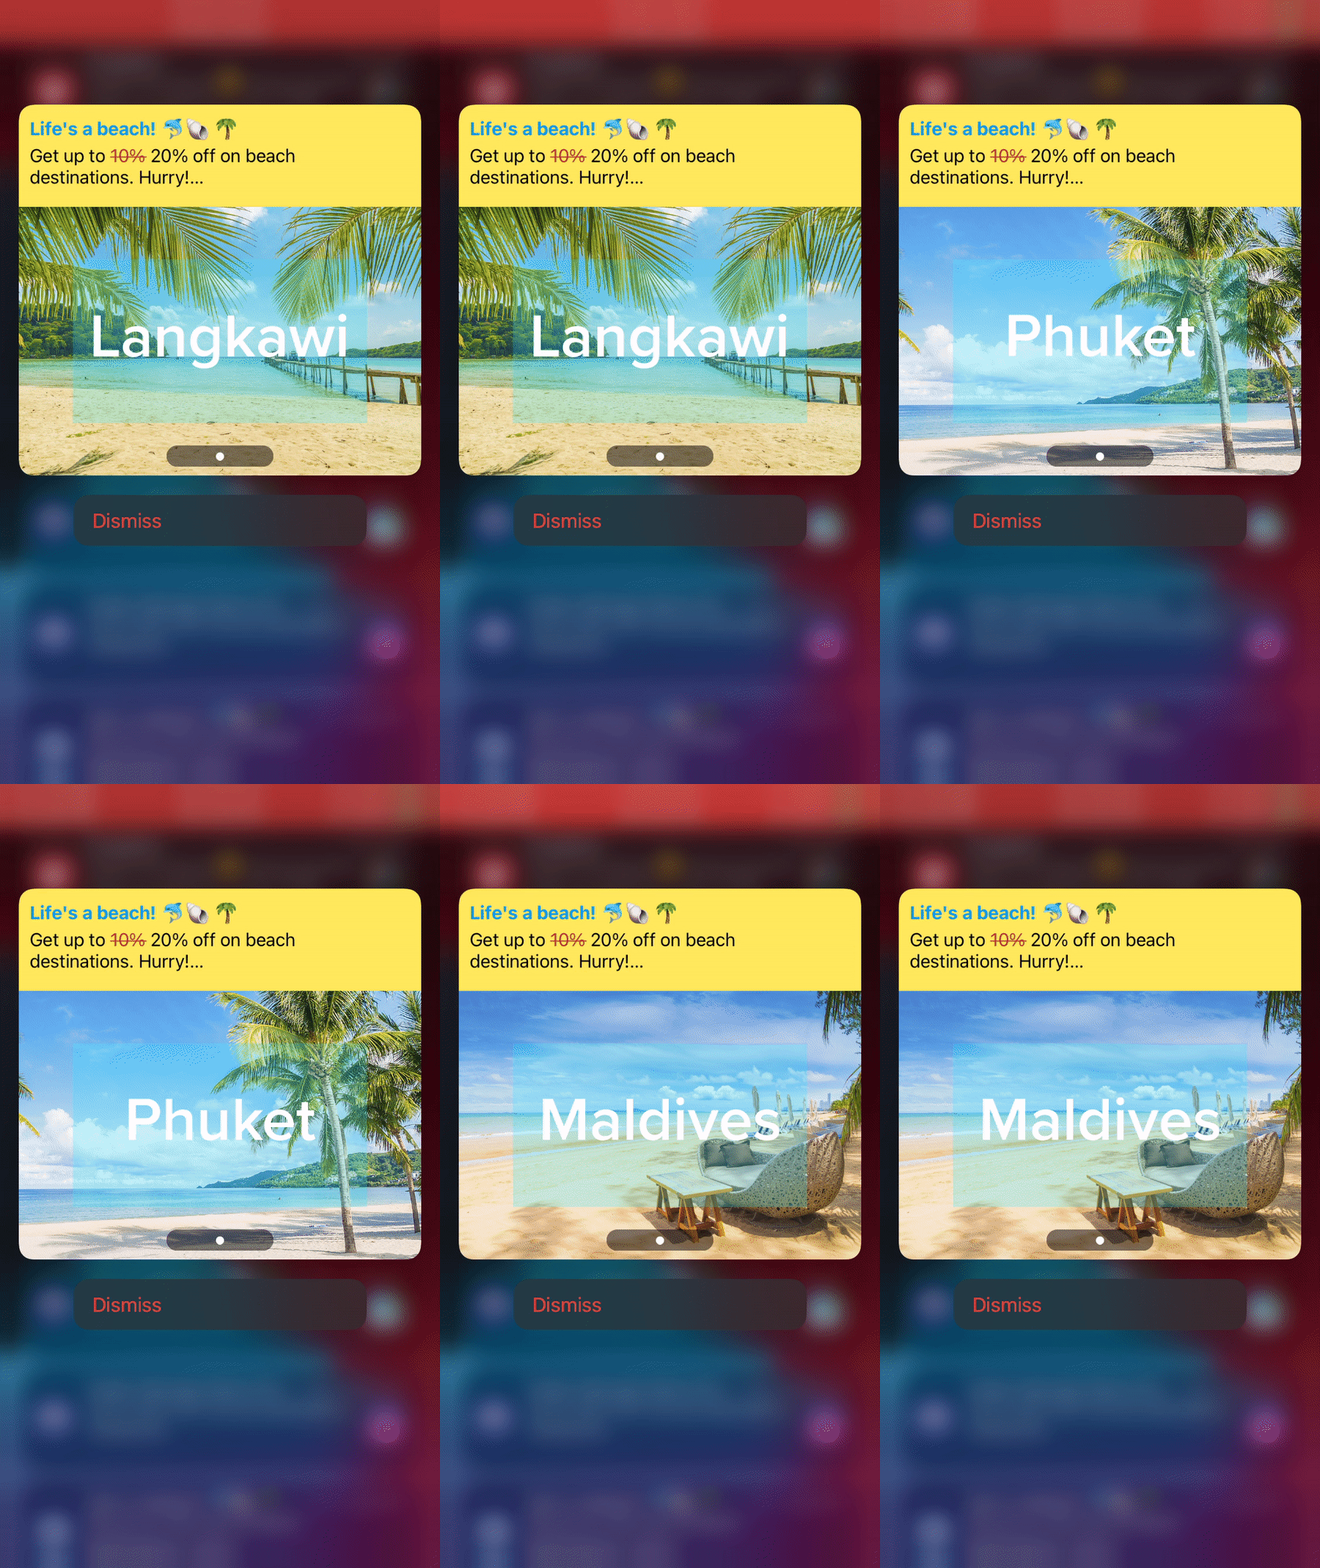
MoEngage iOS SDK バージョン `6.2.0` および MORichNotification バージョン `4.0.0` 以降、プッシュテンプレートがサポートされ、展開モードでの通知の見た目をカスタマイズできるようになりました。この機能は **iOS 12.0 以上**でサポートされています。ダッシュボードでテンプレートを使用してキャンペーンを作成する方法については、こちらの[リンク](https://help.moengage.com/hc/en-us/articles/4415622460948-Push-Templates?_gl=1*1oma0f1*_ga*MTU4NTM0MzI0NS4xNzI3MTcwMzYy*_ga_SEBHW7YTZ7*czE3NzA2OTUzMDIkbzE0NiRnMSR0MTc3MDcxODYxOSRqNjAkbDAkaDA.)を参照してください。
**iOS 15.0 アップデート**
iOS 15.0 のアップデートに伴い、`MORichNotification` バージョン `5.2.0` をリリースしました。iOS 15.0 以上では、標準の通知レイアウトに合わせて、コンテンツを上部に、メディアを下部に表示するようにレイアウトを更新しています。
 以下の手順に進む前に、プロジェクトでリッチプッシュをサポートするための [App Target](https://developers.moengage.com/hc/en-us/articles/43960004257428-iOS-Push-Integration-Tutorial#h_01K4MBZ6WN3PTSSS6N6K2YQ8S2) と [Notification Service Extension](https://developers.moengage.com/hc/en-us/articles/43960004257428-iOS-Push-Integration-Tutorial#h_01K4MBZ6WN3PTSSS6N6K2YQ8S2) の実装が完了していることを確認してください。
# 手順:
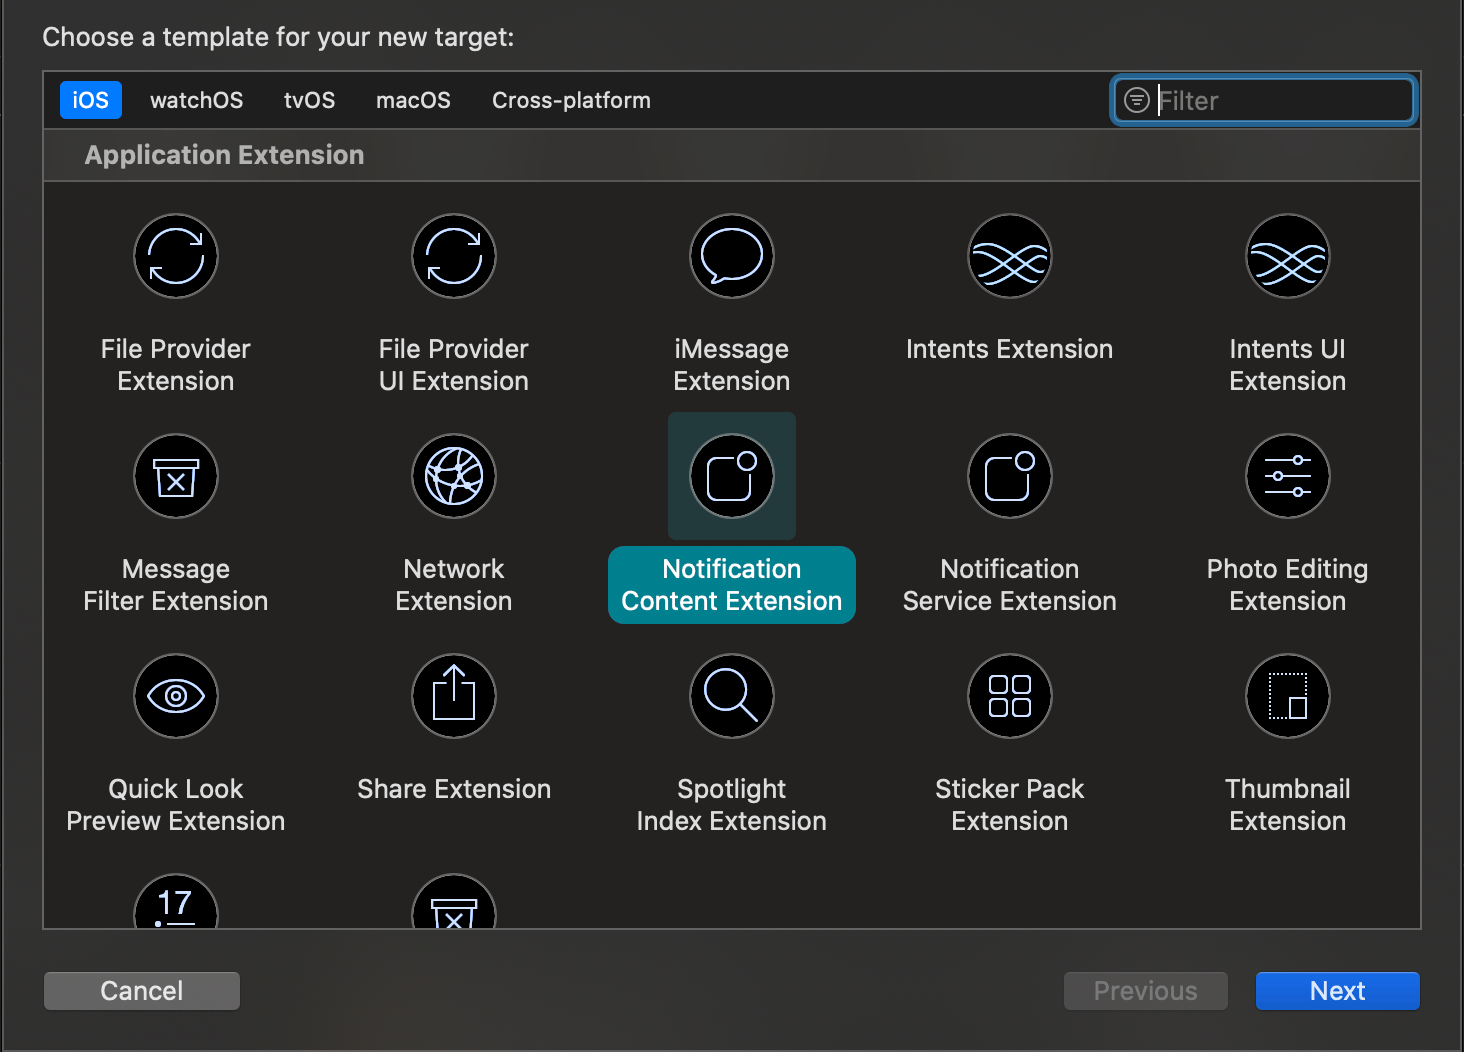
これらのカスタムプッシュテンプレートをサポートするには、プロジェクトに Notification Content Extension が必要です。以下の手順に従って Content Extension を作成し、MoEngage のテンプレートをサポートするようにセットアップします。
## 1. Notification Content Extension の作成
以下の手順に進む前に、プロジェクトでリッチプッシュをサポートするための [App Target](https://developers.moengage.com/hc/en-us/articles/43960004257428-iOS-Push-Integration-Tutorial#h_01K4MBZ6WN3PTSSS6N6K2YQ8S2) と [Notification Service Extension](https://developers.moengage.com/hc/en-us/articles/43960004257428-iOS-Push-Integration-Tutorial#h_01K4MBZ6WN3PTSSS6N6K2YQ8S2) の実装が完了していることを確認してください。
# 手順:
これらのカスタムプッシュテンプレートをサポートするには、プロジェクトに Notification Content Extension が必要です。以下の手順に従って Content Extension を作成し、MoEngage のテンプレートをサポートするようにセットアップします。
## 1. Notification Content Extension の作成
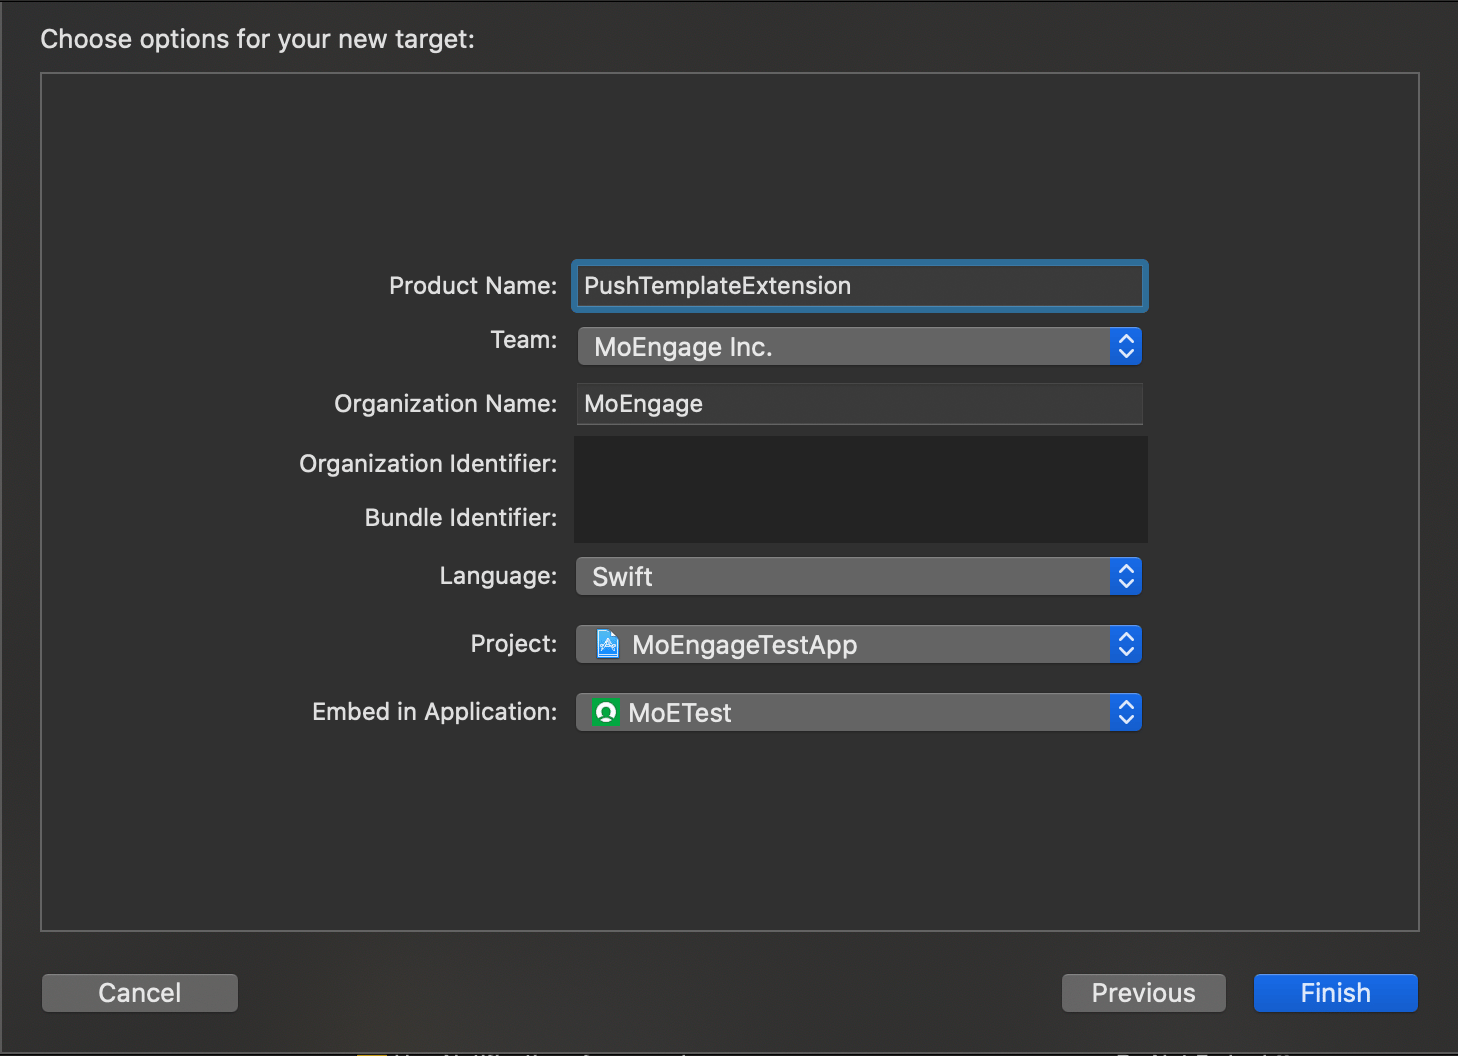 ターゲットが作成されたら、プロンプトが表示された際に Extension のスキームをアクティブにします。その後、Extension がプロジェクトに追加され、作成時に指定した Extension 名のクラスと、それに関連付けられた .plist ファイルが表示されます。
## 2. デプロイメントターゲットの設定と必要なフレームワークの追加
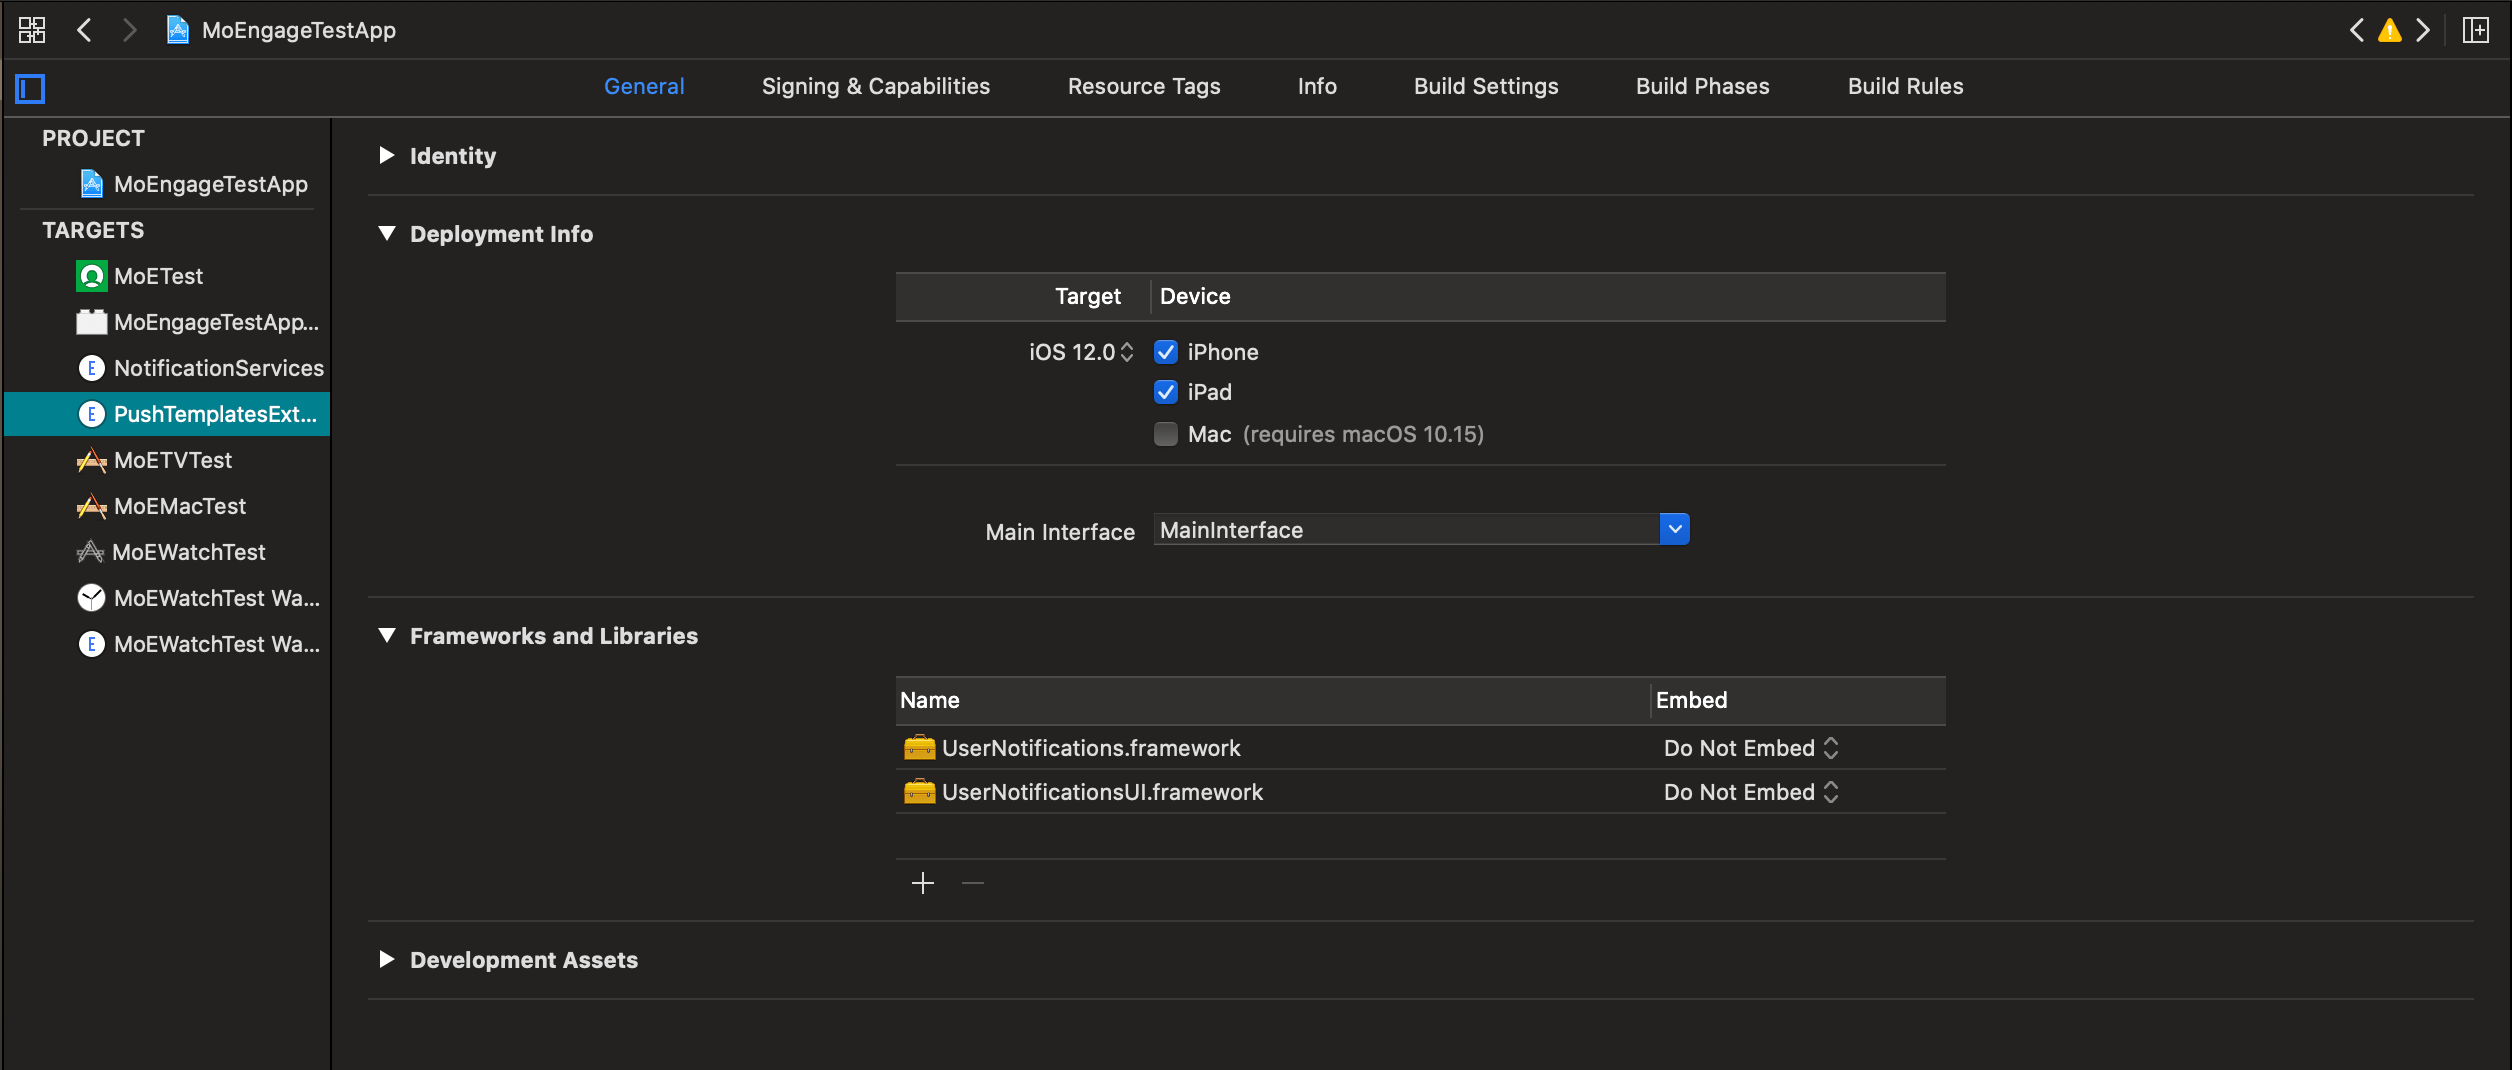
この機能は iOS 12.0 からサポートされているため、デプロイメントターゲットを **iOS 12.0** 以上に設定します。その後、以下に示すように Frameworks and Libraries に `UserNotifications.framework` と `UserNotificationsUI.framework` を追加します。
ターゲットが作成されたら、プロンプトが表示された際に Extension のスキームをアクティブにします。その後、Extension がプロジェクトに追加され、作成時に指定した Extension 名のクラスと、それに関連付けられた .plist ファイルが表示されます。
## 2. デプロイメントターゲットの設定と必要なフレームワークの追加
この機能は iOS 12.0 からサポートされているため、デプロイメントターゲットを **iOS 12.0** 以上に設定します。その後、以下に示すように Frameworks and Libraries に `UserNotifications.framework` と `UserNotificationsUI.framework` を追加します。
 ## 3. 必要な Capability の追加
Capabilities セクションで **App Groups** を追加し、アプリターゲットと Notification Service Extension ターゲットで構成したものと同じ App Group ID を選択します。
## 3. 必要な Capability の追加
Capabilities セクションで **App Groups** を追加し、アプリターゲットと Notification Service Extension ターゲットで構成したものと同じ App Group ID を選択します。
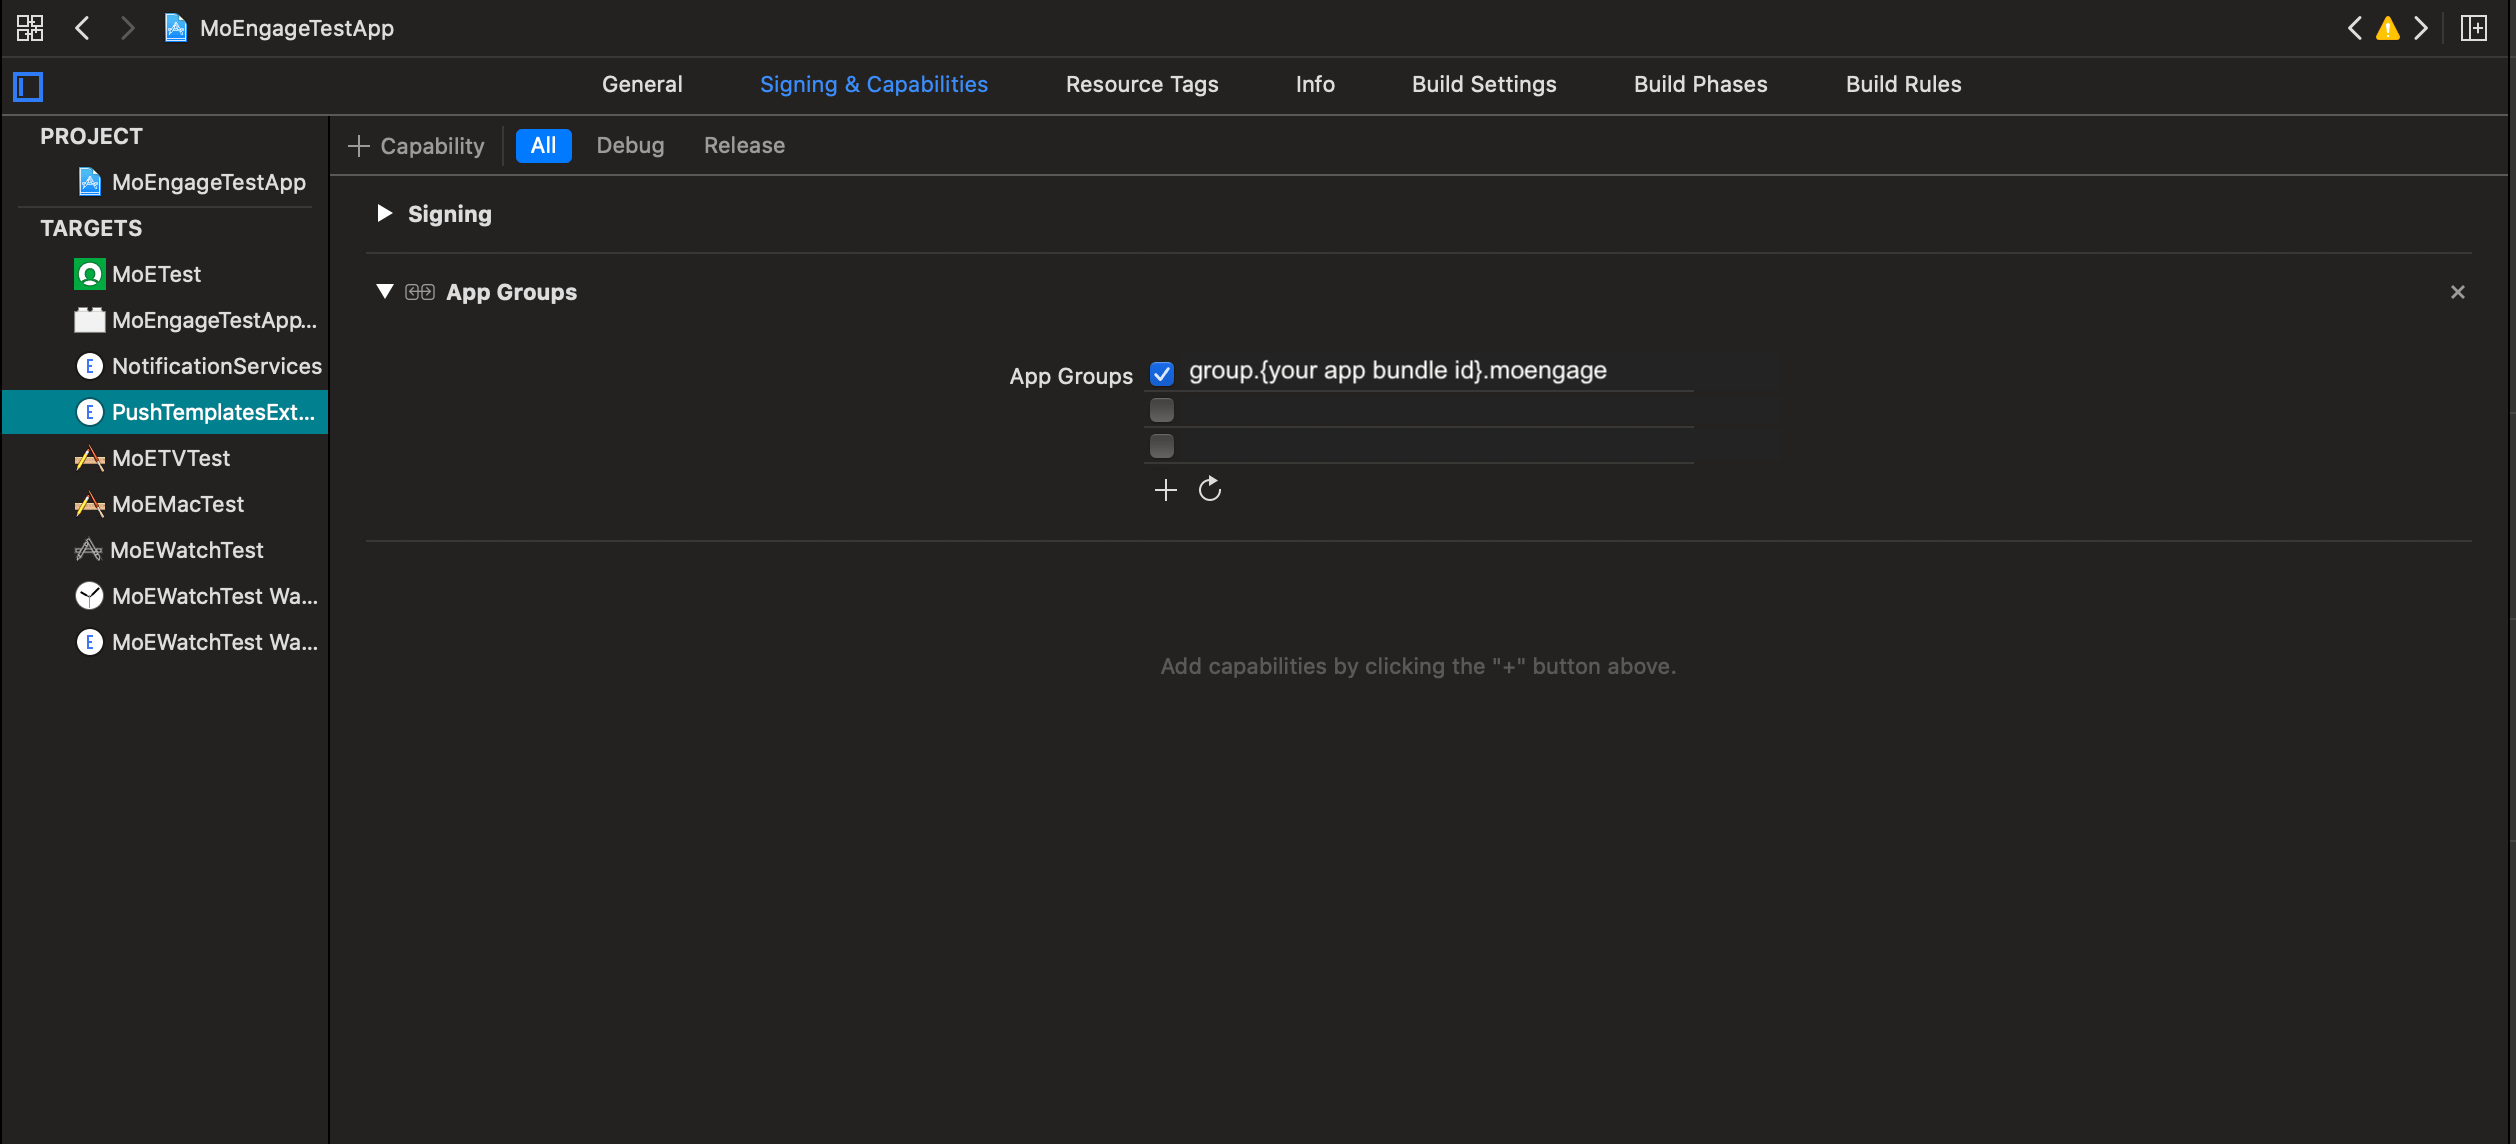 **App Group ID の推奨事項**
MoEngage 用に、`group.{app bundle id}.MoEngage` という形式で別の App Group ID を設定することを推奨します。また、MoEngage を使用しているすべてのターゲットで同じ App Group ID が有効になっていることを確認してください。
## 4. Info.plist の変更
**App Group ID の推奨事項**
MoEngage 用に、`group.{app bundle id}.MoEngage` という形式で別の App Group ID を設定することを推奨します。また、MoEngage を使用しているすべてのターゲットで同じ App Group ID が有効になっていることを確認してください。
## 4. Info.plist の変更
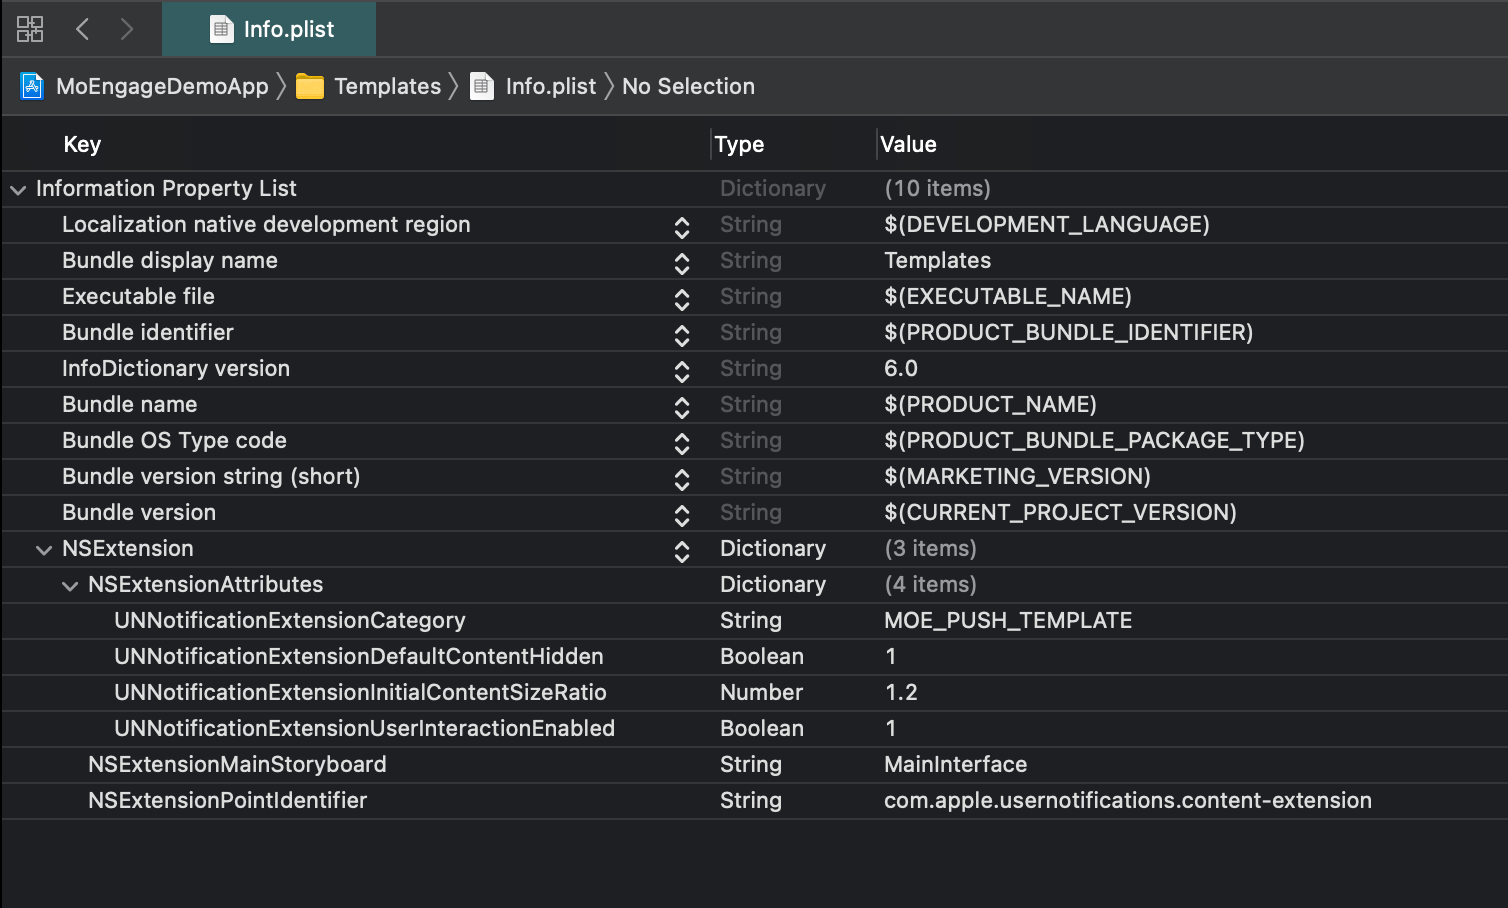 上記に示すように、Notification Content Extension の `Info.plist` を変更し、NSExtensionAttributes を次のように設定します。
| 属性 | 属性値 |
| - | - |
| UNNotificationExtensionCategory | MOE\_PUSH\_TEMPLATE |
| UNNotificationExtensionInitialContentSizeRatio | 1.2 |
| UNNotificationExtensionDefaultContentHidden | YES |
| UNNotificationExtensionUserInteractionEnabled | YES |
## 5. Storyboard の変更
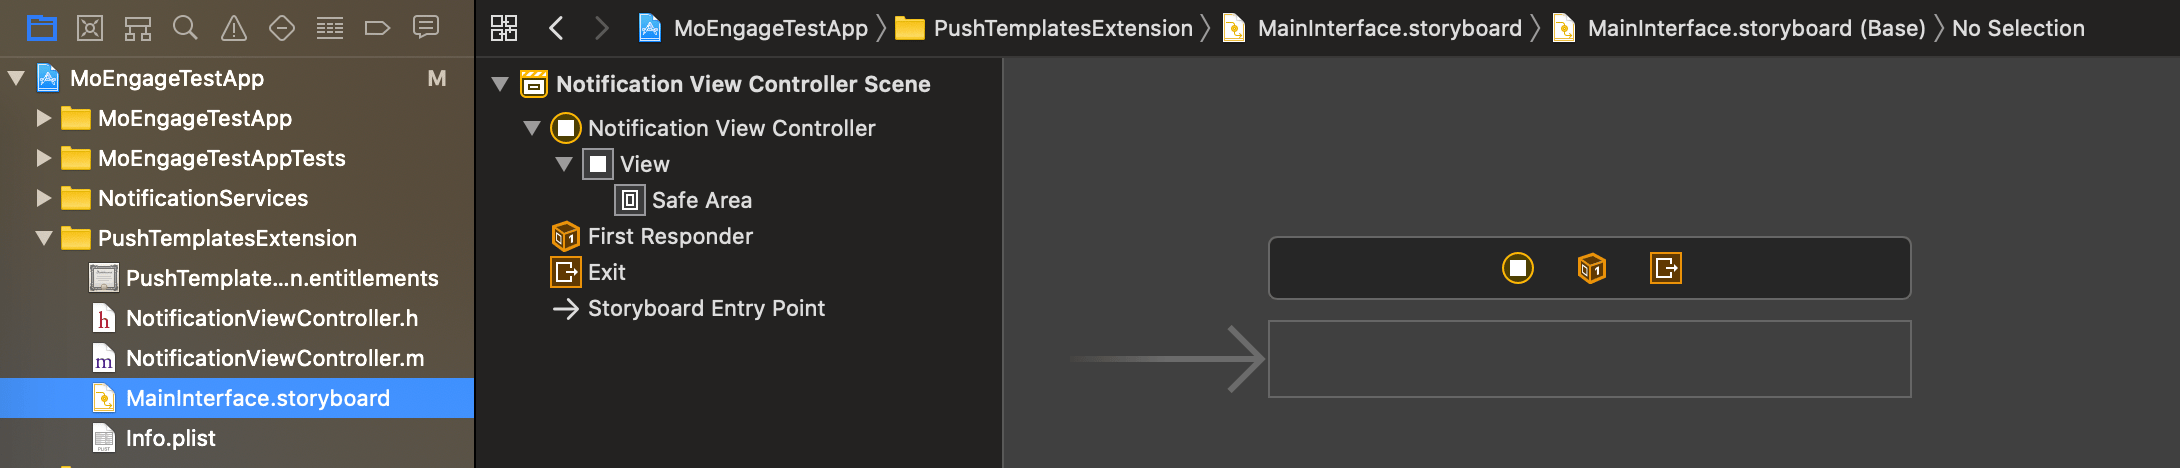
Content Extension の `MainInterface.storyboard` を選択し、そこに配置されているデフォルトのラベルを削除して、以下に示すようにビューの背景色を clear color に設定します。
上記に示すように、Notification Content Extension の `Info.plist` を変更し、NSExtensionAttributes を次のように設定します。
| 属性 | 属性値 |
| - | - |
| UNNotificationExtensionCategory | MOE\_PUSH\_TEMPLATE |
| UNNotificationExtensionInitialContentSizeRatio | 1.2 |
| UNNotificationExtensionDefaultContentHidden | YES |
| UNNotificationExtensionUserInteractionEnabled | YES |
## 5. Storyboard の変更
Content Extension の `MainInterface.storyboard` を選択し、そこに配置されているデフォルトのラベルを削除して、以下に示すようにビューの背景色を clear color に設定します。
 ## 6. MoEngageRichNotification の統合
### CocoaPods による統合
CocoaPods を使用して統合するには、以下に示すように Notification Content Extension に **MoEngageRichNotification** pod を含め、pod update / install コマンドを実行します。
```Ruby theme={null}
target "PushTemplatesExtension" do
pod 'MoEngageRichNotification','~>6.2.0'
end
```
### Swift Package Manager による統合
SPM を使用して統合するには、次の GitHub の URL リンクを使用し、ブランチを master に、またはバージョンを 6.2.0 以上に設定します。[https://github.com/moengage/MoEngage-iOS-RichNotification.git](https://github.com/moengage/MoEngage-iOS-RichNotification.git)
**手動統合**
* `MoEngageRichNotification` SDK をプロジェクトに手動で統合するには、こちらの[ドキュメント](https://developers.moengage.com/hc/en-us/articles/4404183451412)に従ってください。
* `MoEngageRichNotification` をアプリターゲットの Embedded Binaries に追加し、Notification Content Extension ターゲットにリンクされていることを確認します。
## 7. Content Extension でのコードの変更:
```swift Swift theme={null}
import UIKit
import UserNotifications
import UserNotificationsUI
import MoEngageRichNotification
class NotificationViewController: UIViewController, UNNotificationContentExtension {
override func viewDidLoad() {
super.viewDidLoad()
// Set App Group ID
MORichNotification.setAppGroupID("Your App Group ID")
}
func didReceive(_ notification: UNNotification) {
// Method to add template to UI
MORichNotification.addPushTemplate(toController: self, withNotification: notification)
}
}
```
```objectivec Objective-C theme={null}
#import "NotificationViewController.h"
#import
#import
#import
@interface NotificationViewController ()
@end
@implementation NotificationViewController
- (void)viewDidLoad {
[super viewDidLoad];
// Set App Group ID
[MORichNotification setAppGroupID:@"Your App Group ID"];
}
- (void)didReceiveNotification:(UNNotification *)notification {
// Method to add template to UI
[MORichNotification addPushTemplateToController:self withNotification:notification];
}
@end
```
上記に示すように、`NotificationViewController` クラスで次の変更を行います。
1. `viewDidLoad()` メソッドで、[Capabilities](https://developers.moengage.com/hc/en-us/articles/4403956104084-Push-Templates#3-add-required-capabilities-0-3) で有効にしたものと同じ App Group ID を設定します。`[Recommended: group.{app bundle id}.MoEngage]`
2. `didReceiveNotification()` コールバックで `addPushTemplateToController:withNotification:` メソッドを呼び出して、テンプレートを追加します。
## 8. アプリでの通知クリックのコールバック:
Simple Image Carousel 通知の場合、ユーザーがどのスライドをクリックしたかを知るには、`MOMessagingDelegate` を利用して `notificationClicked(withScreenName: andKVPairs:)` コールバックを取得し、クリックされたスライドに設定されているキーと値のペアと画面名を取得します。以下の例を参照してください。ここでは AppDelegate でコールバックを登録しています。
```swift Swift theme={null}
class AppDelegate: UIResponder, UIApplicationDelegate, UNUserNotificationCenterDelegate, MOMessagingDelegate{
func application(_ application: UIApplication, didFinishLaunchingWithOptions launchOptions: [UIApplication.LaunchOptionsKey: Any]?) -> Bool {
// Set the delegate
MOMessaging.sharedInstance.setMessagingDelegate(self)
//Rest of the implementation
}
// Notification Clicked Callback
func notificationClicked(withScreenName screenName: String?, andKVPairs kvPairs: [AnyHashable : Any]?) {
if let screenName = screenName {
print("Navigate to Screen:\(screenName)")
}
if let actionKVPairs = kvPairs {
print("Selected Action KVPair:\(actionKVPairs)")
}
}
// Notification Clicked Callback with Push Payload
func notificationClicked(withScreenName screenName: String?, kvPairs: [AnyHashable : Any]?, andPushPayload userInfo: [AnyHashable : Any]) {
print("Push Payload: \(userInfo)")
if let screenName = screenName {
print("Navigate to Screen:\(screenName)")
}
if let actionKVPairs = kvPairs {
print("Selected Action KVPair:\(actionKVPairs)")
}
}
}
```
```objectivec Objective-C theme={null}
@interface AppDelegate ()
@end
@implementation AppDelegate
- (BOOL)application:(UIApplication *)application didFinishLaunchingWithOptions:(NSDictionary *)launchOptions {
// Set the delegate
[[MOMessaging sharedInstance] setMessagingDelegate:self forAppID:@"YOUR_WORKSPACE_ID"];
//Rest of the implementation
}
// Notification Clicked Callback
-(void)notificationClickedWithScreenName:(NSString *)screenName andKVPairs:(NSDictionary *)kvPairs{
if (screenName) {
NSLog(@"Screen Name : %@",screenName);
}
if (kvPairs) {
NSLog(@"KV Pairs : %@",kvPairs);
}
}
// Notification Clicked Callback with Push Payload
-(void)notificationClickedWithScreenName:(NSString *)screenName KVPairs:(NSDictionary *)kvPairs andPushPayload:(NSDictionary *)userInfo{
NSLog(@"Push Payload: %@",userInfo);
if (screenName) {
NSLog(@"Screen Name : %@",screenName);
}
if (kvPairs) {
NSLog(@"KV Pairs : %@",kvPairs);
}
}
@end
```
このコールバックは、通常の通知と Stylized Basic 通知でも呼び出されるため、それらの場合にも利用できます。
## 6. MoEngageRichNotification の統合
### CocoaPods による統合
CocoaPods を使用して統合するには、以下に示すように Notification Content Extension に **MoEngageRichNotification** pod を含め、pod update / install コマンドを実行します。
```Ruby theme={null}
target "PushTemplatesExtension" do
pod 'MoEngageRichNotification','~>6.2.0'
end
```
### Swift Package Manager による統合
SPM を使用して統合するには、次の GitHub の URL リンクを使用し、ブランチを master に、またはバージョンを 6.2.0 以上に設定します。[https://github.com/moengage/MoEngage-iOS-RichNotification.git](https://github.com/moengage/MoEngage-iOS-RichNotification.git)
**手動統合**
* `MoEngageRichNotification` SDK をプロジェクトに手動で統合するには、こちらの[ドキュメント](https://developers.moengage.com/hc/en-us/articles/4404183451412)に従ってください。
* `MoEngageRichNotification` をアプリターゲットの Embedded Binaries に追加し、Notification Content Extension ターゲットにリンクされていることを確認します。
## 7. Content Extension でのコードの変更:
```swift Swift theme={null}
import UIKit
import UserNotifications
import UserNotificationsUI
import MoEngageRichNotification
class NotificationViewController: UIViewController, UNNotificationContentExtension {
override func viewDidLoad() {
super.viewDidLoad()
// Set App Group ID
MORichNotification.setAppGroupID("Your App Group ID")
}
func didReceive(_ notification: UNNotification) {
// Method to add template to UI
MORichNotification.addPushTemplate(toController: self, withNotification: notification)
}
}
```
```objectivec Objective-C theme={null}
#import "NotificationViewController.h"
#import
#import
#import
@interface NotificationViewController ()
@end
@implementation NotificationViewController
- (void)viewDidLoad {
[super viewDidLoad];
// Set App Group ID
[MORichNotification setAppGroupID:@"Your App Group ID"];
}
- (void)didReceiveNotification:(UNNotification *)notification {
// Method to add template to UI
[MORichNotification addPushTemplateToController:self withNotification:notification];
}
@end
```
上記に示すように、`NotificationViewController` クラスで次の変更を行います。
1. `viewDidLoad()` メソッドで、[Capabilities](https://developers.moengage.com/hc/en-us/articles/4403956104084-Push-Templates#3-add-required-capabilities-0-3) で有効にしたものと同じ App Group ID を設定します。`[Recommended: group.{app bundle id}.MoEngage]`
2. `didReceiveNotification()` コールバックで `addPushTemplateToController:withNotification:` メソッドを呼び出して、テンプレートを追加します。
## 8. アプリでの通知クリックのコールバック:
Simple Image Carousel 通知の場合、ユーザーがどのスライドをクリックしたかを知るには、`MOMessagingDelegate` を利用して `notificationClicked(withScreenName: andKVPairs:)` コールバックを取得し、クリックされたスライドに設定されているキーと値のペアと画面名を取得します。以下の例を参照してください。ここでは AppDelegate でコールバックを登録しています。
```swift Swift theme={null}
class AppDelegate: UIResponder, UIApplicationDelegate, UNUserNotificationCenterDelegate, MOMessagingDelegate{
func application(_ application: UIApplication, didFinishLaunchingWithOptions launchOptions: [UIApplication.LaunchOptionsKey: Any]?) -> Bool {
// Set the delegate
MOMessaging.sharedInstance.setMessagingDelegate(self)
//Rest of the implementation
}
// Notification Clicked Callback
func notificationClicked(withScreenName screenName: String?, andKVPairs kvPairs: [AnyHashable : Any]?) {
if let screenName = screenName {
print("Navigate to Screen:\(screenName)")
}
if let actionKVPairs = kvPairs {
print("Selected Action KVPair:\(actionKVPairs)")
}
}
// Notification Clicked Callback with Push Payload
func notificationClicked(withScreenName screenName: String?, kvPairs: [AnyHashable : Any]?, andPushPayload userInfo: [AnyHashable : Any]) {
print("Push Payload: \(userInfo)")
if let screenName = screenName {
print("Navigate to Screen:\(screenName)")
}
if let actionKVPairs = kvPairs {
print("Selected Action KVPair:\(actionKVPairs)")
}
}
}
```
```objectivec Objective-C theme={null}
@interface AppDelegate ()
@end
@implementation AppDelegate
- (BOOL)application:(UIApplication *)application didFinishLaunchingWithOptions:(NSDictionary *)launchOptions {
// Set the delegate
[[MOMessaging sharedInstance] setMessagingDelegate:self forAppID:@"YOUR_WORKSPACE_ID"];
//Rest of the implementation
}
// Notification Clicked Callback
-(void)notificationClickedWithScreenName:(NSString *)screenName andKVPairs:(NSDictionary *)kvPairs{
if (screenName) {
NSLog(@"Screen Name : %@",screenName);
}
if (kvPairs) {
NSLog(@"KV Pairs : %@",kvPairs);
}
}
// Notification Clicked Callback with Push Payload
-(void)notificationClickedWithScreenName:(NSString *)screenName KVPairs:(NSDictionary *)kvPairs andPushPayload:(NSDictionary *)userInfo{
NSLog(@"Push Payload: %@",userInfo);
if (screenName) {
NSLog(@"Screen Name : %@",screenName);
}
if (kvPairs) {
NSLog(@"KV Pairs : %@",kvPairs);
}
}
@end
```
このコールバックは、通常の通知と Stylized Basic 通知でも呼び出されるため、それらの場合にも利用できます。