> ## Documentation Index
> Fetch the complete documentation index at: https://moengage.com/docs/llms.txt
> Use this file to discover all available pages before exploring further.
# iOS デバイスモード 6.x.x
# SDK のインストール
MoEngage は、Cocoapods を使用して Segment 経由で統合できます。
* pod init コマンドで pod を初期化します。これにより、プロジェクトの podfile が作成されます。
* 以下のように pod '**Segment-MoEngage** ' を追加して podfile を更新します。
```ruby Ruby theme={null}
use_frameworks!
pod 'Segment-MoEngage', '~> 6.0'
```
* pod を更新します。- pod update
# Segment SDK のセットアップ
App Delegate に移動し、Segment SDK をセットアップします。
```objectivec Objective-C wrap theme={null}
#import // This line is key for MoEngage integration
#import
- (BOOL)application:(UIApplication *)application didFinishLaunchingWithOptions:(NSDictionary *)launchOptions {
// Add your configuration key from Segment
SEGAnalyticsConfiguration *config = [SEGAnalyticsConfiguration configurationWithWriteKey:@"configuration key"];
// Add MoEngageIntegrationFactory. Without this data will not come to MoEngage.
[config use:[SEGMoEngageIntegrationFactory instance]];
[SEGAnalytics setupWithConfiguration:config];
}
```
```swift Swift wrap theme={null}
import Segment_MoEngage
...
func application(_ application: UIApplication, didFinishLaunchingWithOptions launchOptions: [UIApplication.LaunchOptionsKey: Any]?) -> Bool {
...
// Add your configuration key from Segment
let config = SEGAnalyticsConfiguration(writeKey:"configuration key")
// Add MoEngageIntegrationFactory. Without this data will not come to MoEngage.
config.use(SEGMoEngageIntegrationFactory.instance())
SEGAnalytics.setup(with: config)
...
}
```
AppDelegate の `application:didFinishLaunchingWithOptions` メソッドで、MoEngage SDK のデータセンター/リージョンを別途設定してください。詳細については、[ドキュメント](/docs/ja/developer-guide/ios-sdk/sdk-integration/basic/data-center)を参照してください。
Segment SDK のセットアップ時に、**\[config use:\[SEGMoEngageIntegrationFactory instance]]** の追加を忘れないでください。**これを行わないと、データは MoEngage に送信されません**。
# MoEngage のセットアップ
MoEngage をセットアップするには、次の手順を実行します。
1. MoEngage Dashboard > Settings > General に移動します。
2. Workspace ID(旧 App ID)をコピーします。
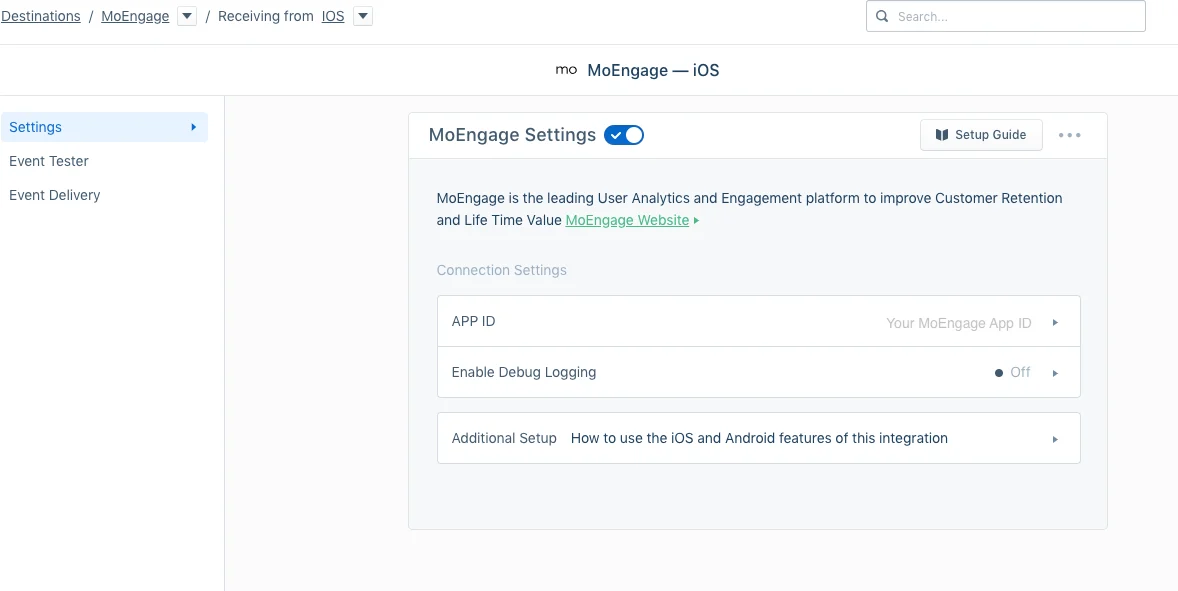
3. **Segment ダッシュボード**に移動し、**Integrations** に進んで **MoEngage** を選択します。
4. MoEngage Integration を有効にします。
5. MoEngage Settings に移動し、**ステップ 1** で取得した MoEngage Workspace ID(旧 App ID)を入力します。
6. 変更を保存します。
 これらの新しい設定がすべての既存ユーザーに反映されるまで、最大 1 時間かかります。新規ユーザーには即座に反映されます。Segment-MoEngage Integration はバンドル統合であり、クライアント側の統合が必要です。
# ユーザー属性のトラッキング
ユーザー属性とは、メールアドレス、ユーザー名、携帯電話番号、性別など、ユーザー固有の特性です。**identify** を使用すると、ユーザーとそのアクションを紐付け、ユーザーの特性を記録できます。これには、一意の User ID と、ユーザーについて把握している任意の traits が含まれます。
```objectivec Objective-C wrap theme={null}
[[SEGAnalytics sharedAnalytics] identify:@"a user's id"
traits:@{ @"email": @"a user's email address" }];
```
```swift Swift wrap theme={null}
SEGAnalytics.shared().identify("a user's id", traits: ["email": "a user's email address"])
```
詳細については、こちらの[リンク](https://segment.com/docs/sources/mobile/ios/#identify)を参照してください。
# イベントのトラッキング
イベントトラッキングは、アプリ内のユーザー行動をトラッキングするために使用します。**track** を使用すると、ユーザーが実行したアクションを記録できます。すべてのアクションは「イベント」をトリガーし、イベントには関連する属性を含めることもできます。
```objectivec Objective-C wrap theme={null}
[[SEGAnalytics sharedAnalytics] track:@"Item Purchased"
properties:@{ @"item": @"Sword of Heracles"}];
```
```swift Swift wrap theme={null}
SEGAnalytics.shared().track("Item Purchased", properties: ["item": "Sword of Heracles"])
```
データのトラッキングに必要な作業は以上です。詳細については、こちらの[リンク](https://segment.com/docs/sources/mobile/ios/#track)を参照してください。
# ユーザーのリセット
*reset* メソッドは、現在のユーザーに関する SDK の内部ストアをクリアします。これは、ユーザーが時間の経過とともに異なる ID でログイン/ログアウトできるアプリで役立ちます。
```objectivec Objective-C theme={null}
[[SEGAnalytics sharedAnalytics] reset];
```
```swift Swift theme={null}
SEGAnalytics.shared().reset()
```
詳細については、こちらの[リンク](https://segment.com/docs/sources/mobile/ios/#reset)を参照してください。
# プッシュ通知
プッシュ通知は、ユーザーのエンゲージメントを維持し、アプリに関する情報を届けるための優れた方法です。アプリにプッシュ通知を実装する際には、次のオプションがあります。
## MoEngage によるプッシュ実装
Segment SDK は現在、iOS10 から Apple によって導入された [UserNotifications](https://developer.apple.com/documentation/usernotifications) フレームワークをサポートしていないため、こちらがより推奨される実装方法です。MoEngage SDK を使用してモバイルアプリにプッシュ通知を実装するには、次のリンクを参照してください: [**プッシュ通知**](/docs/ja/developer-guide/ios-sdk/push/basic/push-notifications)
Segment による SDK の初期化に遅延があるため、[**AppDelegate Swizzling**](/docs/ja/developer-guide/ios-sdk/push/basic/ios-push-integration-tutorial#step-2-implement-push-handling-in-appdelegate) は Segment Integration では確実に動作しません。そのため、プッシュ関連のすべてのコールバックで MoEngage SDK のメソッドを必ず呼び出してください。
Segment によるプッシュ実装
この方法では、通知のクリックによってアプリが起動された場合に、MoEngage SDK が通知を処理できないことが確認されています。これは、この特定のシナリオで Segment SDK が MoEngage SDK にペイロードを提供しないためです。そのため、プッシュ関連のコールバックで MoEngage SDK のメソッドを直接呼び出す最初の方法を使用することを強く推奨します。
1. こちらの[リンク](https://segment.com/docs/libraries/ios/#how-do-i-use-push-notifications-)の手順に従って、Segment SDK を使用してプッシュを登録します。
2. アプリケーションの application:didReceiveRemoteNotification: メソッドに次のコードを追加します。
```objectivec Objective-C theme={null}
[[SEGAnalytics sharedAnalytics] receivedRemoteNotification:userInfo];
```
```swift Swift theme={null}
SEGAnalytics.sharedAnalytics().receivedRemoteNotification(userInfo)
```
3. アプリに application:didReceiveRemoteNotification:fetchCompletionHandler: を統合している場合は、そのメソッドに次のコードを追加します。
```objectivec Objective-C theme={null}
[[SEGAnalytics sharedAnalytics] receivedRemoteNotification:userInfo];
```
```swift Swift theme={null}
SEGAnalytics.sharedAnalytics().receivedRemoteNotification(userInfo)
```
4. handleActionWithIdentifier:forRemoteNotification: を実装している場合は、そのメソッドに次のコードを追加します。
```objective-c Objective-C wrap theme={null}
[[SEGAnalytics sharedAnalytics] handleActionWithIdentifier:identifier forRemoteNotification:userInfo];
```
# インストール/アップデートの区別:
アプリがすでに App Store で公開されている状態で MoEngage を統合する場合があるため、アプリのアップデートが実際の UPDATE なのか INSTALL なのかを把握する必要があります。\
これらを区別するには、以下のいずれかのメソッドを使用します。
```objectivec Objective-C theme={null}
//For new Install call following
[[MoEngage sharedInstance]appStatus:INSTALL];
//For an app update call following
[[MoEngage sharedInstance]appStatus:UPDATE];
```
```swift Swift theme={null}
//For new Install call following
MoEngage.sharedInstance().appStatus(INSTALL)
//For an app update call following
MoEngage.sharedInstance().appStatus(UPDATE)
```
詳細については、次の[リンク](/docs/ja/developer-guide/ios-sdk/data-tracking/basic/install-update-differentiation)を参照してください。
# InApp Native
アプリ内メッセージングは、ユーザーのセグメントに送信できるカスタムビューで、カスタムメッセージの表示、新しいオファーの提供、特定のページへの誘導などに使用できます。アプリ内メッセージングの詳細とアプリケーションへの実装方法については、次のリンクを参照してください: [InApp NATIV](/docs/ja/developer-guide/ios-sdk/in-app-messages/in-app-nativ)
**Segment for iOS** の使用方法の詳細については、Segment が提供する[開発者ドキュメント](https://segment.com/docs/sources/mobile/ios/)を参照してください。
これらの新しい設定がすべての既存ユーザーに反映されるまで、最大 1 時間かかります。新規ユーザーには即座に反映されます。Segment-MoEngage Integration はバンドル統合であり、クライアント側の統合が必要です。
# ユーザー属性のトラッキング
ユーザー属性とは、メールアドレス、ユーザー名、携帯電話番号、性別など、ユーザー固有の特性です。**identify** を使用すると、ユーザーとそのアクションを紐付け、ユーザーの特性を記録できます。これには、一意の User ID と、ユーザーについて把握している任意の traits が含まれます。
```objectivec Objective-C wrap theme={null}
[[SEGAnalytics sharedAnalytics] identify:@"a user's id"
traits:@{ @"email": @"a user's email address" }];
```
```swift Swift wrap theme={null}
SEGAnalytics.shared().identify("a user's id", traits: ["email": "a user's email address"])
```
詳細については、こちらの[リンク](https://segment.com/docs/sources/mobile/ios/#identify)を参照してください。
# イベントのトラッキング
イベントトラッキングは、アプリ内のユーザー行動をトラッキングするために使用します。**track** を使用すると、ユーザーが実行したアクションを記録できます。すべてのアクションは「イベント」をトリガーし、イベントには関連する属性を含めることもできます。
```objectivec Objective-C wrap theme={null}
[[SEGAnalytics sharedAnalytics] track:@"Item Purchased"
properties:@{ @"item": @"Sword of Heracles"}];
```
```swift Swift wrap theme={null}
SEGAnalytics.shared().track("Item Purchased", properties: ["item": "Sword of Heracles"])
```
データのトラッキングに必要な作業は以上です。詳細については、こちらの[リンク](https://segment.com/docs/sources/mobile/ios/#track)を参照してください。
# ユーザーのリセット
*reset* メソッドは、現在のユーザーに関する SDK の内部ストアをクリアします。これは、ユーザーが時間の経過とともに異なる ID でログイン/ログアウトできるアプリで役立ちます。
```objectivec Objective-C theme={null}
[[SEGAnalytics sharedAnalytics] reset];
```
```swift Swift theme={null}
SEGAnalytics.shared().reset()
```
詳細については、こちらの[リンク](https://segment.com/docs/sources/mobile/ios/#reset)を参照してください。
# プッシュ通知
プッシュ通知は、ユーザーのエンゲージメントを維持し、アプリに関する情報を届けるための優れた方法です。アプリにプッシュ通知を実装する際には、次のオプションがあります。
## MoEngage によるプッシュ実装
Segment SDK は現在、iOS10 から Apple によって導入された [UserNotifications](https://developer.apple.com/documentation/usernotifications) フレームワークをサポートしていないため、こちらがより推奨される実装方法です。MoEngage SDK を使用してモバイルアプリにプッシュ通知を実装するには、次のリンクを参照してください: [**プッシュ通知**](/docs/ja/developer-guide/ios-sdk/push/basic/push-notifications)
Segment による SDK の初期化に遅延があるため、[**AppDelegate Swizzling**](/docs/ja/developer-guide/ios-sdk/push/basic/ios-push-integration-tutorial#step-2-implement-push-handling-in-appdelegate) は Segment Integration では確実に動作しません。そのため、プッシュ関連のすべてのコールバックで MoEngage SDK のメソッドを必ず呼び出してください。
Segment によるプッシュ実装
この方法では、通知のクリックによってアプリが起動された場合に、MoEngage SDK が通知を処理できないことが確認されています。これは、この特定のシナリオで Segment SDK が MoEngage SDK にペイロードを提供しないためです。そのため、プッシュ関連のコールバックで MoEngage SDK のメソッドを直接呼び出す最初の方法を使用することを強く推奨します。
1. こちらの[リンク](https://segment.com/docs/libraries/ios/#how-do-i-use-push-notifications-)の手順に従って、Segment SDK を使用してプッシュを登録します。
2. アプリケーションの application:didReceiveRemoteNotification: メソッドに次のコードを追加します。
```objectivec Objective-C theme={null}
[[SEGAnalytics sharedAnalytics] receivedRemoteNotification:userInfo];
```
```swift Swift theme={null}
SEGAnalytics.sharedAnalytics().receivedRemoteNotification(userInfo)
```
3. アプリに application:didReceiveRemoteNotification:fetchCompletionHandler: を統合している場合は、そのメソッドに次のコードを追加します。
```objectivec Objective-C theme={null}
[[SEGAnalytics sharedAnalytics] receivedRemoteNotification:userInfo];
```
```swift Swift theme={null}
SEGAnalytics.sharedAnalytics().receivedRemoteNotification(userInfo)
```
4. handleActionWithIdentifier:forRemoteNotification: を実装している場合は、そのメソッドに次のコードを追加します。
```objective-c Objective-C wrap theme={null}
[[SEGAnalytics sharedAnalytics] handleActionWithIdentifier:identifier forRemoteNotification:userInfo];
```
# インストール/アップデートの区別:
アプリがすでに App Store で公開されている状態で MoEngage を統合する場合があるため、アプリのアップデートが実際の UPDATE なのか INSTALL なのかを把握する必要があります。\
これらを区別するには、以下のいずれかのメソッドを使用します。
```objectivec Objective-C theme={null}
//For new Install call following
[[MoEngage sharedInstance]appStatus:INSTALL];
//For an app update call following
[[MoEngage sharedInstance]appStatus:UPDATE];
```
```swift Swift theme={null}
//For new Install call following
MoEngage.sharedInstance().appStatus(INSTALL)
//For an app update call following
MoEngage.sharedInstance().appStatus(UPDATE)
```
詳細については、次の[リンク](/docs/ja/developer-guide/ios-sdk/data-tracking/basic/install-update-differentiation)を参照してください。
# InApp Native
アプリ内メッセージングは、ユーザーのセグメントに送信できるカスタムビューで、カスタムメッセージの表示、新しいオファーの提供、特定のページへの誘導などに使用できます。アプリ内メッセージングの詳細とアプリケーションへの実装方法については、次のリンクを参照してください: [InApp NATIV](/docs/ja/developer-guide/ios-sdk/in-app-messages/in-app-nativ)
**Segment for iOS** の使用方法の詳細については、Segment が提供する[開発者ドキュメント](https://segment.com/docs/sources/mobile/ios/)を参照してください。