> ## Documentation Index
> Fetch the complete documentation index at: https://moengage.com/docs/llms.txt
> Use this file to discover all available pages before exploring further.
# Open Weather
## はじめに
[Open Weather](https://openweathermap.org/) は、高度な気象データサイエンスを実践する IT エキスパートとデータサイエンティストのチームです。OpenWeather は、地球上のあらゆる地点について、過去・現在・予報の気象データを高速な API を通じて提供しています。
## MoEngage と Open Weather
MoEngage と Open Weather の統合により、マーケティングキャンペーンを充実させ、パーソナライズできます。ユーザーの位置情報と気象データをその場で取得し、パーソナライズされたキャンペーンをリアルタイムで送信できます。
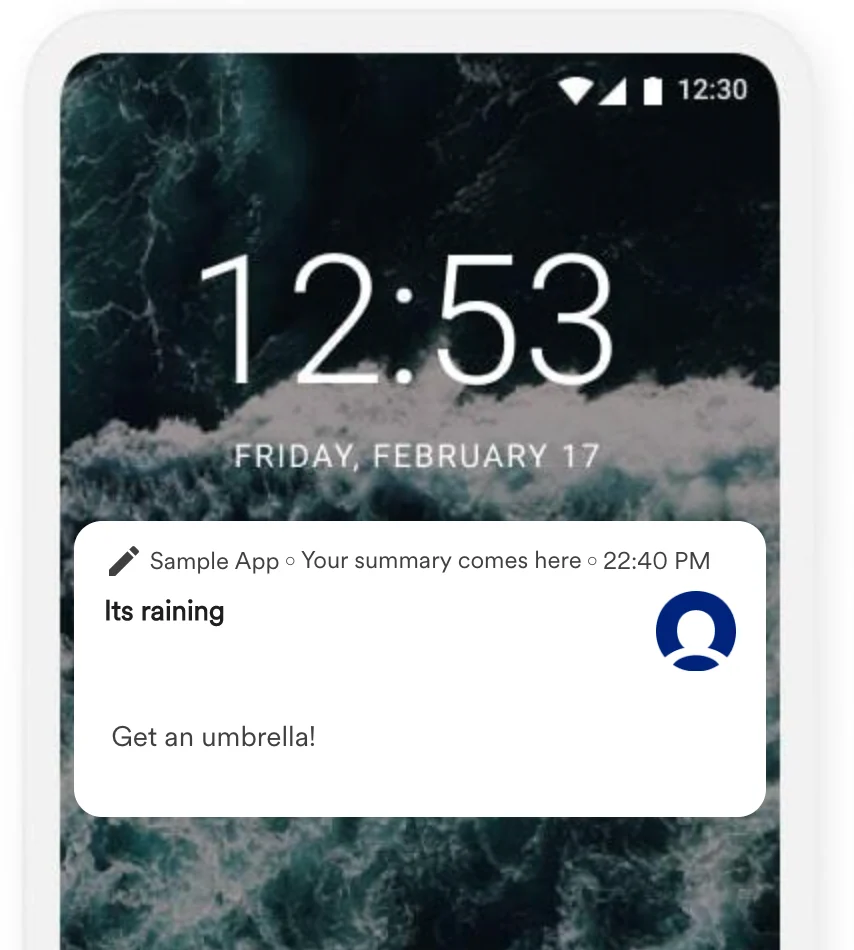
たとえば、E コマースブランドは次のような購入をユーザーに促すことができます。
* ユーザーの所在地の天気が晴れのときは、サングラス。
* 雨が降る可能性が高いときは、傘。
 ## 統合
**前提条件**
* Open Weather アカウント。
* Open Weather API キーへのアクセス権。互換性のある API キーについては、Open Weather のアカウントマネージャーにお問い合わせください。詳細については、[Open Weather API](https://openweathermap.org/api/one-call-3) を参照してください。
* 各ユーザーの座標(緯度と経度)を MoEngage のユーザー属性として追跡していること。
### 利用可能な API
MoEngage キャンペーンでは、次の Open Weather API を使用できます。
1. [現在の気象データ](https://openweathermap.org/current)
2. [時間別予報 — 4 日間](https://openweathermap.org/api/hourly-forecast)
3. [One Call API](https://openweathermap.org/api/one-call-api)
4. [日別予報 — 16 日間](https://openweathermap.org/forecast16)
5. [気候予報 — 30 日間](https://openweathermap.org/api/forecast30)
6. [5 日間の天気予報](https://openweathermap.org/forecast5)
7. [Road risk API](https://openweathermap.org/api/road-risk)
### 手順
以下の例では、ユーザーの座標における現在の気象条件に基づいて 3 つのメッセージバリエーションを示します。MoEngage Content API を通じて Current Weather API を使用し、気象の詳細を取得します。
#### ステップ 1: MoEngage で Content API を追加する
1. **Settings** > **Advanced settings** > **Content API** に移動します。Content API 画面の右上にある **+ Add content API** をクリックします。
## 統合
**前提条件**
* Open Weather アカウント。
* Open Weather API キーへのアクセス権。互換性のある API キーについては、Open Weather のアカウントマネージャーにお問い合わせください。詳細については、[Open Weather API](https://openweathermap.org/api/one-call-3) を参照してください。
* 各ユーザーの座標(緯度と経度)を MoEngage のユーザー属性として追跡していること。
### 利用可能な API
MoEngage キャンペーンでは、次の Open Weather API を使用できます。
1. [現在の気象データ](https://openweathermap.org/current)
2. [時間別予報 — 4 日間](https://openweathermap.org/api/hourly-forecast)
3. [One Call API](https://openweathermap.org/api/one-call-api)
4. [日別予報 — 16 日間](https://openweathermap.org/forecast16)
5. [気候予報 — 30 日間](https://openweathermap.org/api/forecast30)
6. [5 日間の天気予報](https://openweathermap.org/forecast5)
7. [Road risk API](https://openweathermap.org/api/road-risk)
### 手順
以下の例では、ユーザーの座標における現在の気象条件に基づいて 3 つのメッセージバリエーションを示します。MoEngage Content API を通じて Current Weather API を使用し、気象の詳細を取得します。
#### ステップ 1: MoEngage で Content API を追加する
1. **Settings** > **Advanced settings** > **Content API** に移動します。Content API 画面の右上にある **+ Add content API** をクリックします。 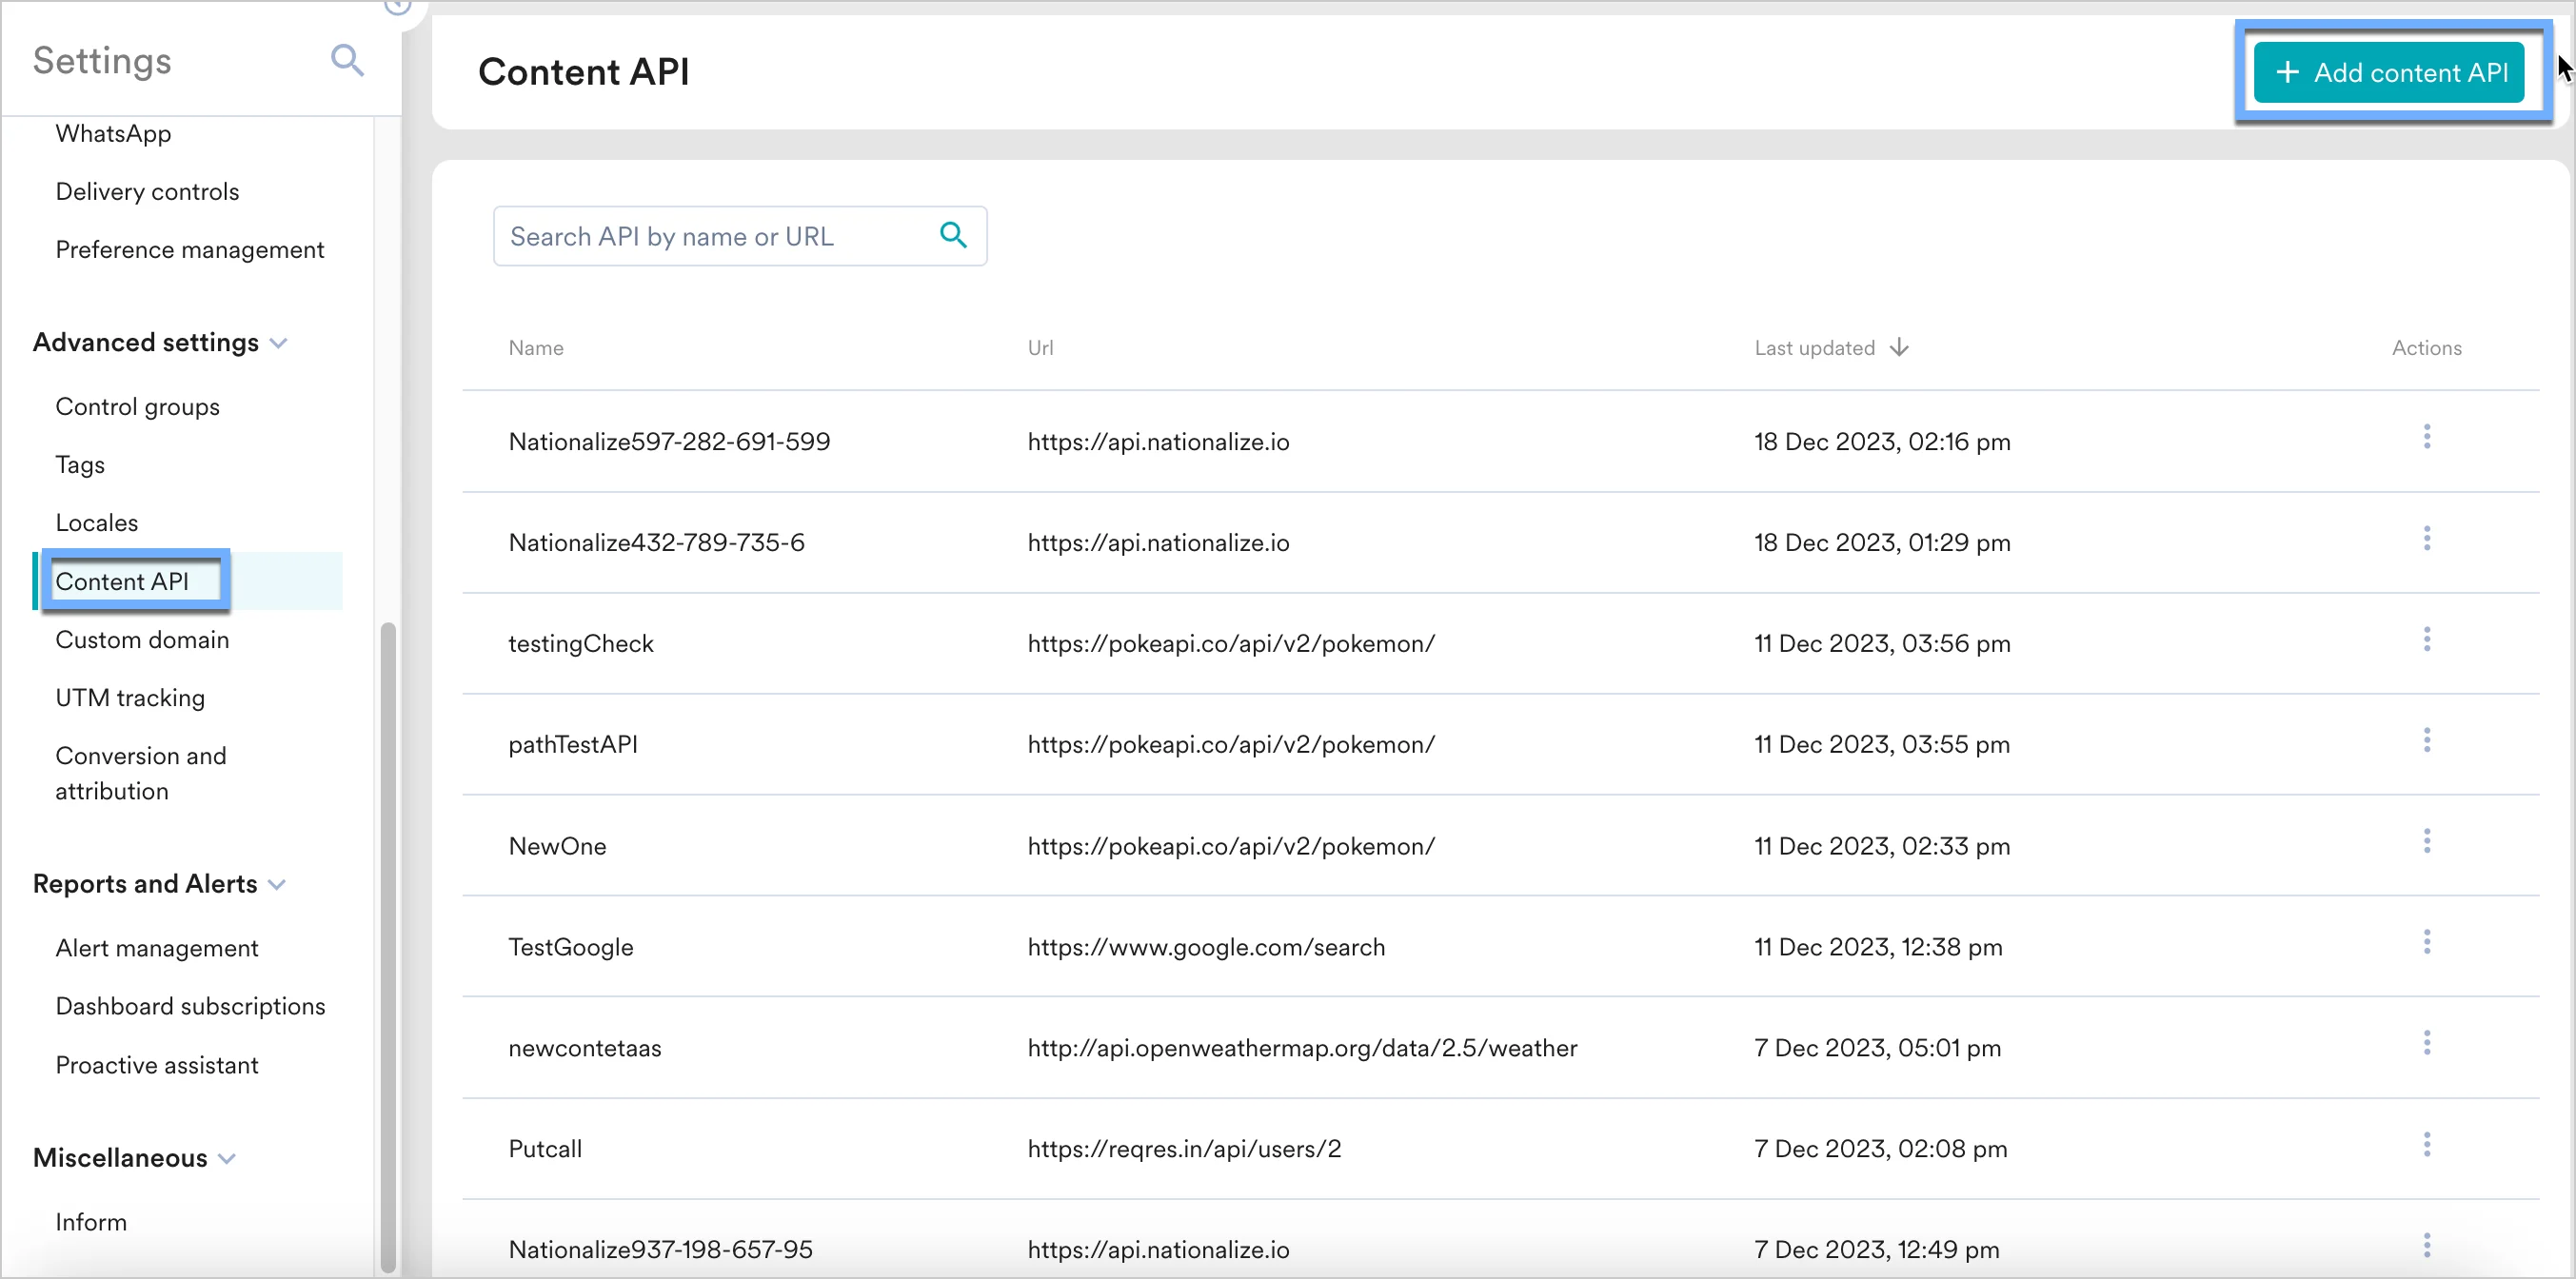 2. Current Weather API の詳細を追加します。 **API URL**
```text wrap theme={null}
https://api.openweathermap.org/data/2.5/weather?lat={{UserAttribute['latitude']}}&lon={{UserAttribute['longitude']}}&appid=
```
**Parameters** パラメーターは自動的に入力されます。値をパーソナライズ変数で更新します。`@` を入力して変数を選択してください。
2. Current Weather API の詳細を追加します。 **API URL**
```text wrap theme={null}
https://api.openweathermap.org/data/2.5/weather?lat={{UserAttribute['latitude']}}&lon={{UserAttribute['longitude']}}&appid=
```
**Parameters** パラメーターは自動的に入力されます。値をパーソナライズ変数で更新します。`@` を入力して変数を選択してください。 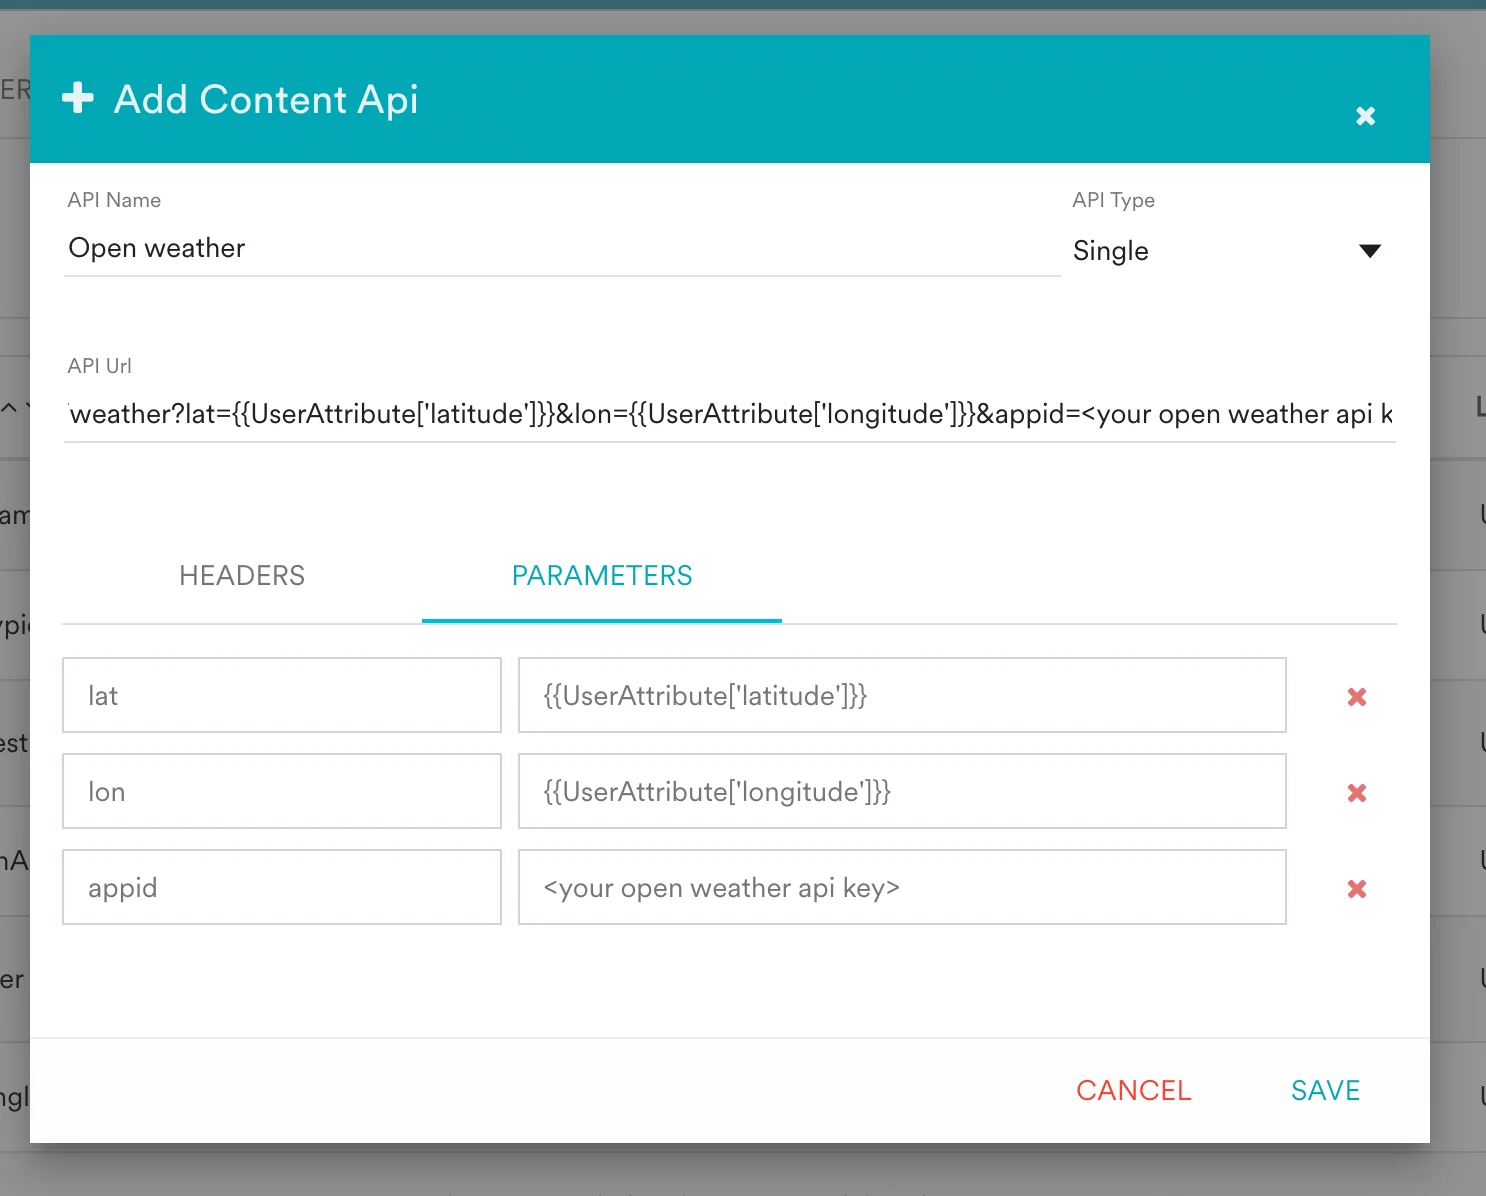 3. **Save** をクリックします。
4. Open Weather API が Content API のリストに表示されます。
3. **Save** をクリックします。
4. Open Weather API が Content API のリストに表示されます。  キャンペーンで使用する前に、Content API の **Test** をクリックしてレスポンスを検証してください。
#### ステップ 2: MoEngage キャンペーンで Content API を使用する
これで、この Content API をキャンペーンで使用できるようになりました。詳細については、[Content APIs](https://www.moengage.com/docs/user-guide/campaigns-and-channels/getting-started/campaign-content/content-apis) を参照してください。
1. キャンペーン作成のステップ 2 で、`@` を入力します。
2. パーソナライズのポップアップで、ステップ 1 で設定した Open Weather Content API を選択します。
キャンペーンで使用する前に、Content API の **Test** をクリックしてレスポンスを検証してください。
#### ステップ 2: MoEngage キャンペーンで Content API を使用する
これで、この Content API をキャンペーンで使用できるようになりました。詳細については、[Content APIs](https://www.moengage.com/docs/user-guide/campaigns-and-channels/getting-started/campaign-content/content-apis) を参照してください。
1. キャンペーン作成のステップ 2 で、`@` を入力します。
2. パーソナライズのポップアップで、ステップ 1 で設定した Open Weather Content API を選択します。 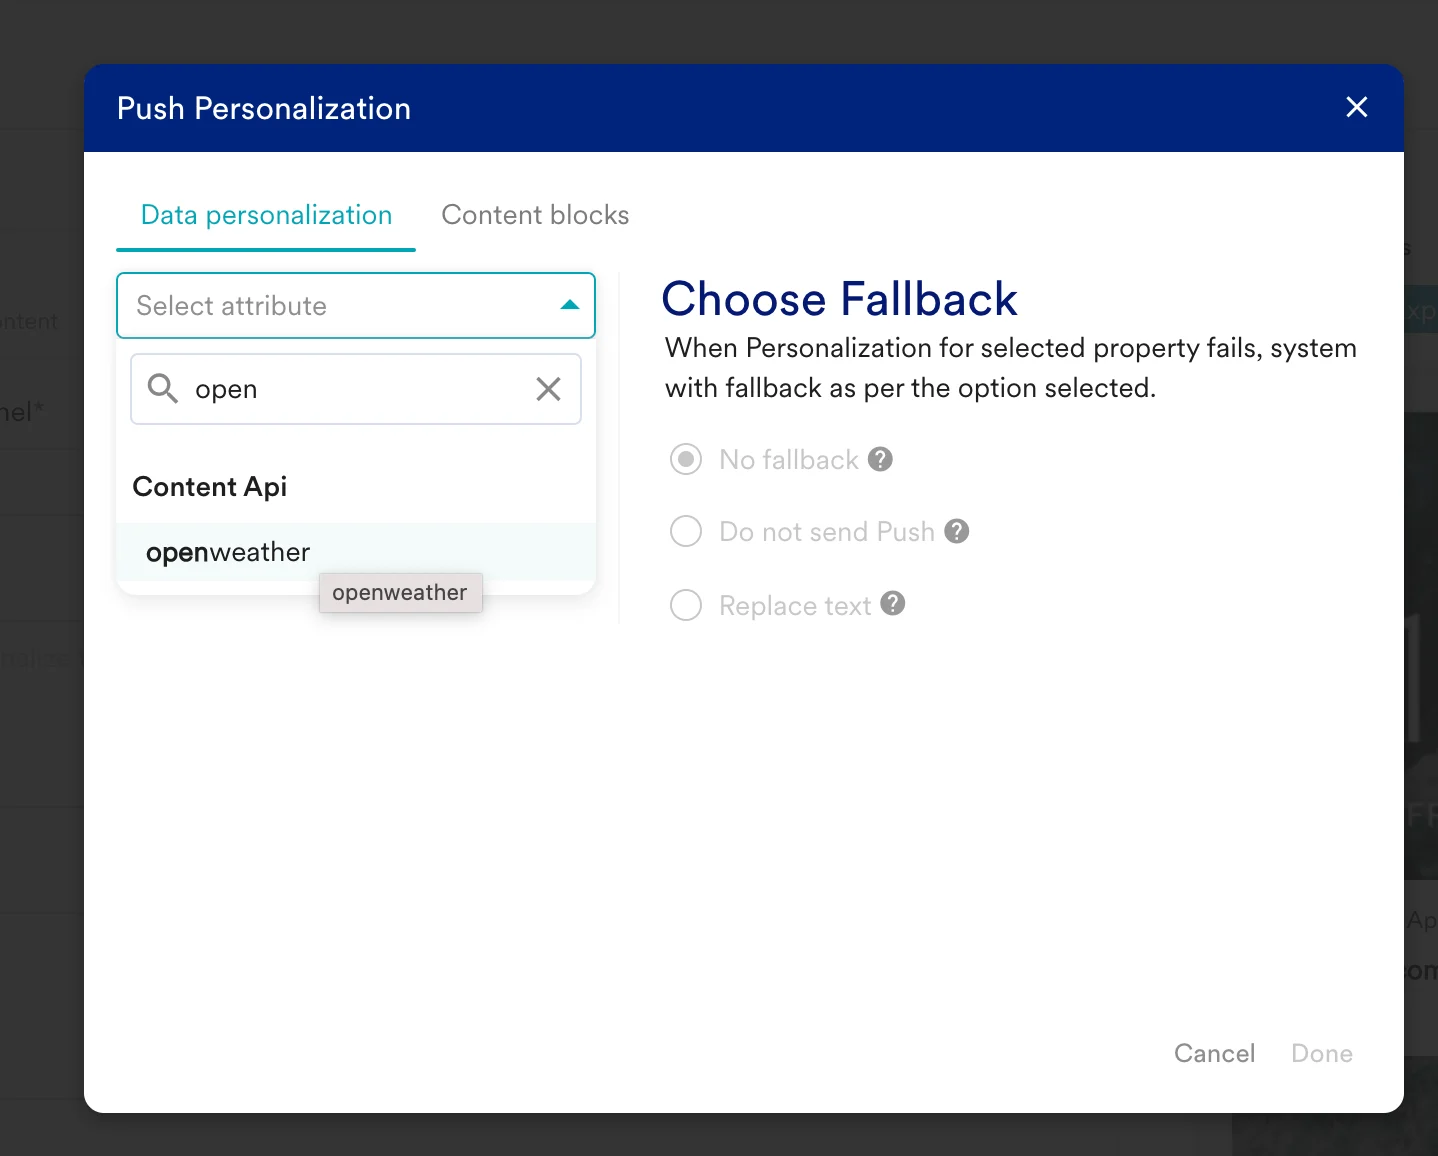 3. [MoEngage Templating Language](https://www.moengage.com/docs/user-guide/campaigns-and-channels/getting-started/message-personalization/jinja-templating-language) を使用して API レスポンスを解析し、現地の天気に基づいてキャンペーンのコンテンツを定義します。例:
* 現地の天気が *Sunny* の場合 → 「日焼け止めを買いましょう」。
* 現地の天気が *Rain* の場合 → 「傘を買いましょう」。
API レスポンスのサンプル:
```json JSON theme={null}
{
"coord": {
"lon": -122.08,
"lat": 37.39
},
"weather": [
{
"id": 800,
"main": "Clear",
"description": "clear sky",
"icon": "01d"
}
],
"base": "stations",
"main": {
"temp": 282.55,
"feels_like": 281.86,
"temp_min": 280.37,
"temp_max": 284.26,
"pressure": 1023,
"humidity": 100
},
"visibility": 10000,
"wind": {
"speed": 1.5,
"deg": 350
},
"clouds": {
"all": 1
},
"dt": 1560350645,
"sys": {
"type": 1,
"id": 5122,
"message": 0.0139,
"country": "US",
"sunrise": 1560343627,
"sunset": 1560396563
},
"timezone": -25200,
"id": 420006353,
"name": "Mountain View",
"cod": 200
}
```
テンプレートで出力を表示するか、[Personalized Previews](https://www.moengage.com/docs/user-guide/campaigns-and-channels/getting-started/message-personalization/personalized-preview) を使用してプレビューします。API レスポンスが天気の説明として `Rain` を返した場合、ユーザーには「雨が降っています。傘を買いましょう」というプッシュメッセージが届きます。
3. [MoEngage Templating Language](https://www.moengage.com/docs/user-guide/campaigns-and-channels/getting-started/message-personalization/jinja-templating-language) を使用して API レスポンスを解析し、現地の天気に基づいてキャンペーンのコンテンツを定義します。例:
* 現地の天気が *Sunny* の場合 → 「日焼け止めを買いましょう」。
* 現地の天気が *Rain* の場合 → 「傘を買いましょう」。
API レスポンスのサンプル:
```json JSON theme={null}
{
"coord": {
"lon": -122.08,
"lat": 37.39
},
"weather": [
{
"id": 800,
"main": "Clear",
"description": "clear sky",
"icon": "01d"
}
],
"base": "stations",
"main": {
"temp": 282.55,
"feels_like": 281.86,
"temp_min": 280.37,
"temp_max": 284.26,
"pressure": 1023,
"humidity": 100
},
"visibility": 10000,
"wind": {
"speed": 1.5,
"deg": 350
},
"clouds": {
"all": 1
},
"dt": 1560350645,
"sys": {
"type": 1,
"id": 5122,
"message": 0.0139,
"country": "US",
"sunrise": 1560343627,
"sunset": 1560396563
},
"timezone": -25200,
"id": 420006353,
"name": "Mountain View",
"cod": 200
}
```
テンプレートで出力を表示するか、[Personalized Previews](https://www.moengage.com/docs/user-guide/campaigns-and-channels/getting-started/message-personalization/personalized-preview) を使用してプレビューします。API レスポンスが天気の説明として `Rain` を返した場合、ユーザーには「雨が降っています。傘を買いましょう」というプッシュメッセージが届きます。