> ## Documentation Index
> Fetch the complete documentation index at: https://moengage.com/docs/llms.txt
> Use this file to discover all available pages before exploring further.
# Amazon Ads Audience
> Sync MoEngage segments to Amazon Ads as Customer List audiences to run targeted advertising and retargeting campaigns.
[Amazon Ads](https://advertising.amazon.com/) is an advertising platform that allows businesses to reach customers across Amazon's ecosystem including Amazon.com, Kindle, Fire TV, and partner publisher sites using a variety of targeting and retargeting capabilities.
## MoEngage × Amazon Ads
The MoEngage and Amazon Ads integration allows you to synchronize audience segments from MoEngage to Amazon Ads. This enables you to create highly targeted advertising campaigns tailored to specific customer segments.
## Use Cases
Integrating MoEngage with Amazon Ads helps you solve the following use cases:
* **Enhanced user retention**: Create remarketing campaigns based on purchase history and behavior patterns to re-engage existing users who haven't interacted recently.
* **VIP user targeting**: Create premium audience segments for high-value users to deliver personalized ads with exclusive offers and promotions.
* **Cart abandonment recovery**: Target users who abandoned their shopping carts by uploading their data to Amazon Ads Customer Lists and showing them targeted ads to complete their purchase.
* **Optimized advertising spend**: Create suppression audiences to prevent loyal users from seeing acquisition ads, while building lookalike audiences to efficiently acquire new users.
# Integration
**Prerequisites**
To use this feature, you must have access to an [Amazon Ads account](https://advertising.amazon.com/) with the required permissions.
**Note**: Amazon Ads Audience is part of the Connected Segments add-on. Contact your dedicated MoEngage customer success manager (CSM) to enable it for your account.
## Step 1: Obtain Your Amazon Ads Manager Account ID
1. Log in to your [Amazon Ads account](https://advertising.amazon.com/).
2. Navigate to **Administration** > **Account access and Settings** > **Manager Accounts**.
3. Copy the **ID** \[Highlighted in blue] from the Manager Accounts page.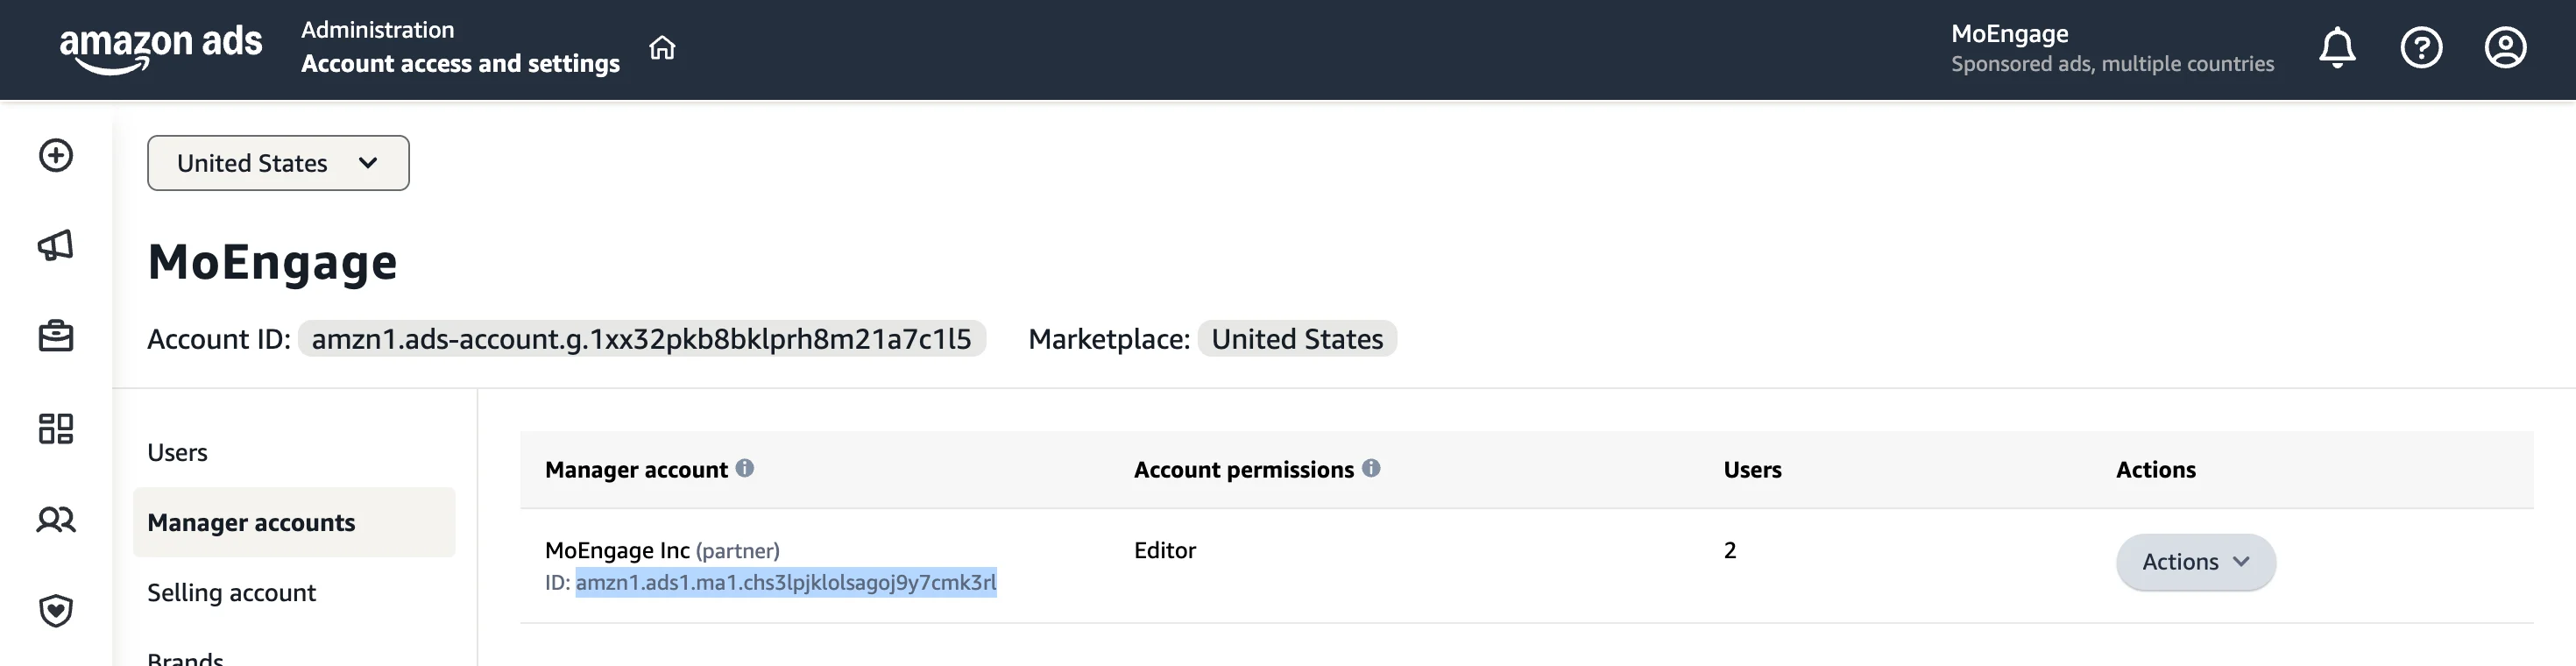 **Information**
The Manager Account ID is required to set up the integration in the MoEngage App Marketplace. You will be redirected to Amazon to authorize access when connecting.
## Step 2: Connect Amazon Ads Audience on the App Marketplace
To connect Amazon Ads Audience on the App Marketplace, perform the following steps:
1. On the left navigation menu in the MoEngage UI, click **App Marketplace**.
2. On the **App Marketplace** page, search for **Amazon Ads**.
3. Click the **Amazon Ads Audience** tile.
4. On the **Amazon Ads Audience** page, go to the **Integrate** tab.
5. Click the
**Information**
The Manager Account ID is required to set up the integration in the MoEngage App Marketplace. You will be redirected to Amazon to authorize access when connecting.
## Step 2: Connect Amazon Ads Audience on the App Marketplace
To connect Amazon Ads Audience on the App Marketplace, perform the following steps:
1. On the left navigation menu in the MoEngage UI, click **App Marketplace**.
2. On the **App Marketplace** page, search for **Amazon Ads**.
3. Click the **Amazon Ads Audience** tile.
4. On the **Amazon Ads Audience** page, go to the **Integrate** tab.
5. Click the  arrow and then select one of the following options:
* **Create Audience**
* **Update Users to Audience**
arrow and then select one of the following options:
* **Create Audience**
* **Update Users to Audience**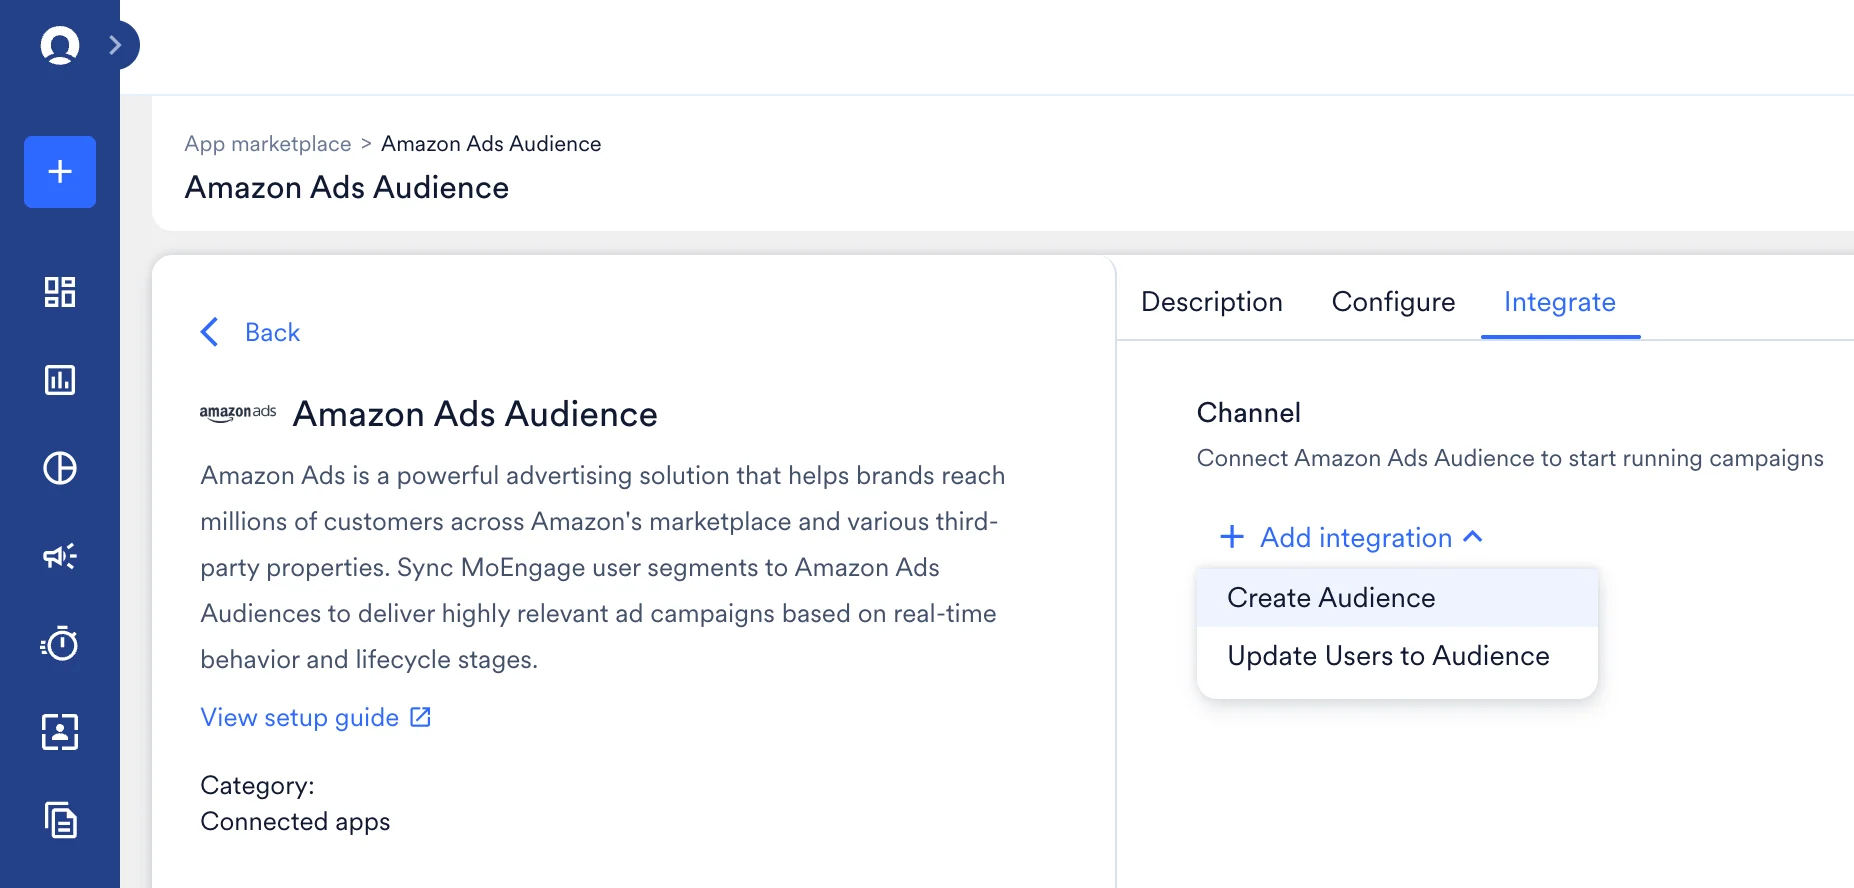 6. Based on the selected connector type, enter the following details:
| Field | Required | Description |
| ------------------ | -------- | -------------------------------------------------------------------------------------------------------------------------------------------------------------------------------------------------------------- |
| Connection name | Yes | The name of the Amazon Ads connection. |
| Manager Account ID | Yes | The **Account ID** from your Amazon Ads Manager Accounts page, retrieved in Step 1. |
| Region | Yes | The region of your Amazon Ads account. Select one of the following:
6. Based on the selected connector type, enter the following details:
| Field | Required | Description |
| ------------------ | -------- | -------------------------------------------------------------------------------------------------------------------------------------------------------------------------------------------------------------- |
| Connection name | Yes | The name of the Amazon Ads connection. |
| Manager Account ID | Yes | The **Account ID** from your Amazon Ads Manager Accounts page, retrieved in Step 1. |
| Region | Yes | The region of your Amazon Ads account. Select one of the following: - **North America** — US, CA, MX, BR
- **Europe** — UK, DE, FR, IN, AE, and others
- **Far East** — JP, AU, SG
|
7. Click **Connect**. You are redirected to Amazon to authorize the connection using your Amazon Ads account.  \
After a successful login, you are redirected back to MoEngage and your Amazon Ads connection is now integrated.
## Step 3: Create a Campaign on MoEngage to Update Audiences to Amazon Ads
To create an Amazon Ads Audience campaign on MoEngage, perform the following steps:
1. On the left navigation menu in the MoEngage UI, click **Engage**, and then click **Campaigns**.
2. On the **All campaigns** page, click **+ Create campaign**.
3. On the **Create campaign** dialog box, under **Connected Apps**, click **Amazon Ads Audience** and then click the most suitable delivery type.
4. Under **Select audience**, click **Filter users by**.
5. On the **User property** tab, select the user segment for Amazon Ads syncing. You can combine this with other segment criteria.
6. In step 2 of the campaign, **Content**, select the pre-configured connector and specify the content you want to send out.
### Create a New Audience on Amazon Ads
To create a new Customer List audience on Amazon Ads, use the **Create Audience** connector and perform the following steps:
1. Select the **Create Audience** connector and the connection you created.
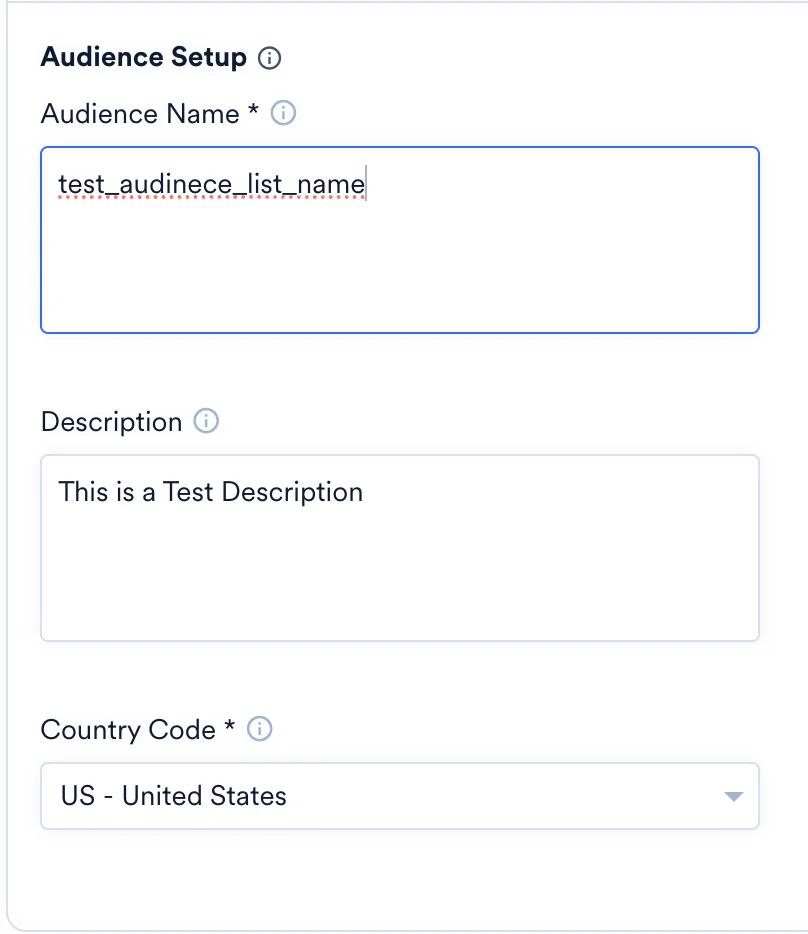
2. Enter the Audience Name and other details.
3. Run a test campaign and review the response.
\
After a successful login, you are redirected back to MoEngage and your Amazon Ads connection is now integrated.
## Step 3: Create a Campaign on MoEngage to Update Audiences to Amazon Ads
To create an Amazon Ads Audience campaign on MoEngage, perform the following steps:
1. On the left navigation menu in the MoEngage UI, click **Engage**, and then click **Campaigns**.
2. On the **All campaigns** page, click **+ Create campaign**.
3. On the **Create campaign** dialog box, under **Connected Apps**, click **Amazon Ads Audience** and then click the most suitable delivery type.
4. Under **Select audience**, click **Filter users by**.
5. On the **User property** tab, select the user segment for Amazon Ads syncing. You can combine this with other segment criteria.
6. In step 2 of the campaign, **Content**, select the pre-configured connector and specify the content you want to send out.
### Create a New Audience on Amazon Ads
To create a new Customer List audience on Amazon Ads, use the **Create Audience** connector and perform the following steps:
1. Select the **Create Audience** connector and the connection you created.
2. Enter the Audience Name and other details.
3. Run a test campaign and review the response. 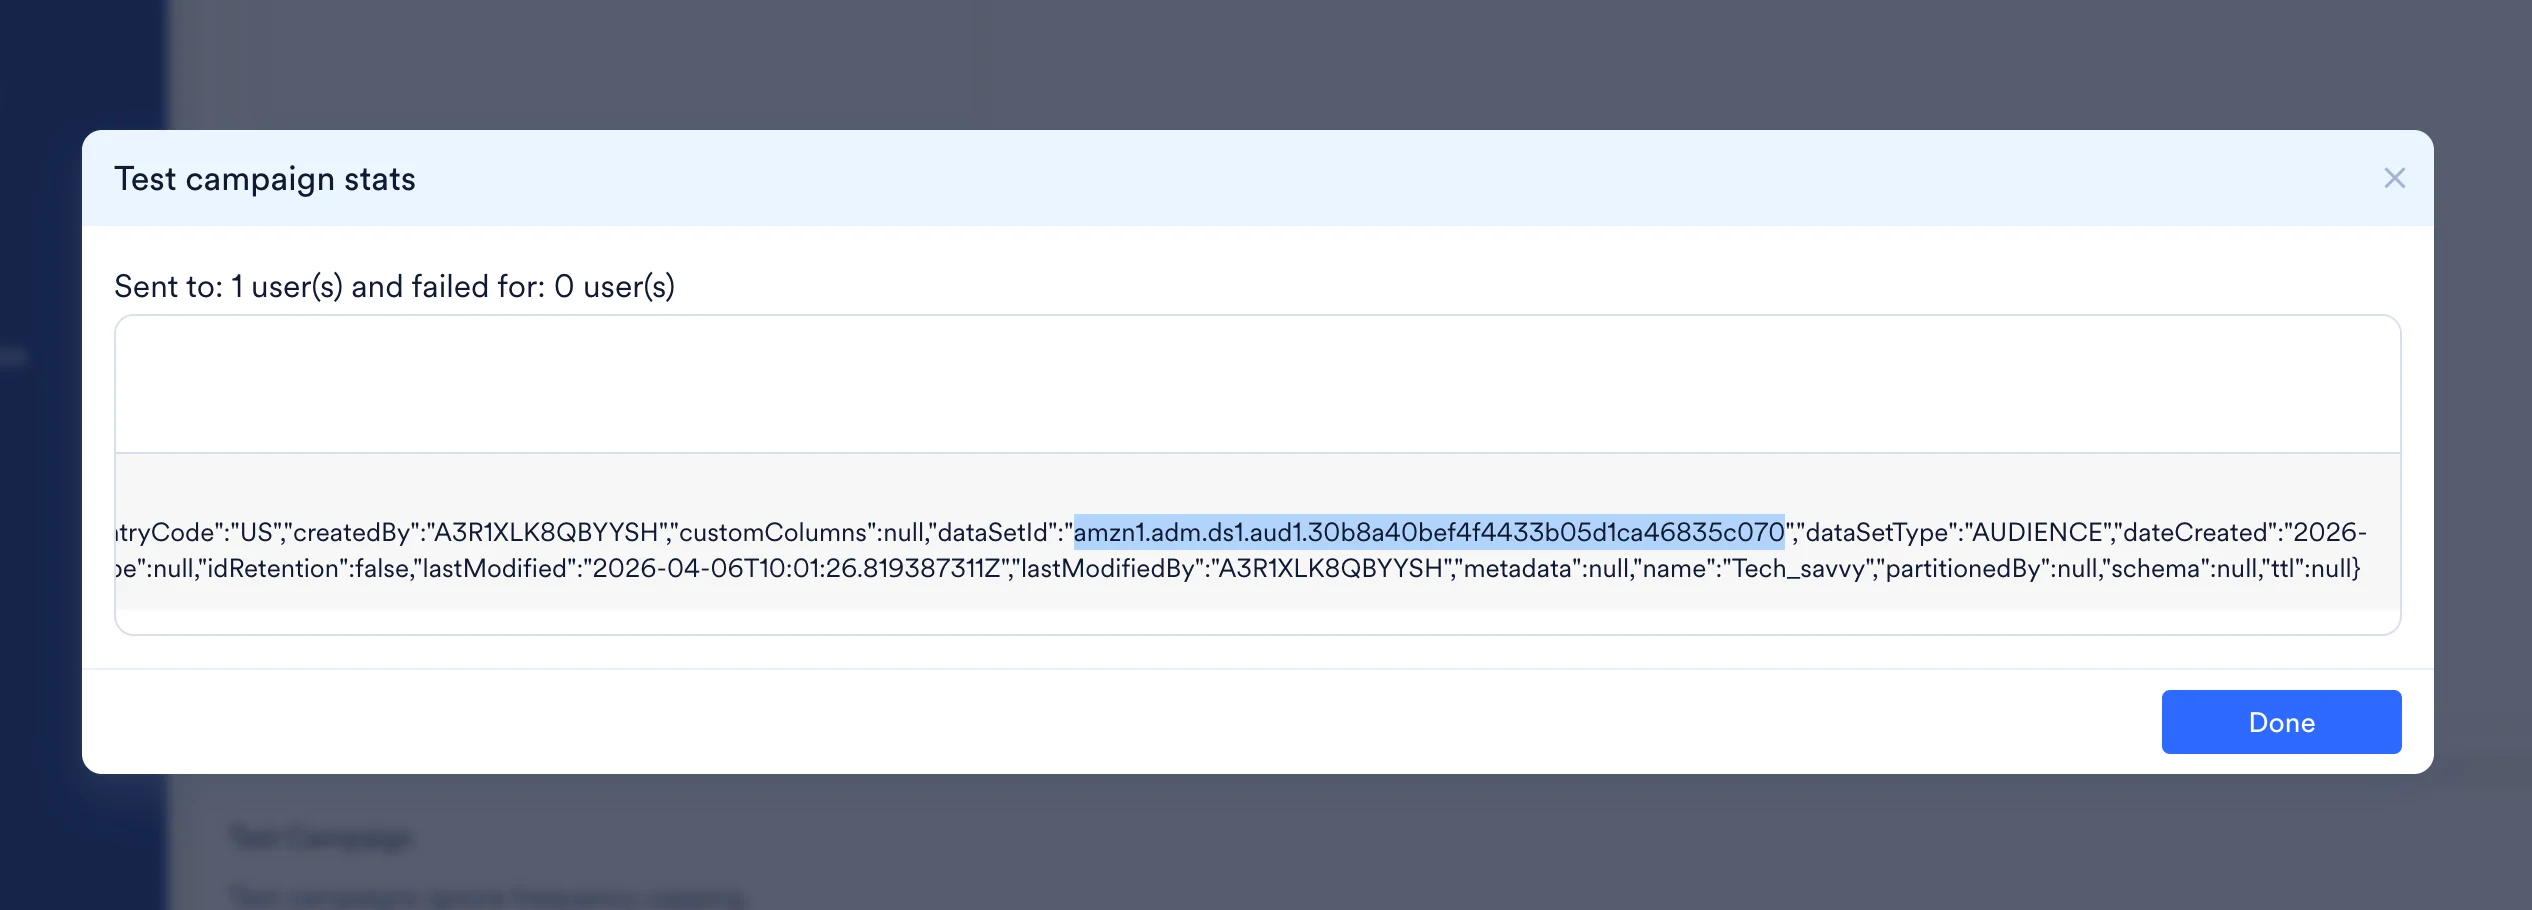 4. The response contains your **Audience Dataset ID**. Note this value you will need it to add or remove users from this audience using the **Update Users to Audience** connector.
Do not publish this campaign; it creates multiple Customer List audiences with the same name in Amazon Ads.
### Running a Campaign
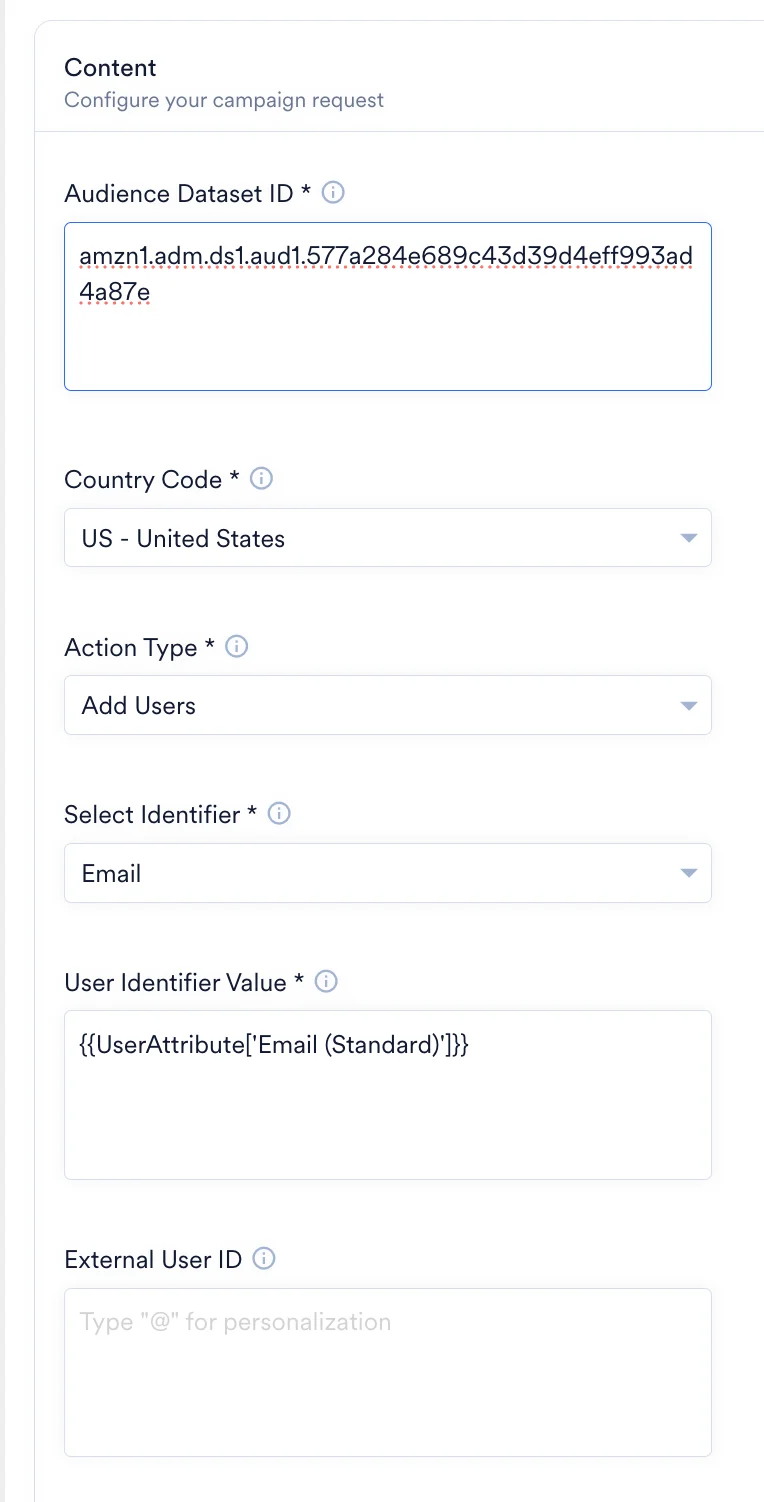
Based on your selected connector, you must provide the following information:
| Field | Required | Description |
| ------------- | -------- | ---------------------------------------------------------------------------------------------------------------------------------- |
| Audience Name | Yes | A unique name for this audience (5–100 characters, must start with a letter). Use a descriptive name like "Checkout-Visitors-30D". |
| Description | No | A short note about this audience to help you identify it later (max 1000 characters). |
| Country Code | Yes | Select the country of your audience members. This must match the country where the ads will be served. |
4. The response contains your **Audience Dataset ID**. Note this value you will need it to add or remove users from this audience using the **Update Users to Audience** connector.
Do not publish this campaign; it creates multiple Customer List audiences with the same name in Amazon Ads.
### Running a Campaign
Based on your selected connector, you must provide the following information:
| Field | Required | Description |
| ------------- | -------- | ---------------------------------------------------------------------------------------------------------------------------------- |
| Audience Name | Yes | A unique name for this audience (5–100 characters, must start with a letter). Use a descriptive name like "Checkout-Visitors-30D". |
| Description | No | A short note about this audience to help you identify it later (max 1000 characters). |
| Country Code | Yes | Select the country of your audience members. This must match the country where the ads will be served. |
 | Field | Required | Description |
| --------------------- | -------- | ------------------------------------------------------------------------------------------------------------------------------------------------------------------------------------------------------------- |
| Audience Dataset ID | Yes | The Dataset ID of the Amazon Ads audience. This is returned in the test campaign response when you use the **Create Audience** connector. |
| Country Code | Yes | Select the country of your audience members. This must match the country used when the audience was created. |
| Action Type | Yes | Select the action you want to perform:
| Field | Required | Description |
| --------------------- | -------- | ------------------------------------------------------------------------------------------------------------------------------------------------------------------------------------------------------------- |
| Audience Dataset ID | Yes | The Dataset ID of the Amazon Ads audience. This is returned in the test campaign response when you use the **Create Audience** connector. |
| Country Code | Yes | Select the country of your audience members. This must match the country used when the audience was created. |
| Action Type | Yes | Select the action you want to perform: - **Add Users**
- **Remove Users**
|
| Select Identifier | Yes | Select the type of user identifier to match against Amazon Ads. Options are: - **Email**
- **Phone**
**Note**: All identifiers are SHA-256 hashed before being sent to Amazon Ads.
|
| User Identifier Value | Yes | The value for the selected identifier. Type **@** to select the user attribute that contains the relevant data (for example, **Email (Standard)** for email addresses). |
| External User ID | No | A unique identifier for this user in your system. Used by Amazon Ads to deduplicate records. Type **@** to personalize. |
 1. Your campaign is now ready to test and send. Using the Test functionality, you can also test your connector configuration.
  2. If your test user successfully receives the message, your setup is ready.
3. Publish the campaign.
## Step 4: View Your Amazon Ads Audiences
In your Amazon Ads account, navigate to **Audiences** > **Your audiences** to view the size and status of each Customer List audience.
**Information**
* After creating or updating an audience, it may take 24 to 48 hours for the new size to be reflected in Amazon Ads
* Ensure the **Region** selected during connection matches the region of your Amazon Ads campaigns.
2. If your test user successfully receives the message, your setup is ready.
3. Publish the campaign.
## Step 4: View Your Amazon Ads Audiences
In your Amazon Ads account, navigate to **Audiences** > **Your audiences** to view the size and status of each Customer List audience.
**Information**
* After creating or updating an audience, it may take 24 to 48 hours for the new size to be reflected in Amazon Ads
* Ensure the **Region** selected during connection matches the region of your Amazon Ads campaigns.