> ## Documentation Index
> Fetch the complete documentation index at: https://moengage.com/docs/llms.txt
> Use this file to discover all available pages before exploring further.
# Pinterest Ads
[Pinterest Ads](https://www.pinterest.com/) allows businesses to use various targeting options to reach specific audiences, including those who have previously visited their website, engaged with their Pins, or are interested in similar products or topics.
# MoEngage × Pinterest Ads
The MoEngage and Pinterest integration empowers you to seamlessly transfer your customer data to Pinterest Ads. Utilizing this data, you can create targeted advertising lists based on specific user behaviors and segmentation, leading to more relevant ad delivery.
## Use Cases
Integrating Pinterest with MoEngage helps you solve the following use cases:
* **Enhanced user engagement and conversions** : You can target high-value users via multiple channels to drive purchases or engagement.
* **Re-engagement of less responsive users** : You can target users who are less responsive to other marketing channels by showing them targeted display ads based on their past behavior.
* **Optimized advertising spend** : You can create suppression audiences to prevent users from receiving advertisements when they’re already loyal consumers of your brand.
* **Efficient new user acquisition** : You can create lookalike audiences to acquire new users more efficiently.
# Integration
* **Pinterest business account** : To use this feature, you must have an active advertising account with Pinterest.
* **Pinterest developer app** : Either an existing App with necessary permissions, or create a new one.
* **Pinterest's marketing APIs** : Use Pinterest's marketing APIs to sync audiences or users to Pinterest Ads through MoEngage. You must have a Pinterest App and an Ad account to use these marketing APIs. You can use your existing app and Ad account or create a new one to connect with MoEngage.
* Pinterest Ads is part of the Connected Segments add-on. Contact your dedicated MoEngage CSM (customer success manager) to enable it for your account.
## Step 1: Create a Developer App on Pinterest
To set up a Pinterest developer account, perform the following steps:
1. Go to the [Pinterest Developers Platform](https://developer.pinterest.com/).
2. Follow the instructions on the [Pinterest document](https://developers.pinterest.com/docs/getting-started/connect-app/) to set up a new App or use your existing App.
3. To connect MoEngage to your Pinterest App configuration, type the specific URL in the **Redirect link** box based on the following MoEngage data center.  | Data Center | Redirect URI |
| ----------- | ------------------------------------------------------------- |
| DC-01 | `https://dashboard-01.moengage.com/v3/partner/oauth/callback` |
| DC-02 | `https://dashboard-02.moengage.com/v3/partner/oauth/callback` |
| DC-03 | `https://dashboard-03.moengage.com/v3/partner/oauth/callback` |
| DC-04 | `https://dashboard-04.moengage.com/v3/partner/oauth/callback` |
4. MoEngage would require access to the following scopes:
| Scope Required | Use Case |
| -------------- | ------------------------------------------------------------ |
| `ads:write` | This allows you to create and manage Audiences in Pinterest. |
| `ads:read ` | This allows you to read existing Audiences on Pinterest. |
5. From your Pinterest App dashboard, on the **Configure** tab, obtain the **App id** and **App secret key**.
| Data Center | Redirect URI |
| ----------- | ------------------------------------------------------------- |
| DC-01 | `https://dashboard-01.moengage.com/v3/partner/oauth/callback` |
| DC-02 | `https://dashboard-02.moengage.com/v3/partner/oauth/callback` |
| DC-03 | `https://dashboard-03.moengage.com/v3/partner/oauth/callback` |
| DC-04 | `https://dashboard-04.moengage.com/v3/partner/oauth/callback` |
4. MoEngage would require access to the following scopes:
| Scope Required | Use Case |
| -------------- | ------------------------------------------------------------ |
| `ads:write` | This allows you to create and manage Audiences in Pinterest. |
| `ads:read ` | This allows you to read existing Audiences on Pinterest. |
5. From your Pinterest App dashboard, on the **Configure** tab, obtain the **App id** and **App secret key**. 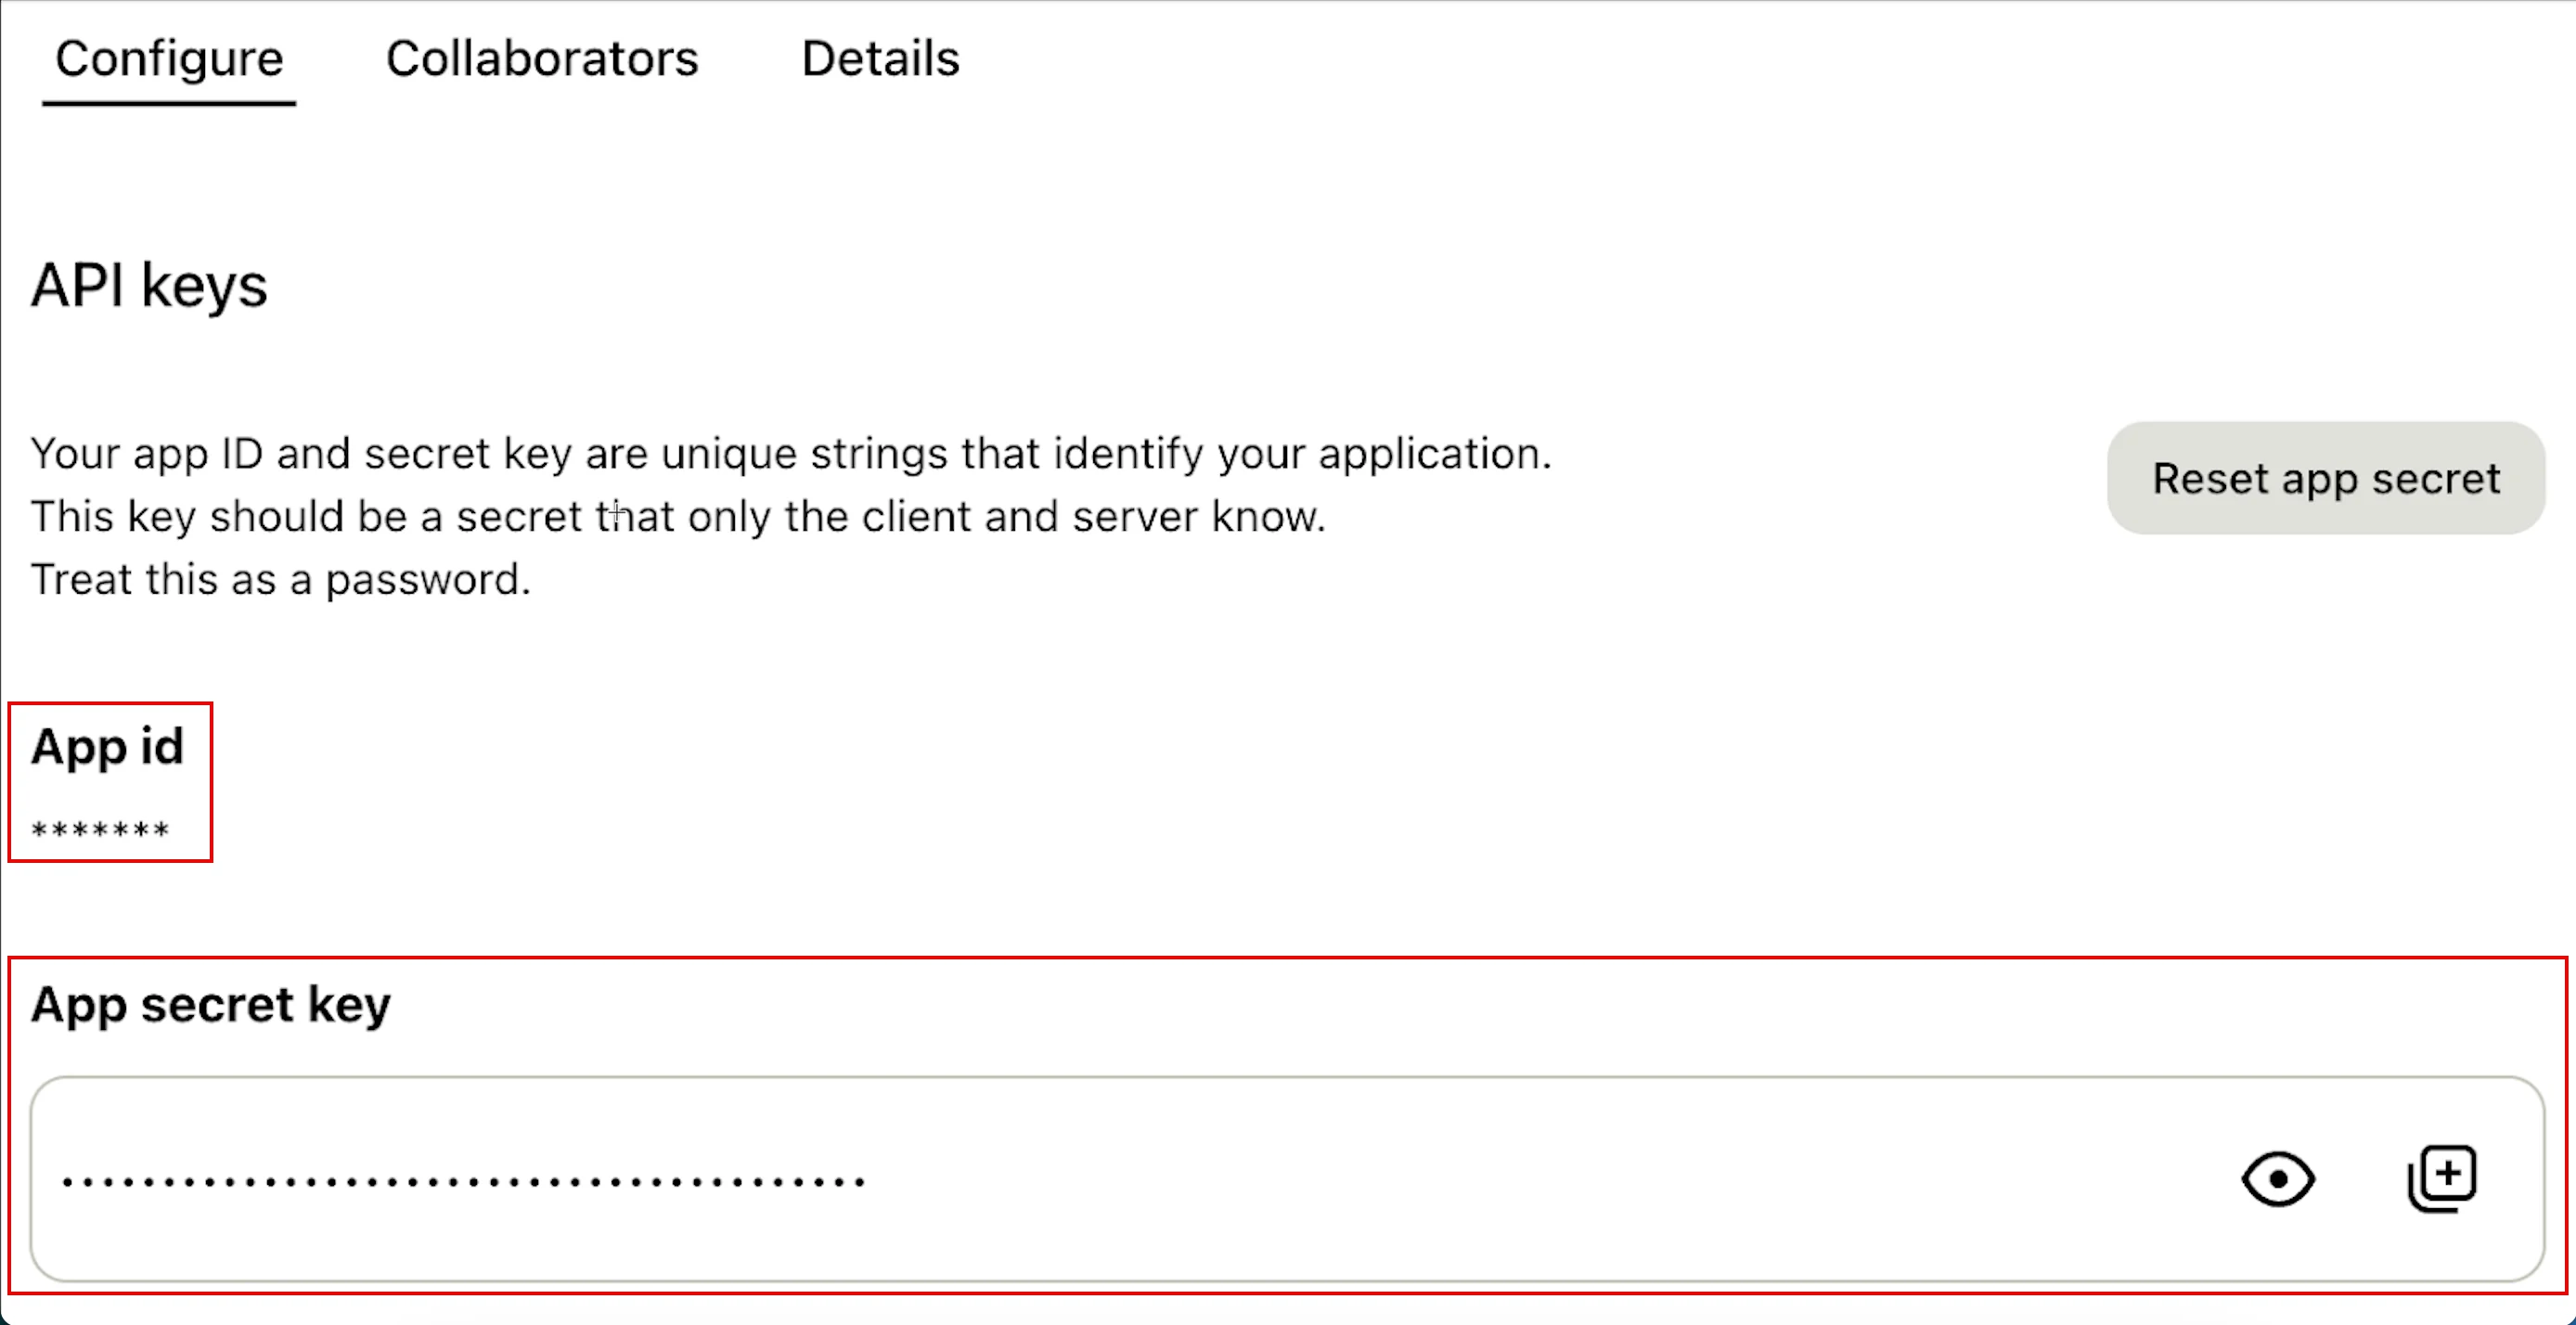 The **App id** and **App secret key** are required to set up the Pinterest integration on the MoEngage App marketplace.
## Step 2: Connect Pinterest on the App Marketplace
To connect Pinterest on the App marketplace, perform the following steps:
1. On the left navigation menu in the MoEngage dashboard, click **App marketplace**.
2. On the App Marketplace page, search for **Pinterest**.
The **App id** and **App secret key** are required to set up the Pinterest integration on the MoEngage App marketplace.
## Step 2: Connect Pinterest on the App Marketplace
To connect Pinterest on the App marketplace, perform the following steps:
1. On the left navigation menu in the MoEngage dashboard, click **App marketplace**.
2. On the App Marketplace page, search for **Pinterest**. 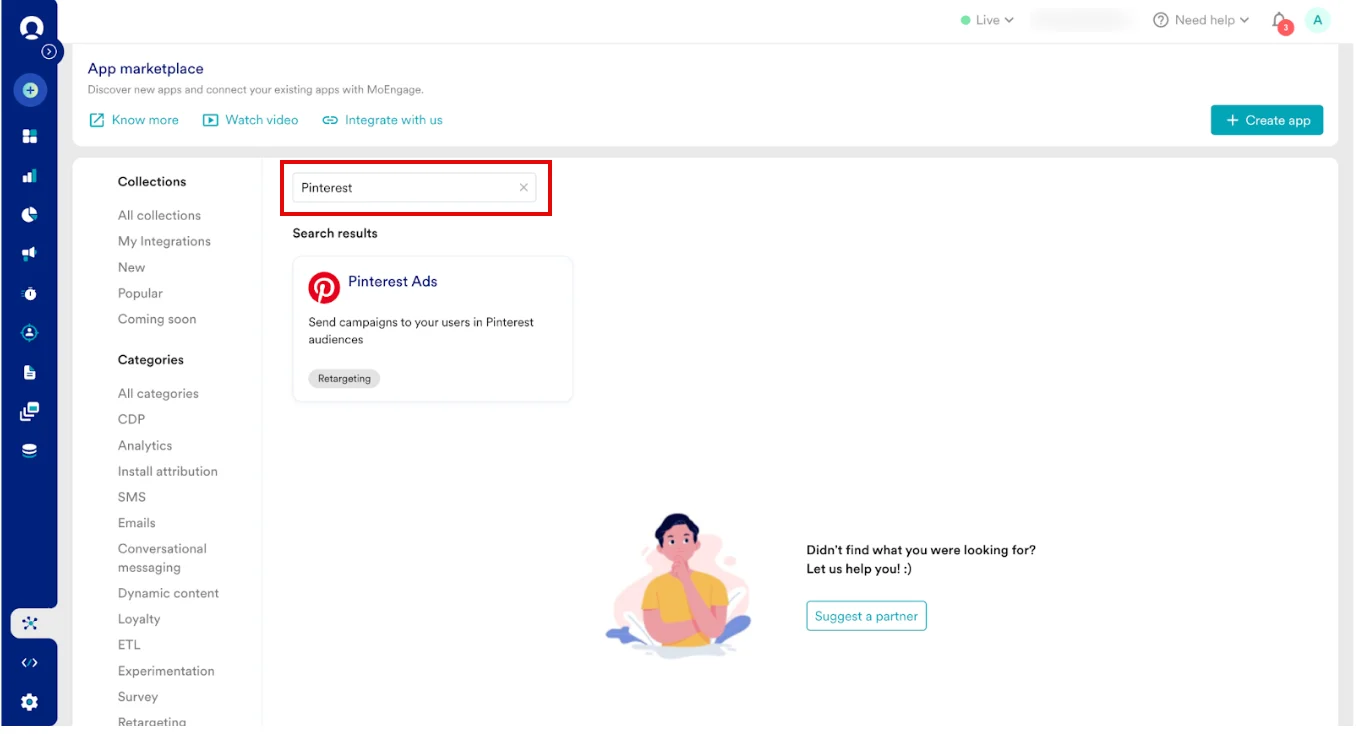 3. Click the **Pinterest** tile.
4. On the **Pinterest** page, go to the **Integrate** tab.
5. Click the
3. Click the **Pinterest** tile.
4. On the **Pinterest** page, go to the **Integrate** tab.
5. Click the  arrow, and then select one of the following options:
* **Create Customer List**
* **Update Customer List**
arrow, and then select one of the following options:
* **Create Customer List**
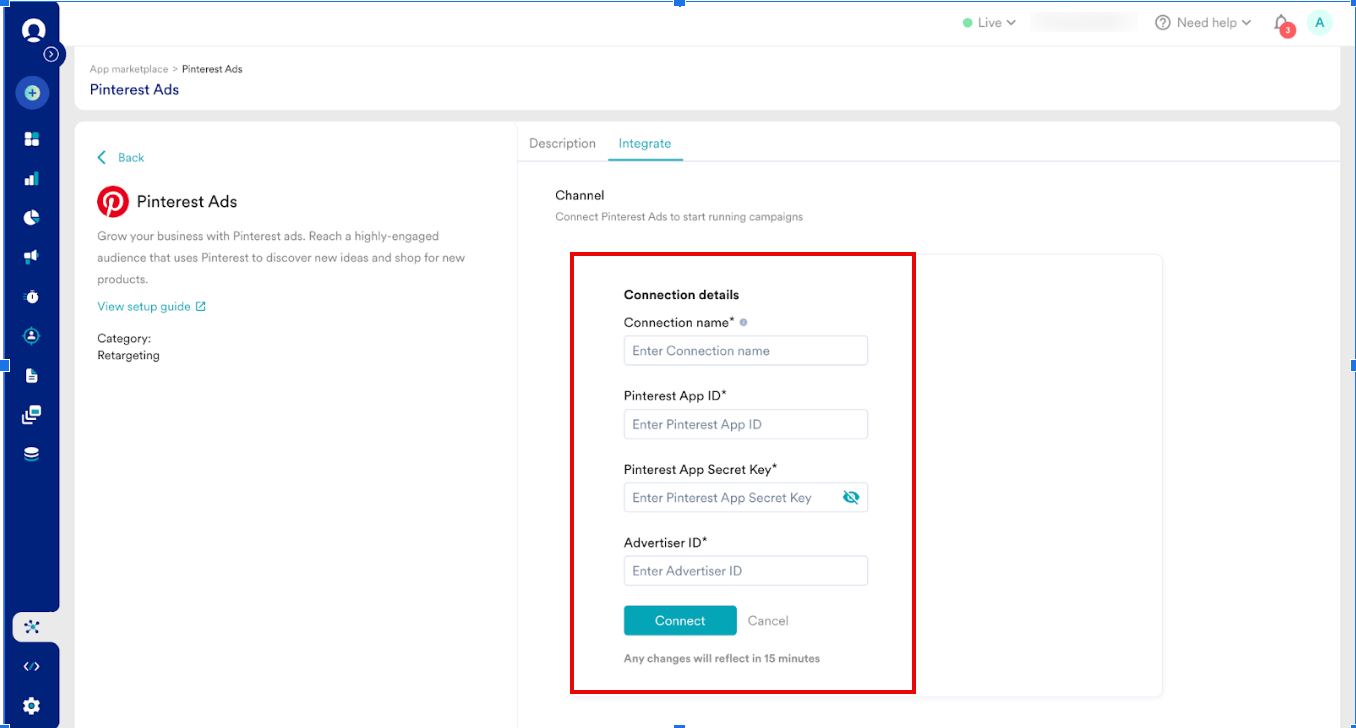
* **Update Customer List** 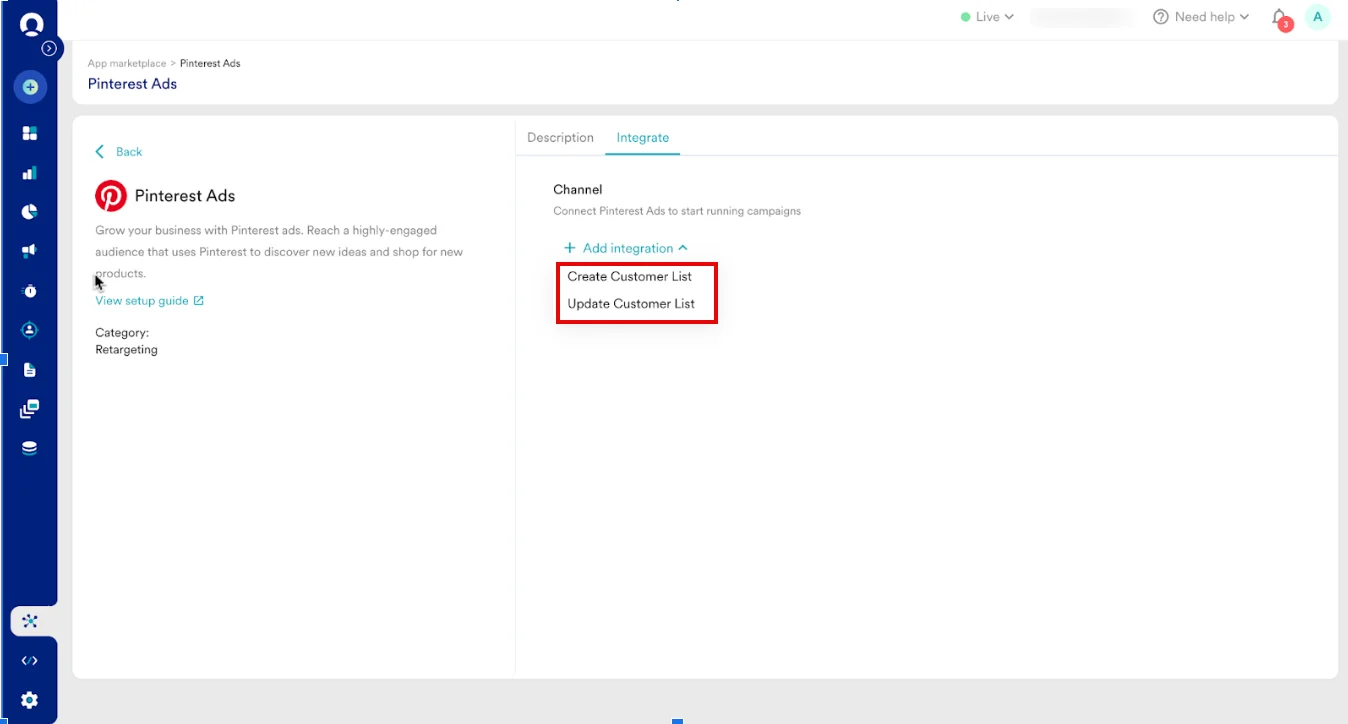 6. Based on the selected connector type, enter the following details:
| Field | Required | Description |
| ------------------- | -------- | ------------------------------------------------------------------------------------------------------- |
| **Connection name** | Yes | Name of the Pinterest connection. Enter your connection name with an identifier. |
| **App id** | Yes | This is the unique ID for your application. This is also referred to as the App ID. |
| **App secret key** | Yes | This is your app’s secret key. This is located in your Pinterest **App dashboard** > **Configure** tab. |
| **Advertiser ID** | Yes | This is your Advertiser ID of your Pinterest Ads Account. |
6. Based on the selected connector type, enter the following details:
| Field | Required | Description |
| ------------------- | -------- | ------------------------------------------------------------------------------------------------------- |
| **Connection name** | Yes | Name of the Pinterest connection. Enter your connection name with an identifier. |
| **App id** | Yes | This is the unique ID for your application. This is also referred to as the App ID. |
| **App secret key** | Yes | This is your app’s secret key. This is located in your Pinterest **App dashboard** > **Configure** tab. |
| **Advertiser ID** | Yes | This is your Advertiser ID of your Pinterest Ads Account. |
 7. Click **Connect**. Your Pinterest connection is now integrated.
## Step 3: Create a Campaign on MoEngage to Sync Audiences to Pinterest Ads
To create a campaign on MoEngage, perform the following steps:
1. On the left navigation menu in the MoEngage dashboard, click **Engage** , and then click **Campaigns**.
2. On the All campaigns page, click + Create campaign
3. On the **Create campaign** dialog box, under **Connected Apps** , click **Pinterest** and then click the most suitable delivery type.
7. Click **Connect**. Your Pinterest connection is now integrated.
## Step 3: Create a Campaign on MoEngage to Sync Audiences to Pinterest Ads
To create a campaign on MoEngage, perform the following steps:
1. On the left navigation menu in the MoEngage dashboard, click **Engage** , and then click **Campaigns**.
2. On the All campaigns page, click + Create campaign
3. On the **Create campaign** dialog box, under **Connected Apps** , click **Pinterest** and then click the most suitable delivery type. 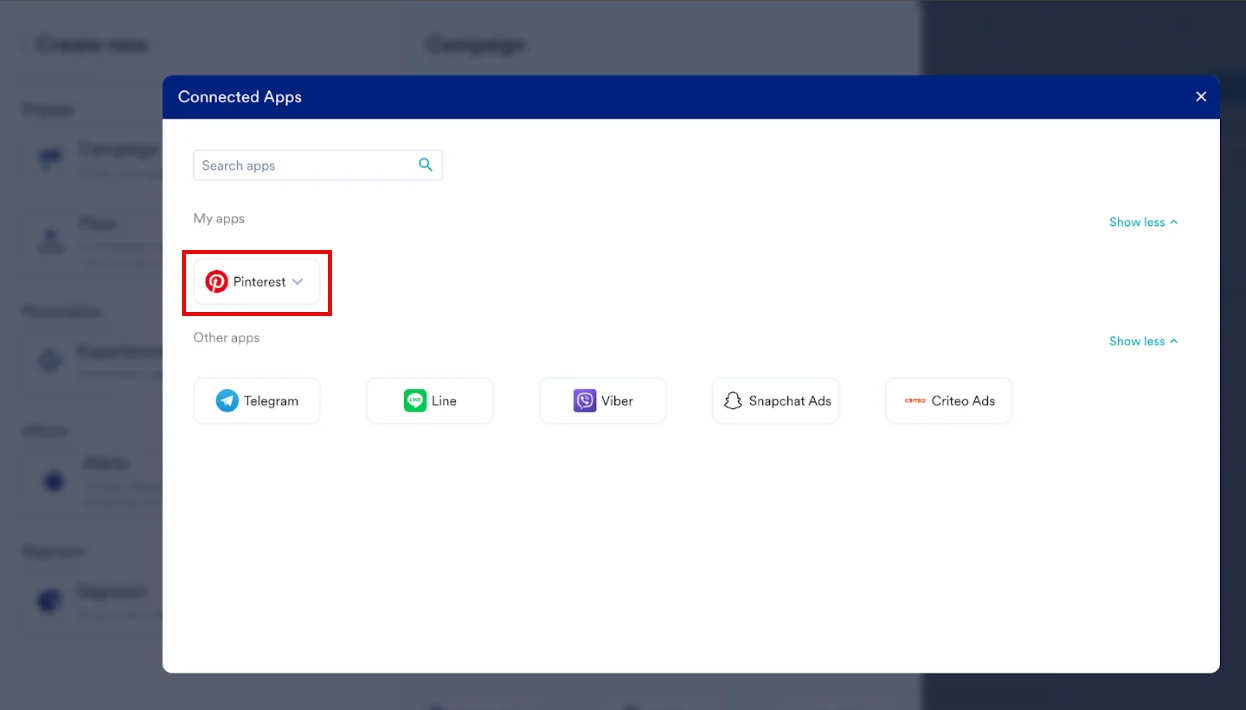 4. Under **Select audience** , click **Filter users by**.
5. On the **User property** tab, select the user segment for Pinterest syncing. You can combine this with other segment criteria.
6. In step 2 of the campaign, **Content** , select the pre-configured connectors and specify the content you want to send out. Enter the following details:
| Field | Description |
| --------------- | ------------------------------------------------------------------------------------------------------------------ |
| **Connector** | You can perform the following actions:
4. Under **Select audience** , click **Filter users by**.
5. On the **User property** tab, select the user segment for Pinterest syncing. You can combine this with other segment criteria.
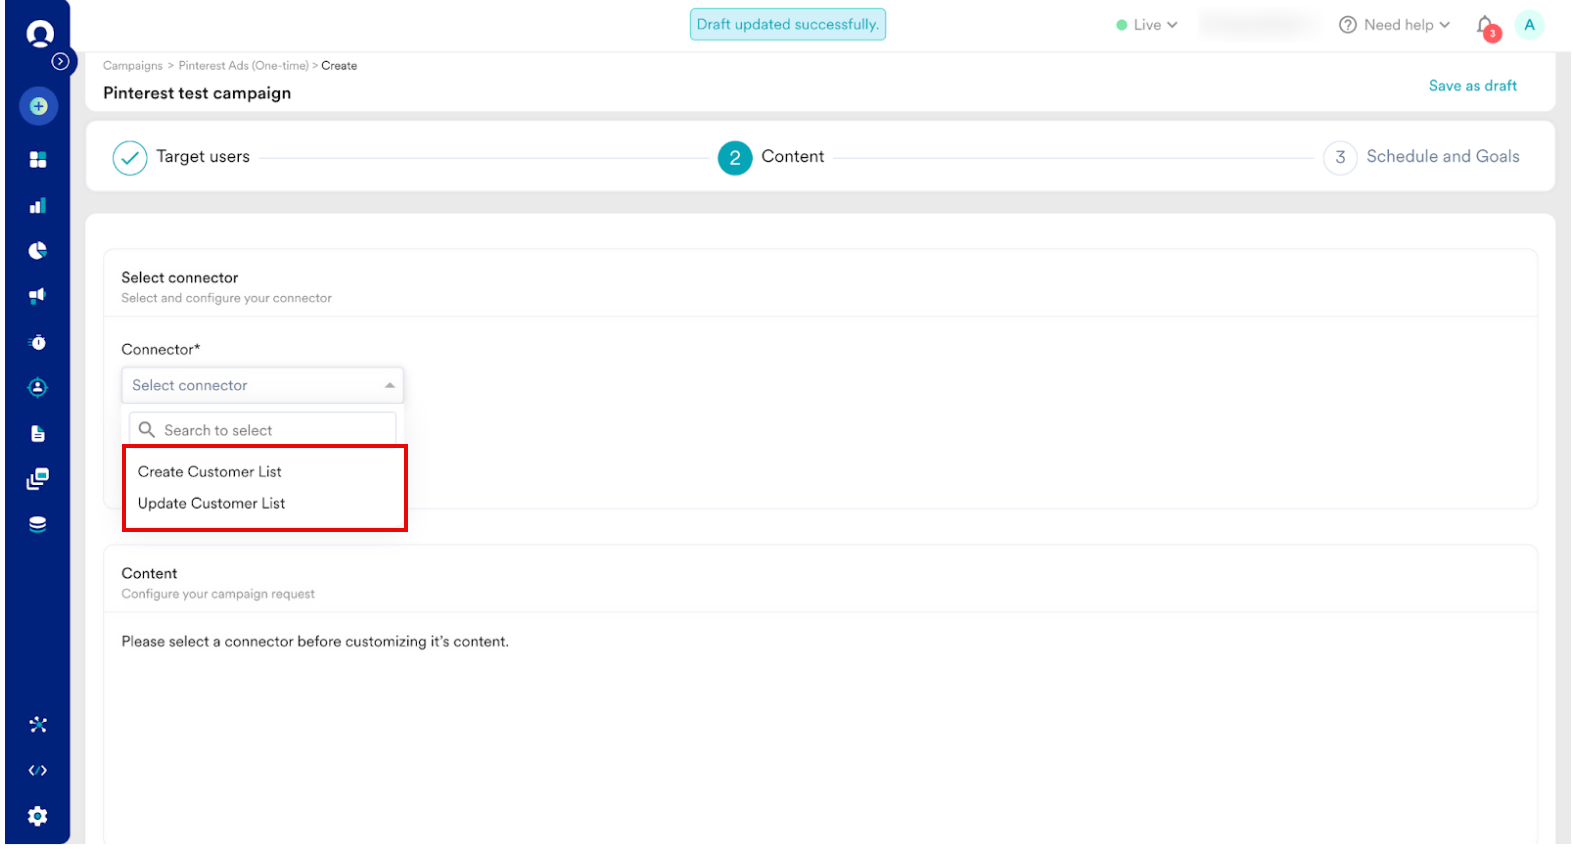
6. In step 2 of the campaign, **Content** , select the pre-configured connectors and specify the content you want to send out. Enter the following details:
| Field | Description |
| --------------- | ------------------------------------------------------------------------------------------------------------------ |
| **Connector** | You can perform the following actions: - **Create Customer List**
- **Update Customer List**
|
| **Connections** | Select the connection you’ve added to the MoEngage App marketplace. |
 Based on the connector you select, you must provide the following information:
| Field | Description |
| :--------------------- | :-------------------------------------------------------------------------------------------------------------------- |
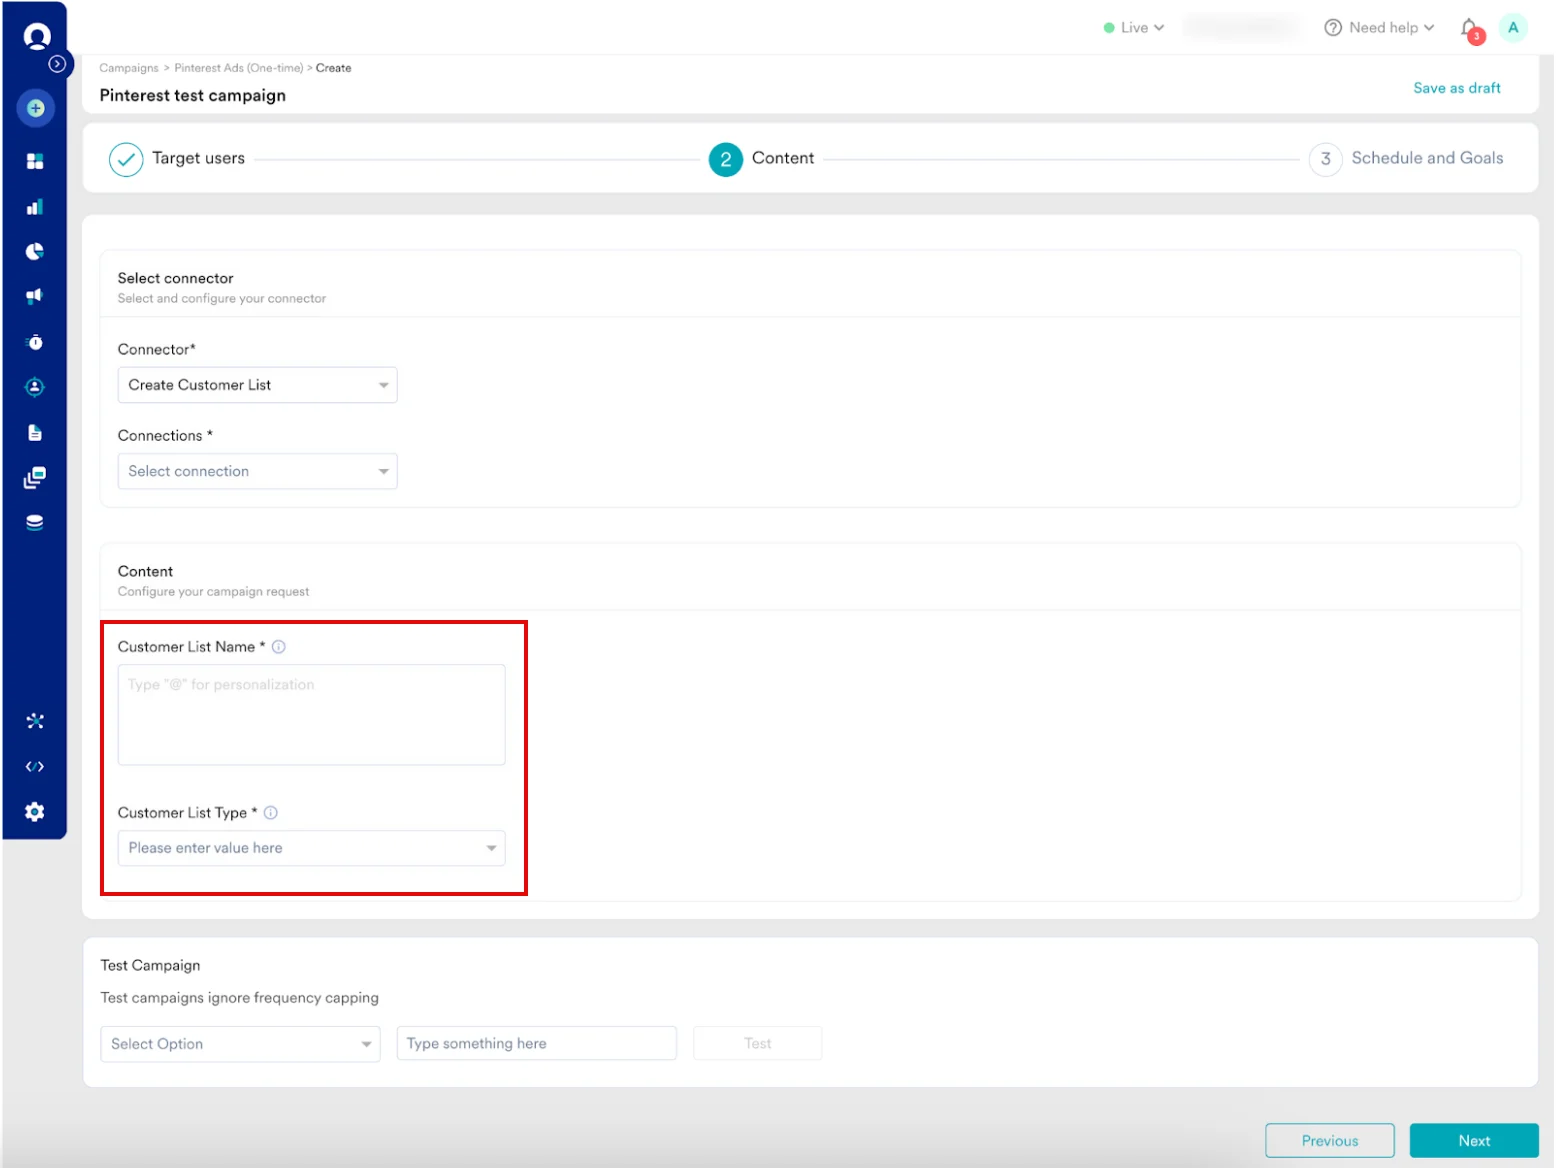
| **Customer List Name** | This is the name of your Customer List. This creates a new Customer List with the provided name. |
| **Customer List Type** | Select the intended identifier type for this new customer list. By default, all identifiers are hashed using SHA-256. |
Based on the connector you select, you must provide the following information:
| Field | Description |
| :--------------------- | :-------------------------------------------------------------------------------------------------------------------- |
| **Customer List Name** | This is the name of your Customer List. This creates a new Customer List with the provided name. |
| **Customer List Type** | Select the intended identifier type for this new customer list. By default, all identifiers are hashed using SHA-256. |
 | **Field** | **Description** |
| -------------------------- | ------------------------------------------------------------------------------------------------------------------------------------------------------------------------------------------------ |
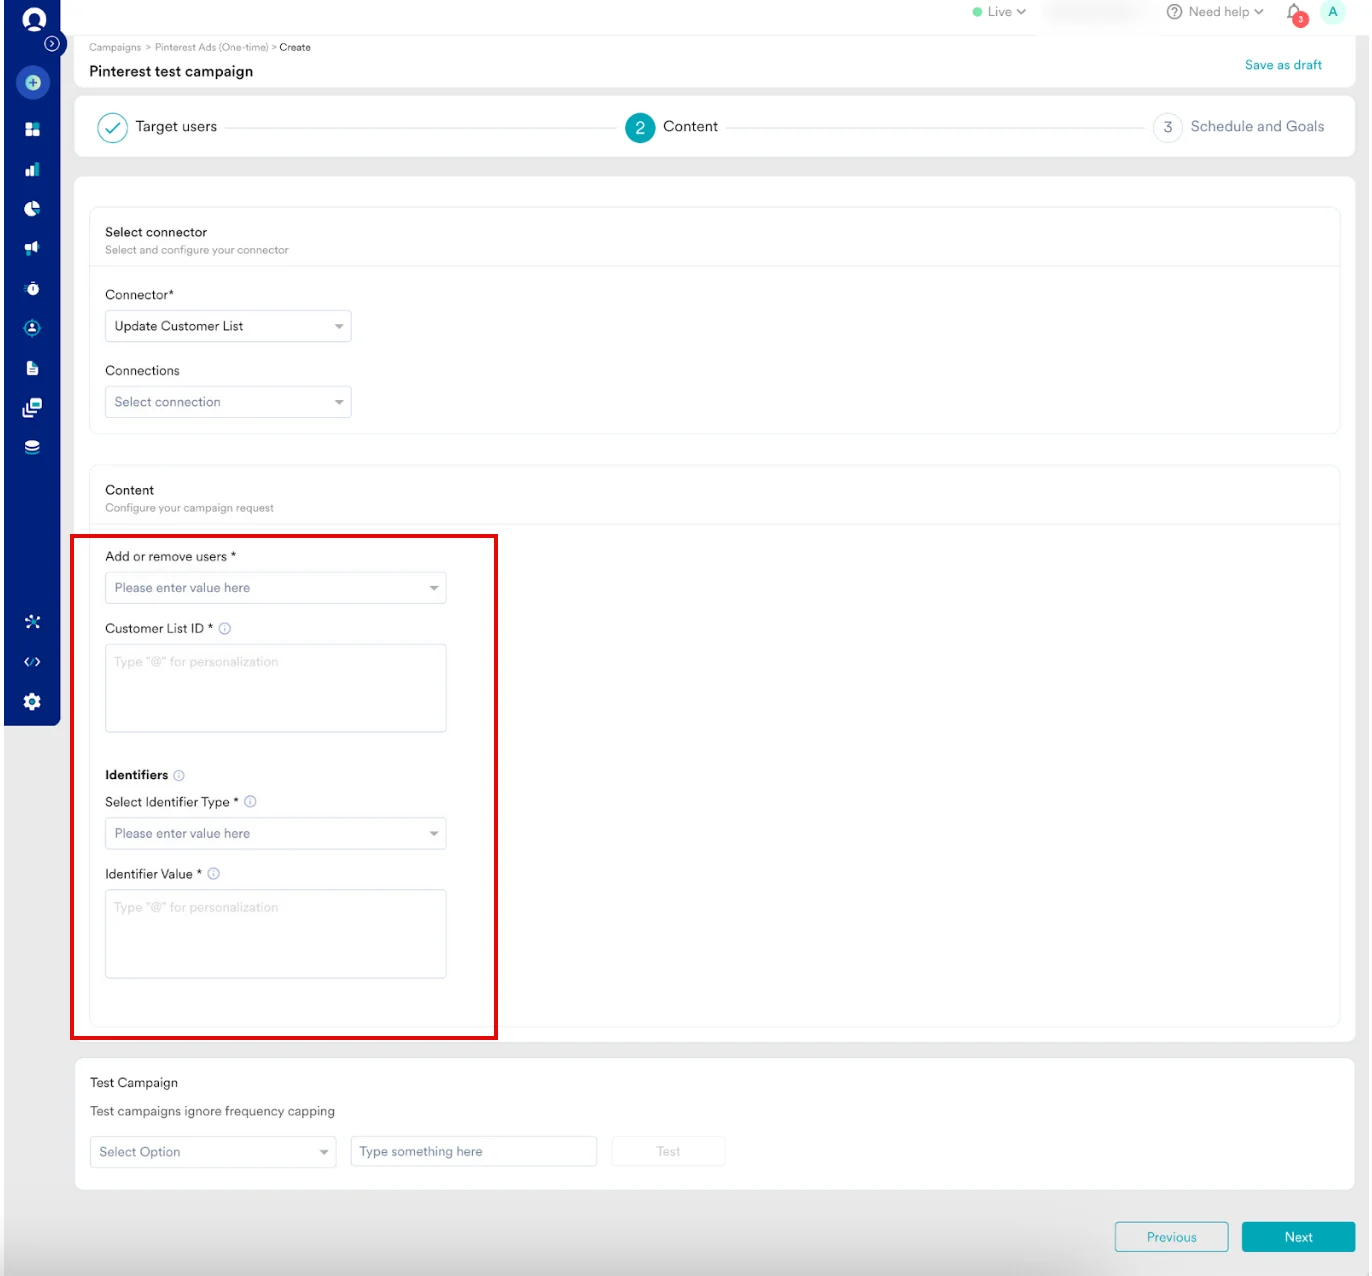
| **Add or remove users** | Select whether you want to add or remove users from your Customer List. |
| **Customer List ID** | This the ID of your Customer List. |
| **Select Identifier Type** | Select the identifier type to match users on Pinterest. MoEngage supports two identifiers:
| **Field** | **Description** |
| -------------------------- | ------------------------------------------------------------------------------------------------------------------------------------------------------------------------------------------------ |
| **Add or remove users** | Select whether you want to add or remove users from your Customer List. |
| **Customer List ID** | This the ID of your Customer List. |
| **Select Identifier Type** | Select the identifier type to match users on Pinterest. MoEngage supports two identifiers: - Email ID
- Google Advertiser ID.
|
| **Identifier Value** | Type **@** and select the user attribute that contains the identifier value. By default, you can use “Email (Standard)” for Email and “Google Advertiser ID (Android)” for Google Advertiser ID. |
 7. Your campaign is now ready to be tested and sent to your audience. Using the **Test** functionality, you can also test your connector configuration.
  If your test user successfully receives the message, your setup is ready.
8. Publish the campaign.
**Note** : If you're creating a new audience, do not publish the campaign.
## Step 4: View Your Pinterest Ads Audience Segments
In your Pinterest Ads Manager account, select **Business Manager** > **Audience** to view the size of each audience.
If your test user successfully receives the message, your setup is ready.
8. Publish the campaign.
**Note** : If you're creating a new audience, do not publish the campaign.
## Step 4: View Your Pinterest Ads Audience Segments
In your Pinterest Ads Manager account, select **Business Manager** > **Audience** to view the size of each audience.