> ## Documentation Index
> Fetch the complete documentation index at: https://moengage.com/docs/llms.txt
> Use this file to discover all available pages before exploring further.
# Truecaller
> Connect Truecaller Verified Campaigns to MoEngage to deliver trust-backed, personalized campaigns across Caller ID, call screens, and verified messages.
[Truecaller](https://business.truecaller.com) Verified Campaigns is an advanced customer engagement platform that allows businesses to deliver hyper-personalized, contextual digital experiences using the Truecaller application. By converting standard business communication into trust-backed touchpoints, enterprises can increase brand awareness and conversion rates during critical communication moments.
# MoEngage X Truecaller
This integration sends real-time outbound data from MoEngage to Truecaller, triggering tailored campaigns across native application interfaces.
## Use cases
Integrating Truecaller Verified Campaigns with MoEngage helps you address the following use cases:
* **Deliver hyper-personalized communication**: Reach customers directly during critical moments across voice calls and SMS.
* **Rich media engagement:** Convert traditional communication channels into interactive brand experiences using media templates and multi-format displays.
* **Inspire trust with native visibility:** Use Truecaller's trusted ecosystem (Verified Caller ID, Post/Missed Call screens) to help ensure brand safety and build customer confidence before they even engage.
* **Automate lifecycle segments in real time**: Deliver contextual offers, onboarding messages, and transactional reminders to dynamic target audiences.
## Supported Touchpoints
The table below details the native Truecaller touchpoints available for your campaigns:
| Interface Name | Functional Description |
| ----------------------- | ------------------------------------------------------------------------------------------------------------------------------- |
| **Verified Caller ID** | Displays a verified badge, logo, and brand name on incoming calls to establish immediate credibility. |
| **Post-Call Screen** | Triggers promotional pop-ups or deep-linked calls to action directly after a call is completed. |
| **Missed Call Screen** | Engages users immediately after a call is missed by displaying branded messages, and contextual CTAs. |
| **Verified Message ID** | Enhances SMS trust by replacing unknown sender numbers with your verified brand identity. |
| **Business Page** | Dedicated brand presence within Truecaller, allowing users to discover company information, contact details, website links, etc |
# Integration
**Prerequisites**
* **Active subscriptions**: Your organization must have active enterprise subscriptions for both Truecaller Verified Calling and Truecaller Verified Campaigns. If you do not have an active account or subscription, contact the Truecaller business team at [business@truecaller.com](mailto:business@truecaller.com).
* **Administrative access**: Access the Truecaller for Business Console to retrieve Webhook credentials.
## Step 1: Retrieve API Credentials
To retrieve your API credentials from Truecaller, perform the following steps:
1. Log in to the [Truecaller for Business Console](https://business.truecaller.com).
2. In the left navigation pane, click **Verified Campaigns**, and then click **Webhook Setup**.
3. Copy and save the following credentials:
* **Organization ID**: A unique 16-digit UUID.
* **Webhook Token**: A secure API communication token.
For more information, refer to [Webhook Token Regeneration | Verified Campaigns | Truecaller for Business](https://docs.truecaller.com/truecaller-for-business/verified-campaigns/api-webhook-documentation/webhook-connectors/webhook-token-regeneration).
## Step 2: Generate the Campaign JSON Payload
To generate the payload for your campaign, perform the following steps:
1. In the **Truecaller for Business Console**, click **Verified Campaigns**, and then click **Template Generator**.
2. In Step 1 (the campaign identifiers and use case section), enter your identifiers:
* In the **Campaign name** box, type a descriptive name for your campaign.
* In the **Campaign ID** box, type a unique campaign identifier.
* Select either the **Manage lifecycle** option or the **Show offers** option, depending on your campaign use case.
3. In Step 2 (the define interaction section), select where you want to introduce verified campaigns, such as **Caller ID**, **Universal ACS**, or **Missed Call ACS**.
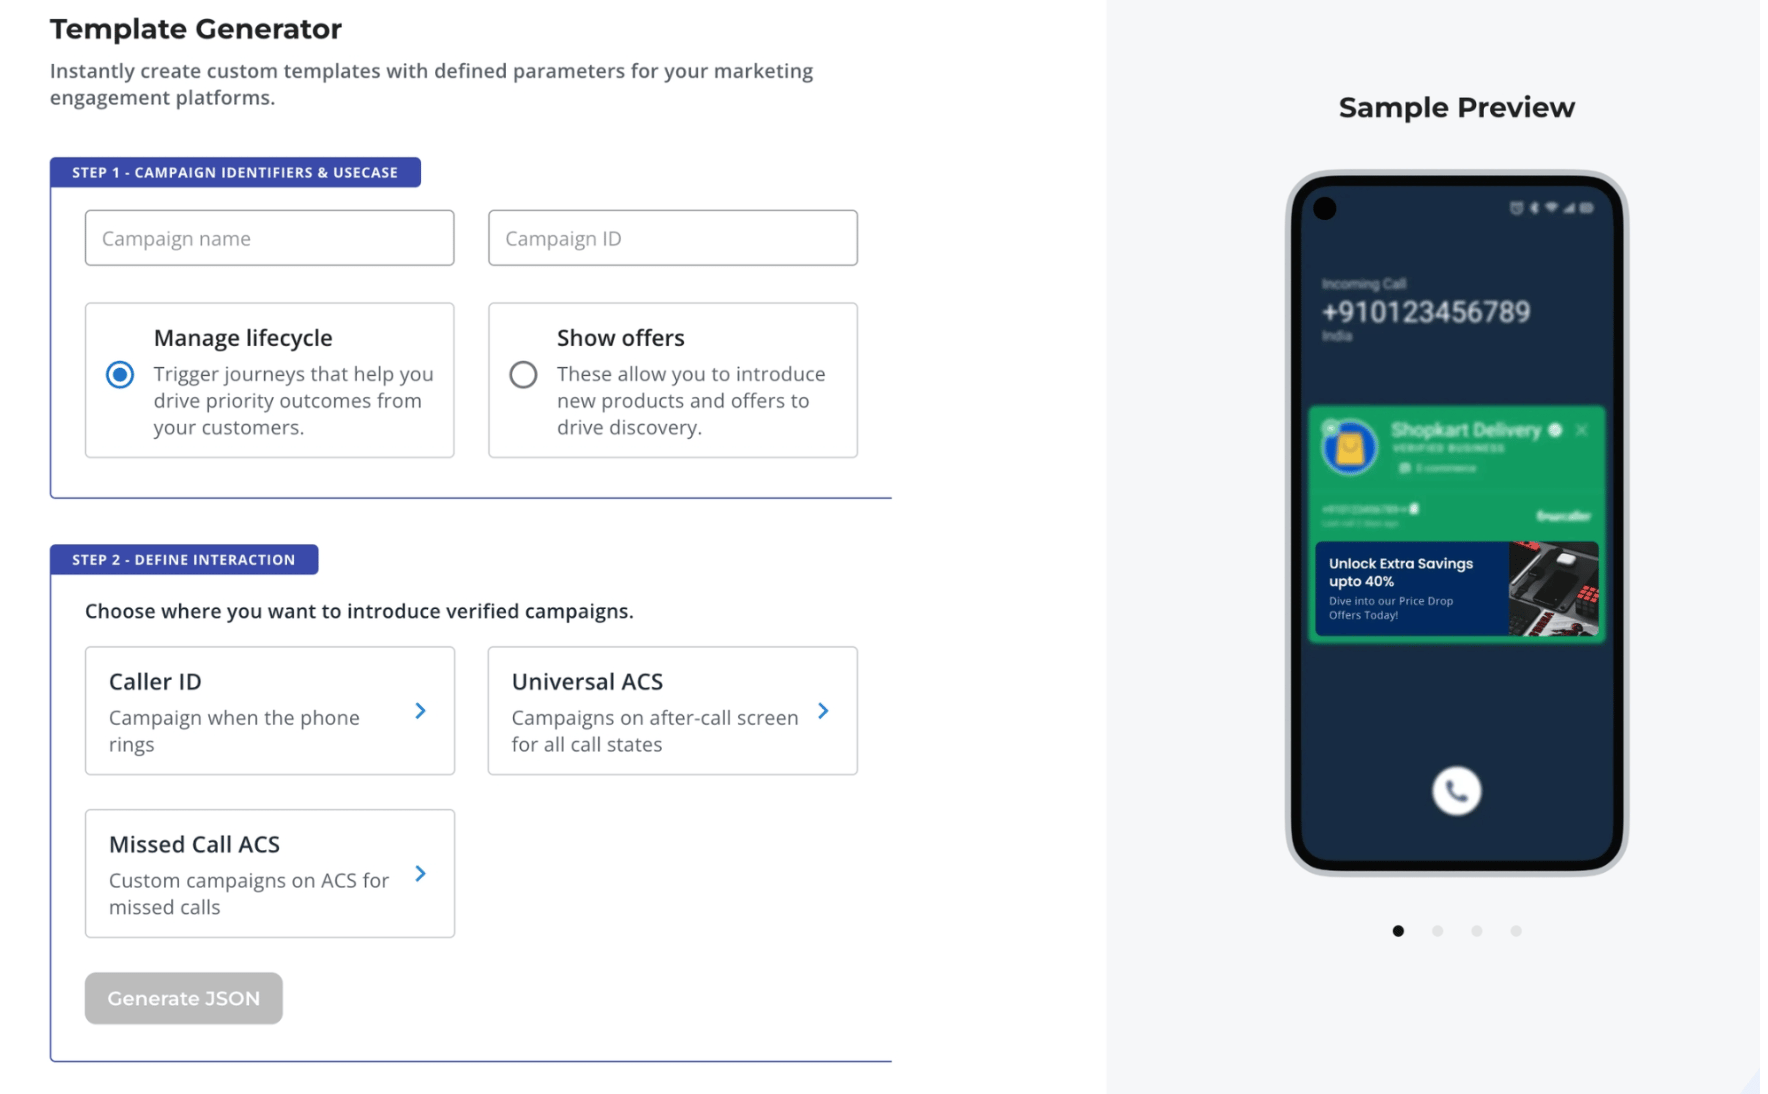 4. On the template configuration page, configure your display units, title, subtitle, and deep links. Then, upload your required brand assets on the **Assets** page.
5. Click **Generate JSON** to open the **Preview** dialog box. Review the interactive device preview mockup, then click **Copy** to paste the payload to your clipboard.
4. On the template configuration page, configure your display units, title, subtitle, and deep links. Then, upload your required brand assets on the **Assets** page.
5. Click **Generate JSON** to open the **Preview** dialog box. Review the interactive device preview mockup, then click **Copy** to paste the payload to your clipboard.
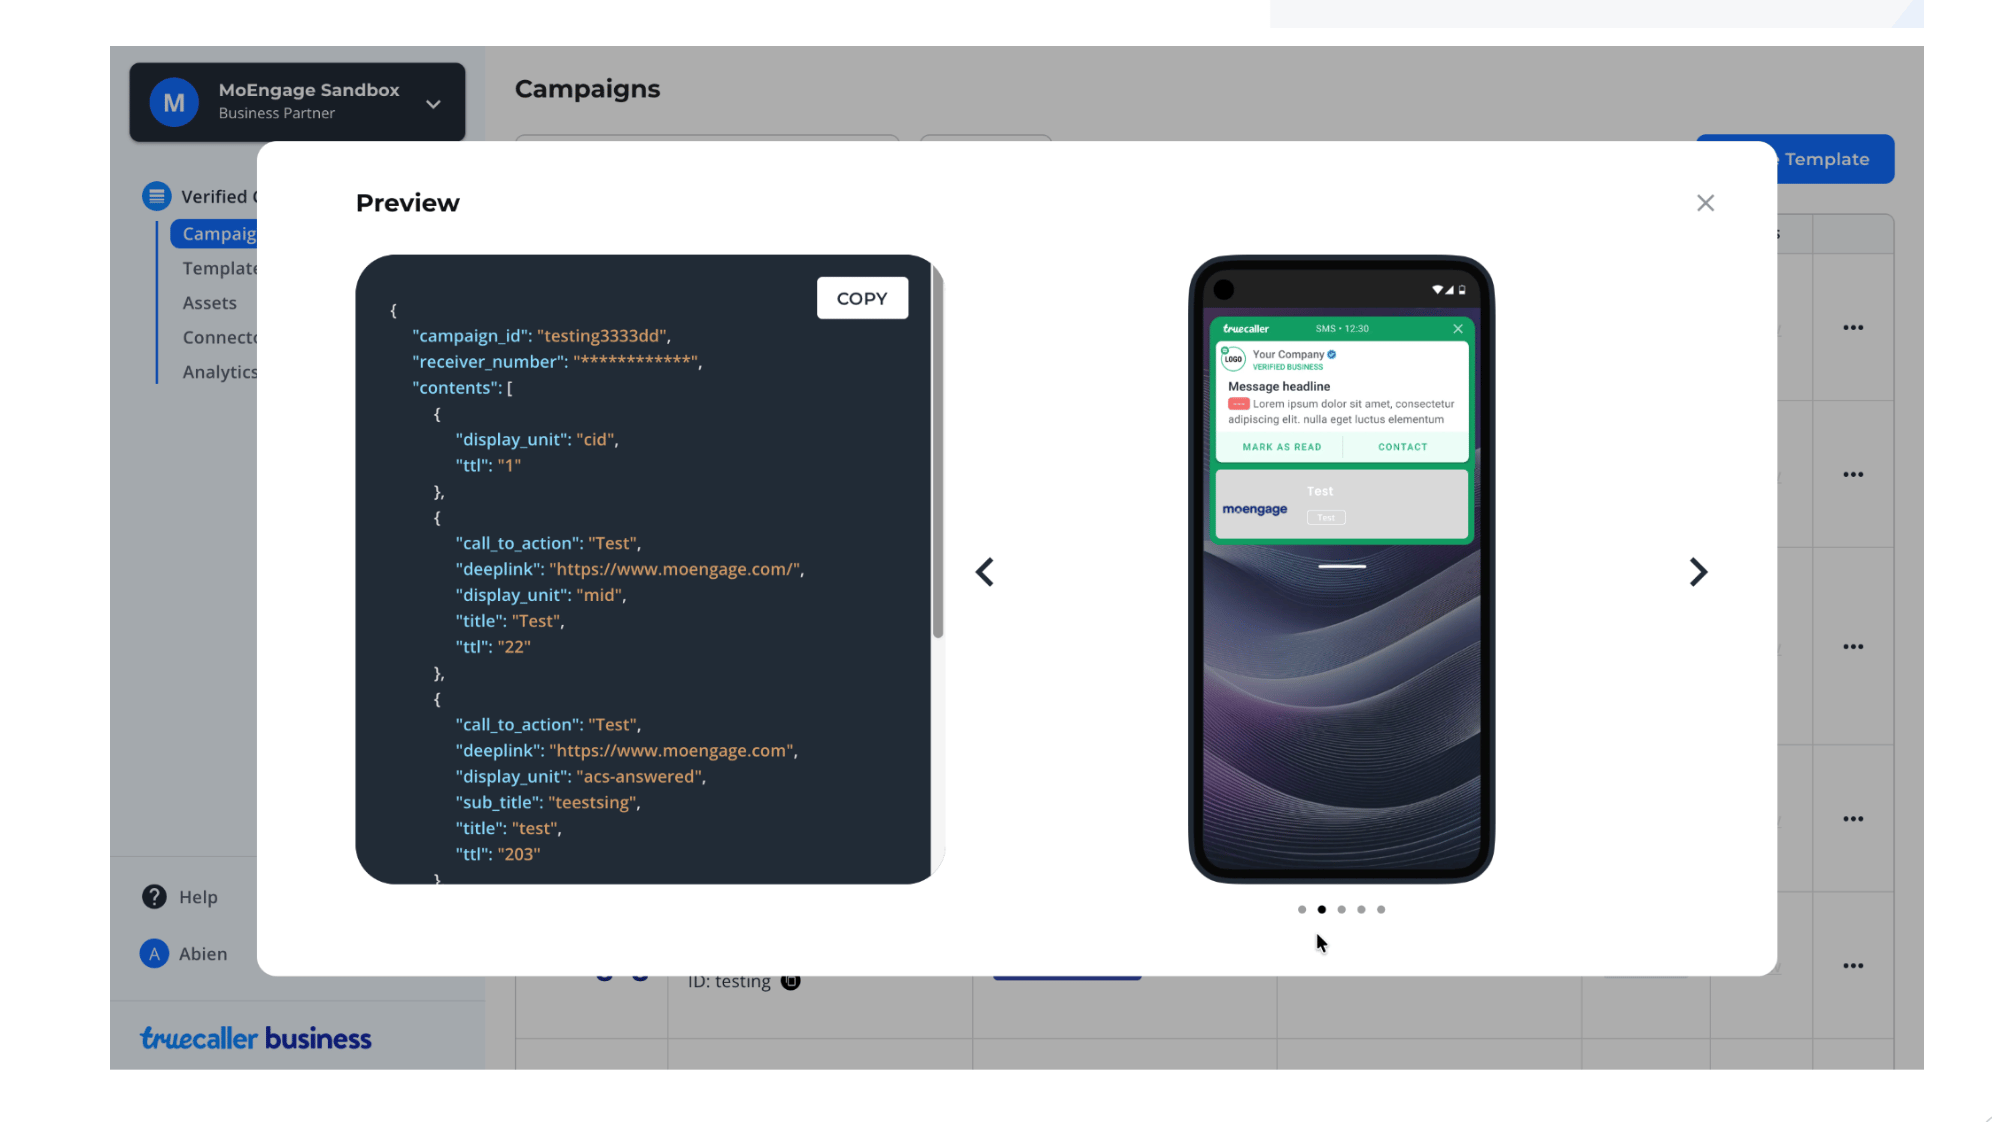 6. Review the payload format in your text editor to verify that all fields, identifiers, and assets are structured correctly.
For more information, refer to [Campaign Payload | Verified Campaigns | Truecaller for Business](https://docs.truecaller.com/truecaller-for-business/verified-campaigns/api-webhook-documentation/campaign-payload).
## Step 3: Configure MoEngage App Marketplace
Connect Truecaller to your MoEngage workspace to start running campaign touchpoints.
To configure the integration on your MoEngage UI, perform the following steps:
1. On the left navigation pane, click **App Marketplace**.
2. On the **App Marketplace** page, search for **Truecaller**, and then click the **Truecaller** tile.
3. Click the **Integrate** tab, and then click **Create Campaigns**.
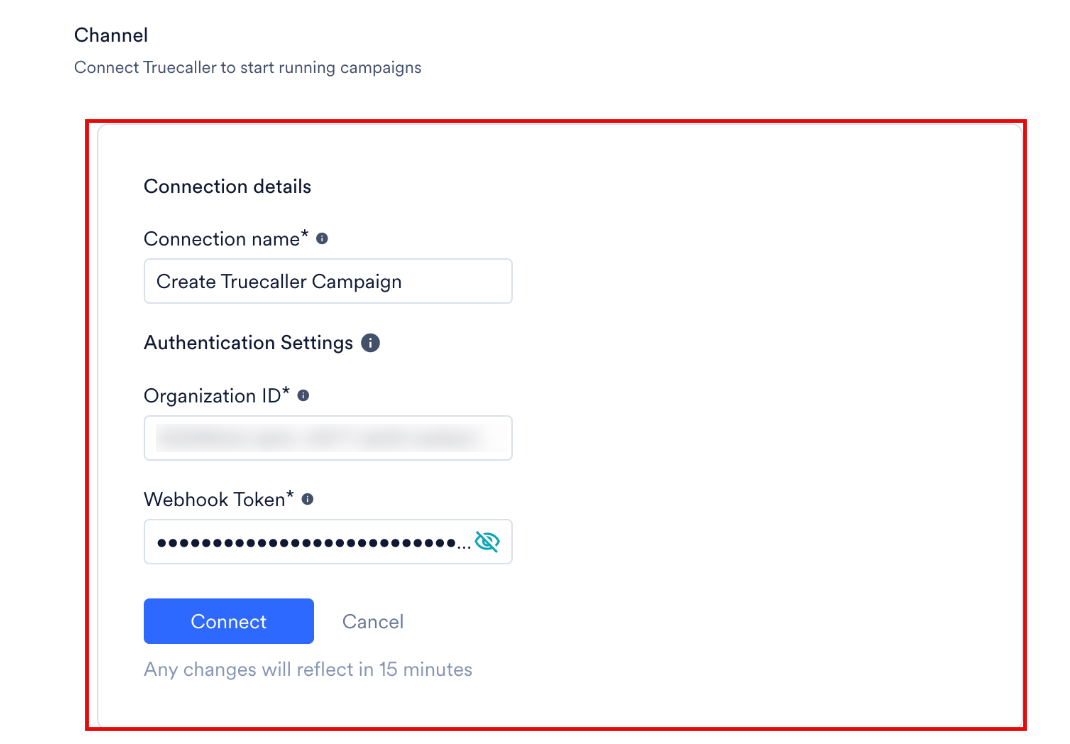
4. In the **Connection details** section, configure the following settings:
| Field | Required | Description |
| ------------------- | -------- | ----------------------------------------------------------------------------------------------- |
| **Connection name** | Yes | The custom name of the Truecaller connection, such as **Create Truecaller Campaign**. |
| **Organization ID** | Yes | The 16-digit UUID you retrieved in [Step 1](#step-1-retrieve-api-credentials). |
| **Webhook Token** | Yes | The secure API communication token you retrieved in [Step 1](#step-1-retrieve-api-credentials). |
5. Click **Connect**.
6. Review the payload format in your text editor to verify that all fields, identifiers, and assets are structured correctly.
For more information, refer to [Campaign Payload | Verified Campaigns | Truecaller for Business](https://docs.truecaller.com/truecaller-for-business/verified-campaigns/api-webhook-documentation/campaign-payload).
## Step 3: Configure MoEngage App Marketplace
Connect Truecaller to your MoEngage workspace to start running campaign touchpoints.
To configure the integration on your MoEngage UI, perform the following steps:
1. On the left navigation pane, click **App Marketplace**.
2. On the **App Marketplace** page, search for **Truecaller**, and then click the **Truecaller** tile.
3. Click the **Integrate** tab, and then click **Create Campaigns**.
4. In the **Connection details** section, configure the following settings:
| Field | Required | Description |
| ------------------- | -------- | ----------------------------------------------------------------------------------------------- |
| **Connection name** | Yes | The custom name of the Truecaller connection, such as **Create Truecaller Campaign**. |
| **Organization ID** | Yes | The 16-digit UUID you retrieved in [Step 1](#step-1-retrieve-api-credentials). |
| **Webhook Token** | Yes | The secure API communication token you retrieved in [Step 1](#step-1-retrieve-api-credentials). |
5. Click **Connect**.
 Your Truecaller connection is now integrated. \
**Note**: Changes can take up to 15 minutes to appear in your workspace.
**Warning: Webhook Token Invalidation**
Regenerating your Webhook Token inside the Truecaller for Business Console immediately invalidates your previous token. Any active MoEngage campaigns that use the old token fail to authenticate. If you regenerate a token, update the MoEngage App Marketplace configuration immediately.
## Step 4: Create a Campaign in MoEngage
To deliver your Truecaller campaigns to users, perform the following steps:
1. In the left navigation menu in the MoEngage UI, click **Engage**, and then click **Campaigns**.
2. On the **All campaigns** page, click **+ Create campaign**.
3. In the **Create campaign** dialog box, under **Connected Apps**, click **Truecaller**, and then click the most suitable delivery type.
4. Under **Select audience**, click **Filter users by** to define your target audience, and then click **Next** to proceed to the **Content** section.
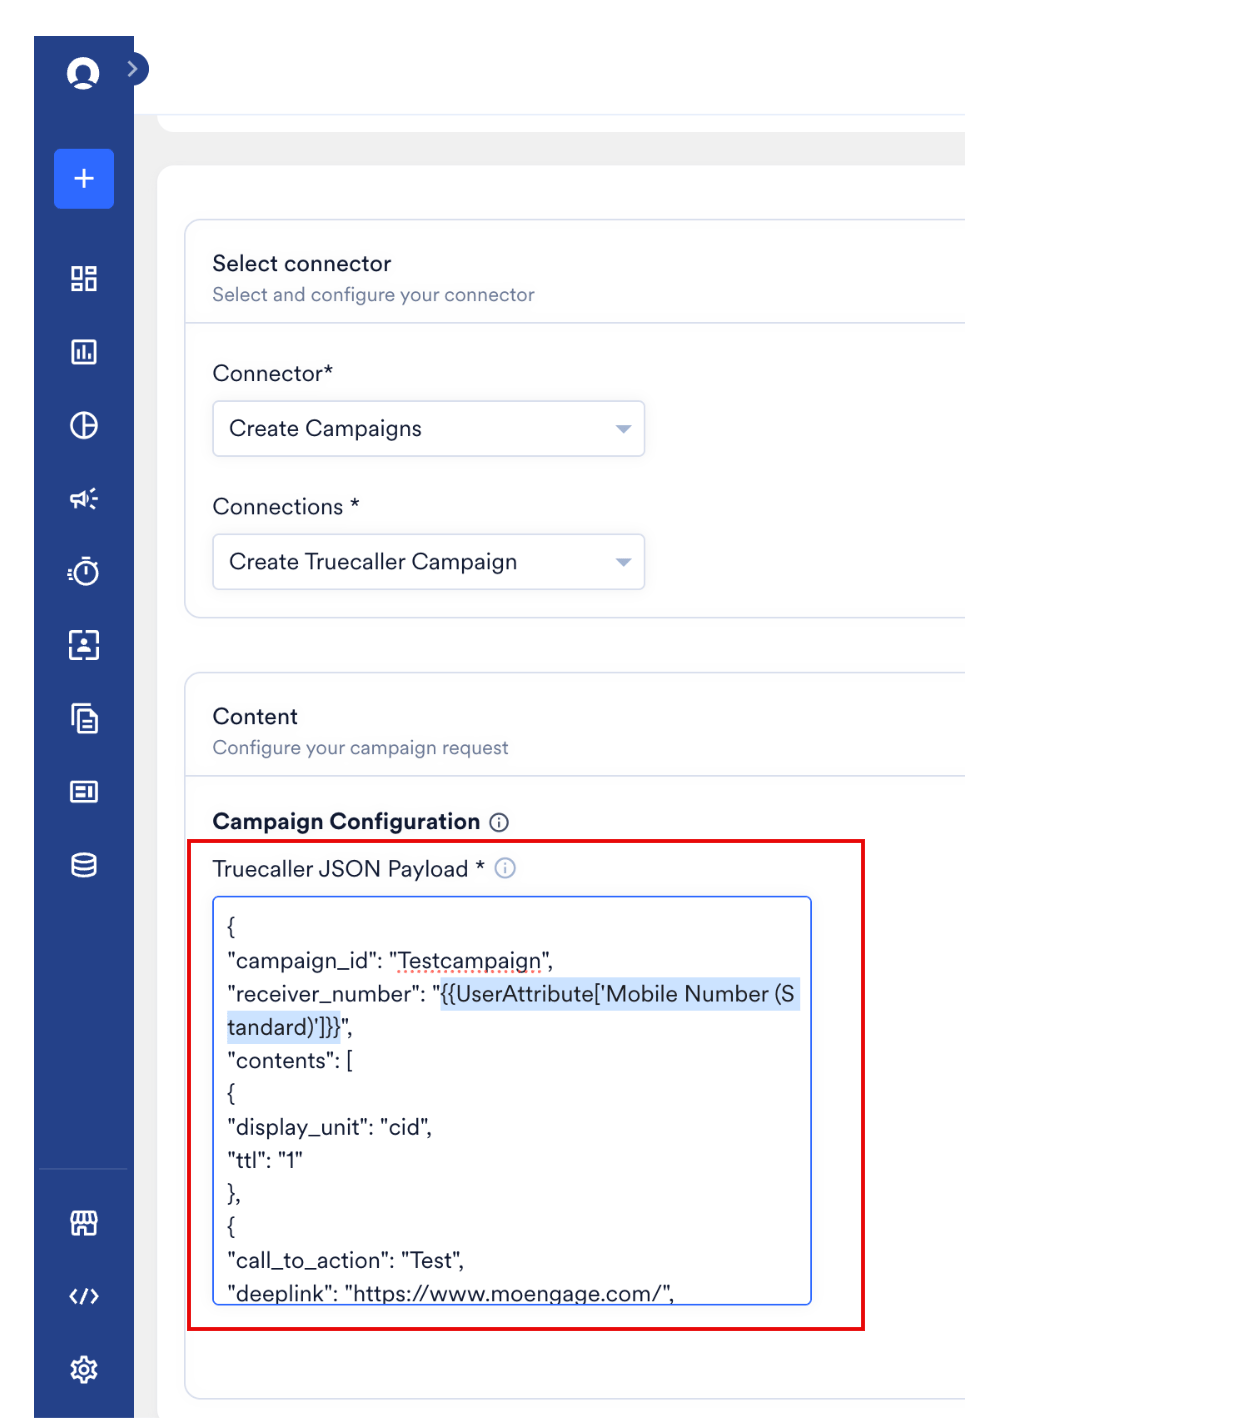
5. In the **Select connector** section, select **Create Campaigns** as the **Connector**, and select the appropriate connection from the **Connections** list, such as **Create Truecaller Campaign**.
6. In the **Content** section, under **Campaign Configuration**, locate the **Truecaller JSON Payload** box.
Your Truecaller connection is now integrated. \
**Note**: Changes can take up to 15 minutes to appear in your workspace.
**Warning: Webhook Token Invalidation**
Regenerating your Webhook Token inside the Truecaller for Business Console immediately invalidates your previous token. Any active MoEngage campaigns that use the old token fail to authenticate. If you regenerate a token, update the MoEngage App Marketplace configuration immediately.
## Step 4: Create a Campaign in MoEngage
To deliver your Truecaller campaigns to users, perform the following steps:
1. In the left navigation menu in the MoEngage UI, click **Engage**, and then click **Campaigns**.
2. On the **All campaigns** page, click **+ Create campaign**.
3. In the **Create campaign** dialog box, under **Connected Apps**, click **Truecaller**, and then click the most suitable delivery type.
4. Under **Select audience**, click **Filter users by** to define your target audience, and then click **Next** to proceed to the **Content** section.
5. In the **Select connector** section, select **Create Campaigns** as the **Connector**, and select the appropriate connection from the **Connections** list, such as **Create Truecaller Campaign**.
6. In the **Content** section, under **Campaign Configuration**, locate the **Truecaller JSON Payload** box.
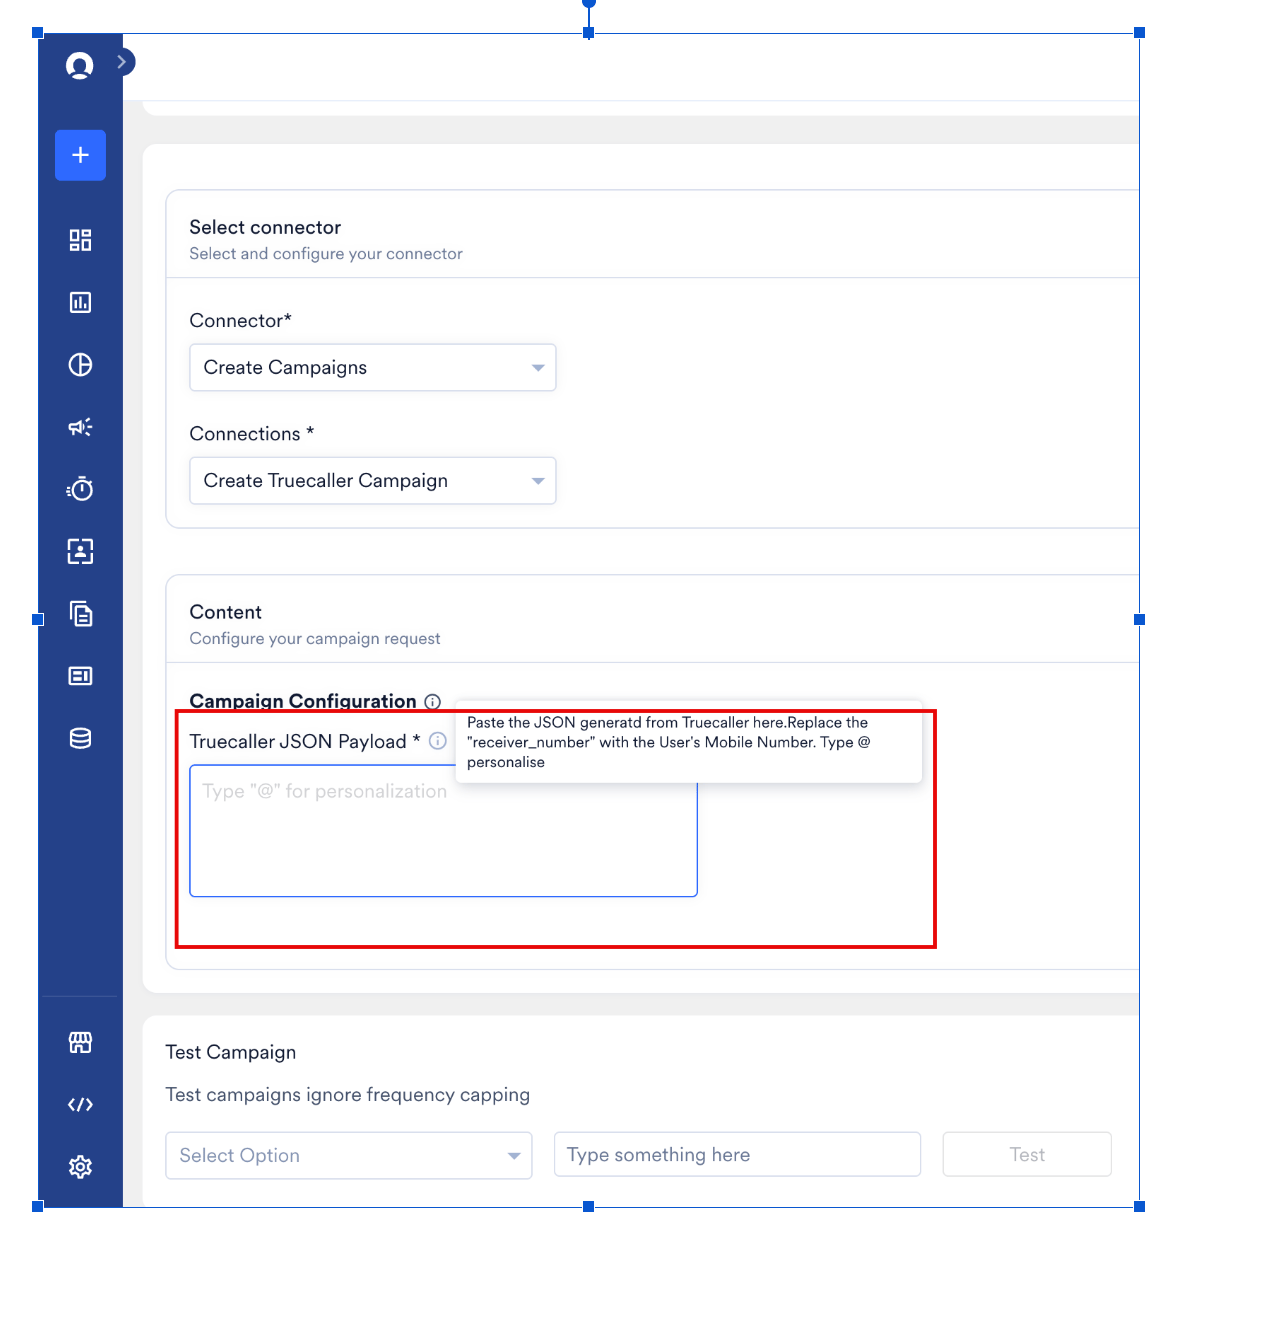 7. Paste the JSON payload you copied in Step 2 into the **Truecaller JSON Payload** box.
8. To personalize the recipient details, update the `receiver_number` key with the MoEngage standardized mobile number attribute: `"receiver_number": "{{UserAttribute['Mobile Number (Standardized)']}}"`. You can use the @ key in the text box to search for and select other user attributes if you use a different custom phone number attribute.
7. Paste the JSON payload you copied in Step 2 into the **Truecaller JSON Payload** box.
8. To personalize the recipient details, update the `receiver_number` key with the MoEngage standardized mobile number attribute: `"receiver_number": "{{UserAttribute['Mobile Number (Standardized)']}}"`. You can use the @ key in the text box to search for and select other user attributes if you use a different custom phone number attribute.
 9. Your campaign is now ready to be tested and sent to your audience. In the **Test Campaign** section, you can test your connector configuration:
* In the **Select Option** list, select the user attribute that represents the recipient's phone number.
* In the text box, type a test user's standardized phone number.
* Click **Test**. If your test user successfully receives the message, your setup is ready.
After you have verified the test message, publish the campaign.
**Note: Phone Number Formatting**
Truecaller supports mobile numbers formatted in the international E.164 standard. A plus sign (+) prefix with the country code, such as `+15550123456`, is also accepted.
9. Your campaign is now ready to be tested and sent to your audience. In the **Test Campaign** section, you can test your connector configuration:
* In the **Select Option** list, select the user attribute that represents the recipient's phone number.
* In the text box, type a test user's standardized phone number.
* Click **Test**. If your test user successfully receives the message, your setup is ready.
After you have verified the test message, publish the campaign.
**Note: Phone Number Formatting**
Truecaller supports mobile numbers formatted in the international E.164 standard. A plus sign (+) prefix with the country code, such as `+15550123456`, is also accepted.