> ## Documentation Index
> Fetch the complete documentation index at: https://moengage.com/docs/llms.txt
> Use this file to discover all available pages before exploring further.
# Zendesk
# Introduction
[Zendesk](https://www.zendesk.com/in/service-suite/#channels) is an AI-powered customer service platform that unifies conversations from all channels into a single view. The MoEngage integration uses Zendesk Webhooks and Triggers to sync real-time user and ticket data directly to the MoEngage platform. This empowers teams to launch personalized campaigns based on customer support activities.
# MoEngage × Zendesk
The integration of MoEngage and Zendesk empowers businesses to enhance their customer engagement and support initiatives through seamless data synchronization.
With this integration, you can:
* Synchronize users and ticket event data from Zendesk to MoEngage.
* Automate the creation of support tickets in Zendesk from MoEngage campaigns.
* Import support activities like ticket state updates as behavioral events in MoEngage.
* Trigger contextual campaigns based on support interactions and user lifecycle events.
## Use Cases
Integrating Zendesk with MoEngage helps you solve the following use cases:
* **Support-driven engagement** : When a new ticket is created in Zendesk, push the lead or user data to MoEngage to trigger contextual support follow-up campaigns, like a "Thanks for contacting support, we are working on your issue" message.
* **Ticket state-based campaigns** : When ticket states are updated (e.g., resolved or closed), push this data to MoEngage to automatically send satisfaction surveys (CSAT), upsell campaigns, or re-engagement messages.
* **Push leads and user data** : Automatically sync newly created users and leads from Zendesk to MoEngage using Outbound Series workflows for targeted marketing campaigns and unified user profiles across platforms.
# Sync Data to MoEngage
This section describes how to import user and ticket data from Zendesk into MoEngage. The integration uses Zendesk webhooks and triggers to automatically push real-time data to the MoEngage platform.
Ensure you have the following:
* Administrator access to your Zendesk account.
* A Zendesk plan that includes access to Triggers and Webhooks.
* A common identifier (such as an email address or external ID) to link user profiles between Zendesk and MoEngage.
### Sync Modules
The following table outlines the default sync type for each module:
| Module | MoEngage Sync Type |
| -------------- | ------------------------------------ |
| Users | Users |
| Companies | Users (synced with Users and Events) |
| Tickets | Events |
| Custom Objects | Events (custom) |
The Companies module is supported, and associated company information is synced with your user data to ensure all profiles are up to date.
## Step 1: Get Your MoEngage Endpoint
To get a dedicated endpoint for your integration, please contact the MoEngage Support team. In your request, you must specify the common identifier used to link user profiles between MoEngage and the partner platform.
For example, the common identifier is typically the user's email address or phone number.
## Step 2: Create a Webhook in Zendesk
To create a webhook in Zendesk, perform the following steps:
1. Log in to your **Zendesk Admin Center** dashboard.
2. On the left navigation menu, click the **Apps and integrations** list.
3. In the menu that appears, under the **Webhooks** section, click **Webhooks**.
4. On the Webhooks page, click **Create webhook** in the upper-right corner. 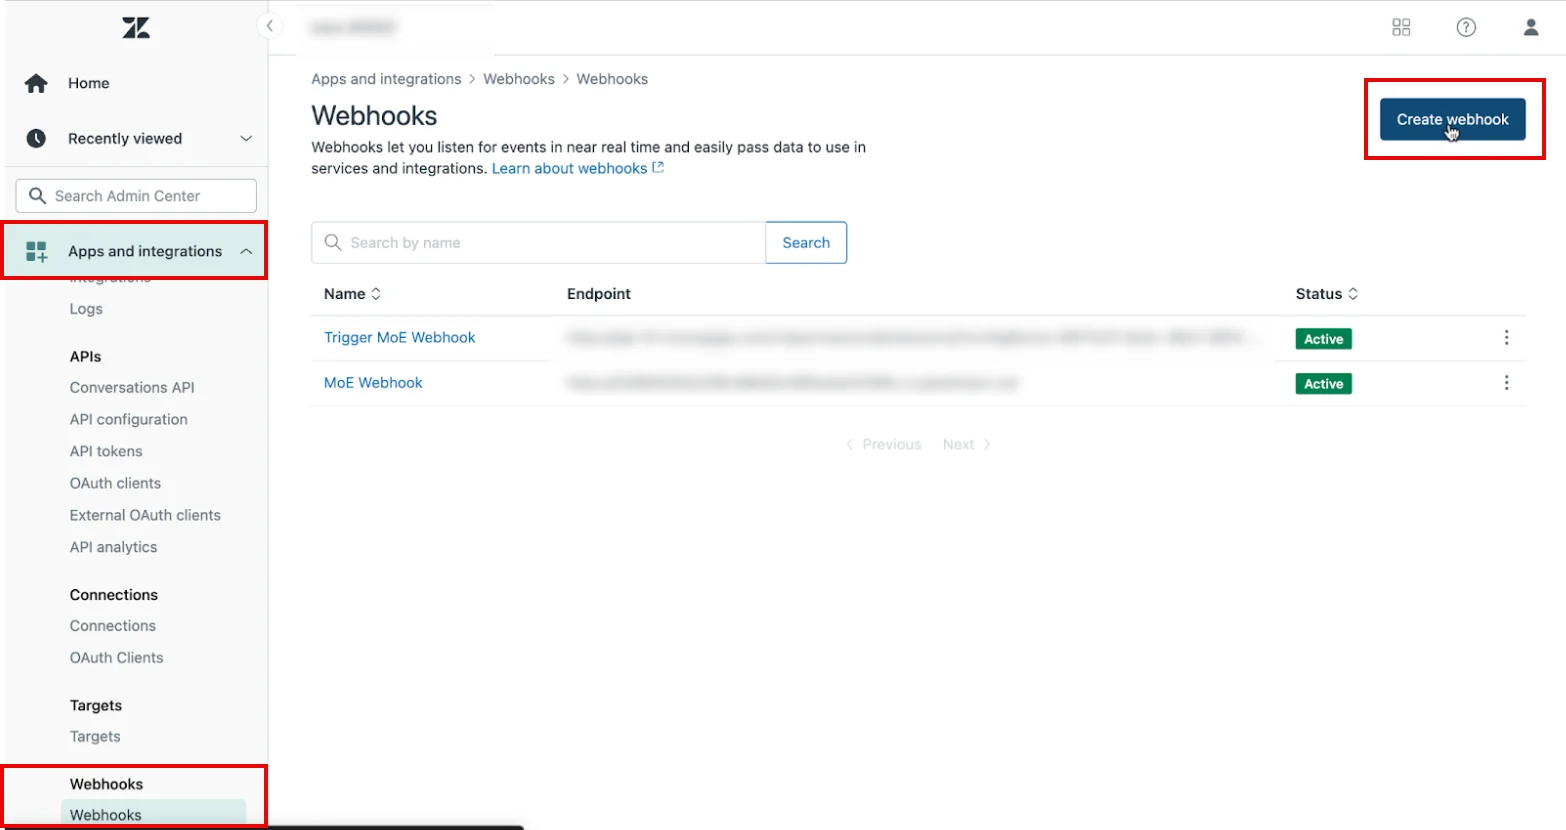 5. On the Create webhook page, under **Select a way to connect** , click the **Trigger or automation Connect the webhook using a business rule** tile.
6. Click **Next**.
5. On the Create webhook page, under **Select a way to connect** , click the **Trigger or automation Connect the webhook using a business rule** tile.
6. Click **Next**. 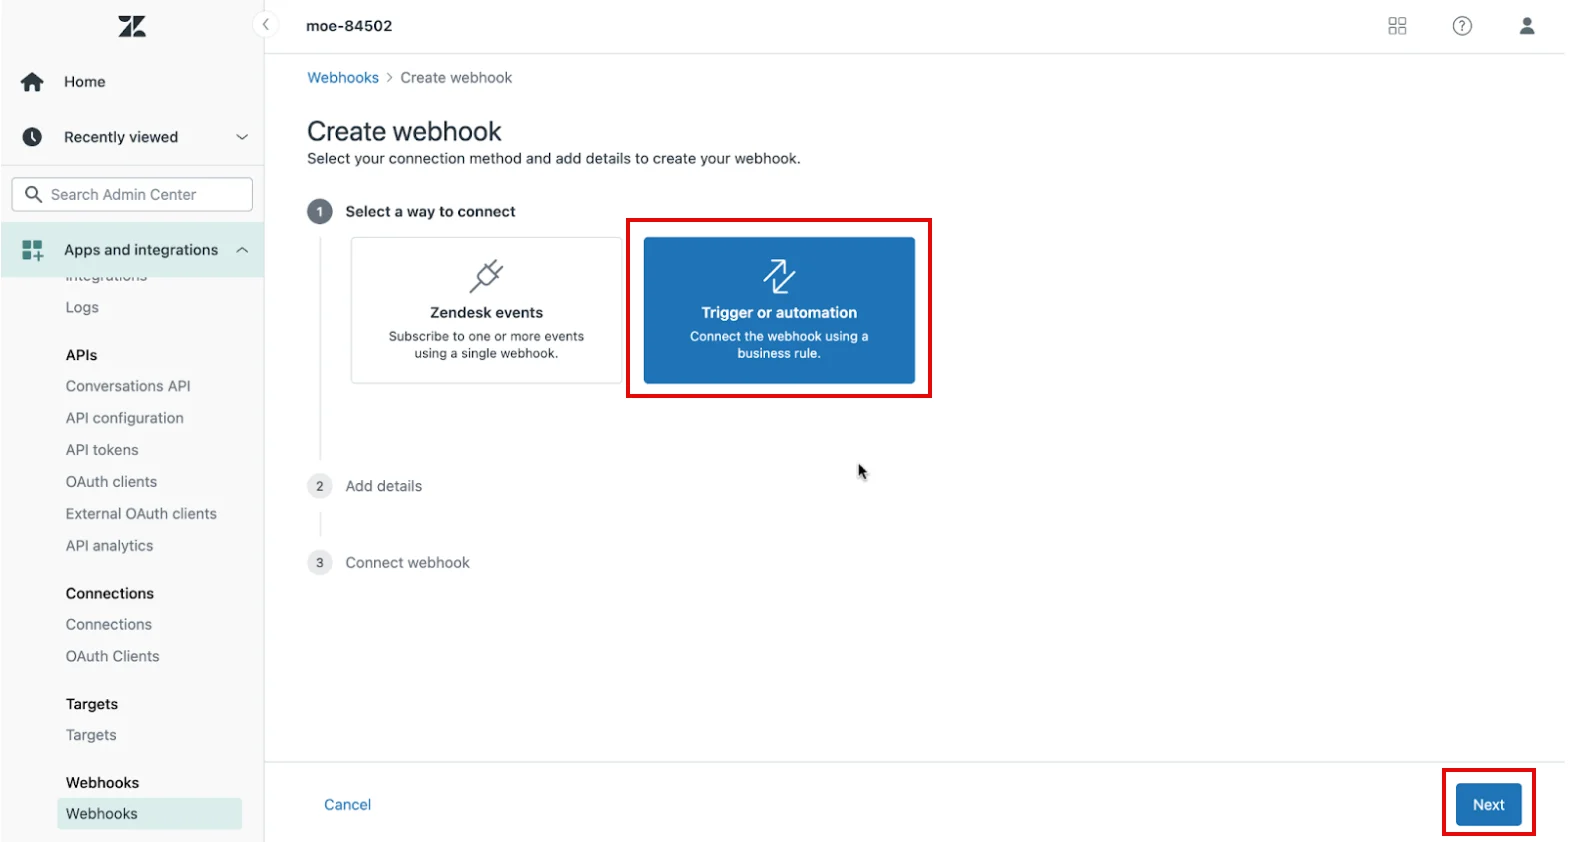 ## Step 3: Configure the Webhook
To configure the webhook, perform the following steps:
1. On the **Create webhook** page, under the **Add details** section, provide the following details:
1. In the **Name (Required)** box, type a name for the destination (for example, MoEngage\_Ticket\_Events).
2. In the **Description** box (optional), add a brief explanation of the webhook's purpose.
3. In the **Endpoint URL**\*(required), enter the webhook URL provided by the MoEngage team. The format is:`https://api-0X.moengage.com/v1/partner/zendesk/{events/user}/?configName={config_name}`
4. In the **Request method**\* list, click **POST**.
5. In the **Request format**\* list, click **JSON**.
## Step 3: Configure the Webhook
To configure the webhook, perform the following steps:
1. On the **Create webhook** page, under the **Add details** section, provide the following details:
1. In the **Name (Required)** box, type a name for the destination (for example, MoEngage\_Ticket\_Events).
2. In the **Description** box (optional), add a brief explanation of the webhook's purpose.
3. In the **Endpoint URL**\*(required), enter the webhook URL provided by the MoEngage team. The format is:`https://api-0X.moengage.com/v1/partner/zendesk/{events/user}/?configName={config_name}`
4. In the **Request method**\* list, click **POST**.
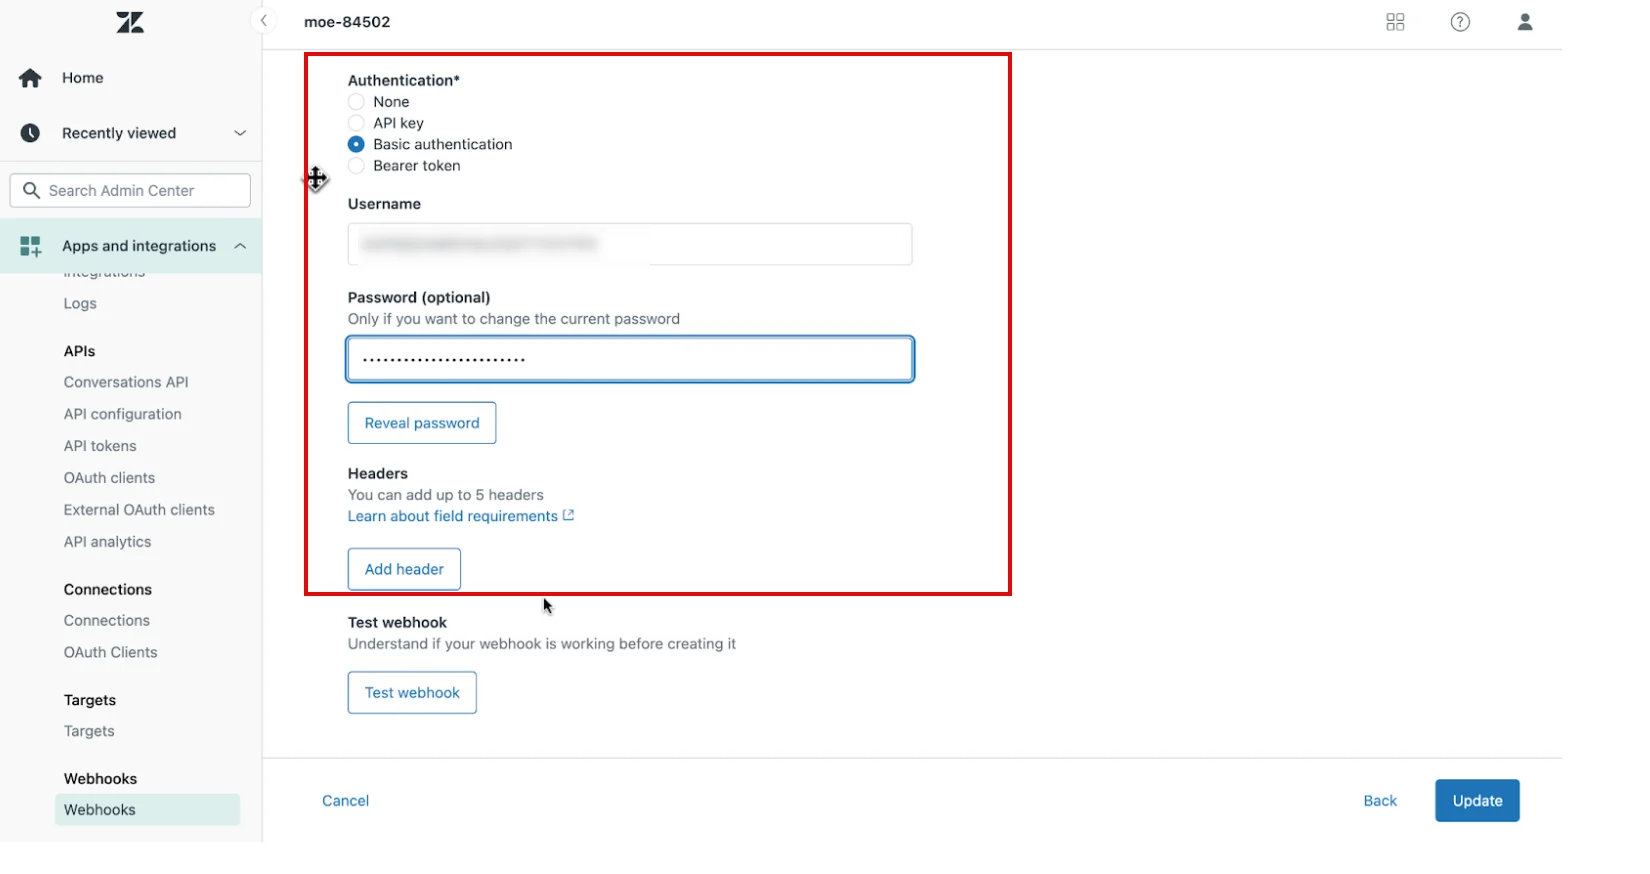
5. In the **Request format**\* list, click **JSON**. 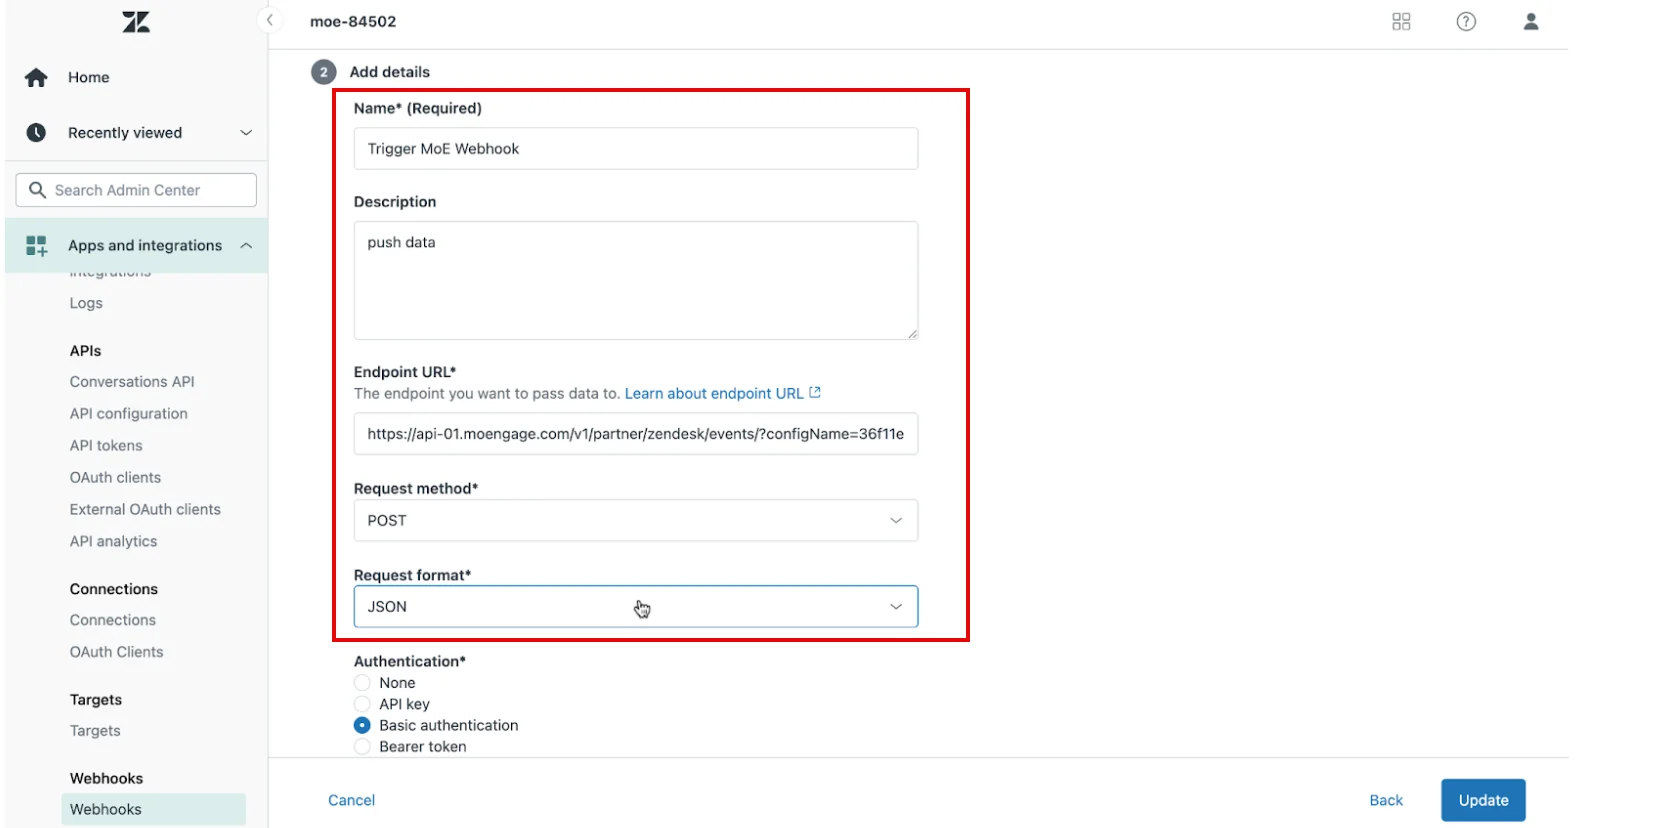 2. In the **Authentication**\* section, provide the following details:
1. Select **Basic authentication**.
2. In the **Username** box, type your MoEngage **Workspace ID**.
3. In the **Password** box, type your **Data API Key**.
To find your credentials, perform the following steps:
1. On the MoEngage UI, navigate to **Settings** > **Account** > **APIs**.
2. Copy the ID under **Workspace ID** (**earlier app id**).
3. Copy the **Data** under **API keys**.
2. In the **Authentication**\* section, provide the following details:
1. Select **Basic authentication**.
2. In the **Username** box, type your MoEngage **Workspace ID**.
3. In the **Password** box, type your **Data API Key**.
To find your credentials, perform the following steps:
1. On the MoEngage UI, navigate to **Settings** > **Account** > **APIs**.
2. Copy the ID under **Workspace ID** (**earlier app id**).
3. Copy the **Data** under **API keys**.
 3. In the **Test webhook** section, provide the following details:
1. Click **Test webhook**. A test configuration dialog box appears.
2. In the **Choose event to test** list, select **Custom test**.
3. In the JSON body section, paste a sample payload from the examples below to send to MoEngage.
4. Click **Send test**.
3. In the **Test webhook** section, provide the following details:
1. Click **Test webhook**. A test configuration dialog box appears.
2. In the **Choose event to test** list, select **Custom test**.
3. In the JSON body section, paste a sample payload from the examples below to send to MoEngage.
4. Click **Send test**. 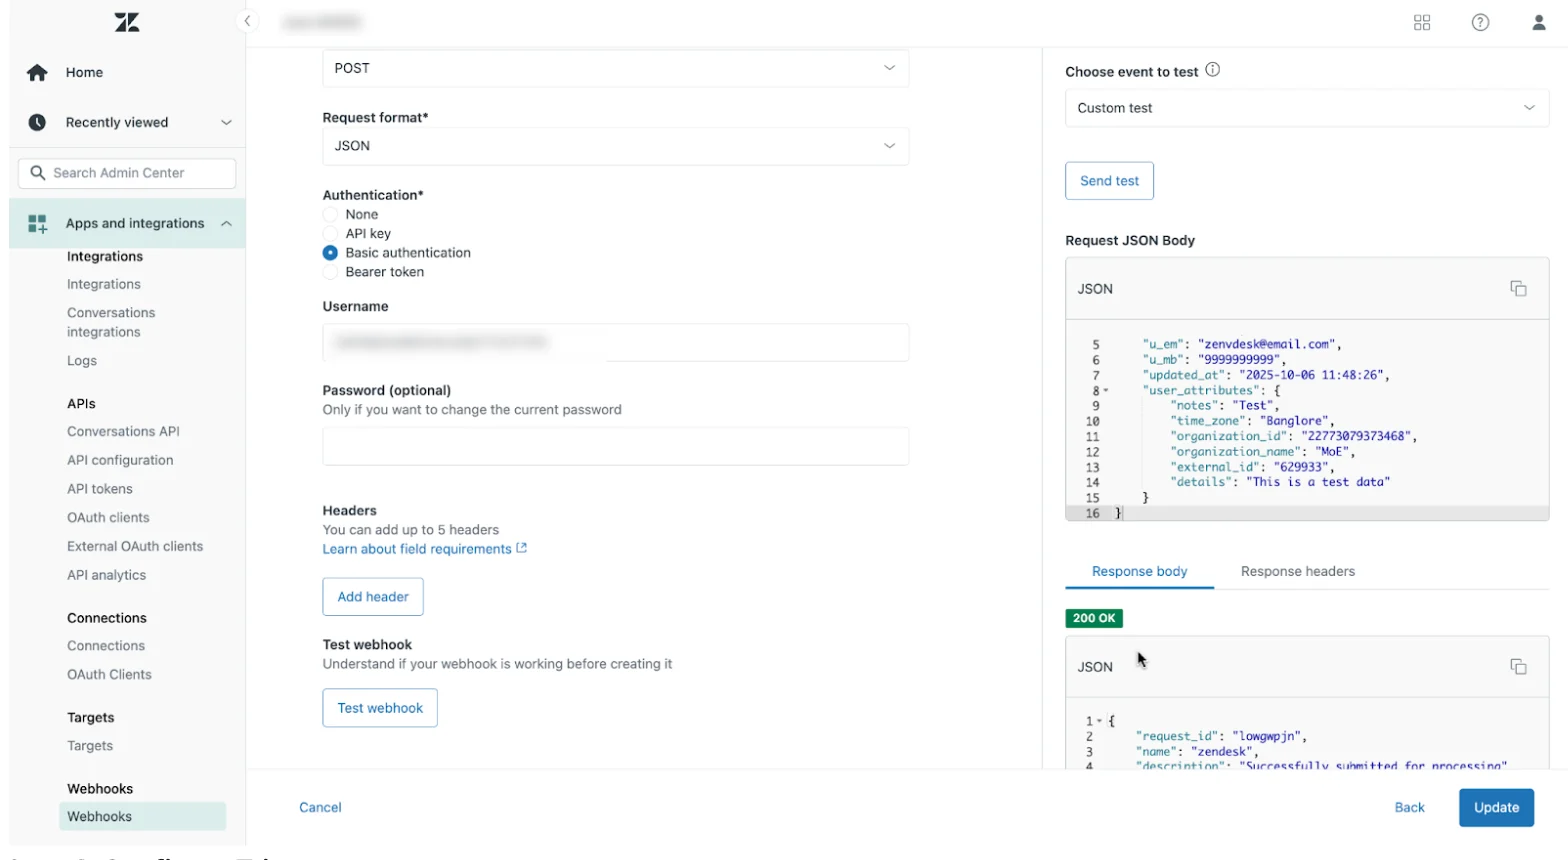 **Sample Payload for Users**
```json JSON theme={null}
{
"customer_id": "22773741448860",
"u_fn": "Zen",
"u_ln": "desk",
"u_em": "zenvdesk@email.com",
"u_mb": "9999999999",
"updated_at": "2025-10-06 11:48:26",
"user_attributes": {
"notes": "Test",
"time_zone": "Bangalore",
"organization_id": "22773079373468",
"organization_name": "MoE",
"external_id": "629933",
"details": "This is a test data"
}
}
```
**Sample Payload for Events**
```json JSON theme={null}
{
"customer_id": "22773741448860",
"u_fn": "Zen",
"u_ln": "desk",
"u_em": "zenvdesk@email.com",
"u_mb": "9999999999",
"updated_at": "2025-10-06 11:48:26",
"user_attributes": {
"notes": "Test",
"time_zone": "Banglore",
"organization_id": "22773079373468",
"organization_name": "MoE",
"external_id": "629933",
"details": "This is a test data"
},
"event_attributes": {
"event_name": "ticket_created",
"ticket_id": "2",
"ticket_subject": "Test",
"event_description": "New ticket submitted by customer",
"event_state" :"Open"
}
}
```
## Step 4: Configure triggers
To configure the triggers, perform the following steps:
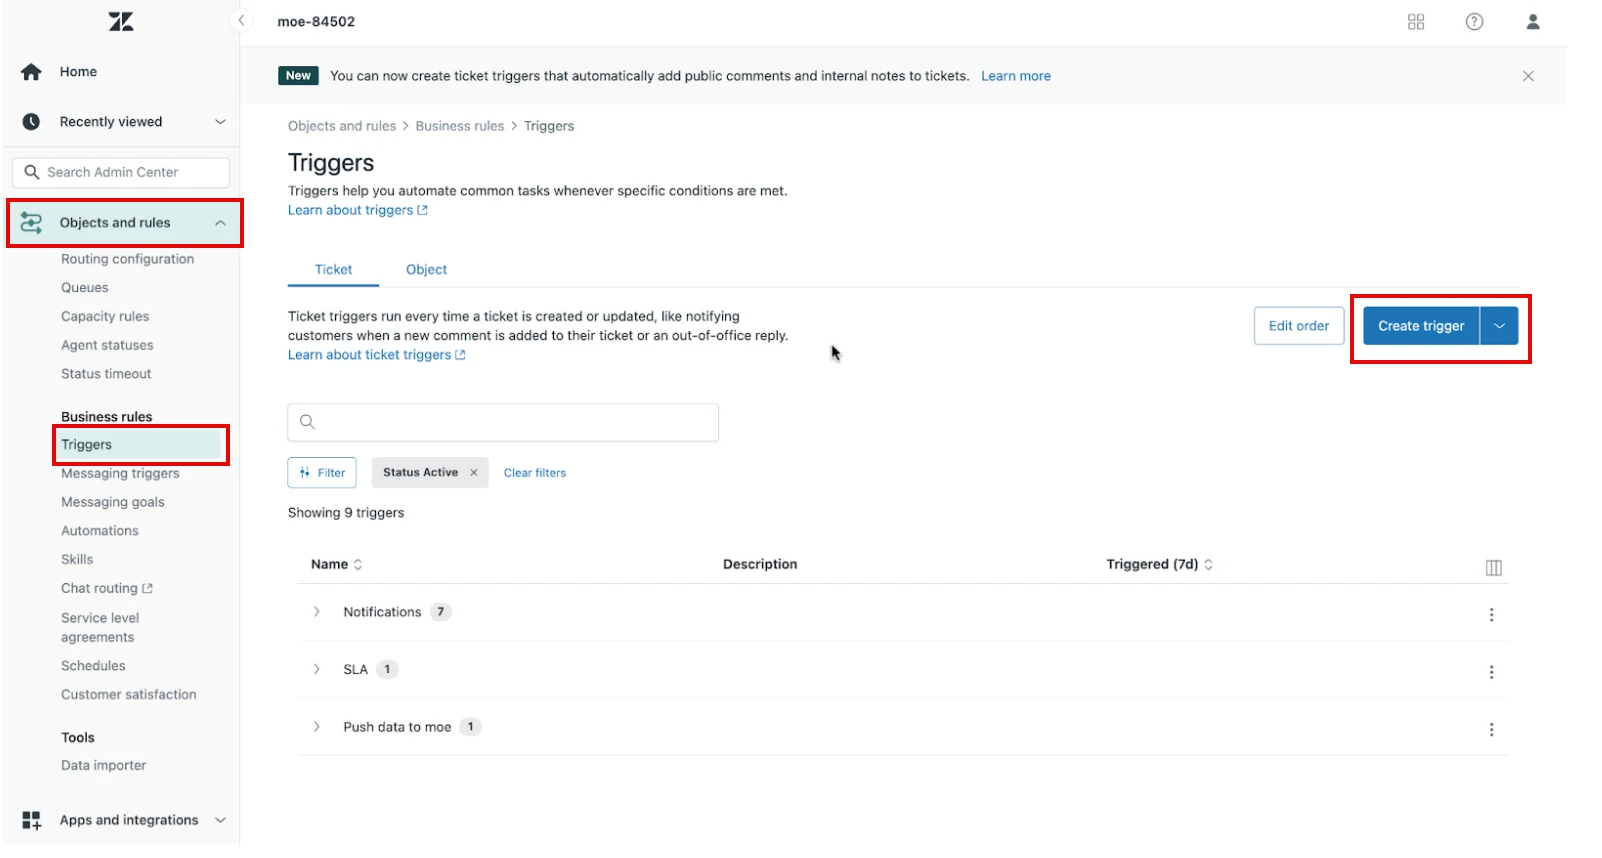
1. Log in to your **Zendesk Admin Center** dashboard.
2. On the left navigation menu, click the **Objects and rules** list.
3. In the menu that appears, in the **Business rules** section, click **Triggers**.
4. On the Triggers page, click **Create trigger** on the right side of the page.\
**Sample Payload for Users**
```json JSON theme={null}
{
"customer_id": "22773741448860",
"u_fn": "Zen",
"u_ln": "desk",
"u_em": "zenvdesk@email.com",
"u_mb": "9999999999",
"updated_at": "2025-10-06 11:48:26",
"user_attributes": {
"notes": "Test",
"time_zone": "Bangalore",
"organization_id": "22773079373468",
"organization_name": "MoE",
"external_id": "629933",
"details": "This is a test data"
}
}
```
**Sample Payload for Events**
```json JSON theme={null}
{
"customer_id": "22773741448860",
"u_fn": "Zen",
"u_ln": "desk",
"u_em": "zenvdesk@email.com",
"u_mb": "9999999999",
"updated_at": "2025-10-06 11:48:26",
"user_attributes": {
"notes": "Test",
"time_zone": "Banglore",
"organization_id": "22773079373468",
"organization_name": "MoE",
"external_id": "629933",
"details": "This is a test data"
},
"event_attributes": {
"event_name": "ticket_created",
"ticket_id": "2",
"ticket_subject": "Test",
"event_description": "New ticket submitted by customer",
"event_state" :"Open"
}
}
```
## Step 4: Configure triggers
To configure the triggers, perform the following steps:
1. Log in to your **Zendesk Admin Center** dashboard.
2. On the left navigation menu, click the **Objects and rules** list.
3. In the menu that appears, in the **Business rules** section, click **Triggers**.
4. On the Triggers page, click **Create trigger** on the right side of the page.\
 \
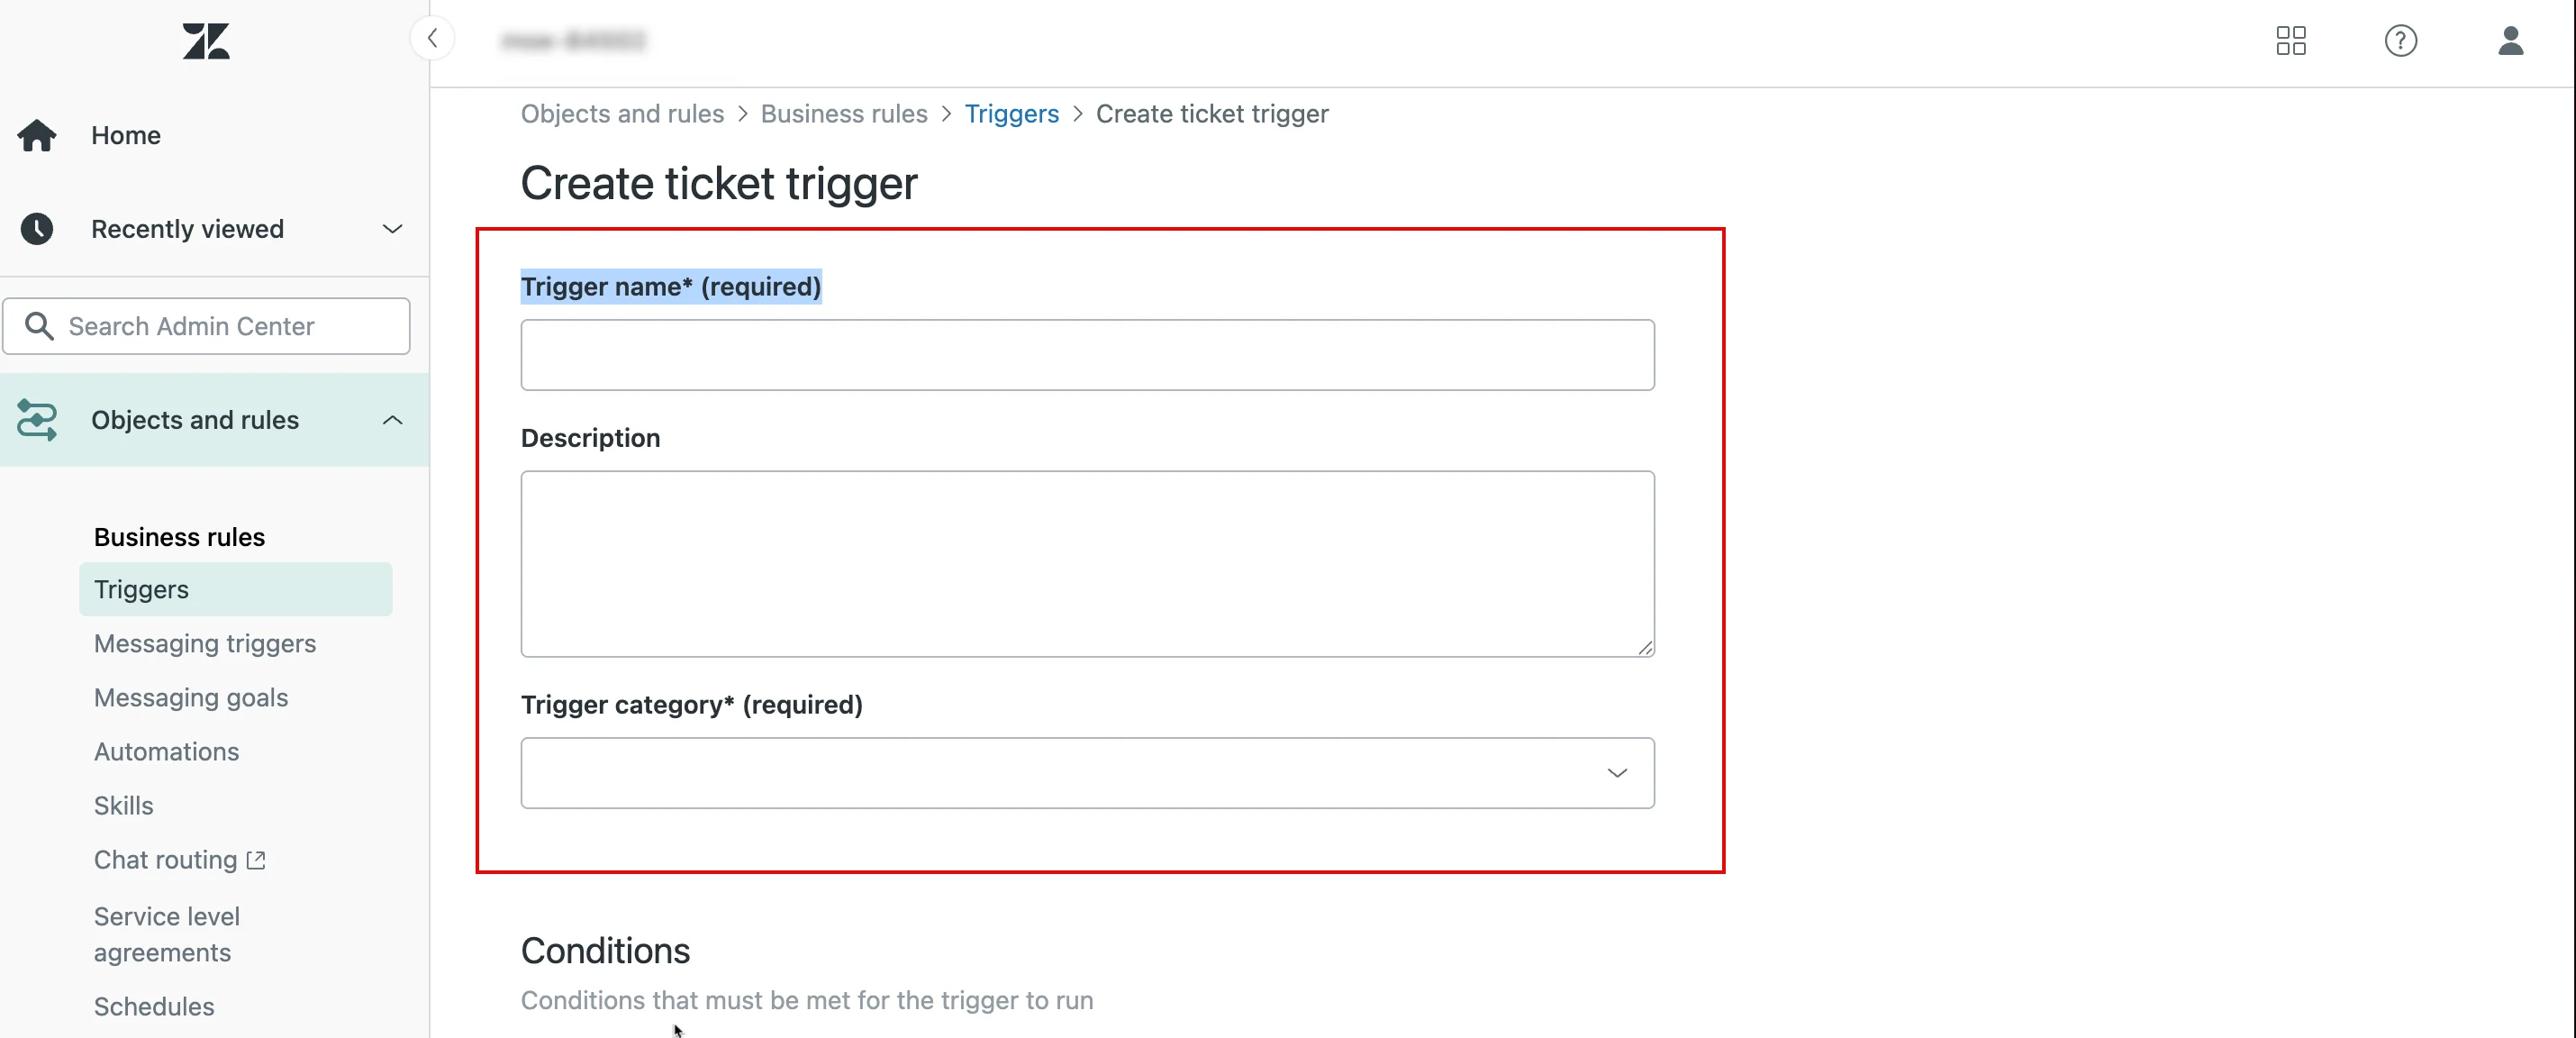
The **Create ticket trigger** page appears.
1. In the *Trigger name (required)*\* box, type a name for the trigger (for example, Send Ticket Update to MoEngage).
2. In the **Description box** (optional), briefly explain what this trigger does.
3. In the *Trigger category (required)*\* list, select your trigger category.\
\
The **Create ticket trigger** page appears.
1. In the *Trigger name (required)*\* box, type a name for the trigger (for example, Send Ticket Update to MoEngage).
2. In the **Description box** (optional), briefly explain what this trigger does.
3. In the *Trigger category (required)*\* list, select your trigger category.\
 \
Next, you must define the Conditions for this trigger.
5. In the **Conditions** section, scroll to the **Actions** section, and click **Add action**.
6. In the **Category** list, click **Notify by** > click **Active webhook**.
7. In the **Value** list, click the Webhook that you created in Step 3.
\
Next, you must define the Conditions for this trigger.
5. In the **Conditions** section, scroll to the **Actions** section, and click **Add action**.
6. In the **Category** list, click **Notify by** > click **Active webhook**.
7. In the **Value** list, click the Webhook that you created in Step 3. 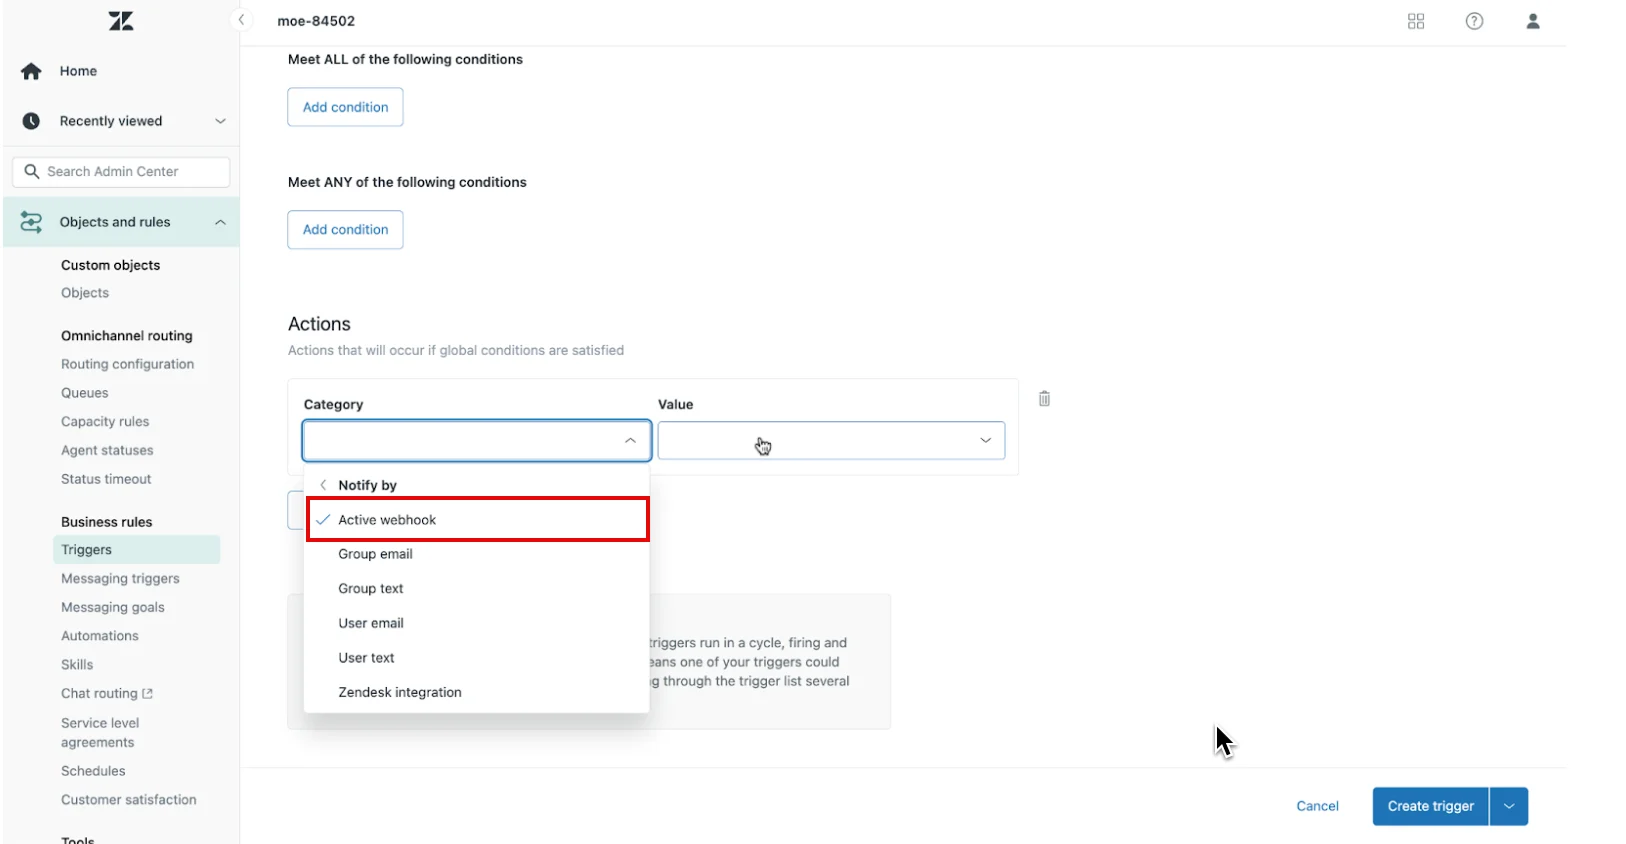 8. In the request body box, add the appropriate JSON payload.
 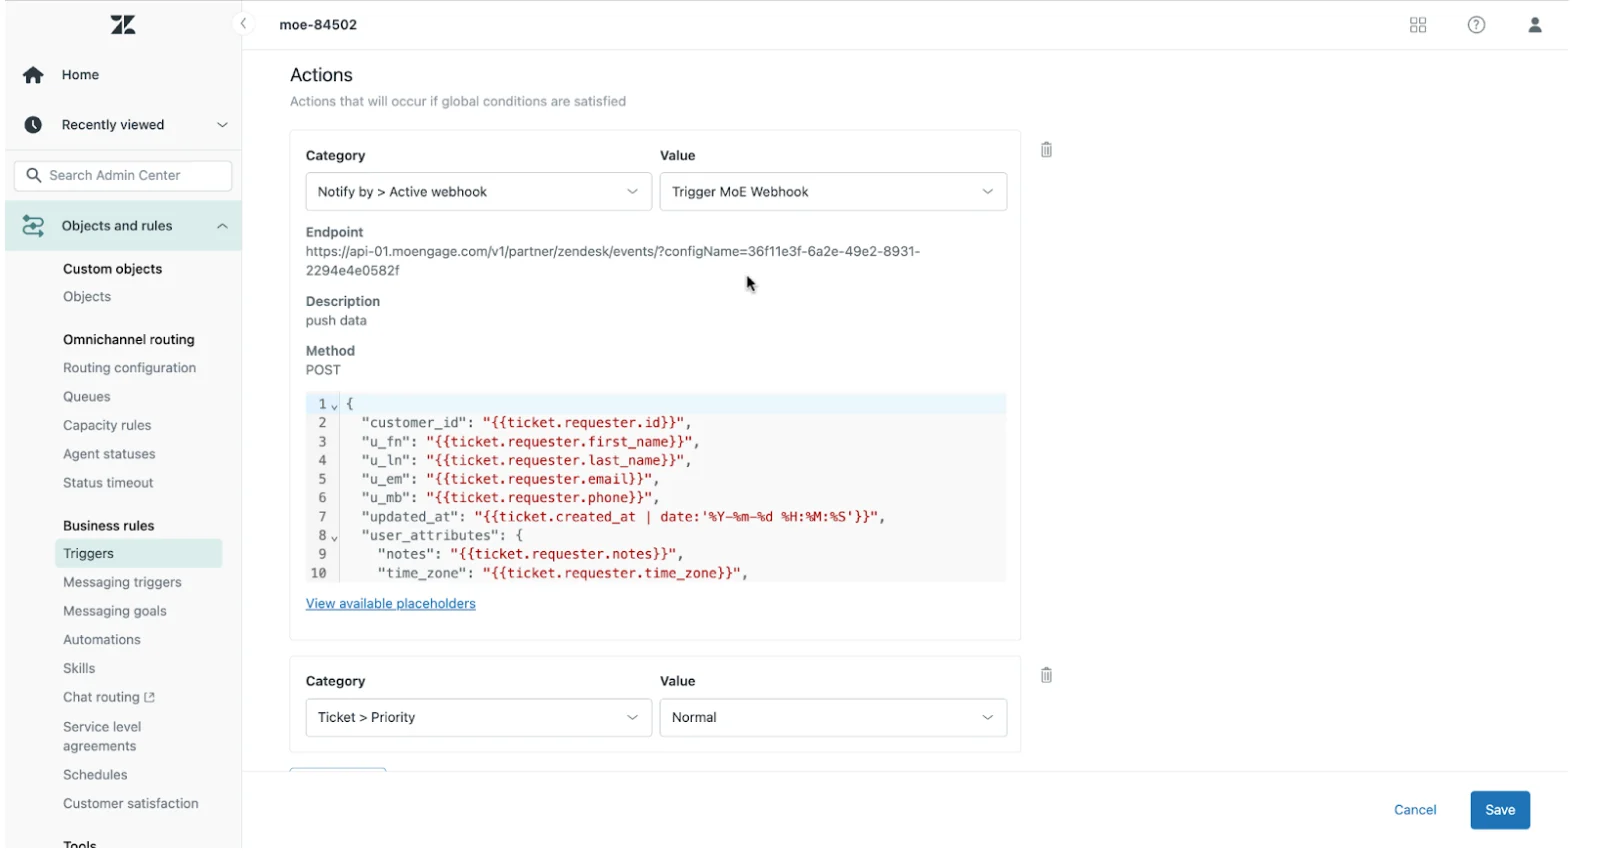 You can use the available placeholders option to copy dynamic key-value pairs from Zendesk.\
**Note**: The **Create ticket trigger** section does not have JSON validation. Ensure your JSON is valid before you save the configuration.
9. Click **Save**.
**Request Body for Users**
```json JSON theme={null}
{
"customer_id": "{{ticket.requester.id}}", // set your desired unique id
"u_fn": "{{ticket.requester.first_name}}",
"u_ln": "{{ticket.requester.last_name}}",
"u_em": "{{ticket.requester.email}}",
"u_mb": "{{ticket.requester.phone}}",
"updated_at": "{{ticket.created_at | date:'%Y-%m-%d %H:%M:%S'}}",
"user_attributes": {
//create your k-v pairs here
}
}
```
**Request Body for Events or Custom Events**
```json JSON theme={null}
{
"customer_id": "{{ticket.requester.id}}", // set your desired unique id
"u_fn": "{{ticket.requester.first_name}}",
"u_ln": "{{ticket.requester.last_name}}",
"u_em": "{{ticket.requester.email}}",
"u_mb": "{{ticket.requester.phone}}",
"updated_at": "{{ticket.created_at | date:'%Y-%m-%d %H:%M:%S'}}",
"user_attributes": {
//create your k-v pairs here (optional when using events type)
},
"event_attributes": {
"event_name": "ticket_created",
"ticket_id": "{{ticket.id}}",
"ticket_subject": "{{ticket.title}}",
"event_description": "New ticket submitted by customer",
"event_state" :"{{ticket.status}}"
}
}
```
## Data Mapping Guidelines
* **Unique Identifier (Customer ID)** : Use a consistent, unique identifier (like an `external_id` or email address) and map it to the `customer_id field` in your MoEngage payload. This is critical for preventing duplicate user profiles.
* **Required Fields** : All payloads must include the customer\_id, updated\_at, and standard user fields (u\_\* fields) for proper data processing.
* **Event Name** : Include the `event_name` in every event to identify and categorize actions in MoEngage. This ensures all events are tracked accurately for analysis and segmentation.
# Send Data from MoEngage using Connected Campaigns
This section describes how to use MoEngage connector campaigns to automatically create support tickets in Zendesk. For example, you can create a support ticket when a user provides negative feedback in an in-app message.
Ensure you have the following:
* Administrator access to your Zendesk account.
* [Zendesk API token](https://support.zendesk.com/hc/en-us/articles/4408889192858-Managing-API-token-access-to-the-Zendesk-API).
* A common identifier (such as an email address or external ID) to link user profiles between Zendesk and MoEngage.
## Step 1: Create a Connector Campaign in MoEngage
To create a connector campaign in MoEngage, perform the following steps:
1. Navigate to the MoEngage Dashboard.
2. On the left navigation menu, click **Engage** and then click **Campaigns**.
3. On the All campaigns page, in the upper-right corner, click **+ Create campaign**.\
You can use the available placeholders option to copy dynamic key-value pairs from Zendesk.\
**Note**: The **Create ticket trigger** section does not have JSON validation. Ensure your JSON is valid before you save the configuration.
9. Click **Save**.
**Request Body for Users**
```json JSON theme={null}
{
"customer_id": "{{ticket.requester.id}}", // set your desired unique id
"u_fn": "{{ticket.requester.first_name}}",
"u_ln": "{{ticket.requester.last_name}}",
"u_em": "{{ticket.requester.email}}",
"u_mb": "{{ticket.requester.phone}}",
"updated_at": "{{ticket.created_at | date:'%Y-%m-%d %H:%M:%S'}}",
"user_attributes": {
//create your k-v pairs here
}
}
```
**Request Body for Events or Custom Events**
```json JSON theme={null}
{
"customer_id": "{{ticket.requester.id}}", // set your desired unique id
"u_fn": "{{ticket.requester.first_name}}",
"u_ln": "{{ticket.requester.last_name}}",
"u_em": "{{ticket.requester.email}}",
"u_mb": "{{ticket.requester.phone}}",
"updated_at": "{{ticket.created_at | date:'%Y-%m-%d %H:%M:%S'}}",
"user_attributes": {
//create your k-v pairs here (optional when using events type)
},
"event_attributes": {
"event_name": "ticket_created",
"ticket_id": "{{ticket.id}}",
"ticket_subject": "{{ticket.title}}",
"event_description": "New ticket submitted by customer",
"event_state" :"{{ticket.status}}"
}
}
```
## Data Mapping Guidelines
* **Unique Identifier (Customer ID)** : Use a consistent, unique identifier (like an `external_id` or email address) and map it to the `customer_id field` in your MoEngage payload. This is critical for preventing duplicate user profiles.
* **Required Fields** : All payloads must include the customer\_id, updated\_at, and standard user fields (u\_\* fields) for proper data processing.
* **Event Name** : Include the `event_name` in every event to identify and categorize actions in MoEngage. This ensures all events are tracked accurately for analysis and segmentation.
# Send Data from MoEngage using Connected Campaigns
This section describes how to use MoEngage connector campaigns to automatically create support tickets in Zendesk. For example, you can create a support ticket when a user provides negative feedback in an in-app message.
Ensure you have the following:
* Administrator access to your Zendesk account.
* [Zendesk API token](https://support.zendesk.com/hc/en-us/articles/4408889192858-Managing-API-token-access-to-the-Zendesk-API).
* A common identifier (such as an email address or external ID) to link user profiles between Zendesk and MoEngage.
## Step 1: Create a Connector Campaign in MoEngage
To create a connector campaign in MoEngage, perform the following steps:
1. Navigate to the MoEngage Dashboard.
2. On the left navigation menu, click **Engage** and then click **Campaigns**.
3. On the All campaigns page, in the upper-right corner, click **+ Create campaign**.\
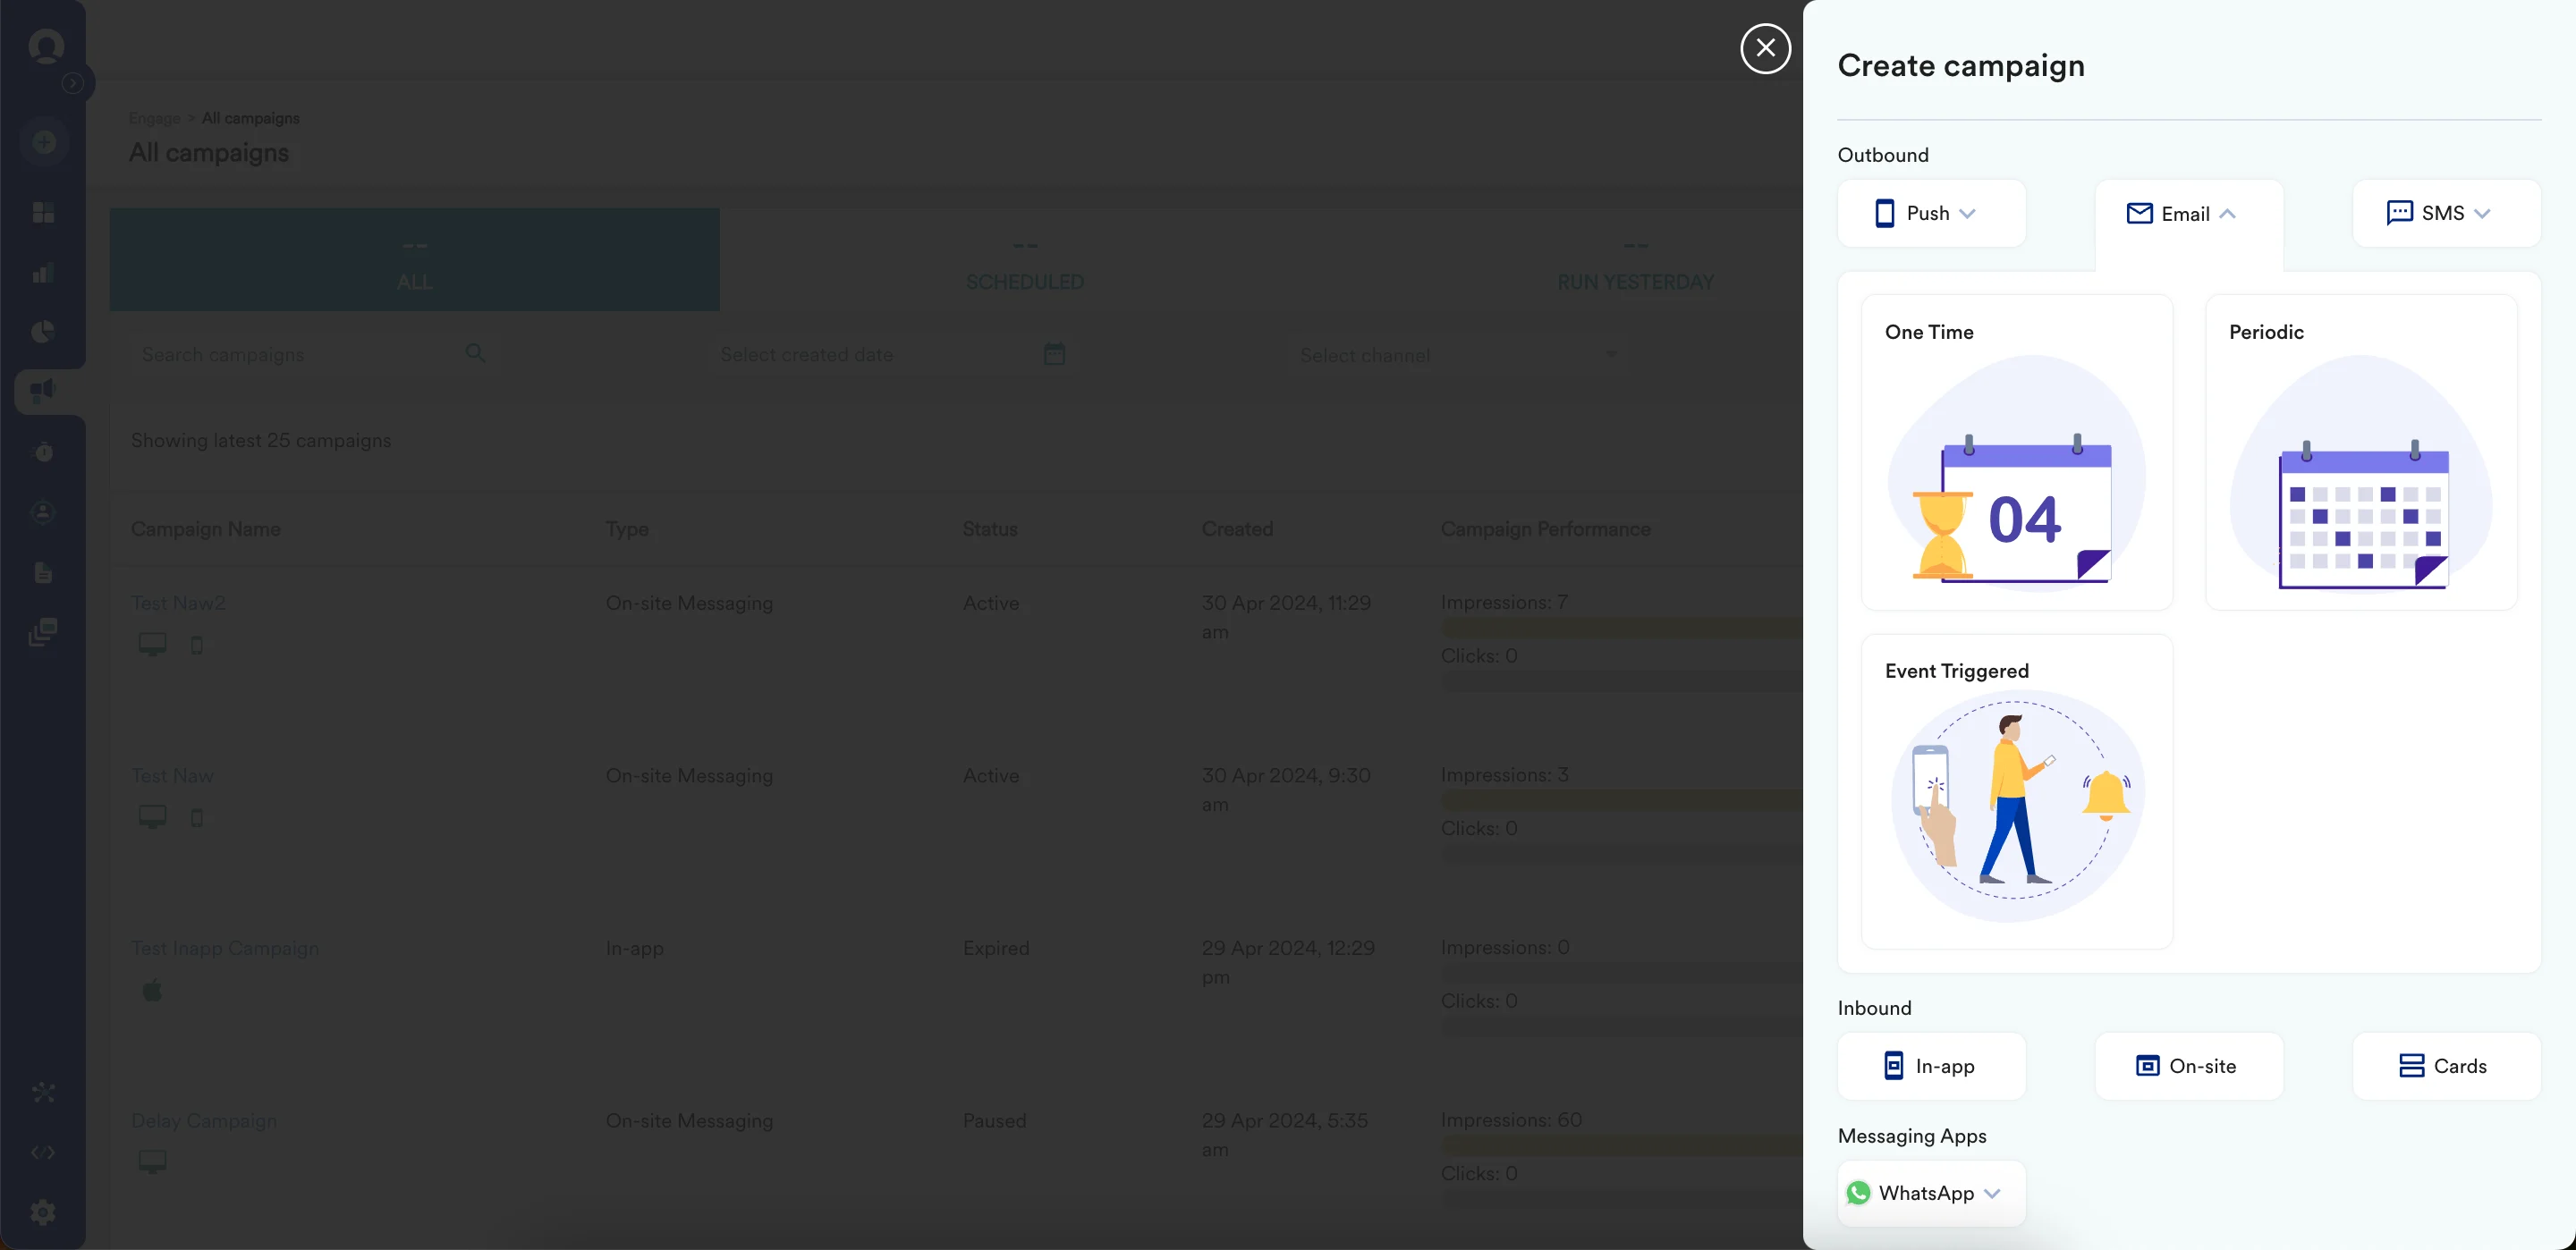 \
The Create campaign page is displayed.\
You can also click **Create New** > **Campaign**. The Campaign page is displayed.
\
The Create campaign page is displayed.\
You can also click **Create New** > **Campaign**. The Campaign page is displayed. 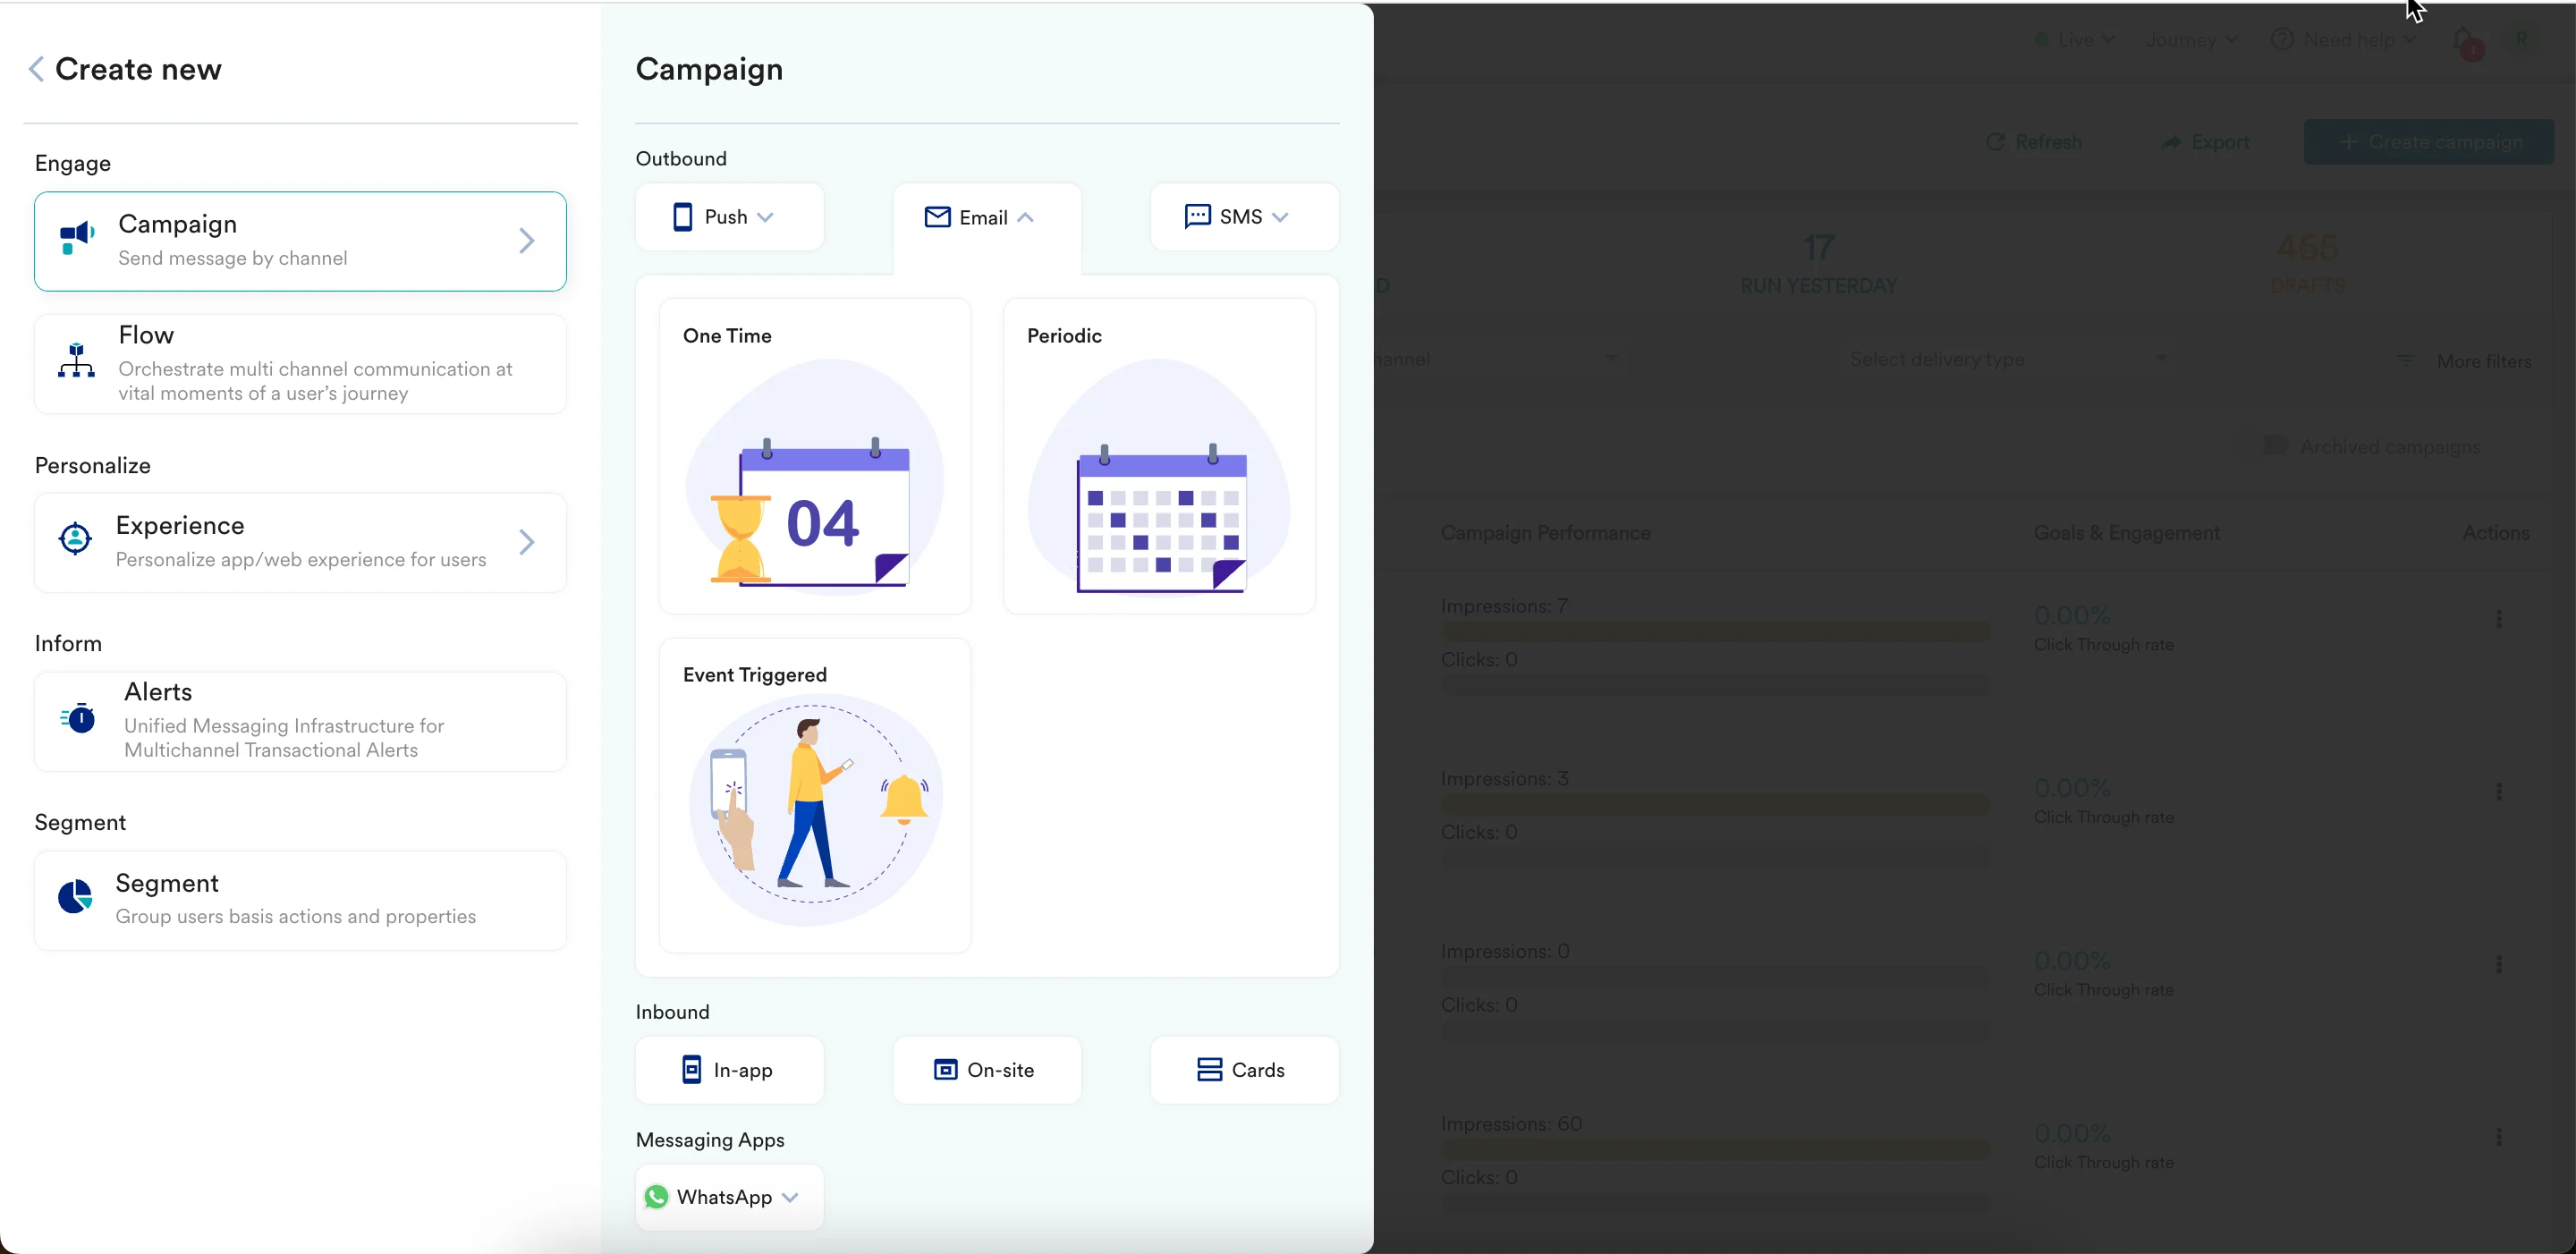 4. Under **Connectors** , click **Custom** and select one of the following campaign delivery types:
* One Time
* Periodic
* Event Triggered
* Business Event Triggered\
For more information, refer to [Delivery Types](/user-guide/campaigns-and-channels/getting-started/introduction/moengage-channels).\
The Connector creation page is displayed.
4. Under **Connectors** , click **Custom** and select one of the following campaign delivery types:
* One Time
* Periodic
* Event Triggered
* Business Event Triggered\
For more information, refer to [Delivery Types](/user-guide/campaigns-and-channels/getting-started/introduction/moengage-channels).\
The Connector creation page is displayed. 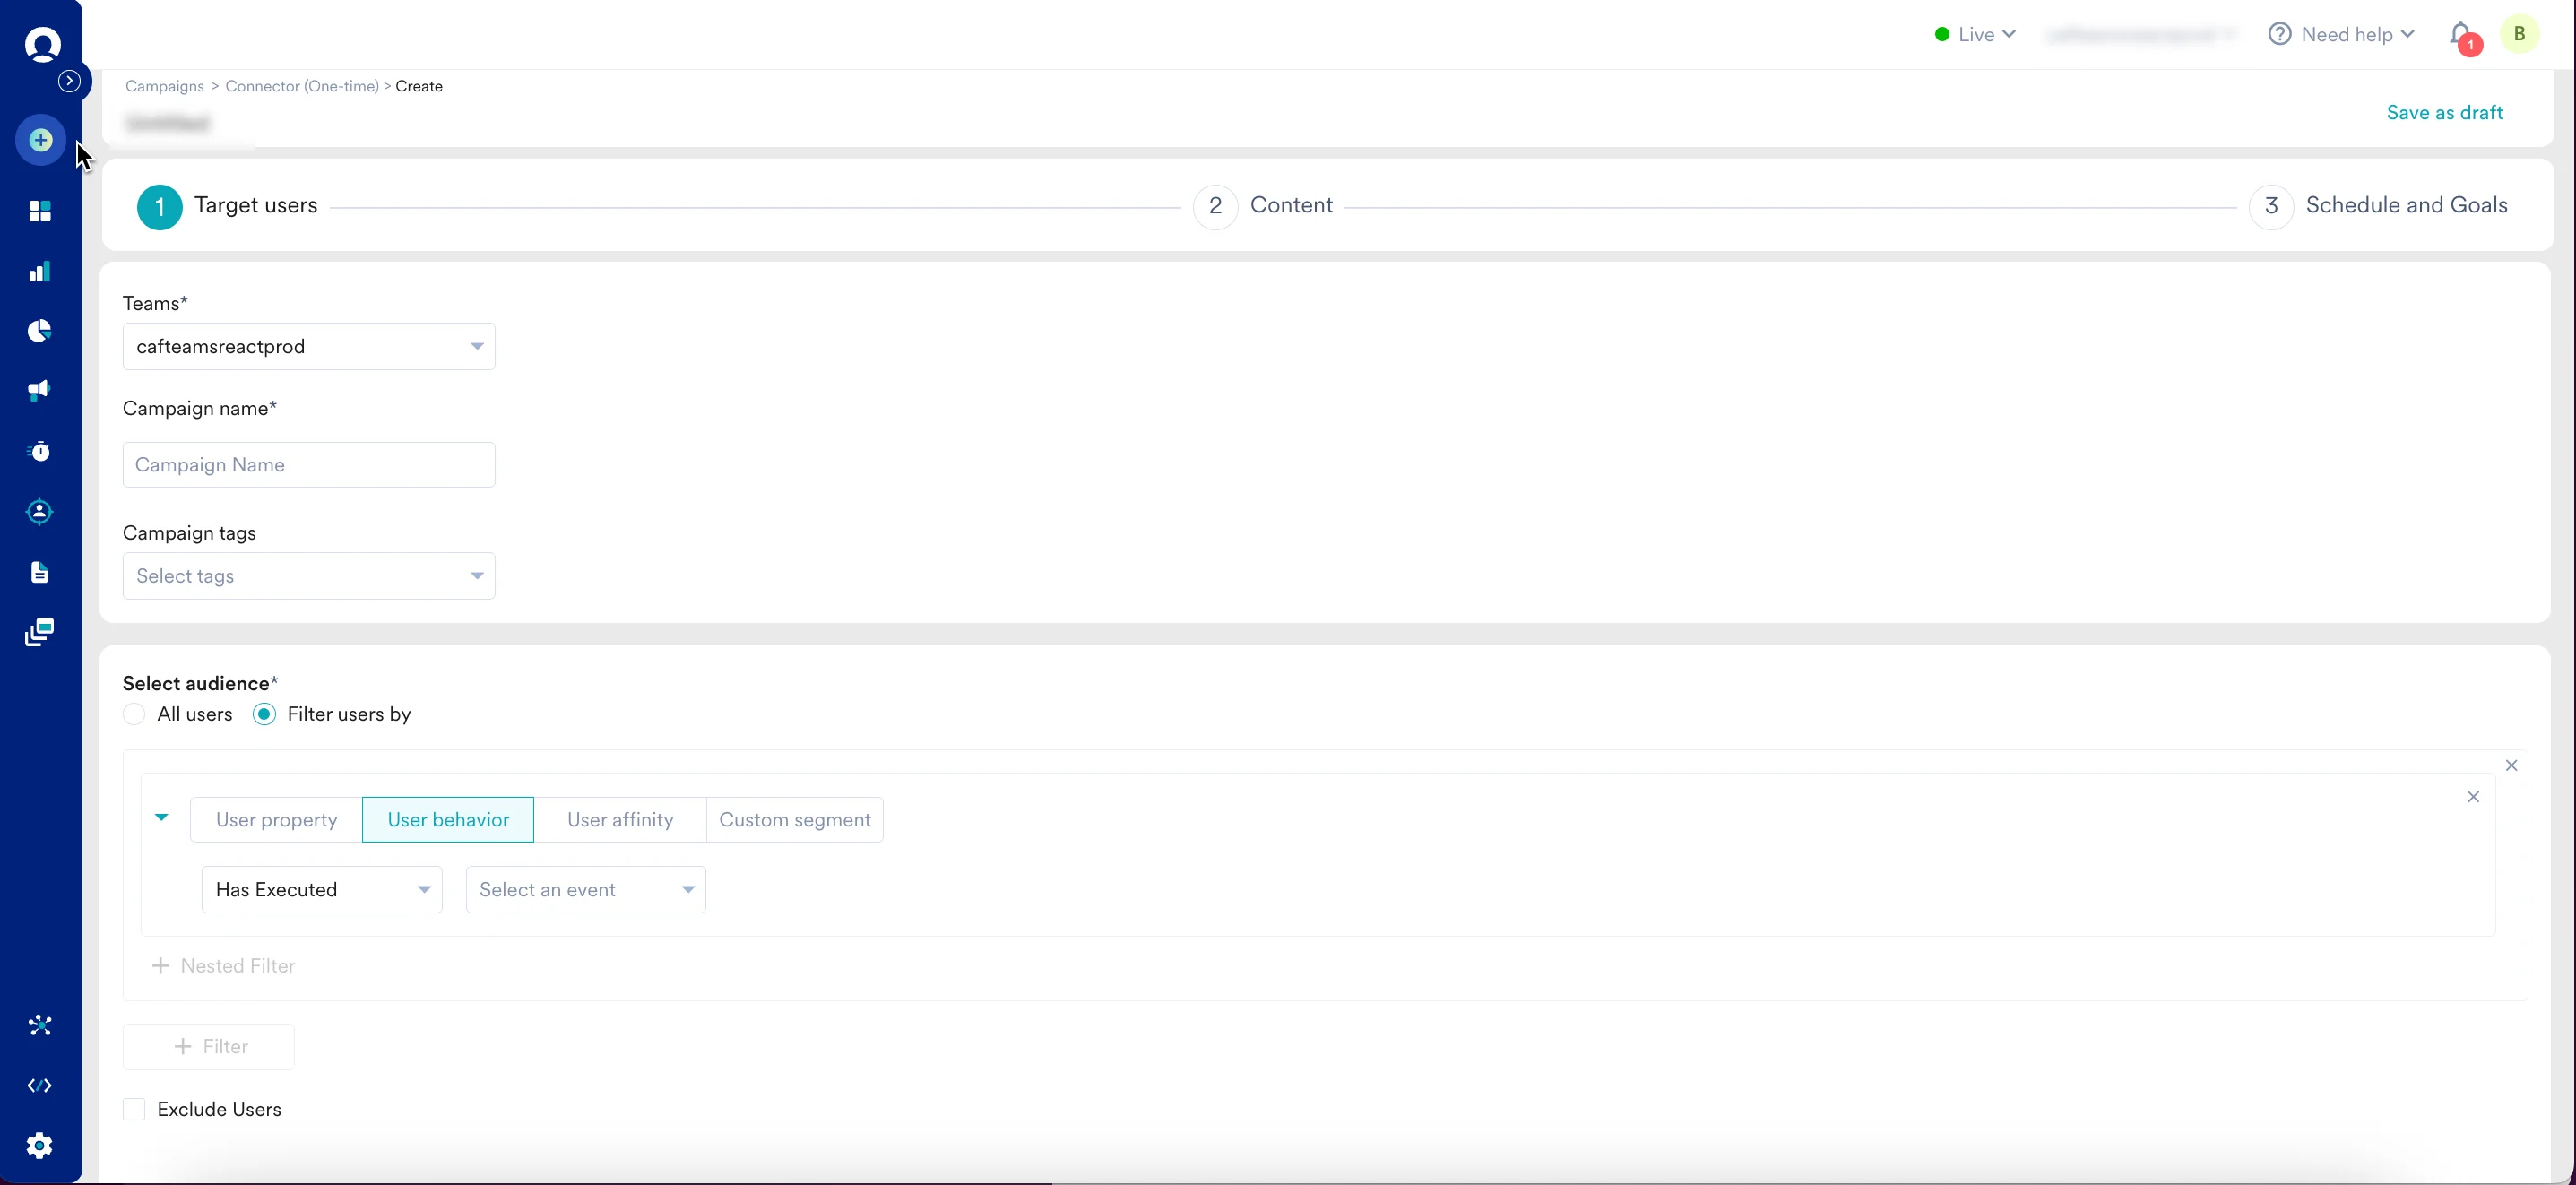 5. In step 2 of the campaign, provide the following information:
1. Under **Method** , select **POST**.
2. In the **Webhook URL** box, paste the following\
`.zendesk.com/api/v2/tickets.json`
3. In the **Headers** section, add the following key-value pairs:
1. **Authorization** : `Basic {{'token:' | base64_encode}}`.
2. **Content-Type** : Application/json.
5. In step 2 of the campaign, provide the following information:
1. Under **Method** , select **POST**.
2. In the **Webhook URL** box, paste the following\
`.zendesk.com/api/v2/tickets.json`
3. In the **Headers** section, add the following key-value pairs:
1. **Authorization** : `Basic {{'token:' | base64_encode}}`.
2. **Content-Type** : Application/json. 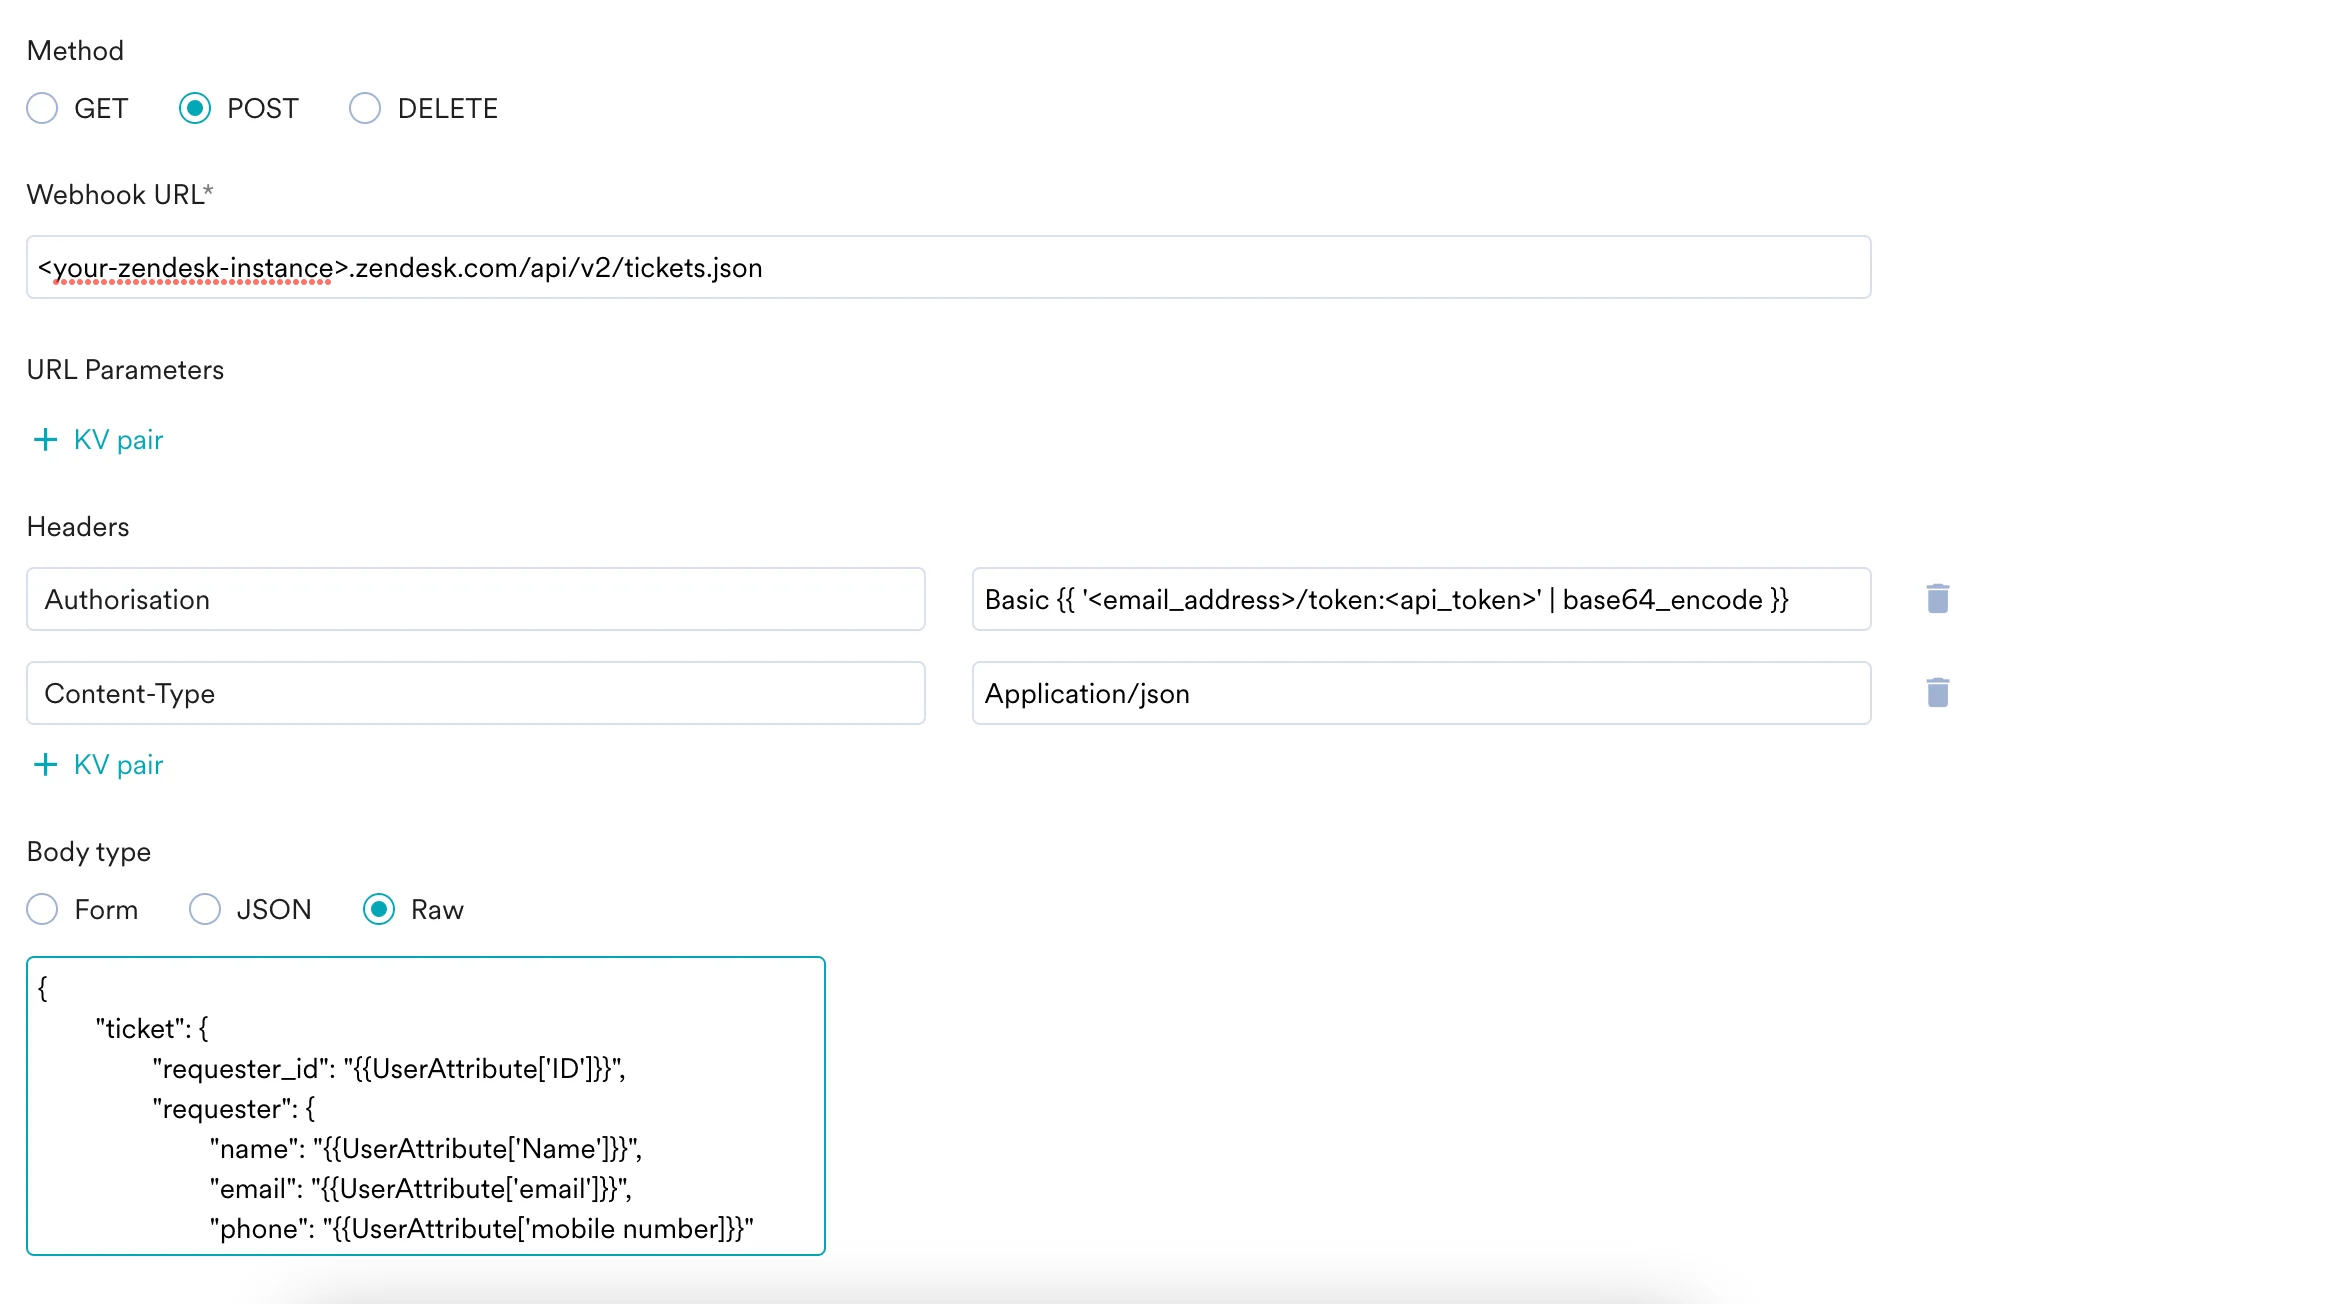 4. In the body section, define the ticket details, such as type, subject, and status. The following is an example payload. You can customize it based on the [Zendesk Ticket API](https://developer.zendesk.com/rest_api/docs/support/tickets#create-ticket).
```json JSON theme={null}
{
"ticket": {
"requester_id": "{{UserAttribute['ID']}}",
"requester": {
"name": "{{UserAttribute['Name']}}",
"email": "{{UserAttribute['email']}}",
"phone": "{{UserAttribute['mobile number]}}"
},
"type": "",
"subject": "",
"comment": {
"body": ""
},
"priority": "urgent",
"status": ""
}
}
```
## Step 2: Preview Your Request
The campaign is now ready to be tested and sent. You can test the connector configuration using the **Test** functionality available in the second step of campaign creation.
To verify the connection, check your Zendesk account. If a ticket is created successfully, your setup is correct, and you can publish the campaign.
4. In the body section, define the ticket details, such as type, subject, and status. The following is an example payload. You can customize it based on the [Zendesk Ticket API](https://developer.zendesk.com/rest_api/docs/support/tickets#create-ticket).
```json JSON theme={null}
{
"ticket": {
"requester_id": "{{UserAttribute['ID']}}",
"requester": {
"name": "{{UserAttribute['Name']}}",
"email": "{{UserAttribute['email']}}",
"phone": "{{UserAttribute['mobile number]}}"
},
"type": "",
"subject": "",
"comment": {
"body": ""
},
"priority": "urgent",
"status": ""
}
}
```
## Step 2: Preview Your Request
The campaign is now ready to be tested and sent. You can test the connector configuration using the **Test** functionality available in the second step of campaign creation.
To verify the connection, check your Zendesk account. If a ticket is created successfully, your setup is correct, and you can publish the campaign.
 ## Common Identifier
If you have a common identifier between MoEngage and Zendesk, we recommend using it as the `requester_id`. This helps unify the user profiles across both platforms. If you do not have a common identifier, we recommend passing a set of identifying attributes, such as name, email address, or phone number.
## Common Identifier
If you have a common identifier between MoEngage and Zendesk, we recommend using it as the `requester_id`. This helps unify the user profiles across both platforms. If you do not have a common identifier, we recommend passing a set of identifying attributes, such as name, email address, or phone number.