> ## Documentation Index
> Fetch the complete documentation index at: https://moengage.com/docs/llms.txt
> Use this file to discover all available pages before exploring further.
# Deepgram - Outbound Voice Call
> Trigger AI-driven outbound voice calls from MoEngage Flows using your own Deepgram-powered server.
[Deepgram](https://deepgram.com/) is an AI voice platform that provides real-time speech-to-text, text-to-speech, and conversational voice agents. The MoEngage and Deepgram integration enables you to trigger AI-driven outbound phone calls directly from MoEngage Flows, so user events on your app or site can lead to a real-time voice conversation handled by your own Deepgram-powered server.
With Outbound Voice Call, you can initiate automated phone conversations via MoEngage. When specific user actions occur, such as checkout abandonment, failed transactions, upcoming renewals, or support needs, MoEngage sends a request to your dedicated server. Your server then uses the Deepgram voice agent to execute the call and manage the interactive dialogue.
## Outbound Voice Call × MoEngage
This integration automates event-triggered voice outreach without requiring you to build telephony or conversational AI infrastructure inside MoEngage.
With this integration, you can:
* Trigger an outbound AI voice call the moment a Flow event fires.
* Pass campaign-configured context (order ID, renewal date, payment amount, or any other field your agent's prompt needs) with every call.
## Use Cases
By integrating Deepgram with MoEngage, you can address the following use cases:
* **Cart abandonment follow-up**: Trigger a call referencing cart contents and offer assistance completing the purchase when a user abandons checkout.
* **Payment failure recovery**: Trigger a call to inform the customer and help them update payment details when a recurring payment fails.
* **Renewal and retention**: Trigger a call to remind the customer ahead of a subscription renewal and offer a retention incentive if needed.
* **Order status and resolution**: Trigger a call to inform the customer of delays or deliveries and offer resolutions based on order status.
## Architecture and Connectivity
The following table describes the integration architecture and components:
| Component | Description |
| ---------------------------------- | --------------------------------------------------------------------------------------- |
| **MoEngage Flow** | Triggers the Connected App action when a specified user event fires. |
| **POST /make-call** | The API request sent from MoEngage to your custom server to initiate the outbound call. |
| **Voice Agent integration server** | Your server that authenticates requests and places calls via telephony providers. |
## Prerequisites
To set up the integration, ensure you have the following:
* **Public HTTPS server**: A publicly reachable server implementing the `/make-call` contract.
* **Authentication secret**: A secret your server validates on incoming requests (sent as a Bearer token).
* **Context object key**: The JSON key your server expects call context under (for example, `lead` or `context`).
MoEngage does not host, run, or operate any part of the voice agent itself. You bring your own server built on whichever voice stack you choose.
## Step 1: Build and Deploy Your Voice Agent Server
Build and host a service with an endpoint (for example, `/make-call`) to receive and process requests from MoEngage. The `/make-call` path is an example; your implementation can use a different endpoint name. Your custom server manages the following tasks:
1. **Request authentication**: Verify the incoming endpoint secret to ensure secure connectivity.
2. **Call orchestration**: Initiate the outbound connection through your preferred telephony service provider.
3. **Conversation logic**: Facilitate the real-time interactive dialogue using the Deepgram AI engine.
For further technical details, refer to the [Deepgram documentation](https://developers.deepgram.com/docs/outbound-telephony-agent#outbound-telephony-voice-agent).
## Step 2: Connect the App in MoEngage
Once you have your server deployed, connect it in MoEngage:
1. On your MoEngage dashboard, go to **App Marketplace**.
2. Search for **Outbound Voice Call (Custom Server)** and click **Connect**.
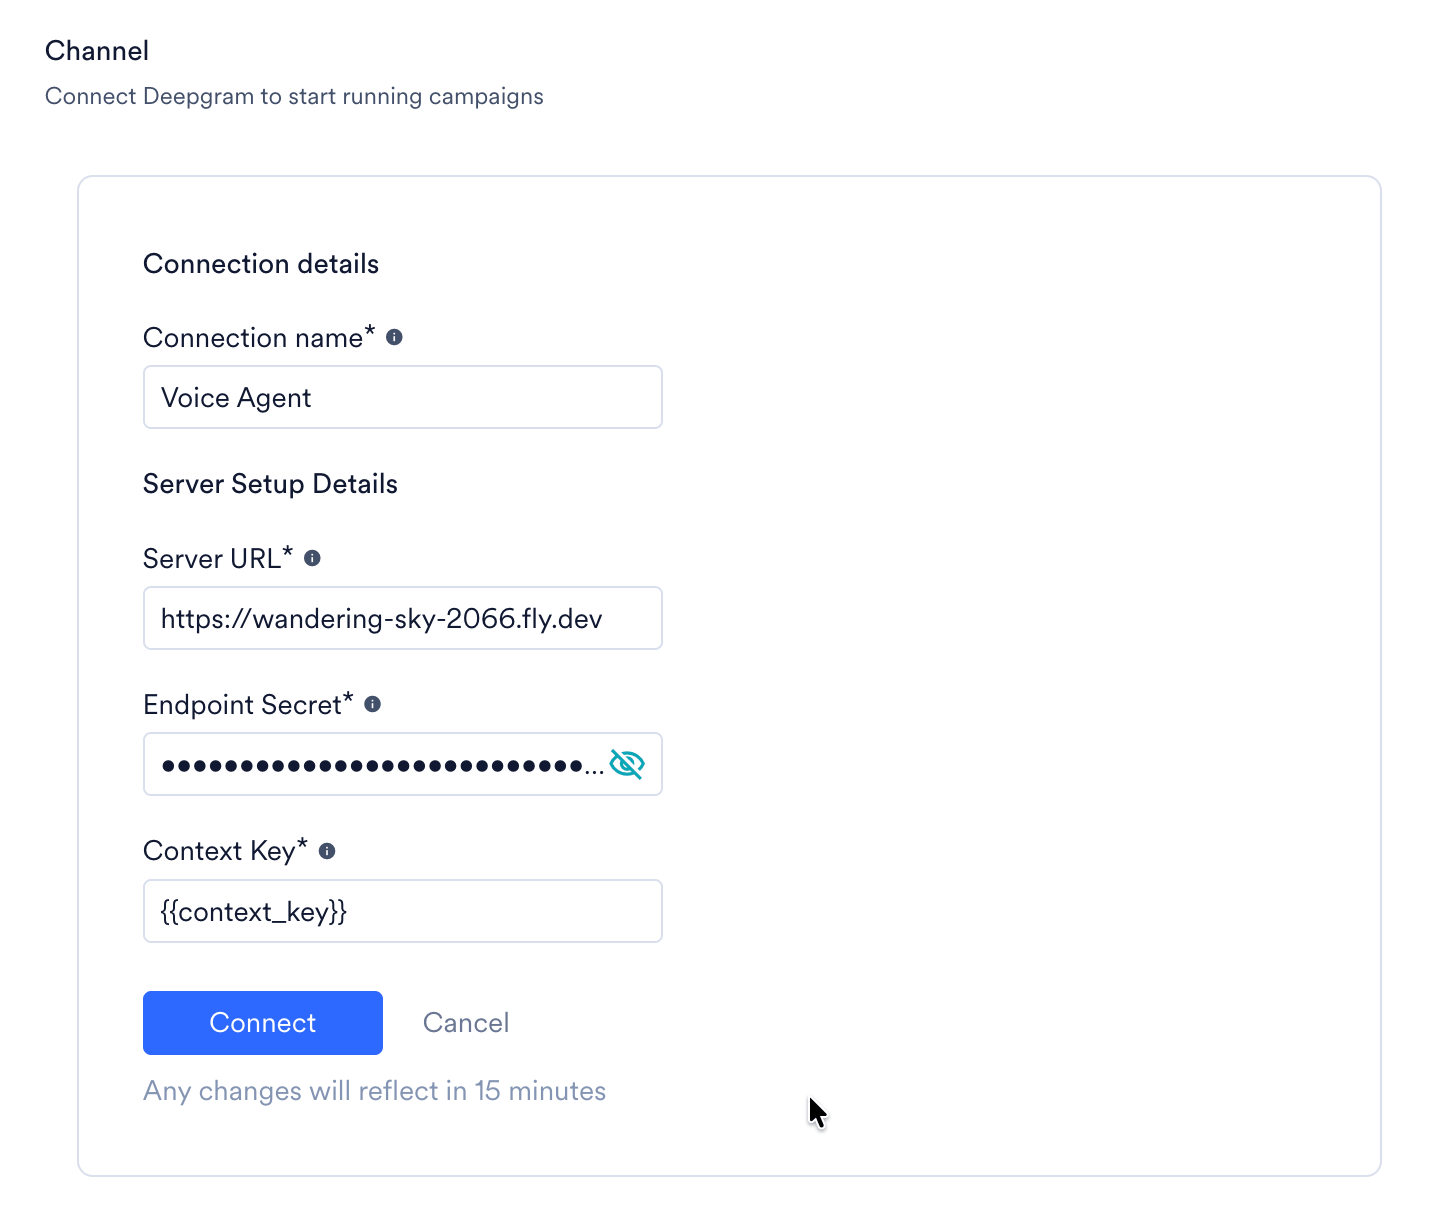
3. Under **Connection details**, enter the following details:
| Field | Required | Description |
| --------------- | -------- | ------------------------------------------------------------------------------------------------------------------------------------------------------------------------ |
| Connection Name | Yes | A name to identify this connection (for example, Production Voice Agent). |
| Server URL | Yes | The public base URL of your deployed server (for example, `https://your-app.com`). |
| Endpoint Secret | Yes | The Bearer secret key your server validates on incoming requests. |
| Context Key | Yes | The JSON key your server expects context under (for example, `lead`, `order`). This key wraps the key-value pairs you add in Context Fields when configuring a campaign. |
4. Click **Connect**.
Any changes to connection details take up to 15 minutes to reflect.
 ## Step 3: Configure a Campaign
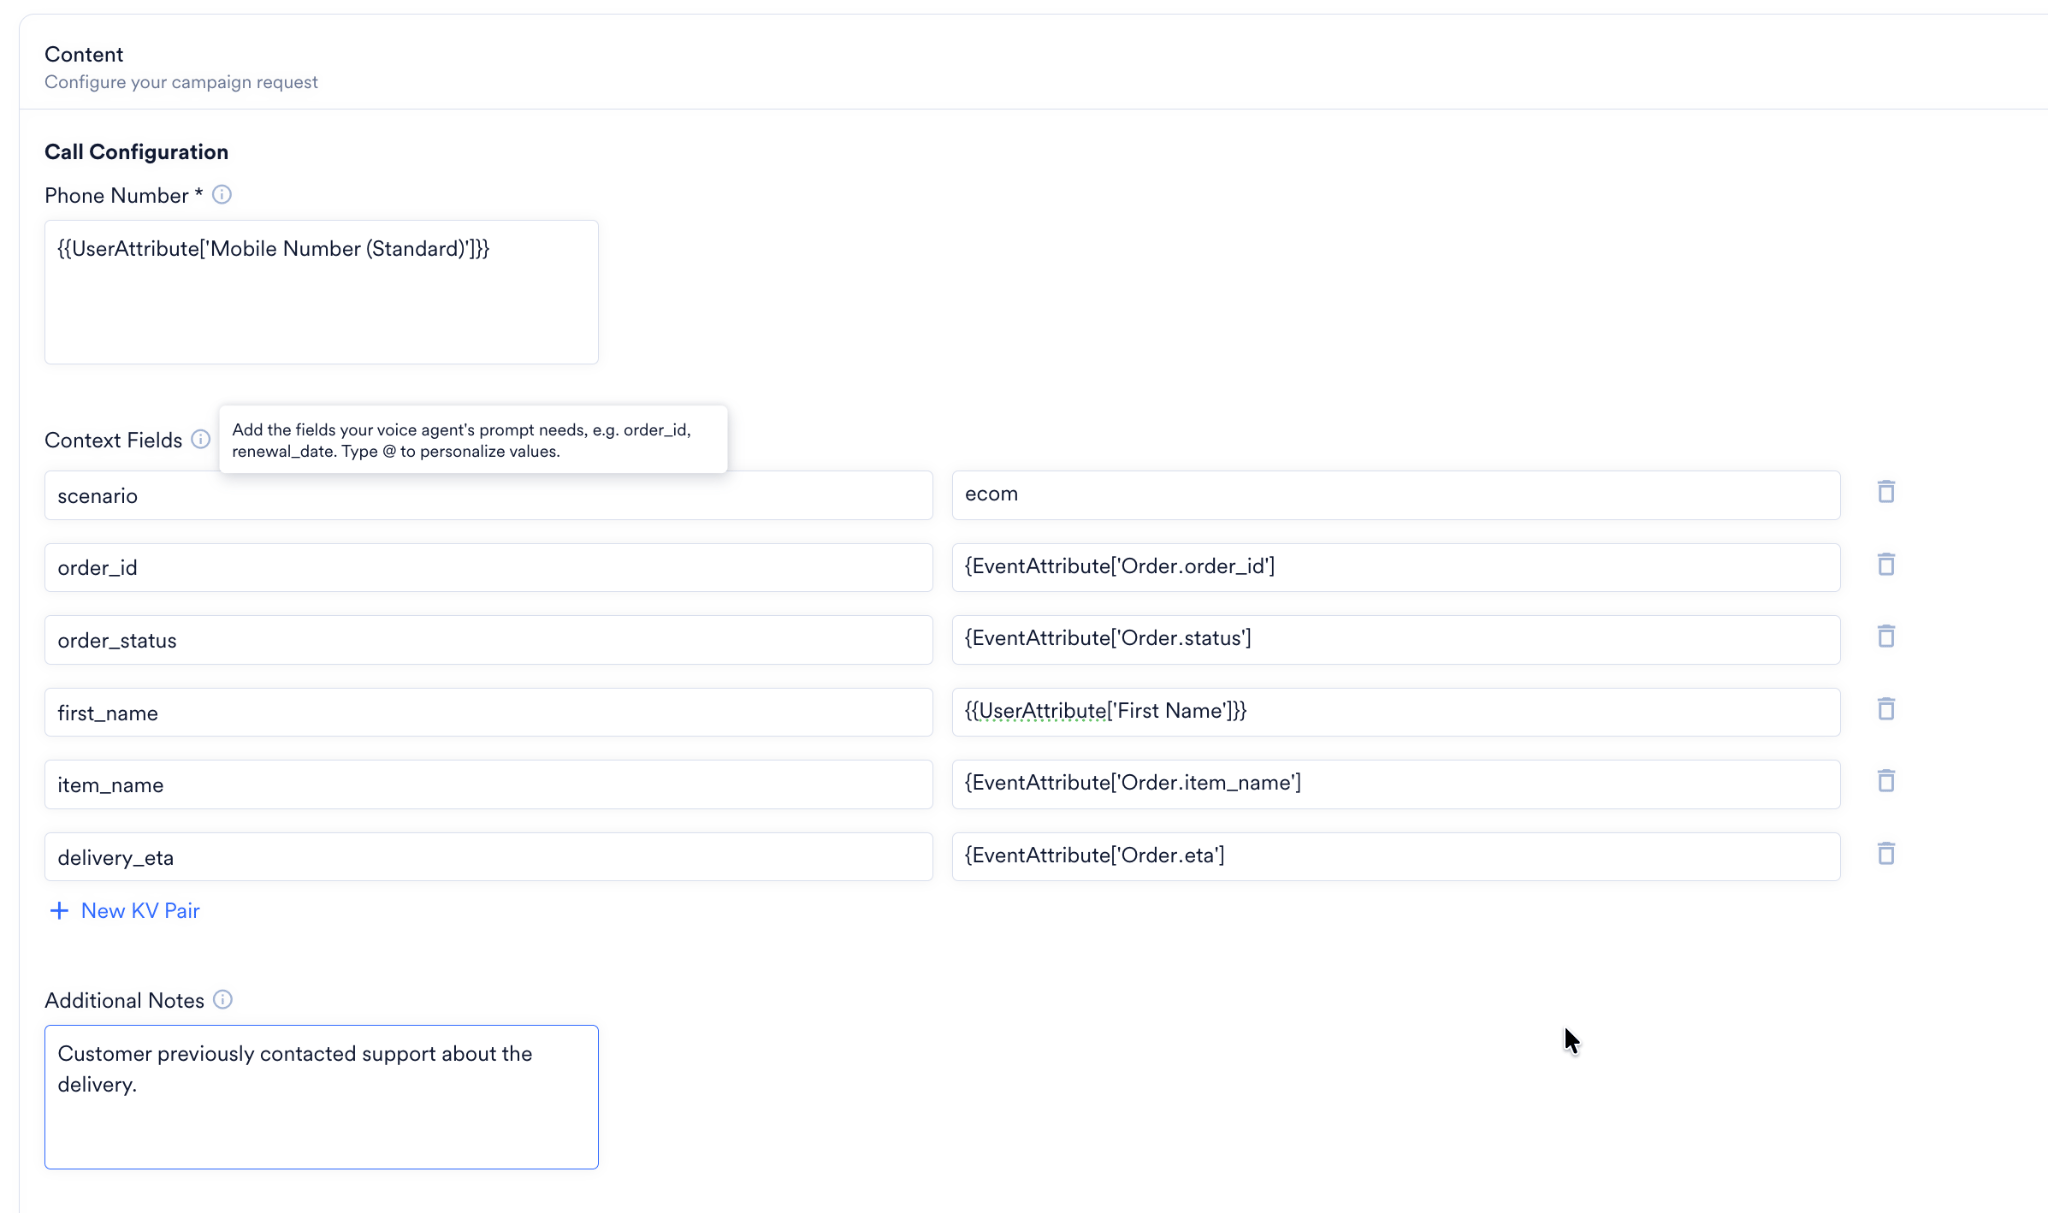
1. [Create a Connected App campaign](/user-guide/campaigns-and-channels/connected-apps/create/create-a-connected-app-campaign), and in Step 2 of the campaign setup, choose the **Make Outbound Call** connector.
2. In the **Call Configuration** section, provide the **Phone Number** in E.164 format. Type `@` to personalize.
3. Add **Context Fields** as key-value pairs that your prompt needs (for example, `order_id`).
## Step 3: Configure a Campaign
1. [Create a Connected App campaign](/user-guide/campaigns-and-channels/connected-apps/create/create-a-connected-app-campaign), and in Step 2 of the campaign setup, choose the **Make Outbound Call** connector.
2. In the **Call Configuration** section, provide the **Phone Number** in E.164 format. Type `@` to personalize.
3. Add **Context Fields** as key-value pairs that your prompt needs (for example, `order_id`).
 ## Step 4: Testing and Validation
To ensure your integration works as expected, follow these validation steps:
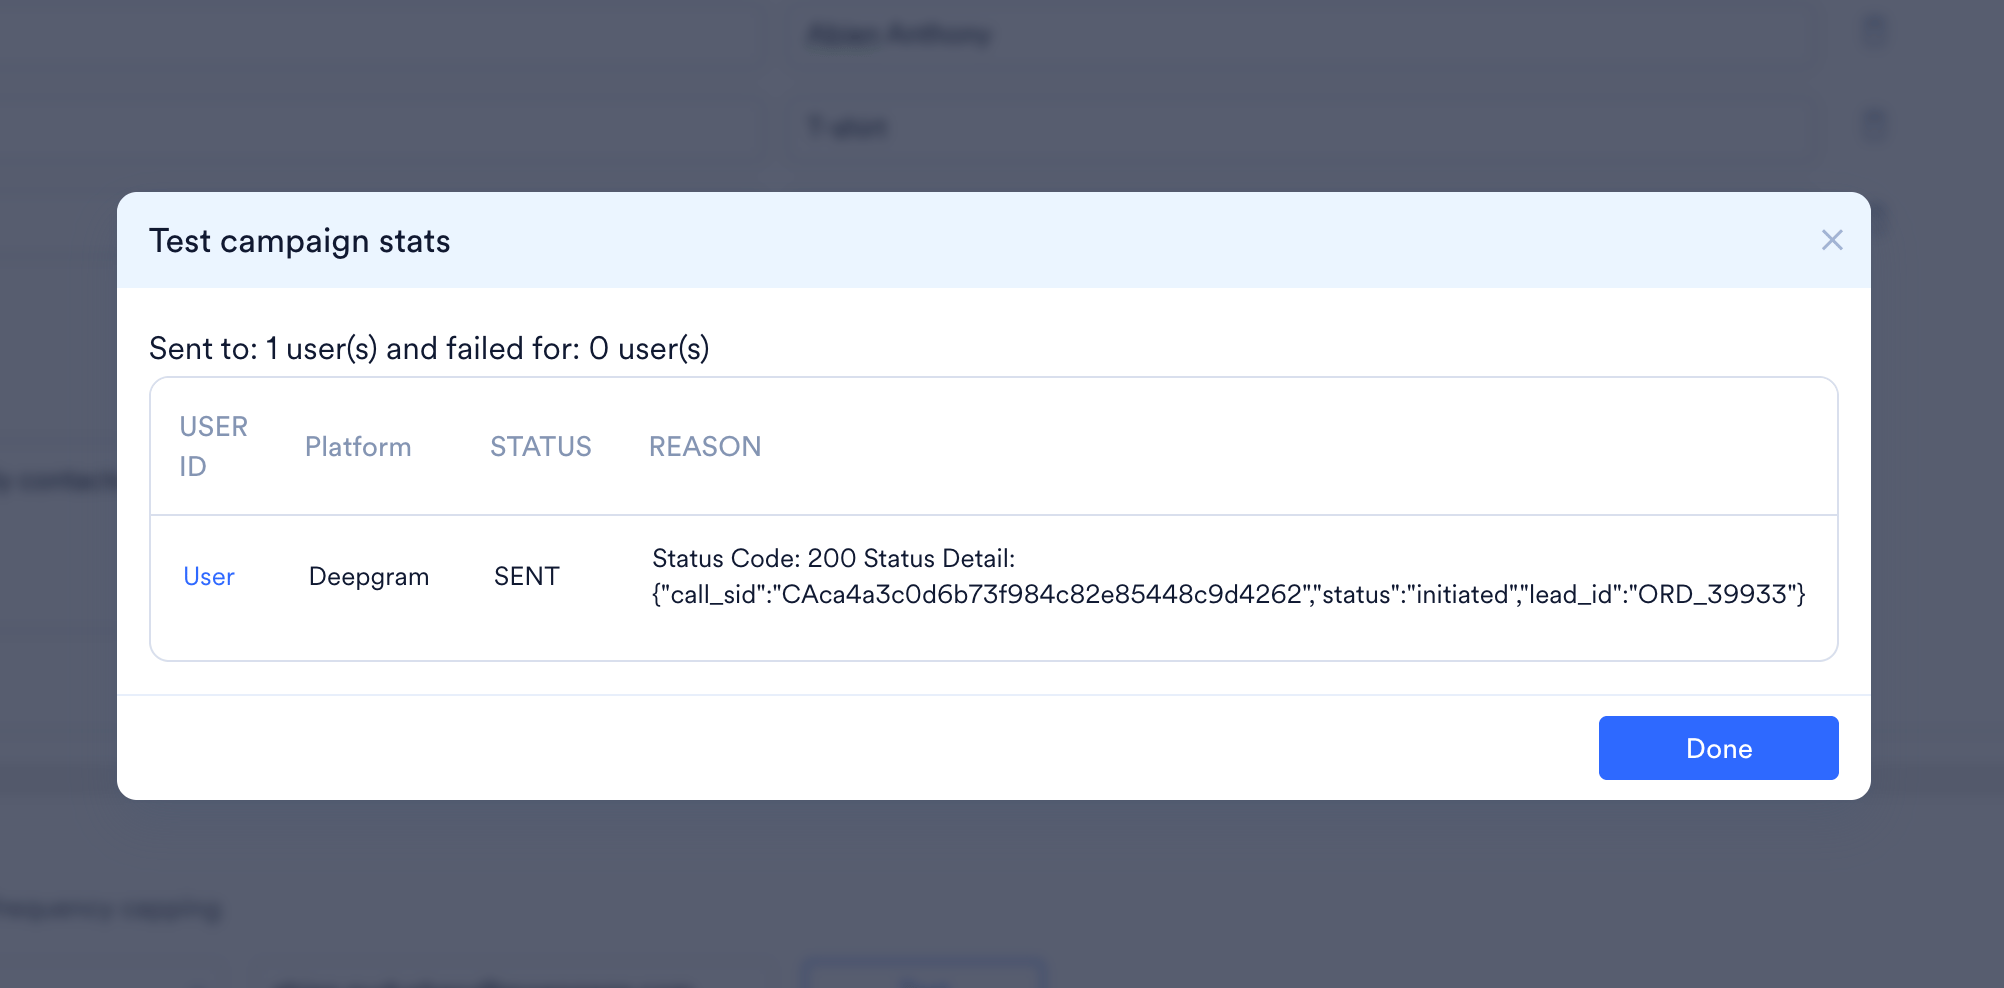
1. Trigger a test send from the campaign and verify the request body context object appears under the exact Context Key you configured when connecting the app.
2. Check your server logs to confirm authentication and telephony placement. Look for an incoming request whose Authorization header matches your Endpoint Secret.
3. Verify that the conversation used the provided context fields correctly.
## Step 4: Testing and Validation
To ensure your integration works as expected, follow these validation steps:
1. Trigger a test send from the campaign and verify the request body context object appears under the exact Context Key you configured when connecting the app.
2. Check your server logs to confirm authentication and telephony placement. Look for an incoming request whose Authorization header matches your Endpoint Secret.
3. Verify that the conversation used the provided context fields correctly.