> ## Documentation Index
> Fetch the complete documentation index at: https://moengage.com/docs/llms.txt
> Use this file to discover all available pages before exploring further.
# Send MoEngage Events to Adobe
## Introduction
The integration enables streaming MoEngage campaign events and user actions to Adobe Experience Platform HTTP APIs via MoEngage Streams, creating unified customer profiles in Adobe Experience Platform (AEP).
## Key Features/Functionality
With this integration, you can:
* Send MoEngage campaign events (email opens, push notifications, SMS delivery) in real-time.
* Send user action events (app events, custom events, behavioral data) from MoEngage to AEP.
* Build unified customer profiles combining MoEngage engagement data with CRM, web analytics, and offline data.
## Architecture and Adobe Audience Manager Integration
**Why Stream to AEP instead of Adobe Analytics?**
This integration utilizes **AEP** as the central ingestion point. Unlike legacy methods that push data directly to Adobe Analytics, streaming to AEP utilizes the flexible **XDM (Experience Data Model)** standard.
**How to use this data in Adobe Audience Manager (AAM):**
Once MoEngage data is ingested into AEP, it enriches the Real-Time Customer Profile. You can then use the **Audience Manager Destination** to share these segments directly with AAM. This allows you to combine MoEngage offline/event data and your existing Adobe Analytics web data inside AAM for advanced audience stitching.
For implementation details, refer to the official Adobe documentation: [**Official Guide: Experience Platform Segment Sharing with Audience Manager →**](https://experienceleague.adobe.com/en/docs/audience-manager/user-guide/implementation-integration-guides/integration-experience-platform/aam-aep-audience-sharing)
## Use Cases
* **Unified Customer View**: Combine MoEngage campaign engagement (email opens, push clicks) with web behavior from Adobe Analytics and offline purchases from CRM to create complete customer profiles.
* **Advanced Segmentation**: Build segments like "Users who opened promotional email in last 7 days but haven't purchased" using both MoEngage engagement data and e-commerce transaction data.
* **Cross-Channel Journey Orchestration**: Trigger Adobe Journey Optimizer campaigns based on MoEngage campaign non-engagement (e.g., didn't open email → send SMS via different channel).
* **Campaign Performance Analytics**: Query historical MoEngage campaign events in Data Lake to analyze performance trends, A/B test results, and cohort behavior over time.
* **Identity Graph Enrichment**: Stitch MoEngage user IDs with Adobe ECID, CRM IDs, and email addresses to resolve identities across all customer touchpoints.
**Prerequisites**
* Adobe Experience Platform with admin permissions to manage Schemas, Datasets, Sources.
* Understanding of your existing AEP identity namespaces and identifiers.
**Integration Approach**
* This integration requires you to configure your AEP environment and share specific details with MoEngage to enable Streams. MoEngage will then configure the streams to send events in the format that matches your AEP schema.
* The MoEngage Streams is a paid add-on.
## Step 1: Identify Your Identity Namespaces
Before you configure the integration, identify the identity namespaces to use for stitching MoEngage data with your existing customer profiles in AEP.
### Step 1.1: Review Existing Identity Namespaces
To review existing identity namespaces, perform the following steps:
1. Log in to Adobe Experience Platform.
2. Navigate to **Identities** → **Browse**.
3. Review your existing identity namespaces.
4. Identify the namespace(s) to use as primary and secondary identities.
### Identity Namespace Requirements
| Identity Type | Requirement | Examples | Notes |
| ------------------------ | ------------------------ | ------------------------- | ------------------------------------------------------------------------------------------------------------- |
| **Primary Identity** | Required | CRM ID, Loyalty ID, Email | Must exist in your AEP namespace. Share the **identity symbol** (e.g., `lumaCrmId` ) with MoEngage. |
| **Secondary Identities** | Optional but recommended | Email, Phone, Adobe ECID | Use standard Adobe namespaces (`Email`, `Phone`, `ECID`) when possible. |
| **MoEngage User ID** | Recommended | MoEngage User ID | If you want to track MoEngage's internal user ID, create a custom namespace with the symbol `moengageUserId`. |
You must share the following identity namespace details with MoEngage when requesting Streams setup:
* Primary Identity Symbol: for example, lumaCrmId, loyaltyId
* Secondary Identity Symbols: for example, Email, Phone
* MoEngage User ID Symbol (if created): moengageUserId
MoEngage configures Streams to map your MoEngage user attributes to these identity namespaces in the identityMap.
## Step 2: Create an XDM Schema
The XDM schema defines the structure of MoEngage event data in AEP. You can use the recommended schema structure or customize it based on your requirements.
#### Use the Recommended Schema Structure (Out-of-the-Box)
MoEngage provides a sample schema structure that works out-of-the-box with MoEngage Streams. If you replicate this structure, the integration will work with minimal configuration.
#### Sample Schema Structure
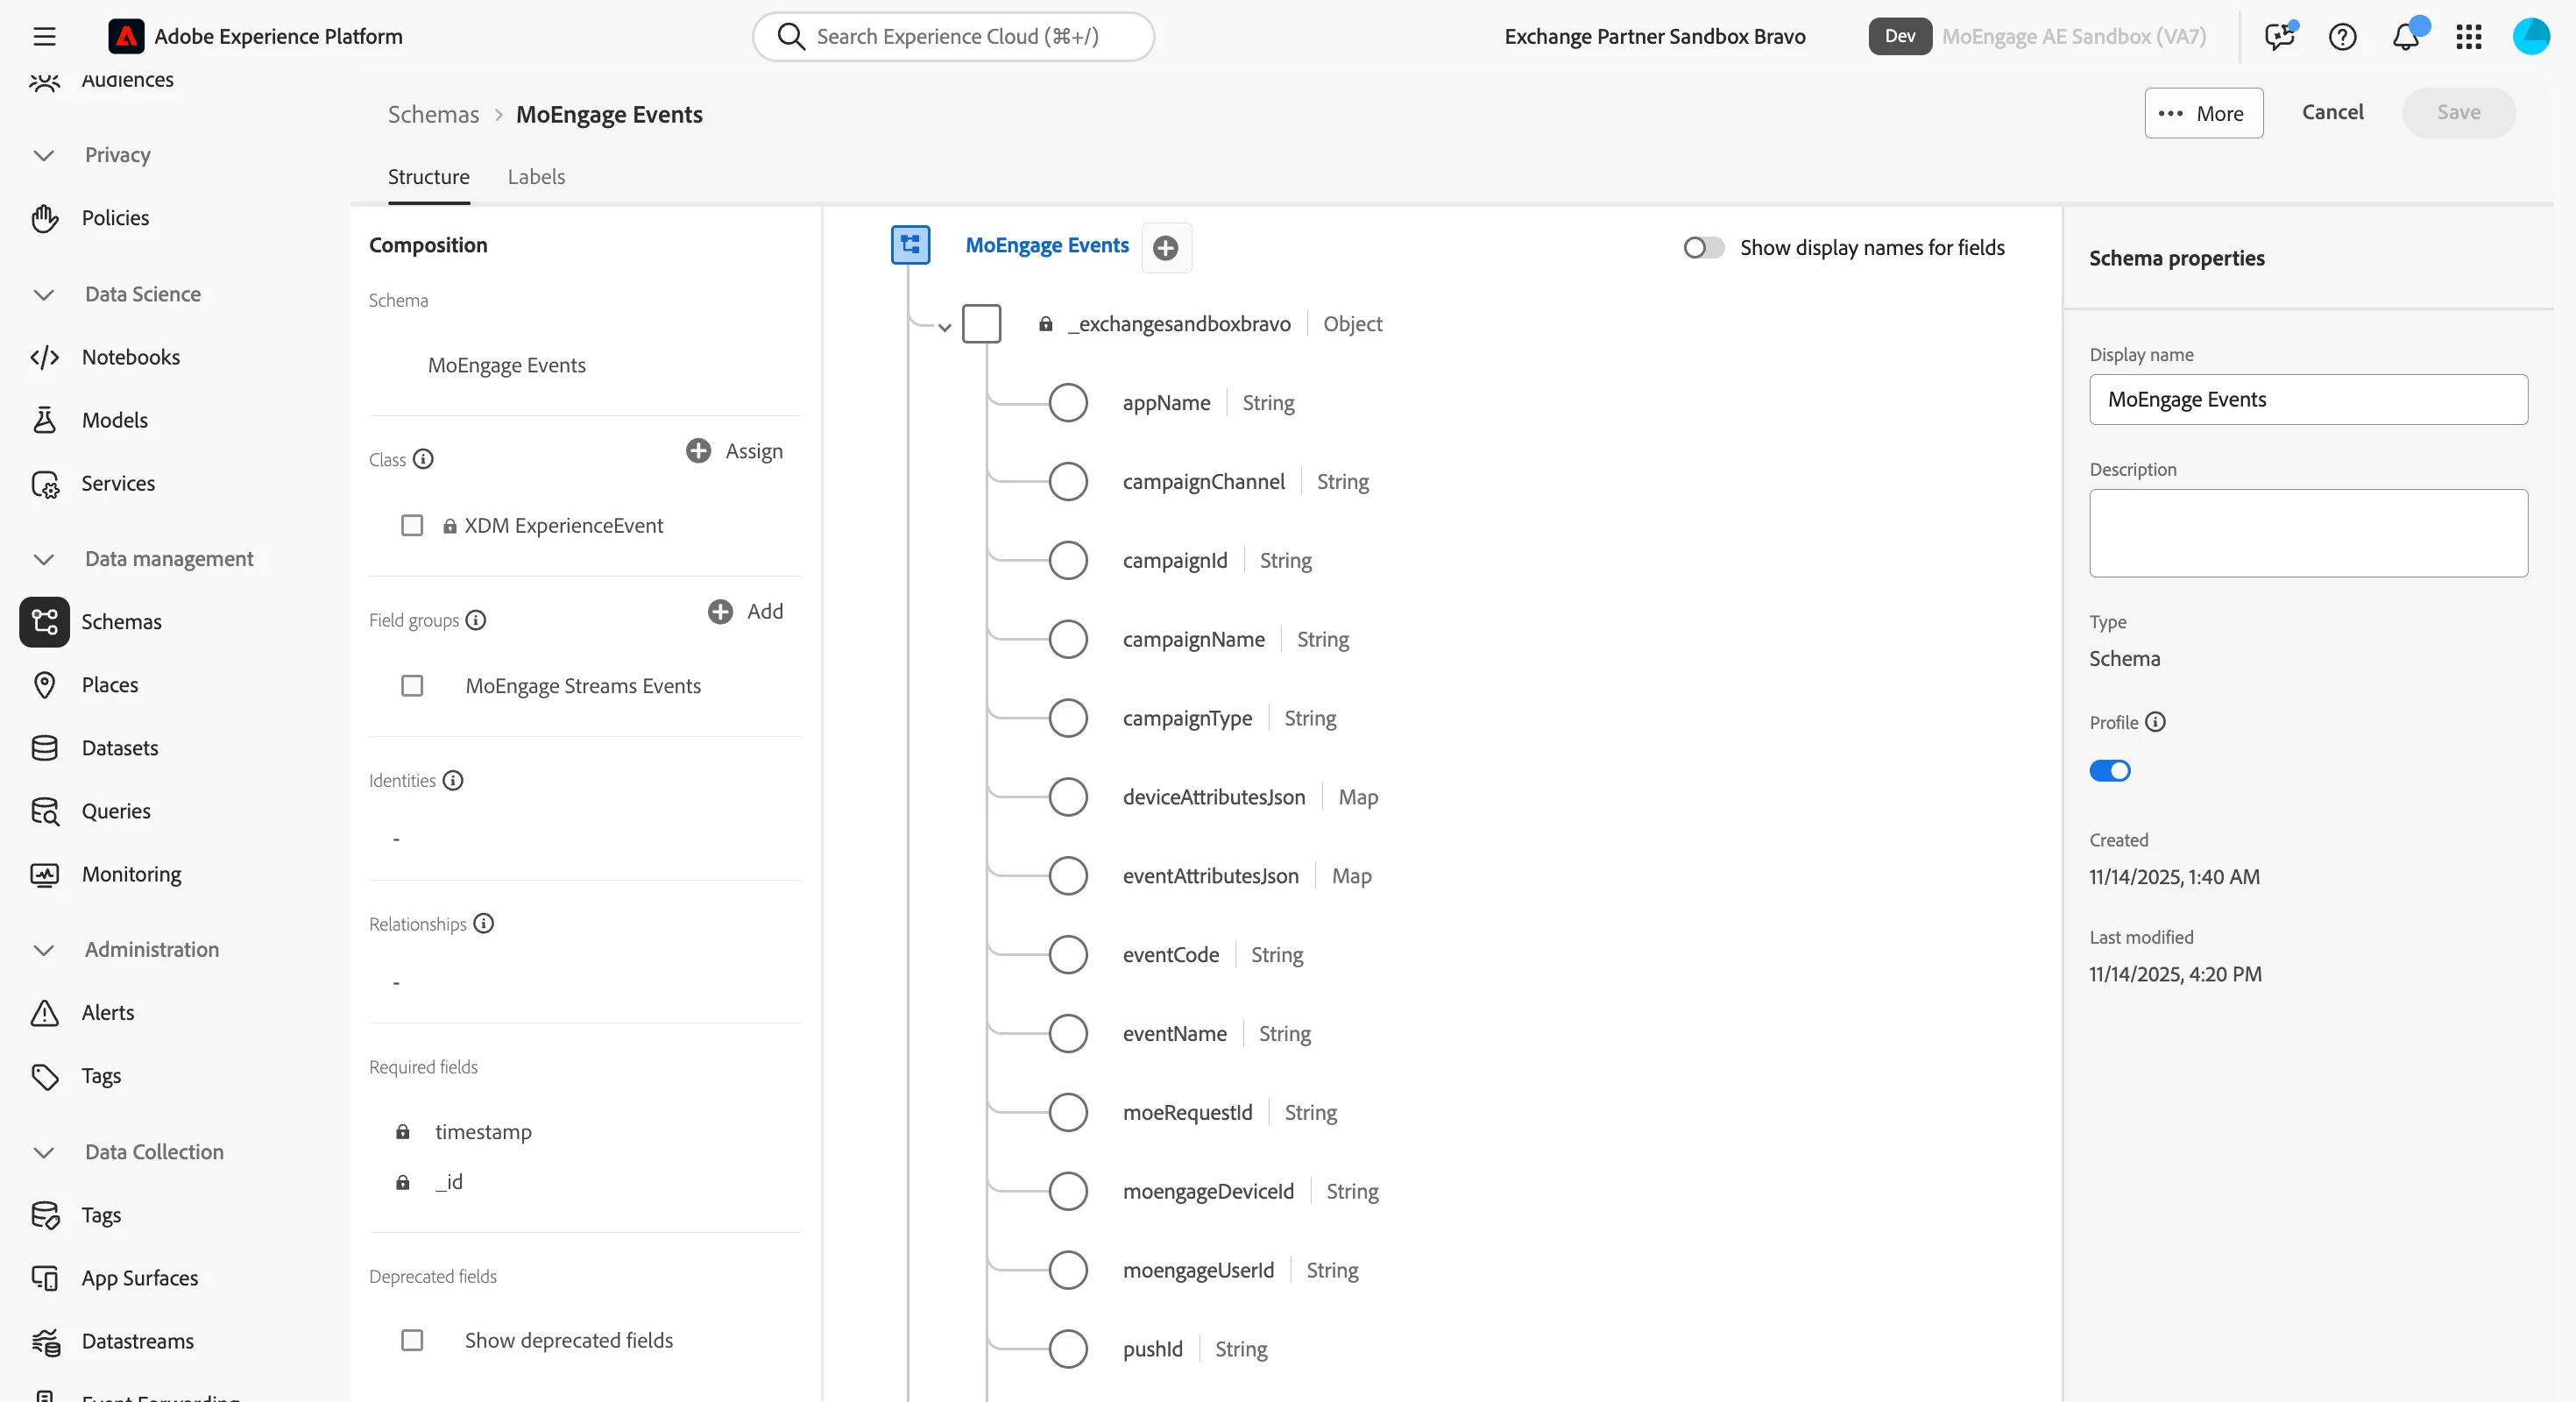
Create an XDM ExperienceEvent schema with the following field structure:
| Field Path | Type |
| -------------------------------- | -------- |
| `_id` | String |
| `timestamp` | DateTime |
| `eventType` | String |
| `eventMergeId` | String |
| `producedBy` | String |
| `identityMap` | Map |
| `_{tenant}.source` | String |
| `_{tenant}.eventName` | String |
| `_{tenant}.eventCode` | String |
| `_{tenant}.appName` | String |
| `_{tenant}.campaignId` | String |
| `_{tenant}.campaignName` | String |
| `_{tenant}.campaignType` | String |
| `_{tenant}.campaignChannel` | String |
| `_{tenant}.eventAttributesJson` | Map |
| `_{tenant}.userAttributesJson` | Map |
| `_{tenant}.deviceAttributesJson` | Map |
**Note**: `_{tenant}` represents your organization's tenant namespace (for example, `_yourorgname`).
### Step 2.2: Create the Schema in AEP
To create the schema in AEP, perform the following steps:
1. Navigate to **Schemas** → **Browse**.
2. Click **Create schema** → **XDM ExperienceEvent**.
3. In the **Name** box, type **MoEngage Events**.
4. Ensure the following standard field groups are present:
* XDM ExperienceEvent
* IdentityMap
5. Create a custom field group named **MoEngage Event Details**.
6. Add the fields listed in the table above under your tenant namespace.
7. To enable the schema for profiles, turn the **Profile** toggle on.
8. Click **Save**.\\
 ### Step 2.4: Download Schema JSON
After you create and save the schema, download the schema JSON for reference:
1. Open your schema in the Schema Editor.
2. Click the **More** (three dots) menu in the upper-right corner.
3. Select **Copy schema structure** or **Download JSON**.
4. Save this file. You might need it when you coordinate with MoEngage support.
### Step 2.5: Note Your Schema Details
After creating the schema, note down the following details:
* **Schema ID**: You can find it in the schema details (for example, `https://ns.adobe.com/{TENANT}/schemas/{SCHEMA_ID}`)
* **Tenant ID**: Your organization's tenant namespace (for example, `_yourorgname`).
## Step 3: Create a Dataset
Datasets store data that conforms to your XDM schema. To create a dataset, perform the following steps:
1. Navigate to **Datasets** → **Browse**.
2. Click **Create dataset from schema**.
3. Select the `MoEngage Events` schema that you created.
4. Configure the dataset with the following information:
* **Name**: `MoEngage Event Data`
* **Description**: Campaign events and user actions from the MoEngage Streams API.
5. Click **Finish**.
6. Open the new dataset and turn the **Profile** toggle on to enable it for the Real-Time Customer Profile.\\
### Step 2.4: Download Schema JSON
After you create and save the schema, download the schema JSON for reference:
1. Open your schema in the Schema Editor.
2. Click the **More** (three dots) menu in the upper-right corner.
3. Select **Copy schema structure** or **Download JSON**.
4. Save this file. You might need it when you coordinate with MoEngage support.
### Step 2.5: Note Your Schema Details
After creating the schema, note down the following details:
* **Schema ID**: You can find it in the schema details (for example, `https://ns.adobe.com/{TENANT}/schemas/{SCHEMA_ID}`)
* **Tenant ID**: Your organization's tenant namespace (for example, `_yourorgname`).
## Step 3: Create a Dataset
Datasets store data that conforms to your XDM schema. To create a dataset, perform the following steps:
1. Navigate to **Datasets** → **Browse**.
2. Click **Create dataset from schema**.
3. Select the `MoEngage Events` schema that you created.
4. Configure the dataset with the following information:
* **Name**: `MoEngage Event Data`
* **Description**: Campaign events and user actions from the MoEngage Streams API.
5. Click **Finish**.
6. Open the new dataset and turn the **Profile** toggle on to enable it for the Real-Time Customer Profile.\\
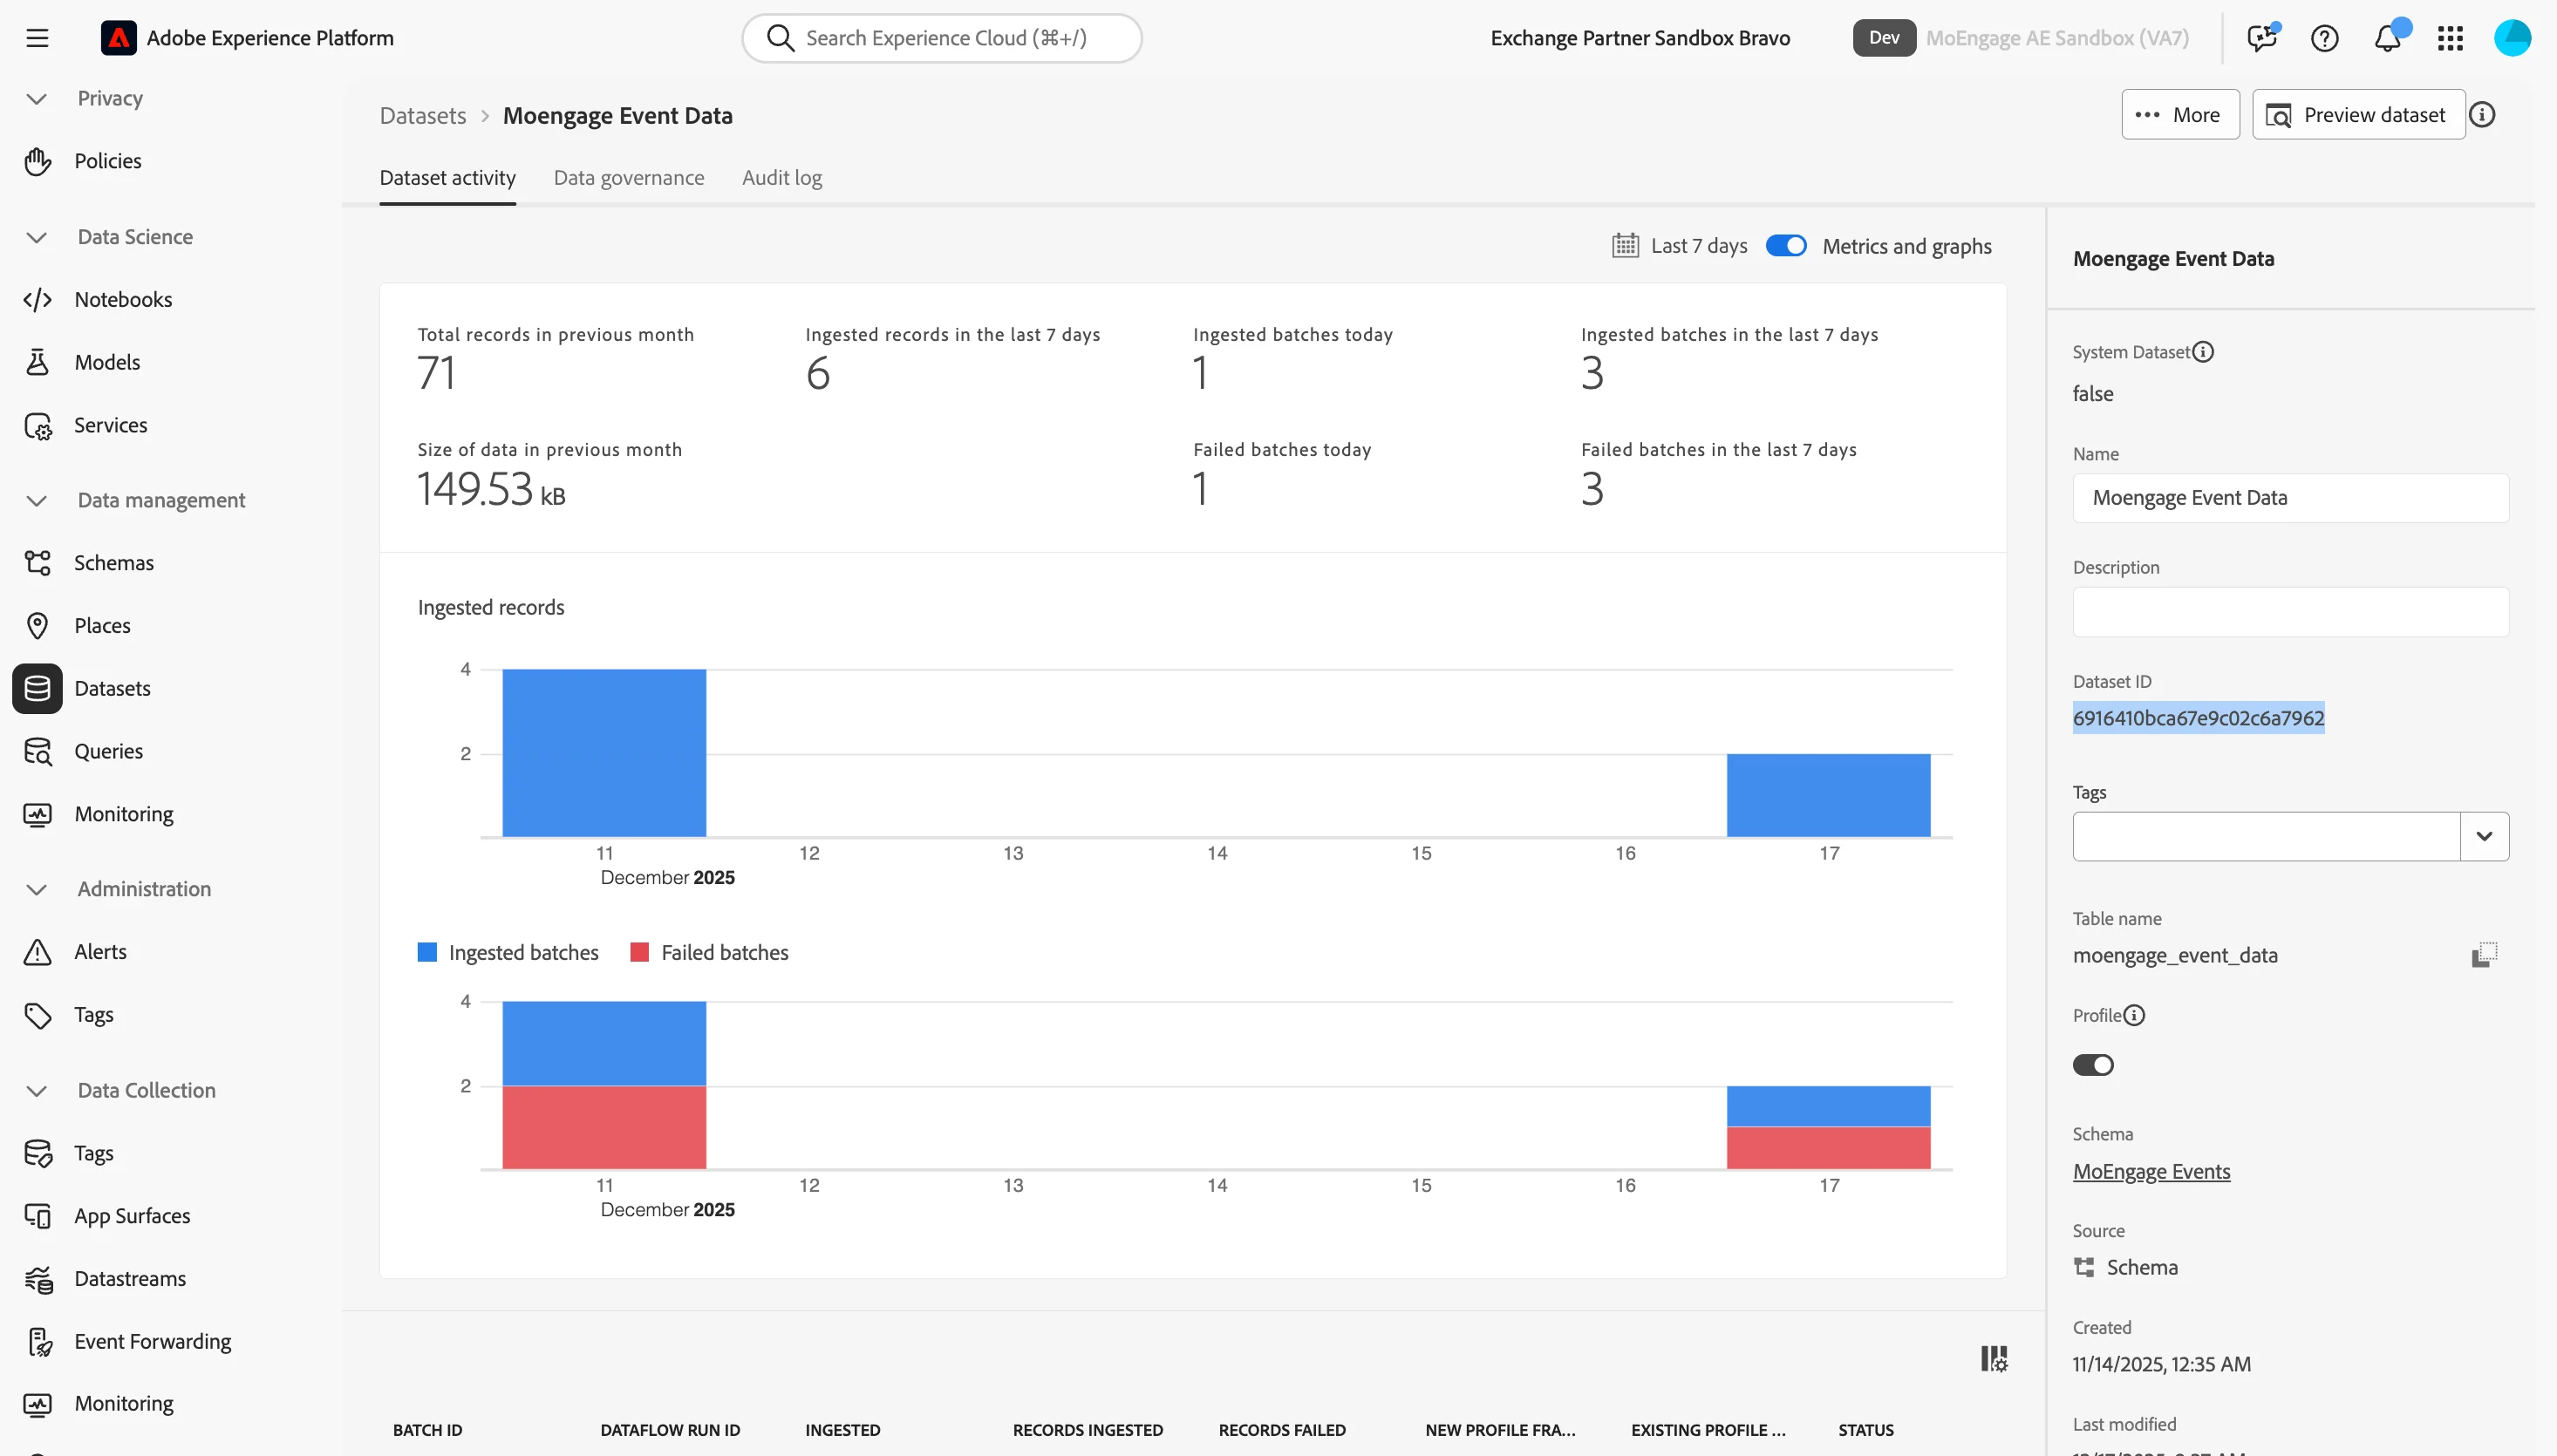 **Save the Dataset ID**: This is required for the HTTP API configuration (locate in the dataset details, for example, `690da33230e4cd0adff86e57`).
## Step 4: Configure the HTTP API Streaming Source
The HTTP API source provides a streaming endpoint to send data to AEP.
### Step 4.1: Choose an Authentication Method
Before you create the HTTP API source connection, choose one of the following authentication methods:
1. No Authentication
2. OAuth 2.0 Authentication
### Step 4.2: Create the HTTP API Source Connection
To create the HTTP API source connection, perform the following steps:
1. Navigate to **Sources** → **Catalog**.
2. In the **Streaming** category, find **HTTP API.**
3. Click **Add data**.
4. Configure the account details:
* **Account name**: MoEngage Streams Connection.
* **Description**: HTTP API endpoint for streaming MoEngage events.
* **Authentication**: Choose the method you had selected earlier.
5. Click **Connect** to source.
**Save the Dataset ID**: This is required for the HTTP API configuration (locate in the dataset details, for example, `690da33230e4cd0adff86e57`).
## Step 4: Configure the HTTP API Streaming Source
The HTTP API source provides a streaming endpoint to send data to AEP.
### Step 4.1: Choose an Authentication Method
Before you create the HTTP API source connection, choose one of the following authentication methods:
1. No Authentication
2. OAuth 2.0 Authentication
### Step 4.2: Create the HTTP API Source Connection
To create the HTTP API source connection, perform the following steps:
1. Navigate to **Sources** → **Catalog**.
2. In the **Streaming** category, find **HTTP API.**
3. Click **Add data**.
4. Configure the account details:
* **Account name**: MoEngage Streams Connection.
* **Description**: HTTP API endpoint for streaming MoEngage events.
* **Authentication**: Choose the method you had selected earlier.
5. Click **Connect** to source. 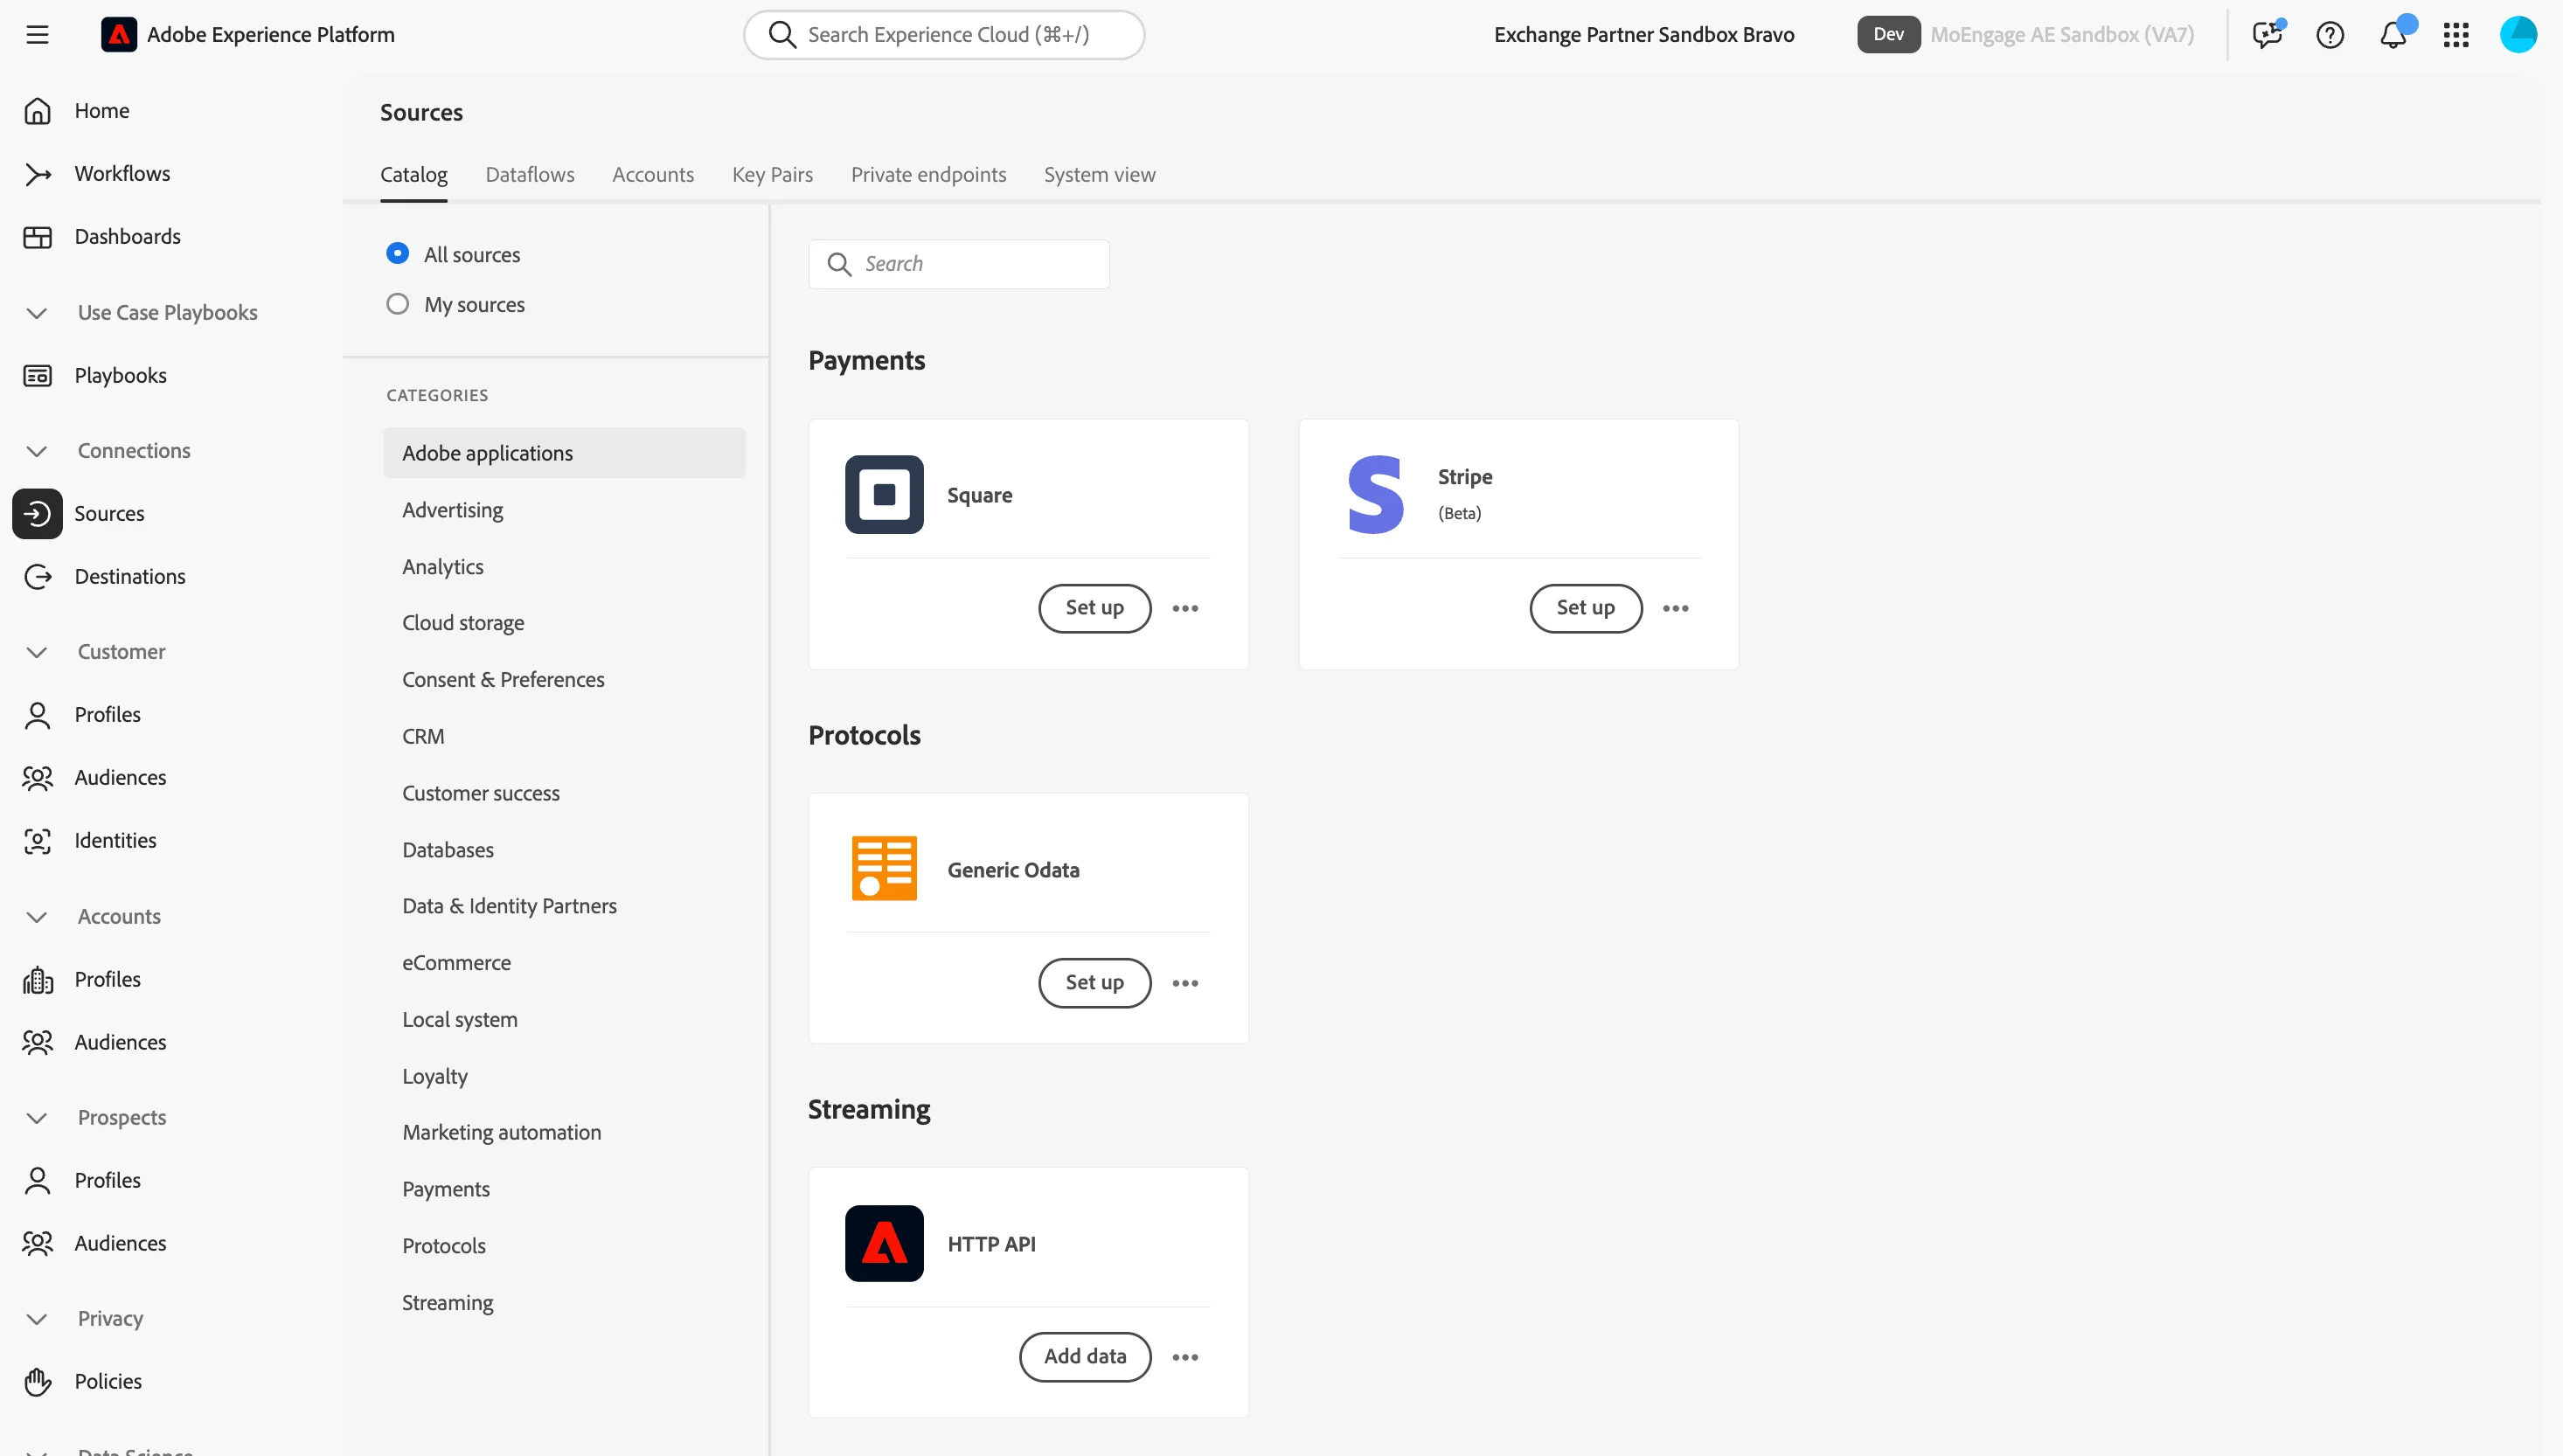 ### Step 4.3: Set Up OAuth 2.0 Credentials (If Selected)
If you selected Authenticated in the previous step, you must set up OAuth 2.0 credentials through Adobe Developer Console and perform the following steps:
### Step 4.4: Create the Service Account Integration
To create the service account integration, perform the following steps:
1. Navigate to [Adobe Developer Console.](https://developer.adobe.com/console)
2. Select your organization or create a new project.
3. Click **Add to Project** → **API**.
4. Select **Adobe Experience Platform** from the API list.
5. Choose **OAuth Server-to-Server** credential type.
6. Configure the required product profiles and permissions.
7. Click **Save configured API**.
#### Copy OAuth Credentials
After creating the integration, copy the following credentials from the Adobe Developer Console:
| Credential | Where to Find |
| -------------------------------- | ----------------------------------------------------------------------- |
| **Client ID** | Developer Console → Your Project → Credentials → OAuth Server-to-Server |
| **Client Secret** | Developer Console → Your Project → Credentials → OAuth Server-to-Server |
| **Organization ID (IMS Org ID)** | Developer Console → Your Project → Overview |
| **Technical Account ID** | Developer Console → Your Project → Credentials → OAuth Server-to-Server |
| **Scopes** | Developer Console → Your Project → Credentials → OAuth Server-to-Server |
### Step 4.5: Configure Dataflow
To configure the dataflow, perform the following steps:
1. In the dataflow configuration enter the following details:
* Dataflow name: `MoEngage Event Stream`.
* Description: Streams MoEngage campaign and user events to AEP.\
**Note**: Do NOT select **XDM compatible**.
2. **Select dataset**: `MoEngage Event Data`
3. Click **Next** to proceed to mapping.
### Step 4.3: Set Up OAuth 2.0 Credentials (If Selected)
If you selected Authenticated in the previous step, you must set up OAuth 2.0 credentials through Adobe Developer Console and perform the following steps:
### Step 4.4: Create the Service Account Integration
To create the service account integration, perform the following steps:
1. Navigate to [Adobe Developer Console.](https://developer.adobe.com/console)
2. Select your organization or create a new project.
3. Click **Add to Project** → **API**.
4. Select **Adobe Experience Platform** from the API list.
5. Choose **OAuth Server-to-Server** credential type.
6. Configure the required product profiles and permissions.
7. Click **Save configured API**.
#### Copy OAuth Credentials
After creating the integration, copy the following credentials from the Adobe Developer Console:
| Credential | Where to Find |
| -------------------------------- | ----------------------------------------------------------------------- |
| **Client ID** | Developer Console → Your Project → Credentials → OAuth Server-to-Server |
| **Client Secret** | Developer Console → Your Project → Credentials → OAuth Server-to-Server |
| **Organization ID (IMS Org ID)** | Developer Console → Your Project → Overview |
| **Technical Account ID** | Developer Console → Your Project → Credentials → OAuth Server-to-Server |
| **Scopes** | Developer Console → Your Project → Credentials → OAuth Server-to-Server |
### Step 4.5: Configure Dataflow
To configure the dataflow, perform the following steps:
1. In the dataflow configuration enter the following details:
* Dataflow name: `MoEngage Event Stream`.
* Description: Streams MoEngage campaign and user events to AEP.\
**Note**: Do NOT select **XDM compatible**.
2. **Select dataset**: `MoEngage Event Data`
3. Click **Next** to proceed to mapping. 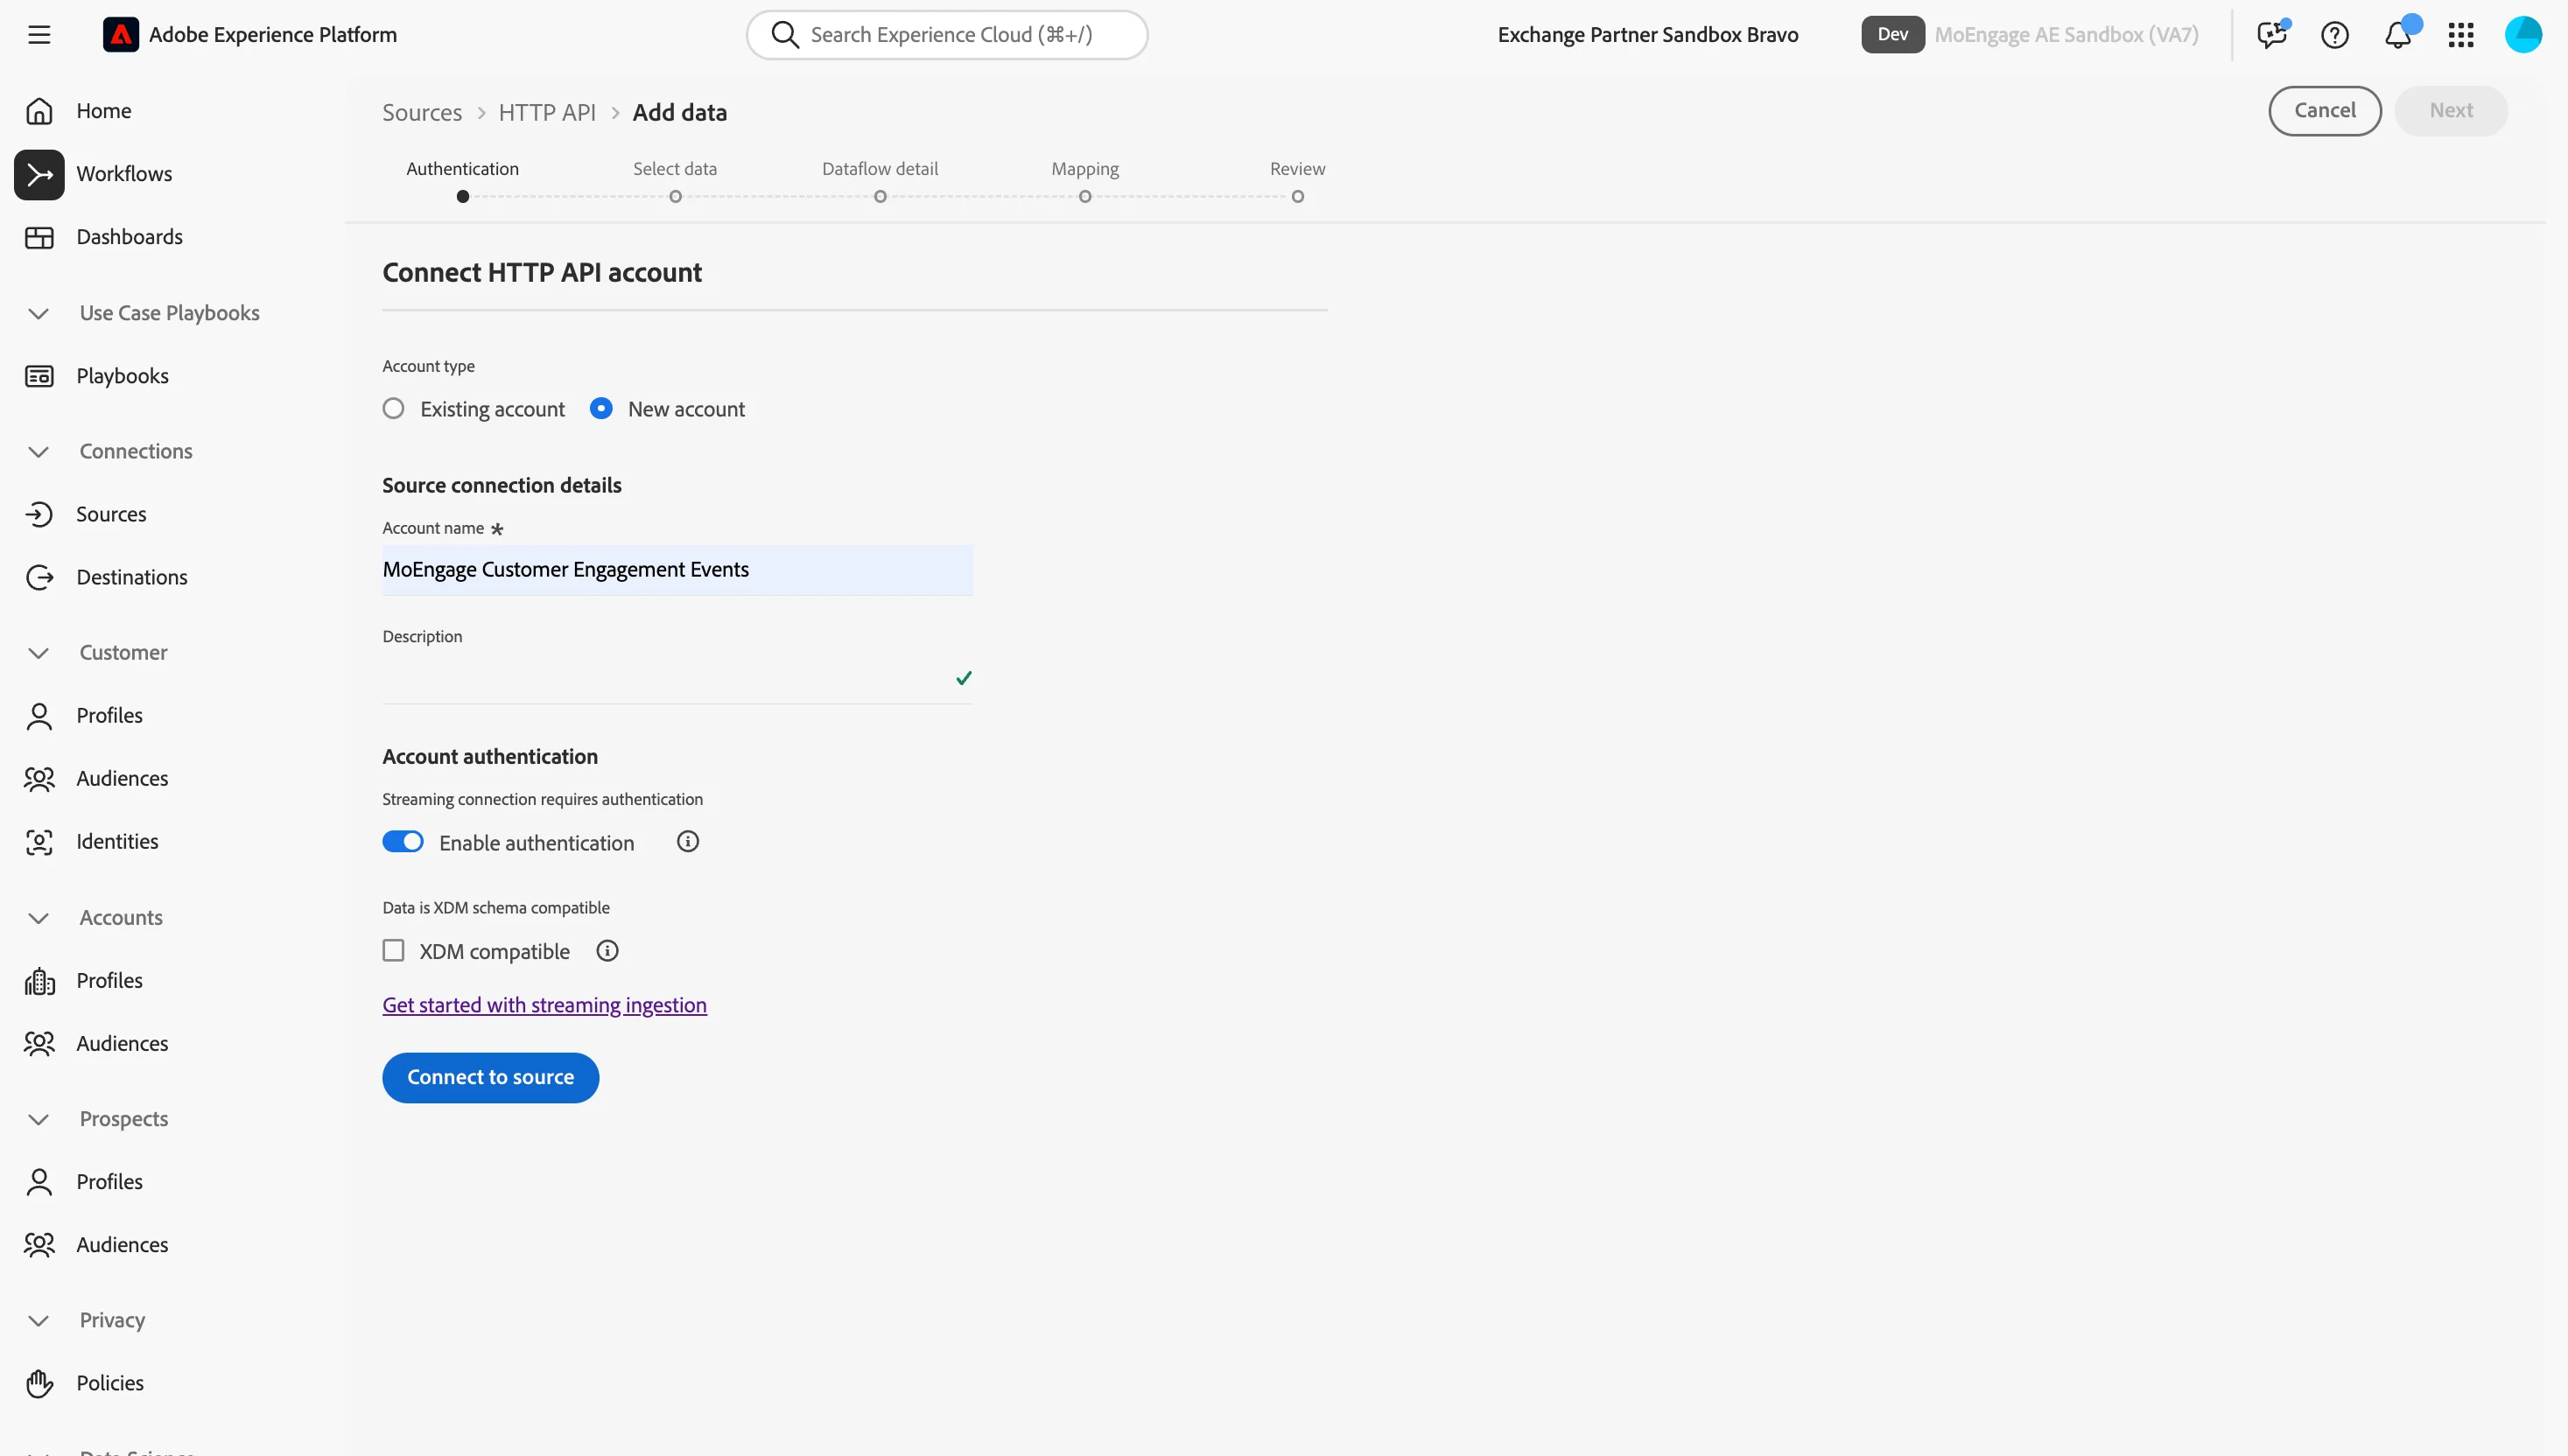 **Limitations of XDM compatible mode**
We do not select "XDM compatible" because MoEngage sends data in its own format, and we'll use the mapping interface to transform it to your XDM schema structure. This gives you more flexibility and control over field mappings.
## Step 5: Configure Field Mapping
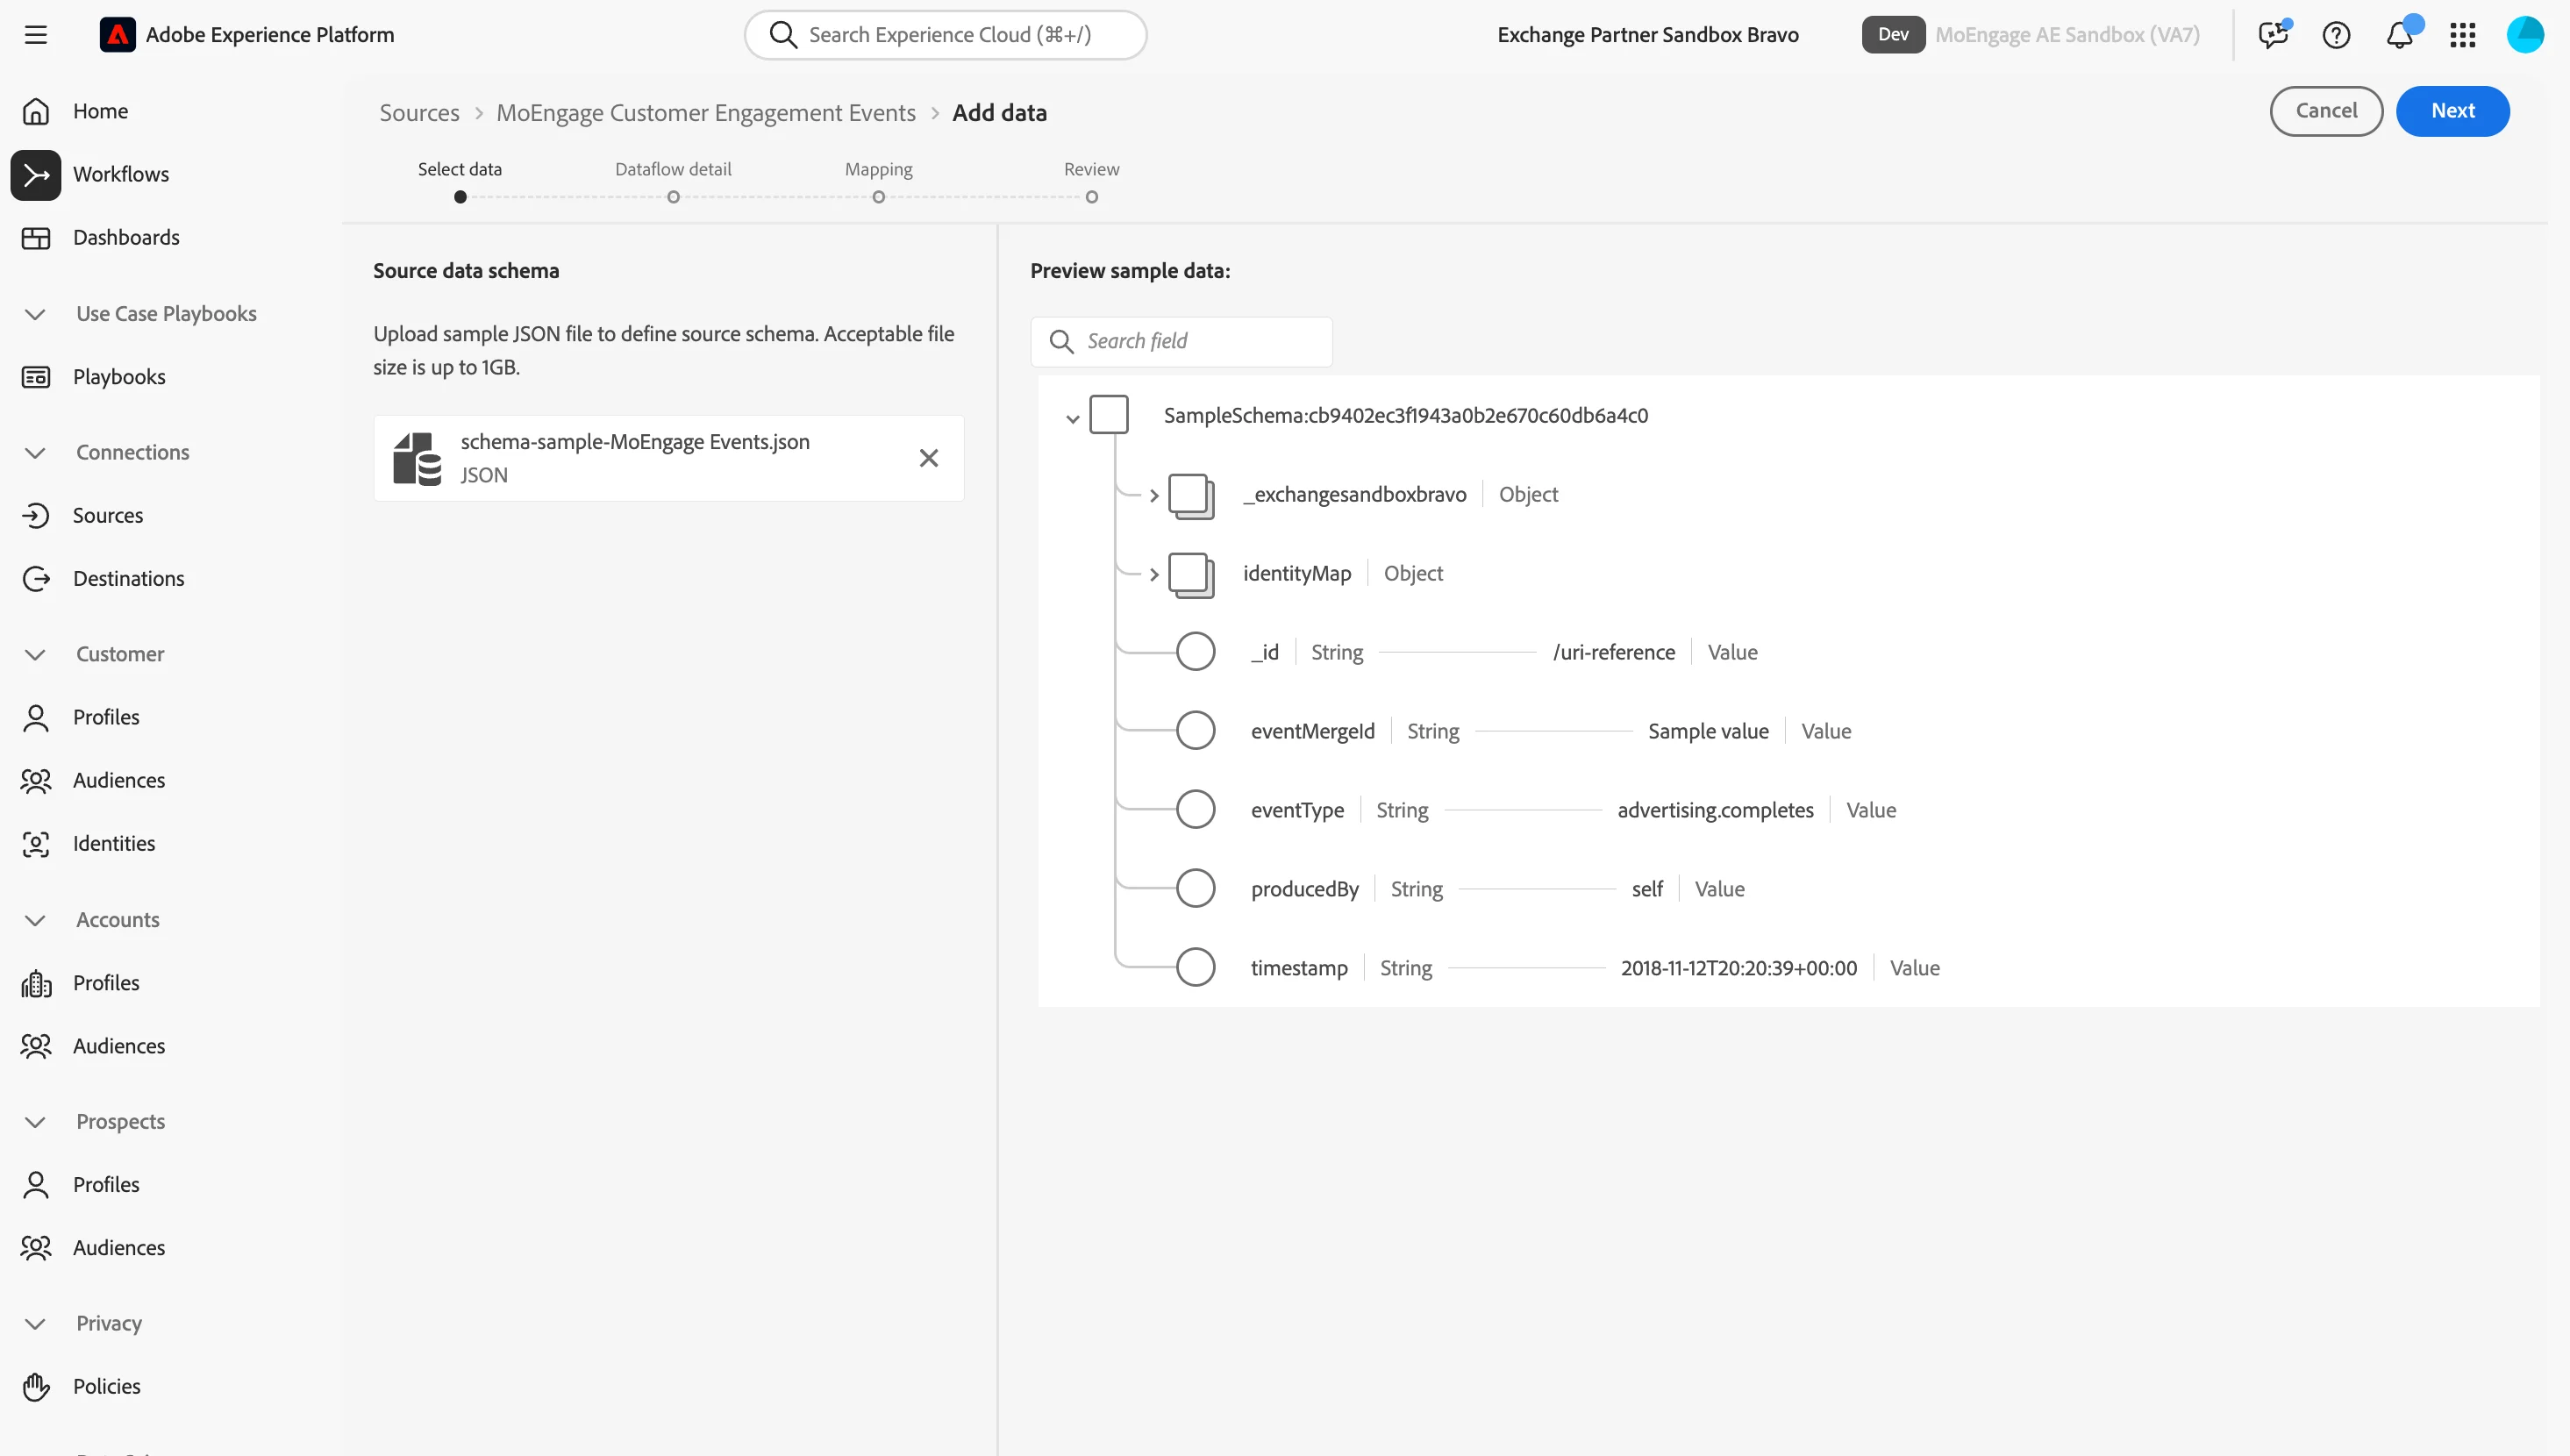
After you create the HTTP API source, AEP displays a mapping interface where you can map MoEngage fields to your XDM schema. Before proceeding with field mapping, you have to either share your schema structure with MoEngage or generate a test payload yourself.
### Step 5.1: Prepare a Schema Sample
Generate a sample payload based on your schema structure to validate the mapping configuration:
1. Using the schema JSON you downloaded in Step 2, generate a sample event payload that includes:
* All required XDM fields (`_id`, `timestamp`, `identityMap`)
* Your custom tenant fields for MoEngage data
* Identity mappings for your configured namespaces
2. **Share with MoEngage**: Send this sample payload along with your schema JSON to MoEngage support. They will generate the appropriate mapping CSV file for your schema structure.
**Limitations of XDM compatible mode**
We do not select "XDM compatible" because MoEngage sends data in its own format, and we'll use the mapping interface to transform it to your XDM schema structure. This gives you more flexibility and control over field mappings.
## Step 5: Configure Field Mapping
After you create the HTTP API source, AEP displays a mapping interface where you can map MoEngage fields to your XDM schema. Before proceeding with field mapping, you have to either share your schema structure with MoEngage or generate a test payload yourself.
### Step 5.1: Prepare a Schema Sample
Generate a sample payload based on your schema structure to validate the mapping configuration:
1. Using the schema JSON you downloaded in Step 2, generate a sample event payload that includes:
* All required XDM fields (`_id`, `timestamp`, `identityMap`)
* Your custom tenant fields for MoEngage data
* Identity mappings for your configured namespaces
2. **Share with MoEngage**: Send this sample payload along with your schema JSON to MoEngage support. They will generate the appropriate mapping CSV file for your schema structure.
 **MoEngage Mapping CSV Generation**
MoEngage support will create a custom mapping CSV file tailored to your schema structure and identity namespace configuration. This ensures accurate field mappings between MoEngage event data and your AEP schema.
### Step 5.2: Use the MoEngage-Provided Mapping CSV File (Recommended)
For production deployments, request the mapping CSV file from MoEngage support:
1. In the mapping interface, you will see error messages for fields that don't auto-map.
2. Remove any error-causing fields by clicking the trash icon.
3. Contact MoEngage support and provide the following:
* Your schema JSON file (from Step 2)
* A sample event payload with your required fields
* Identity namespace symbols (primary and secondary)
* Your tenant namespace (for example, `_yourorgname`)
4. MoEngage will generate a custom `moengage-aep-mapping.csv` file tailored to your schema.
5. Once received, verify the CSV contains correct mappings:
* Tenant namespace should match yours (for example, `_yourorgname`).
* Identity namespace symbols should match your configuration (e.g., `lumaCrmId`, `Email`, `Phone`).
* Field paths should match your schema structure.
6. Click **Import** in the AEP mapping interface and upload the CSV file.
7. Review the imported mappings to ensure all fields are correctly mapped.
8. Click **Next** to proceed.
**Verify Before Importing**
Always review the mapping CSV file before importing to ensure:
* Tenant namespace matches your AEP organization (replace any example values like `_exchangesandboxbravo`).
* Identity symbols are correct for your environment.
* Formulas for timestamp conversion and data transformation are present.
### Step 5:3 Manual Mapping for Local Testing
If you want to test the integration locally before involving MoEngage support, you can manually create the following field mappings:
1. In the mapping interface, map MoEngage source fields to your XDM destination fields.
2. Key mappings to configure:
* **id** → `_id`
* **event\_uuid** → `eventMergeId`
* **Use formula**: `dformat((time * 1000), "yyyy-MM-dd'T'HH:mm:ssX")` → `timestamp`
* **event\_code** → `eventType` (with decode formula for XDM event types)
* **identities.**{yourPrimaryId} → `identityMap.{yourNamespace}[0].id` with `primary: true`
* Map additional fields from `event_attributes`, `user_attributes`, and `device_attributes` to your tenant fields
3. Test the mapping with Postman (Step 6) to validate data ingestion.
4. Export your working mapping as CSV for documentation.
5. After validation, send the following to MoEngage support for production Streams configuration:
* Tested mapping CSV
* Sample test payload that worked successfully
* Schema JSON
6. Click **Next** to proceed.
**Important Mapping Notes**
* **Timestamp conversion**: MoEngage sends Unix timestamps (seconds). Use the formula `dformat((time * 1000), "yyyy-MM-dd'T'HH:mm:ssX")` to convert to ISO 8601 format.
* **Primary identity**: Ensure only ONE identity has `primary: true`. All others should be `primary: false`.
* **Event type mapping**: Use the decode function to map MoEngage event codes to standard XDM event types (e.g., `MOE_EMAIL_SENT` → `directMarketing.emailSent`).
### Complete Dataflow Setup
After configuring the dataflow, you'll receive a streaming endpoint URL that looks like:
```text Endpoint URL wrap theme={null}
https://dcs.adobedc.net/collection/{UNIQUE_COLLECTION_ID}
```
**Copy and save this URL** - you must share it with MoEngage for Streams configuration.
**Important Mapping Notes**
* **Timestamp conversion**: MoEngage sends Unix timestamps (seconds). Use the formula `dformat((time * 1000), "yyyy-MM-dd'T'HH:mm:ssX")` to convert to ISO 8601 format.
* **Primary identity**: Ensure only ONE identity has `primary: true`. All others should be `primary: false`.
* **Event type mapping**: Use the decode function to map MoEngage event codes to standard XDM event types (e.g., `MOE_EMAIL_SENT` → `directMarketing.emailSent`).
## Step 6: Test with Postman
Before enabling MoEngage Streams, test the streaming endpoint with sample data to ensure proper schema validation and data ingestion.
### Step 6.1: Prepare the Test Payload
Create a test payload in the MoEngage Streams format:
**Test Payload JSON**
```json theme={null}
{
"app_name": "Your App Name",
"source": "MOENGAGE",
"moe_request_id": "test_request_001",
"id": "test_event_001",
"time": 1731421200,
"event_uuid": "unique_event_id_001",
"event_source": "MOENGAGE",
"event_name": "Email Sent",
"event_code": "MOE_EMAIL_SENT",
"event_type": "CAMPAIGN_EVENT",
"identities": {
"externalId": "customer_123",
"moengageUserId": "moe_user_456",
"email": "test@example.com",
"phone": "+1234567890"
},
"event_attributes": {
"campaign_id": "camp_001",
"campaign_name": "Welcome Campaign",
"campaign_type": "Event Trigger",
"campaign_channel": "Email"
},
"user_attributes": {
"subscription_tier": "premium",
"preferred_language": "en"
},
"device_attributes": {
"platform": "iOS",
"os_version": "16.2"
}
}
```
### Step 6.2: Send a Test Request in Postman
To send a test request in postman, perform the following steps:
1. Open Postman and create a new POST request.
2. In the **URL** box, enter: `{YOUR_STREAMING_ENDPOINT}?syncValidation=true`.
3. Add the following header `Content-Type: application/json`.
4. Paste the test payload in the Body (RAW JSON).
5. Update the identities section with your actual identity values.
6. Click **Send**.
#### Expected Response
Successful ingestion returns:
**Success Response JSON**
```json theme={null}
{
"inletId": "{INLET_ID}",
"xactionId": "{TRANSACTION_ID}",
"receivedTimeMs": 1731421250000,
"synchronousValidation": {
"status": "pass"
}
}
```
### Step 6.3: Verify Data in AEP
1. Navigate to **Datasets** → **MoEngage Event Data**.
2. Click **Preview dataset**.
3. Verify that the test event appears with the correct field values.
4. Check **Profiles** → **Browse** to verify profile creation or update.
**Save Your Test Payload**
Keep your verified test payload - you'll need to share it with MoEngage when requesting Streams setup. This payload demonstrates the exact format and identity mappings that work with your AEP configuration.
## Step 7: Share Details with MoEngage for Streams Setup
After you have successfully tested the integration, provide the following details to MoEngage to enable Streams for your workspace.
### Information to Share with MoEngage
| Item | Description | Where to Find It |
| --------------------------------------------------------- | ----------------------------------------------------------------- | ---------------------------------------------------- |
| **Streaming Endpoint URL** | HTTP API streaming URL from Step 4 | Sources → HTTP API → Dataflow details |
| **Schema JSON** | Downloaded schema structure from Step 2 | Schema Editor → Copy schema structure |
| **Primary Identity Namespace Symbol** | Your primary identity symbol (e.g., `lumaCrmId`, `loyaltyId`) | Identities → Browse → Identity symbol column |
| **Secondary Identity Namespace Symbols** | Email, Phone, or other secondary identities | Identities → Browse |
| **MoEngage User ID Namespace** | `moengageUserId` (if created) | Identities → Browse |
| **User Attribute Mapping for Primary ID** | MoEngage user attribute that contains your primary identity value | Your MoEngage user profile configuration |
| **Verified Test Payload** | Sample payload that passed Postman testing | Your Postman test from Step 6 |
| **Authentication Method** | No Auth or OAuth 2.0 | Step 4 configuration |
| **OAuth 2.0 Credentials** (if using OAuth authentication) | Complete OAuth credentials from Adobe Developer Console | Adobe Developer Console → Your Project → Credentials |
| **Tenant Namespace** | Your organization's tenant ID (e.g., `_yourorgname`) | Schema editor → Custom field paths |
### OAuth 2.0 Credentials Details (If Using OAuth)
If you configured OAuth 2.0 authentication in Step 4, provide the following credentials to MoEngage:
| OAuth Credential | Value to Share | Example Format |
| -------------------------------- | ----------------------------------------------------- | --------------------------------------------- |
| **Client ID** | Your OAuth Client ID from Adobe Developer Console | `abc123def456ghi789jkl012` |
| **Client Secret** | Your OAuth Client Secret from Adobe Developer Console | `p8e-XYZ...ABC123` |
| **Organization ID (IMS Org ID)** | Your Adobe organization ID | `1234567890ABCDEF@AdobeOrg` |
| **Technical Account ID** | Service account identifier | `ABC123@techacct.adobe.com` |
| **Scopes** | Granted API permissions (comma-separated) | `openid, AdobeID, read_organizations` |
| **Token Endpoint** | Adobe IMS token endpoint URL | `https://ims-na1.adobelogin.com/ims/token/v3` |
### Submit Integration Request
Contact your MoEngage Customer Success Manager and share all the details mentioned above. MoEngage performs the following:
1. Review your configuration and test payload.
2. Generate or validate the mapping CSV file for your schema (if not provided).
3. Configure Streams to send data in the correct format.
4. Set up identity mappings based on your namespace configuration.
5. Enable Streams for your workspace.
6. Notify you once the integration is live.
**MoEngage Streams Documentation**
For more information on MoEngage Streams configuration and available event types, refer to [MoEngage Streams Documentation](https://developers.moengage.com/hc/en-us/articles/4952761690644-MoEngage-Streams).
**Need Help?**
For assistance with this integration, contact your MoEngage Customer Success Manager. For Adobe Experience Platform support, visit the [Adobe Experience League Community](https://experienceleaguecommunities.adobe.com/).
**MoEngage Mapping CSV Generation**
MoEngage support will create a custom mapping CSV file tailored to your schema structure and identity namespace configuration. This ensures accurate field mappings between MoEngage event data and your AEP schema.
### Step 5.2: Use the MoEngage-Provided Mapping CSV File (Recommended)
For production deployments, request the mapping CSV file from MoEngage support:
1. In the mapping interface, you will see error messages for fields that don't auto-map.
2. Remove any error-causing fields by clicking the trash icon.
3. Contact MoEngage support and provide the following:
* Your schema JSON file (from Step 2)
* A sample event payload with your required fields
* Identity namespace symbols (primary and secondary)
* Your tenant namespace (for example, `_yourorgname`)
4. MoEngage will generate a custom `moengage-aep-mapping.csv` file tailored to your schema.
5. Once received, verify the CSV contains correct mappings:
* Tenant namespace should match yours (for example, `_yourorgname`).
* Identity namespace symbols should match your configuration (e.g., `lumaCrmId`, `Email`, `Phone`).
* Field paths should match your schema structure.
6. Click **Import** in the AEP mapping interface and upload the CSV file.
7. Review the imported mappings to ensure all fields are correctly mapped.
8. Click **Next** to proceed.
**Verify Before Importing**
Always review the mapping CSV file before importing to ensure:
* Tenant namespace matches your AEP organization (replace any example values like `_exchangesandboxbravo`).
* Identity symbols are correct for your environment.
* Formulas for timestamp conversion and data transformation are present.
### Step 5:3 Manual Mapping for Local Testing
If you want to test the integration locally before involving MoEngage support, you can manually create the following field mappings:
1. In the mapping interface, map MoEngage source fields to your XDM destination fields.
2. Key mappings to configure:
* **id** → `_id`
* **event\_uuid** → `eventMergeId`
* **Use formula**: `dformat((time * 1000), "yyyy-MM-dd'T'HH:mm:ssX")` → `timestamp`
* **event\_code** → `eventType` (with decode formula for XDM event types)
* **identities.**{yourPrimaryId} → `identityMap.{yourNamespace}[0].id` with `primary: true`
* Map additional fields from `event_attributes`, `user_attributes`, and `device_attributes` to your tenant fields
3. Test the mapping with Postman (Step 6) to validate data ingestion.
4. Export your working mapping as CSV for documentation.
5. After validation, send the following to MoEngage support for production Streams configuration:
* Tested mapping CSV
* Sample test payload that worked successfully
* Schema JSON
6. Click **Next** to proceed.
**Important Mapping Notes**
* **Timestamp conversion**: MoEngage sends Unix timestamps (seconds). Use the formula `dformat((time * 1000), "yyyy-MM-dd'T'HH:mm:ssX")` to convert to ISO 8601 format.
* **Primary identity**: Ensure only ONE identity has `primary: true`. All others should be `primary: false`.
* **Event type mapping**: Use the decode function to map MoEngage event codes to standard XDM event types (e.g., `MOE_EMAIL_SENT` → `directMarketing.emailSent`).
### Complete Dataflow Setup
After configuring the dataflow, you'll receive a streaming endpoint URL that looks like:
```text Endpoint URL wrap theme={null}
https://dcs.adobedc.net/collection/{UNIQUE_COLLECTION_ID}
```
**Copy and save this URL** - you must share it with MoEngage for Streams configuration.
**Important Mapping Notes**
* **Timestamp conversion**: MoEngage sends Unix timestamps (seconds). Use the formula `dformat((time * 1000), "yyyy-MM-dd'T'HH:mm:ssX")` to convert to ISO 8601 format.
* **Primary identity**: Ensure only ONE identity has `primary: true`. All others should be `primary: false`.
* **Event type mapping**: Use the decode function to map MoEngage event codes to standard XDM event types (e.g., `MOE_EMAIL_SENT` → `directMarketing.emailSent`).
## Step 6: Test with Postman
Before enabling MoEngage Streams, test the streaming endpoint with sample data to ensure proper schema validation and data ingestion.
### Step 6.1: Prepare the Test Payload
Create a test payload in the MoEngage Streams format:
**Test Payload JSON**
```json theme={null}
{
"app_name": "Your App Name",
"source": "MOENGAGE",
"moe_request_id": "test_request_001",
"id": "test_event_001",
"time": 1731421200,
"event_uuid": "unique_event_id_001",
"event_source": "MOENGAGE",
"event_name": "Email Sent",
"event_code": "MOE_EMAIL_SENT",
"event_type": "CAMPAIGN_EVENT",
"identities": {
"externalId": "customer_123",
"moengageUserId": "moe_user_456",
"email": "test@example.com",
"phone": "+1234567890"
},
"event_attributes": {
"campaign_id": "camp_001",
"campaign_name": "Welcome Campaign",
"campaign_type": "Event Trigger",
"campaign_channel": "Email"
},
"user_attributes": {
"subscription_tier": "premium",
"preferred_language": "en"
},
"device_attributes": {
"platform": "iOS",
"os_version": "16.2"
}
}
```
### Step 6.2: Send a Test Request in Postman
To send a test request in postman, perform the following steps:
1. Open Postman and create a new POST request.
2. In the **URL** box, enter: `{YOUR_STREAMING_ENDPOINT}?syncValidation=true`.
3. Add the following header `Content-Type: application/json`.
4. Paste the test payload in the Body (RAW JSON).
5. Update the identities section with your actual identity values.
6. Click **Send**.
#### Expected Response
Successful ingestion returns:
**Success Response JSON**
```json theme={null}
{
"inletId": "{INLET_ID}",
"xactionId": "{TRANSACTION_ID}",
"receivedTimeMs": 1731421250000,
"synchronousValidation": {
"status": "pass"
}
}
```
### Step 6.3: Verify Data in AEP
1. Navigate to **Datasets** → **MoEngage Event Data**.
2. Click **Preview dataset**.
3. Verify that the test event appears with the correct field values.
4. Check **Profiles** → **Browse** to verify profile creation or update.
**Save Your Test Payload**
Keep your verified test payload - you'll need to share it with MoEngage when requesting Streams setup. This payload demonstrates the exact format and identity mappings that work with your AEP configuration.
## Step 7: Share Details with MoEngage for Streams Setup
After you have successfully tested the integration, provide the following details to MoEngage to enable Streams for your workspace.
### Information to Share with MoEngage
| Item | Description | Where to Find It |
| --------------------------------------------------------- | ----------------------------------------------------------------- | ---------------------------------------------------- |
| **Streaming Endpoint URL** | HTTP API streaming URL from Step 4 | Sources → HTTP API → Dataflow details |
| **Schema JSON** | Downloaded schema structure from Step 2 | Schema Editor → Copy schema structure |
| **Primary Identity Namespace Symbol** | Your primary identity symbol (e.g., `lumaCrmId`, `loyaltyId`) | Identities → Browse → Identity symbol column |
| **Secondary Identity Namespace Symbols** | Email, Phone, or other secondary identities | Identities → Browse |
| **MoEngage User ID Namespace** | `moengageUserId` (if created) | Identities → Browse |
| **User Attribute Mapping for Primary ID** | MoEngage user attribute that contains your primary identity value | Your MoEngage user profile configuration |
| **Verified Test Payload** | Sample payload that passed Postman testing | Your Postman test from Step 6 |
| **Authentication Method** | No Auth or OAuth 2.0 | Step 4 configuration |
| **OAuth 2.0 Credentials** (if using OAuth authentication) | Complete OAuth credentials from Adobe Developer Console | Adobe Developer Console → Your Project → Credentials |
| **Tenant Namespace** | Your organization's tenant ID (e.g., `_yourorgname`) | Schema editor → Custom field paths |
### OAuth 2.0 Credentials Details (If Using OAuth)
If you configured OAuth 2.0 authentication in Step 4, provide the following credentials to MoEngage:
| OAuth Credential | Value to Share | Example Format |
| -------------------------------- | ----------------------------------------------------- | --------------------------------------------- |
| **Client ID** | Your OAuth Client ID from Adobe Developer Console | `abc123def456ghi789jkl012` |
| **Client Secret** | Your OAuth Client Secret from Adobe Developer Console | `p8e-XYZ...ABC123` |
| **Organization ID (IMS Org ID)** | Your Adobe organization ID | `1234567890ABCDEF@AdobeOrg` |
| **Technical Account ID** | Service account identifier | `ABC123@techacct.adobe.com` |
| **Scopes** | Granted API permissions (comma-separated) | `openid, AdobeID, read_organizations` |
| **Token Endpoint** | Adobe IMS token endpoint URL | `https://ims-na1.adobelogin.com/ims/token/v3` |
### Submit Integration Request
Contact your MoEngage Customer Success Manager and share all the details mentioned above. MoEngage performs the following:
1. Review your configuration and test payload.
2. Generate or validate the mapping CSV file for your schema (if not provided).
3. Configure Streams to send data in the correct format.
4. Set up identity mappings based on your namespace configuration.
5. Enable Streams for your workspace.
6. Notify you once the integration is live.
**MoEngage Streams Documentation**
For more information on MoEngage Streams configuration and available event types, refer to [MoEngage Streams Documentation](https://developers.moengage.com/hc/en-us/articles/4952761690644-MoEngage-Streams).
**Need Help?**
For assistance with this integration, contact your MoEngage Customer Success Manager. For Adobe Experience Platform support, visit the [Adobe Experience League Community](https://experienceleaguecommunities.adobe.com/).