> ## Documentation Index
> Fetch the complete documentation index at: https://moengage.com/docs/llms.txt
> Use this file to discover all available pages before exploring further.
# Amperity
> Sync customer profiles and audiences from Amperity to MoEngage using the native connector or S3 imports for personalized campaigns.
# Introduction
[Amperity](https://amperity.com/) is an Intelligent Customer Data Platform that empowers global consumer brands by unlocking customer data. Amperity provides intelligent capabilities across data management, unification, analytics, insights, and activation.
*This integration is maintained by Amperity.*
# MoEngage × Amperity
Using the MoEngage and Amperity integration, you can create a unified view of your customers and run hyper-personalized campaigns. With this integration, you can:
* **Sync customer profiles:** Send customer profiles and custom attributes from Amperity directly to MoEngage in real time.
* **Sync customer audiences:** Build segments in Amperity and push them to MoEngage for targeted campaigns.
* **Manage data updates:** Control the frequency and scope of attribute updates sent to MoEngage.
**Ready to target Segment**
Data synced from Amperity is built as a custom segment, helping marketers go from audience to campaign in fewer steps.
# Integration Methods
MoEngage supports two methods for integrating with Amperity:
| Method | How it works | Best for |
| ---------------------------------------------- | ---------------------------------------------------------------------------------------------- | ------------------------------------------------------------------- |
| **Method 1: Native Connector** *(Recommended)* | Amperity pushes data directly to MoEngage via the Data API. No intermediate storage required. | Real-time or scheduled syncs, dynamic cohort updates. |
| **Method 2: S3 Import** | Amperity exports CSV files to an Amazon S3 bucket, which MoEngage then imports via S3 Imports. | Bulk historical data loads, teams already using S3-based workflows. |
# Method 1: Native Connector *(Recommended)*
## Prerequisites
**Requirements**
* An active [Amperity account](https://amperity.com/).
* A MoEngage account with access to **Settings > Account > APIs**.
* Your MoEngage **Workspace ID**, **Data API Secret**, and **Data Center**.
## Step 1: Collect Your MoEngage Configuration Details
Before setting up the destination in Amperity, collect the following credentials from your MoEngage workspace.
| Field | Description |
| ----------- | ----------------------------------------------------------------------------------------------------------------------------------------------------------------------------------------------------- |
| App ID | Your MoEngage Workspace ID. To find this:
1. In the MoEngage dashboard, navigate to **Settings > Account > APIs**.
2. Copy the value under **Workspace ID** (formerly known as App ID). |
| API Key | Your MoEngage Data API Secret key. To find this:
1. In the MoEngage dashboard, navigate to **Settings > Account > APIs**.
2. Copy the value under **Data** in the **API Keys** section. |
| Data Center | Your MoEngage Data Center number. For more information, refer to [Data Centers in MoEngage](/user-guide/data/key-concepts/data-centers-in-moengage). |
## Step 2: Add MoEngage as a Destination in Amperity
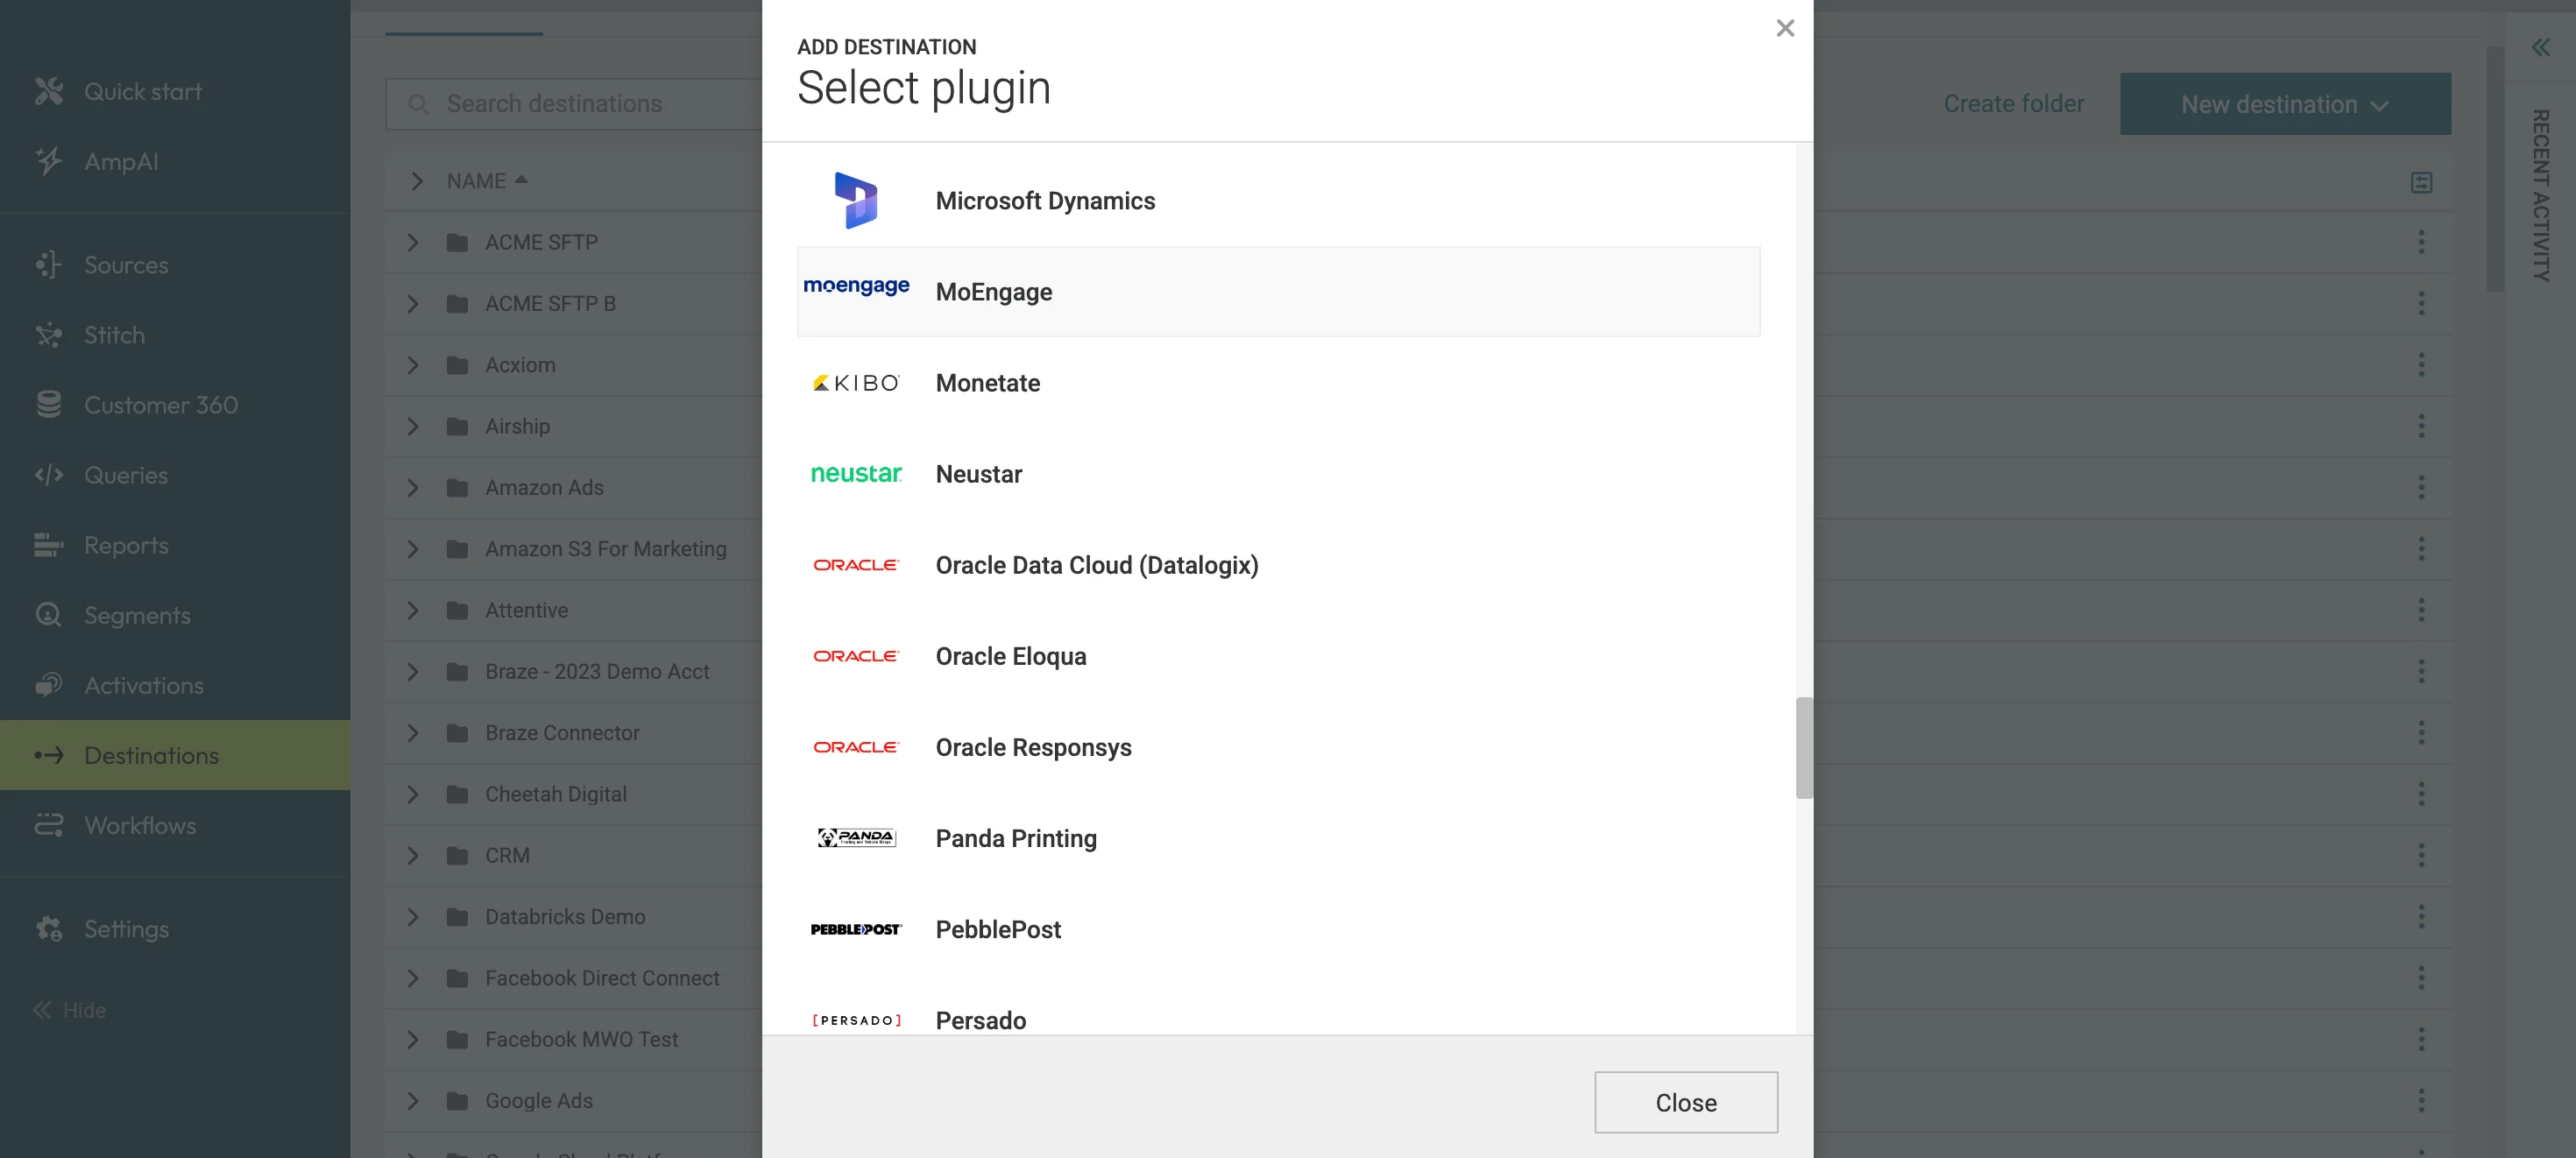
1. On your Amperity dashboard, navigate to **Destinations >> Add Destination**.
2. Search for and select **MoEngage** from the list of available plugins.
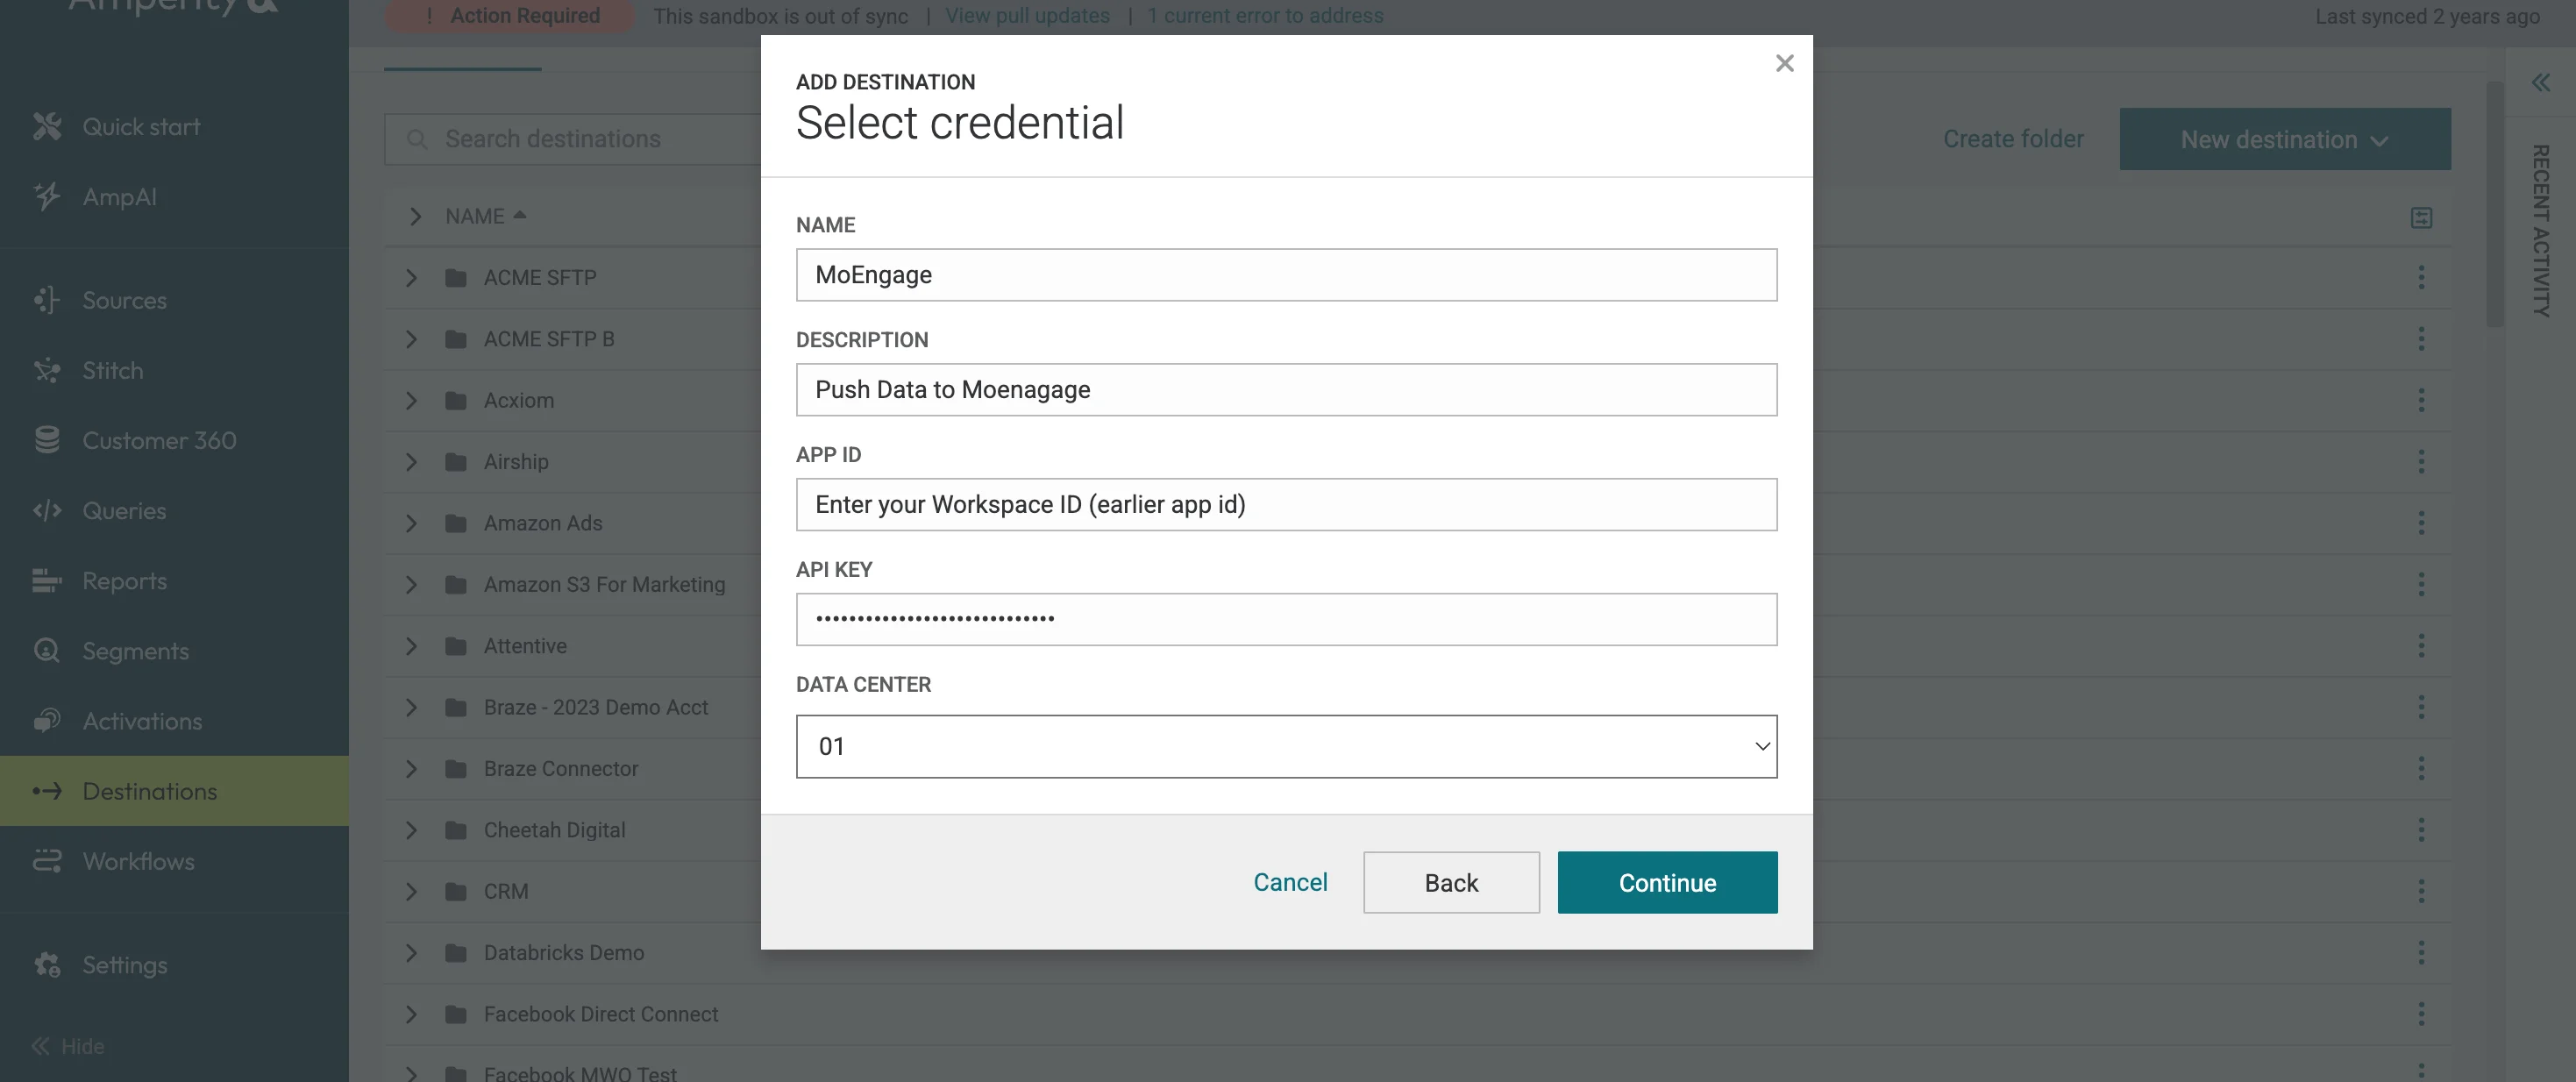
 3. In the **Select credential** dialog, select an existing credential from the dropdown or choose **Create new credential** and fill in the following fields:
| Field | Description |
| ----------- | ----------------------------------------------------------------------- |
| Name | A label to identify this credential (for example, *MoEngage Data API*). |
| Description | Optional. A short description of the credential. |
| App ID | Enter your App ID collected in Step 1. |
| API Key | Enter your Data API Secret key collected in Step 1. |
| Data Center | Select your Data Center. |
3. In the **Select credential** dialog, select an existing credential from the dropdown or choose **Create new credential** and fill in the following fields:
| Field | Description |
| ----------- | ----------------------------------------------------------------------- |
| Name | A label to identify this credential (for example, *MoEngage Data API*). |
| Description | Optional. A short description of the credential. |
| App ID | Enter your App ID collected in Step 1. |
| API Key | Enter your Data API Secret key collected in Step 1. |
| Data Center | Select your Data Center. |
 4. Define the **User Identifier** that Amperity will use to match records in MoEngage. Select the identifier that aligns with how your workspace identifies users:
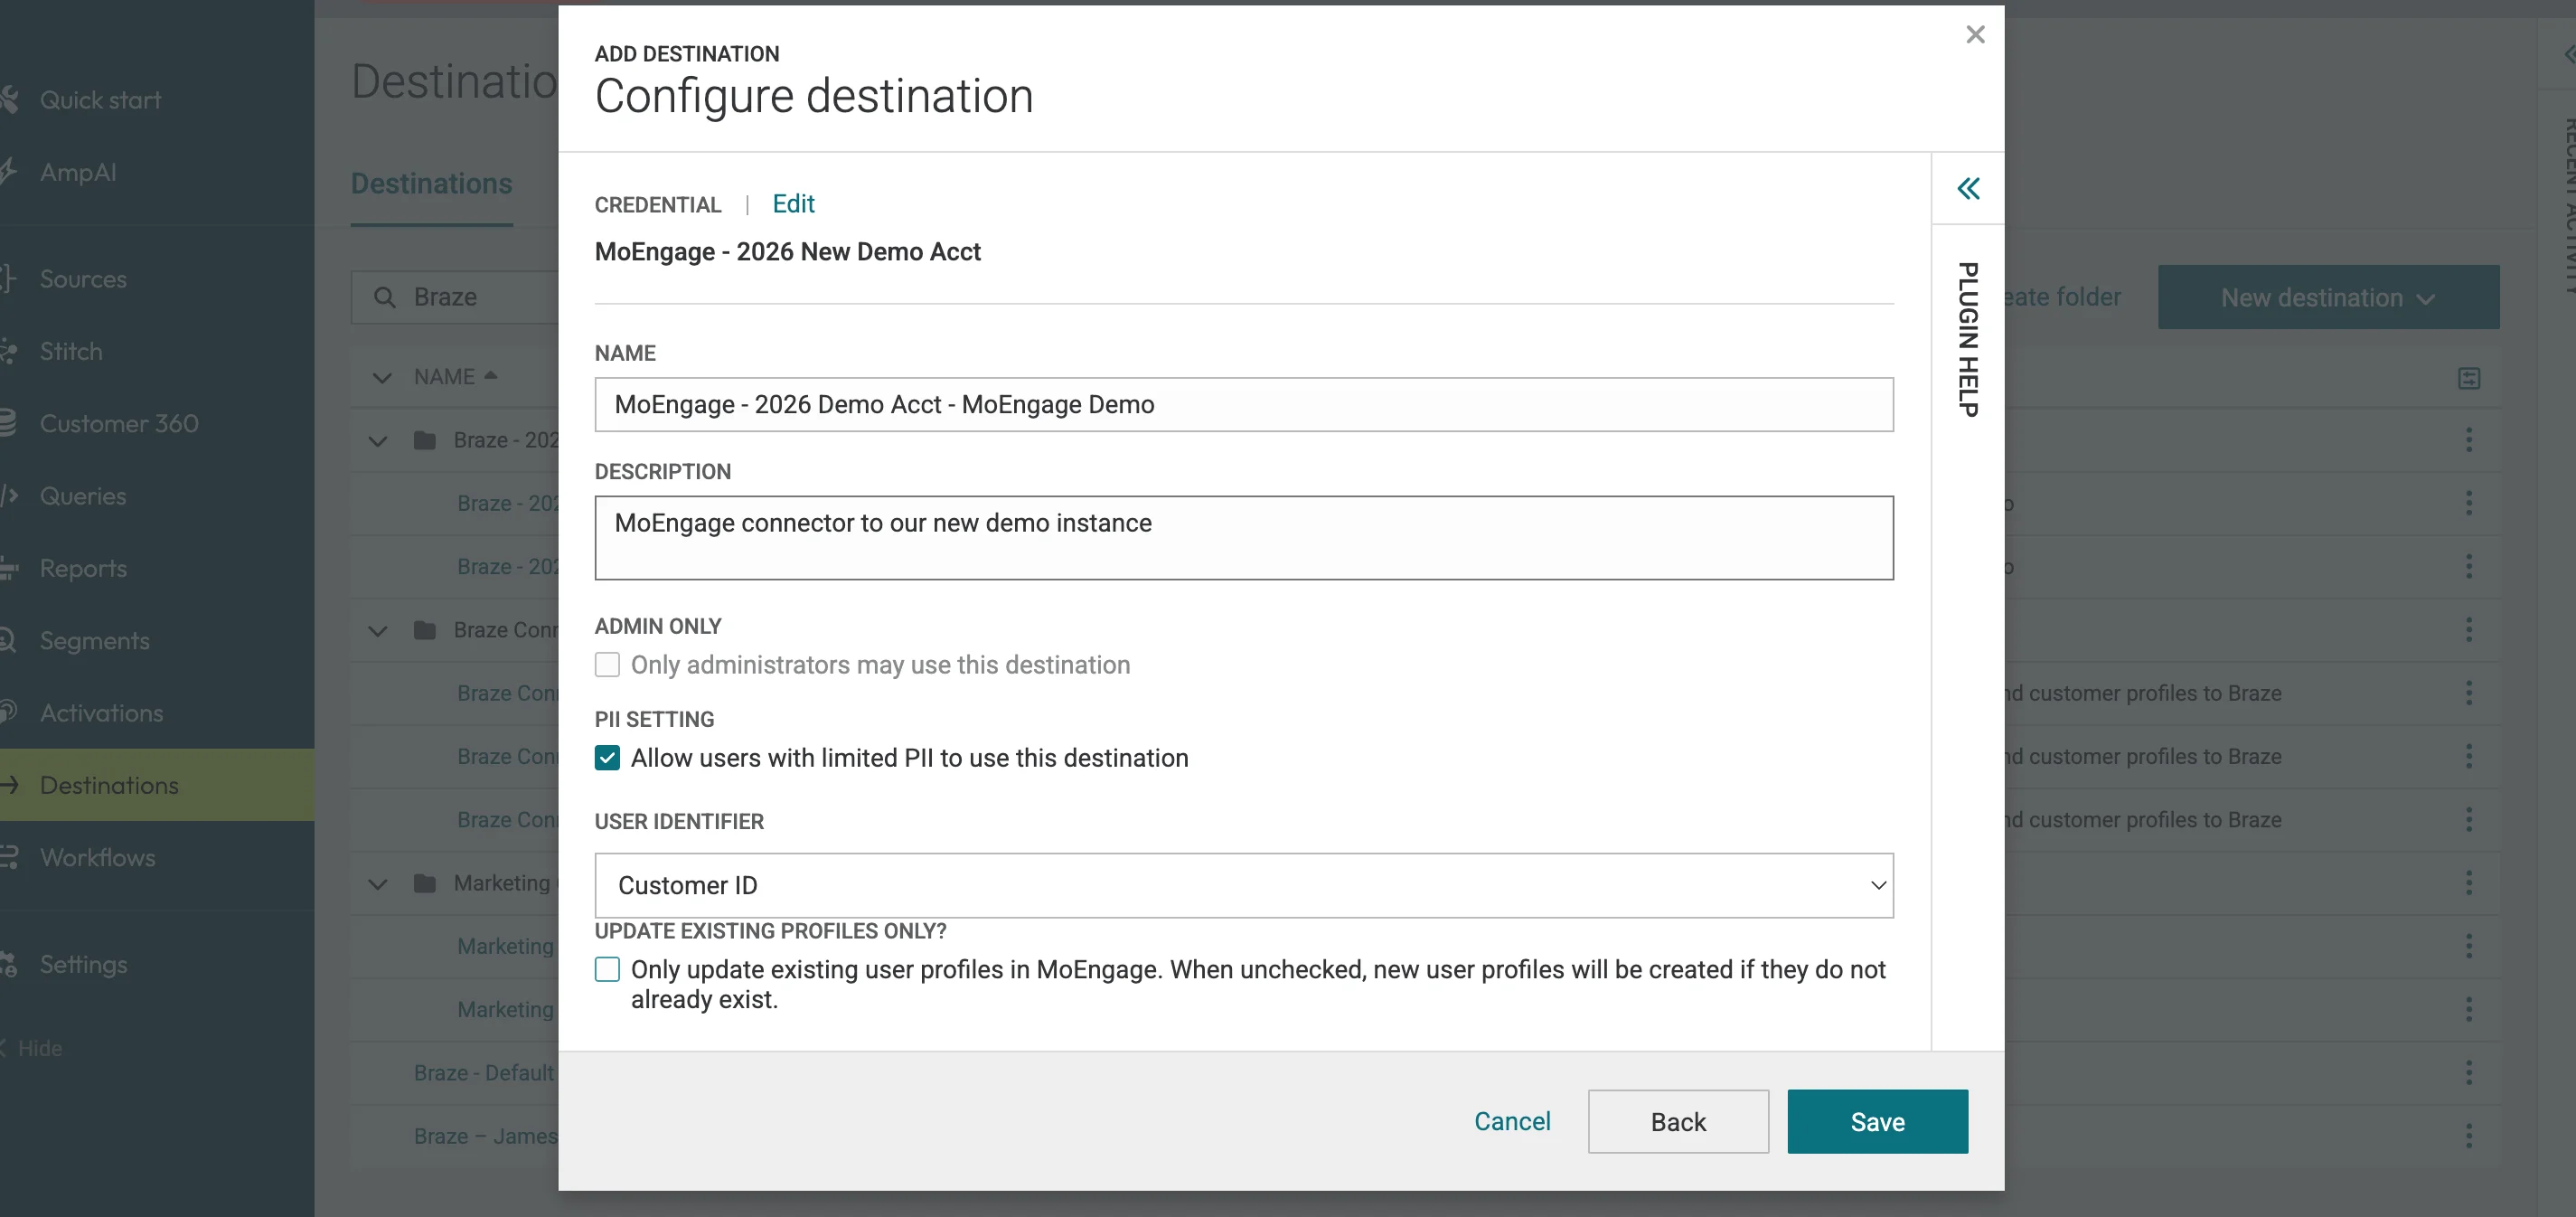 | Identifier | Description |
| ------------- | -------------------------------------------------------------------------------- |
| `customer_id` | A customer-assigned unique identifier (for example, a UUID or internal user ID). |
5. Save the destination configuration.
## Step 3: Add a Data Template
1. In the **Destinations** tab, open the menu for the MoEngage destination you just created and select **Add Data Template**.
2. Enter a name and description. For example:
* **Name:** MoEngage Audience Attributes
* **Description:** Send audience attributes to MoEngage.
3. Verify business user access settings and review all configuration details.
4. Ensure the template is enabled for **Campaigns** so AmpIQ users can access it.
5. Save the data template.
## Step 4: Send Data to MoEngage
Once MoEngage is configured as a destination, data can be sent via two paths depending on your Amperity product access.
Amp360 users can write SQL queries and configure orchestrations to send results to MoEngage on a schedule.
#### Step 1: Create a query in Amperity
Navigate to the **Queries** section and write an SQL query that returns the customer attributes you want to send to MoEngage. Include the user identifier field you selected in Step 2.
*For query examples, refer to the [Amperity Queries Reference](https://docs.amperity.com/amp360/queries_reference.html).*
#### Step 2: Add an orchestration
1. Go to the **Orchestrations** section and click **Add Orchestration**.
2. Select the SQL query you created as the data source.
3. Select **MoEngage** as the destination.
4. Define the run frequency (for example, daily at a set time).
5. Save the orchestration.
#### Step 3: Run the orchestration
Trigger the orchestration manually to validate data delivery. Once confirmed, rely on the schedule for automated syncs.
To avoid stale data, ensure the Amperity export schedule runs **before** any downstream processing in MoEngage. Amperity only sends attributes that have changed since the last sync, keeping your payloads efficient.
AmpIQ users can build segments using a no-SQL interface and push them to MoEngage. Amperity will automatically re-sync the segment to MoEngage each time the campaign runs, keeping your MoEngage cohorts dynamically updated.
#### Step 1: Build a segment in Amperity
Use the **Segment Editor** in Amperity to define your audience using dropdowns and picklists. Ensure the segment includes all custom attributes you want to update in MoEngage.
| Identifier | Description |
| ------------- | -------------------------------------------------------------------------------- |
| `customer_id` | A customer-assigned unique identifier (for example, a UUID or internal user ID). |
5. Save the destination configuration.
## Step 3: Add a Data Template
1. In the **Destinations** tab, open the menu for the MoEngage destination you just created and select **Add Data Template**.
2. Enter a name and description. For example:
* **Name:** MoEngage Audience Attributes
* **Description:** Send audience attributes to MoEngage.
3. Verify business user access settings and review all configuration details.
4. Ensure the template is enabled for **Campaigns** so AmpIQ users can access it.
5. Save the data template.
## Step 4: Send Data to MoEngage
Once MoEngage is configured as a destination, data can be sent via two paths depending on your Amperity product access.
Amp360 users can write SQL queries and configure orchestrations to send results to MoEngage on a schedule.
#### Step 1: Create a query in Amperity
Navigate to the **Queries** section and write an SQL query that returns the customer attributes you want to send to MoEngage. Include the user identifier field you selected in Step 2.
*For query examples, refer to the [Amperity Queries Reference](https://docs.amperity.com/amp360/queries_reference.html).*
#### Step 2: Add an orchestration
1. Go to the **Orchestrations** section and click **Add Orchestration**.
2. Select the SQL query you created as the data source.
3. Select **MoEngage** as the destination.
4. Define the run frequency (for example, daily at a set time).
5. Save the orchestration.
#### Step 3: Run the orchestration
Trigger the orchestration manually to validate data delivery. Once confirmed, rely on the schedule for automated syncs.
To avoid stale data, ensure the Amperity export schedule runs **before** any downstream processing in MoEngage. Amperity only sends attributes that have changed since the last sync, keeping your payloads efficient.
AmpIQ users can build segments using a no-SQL interface and push them to MoEngage. Amperity will automatically re-sync the segment to MoEngage each time the campaign runs, keeping your MoEngage cohorts dynamically updated.
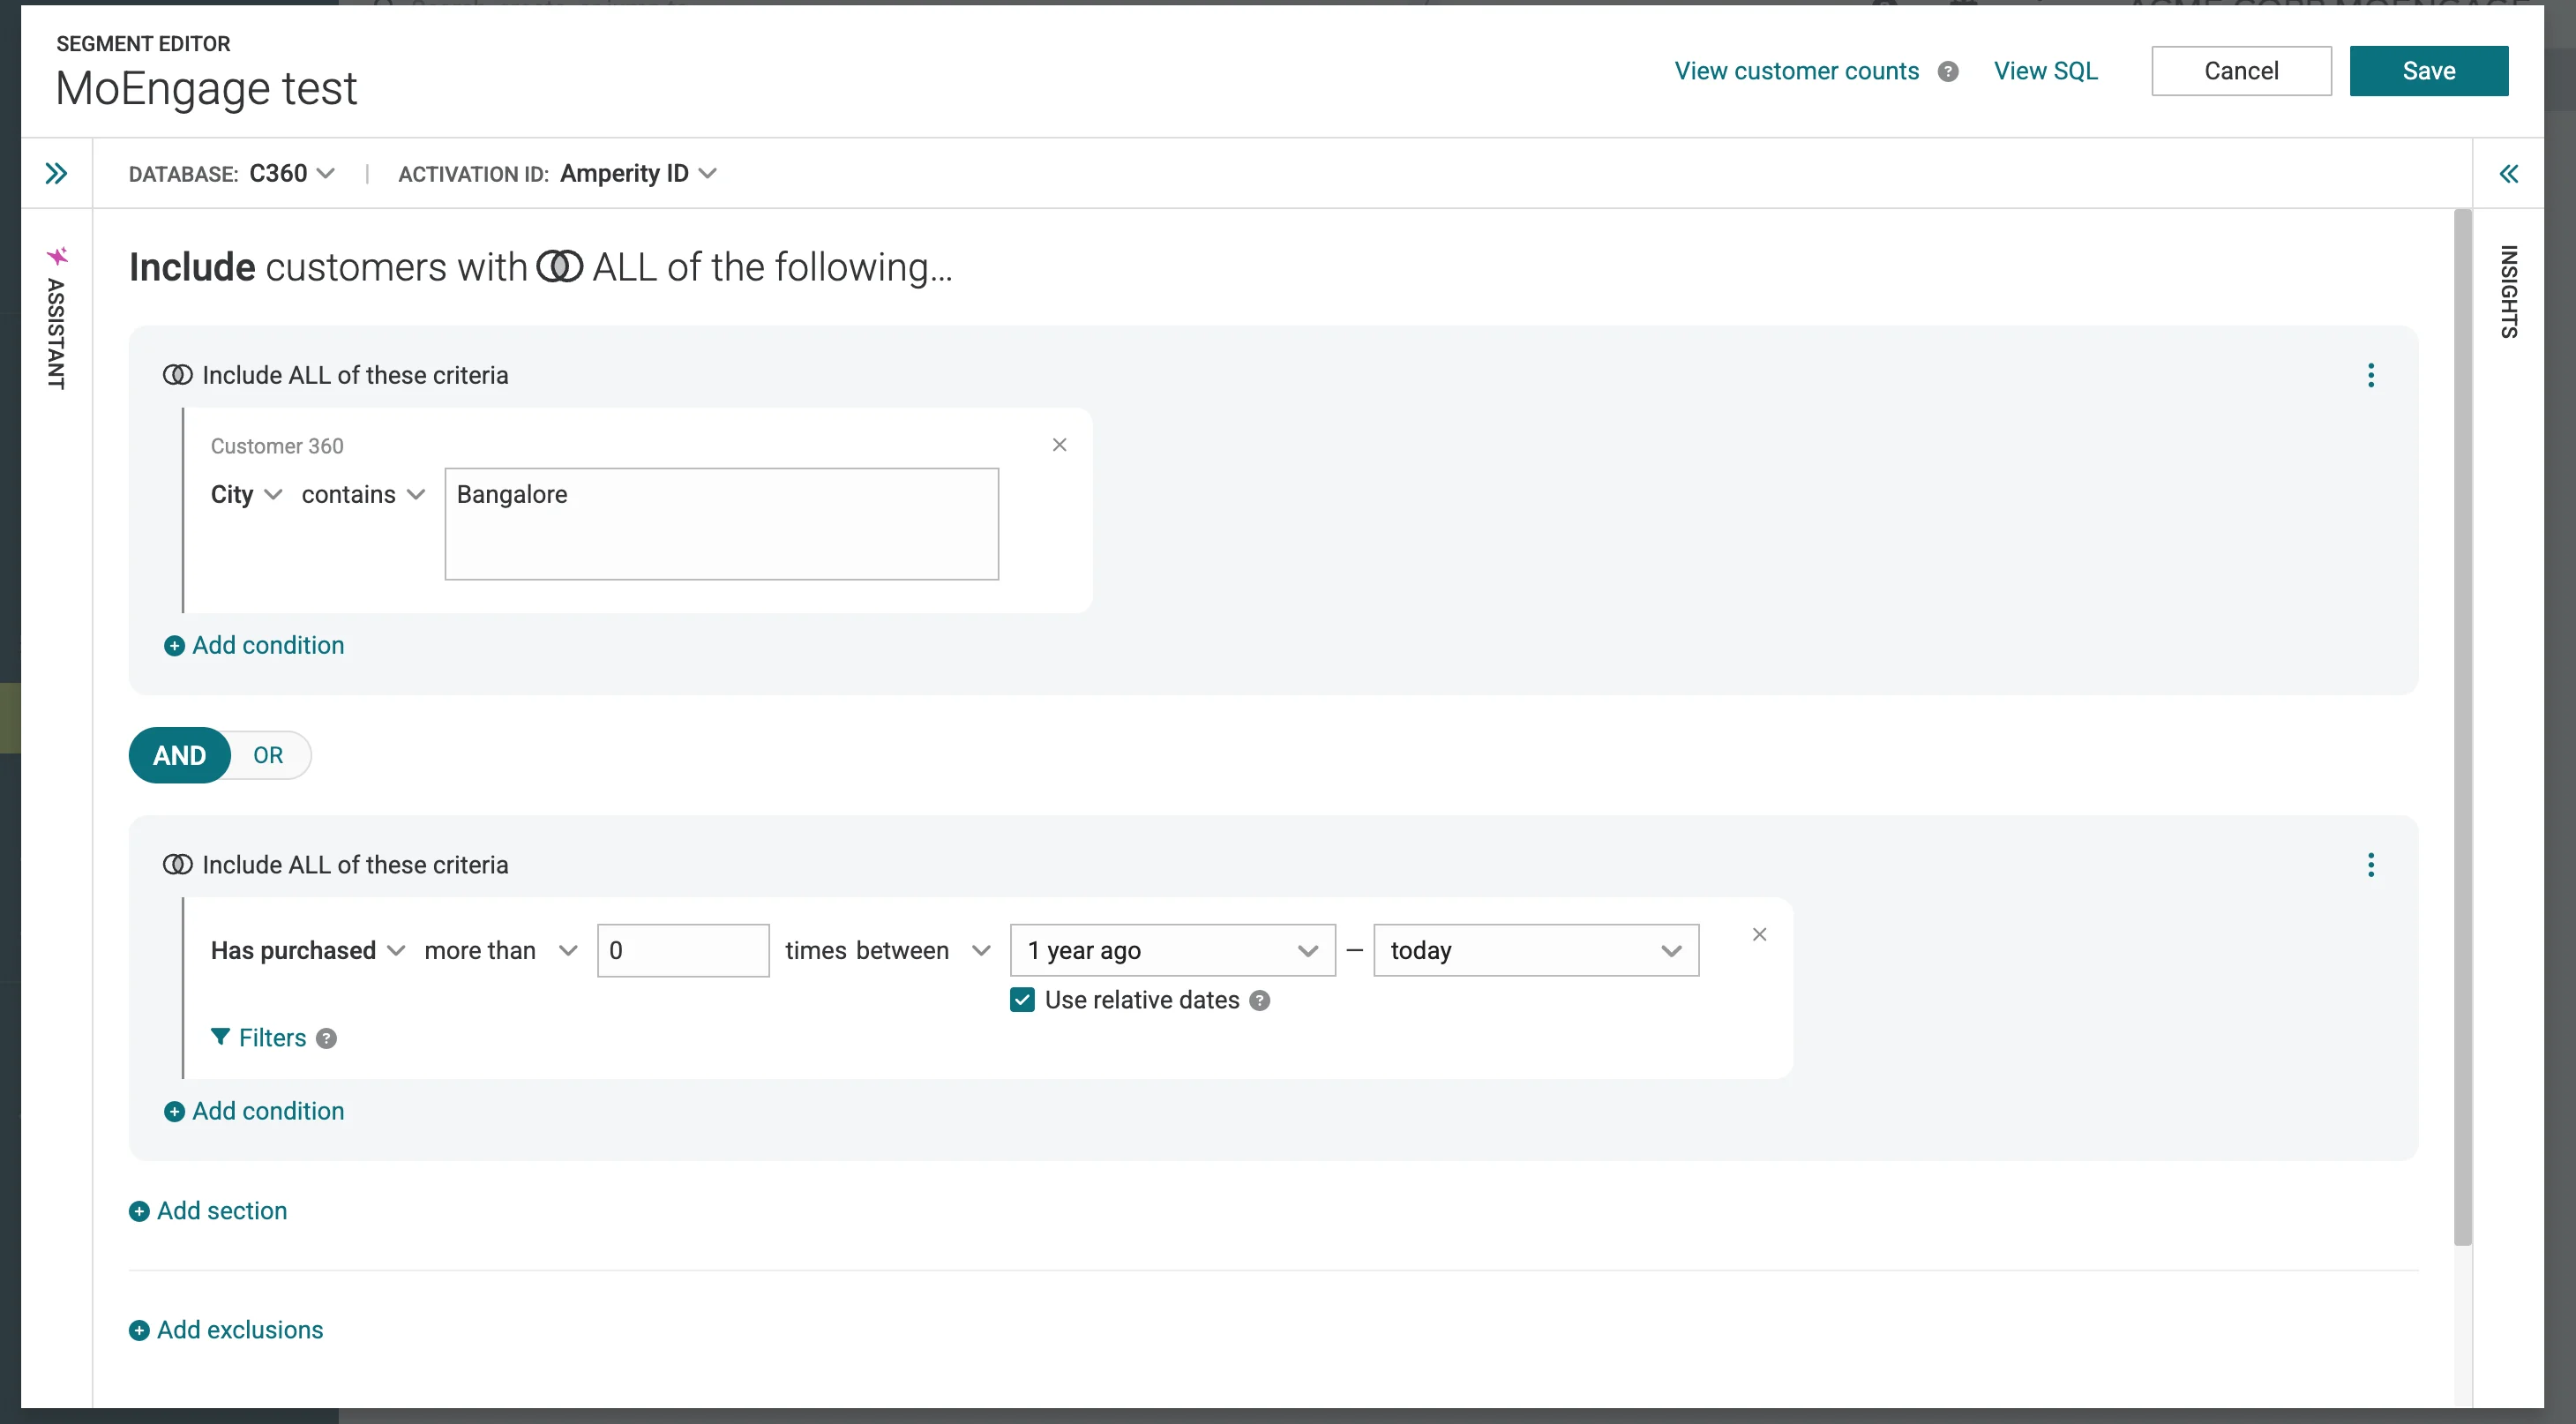
#### Step 1: Build a segment in Amperity
Use the **Segment Editor** in Amperity to define your audience using dropdowns and picklists. Ensure the segment includes all custom attributes you want to update in MoEngage.
 #### Step 2: Build a campaign in Amperity
1. Navigate to the **Campaigns** section and click **Create Campaign**.
2. Give the campaign a descriptive, unique name.
3. Select the segment you created as the target audience.
4. Define any exclusions or sub-audiences as needed.
#### Step 2: Build a campaign in Amperity
1. Navigate to the **Campaigns** section and click **Create Campaign**.
2. Give the campaign a descriptive, unique name.
3. Select the segment you created as the target audience.
4. Define any exclusions or sub-audiences as needed.
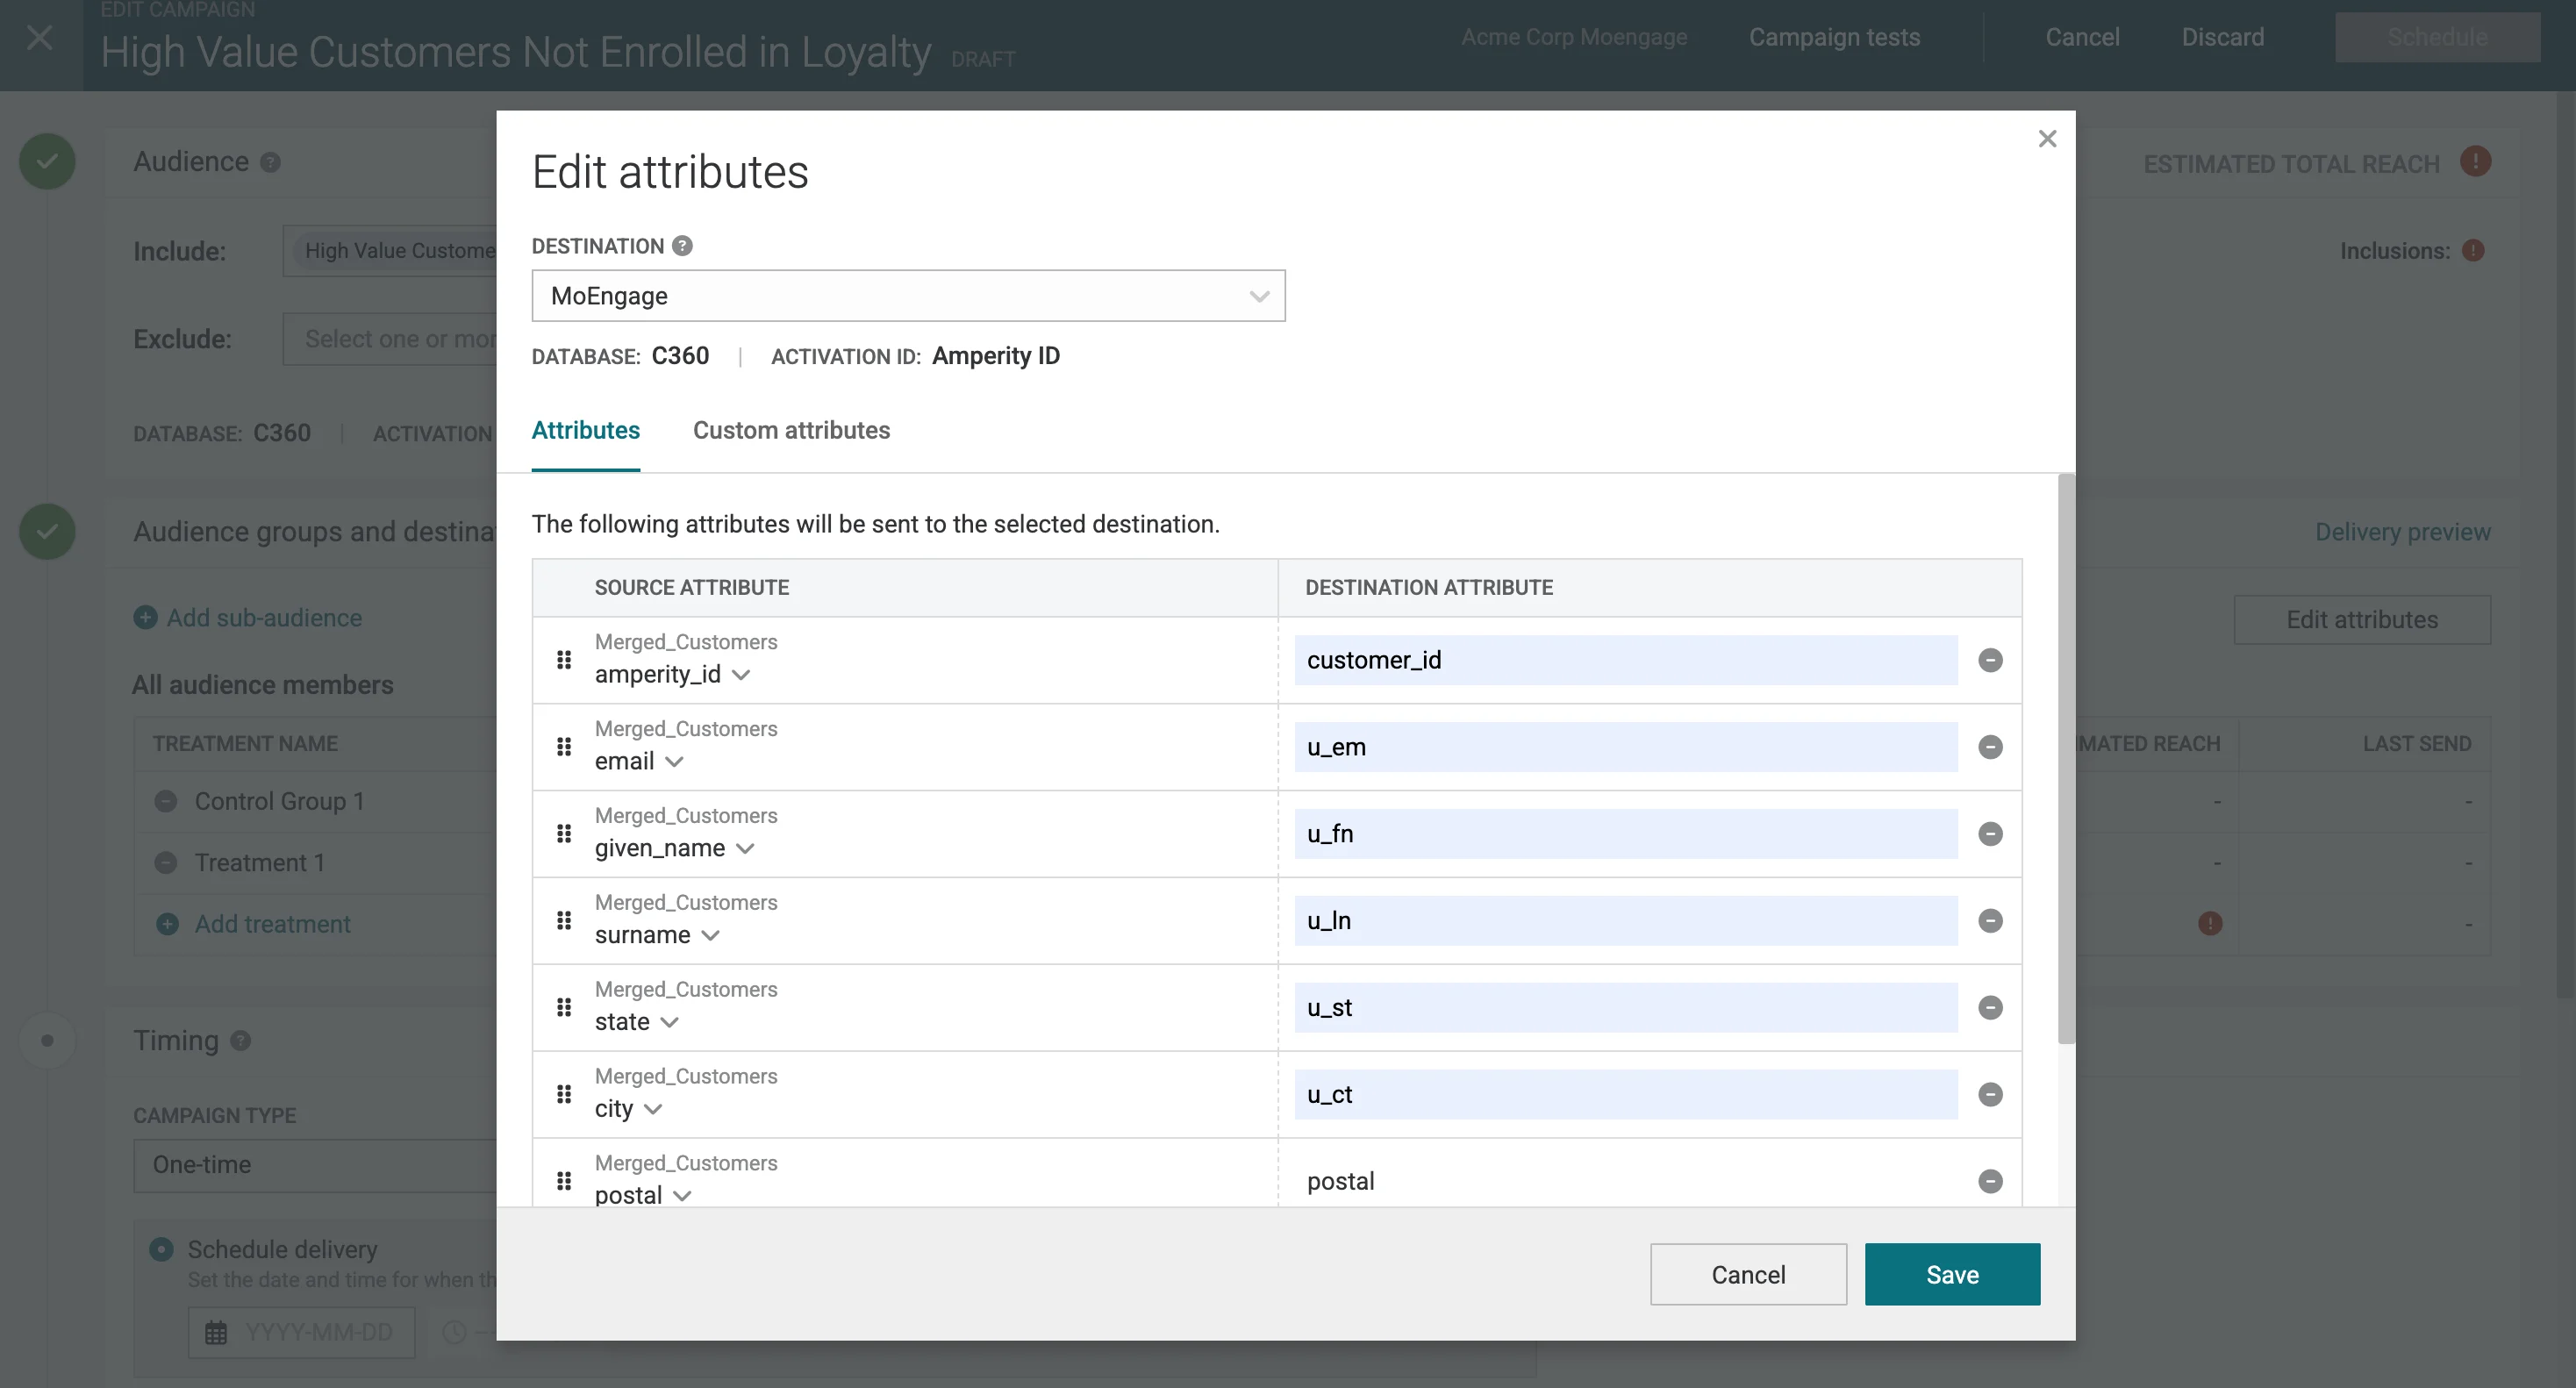 5. Select **MoEngage** as the destination.
6. Use the **Edit Campaign Attributes** panel to choose which customer attributes to send.
7. Set the campaign schedule (one-time or recurring).
8. Save the campaign and run a test.
#### Step 3: Run the campaign
Run the campaign manually to validate delivery. Once confirmed, the recurring schedule will keep your MoEngage audiences updated automatically.
## Data Mapping
Both standard and custom attributes can be sent from Amperity to MoEngage. To ensure data flows correctly into MoEngage user profiles, map Amperity attributes to MoEngage's exact API keys.
### Standard Attributes
When sending standard attributes from Amperity, use the MoEngage API keys below so they are parsed into the correct user profile fields:
* **ID:** `uid`
* **First Name:** `u_fn`
* **Last Name:** `u_ln`
* **Full Name:** `u_n`
* **Birthday:** `u_bd` *(ISO 8601 format, for example, 2023-05-21T03:47:35Z)*
* **Email Address:** `u_em`
* **Mobile Number:** `u_mb`
* **Gender:** `u_gd`
### Custom Attributes
Custom attributes are fields defined by your brand (for example, loyalty tiers, purchase history, or location). Unlike standard attributes, custom attributes can be named freely — but must exactly match the names already configured in your MoEngage workspace to avoid duplication. Examples include:
* `loyalty_status`
* `lifetime_value`
* `last_purchase_date`
* `city`
* `state`
**Avoid attribute name mismatches**
If an attribute name from Amperity does not match an existing attribute in MoEngage, a new custom attribute will be created. For example, sending `firstname` instead of the standard `u_fn` key will create a new attribute. Always verify attribute mapping before running a sync.
### Data Points
Amperity tracks what has changed between syncs. Only attributes updated since the last sync are sent to MoEngage — minimizing unnecessary data point consumption and keeping payloads efficient. Custom attributes will only be updated for users with a matching primary identifier (`customer_id`) in MoEngage.
# Method 2: S3 Import *(Alternative)*
Use this method if you prefer a file-based workflow or are already routing data through Amazon S3. Amperity exports CSV files to an S3 bucket, and MoEngage imports them via the S3 Imports feature.
## Prerequisites
**Requirements**
* Ensure you have [S3 Imports](/user-guide/data/imports/file-based-imports/s3-imports) enabled for your MoEngage Workspace.
## Step 1: Create a MoEngage Destination on Amperity
1. On your Amperity Dashboard, go to *Destinations* >> *Add Destination*.
5. Select **MoEngage** as the destination.
6. Use the **Edit Campaign Attributes** panel to choose which customer attributes to send.
7. Set the campaign schedule (one-time or recurring).
8. Save the campaign and run a test.
#### Step 3: Run the campaign
Run the campaign manually to validate delivery. Once confirmed, the recurring schedule will keep your MoEngage audiences updated automatically.
## Data Mapping
Both standard and custom attributes can be sent from Amperity to MoEngage. To ensure data flows correctly into MoEngage user profiles, map Amperity attributes to MoEngage's exact API keys.
### Standard Attributes
When sending standard attributes from Amperity, use the MoEngage API keys below so they are parsed into the correct user profile fields:
* **ID:** `uid`
* **First Name:** `u_fn`
* **Last Name:** `u_ln`
* **Full Name:** `u_n`
* **Birthday:** `u_bd` *(ISO 8601 format, for example, 2023-05-21T03:47:35Z)*
* **Email Address:** `u_em`
* **Mobile Number:** `u_mb`
* **Gender:** `u_gd`
### Custom Attributes
Custom attributes are fields defined by your brand (for example, loyalty tiers, purchase history, or location). Unlike standard attributes, custom attributes can be named freely — but must exactly match the names already configured in your MoEngage workspace to avoid duplication. Examples include:
* `loyalty_status`
* `lifetime_value`
* `last_purchase_date`
* `city`
* `state`
**Avoid attribute name mismatches**
If an attribute name from Amperity does not match an existing attribute in MoEngage, a new custom attribute will be created. For example, sending `firstname` instead of the standard `u_fn` key will create a new attribute. Always verify attribute mapping before running a sync.
### Data Points
Amperity tracks what has changed between syncs. Only attributes updated since the last sync are sent to MoEngage — minimizing unnecessary data point consumption and keeping payloads efficient. Custom attributes will only be updated for users with a matching primary identifier (`customer_id`) in MoEngage.
# Method 2: S3 Import *(Alternative)*
Use this method if you prefer a file-based workflow or are already routing data through Amazon S3. Amperity exports CSV files to an S3 bucket, and MoEngage imports them via the S3 Imports feature.
## Prerequisites
**Requirements**
* Ensure you have [S3 Imports](/user-guide/data/imports/file-based-imports/s3-imports) enabled for your MoEngage Workspace.
## Step 1: Create a MoEngage Destination on Amperity
1. On your Amperity Dashboard, go to *Destinations* >> *Add Destination*.
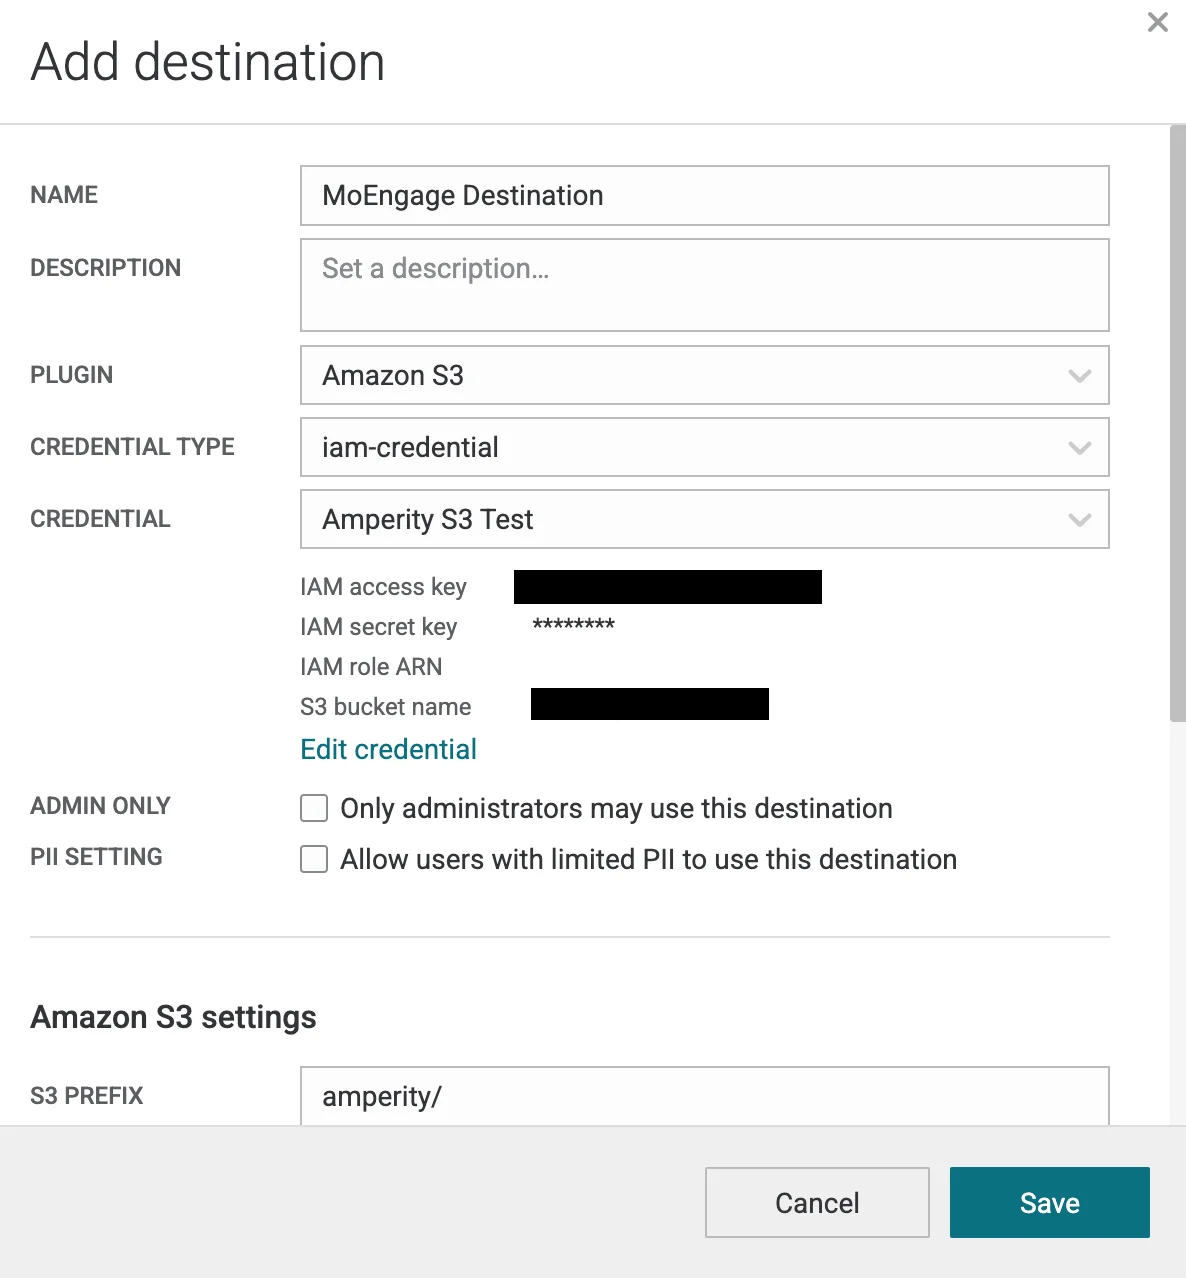 Below are some of the mandatory fields you need to select while configuring the destination from the Amperity dashboard:
| Field | Description |
| --------------- | ------------------------------------------------------------------------------------ |
| Plugin | Select Amazon S3. |
| Credential Type | Select how you want Amperity to connect to your storage. |
| Credential | Select or create a new credential to use for this connection. |
| S3 Prefix | Enter a folder path and how the prefix will be. For example: `registered_user_data_` |
| File Format | csv |
| Header | Ensure to include header row in your file. |
You can read about [adding Amazon S3](https://docs.amperity.com/datagrid/destination_amazon_s3.html) as your Destination on Amperity.
## Step 2: Add a Data Template
1. On your Amperity Dashboard, go to *Destinations* >> *Add Destination*.
Below are some of the mandatory fields you need to select while configuring the destination from the Amperity dashboard:
| Field | Description |
| --------------- | ------------------------------------------------------------------------------------ |
| Plugin | Select Amazon S3. |
| Credential Type | Select how you want Amperity to connect to your storage. |
| Credential | Select or create a new credential to use for this connection. |
| S3 Prefix | Enter a folder path and how the prefix will be. For example: `registered_user_data_` |
| File Format | csv |
| Header | Ensure to include header row in your file. |
You can read about [adding Amazon S3](https://docs.amperity.com/datagrid/destination_amazon_s3.html) as your Destination on Amperity.
## Step 2: Add a Data Template
1. On your Amperity Dashboard, go to *Destinations* >> *Add Destination*.
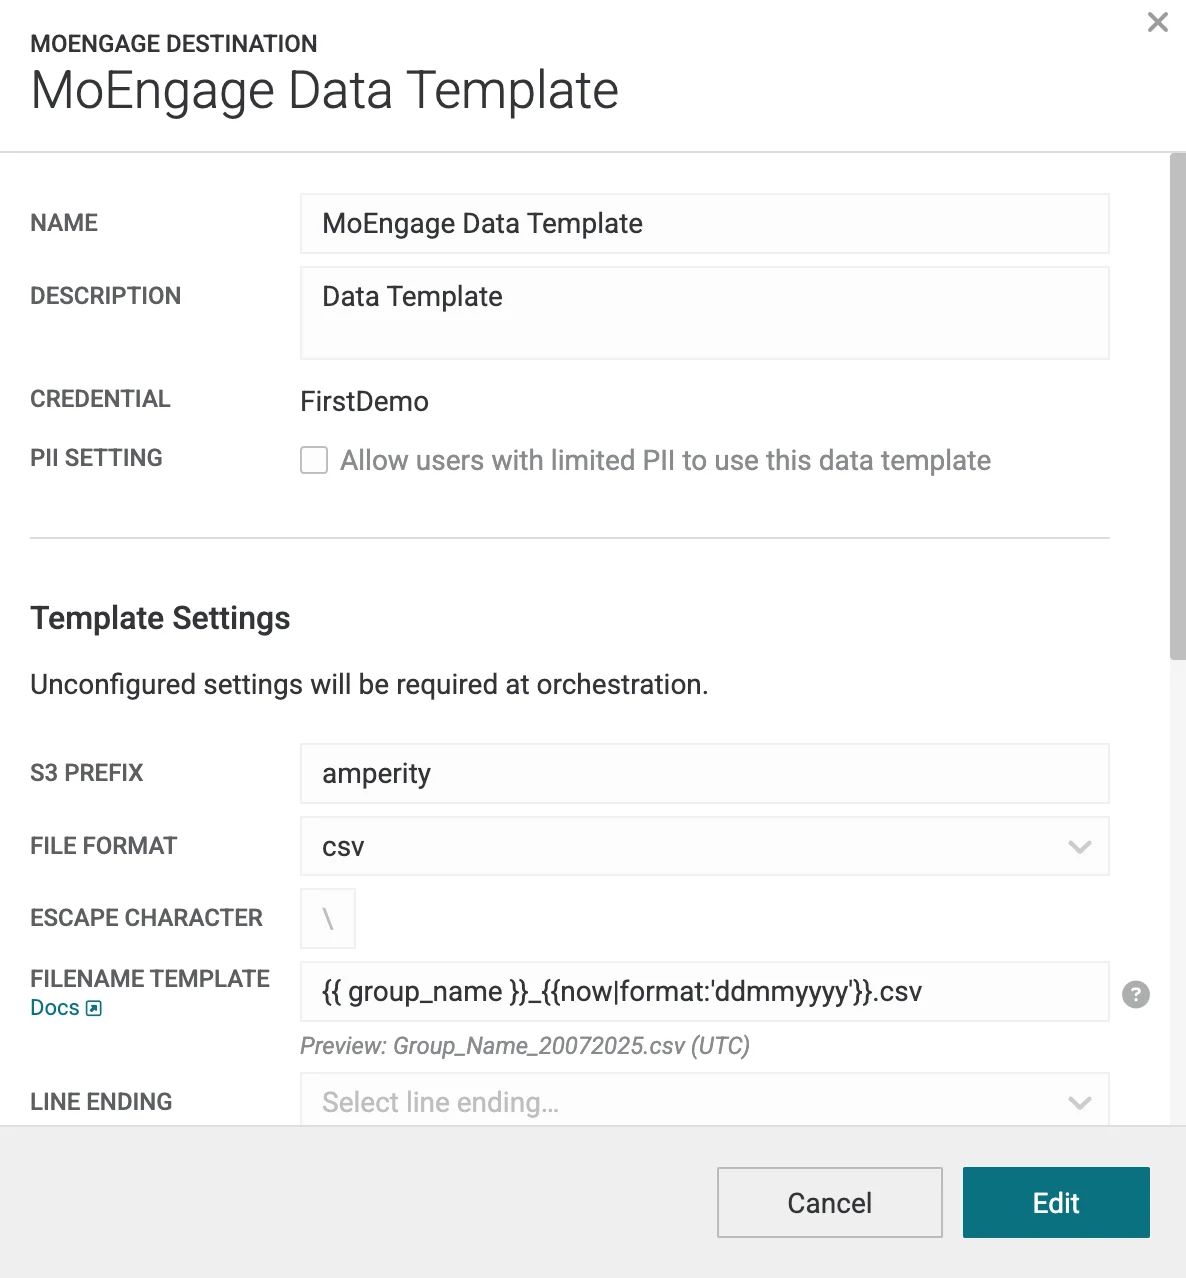 Below are some of the mandatory fields you need to select while configuring your exports from the Amperity dashboard:
| Field | Description |
| ----------------- | ------------------------------------------------------------------------------------ |
| Plugin | Select Amazon S3. |
| Credential Type | Select how you want Amperity to connect to your storage. |
| Credential | Select or create a new credential to use for this connection. |
| S3 Prefix | Enter a folder path and how the prefix will be. For example: `registered_user_data_` |
| File Format | csv |
| Filename template | `{{ group_name }}_{{now | format:'ddmmyyyy'}}.csv` |
| Compression | Ensure you have selected "None". |
| PGP Public Key | Enter a PGP Public Key you want to use for the files. |
| Header | Ensure to include header row in your file. |
| Visibility | Ensure this destination is available for Campaigns. |
| File Settings | You need to send audience lists as separate files. |
## Step 3: Create a New Import in MoEngage
Follow [these instructions](/user-guide/data/imports/file-based-imports/s3-imports) to set up S3 Imports on MoEngage.
### Data Mapping
MoEngage supports importing both standard and custom attributes from your S3 CSV columns. During the mapping step, you can map the following:
* Names
* Birthdates
* Email addresses
* Phone numbers
* Any other custom attribute
### Data Types
Supported data types include:
* Boolean
* Datetime
* Number
* String
## Step 4: Send Data to MoEngage via S3
Once you have configured your Amazon S3 buckets to capture data from Amperity, you are ready to send data to MoEngage. Choose a sync method based on your Amperity product access.
With Amp360, you can write queries and configure a schedule that sends results to your S3 bucket, which MoEngage then imports.
#### Step 1: Create a new query in Amperity
Follow [this guide](https://docs.amperity.com/amp360/queries_reference.html) to build a new query on Amperity.
#### Step 2: Add an orchestration to forward data to your S3 Bucket
An orchestration defines the relationship between query results and a destination, including the location to which those query results will be sent and the frequency at which the orchestration will be run. Read [this guide](https://docs.amperity.com/amp360/destination_amazon_s3.html) to add your newly created Destination to this orchestration.
#### Step 3: Running the orchestration
Run the orchestration manually to validate that it works. Once confirmed, set up a schedule.
Set the Amperity export schedule to run **before** the MoEngage S3 import schedule to avoid ingesting stale data.
Using AmpIQ, you can create segments on Amperity and send them to MoEngage. [This guide](https://docs.amperity.com/ampiq/destination_amazon_s3.html) talks about how to send audiences from Amperity to your S3 Buckets.
#### Step 1: Build a segment in Amperity
Use the Segment Editor in Amperity to build any audience using a series of drop-downs and picklists. Ensure that you include the custom attributes that you want to update in MoEngage.
#### Step 2: Build a campaign in Amperity
Use the campaign editor to build campaigns that send data to Amazon S3. Add a segment, define exclusions and sub-audiences, and then configure Amperity to send campaign data to Amazon S3.
#### Step 3: Run the campaign
Run the campaign to start sending your audiences to Amazon S3. You then need to create relevant imports in MoEngage and select the segment you want to create for this set of users.
#### Step 4: Create an S3 Import on MoEngage
Create an S3 Import on MoEngage and select (or create) the segment you want your audience to sync to. Once the sync is completed, you should see all your users reflect on the segment you selected within MoEngage.
Below are some of the mandatory fields you need to select while configuring your exports from the Amperity dashboard:
| Field | Description |
| ----------------- | ------------------------------------------------------------------------------------ |
| Plugin | Select Amazon S3. |
| Credential Type | Select how you want Amperity to connect to your storage. |
| Credential | Select or create a new credential to use for this connection. |
| S3 Prefix | Enter a folder path and how the prefix will be. For example: `registered_user_data_` |
| File Format | csv |
| Filename template | `{{ group_name }}_{{now | format:'ddmmyyyy'}}.csv` |
| Compression | Ensure you have selected "None". |
| PGP Public Key | Enter a PGP Public Key you want to use for the files. |
| Header | Ensure to include header row in your file. |
| Visibility | Ensure this destination is available for Campaigns. |
| File Settings | You need to send audience lists as separate files. |
## Step 3: Create a New Import in MoEngage
Follow [these instructions](/user-guide/data/imports/file-based-imports/s3-imports) to set up S3 Imports on MoEngage.
### Data Mapping
MoEngage supports importing both standard and custom attributes from your S3 CSV columns. During the mapping step, you can map the following:
* Names
* Birthdates
* Email addresses
* Phone numbers
* Any other custom attribute
### Data Types
Supported data types include:
* Boolean
* Datetime
* Number
* String
## Step 4: Send Data to MoEngage via S3
Once you have configured your Amazon S3 buckets to capture data from Amperity, you are ready to send data to MoEngage. Choose a sync method based on your Amperity product access.
With Amp360, you can write queries and configure a schedule that sends results to your S3 bucket, which MoEngage then imports.
#### Step 1: Create a new query in Amperity
Follow [this guide](https://docs.amperity.com/amp360/queries_reference.html) to build a new query on Amperity.
#### Step 2: Add an orchestration to forward data to your S3 Bucket
An orchestration defines the relationship between query results and a destination, including the location to which those query results will be sent and the frequency at which the orchestration will be run. Read [this guide](https://docs.amperity.com/amp360/destination_amazon_s3.html) to add your newly created Destination to this orchestration.
#### Step 3: Running the orchestration
Run the orchestration manually to validate that it works. Once confirmed, set up a schedule.
Set the Amperity export schedule to run **before** the MoEngage S3 import schedule to avoid ingesting stale data.
Using AmpIQ, you can create segments on Amperity and send them to MoEngage. [This guide](https://docs.amperity.com/ampiq/destination_amazon_s3.html) talks about how to send audiences from Amperity to your S3 Buckets.
#### Step 1: Build a segment in Amperity
Use the Segment Editor in Amperity to build any audience using a series of drop-downs and picklists. Ensure that you include the custom attributes that you want to update in MoEngage.
#### Step 2: Build a campaign in Amperity
Use the campaign editor to build campaigns that send data to Amazon S3. Add a segment, define exclusions and sub-audiences, and then configure Amperity to send campaign data to Amazon S3.
#### Step 3: Run the campaign
Run the campaign to start sending your audiences to Amazon S3. You then need to create relevant imports in MoEngage and select the segment you want to create for this set of users.
#### Step 4: Create an S3 Import on MoEngage
Create an S3 Import on MoEngage and select (or create) the segment you want your audience to sync to. Once the sync is completed, you should see all your users reflect on the segment you selected within MoEngage.