> ## Documentation Index
> Fetch the complete documentation index at: https://moengage.com/docs/llms.txt
> Use this file to discover all available pages before exploring further.
# MoEngage Destination
# Introduction
The Twilio Segment integration does not currently support [Unified Identity (Identity Resolution)](https://moengage-user-guide.mintlify.app/user-guide/data/user-data/unified-identity-identity-resolution).
With MoEngage Destination on Twilio Segment, you can forward your Users, Events, and Audiences ([Twilio Segment Engage](/partner-guide/data-and-analytics/cdps/twillio-segment/getting-started/twilio-segment-engage)) data to MoEngage and run personalized campaigns targeting them. If you’re a new MoEngage customer, you can relay historical data to MoEngage using [Twilio Segment replays](/partner-guide/data-and-analytics/cdps/twillio-segment/getting-started/twilio-segment-engage).
## Integration modes
| Integration mode | Details |
| ----------------------------- | ----------------------------------------------------------------------------------------------------------------------------------------------------------------------------------------------------------------------------------------------------------------------------------------------------------------------------------------------------- |
| Side-by-side (Device mode) | Preferred mode of integration
Device mode uses Segment’s SDK to send data directly to MoEngage. This allows access to deeper features and more comprehensive usage of MoEngage. |
| Server-to-server (Cloud mode) | Cloud mode forwards data from Segment servers directly to MoEngage Data APIs. Cloud mode is generally recommended for sending offline data to MoEngage.
Limitations: Cloud mode does not support Push Notifications, In-app Messaging, On-site Messaging, Cards. You will need to install MoEngage SDKs separately to use these functionalities. |
## Destination frameworks
MoEngage supports two type of destination frameworks- MoEngage Classic and MoEngage Actions.
Refer to the table below to select the type of framework that best suits your needs.
| Destination Frameworks >
*Integration Modes v* | MoEngage Classic | MoEngage Actions |
| ---------------------------------------------------- | ---------------------------- | ---------------- |
| *Device Mode* | Recommended | N/A |
| *Cloud Mode* | To be deprecated by Dec 2025 | Recommended |
Note that- Anonymous users and their events are supported only in the MoEngage (Actions) Destination.
# Integration
* Login credentials for MoEngage and Segment.
* Installed source and Segment source [libraries](https://segment.com/docs/sources/)—The origin of any data sent into Segment, such as mobile apps, websites, or backend servers. You must install the libraries into your app, site, or server before being able to set up a successful `Source > Destination` flow.
# Step 1: Add MoEngage as the Destination
After your sources are successfully configured, you must establish MoEngage as a destination. The connection settings offer numerous ways to customize how data moves between MoEngage and Segment. To add MoEngage as the destination, perform the following steps:
1. Log in to your **Segment** App.
2. On the left navigation menu in the Segment dashboard, click **Connections** > **Destinations**.
3. Click + **Add destination**. 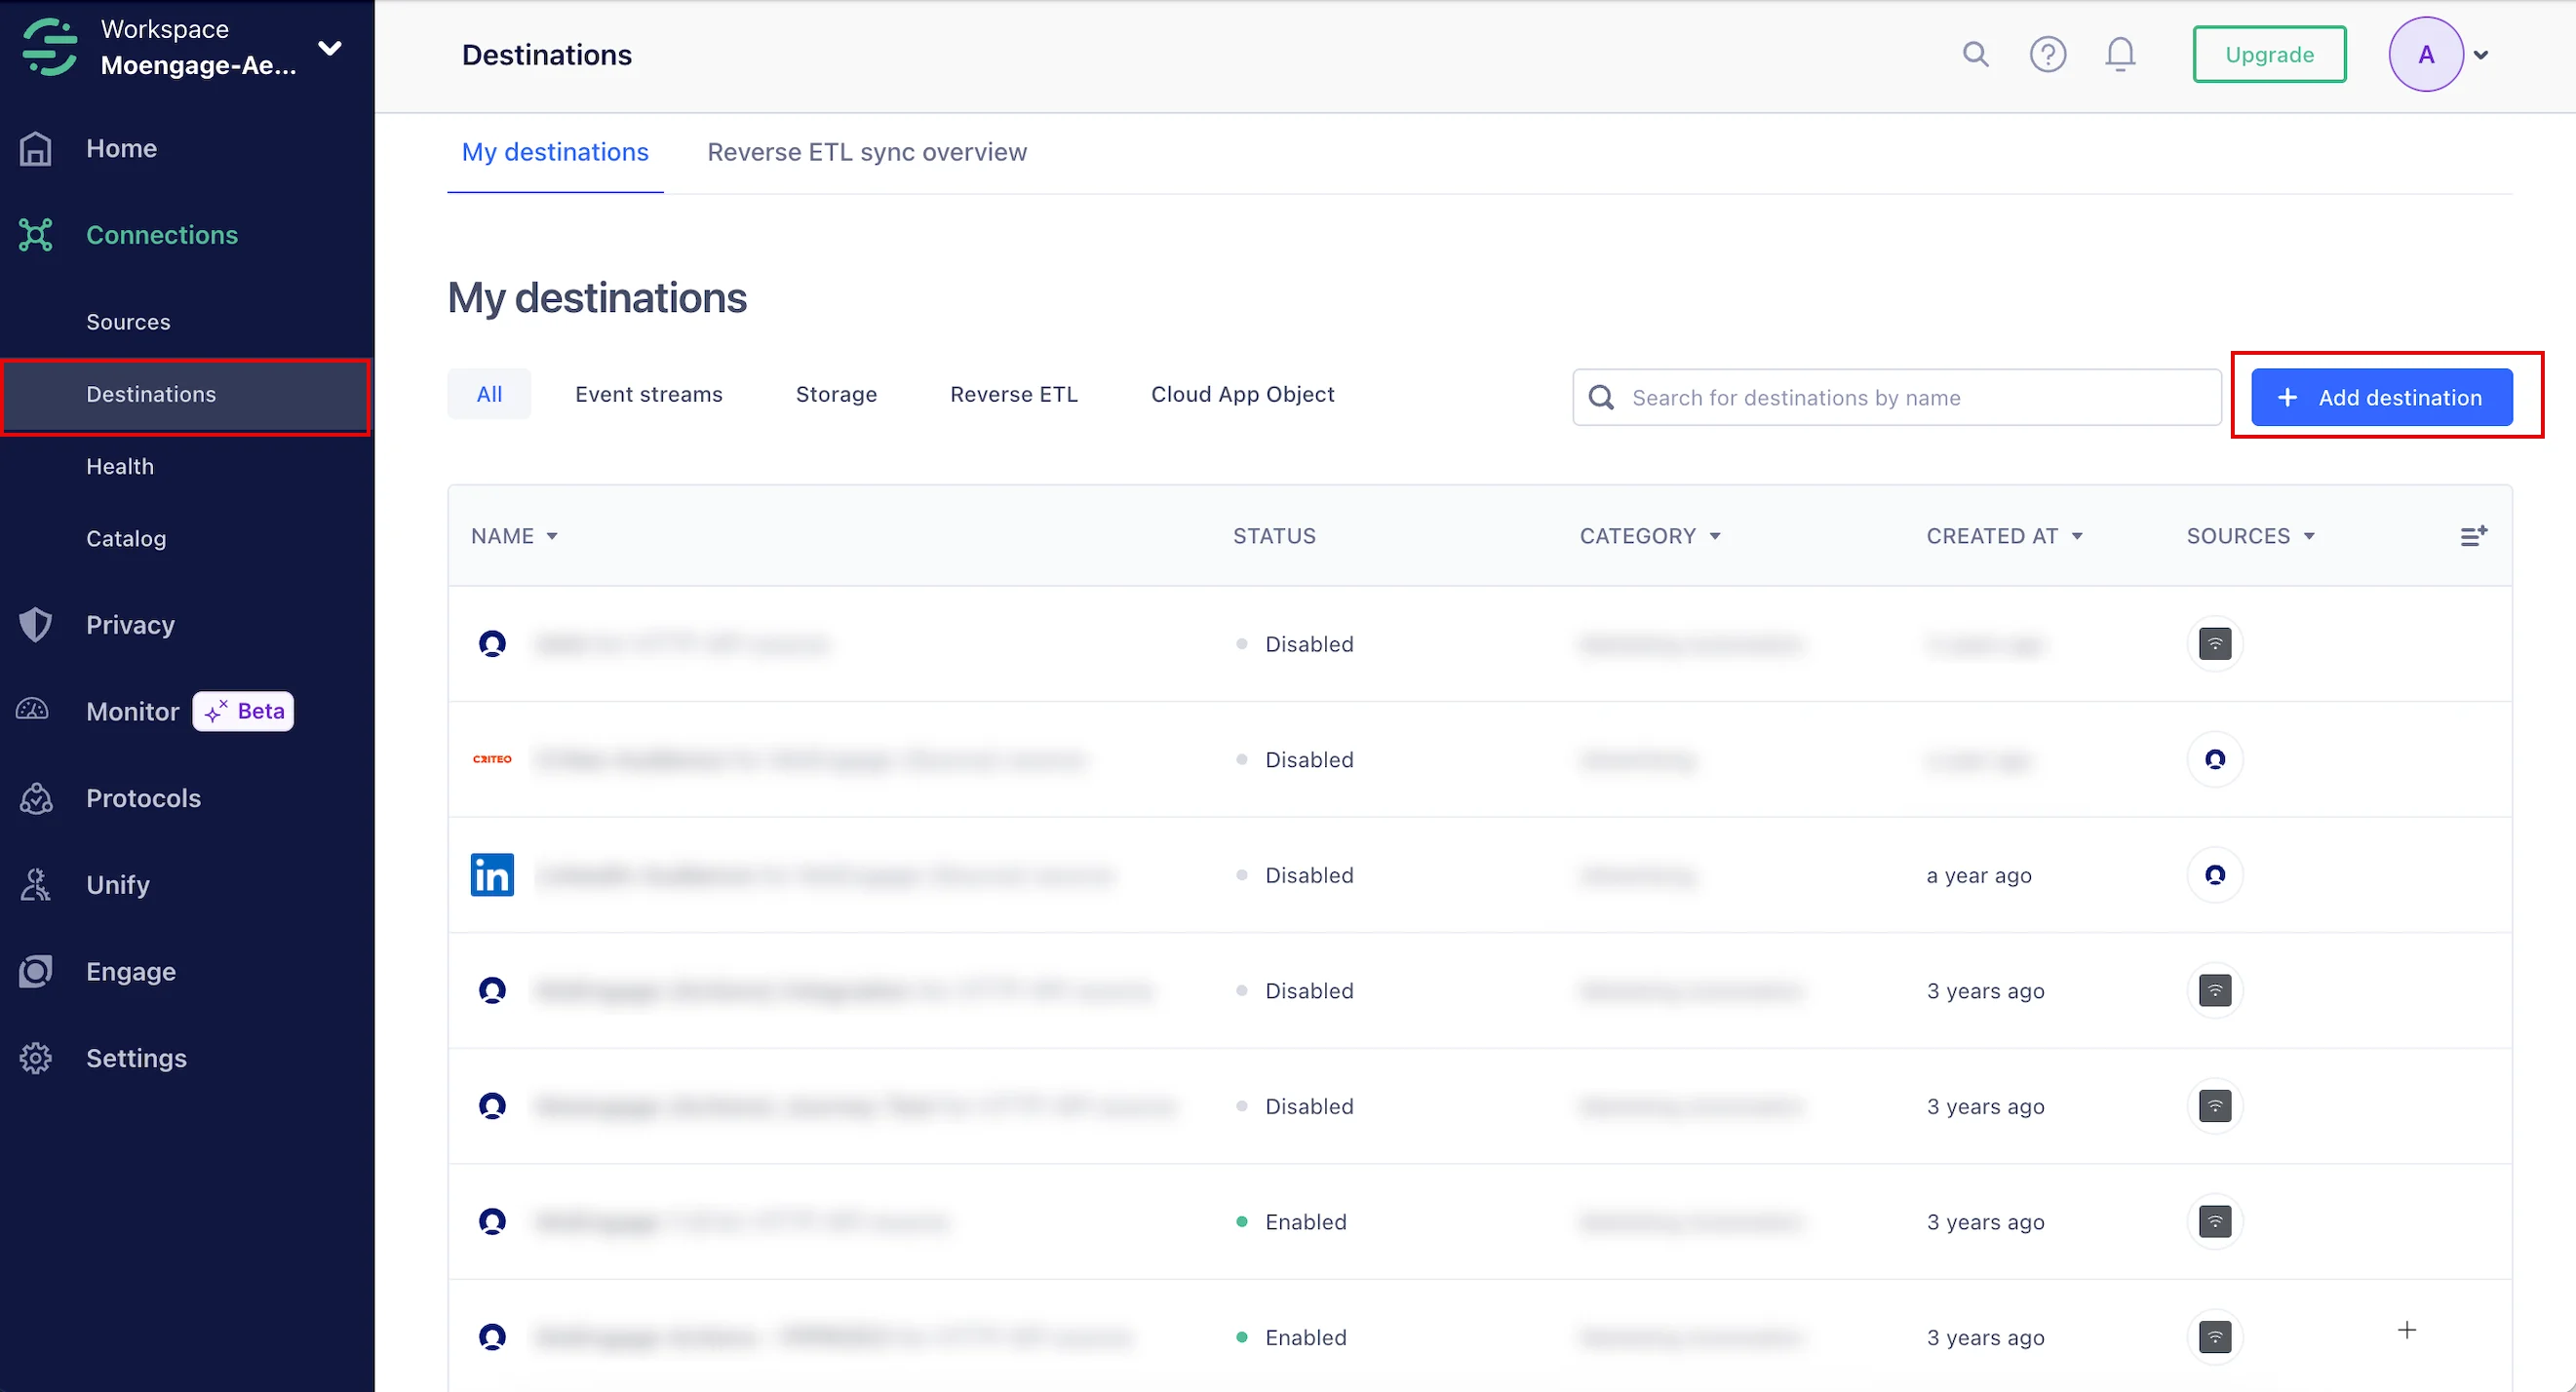 4. Under **Destinations** , you can select **MoEngage** and **MoEngage (Actions)** based on your preferred destination.
 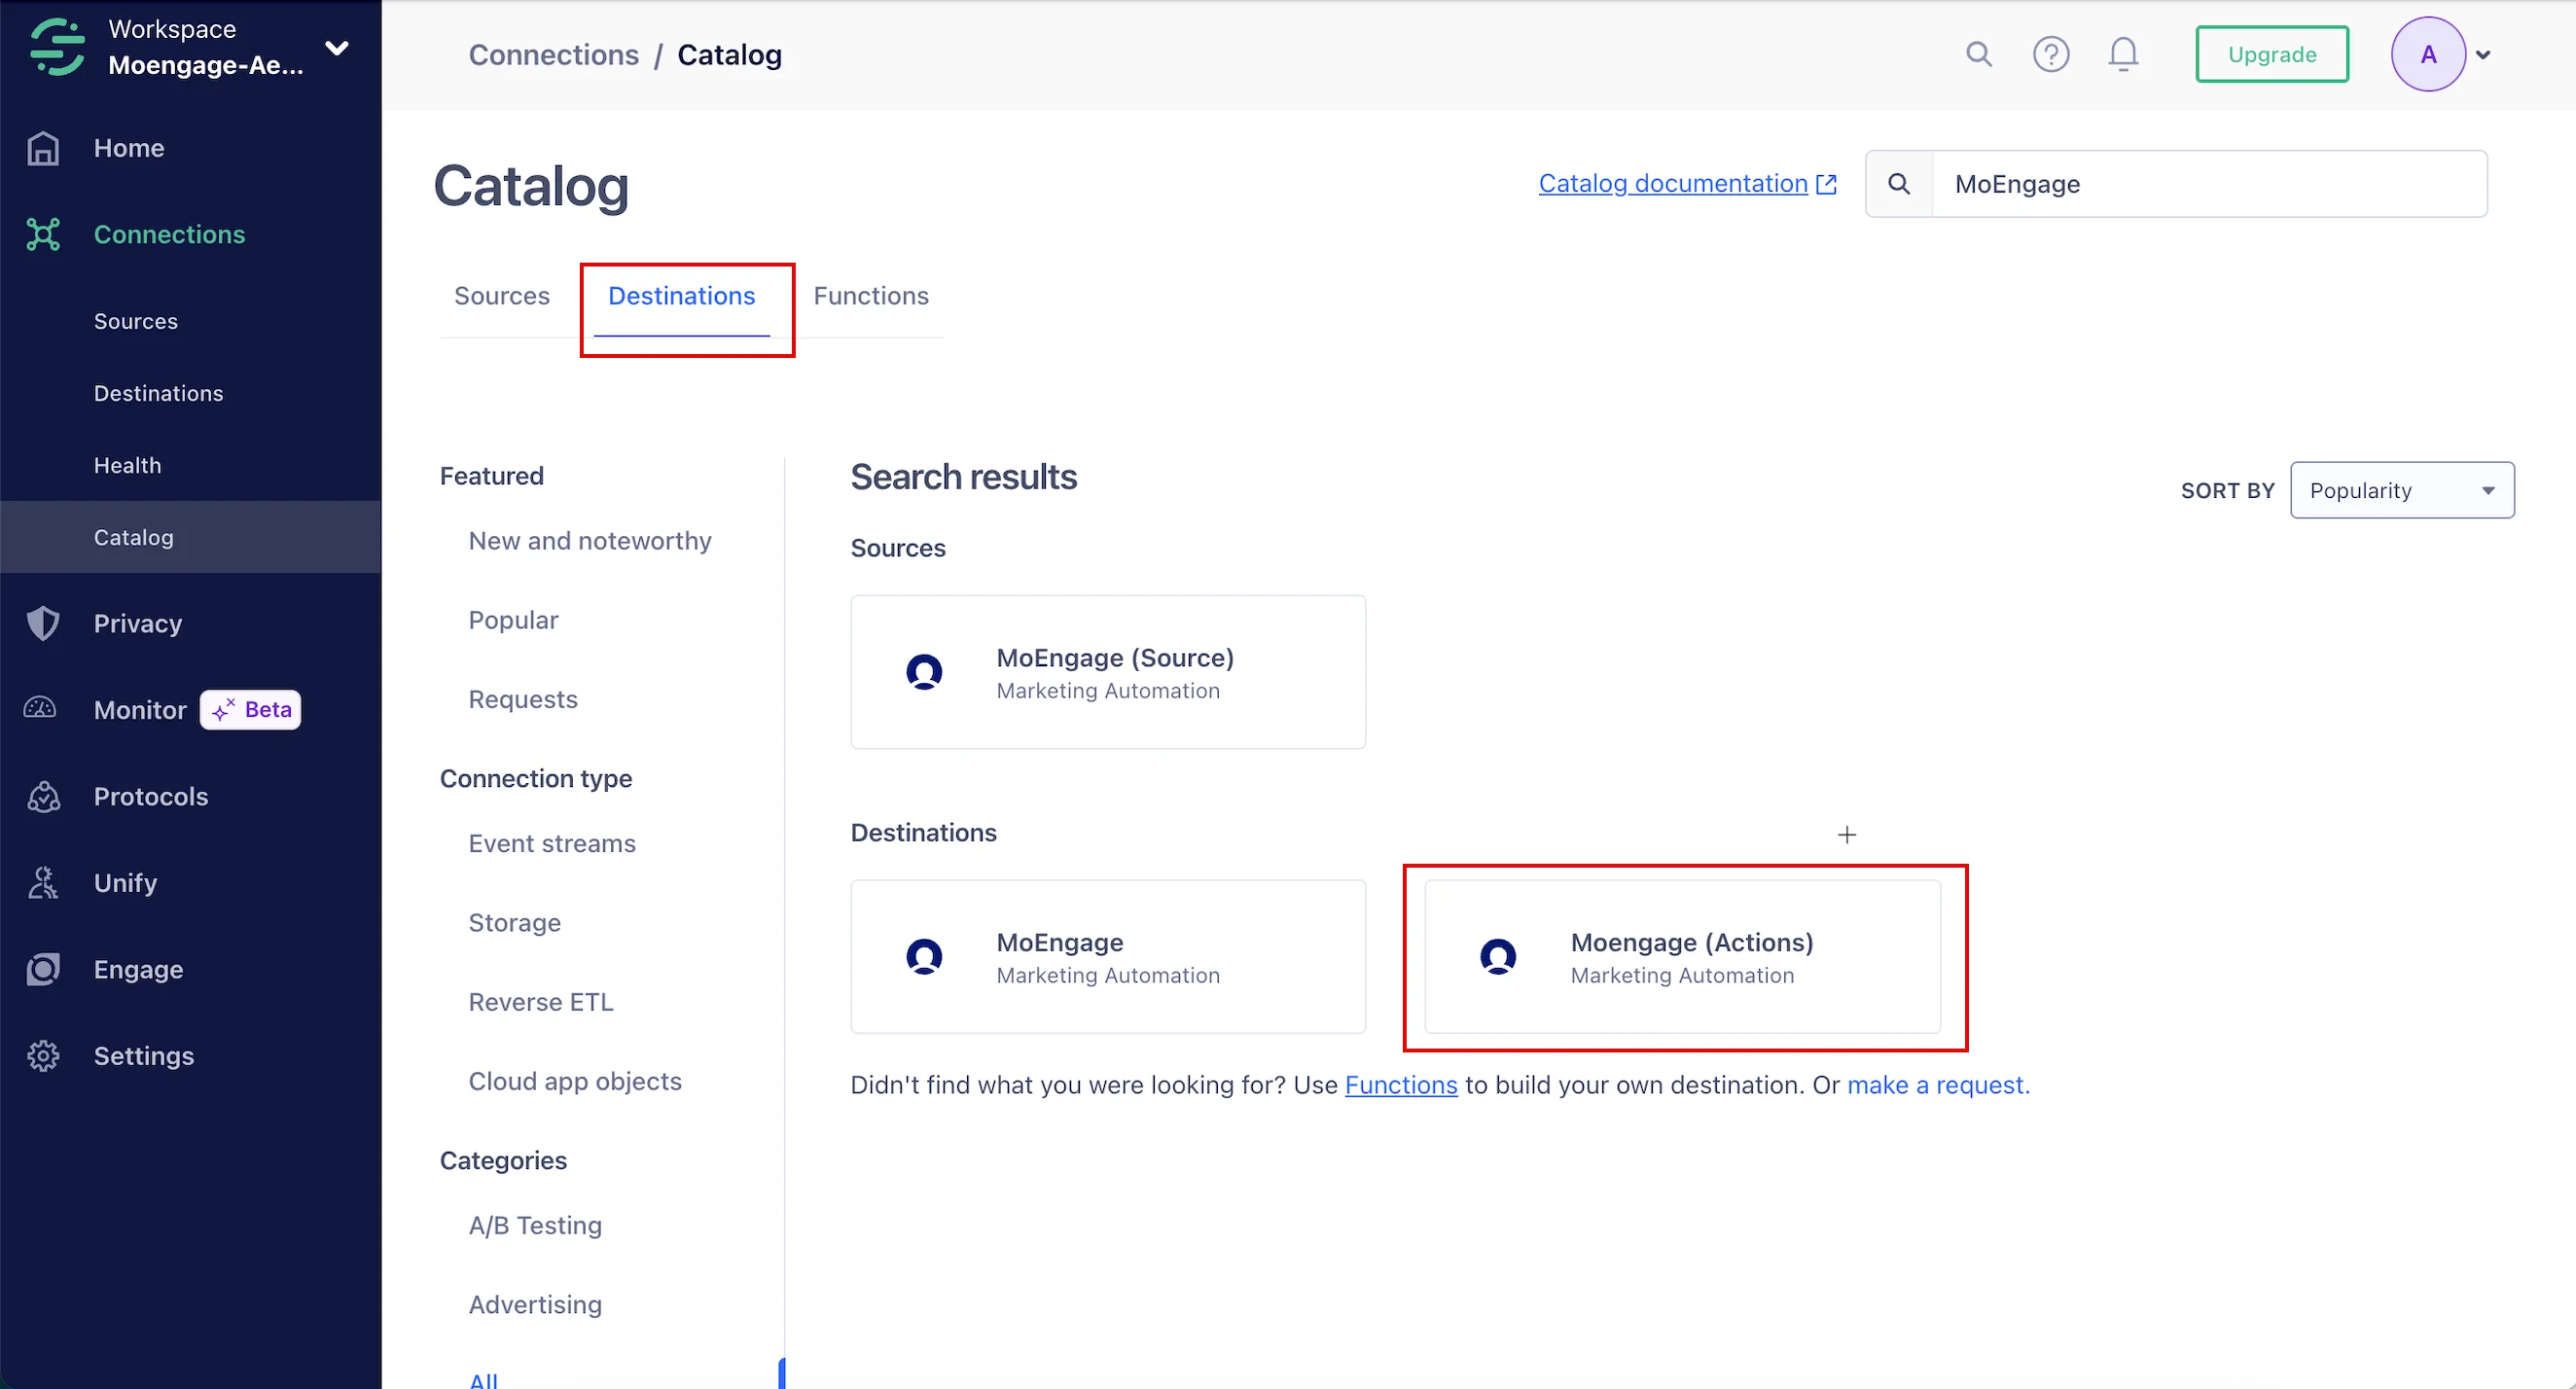 ### MoEngage (Classic)
The MoEngage or “MoEngage (Classic)” Destination allows you to forward Users and Events data from Segment using either Segment’s Device mode or Cloud mode. To set up MoEngage:
1. On the [MoEngage Destination page](https://app.segment.com/moengage-shivam/destinations/catalog/moengage), click **Add Destination**.
2. Select **Data Source** and click **Next**.
3. Based on your integration mode selected in Step 2, on the **Setup** page, enter the destination name.\
Optional: If you previously integrated with the MoEngage destination, you can select to copy those settings here.
### MoEngage (Classic)
The MoEngage or “MoEngage (Classic)” Destination allows you to forward Users and Events data from Segment using either Segment’s Device mode or Cloud mode. To set up MoEngage:
1. On the [MoEngage Destination page](https://app.segment.com/moengage-shivam/destinations/catalog/moengage), click **Add Destination**.
2. Select **Data Source** and click **Next**.
3. Based on your integration mode selected in Step 2, on the **Setup** page, enter the destination name.\
Optional: If you previously integrated with the MoEngage destination, you can select to copy those settings here. 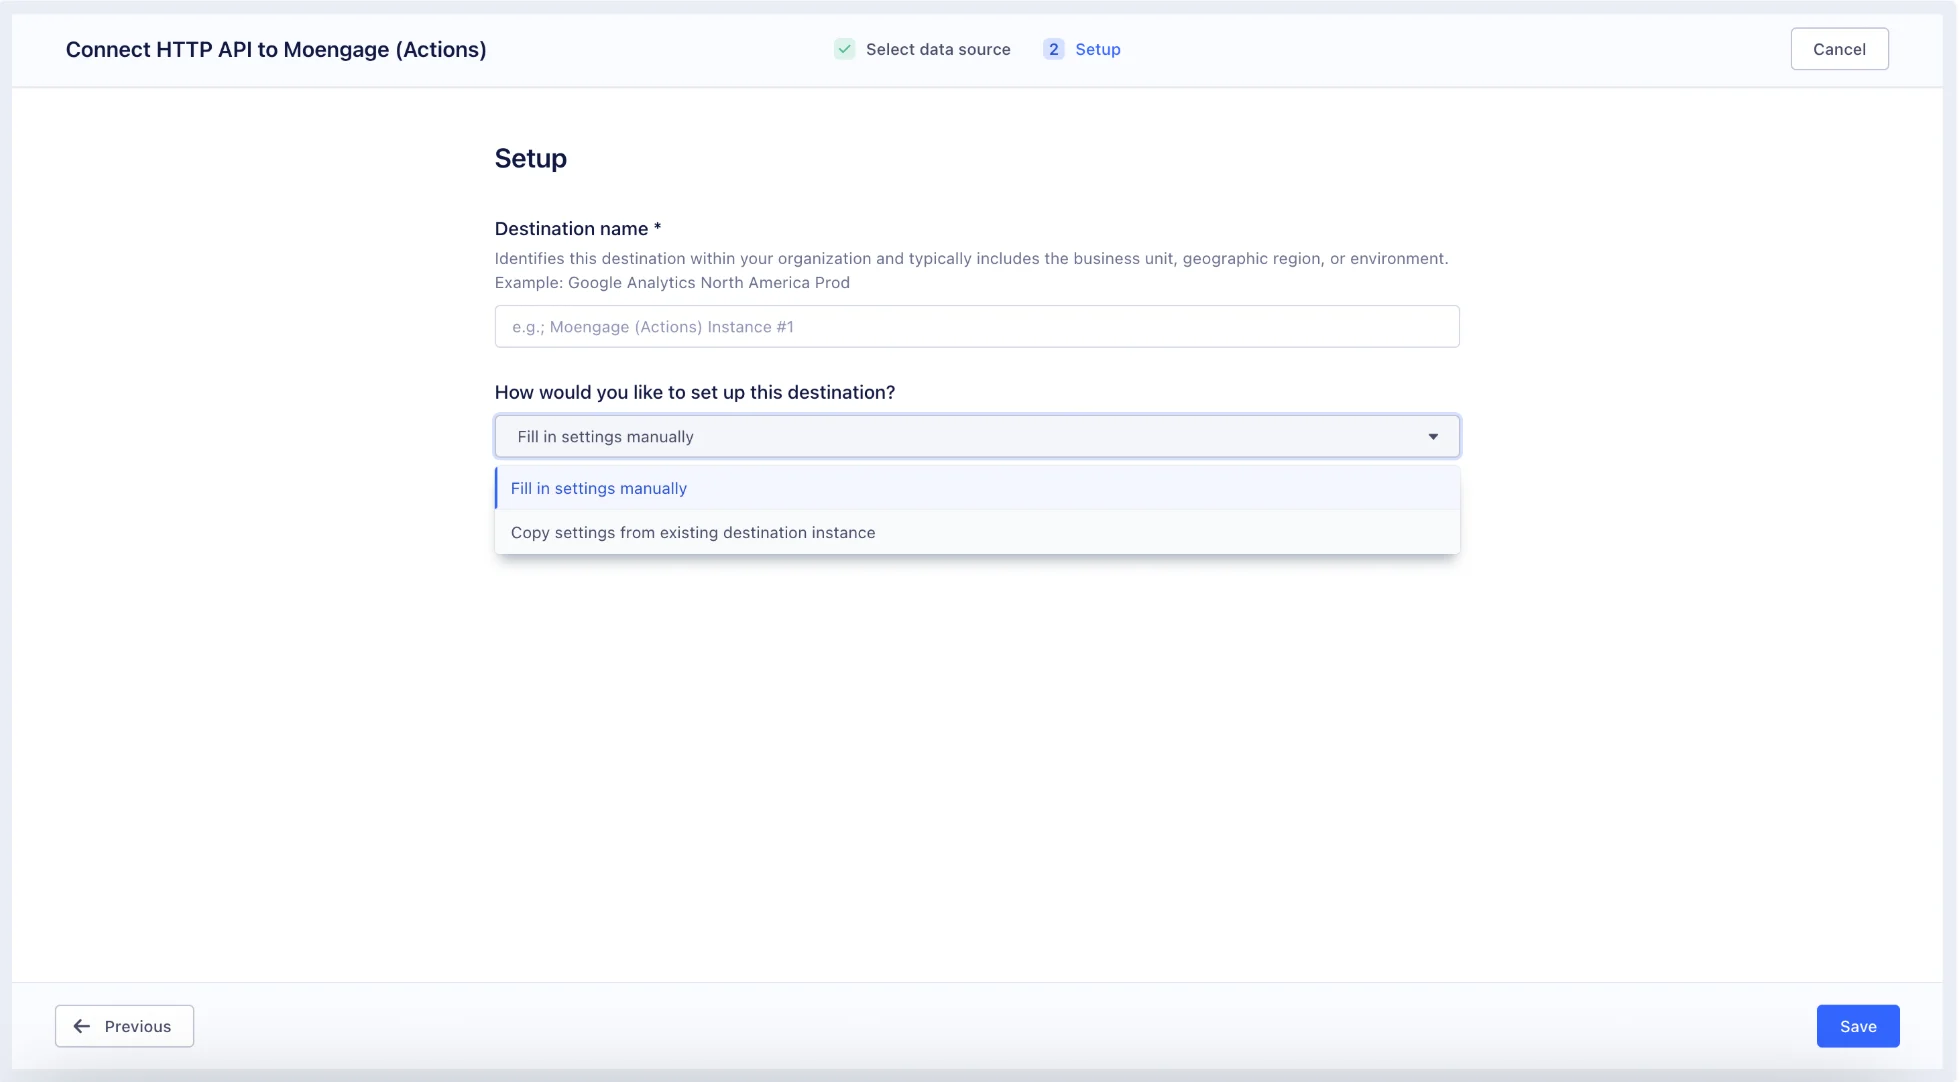 4. Click **Create Destination**.
5. On the **Settings** tab, enter the details of your MoEngage app and enable the connection to start forwarding data to MoEngage.
4. Click **Create Destination**.
5. On the **Settings** tab, enter the details of your MoEngage app and enable the connection to start forwarding data to MoEngage. 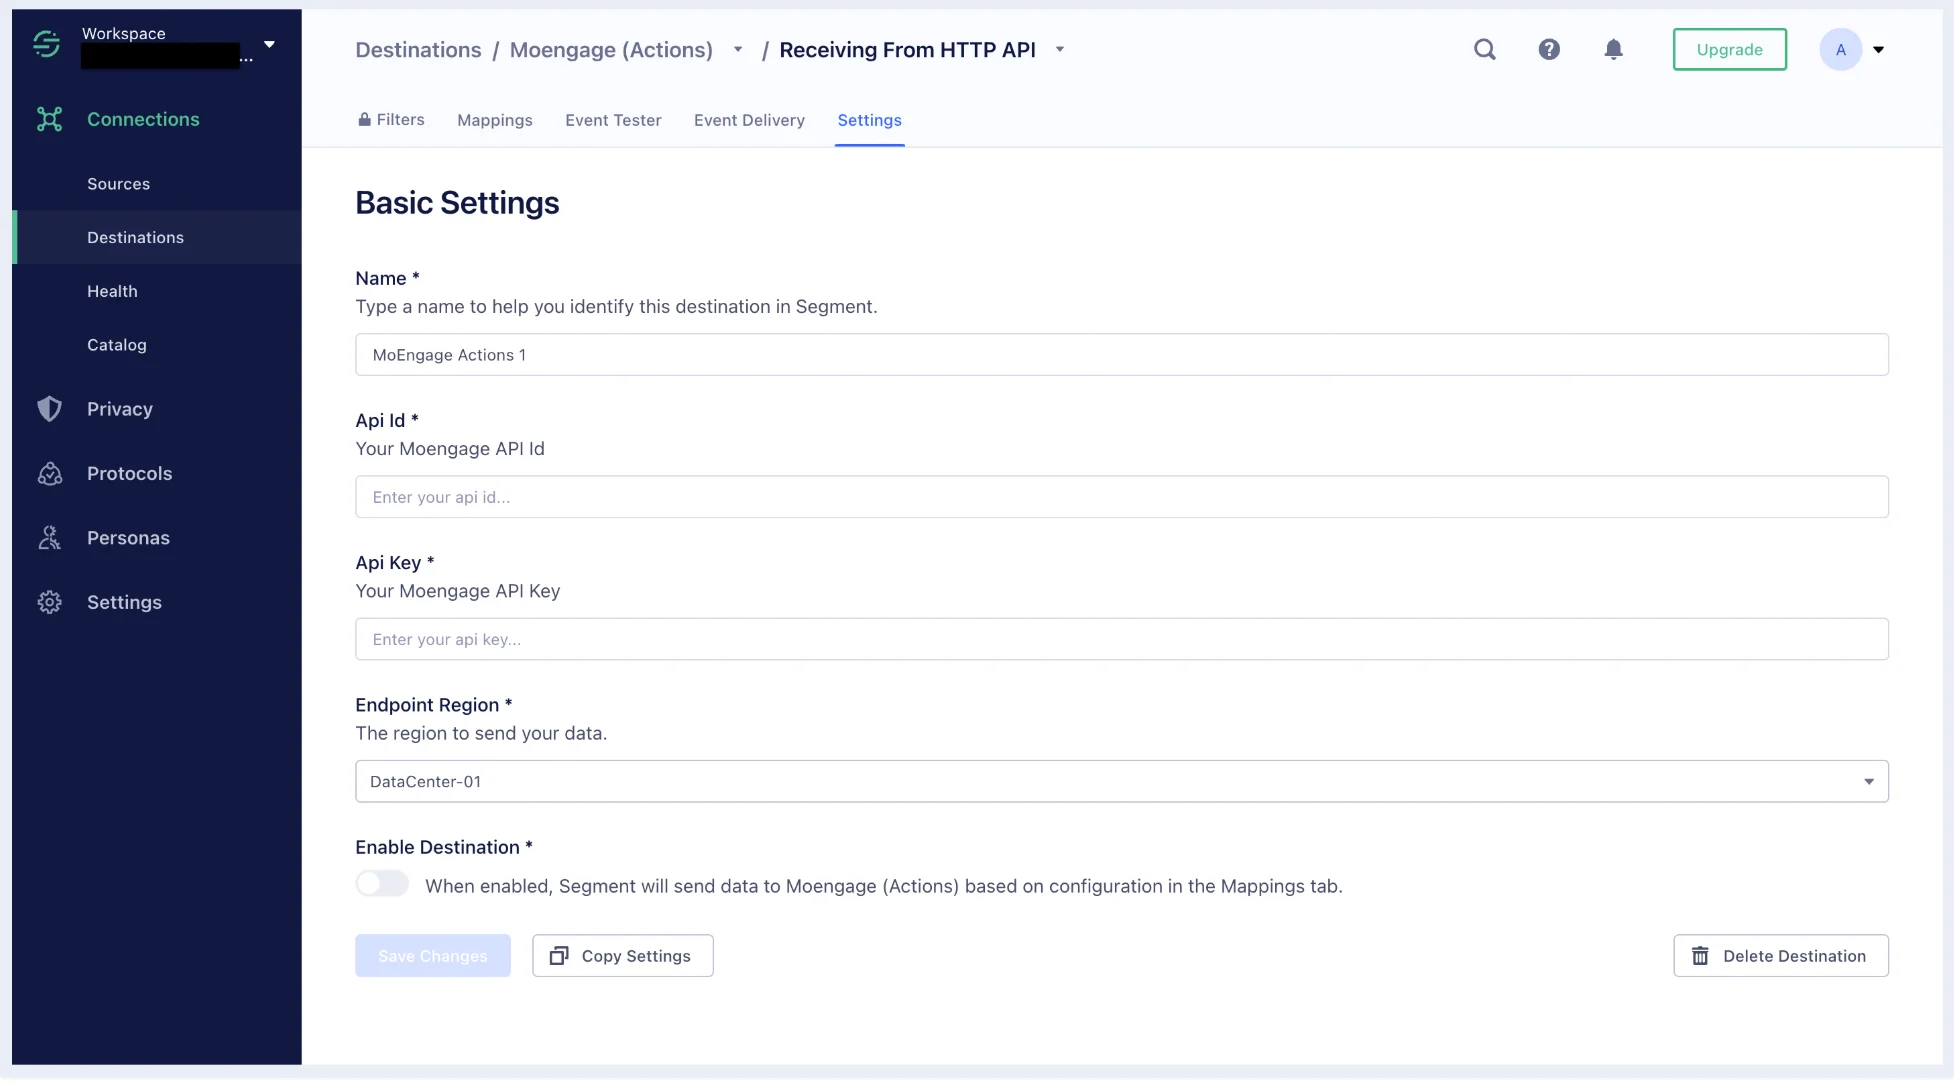 # Step 2: Select the Integration Type and Implement
The MoEngage (Classic) integration supports two connection modes for forwarding data from Segment to MoEngage:
* **Device Mode (Side-by-side)** : This mode enables all MoEngage capabilities for your mobile app and forwards all data directly from your mobile app to MoEngage. This is the preferred mode.
* **Cloud Mode (Server-to-server)** : This mode is recommended for sending offline data to MoEngage.
## Device Mode (Side-by-side)
Device Mode is the preferred connection mode for using MoEngage with Segment. When configured with Device Mode, Segment forwards all track and identify requests directly to MoEngage via the user's device. This means your app makes separate requests to Segment and MoEngage, eliminating the need for you to explicitly send data to MoEngage. To use Device Mode on Android and iOS, integrate the MoEngage **+ Segment** bundle. For your website data, select a Device Mode connection.
# Step 2: Select the Integration Type and Implement
The MoEngage (Classic) integration supports two connection modes for forwarding data from Segment to MoEngage:
* **Device Mode (Side-by-side)** : This mode enables all MoEngage capabilities for your mobile app and forwards all data directly from your mobile app to MoEngage. This is the preferred mode.
* **Cloud Mode (Server-to-server)** : This mode is recommended for sending offline data to MoEngage.
## Device Mode (Side-by-side)
Device Mode is the preferred connection mode for using MoEngage with Segment. When configured with Device Mode, Segment forwards all track and identify requests directly to MoEngage via the user's device. This means your app makes separate requests to Segment and MoEngage, eliminating the need for you to explicitly send data to MoEngage. To use Device Mode on Android and iOS, integrate the MoEngage **+ Segment** bundle. For your website data, select a Device Mode connection.
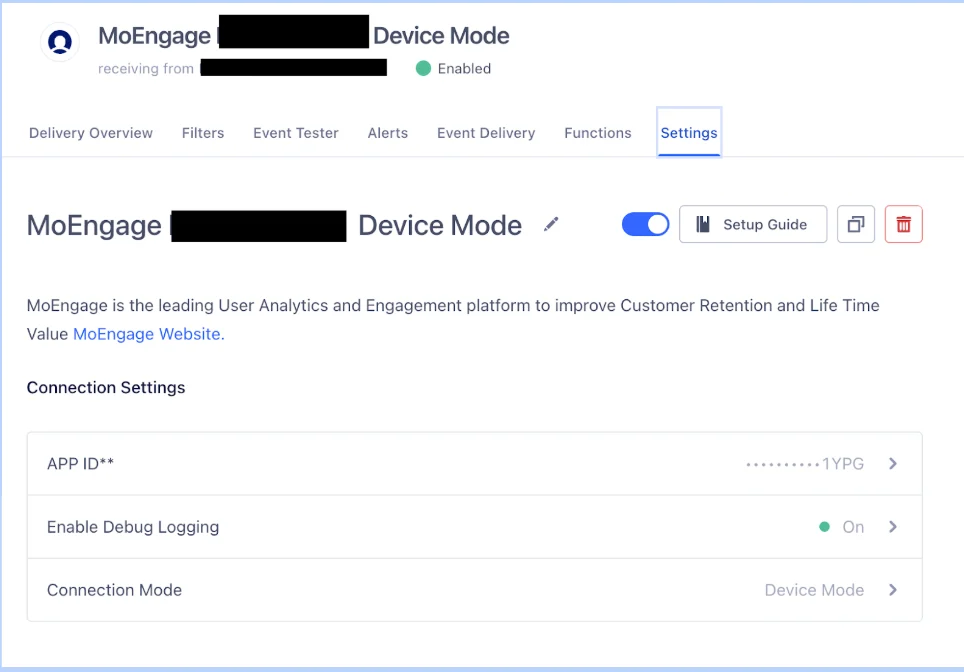 Under the **Settings** tab, enter the following details:
| Entity | Description |
| ------------------------------------------------------------------------- | -------------------------------------------------------------------------------------------------------------------------------------------------------------- |
| App ID | To obtain your Workspace ID, navigate to **Settings** > **Account** > **General settings** in the MoEngage dashboard. |
| Debug Logging | You must enable debug logs by turning on this option. This routes your data to the TEST environment in MoEngage. |
| Connection Mode (You will see this option only for the JavaScript source) |
Under the **Settings** tab, enter the following details:
| Entity | Description |
| ------------------------------------------------------------------------- | -------------------------------------------------------------------------------------------------------------------------------------------------------------- |
| App ID | To obtain your Workspace ID, navigate to **Settings** > **Account** > **General settings** in the MoEngage dashboard. |
| Debug Logging | You must enable debug logs by turning on this option. This routes your data to the TEST environment in MoEngage. |
| Connection Mode (You will see this option only for the JavaScript source) | - **Website, Android, & iOS**: The default connection mode is Device Mode.
- **Server-side**: The default connection mode is Cloud Mode.
|
For using the Device Mode connection and leveraging all MoEngage capabilities, you would need to follow the integration steps mentioned below:
## Cloud Mode (Server-to-server)
It is preferred to use MoEngage (Actions) for Cloud Mode.
Cloud Mode integration is beneficial in the following scenarios:
* Forwarding data to MoEngage generated by Segment's server-side sources.
* Automatically sending data via Cloud Mode when the MoEngage + Segment code is not bundled on an Android or iOS device.
For more information, refer to [Segment Sources](https://segment.com/docs/connections/sources/), [MoEngage Destination](https://segment.com/docs/connections/destinations/catalog/moengage/), and supported connection modes.
**Limitations**
A few limitations exist when using Cloud Mode integration: Segment transforms all your attributes (properties) from `camelCase` to `snake_case` before sending this data to MoEngage (only via Cloud Mode). This might result in duplicate attributes appearing on your MoEngage dashboard. This transformation does not occur when you use Device Mode.
### iOS
The MoEngage SDK you need to use will depend on which Segment SDK you use:
| | Segment SDK | MoEngage SDK |
| --------- | --------------------------------------------------------------- | ------------------------------------------------------------------------------------------------------------------------------ |
| Preferred | [Analytics Swift](https://github.com/segmentio/analytics-swift) | [MoEngage Segment Swift](/partner-guide/data-and-analytics/cdps/twillio-segment/device-mode-integration/ios-swift-device-mode) |
| Legacy | [Analytics iOS](https://github.com/segmentio/analytics-ios) | [MoEngage Segment iOS](/partner-guide/data-and-analytics/cdps/twillio-segment/device-mode-integration/ios-swift-device-mode) |
### Android
The MoEngage SDK you need to use will depend on which Segment SDK you use:
| | Segment SDK | MoEngage SDK |
| --------- | ------------------------------------------------------------------- | ------------------------------------------------------------------------------------------------------------------------------------ |
| Preferred | [Analytics Kotlin](https://github.com/segmentio/analytics-kotlin) | [MoEngage Segment Kotlin](/partner-guide/data-and-analytics/cdps/twillio-segment/device-mode-integration/android-kotlin-device-mode) |
| Legacy | [Analytics Android](https://github.com/segmentio/analytics-android) | [MoEngage Segment Android](/partner-guide/data-and-analytics/cdps/twillio-segment/device-mode-integration/android-device-mode) |
### Web
To complete the side-by-side integration, please refer to the detailed instructions for [Segment Web](/partner-guide/data-and-analytics/cdps/twillio-segment/device-mode-integration/web-device-mode).
### React Native
To complete the side-by-side integration, please refer to the detailed instructions for [Segment React Native](/partner-guide/data-and-analytics/cdps/twillio-segment/device-mode-integration).
### MoEngage (Actions)
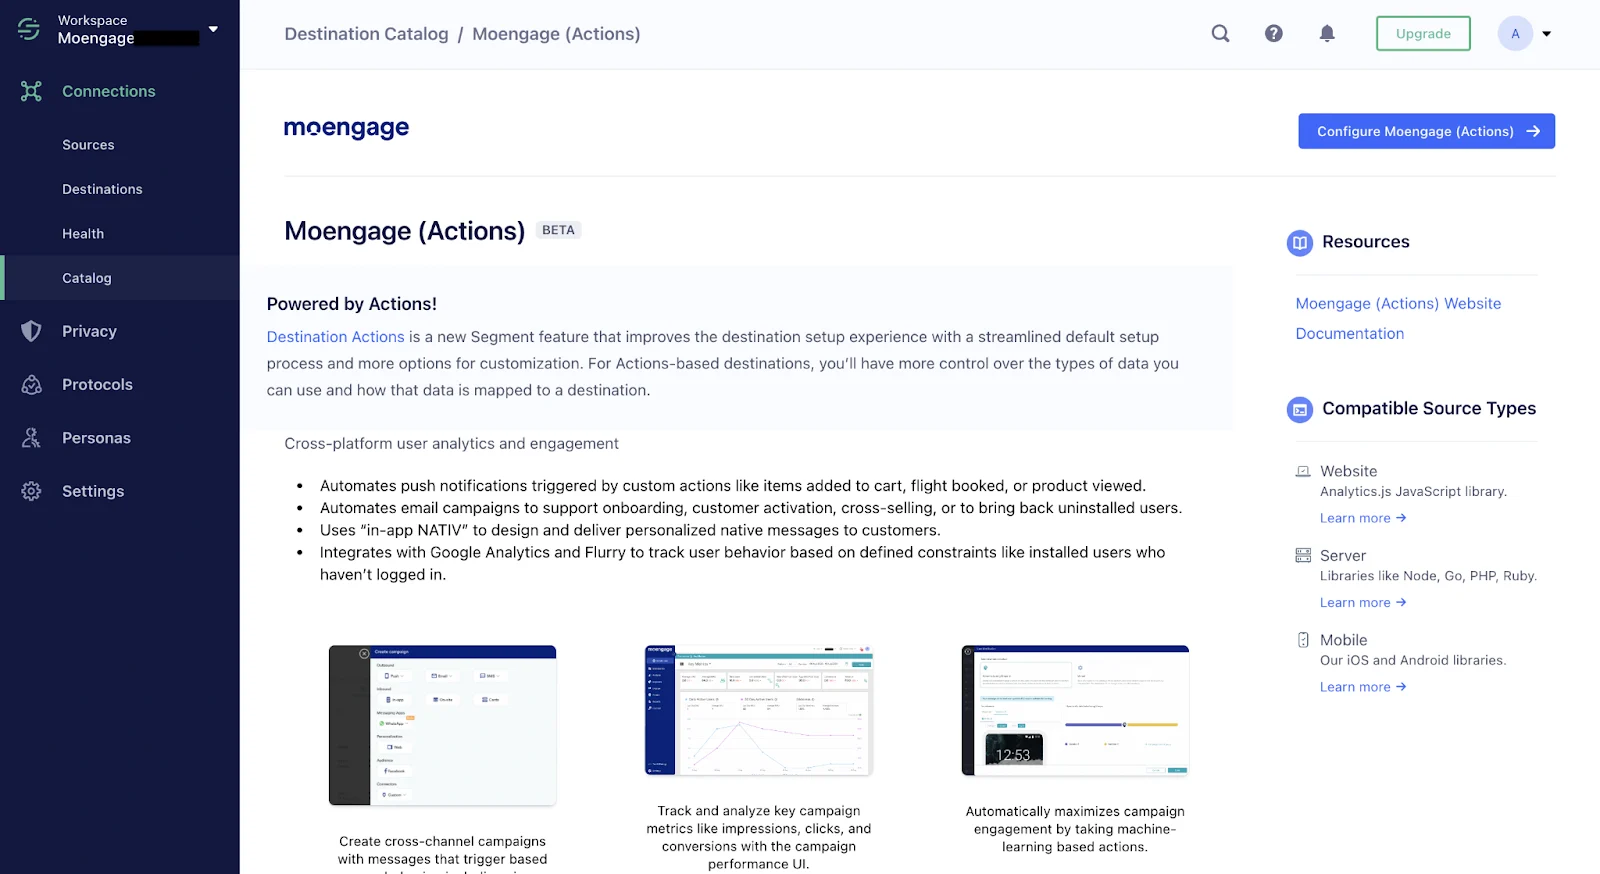
MoEngage (Actions) Destination provides significant improvements over the Classic Destination:
 ## Benefits of MoEngage (Actions) vs. MoEngage Classic
MoEngage (Actions) provides the following benefits over the MoEngage Classic destination:
* **Data consistency** : We have improved data consistency between Device Mode and Cloud Mode. Previously, data sent through these modes would sometimes be mismatched or contain duplicated properties; this issue is now resolved.
* **Mapping support** : Using MoEngage Actions, you can now map properties that are previously incompatible with MoEngage-compatible properties. This significantly reduces your development bandwidth.
* **Enhanced configuration** : Additional configurations are now available for the JavaScript integration, including the option for a custom Service Worker.
### Step 2: Set up MoEngage (Actions) Destination
To set up the MoEngage (Actions) Destination, perform the following steps:
1. On the **Setup** page, enter a **Destination name**.\
**Note** : Select your preferred setup method. Optional: If you previously integrated with MoEngage, you can copy the settings from a previous destination.
2. Click **Save**.
## Benefits of MoEngage (Actions) vs. MoEngage Classic
MoEngage (Actions) provides the following benefits over the MoEngage Classic destination:
* **Data consistency** : We have improved data consistency between Device Mode and Cloud Mode. Previously, data sent through these modes would sometimes be mismatched or contain duplicated properties; this issue is now resolved.
* **Mapping support** : Using MoEngage Actions, you can now map properties that are previously incompatible with MoEngage-compatible properties. This significantly reduces your development bandwidth.
* **Enhanced configuration** : Additional configurations are now available for the JavaScript integration, including the option for a custom Service Worker.
### Step 2: Set up MoEngage (Actions) Destination
To set up the MoEngage (Actions) Destination, perform the following steps:
1. On the **Setup** page, enter a **Destination name**.\
**Note** : Select your preferred setup method. Optional: If you previously integrated with MoEngage, you can copy the settings from a previous destination.
2. Click **Save**. 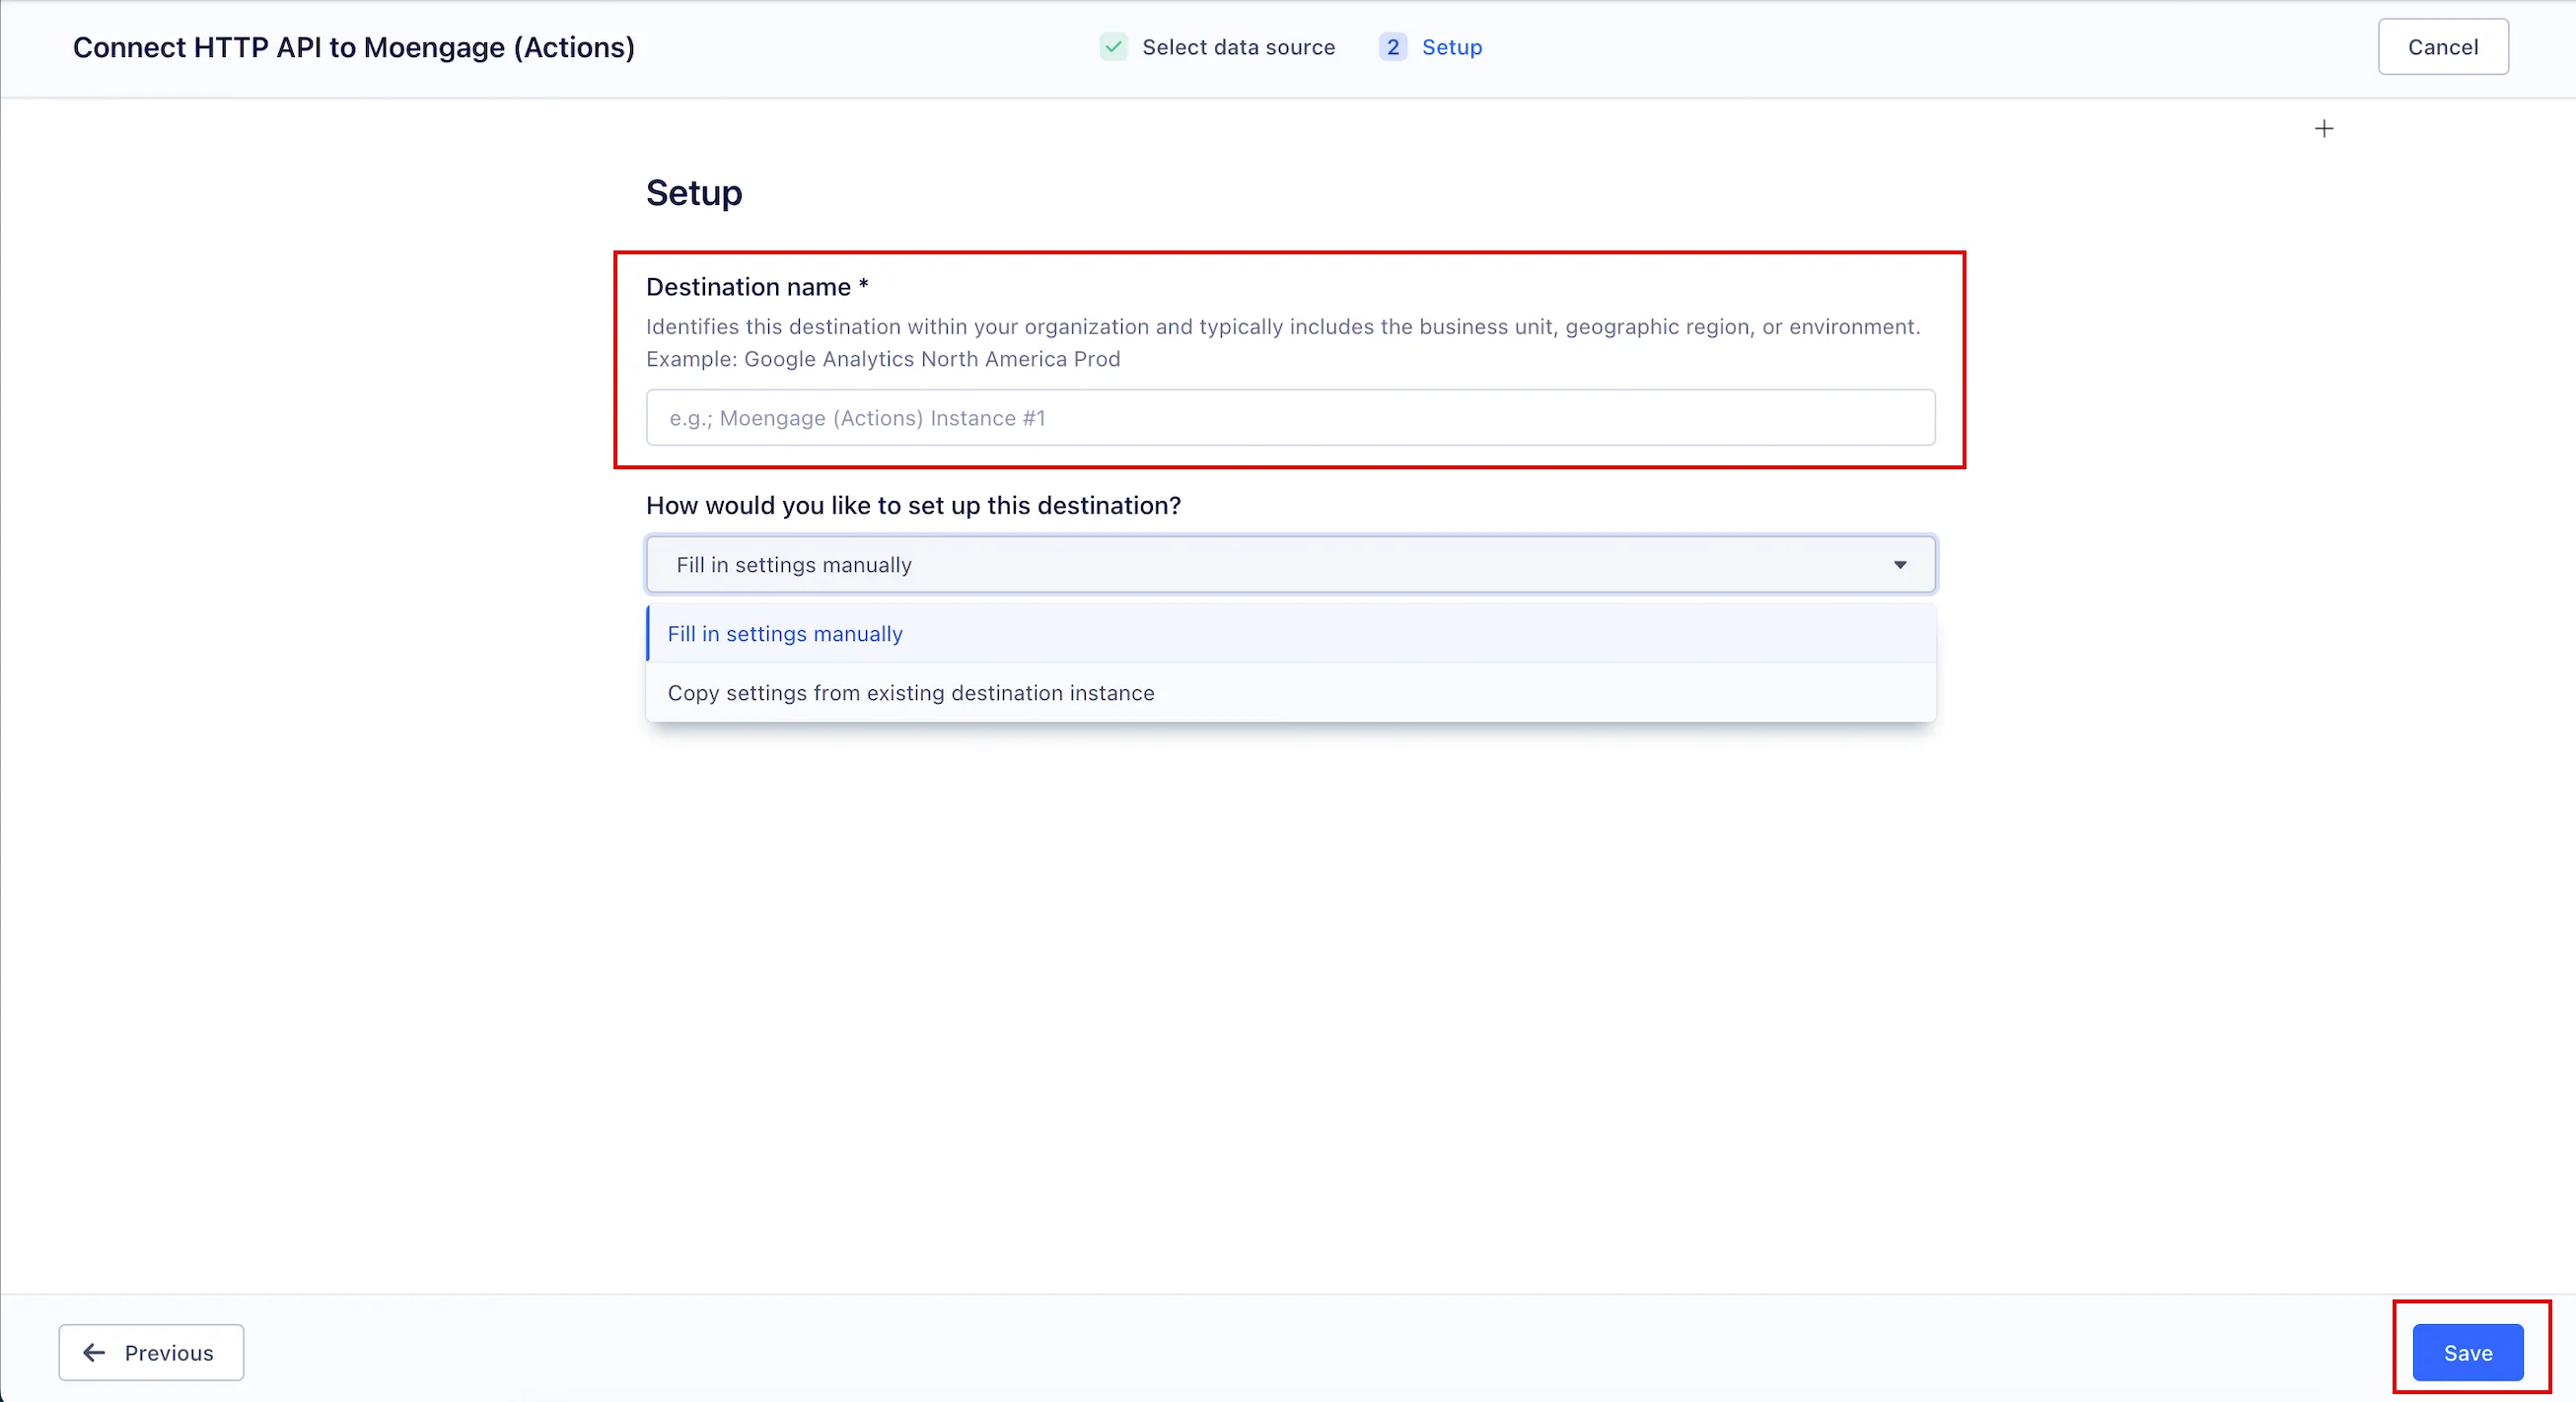 3. On the **Settings** tab, enter your **MoEngage App** details.
| Entity | Description |
| --------------- | ----------------------------------------------------------------------------------------------------------------------------------------------------------------------------------------------------------------------------------- |
| Name | This is the name of the MoEngage destination, such as MoEngage prod, MoEngage test, and so on. |
| App ID | Copy and paste the Workspace ID. The Workspace ID of your MoEngage account is available at **Settings** -> **Account** -> **APIs** -> **Workspace ID**. The Data API ID and the Workspace ID of your MoEngage account are the same. |
| App Key | Copy and paste the App Key. The Data API key of your MoEngage account is available at **Settings** -> **Account** -> **APIs** -> **API keys** > **Data API settings**. |
| Endpoint region | This is your MoEngage data center. For more information, refer [here](https://moengage-user-guide.mintlify.app/user-guide/data/key-concepts/data-centers-in-moengage). |
4. Turn the **Enable** **Destination** toggle on and then click **Save** **Changes**.
3. On the **Settings** tab, enter your **MoEngage App** details.
| Entity | Description |
| --------------- | ----------------------------------------------------------------------------------------------------------------------------------------------------------------------------------------------------------------------------------- |
| Name | This is the name of the MoEngage destination, such as MoEngage prod, MoEngage test, and so on. |
| App ID | Copy and paste the Workspace ID. The Workspace ID of your MoEngage account is available at **Settings** -> **Account** -> **APIs** -> **Workspace ID**. The Data API ID and the Workspace ID of your MoEngage account are the same. |
| App Key | Copy and paste the App Key. The Data API key of your MoEngage account is available at **Settings** -> **Account** -> **APIs** -> **API keys** > **Data API settings**. |
| Endpoint region | This is your MoEngage data center. For more information, refer [here](https://moengage-user-guide.mintlify.app/user-guide/data/key-concepts/data-centers-in-moengage). |
4. Turn the **Enable** **Destination** toggle on and then click **Save** **Changes**. 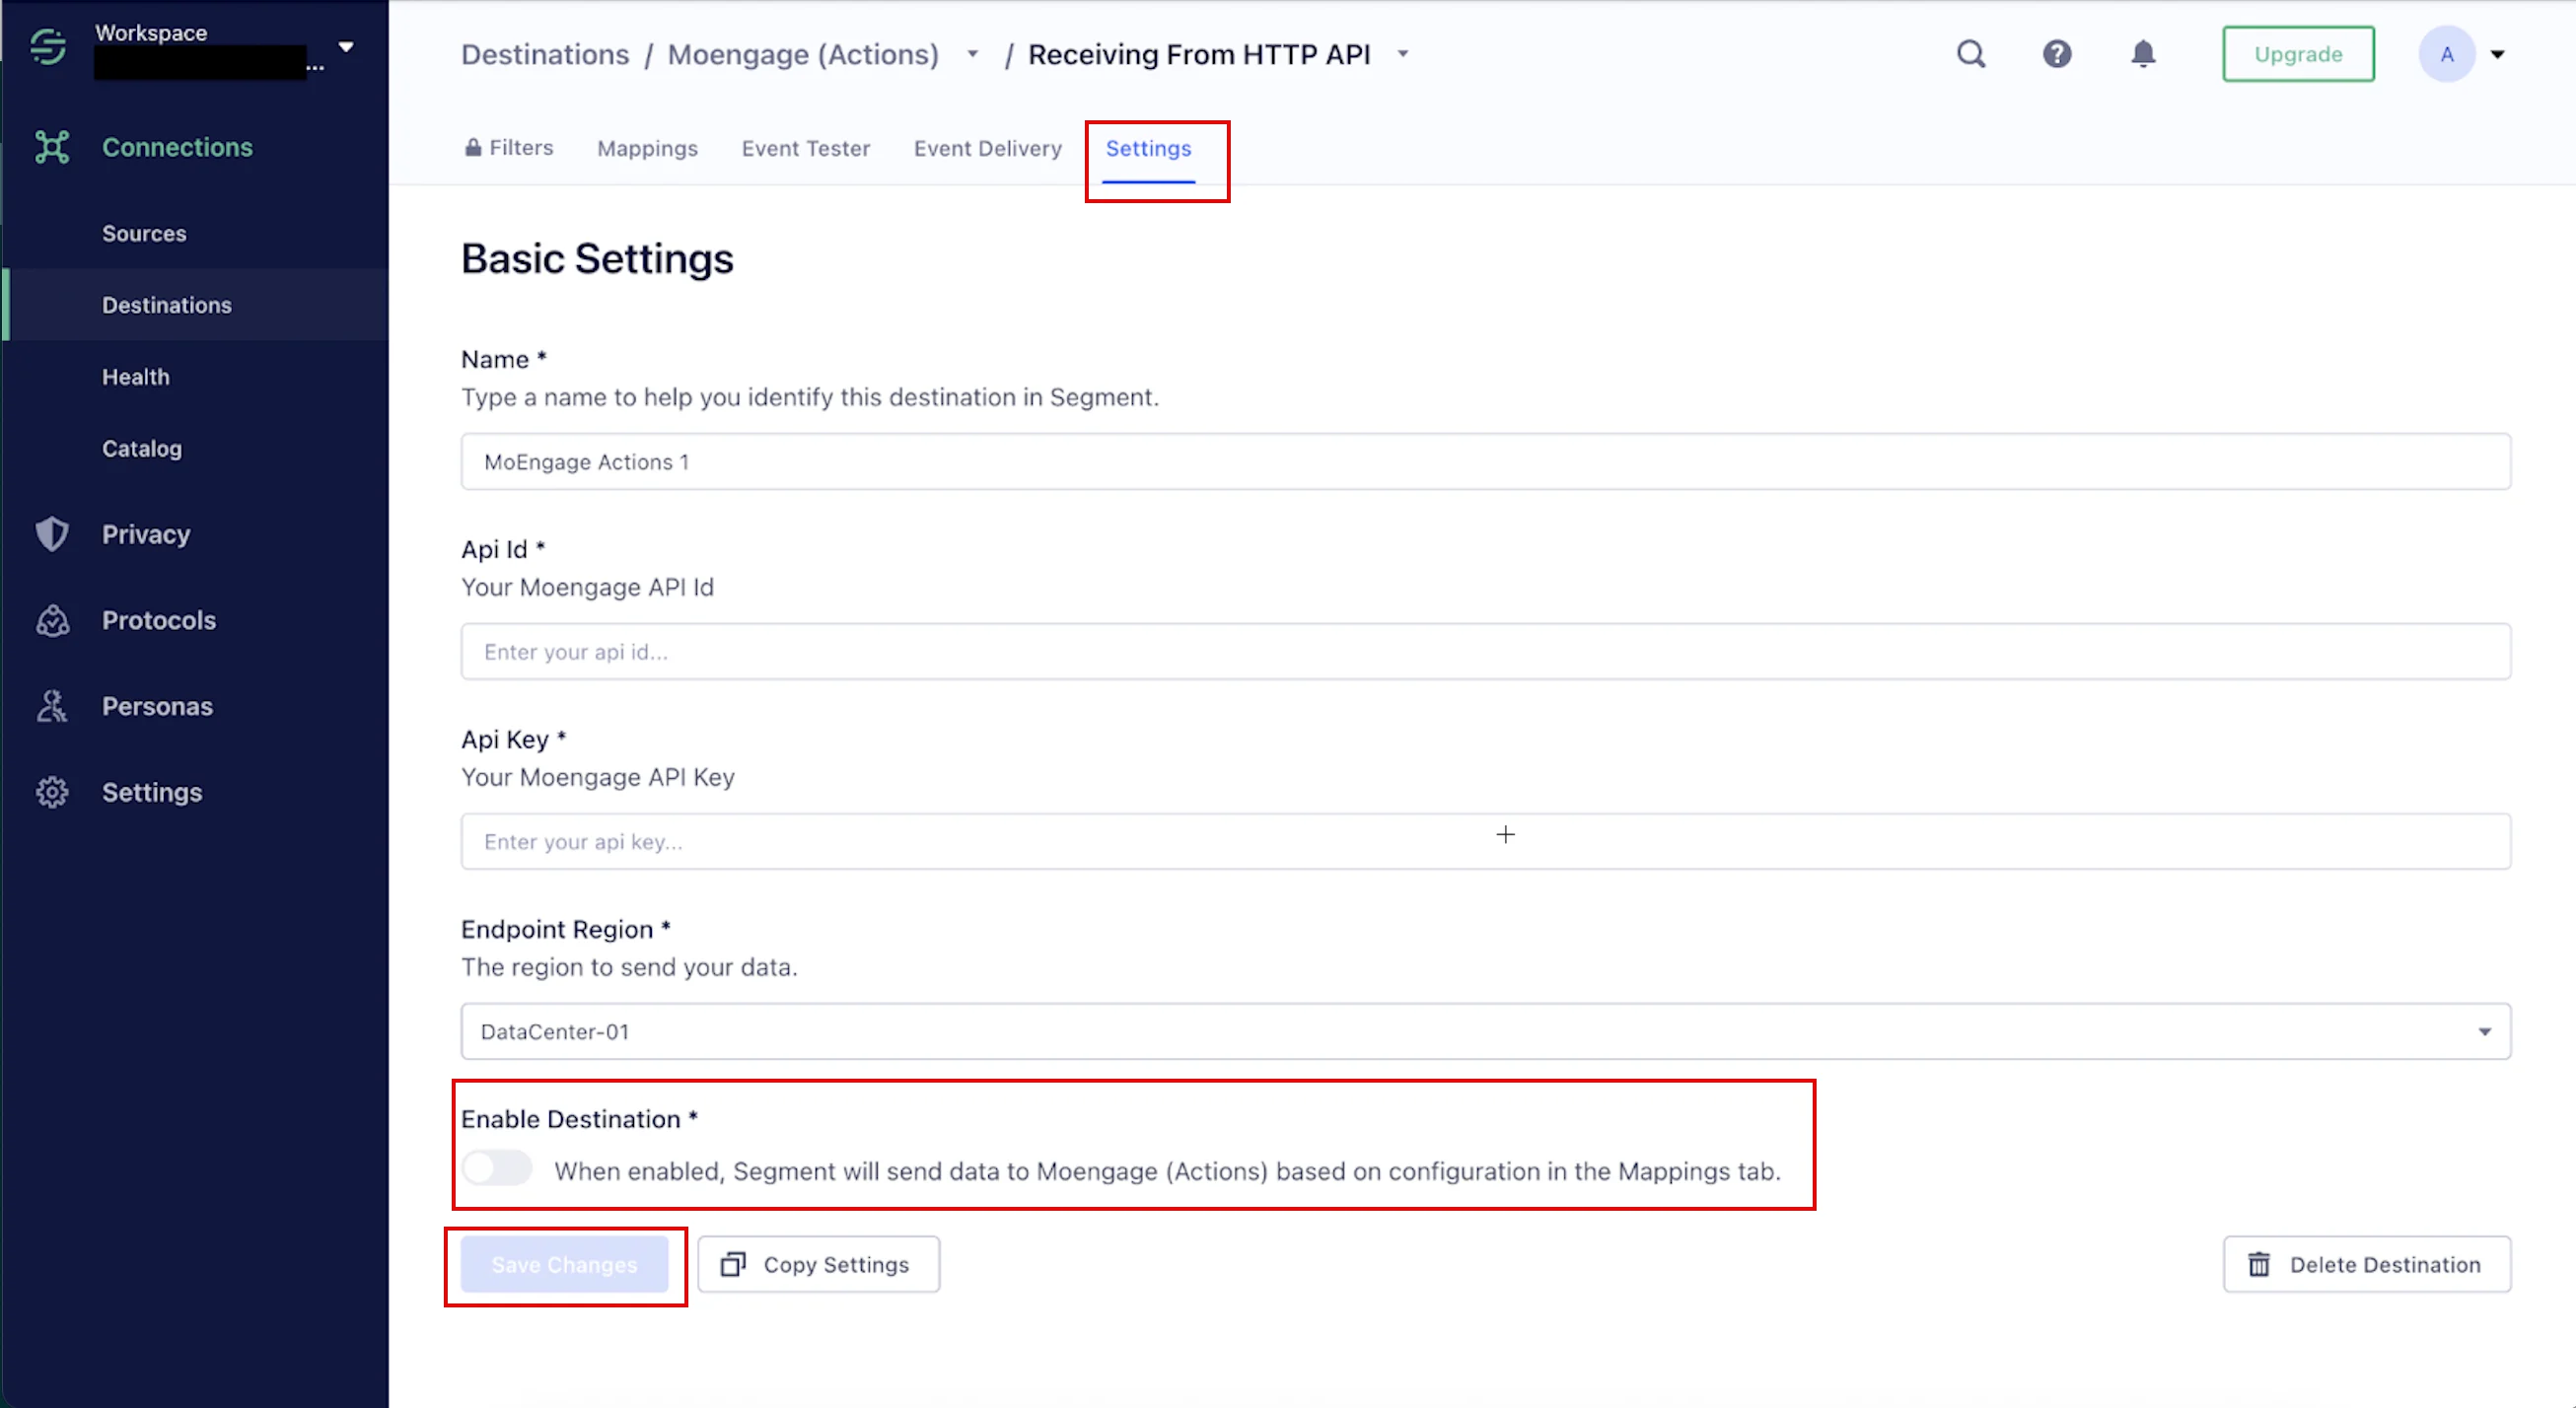 ## Enable Mappings - Track and Identify
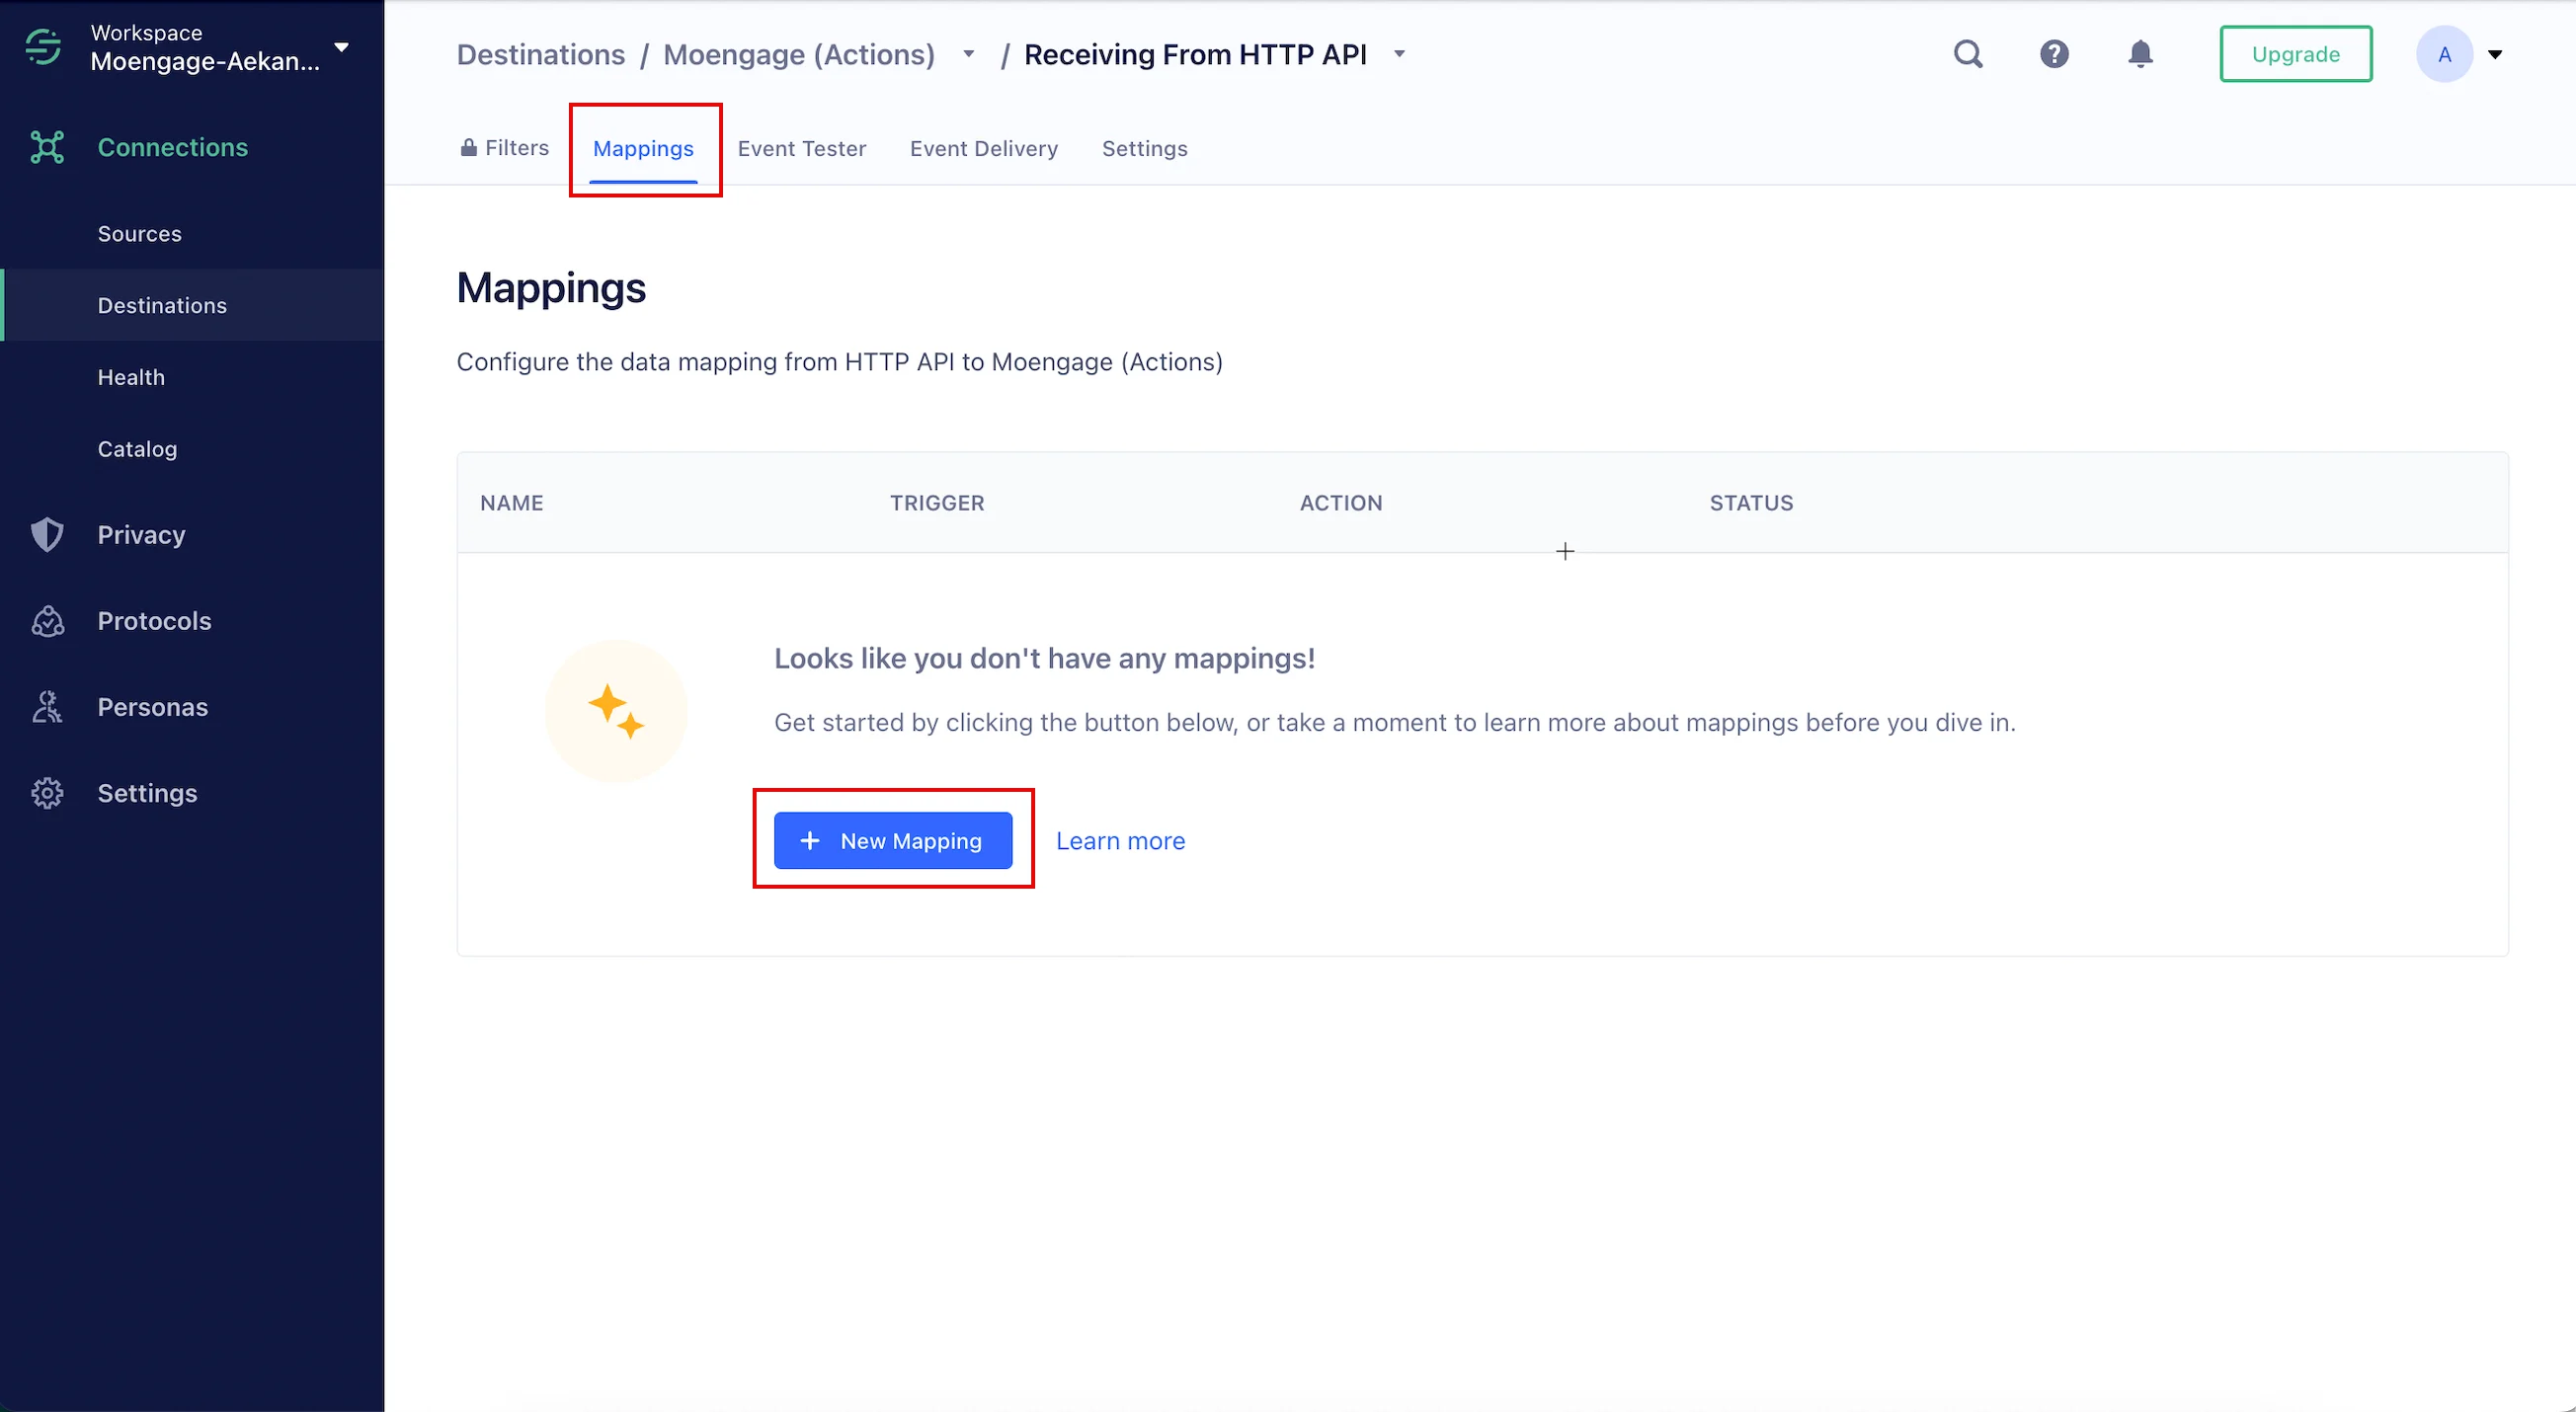
The MoEngage (Actions) Destination now supports Data Mapping. This allows you to control how Segment sends the event data it receives from your sources to MoEngage. Each Action within this destination lists its required and optional event data. You can also choose which event types, event names, or event property values trigger an Action.
These triggers and mappings enable you to send different versions of an Action, depending on the context from which it is triggered. For more information, refer to [Classic Destinations and Destination Actions](https://segment.com/docs/connections/destinations/actions/). To use mappings, click the **Mappings** tab > **+** **New Mapping**. The MoEngage (Actions) provides two Actions: **Track Event** and **Identify User**.
## Enable Mappings - Track and Identify
The MoEngage (Actions) Destination now supports Data Mapping. This allows you to control how Segment sends the event data it receives from your sources to MoEngage. Each Action within this destination lists its required and optional event data. You can also choose which event types, event names, or event property values trigger an Action.
These triggers and mappings enable you to send different versions of an Action, depending on the context from which it is triggered. For more information, refer to [Classic Destinations and Destination Actions](https://segment.com/docs/connections/destinations/actions/). To use mappings, click the **Mappings** tab > **+** **New Mapping**. The MoEngage (Actions) provides two Actions: **Track Event** and **Identify User**.
 ### Add Identify User mapping
MoEngage (Actions) supports importing both Registered and anonymous users via Cloud Mode. Make sure to pass at least one of the User IDs or anonymous IDs.
1. Click the **Mappings** tab and then click **+ New Mapping**.
2. In the **Add mapping** section, under **ACTIONS** , select **Identify User**.
### Add Identify User mapping
MoEngage (Actions) supports importing both Registered and anonymous users via Cloud Mode. Make sure to pass at least one of the User IDs or anonymous IDs.
1. Click the **Mappings** tab and then click **+ New Mapping**.
2. In the **Add mapping** section, under **ACTIONS** , select **Identify User**. 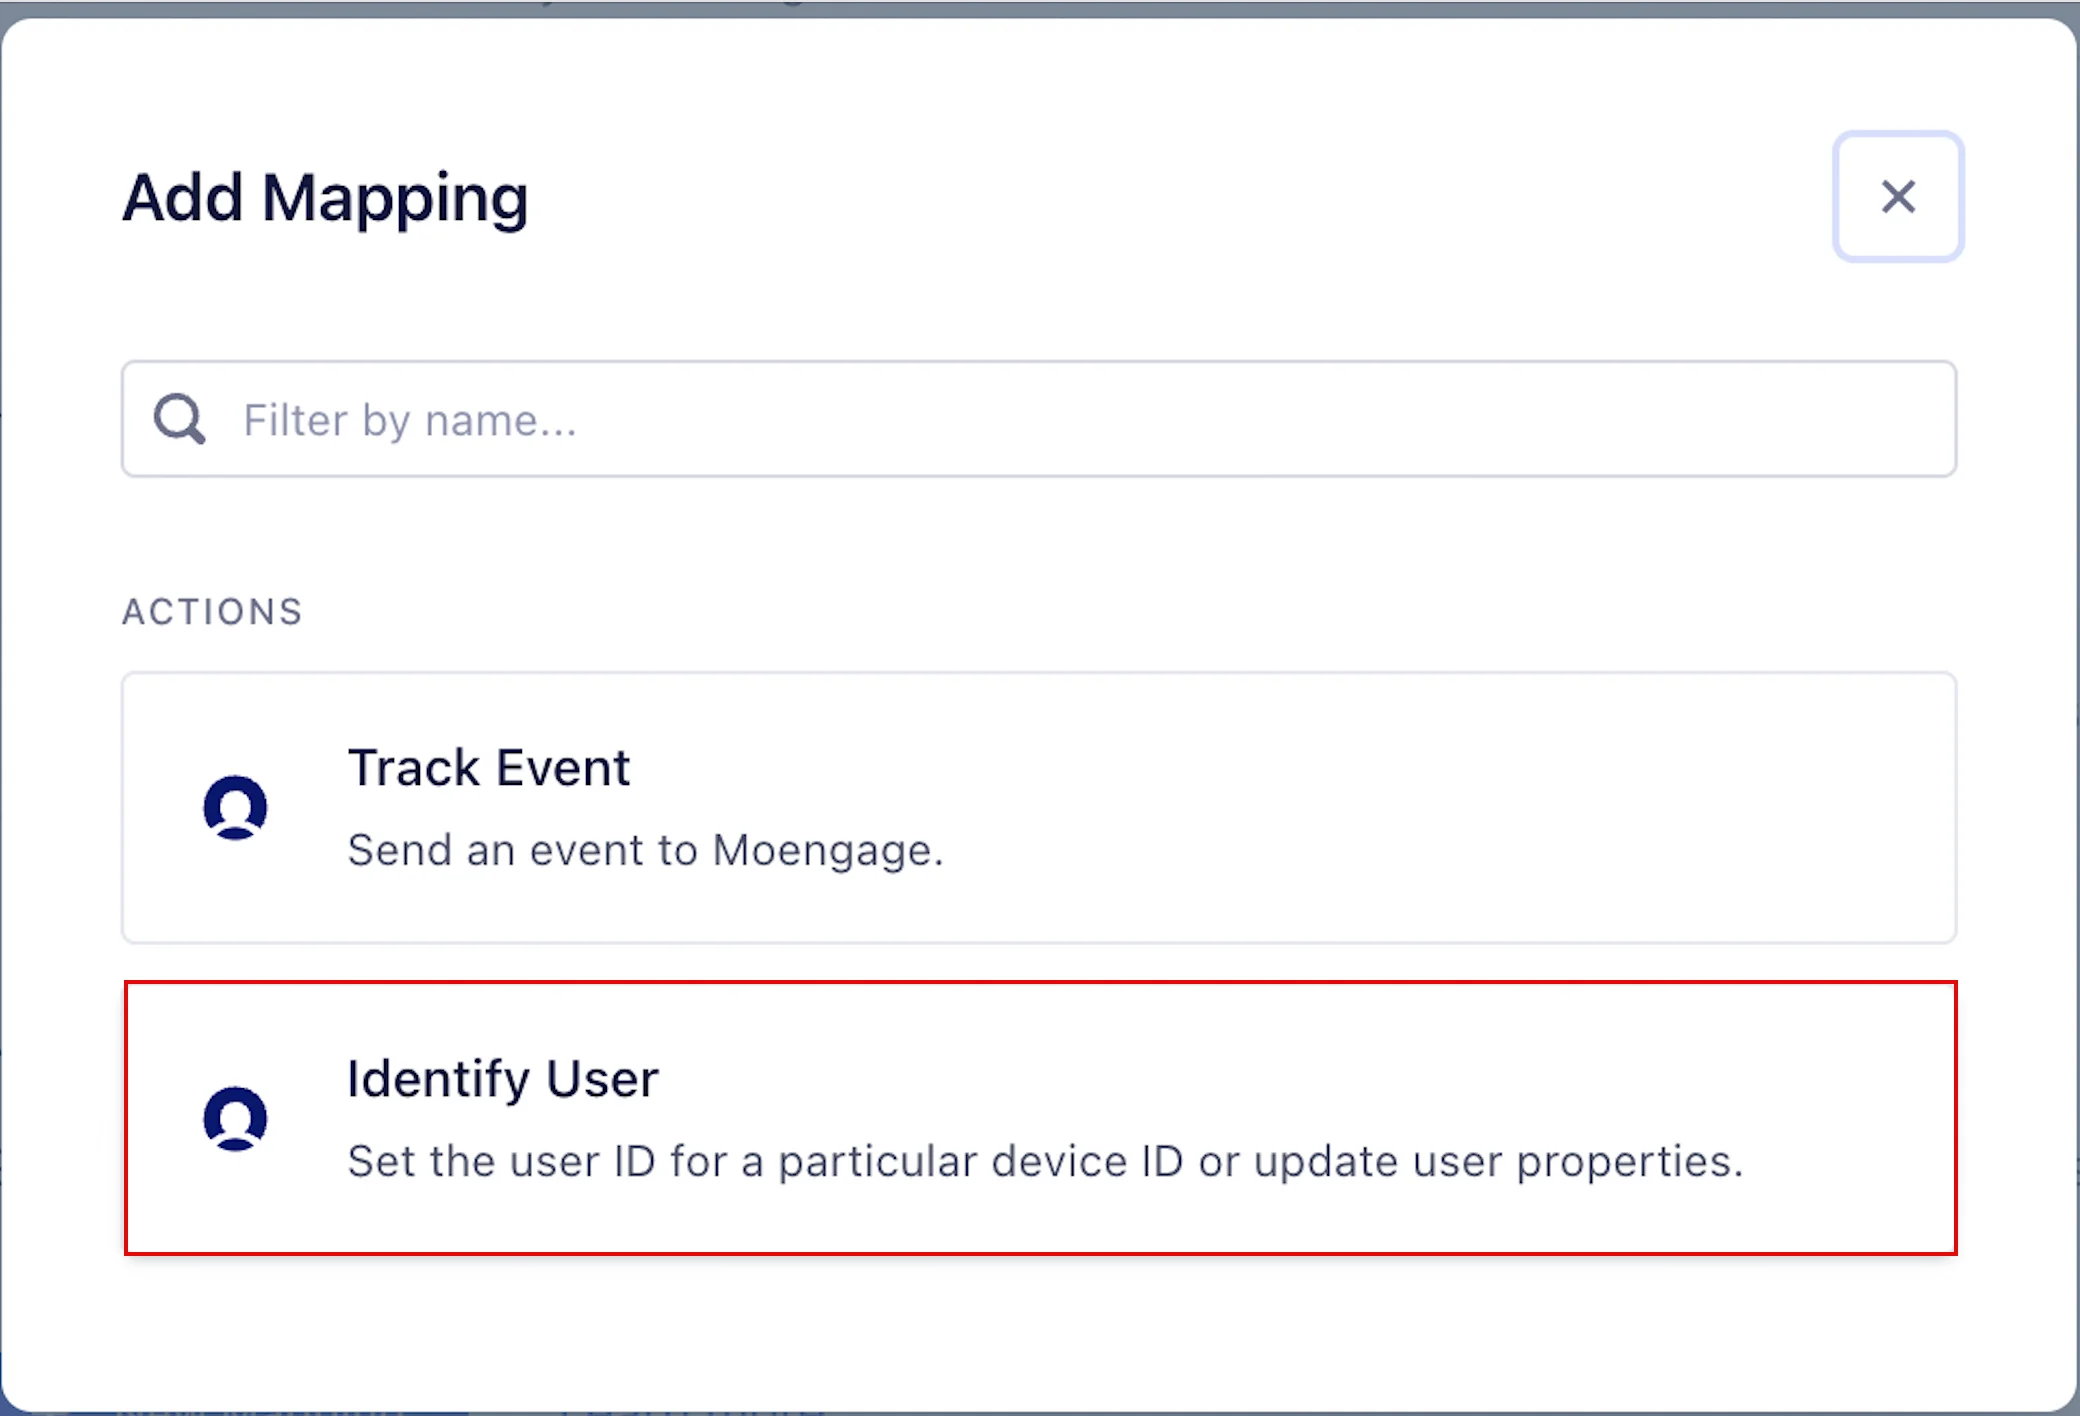 3. Define the event triggers based on your requirements, or retain the default condition provided by MoEngage.
4. Click **Test Event**. The segment attempts to fetch a recent event that matches your trigger conditions.
5. In the **Define mappings** step, MoEngage provides preset values for all mappings.
6. Scroll to the end of the page to optionally test your connection.
3. Define the event triggers based on your requirements, or retain the default condition provided by MoEngage.
4. Click **Test Event**. The segment attempts to fetch a recent event that matches your trigger conditions.
5. In the **Define mappings** step, MoEngage provides preset values for all mappings.
6. Scroll to the end of the page to optionally test your connection. 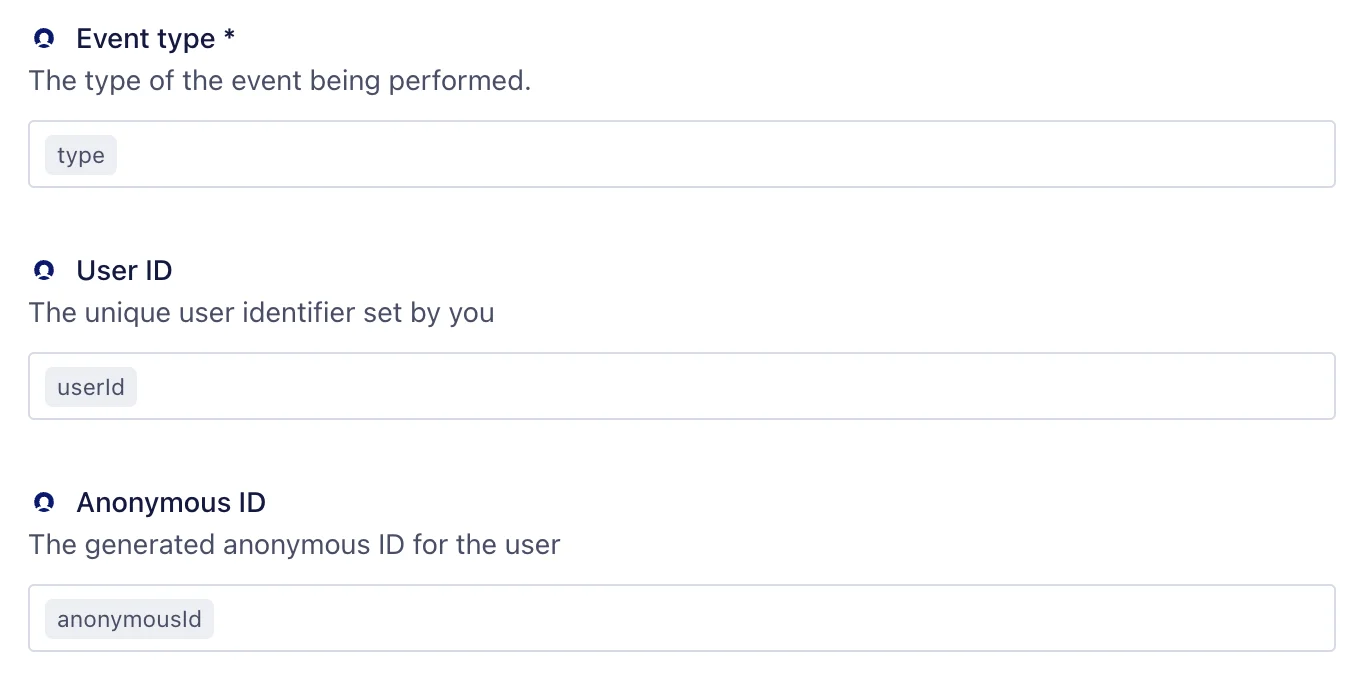 7. After the configuration, click **Save**. Ensure these values remain unchanged.
The Twilio Segment integration supports the MoEngage Portfolio. You can route events to specific projects within a Portfolio-enabled workspace by using the Project Name attribute.
## Portfolio Support
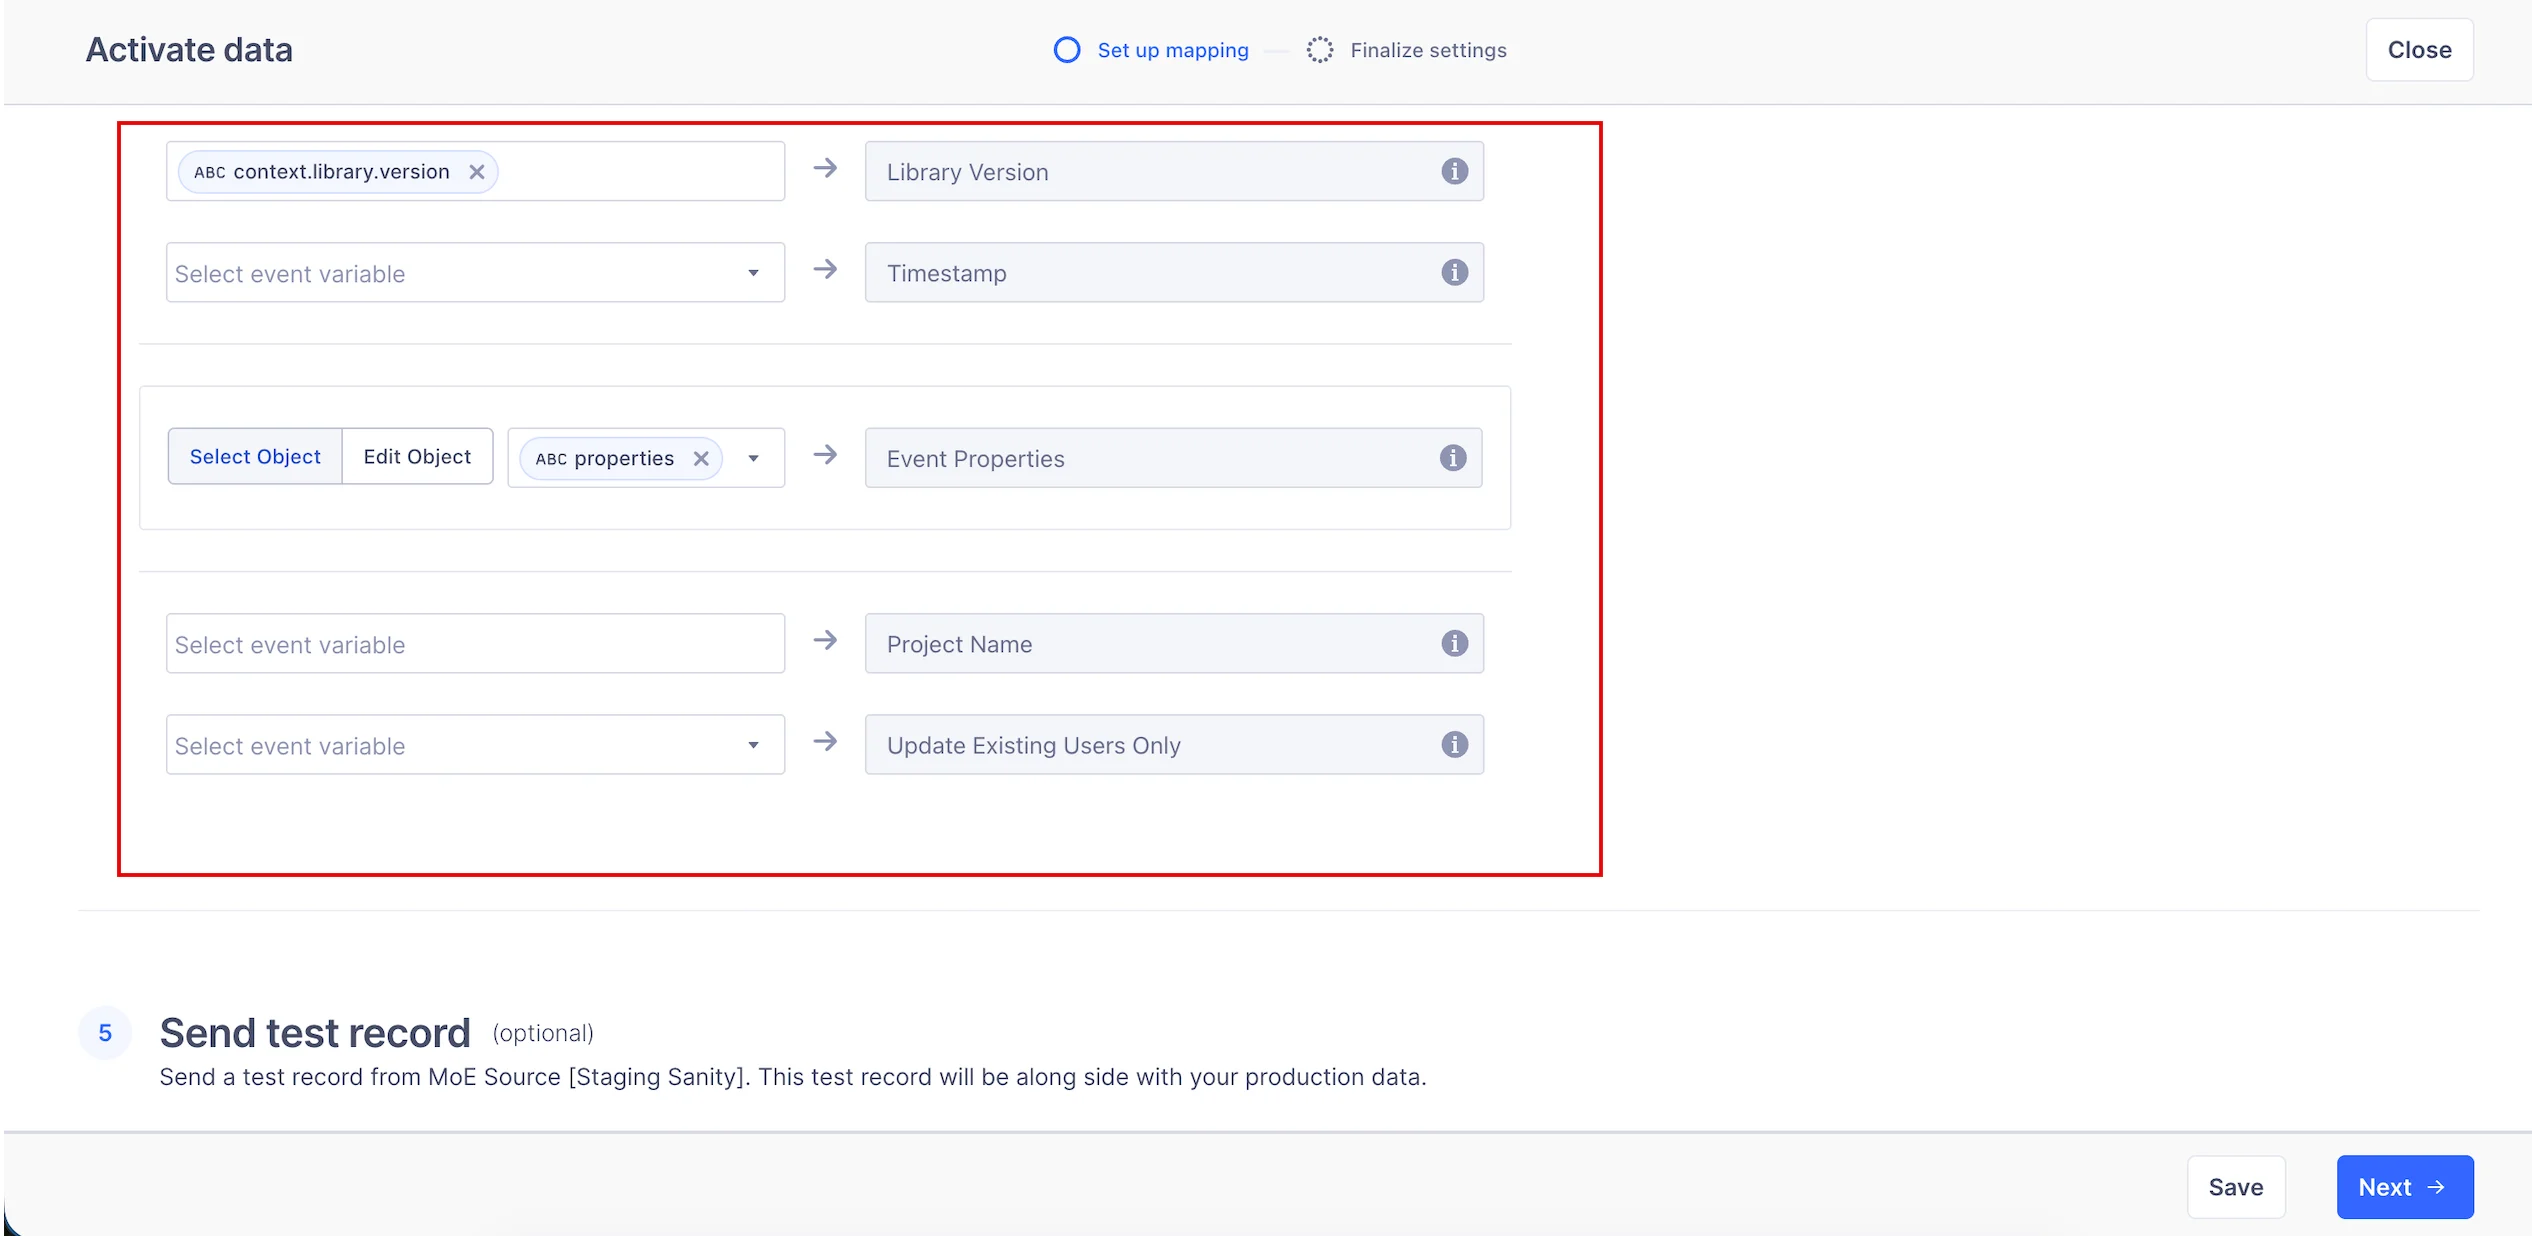
If Portfolio is enabled in your MoEngage workspace, you can route events to specific projects by providing the project name in your Segment payload according to the following requirements:
* Map the Project Name attribute in Segment to your MoEngage project name.
* Ensure the value for this field exactly matches the project names configured in your MoEngage Portfolio.
7. After the configuration, click **Save**. Ensure these values remain unchanged.
The Twilio Segment integration supports the MoEngage Portfolio. You can route events to specific projects within a Portfolio-enabled workspace by using the Project Name attribute.
## Portfolio Support
If Portfolio is enabled in your MoEngage workspace, you can route events to specific projects by providing the project name in your Segment payload according to the following requirements:
* Map the Project Name attribute in Segment to your MoEngage project name.
* Ensure the value for this field exactly matches the project names configured in your MoEngage Portfolio.
 ### Event Route to Projects
For Portfolio-enabled workspaces, MoEngage uses attribute-based routing. This allows you to send events from Segment to specific projects. To route events, you must map the project identifier from your Segment properties to the dedicated MoEngage attribute: Project Name (`moe_project_name`).
### Event Ingestion Rules
The following behavior describes how MoEngage handles event ingestion based on the Project Name mapping:
* **Attribute mapping**: Map your source property (for example, brand\_name or app\_id in Segment) to the MoEngage attribute Project Name. When this mapping is present, MoEngage identifies the target project based on the attribute value.
* **Exact name matching**: The value passed in the source column must exactly match the Project Name configured in your MoEngage portfolio settings.
* **Fallback behavior (mismatched or blank)**: If the Project Name field is left blank, the mapping is missing, or the value does not exactly match a configured project, the event is ingested at the global portfolio level.
Data ingested at the portfolio level is not associated with any specific project and cannot be used for project-specific analysis, segmentation, or targeting.
For more information, refer to [Portfolio](/user-guide/settings/account/portfolio/portfolio) and [Portfolio: Data Ingestion and Management](https://www.moengage.com/docs/user-guide/data/key-concepts/portfolio-data-ingestion-and-management#event-attributes-project-level).
**Limitations**
Project-level routing for Segment is only available for events. The following features are managed at the global portfolio level:
* **User sync**: Not supported at the project level. Users are tracked at the global portfolio level by default during outbound user syncs.
* **Cohort sync**: Not supported at the project level.
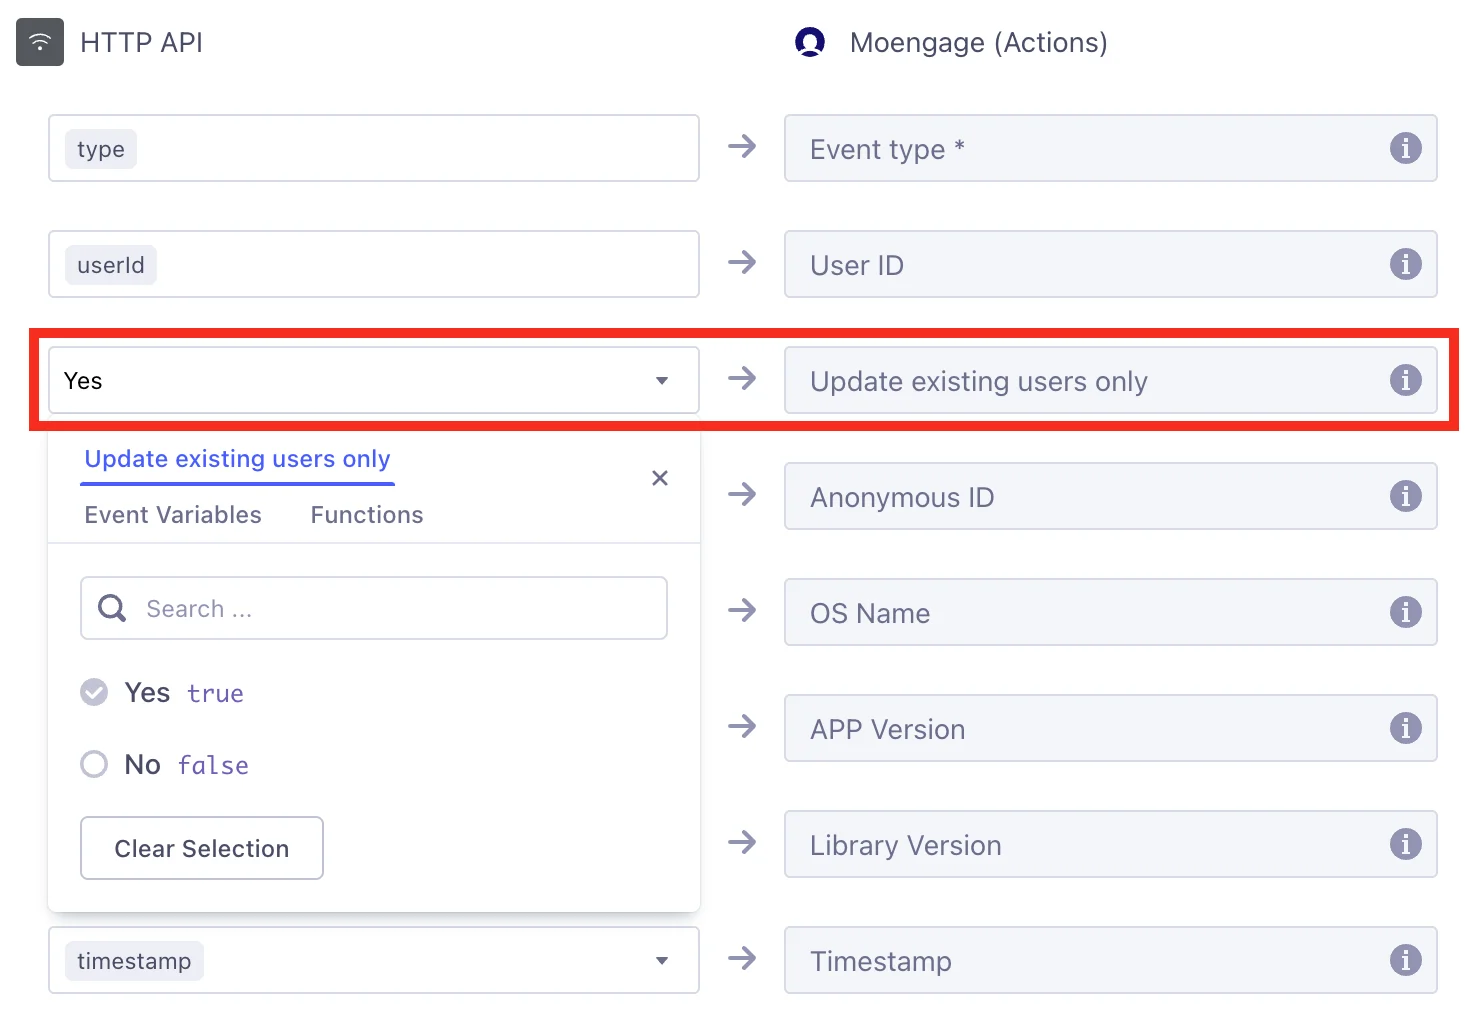
### Update Existing Users Only
When making an Identity call, you can create new users in MoEngage. If you select the **Update existing users only** option and the forwarded user is not already present in MoEngage, a new user will not be created; only the properties of existing users will be updated. If the setting to create new users is set to **Yes** , only the properties of existing users will be updated. (The value true is implied by **Yes**.)
### Event Route to Projects
For Portfolio-enabled workspaces, MoEngage uses attribute-based routing. This allows you to send events from Segment to specific projects. To route events, you must map the project identifier from your Segment properties to the dedicated MoEngage attribute: Project Name (`moe_project_name`).
### Event Ingestion Rules
The following behavior describes how MoEngage handles event ingestion based on the Project Name mapping:
* **Attribute mapping**: Map your source property (for example, brand\_name or app\_id in Segment) to the MoEngage attribute Project Name. When this mapping is present, MoEngage identifies the target project based on the attribute value.
* **Exact name matching**: The value passed in the source column must exactly match the Project Name configured in your MoEngage portfolio settings.
* **Fallback behavior (mismatched or blank)**: If the Project Name field is left blank, the mapping is missing, or the value does not exactly match a configured project, the event is ingested at the global portfolio level.
Data ingested at the portfolio level is not associated with any specific project and cannot be used for project-specific analysis, segmentation, or targeting.
For more information, refer to [Portfolio](/user-guide/settings/account/portfolio/portfolio) and [Portfolio: Data Ingestion and Management](https://www.moengage.com/docs/user-guide/data/key-concepts/portfolio-data-ingestion-and-management#event-attributes-project-level).
**Limitations**
Project-level routing for Segment is only available for events. The following features are managed at the global portfolio level:
* **User sync**: Not supported at the project level. Users are tracked at the global portfolio level by default during outbound user syncs.
* **Cohort sync**: Not supported at the project level.
### Update Existing Users Only
When making an Identity call, you can create new users in MoEngage. If you select the **Update existing users only** option and the forwarded user is not already present in MoEngage, a new user will not be created; only the properties of existing users will be updated. If the setting to create new users is set to **Yes** , only the properties of existing users will be updated. (The value true is implied by **Yes**.)
 ### Add Track Event Action
To add the Track Event action, perform the following steps:
1. Click the **Mappings** tab and then click **+** **New Mapping**.
2. In the **Add mapping** section, under **ACTIONS** , select **Track Event**.
### Add Track Event Action
To add the Track Event action, perform the following steps:
1. Click the **Mappings** tab and then click **+** **New Mapping**.
2. In the **Add mapping** section, under **ACTIONS** , select **Track Event**. 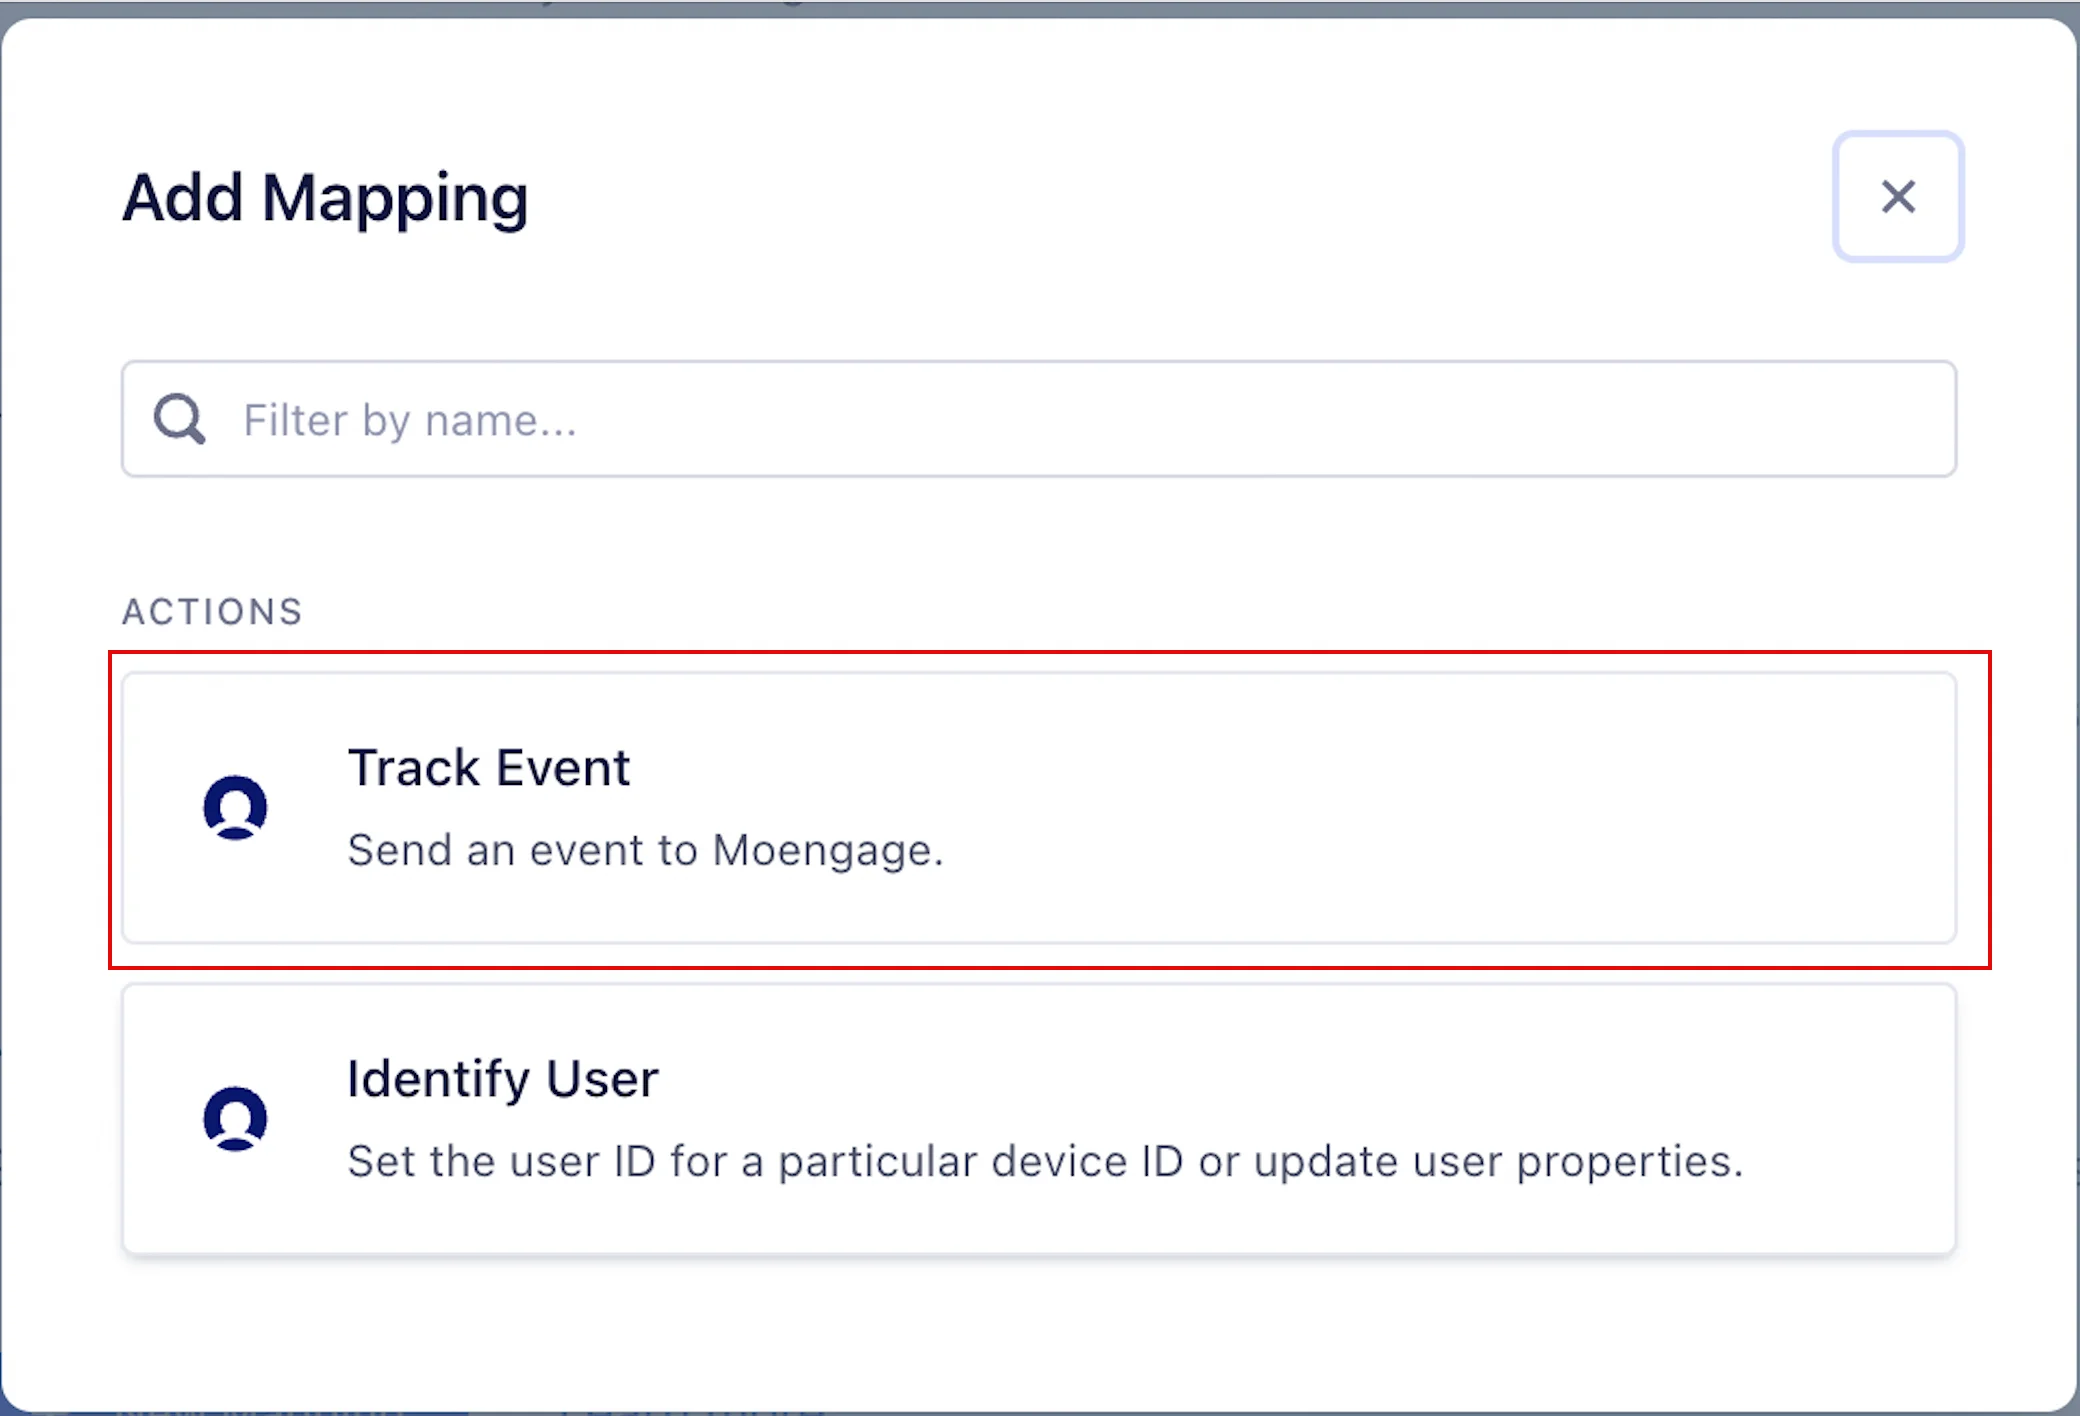 3. Define the event triggers based on your requirements, or retain the default condition provided by MoEngage.
4. Click **Test Event**. The segment attempts to fetch a recent event that matches your trigger conditions.
5. In the **Define mappings** step, MoEngage provides preset values for all mappings.
6. Scroll to the end of the page to optionally test your connection.
3. Define the event triggers based on your requirements, or retain the default condition provided by MoEngage.
4. Click **Test Event**. The segment attempts to fetch a recent event that matches your trigger conditions.
5. In the **Define mappings** step, MoEngage provides preset values for all mappings.
6. Scroll to the end of the page to optionally test your connection. 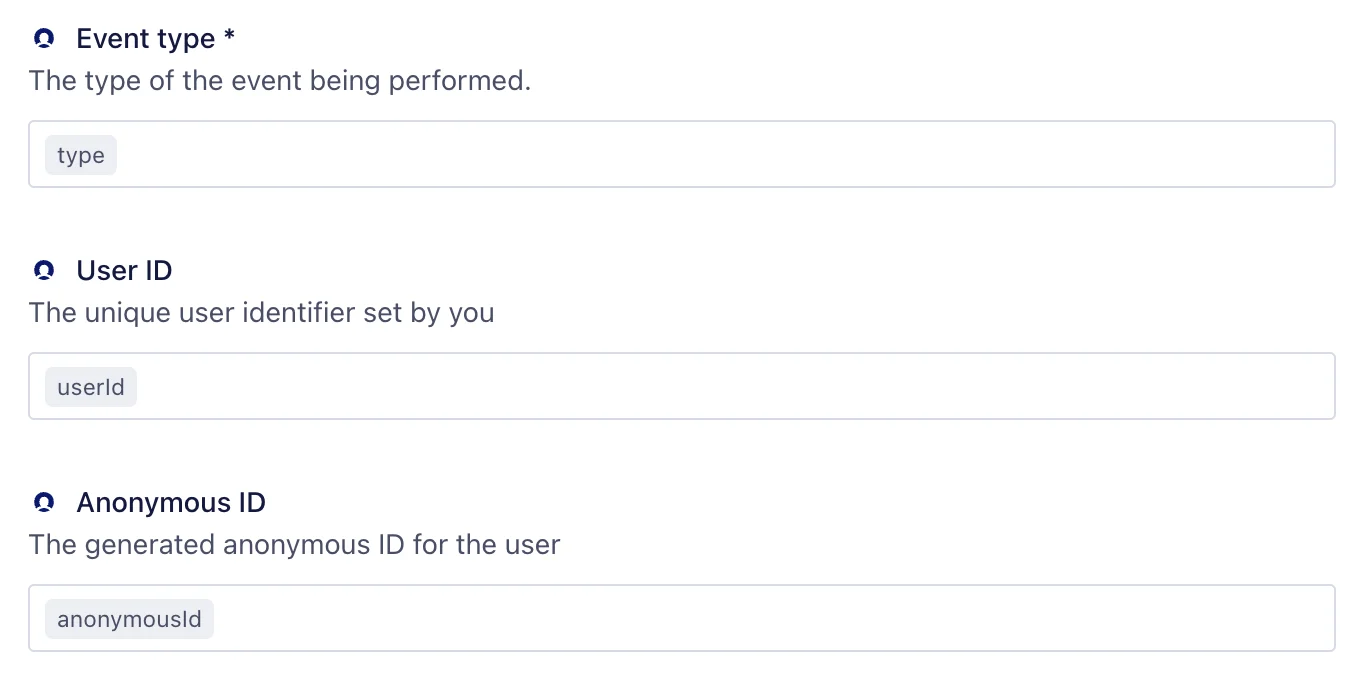 7. After the configuration, click **Save**.\
**Note** : Ensure these values remain unchanged.
After the **Identify User** and **Track Event** mappings, the **Enabled** toggle is turned on. If not, enable them by turning the toggle in the **Status** column.
7. After the configuration, click **Save**.\
**Note** : Ensure these values remain unchanged.
After the **Identify User** and **Track Event** mappings, the **Enabled** toggle is turned on. If not, enable them by turning the toggle in the **Status** column. 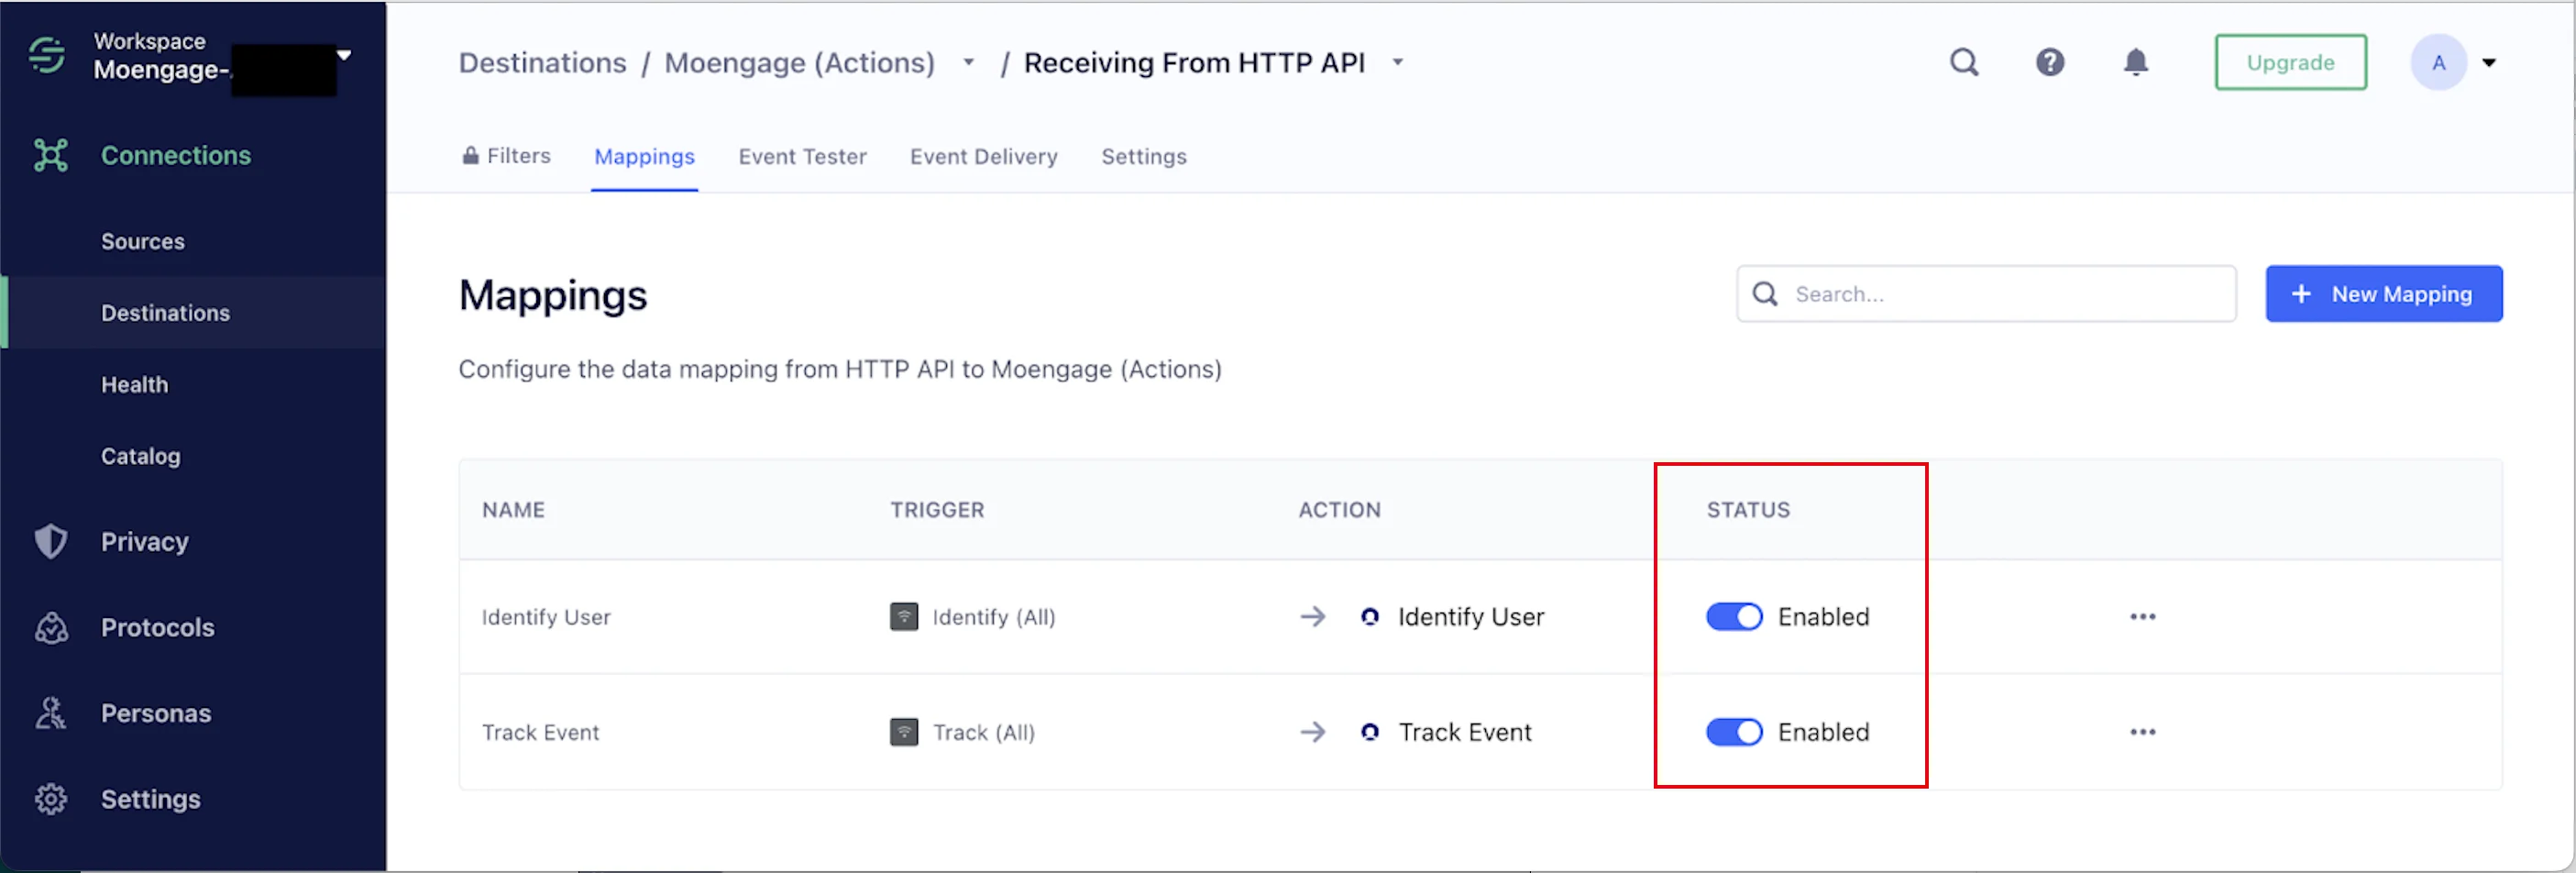 ## Migration from the Classic MoEngage Destination
**Segment's Analytics.js 2.0 Required**
MoEngage (Actions) Destination requires features found in Segment's Analytics.js 2.0. If you are using Web actions and have connected MoEngage (Actions) Destination to a JavaScript Source, upgrade your Analytics.js (provided by Segment) to ensure compatibility.
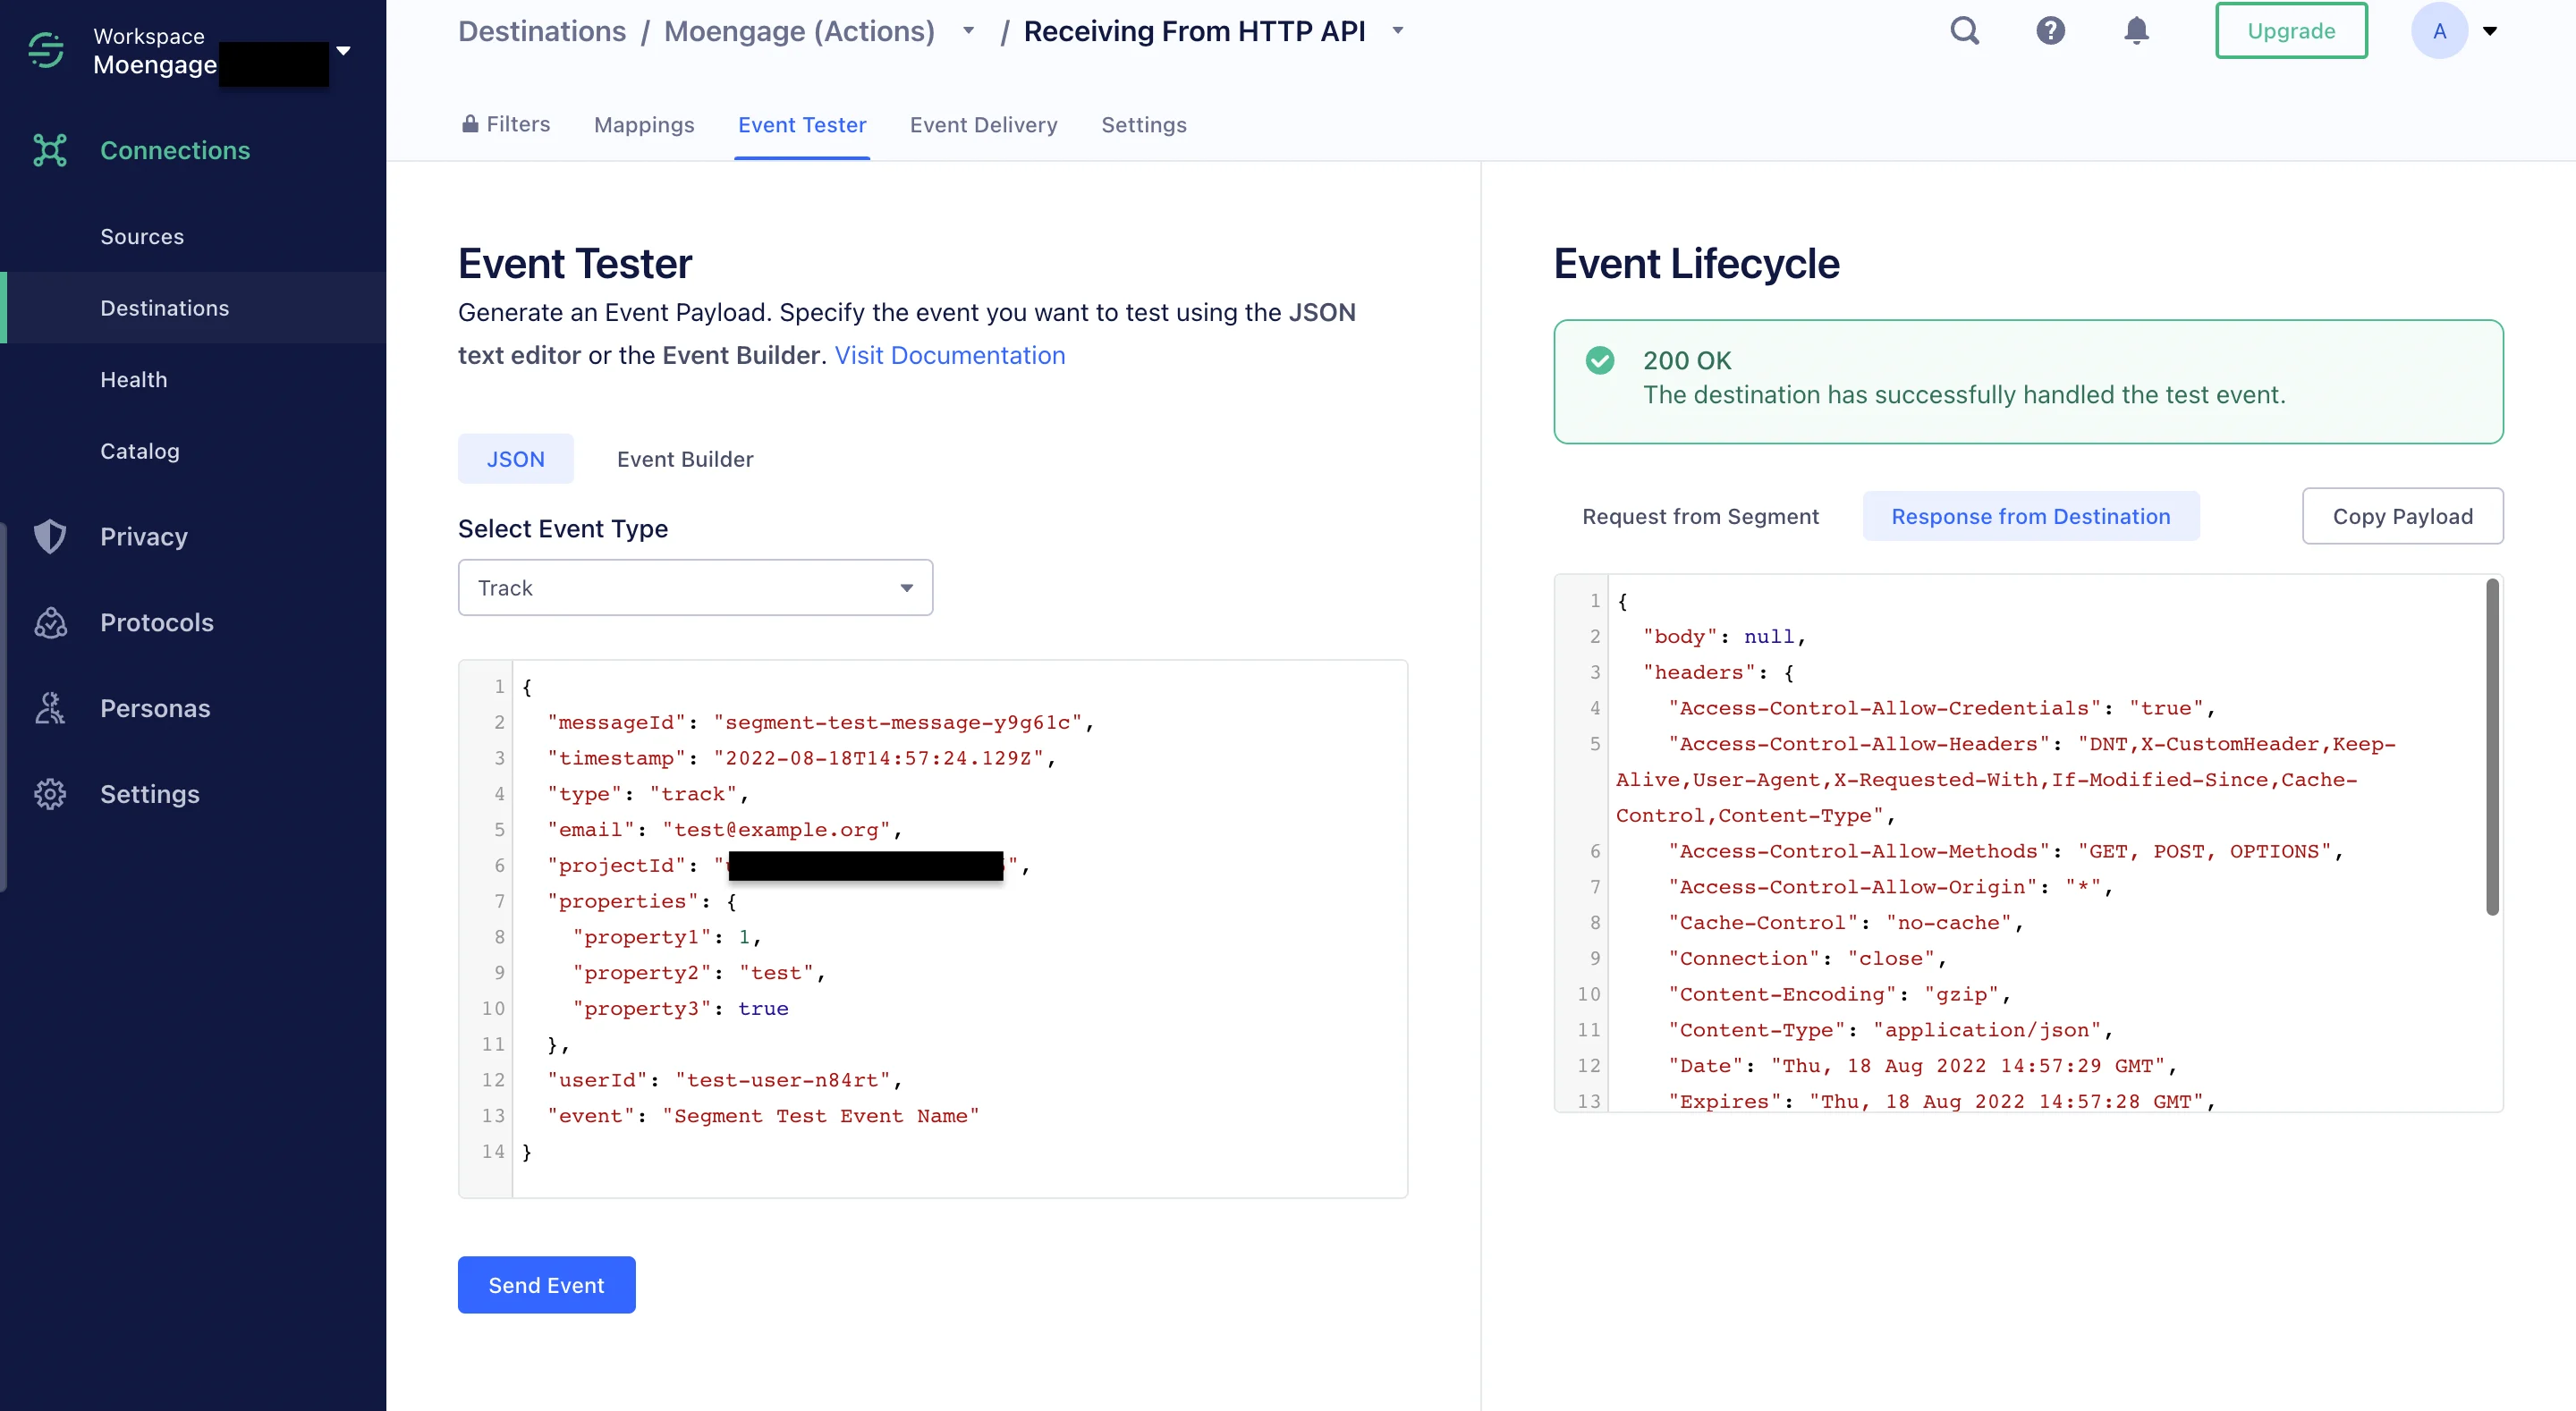
# Step 3: Test Your Integration
After your integration is configured, you must confirm that data is being sent to MoEngage correctly. First, perform some test actions in your app. Then, in the MoEngage dashboard, you can view your data in the recent events, segments, or analytics sections. To verify specific data, you can filter your users and events based on the custom event and attribute data.
## Migration from the Classic MoEngage Destination
**Segment's Analytics.js 2.0 Required**
MoEngage (Actions) Destination requires features found in Segment's Analytics.js 2.0. If you are using Web actions and have connected MoEngage (Actions) Destination to a JavaScript Source, upgrade your Analytics.js (provided by Segment) to ensure compatibility.
# Step 3: Test Your Integration
After your integration is configured, you must confirm that data is being sent to MoEngage correctly. First, perform some test actions in your app. Then, in the MoEngage dashboard, you can view your data in the recent events, segments, or analytics sections. To verify specific data, you can filter your users and events based on the custom event and attribute data.
 # Segment Replays
Segment Replay takes an archived copy of your Segment data and resends it to MoEngage. With this, you can import all historical data from Segment to MoEngage. For more information, contact your Segment CSM related to Segment Replays.
# Segment Engage and Computed Traits
Using Segment Engage, you can create segments of users based on data you have already collected across various sources and sync them to MoEngage. For more information, refer to how to set up and sync [Segment Personas and Computed Traits](/partner-guide/data-and-analytics/cdps/twillio-segment/getting-started/twilio-segment-engage).
# Segment Unify
The existing Segment-to-MoEngage integration **remains unchanged** and **requires no configuration updates** on your MoEngage destination.
Segment Unify works upstream to ensure the `Identify` calls sent to MoEngage contain the most accurate, stitched customer profile. Your MoEngage setup will automatically leverage the new, unified user traits and event data flowing from Segment's Unify layer.
# Rate Limits
To maintain platform stability, MoEngage limits ingestion of Segment data to a maximum of 500 requests per second (RPS) per workspace. If your workspace exceeds this limit, MoEngage returns an HTTP `429 (Too Many Requests)` status code.
Segment typically handles rate-limiting instances automatically. Refer to Segment's default retry policy to understand how rate limiting affects your data flow. For more information, see the Segment documentation.
**Retry Exhaustion**: If Segment exhausts all retry attempts for a batch of data, you must contact the Segment Support Team to replay the failed requests.
# Frequently Asked Questions
No, Data Exports is primarily built to export your Events in near real-time and user attributes in MoEngage are updated asynchronously so it is currently not possible to guarantee the latest values of user attributes in the exports.
It typically takes up to 30 minutes for the automated data exports to be set up for your account and for you to start seeing data there.
Yes, if you need to export new events at a later time, you can always edit your configuration on the App Marketplace and get the new events added to your exports.
As of now, you cannot export historical data using Automated Data Exports. Once configured, you will start seeing data for each event from the time you enabled your exports.
If your billing plan does not cover this already and you need to get this enabled at a later time, you would need to work with your Customer Success Manager to get this included in your billing plan. Based on the amount of data that MoEngage will place in your Data warehouse/Partner/API on a monthly basis, this could lead to additional charges.
# Segment Replays
Segment Replay takes an archived copy of your Segment data and resends it to MoEngage. With this, you can import all historical data from Segment to MoEngage. For more information, contact your Segment CSM related to Segment Replays.
# Segment Engage and Computed Traits
Using Segment Engage, you can create segments of users based on data you have already collected across various sources and sync them to MoEngage. For more information, refer to how to set up and sync [Segment Personas and Computed Traits](/partner-guide/data-and-analytics/cdps/twillio-segment/getting-started/twilio-segment-engage).
# Segment Unify
The existing Segment-to-MoEngage integration **remains unchanged** and **requires no configuration updates** on your MoEngage destination.
Segment Unify works upstream to ensure the `Identify` calls sent to MoEngage contain the most accurate, stitched customer profile. Your MoEngage setup will automatically leverage the new, unified user traits and event data flowing from Segment's Unify layer.
# Rate Limits
To maintain platform stability, MoEngage limits ingestion of Segment data to a maximum of 500 requests per second (RPS) per workspace. If your workspace exceeds this limit, MoEngage returns an HTTP `429 (Too Many Requests)` status code.
Segment typically handles rate-limiting instances automatically. Refer to Segment's default retry policy to understand how rate limiting affects your data flow. For more information, see the Segment documentation.
**Retry Exhaustion**: If Segment exhausts all retry attempts for a batch of data, you must contact the Segment Support Team to replay the failed requests.
# Frequently Asked Questions
No, Data Exports is primarily built to export your Events in near real-time and user attributes in MoEngage are updated asynchronously so it is currently not possible to guarantee the latest values of user attributes in the exports.
It typically takes up to 30 minutes for the automated data exports to be set up for your account and for you to start seeing data there.
Yes, if you need to export new events at a later time, you can always edit your configuration on the App Marketplace and get the new events added to your exports.
As of now, you cannot export historical data using Automated Data Exports. Once configured, you will start seeing data for each event from the time you enabled your exports.
If your billing plan does not cover this already and you need to get this enabled at a later time, you would need to work with your Customer Success Manager to get this included in your billing plan. Based on the amount of data that MoEngage will place in your Data warehouse/Partner/API on a monthly basis, this could lead to additional charges.