> ## Documentation Index
> Fetch the complete documentation index at: https://moengage.com/docs/llms.txt
> Use this file to discover all available pages before exploring further.
# Apollo.io
# Introduction
[Apollo.io](https://www.apollo.io/) is a sales intelligence and engagement platform used by sales and marketing teams to find, contact, and engage with potential customers. It provides a comprehensive B2B database, email automation, and analytics.
## MoEngage × Apollo.io
The integration of MoEngage and Apollo.io, facilitated by [Zapier](https://zapier.com/), empowers businesses to automate their lead nurturing process through seamless data synchronization.
With this integration, you can:
* Automatically send user and account data from Apollo.io to MoEngage.
* Instantly enroll new prospects into personalized marketing campaigns in MoEngage.
* Enrich existing user profiles in MoEngage with real-time updates from Apollo.io.
* Trigger contextual campaigns based on key prospecting activities and profile updates.
## Use Cases
Integrating Apollo.io with MoEngage, using Zapier, helps you solve the following key use cases:
* **Automated welcome and onboarding journeys** : When a "New contact" is saved in Apollo.io, automatically create or update that user in MoEngage. This instantly enrolls high-value prospects into a personalized welcome email series or an automated onboarding journey.
* **Targeted audience segmentation and personalization** : Sync detailed firmographic and demographic data (like "Industry," "Company Size," or "Job Title") from new Apollo.io accounts to MoEngage. Use this data to build precise segments (for example, "VPs in the Fintech industry") and send them highly targeted campaigns, like a specific webinar invitation.
* **Real-time profile enrichment** : When a "Contact updated" trigger is executed in Apollo.io (for example, a prospect's job title changes), instantly update the corresponding user attribute in MoEngage. This ensures that your marketing campaigns consistently utilize the most up-to-date data for accurate personalization and segmentation, providing a more effective approach.
## Key Features/Functionality
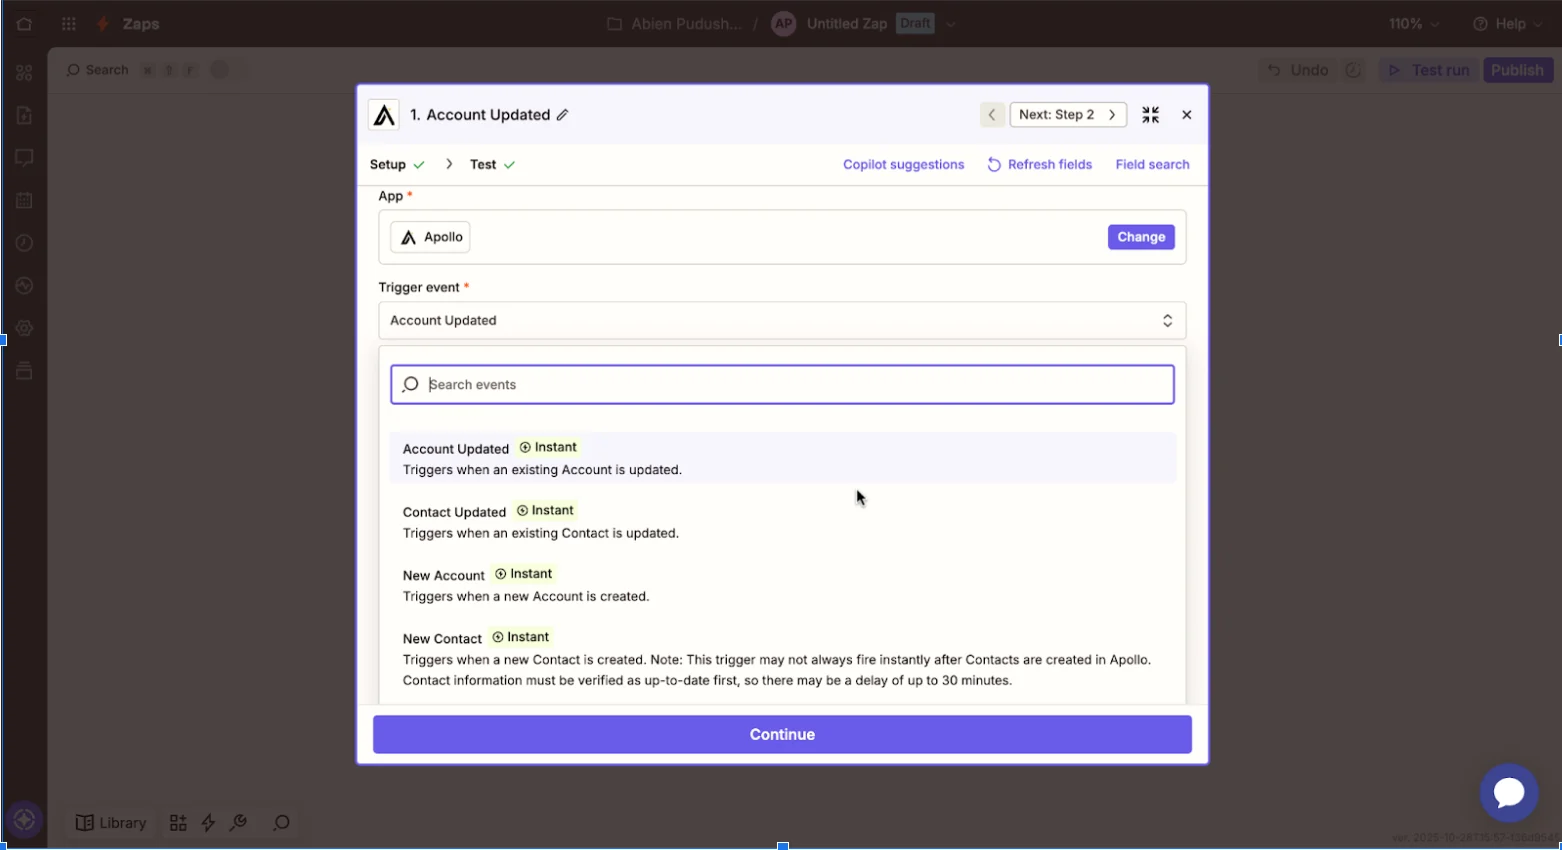
This integration uses Zapier to connect Apollo.io's triggers to MoEngage, primarily focusing on creating and updating user profiles. The following table explains the core integration scopes:
| Trigger | Description |
| --------------- | -------------------------------------------------------------------------------------------------------------------------------------------------------------- |
| New account | This is triggered when you [save a new account](https://knowledge.apollo.io/hc/en-us/articles/4413032484493-Save-Contacts-and-Accounts) in Apollo. |
| Account updated | This is triggered when you [update an existing account](https://knowledge.apollo.io/hc/en-us/articles/5995865049229-View-and-Edit-Account-Profiles) in Apollo. |
| New contact | This is triggered when you [save a new contact](https://knowledge.apollo.io/hc/en-us/articles/4413032484493-Save-Contacts-and-Accounts) in Apollo. |
| Contact updated | This is triggered when you [update an existing contact](https://knowledge.apollo.io/hc/en-us/articles/5995459280525-View-and-Edit-Contact-Profiles) in Apollo. |
 To set up the Zap to send contact or account data to MoEngage, ensure you have the following:
* Access to integration settings in your Apollo.io account.
* A common identifier (such as an email address or external ID) to link user profiles between Apollo.io and MoEngage.
## Step 1: Connect Apollo.io to Zapier
To connect Apollo.io to Zapier, perform the following steps:
1. Log in to the **Apollo.io** UI.
2. On the left navigation menu, scroll to the end, and click **Admin** **Settings**.
3. From the **Admin Settings** expanded menu, click **Integrations**.
To set up the Zap to send contact or account data to MoEngage, ensure you have the following:
* Access to integration settings in your Apollo.io account.
* A common identifier (such as an email address or external ID) to link user profiles between Apollo.io and MoEngage.
## Step 1: Connect Apollo.io to Zapier
To connect Apollo.io to Zapier, perform the following steps:
1. Log in to the **Apollo.io** UI.
2. On the left navigation menu, scroll to the end, and click **Admin** **Settings**.
3. From the **Admin Settings** expanded menu, click **Integrations**. 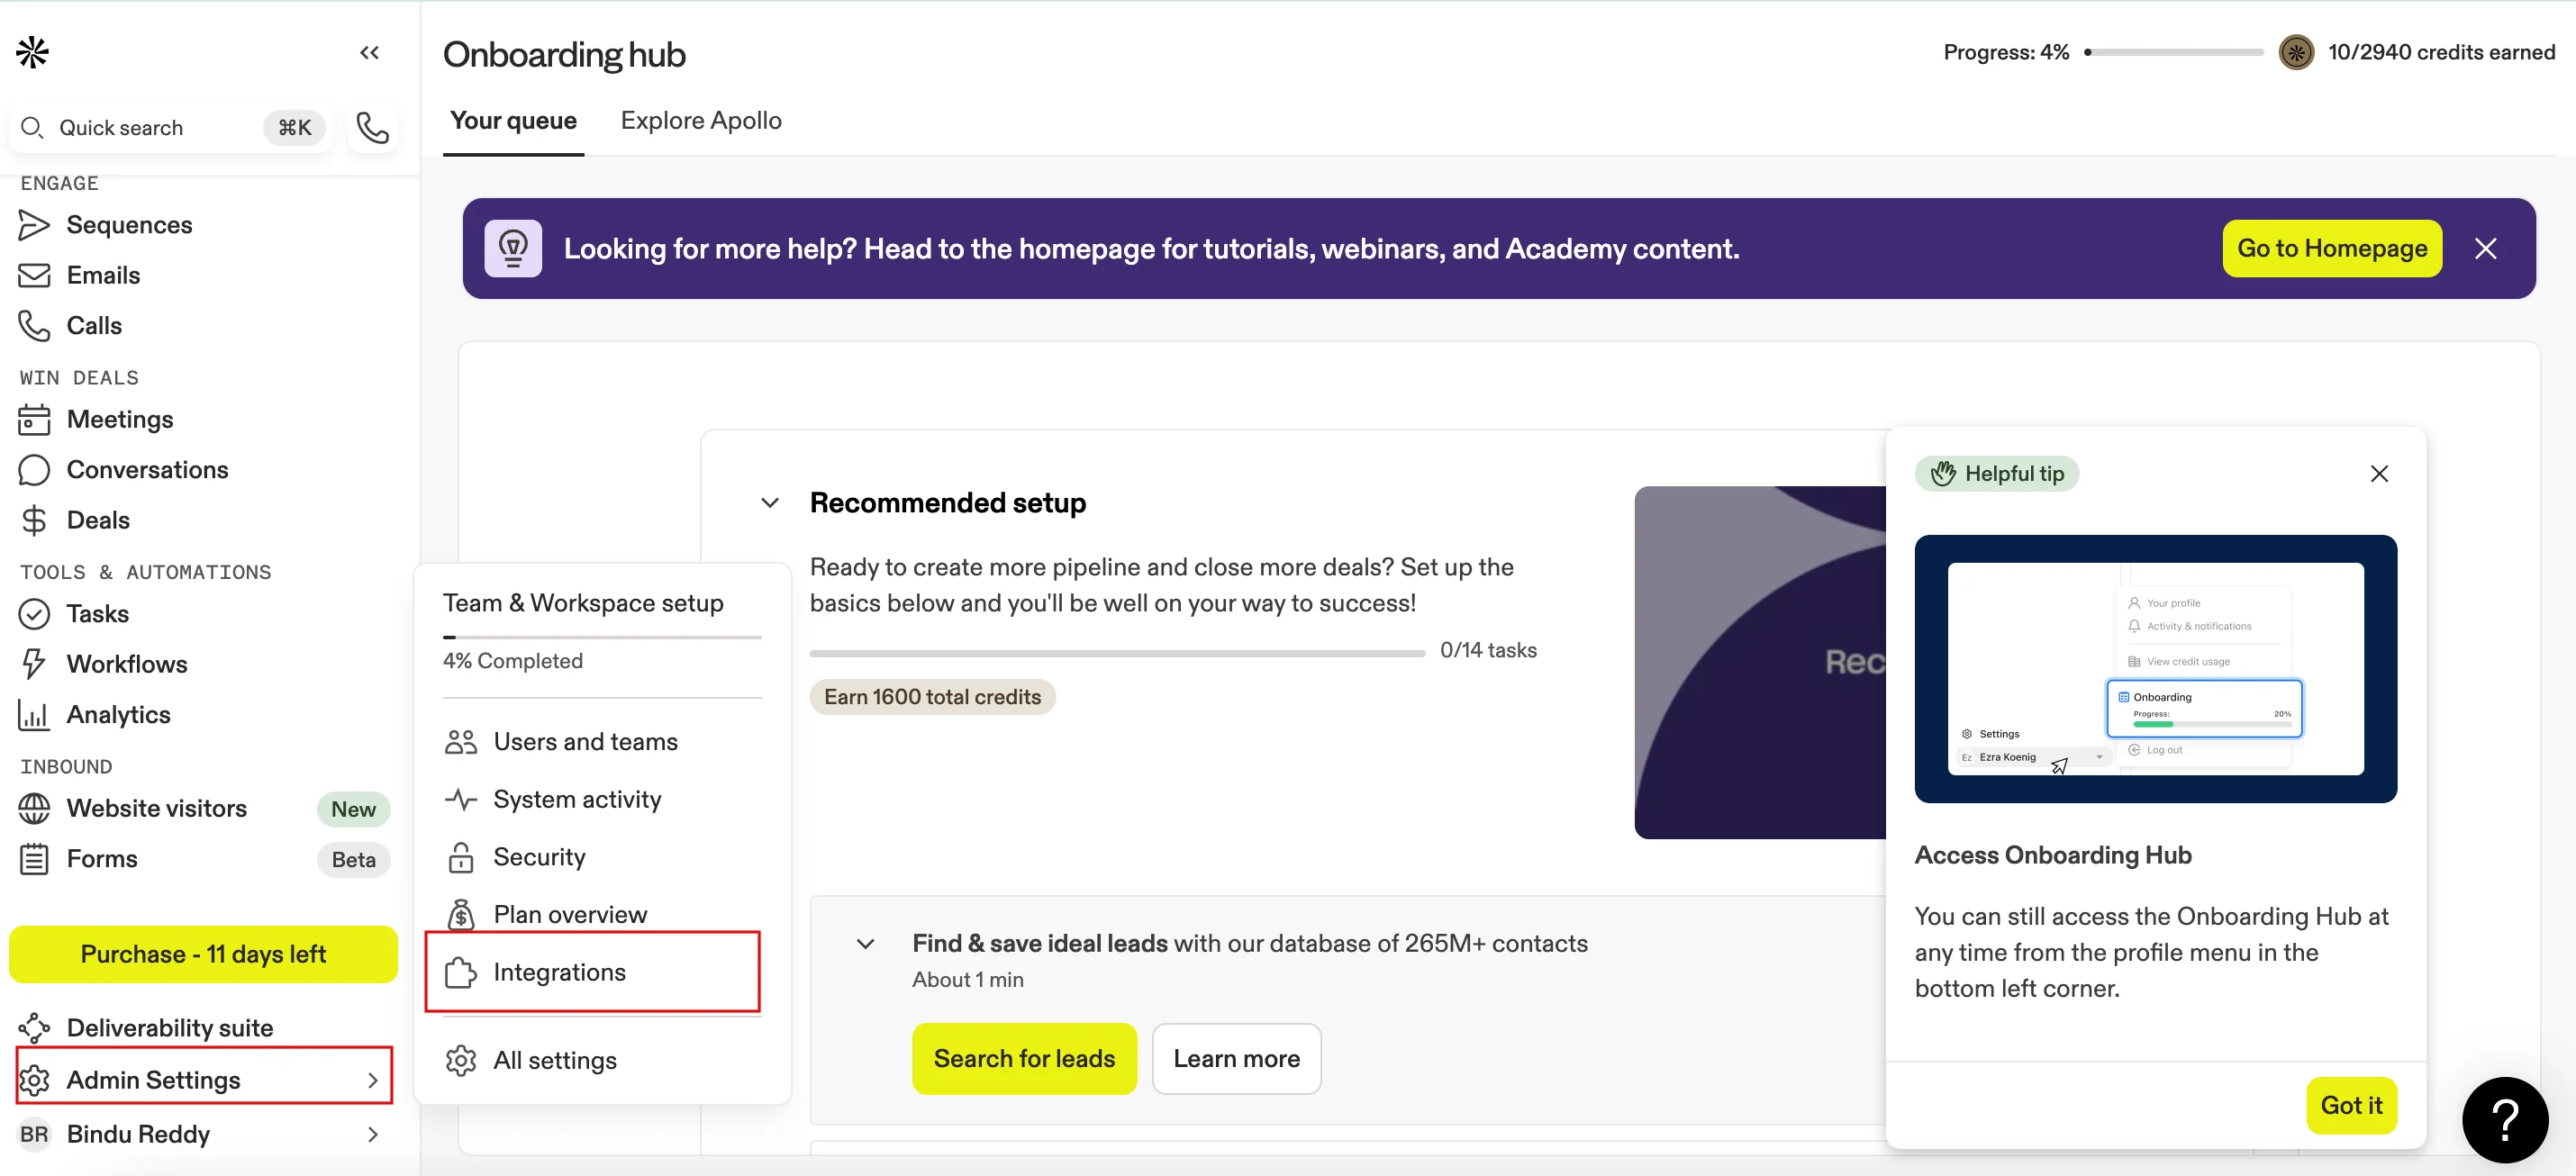 \
The Integrations page appears.
4. In the **Search integrations** box, search for API.\
The [**API keys**](https://developer.apollo.io/keys/) page appears.
5. Click
\
The Integrations page appears.
4. In the **Search integrations** box, search for API.\
The [**API keys**](https://developer.apollo.io/keys/) page appears.
5. Click  **Create new key**.
 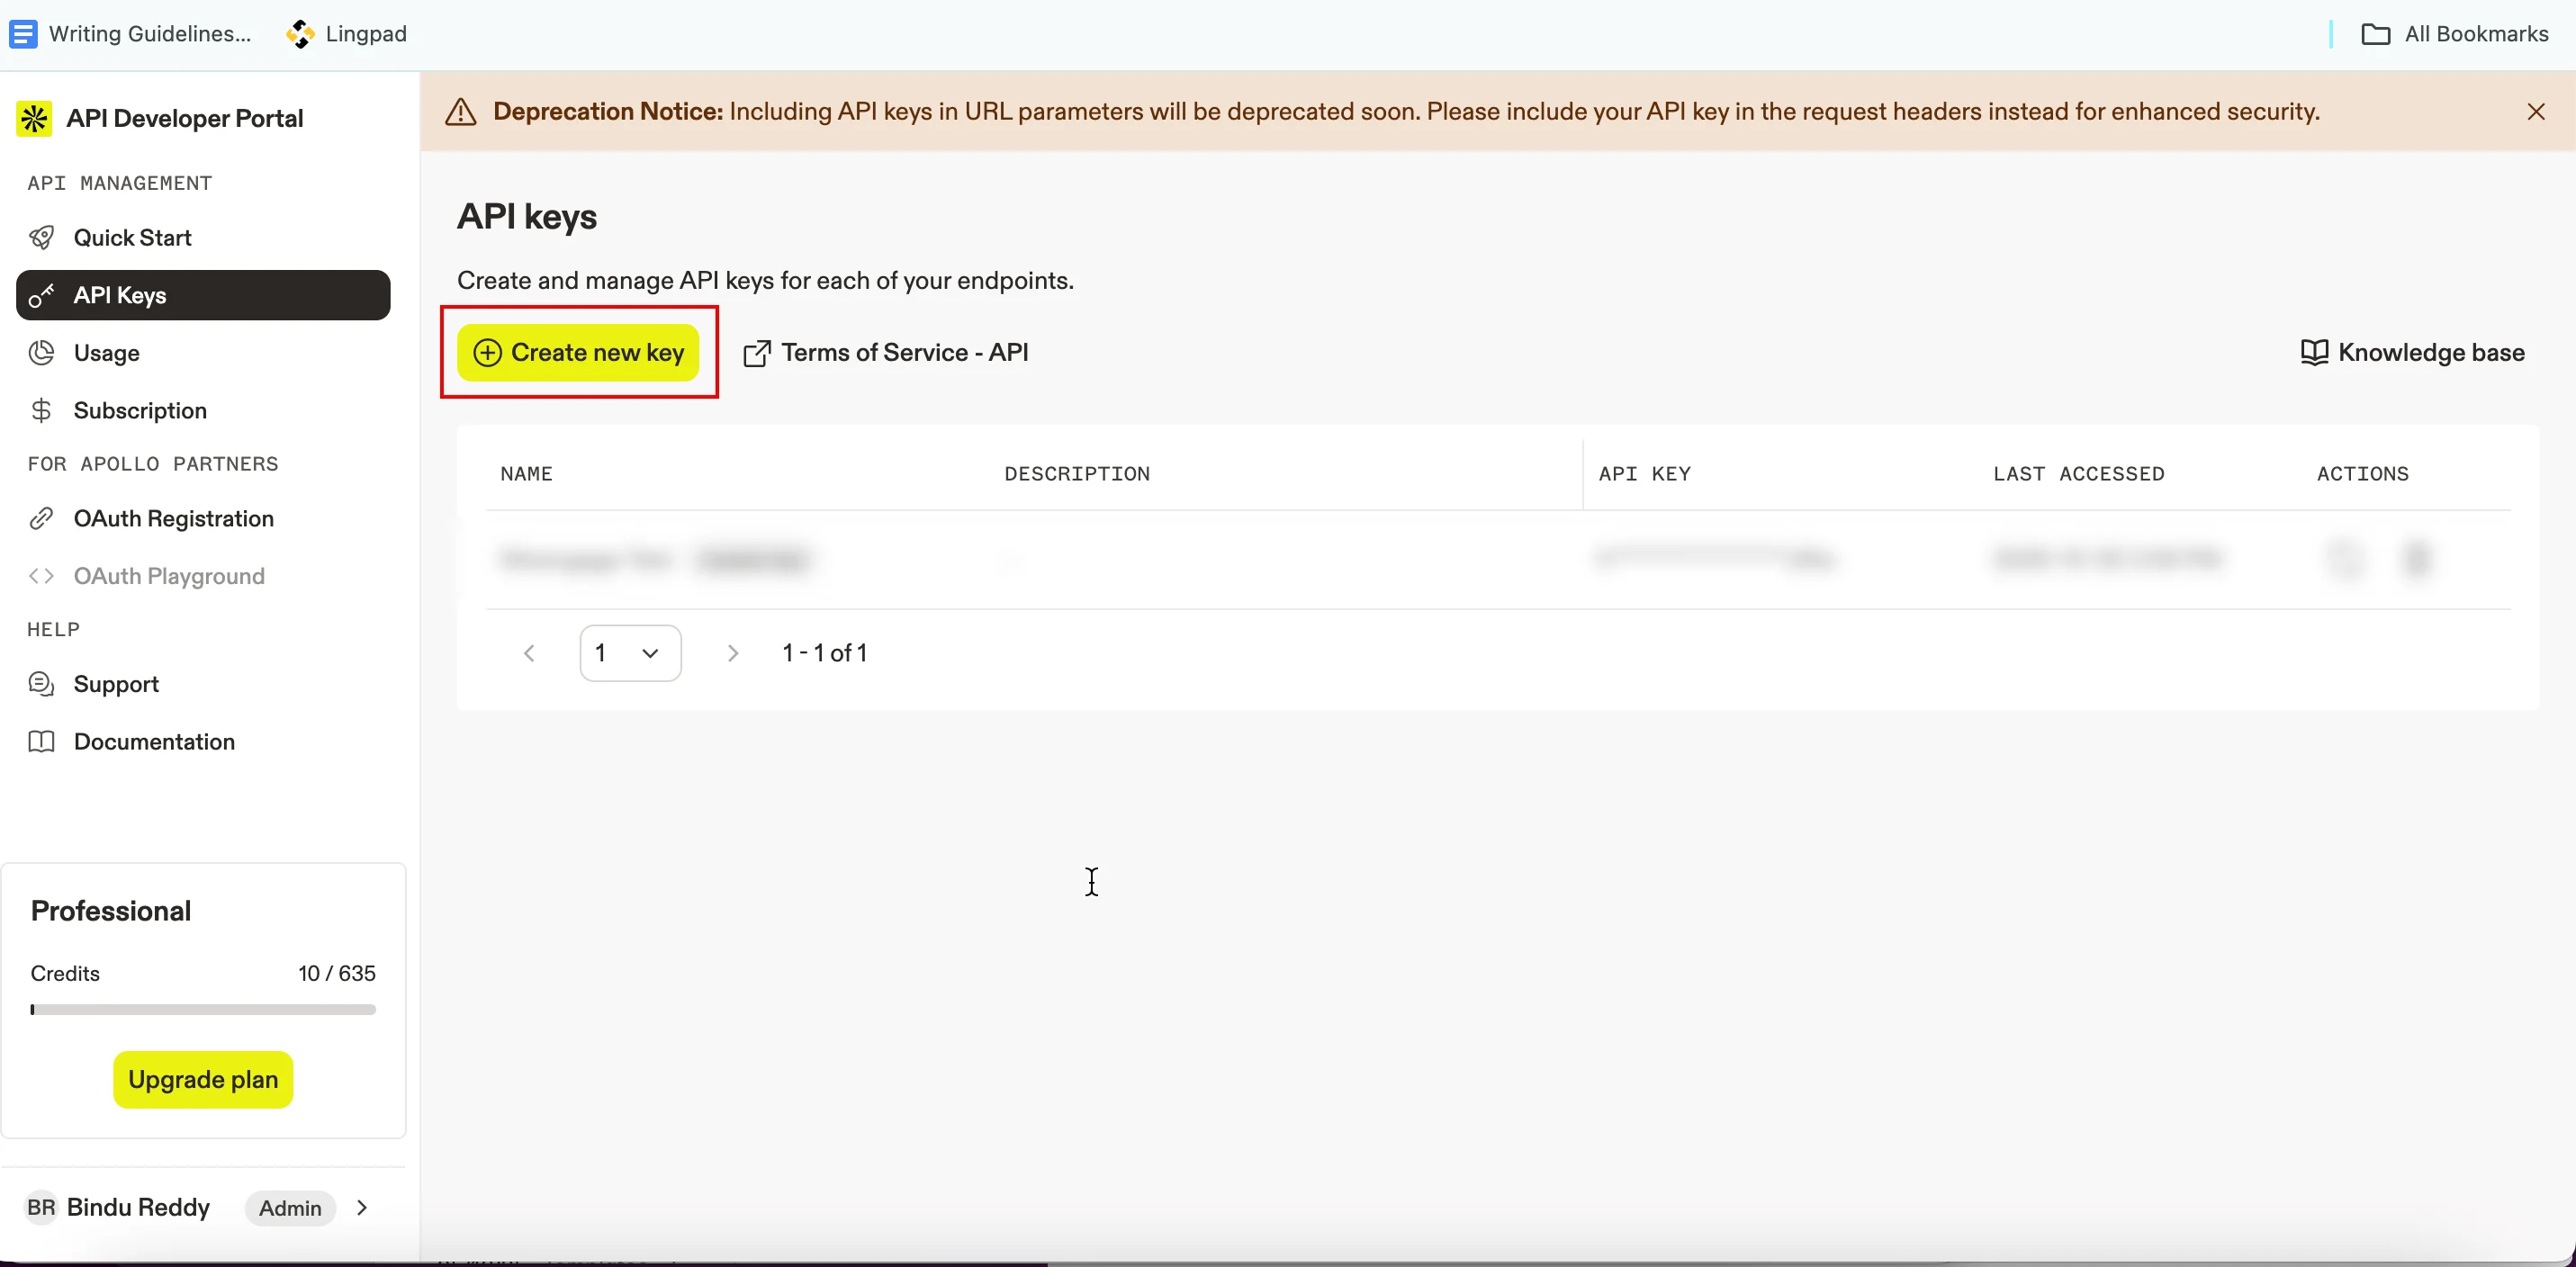 \
The [**Create new API key**](https://docs.apollo.io/docs/create-api-key) dialog box appears.
6. Under **Name** , in the **Name** box, type a name for the key.
7. In the **Description** box, type a description for the key.
8. Under **APIs** , use the search box or click the API you want to associate with this key in the **Select an API to associate this key with** list.
9. Click **Create API key**.
\
The [**Create new API key**](https://docs.apollo.io/docs/create-api-key) dialog box appears.
6. Under **Name** , in the **Name** box, type a name for the key.
7. In the **Description** box, type a description for the key.
8. Under **APIs** , use the search box or click the API you want to associate with this key in the **Select an API to associate this key with** list.
9. Click **Create API key**. 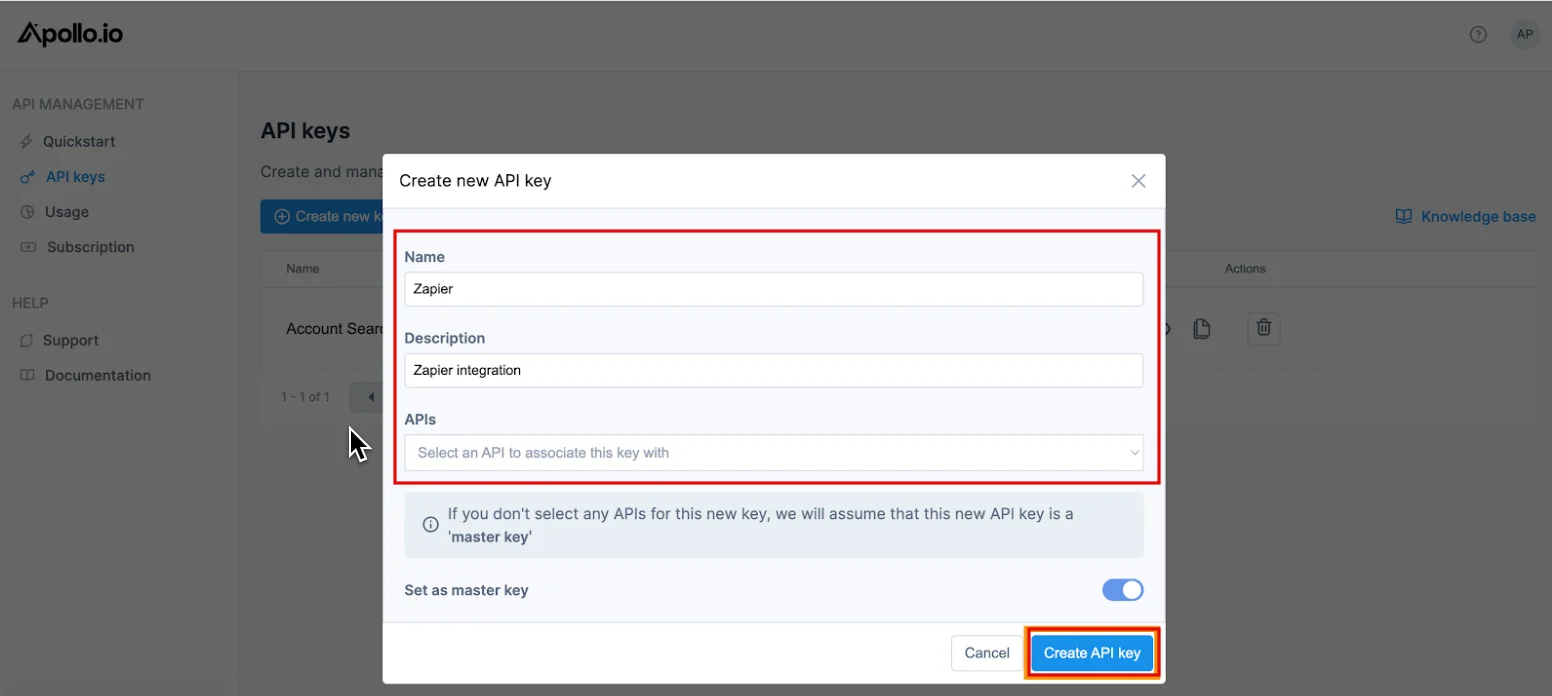 \
The API key is now successfully created.
10. Click the
\
The API key is now successfully created.
10. Click the  copy icon next to the API Key in the **Copy the API key** dialog box.
11. Click **Done**.
copy icon next to the API Key in the **Copy the API key** dialog box.
11. Click **Done**.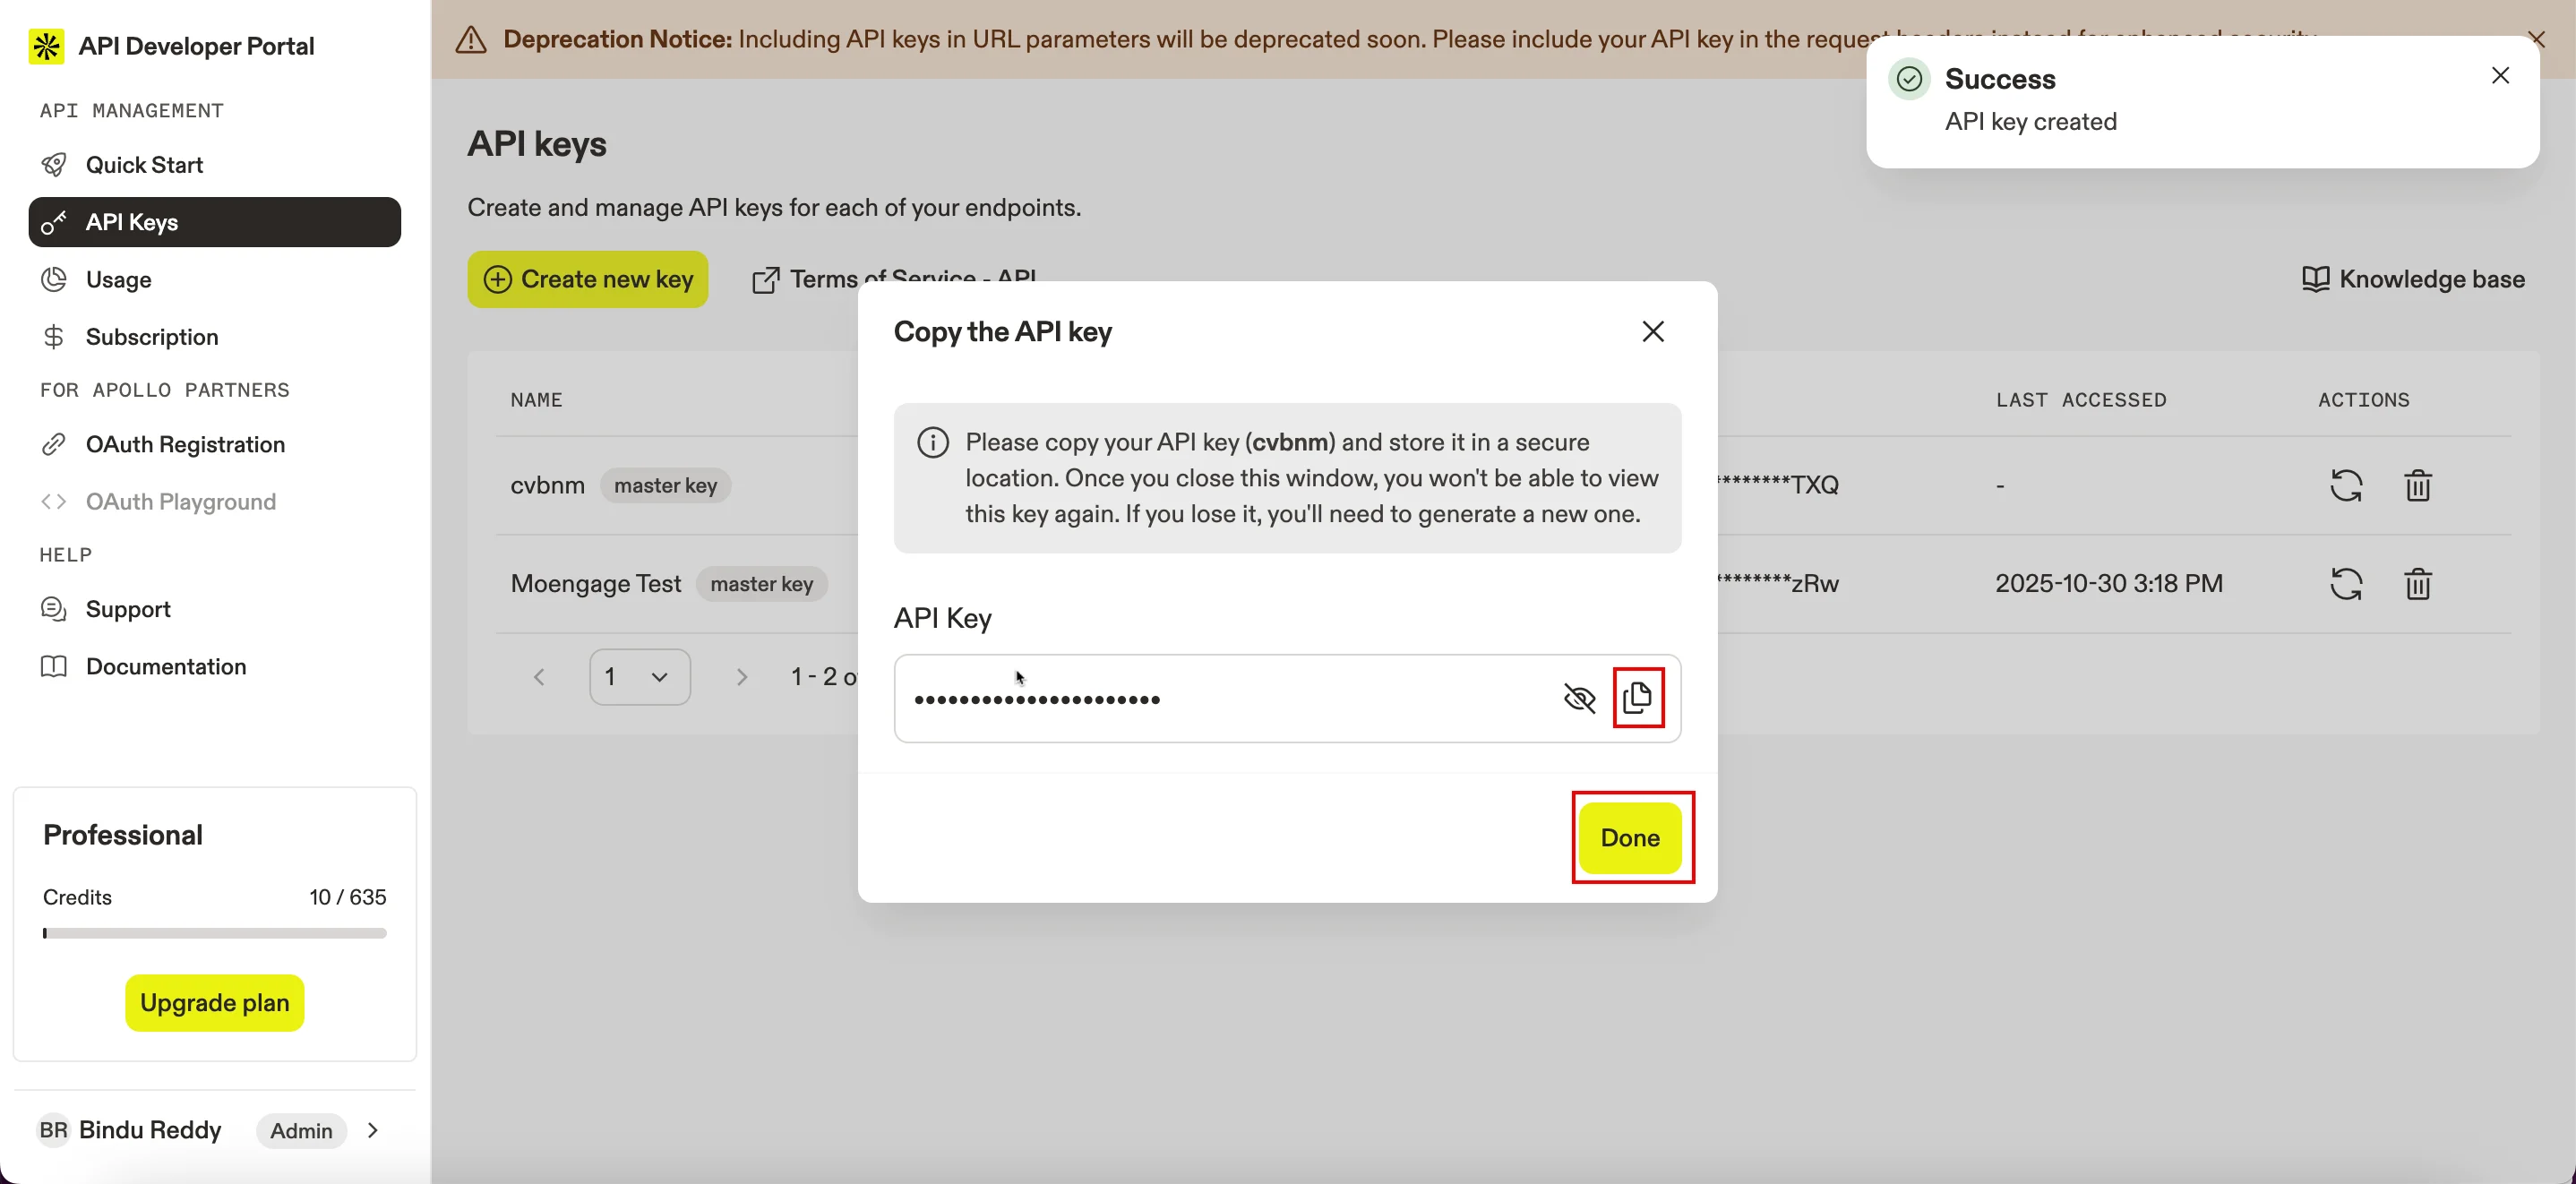 12. Next, log in to [Zapier](https://zapier.com/app/login) UI.
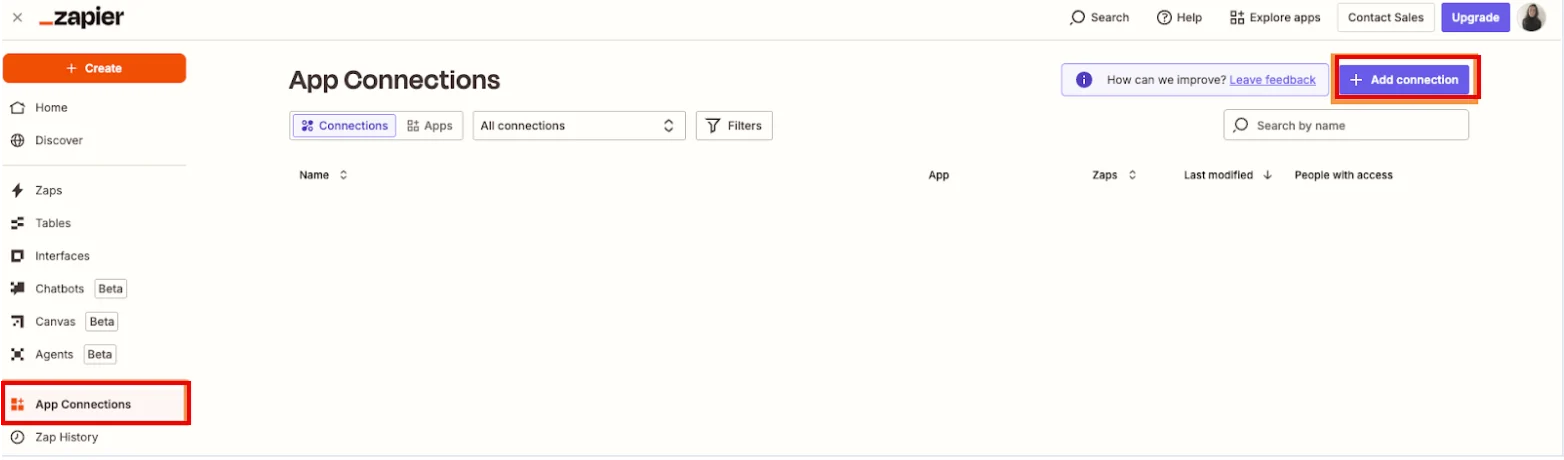
13. On the left navigation menu, click **App Connections**.\
The App Connection page appears.
14. In the upper-right corner, click **+ Add connection**.\\
12. Next, log in to [Zapier](https://zapier.com/app/login) UI.
13. On the left navigation menu, click **App Connections**.\
The App Connection page appears.
14. In the upper-right corner, click **+ Add connection**.\\
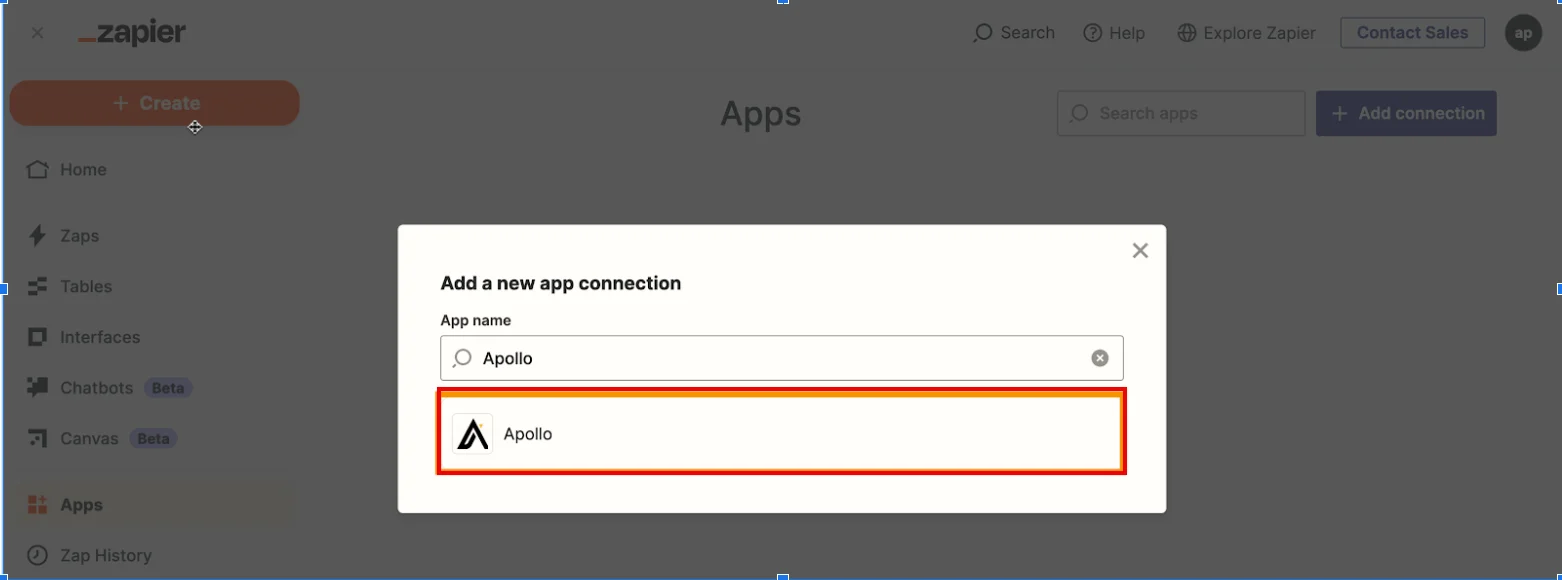
 15. Search for and click **Apollo** in the **Search for an app** list.\\
 16. Click **Add connection**.\
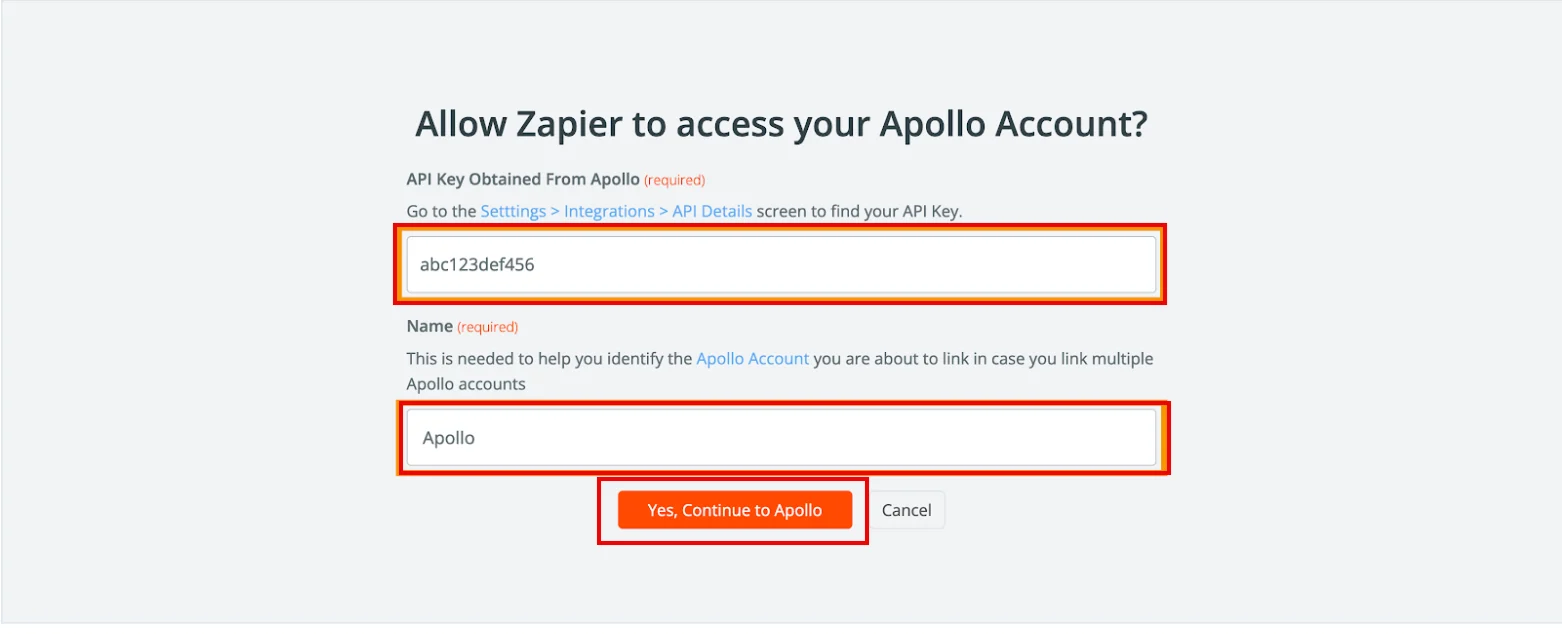
The **Allow Zapier to access your Apollo Account?** window appears.
17. Under **API Key Obtained From Apollo (required)** , paste the Apollo API key you copied in step 3.
18. Under the **Name (required)** box, type the name to help you identify this specific Apollo account.
19. Click **Yes, Continue to Apollo**.\
16. Click **Add connection**.\
The **Allow Zapier to access your Apollo Account?** window appears.
17. Under **API Key Obtained From Apollo (required)** , paste the Apollo API key you copied in step 3.
18. Under the **Name (required)** box, type the name to help you identify this specific Apollo account.
19. Click **Yes, Continue to Apollo**.\
 \
You have now connected Zapier to Apollo. You can now use the integration to [create zaps](https://knowledge.apollo.io/hc/en-us/articles/4415362778509-Integrate-Zapier-with-Apollo#create).
## Step 2: Use the Integration (Create a Zap)
Zapier uses zaps to connect apps and services together. Each zap includes a trigger and at least one action. When you [create a zap](https://knowledge.apollo.io/hc/en-us/articles/4415362778509-Integrate-Zapier-with-Apollo#create) and a trigger takes place, Zapier automatically completes the action for you. You can create zaps that complete an action in Apollo, based on a trigger in another app, or in another app based on a trigger in Apollo.
To create a zap to complete an action in another app, perform the following steps:
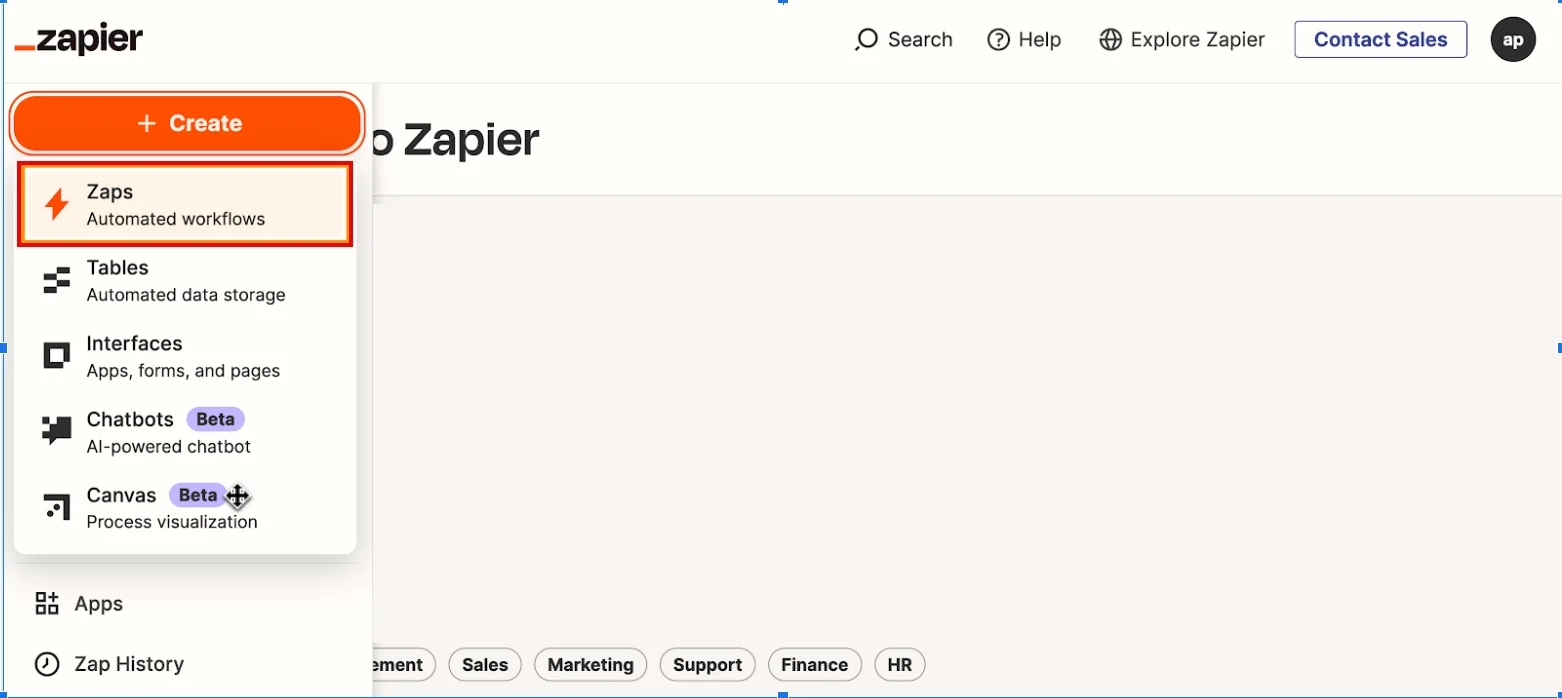
1. Log in to the [Zapier](https://zapier.com/app/login) dashboard.
2. In the left navigation menu, click **+ Create**.
3. In the menu that appears, click **Zaps**.\
\
You have now connected Zapier to Apollo. You can now use the integration to [create zaps](https://knowledge.apollo.io/hc/en-us/articles/4415362778509-Integrate-Zapier-with-Apollo#create).
## Step 2: Use the Integration (Create a Zap)
Zapier uses zaps to connect apps and services together. Each zap includes a trigger and at least one action. When you [create a zap](https://knowledge.apollo.io/hc/en-us/articles/4415362778509-Integrate-Zapier-with-Apollo#create) and a trigger takes place, Zapier automatically completes the action for you. You can create zaps that complete an action in Apollo, based on a trigger in another app, or in another app based on a trigger in Apollo.
To create a zap to complete an action in another app, perform the following steps:
1. Log in to the [Zapier](https://zapier.com/app/login) dashboard.
2. In the left navigation menu, click **+ Create**.
3. In the menu that appears, click **Zaps**.\
 \
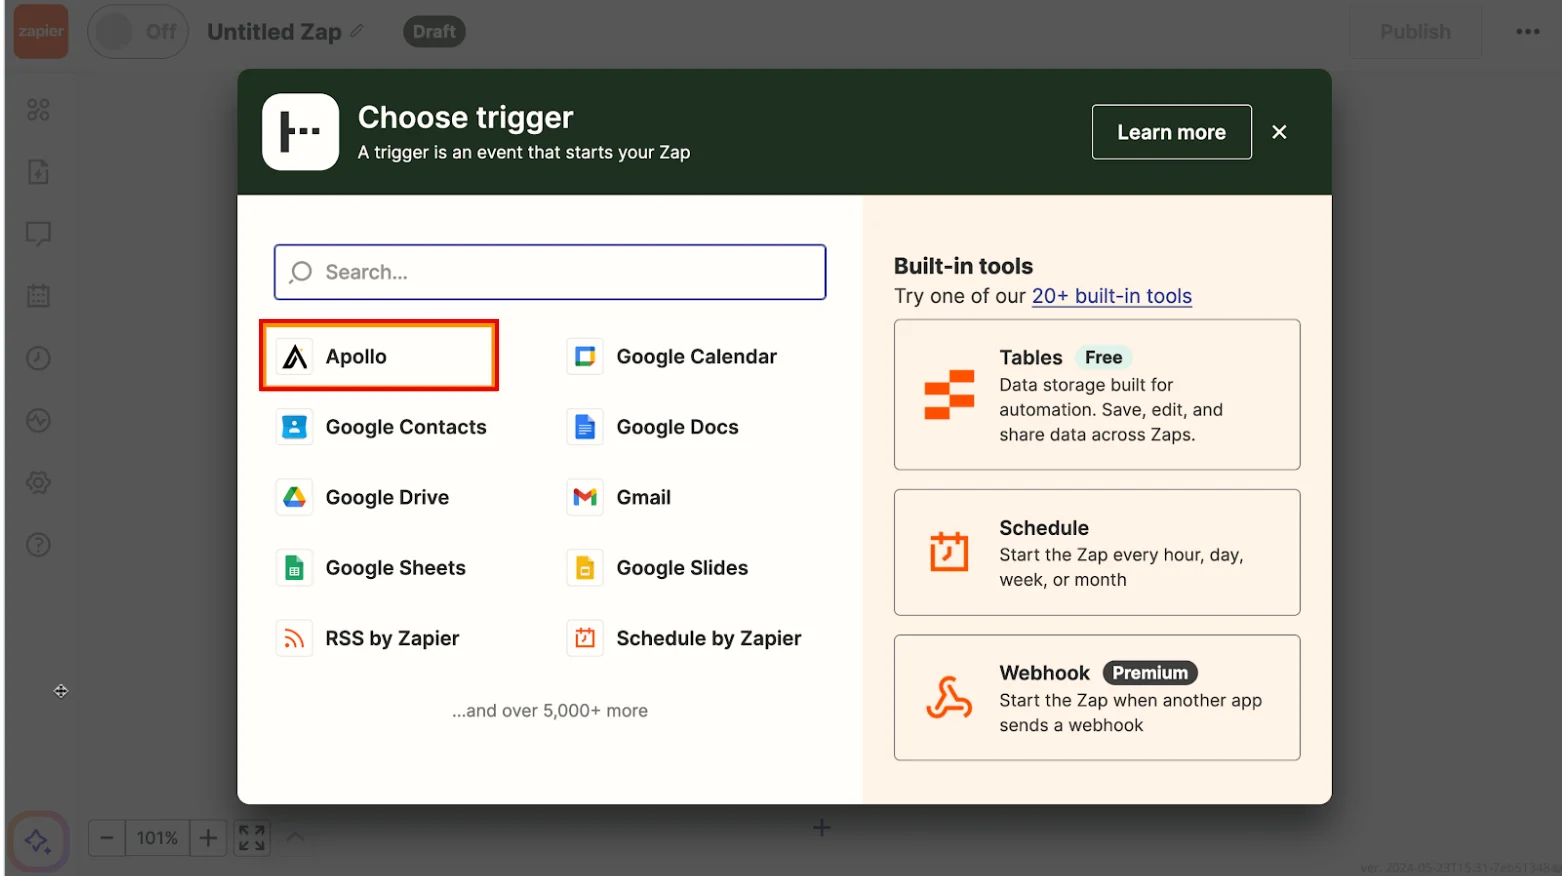
Now, set up the Trigger.
4. Click **Trigger** and choose Apollo as the app.\\
\
Now, set up the Trigger.
4. Click **Trigger** and choose Apollo as the app.\\
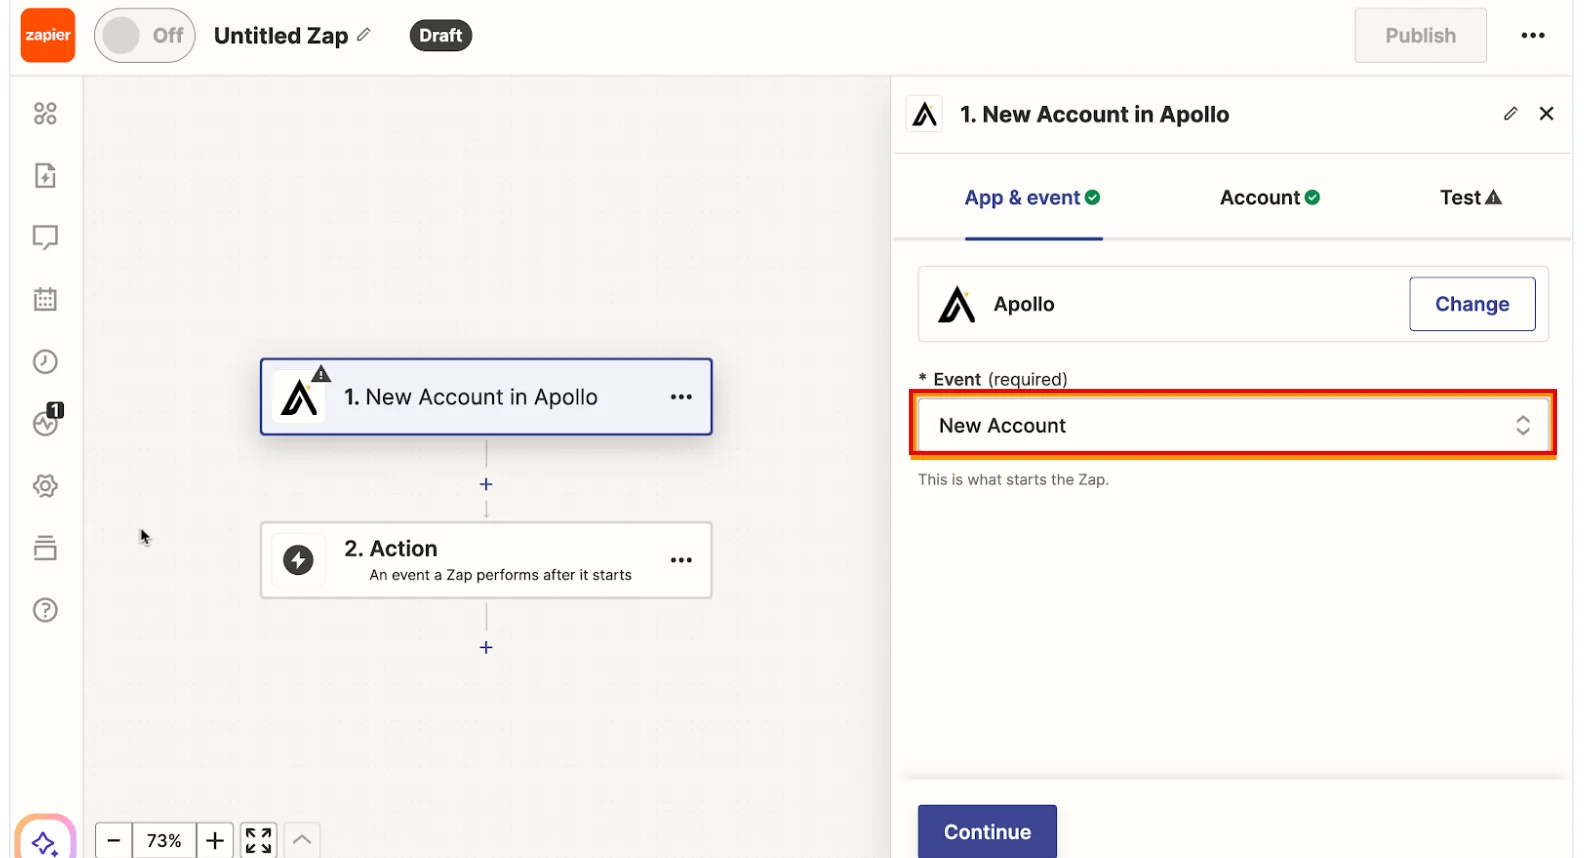
 5. Select one of the supported triggers (for example, **New Contact**) and click **Continue**.
6. Select the **Apollo** account you connected in step 1.
7. Click **Find Records** to test the trigger and fetch sample data.\\
5. Select one of the supported triggers (for example, **New Contact**) and click **Continue**.
6. Select the **Apollo** account you connected in step 1.
7. Click **Find Records** to test the trigger and fetch sample data.\\
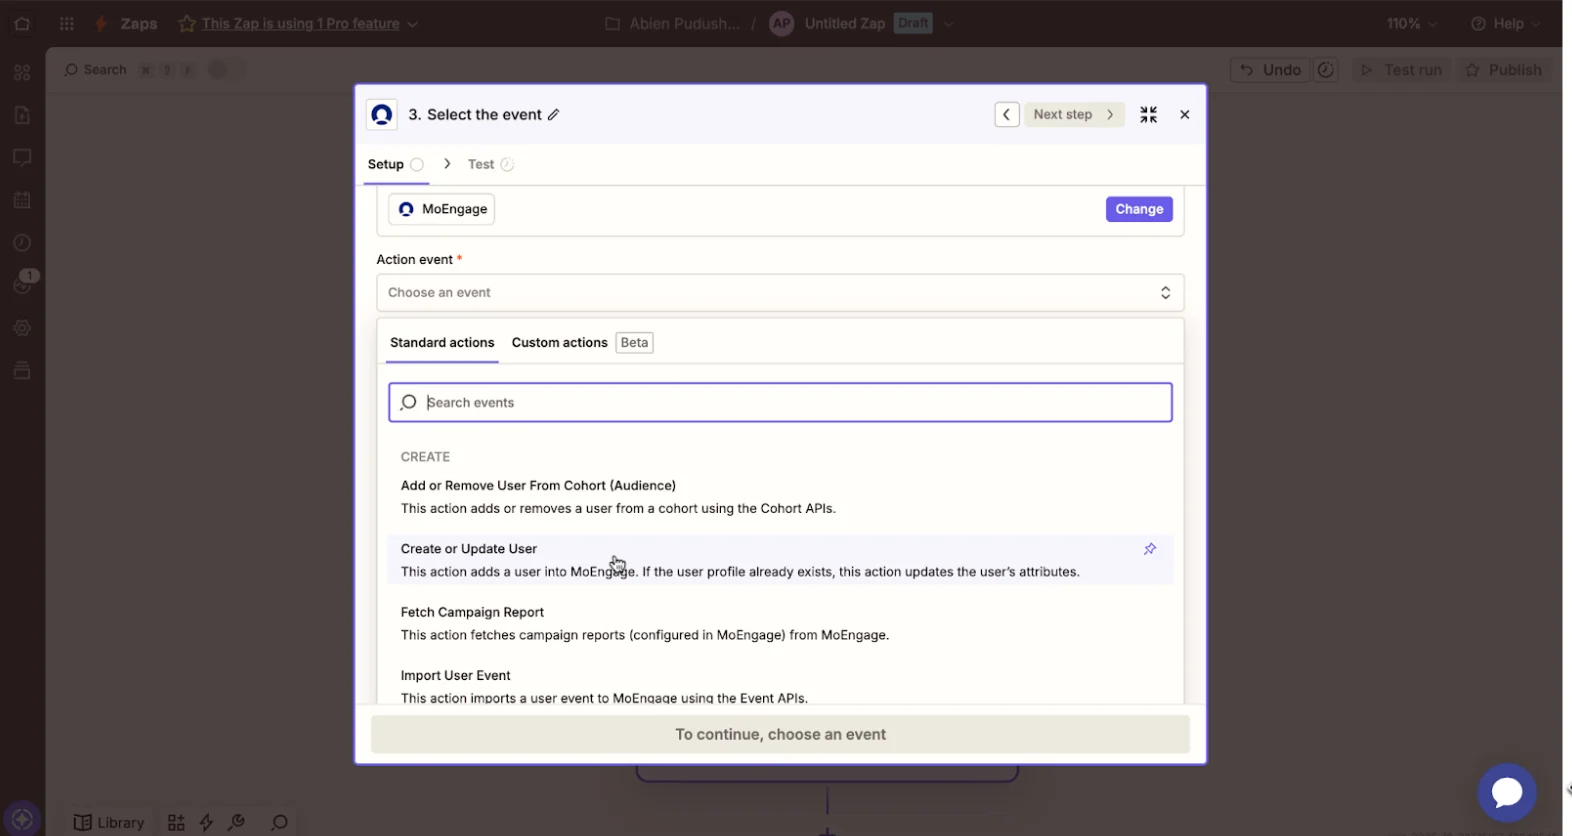
 Now, set up the Action.
8. Click **Action** and search for and select the MoEngage app.
9. Select the action as **Create or Update User**.\\
Now, set up the Action.
8. Click **Action** and search for and select the MoEngage app.
9. Select the action as **Create or Update User**.\\
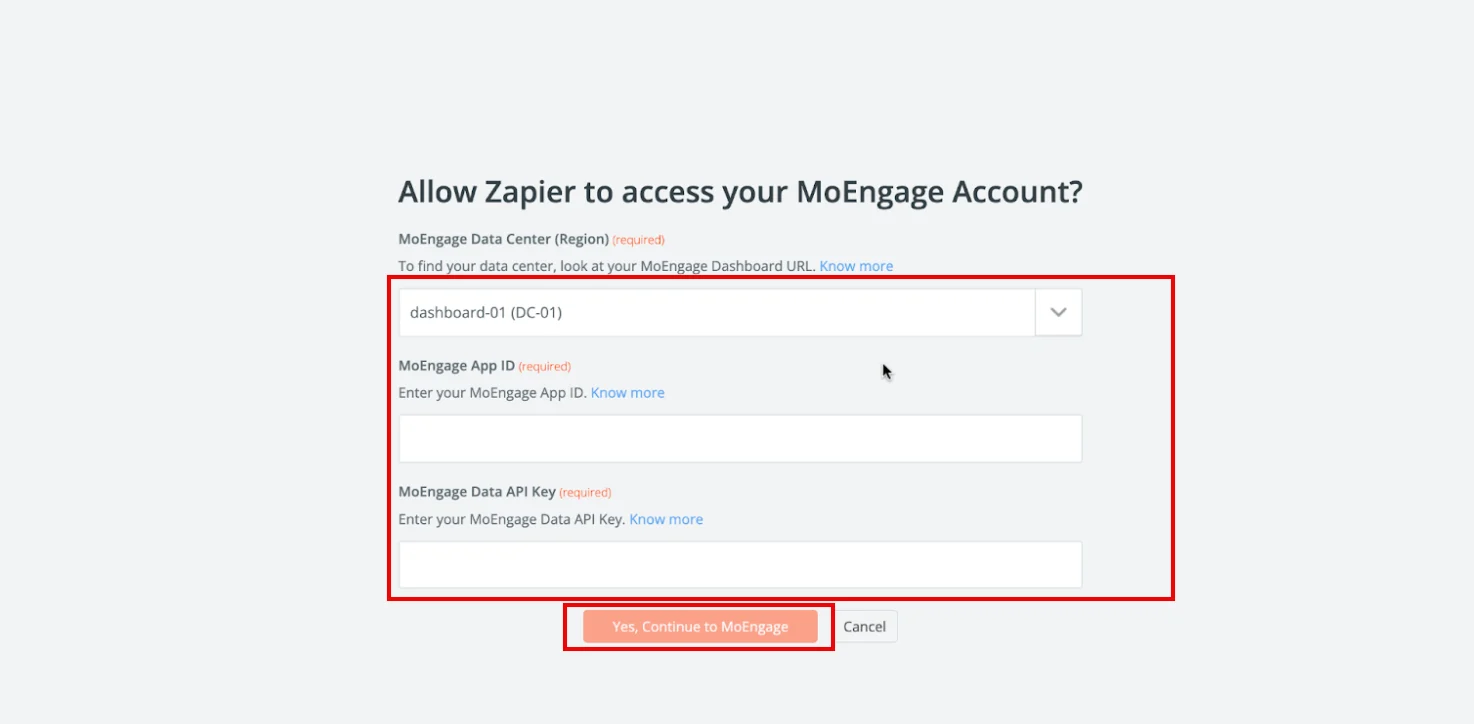
 10. Provide the following credentials in Zapier, which you can obtain from the MoEngage UI:
1. In the **Allow Zapier to access your Apollo Account**\*\*?\*\* window, under **MoEngage Data Center Region (required)** , click the appropriate region from the drop-down list.
2. Under **MoEngage App ID (required)** , paste the workspace ID (app ID) copied from MoEngage.
3. Under **MoEngage Data API Key (required)** , paste the Data API Key copied from MoEngage.
To find your credentials, perform the following steps:
1. Copy the ID under **Workspace ID** (**earlier app id**).
2. Copy the **Data** under **API keys**.
3. Data Center IDs are assigned when signing up with MoEngage. Your data center ID can be identified from the dashboard URL. For example, if your dashboard URL is [https://dashboard-04.moengage.com/v4/#/auth](https://dashboard-04.moengage.com/v4/#/auth), your data center is data center 04, and the data center ID is\
DC-04. For more information, refer to [Data Centers in MoEngage](/user-guide/data/key-concepts/data-centers-in-moengage#list-of-data-centers).
11. Click **Yes, Continue to Apollo**.\\
10. Provide the following credentials in Zapier, which you can obtain from the MoEngage UI:
1. In the **Allow Zapier to access your Apollo Account**\*\*?\*\* window, under **MoEngage Data Center Region (required)** , click the appropriate region from the drop-down list.
2. Under **MoEngage App ID (required)** , paste the workspace ID (app ID) copied from MoEngage.
3. Under **MoEngage Data API Key (required)** , paste the Data API Key copied from MoEngage.
To find your credentials, perform the following steps:
1. Copy the ID under **Workspace ID** (**earlier app id**).
2. Copy the **Data** under **API keys**.
3. Data Center IDs are assigned when signing up with MoEngage. Your data center ID can be identified from the dashboard URL. For example, if your dashboard URL is [https://dashboard-04.moengage.com/v4/#/auth](https://dashboard-04.moengage.com/v4/#/auth), your data center is data center 04, and the data center ID is\
DC-04. For more information, refer to [Data Centers in MoEngage](/user-guide/data/key-concepts/data-centers-in-moengage#list-of-data-centers).
11. Click **Yes, Continue to Apollo**.\\
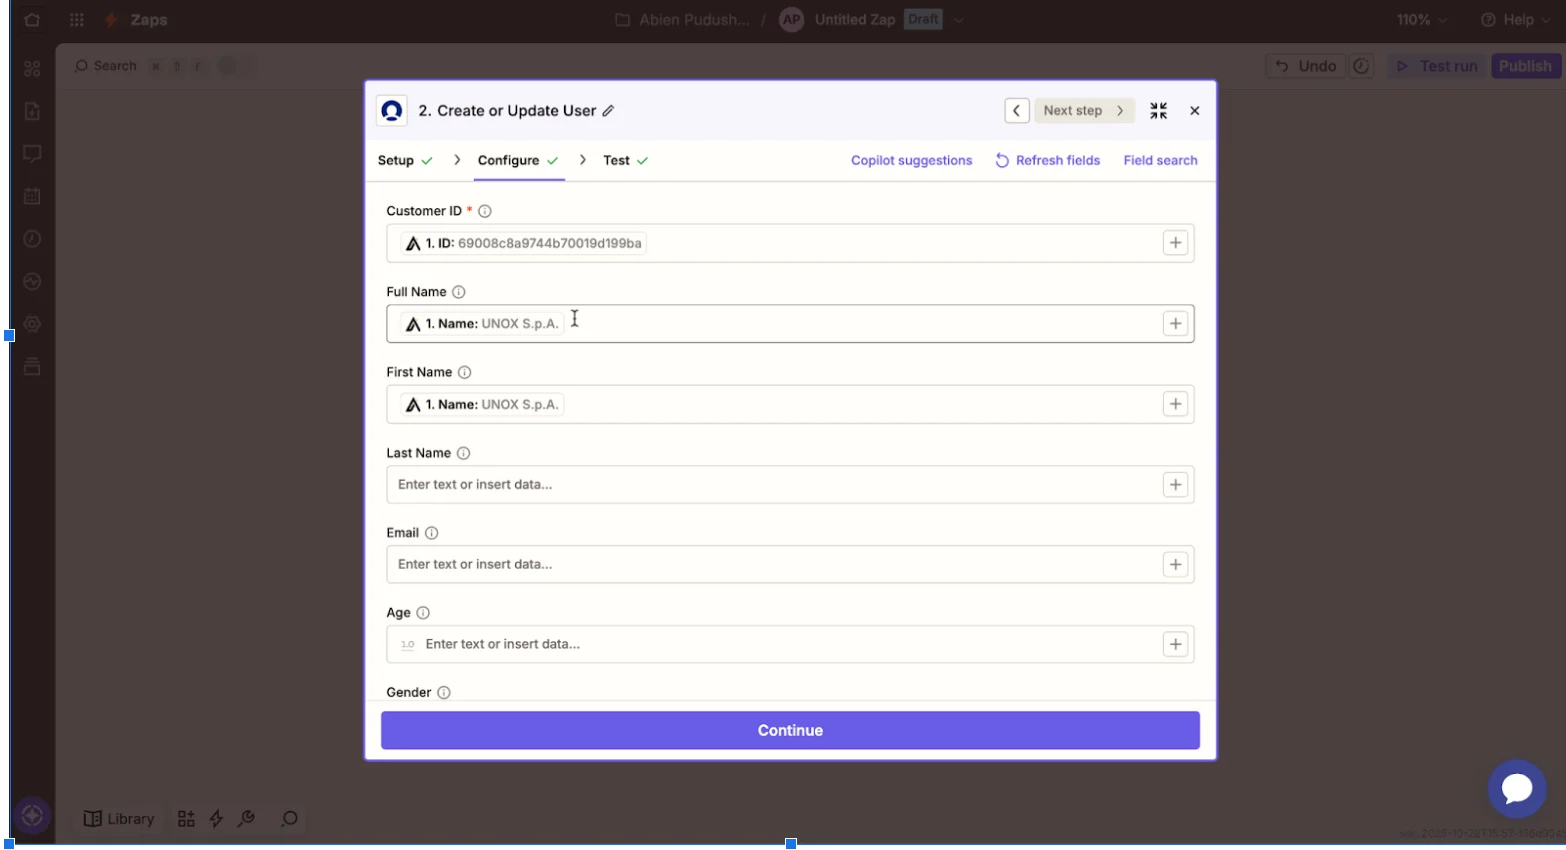
 12. Now, create the mapping between Apollo fields and MoEngage user attributes based on the trigger selected.\
 \
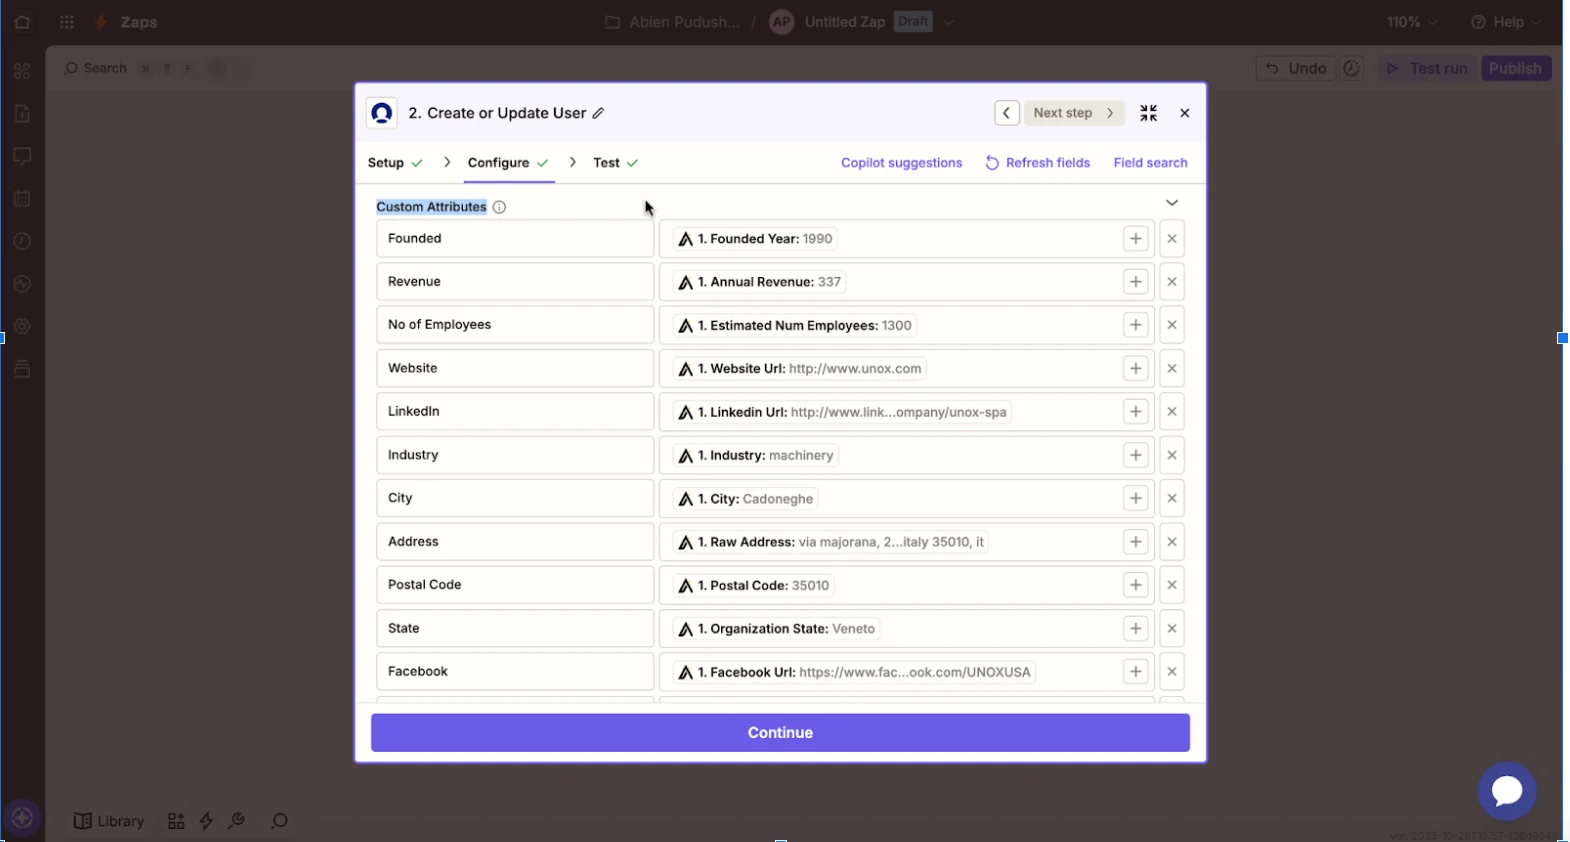
Use the **Custom Attributes** section to enrich the MoEngage profile with additional details.
\
Use the **Custom Attributes** section to enrich the MoEngage profile with additional details.
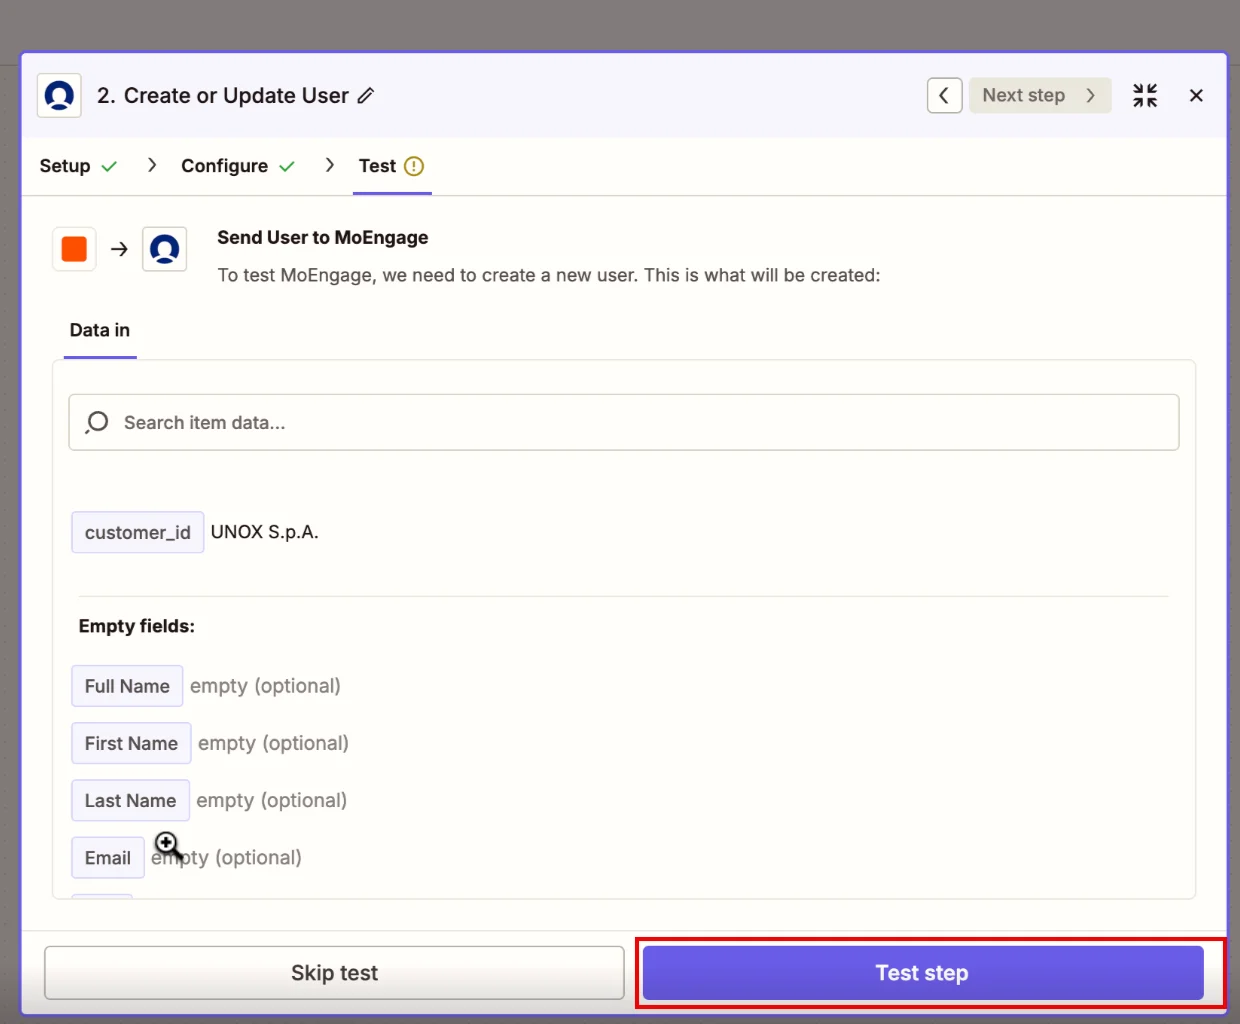
 13. Click **Test step**.
 14. Click **Publish**.
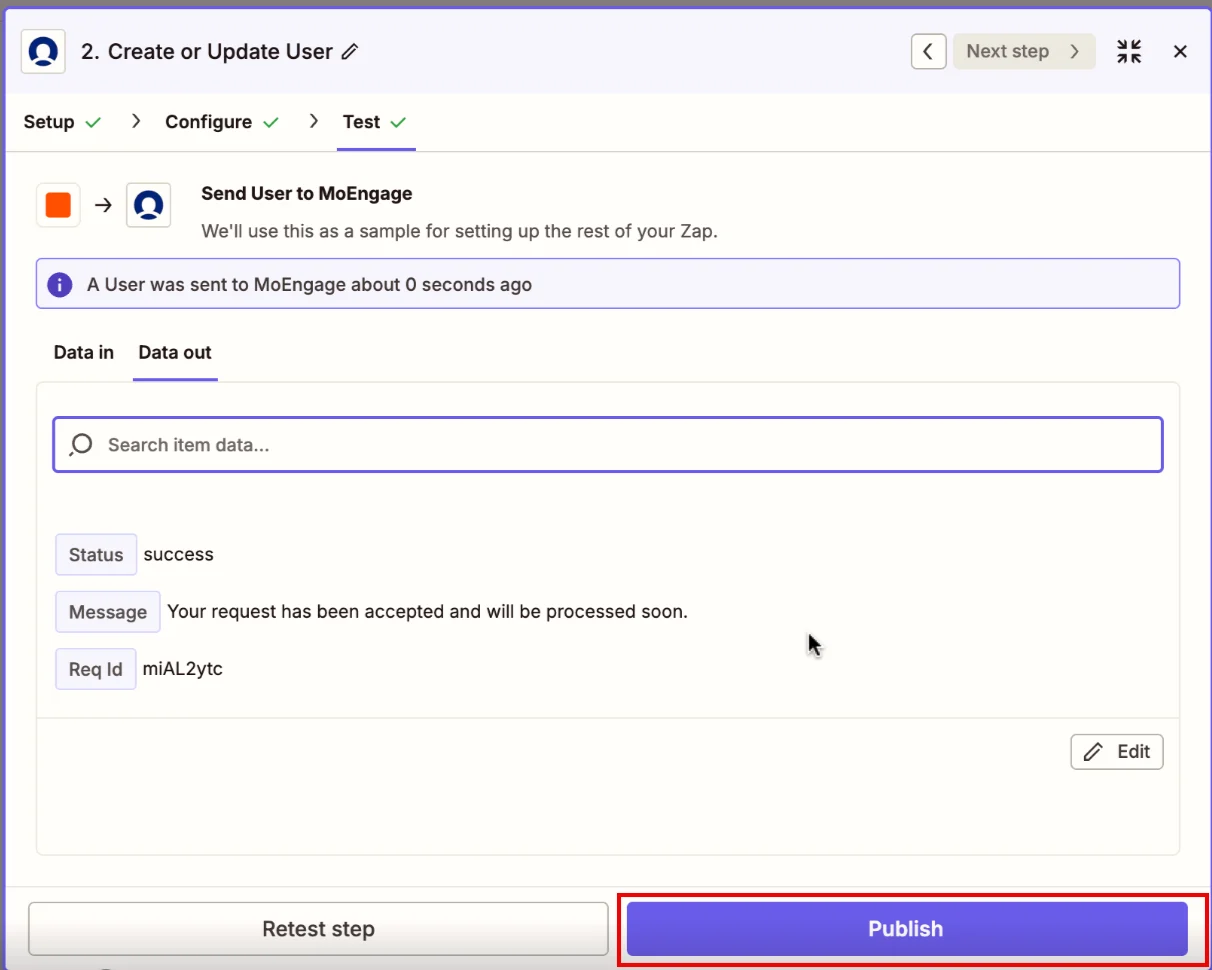 After configuration, Zap will automatically trigger MoEngage with the relevant information every time the event occurs in Apollo.