> ## Documentation Index
> Fetch the complete documentation index at: https://moengage.com/docs/llms.txt
> Use this file to discover all available pages before exploring further.
# Microsoft Dynamics 365 Sales
[Microsoft Dynamics 365 Sales](https://www.microsoft.com/en-us/dynamics-365/products/sales) is an enterprise CRM solution that manages customer relationships through contacts, leads, opportunities, and activities. This integration uses *Power Automate* to automatically push real-time sales data from Microsoft Dynamics 365 (D365) Sales to the MoEngage platform.
This automatic data synchronization helps marketing and support teams trigger highly contextual and personalized engagement campaigns based on sales activities and the customer lifecycle.
## MoEngage and Microsoft Dynamics 365
The integration of D365 Sales and MoEngage enables enhanced alignment between marketing and sales. With this integration, you can:
* Synchronize Contacts, Leads, and Opportunities from D365 Sales to MoEngage.
* Import sales activities like Calls, Meetings, and Tasks as behavioral events.
* Capture custom attributes and relationships for comprehensive customer profiling.
* Trigger contextual campaigns based on sales interactions and opportunity lifecycle events.
## Use cases
Integrating Microsoft Dynamics 365 with MoEngage helps you solve the following use cases:
* **Lead-to-engagement**: When a new Lead is created in D365, the complete lead data is automatically pushed to MoEngage, allowing you to instantly trigger a personalized welcome campaign and enroll the lead in relevant nurturing sequences based on their source or score.
* **Contact synchronization**: When Opportunity stages change (for example, from *Qualify* to *Propose*), push updates to MoEngage to send targeted content, deal status notifications, or win/loss analysis.
* **Sales activity events**: When Calls, Meetings, or Tasks are logged, capture these as behavioral events in MoEngage for engagement attribution.
* **CSAT and re-engagement**: When Opportunities are closed or deals are won, trigger satisfaction surveys or customer onboarding campaigns.
### Sync modules
The following table outlines the data synchronization type for each D365 Sales module.
| Module | MoEngage sync type |
| --------------- | ------------------ |
| Contacts | Users |
| Leads | Users |
| Opportunities | Events |
| Tasks | Events |
| Calls | Events |
| Meetings | Events |
| Custom Entities | Events (Custom) |
## Integration
**Prerequisites**
Admin access to your Power Automate and D365 Sales environment.
### Step 1: Get your MoEngage endpoint
To get a dedicated endpoint for your integration, contact the MoEngage Support team. In your request, specify the common identifier used to link user profiles between MoEngage and the partner platform.
### Step 2: Create a Power Automate flow
Go to [Power Automate](https://www.microsoft.com/en-us/power-platform/products/power-automate).
Click **Create** > **Automated Cloud Flow**.
Provide a flow name. For example, `D365 - Sync Contact to MoEngage`.
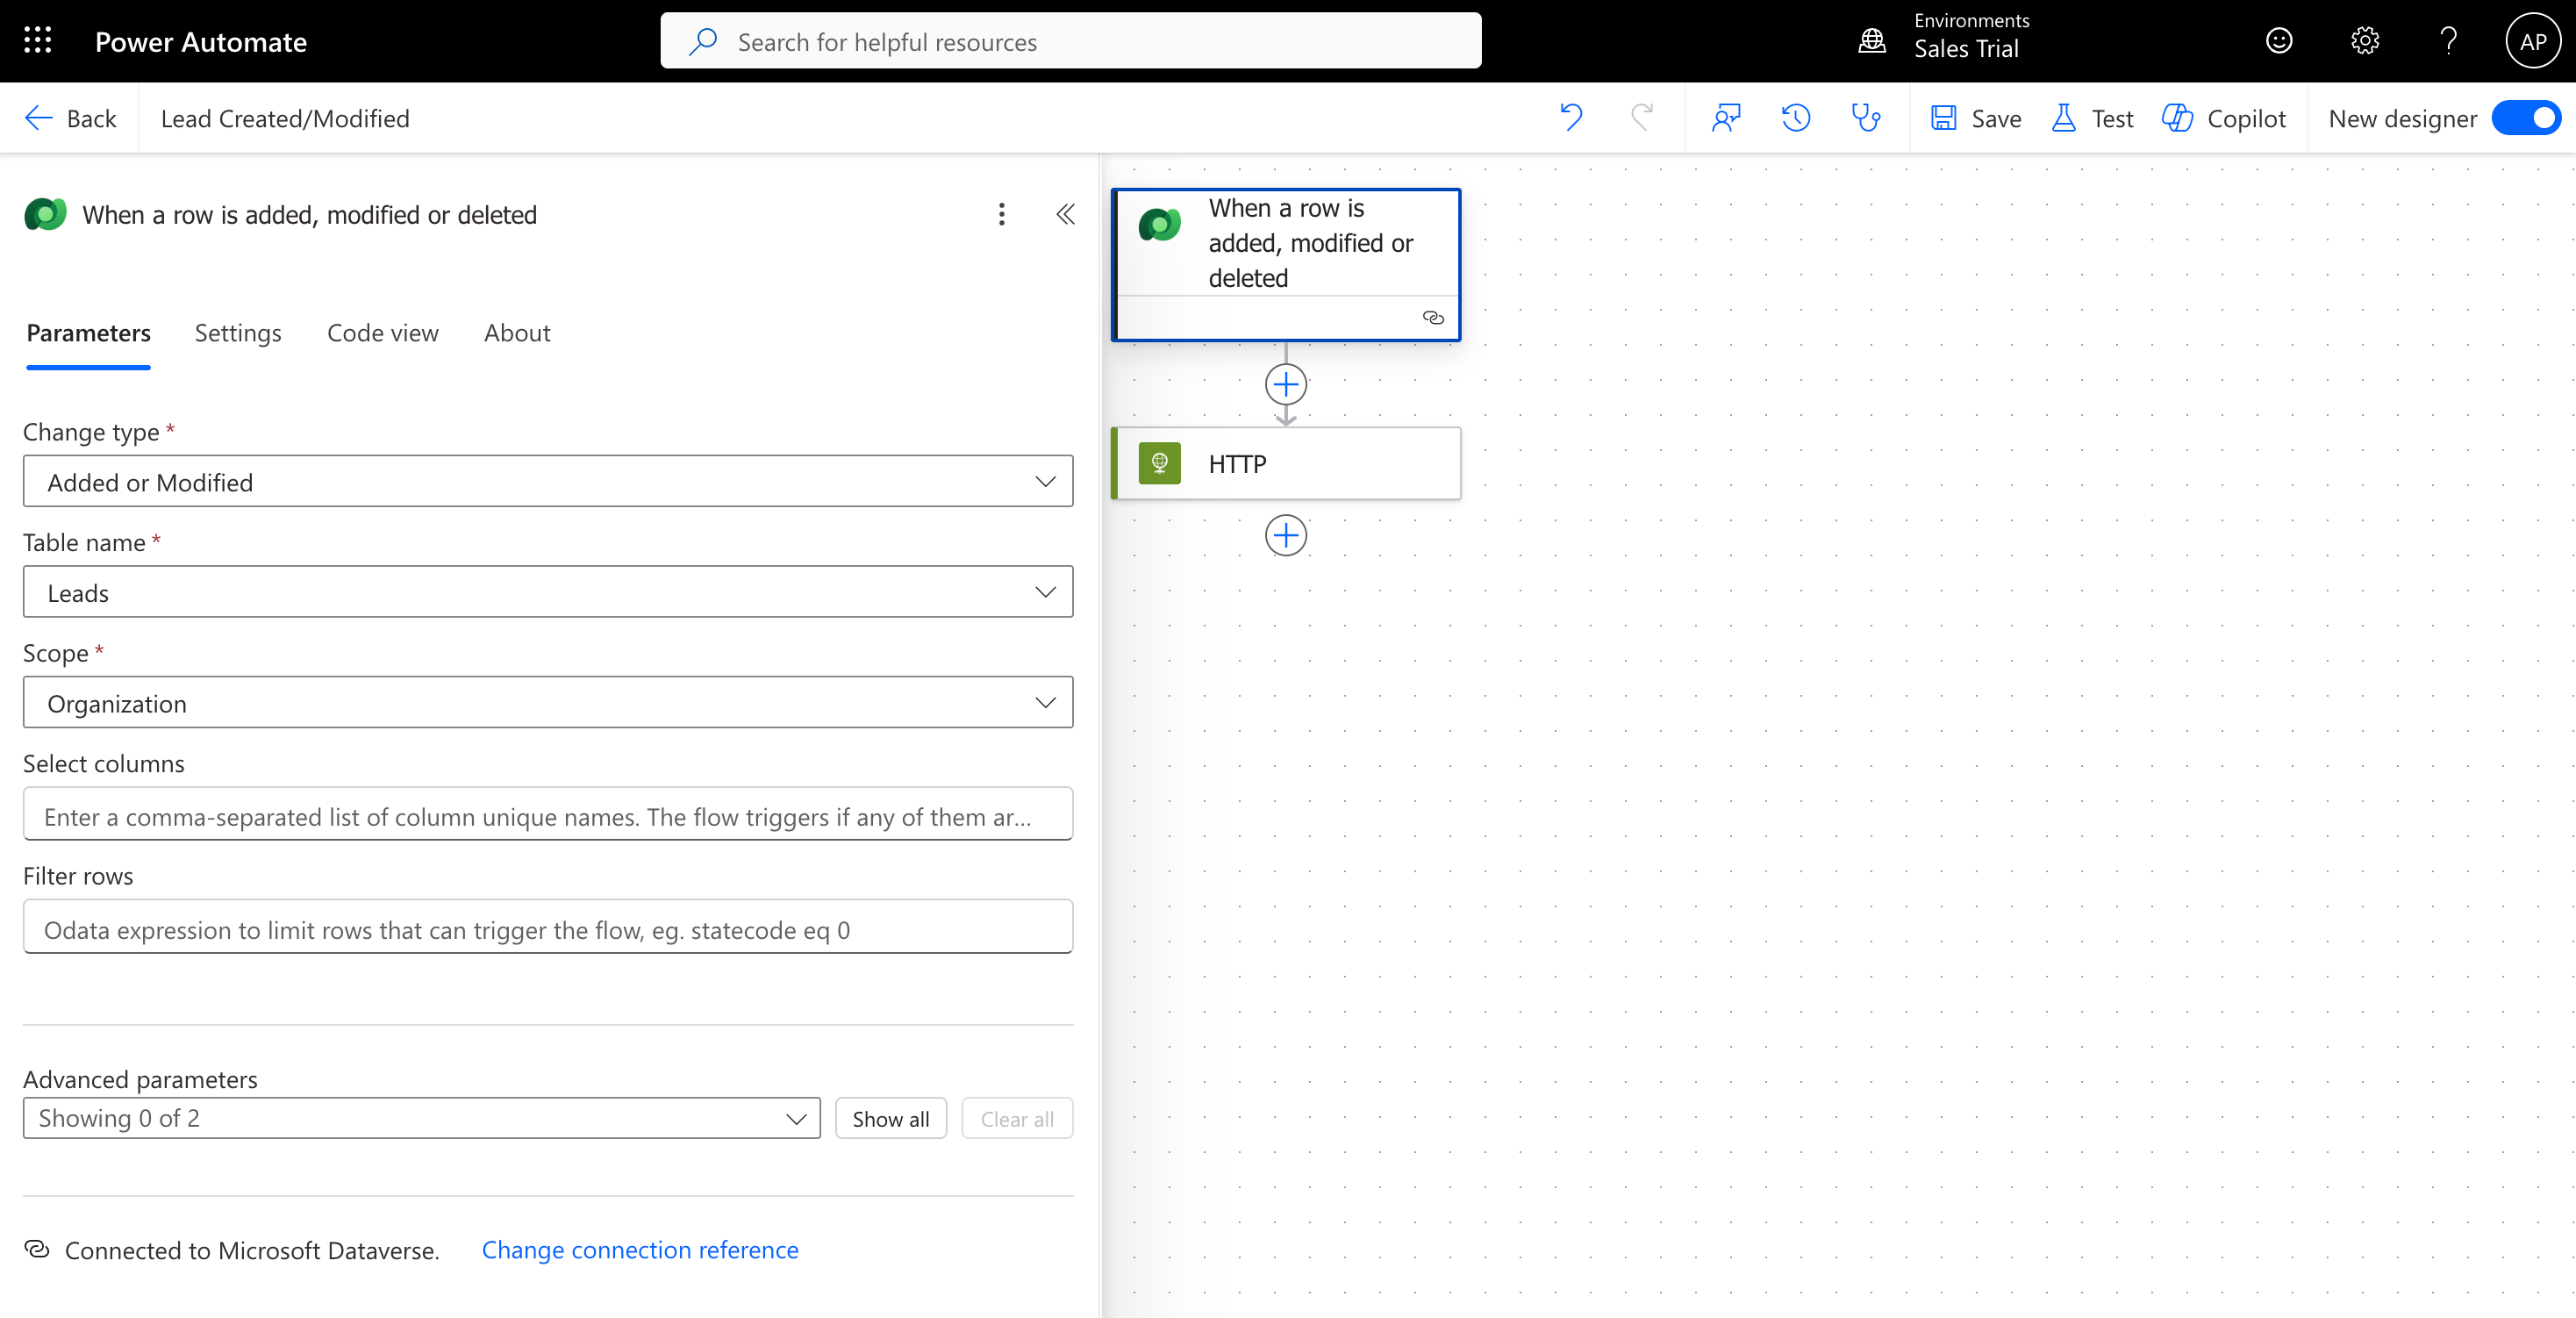
Select the trigger *When a row is added, modified, or deleted* (Dataverse).
Configure the following trigger details:
* **Table**: Select the entity you want to sync (for example, Contact, Lead, Opportunity).
* **Scope**: Select **Organization**.
* **Trigger on**: Select **Added** or **Modified**.
 ### Step 3: Configure the HTTP webhook action
Click **New Step** > **HTTP**.
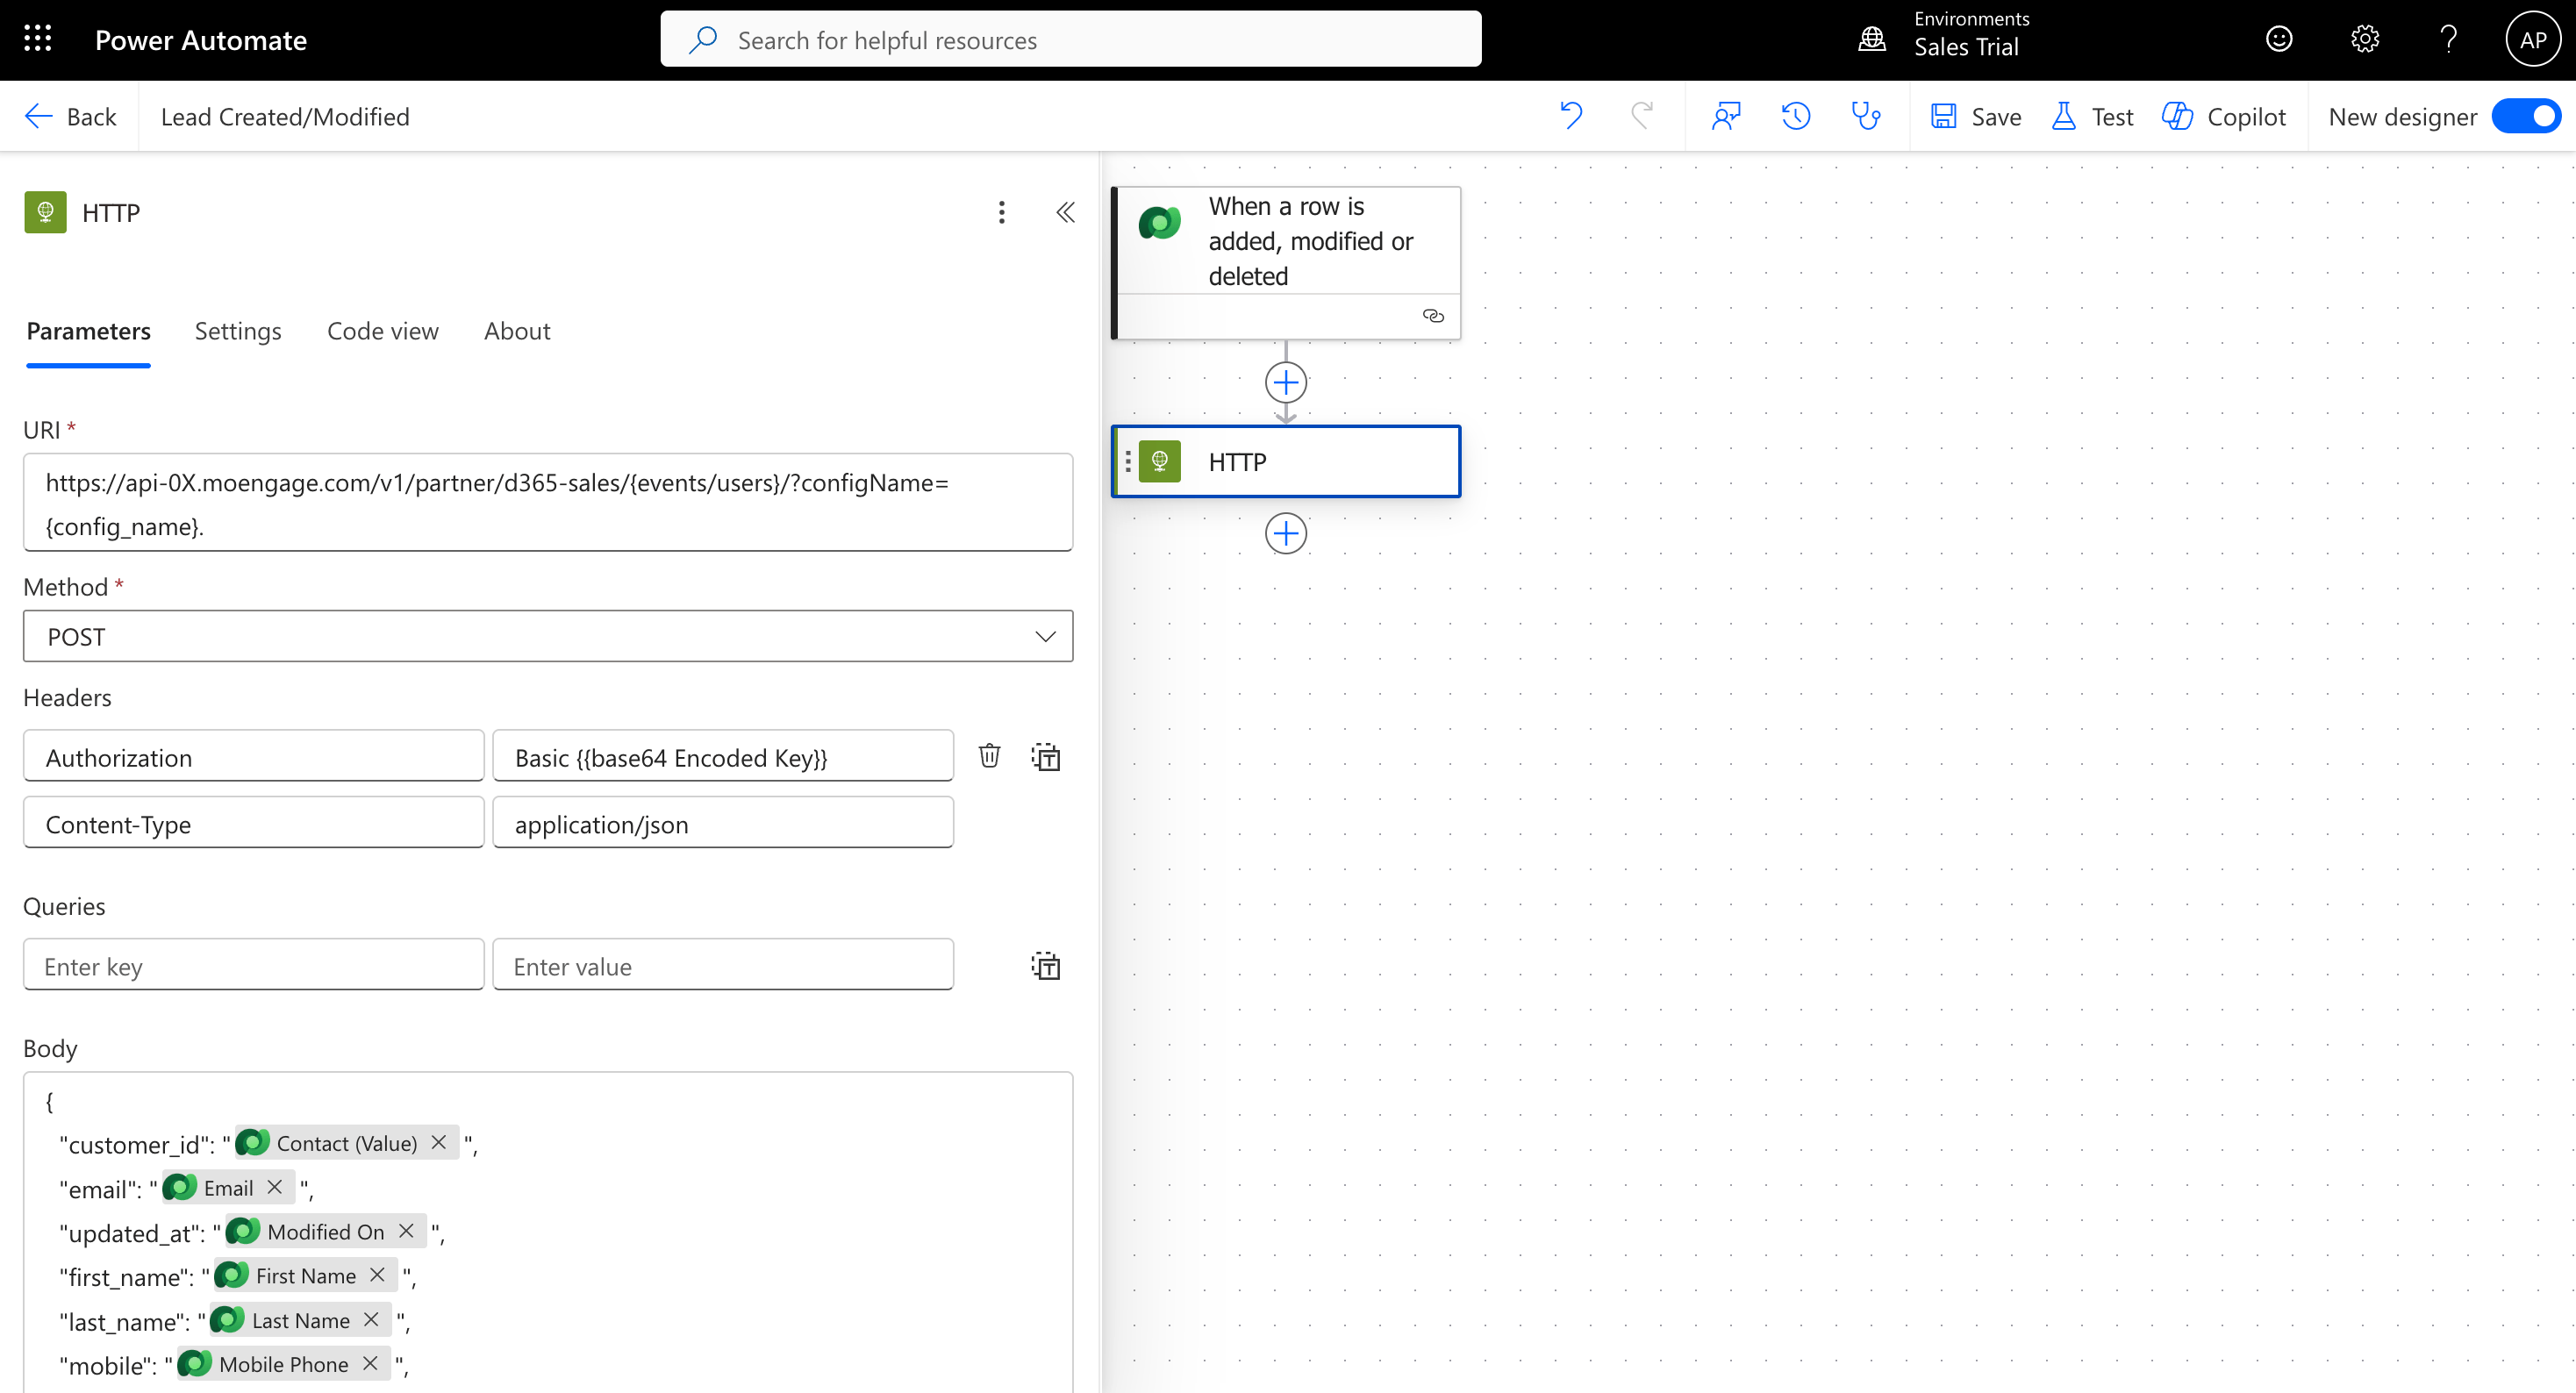
Configure the HTTP webhook with the following values.
| HTTP webhook section | Description |
| -------------------- | -------------------------------------------------------------------------------------------------------------------------------------------------------------------------- |
| **Method** | `POST` |
| **URL** | Enter the dedicated webhook URL provided by MoEngage in the following format: `https://api-0X.moengage.com/v1/partner/d365-sales/{events/users}/?configName={config_name}` |
| **Custom Headers** | See the headers configuration below. |
**Custom headers**
| Header | Value |
| --------------- | -------------------------------------------------------------------------------------- |
| `Content-Type` | `application/json` |
| `Authorization` | `Basic [Base64(Workspace_ID:API_Key)]` |
| `Body` | One of the sample payloads provided in [Step 4](#step-4-add-the-request-body-payload). |
To generate your **Authorization** token:
1. Use a [Basic Auth Header Generator tool](https://www.debugbear.com/basic-auth-header-generator).
2. Enter your **Workspace ID** as the username and your **Data API Key** as the password.
To find your credentials:
1. On the MoEngage UI, navigate to **Settings** > **Account** > **APIs**.
2. Copy the ID under **Workspace ID** (earlier called *App ID*).
3. Copy the **Data** key under **API keys**.
Your Basic Authentication Token is the Base64-encoded combination of **Workspace ID** and **Data**:
```text theme={null}
Authorization: Basic {base64_encoded_credentials}
```
Ensure the token is copied completely without extra spaces.
### Step 3: Configure the HTTP webhook action
Click **New Step** > **HTTP**.
Configure the HTTP webhook with the following values.
| HTTP webhook section | Description |
| -------------------- | -------------------------------------------------------------------------------------------------------------------------------------------------------------------------- |
| **Method** | `POST` |
| **URL** | Enter the dedicated webhook URL provided by MoEngage in the following format: `https://api-0X.moengage.com/v1/partner/d365-sales/{events/users}/?configName={config_name}` |
| **Custom Headers** | See the headers configuration below. |
**Custom headers**
| Header | Value |
| --------------- | -------------------------------------------------------------------------------------- |
| `Content-Type` | `application/json` |
| `Authorization` | `Basic [Base64(Workspace_ID:API_Key)]` |
| `Body` | One of the sample payloads provided in [Step 4](#step-4-add-the-request-body-payload). |
To generate your **Authorization** token:
1. Use a [Basic Auth Header Generator tool](https://www.debugbear.com/basic-auth-header-generator).
2. Enter your **Workspace ID** as the username and your **Data API Key** as the password.
To find your credentials:
1. On the MoEngage UI, navigate to **Settings** > **Account** > **APIs**.
2. Copy the ID under **Workspace ID** (earlier called *App ID*).
3. Copy the **Data** key under **API keys**.
Your Basic Authentication Token is the Base64-encoded combination of **Workspace ID** and **Data**:
```text theme={null}
Authorization: Basic {base64_encoded_credentials}
```
Ensure the token is copied completely without extra spaces.
 ### Step 4: Add the request body payload
To add the request body payload:
1. Copy the appropriate payload template from below and paste it into the **Body** field of the HTTP action.
2. Replace placeholder values (for example, `@{triggerBody()?['firstname']}`) with the corresponding dynamic content fields from the D365 trigger.
```json Contacts and Leads (User Sync) theme={null}
{
"customer_id": "@{triggerBody()?['contactid']}",
"u_fn": "@{triggerBody()?['firstname']}",
"u_ln": "@{triggerBody()?['lastname']}",
"u_em": "@{triggerBody()?['emailaddress1']}",
"u_mb": "@{triggerBody()?['mobilephone']}",
"updated_at": "@{triggerBody()?['modifiedon']}",
"user_attributes": {
"job_title": "@{triggerBody()?['jobtitle']}",
"company_name": "@{triggerBody()?['companyname']}",
"account_id": "@{triggerBody()?['_accountid_value']}",
"business_phone": "@{triggerBody()?['telephone1']}",
"status": "@{triggerBody()?['statecode']}"
}
}
```
```json Opportunities (Event) theme={null}
{
"customer_id": "@{triggerBody()?['opportunityid']}",
"u_fn": "@{triggerBody()?['name']}",
"u_ln": "",
"u_em": "",
"u_mb": "",
"updated_at": "@{triggerBody()?['modifiedon']}",
"event_attributes": {
"event_name": "opportunity_updated",
"opportunity_id": "@{triggerBody()?['opportunityid']}",
"opportunity_name": "@{triggerBody()?['name']}",
"deal_value": "@{triggerBody()?['estimatedvalue']}",
"stage": "@{triggerBody()?['stageid']}",
"probability": "@{triggerBody()?['closeprobability']}",
"close_date": "@{triggerBody()?['estimatedclosedate']}",
"owner_id": "@{triggerBody()?['_ownerid_value']}"
}
}
```
```json Tasks, Calls and Meetings (Activity Events) theme={null}
{
"customer_id": "@{triggerBody()?['regardingobjectid']}",
"u_fn": "@{triggerBody()?['subject']}",
"u_ln": "",
"u_em": "",
"u_mb": "@{triggerBody()?['phonenumber']}",
"updated_at": "@{triggerBody()?['modifiedon']}",
"event_attributes": {
"event_name": "task_created",
"activity_id": "@{triggerBody()?['taskid']}",
"subject": "@{triggerBody()?['subject']}",
"priority": "@{triggerBody()?['prioritycode']}",
"due_date": "@{triggerBody()?['duedate']}",
"status": "@{triggerBody()?['statecode']}",
"owner_id": "@{triggerBody()?['_ownerid_value']}"
}
}
```
* For each activity type, set the `event_name` to the `{{activity name}}` or a custom value.
* Add additional custom event fields under `event_attributes`.
* Add additional custom user fields under `user_attributes`.
#### Required fields
| Field (key) | Required |
| ------------------ | ------------ |
| `customer_id` | Yes |
| `u_fn` | Yes |
| `u_ln` | Yes |
| `u_em` | Yes |
| `u_mb` | Yes |
| `updated_at` | Yes |
| `user_attributes` | No |
| `event_name` | Yes (events) |
| `event_attributes` | Yes (events) |
#### Data mapping guidelines
* **Unique identifier (Customer ID)**: Use a consistent, immutable identifier to link user profiles between D365 and MoEngage. Map this value to the `customer_id` field in your MoEngage payload. This is critical for data merging and preventing duplicate user profiles. Use one of:
* Email address (if unique).
* D365 record GUID (for example, `contactid`, `leadid`).
* External ID (if configured in D365).
* **Event name (`event_name`)**: Always include a descriptive `event_name` to identify and categorize actions in MoEngage. This ensures all events are tracked accurately for analysis and segmentation.
### Step 5: Test the integration
In Power Automate, click **Test** and then manually trigger a cloud flow.
For example, create a new Contact in D365 Sales.
Watch the flow execution in Power Automate for a successful HTTP `200` or `201` response.
Verify in the MoEngage UI that the test data has synced correctly within 1–5 minutes.
### Step 4: Add the request body payload
To add the request body payload:
1. Copy the appropriate payload template from below and paste it into the **Body** field of the HTTP action.
2. Replace placeholder values (for example, `@{triggerBody()?['firstname']}`) with the corresponding dynamic content fields from the D365 trigger.
```json Contacts and Leads (User Sync) theme={null}
{
"customer_id": "@{triggerBody()?['contactid']}",
"u_fn": "@{triggerBody()?['firstname']}",
"u_ln": "@{triggerBody()?['lastname']}",
"u_em": "@{triggerBody()?['emailaddress1']}",
"u_mb": "@{triggerBody()?['mobilephone']}",
"updated_at": "@{triggerBody()?['modifiedon']}",
"user_attributes": {
"job_title": "@{triggerBody()?['jobtitle']}",
"company_name": "@{triggerBody()?['companyname']}",
"account_id": "@{triggerBody()?['_accountid_value']}",
"business_phone": "@{triggerBody()?['telephone1']}",
"status": "@{triggerBody()?['statecode']}"
}
}
```
```json Opportunities (Event) theme={null}
{
"customer_id": "@{triggerBody()?['opportunityid']}",
"u_fn": "@{triggerBody()?['name']}",
"u_ln": "",
"u_em": "",
"u_mb": "",
"updated_at": "@{triggerBody()?['modifiedon']}",
"event_attributes": {
"event_name": "opportunity_updated",
"opportunity_id": "@{triggerBody()?['opportunityid']}",
"opportunity_name": "@{triggerBody()?['name']}",
"deal_value": "@{triggerBody()?['estimatedvalue']}",
"stage": "@{triggerBody()?['stageid']}",
"probability": "@{triggerBody()?['closeprobability']}",
"close_date": "@{triggerBody()?['estimatedclosedate']}",
"owner_id": "@{triggerBody()?['_ownerid_value']}"
}
}
```
```json Tasks, Calls and Meetings (Activity Events) theme={null}
{
"customer_id": "@{triggerBody()?['regardingobjectid']}",
"u_fn": "@{triggerBody()?['subject']}",
"u_ln": "",
"u_em": "",
"u_mb": "@{triggerBody()?['phonenumber']}",
"updated_at": "@{triggerBody()?['modifiedon']}",
"event_attributes": {
"event_name": "task_created",
"activity_id": "@{triggerBody()?['taskid']}",
"subject": "@{triggerBody()?['subject']}",
"priority": "@{triggerBody()?['prioritycode']}",
"due_date": "@{triggerBody()?['duedate']}",
"status": "@{triggerBody()?['statecode']}",
"owner_id": "@{triggerBody()?['_ownerid_value']}"
}
}
```
* For each activity type, set the `event_name` to the `{{activity name}}` or a custom value.
* Add additional custom event fields under `event_attributes`.
* Add additional custom user fields under `user_attributes`.
#### Required fields
| Field (key) | Required |
| ------------------ | ------------ |
| `customer_id` | Yes |
| `u_fn` | Yes |
| `u_ln` | Yes |
| `u_em` | Yes |
| `u_mb` | Yes |
| `updated_at` | Yes |
| `user_attributes` | No |
| `event_name` | Yes (events) |
| `event_attributes` | Yes (events) |
#### Data mapping guidelines
* **Unique identifier (Customer ID)**: Use a consistent, immutable identifier to link user profiles between D365 and MoEngage. Map this value to the `customer_id` field in your MoEngage payload. This is critical for data merging and preventing duplicate user profiles. Use one of:
* Email address (if unique).
* D365 record GUID (for example, `contactid`, `leadid`).
* External ID (if configured in D365).
* **Event name (`event_name`)**: Always include a descriptive `event_name` to identify and categorize actions in MoEngage. This ensures all events are tracked accurately for analysis and segmentation.
### Step 5: Test the integration
In Power Automate, click **Test** and then manually trigger a cloud flow.
For example, create a new Contact in D365 Sales.
Watch the flow execution in Power Automate for a successful HTTP `200` or `201` response.
Verify in the MoEngage UI that the test data has synced correctly within 1–5 minutes.
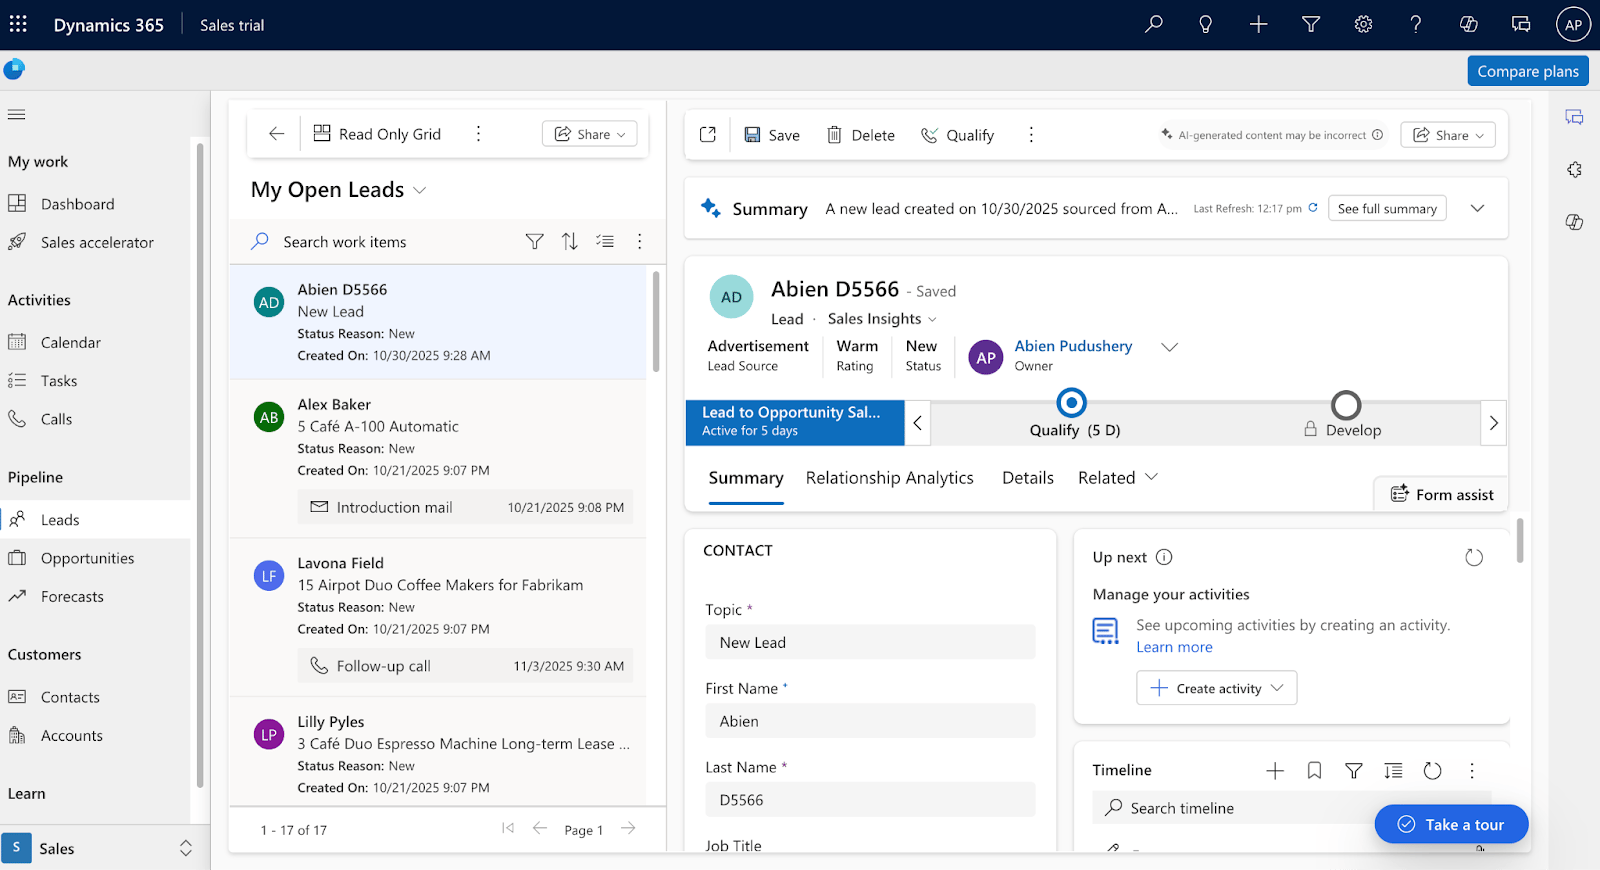 The test record appears in MoEngage with all mapped attributes populated.
## Rate limits
To maintain platform stability, MoEngage limits ingestion of Microsoft Dynamics 365 Sales data to a maximum of 500 requests per second (RPS) per workspace. If your workspace exceeds this limit, MoEngage returns an HTTP `429 (Too Many Requests)` status code.
Refer to the Microsoft Dynamics 365 Sales default retry policy to understand how rate limiting affects your data flow.
**Retry exhaustion**: If Microsoft Dynamics 365 Sales exhausts all retry attempts for a batch of data, you must contact the Microsoft Support Team to replay the failed requests.
The test record appears in MoEngage with all mapped attributes populated.
## Rate limits
To maintain platform stability, MoEngage limits ingestion of Microsoft Dynamics 365 Sales data to a maximum of 500 requests per second (RPS) per workspace. If your workspace exceeds this limit, MoEngage returns an HTTP `429 (Too Many Requests)` status code.
Refer to the Microsoft Dynamics 365 Sales default retry policy to understand how rate limiting affects your data flow.
**Retry exhaustion**: If Microsoft Dynamics 365 Sales exhausts all retry attempts for a batch of data, you must contact the Microsoft Support Team to replay the failed requests.