> ## Documentation Index
> Fetch the complete documentation index at: https://moengage.com/docs/llms.txt
> Use this file to discover all available pages before exploring further.
# Databricks
> Set up the MoEngage and Databricks integration to sync, import, and export data between your Databricks instance and MoEngage.
[Databricks](https://www.databricks.com/resources/ebook/maximize-your-organizations-potential-data-and-ai?scid=7018Y000001Fi1AQAS\&utm_medium=paid+search\&utm_source=google\&utm_campaign=15418435374\&utm_adgroup=130717555576\&utm_content=ebook\&utm_offer=maximize-your-organizations-potential-data-and-ai\&utm_ad=703594935116\&utm_term=databricks\&gad_source=1\&gclid=CjwKCAjwvr--BhB5EiwAd5YbXpGh4ugWZyyOwJrqbfr-c5cZhP9HVrGMKQmBuZRlVcC_BRLco-zKVxoCmZkQAvD_BwE) is a platform that allows organizations to store, analyze, and process large volumes of structured and semi-structured data in a highly scalable and efficient manner. With its unique architecture, Databricks allows organizations to consolidate their data, perform quick analytics, and gain valuable data-driven insights accessible to all users.
# MoEngage × Databricks
The MoEngage × Databricks integration allows you to set up a direct connection between your Databricks instance and MoEngage app to sync data regularly. You can define a schedule to run the sync periodically; periodic syncs can be frequent or with a time interval, such as once every month. During synchronization, MoEngage will directly connect to your data warehouse instance, retrieve all new data from the specified table or the table you have access to, and update the corresponding data on your MoEngage dashboard.
## Use Cases
Databricks integration with MoEngage helps you with the following use cases:
* Sync real-time audiences from Databricks
* Import users and events from Databricks
* Export campaign interaction events to Databricks
## Advantages
The integration with MoEngage helps you with the following advantages:
### Reduce Integration Time
* No more searching for the right ETL (Extract, Transform, and Load) tool, as MoEngage directly integrates with Databricks.
* Long and complicated ETL pipelines are now replaced with a one-time integration setup that gives MoEngage direct access to your data.
* This decreases the dependency on tech teams significantly.
### Faster Data Processing
* The power of the Databricks infrastructure enables us to store, process, and query massive amounts of data in near real-time.
* Any changes in the original schema are propagated immediately without having to change any configuration on MoEngage's end, which is a significant advantage over the traditional ETL pipelines.
* Since there is no need for ETL tools and external cloud providers, the cost of import is significantly lower than traditional data pipelines.
# Integration
**Prerequisites**
Ensure you have a Databricks account with administrative workspace privileges to create service principals, generate secrets, and grant permissions on catalogs and schemas.
## Part A: Set Up Authentication
To securely connect MoEngage to your Databricks SQL warehouse, MoEngage recommends configuring a **Databricks service principal (SP)** by using **OAuth 2.0 Machine-to-Machine (M2M) authentication**. This approach does not require workspace administrator privileges or full catalog ownership.
Warehouse Segments currently does not support the OAuth method.
To set up a Databricks service principal (SP) using OAuth 2.0 M2M authentication, perform the following steps:
**Add a Service Principal in Databricks**
1. Sign in to your account console in Databricks as an admin.
2. In the sidebar, click **User Management**.
3. On the **Service principals** tab, click **Add Service principal**.
4. Enter a name for the service principal (for example, `moengage-pi-sp`).
5. Click **Add**.
**Generate an OAuth secret for the service principal**
1. In the service principals management dashboard, click your newly registered principal (for example, `moengage-pi`).
2. Click the **Secrets** tab.
3. Click **Generate secret**. The **Generate OAuth secret** dialog box appears. 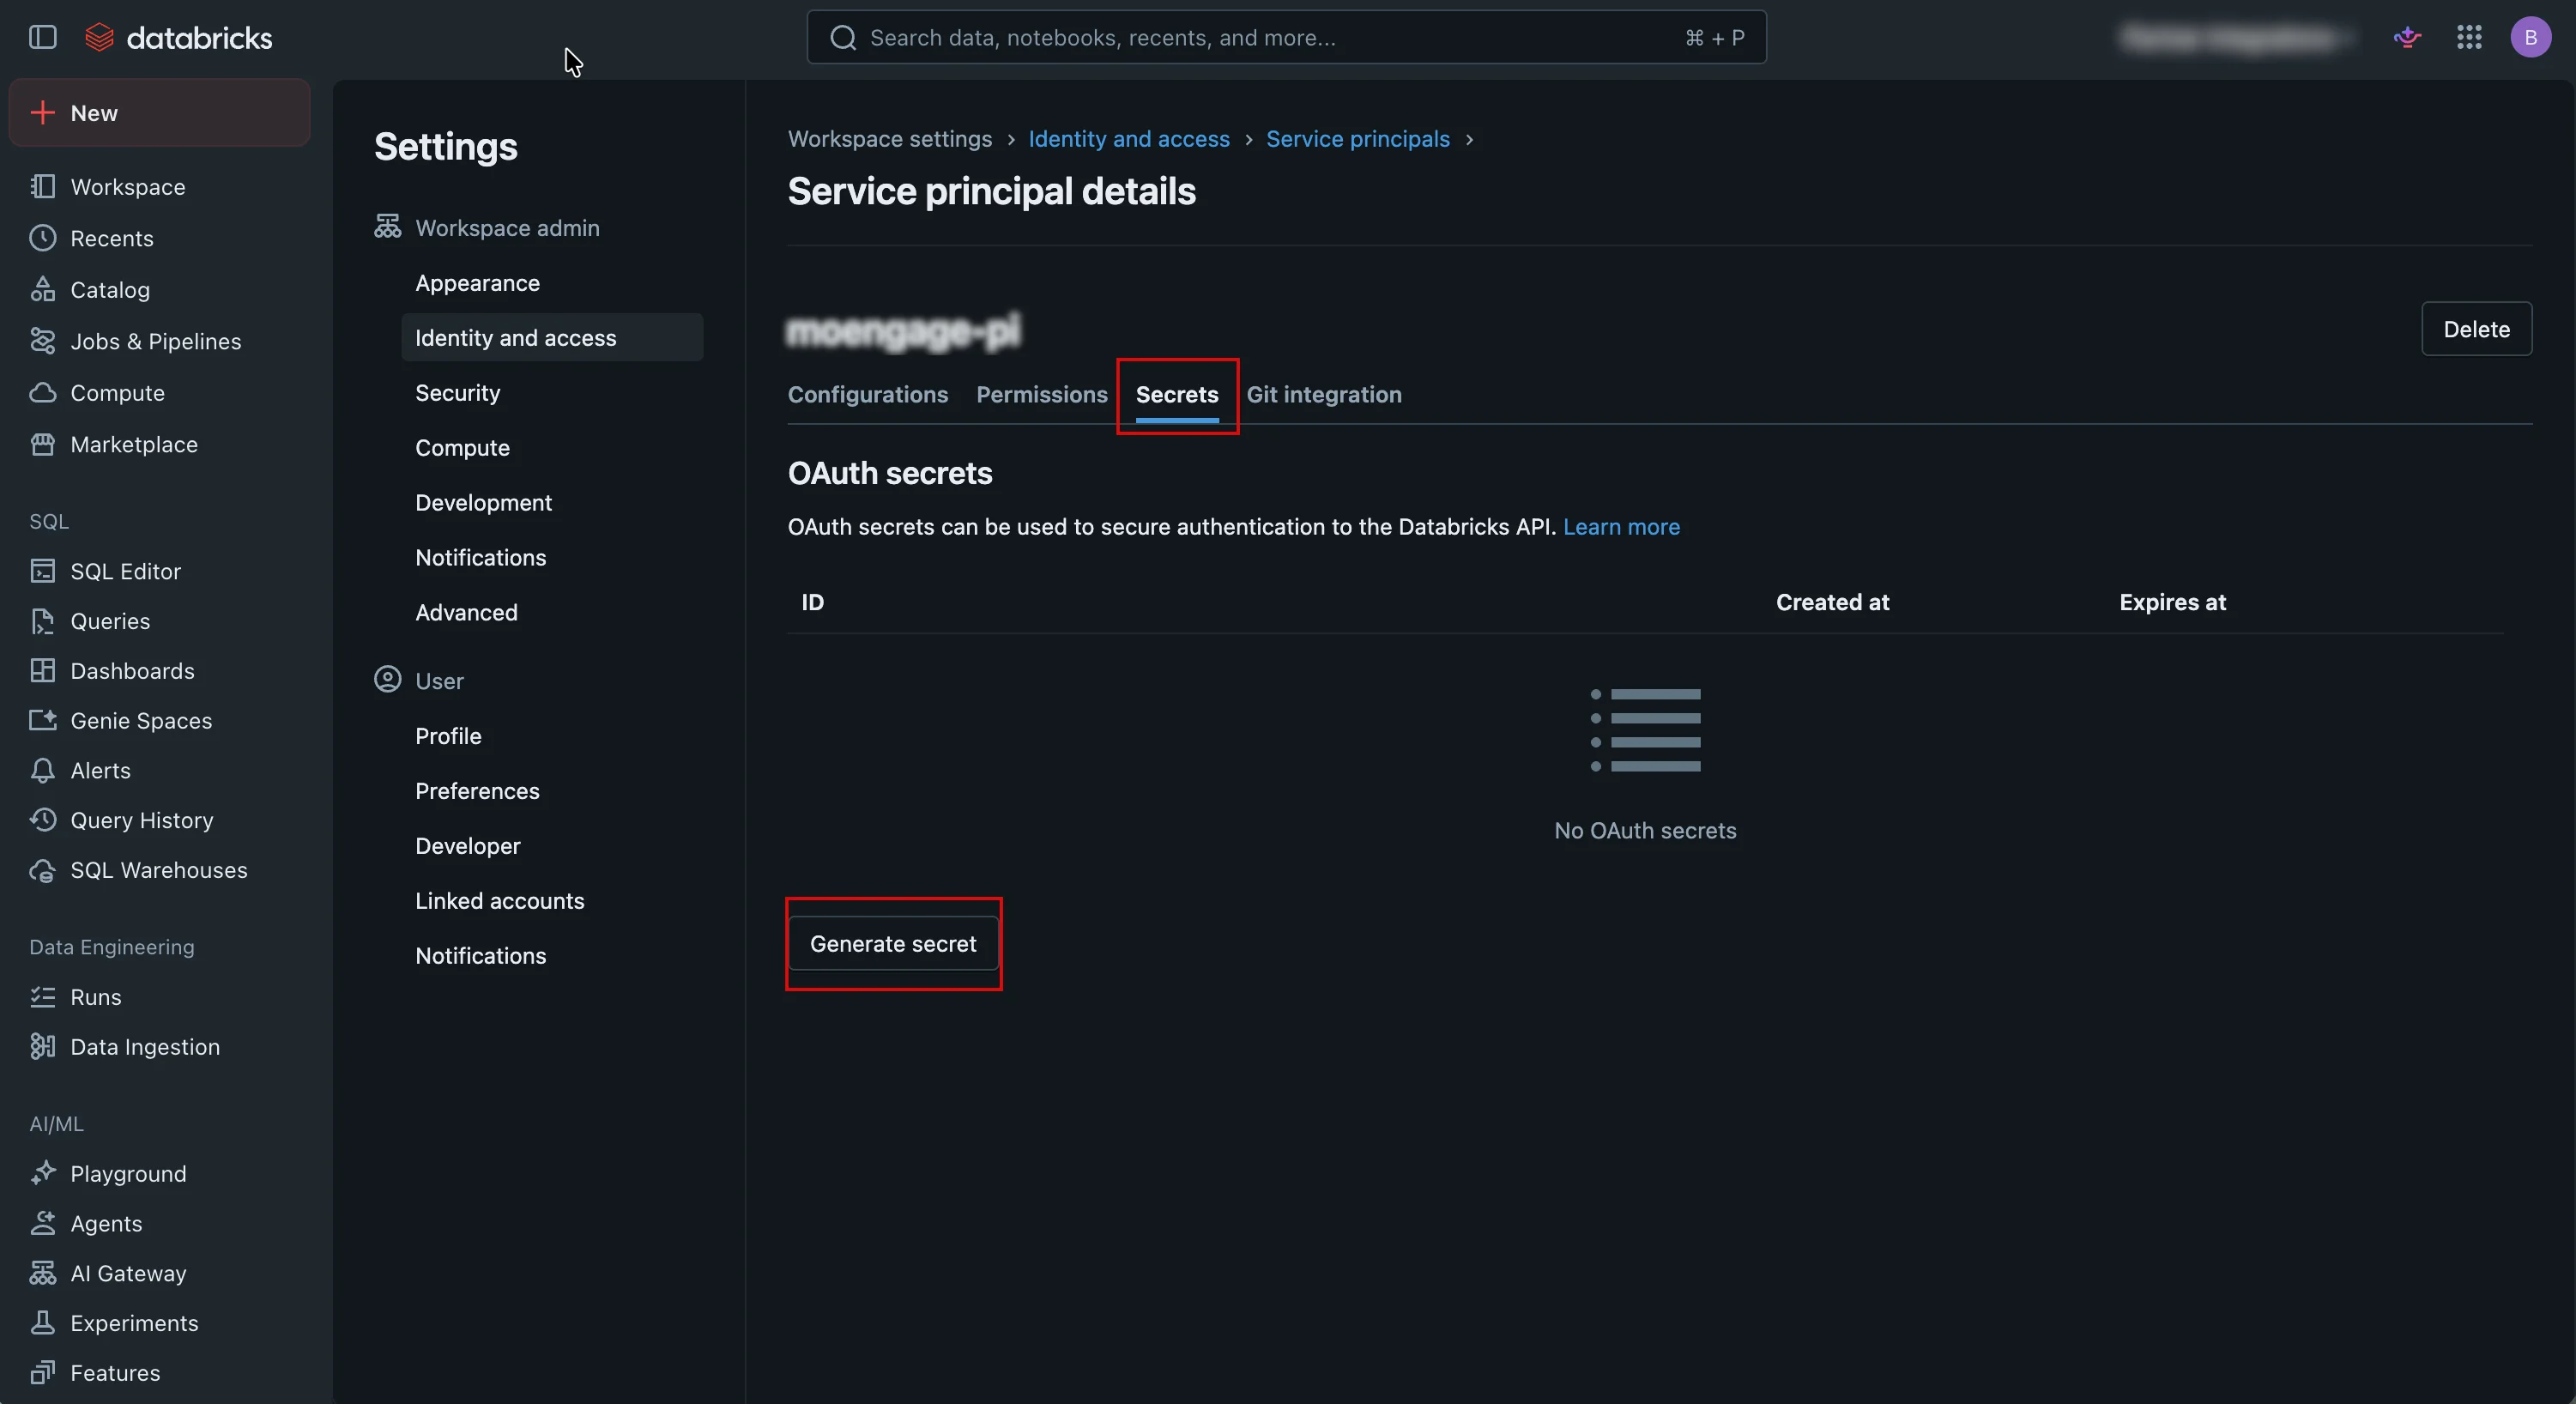 4. In the **Lifetime (days)** box, type a lifetime (you must specify a value between 1 and 730 days; the default setting is 365 days).
5. Click **Generate**.
4. In the **Lifetime (days)** box, type a lifetime (you must specify a value between 1 and 730 days; the default setting is 365 days).
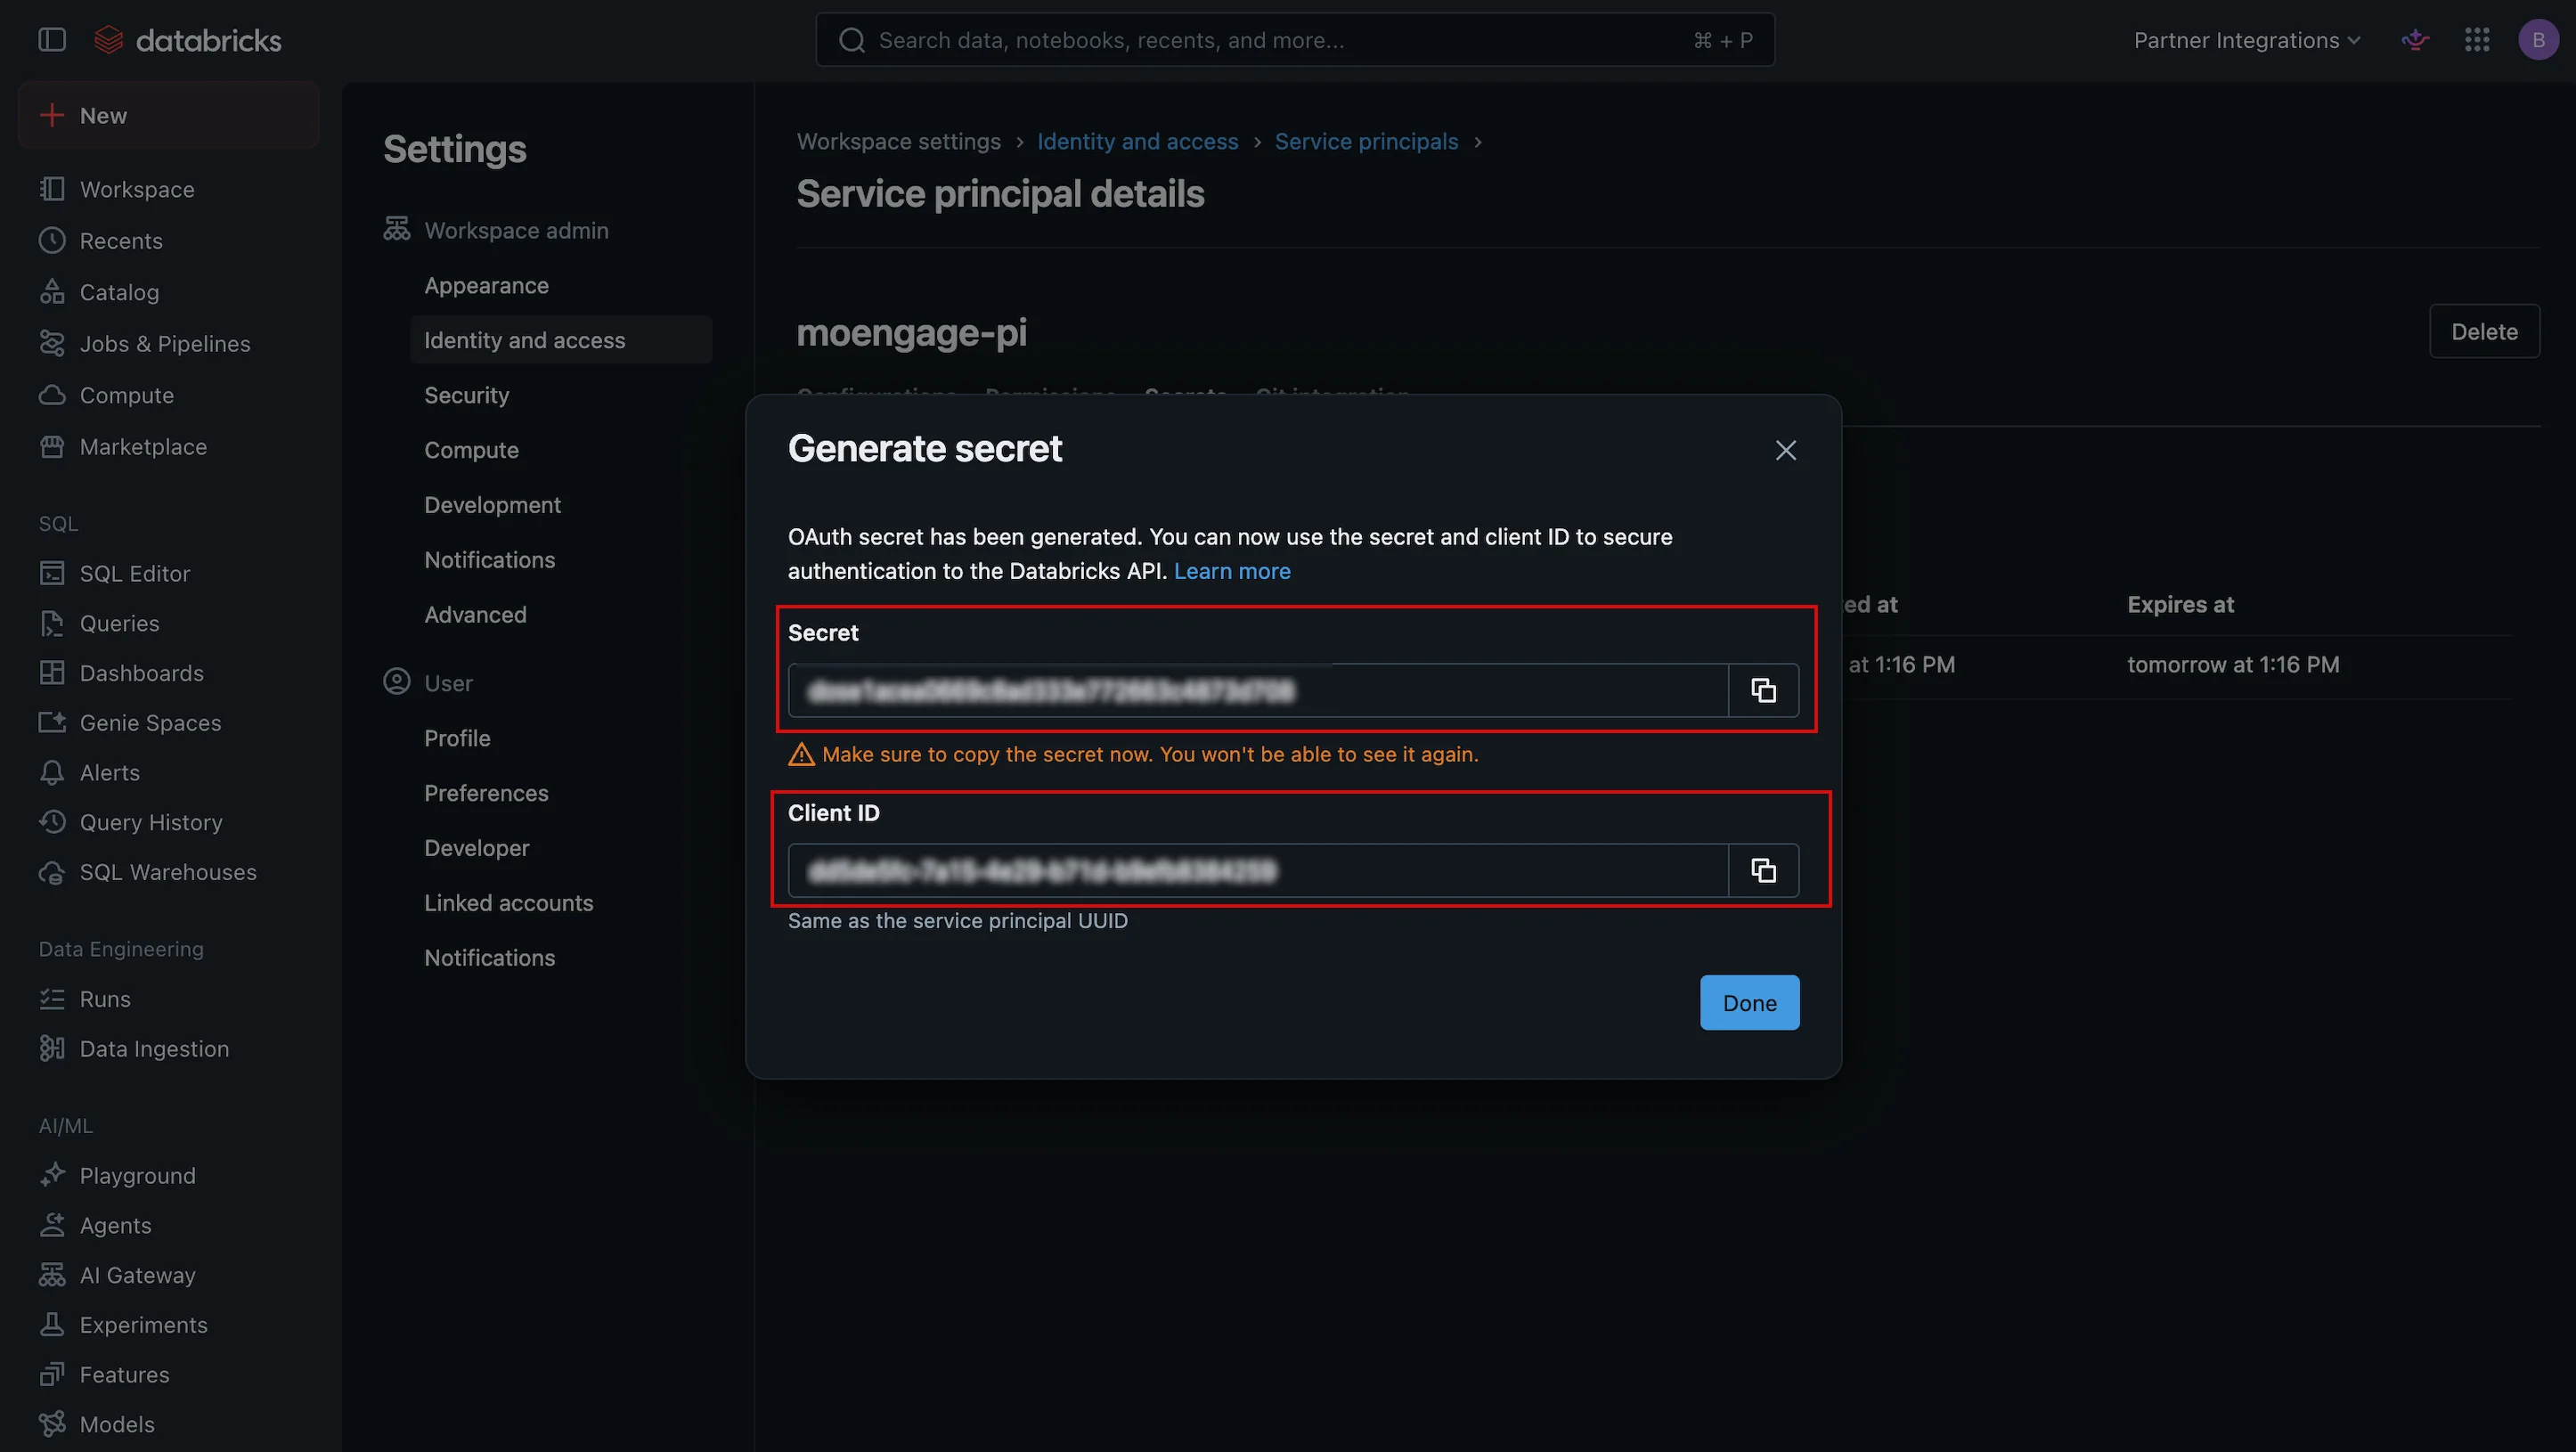
5. Click **Generate**. 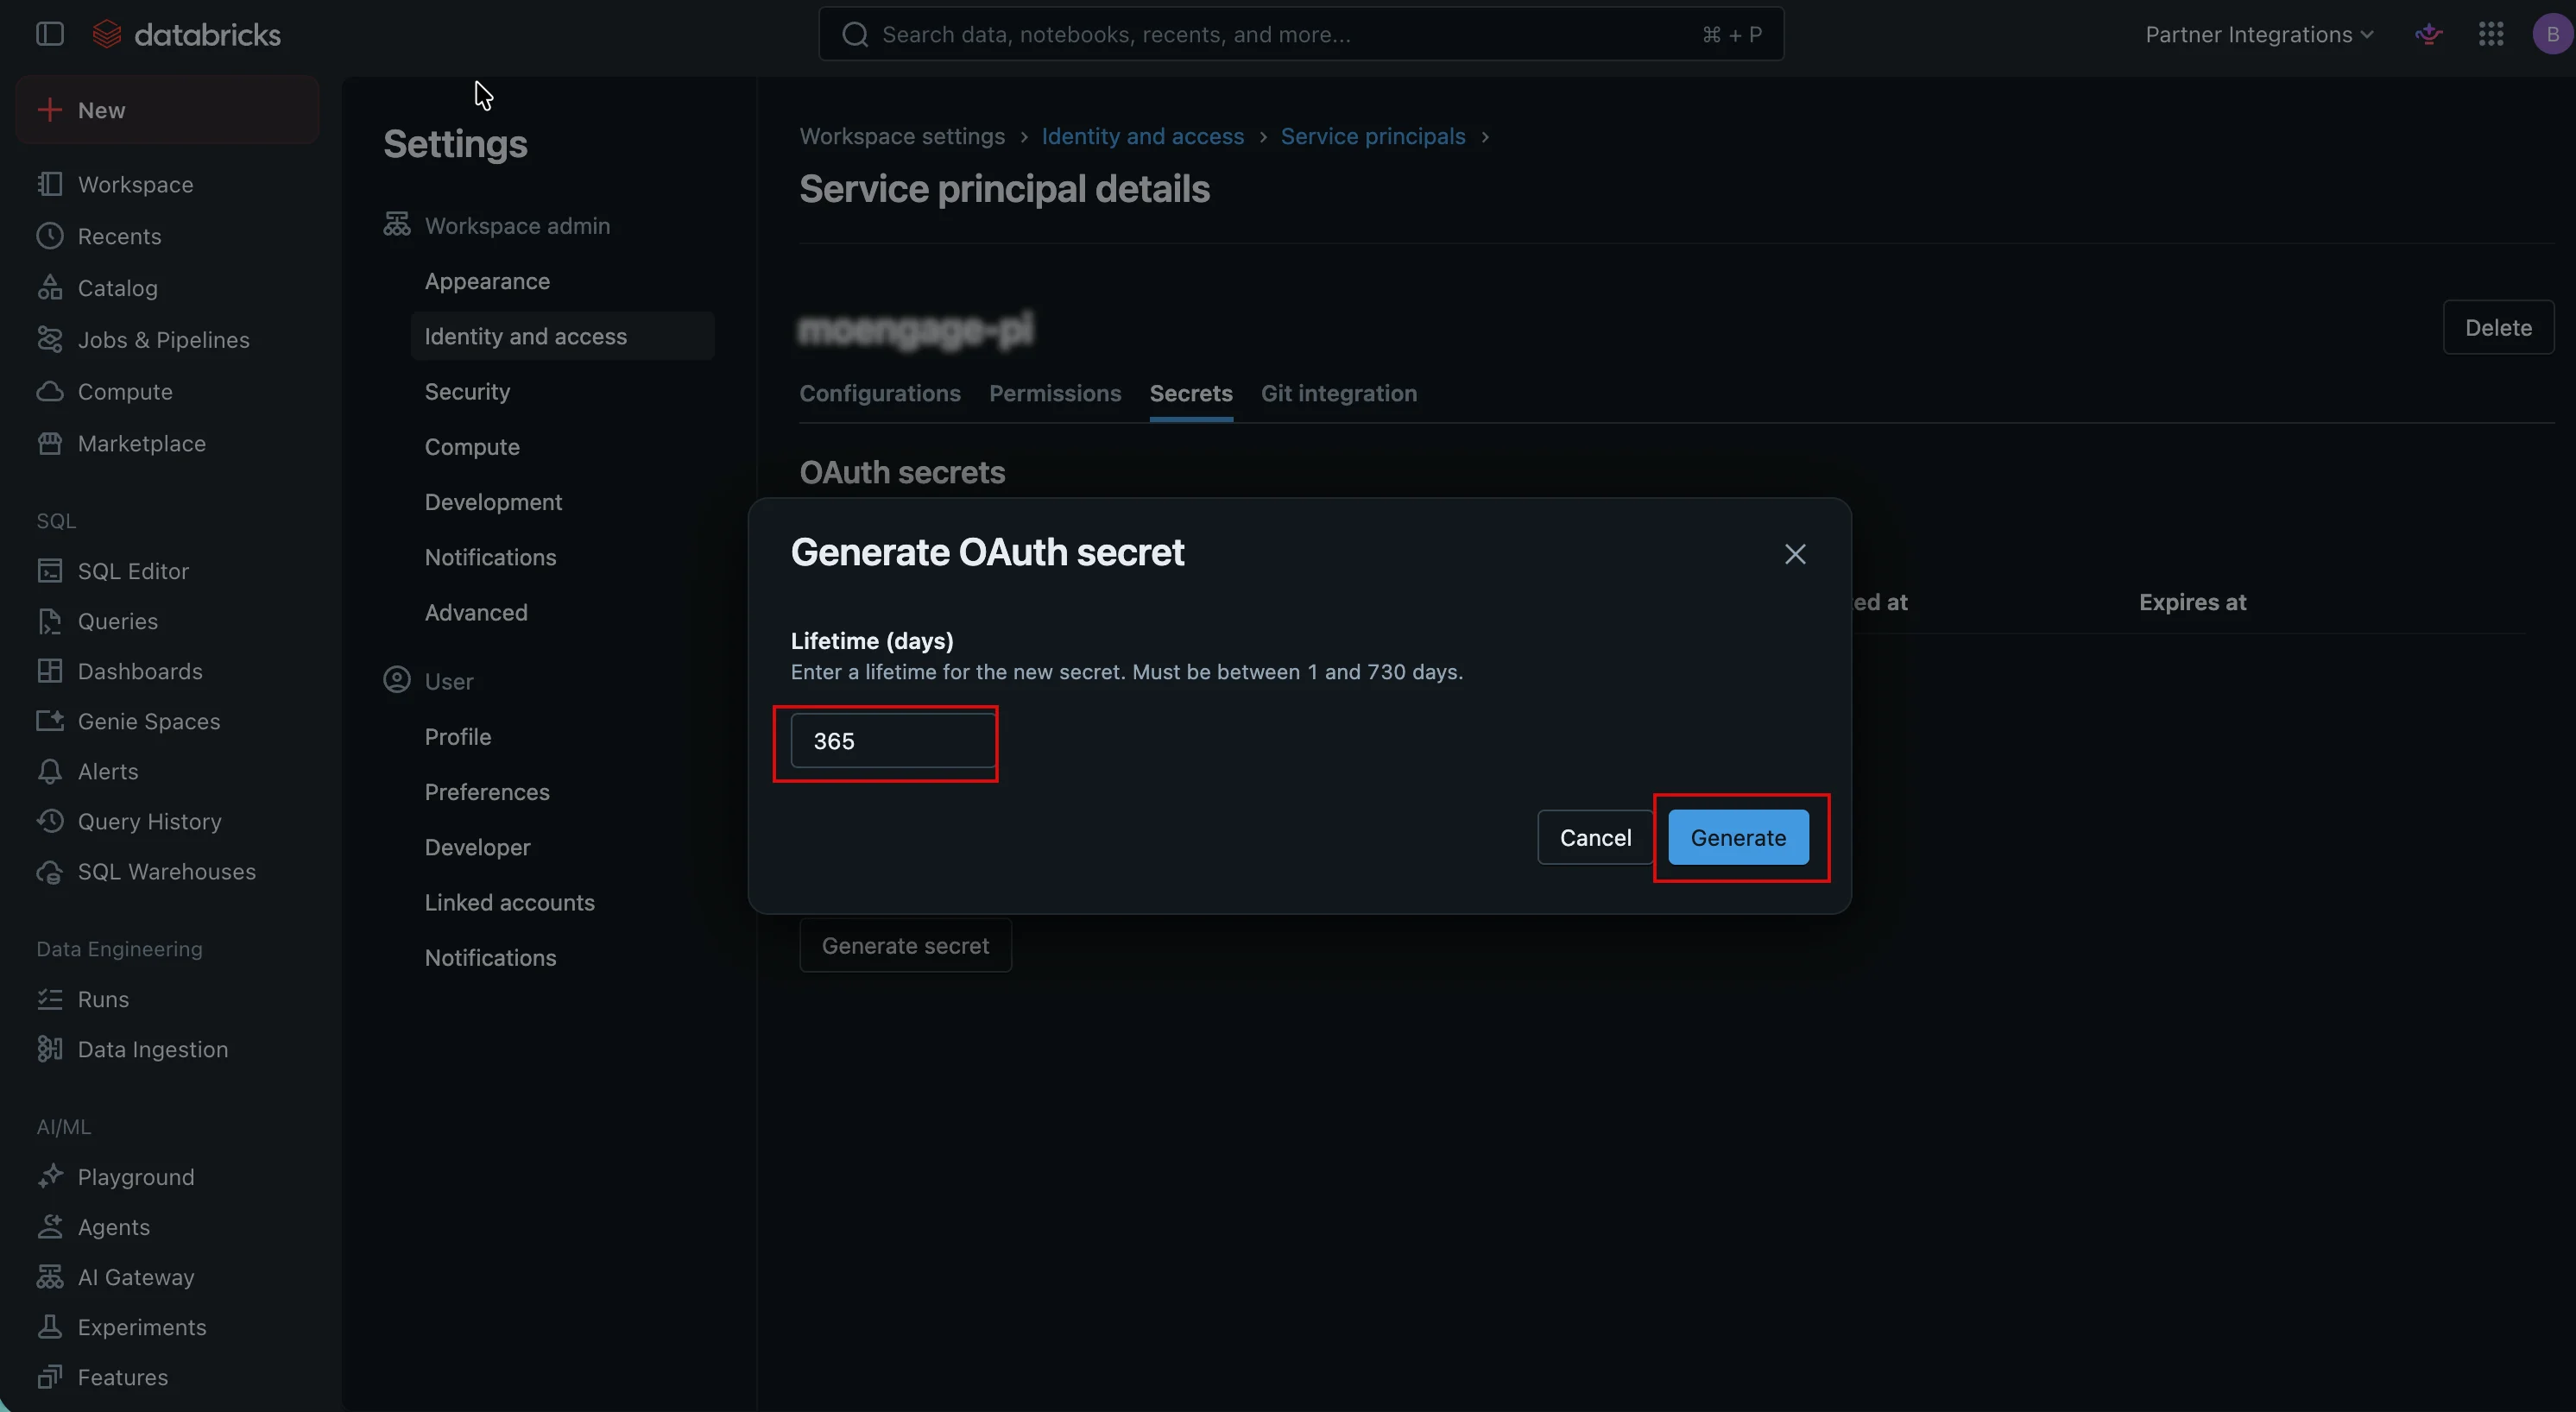 Copy the generated `client_id` and `client_secret` immediately and save them in a secure location. Databricks does not display the secret value again. Use these values during the OAuth authentication setup on MoEngage.
 Note the following cloud-specific considerations:
* **Azure**: If you are using a Microsoft Entra ID app, sync it to the Databricks workspace as a service principal first, and then generate a Databricks-managed OAuth secret on it. The client ID to be pasted into MoEngage is the Databricks-side ID, not the Azure Active Directory (AAD) app ID.
* **GCP**: Google service-account IAM constraints are managed independently. MoEngage only consumes the Databricks OAuth credentials.
* **Private Deployments / Custom Domains**: If your workspace uses a custom OAuth token endpoint that differs from the workspace host, locate and copy the custom endpoint URL. Enter it in the optional **OAuth Token Endpoint** field on MoEngage.
A personal access token (PAT) inherits all the privileges of the identity that issues it. You can generate a PAT for either a dedicated service principal or a dedicated user.
**Enable personal access tokens (one-time setup)**
1. Sign in to Databricks as a workspace administrator.
2. Go to **Settings** > **Advanced** > **Personal Access Tokens** and ensure the feature is enabled.
3. (Optional but recommended) Under **Permission settings**, restrict which users or service principals can create tokens.
**Choose the identity for the token**
* **Dedicated service principal (recommended)**: This identity is not tied to a specific person, uses least-privilege principles, and survives employee turnover. You must generate service-principal tokens by using the Databricks CLI or the Token Management API, because service principals cannot sign in to the user interface.
* **Dedicated user**: This method is generated in the user interface. However, the token carries that user's full permissions and stops working if the user is deactivated.
**Generate the Token**
* **User token via the user interface:**
1. In your Databricks workspace, select your Databricks username in the title bar, and then select **Settings** from the list.
2. On the **Access Tokens** tab, select **Generate New Token**.
3. Enter a comment to identify this token, and change the token's lifetime to no lifetime by leaving the Lifetime box empty.
4. Click **Generate** and copy the generated token.
5. Click **Done**.
Note the following cloud-specific considerations:
* **Azure**: If you are using a Microsoft Entra ID app, sync it to the Databricks workspace as a service principal first, and then generate a Databricks-managed OAuth secret on it. The client ID to be pasted into MoEngage is the Databricks-side ID, not the Azure Active Directory (AAD) app ID.
* **GCP**: Google service-account IAM constraints are managed independently. MoEngage only consumes the Databricks OAuth credentials.
* **Private Deployments / Custom Domains**: If your workspace uses a custom OAuth token endpoint that differs from the workspace host, locate and copy the custom endpoint URL. Enter it in the optional **OAuth Token Endpoint** field on MoEngage.
A personal access token (PAT) inherits all the privileges of the identity that issues it. You can generate a PAT for either a dedicated service principal or a dedicated user.
**Enable personal access tokens (one-time setup)**
1. Sign in to Databricks as a workspace administrator.
2. Go to **Settings** > **Advanced** > **Personal Access Tokens** and ensure the feature is enabled.
3. (Optional but recommended) Under **Permission settings**, restrict which users or service principals can create tokens.
**Choose the identity for the token**
* **Dedicated service principal (recommended)**: This identity is not tied to a specific person, uses least-privilege principles, and survives employee turnover. You must generate service-principal tokens by using the Databricks CLI or the Token Management API, because service principals cannot sign in to the user interface.
* **Dedicated user**: This method is generated in the user interface. However, the token carries that user's full permissions and stops working if the user is deactivated.
**Generate the Token**
* **User token via the user interface:**
1. In your Databricks workspace, select your Databricks username in the title bar, and then select **Settings** from the list.
2. On the **Access Tokens** tab, select **Generate New Token**.
3. Enter a comment to identify this token, and change the token's lifetime to no lifetime by leaving the Lifetime box empty.
4. Click **Generate** and copy the generated token.
5. Click **Done**. 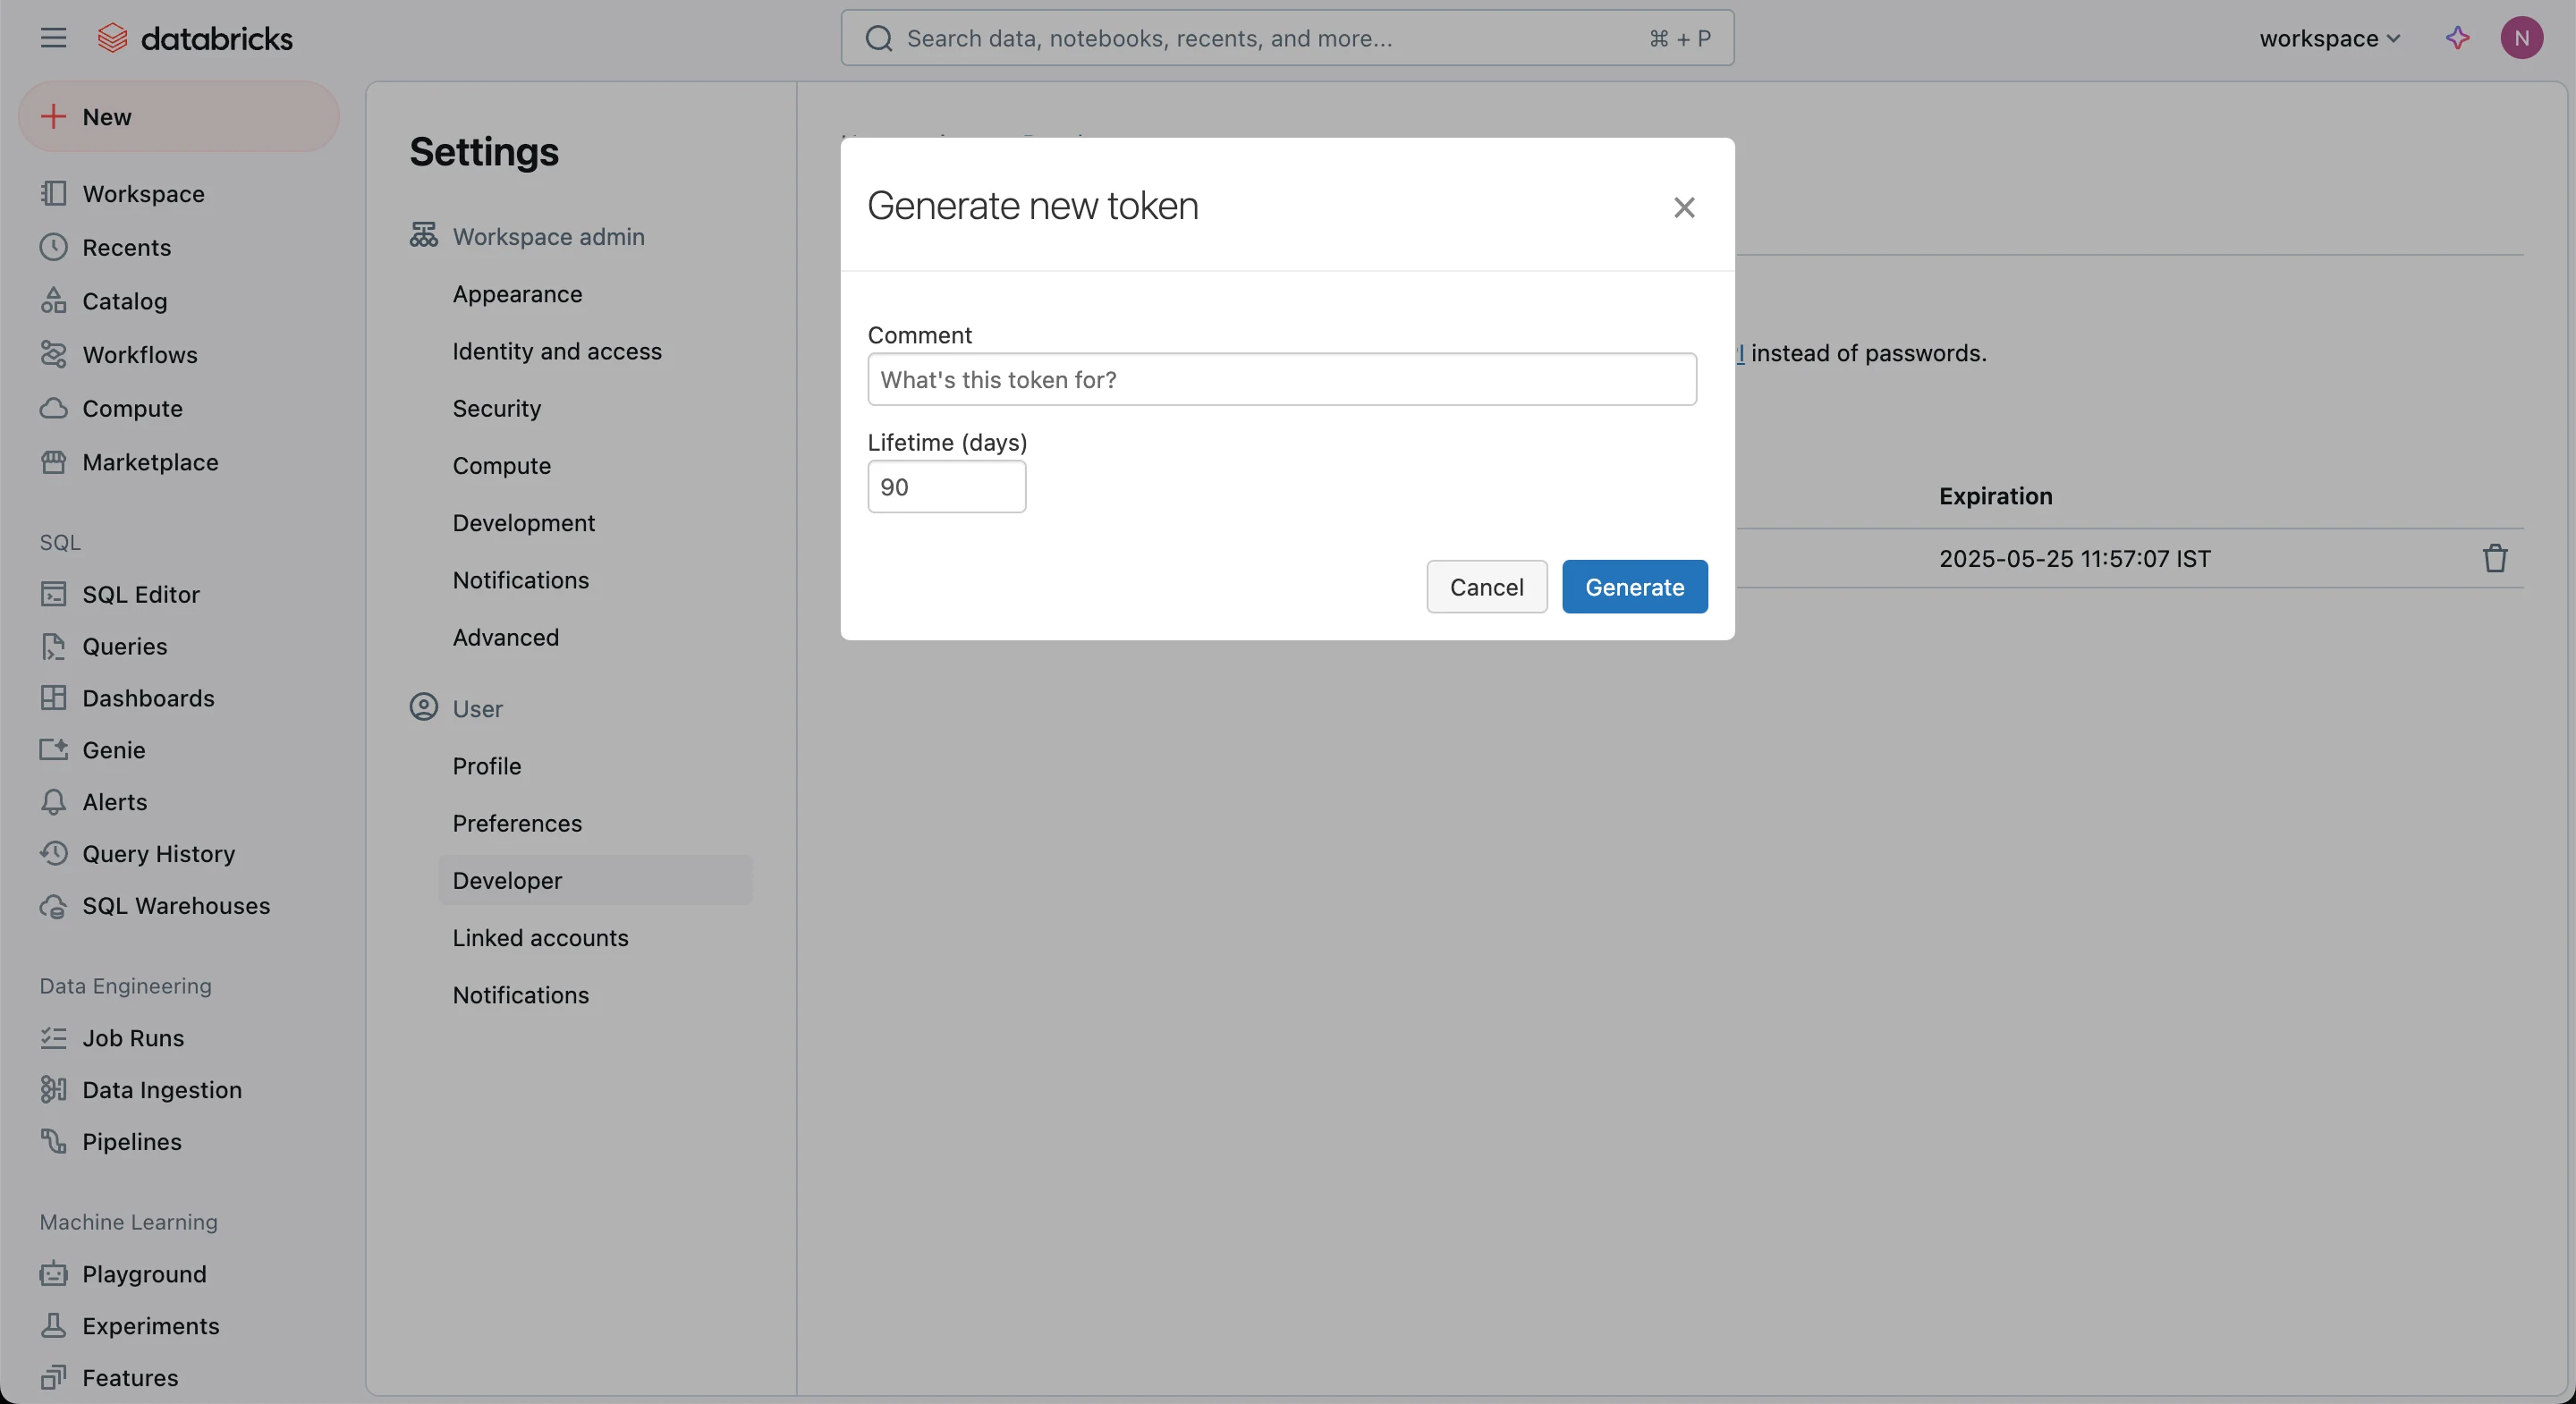 * **Service-principal token via the Databricks CLI:** Run the following command in your terminal:
```bash Databricks CLI Token Creation theme={null}
databricks tokens create \
--lifetime-seconds \
--comment "" \
-p
```
Copy the returned `token_value` immediately, because it is displayed only once.
## Part B: Grant Permissions
The required data permissions remain the same regardless of your chosen authentication method. Throughout this section, `` represents either:
* The service principal's application ID (if using OAuth or a Service Principal PAT).
* The user's email address (if using a User PAT).
You must assign the **Can use** permission on the SQL warehouse referenced in your connection path. To set this in the Databricks user interface, go to **SQL Warehouses** > **\** > **Permissions**, and then add the `` with the **Can use** permission.
To run queries on data from Databricks, import data into MoEngage, or use the Warehouse Segments feature, you must connect to your Databricks warehouse. Ensure you have administrative privileges on the Databricks platform and that your credentials do not expire.
**Provide Data Reader Access to the Service Principal**
To provide data reader access to the service principal, execute the following SQL query in Databricks:
```sql Catalog SQL Permission theme={null}
GRANT USE CATALOG ON CATALOG TO ``;
```
* **Service-principal token via the Databricks CLI:** Run the following command in your terminal:
```bash Databricks CLI Token Creation theme={null}
databricks tokens create \
--lifetime-seconds \
--comment "" \
-p
```
Copy the returned `token_value` immediately, because it is displayed only once.
## Part B: Grant Permissions
The required data permissions remain the same regardless of your chosen authentication method. Throughout this section, `` represents either:
* The service principal's application ID (if using OAuth or a Service Principal PAT).
* The user's email address (if using a User PAT).
You must assign the **Can use** permission on the SQL warehouse referenced in your connection path. To set this in the Databricks user interface, go to **SQL Warehouses** > **\** > **Permissions**, and then add the `` with the **Can use** permission.
To run queries on data from Databricks, import data into MoEngage, or use the Warehouse Segments feature, you must connect to your Databricks warehouse. Ensure you have administrative privileges on the Databricks platform and that your credentials do not expire.
**Provide Data Reader Access to the Service Principal**
To provide data reader access to the service principal, execute the following SQL query in Databricks:
```sql Catalog SQL Permission theme={null}
GRANT USE CATALOG ON CATALOG TO ``;
```
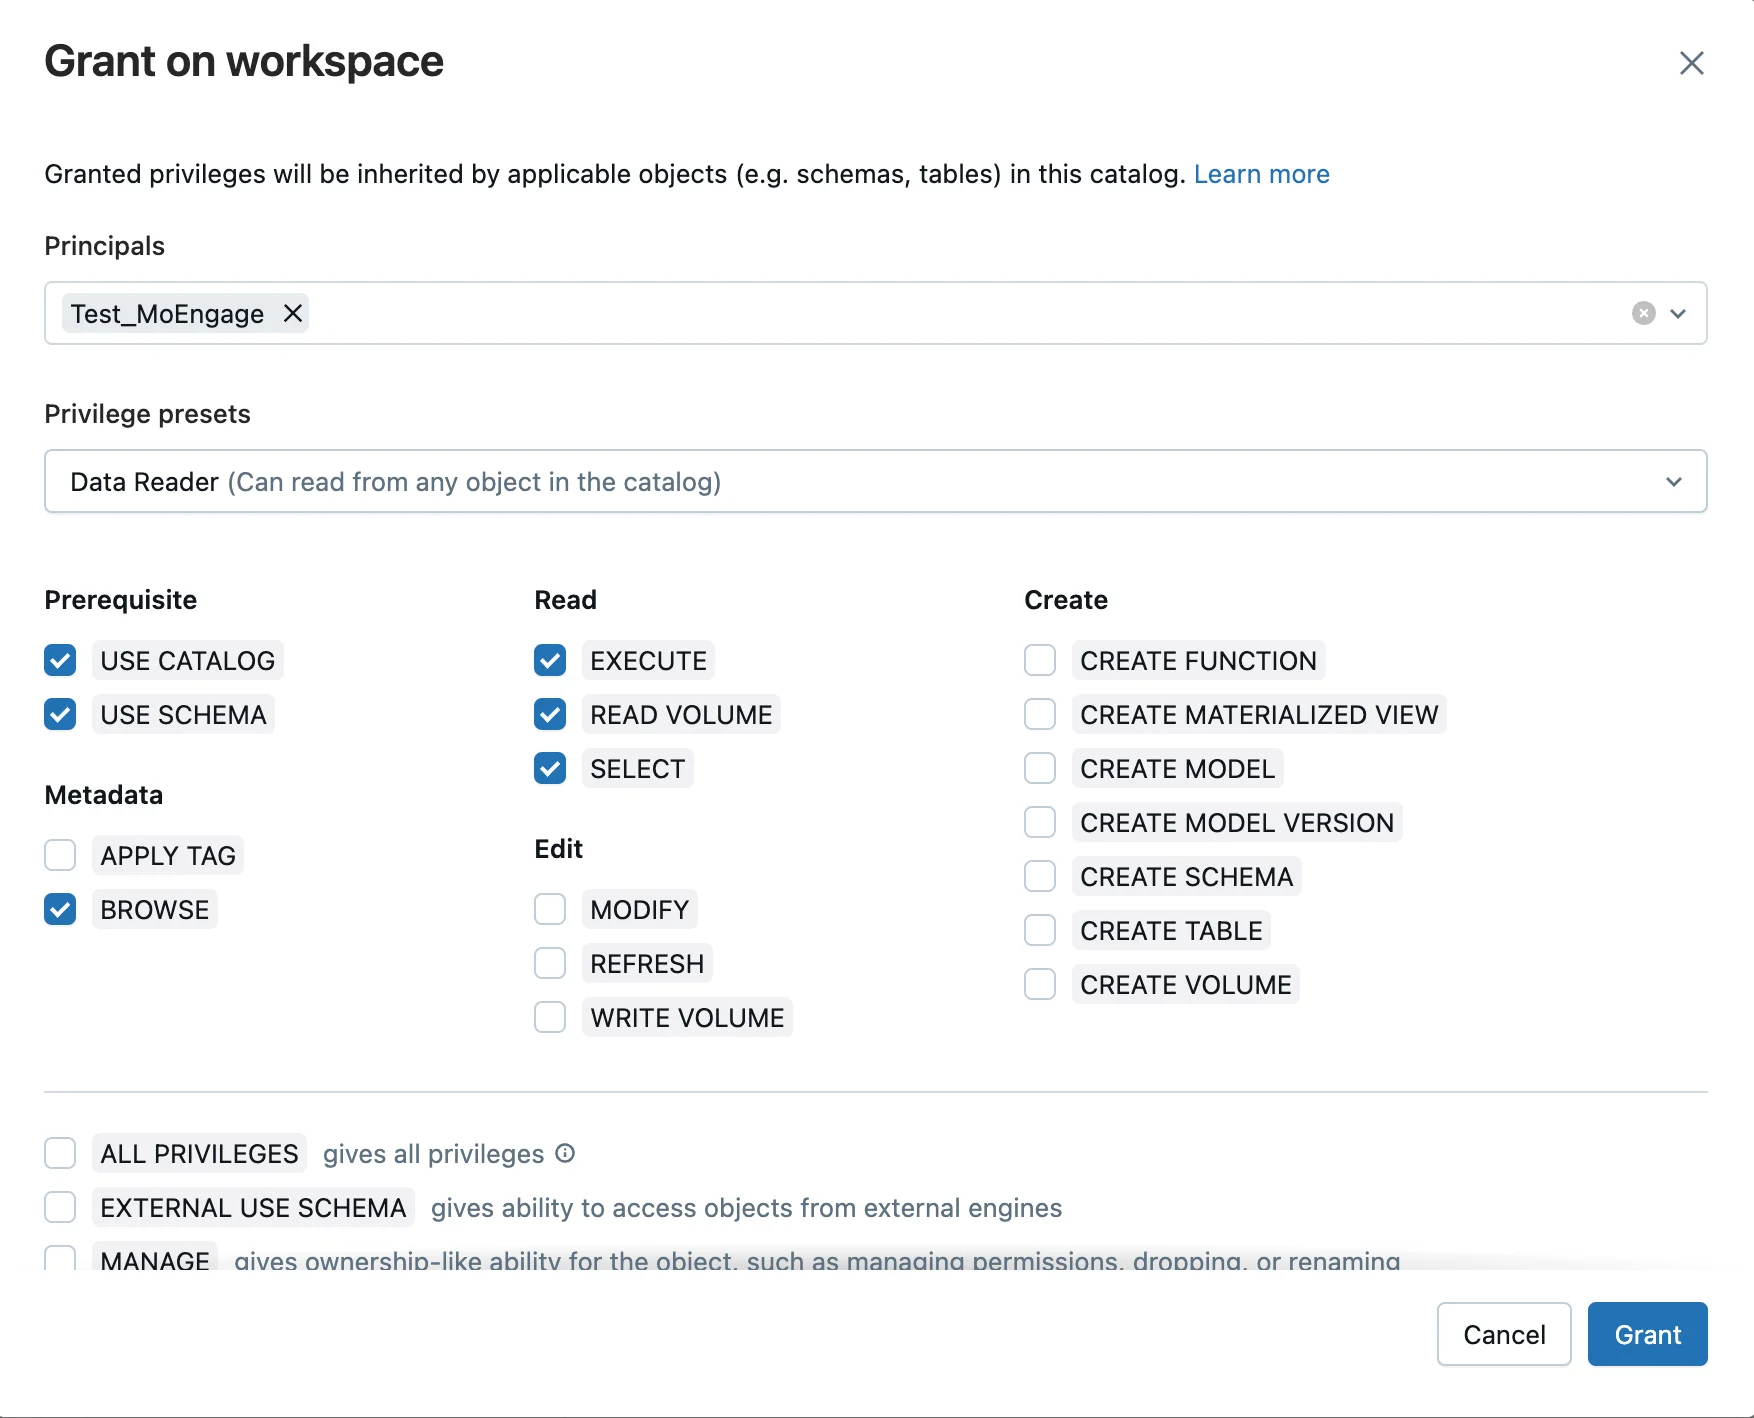 **Bare Minimum Grants (One Source Table)**
To grant bare minimum permissions for one source table, execute the following SQL queries in Databricks:
```sql wrap theme={null}
GRANT USE SCHEMA ON SCHEMA . TO ``;
GRANT SELECT ON TABLE .. TO ``;
```
The service principal does not require `MODIFY`, `CREATE TABLE`, or any write permissions for imports.
**Optional Convenience Grant for All Current and Future Tables**
To grant schema-wide access to avoid setting permissions manually for each new source table, execute the following SQL query in Databricks:
```sql theme={null}
GRANT SELECT ON SCHEMA . TO ``;
```
This schema-wide authorization is broader than the single-table approach. You can choose either the table-level approach or the schema-level approach, but do not configure both.
To export data from MoEngage to Databricks, you must connect MoEngage to your Databricks warehouse. Ensure you have administrative privileges on the Databricks platform and that your credentials do not expire.
**Provide Write Access to the Service Principal**
To provide write access to the service principal, execute the following SQL query in Databricks:
```sql Catalog SQL Permission theme={null}
GRANT USE CATALOG ON CATALOG TO ``;
```
**Bare Minimum Grants (One Source Table)**
To grant bare minimum permissions for one source table, execute the following SQL queries in Databricks:
```sql wrap theme={null}
GRANT USE SCHEMA ON SCHEMA . TO ``;
GRANT SELECT ON TABLE .. TO ``;
```
The service principal does not require `MODIFY`, `CREATE TABLE`, or any write permissions for imports.
**Optional Convenience Grant for All Current and Future Tables**
To grant schema-wide access to avoid setting permissions manually for each new source table, execute the following SQL query in Databricks:
```sql theme={null}
GRANT SELECT ON SCHEMA . TO ``;
```
This schema-wide authorization is broader than the single-table approach. You can choose either the table-level approach or the schema-level approach, but do not configure both.
To export data from MoEngage to Databricks, you must connect MoEngage to your Databricks warehouse. Ensure you have administrative privileges on the Databricks platform and that your credentials do not expire.
**Provide Write Access to the Service Principal**
To provide write access to the service principal, execute the following SQL query in Databricks:
```sql Catalog SQL Permission theme={null}
GRANT USE CATALOG ON CATALOG TO ``;
```
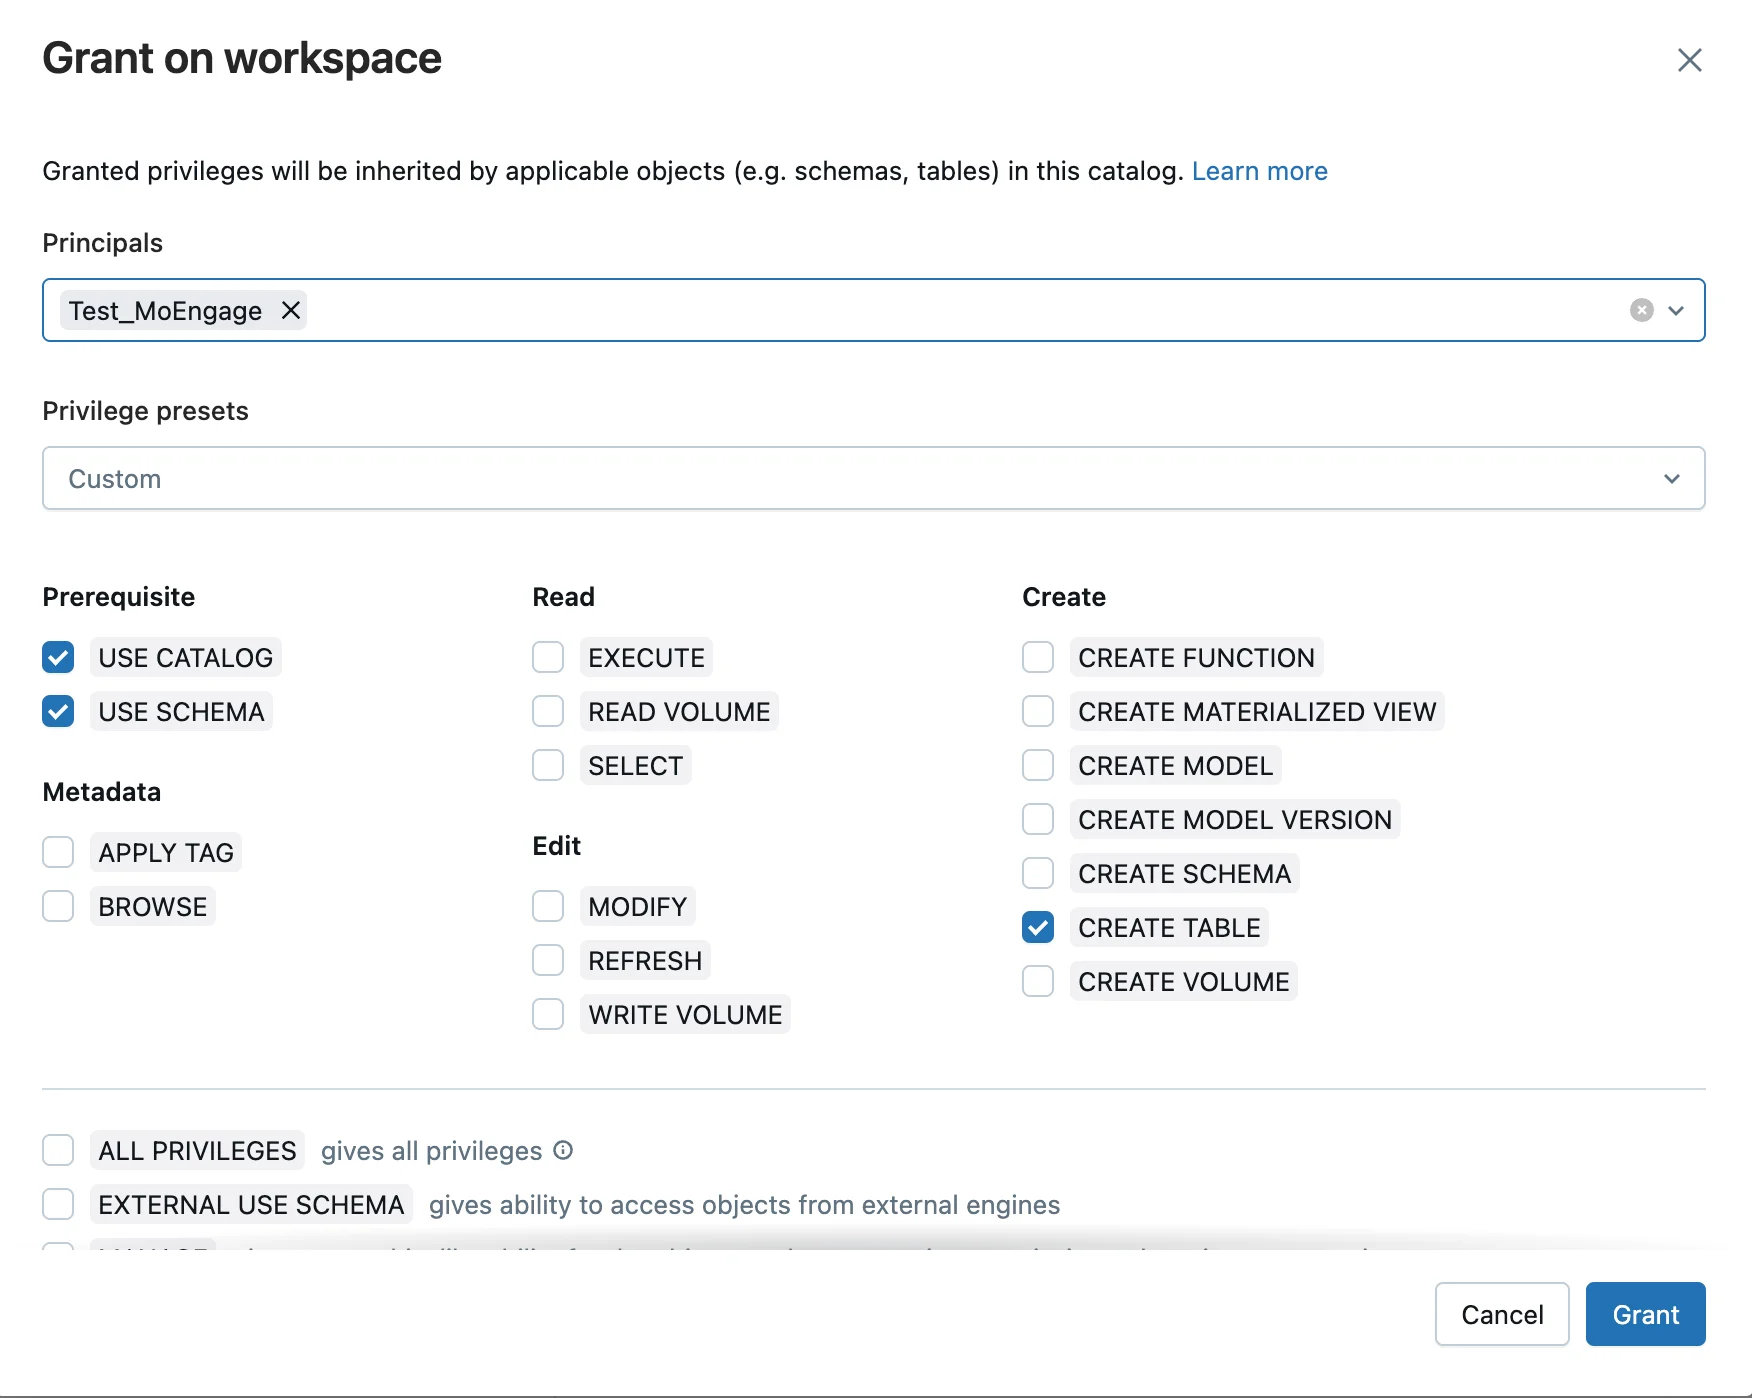 **Bare Minimum Grants (MoEngage Creates the Table)**
To authorize MoEngage to create and write to the target table automatically, execute the following SQL commands to grant schema-level permissions:
```sql Export SQL Permissions wrap theme={null}
GRANT USE SCHEMA ON SCHEMA . TO ``;
GRANT CREATE TABLE ON SCHEMA . TO ``;
```
Unity Catalog automatically assigns ownership of the new table to the service principal that runs the `CREATE TABLE` command. This ownership implicitly grants the service principal the necessary `MODIFY`, `SELECT`, and `DROP` privileges required for subsequent bulk inserts and updates.
**Optional Convenience Grant for All Current and Future Tables**
To grant schema-wide write permissions, execute the following SQL query in Databricks:
```sql theme={null}
GRANT MODIFY ON SCHEMA . TO ``;
```
This schema-level grant is broader than the single-table approach. You can choose either the table-level or the schema-level approach, but do not configure both.
## Part C: Token and Secret Management
To maintain a secure connection, use the following procedures to manage and rotate your authentication credentials.
### Personal Access Token (PAT) lifetime and rotation
Unlike OAuth credentials, PATs are static and do not refresh automatically. When a token expires or is revoked, the MoEngage connection stops working until you update it. Set a token lifetime that aligns with your corporate security policy and avoid using no-expiry tokens.
To rotate an expiring or compromised PAT, perform the following steps:
1. Generate a new token in Databricks (see Method 2: Personal Access Token (PAT) for detailed generation steps).
2. Copy the newly generated token.
3. Sign in to your MoEngage dashboard, go to the active connection, click **Edit**, and then paste the new token in the **Access token** box.
4. Click **Save**.
5. Revoke the old token in the Databricks workspace immediately to terminate outdated access.
### Rotate the Client Secret
To rotate the service principal client secret, perform the following steps:
1. In Databricks, generate a new secret for the service principal (click **Service principals** > **Secrets** > **Generate secret**).
2. Copy the newly generated `client_secret`.
3. In the MoEngage dashboard, open the active connection, click **Edit**, paste the new `client_secret`, and then click **Save**.
4. (Optional) After you verify that the new secret works correctly, revoke the old secret in Databricks.
MoEngage does not poll for secret changes. The next scheduled MoEngage sync job that starts after you save the configuration automatically uses the new secret.
Active jobs that run during the secret rotation continue to use the old token until the token expires (typically one hour or less). These jobs might experience brief, temporary token refresh failures during the rotation window, but the next scheduled run completes successfully.
### Switch between a Personal Access Token (PAT) and OAuth
If you change your authentication type, your existing credentials will be lost. For example, switching from a Personal Access Token (PAT) to OAuth permanently deletes the existing token. If you want to switch back later, you must generate and paste a new PAT into MoEngage. The updated connection details take effect starting with the next scheduled job. Active jobs continue to use the credentials retrieved at startup.
## Step 2: Obtain Databricks Credentials for App Marketplace Integration
To obtain Databricks credentials for the App Marketplace, perform the following steps:
1. Sign in to your Databricks account.
2. On the left navigation menu, click the **SQL Warehouses** tab.
3. Click **Serverless Starter Warehouse**.
**Bare Minimum Grants (MoEngage Creates the Table)**
To authorize MoEngage to create and write to the target table automatically, execute the following SQL commands to grant schema-level permissions:
```sql Export SQL Permissions wrap theme={null}
GRANT USE SCHEMA ON SCHEMA . TO ``;
GRANT CREATE TABLE ON SCHEMA . TO ``;
```
Unity Catalog automatically assigns ownership of the new table to the service principal that runs the `CREATE TABLE` command. This ownership implicitly grants the service principal the necessary `MODIFY`, `SELECT`, and `DROP` privileges required for subsequent bulk inserts and updates.
**Optional Convenience Grant for All Current and Future Tables**
To grant schema-wide write permissions, execute the following SQL query in Databricks:
```sql theme={null}
GRANT MODIFY ON SCHEMA . TO ``;
```
This schema-level grant is broader than the single-table approach. You can choose either the table-level or the schema-level approach, but do not configure both.
## Part C: Token and Secret Management
To maintain a secure connection, use the following procedures to manage and rotate your authentication credentials.
### Personal Access Token (PAT) lifetime and rotation
Unlike OAuth credentials, PATs are static and do not refresh automatically. When a token expires or is revoked, the MoEngage connection stops working until you update it. Set a token lifetime that aligns with your corporate security policy and avoid using no-expiry tokens.
To rotate an expiring or compromised PAT, perform the following steps:
1. Generate a new token in Databricks (see Method 2: Personal Access Token (PAT) for detailed generation steps).
2. Copy the newly generated token.
3. Sign in to your MoEngage dashboard, go to the active connection, click **Edit**, and then paste the new token in the **Access token** box.
4. Click **Save**.
5. Revoke the old token in the Databricks workspace immediately to terminate outdated access.
### Rotate the Client Secret
To rotate the service principal client secret, perform the following steps:
1. In Databricks, generate a new secret for the service principal (click **Service principals** > **Secrets** > **Generate secret**).
2. Copy the newly generated `client_secret`.
3. In the MoEngage dashboard, open the active connection, click **Edit**, paste the new `client_secret`, and then click **Save**.
4. (Optional) After you verify that the new secret works correctly, revoke the old secret in Databricks.
MoEngage does not poll for secret changes. The next scheduled MoEngage sync job that starts after you save the configuration automatically uses the new secret.
Active jobs that run during the secret rotation continue to use the old token until the token expires (typically one hour or less). These jobs might experience brief, temporary token refresh failures during the rotation window, but the next scheduled run completes successfully.
### Switch between a Personal Access Token (PAT) and OAuth
If you change your authentication type, your existing credentials will be lost. For example, switching from a Personal Access Token (PAT) to OAuth permanently deletes the existing token. If you want to switch back later, you must generate and paste a new PAT into MoEngage. The updated connection details take effect starting with the next scheduled job. Active jobs continue to use the credentials retrieved at startup.
## Step 2: Obtain Databricks Credentials for App Marketplace Integration
To obtain Databricks credentials for the App Marketplace, perform the following steps:
1. Sign in to your Databricks account.
2. On the left navigation menu, click the **SQL Warehouses** tab.
3. Click **Serverless Starter Warehouse**. 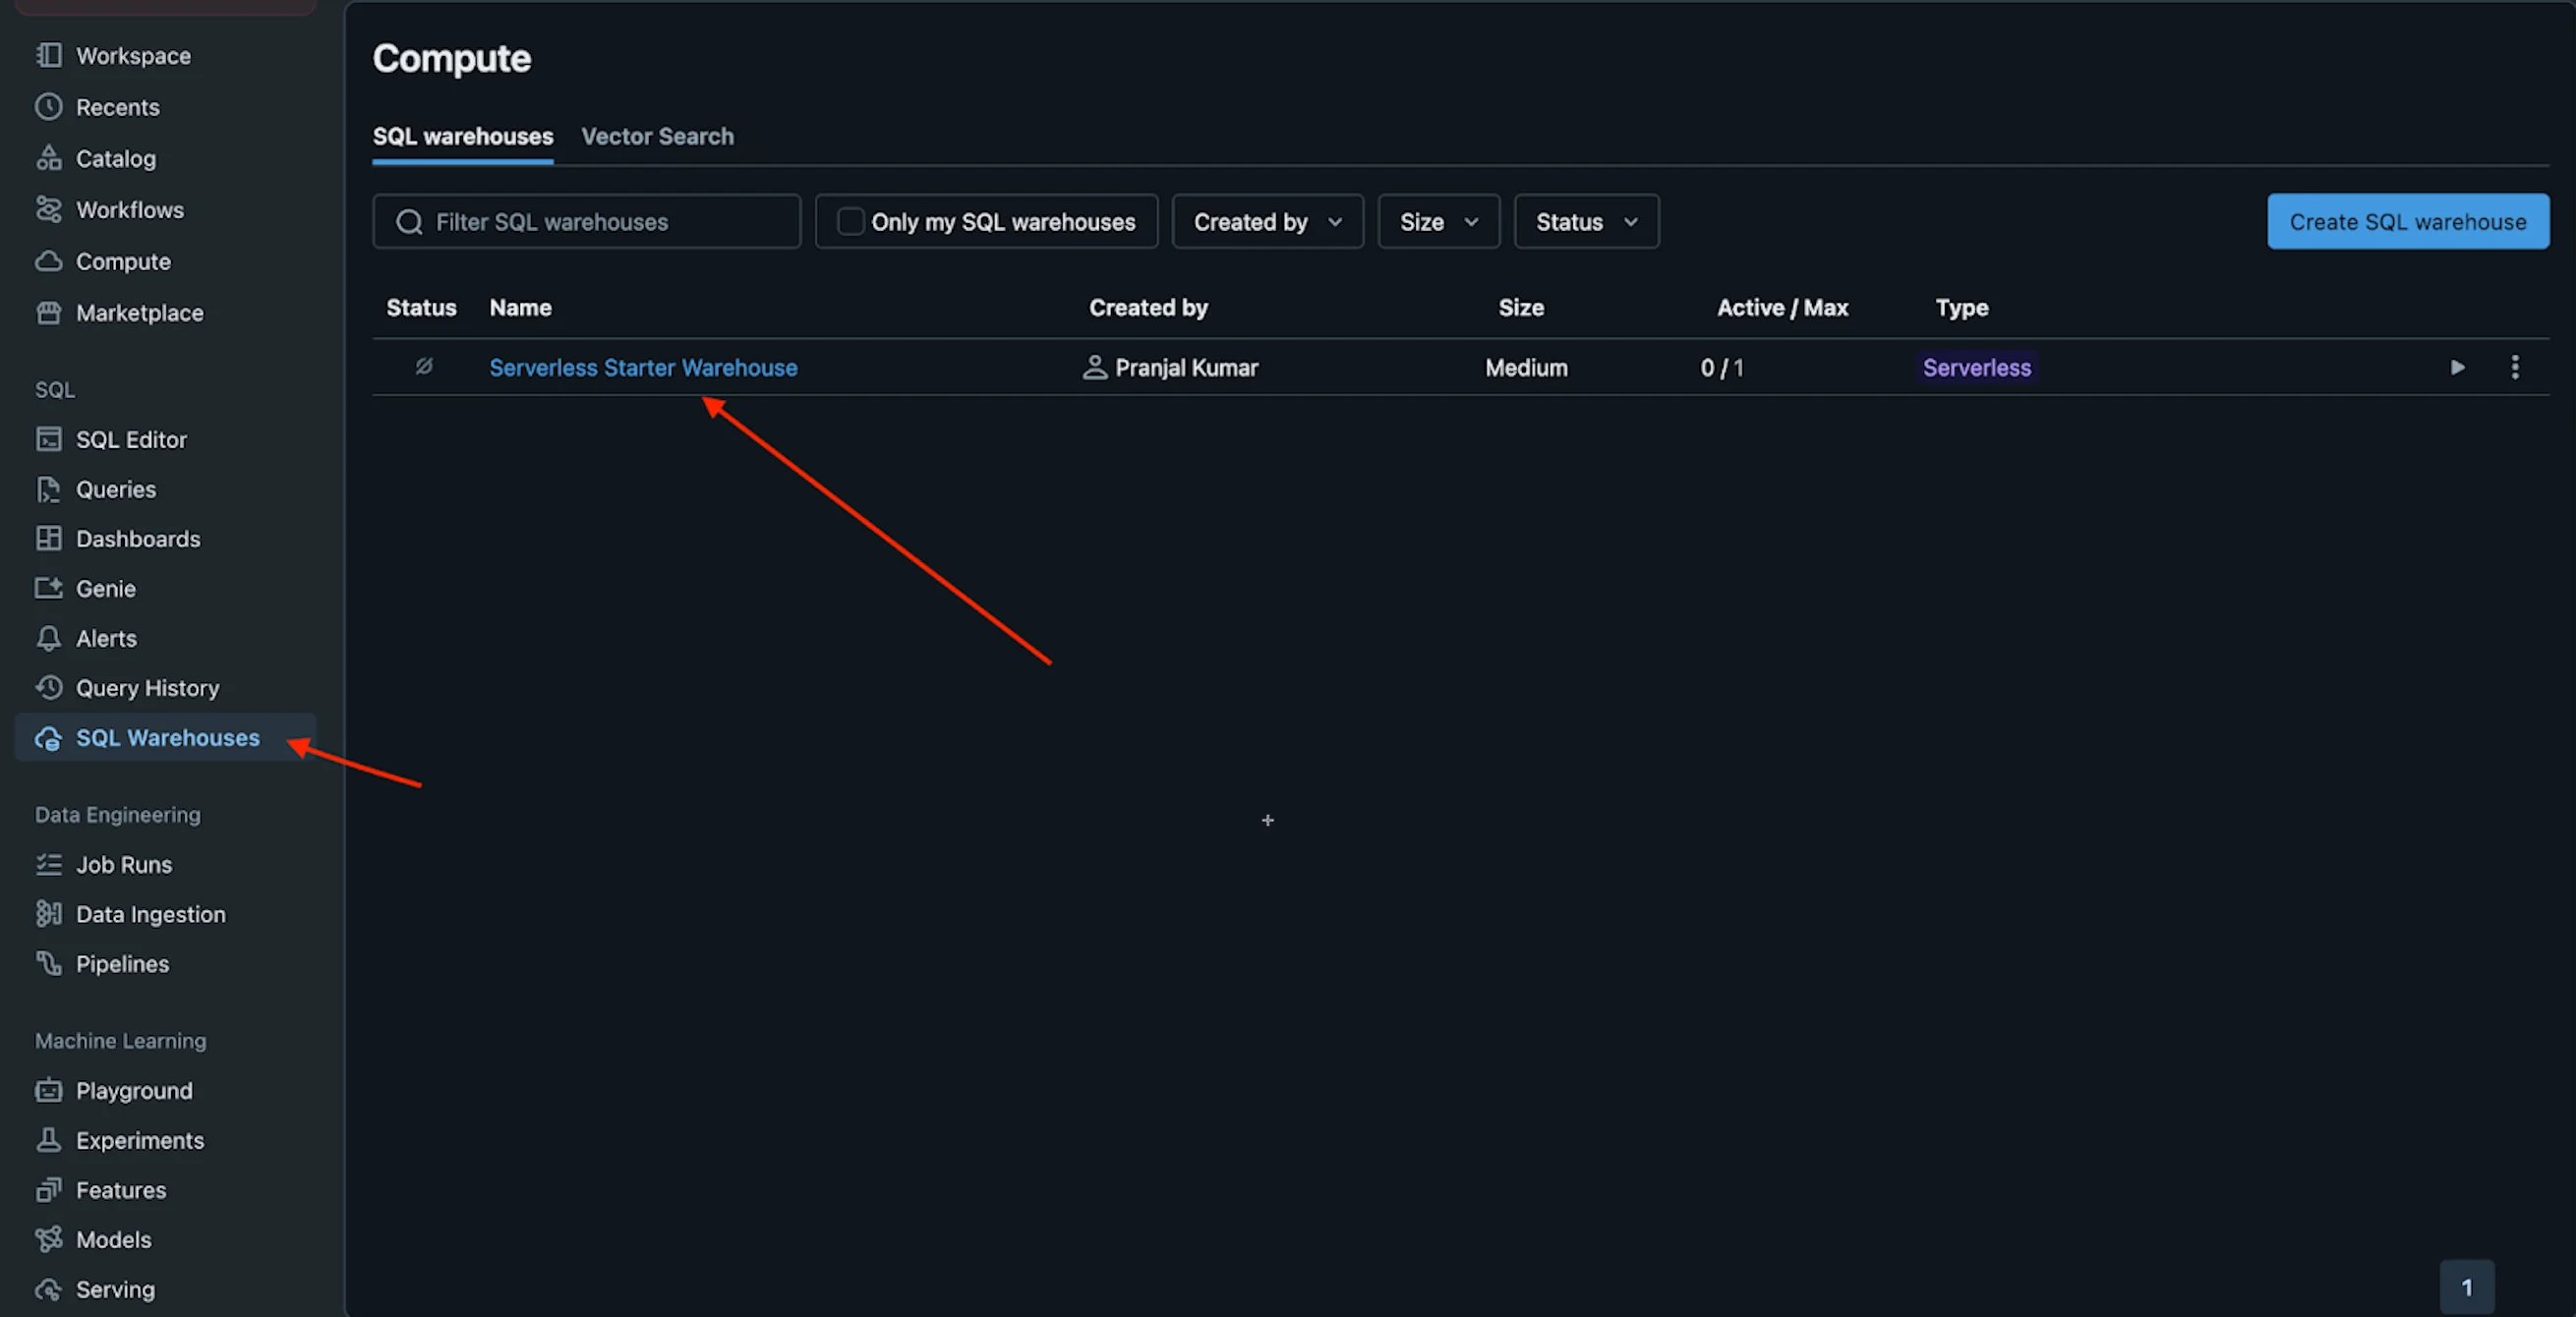 4. On the **Serverless Starter Warehouse** page, click the **Connection details** tab.
 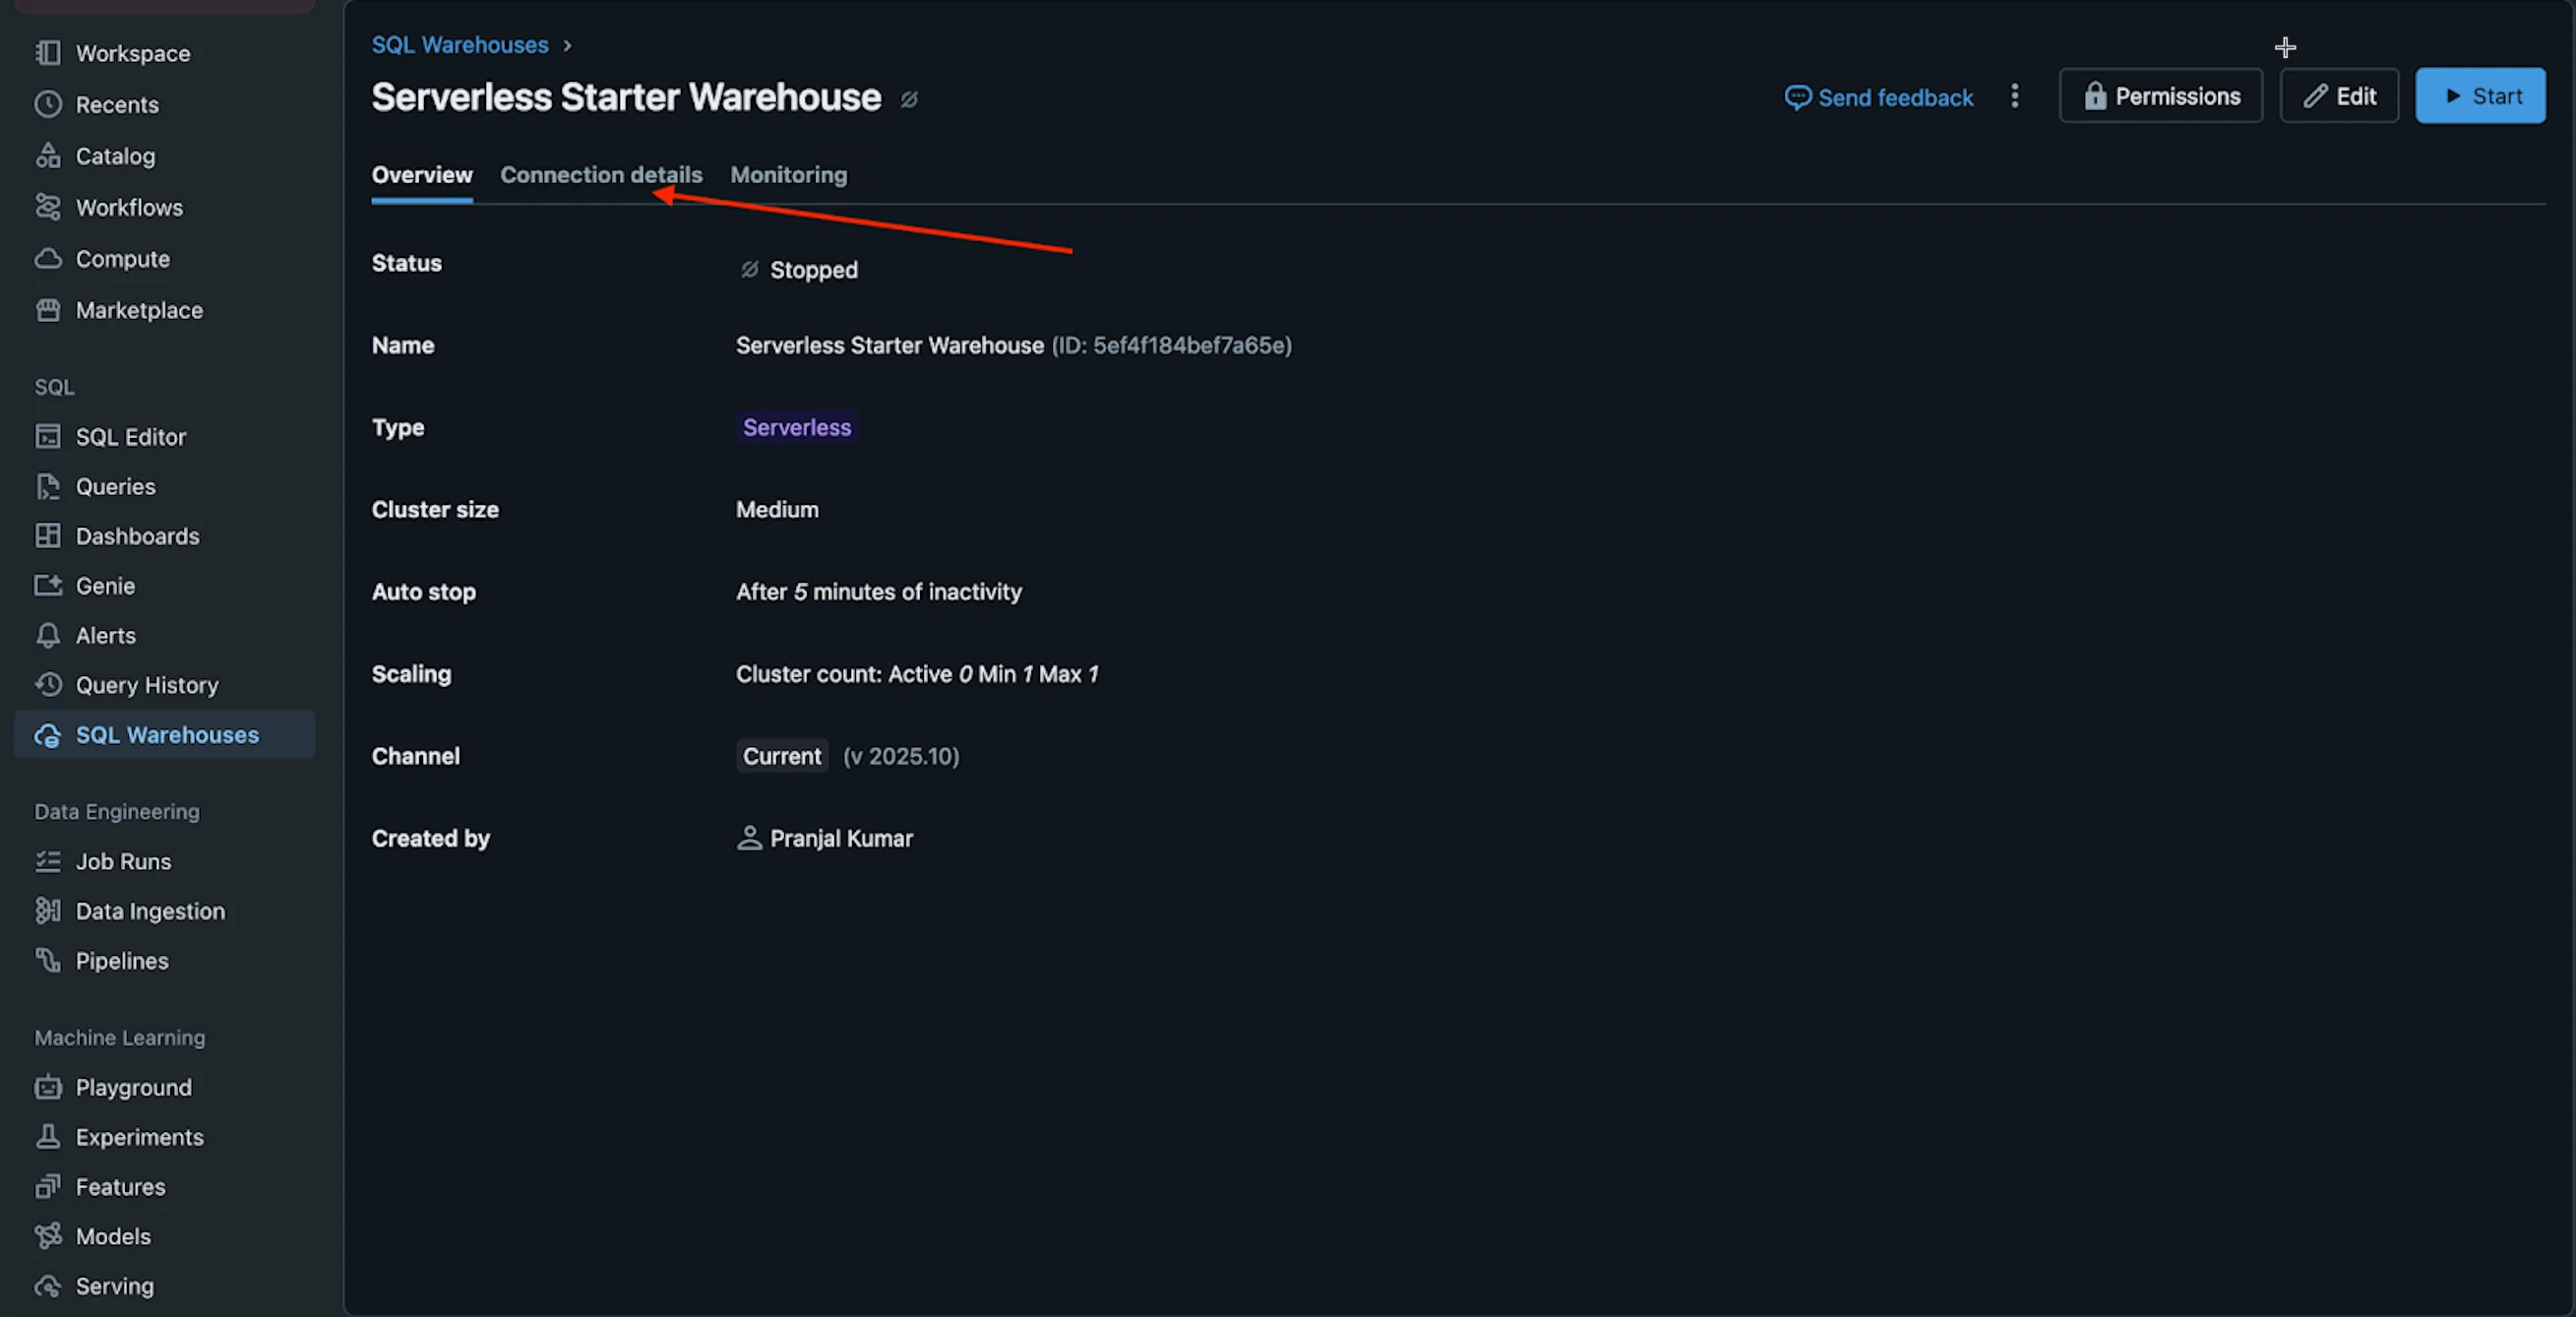 5. Copy the **Server hostname** and **HTTP path** credentials to paste into the MoEngage App Marketplace.
  To create a generated access token, you can also follow the steps described in the **Method 2: Personal Access Token (PAT)** section in Part A.
## Step 3: Connect Databricks on the App Marketplace
To connect Databricks on the App Marketplace, perform the following steps:
1. On the left navigation menu in the MoEngage dashboard, click **App marketplace**.
2. On the App Marketplace page, search for **Databricks**.
To create a generated access token, you can also follow the steps described in the **Method 2: Personal Access Token (PAT)** section in Part A.
## Step 3: Connect Databricks on the App Marketplace
To connect Databricks on the App Marketplace, perform the following steps:
1. On the left navigation menu in the MoEngage dashboard, click **App marketplace**.
2. On the App Marketplace page, search for **Databricks**.
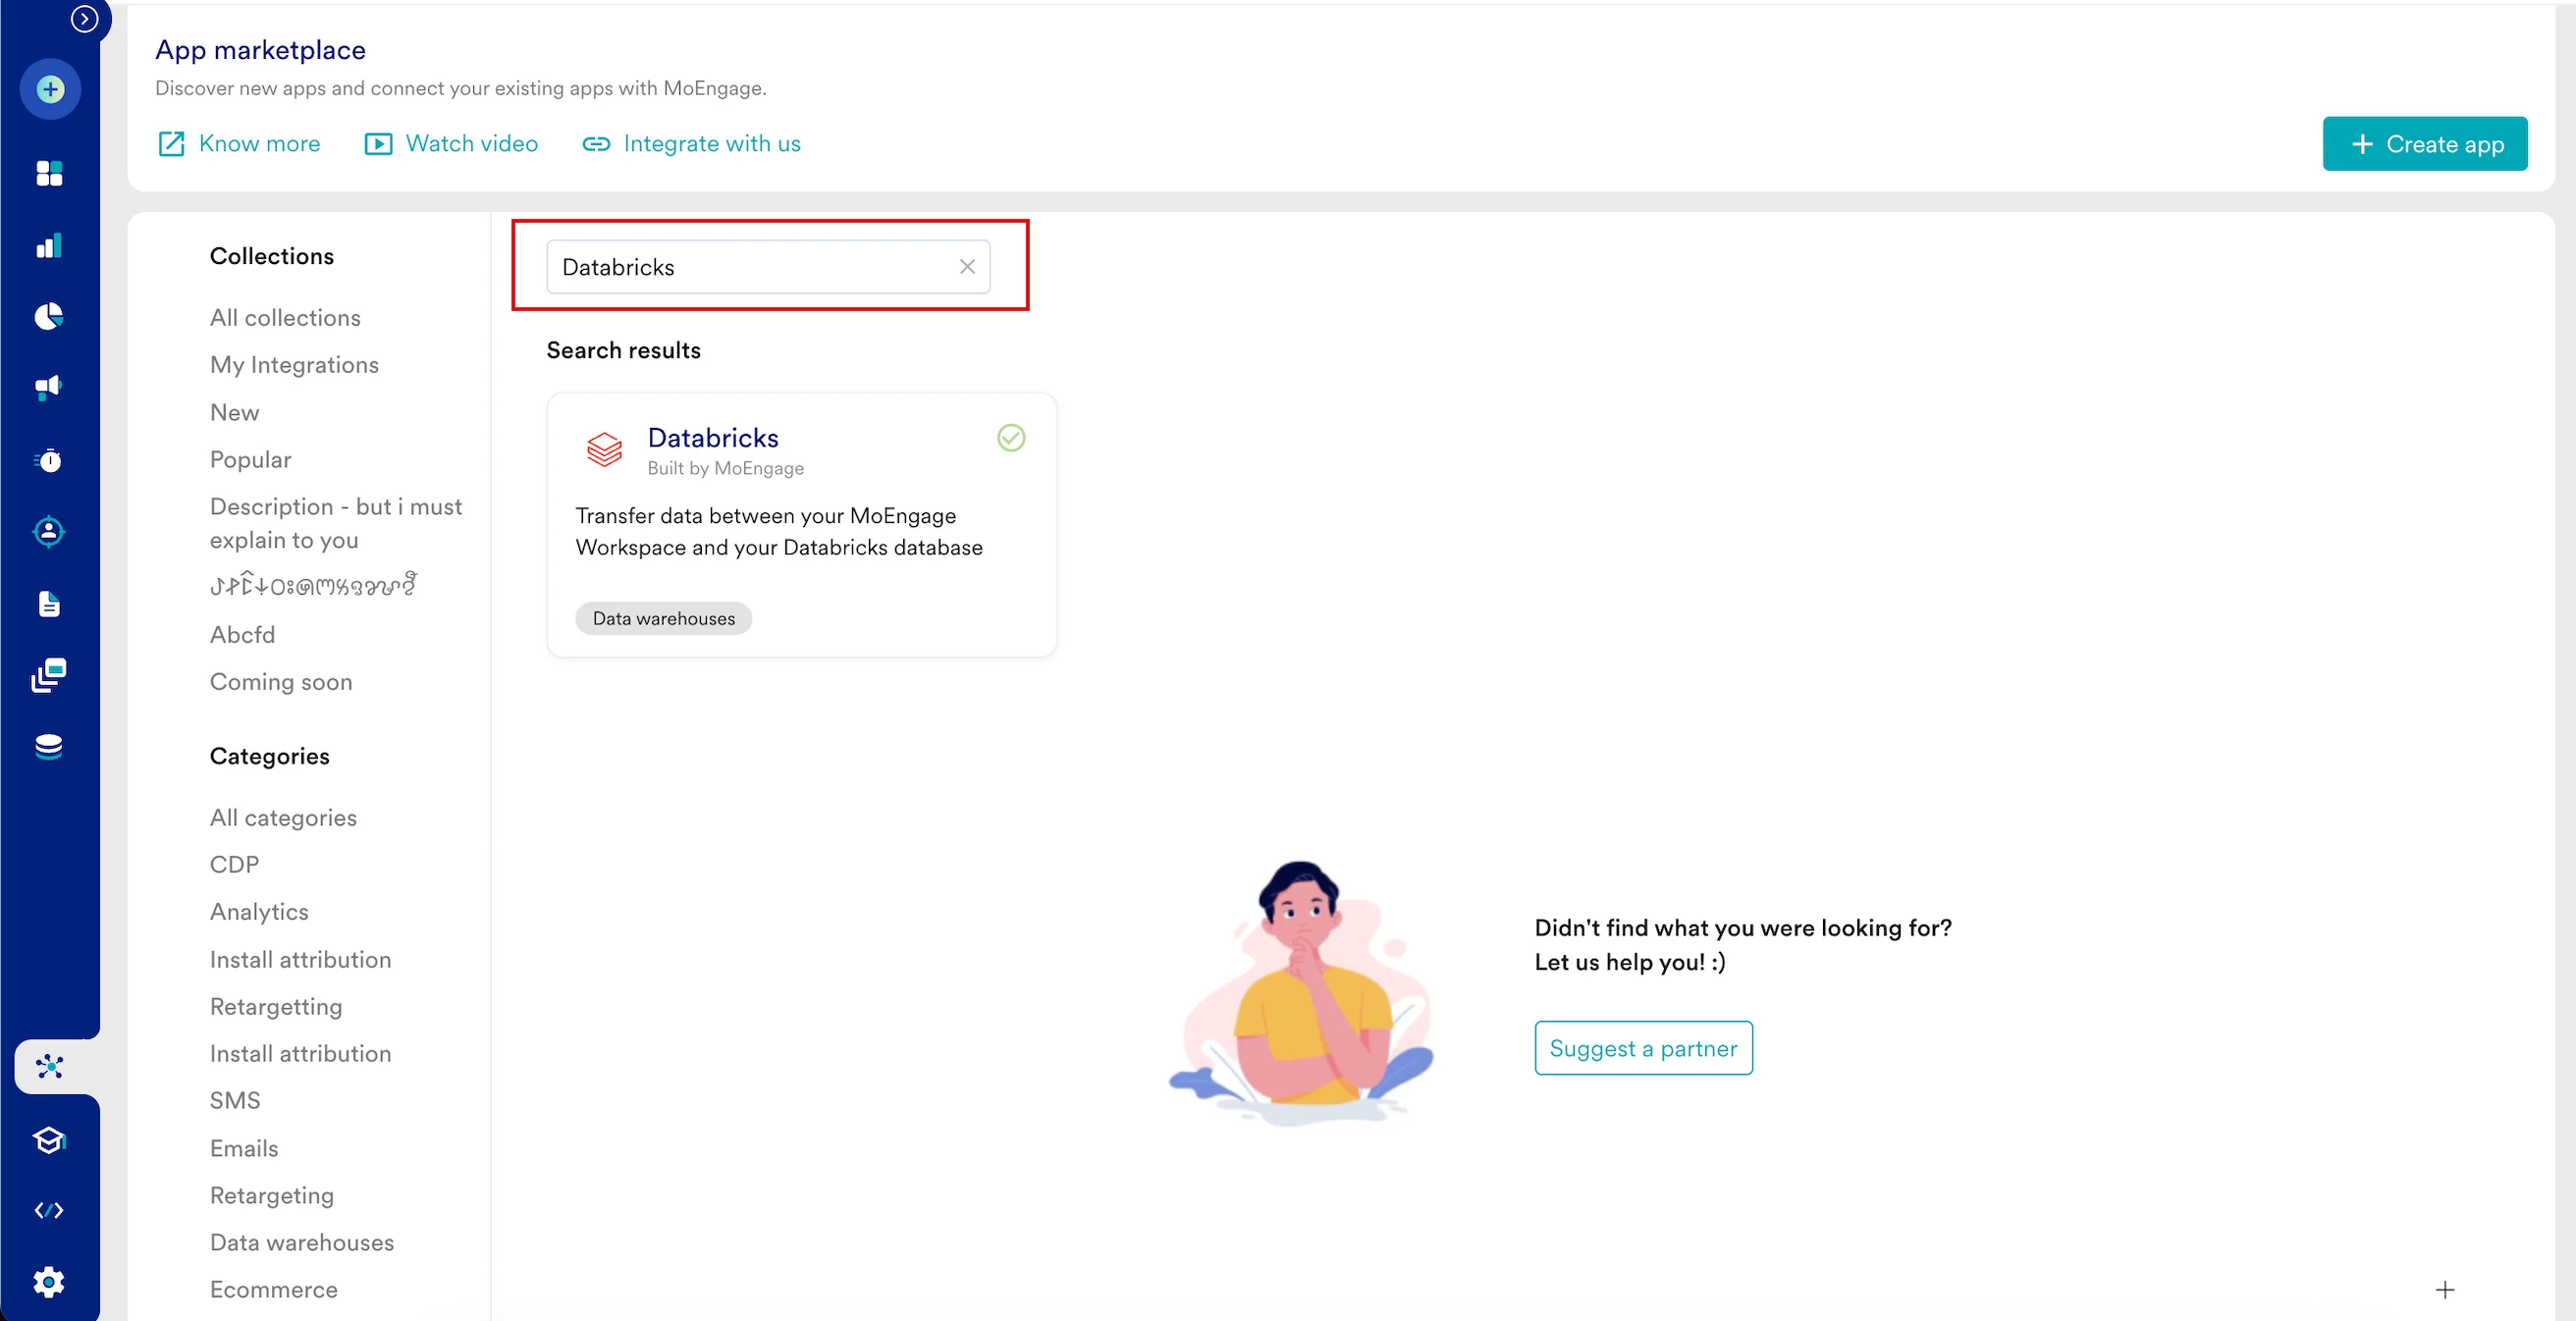 3. Click the **Databricks** tile.
4. On the Databricks page, go to the **Integrate** tab and click **+Add Connection**.
5. Enter the following details:
| Field | Required | Description |
| ------------------------- | ----------- | ---------------------------------------------------------------------------------------------------------------------------------------------------------------------------------------------------------------------------------------------------------- |
| **Connection name** | Yes | Type a name for the Databricks connection. |
| **Host name** | Yes | This refers to the unique identifier assigned to a specific cluster. Type the hostname that you want to connect to. To find your server hostname, sign in to the Databricks web console, and then navigate to **SQL Warehouses** > **Connection details**. |
| **Port** | Optional | Type the port to which you want to connect your Databricks server. The default is 443. |
| **HTTP path** | Yes | Type the HTTP path of your compute resource on Databricks. To find your HTTP path, navigate to **SQL Warehouses** > **Connection details**. |
| **Authentication method** | Yes | Select the authentication method to connect MoEngage with Databricks:
3. Click the **Databricks** tile.
4. On the Databricks page, go to the **Integrate** tab and click **+Add Connection**.
5. Enter the following details:
| Field | Required | Description |
| ------------------------- | ----------- | ---------------------------------------------------------------------------------------------------------------------------------------------------------------------------------------------------------------------------------------------------------- |
| **Connection name** | Yes | Type a name for the Databricks connection. |
| **Host name** | Yes | This refers to the unique identifier assigned to a specific cluster. Type the hostname that you want to connect to. To find your server hostname, sign in to the Databricks web console, and then navigate to **SQL Warehouses** > **Connection details**. |
| **Port** | Optional | Type the port to which you want to connect your Databricks server. The default is 443. |
| **HTTP path** | Yes | Type the HTTP path of your compute resource on Databricks. To find your HTTP path, navigate to **SQL Warehouses** > **Connection details**. |
| **Authentication method** | Yes | Select the authentication method to connect MoEngage with Databricks:
- **OAuth** (uses secure OAuth 2.0 M2M credential verification; requires a client ID and client secret)
- **Access Token** (uses your Personal Access Token). |
| **Client ID** | Conditional | Type the client identifier (Application ID) of your registered service principal on Databricks. Required only when you select OAuth as the authentication method. |
| **Client Secret** | Conditional | Type the client secret corresponding to your client ID. Required only when you select OAuth as the authentication method. |
| **Catalog** | Yes | Type the Databricks catalog name to which MoEngage will have access. Displayed for both authentication methods. |
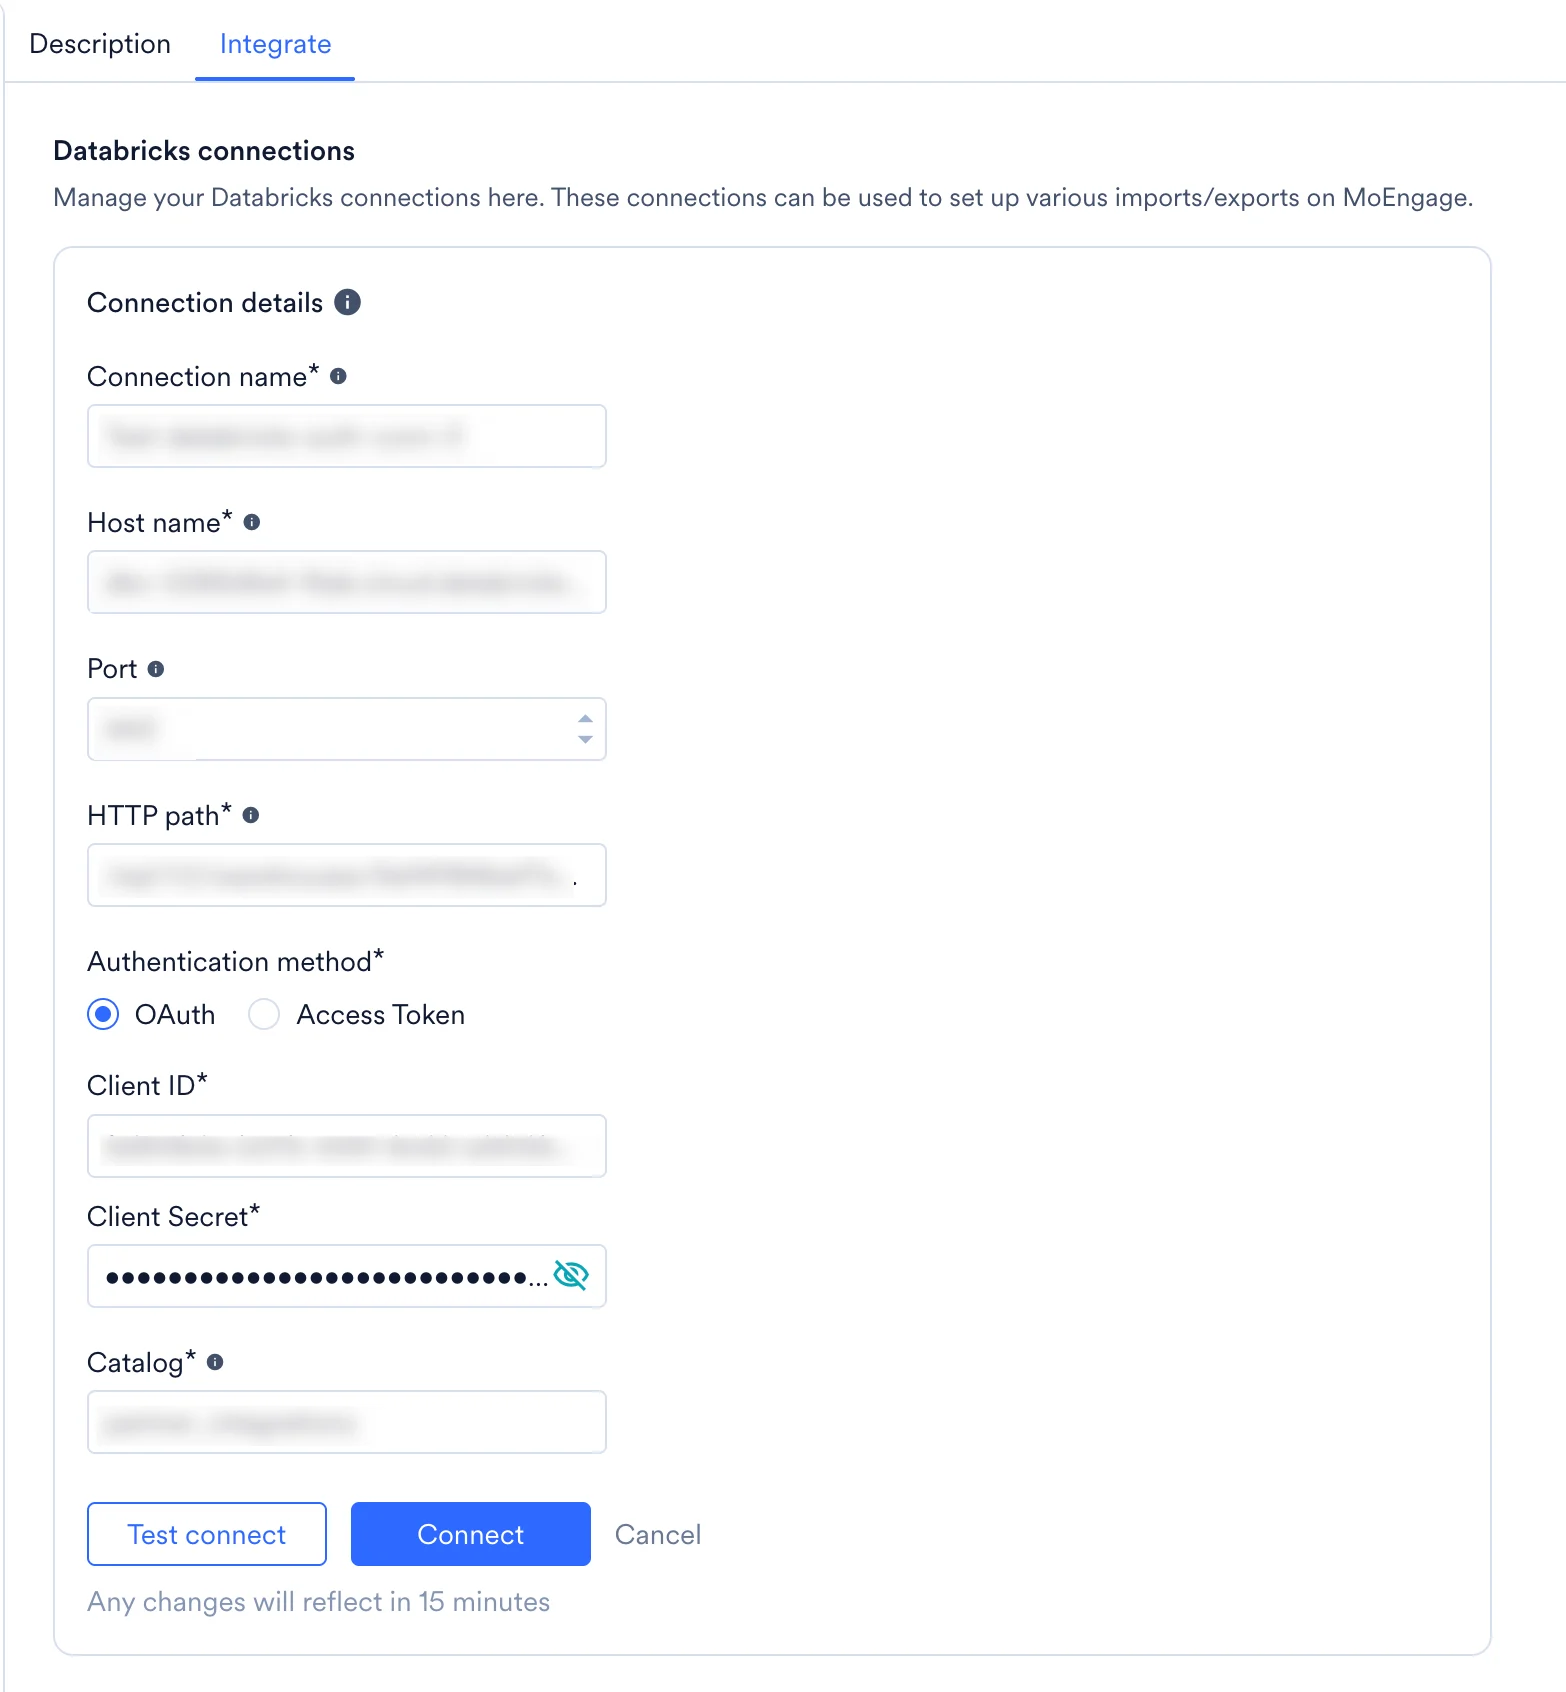 6. Click **Connect**. Your Databricks connection is now integrated.
After you have set up a Databricks connection, you can use it to set up various imports and exports in MoEngage.
### Supported Datetime Formats
| Date and Time Format | Examples |
| ----------------------------------------------- | ---------------------------------------------------------------------------------------------------------------------------- |
| `"datetime_format": "YYYY-MM-DD"` | |
| `"datetime_format": "YYYY/MM/DD"` | |
| `"datetime_format": "DD/MM/YYYY"` | |
| `"datetime_format": "DD-MM-YYYY"` | |
| `"datetime_format": "DD-MM-YYYY hh:mm:ss"` | |
| `"datetime_format": "DD/MM/YYYY hh:mm:ss"` | |
| `"datetime_format": "YYYY-MM-DD hh:mm:ss"` | |
| `"datetime_format": "YYYY/MM/DD hh:mm:ss"` | |
| `"datetime_format": "DD-MM-YYYYThh:mm:ss.s"` | |
| `"datetime_format": "DD/MM/YYYYThh:mm:ss.s"` | |
| `"datetime_format": "DD-MM-YYYYThh:mm:ssTZD"` |
6. Click **Connect**. Your Databricks connection is now integrated.
After you have set up a Databricks connection, you can use it to set up various imports and exports in MoEngage.
### Supported Datetime Formats
| Date and Time Format | Examples |
| ----------------------------------------------- | ---------------------------------------------------------------------------------------------------------------------------- |
| `"datetime_format": "YYYY-MM-DD"` | |
| `"datetime_format": "YYYY/MM/DD"` | |
| `"datetime_format": "DD/MM/YYYY"` | |
| `"datetime_format": "DD-MM-YYYY"` | |
| `"datetime_format": "DD-MM-YYYY hh:mm:ss"` | |
| `"datetime_format": "DD/MM/YYYY hh:mm:ss"` | |
| `"datetime_format": "YYYY-MM-DD hh:mm:ss"` | |
| `"datetime_format": "YYYY/MM/DD hh:mm:ss"` | |
| `"datetime_format": "DD-MM-YYYYThh:mm:ss.s"` | |
| `"datetime_format": "DD/MM/YYYYThh:mm:ss.s"` | |
| `"datetime_format": "DD-MM-YYYYThh:mm:ssTZD"` | - 31-12-2022T12:10:33Z
- 31-12-2022T12:10:33+08:00
- 31-12-2022T12:10:33-08:00
|
| `"datetime_format": "DD/MM/YYYYThh:mm:ssTZD"` | - 31/12/2022T12:10:33Z
- 31/12/2022T12:10:33+08:00
- 31/12/2022T12:10:33-08:00
|
| `"datetime_format": "YYYY-MM-DD hh:mm:ss.s"` | 2019-02-22 17:54:14.933 |
| `"datetime_format": "YYYY/MM/DD hh:mm:ss.s"` | 2019/02/22 17:54:14.933 |
| `"datetime_format": "YYYY-MM-DDThh:mm:ssTZD"` | - 2019-11-14T00:01:02Z
- 2019-11-14T00:01:02+08:00
- 2019-11-14T00:01:02Z-08:00
|
| `"datetime_format": "YYYY/MM/DDThh:mm:ssTZD"` | - 2019/11/14T00:01:02Z
- 2019/11/14T00:01:02+08:00
- 2019/11/14T00:01:02-08:00
|
| `"datetime_format": "YYYY-MM-DDThh:mm:ss.sTZD"` | - 2019-02-22T17:54:14.957Z
- 2019-02-22T17:54:14.957299-08:00
- 2019-02-22T17:54:14.957299+08:00
|
| `"datetime_format": "YYYY/MM/DDThh:mm:ss.sTZD"` | - 2019/02/22T17:54:14.957Z
- 2019/02/22T17:54:14.957299-08:00
- 2019/02/22T17:54:14.957299+08:00
|
## Step 4: Network Security and IP Allowlisting
If your Databricks workspace restricts network access or uses IP access lists, you must explicitly add the egress IP blocks allocated to MoEngage to your allowlist, based on your data center (DC) geography.
Because Databricks routing for database execution traffic resolves through your workspace host URL, a single allowlist entry covering the workspace host encompasses database and query traffic. Contact MoEngage Support to obtain the regional egress IP blocks corresponding to your workspace data center.
## Step 5: Connection Verification and Troubleshooting
After the service principal and grants are configured, navigate to the MoEngage **App marketplace** tab and test your connection. A successful test confirms that authentication and service principal permissions are configured correctly.
If the verification step fails, use the following diagnostics guide to resolve common issues:
| Observed Connection Error | Cause and Resolution |
| ------------------------------------------------- | ---------------------------------------------------------------------------------------------------------------------------------------------------------------------------- |
| **Invalid OAuth client credentials** | The `client_id` or `client_secret` contains a typo, or the active secret was rotated or deleted in Databricks. Verify the credentials and try again. |
| **Service principal lacks workspace permissions** | The service principal is missing the *Can use* permission on the designated SQL warehouse, or is missing *USE CATALOG* privileges on the catalog. |
| **Invalid Catalog** | The catalog name specified in MoEngage is incorrect, or the service principal has catalog-level traversal permissions but is missing underlying schema or table permissions. |
## Warehouse Segments Using Databricks
Databricks is available in our Warehouse Segments. For more information, refer to [Warehouse Segments](https://www.moengage.com/docs/user-guide/segment/segment-operations/warehouse-segments).
## Import Users and Events from Databricks into MoEngage
To set up MoEngage × Databricks imports for your account, refer to the [Databricks Imports guide](https://www.moengage.com/docs/user-guide/data/imports/data-warehouses-imports/databricks-imports).
## Export Events from MoEngage to Databricks
You can export events from MoEngage to your Databricks tables. To set up an export, refer to the [Databricks Exports guide](https://www.moengage.com/docs/user-guide/data/exports/events/data-warehouse/databricks-exports).
## Reference Documents
* [Databricks: OAuth machine-to-machine (M2M) authentication](https://docs.databricks.com/en/dev-tools/auth/oauth-m2m.html)
* [Databricks: Manage service principals](https://docs.databricks.com/en/admin/users-groups/service-principals.html)
* [Databricks: SQL warehouse permissions](https://docs.databricks.com/aws/en/security/auth/access-control/#sql-warehouse-acls)
* [Databricks: Cluster-level access control permissions](https://docs.databricks.com/en/security/auth-authz/access-control/index.html)