> ## Documentation Index
> Fetch the complete documentation index at: https://moengage.com/docs/llms.txt
> Use this file to discover all available pages before exploring further.
# Konnectify
> Learn how to integrate MoEngage with Konnectify to automate workflows, sync user data, and trigger cross-platform actions using Webhooks and APIs.
# Introduction
[Konnectify](https://www.konnectify.co/) is an integration platform that helps you connect your software stack, set automations between them to save your time and be more productive.
# MoEngage × Konnectify
The MoEngage × Konnectify integration allows you to connect your MoEngage account to various 3rd party destinations listed on Konnectify's app marketplace, such as Salesforce, HubSpot, Stripe, etc., to automate various actions.
## Use Cases
1. Forward your Salesforce Leads to MoEngage and win them using timely campaigns
2. Send data out of MoEngage to any app on Konnectify
## Actions
With Konnectify Actions, you can perform various operations on the integrated apps like creating a new contact or lead, adding a new product, etc. The currently available Actions on MoEngage are:
1. Create or update a user in MoEngage
2. Create an event in MoEngage
## Lookups
With Konnectify Lookups, you can effortlessly retrieve explicit information from integrated apps or systems. It can pull information like fetching product details, contact information, or records based on specific criteria.
## Triggers
With MoEngage's [Connecter Campaigns](/user-guide/campaigns-and-channels/connectors/create/create-a-connector-campaign), you can use MoEngage to trigger your Konnectors for a multitude of purposes.
# Integration
**Prerequisites**
* Ensure you have access to your Konnectify account.
## Adding your MoEngage account on Konnectify
Konnectify must connect with your MoEngage account before you can start creating any new Konnectors. On your Konnectify dashboard,
1. On the top right, click on *+ New* >> *New Account*.
2. Select "MoEngage" from the dropdown.
3. You will need to enter your MoEngage app credentials:
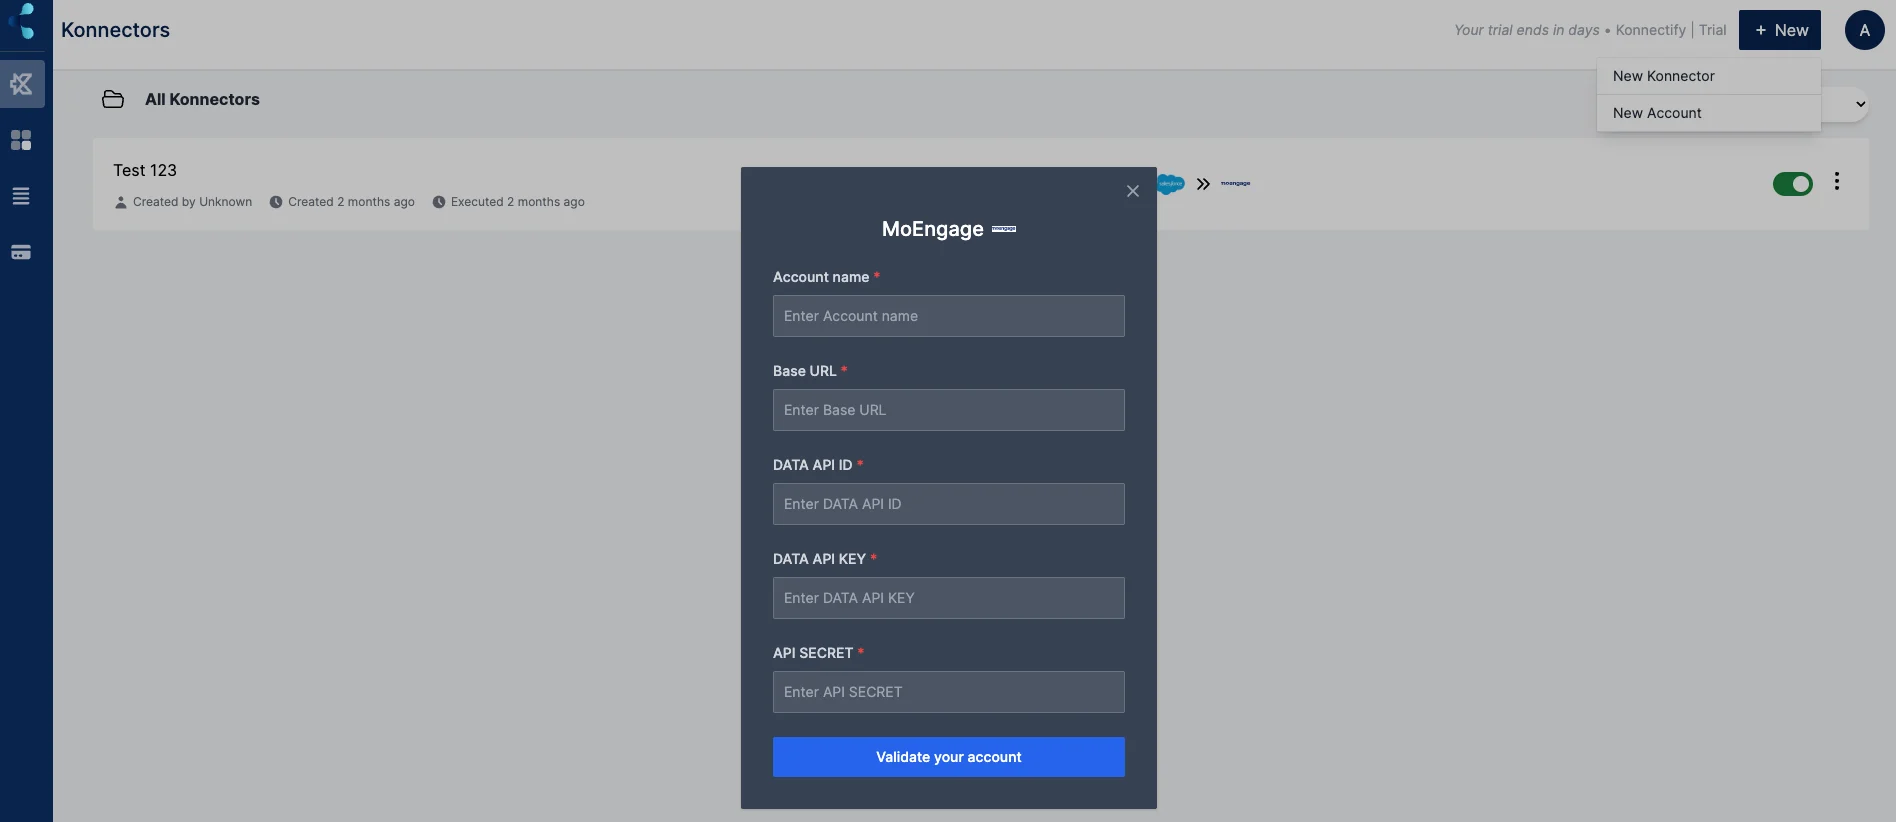 | Field | Description |
| ------------ | ---------------------------------------------------------------------------------------------------------------------------------------------------------------------------------------------------------------------------------------------------------------------------------------------------------- |
| Account name | Give this account a recognizable name. |
| Base URL | The URL of your MoEngage REST API Host. For more information about your REST API URL, please refer to [Data centers in MoEngage](https://www.moengage.com/docs/user-guide/data/key-concepts/data-centers-in-moengage). Example: [https://api-01.moengage.com](https://api-01.moengage.com) |
| DATA API ID | Type or copy and paste the Data API ID. The Data API ID and the Workspace ID of your MoEngage account are the same. The Workspace ID of your MoEngage account is available at **Settings - > Account -> APIs ->Workspace ID**. The Data API ID and the Workspace ID of your MoEngage account are the same. |
| DATA API KEY | Type or copy and paste the Data API Key. The Data API key of your MoEngage account is available at Settings - > Account -> APIs -> API keys >**Data** API settings. |
| API SECRET | Same as your Data API Key. |
4. Click on "Validate your account" to test the connection and then save your account.
## Create a new Konnector
In the following example, we will be sending Leads from Salesforce to MoEngage. These users can then be used for targeting in MoEngage campaigns.
### Step 1: Create a new Salesforce trigger
1. On the top right, click on *+ New* >> *New Konnector*.
2. Select "Salesforce" as the Trigger app.
3. If you have not connected to Salesforce earlier, you will be prompted to enter your Salesforce account details. Validate your account and then save it. If you already have an account, select your the account you want to fetch new leads from.
4. Select the trigger event as "new-lead-trigger":
| Field | Description |
| ------------ | ---------------------------------------------------------------------------------------------------------------------------------------------------------------------------------------------------------------------------------------------------------------------------------------------------------- |
| Account name | Give this account a recognizable name. |
| Base URL | The URL of your MoEngage REST API Host. For more information about your REST API URL, please refer to [Data centers in MoEngage](https://www.moengage.com/docs/user-guide/data/key-concepts/data-centers-in-moengage). Example: [https://api-01.moengage.com](https://api-01.moengage.com) |
| DATA API ID | Type or copy and paste the Data API ID. The Data API ID and the Workspace ID of your MoEngage account are the same. The Workspace ID of your MoEngage account is available at **Settings - > Account -> APIs ->Workspace ID**. The Data API ID and the Workspace ID of your MoEngage account are the same. |
| DATA API KEY | Type or copy and paste the Data API Key. The Data API key of your MoEngage account is available at Settings - > Account -> APIs -> API keys >**Data** API settings. |
| API SECRET | Same as your Data API Key. |
4. Click on "Validate your account" to test the connection and then save your account.
## Create a new Konnector
In the following example, we will be sending Leads from Salesforce to MoEngage. These users can then be used for targeting in MoEngage campaigns.
### Step 1: Create a new Salesforce trigger
1. On the top right, click on *+ New* >> *New Konnector*.
2. Select "Salesforce" as the Trigger app.
3. If you have not connected to Salesforce earlier, you will be prompted to enter your Salesforce account details. Validate your account and then save it. If you already have an account, select your the account you want to fetch new leads from.
4. Select the trigger event as "new-lead-trigger":
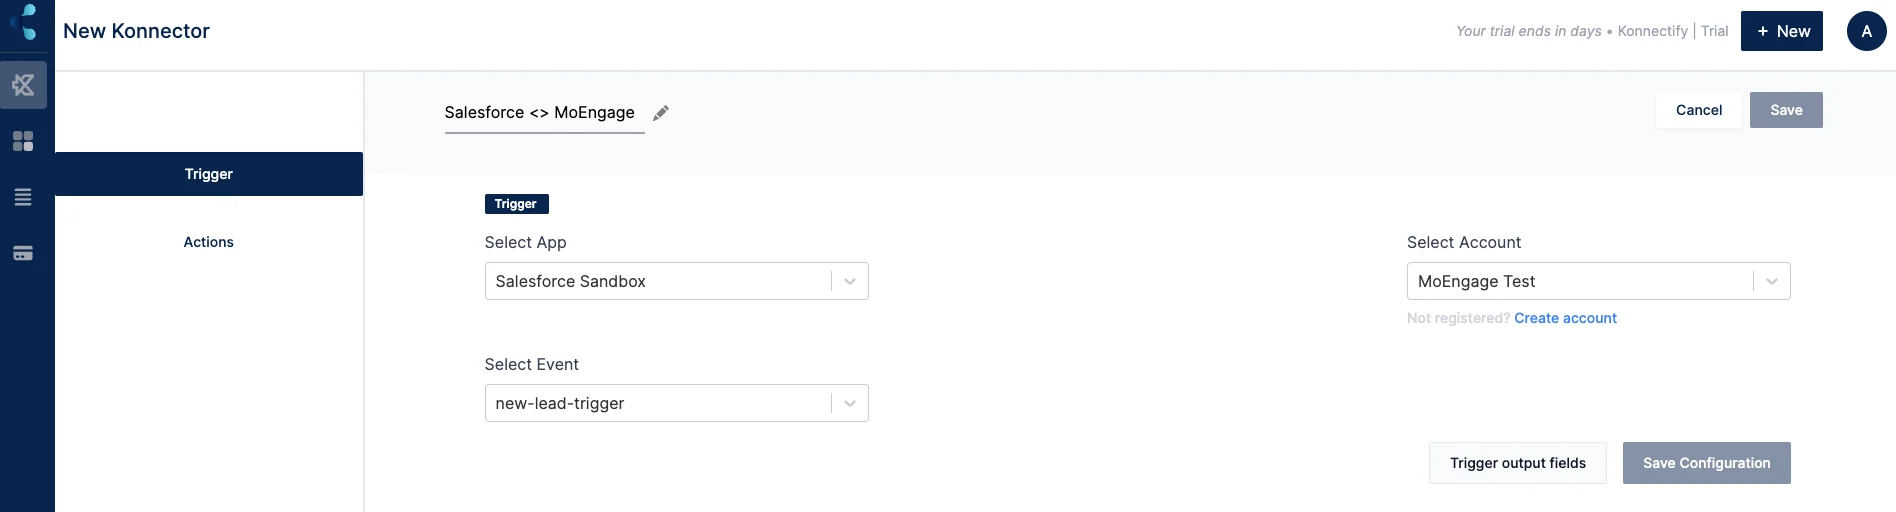 5. Click on "Trigger output fields" to fetch a sample lead from Salesforce.
6. Once you have fetched a sample lead, click on "Save configuration".
### Step 2: Create a new Action
1. On your Konnector page, click on "+ Add Action".
2. Select "MoEngage" app.
3. Select the MoEngage account you added earlier.
4. Select the event as "upsert-user-action".
5. Click on "Trigger output fields" to fetch a sample lead from Salesforce.
6. Once you have fetched a sample lead, click on "Save configuration".
### Step 2: Create a new Action
1. On your Konnector page, click on "+ Add Action".
2. Select "MoEngage" app.
3. Select the MoEngage account you added earlier.
4. Select the event as "upsert-user-action".
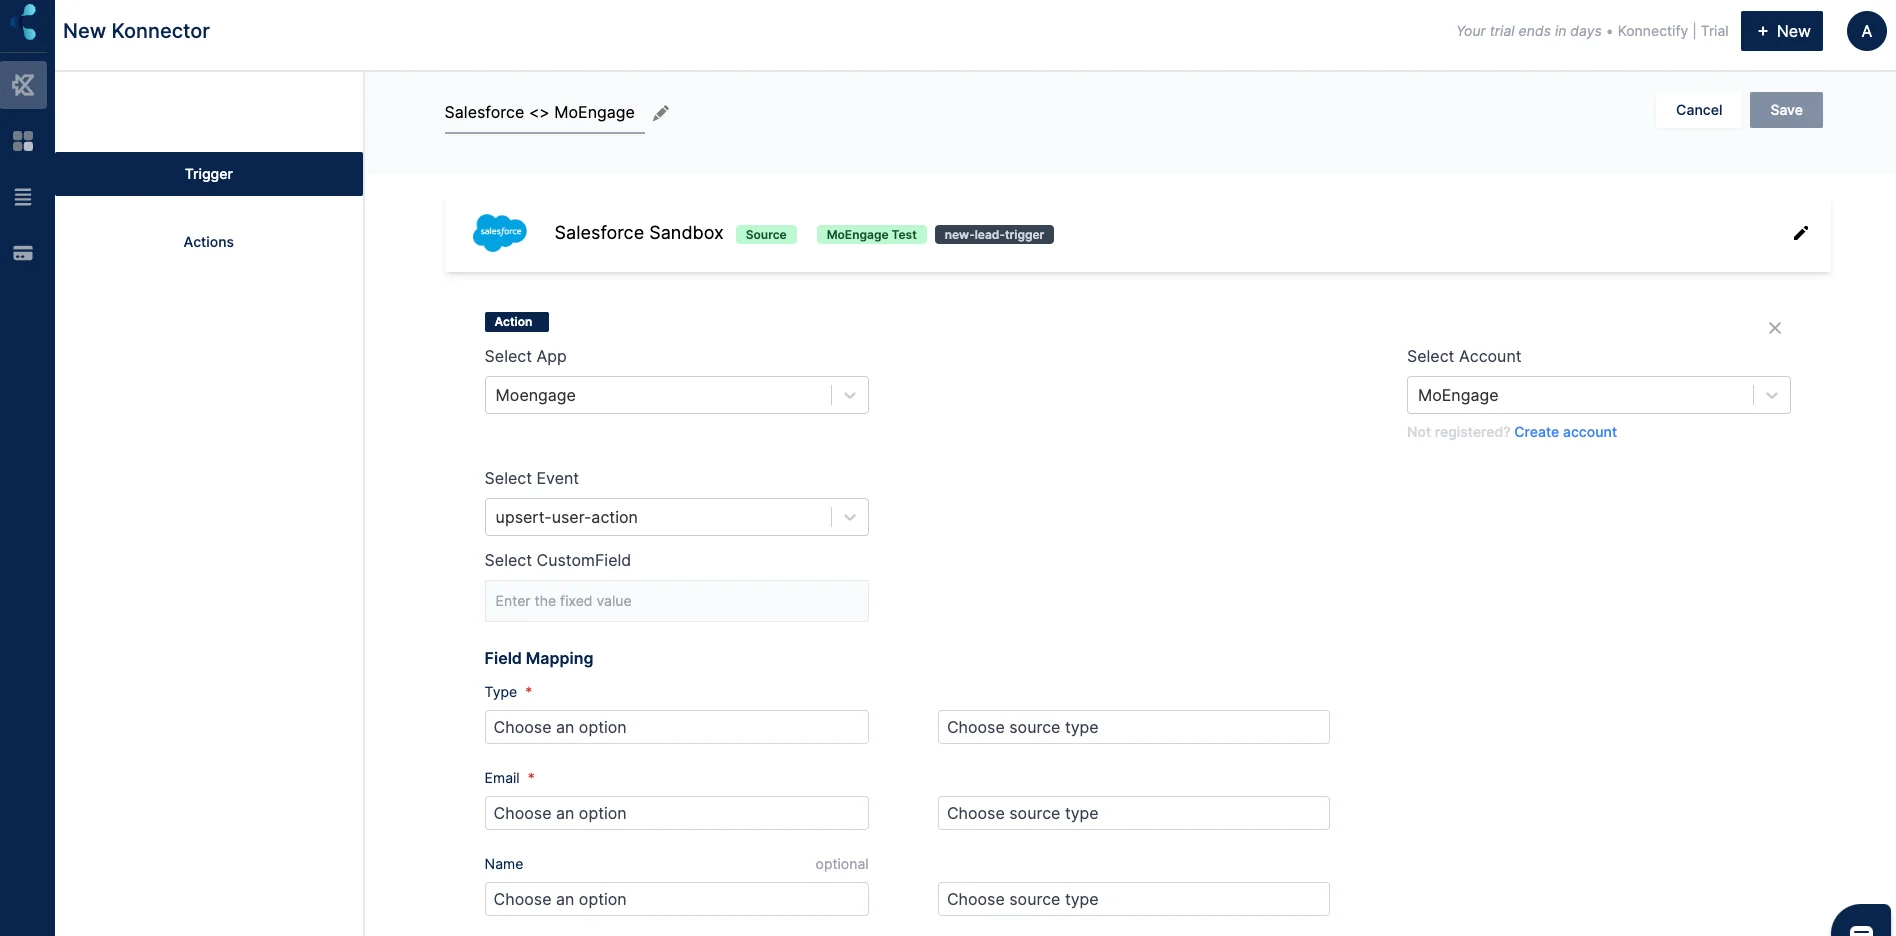 For each of the mapping, you can select from two options:
* Source: You can map fields from earlier triggers or lookups. Select the trigger from which you want to map this value.
* Fixed: If you want to map a fixed value, select this option and enter the value that you want to map.
| Field | Description |
| ----------- | --------------------------------------------------------------------------------------------------------------------------------- |
| Type | Select the type "Fixed" and enter the fixed value as "customer". |
| Email | The unique identifier is used to identify/create a user in MoEngage. |
| Name | Full name of the user. |
| First\_Name | First name of the user. |
| Last\_Name | Last name of the user. |
| Age | Age of the user |
| Gender | The gender of the user |
| Mobile | Mobile Number of the user. For example, 918888444411 |
| Platform | The platform of the user: ANDROID, IOS, etc. |
| Active | Value is based on the active platforms of the user. Select the type "Fixed" and enter the fixed value as either "true" or "false. |
You can also map custom attributes. To add custom attributes, type the custom attribute names in a comma-separated list in the "Select CustomField" textbox. Example: "field1,field2".
### Step 3: Save your Konnector
Once you have set up your Konnector, give it a name and click on "Save" to save and enable this Konnector:
For each of the mapping, you can select from two options:
* Source: You can map fields from earlier triggers or lookups. Select the trigger from which you want to map this value.
* Fixed: If you want to map a fixed value, select this option and enter the value that you want to map.
| Field | Description |
| ----------- | --------------------------------------------------------------------------------------------------------------------------------- |
| Type | Select the type "Fixed" and enter the fixed value as "customer". |
| Email | The unique identifier is used to identify/create a user in MoEngage. |
| Name | Full name of the user. |
| First\_Name | First name of the user. |
| Last\_Name | Last name of the user. |
| Age | Age of the user |
| Gender | The gender of the user |
| Mobile | Mobile Number of the user. For example, 918888444411 |
| Platform | The platform of the user: ANDROID, IOS, etc. |
| Active | Value is based on the active platforms of the user. Select the type "Fixed" and enter the fixed value as either "true" or "false. |
You can also map custom attributes. To add custom attributes, type the custom attribute names in a comma-separated list in the "Select CustomField" textbox. Example: "field1,field2".
### Step 3: Save your Konnector
Once you have set up your Konnector, give it a name and click on "Save" to save and enable this Konnector:
 After you have enabled the Konnector, any new leads in Salesforce CRM will be directly imported to MoEngage as new users. You can set up similar mappings for other apps as well.
## Use MoEngage as a trigger
With MoEngage Connector Campaigns, you can send out data to many apps on Konnectify. In the following example, we will be sending users from MoEngage to Salesforce. These users will be added to Salesforce CRM each time they submit a form.
### Step 1: Create a new Webhook trigger
1. On the top right, click on *+ New* >> *New Konnector*.
2. Select "Webhook" as the Trigger app.
3. Your Konnector type will be changed to "Webhook based".
4. Click on "Generate URL". This URL will be used to capture data from MoEngage. Copy this Webhook URL.
After you have enabled the Konnector, any new leads in Salesforce CRM will be directly imported to MoEngage as new users. You can set up similar mappings for other apps as well.
## Use MoEngage as a trigger
With MoEngage Connector Campaigns, you can send out data to many apps on Konnectify. In the following example, we will be sending users from MoEngage to Salesforce. These users will be added to Salesforce CRM each time they submit a form.
### Step 1: Create a new Webhook trigger
1. On the top right, click on *+ New* >> *New Konnector*.
2. Select "Webhook" as the Trigger app.
3. Your Konnector type will be changed to "Webhook based".
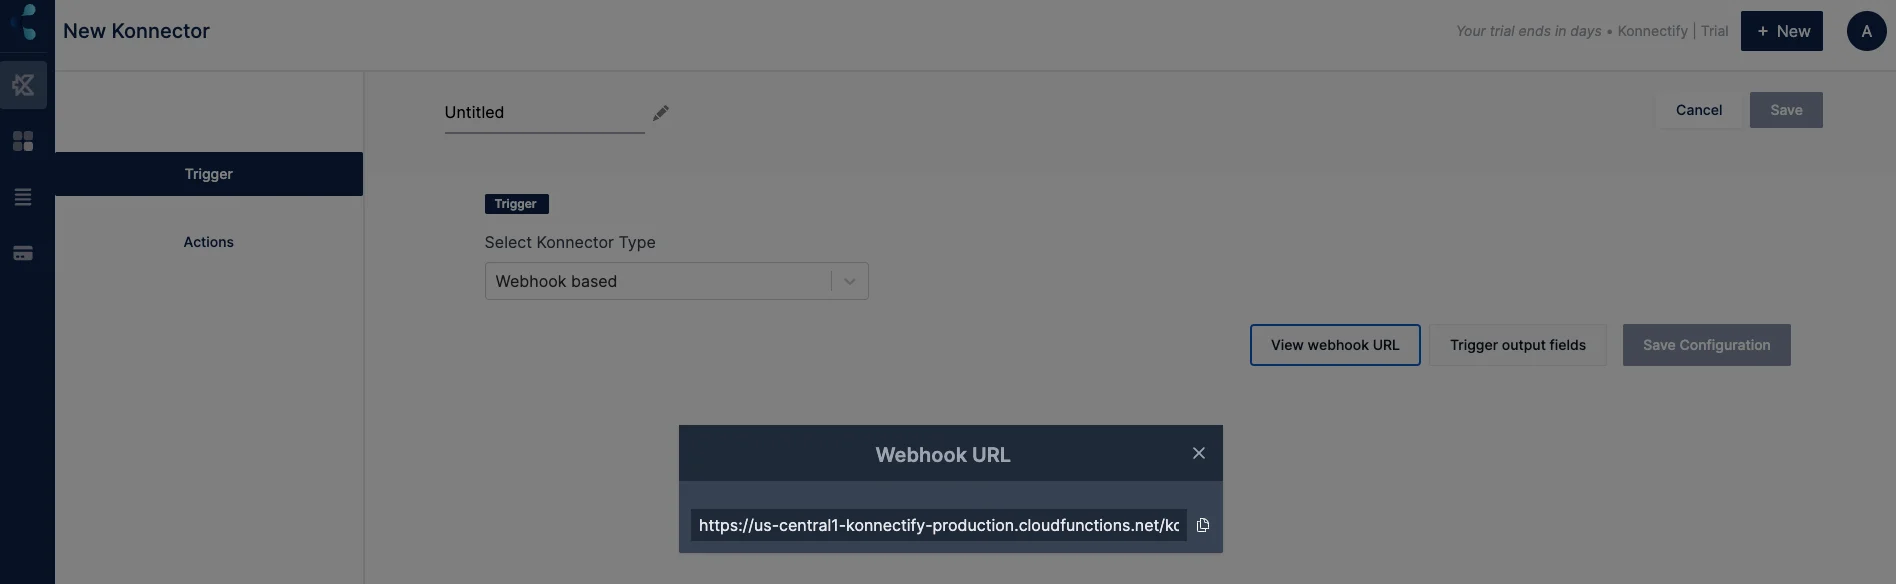
4. Click on "Generate URL". This URL will be used to capture data from MoEngage. Copy this Webhook URL.
 ### Step 2: Set up a new Connector Campaign on MoEngage
In order to proceed with the Konnector, you will need to now set up a Connector Campaign to the provided URL above.
1. Navigate to MoEngage Dashboard.
2. Use any one of the following options:
1. On the **All Campaigns** page, click **Create Campaign**.
The Create Campaign page is displayed.
### Step 2: Set up a new Connector Campaign on MoEngage
In order to proceed with the Konnector, you will need to now set up a Connector Campaign to the provided URL above.
1. Navigate to MoEngage Dashboard.
2. Use any one of the following options:
1. On the **All Campaigns** page, click **Create Campaign**.
The Create Campaign page is displayed.
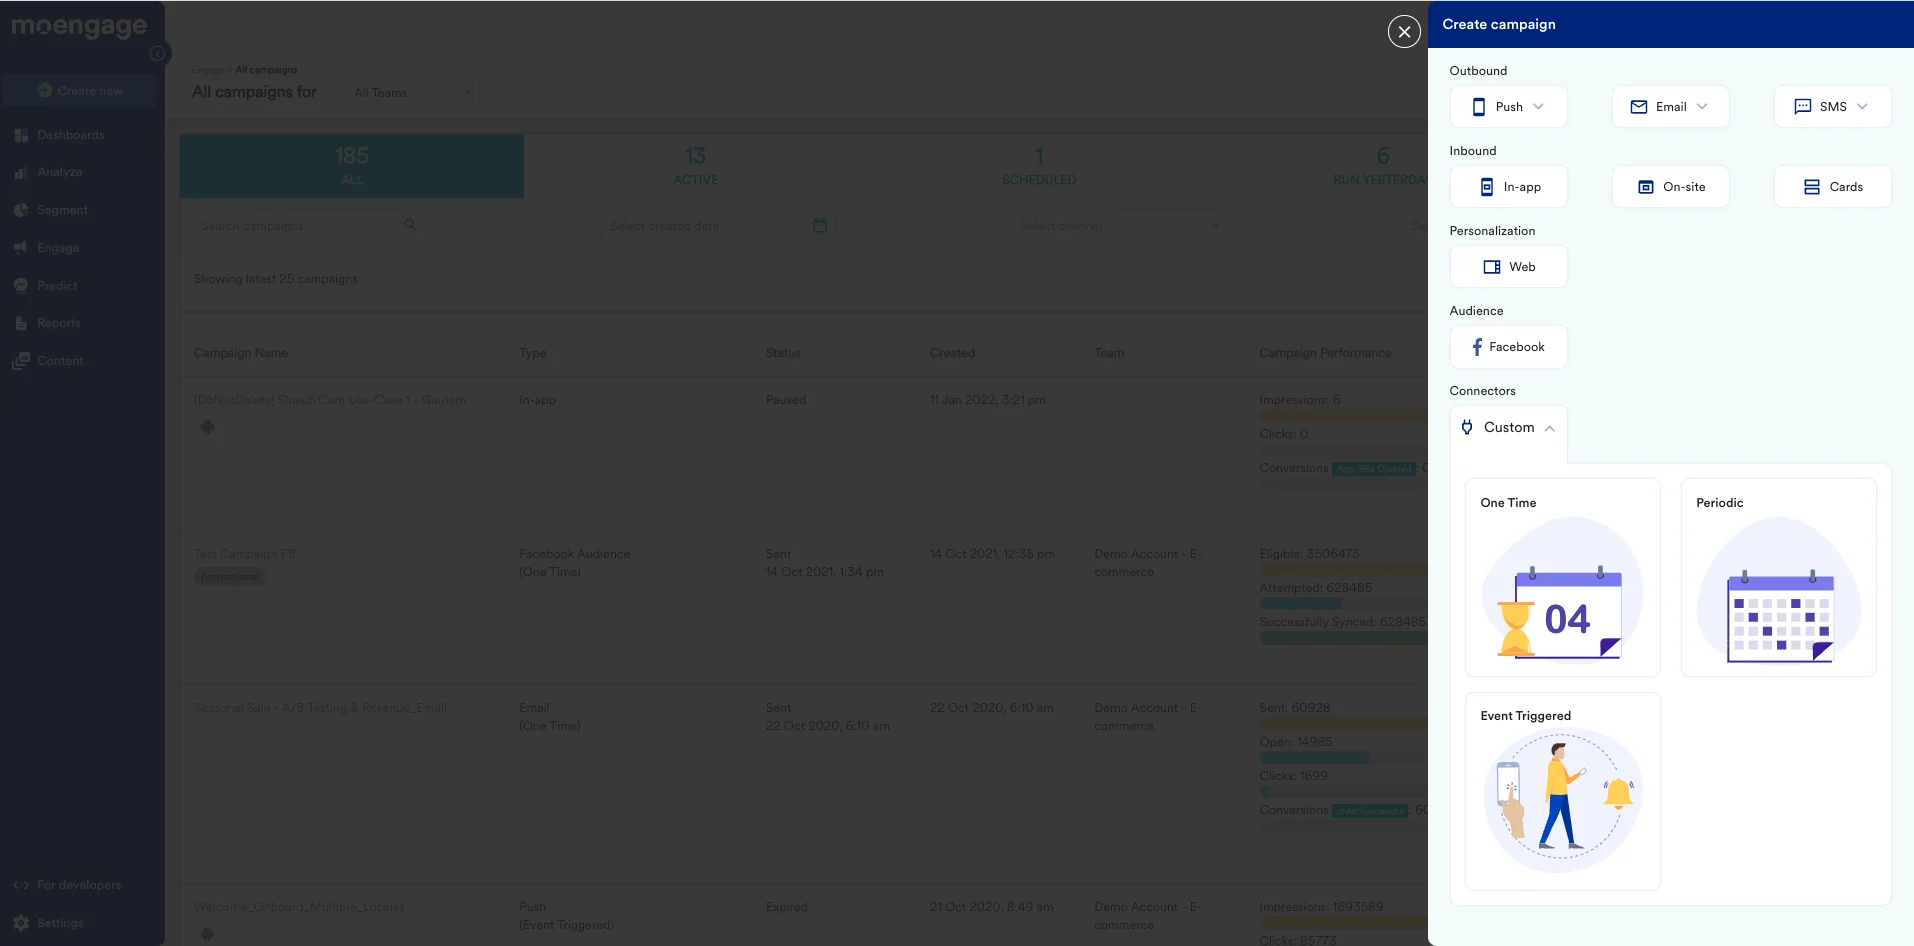 2. Click **Create New** > **Campaign**.
The Create Campaign page is displayed.
2. Click **Create New** > **Campaign**.
The Create Campaign page is displayed.
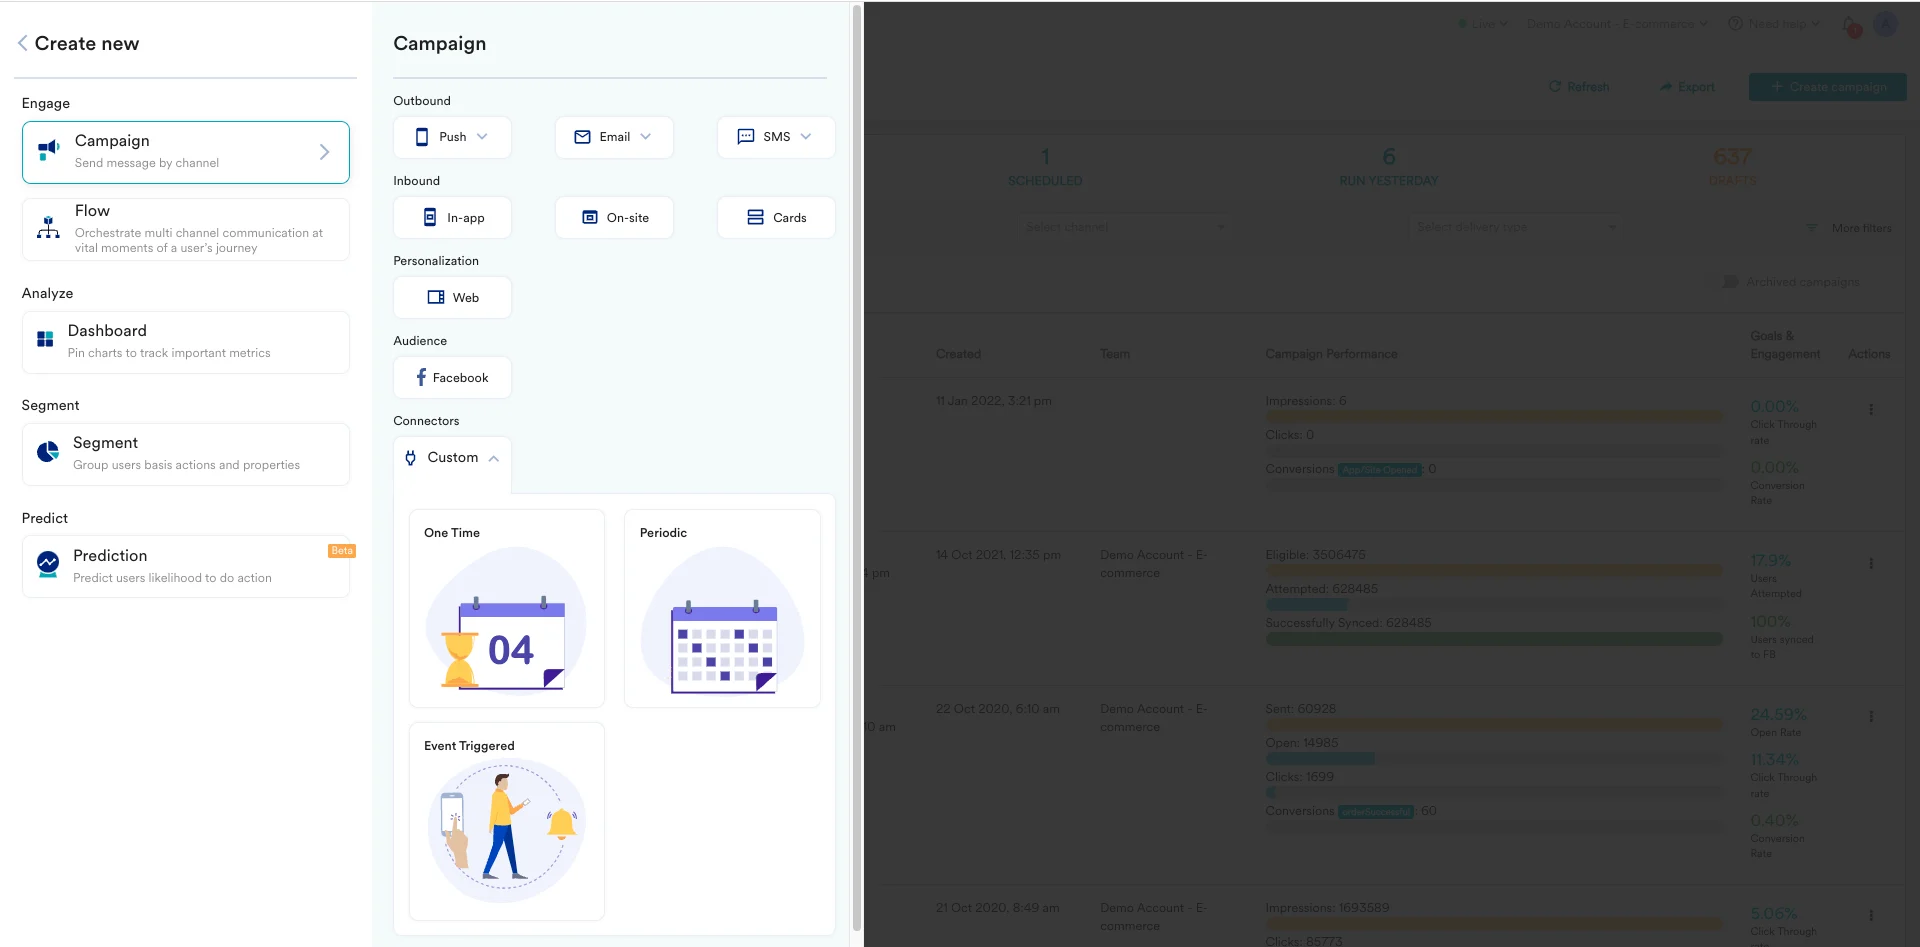 3. Click **Custom** under Connectors.
4. For the campaign delivery types, choose "Event-Triggered".
* For more information about delivery types, refer to [Delivery Types](https://www.moengage.com/docs/user-guide/campaigns-and-channels/getting-started/introduction/delivery-types-moengage-channels).
5. On the next screen, give your Campaign a name, and select the Criteria as "Form submitted" (this is our user event, you can pick anything as per your use case).
6. For trigger, choose "immediately".
3. Click **Custom** under Connectors.
4. For the campaign delivery types, choose "Event-Triggered".
* For more information about delivery types, refer to [Delivery Types](https://www.moengage.com/docs/user-guide/campaigns-and-channels/getting-started/introduction/delivery-types-moengage-channels).
5. On the next screen, give your Campaign a name, and select the Criteria as "Form submitted" (this is our user event, you can pick anything as per your use case).
6. For trigger, choose "immediately".
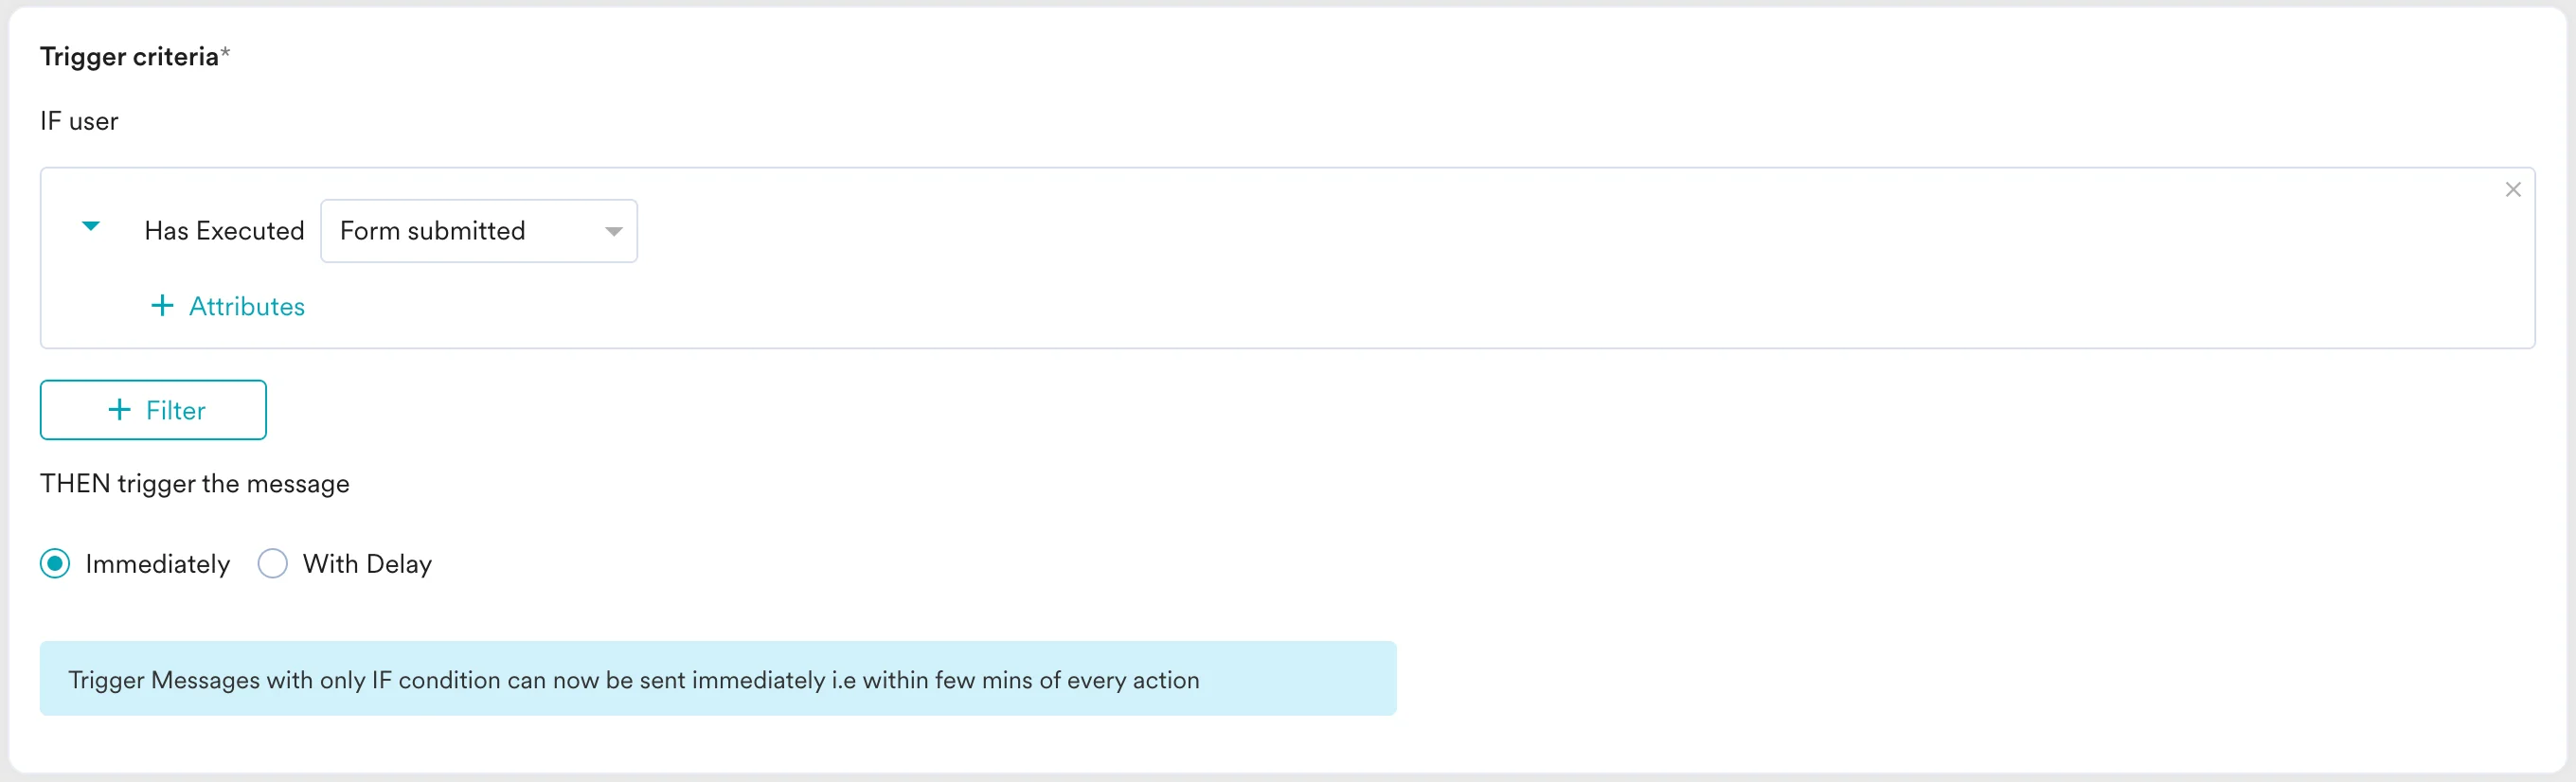 7. For audience, let us choose "All users" for this use case. Click "next" when satisfied.
8. On the content screen, we will define our payload and webhook URL we got from the previous step.
9. Choose method as "POST".
10. Enter the webhook URL you copied earlier.
11. Define the headers and parameters as per your requirements. For this use case, we will just define our payload body- (you can type @ to insert personalised values as well)
7. For audience, let us choose "All users" for this use case. Click "next" when satisfied.
8. On the content screen, we will define our payload and webhook URL we got from the previous step.
9. Choose method as "POST".
10. Enter the webhook URL you copied earlier.
11. Define the headers and parameters as per your requirements. For this use case, we will just define our payload body- (you can type @ to insert personalised values as well)
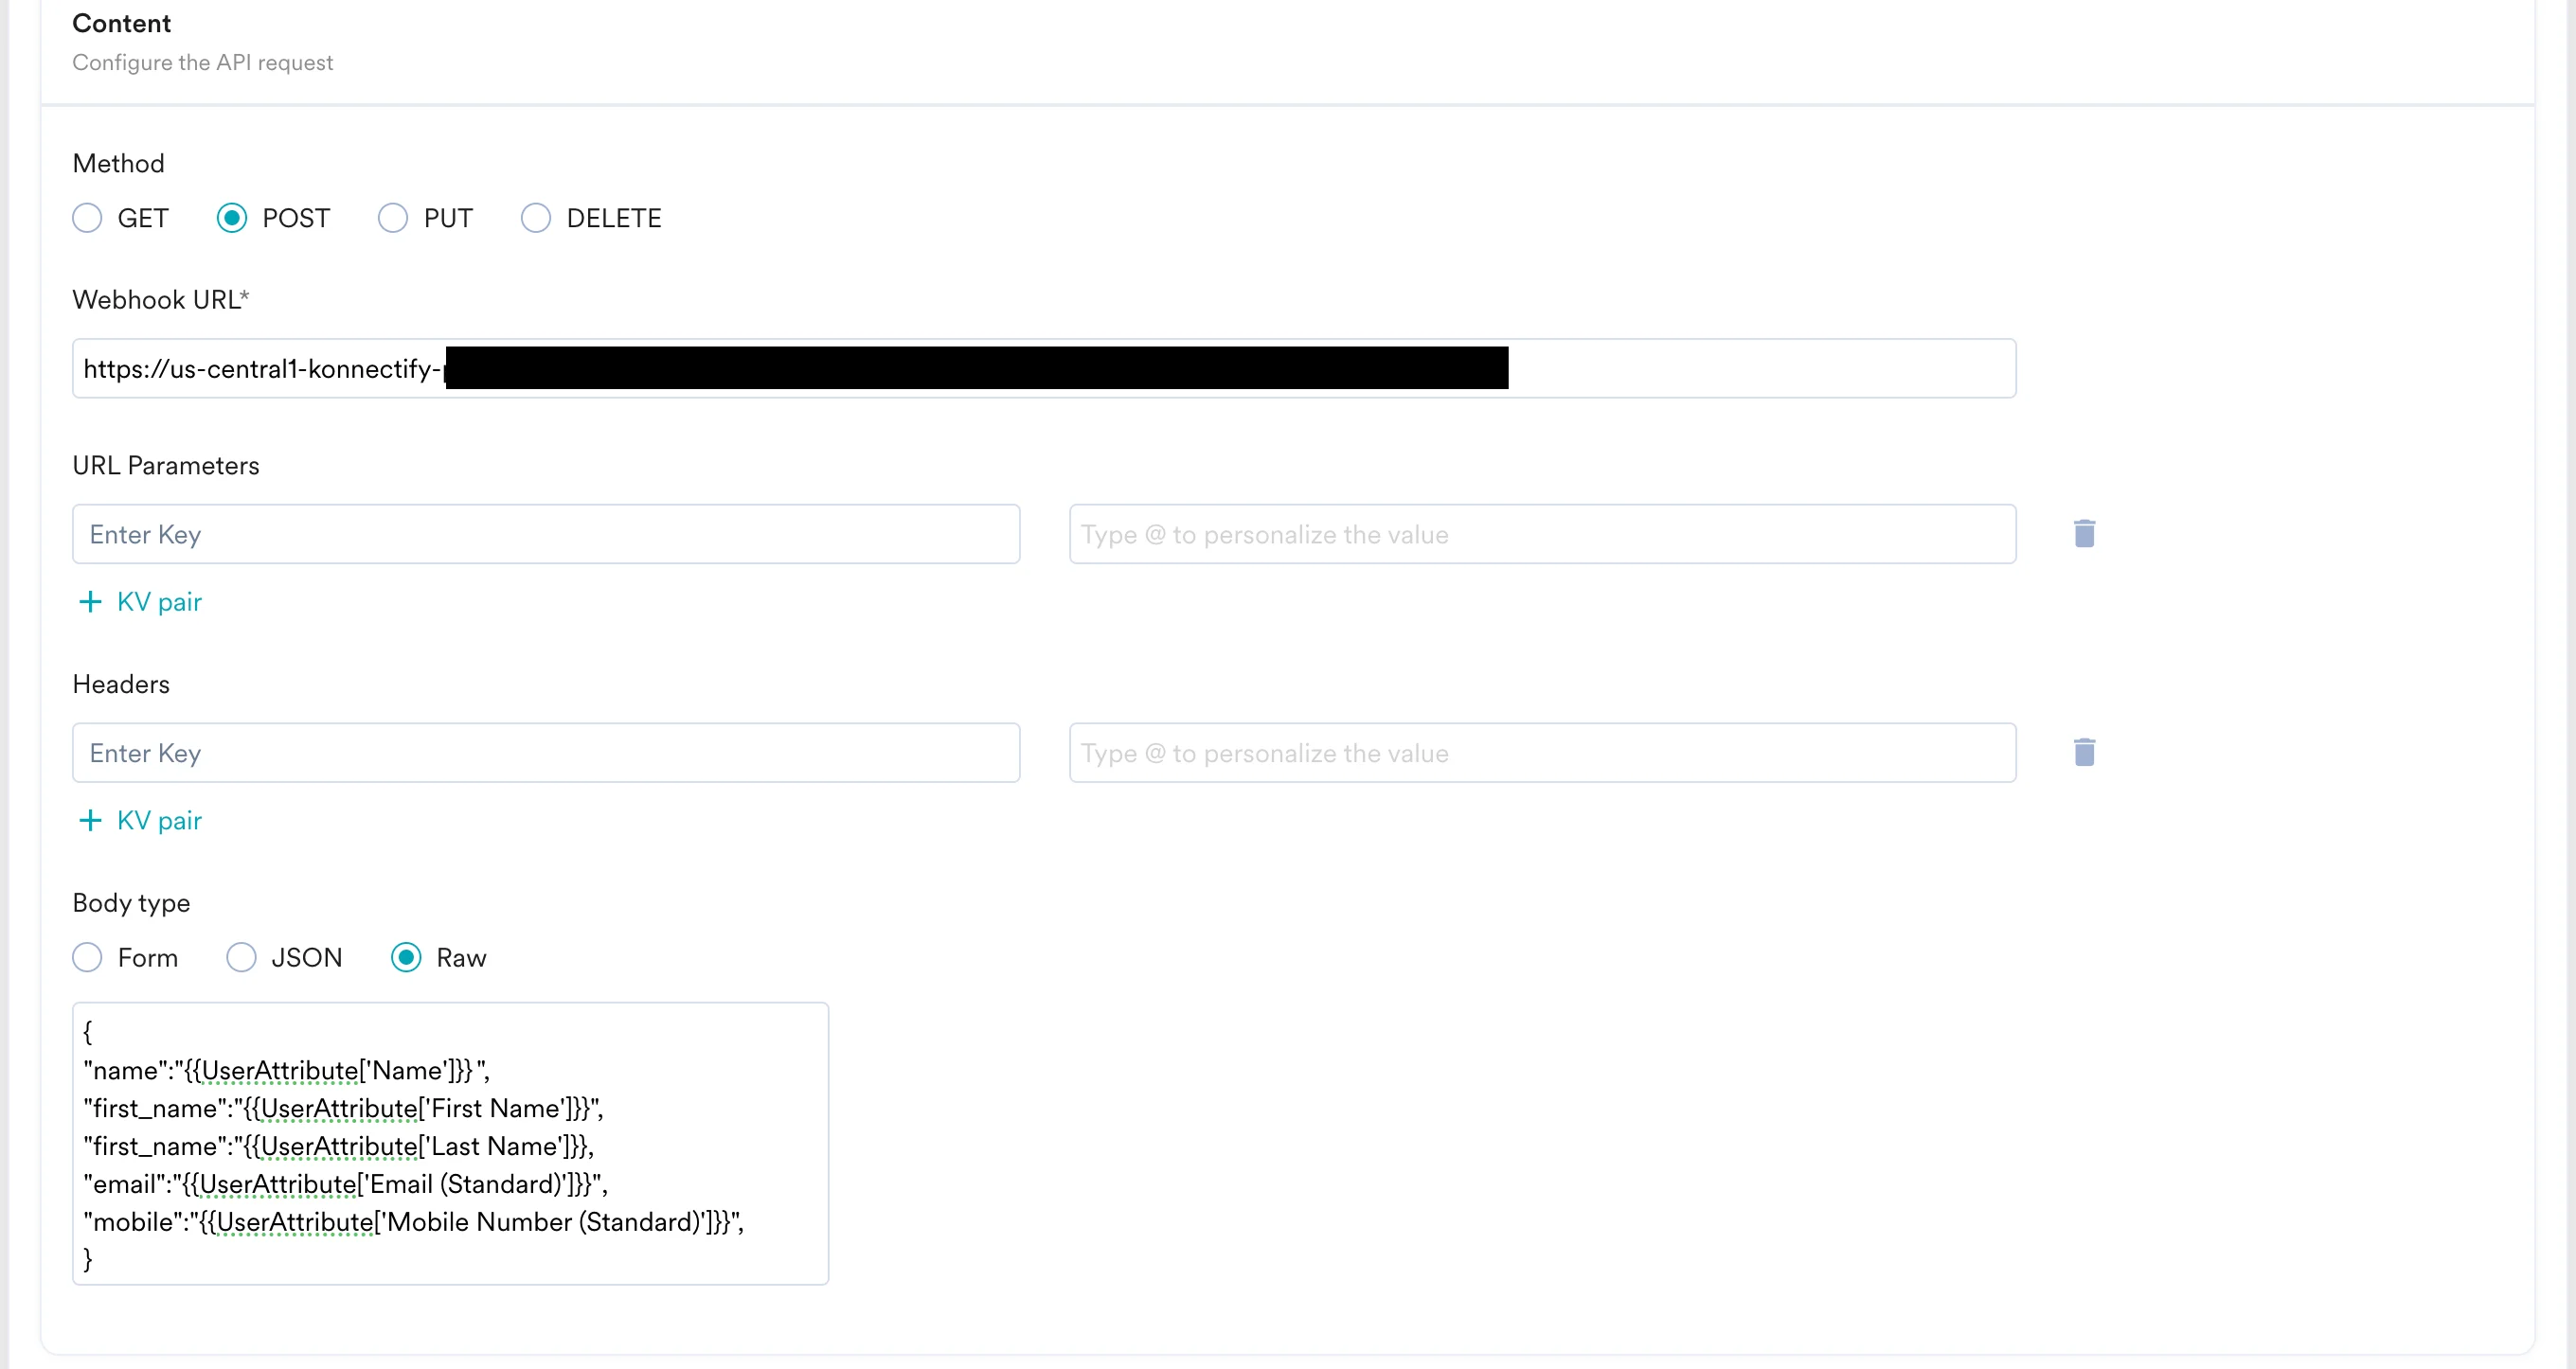 12. Now you need to test this webhook, scroll down and enter a test user's data and click on "test".
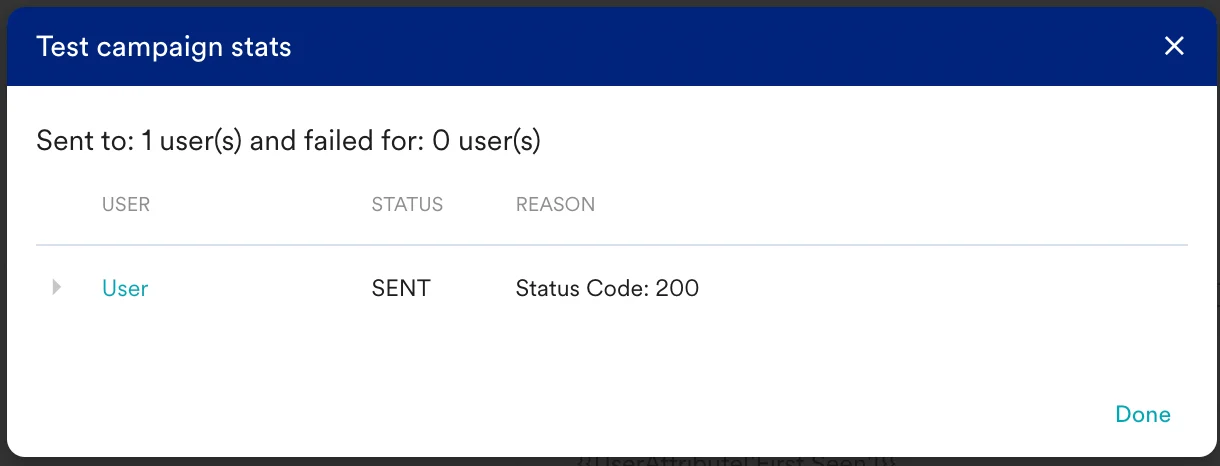
13. You should see a new modal saying the test was successful:
12. Now you need to test this webhook, scroll down and enter a test user's data and click on "test".
13. You should see a new modal saying the test was successful:
 14. Now go back to the Konnectify dashboard.
### Step 3: Capture webhook on Konnectify
Once you have sent a test campaign on MoEngage
1. On your Konnectify dashboard, click on "Trigger output fields" to capture the response.
2. Your sample data will be shown on Konnectify.
3. Click on "Save configuration" to save this webhook.
### Step 4: Create Salesforce as a new Action
1. Click on "+ Add Action".
2. Select "Salesforce" as the Action app.
3. If you have not connected to Salesforce earlier, you will be prompted to enter your Salesforce account details. Validate your account and then save it. If you already have an account, select your the account you want to fetch new leads from.
4. Select the action event as "new-contact":
14. Now go back to the Konnectify dashboard.
### Step 3: Capture webhook on Konnectify
Once you have sent a test campaign on MoEngage
1. On your Konnectify dashboard, click on "Trigger output fields" to capture the response.
2. Your sample data will be shown on Konnectify.
3. Click on "Save configuration" to save this webhook.
### Step 4: Create Salesforce as a new Action
1. Click on "+ Add Action".
2. Select "Salesforce" as the Action app.
3. If you have not connected to Salesforce earlier, you will be prompted to enter your Salesforce account details. Validate your account and then save it. If you already have an account, select your the account you want to fetch new leads from.
4. Select the action event as "new-contact":
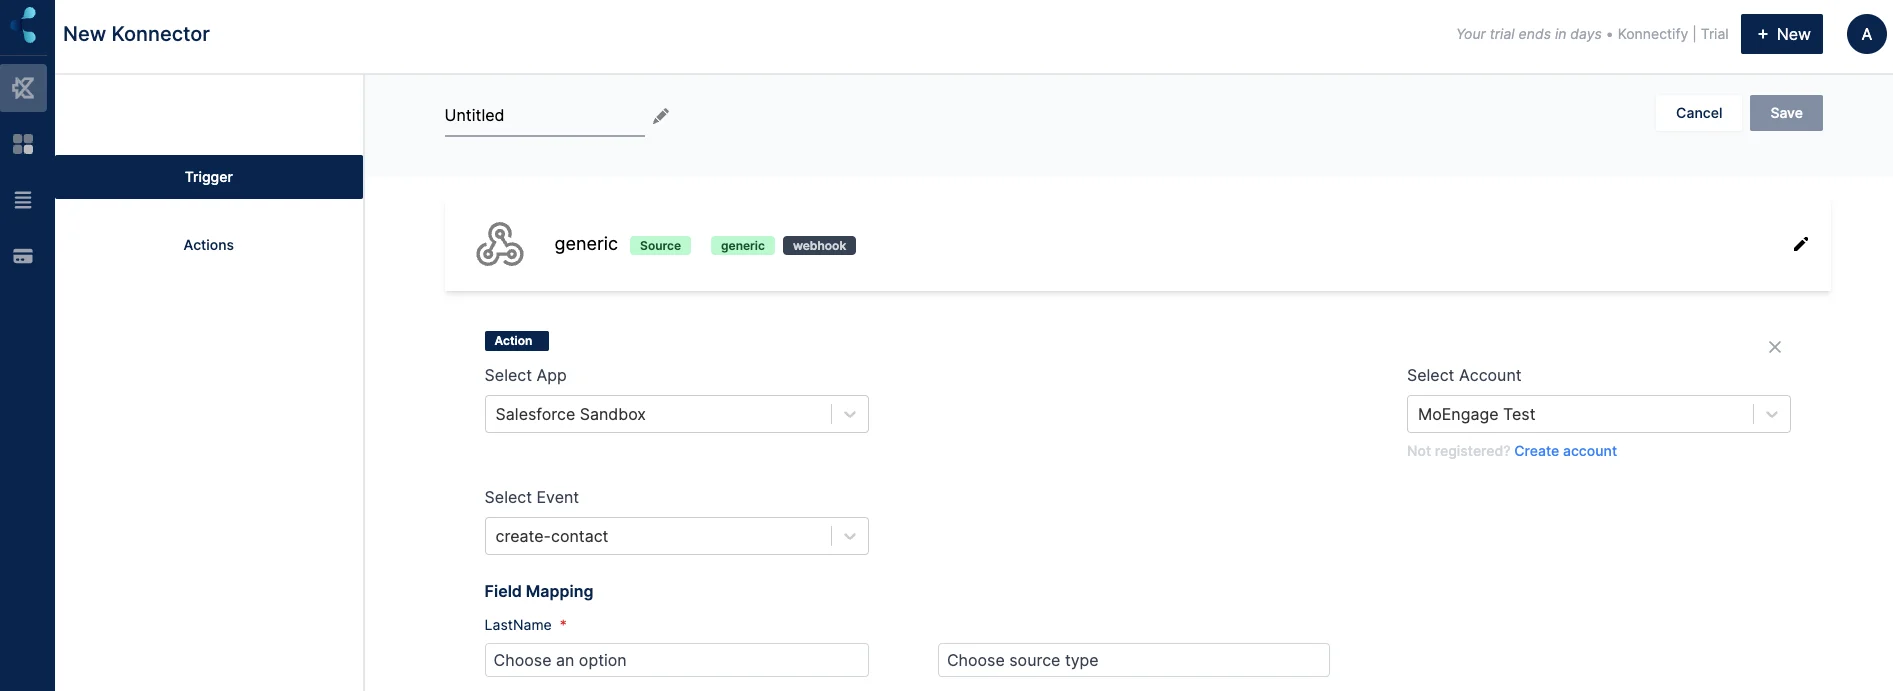 5. Map your contact fields on Salesforce as per your requirements.
6. Click on "Save" when done.
### Step 5: Save your Konnector
Once you have set up your Konnector, give it a name and click on "Save" to save and enable this Konnector:
After you have enabled the Konnector, any user who has submitted the form will be directly imported to Salesforce as a new contact. You can set up similar mappings for other apps as well.
5. Map your contact fields on Salesforce as per your requirements.
6. Click on "Save" when done.
### Step 5: Save your Konnector
Once you have set up your Konnector, give it a name and click on "Save" to save and enable this Konnector:
After you have enabled the Konnector, any user who has submitted the form will be directly imported to Salesforce as a new contact. You can set up similar mappings for other apps as well.