> ## Documentation Index
> Fetch the complete documentation index at: https://moengage.com/docs/llms.txt
> Use this file to discover all available pages before exploring further.
# Behamics Signals
> Integrate Behamics Signals with MoEngage to sync AI-scored behavioral events and trigger contextual journeys based on real-time intent data.
## Introduction
[Behamics](https://behamics.com/), a technology partner of MoEngage, is a leading revenue optimization platform that combines behavioral science with AI to minimize cart abandonment and reduce product returns for E-commerce businesses. Unlike conventional analytics tools that capture simple binary events, Behamics evaluates every user session in real time and assigns intent scores based on full-funnel behavioral patterns.
## MoEngage × Behamics Signals
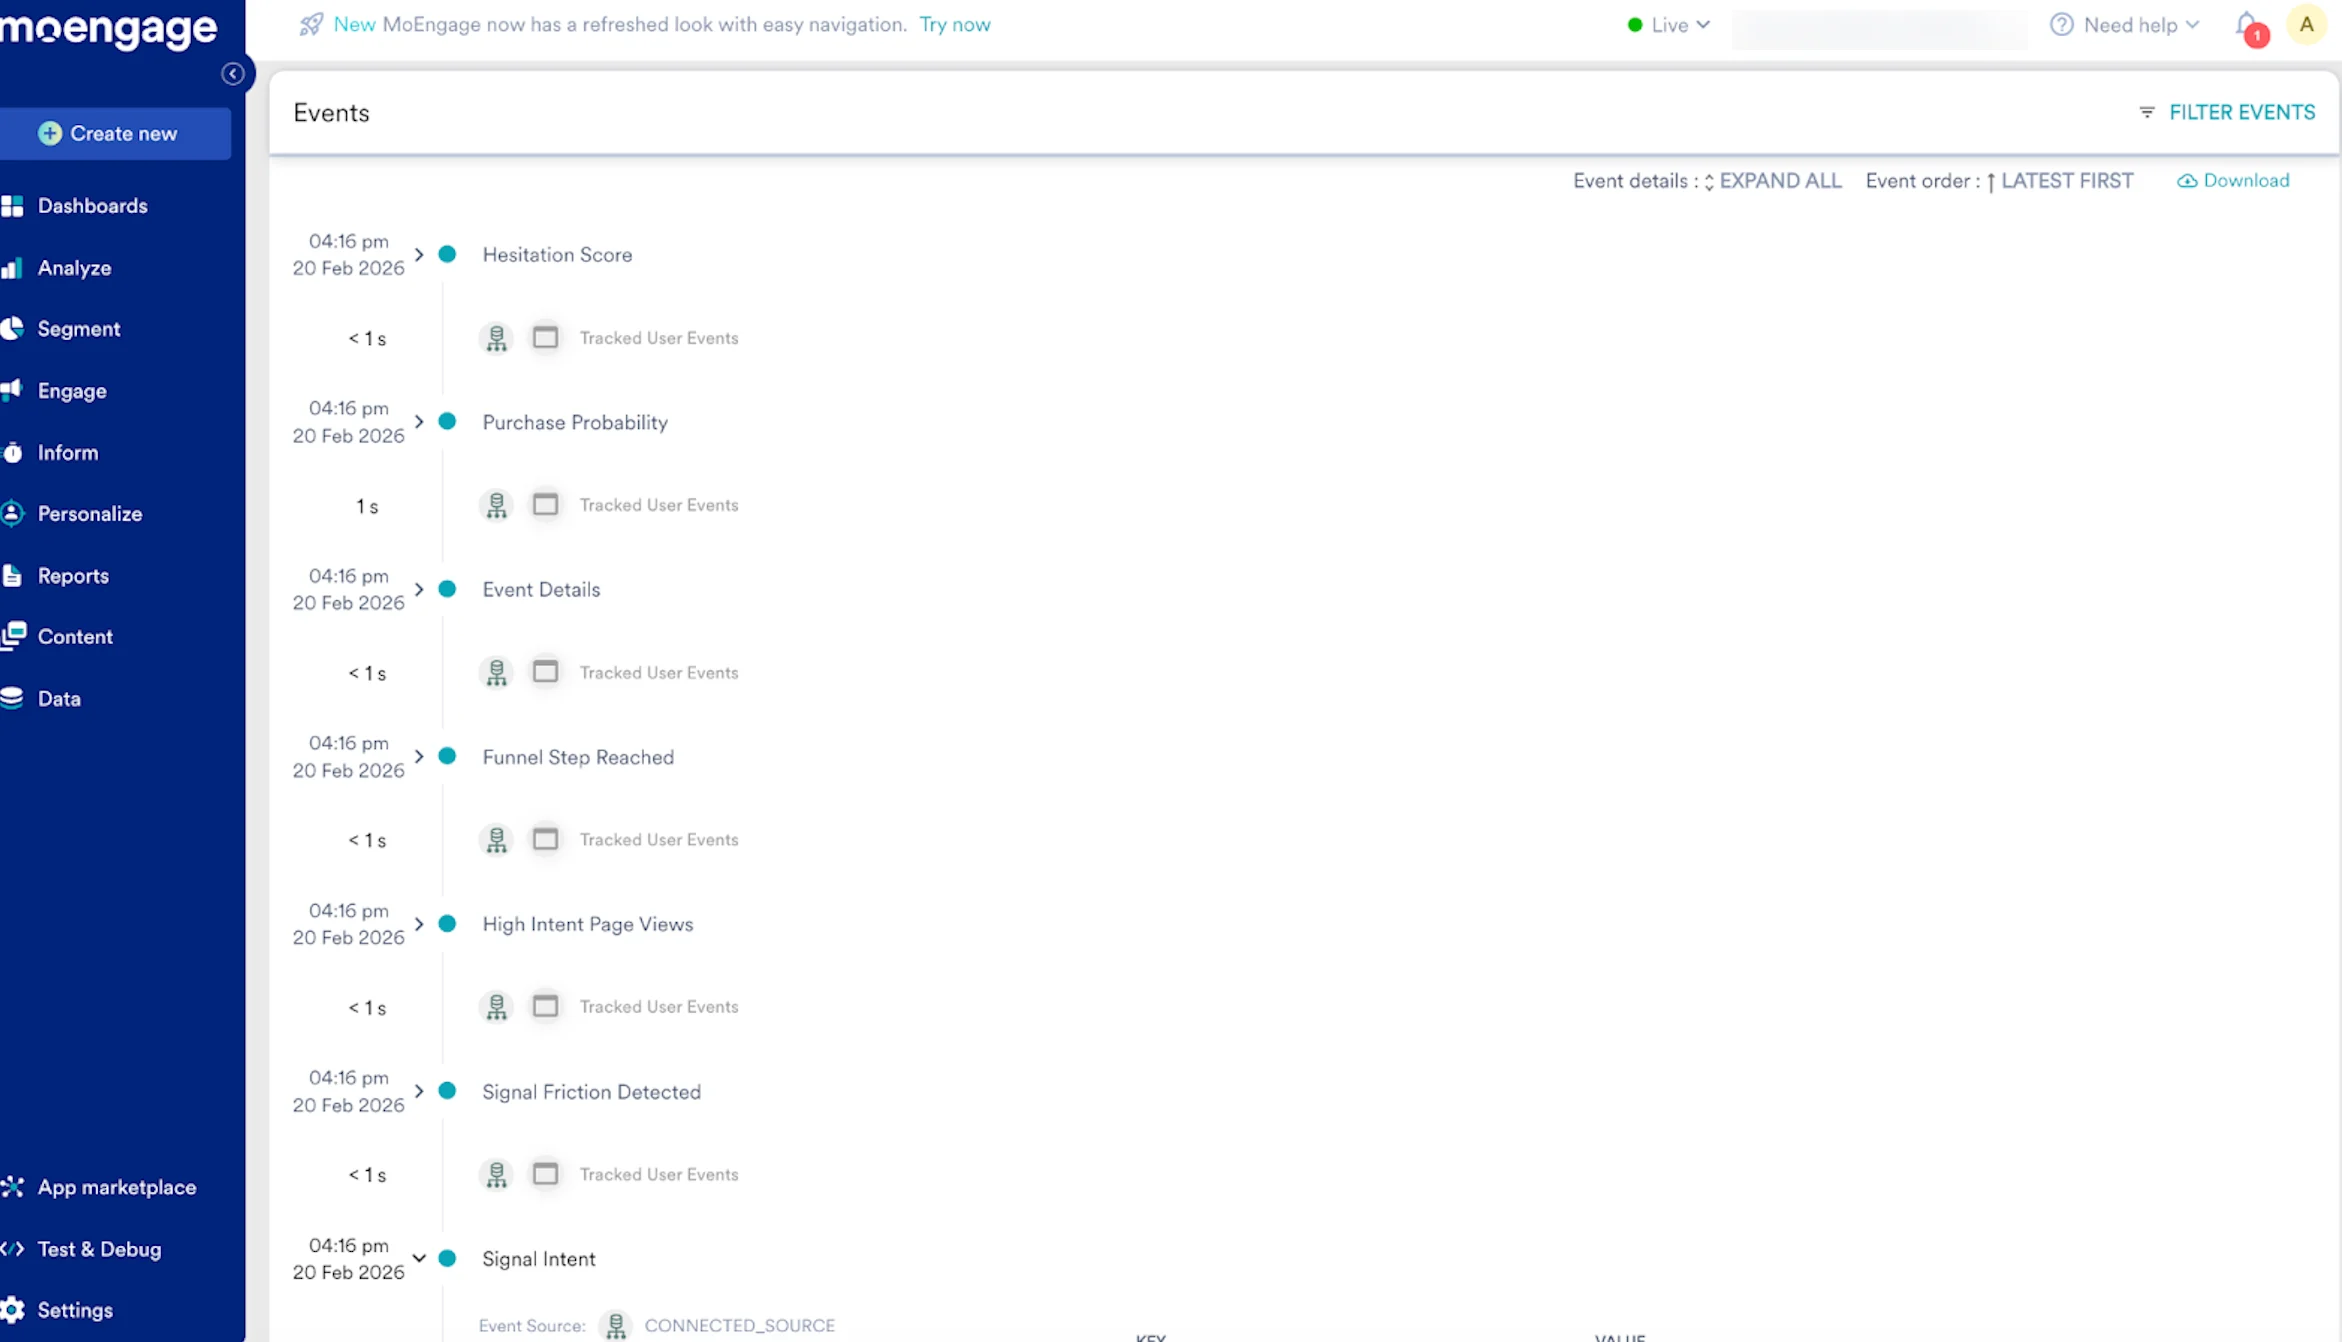
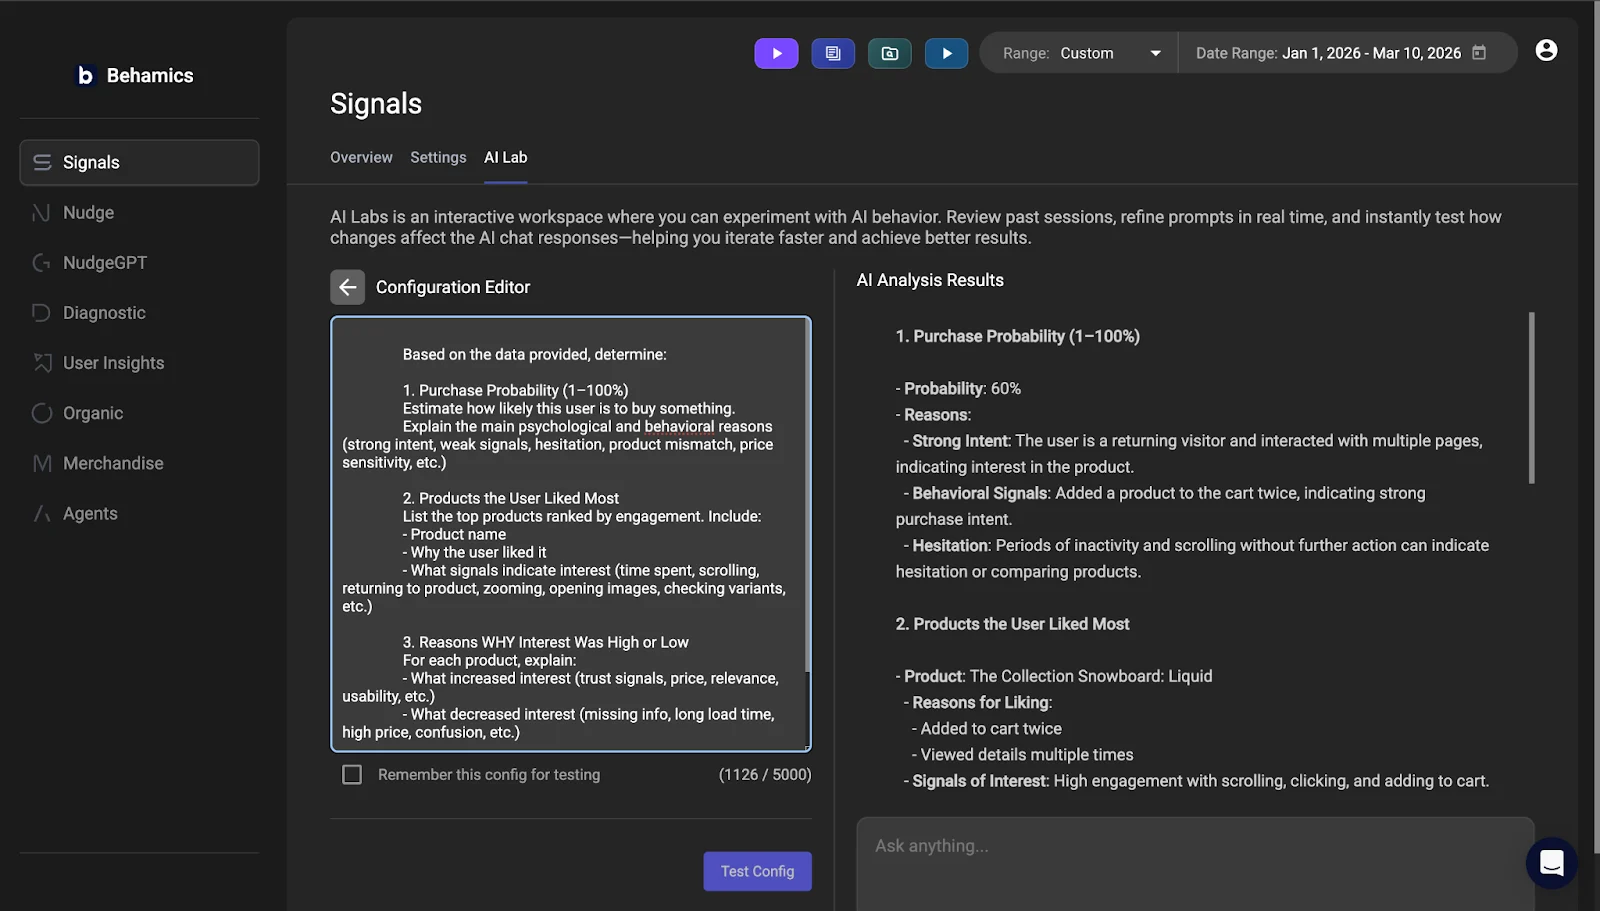
The [Behamics Signals](https://behamics.com/signals/) product translates raw behavioral data—including AI-detected patterns such as rage clicks, accidental add-to-cart actions, sustained product interest, and hesitation signals—into prioritized, decision-ready events.
Integrating Behamics Signals with MoEngage allows you to:
* Sync real-time AI-scored behavioral signals into MoEngage as fully structured custom events, preserving all intent metadata.
* Trigger MoEngage journeys, campaigns, and automated flows directly from Behamics events such as *rage\_click\_detected* or *accidental\_add\_to\_cart*.
* Enrich user profiles with behavioral attributes transmitted alongside each signal, keeping CRM data up to date without manual imports.
* Filter and segment users in MoEngage based on specific signal types to enable behaviorally differentiated marketing journeys.
### Use Cases
Integrating Behamics Signals with MoEngage helps you with the following use cases:
* **High-intent abandonment recovery**: Identify users whose abandonment signals genuine hesitation and trigger a MoEngage flow with behaviorally informed nudges, such as social proof or urgency messaging.
* **Rage-click retention**: Detect UI frustration signals and automatically trigger a support-oriented push notification or in-app message to offer assistance and prevent churn.
* **Precision VIP segmentation**: Sync advanced intent signals to MoEngage to build loyalty segments that prioritize users showing genuine long-term purchase intent over casual browsers.
* **Behavior-based cross-selling**: Leverage AI-detected interest in specific product categories to trigger personalized campaigns recommending complementary items.
* **Returns prevention**: Use detected low-confidence purchase signals to trigger pre-purchase reassurance flows, such as size guides, via MoEngage to reduce return rates.
## Integration
**Prerequisites**
Before you begin, ensure that you meet the following requirements:
* A MoEngage account with `customer_id` details.
* Appropriate permissions to access the MoEngage API settings.
* A dedicated MoEngage endpoint.
### Step 1: Request a Dedicated Endpoint from MoEngage Support
To initiate the integration, you must request a target for the Behamics data and perform the following steps:
1. Contact MoEngage Support and specify your `customer_id`.
**Note**: This ID serves as the primary merge key for associating Behamics events with MoEngage user profiles.
2. MoEngage Support will provision and return a dedicated webhook endpoint URL.
3. Share this URL with your Behamics point of contact for platform configuration.
### Step 2: Retrieve Your Authentication Credentials
The integration uses Basic Authentication via HTTP request headers. To find your credentials, perform the following steps:
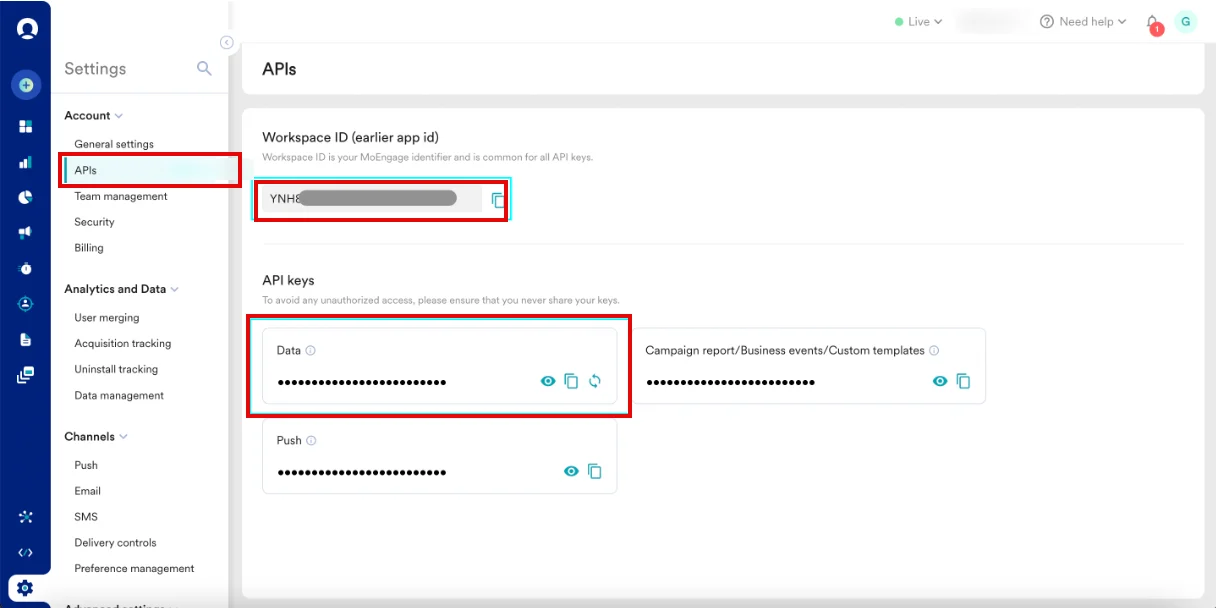
1. On the left navigation menu in the MoEngage UI, go to **Settings** > **Account** > **APIs**.
2. Copy the ID under **Workspace ID (earlier app id)**.
3. In the **API keys** section, copy the API key on the **Data** tile.
 ### Step 3: Generate the Basic Authentication Token
To generate the basic authentication token, perform the following steps:
1. Open an online Basic Auth Header Generator tool.
2. Use your **Workspace ID** as the username.
3. Use your **Data API Key** as the password.
4. The tool generates a value in the format: `Basic {base64_encoded_credentials}`.
**For example**: `Authorization: Basic bW9lbmdhZ2VfYXBwX2lkOmRhdGFfYXBpX2tleQ==`
5. Share this token with the Behamics team to secure the outbound webhook.
### Step 3: Generate the Basic Authentication Token
To generate the basic authentication token, perform the following steps:
1. Open an online Basic Auth Header Generator tool.
2. Use your **Workspace ID** as the username.
3. Use your **Data API Key** as the password.
4. The tool generates a value in the format: `Basic {base64_encoded_credentials}`.
**For example**: `Authorization: Basic bW9lbmdhZ2VfYXBwX2lkOmRhdGFfYXBpX2tleQ==`
5. Share this token with the Behamics team to secure the outbound webhook.
 ### Inject the Behamics Snippet by Using HTML
Inject the Behamics snippet into every front-end page of the shop, including the **Thank You** or **Order Confirmation** page, to properly track the user journey. It is recommended that you inject the Behamics snippet early, for example, in the `` section of the shop.
Depending on the shop's platform, there are multiple ways to inject the snippet. Perform the following steps to inject the Behamics snippet using HTML:
1. Identify a secure connection to the shop's source code directory. You can use a **File Manager**, **FTP access**, **SSH access**, or the platform's administrator account.
2. After you gain access to the source code directory, locate the header HTML file so you can edit it.
3. In a text editor, open the header HTML file, and then paste the following Behamics snippet one line above the closing `` tag:
```html HTML wrap theme={null}
```
**Note**: If the header HTML file is part of the **Thank You** or **Order Confirmation** page, you can skip step 4.
4. To inject the snippet into a separate **Thank You** or **Order Confirmation** page, you must repeat step 2 and locate that specific file, and then paste the Behamics Snippet one line above the closing `` tag as well.
**Information**
For more information, you can contact Behamics support.
### Payload Structure
Behamics transmits event data via HTTPS POST using a JSON payload. The following is the standard payload structure:
```json JSON theme={null}
{
"customer_id": "user_98765",
"event_name": "Signal Session Scored",
"updated_at": "2026-02-20T16:16:50Z",
"page_name": "Summer Collection - Item 42",
"event_details": {
"session_score": 87,
"session_duration_seconds": 214,
"scored_at": "2026-02-20T16:16:50Z"
},
"first_name": "Jane",
"last_name": "Smith",
"email": "jane.smith@example.com",
"phone": "+15550109988",
"birthday": "1992-05-15",
"gender": "female",
"city": "San Francisco",
"state": "California",
"country": "USA",
"user_attributes": {
"loyalty_tier": "gold",
"signup_source": "marketing_email",
"preferences": ["outdoor", "running"]
}
}
```
### Inject the Behamics Snippet by Using HTML
Inject the Behamics snippet into every front-end page of the shop, including the **Thank You** or **Order Confirmation** page, to properly track the user journey. It is recommended that you inject the Behamics snippet early, for example, in the `` section of the shop.
Depending on the shop's platform, there are multiple ways to inject the snippet. Perform the following steps to inject the Behamics snippet using HTML:
1. Identify a secure connection to the shop's source code directory. You can use a **File Manager**, **FTP access**, **SSH access**, or the platform's administrator account.
2. After you gain access to the source code directory, locate the header HTML file so you can edit it.
3. In a text editor, open the header HTML file, and then paste the following Behamics snippet one line above the closing `` tag:
```html HTML wrap theme={null}
```
**Note**: If the header HTML file is part of the **Thank You** or **Order Confirmation** page, you can skip step 4.
4. To inject the snippet into a separate **Thank You** or **Order Confirmation** page, you must repeat step 2 and locate that specific file, and then paste the Behamics Snippet one line above the closing `` tag as well.
**Information**
For more information, you can contact Behamics support.
### Payload Structure
Behamics transmits event data via HTTPS POST using a JSON payload. The following is the standard payload structure:
```json JSON theme={null}
{
"customer_id": "user_98765",
"event_name": "Signal Session Scored",
"updated_at": "2026-02-20T16:16:50Z",
"page_name": "Summer Collection - Item 42",
"event_details": {
"session_score": 87,
"session_duration_seconds": 214,
"scored_at": "2026-02-20T16:16:50Z"
},
"first_name": "Jane",
"last_name": "Smith",
"email": "jane.smith@example.com",
"phone": "+15550109988",
"birthday": "1992-05-15",
"gender": "female",
"city": "San Francisco",
"state": "California",
"country": "USA",
"user_attributes": {
"loyalty_tier": "gold",
"signup_source": "marketing_email",
"preferences": ["outdoor", "running"]
}
}
```
 **Information**
* **Unique user ID**: The `customer_id` field is the sole merge key. Ensure that the identifier used in Behamics matches the MoEngage `unique_user_id`. Mismatches create duplicate user profiles.
* **Payload updates**: Communicate any changes to payload fields or `user_attributes` keys to both MoEngage Support and your Behamics point of contact.
* **One-way data flow:** This integration provides a one-way data flow from Behamics to MoEngage. The current implementation does not support bidirectional sync.
### Best Practices
* **Consistent identifiers**: Always use the MoEngage `unique_user_id` as the Behamics `customer_id` to ensure accurate profile updates.
* **Payload communication**: Verify custom mappings with MoEngage Support before finalizing the Behamics webhook setup to prevent data loss.
* **Secure storage**: Keep your Base64-encoded Basic Auth token in a secure location and share it only with authorized Behamics personnel.
### Rate Limits
To maintain platform stability, MoEngage limits ingestion of Behamics data to a maximum of 500 requests per second (RPS) per workspace. If your workspace exceeds this limit, MoEngage returns an HTTP `429 (Too Many Requests)` status code.
Refer to Behamics default retry policy to understand how rate limiting affects your data flow.
**Retry Exhaustion**: If Behamics exhausts all retry attempts for a batch of data, you must contact the Behamics Support Team to replay the failed requests.
**Information**
* **Unique user ID**: The `customer_id` field is the sole merge key. Ensure that the identifier used in Behamics matches the MoEngage `unique_user_id`. Mismatches create duplicate user profiles.
* **Payload updates**: Communicate any changes to payload fields or `user_attributes` keys to both MoEngage Support and your Behamics point of contact.
* **One-way data flow:** This integration provides a one-way data flow from Behamics to MoEngage. The current implementation does not support bidirectional sync.
### Best Practices
* **Consistent identifiers**: Always use the MoEngage `unique_user_id` as the Behamics `customer_id` to ensure accurate profile updates.
* **Payload communication**: Verify custom mappings with MoEngage Support before finalizing the Behamics webhook setup to prevent data loss.
* **Secure storage**: Keep your Base64-encoded Basic Auth token in a secure location and share it only with authorized Behamics personnel.
### Rate Limits
To maintain platform stability, MoEngage limits ingestion of Behamics data to a maximum of 500 requests per second (RPS) per workspace. If your workspace exceeds this limit, MoEngage returns an HTTP `429 (Too Many Requests)` status code.
Refer to Behamics default retry policy to understand how rate limiting affects your data flow.
**Retry Exhaustion**: If Behamics exhausts all retry attempts for a batch of data, you must contact the Behamics Support Team to replay the failed requests.