> ## Documentation Index
> Fetch the complete documentation index at: https://moengage.com/docs/llms.txt
> Use this file to discover all available pages before exploring further.
# Heap Analytics
> Stream behavioral events and user properties between Heap Analytics and MoEngage to enrich profiles and trigger contextual campaigns.
## Introduction
[Heap Analytics](https://www.heap.io/) is a product analytics platform that automatically captures a complete and retroactive dataset of all user actions, including clicks, taps, and page views. With Heap, teams can eliminate manual tracking, focusing entirely on analysis and insights.
## MoEngage × Heap
The MoEngage and Heap Analytics integration allows for the bi-directional flow of data. You can stream behavioral events from Heap to MoEngage to enrich user profiles, and you can forward MoEngage events to Heap for in-depth analysis.
This synchronization ensures you have the richest, most current user behavior data for accurate segmentation and timely, contextually relevant engagement campaigns.
With this integration, you can:
* Stream automatically behavioral data and custom events from Heap to MoEngage.
* Enrich MoEngage user profiles with detailed user properties and segmentation data from Heap.
* Trigger real-time, personalized campaigns based on significant in-app or on-site actions identified by Heap.
* Use Heap's retroactive data to segment users in MoEngage based on actions taken even before the campaign was set up.
### Use Cases
Integrating Heap with MoEngage helps you solve the following use cases:
* **High-friction drop-off re-engagement**: When a user completes a critical product flow but drops off at a high-friction point (identified by Heap Illuminate), trigger an immediate MoEngage campaign with a helpful tip or a support offer.
* **Feature adoption nurturing**: Track the first time a user performs a key action in your product. Stream that event to MoEngage to initiate a multi-step campaign that encourages deeper feature exploration or highlights advanced functionality.
* **Subscription trial conversion**: When a user's *Trial Ended* event is captured in Heap, stream it to MoEngage to trigger a highly personalized discount or extension offer based on their past usage intensity (for example, number of sessions or key events completed).
## Sync Data to MoEngage
This section describes how to configure webhooks in Heap Analytics to stream user and event data to your MoEngage workspace.
Ensure you have the following:
* Administrator access to your Heap account.
* A Heap plan that includes access to Webhooks.
### Sync Modules
The following table outlines the default sync type for each module:
| Module | MoEngage Sync Type |
| ----------------- | ------------------ |
| Users | Users |
| Events | Events |
| Sessions Data | Events |
| Custom Properties | Events |
### Step 1: Get Your MoEngage Endpoint
To get a dedicated endpoint for your integration, please contact the MoEngage Support team. In your request, you must specify the common identifier used to link user profiles between MoEngage and the partner platform.
For example, the common identifier is typically the user's email address or phone number.
### Step 2: Create a Webhook in Heap
To create a webhook in Heap, perform the following steps:
1. Log in to your Heap account.
2. On the left navigation menu, click the **Integrations** list, and then click **Directory**.
3. In the **Search all** box, type **Webhooks**.
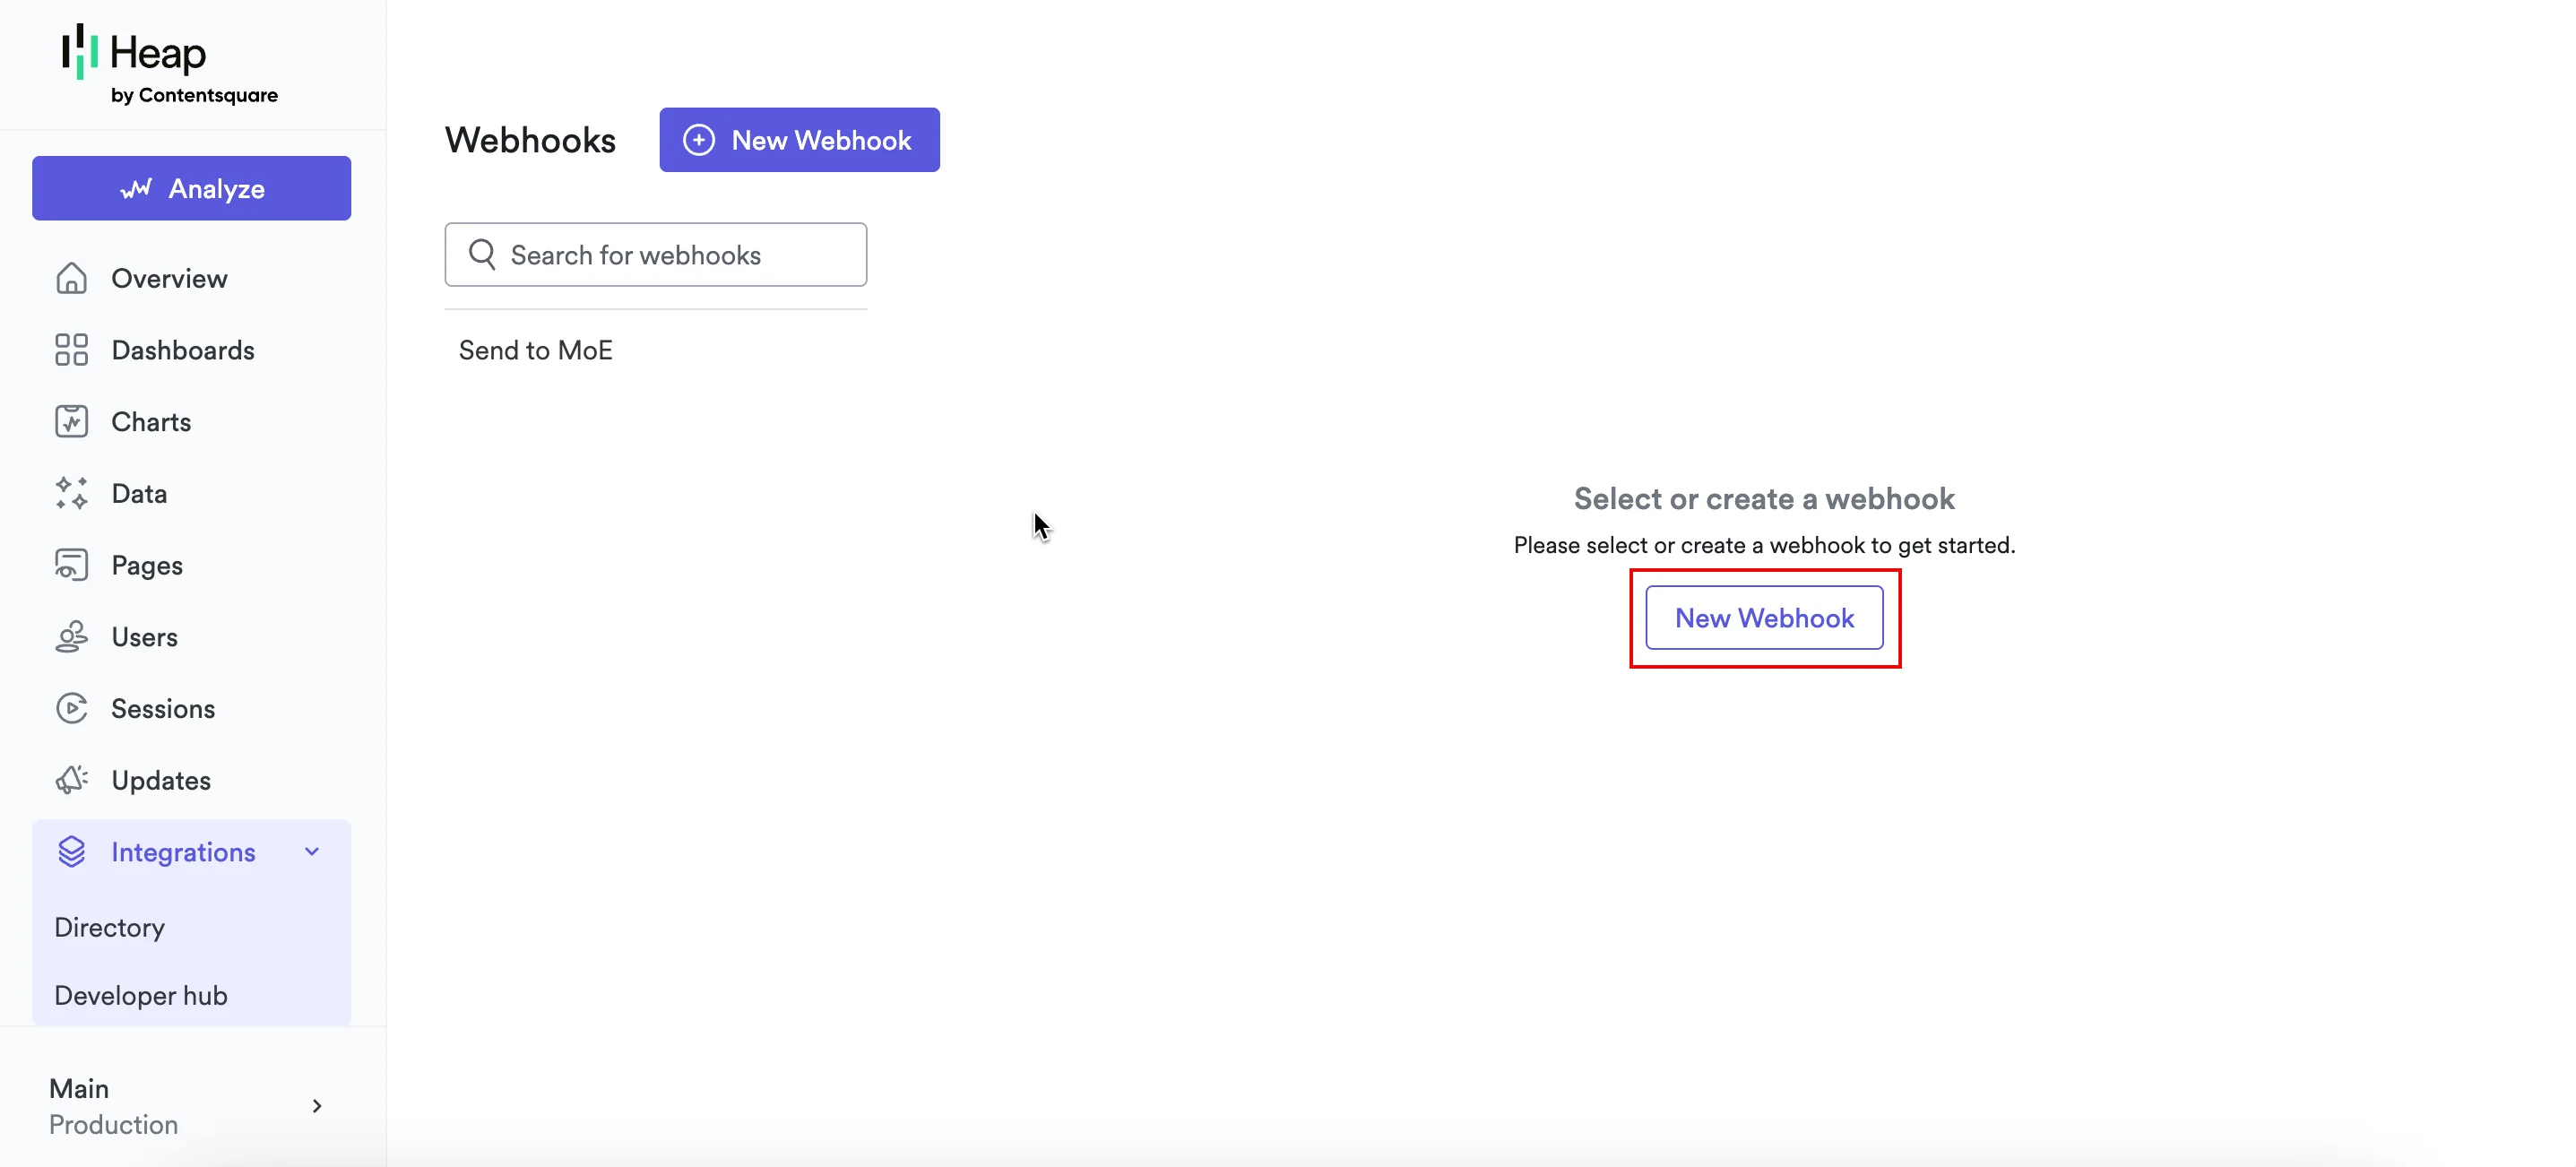
4. In the results list, click **Webhooks**. 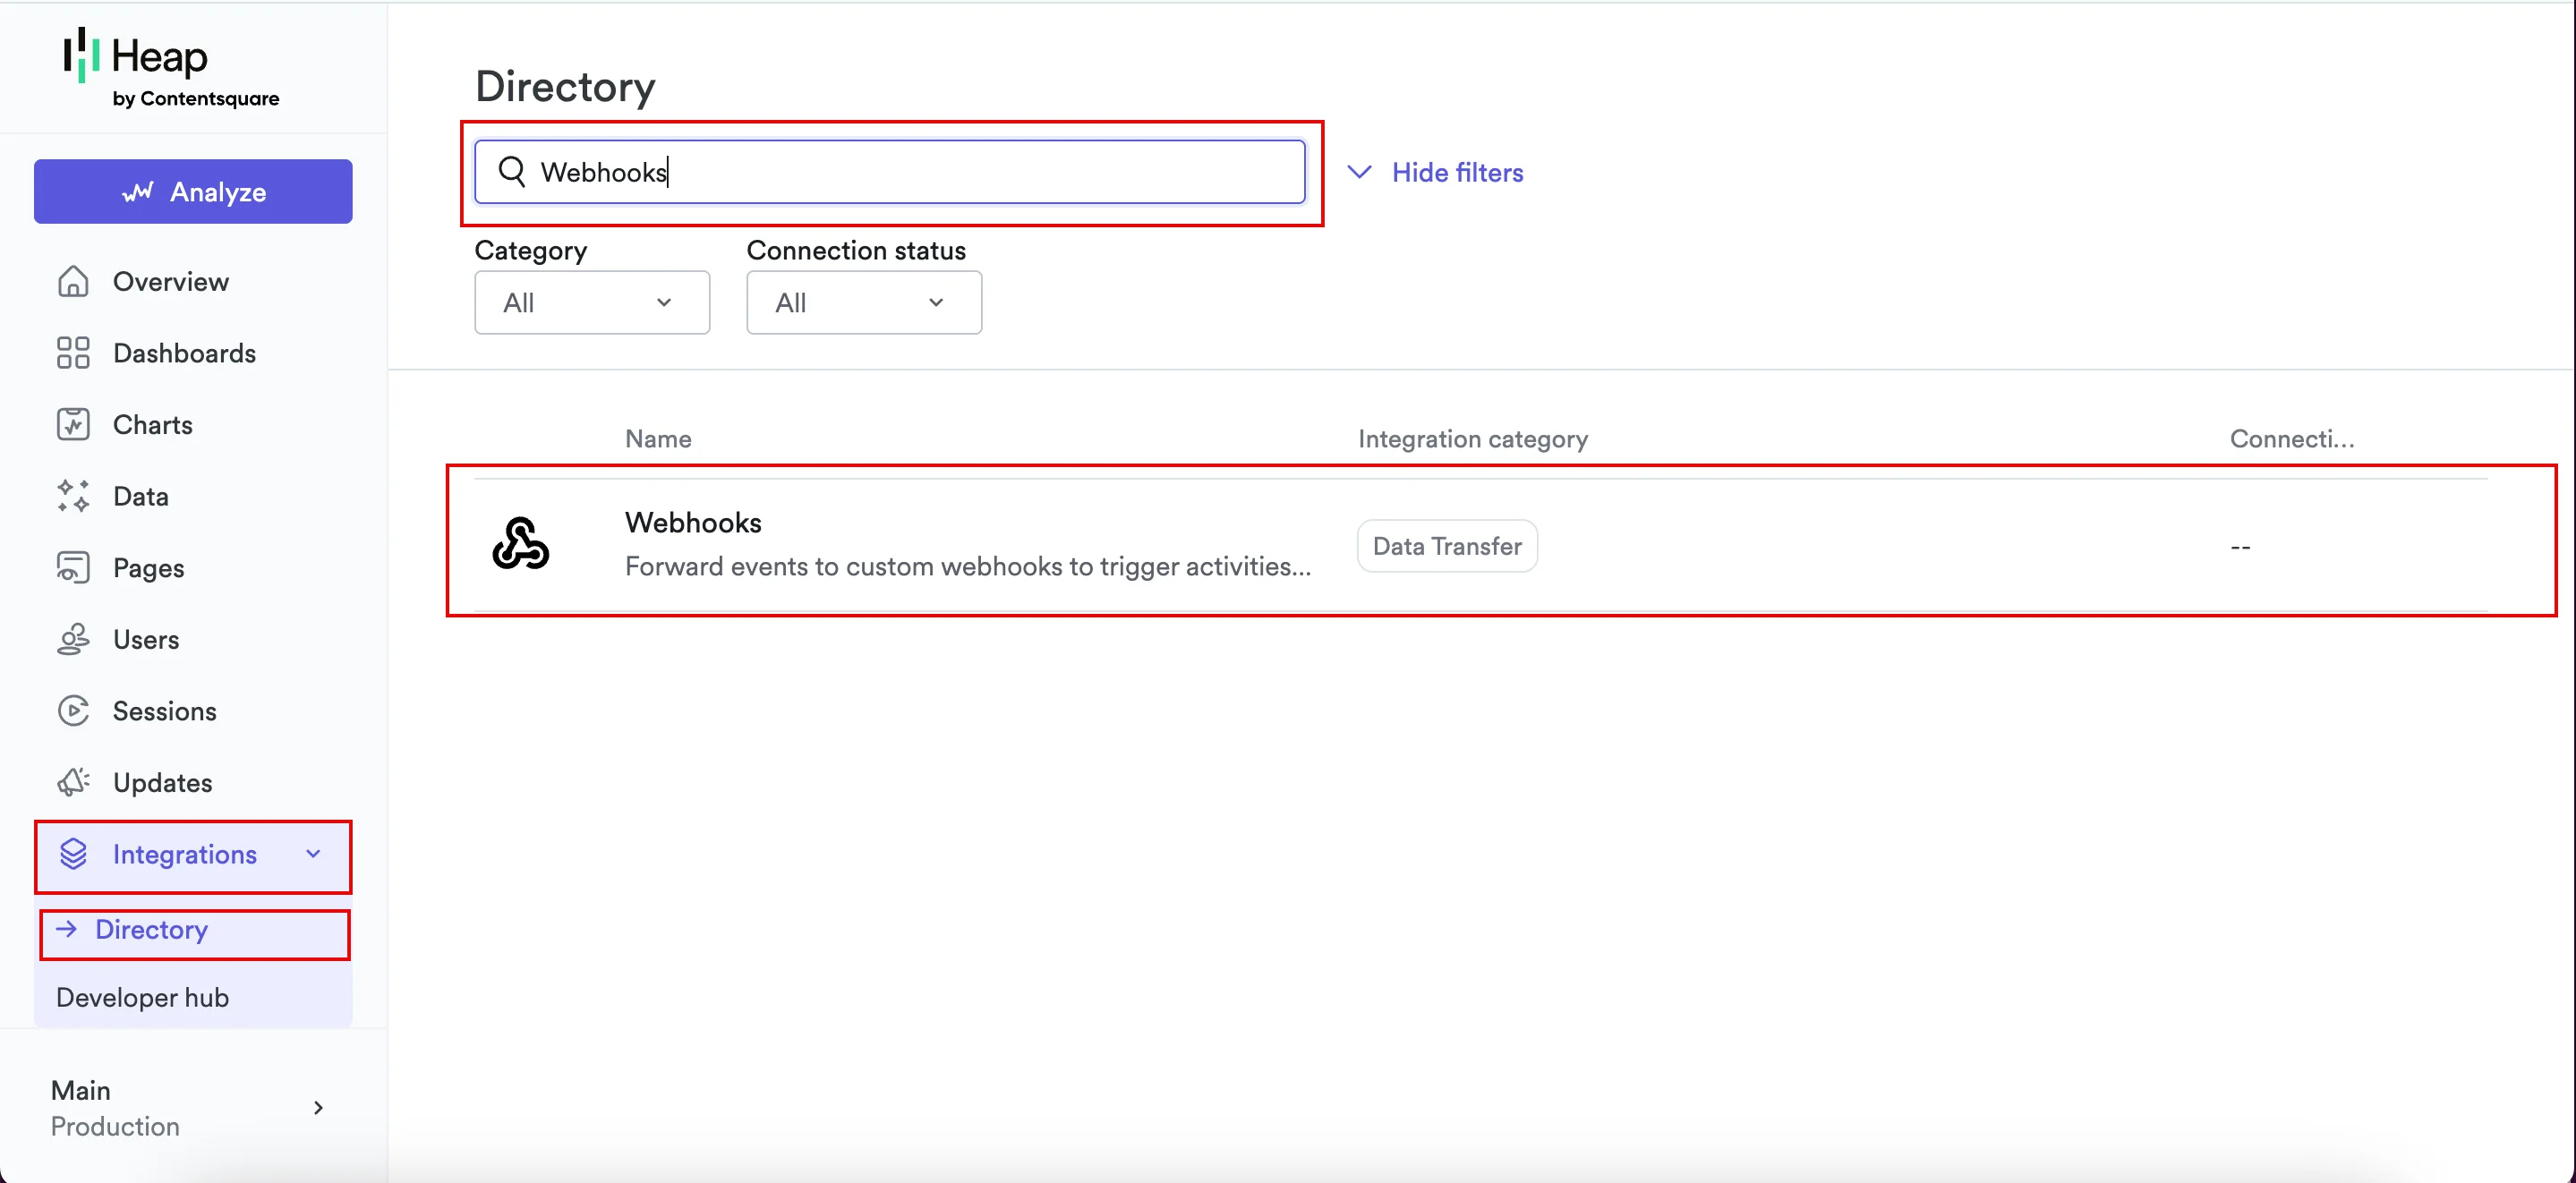 5. In the center of the screen, click **New Webhook**.
  ### Step 3: Configure the Webhook, Authentication, and Data to Send
Provide the following details to configure the webhook, Authentication, and Data to Send:
1. Under **Basic Configuration**, in the **Heap Webhook** section, provide the following details:
| Heap Webhook Section | Description |
| -------------------- | ------------------------------------------------------------------------------------------------------------------------------------------------------------------------------ |
| **URL** | Enter the dedicated webhook URL provided by the MoEngage team. The format is: `https://api-0X.moengage.com/v1/partner/heap-analytics/{events/user}/?configName={config_name}`. |
2. Under **HTTP Headers**, click **Add Header**.
3. Provide the following key-value pairs:
| Key | Value |
| ----------------- | ------------------------------------------------------------------------------------------------------------------------------------------------------------------------------------------------------------------------------------------------------------------------------------------------------------------------------------------------------------------------------------------------------------------------------------------------------------------------------------------------------------------------------------------------------------------------------------------------------------------------------------------------------------------------------------------------------------------------------------------------------------------------ |
| **Authorization** | Generate a Basic Authentication Token using an online [Basic Auth Header Generator tool](https://www.debugbear.com/basic-auth-header-generator). You must enter your **Workspace ID** as username and **Data API Key** as password. To find your credentials, perform the following steps:
### Step 3: Configure the Webhook, Authentication, and Data to Send
Provide the following details to configure the webhook, Authentication, and Data to Send:
1. Under **Basic Configuration**, in the **Heap Webhook** section, provide the following details:
| Heap Webhook Section | Description |
| -------------------- | ------------------------------------------------------------------------------------------------------------------------------------------------------------------------------ |
| **URL** | Enter the dedicated webhook URL provided by the MoEngage team. The format is: `https://api-0X.moengage.com/v1/partner/heap-analytics/{events/user}/?configName={config_name}`. |
2. Under **HTTP Headers**, click **Add Header**.
3. Provide the following key-value pairs:
| Key | Value |
| ----------------- | ------------------------------------------------------------------------------------------------------------------------------------------------------------------------------------------------------------------------------------------------------------------------------------------------------------------------------------------------------------------------------------------------------------------------------------------------------------------------------------------------------------------------------------------------------------------------------------------------------------------------------------------------------------------------------------------------------------------------------------------------------------------------ |
| **Authorization** | Generate a Basic Authentication Token using an online [Basic Auth Header Generator tool](https://www.debugbear.com/basic-auth-header-generator). You must enter your **Workspace ID** as username and **Data API Key** as password. To find your credentials, perform the following steps: - On the MoEngage UI, navigate to **Settings** > **Account** > **APIs**.
- Copy the ID under **Workspace ID (earlier app id)**.
- Copy the **Data** under **API keys**.
Your Basic Authentication Token is a combination of **Workspace ID** and **Data**. For example, paste the following value as your Basic Authentication Token: `Basic {base64_encoded_credentials}`. **Note**: Ensure the token is copied completely without extra spaces. |
| **Content-Type** | `application/json` |
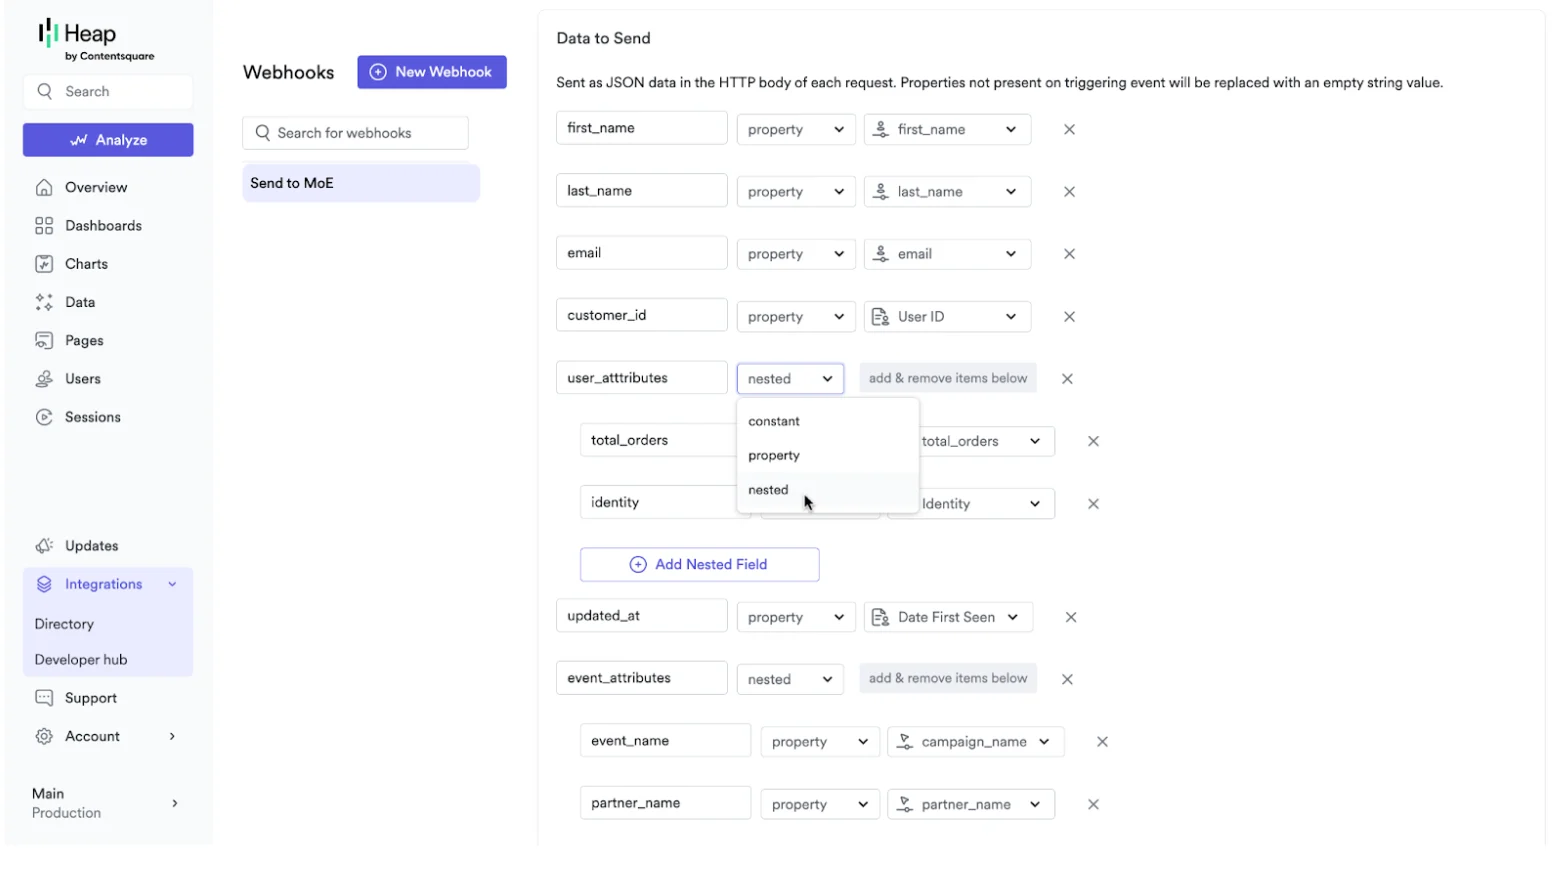
4. In the **Data to Send** section, map the required fields for syncing.
5. Click **+ Add Field**.
6. Enter the field name.
7. Select its type (for example, **property**).
8. Select the corresponding value based on the sync type.
9. Configure the user's sync. The following mappings are for syncing user profiles:
| Key (MoEngage Payload) | Type | Heap Property Selection |
| ---------------------- | -------- | ----------------------- |
| `customer_id` | property | Unique User Identifier |
| `first_name` | property | First Name |
| `last_name` | property | Last Name |
| `email` | property | Email |
| `phone` | property | Phone |
| `updated_at` | property | Timestamp |
10. To send user's additional details, click **+ Add Field** again. Create a field named `user_attributes` and set its type to **Nested**.
11. Configure the event sync.
12. To map the required details, repeat steps 4 through 8.
13. To send event details, click **+ Add Field** again. Create a field named `event_attributes` and set its type to **Nested**.
14. Inside this `event_attributes` nested structure, add the following keys:
* An `event_name` key to identify the event.
* Any other event-specific properties (for example, `order_id` or `product_category`).
15. Scroll down to the **Triggering Events** section and select the event(s) that will trigger the webhook.
16. Click **Save Webhook** in the upper-right corner to save your configuration. 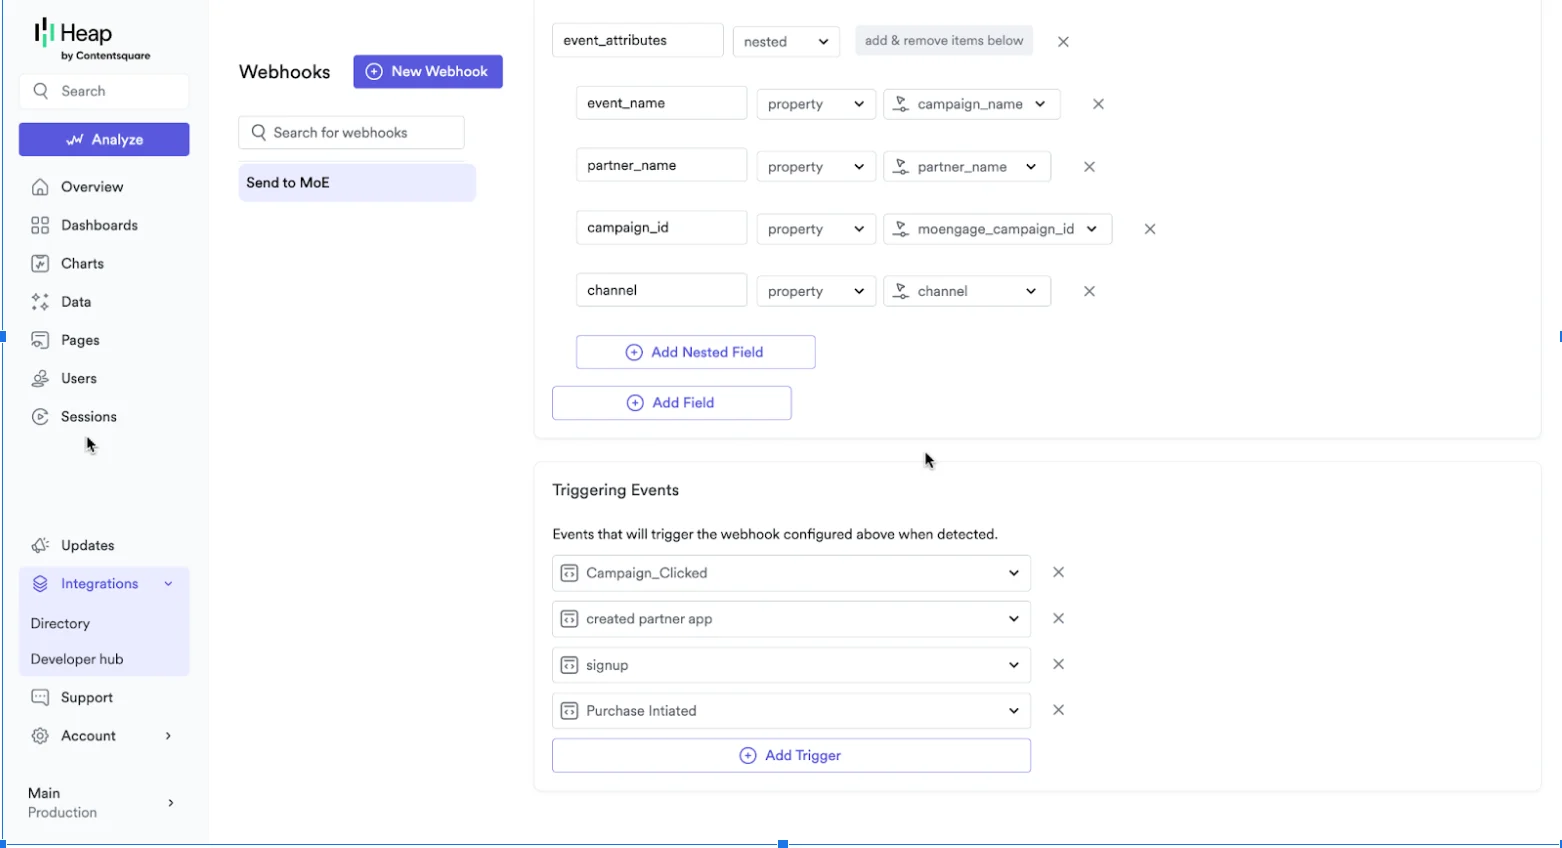 You can sync customer information along with the event, if needed, by using the keys in the user profiles table.
 ### Data Mapping Guidelines
* **Unique Identifier (Customer ID)**: Use a consistent, immutable unique identifier (like an external\_id, email address, or phone number) from your Heap setup. Map this value to the `customer_id` field in your MoEngage payload. This is critical for data merging and preventing duplicate user profiles.
* **Required Fields**: All payloads must include the `customer_id`, `updated_at`, and standard user fields (first, last name, email, and phone fields) for proper data processing.
* **Event Name**: Include the `event_name` inside `event_attributes` in every event to identify and categorize actions in MoEngage accurately for analysis and segmentation.
## Send Data from MoEngage
This section describes how to use the MoEngage connector campaigns to forward events to Heap for in-depth analysis.
**Prerequisites**
Ensure you are aware of your Heap data API limit.
### Step 1: Create a Connector Campaign on MoEngage
To create a connector campaign in MoEngage, perform the following steps:
1. Navigate to the MoEngage Dashboard.
2. On the left navigation menu, click **Engage** and then click **Campaigns**.
3. On the All campaigns page, in the upper-right corner, click **+ Create campaign**.
### Data Mapping Guidelines
* **Unique Identifier (Customer ID)**: Use a consistent, immutable unique identifier (like an external\_id, email address, or phone number) from your Heap setup. Map this value to the `customer_id` field in your MoEngage payload. This is critical for data merging and preventing duplicate user profiles.
* **Required Fields**: All payloads must include the `customer_id`, `updated_at`, and standard user fields (first, last name, email, and phone fields) for proper data processing.
* **Event Name**: Include the `event_name` inside `event_attributes` in every event to identify and categorize actions in MoEngage accurately for analysis and segmentation.
## Send Data from MoEngage
This section describes how to use the MoEngage connector campaigns to forward events to Heap for in-depth analysis.
**Prerequisites**
Ensure you are aware of your Heap data API limit.
### Step 1: Create a Connector Campaign on MoEngage
To create a connector campaign in MoEngage, perform the following steps:
1. Navigate to the MoEngage Dashboard.
2. On the left navigation menu, click **Engage** and then click **Campaigns**.
3. On the All campaigns page, in the upper-right corner, click **+ Create campaign**.  The Create campaign page is displayed. You can also click **Create New** > **Campaign**. The Campaign page is displayed.
 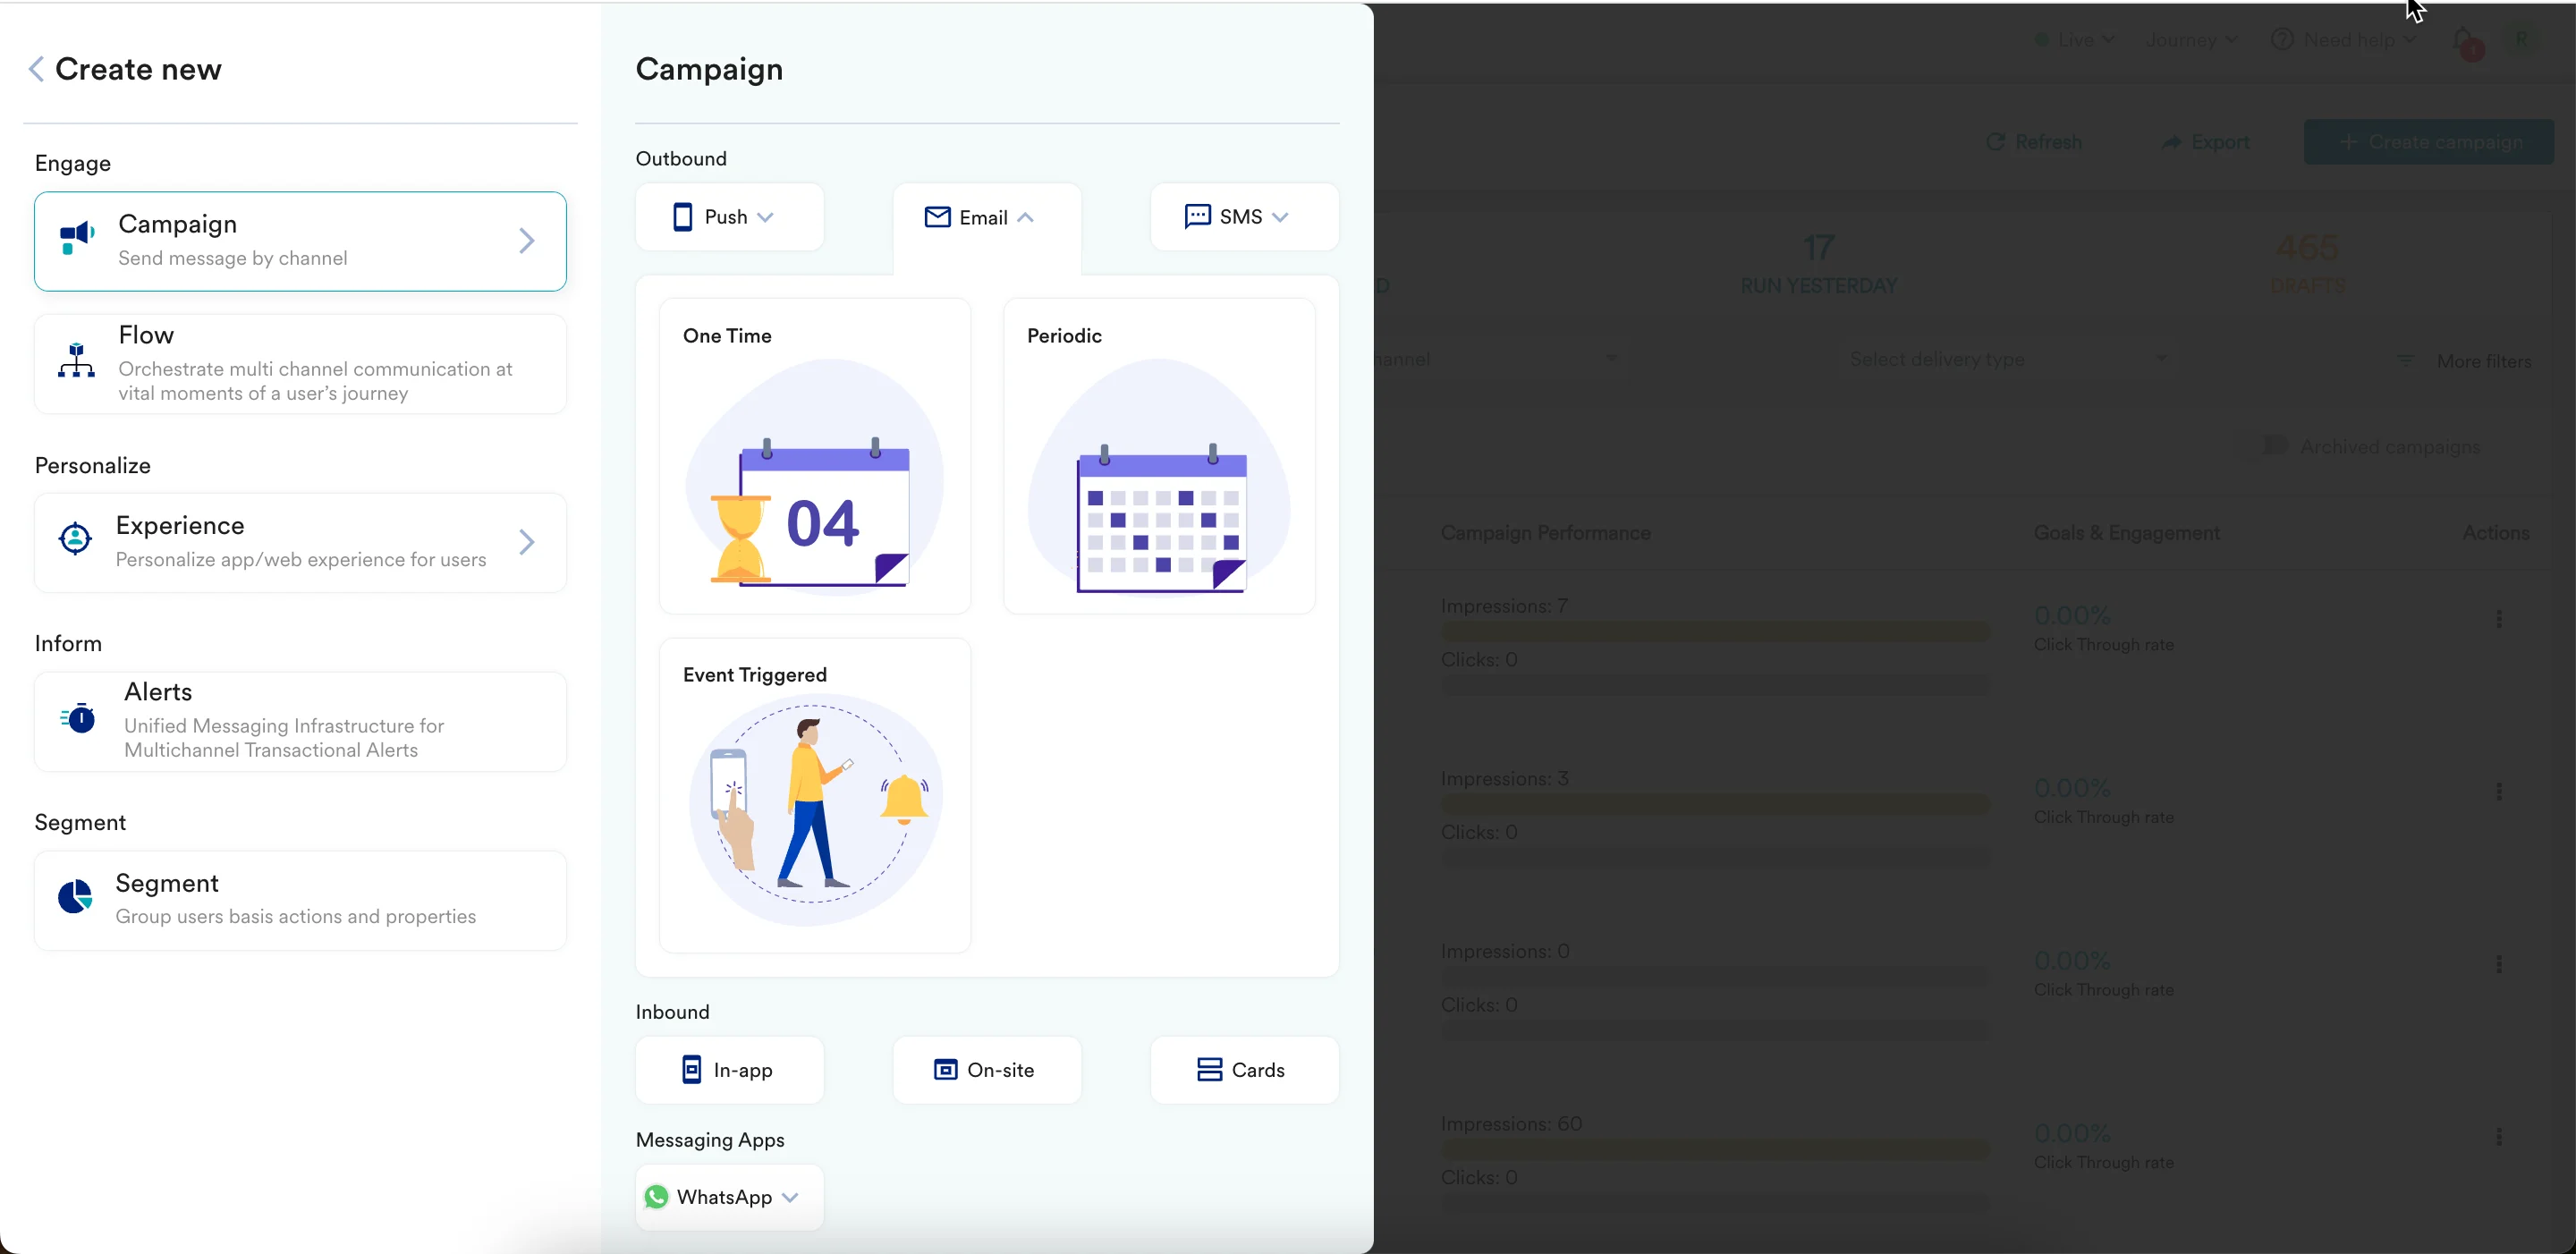 4. Under **Connectors**, click **Custom** and select one of the following campaign delivery types:
* One Time
* Periodic
* Event Triggered
* Business Event Triggered For more information, refer to [Delivery Types](https://www.moengage.com/docs/user-guide/campaigns-and-channels/getting-started/introduction/delivery-types-moengage-channels). The Connector creation page is displayed.
4. Under **Connectors**, click **Custom** and select one of the following campaign delivery types:
* One Time
* Periodic
* Event Triggered
* Business Event Triggered For more information, refer to [Delivery Types](https://www.moengage.com/docs/user-guide/campaigns-and-channels/getting-started/introduction/delivery-types-moengage-channels). The Connector creation page is displayed.  **Note:** For example, click **Event Triggered** and select the event as *Purchased*.
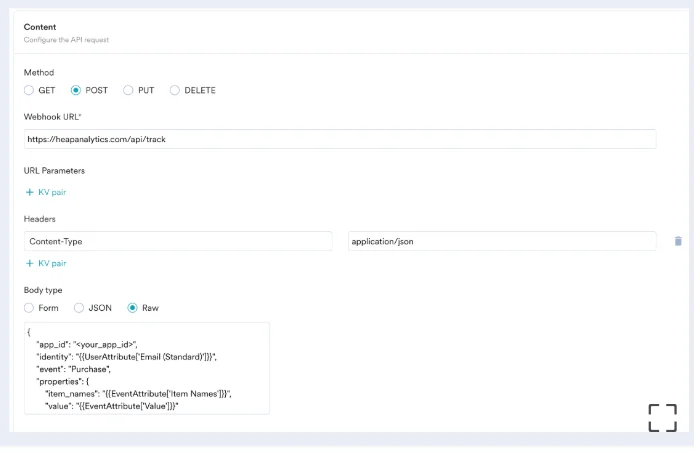
5. In step 2 of the campaign, provide the following information:
1. Under **Method**, select **POST**.
2. In the **Webhook URL** box, paste the following [https://heapanalytics.com/api/track](https://heapanalytics.com/api/track).
3. In the **Headers** section, add the following key-value pairs:
1. **Content-Type**: Application/json.
4. In the body section, you can use **@** to personalize your payload with user and event attributes.
```json JSON theme={null}
{
"app_id": "",
"identity": "{{UserAttribute['Email (Standard)']}}",
"event": "Purchase",
"properties": {
"item_names": "{{EventAttribute['Item Names']}}",
"value": "{{EventAttribute['Value']}}"
```
For more information, refer to the [Heap API Documentation](https://developers.heap.io/reference/track-1).
**Note:** For example, click **Event Triggered** and select the event as *Purchased*.
5. In step 2 of the campaign, provide the following information:
1. Under **Method**, select **POST**.
2. In the **Webhook URL** box, paste the following [https://heapanalytics.com/api/track](https://heapanalytics.com/api/track).
3. In the **Headers** section, add the following key-value pairs:
1. **Content-Type**: Application/json.
4. In the body section, you can use **@** to personalize your payload with user and event attributes.
```json JSON theme={null}
{
"app_id": "",
"identity": "{{UserAttribute['Email (Standard)']}}",
"event": "Purchase",
"properties": {
"item_names": "{{EventAttribute['Item Names']}}",
"value": "{{EventAttribute['Value']}}"
```
For more information, refer to the [Heap API Documentation](https://developers.heap.io/reference/track-1).
 ### Step 2: Preview Your Request
The campaign is now ready to be tested and sent. You can test the connector configuration using the **Test** functionality available in the second step of campaign creation.
To verify the connection, check your Heap account. If a ticket is created successfully, your setup is correct, and you can publish the campaign.
### Step 2: Preview Your Request
The campaign is now ready to be tested and sent. You can test the connector configuration using the **Test** functionality available in the second step of campaign creation.
To verify the connection, check your Heap account. If a ticket is created successfully, your setup is correct, and you can publish the campaign.
 ## Rate Limits
To maintain platform stability, MoEngage limits ingestion of Heap data to a maximum of 500 requests per second (RPS) per workspace. If your workspace exceeds this limit, MoEngage returns an HTTP `429 (Too Many Requests)` status code.
Although Heap handles most of these rate-limiting instances automatically through its default retry policy, note the following behavior:
**Retry Exhaustion:** If Heap exhausts all retry attempts for a batch of data, you must contact the Heap Support Team to replay the failed requests.
## Rate Limits
To maintain platform stability, MoEngage limits ingestion of Heap data to a maximum of 500 requests per second (RPS) per workspace. If your workspace exceeds this limit, MoEngage returns an HTTP `429 (Too Many Requests)` status code.
Although Heap handles most of these rate-limiting instances automatically through its default retry policy, note the following behavior:
**Retry Exhaustion:** If Heap exhausts all retry attempts for a batch of data, you must contact the Heap Support Team to replay the failed requests.