> ## Documentation Index
> Fetch the complete documentation index at: https://moengage.com/docs/llms.txt
> Use this file to discover all available pages before exploring further.
# Audience Sync
# Introduction
The [Zeotap Audience](https://zeotap.com/platform/capabilities/audience-boost/) integration syncs your Zeotap audiences directly to MoEngage, making them immediately available for your campaigns. Using this integration lets you:
* Create custom segments (audiences) for campaigns.
* Add or remove users from MoEngage segments in real time.
* Dynamically keep segments updated for fresh campaign targeting.
The Zeotap integration does not currently support [Unified Identity (Identity Resolution)](/user-guide/data/user-data/unified-identity-identity-resolution) and [Portfolio](/user-guide/settings/account/portfolio/portfolio).
# Integration
Ensure you have the following:
* An active Zeotap account.
* Access to your MoEngage dashboard settings.
## Step 1: Configure MoEngage as a Destination in Zeotap
To configure MoEngage as a destination in Zeotap, perform the following steps:
1. Log in to your Zeotap dashboard, navigate to **Integrate** > **Destinations**.
2. On the Destinations page, click **+ Create Destination** in the upper-right corner. 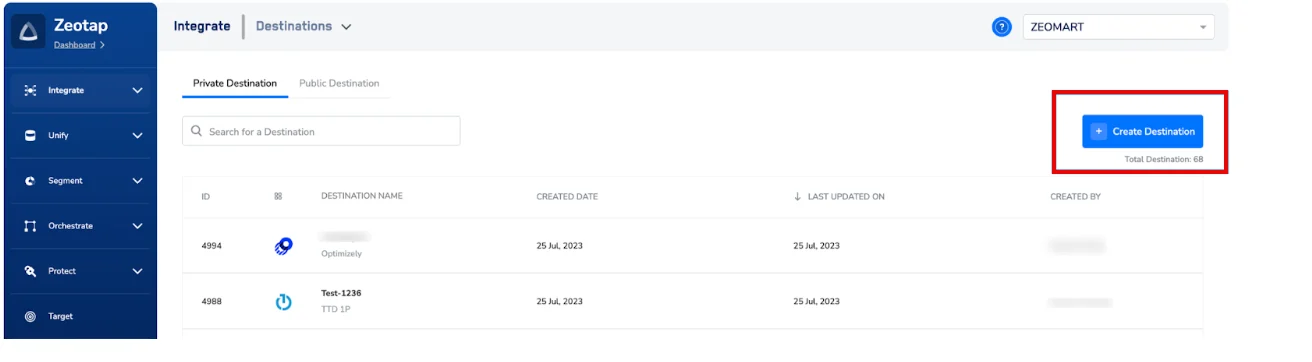 3. Under **All Destinations** , in the **Search for a** **Destination** box, type **MoEngage**.\
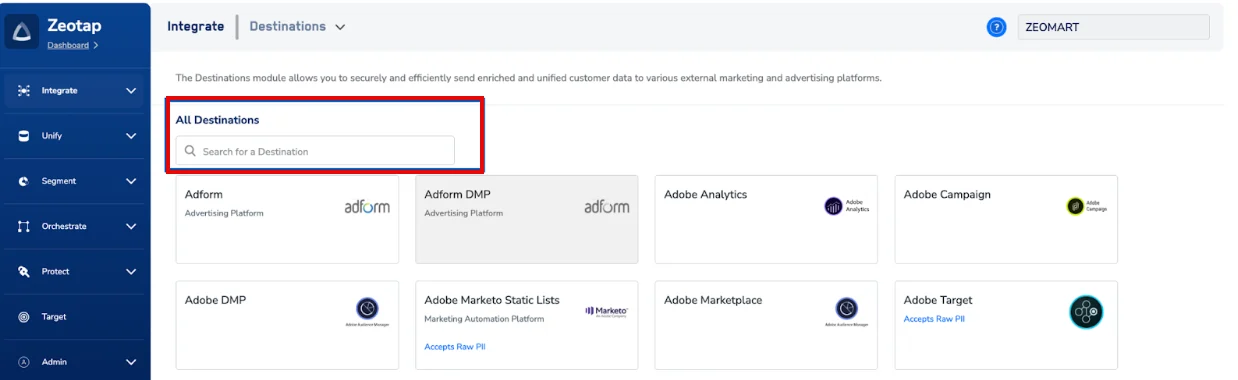 \
The **Destination Details** configuration page appears.
4. On the **Destination** **Details** tab, provide the following details:
1. In the **Destination Name** box, type a name for the destination.
2. In the **API Key box** , type your MoEngage API key.
3. In the **Workspace ID** box, type your MoEngage account's Workspace ID.
4. In the **Data Center** box, type your MoEngage Data Center number.
5. Click **Next**. The MoEngage destination is now active in your journey.
\
The **Destination Details** configuration page appears.
4. On the **Destination** **Details** tab, provide the following details:
1. In the **Destination Name** box, type a name for the destination.
2. In the **API Key box** , type your MoEngage API key.
3. In the **Workspace ID** box, type your MoEngage account's Workspace ID.
4. In the **Data Center** box, type your MoEngage Data Center number.
5. Click **Next**. The MoEngage destination is now active in your journey. 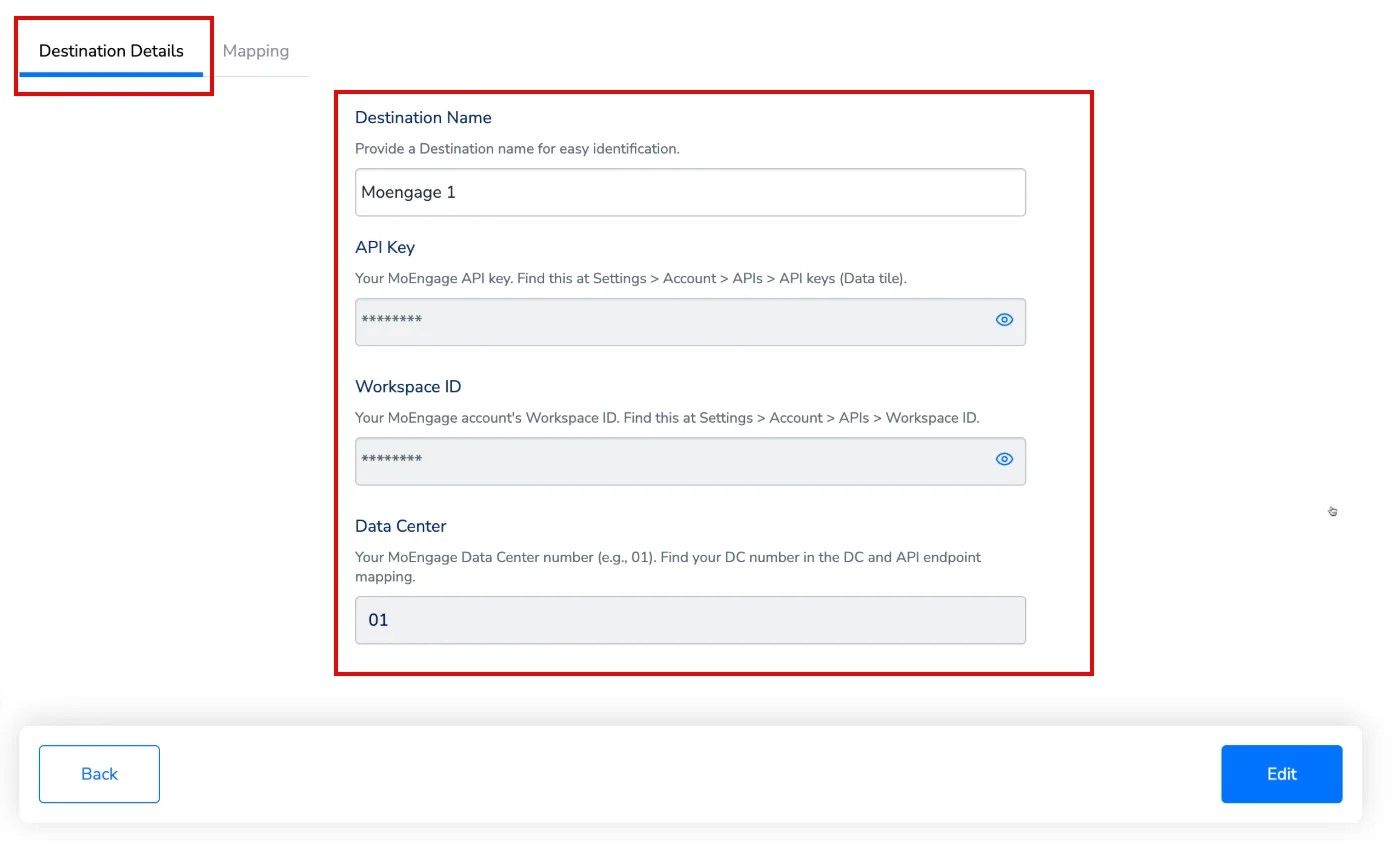 The **Mapping** configuration page appears.
For more information on obtaining your MoEngage API credentials, refer to [Outbound: User and Event Forwarding](/partner-guide/data-and-infrastructure/cdps/zeotap/outbound-user-and-event-forwarding) > Step 1.
6. Select the action (**Add Audience to segment** , **Send events to moengage** , and **Sync User**) you want to perform in MoEngage based on your specific use case. For example, in this use case, the action is **Create User** , which instructs MoEngage to either create a new user profile or update an existing one with the data from Zeotap.
7. Under **Choose your Action** , in the drop-down list, select **Create User**.
8. Under **Map the Fields** , map the **Catalogue Field** from Zeotap to the corresponding **Destination Field** in MoEngage:
* **Identifiers** : Map the **Email Raw** field to the **Email/Customer ID**\* field. This is a mandatory field.
* **Attributes** : Map the necessary Zeotap fields to their corresponding MoEngage fields, such as **Name** and **First Name**.
9. Click **Create Destination** to save the configuration.\
**Note** : To sync multiple user identifiers, click **+ Add Mapping**. This allows you to create new rows for mapping standard attributes (such as Name) and any custom fields you require.
The **Mapping** configuration page appears.
For more information on obtaining your MoEngage API credentials, refer to [Outbound: User and Event Forwarding](/partner-guide/data-and-infrastructure/cdps/zeotap/outbound-user-and-event-forwarding) > Step 1.
6. Select the action (**Add Audience to segment** , **Send events to moengage** , and **Sync User**) you want to perform in MoEngage based on your specific use case. For example, in this use case, the action is **Create User** , which instructs MoEngage to either create a new user profile or update an existing one with the data from Zeotap.
7. Under **Choose your Action** , in the drop-down list, select **Create User**.
8. Under **Map the Fields** , map the **Catalogue Field** from Zeotap to the corresponding **Destination Field** in MoEngage:
* **Identifiers** : Map the **Email Raw** field to the **Email/Customer ID**\* field. This is a mandatory field.
* **Attributes** : Map the necessary Zeotap fields to their corresponding MoEngage fields, such as **Name** and **First Name**.
9. Click **Create Destination** to save the configuration.\
**Note** : To sync multiple user identifiers, click **+ Add Mapping**. This allows you to create new rows for mapping standard attributes (such as Name) and any custom fields you require. 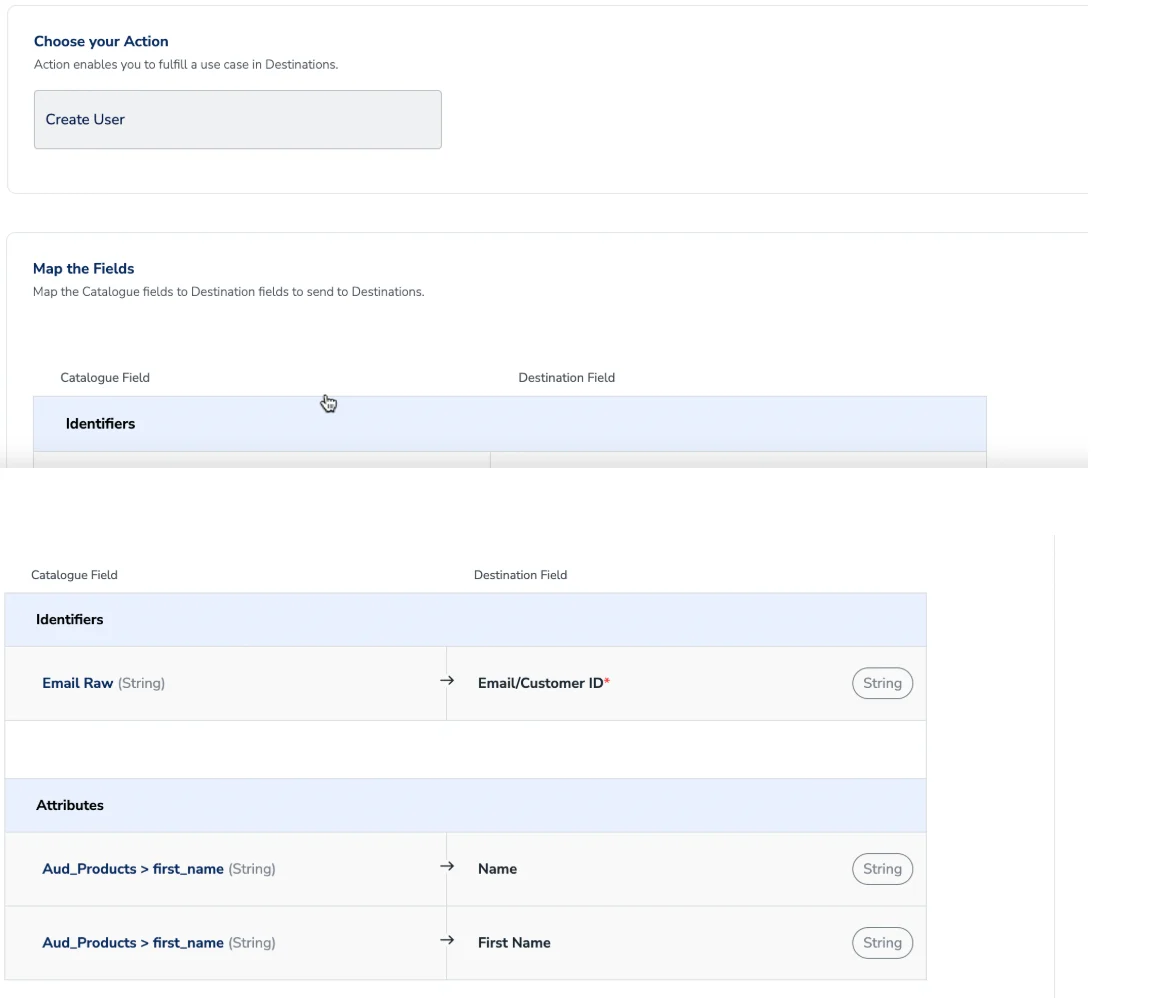 10. Click **Save Mapping**.
After creating the destination, you can link your new destination in the Zeotap Journey app to send user data to MoEngage.
## Step 2: Activate the Destination for an Audience
To link an audience to your configured MoEngage destination, perform the following steps:
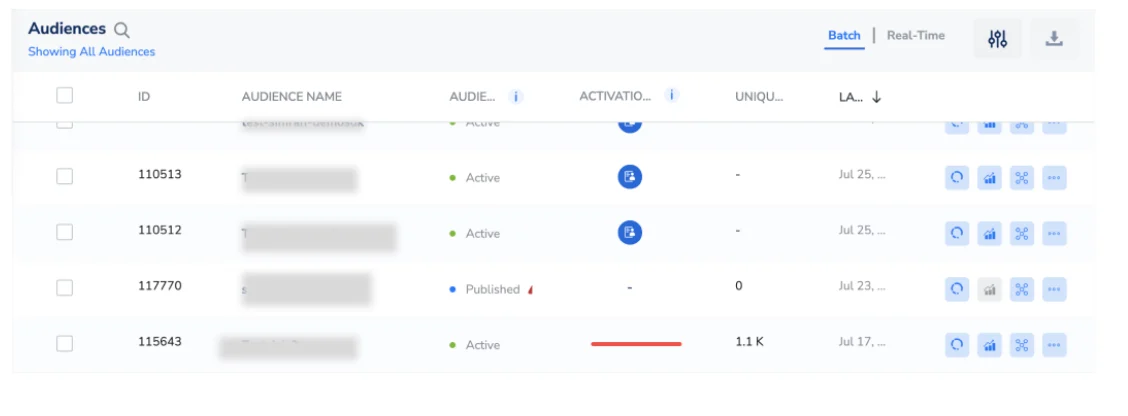
1. On the **Audiences** page in Zeotap, locate the audience that you want to sync.
2. In the row for that audience, click the **More options** icon (...) on the right.
3. In the drop-down list that appears, click **Link to destinations**.
10. Click **Save Mapping**.
After creating the destination, you can link your new destination in the Zeotap Journey app to send user data to MoEngage.
## Step 2: Activate the Destination for an Audience
To link an audience to your configured MoEngage destination, perform the following steps:
1. On the **Audiences** page in Zeotap, locate the audience that you want to sync.
2. In the row for that audience, click the **More options** icon (...) on the right.
3. In the drop-down list that appears, click **Link to destinations**.
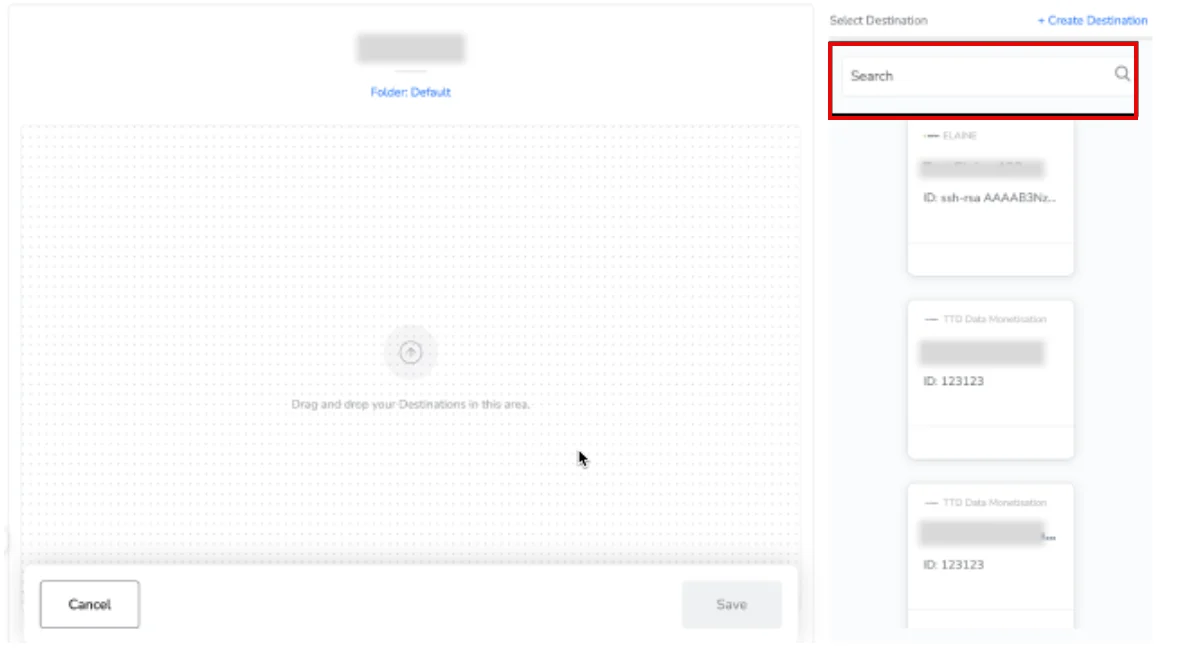
 4. In the **Search** box, type the MoEngage destination that you created.
  5. Click the **Destination Details** tab and verify that the Workspace ID, API key, and data center fields are pre-populated.
6. Click **Save Destination**.\
After you save, the destination is attached and becomes active for that audience.
5. Click the **Destination Details** tab and verify that the Workspace ID, API key, and data center fields are pre-populated.
6. Click **Save Destination**.\
After you save, the destination is attached and becomes active for that audience. 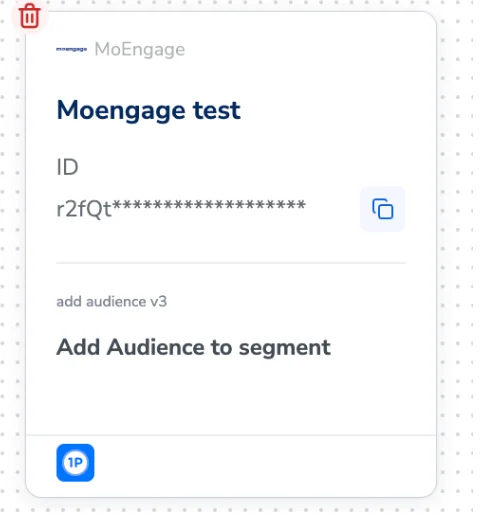 ## Step 3: Find Your Audiences in MoEngage
After the sync, your audience is automatically created as a custom segment in MoEngage, which you can find by navigating to **Segment** > **Custom Segments**. For more information, refer to [Custom Segments](https://moengage-user-guide.mintlify.app/user-guide/segment/segment-operations/custom-segments).
# Rate Limits
To maintain platform stability, MoEngage limits ingestion of Zeotap data to a maximum of 500 requests per second (RPS) per workspace. If your workspace exceeds this limit, MoEngage returns an HTTP `429 (Too Many Requests)` status code. Refer to Zeotap's documentation on default retry policy to understand how rate limiting affects your data flow
**Retry Exhaustion:** If Zeotap exhausts all retry attempts for a batch of data, you must contact the Zeotap Support Team to replay the failed requests.
## Step 3: Find Your Audiences in MoEngage
After the sync, your audience is automatically created as a custom segment in MoEngage, which you can find by navigating to **Segment** > **Custom Segments**. For more information, refer to [Custom Segments](https://moengage-user-guide.mintlify.app/user-guide/segment/segment-operations/custom-segments).
# Rate Limits
To maintain platform stability, MoEngage limits ingestion of Zeotap data to a maximum of 500 requests per second (RPS) per workspace. If your workspace exceeds this limit, MoEngage returns an HTTP `429 (Too Many Requests)` status code. Refer to Zeotap's documentation on default retry policy to understand how rate limiting affects your data flow
**Retry Exhaustion:** If Zeotap exhausts all retry attempts for a batch of data, you must contact the Zeotap Support Team to replay the failed requests.