Introduction
Snowflake is a data platform that allows organizations to store, analyze, and process large volumes of structured and semi-structured data in a highly scalable and efficient manner. With its unique architecture, Snowflake allows organizations to consolidate their data, perform quick analytics, and gain valuable data-driven insights accessible to all users.MoEngage × Snowflake
The MoEngage × Snowflake integration allows you to set up a direct connection between your Snowflake instance and MoEngage app to sync data on a recurring basis. You can define a schedule to run the sync periodically - syncs can be as frequently as every hour or as infrequently as once per month. When a sync runs, MoEngage will directly connect to your data warehouse instance, retrieve all new data from the specified table, and update the corresponding data on your MoEngage dashboard.Benefits
Reduce integration time
- No more searching for the right ETL tool, as MoEngage directly integrates with Snowflake.
- Long and complicated ETL pipelines are now replaced with a one-time integration setup that gives MoEngage direct access to your data without actual data flow.
- This decreases the dependency on tech teams significantly.
Faster data processing
- The power of the Snowflake infrastructure enables us to store, process, and query massive amounts of data in near real-time.
- Any changes in the original schema are propagated immediately without having to change any configuration on MoEngage’s end, which is a significant advantage over the traditional ETL pipelines.
- Since there is no need for ETL tools and external cloud providers, the cost of import is significantly lower than traditional data pipelines.
Integration use-cases
- Sync real-time audiences from Snowflake
- Keep your users in MoEngage up-to-date with the user data in your Snowflake account.
- Import event data from your Snowflake account directly into MoEngage.
- Import users into MoEngage and retarget them via custom segments.
Integration
PrerequisitesEnsure you have a Snowflake account with enough permissions to create new users, schemas or tables.
Set up a new Snowflake Connection
In order to import or export from Snowflake, you will first need to connect MoEngage to your Snowflake data warehouse. To create a new Snowflake Connection:- On your MoEngage Dashboard, go to the App Marketplace.
- Search for “Snowflake”.

- Go to the Integrate tab, and click + Add Connection.
- Provide your Snowflake data warehouse details:
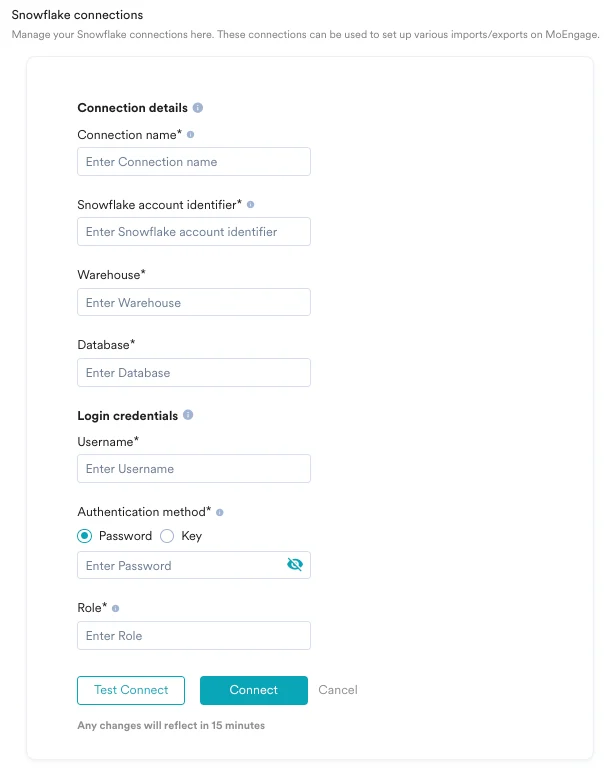
Field Description Example Connection Name Give this connection an identifiable name. My Snowflake Prod Snowflake Account Identifier The account identifier of your Snowflake account. - It is always found at the beginning of your Snowflake URL (
https://ACCOUNT_IDENTIFIER.snowflakecomputing.com). - The format may differ based on Snowflake account age. For details, visit Snowflake docs.
Format should be: ACCOUNT_IDENTIFIER.snowflakecomputing.comWarehouse The name of the warehouse MoEngage will use to execute the queries. COMPUTE_WAREHOUSE Database The database that MoEngage should use to read the tables from. You can pick the schema while setting up imports/exports. MY_DEMO_DB Username Either an existing database username with the read access or create a new one for MoEngage. — Authentication Method MoEngage can connect to your Snowflake Instance using two methods: - Password - Please provide the password of the database user (username) you entered above.
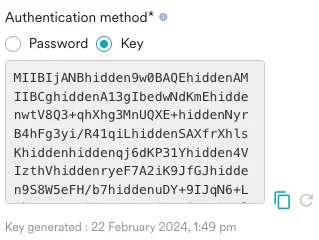
- Key - MoEngage can connect to your Snowflake Instance using the Key pair authentication method.
— Role This role will be used in executing queries from MoEngage. You can click Test connection to test your details or directly click on Save connection to proceed. — 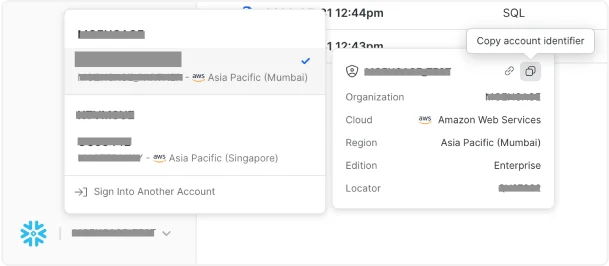
For Key pair authentication: - Select Key as your authentication method.
- Click on Generate Key and MoEngage will display your public key. You will need to add this public key to your database user. Follow the instructions mentioned on Snowflake help docs to set this up:
- Once you have added this key to your database user, click on Test connection and MoEngage will attempt to verify the credentials. MoEngage also supports rotating of keys. If your IT Policy requires key rotation, you can do it by following these steps:
- Go to the App Marketplace > Snowflake > Integrate and edit the connection.
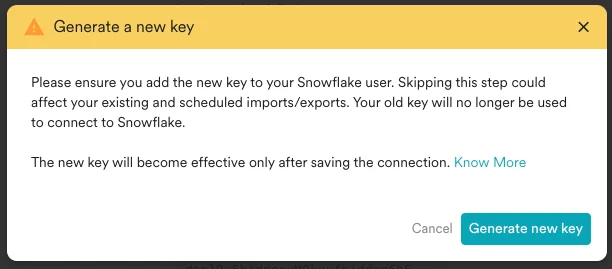
- Click on the generate new key icon:

- A confirmation will be asked for you to review. Please read the instructions carefully. Once you save the connection with the newly generated key, MoEngage will no longer use the previous key. You have to ensure that the new key is attached to your database user as the second RSA key (see Snowflake help doc on rotating keys) for the rotation to work properly. If the new key is not attached after saving the connection, your imports and exports might break:
- Your new key will be generated and shown to you. At this point, it is highly recommended to copy this new key and attach it as an additional key to your Snowflake database user by following the instructions provided on the Snowflake help docs. Once you have attached the new key, you need to test the connection successfully to complete the rotation.
- At any point after generating the new key, if you decide to close the edit form, or do not click on Connect, your old (existing) key will continue to be used as before and the newly generated key will be deleted from our system.
- It is always found at the beginning of your Snowflake URL (
- Once you have set up a Snowflake Connection, you can use that to set up various imports and exports in MoEngage.
Supported Datetime Formats
| Date and Time Format | Examples |
|---|---|
"datetime_format": "YYYY-MM-DD" | 2022-01-22 |
"datetime_format": "YYYY/MM/DD" | 2022/01/22 |
"datetime_format": "DD/MM/YYYY" | 22/01/2022 |
"datetime_format": "DD-MM-YYYY" | 22-01-2022 |
"datetime_format": "DD-MM-YYYY hh:mm:ss" | 31-12-2022 12:10:33 |
"datetime_format": "DD/MM/YYYY hh:mm:ss" | 31/12/2022 12:10:33 |
"datetime_format": "YYYY-MM-DD hh:mm:ss" | 2019-02-22 17:54:14 |
"datetime_format": "YYYY/MM/DD hh:mm:ss" | 2019/02/22 17:54:14 |
"datetime_format": "DD-MM-YYYYThh:mm:ss.s" | 31-12-2022T12:10:33.882 |
"datetime_format": "DD/MM/YYYYThh:mm:ss.s" | 31/12/2022T12:10:33.882 |
"datetime_format": "DD-MM-YYYYThh:mm:ssTZD" | 31-12-2022T12:10:33Z 31-12-2022T12:10:33+08:00 31-12-2022T12:10:33-08:00 |
"datetime_format": "DD/MM/YYYYThh:mm:ssTZD" | 31/12/2022T12:10:33Z 31/12/2022T12:10:33+08:00 31/12/2022T12:10:33-08:00 |
"datetime_format": "YYYY-MM-DD hh:mm:ss.s" | 2019-02-22 17:54:14.933 |
"datetime_format": "YYYY/MM/DD hh:mm:ss.s" | 2019/02/22 17:54:14.933 |
"datetime_format": "YYYY-MM-DDThh:mm:ssTZD" | 2019-11-14T00:01:02Z 2019-11-14T00:01:02+08:00 2019-11-14T00:01:02Z-08:00 |
"datetime_format": "YYYY/MM/DDThh:mm:ssTZD" | 2019/11/14T00:01:02Z 2019/11/14T00:01:02+08:00 2019/11/14T00:01:02-08:00 |
"datetime_format": "YYYY-MM-DDThh:mm:ss.sTZD" | 2019-02-22T17:54:14.957Z 2019-02-22T17:54:14.957299-08:00 2019-02-22T17:54:14.957299+08:00 |
"datetime_format": "YYYY/MM/DDThh:mm:ss.sTZD" | 2019/02/22T17:54:14.957Z 2019/02/22T17:54:14.957299-08:00 2019/02/22T17:54:14.957299+08:00 |
Warehouse Segments Using Snowflake
Snowflake is now available in our Warehouse Segments. For more information, refer to Warehouse Segments.Import users and events from Snowflake into MoEngage
Read our Snowflake Imports guide to set up MoEngage × Snowflake imports for your account. Snowflake is now available in our warehouse segment. Learn more.Export events from MoEngage to Snowflake
Prerequisites
- Ensure you have a Snowflake account with relevant permissions to create/edit Snowflake instances, roles, and policies. It is optional to create a new user; you must have access to create a new user in your Snowflake database.
- If your system requires IP whitelisting, you must whitelist MoEngage IPs. For more information, refer here.
- Ensure you have a Snowflake Connection on the App marketplace.
- Exports to Snowflake are part of the Streams add-on. Please reach out to your dedicated MoEngage CSM (customer success manager) to get it enabled for your account.
Step 1: Make sure your user’s assigned role has required permissions
MoEngage will requireWRITE access to your database so that we can write data into your Snowflake database. You can either grant these permissions to an existing database user or choose to create a new dedicated database user for MoEngage:
<YOUR_WAREHOUSE_NAME>- The name of the warehouse you want MoEngage to use while executing queries.<YOUR_DATABASE_NAME>- The name of the database you want to import data from.<YOUR_PASSWORD>- Give a strong password to the newly created database user.
Step 2: Create a new export in the App Marketplace
- For the full list of events and attributes exported, refer to the Data Exports Glossary.
- Please note that the
event_timeof the exported events will always be in UTC.
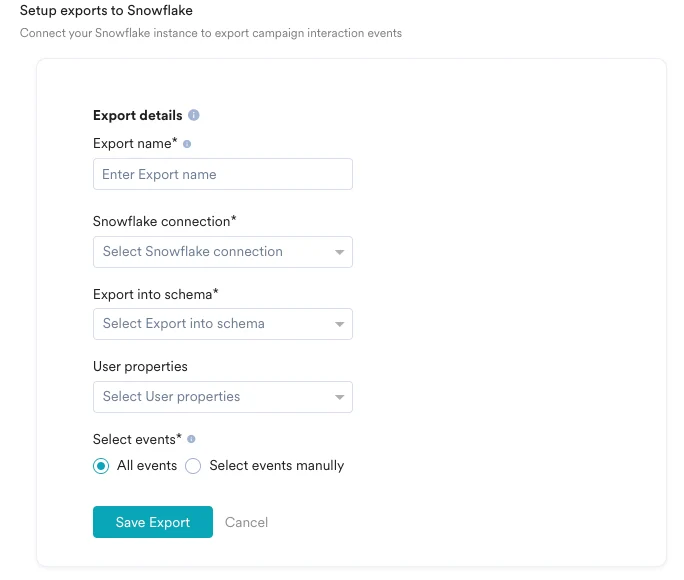
- Click Integrate > Add Integration.
- Select your Snowflake connection.
- Select which schema MoEngage will use to create new tables and export your events into.
- Select the events and additional user properties you want to export to Snowflake.
- Click Save Export.
Export Process and Frequency
After you save the export, MoEngage creates a destination table in your schema. New event data is then appended to this same table at hourly intervals:- Initial action: MoEngage creates the table when the first export is triggered.
- Recurring action: MoEngage adds (appends) data to the same table every hour.
Sample Table Structure
MoEngage creates a single table in your schema using the following format:moe_events_<table_creation_timestamp>
This table is created once per connection. All hourly exports and different event types configured under a single connection are consolidated and appended to this same table.
user_attributes or event_attributes column, respectively. All events are consolidated in a single table containing necessary information, such as event names and event times, for easy analysis:
| Field | Type | NL |
|---|---|---|
app_name | VARCHAR | NN |
event_name | VARCHAR | NN |
event_code | VARCHAR | NN |
event_uuid | VARCHAR | NN |
event_time | TIMESTAMP_NTZ | NN |
event_type | VARCHAR | NN |
event_source | VARCHAR | NN |
uid | VARCHAR | NULL |
user_attributes_moengage_user_id | VARCHAR | NULL |
device_attributes_moengage_device_id | VARCHAR | NULL |
push_id | VARCHAR | NULL |
email_address | VARCHAR | NULL |
mobile_number | VARCHAR | NULL |
event_attributes_app_version | VARCHAR | NULL |
event_attributes_sdk_version | VARCHAR | NULL |
event_attributes_platform | VARCHAR | NULL |
event_attributes_campaign_id | VARCHAR | NULL |
event_attributes_campaign_name | VARCHAR | NULL |
event_attributes_campaign_type | VARCHAR | NULL |
event_attributes_campaign_channel | VARCHAR | NULL |
event_attributes_readable_campaign_id | VARCHAR | NULL |
event_attributes_parent_campaign_id | VARCHAR | NULL |
event_attributes_parent_flow_id | VARCHAR | NULL |
event_attributes_parent_flow_name | VARCHAR | NULL |
event_attributes_variation_id | VARCHAR | NULL |
event_attributes_locale_id | VARCHAR | NULL |
event_attributes_locale_name | VARCHAR | NULL |
event_attributes_url | VARCHAR | NULL |
event_attributes_timestamp | TIMESTAMP_NTZ | NULL |
event_attributes_first_session | BOOLEAN | NULL |
event_attributes_logged_in_status | VARCHAR | NULL |
event_attributes | VARIANT | NULL |
user_attributes | VARIANT | NULL |
device_attributes | VARIANT | NULL |
Export Frequency
MoEngage will dump the data at hourly intervals.Frequently Asked Questions
How soon will I start getting the data?
How soon will I start getting the data?
It typically takes up to 30 minutes for the automated data exports to be set up for your account and for you to start seeing data there.
Can I export additional events at a later time?
Can I export additional events at a later time?
Yes, if you need to export new events at a later time, you can always edit your configuration on the App Marketplace and get the new events added to your exports.
Can I export historical data using Automated Data Exports?
Can I export historical data using Automated Data Exports?
As of now, you cannot export historical data using Automated Data Exports. Once configured, you will start seeing data for each event from the time you enabled your exports.
Is there any pricing involved for Automated Data Exports?
Is there any pricing involved for Automated Data Exports?
If your billing plan does not cover this already and you need to get this enabled at a later time, you would need to work with your Customer Success Manager to get this included in your billing plan. Based on the amount of data that MoEngage will place in your Data warehouse/Partner/API on a monthly basis, this could lead to additional charges.
Does Data Exports guarantee the latest user attributes?
Does Data Exports guarantee the latest user attributes?
No, Data Exports is primarily built to export your Events in near real-time and user attributes in MoEngage are updated asynchronously so it is currently not possible to guarantee the latest values of user attributes in the exports.