> ## Documentation Index
> Fetch the complete documentation index at: https://moengage.com/docs/llms.txt
> Use this file to discover all available pages before exploring further.
# Kochava
> Import mobile attribution and in-app event data from Kochava into MoEngage via Kochava-Certified Postbacks for richer campaign analysis.
## Introduction
[Kochava](https://www.kochava.com/) offers mobile attribution and analytics to help you harness your data for growth. The Kochava Audience Platform enables you to plan, target, activate, measure, and optimize your app campaigns.
## MoEngage × Kochava
The MoEngage and Kochava integration powers a more holistic understanding of your campaigns by sending attribution data to MoEngage, helping you understand the campaigns that are driving installs, in-app activity, and more.
## Integration
**Prerequisites**
* Ensure you have access to your Kochava account.
* Ensure the **Kochava-Certified Postback** feature is enabled for your Kochava account.
To integrate Kochava with MoEngage, follow these steps.
### Step 1: Get the MoEngage attribution tracking app key
1. Navigate to **Settings** > **Analytics** > **Acquisition tracking** in the MoEngage Dashboard.
2. Turn on **Acquisition Tracking**, and select **Kochava** from the dropdown. This generates an **App Key**. 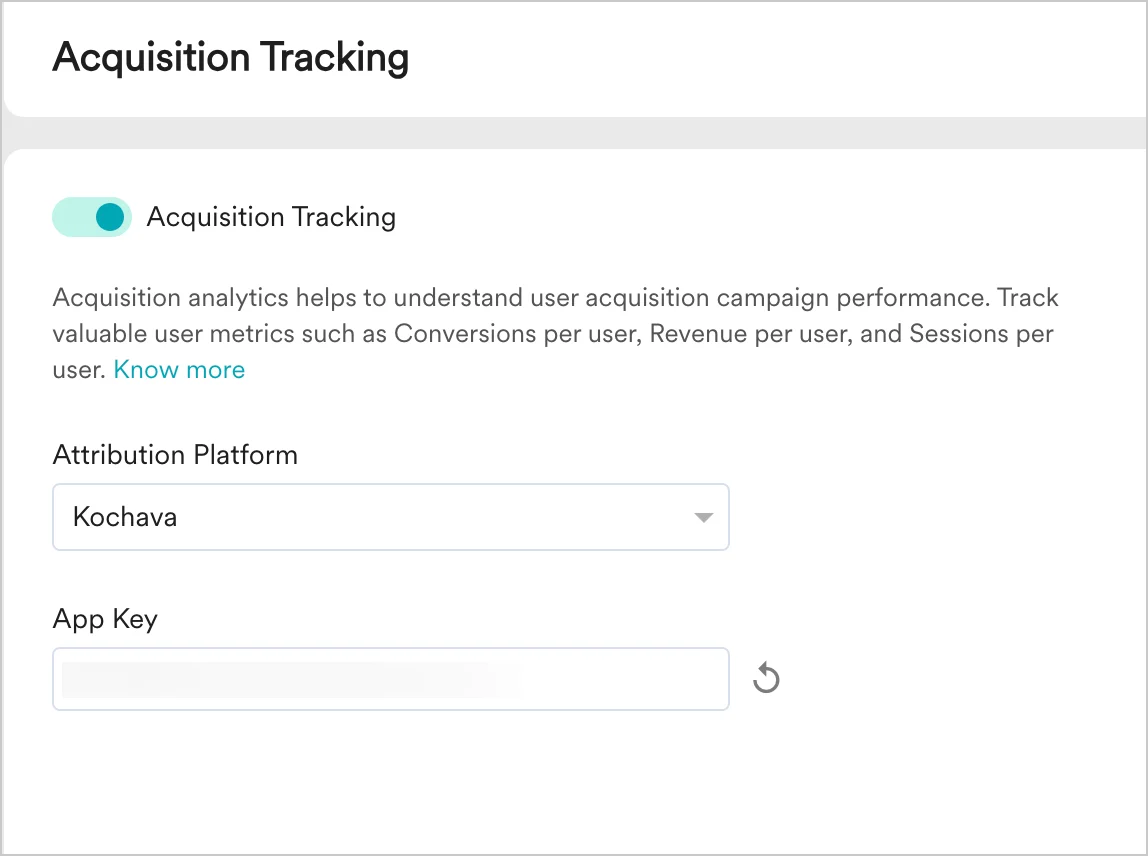 3. Click **Save**.
4. Copy the **App Key**. You will need it to configure MoEngage on Kochava.
### Step 2: Set up a Postback on Kochava
Create a **Kochava-Certified Postback**. Postbacks allow Kochava to send a real-time feed of installs and in-app events to MoEngage. For more details, refer to the [Kochava-Certified Postback documentation](https://support.kochava.com/campaign-management/create-a-kochava-certified-postback/).
#### Create a new Postback
1. Navigate to **App & Assets** > **Partner Configuration**.
3. Click **Save**.
4. Copy the **App Key**. You will need it to configure MoEngage on Kochava.
### Step 2: Set up a Postback on Kochava
Create a **Kochava-Certified Postback**. Postbacks allow Kochava to send a real-time feed of installs and in-app events to MoEngage. For more details, refer to the [Kochava-Certified Postback documentation](https://support.kochava.com/campaign-management/create-a-kochava-certified-postback/).
#### Create a new Postback
1. Navigate to **App & Assets** > **Partner Configuration**. 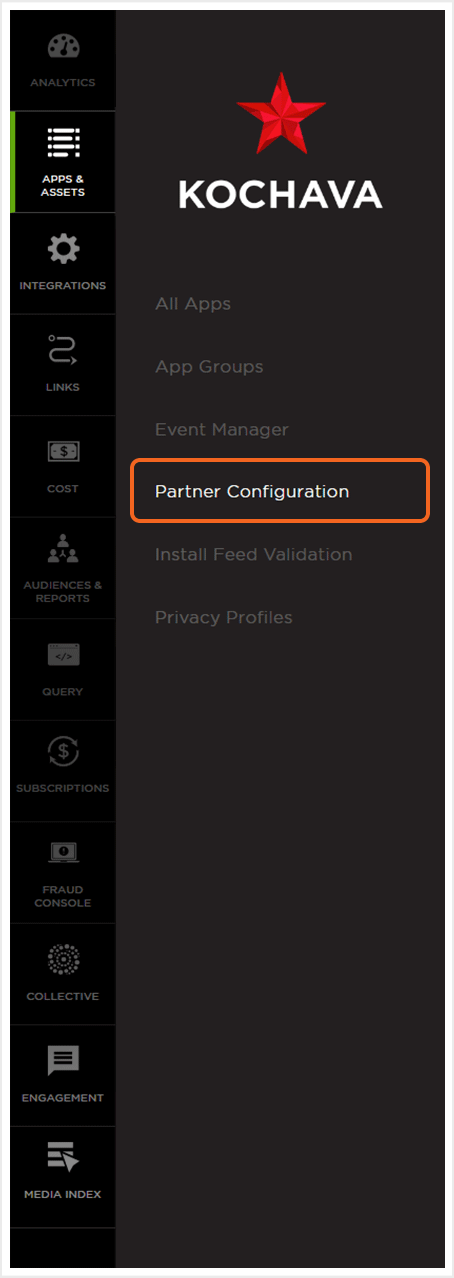 2. Click **Add a Configuration**.
3. Under **Media Partner**, select **MoEngage** (for Android or iOS).
2. Click **Add a Configuration**.
3. Under **Media Partner**, select **MoEngage** (for Android or iOS). 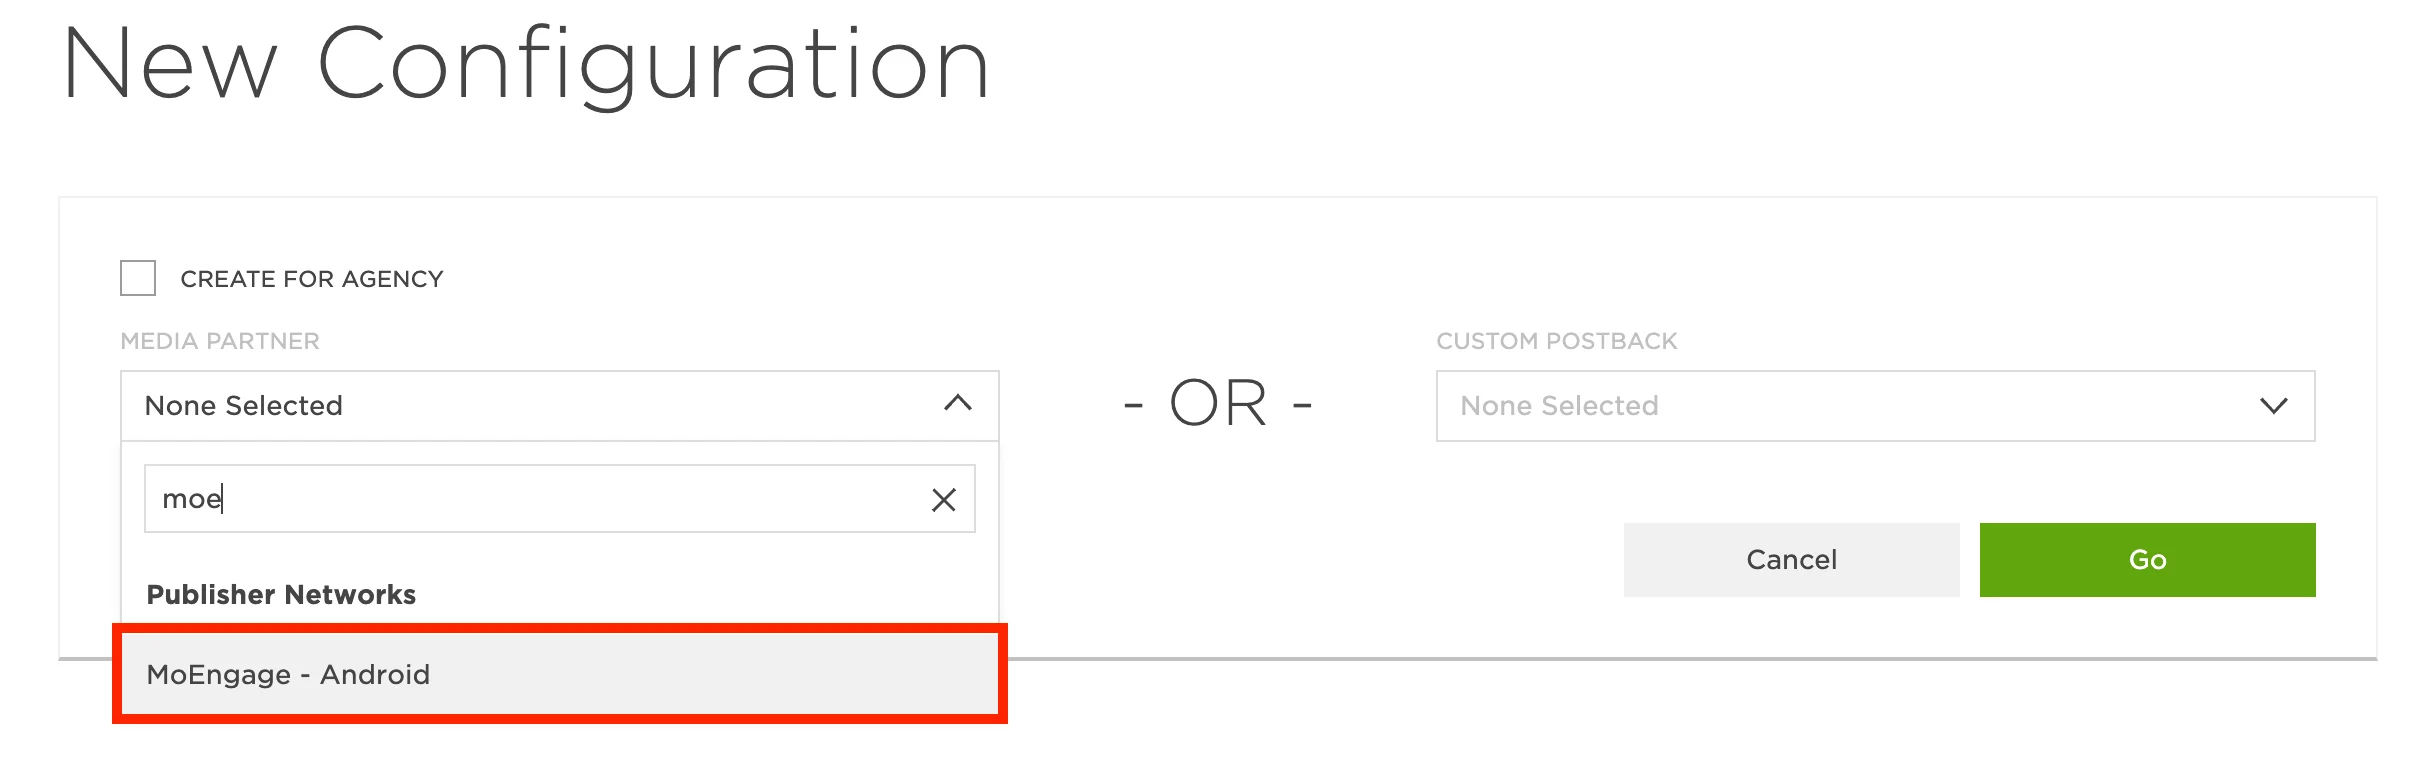 4. Click **Go**.
5. Kochava displays all standard and custom events you have configured.
6. In the install event with the status **Configured Postback**, click the three-dot action menu and select **Edit**.
4. Click **Go**.
5. Kochava displays all standard and custom events you have configured.
6. In the install event with the status **Configured Postback**, click the three-dot action menu and select **Edit**. 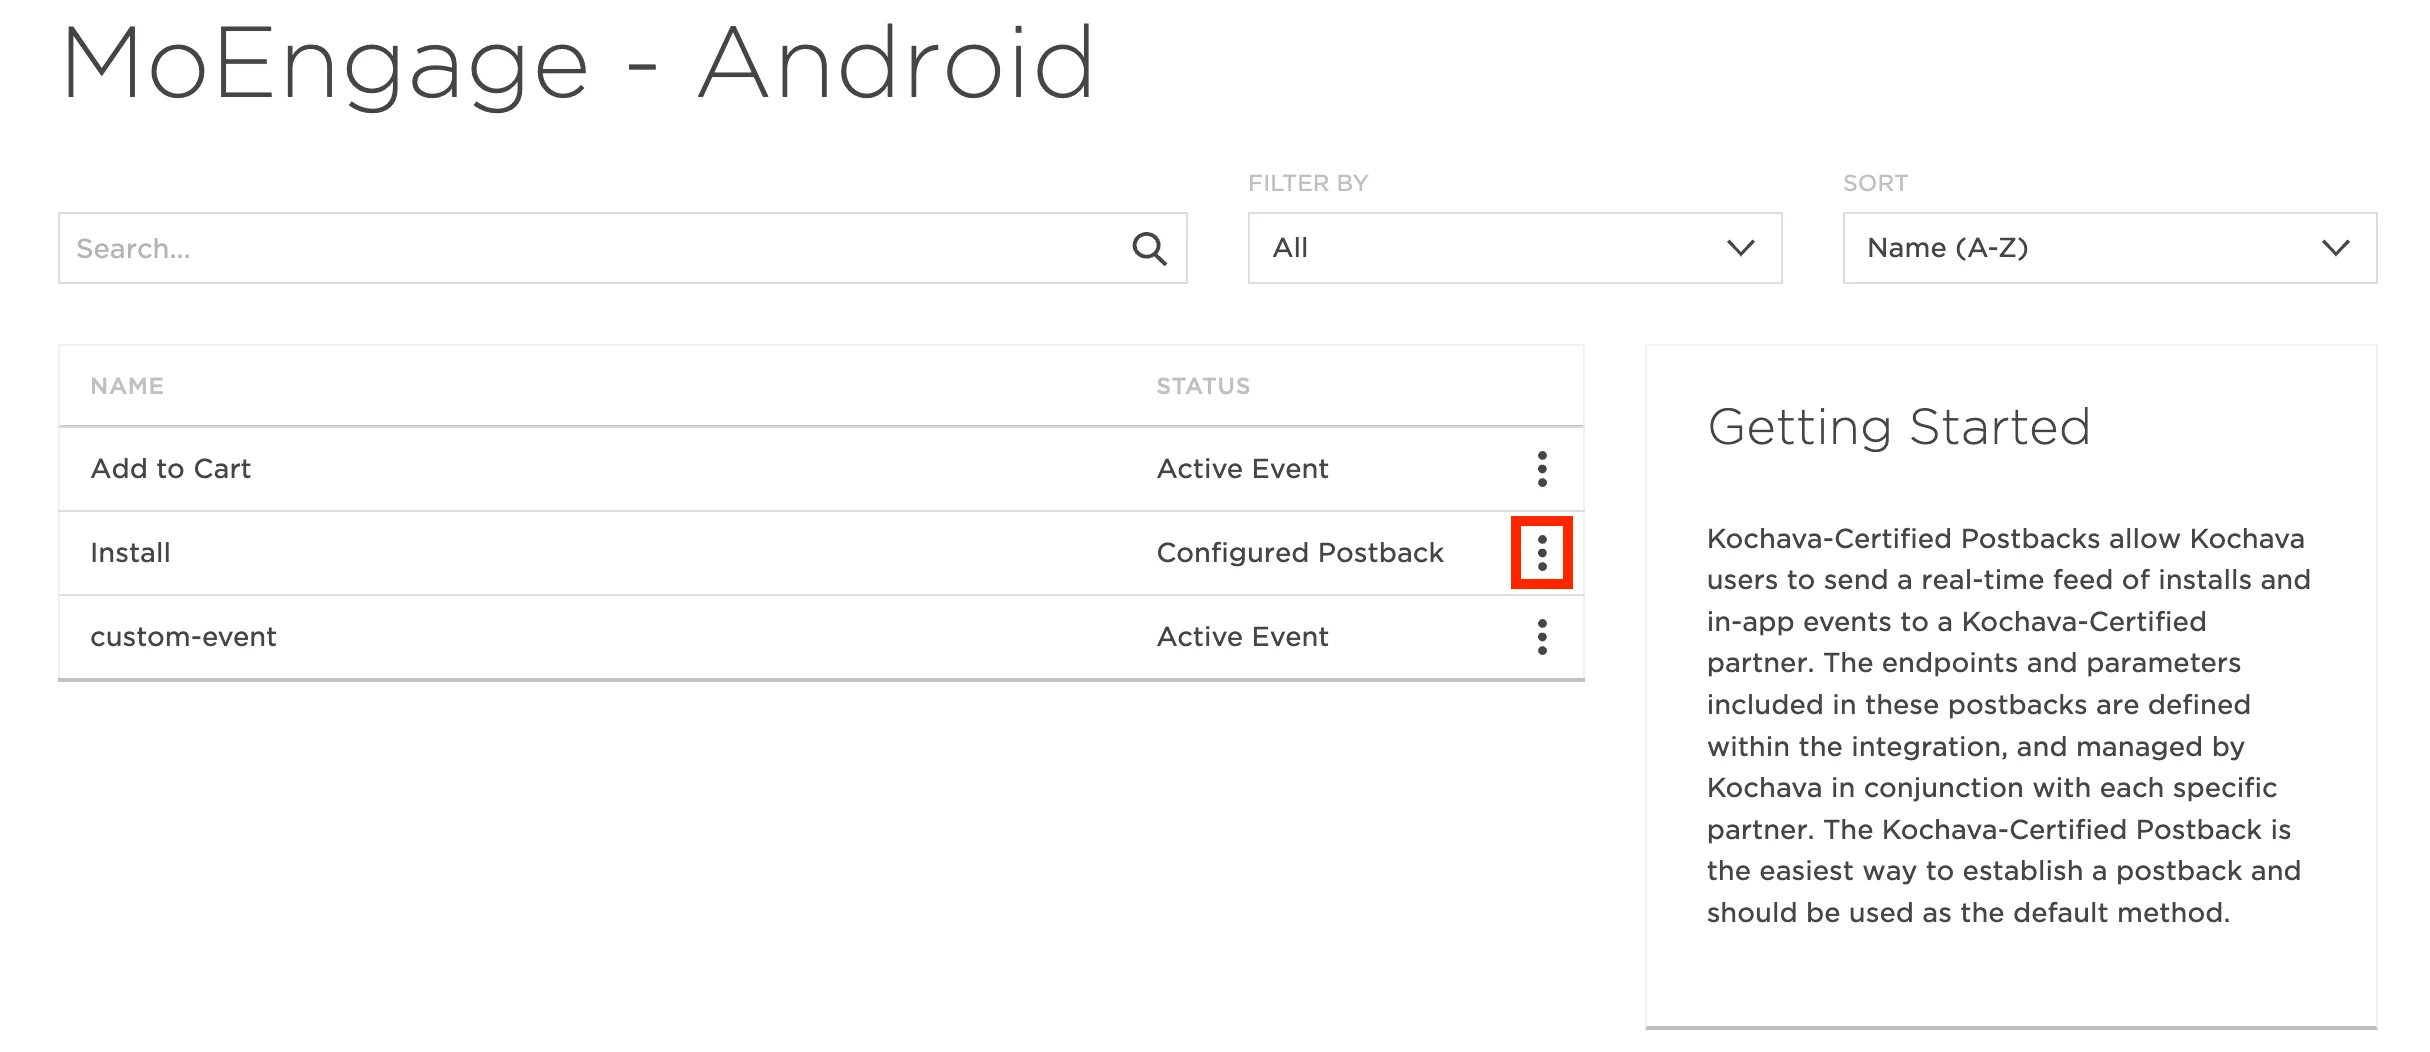 7. For **Post-Install Active Events**, locate the desired event and click **Edit Postback**.
8. On the **Edit Postback** page, fill out the form with the following details:
* **Supply network data to analytics partner**: Select **True**. If you don't want to forward this data to MoEngage, select **False**.
* **Workspace ID**: Your Workspace ID as provided by MoEngage. Refer to the table below.
* **App attribution key**: Your App attribution key as defined by MoEngage. Refer to the table below.
* **Datacenter endpoint**: The Data Center endpoint as provided by MoEngage. Refer to the table below.
* **Delivery delay**: Automatically delay postback delivery for this duration.
* **Retry attempts**: Maximum times to attempt redelivery in the event of a posting failure.
Use the following values for the MoEngage-specific fields:
| Key | Description | Value |
| ------------------------ | ---------------------------------------------------------------------------------------------------------------------------------------------------- | --------------------- |
| **Data Center Endpoint** | Your [MoEngage Data Cluster](https://www.moengage.com/docs/user-guide/data/key-concepts/data-centers-in-moengage). | `1`, `2`, `3`, or `4` |
| **Workspace ID** | Workspace ID of your MoEngage account. You can find this by navigating to **Settings** > **Account** > **APIs** > **Workspace ID (earlier app id)**. | — |
| **App attribution key** | Available on the MoEngage dashboard by navigating to **Settings** > **Analytics** > **Acquisition tracking**. | — |
After entering the field values, continue with the remaining steps:
9. Click **Save**.
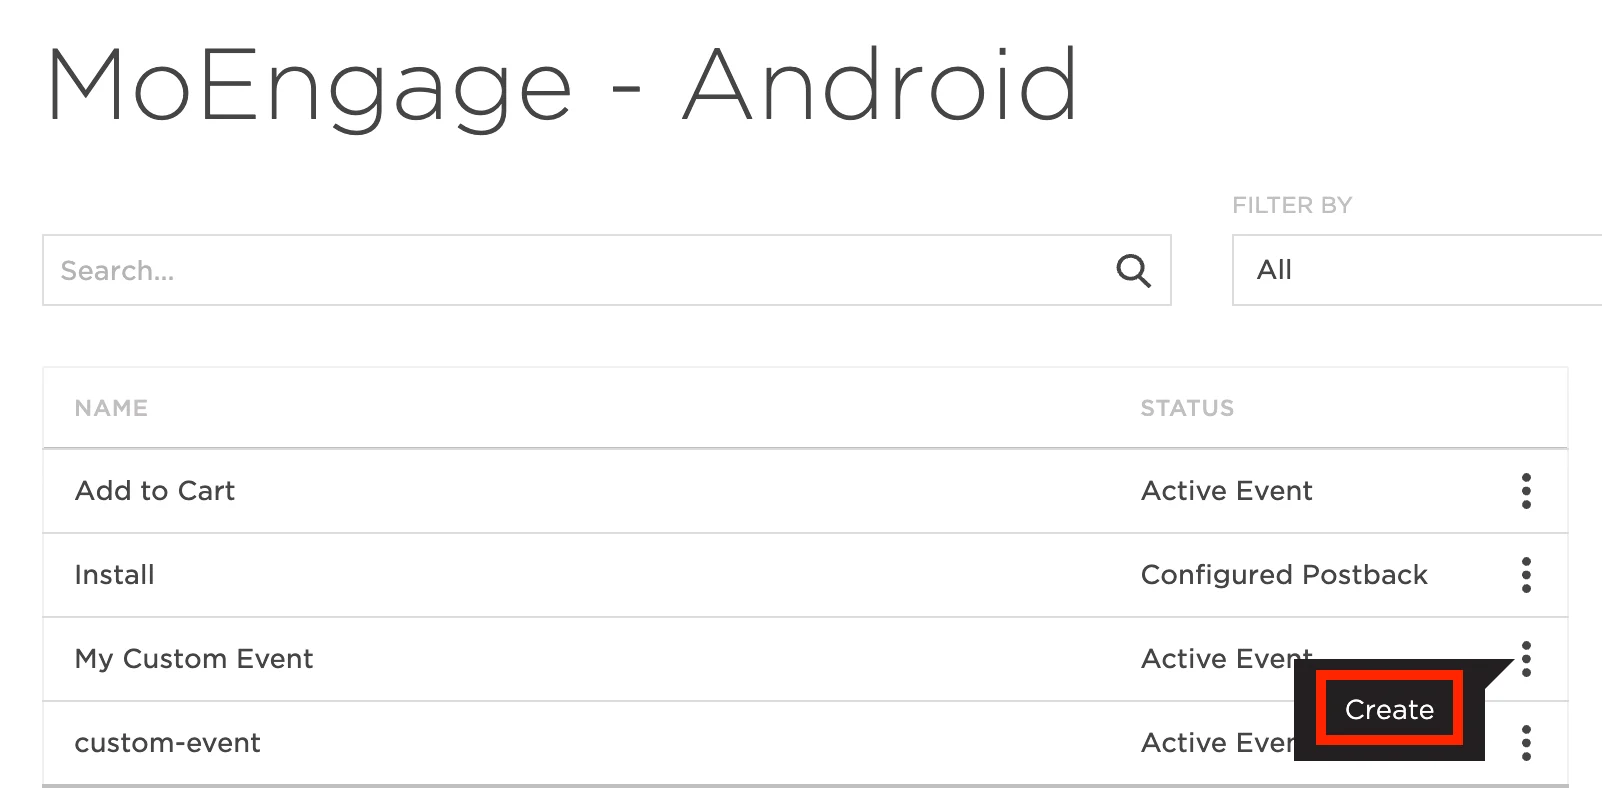
10. For all other post-install events, click the three-dot action menu and select **Create** on each of them.
7. For **Post-Install Active Events**, locate the desired event and click **Edit Postback**.
8. On the **Edit Postback** page, fill out the form with the following details:
* **Supply network data to analytics partner**: Select **True**. If you don't want to forward this data to MoEngage, select **False**.
* **Workspace ID**: Your Workspace ID as provided by MoEngage. Refer to the table below.
* **App attribution key**: Your App attribution key as defined by MoEngage. Refer to the table below.
* **Datacenter endpoint**: The Data Center endpoint as provided by MoEngage. Refer to the table below.
* **Delivery delay**: Automatically delay postback delivery for this duration.
* **Retry attempts**: Maximum times to attempt redelivery in the event of a posting failure.
Use the following values for the MoEngage-specific fields:
| Key | Description | Value |
| ------------------------ | ---------------------------------------------------------------------------------------------------------------------------------------------------- | --------------------- |
| **Data Center Endpoint** | Your [MoEngage Data Cluster](https://www.moengage.com/docs/user-guide/data/key-concepts/data-centers-in-moengage). | `1`, `2`, `3`, or `4` |
| **Workspace ID** | Workspace ID of your MoEngage account. You can find this by navigating to **Settings** > **Account** > **APIs** > **Workspace ID (earlier app id)**. | — |
| **App attribution key** | Available on the MoEngage dashboard by navigating to **Settings** > **Analytics** > **Acquisition tracking**. | — |
After entering the field values, continue with the remaining steps:
9. Click **Save**.
10. For all other post-install events, click the three-dot action menu and select **Create** on each of them. 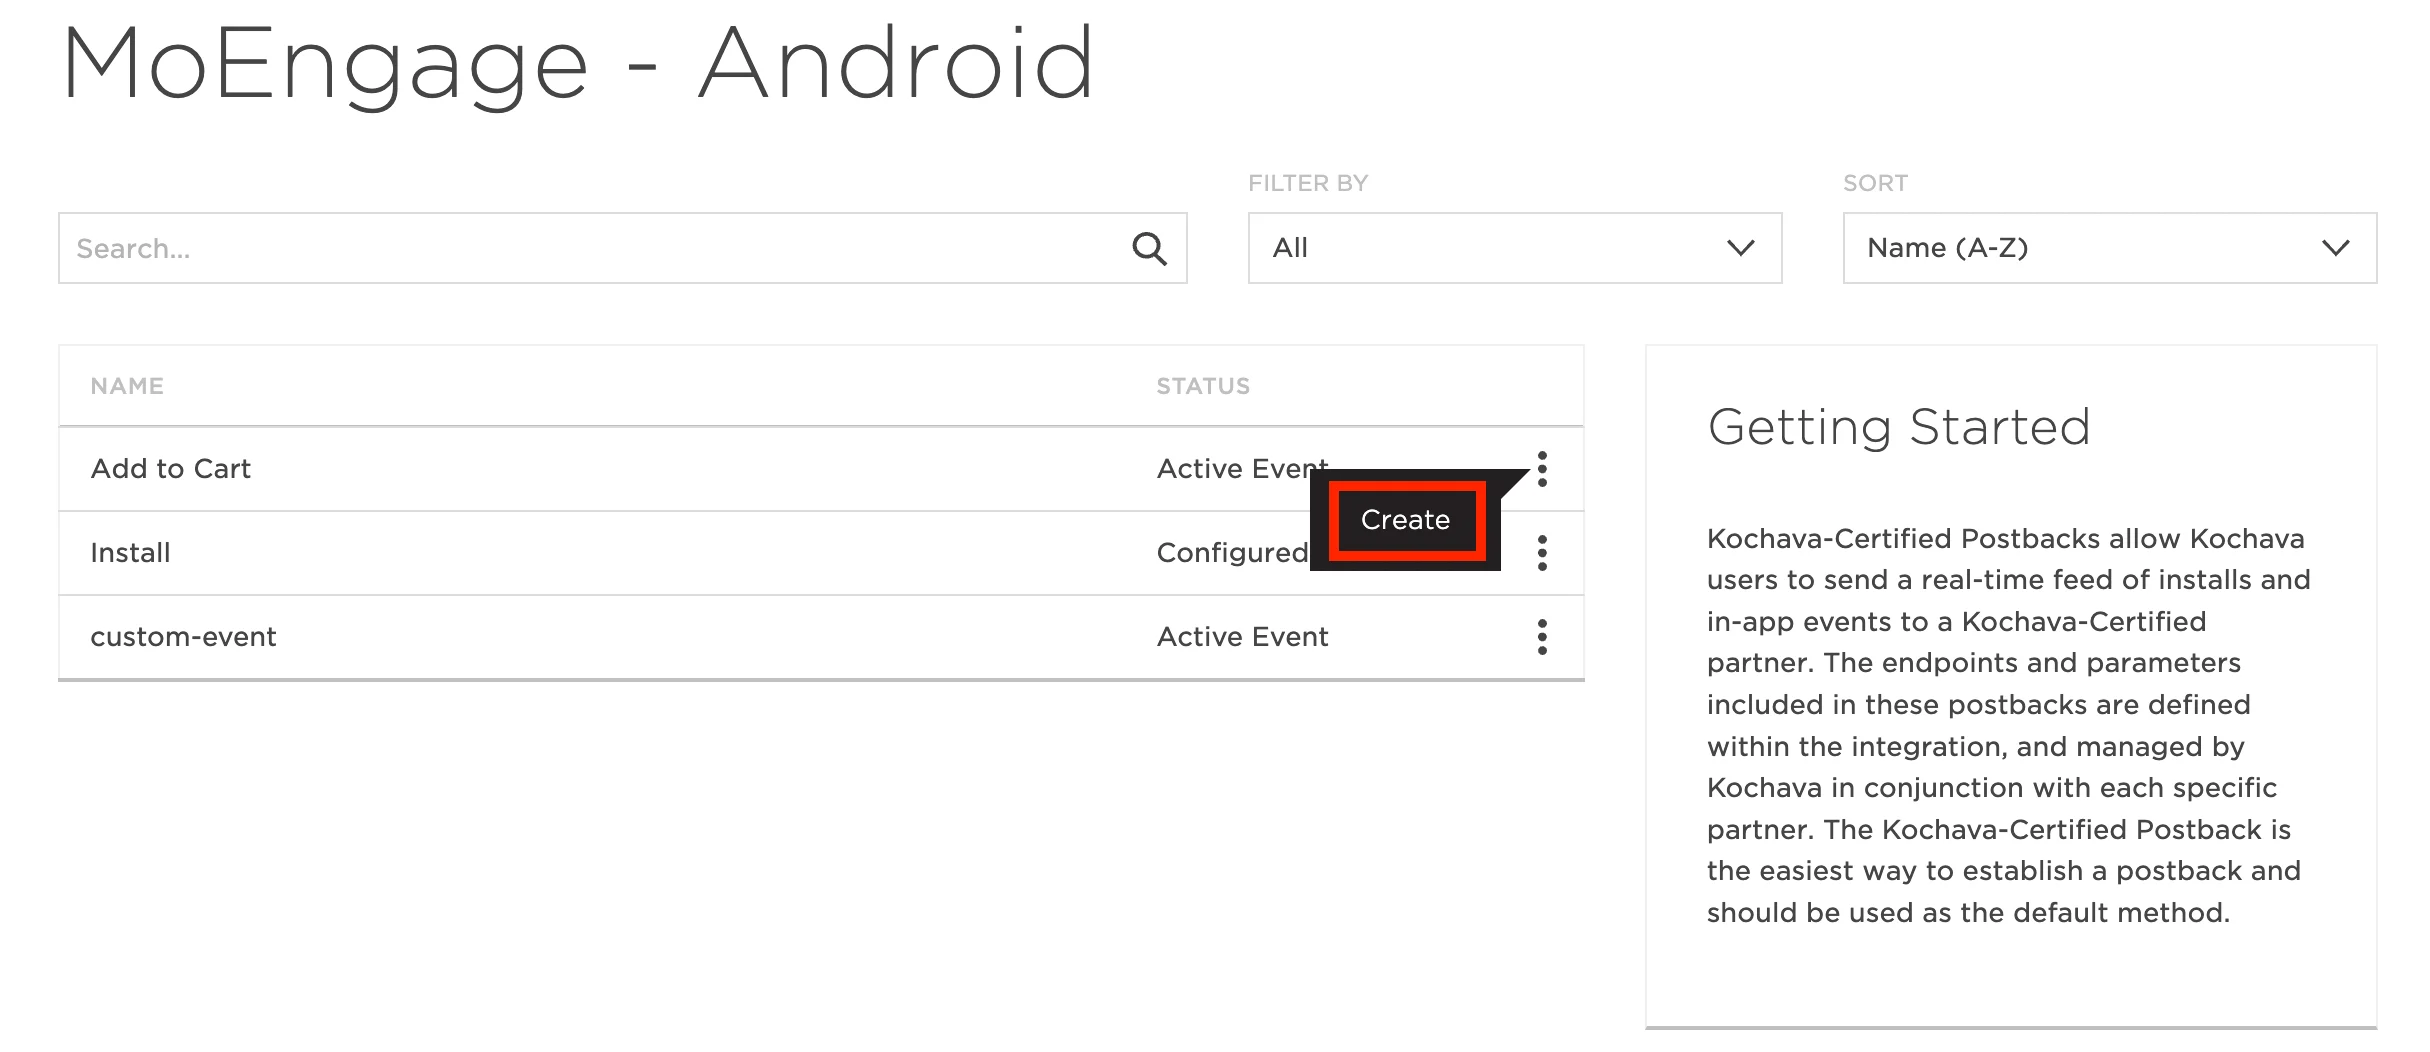 11. You do not need to enter the MoEngage details (Workspace ID, App attribution key, Data Center) again. For each of the post-install events, fill out the form per your requirements. Refer to step 8 for details of each field.
12. Repeat this activity for your other apps.
You have successfully added MoEngage endpoints on Kochava.
### Send custom events to MoEngage
You can also forward custom events to MoEngage. Follow the steps below to create a new custom event.
1. Navigate to **App & Assets** > **Event Manager**.
11. You do not need to enter the MoEngage details (Workspace ID, App attribution key, Data Center) again. For each of the post-install events, fill out the form per your requirements. Refer to step 8 for details of each field.
12. Repeat this activity for your other apps.
You have successfully added MoEngage endpoints on Kochava.
### Send custom events to MoEngage
You can also forward custom events to MoEngage. Follow the steps below to create a new custom event.
1. Navigate to **App & Assets** > **Event Manager**. 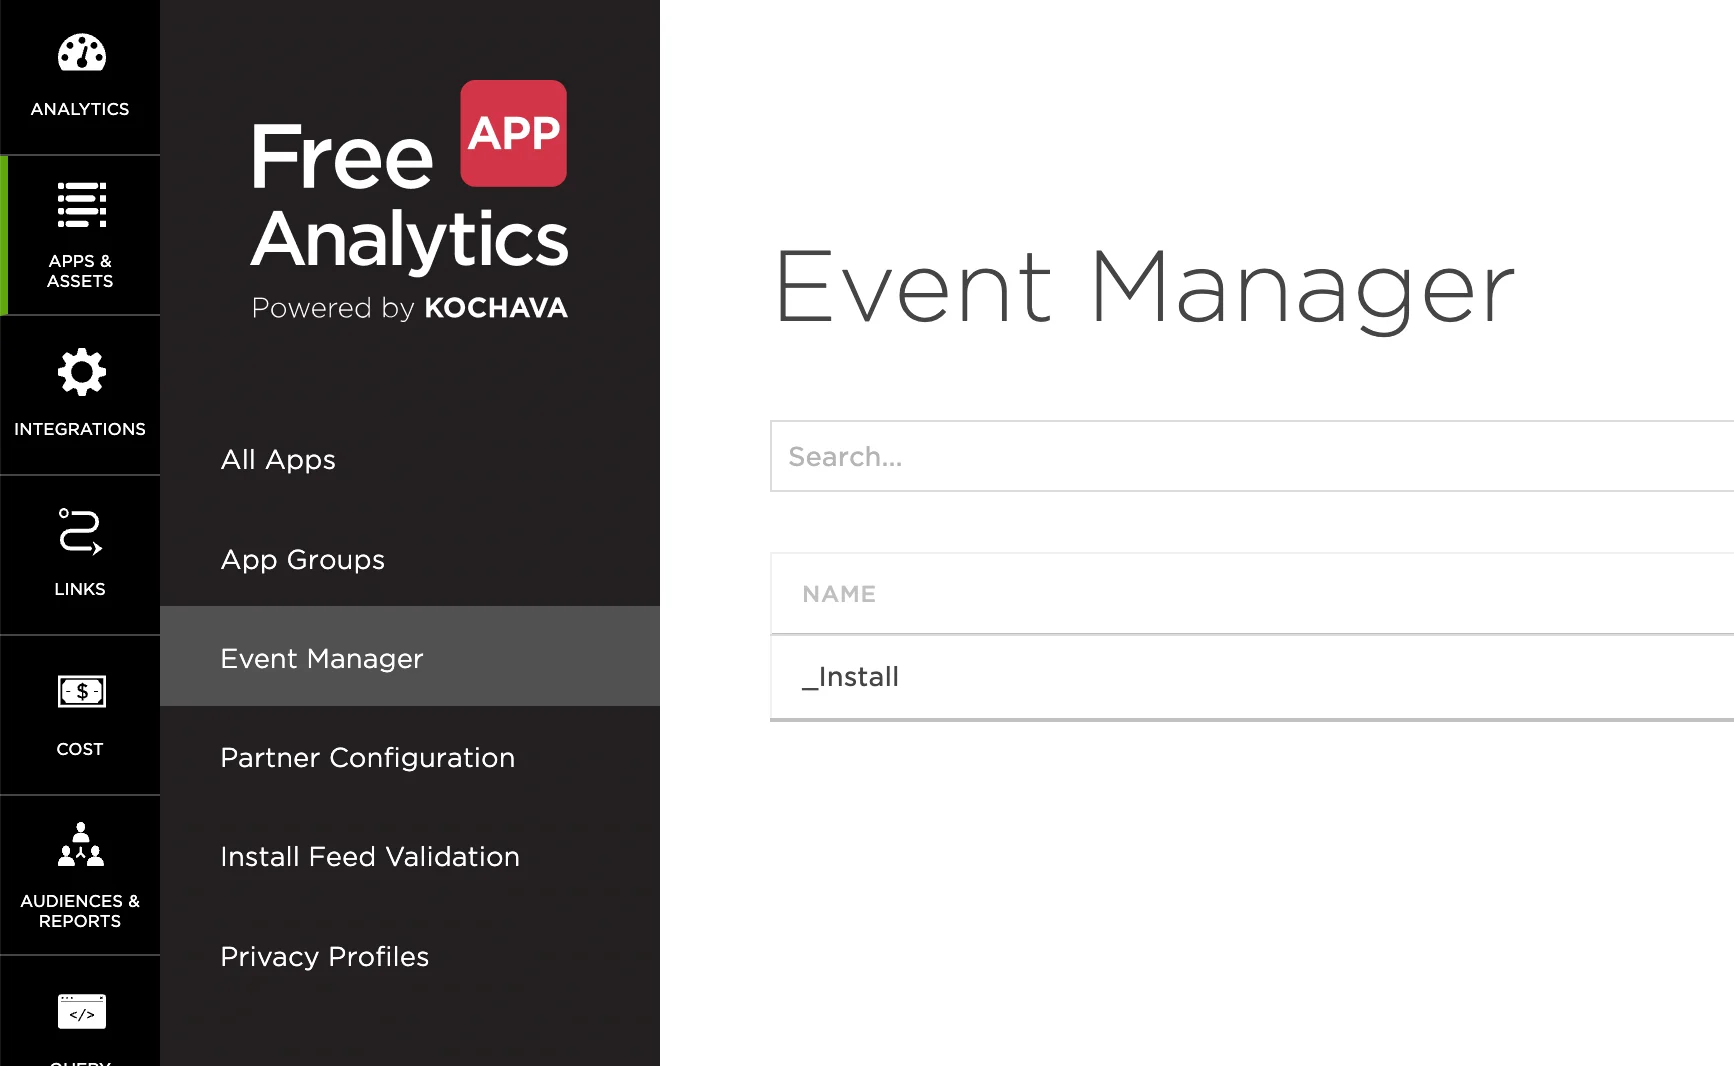 2. Under the **Add an event** section, add a name (for example, "My Custom Event") for the custom event.
 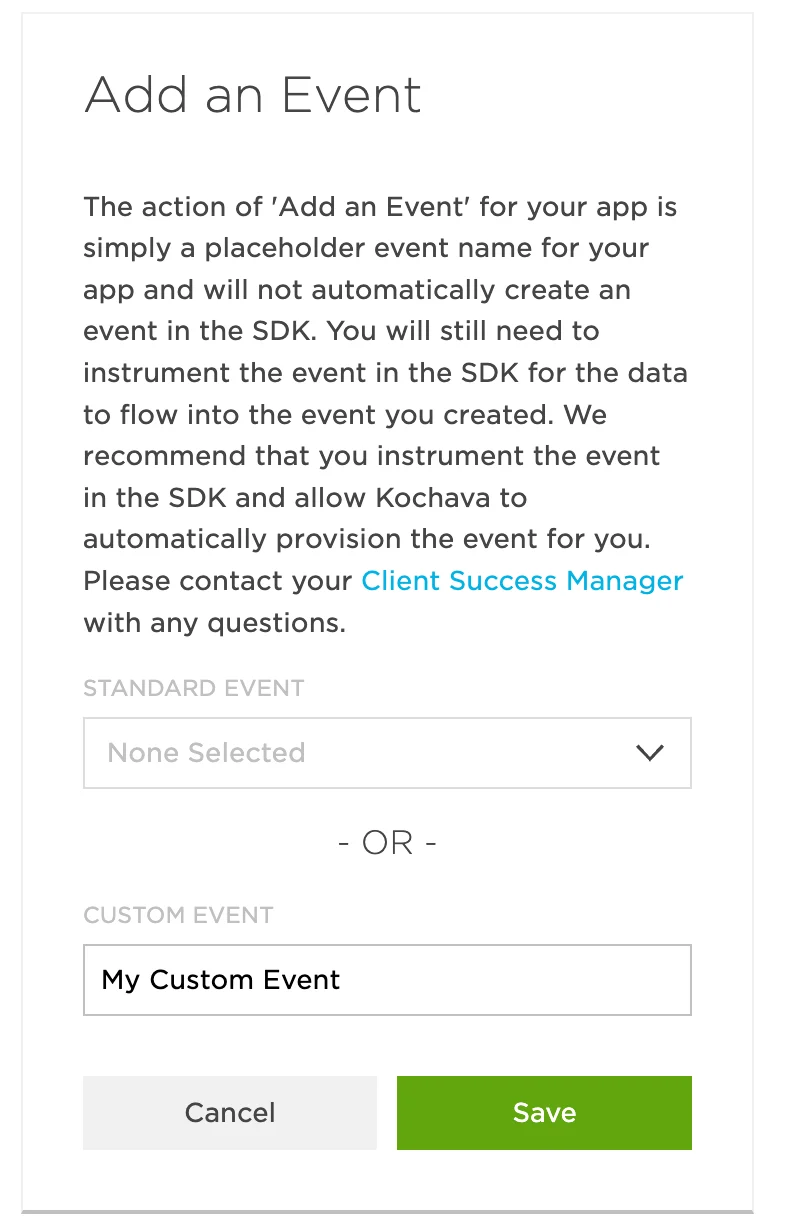 3. Click **Save**.
4. Optionally, you can set up a remap to forward all incoming data of another event to this event.
Once your custom event is ready, create a Postback to send the data to MoEngage:
1. Navigate to **App & Assets** > **Partner Configuration**.
2. Click **Postbacks** from the three-dot action menu of the MoEngage Postback you configured earlier.
3. Click **Save**.
4. Optionally, you can set up a remap to forward all incoming data of another event to this event.
Once your custom event is ready, create a Postback to send the data to MoEngage:
1. Navigate to **App & Assets** > **Partner Configuration**.
2. Click **Postbacks** from the three-dot action menu of the MoEngage Postback you configured earlier. 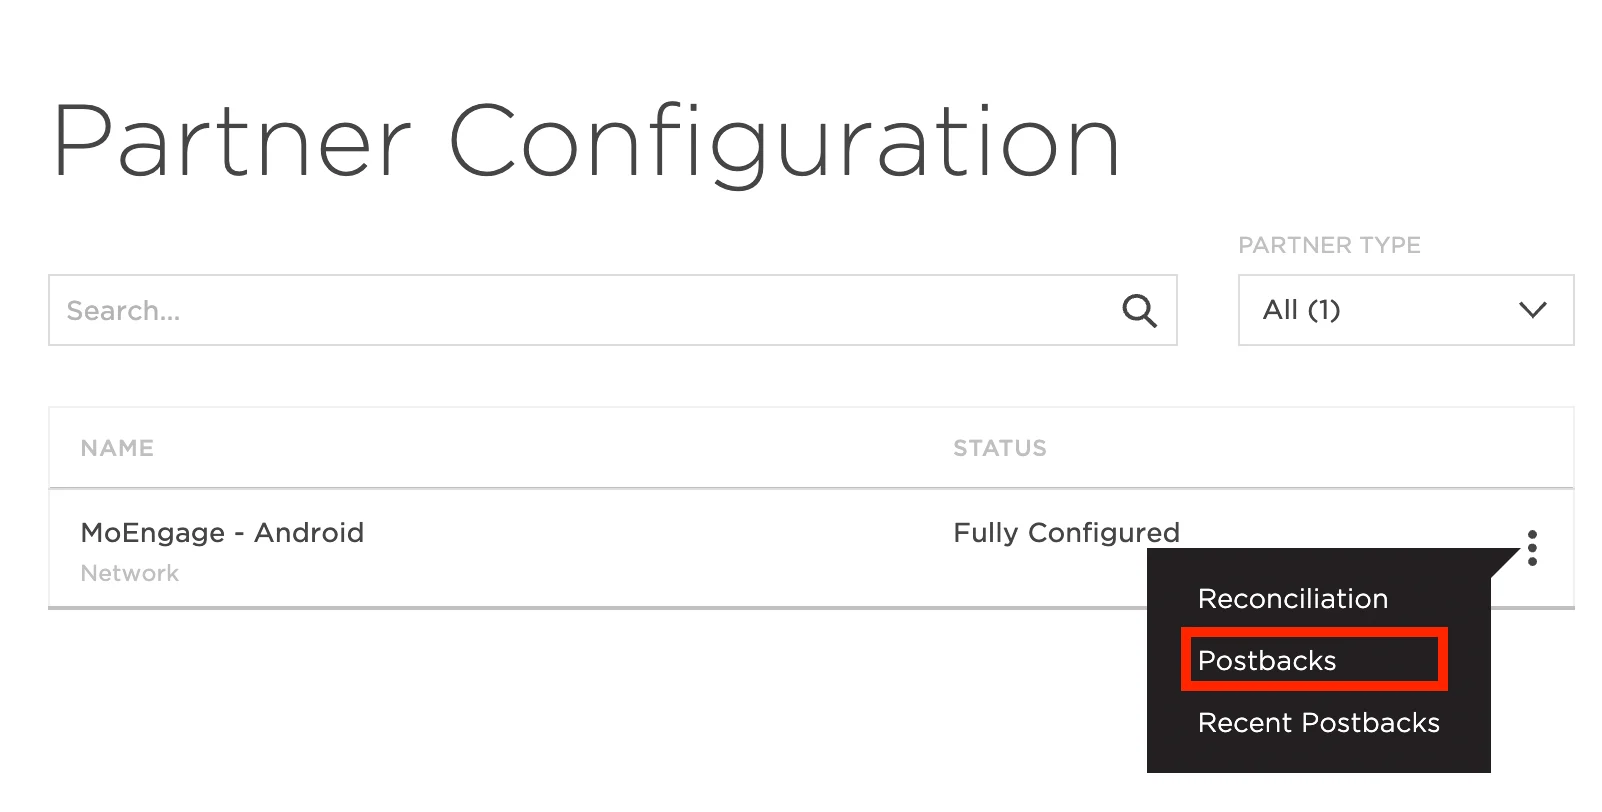 3. From the three-dot action menu for the custom event you just created, select **Create**.
  4. Fill out the form per your requirements. Refer to step 8 above for details on the form fields.
You are now sending both standard and custom events from Kochava to MoEngage.
## How to use the acquisition data in MoEngage
After MoEngage starts receiving data from Kochava, you can leverage this data in the following ways.
### User attributes
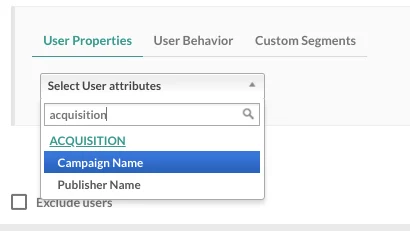
MoEngage tracks two user attributes: **Campaign Name** and **Publisher Name**. You can use these attributes in your campaigns, segmentation, and analytics. The Publisher Name and Campaign Name of install give you added insight into the persona of the user. You can leverage this data to enhance your onboarding campaigns and user funnels, and to personalize your marketing automation activities on MoEngage. The next sections list a few popular use cases for leveraging this data.
4. Fill out the form per your requirements. Refer to step 8 above for details on the form fields.
You are now sending both standard and custom events from Kochava to MoEngage.
## How to use the acquisition data in MoEngage
After MoEngage starts receiving data from Kochava, you can leverage this data in the following ways.
### User attributes
MoEngage tracks two user attributes: **Campaign Name** and **Publisher Name**. You can use these attributes in your campaigns, segmentation, and analytics. The Publisher Name and Campaign Name of install give you added insight into the persona of the user. You can leverage this data to enhance your onboarding campaigns and user funnels, and to personalize your marketing automation activities on MoEngage. The next sections list a few popular use cases for leveraging this data.
 ### Analyze the performance of different publishers
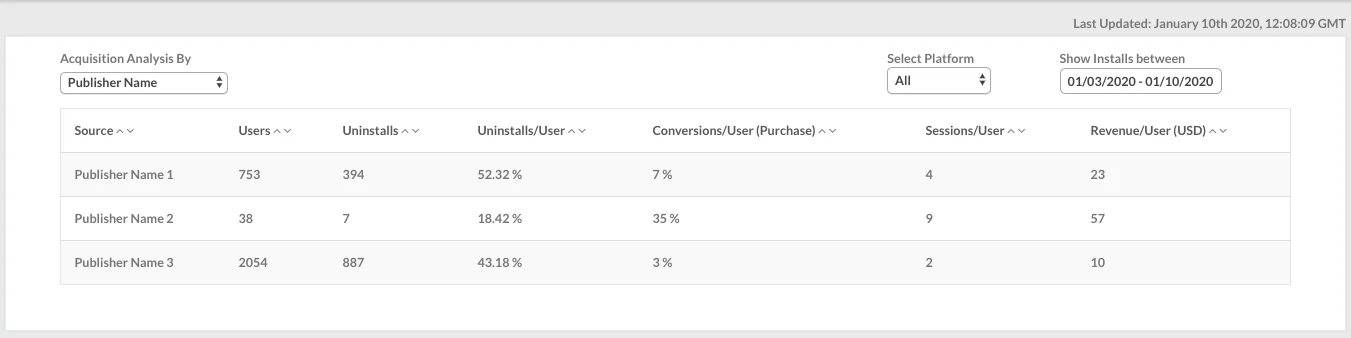
The Kochava integration helps you analyze the effectiveness of your app install campaigns and sources in MoEngage. Using data already tracked in MoEngage—user events, conversion goals, and uninstalls—you can compare the performance of different app install campaigns and analyze the relative performance of installs from different publishers to optimize your marketing spend.
### Analyze the performance of different publishers
The Kochava integration helps you analyze the effectiveness of your app install campaigns and sources in MoEngage. Using data already tracked in MoEngage—user events, conversion goals, and uninstalls—you can compare the performance of different app install campaigns and analyze the relative performance of installs from different publishers to optimize your marketing spend.
 ### Analyze the performance of different campaigns
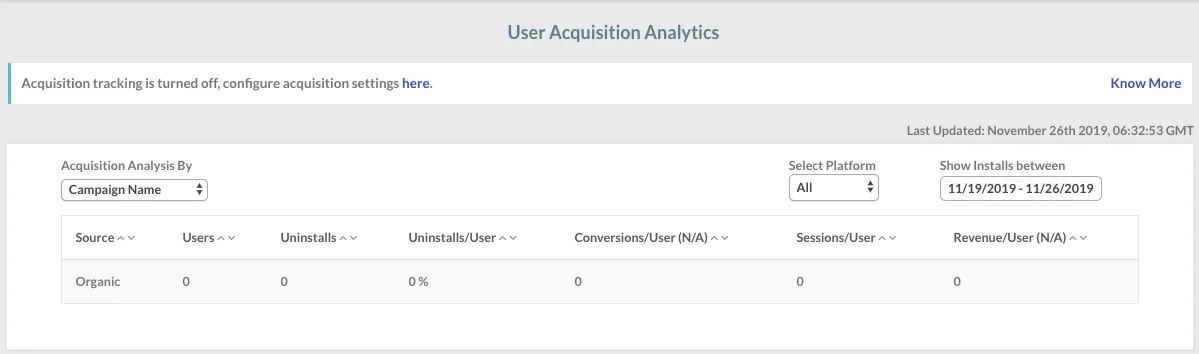
After the integration is complete, you can view your acquisition data analysis on the acquisition dashboard by navigating to **Analyze** > **Acquisitions** in the dashboard sidebar.
### Analyze the performance of different campaigns
After the integration is complete, you can view your acquisition data analysis on the acquisition dashboard by navigating to **Analyze** > **Acquisitions** in the dashboard sidebar.
 If you use MoEngage Analytics, you can also leverage the Publisher Name and Campaign Name information of installs to analyze your user funnels.
### Enhanced onboarding campaigns
You can use the Publisher Name and Campaign Name of install—available as user properties in MoEngage—to create segments and personalize the push notifications, in-app messages, emails, and SMS that you send through MoEngage.
Install attribution data gives you an insight into how users could progress in their lifecycle right when they install the app. This is a very useful piece of information and can help you enhance the performance of your onboarding campaigns by improving retention, reducing the time to first conversion, and driving a higher LTV per user.
| Publisher category | Use case |
| -------------------------------------------------- | ----------------------------------------------------------------------------------------------------------------------------------------------------------- |
| Publishers where average sessions per user are low | Send push notifications periodically to increase the average number of sessions per user, right from the time users install the app. |
| Publishers where average LTV is high | These are your potential premium users. Implement a campaign strategy to nurture them into your premium-user segment. |
| Publishers where the uninstall rate is high | Identify users with a higher propensity to churn immediately after install, and incentivize them to make a first purchase—which can reduce your churn rate. |
If you use MoEngage Analytics, you can also leverage the Publisher Name and Campaign Name information of installs to analyze your user funnels.
### Enhanced onboarding campaigns
You can use the Publisher Name and Campaign Name of install—available as user properties in MoEngage—to create segments and personalize the push notifications, in-app messages, emails, and SMS that you send through MoEngage.
Install attribution data gives you an insight into how users could progress in their lifecycle right when they install the app. This is a very useful piece of information and can help you enhance the performance of your onboarding campaigns by improving retention, reducing the time to first conversion, and driving a higher LTV per user.
| Publisher category | Use case |
| -------------------------------------------------- | ----------------------------------------------------------------------------------------------------------------------------------------------------------- |
| Publishers where average sessions per user are low | Send push notifications periodically to increase the average number of sessions per user, right from the time users install the app. |
| Publishers where average LTV is high | These are your potential premium users. Implement a campaign strategy to nurture them into your premium-user segment. |
| Publishers where the uninstall rate is high | Identify users with a higher propensity to churn immediately after install, and incentivize them to make a first purchase—which can reduce your churn rate. |