> ## Documentation Index
> Fetch the complete documentation index at: https://moengage.com/docs/llms.txt
> Use this file to discover all available pages before exploring further.
# Pipedream
# Introduction
[Pipedream](https://pipedream.com/) is a low code integration platform built for developers. With Pipedream, you can build workflows by selecting a trigger (HTTP requests, schedules, app events, and more) and adding one or more steps.
# MoEngage × Pipedream
The MoEngage and Pipedream integration allows you to easily send data between MoEngage and other apps using custom logic and code functions. With this integration, you can -
1. Use MoEngage as a trigger Pipedream via our Connector campaigns
2. Send data from Pipedream to MoEngage using our Data APIs
## Use Cases
1. When an event occurs in MoEngage, add a new row in Google Sheets.
2. Import users from Google Form Leads into MoEngage.
3. Send a Slack message when a user performs an event.
4. Import events into MoEngage from a WebHook setup in Pipedream.
# Integration Prerequisites
* Ensure you have access to your Pipedream account.
* Ensure you have access to Data API keys in MoEngage Dashboard.
* The Data API ID and Data API Key are available at **Settings** -> **Account** -> **APIs**. The Data API ID is the same as the Workspace **ID**. The Data API Key is available in the same screen in the **API Keys** -> **Data** section.
## Use MoEngage as a Trigger
You can make use of MoEngage's Connector Campaigns to use MoEngage as a trigger.
### Step 1: Add HTTP Webhook Requests as a Trigger
 1. Click on "Add a Trigger".
2. Search for "HTTP / Webhook".
1. Click on "Add a Trigger".
2. Search for "HTTP / Webhook".
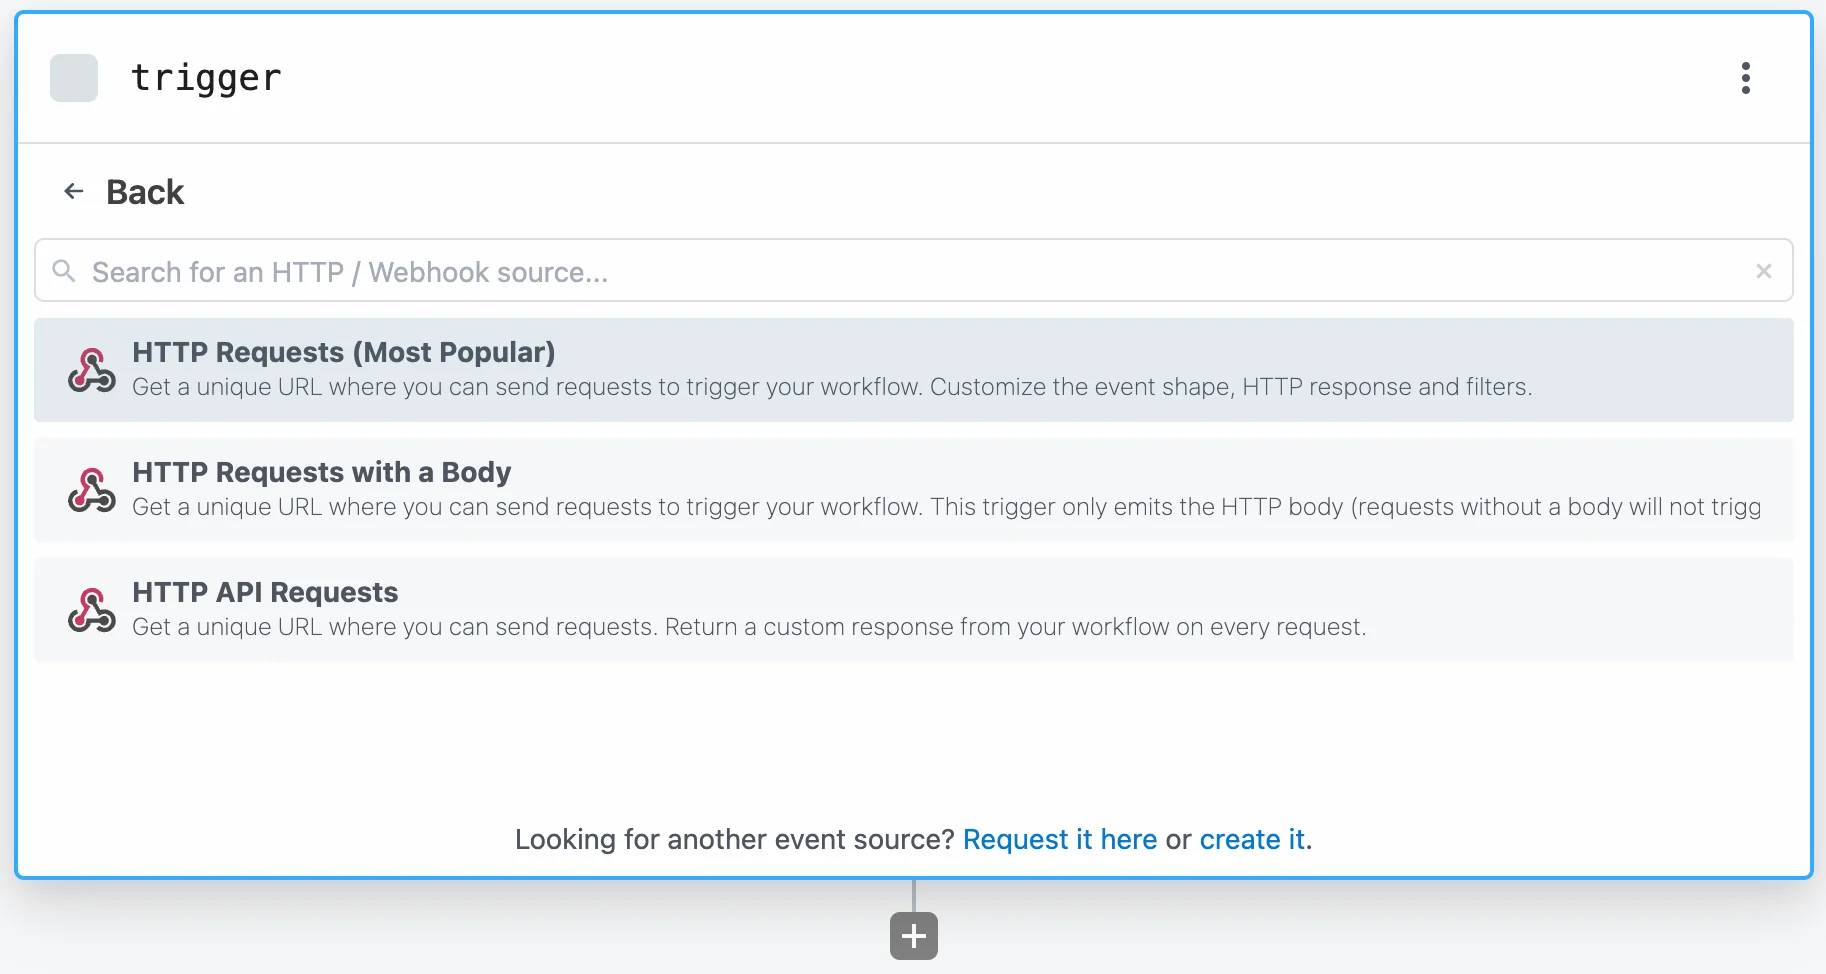 3. Event Data => `Full HTTP Request` HTTP Response => `Return HTTP 200 OK`
4. Click on "Save and continue".
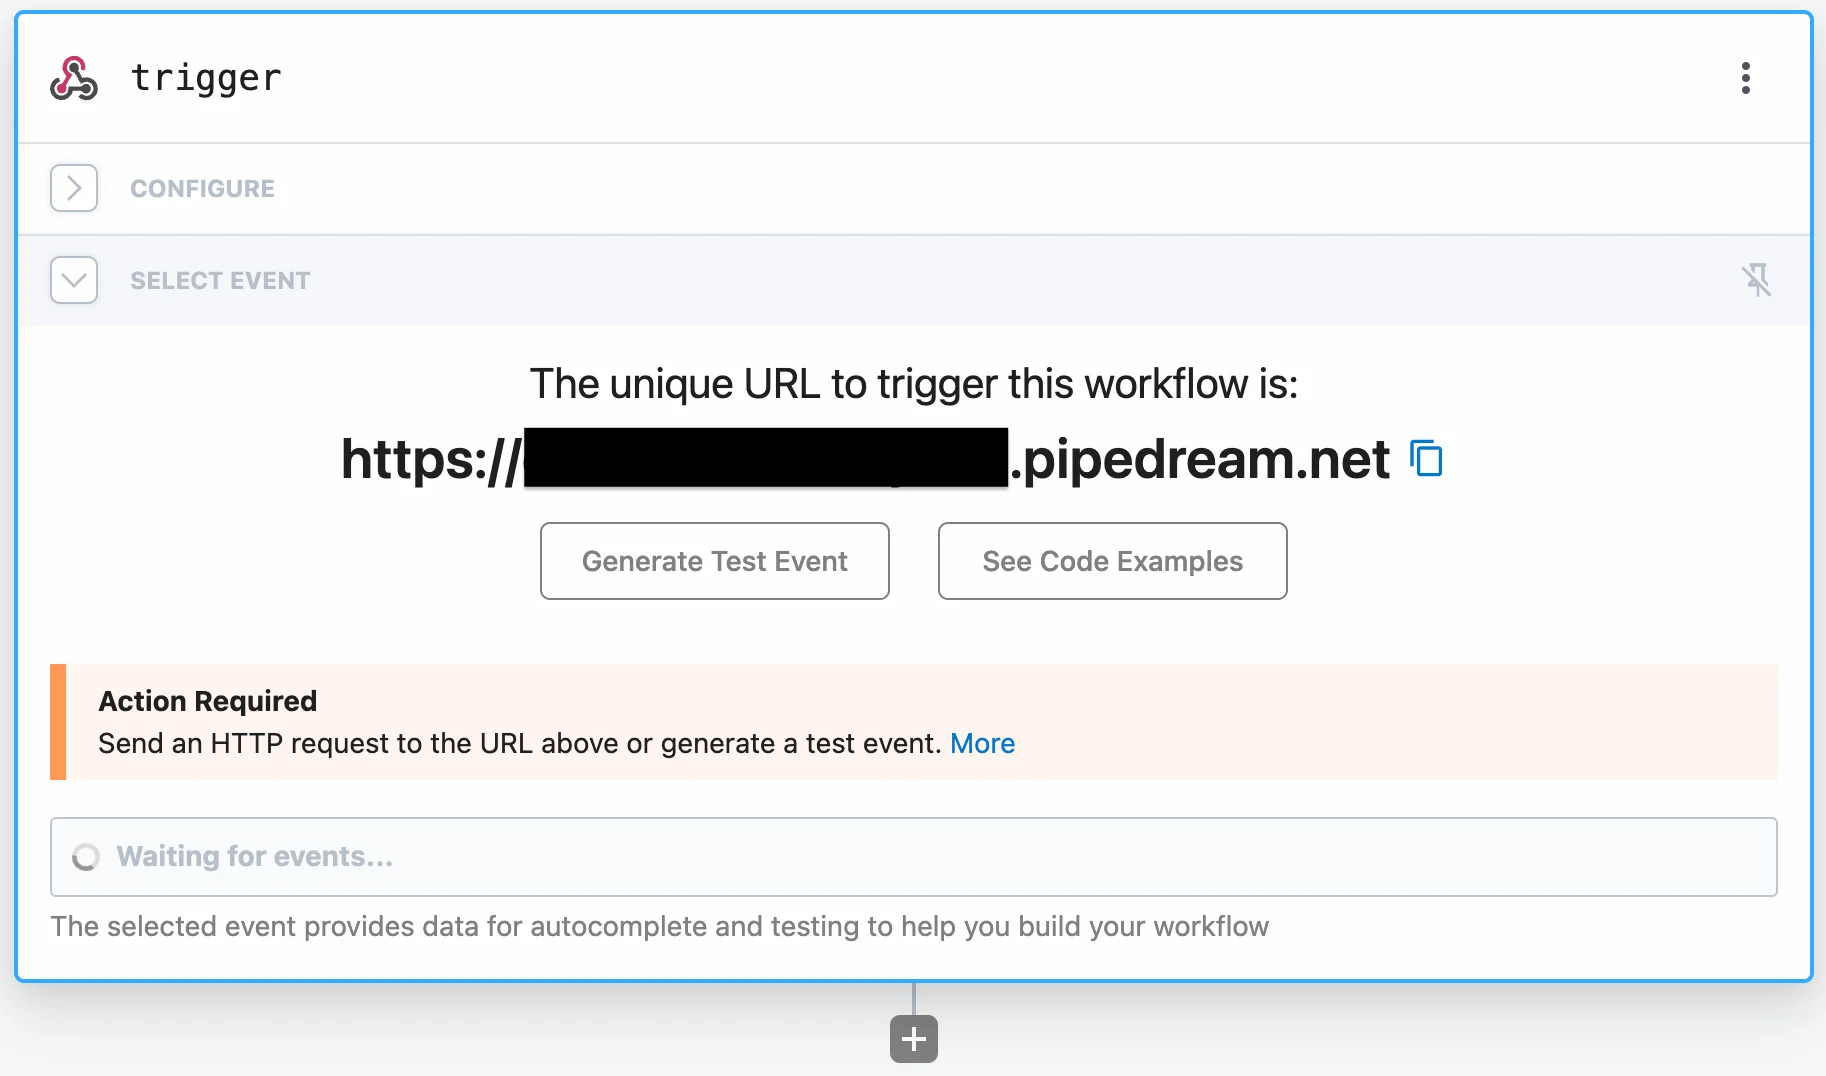
5. A new unique URL to trigger your workflow will be displayed. Save this URL as we will need it to set up the Connector Campaign.
3. Event Data => `Full HTTP Request` HTTP Response => `Return HTTP 200 OK`
4. Click on "Save and continue".
5. A new unique URL to trigger your workflow will be displayed. Save this URL as we will need it to set up the Connector Campaign.
 ### Step 2: Setup the Connector Campaign in MoEngage Dashboard
1. Navigate to MoEngage Dashboard.
2. Use any one of the following options:
1. On the **All Campaigns** page, click **Create Campaign**. The Create Campaign page is displayed.
### Step 2: Setup the Connector Campaign in MoEngage Dashboard
1. Navigate to MoEngage Dashboard.
2. Use any one of the following options:
1. On the **All Campaigns** page, click **Create Campaign**. The Create Campaign page is displayed. 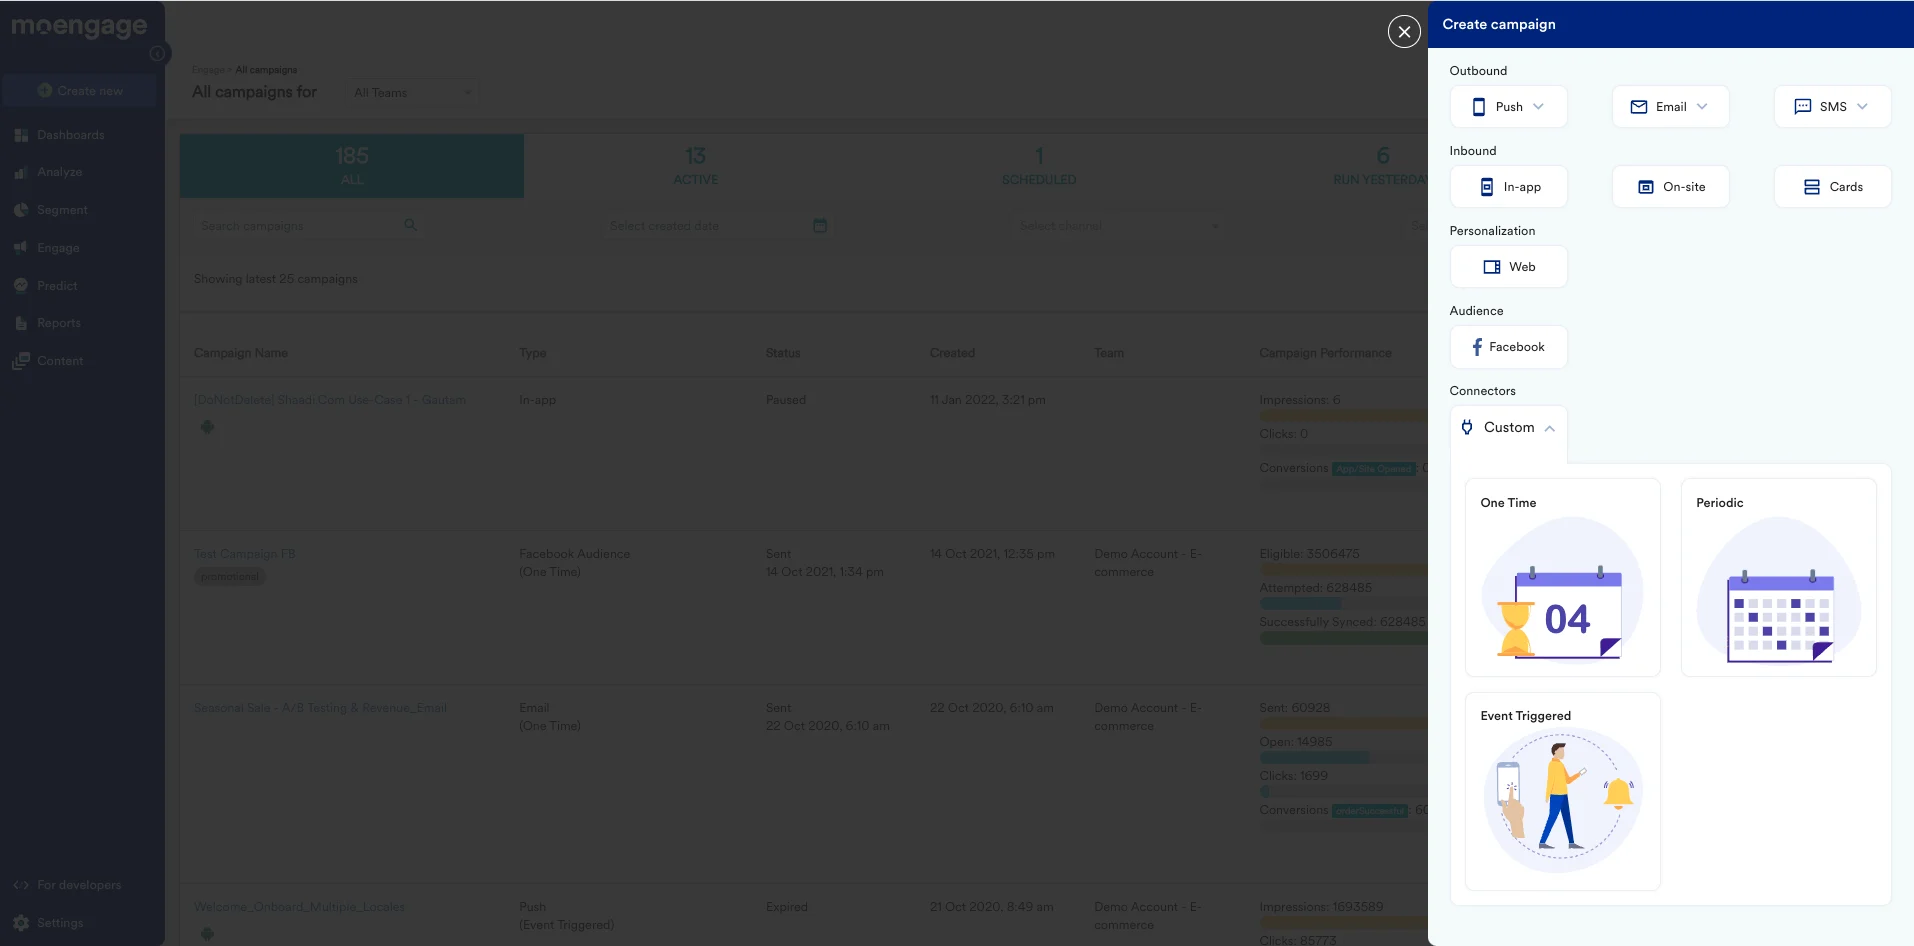 2. Click **Create New** > **Campaign**. The Create Campaign page is displayed.
 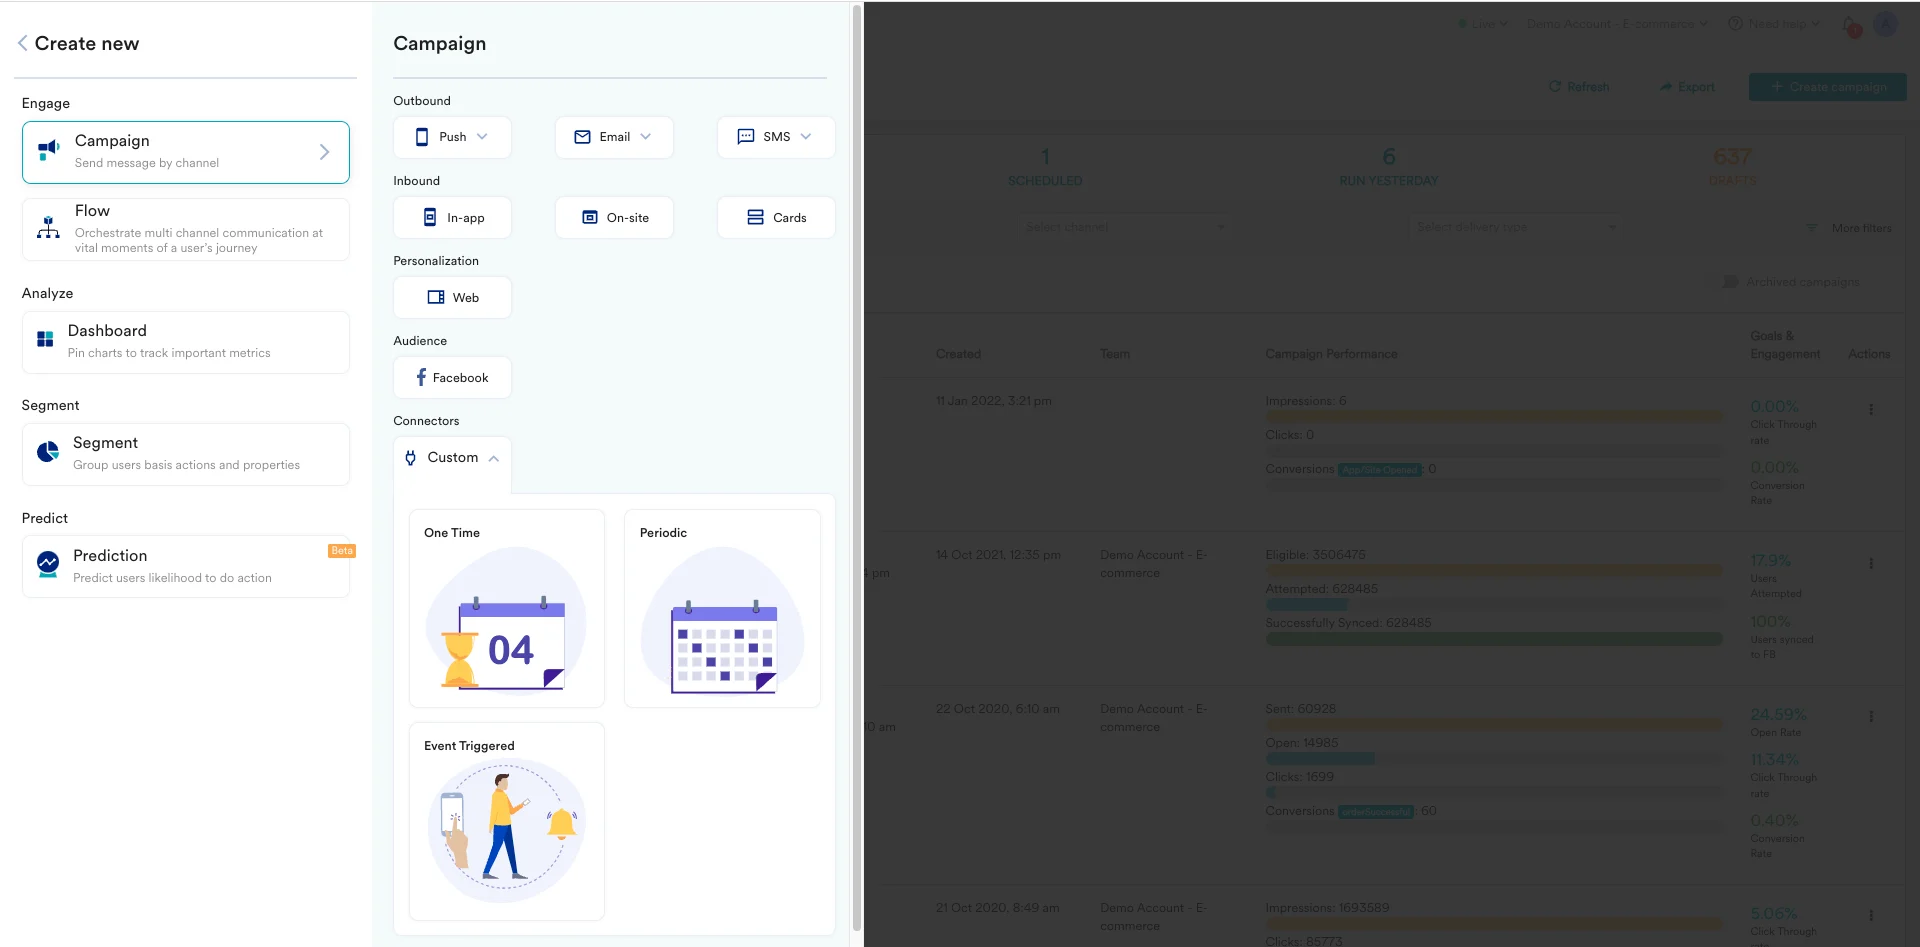 3. Click **Custom** under Connectors.
4. For the campaign delivery types, choose "Event-Triggered".
* For more information about delivery types, refer to [Delivery Types](https://www.moengage.com/docs/user-guide/campaigns-and-channels/getting-started/introduction/delivery-types-moengage-channels).
5. On the next screen, give your Campaign a name, and select the Criteria as "Device Uninstall".
6. For the trigger, choose "immediately".
3. Click **Custom** under Connectors.
4. For the campaign delivery types, choose "Event-Triggered".
* For more information about delivery types, refer to [Delivery Types](https://www.moengage.com/docs/user-guide/campaigns-and-channels/getting-started/introduction/delivery-types-moengage-channels).
5. On the next screen, give your Campaign a name, and select the Criteria as "Device Uninstall".
6. For the trigger, choose "immediately".
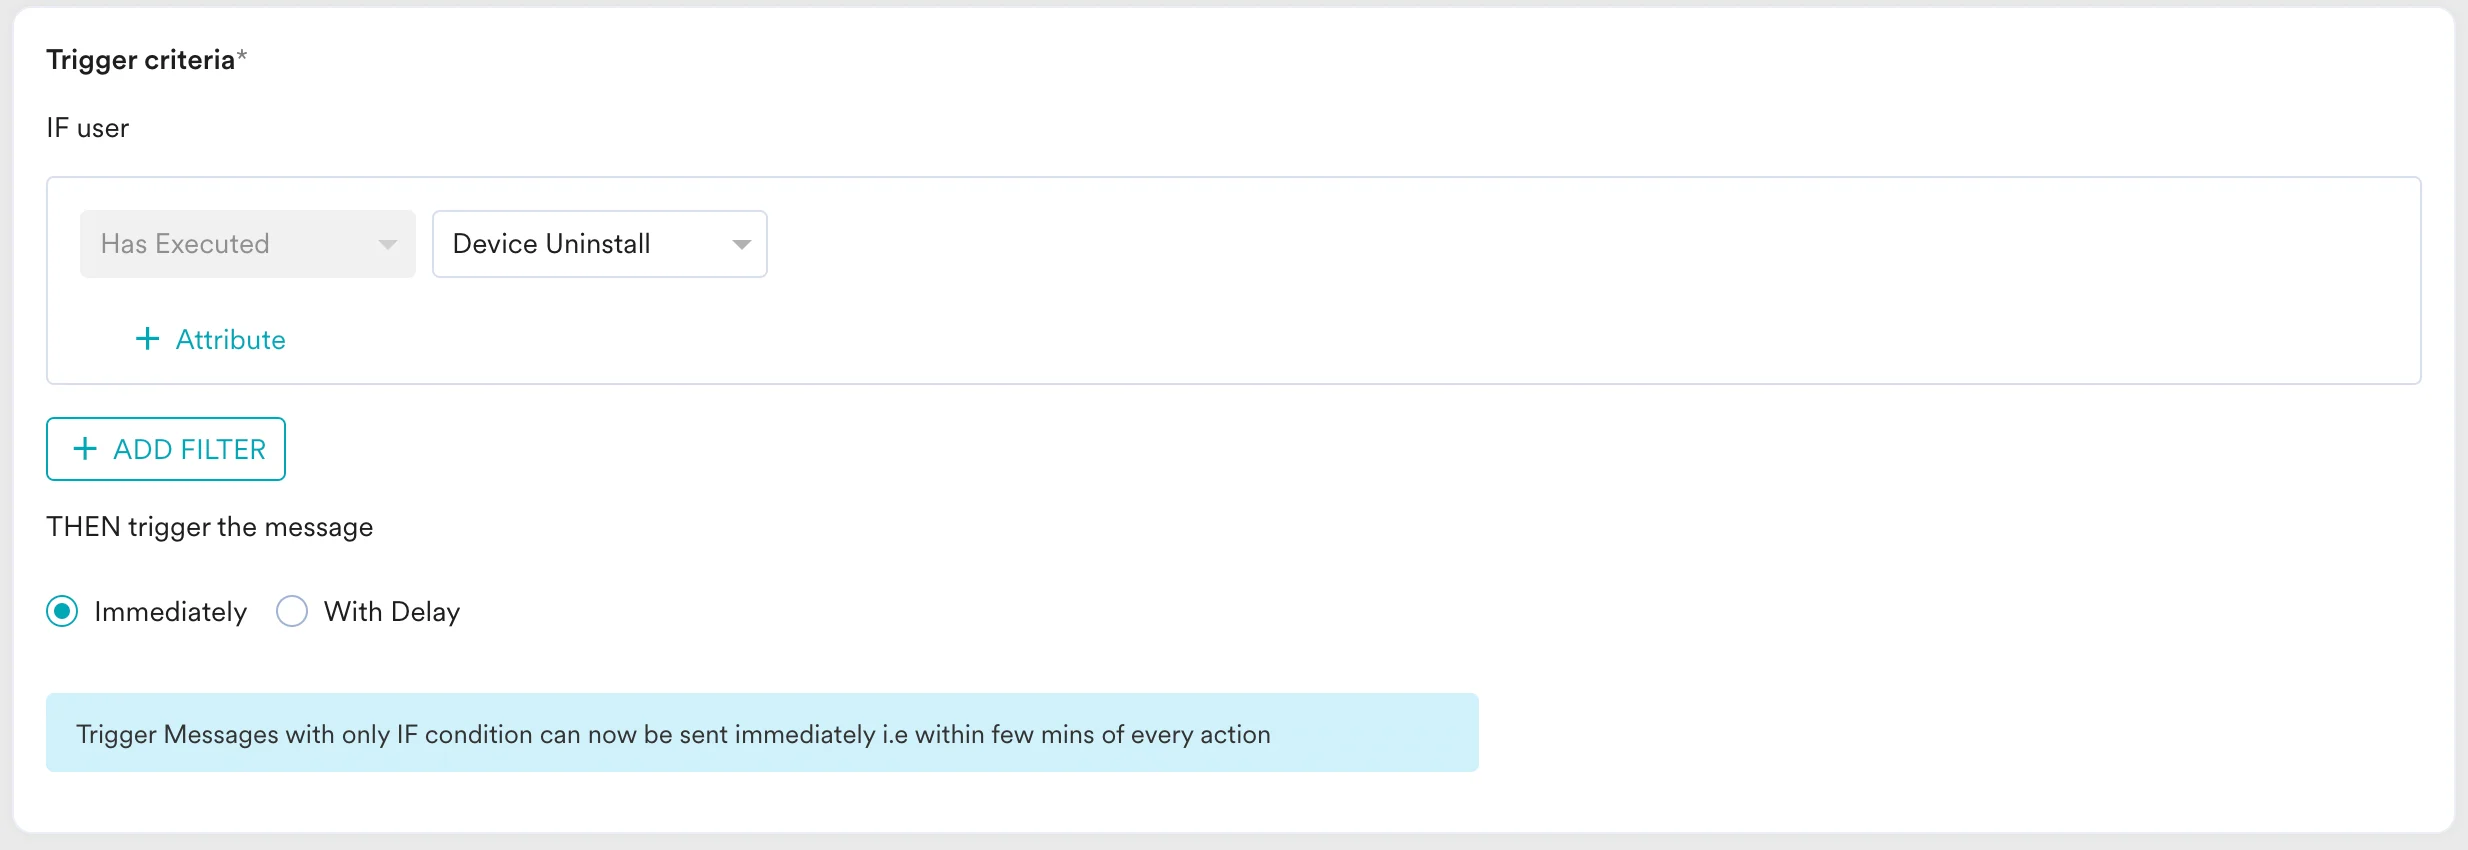 7. For the audience, let us choose "All users" for this use case. Click "Next" when satisfied.
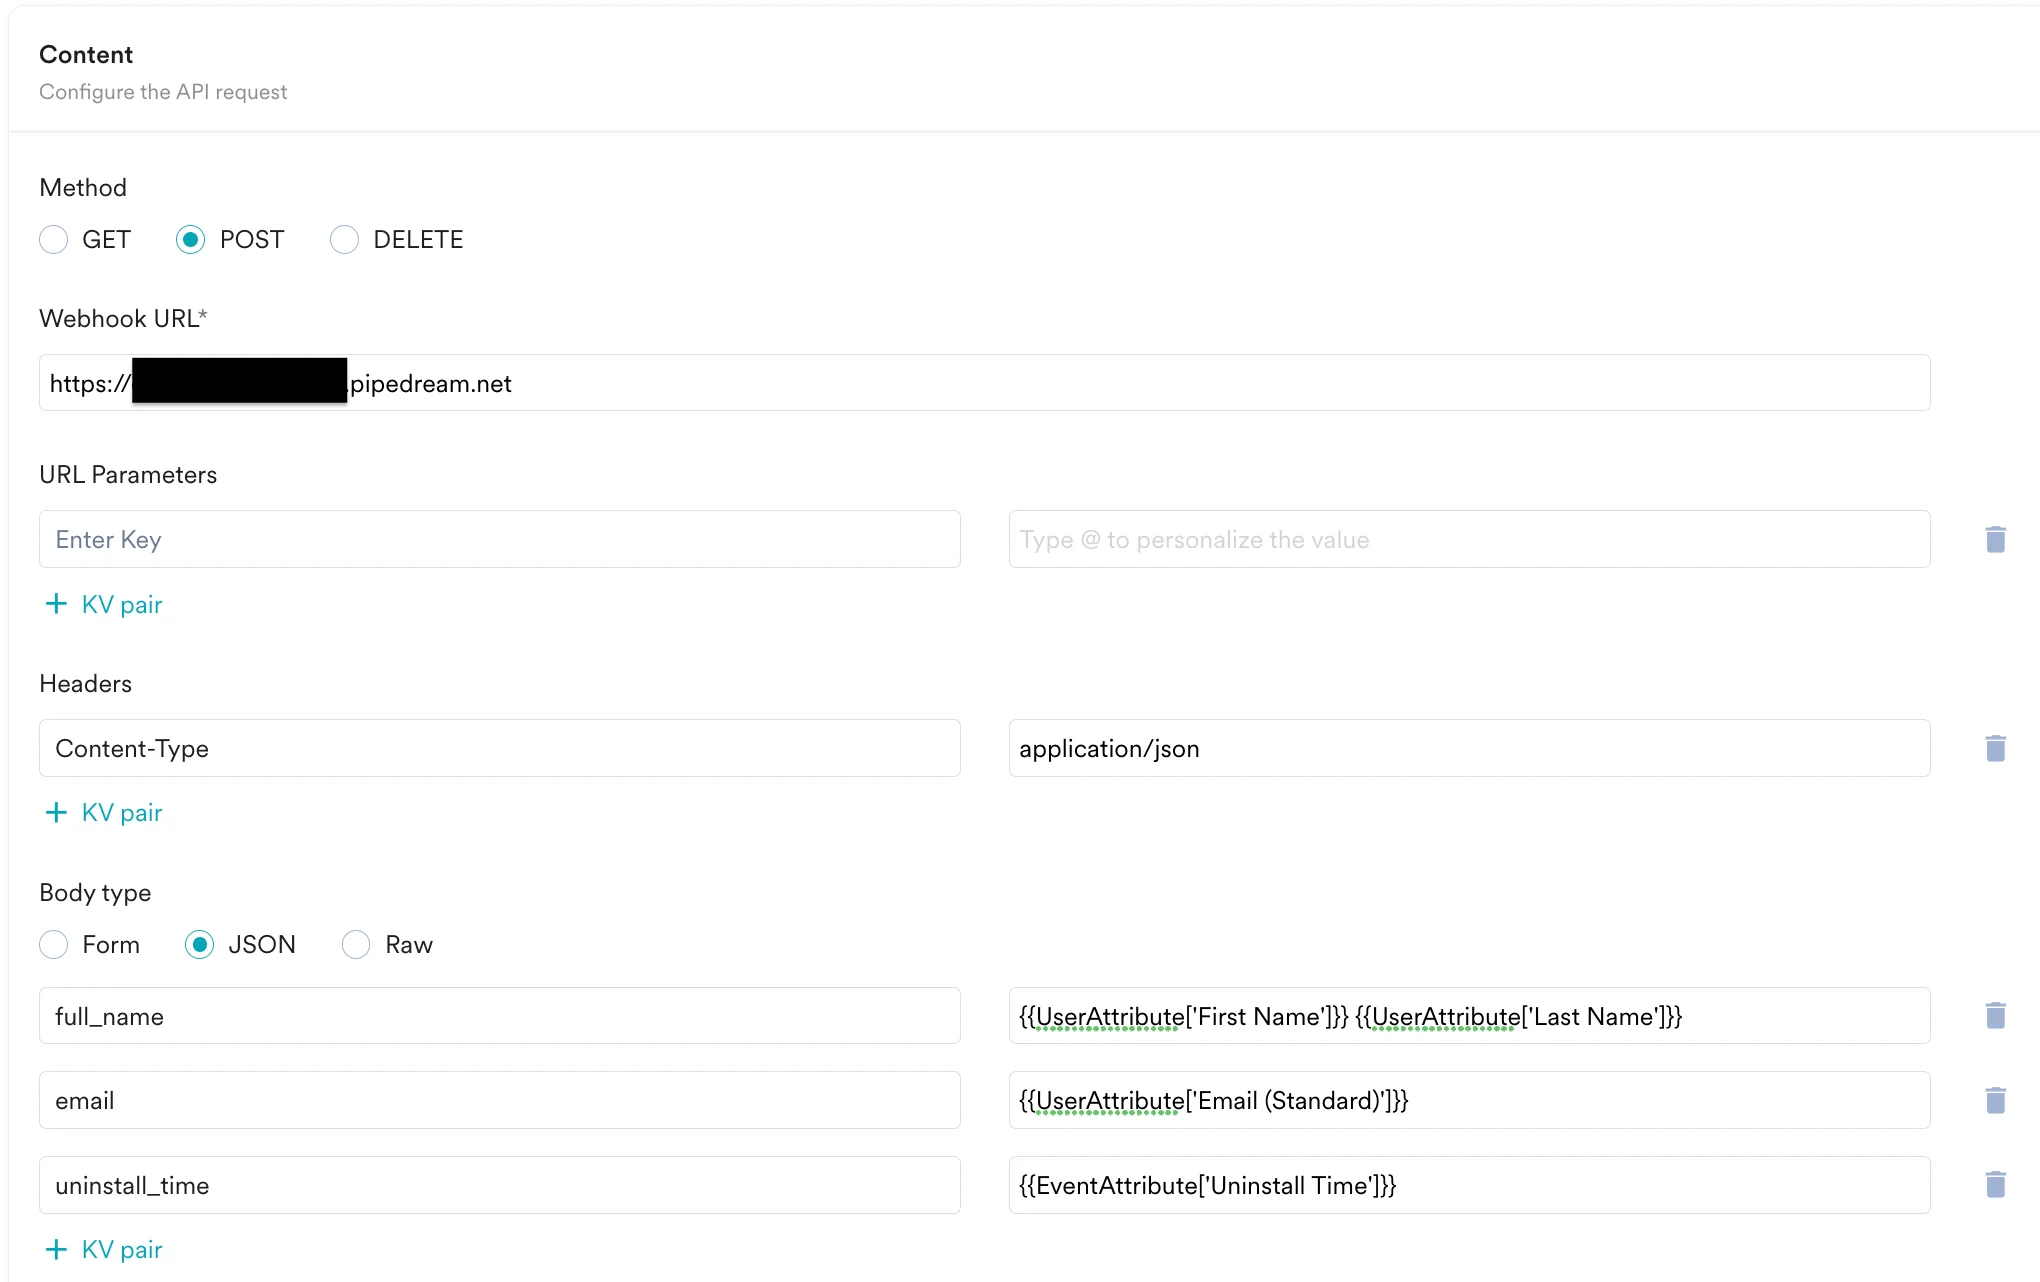
8. On the content screen, we will define our payload and webhook URL we got from the previous step.
9. Choose the method as "POST" (know more about Pipedream [HTTP Requests](https://pipedream.com/apps/http)).
10. Enter the webhook URL you copied earlier.
11. Define the headers and parameters as per your requirements. For this use case, we will just define our payload body- (you can type @ to insert personalized values as well)
7. For the audience, let us choose "All users" for this use case. Click "Next" when satisfied.
8. On the content screen, we will define our payload and webhook URL we got from the previous step.
9. Choose the method as "POST" (know more about Pipedream [HTTP Requests](https://pipedream.com/apps/http)).
10. Enter the webhook URL you copied earlier.
11. Define the headers and parameters as per your requirements. For this use case, we will just define our payload body- (you can type @ to insert personalized values as well)
 12. Now you need to test this webhook, scroll down and enter a test user's data and click on "test".
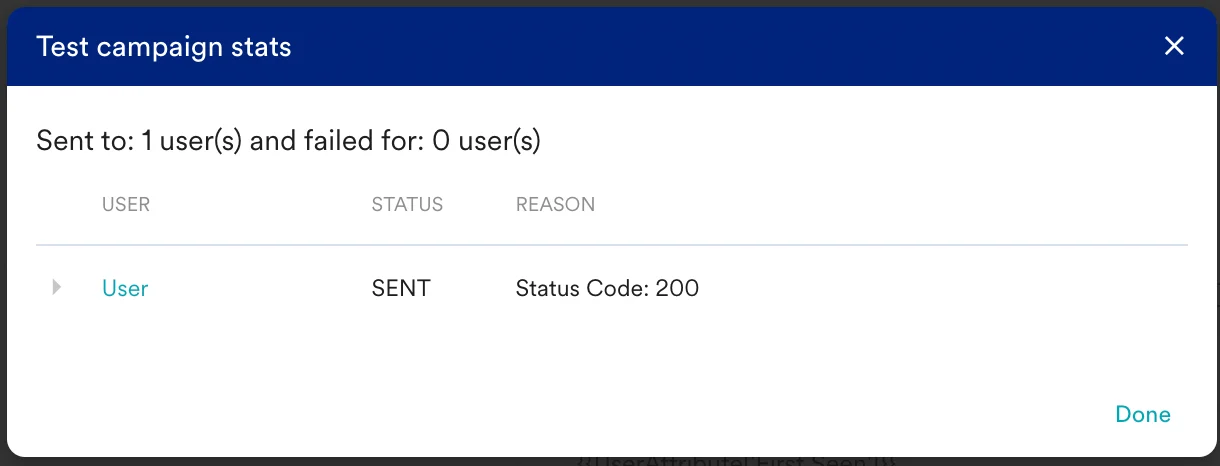
13. You should see a new modal saying the test was successful:
12. Now you need to test this webhook, scroll down and enter a test user's data and click on "test".
13. You should see a new modal saying the test was successful:
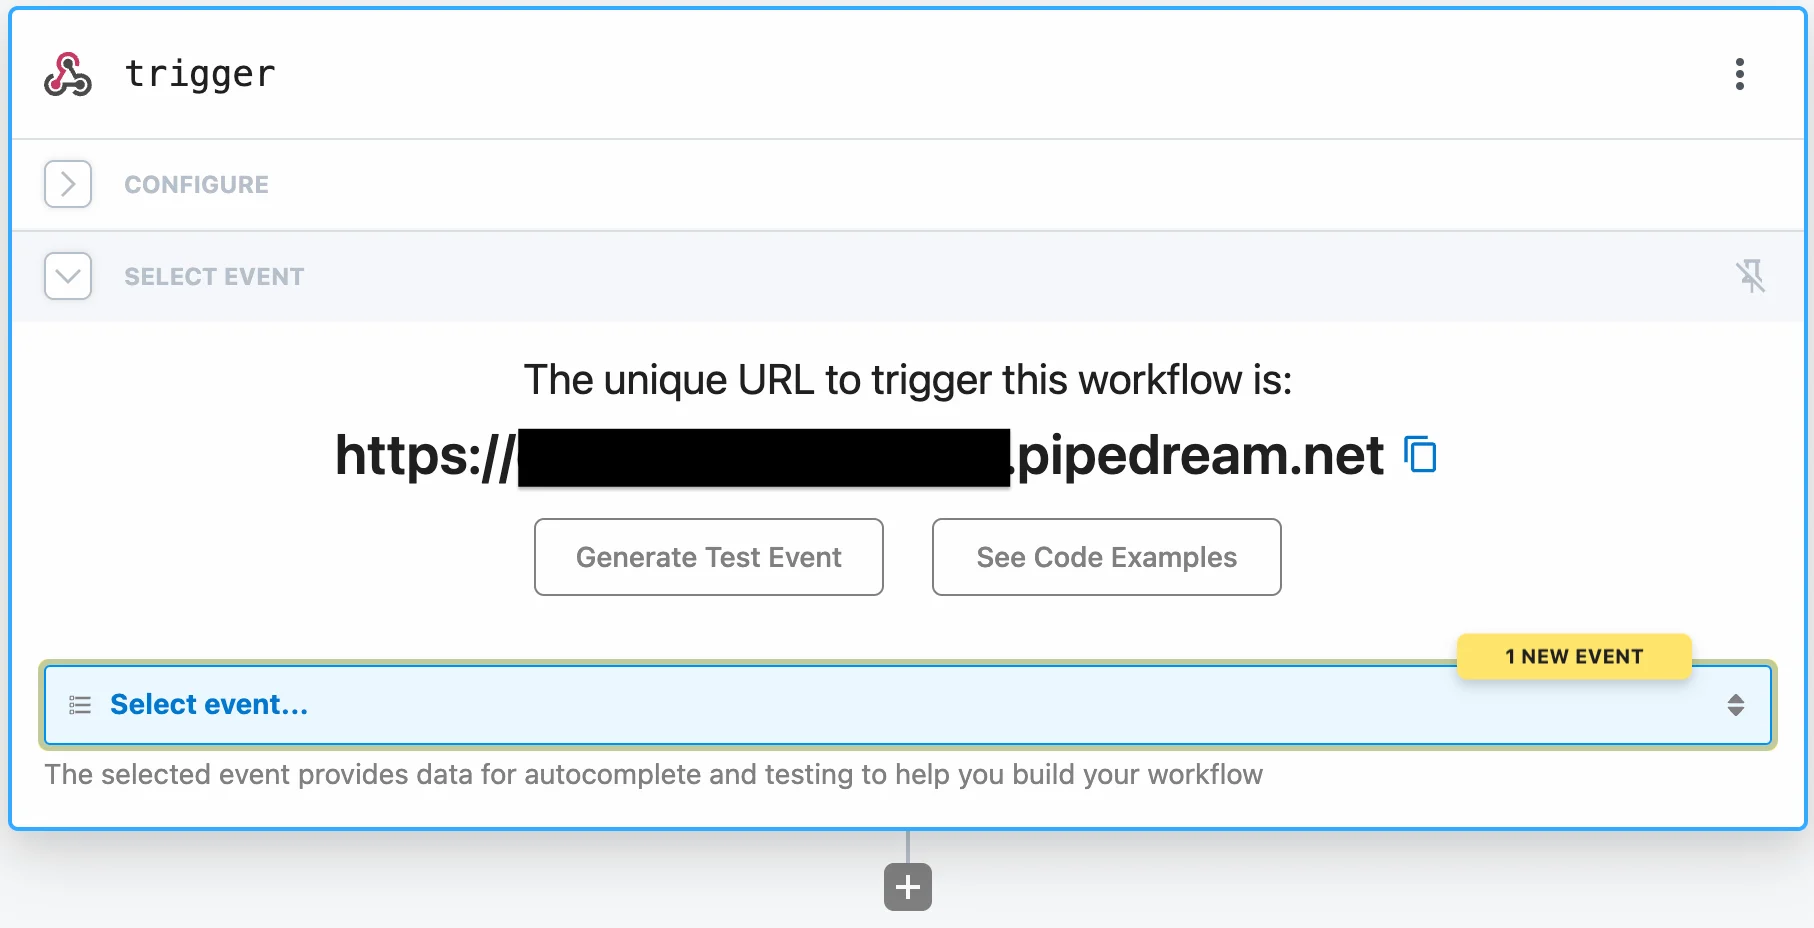
 14. Now go back to the Pipedream editor. You should see "1 New Event" in the Select Event dropdown.
 ### Step 4: Test Trigger on Pipedream
1. Select the latest event from the "Select Event" dropdown. You should see the API request in the Exports tab. Click continue.
### Step 4: Test Trigger on Pipedream
1. Select the latest event from the "Select Event" dropdown. You should see the API request in the Exports tab. Click continue.
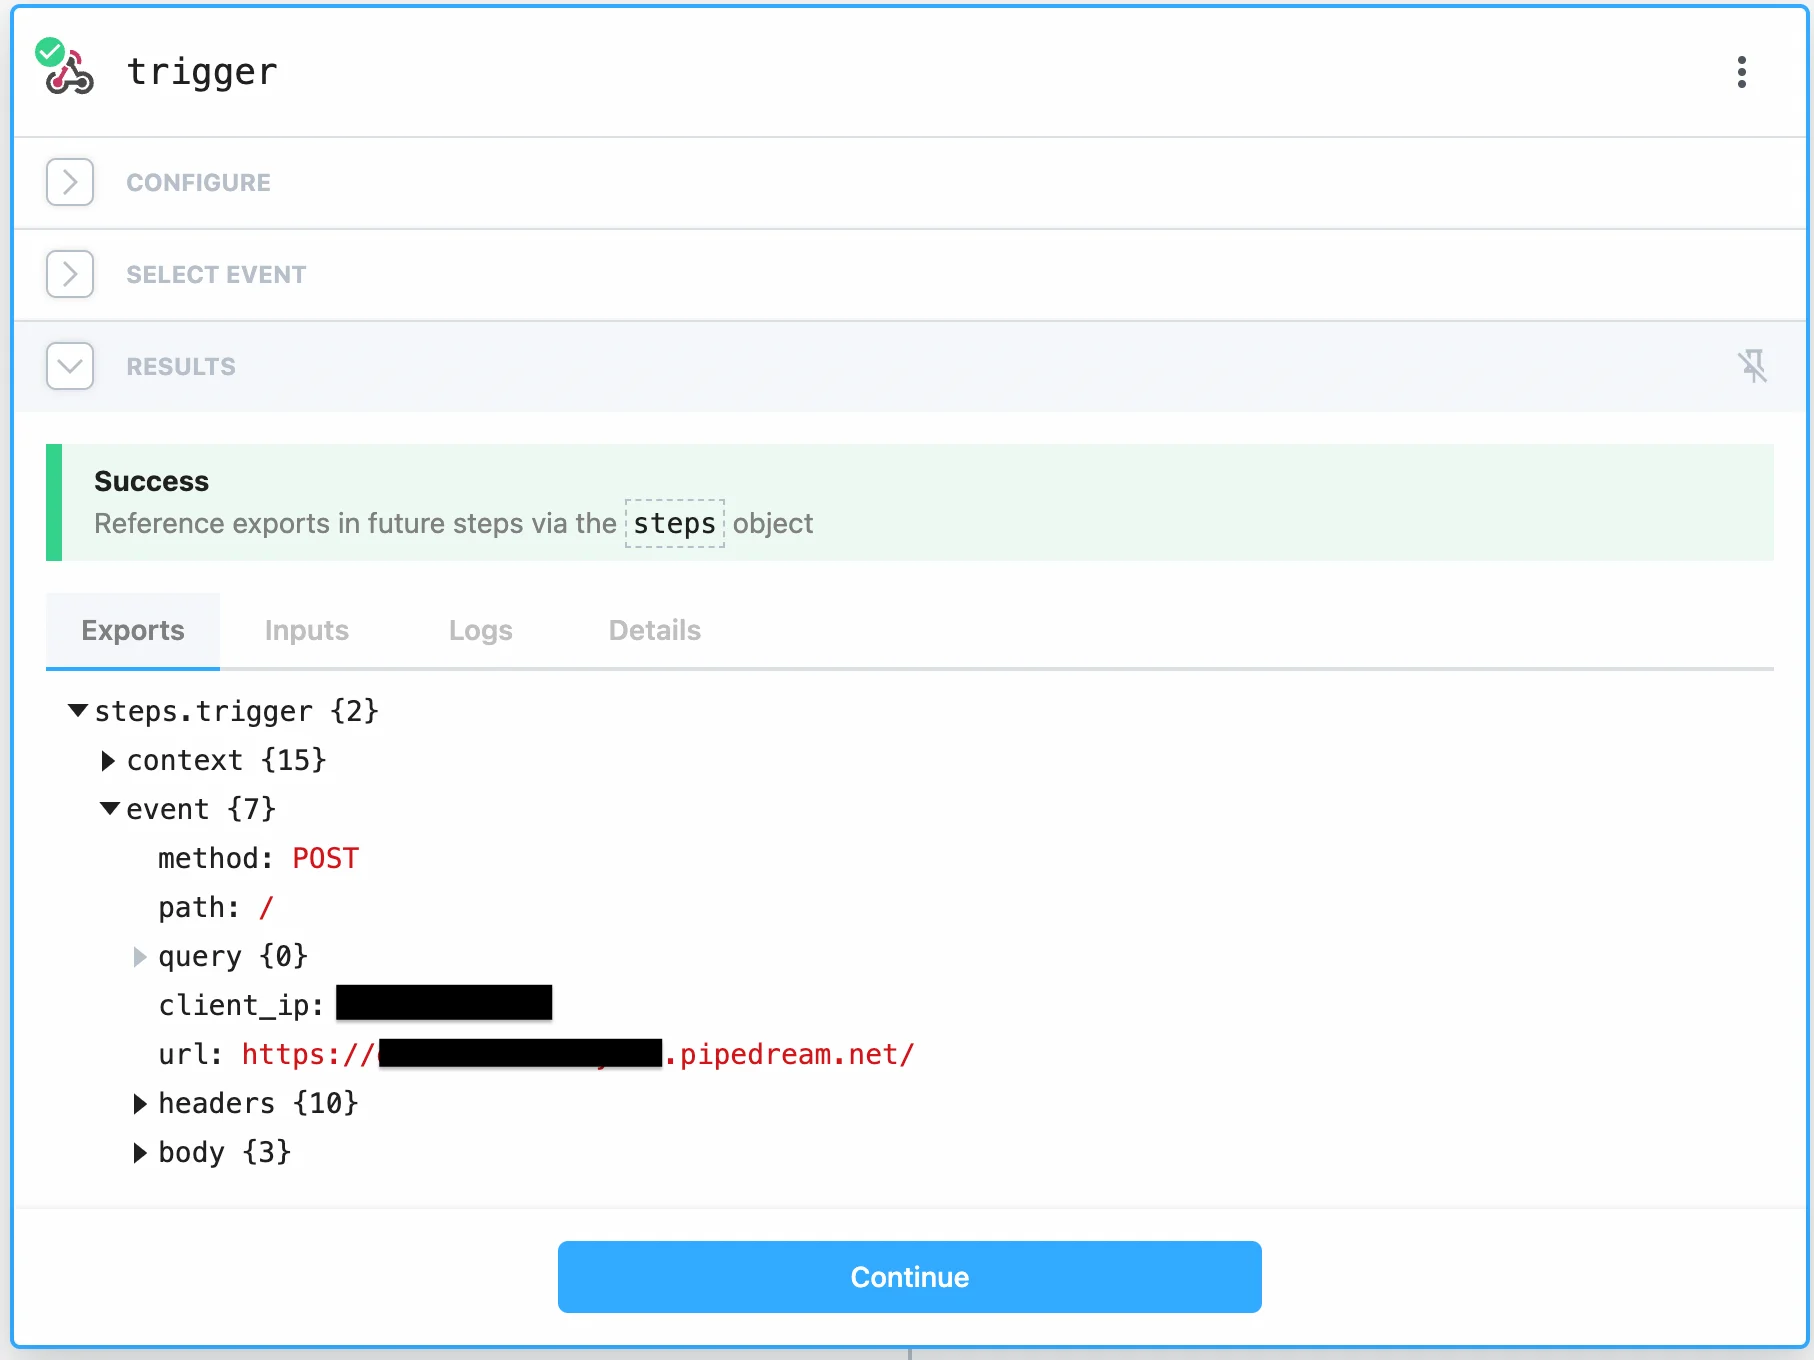 2. You can now publish your Connector Campaign on MoEngage.
3. In Pipedream, add a new step in your workflow. For example, let's pick Google Sheets. Choose "Add Single Row" Action.
4. Select or connect a new Google Sheets Account.
5. Pick your Spreadsheet.
6. Pick your Sheet.
7. Pick "Yes" if you have the first row as Header in your Sheet.
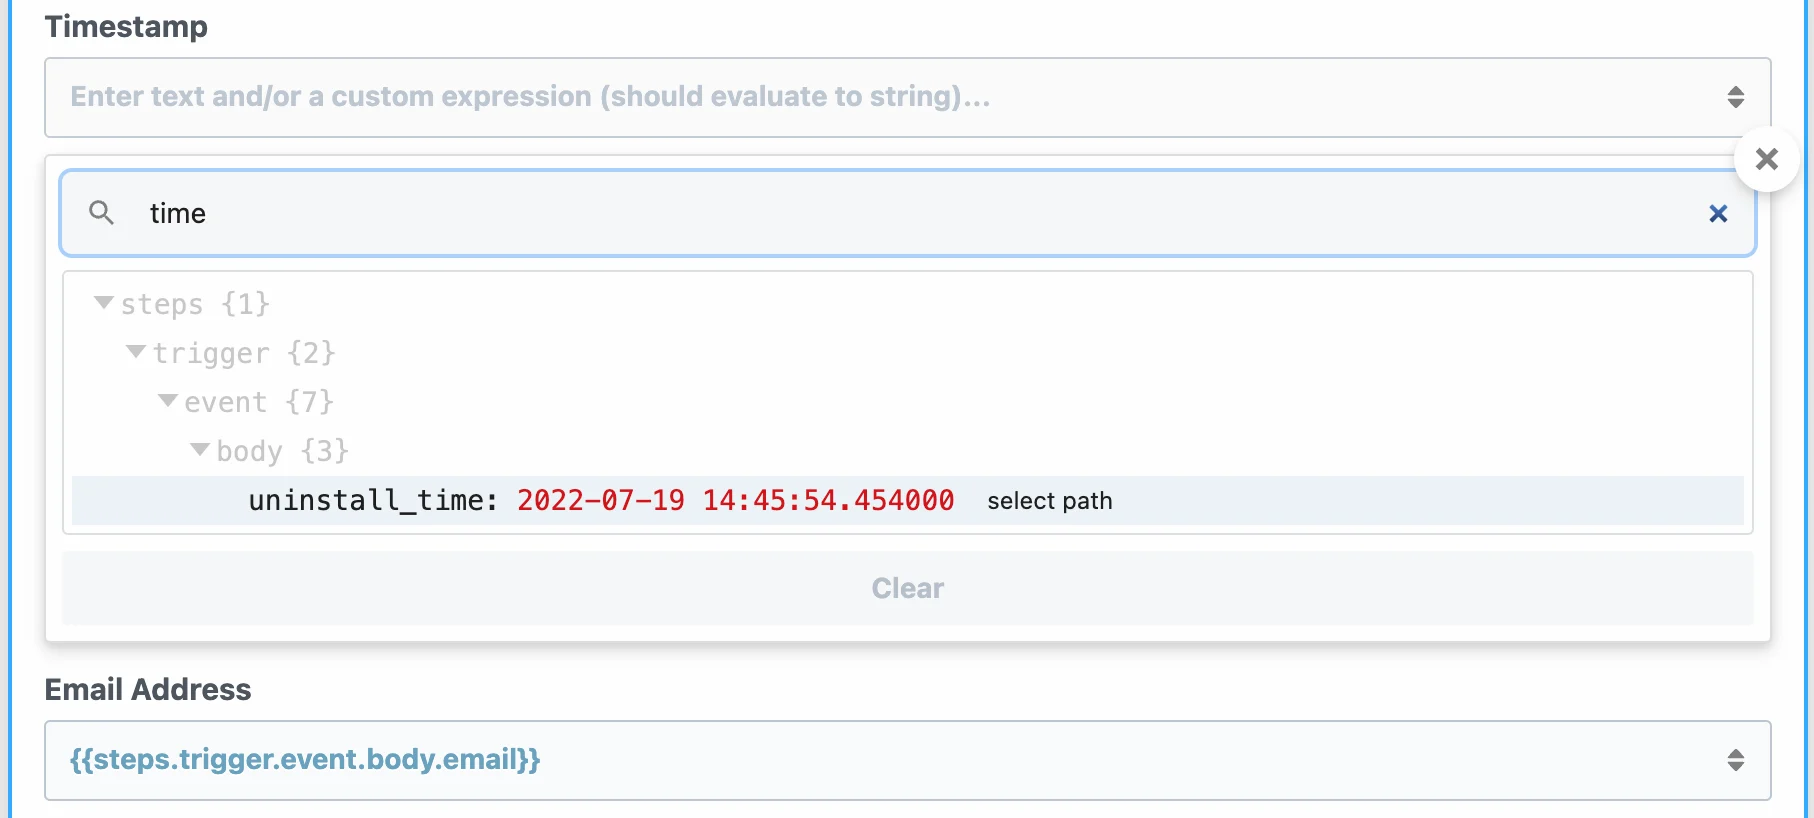
8. Map each of the columns of your Sheet from the response of the Trigger. You can also enter custom values.
2. You can now publish your Connector Campaign on MoEngage.
3. In Pipedream, add a new step in your workflow. For example, let's pick Google Sheets. Choose "Add Single Row" Action.
4. Select or connect a new Google Sheets Account.
5. Pick your Spreadsheet.
6. Pick your Sheet.
7. Pick "Yes" if you have the first row as Header in your Sheet.
8. Map each of the columns of your Sheet from the response of the Trigger. You can also enter custom values.
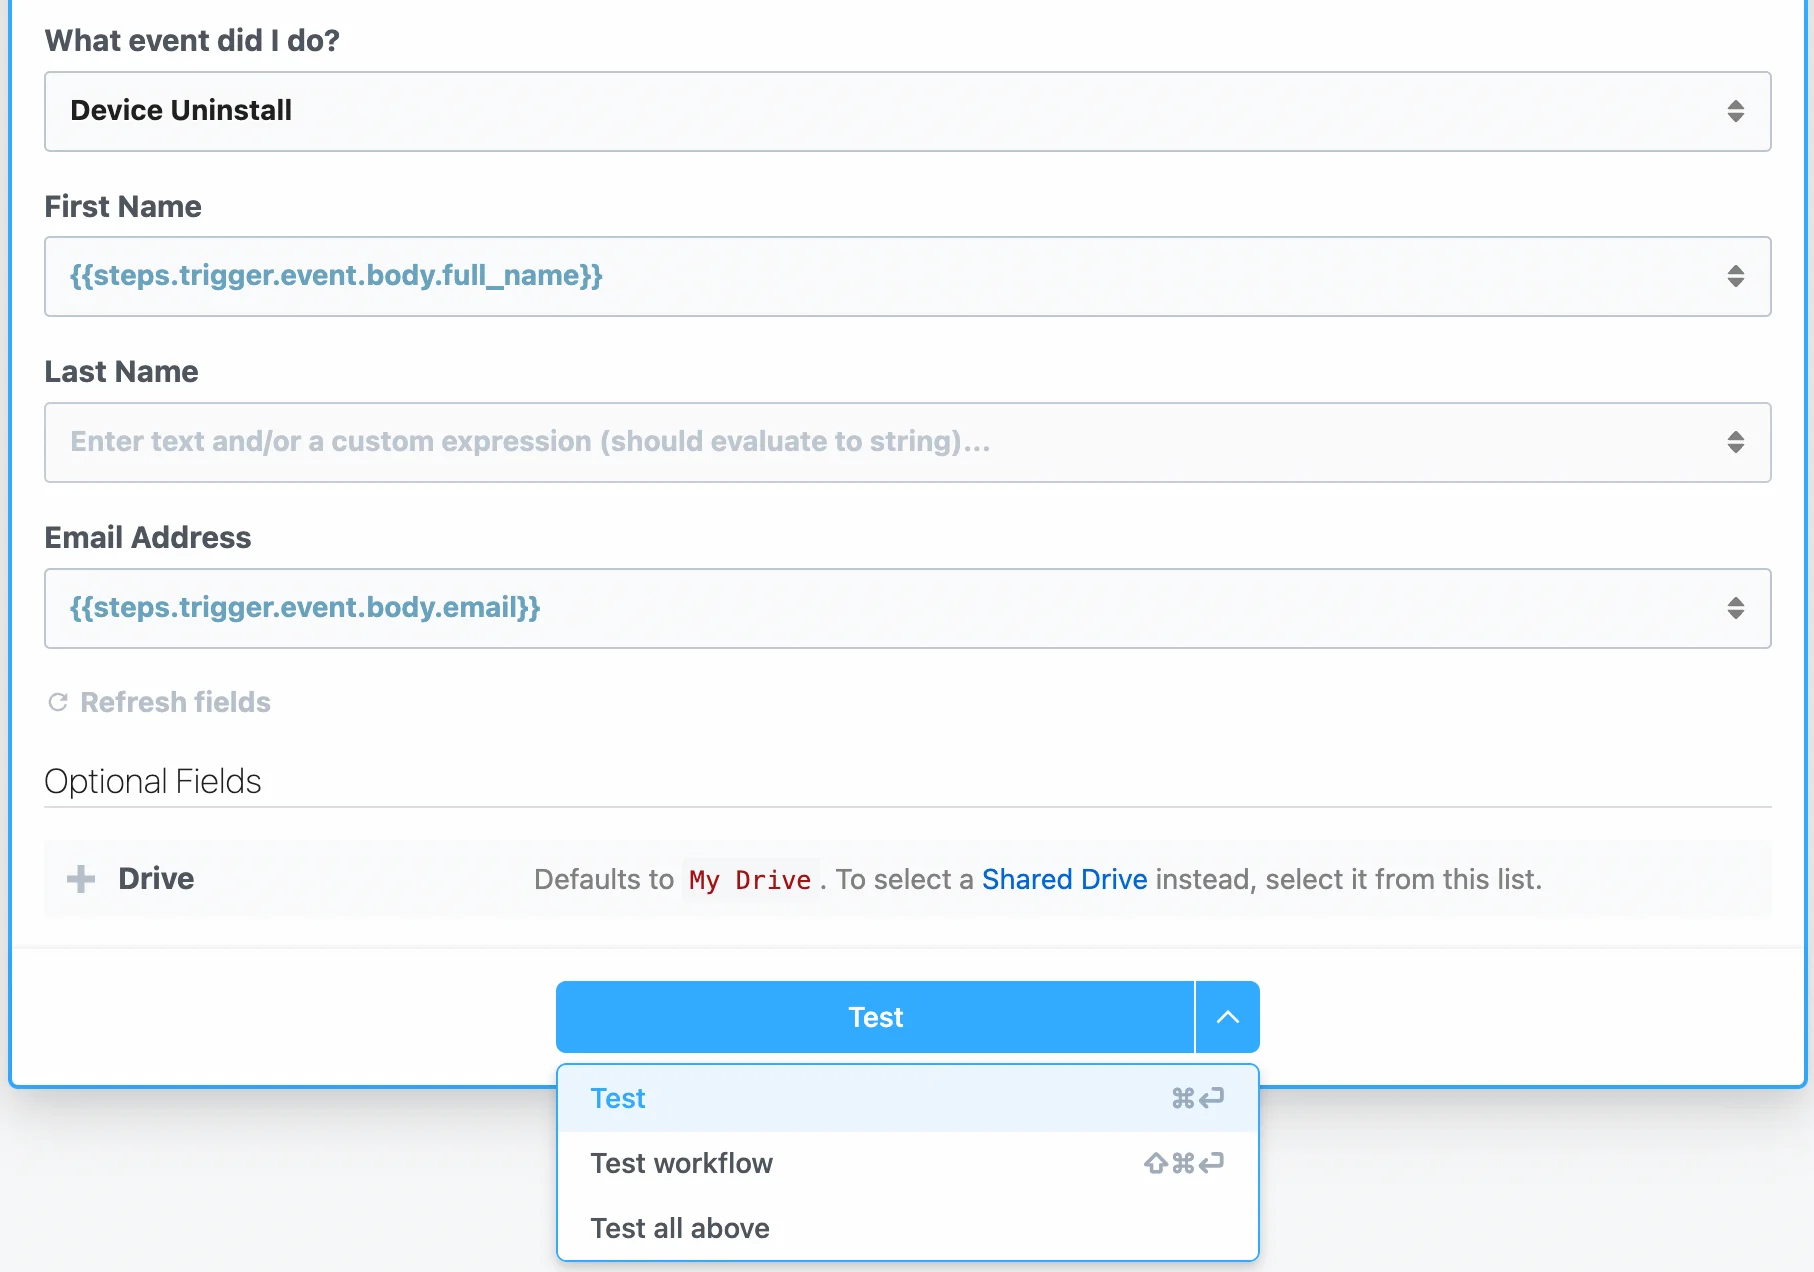
 9. Once you are satisfied with the configuration, you can choose to test this step or the entire workflow.
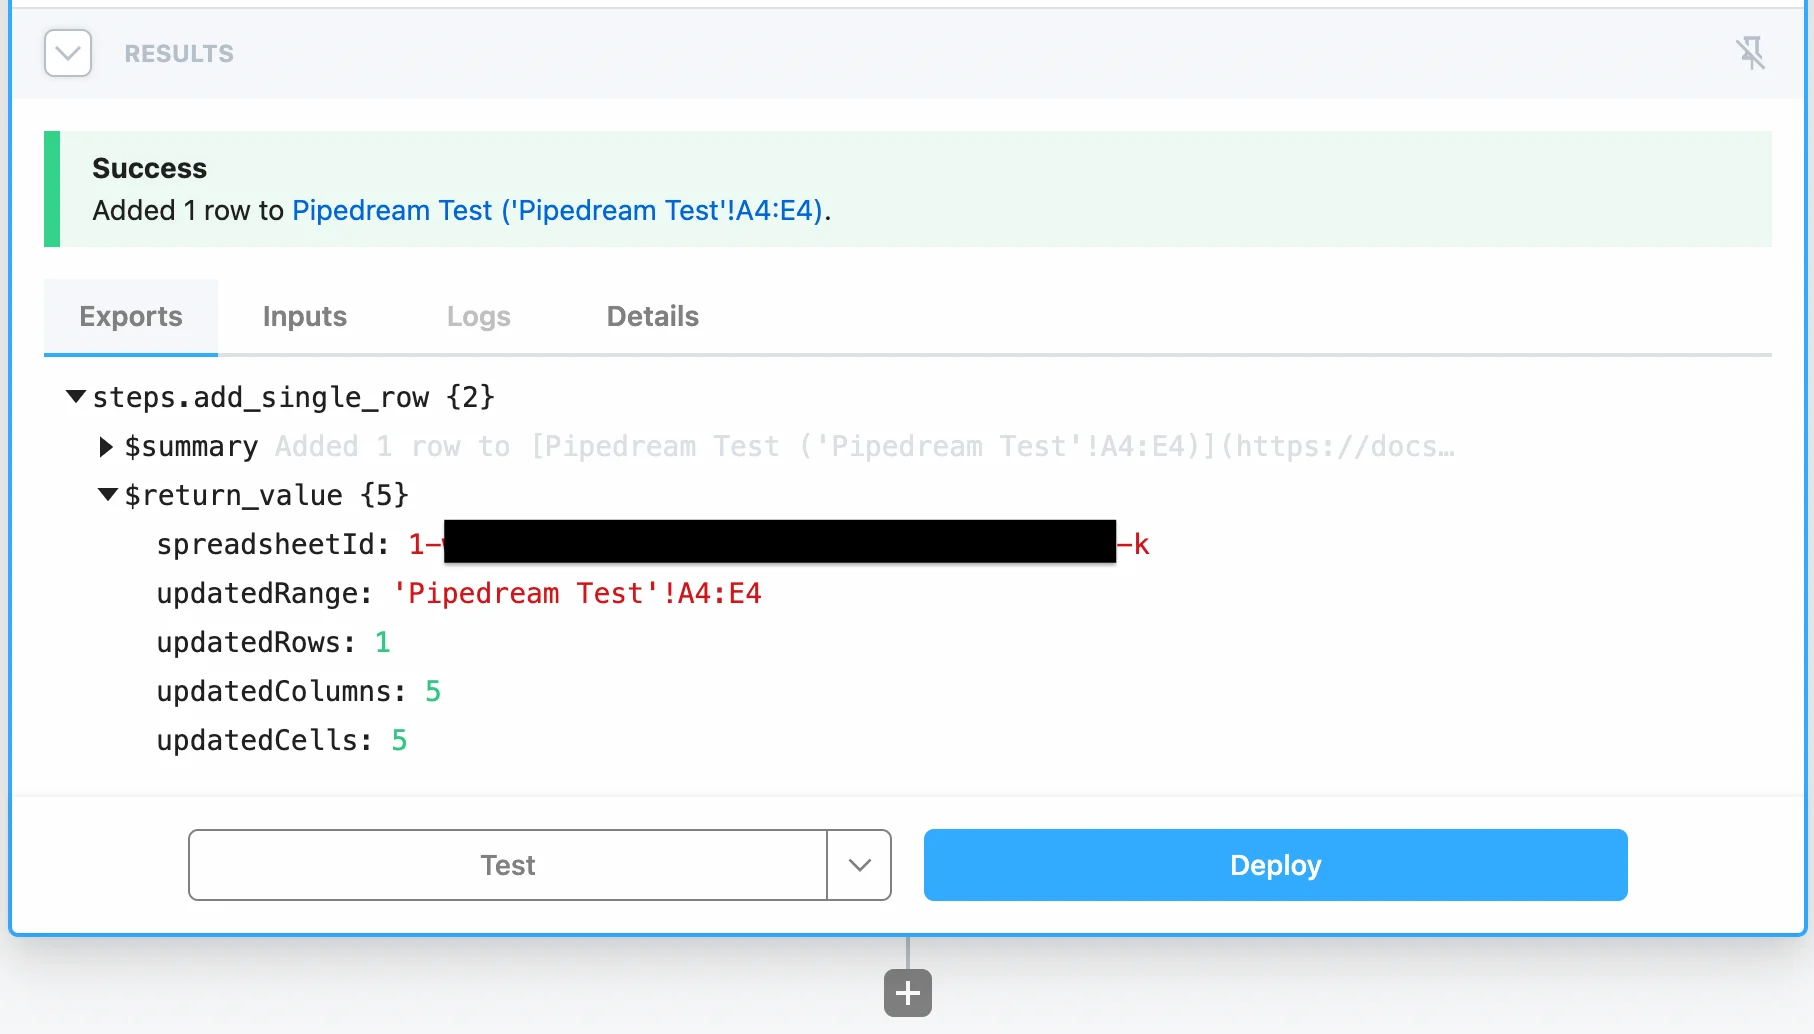
 10. Once the insert is successful, you can then deploy this workflow. It will insert new rows to Google Sheets each time a user performs your selected event in MoEngage.
 ## Using Data APIs in Pipedream
Using MoEngage's [Data APIs](https://www.moengage.com/docs/api/data/data-overview), you can:
1. Create or Update users
2. Import Events
3. Add or remove users in cohort (segment)
In order to make use of Data APIs in Pipedream, you need to add the "HTTP / Webhook" step. You can choose to send GET or POST Requests depending on the type of call supported in MoEngage. Data API is a collection of the following APIs:
* [User API](https://www.moengage.com/docs/api/user/track-user)
* [Event API](https://www.moengage.com/docs/api/event/track-event)
This help doc will show you how to setup User API as Action, but can be applied to any of the above APIs.
### Step 1: Add Webhook Step in Pipedream
1. Choose "HTTP / Webhook" from the list of apps.
2. Select "Send POST Request" from the list of actions.
3. For the request URL, type `https://api-0X.moengage.com/v1/customer/<Workspcae_ID>`. Replace `0X` with the Data Center Region your app resides in, and `Workspace_ID` with your Workspace ID.
| **Field** | **Description** | | | |
| ---------------- | ------------------------------------------------------------------------------------------------------------------------------ | ------- | ------- | ------------------------------------------------------------------------------------------------------------------------------------------------------------------------------------- |
| Workspace ID | The Workspace ID of your MoEngage account is available at **Settings -> Account -> APIs ->Workspace ID**. | | | |
| Data API ID | The Data API ID and the Workspace ID of your MoEngage account are the same. | | | |
| Data API Key | The Data API key of your MoEngage account is available at **Settings -> Account -> APIs -> API keys** > **Data** API settings. | | | |
| Data Center Name | Check your MoEngage URL: `https://dashboard-OX.moengage.com` Based on the dashboard value (‘DC-01’ | ‘DC-02’ | ‘DC-03’ | ‘DC-04’), set the correct input in the data center name on the Pipedream dashboard. [Know more](https://www.moengage.com/docs/user-guide/data/key-concepts/data-centers-in-moengage). |
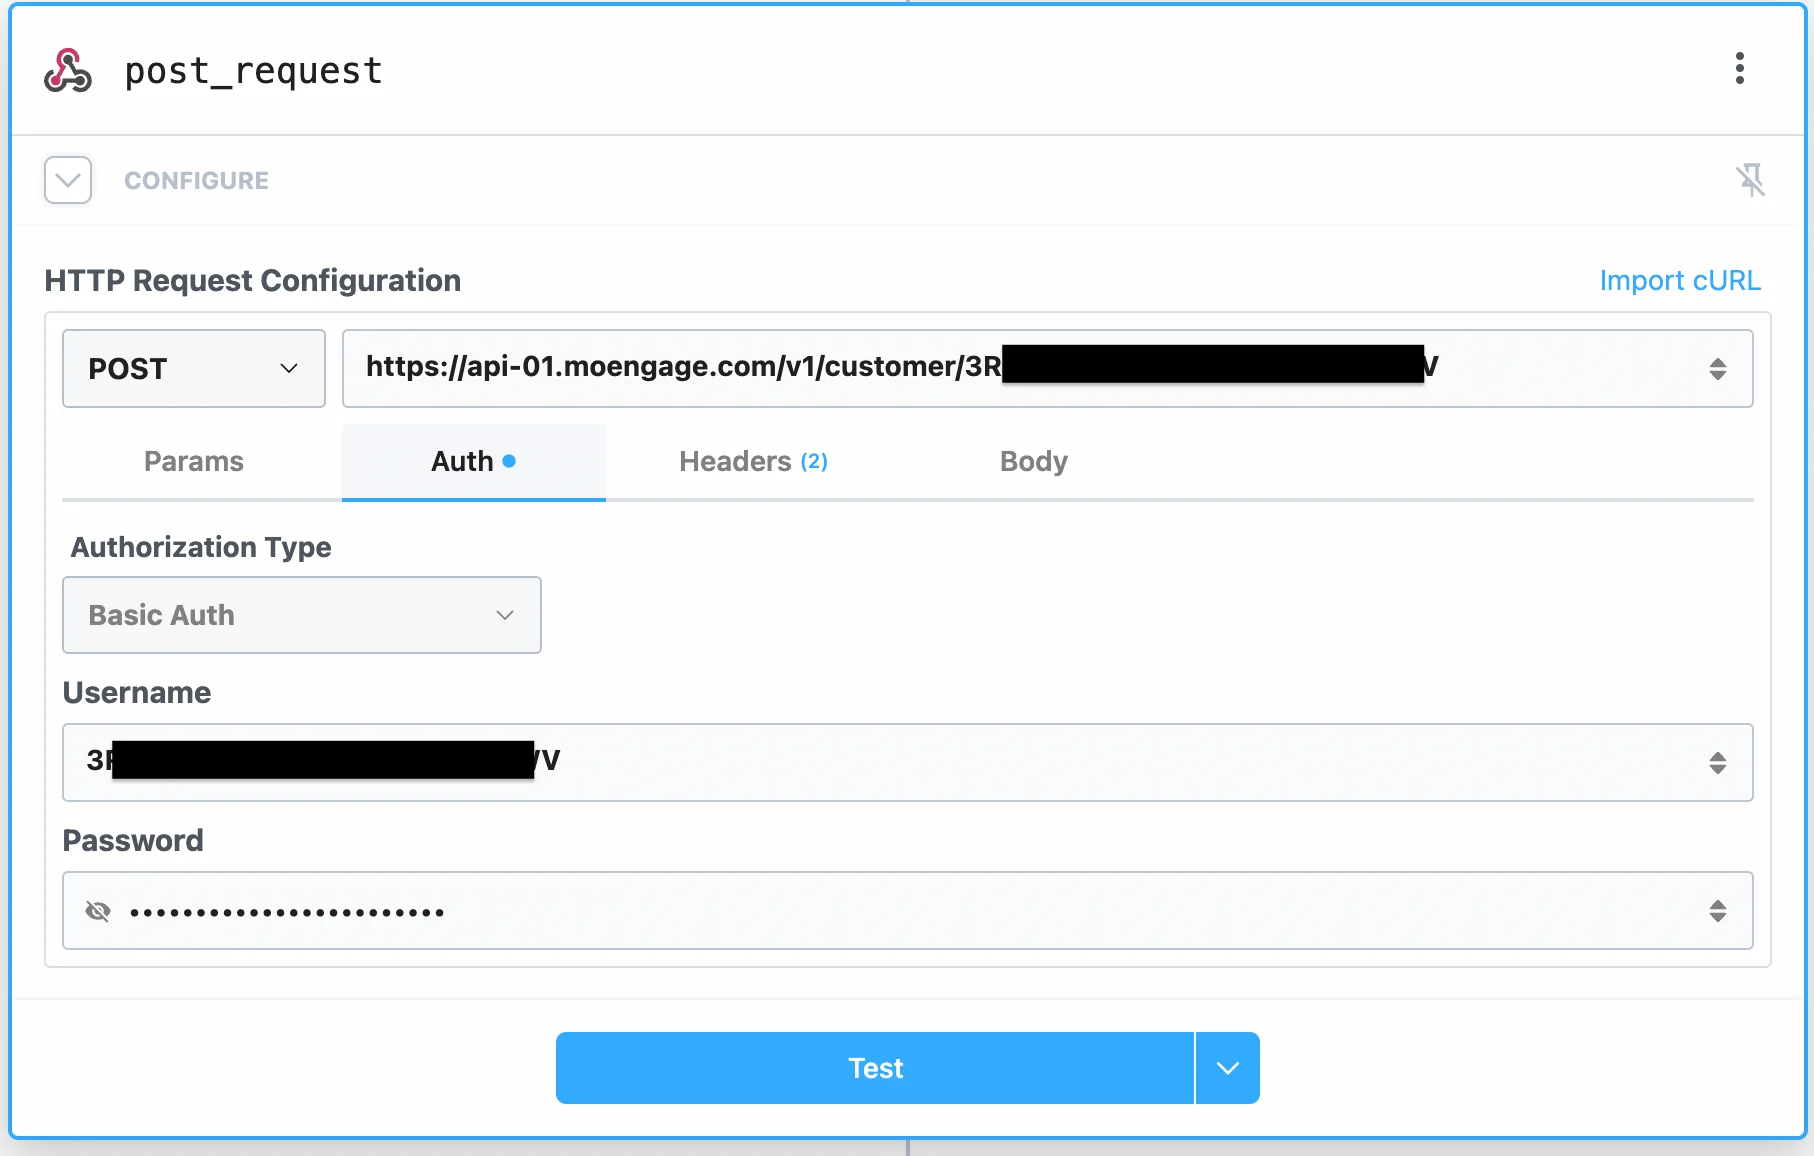
4. In the Auth tab, select "Basic Auth".
1. For Username, type your Workspace ID.
2. For Password, type your Data API Key.
## Using Data APIs in Pipedream
Using MoEngage's [Data APIs](https://www.moengage.com/docs/api/data/data-overview), you can:
1. Create or Update users
2. Import Events
3. Add or remove users in cohort (segment)
In order to make use of Data APIs in Pipedream, you need to add the "HTTP / Webhook" step. You can choose to send GET or POST Requests depending on the type of call supported in MoEngage. Data API is a collection of the following APIs:
* [User API](https://www.moengage.com/docs/api/user/track-user)
* [Event API](https://www.moengage.com/docs/api/event/track-event)
This help doc will show you how to setup User API as Action, but can be applied to any of the above APIs.
### Step 1: Add Webhook Step in Pipedream
1. Choose "HTTP / Webhook" from the list of apps.
2. Select "Send POST Request" from the list of actions.
3. For the request URL, type `https://api-0X.moengage.com/v1/customer/<Workspcae_ID>`. Replace `0X` with the Data Center Region your app resides in, and `Workspace_ID` with your Workspace ID.
| **Field** | **Description** | | | |
| ---------------- | ------------------------------------------------------------------------------------------------------------------------------ | ------- | ------- | ------------------------------------------------------------------------------------------------------------------------------------------------------------------------------------- |
| Workspace ID | The Workspace ID of your MoEngage account is available at **Settings -> Account -> APIs ->Workspace ID**. | | | |
| Data API ID | The Data API ID and the Workspace ID of your MoEngage account are the same. | | | |
| Data API Key | The Data API key of your MoEngage account is available at **Settings -> Account -> APIs -> API keys** > **Data** API settings. | | | |
| Data Center Name | Check your MoEngage URL: `https://dashboard-OX.moengage.com` Based on the dashboard value (‘DC-01’ | ‘DC-02’ | ‘DC-03’ | ‘DC-04’), set the correct input in the data center name on the Pipedream dashboard. [Know more](https://www.moengage.com/docs/user-guide/data/key-concepts/data-centers-in-moengage). |
4. In the Auth tab, select "Basic Auth".
1. For Username, type your Workspace ID.
2. For Password, type your Data API Key.
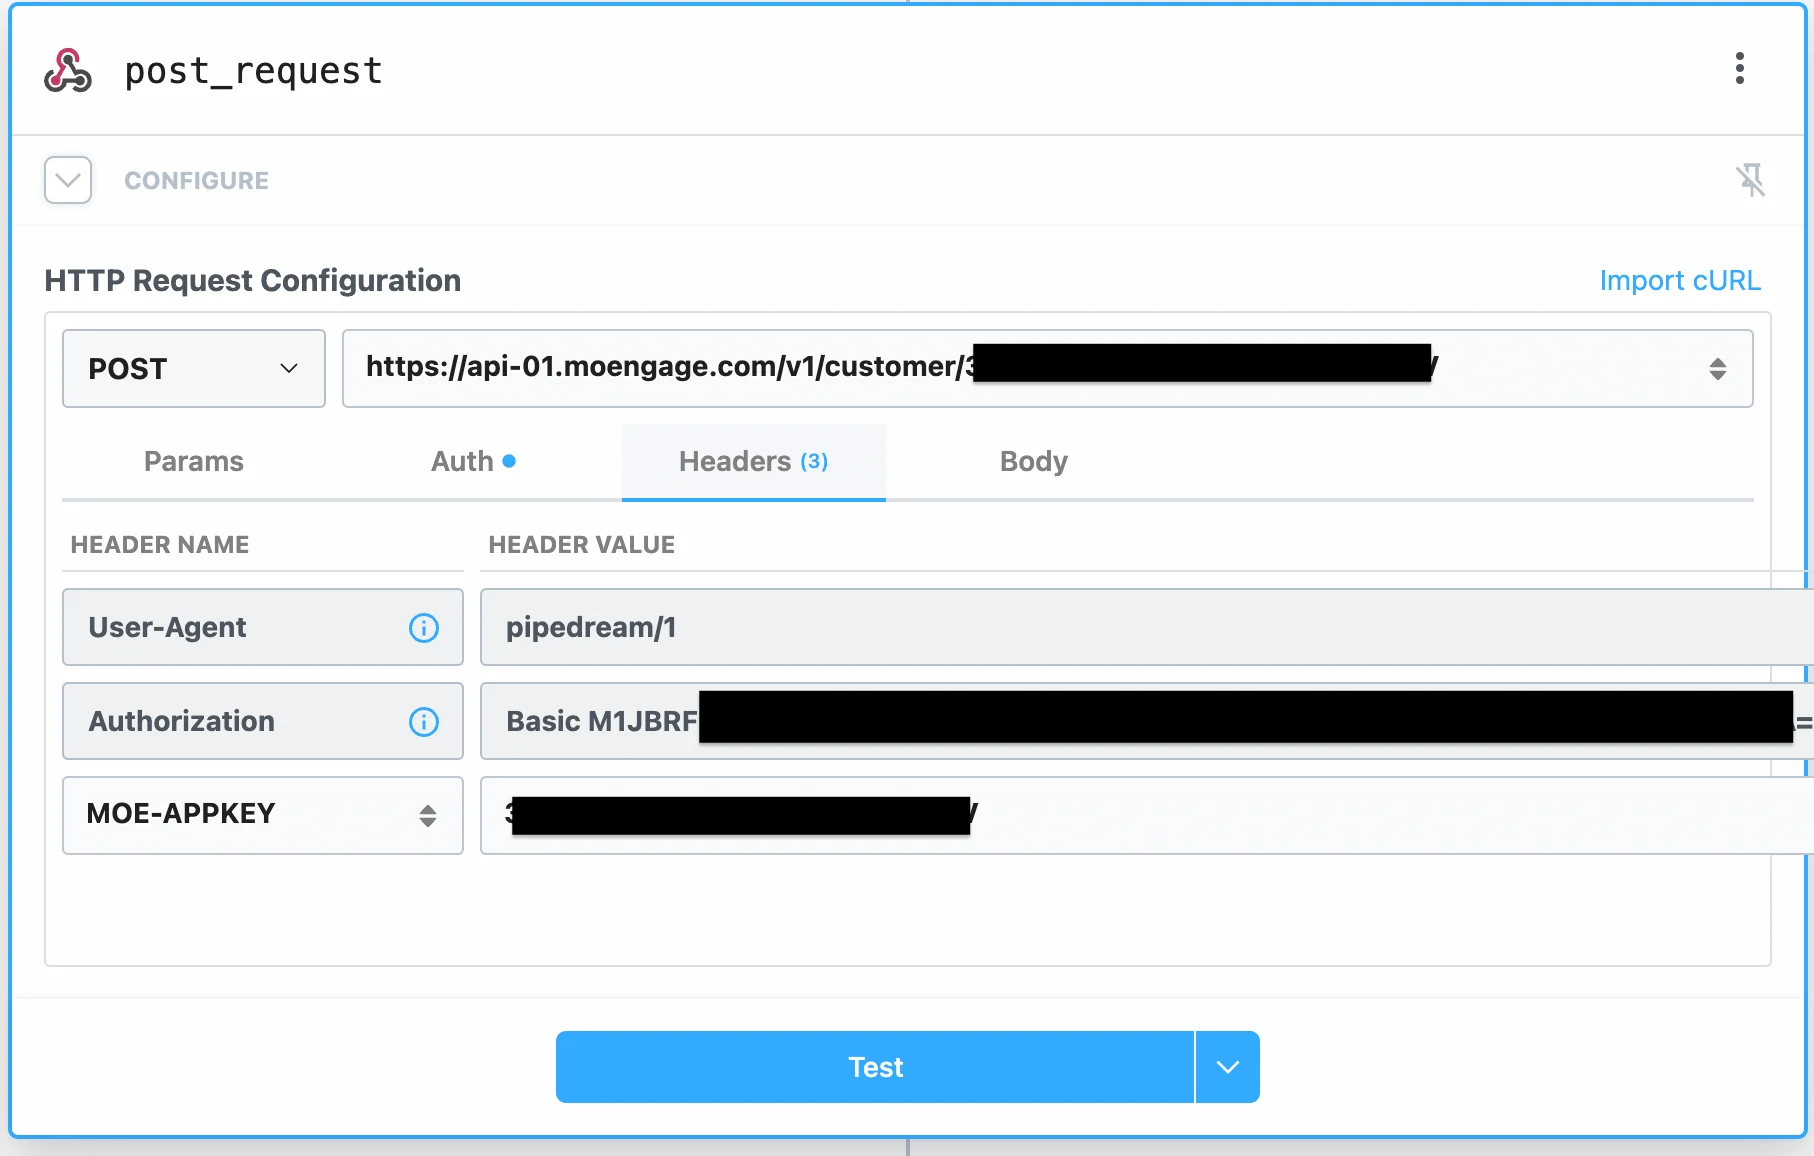
 5. In the Headers tab, enter a new header:
1. Header Name: `MOE-APPKEY`
2. Header Value: type your Workspace ID.
5. In the Headers tab, enter a new header:
1. Header Name: `MOE-APPKEY`
2. Header Value: type your Workspace ID.
 6. In the Body tab, select Content-Type as "application/json".
7. Click on the "Edit Raw JSON".
8. Copy and paste the following payload from the [User API](https://www.moengage.com/docs/api/user/track-user) docs:
```json JSON theme={null}
{
"type" : "customer",
"customer_id": "john@example.com",
"attributes": {
"first_name":"John",
"last_name":"Doe",
"email": "john.doe@example.com",
"platforms" : [{"platform":"ANDROID", "active":"true"}]
}
}
```
9. You can now map values from your previous step to this JSON body. Just select the appropriate variable from the Pipedream editor Variable selector dropdown.
6. In the Body tab, select Content-Type as "application/json".
7. Click on the "Edit Raw JSON".
8. Copy and paste the following payload from the [User API](https://www.moengage.com/docs/api/user/track-user) docs:
```json JSON theme={null}
{
"type" : "customer",
"customer_id": "john@example.com",
"attributes": {
"first_name":"John",
"last_name":"Doe",
"email": "john.doe@example.com",
"platforms" : [{"platform":"ANDROID", "active":"true"}]
}
}
```
9. You can now map values from your previous step to this JSON body. Just select the appropriate variable from the Pipedream editor Variable selector dropdown.
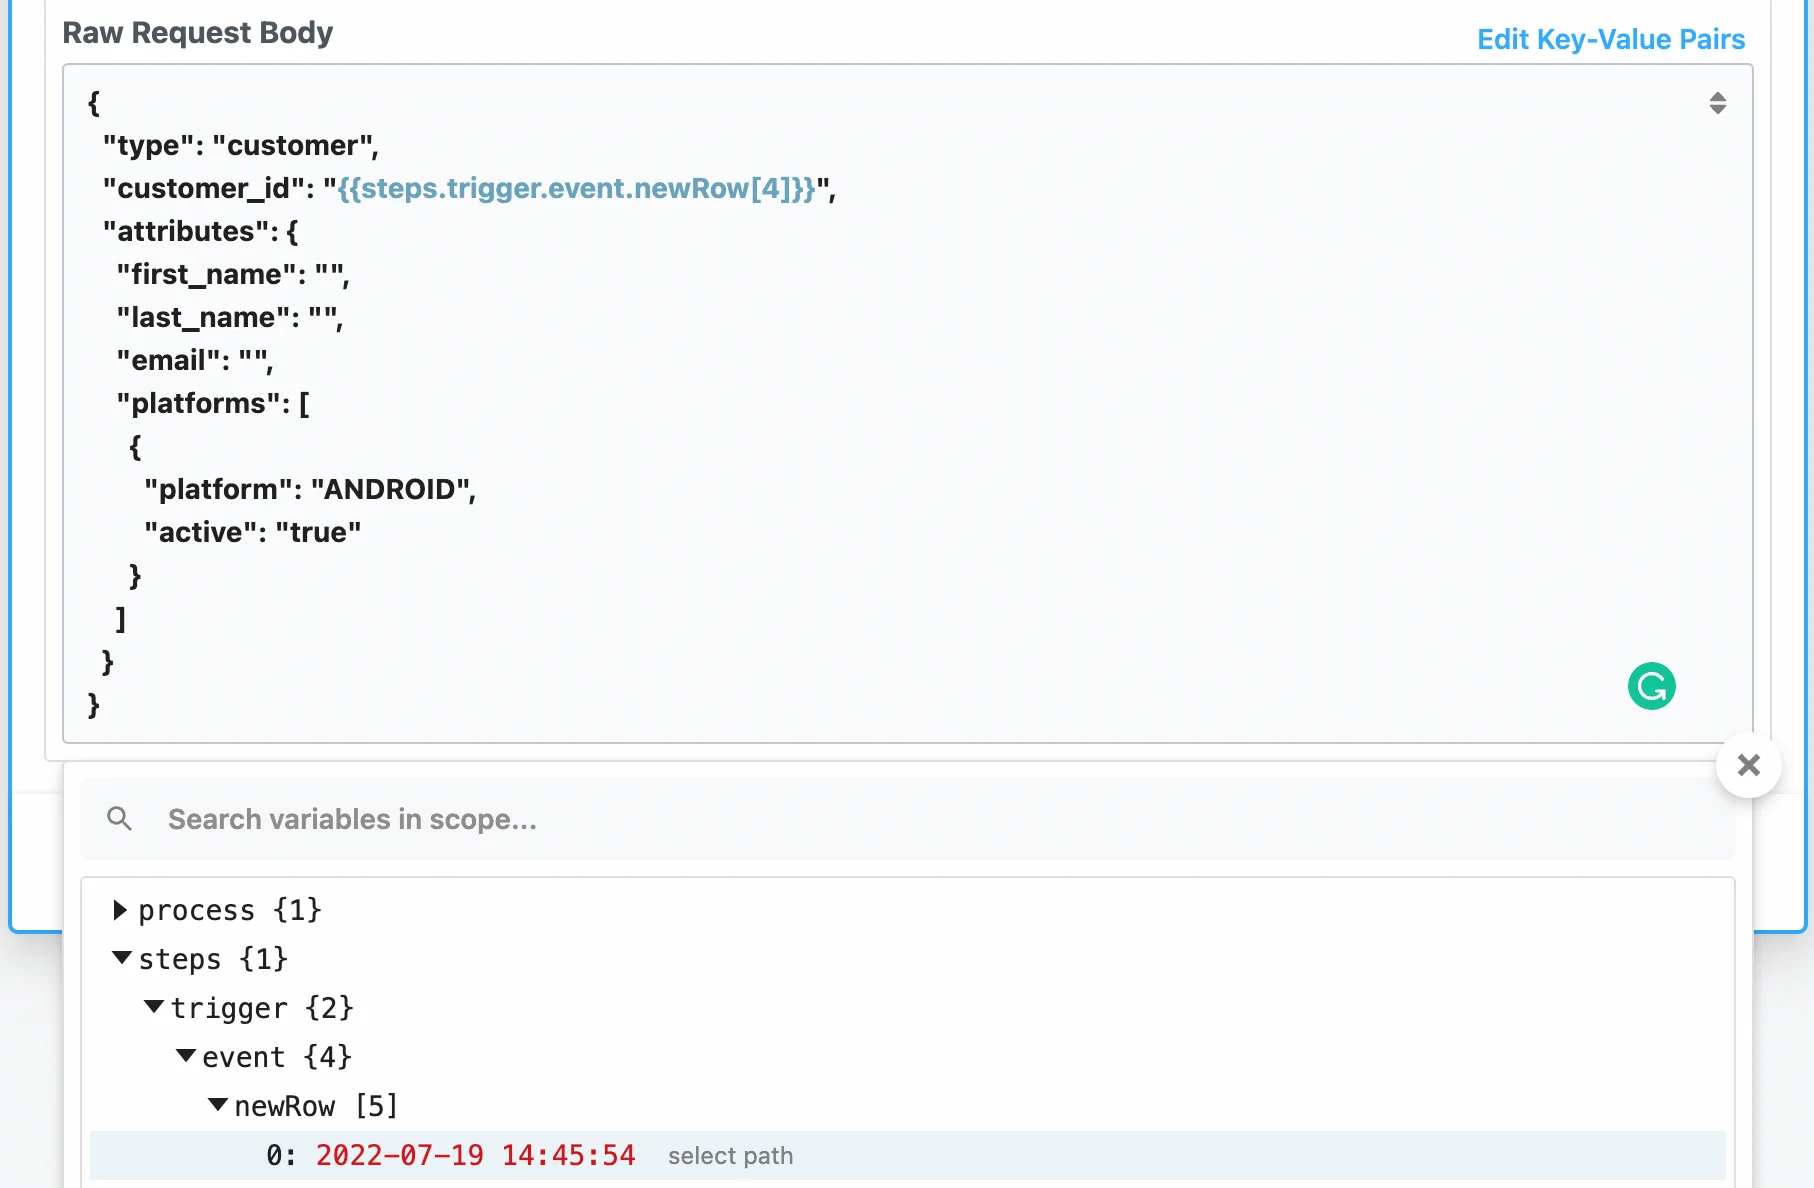 10. You can add/remove the fields in the Body as you like. The final payload can look something like this:
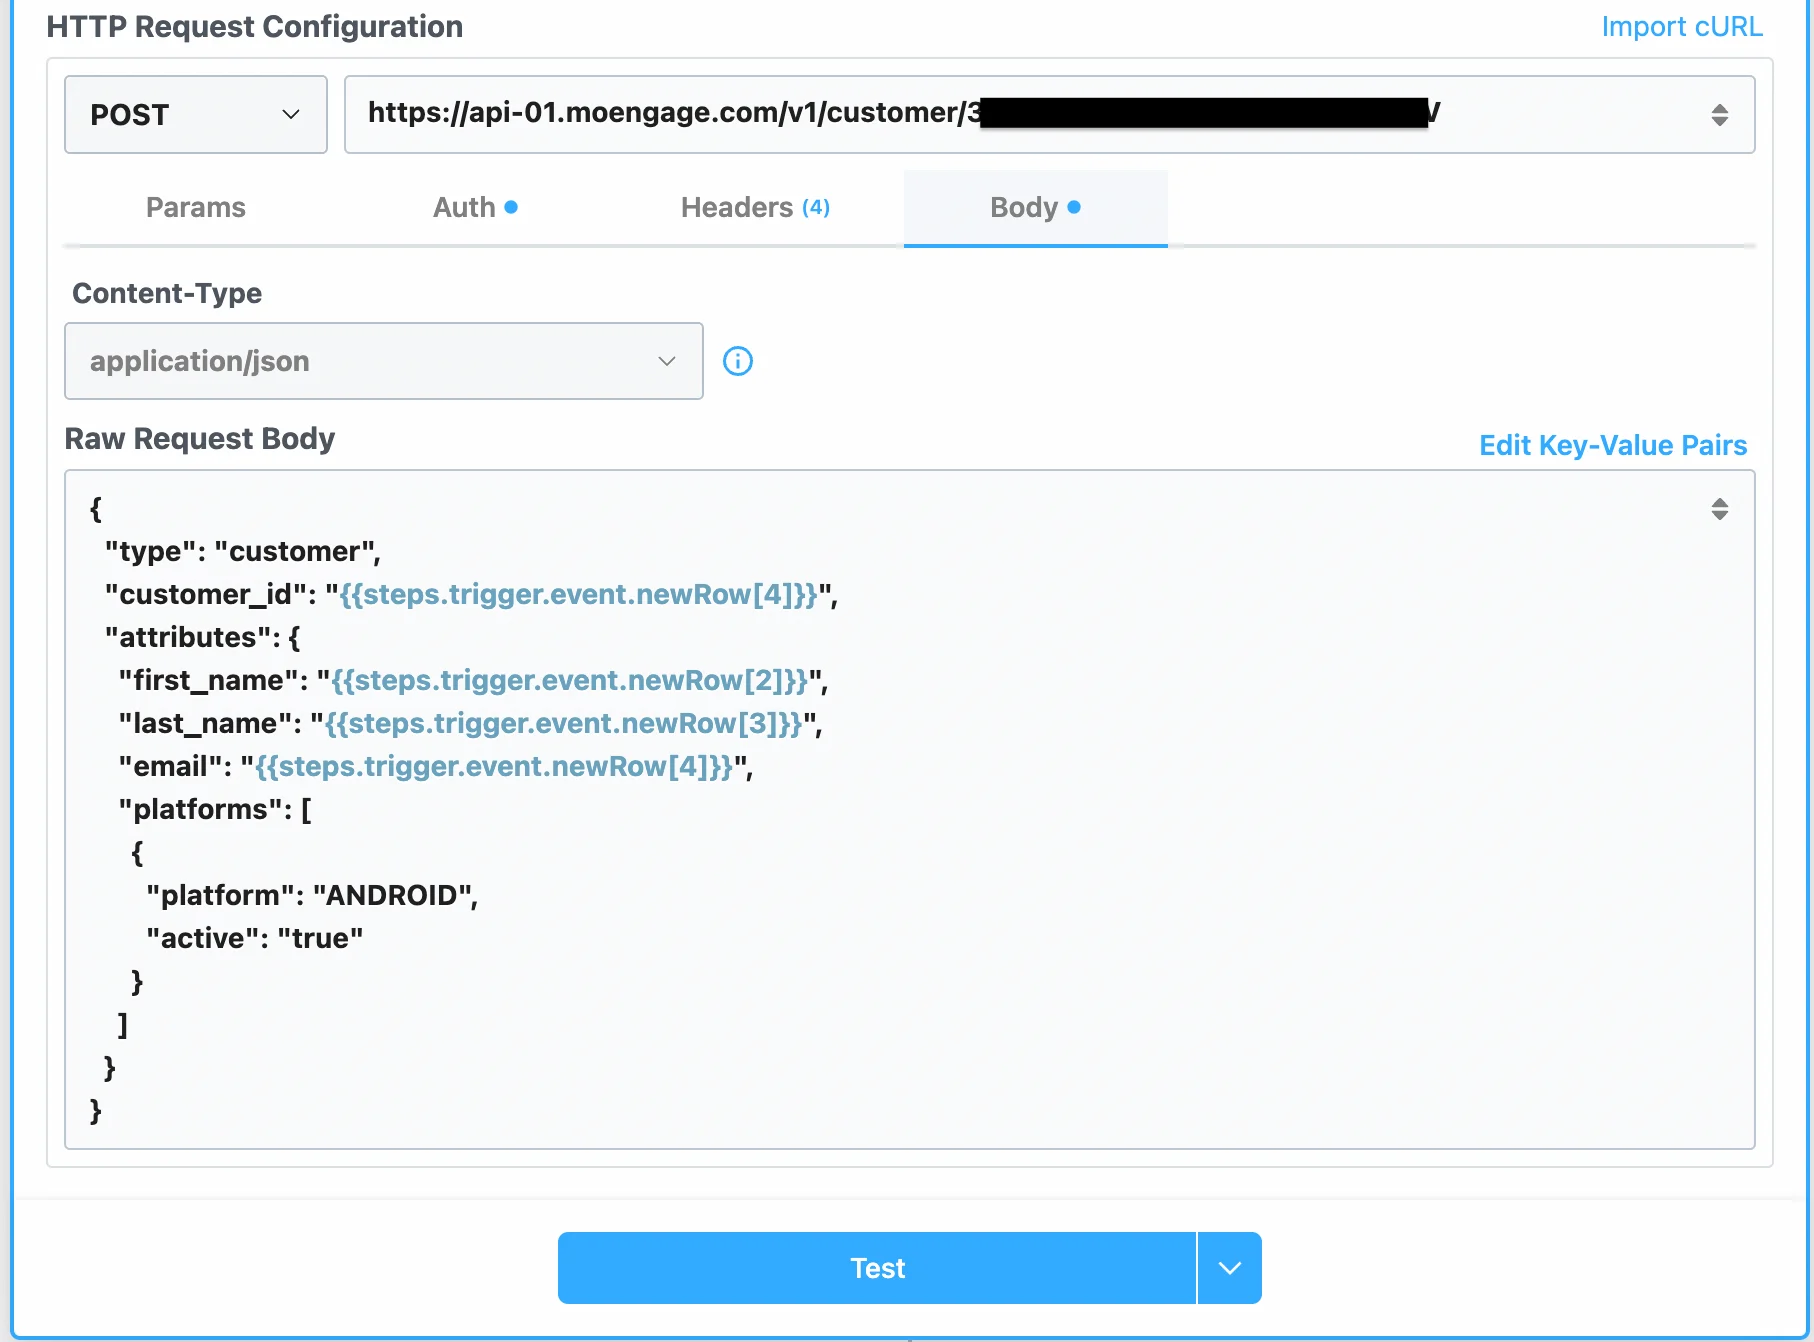 11. Once you are ready, you can "Test" the step. This will send an API Request to the MoEngage Data Centers.
12. If your call is a success, you should see the following in your Results panel:
11. Once you are ready, you can "Test" the step. This will send an API Request to the MoEngage Data Centers.
12. If your call is a success, you should see the following in your Results panel:
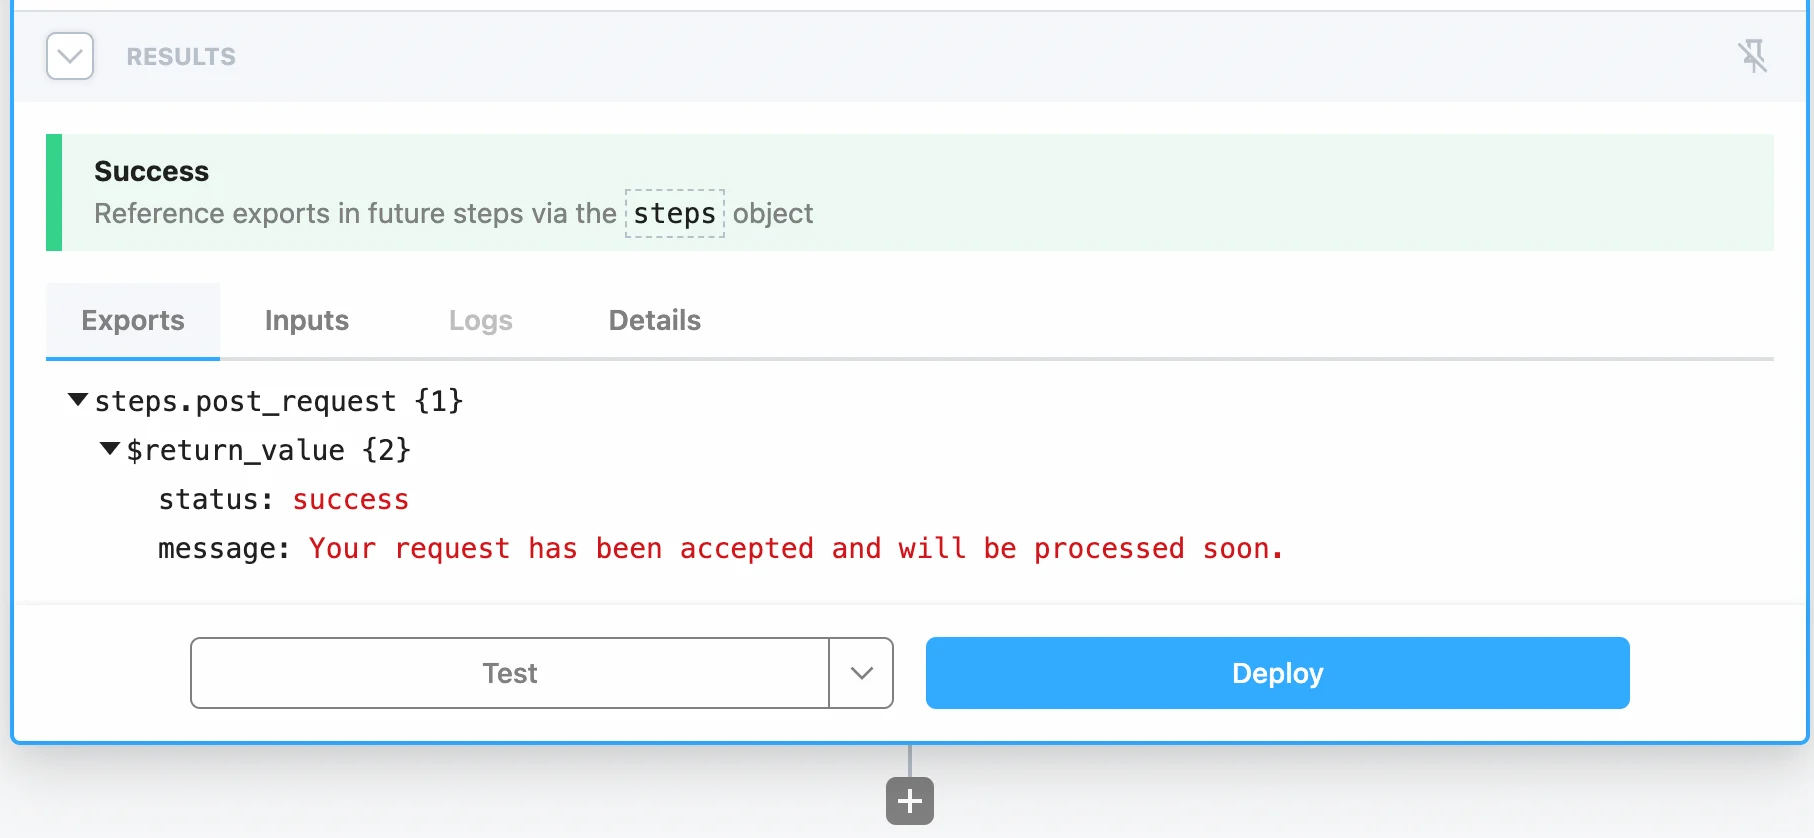 13. You can choose to Deploy your workflow once you are happy with the results.
The rest of the Data APIs can also be deployed in a similar fashion.
13. You can choose to Deploy your workflow once you are happy with the results.
The rest of the Data APIs can also be deployed in a similar fashion.