> ## Documentation Index
> Fetch the complete documentation index at: https://moengage.com/docs/llms.txt
> Use this file to discover all available pages before exploring further.
# Stream Events to Microsoft D365 Sales
## Introduction
[Microsoft Dynamics 365 Sales](https://www.microsoft.com/en-us/dynamics-365/products/sales) is an enterprise CRM solution that manages customer relationships through contacts, leads, opportunities, and activities. This integration enables **inbound data flow** from MoEngage to Microsoft Dynamics 365 Sales using Microsoft Power Automate.
## Key features
With this integration, you can:
* Receive real-time campaign engagement events from MoEngage (email opens, clicks, form submissions, webinar attendance, and more).
* Automatically update Lead, Contact, or Opportunity records in D365 Sales with the latest engagement data.
* Maintain synchronized engagement history between MoEngage and D365 Sales.
* Trigger D365 Sales workflows or business process flows based on MoEngage campaign interactions.
* Track sales activity events and marketing attribution for closed-loop reporting.
## Use cases
* **Lead scoring based on email engagement**: When a lead opens a marketing email in MoEngage, automatically increment their lead score in D365 Sales and update the *Last Engagement Date* field to help sales reps prioritize follow-ups.
* **Opportunity stage progression**: When a prospect attends a webinar or downloads a pricing guide tracked in MoEngage, automatically move their D365 Sales Opportunity to the *Qualified* or *Proposal* stage and assign a follow-up task to the account owner.
* **Campaign response tracking**: Capture all form submissions from MoEngage landing pages and create Marketing Response or Activity records in D365 Sales linked to the relevant Lead or Contact for comprehensive engagement history.
* **Multi-channel engagement history**: Build a complete timeline of customer interactions by syncing email, SMS, push notification, and in-app message events from MoEngage to D365 Sales activity records, giving sales teams full visibility into marketing touchpoints.
* **Sales and marketing alignment**: When a Contact engages with multiple campaign touches, automatically create a follow-up Call or Task for the assigned sales representative, ensuring timely outreach based on demonstrated interest.
## Step-by-step integration guide
**Prerequisites**
* Admin access to Microsoft Power Platform and the D365 Sales environment.
* A D365 Sales security role with write permissions on the Lead, Contact, and Opportunity entities.
* **MoEngage data requirement**: MoEngage must send one of the following D365 entity IDs in the `user_attributes` field for proper record matching:
* `d365_lead_id` (Lead GUID) — used to update Lead records.
* `d365_contact_id` (Contact GUID) — used to update Contact records.
* `d365_opportunity_id` (Opportunity GUID) — used to update Opportunity records.
These identifiers must be synced to MoEngage during the outbound integration (D365 Sales → MoEngage) so that MoEngage can include them when sending events back to D365 Sales. When configuring MoEngage Streams, specify which user properties to export under **User properties to export** — select either *All* or list the specific identifier fields you need (for example, `d365_lead_id`, `d365_contact_id`).
**Accepted entity identifiers**
Microsoft Dataverse accepts the following primary identifiers for updating records:
* **Primary Key (GUID)**: The unique identifier for each entity (`leadid`, `contactid`, `opportunityid`, and so on).
* **Alternate Keys**: Custom alternate keys if configured in your D365 environment (for example, email address as an alternate key for Contacts).
For this integration, we recommend using the **Primary Key (GUID)** as it is guaranteed to be unique and immutable across all D365 environments.
### Step 1: Create the HTTP request trigger in Power Automate
Go to [Power Automate](https://flow.microsoft.com/).
Click **Create** > **Automated Cloud Flow**.
Name your flow `MoEngage - Receive Events to D365`.
Select the trigger **When a HTTP request is received**.
Click **Create**.
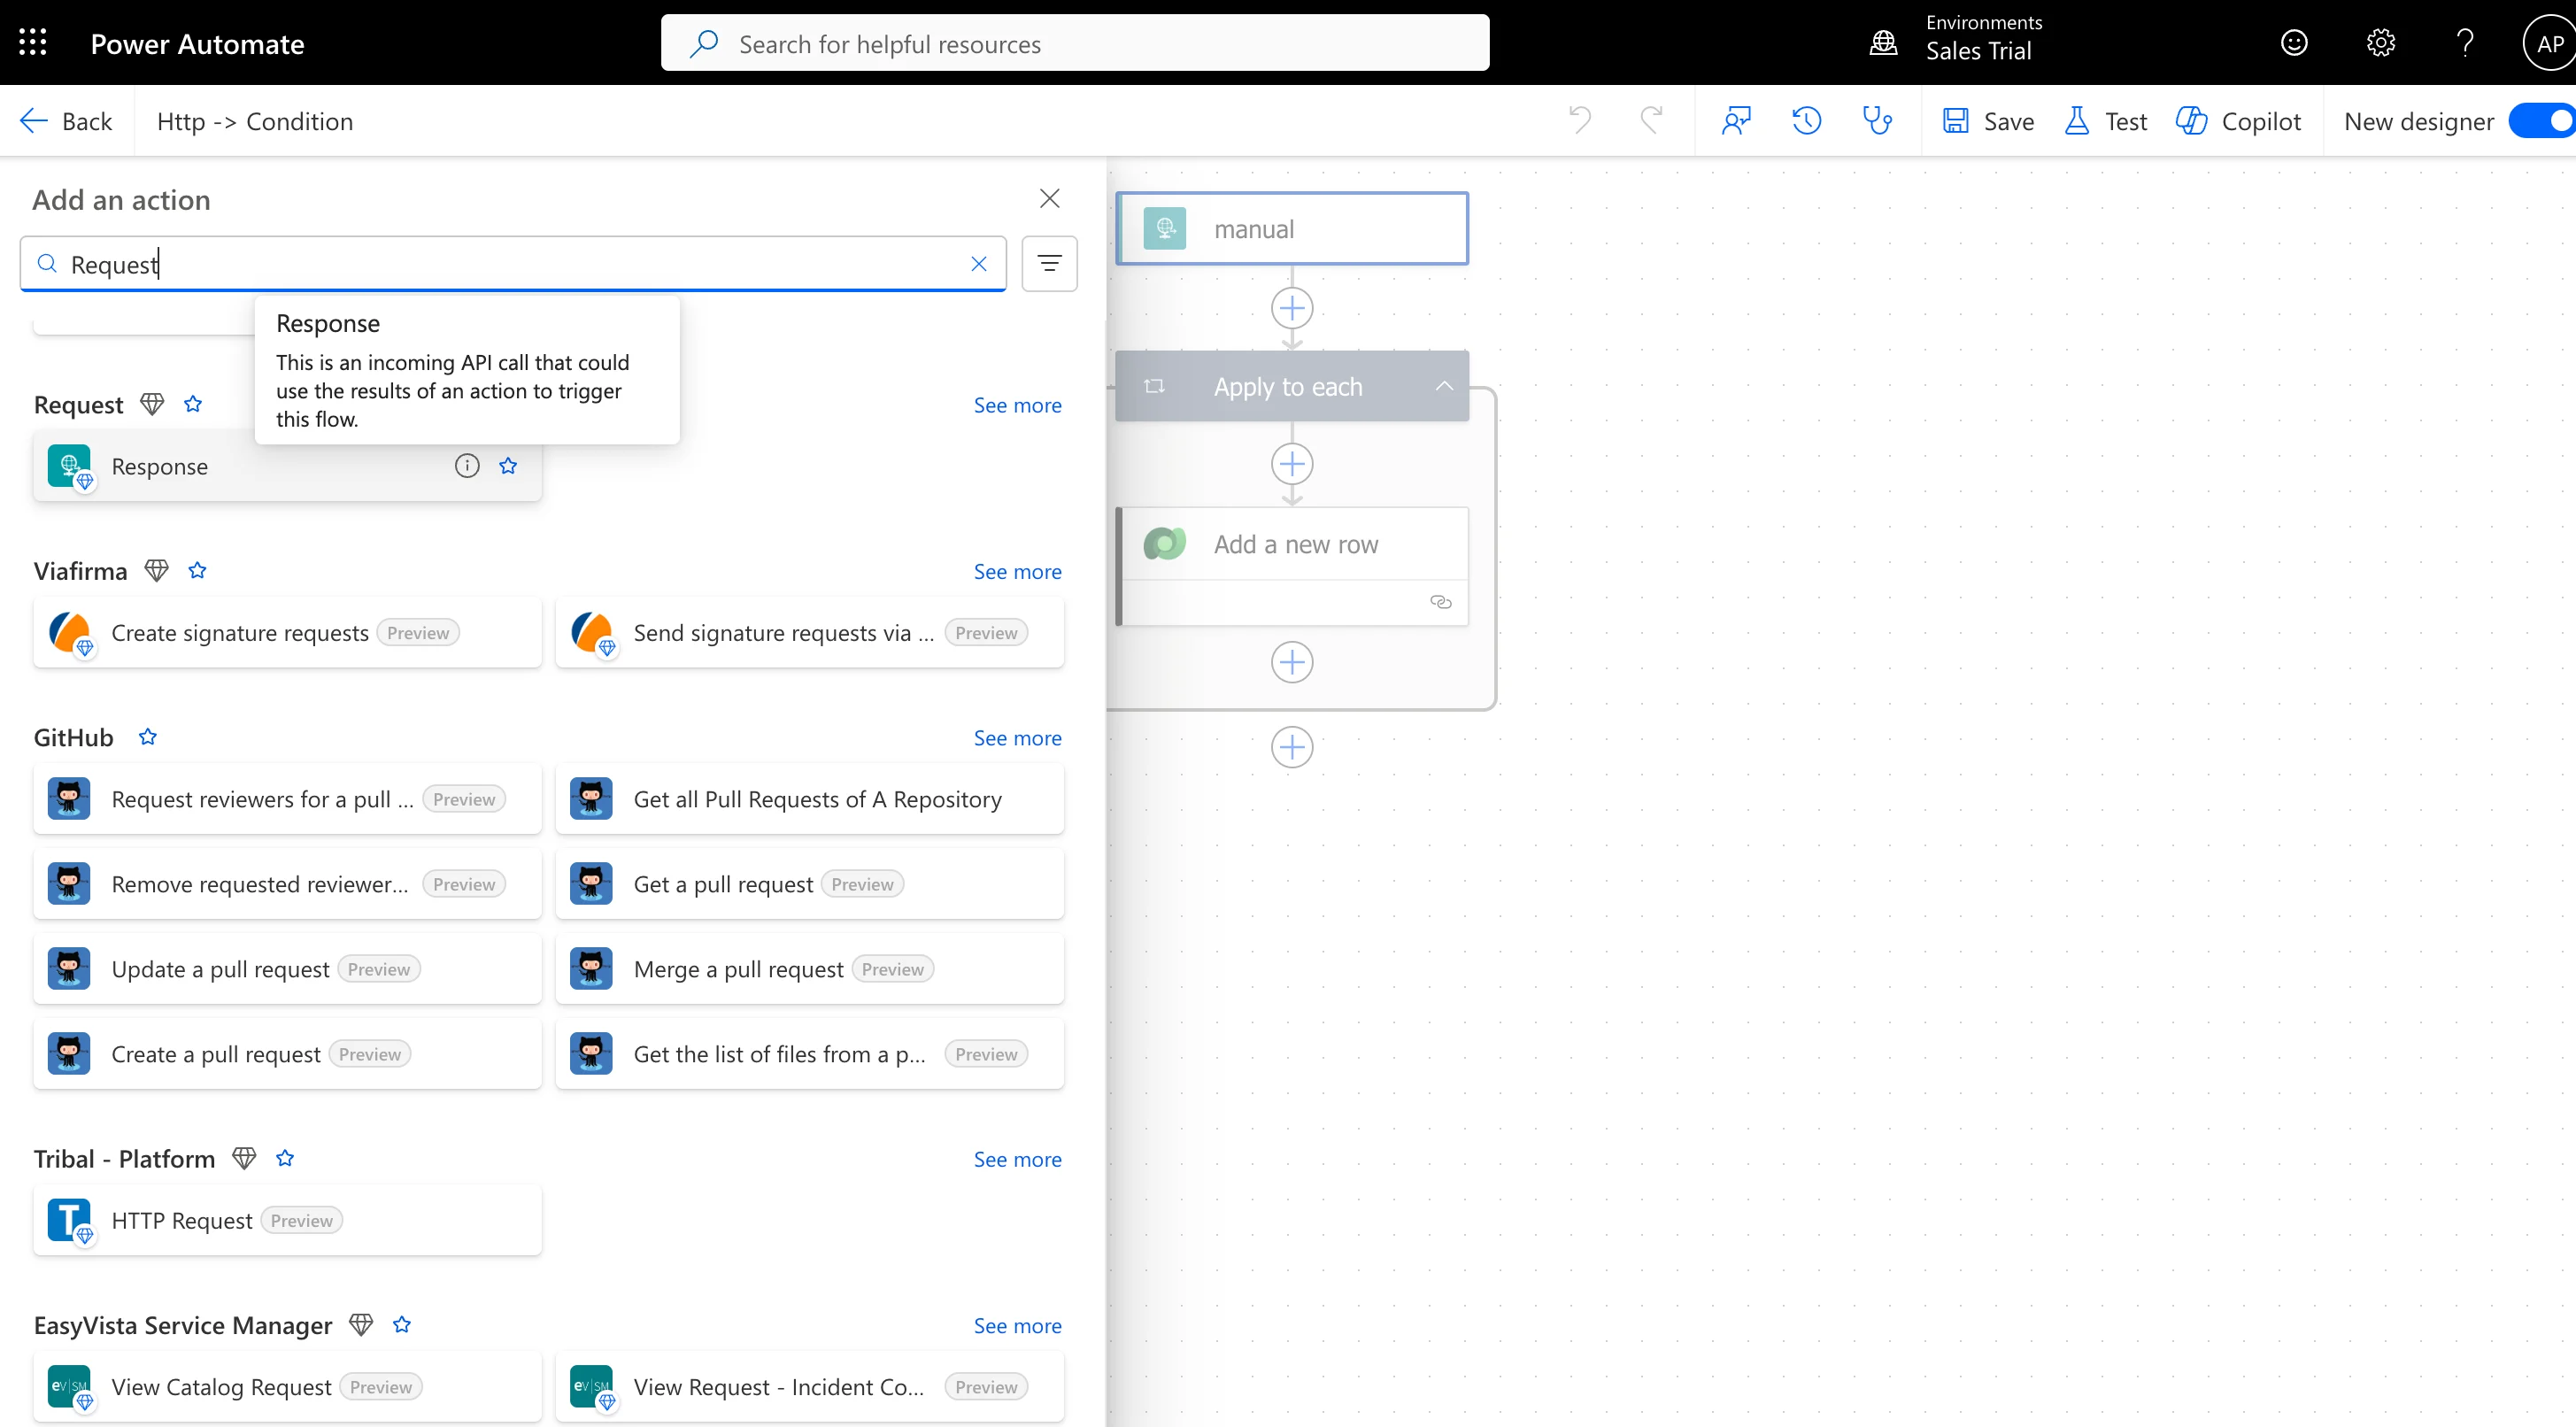 #### Configure the HTTP request trigger
In the trigger configuration, define the **Request Body JSON Schema**. This tells Power Automate the structure to expect from MoEngage Streams.
#### Configure the HTTP request trigger
In the trigger configuration, define the **Request Body JSON Schema**. This tells Power Automate the structure to expect from MoEngage Streams.
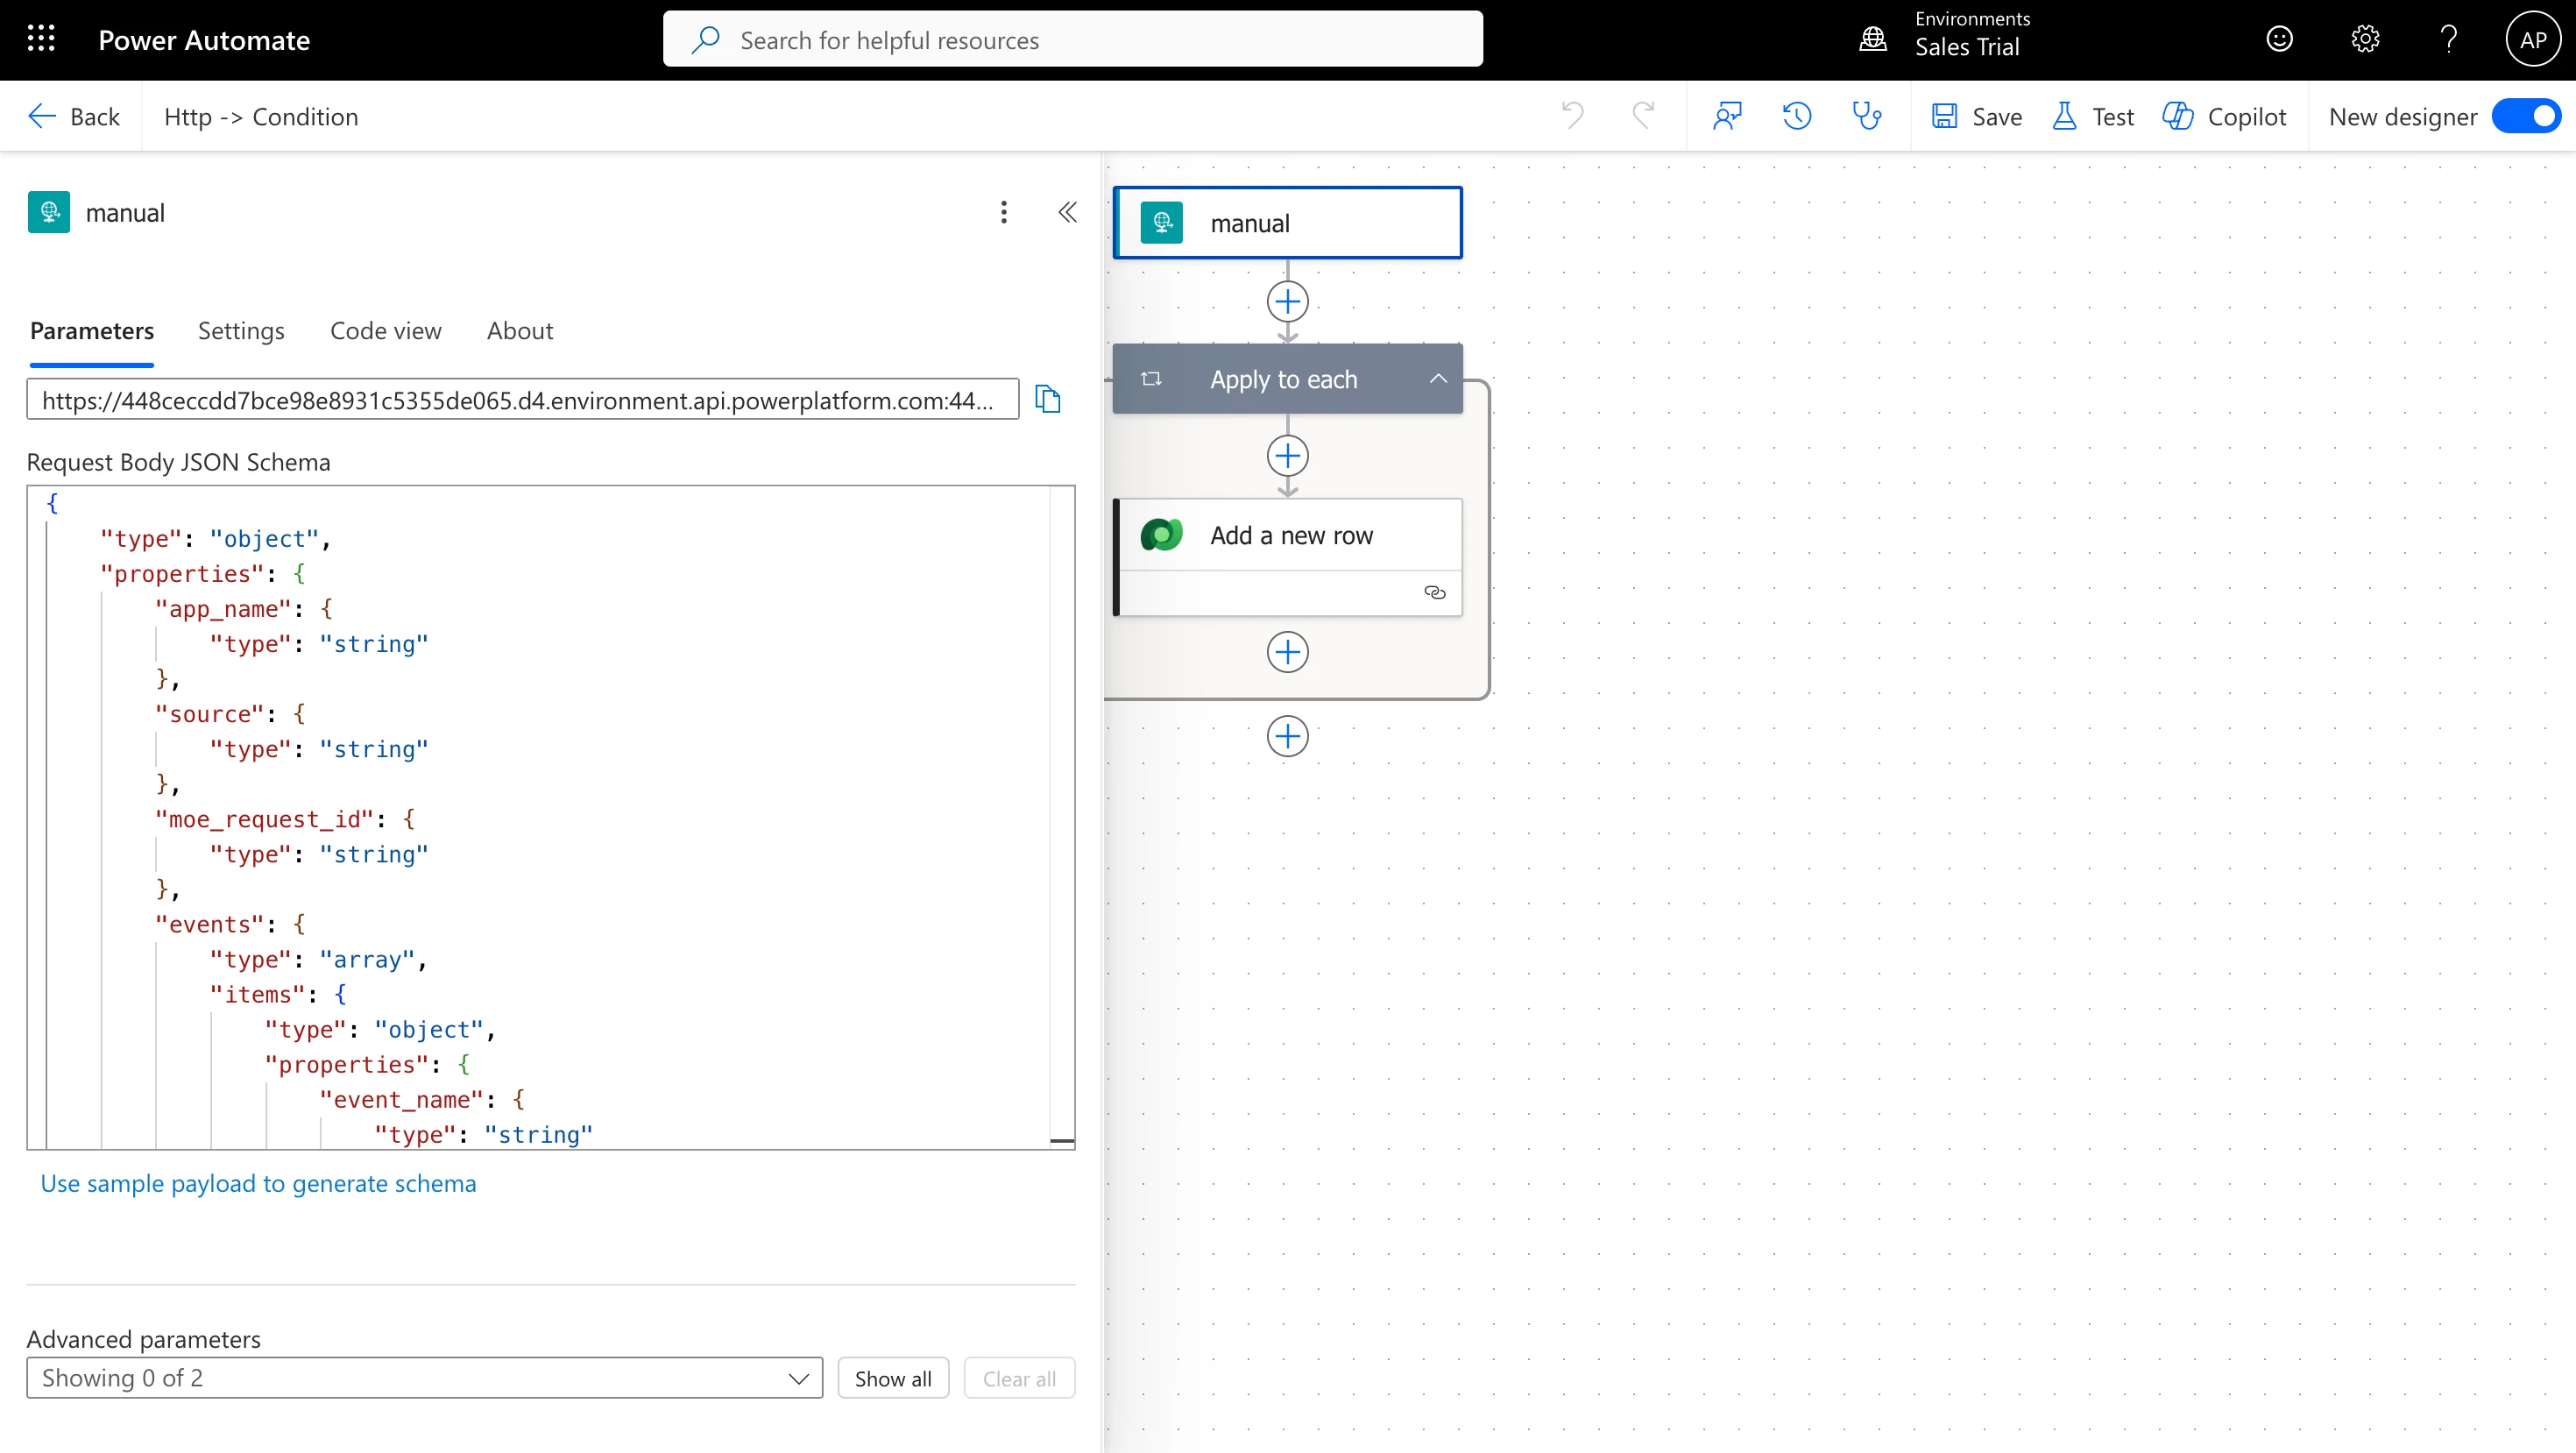 Copy and paste this schema into the **Request Body JSON Schema** field:
```json JSON Schema theme={null}
{
"type": "object",
"properties": {
"app_name": { "type": "string" },
"source": { "type": "string" },
"moe_request_id": { "type": "string" },
"events": {
"type": "array",
"items": {
"type": "object",
"properties": {
"event_name": { "type": "string" },
"event_code": { "type": "string" },
"event_uuid": { "type": "string" },
"event_time": { "type": "integer" },
"event_type": { "type": "string" },
"event_source": { "type": "string" },
"email_id": { "type": "string" },
"uid": { "type": "string" },
"event_attributes": {
"type": "object",
"properties": {
"campaign_id": { "type": "string" },
"campaign_name": { "type": "string" },
"campaign_type": { "type": "string" },
"campaign_channel": { "type": "string" }
}
},
"user_attributes": {
"type": "object",
"properties": {
"moengage_user_id": { "type": "string" },
"d365_lead_id": { "type": "string" },
"d365_contact_id": { "type": "string" },
"d365_opportunity_id": { "type": "string" },
"d365_custom_entity_id": { "type": "string" },
"external_identifier": { "type": "string" }
}
},
"device_attributes": {
"type": "object",
"properties": {
"moengage_device_id": { "type": "string" }
}
}
},
"required": ["event_name", "event_time", "user_attributes"]
}
}
},
"required": ["app_name", "source", "events"]
}
```
After adding the schema, click **Save**. Power Automate generates a unique **HTTP POST URL**. Copy this URL — you will need it to configure MoEngage Streams later.
### Step 2: Apply to each event
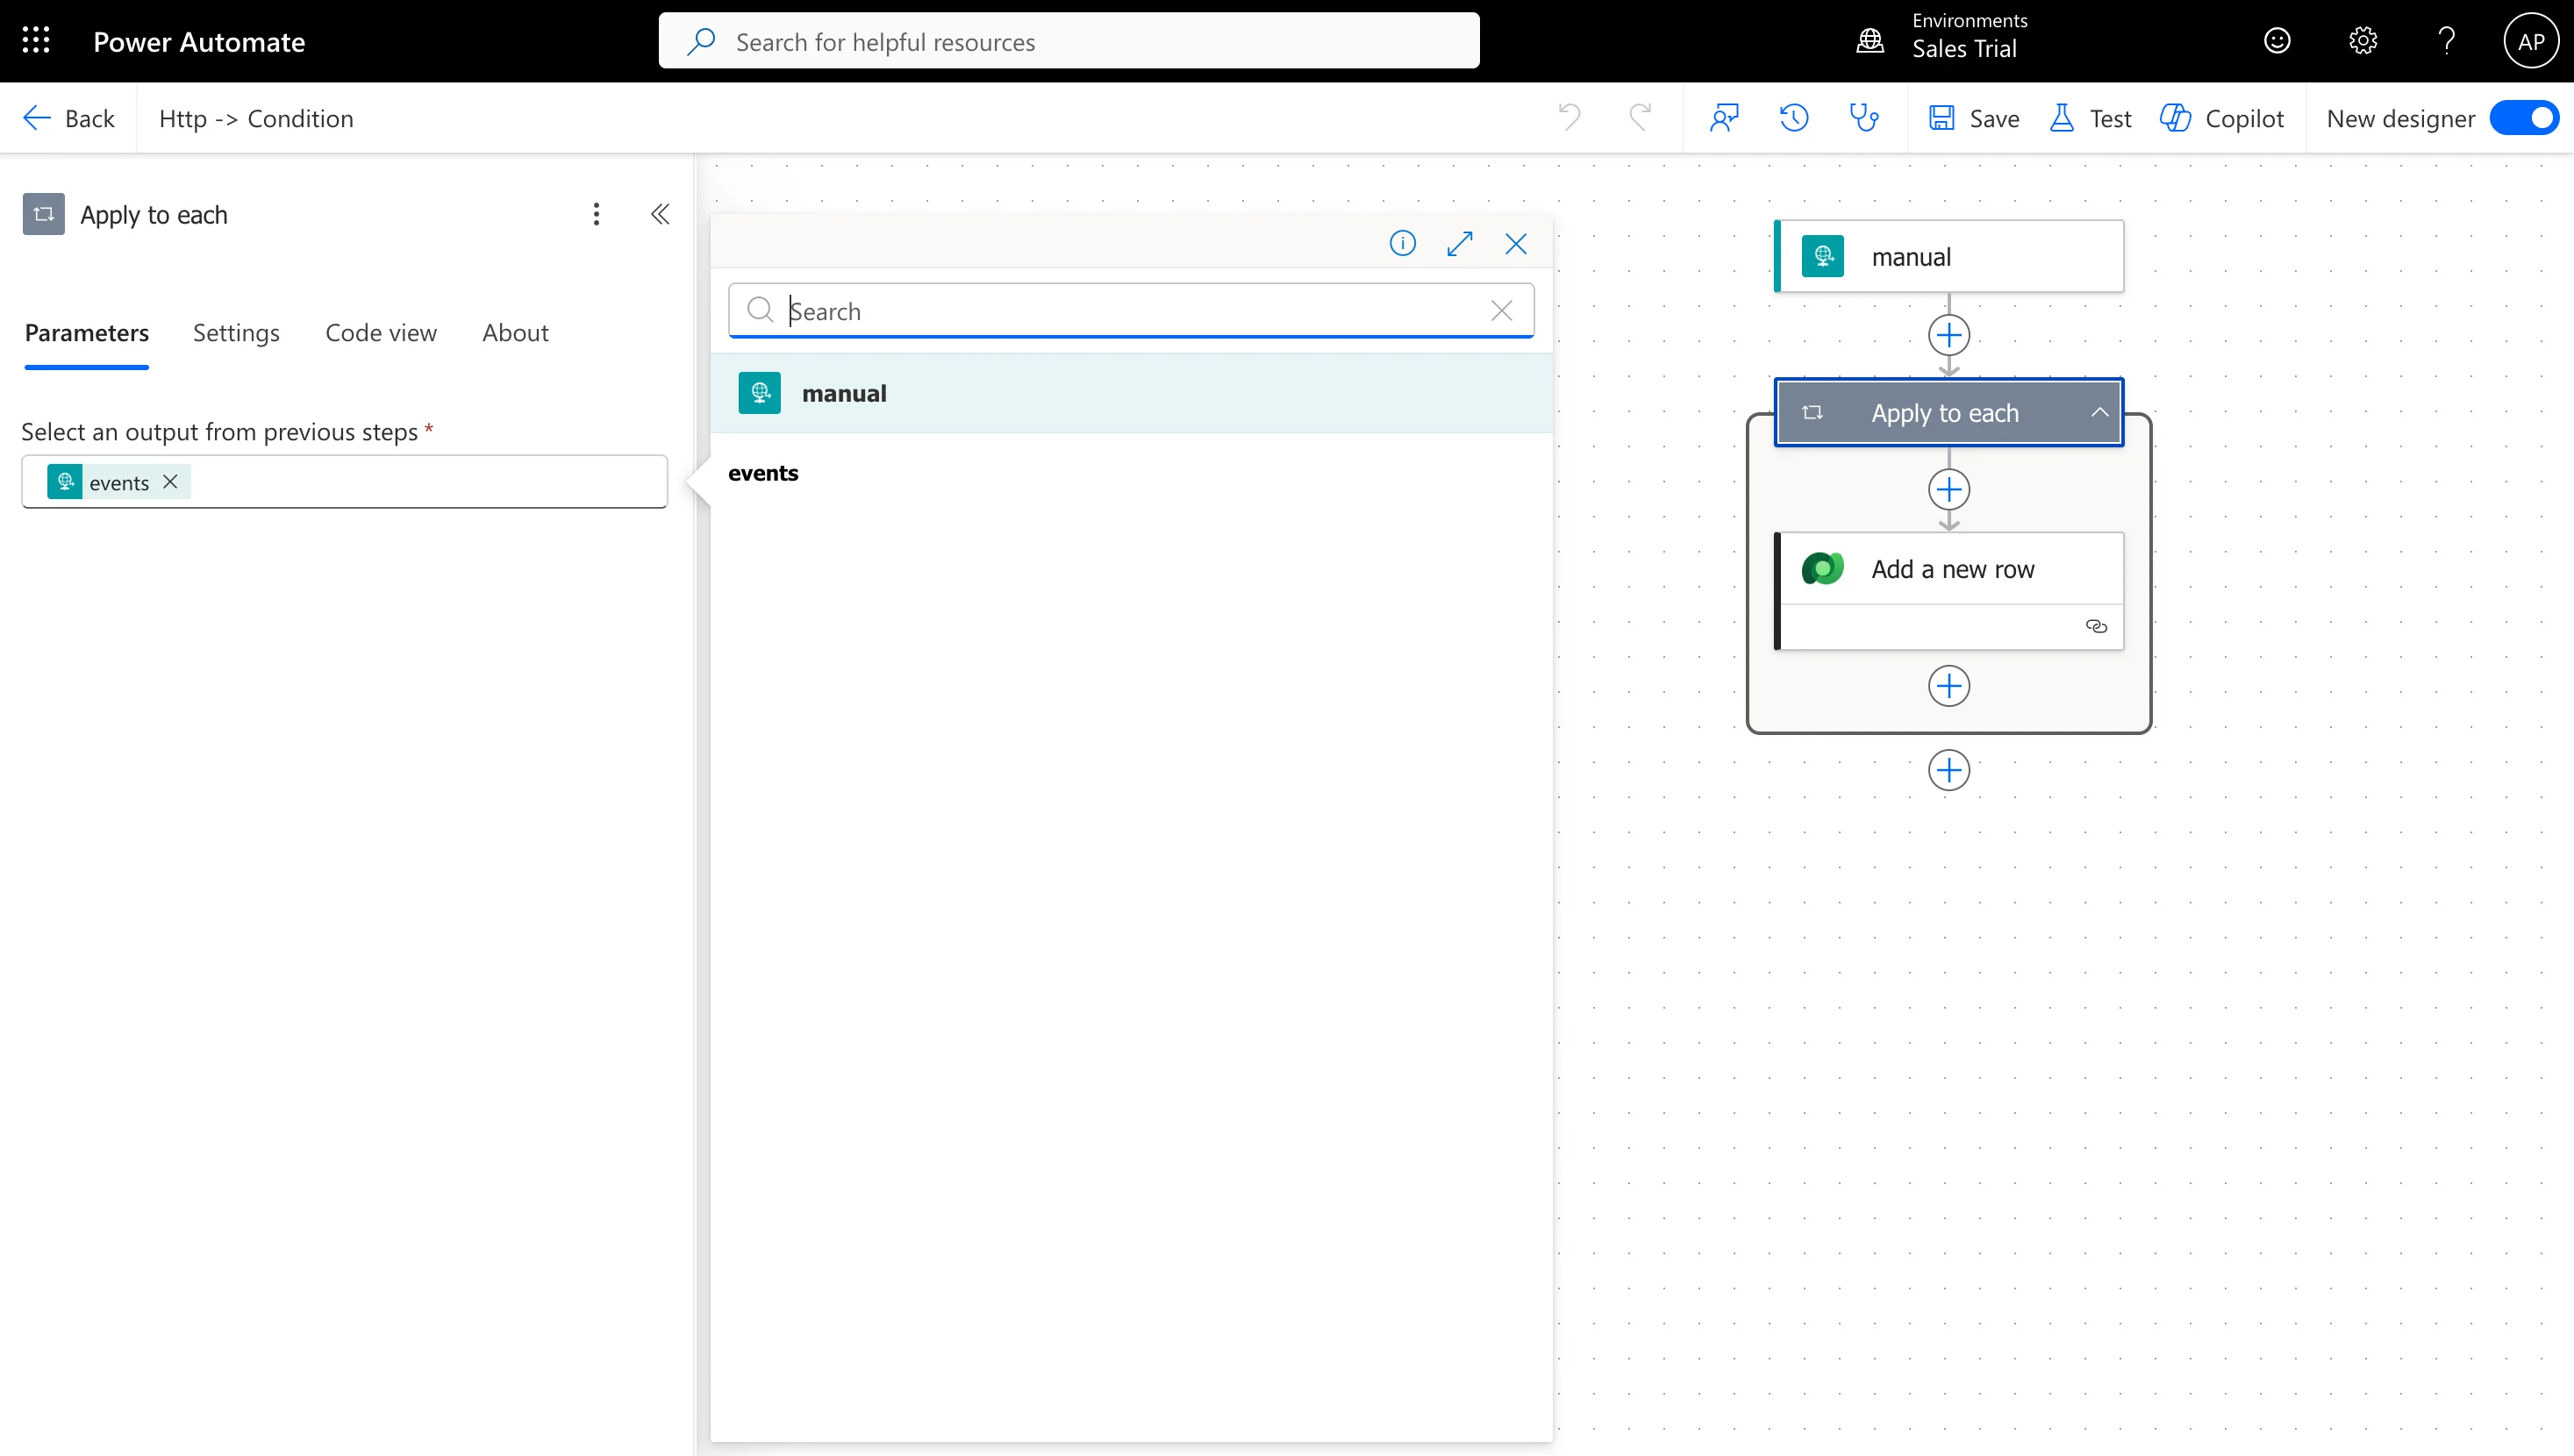
Since MoEngage can send multiple events in a single request, add an **Apply to each** loop to process them individually.
Click **New Step**.
Search for **Control** and select **Apply to each** (Control).
In the **Select an output from previous steps** field, choose **events** from the JSON dynamic content.
All subsequent actions must be added **inside** this *Apply to each* loop so they run for every event in the MoEngage payload.
Copy and paste this schema into the **Request Body JSON Schema** field:
```json JSON Schema theme={null}
{
"type": "object",
"properties": {
"app_name": { "type": "string" },
"source": { "type": "string" },
"moe_request_id": { "type": "string" },
"events": {
"type": "array",
"items": {
"type": "object",
"properties": {
"event_name": { "type": "string" },
"event_code": { "type": "string" },
"event_uuid": { "type": "string" },
"event_time": { "type": "integer" },
"event_type": { "type": "string" },
"event_source": { "type": "string" },
"email_id": { "type": "string" },
"uid": { "type": "string" },
"event_attributes": {
"type": "object",
"properties": {
"campaign_id": { "type": "string" },
"campaign_name": { "type": "string" },
"campaign_type": { "type": "string" },
"campaign_channel": { "type": "string" }
}
},
"user_attributes": {
"type": "object",
"properties": {
"moengage_user_id": { "type": "string" },
"d365_lead_id": { "type": "string" },
"d365_contact_id": { "type": "string" },
"d365_opportunity_id": { "type": "string" },
"d365_custom_entity_id": { "type": "string" },
"external_identifier": { "type": "string" }
}
},
"device_attributes": {
"type": "object",
"properties": {
"moengage_device_id": { "type": "string" }
}
}
},
"required": ["event_name", "event_time", "user_attributes"]
}
}
},
"required": ["app_name", "source", "events"]
}
```
After adding the schema, click **Save**. Power Automate generates a unique **HTTP POST URL**. Copy this URL — you will need it to configure MoEngage Streams later.
### Step 2: Apply to each event
Since MoEngage can send multiple events in a single request, add an **Apply to each** loop to process them individually.
Click **New Step**.
Search for **Control** and select **Apply to each** (Control).
In the **Select an output from previous steps** field, choose **events** from the JSON dynamic content.
All subsequent actions must be added **inside** this *Apply to each* loop so they run for every event in the MoEngage payload.
 ### Step 3: Create a custom table and add event records
For this integration, we created a custom table called **MoEngage Event** in Power Apps to store all engagement event data from MoEngage campaigns against Leads.
This approach lets you maintain a complete historical record of all customer interactions, and you can configure this for any of your desired entities.
**Creating your custom table in Power Apps**
Before configuring the Power Automate action, create a custom table in Power Apps to store MoEngage event data. The table should include the necessary columns (Event Name, Event Date, Campaign Name, Campaign Channel, Event Code, Event UUID) and a lookup relationship to your desired entity (Lead, Contact, or Opportunity).
For step-by-step instructions, refer to the [Microsoft Power Apps documentation on creating custom tables](https://learn.microsoft.com/en-us/power-apps/maker/data-platform/create-custom-entity).
#### Add a Dataverse action to create event records
Inside the *Apply to each* loop, add a **Microsoft Dataverse** action.
Choose **Add a new row** as the Dataverse action.
For **Table name**, select your custom table (for example, **MoEngage Events**).
Configure the field mappings as described in the next section.
#### Field mapping instructions
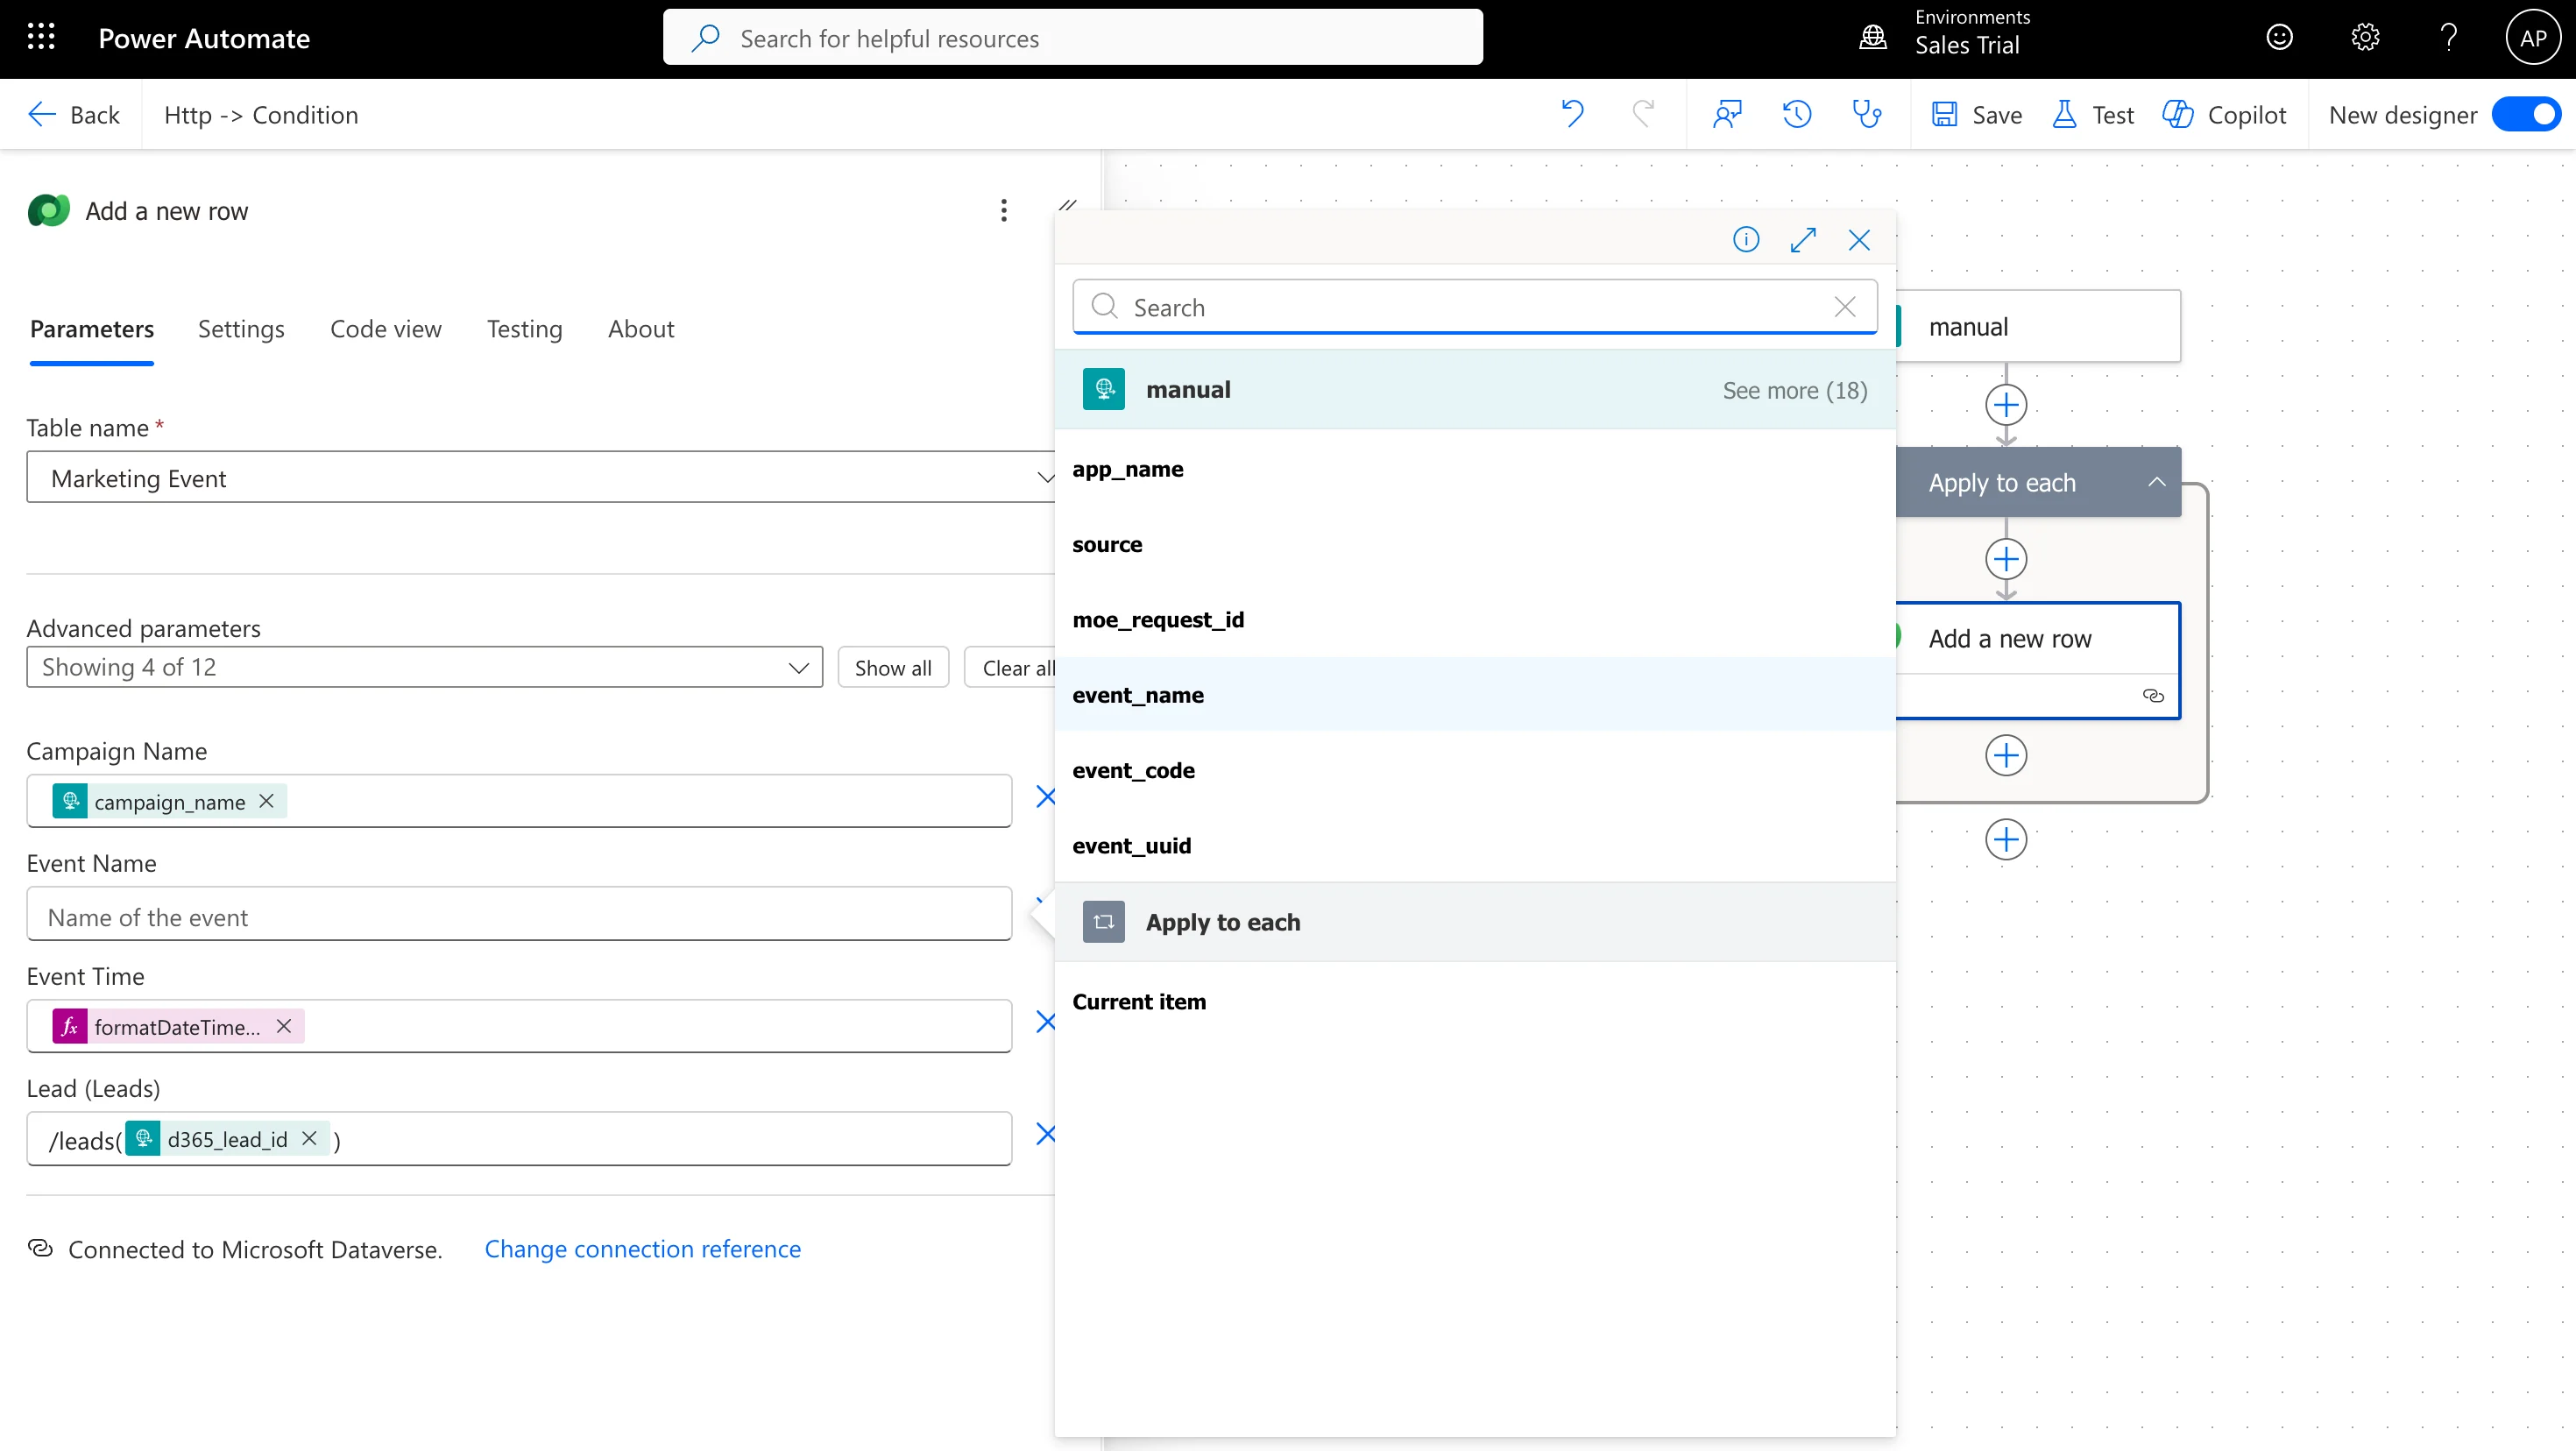
For each field in your MoEngage Events table, map data from the incoming MoEngage payload. Below is an example of how to map the **Event Name** field.
| Field name | How to map | Expression / dynamic content |
| -------------- | -------------------------------------------------------------------------- | ------------------------------------------------------ |
| **Event Name** | Click the field, then click **/** and select from the dynamic content list | Select **event\_name** from the dynamic content picker |
### Step 3: Create a custom table and add event records
For this integration, we created a custom table called **MoEngage Event** in Power Apps to store all engagement event data from MoEngage campaigns against Leads.
This approach lets you maintain a complete historical record of all customer interactions, and you can configure this for any of your desired entities.
**Creating your custom table in Power Apps**
Before configuring the Power Automate action, create a custom table in Power Apps to store MoEngage event data. The table should include the necessary columns (Event Name, Event Date, Campaign Name, Campaign Channel, Event Code, Event UUID) and a lookup relationship to your desired entity (Lead, Contact, or Opportunity).
For step-by-step instructions, refer to the [Microsoft Power Apps documentation on creating custom tables](https://learn.microsoft.com/en-us/power-apps/maker/data-platform/create-custom-entity).
#### Add a Dataverse action to create event records
Inside the *Apply to each* loop, add a **Microsoft Dataverse** action.
Choose **Add a new row** as the Dataverse action.
For **Table name**, select your custom table (for example, **MoEngage Events**).
Configure the field mappings as described in the next section.
#### Field mapping instructions
For each field in your MoEngage Events table, map data from the incoming MoEngage payload. Below is an example of how to map the **Event Name** field.
| Field name | How to map | Expression / dynamic content |
| -------------- | -------------------------------------------------------------------------- | ------------------------------------------------------ |
| **Event Name** | Click the field, then click **/** and select from the dynamic content list | Select **event\_name** from the dynamic content picker |
 **Dynamic content vs. expressions**
For most fields (Event Name, Campaign Name, Event Code, Event UUID, and so on):
* Click in the field and type **/**, or click the lightning bolt icon.
* Select the appropriate value from the dynamic content picker.
For lookup fields:
* Click the field and enter `/leads({id})`, where `{id}` is selected from dynamic content.
### Step 4: Convert Unix timestamp to DateTime
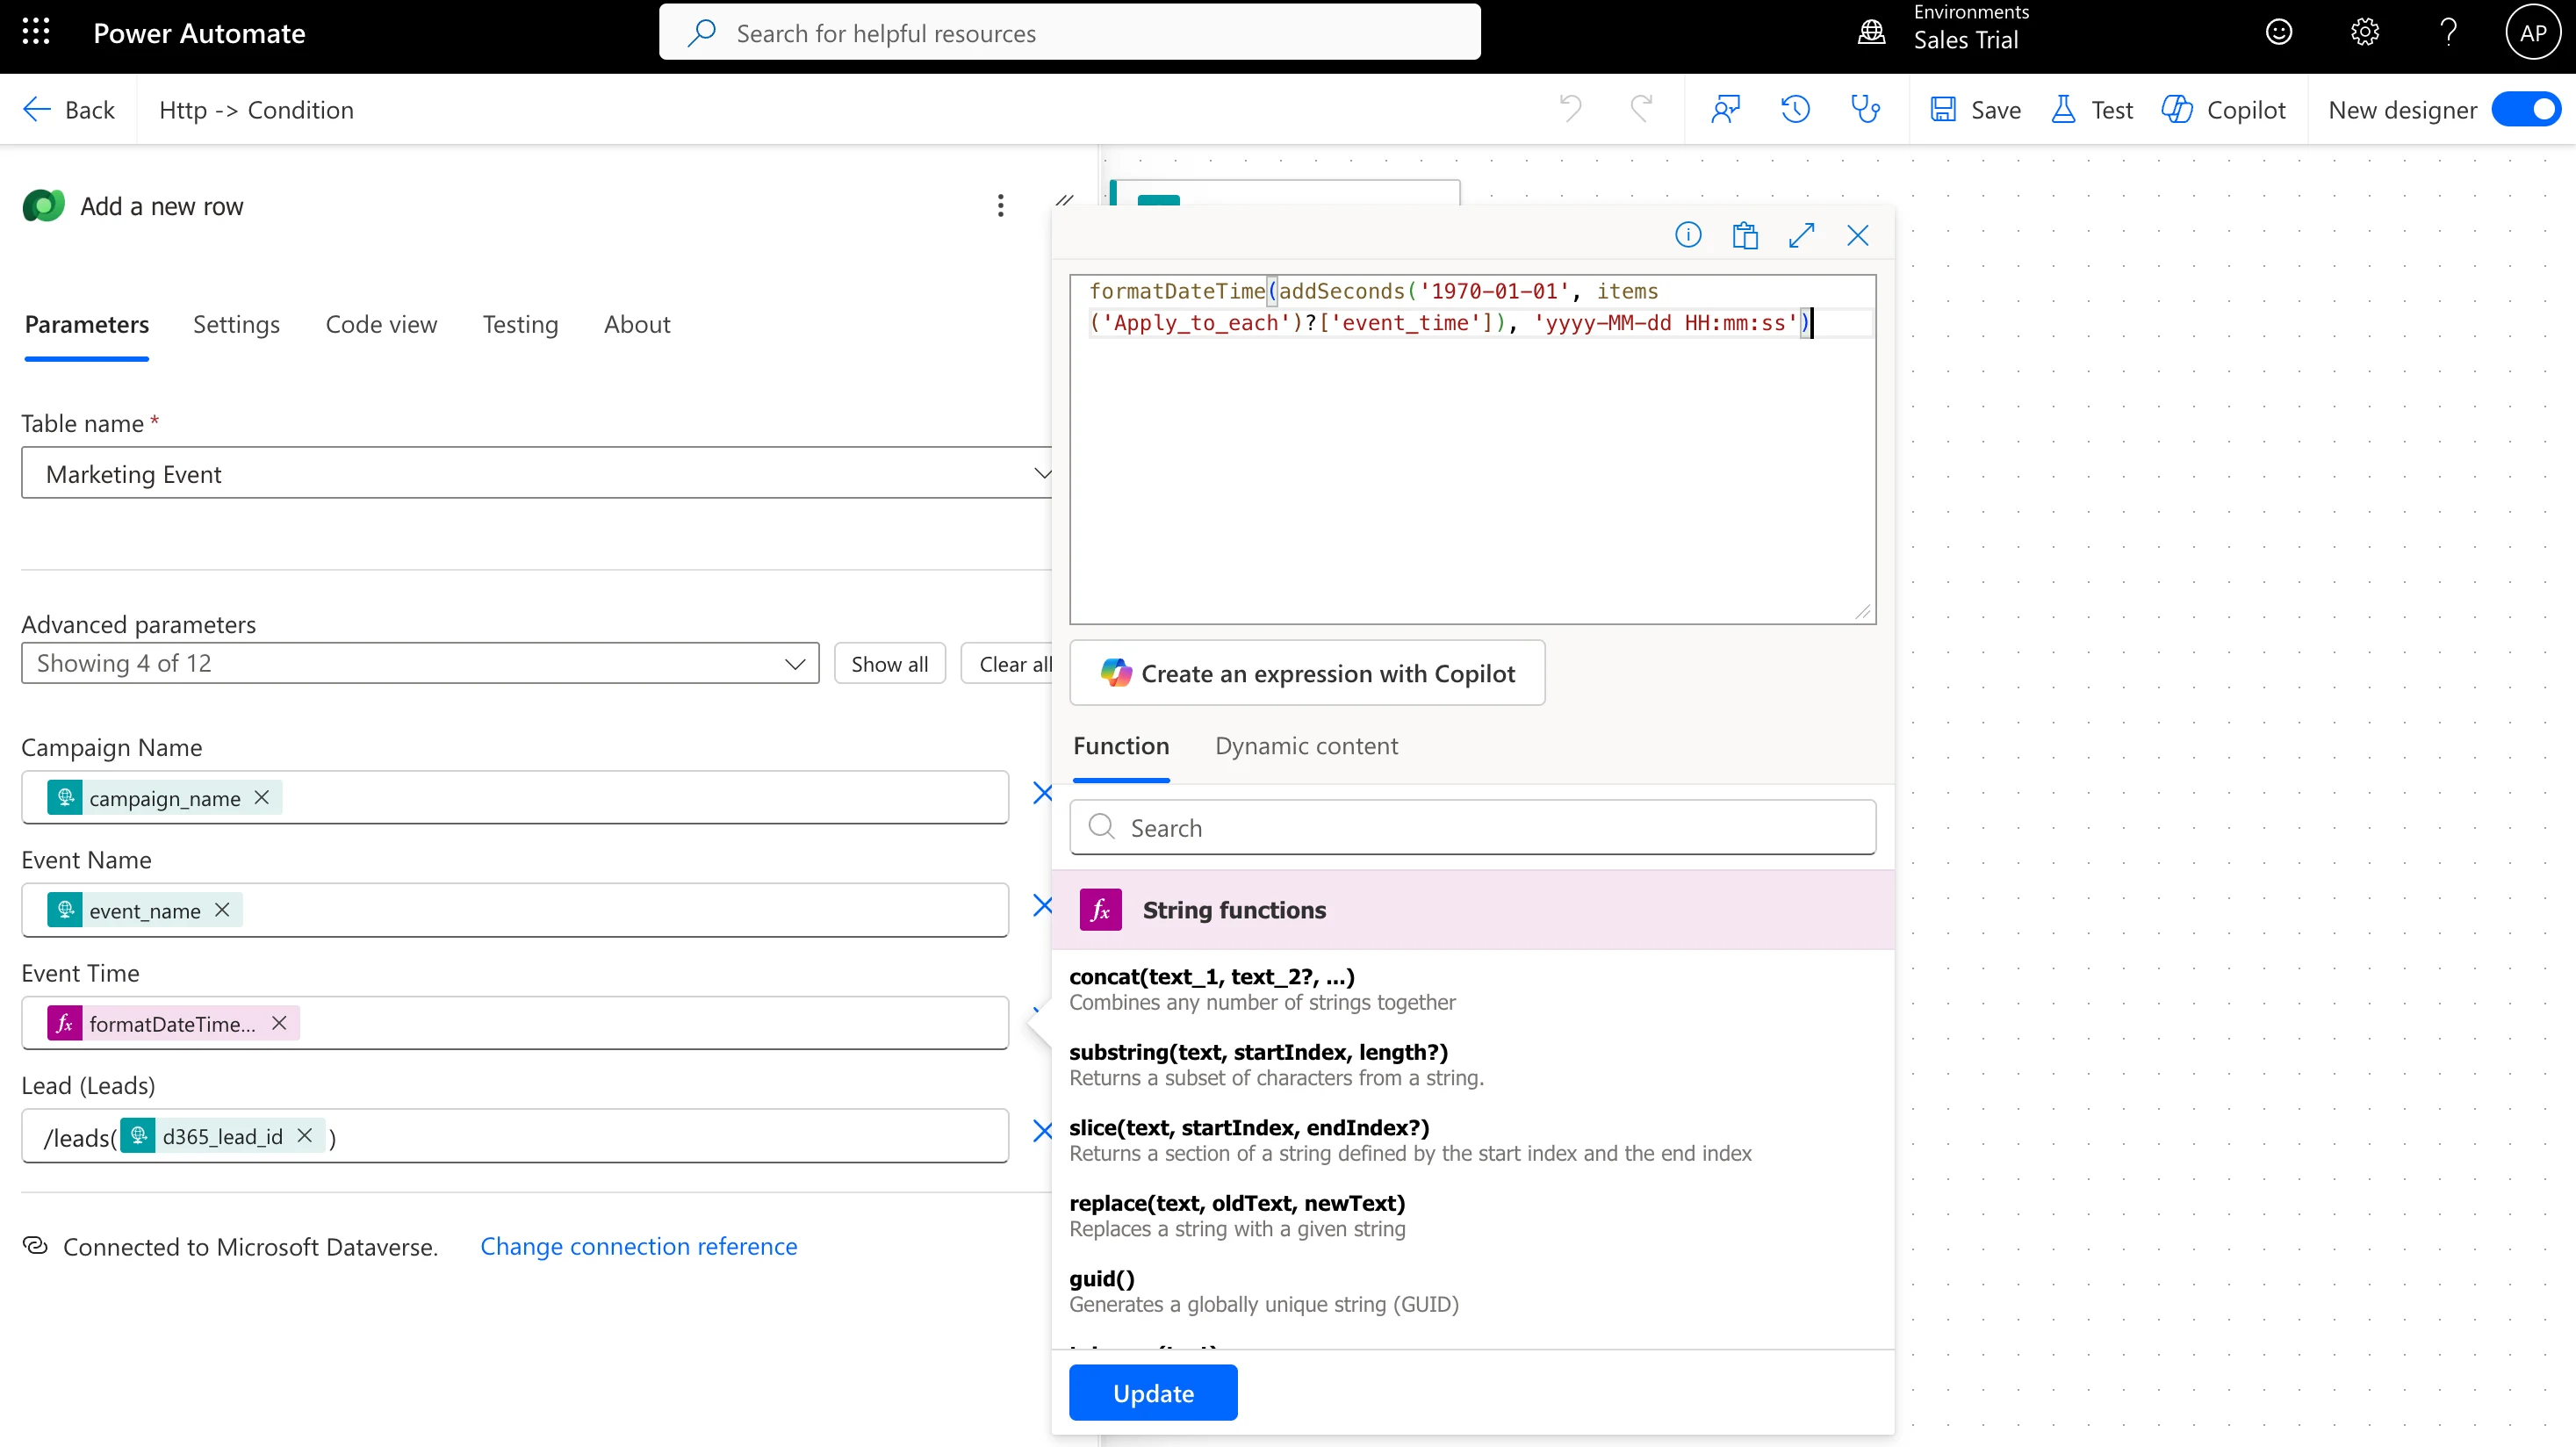
MoEngage sends event timestamps as Unix epoch time (for example, `1731421200`). Convert this to a D365-compatible datetime format when mapping to date or time fields.
In the **Inputs** field, use this expression:
```text Expression wrap theme={null}
formatDateTime(addSeconds('1970-01-01', items('Apply_to_each')?['event_time']), 'yyyy-MM-dd HH:mm:ss')
```
**Dynamic content vs. expressions**
For most fields (Event Name, Campaign Name, Event Code, Event UUID, and so on):
* Click in the field and type **/**, or click the lightning bolt icon.
* Select the appropriate value from the dynamic content picker.
For lookup fields:
* Click the field and enter `/leads({id})`, where `{id}` is selected from dynamic content.
### Step 4: Convert Unix timestamp to DateTime
MoEngage sends event timestamps as Unix epoch time (for example, `1731421200`). Convert this to a D365-compatible datetime format when mapping to date or time fields.
In the **Inputs** field, use this expression:
```text Expression wrap theme={null}
formatDateTime(addSeconds('1970-01-01', items('Apply_to_each')?['event_time']), 'yyyy-MM-dd HH:mm:ss')
```
 ### Step 5: Test the integration
#### Test with a manual trigger
In Power Automate, click **Test** → **Manually**, then click **Test** again to start the flow in listening mode.
Use a tool like **Postman** or **cURL** to send a test payload to your webhook URL. Use the sample payload below.
```json Sample test payload theme={null}
{
"app_name": "App Name",
"source": "MOENGAGE",
"moe_request_id": "test_request_12345",
"events": [
{
"event_name": "Email Opened",
"event_code": "37930333",
"event_uuid": "moe_unique_event_id_001",
"event_time": 1731421200,
"event_type": "CAMPAIGN_EVENT",
"event_source": "MOENGAGE",
"email_id": "test@example.com",
"uid": "moe_customer_123",
"event_attributes": {
"campaign_id": "q4_nurture_series_001",
"campaign_name": "Q4 Nurture Series",
"campaign_type": "General",
"campaign_channel": "Email"
},
"user_attributes": {
"moengage_user_id": "moe_internal_user_id",
"d365_lead_id": ""
},
"device_attributes": {
"moengage_device_id": "moe_internal_device_id"
}
}
]
}
```
#### Verification steps
Open the flow in Power Automate and check the latest run.
Confirm green checkmarks appear on all actions.
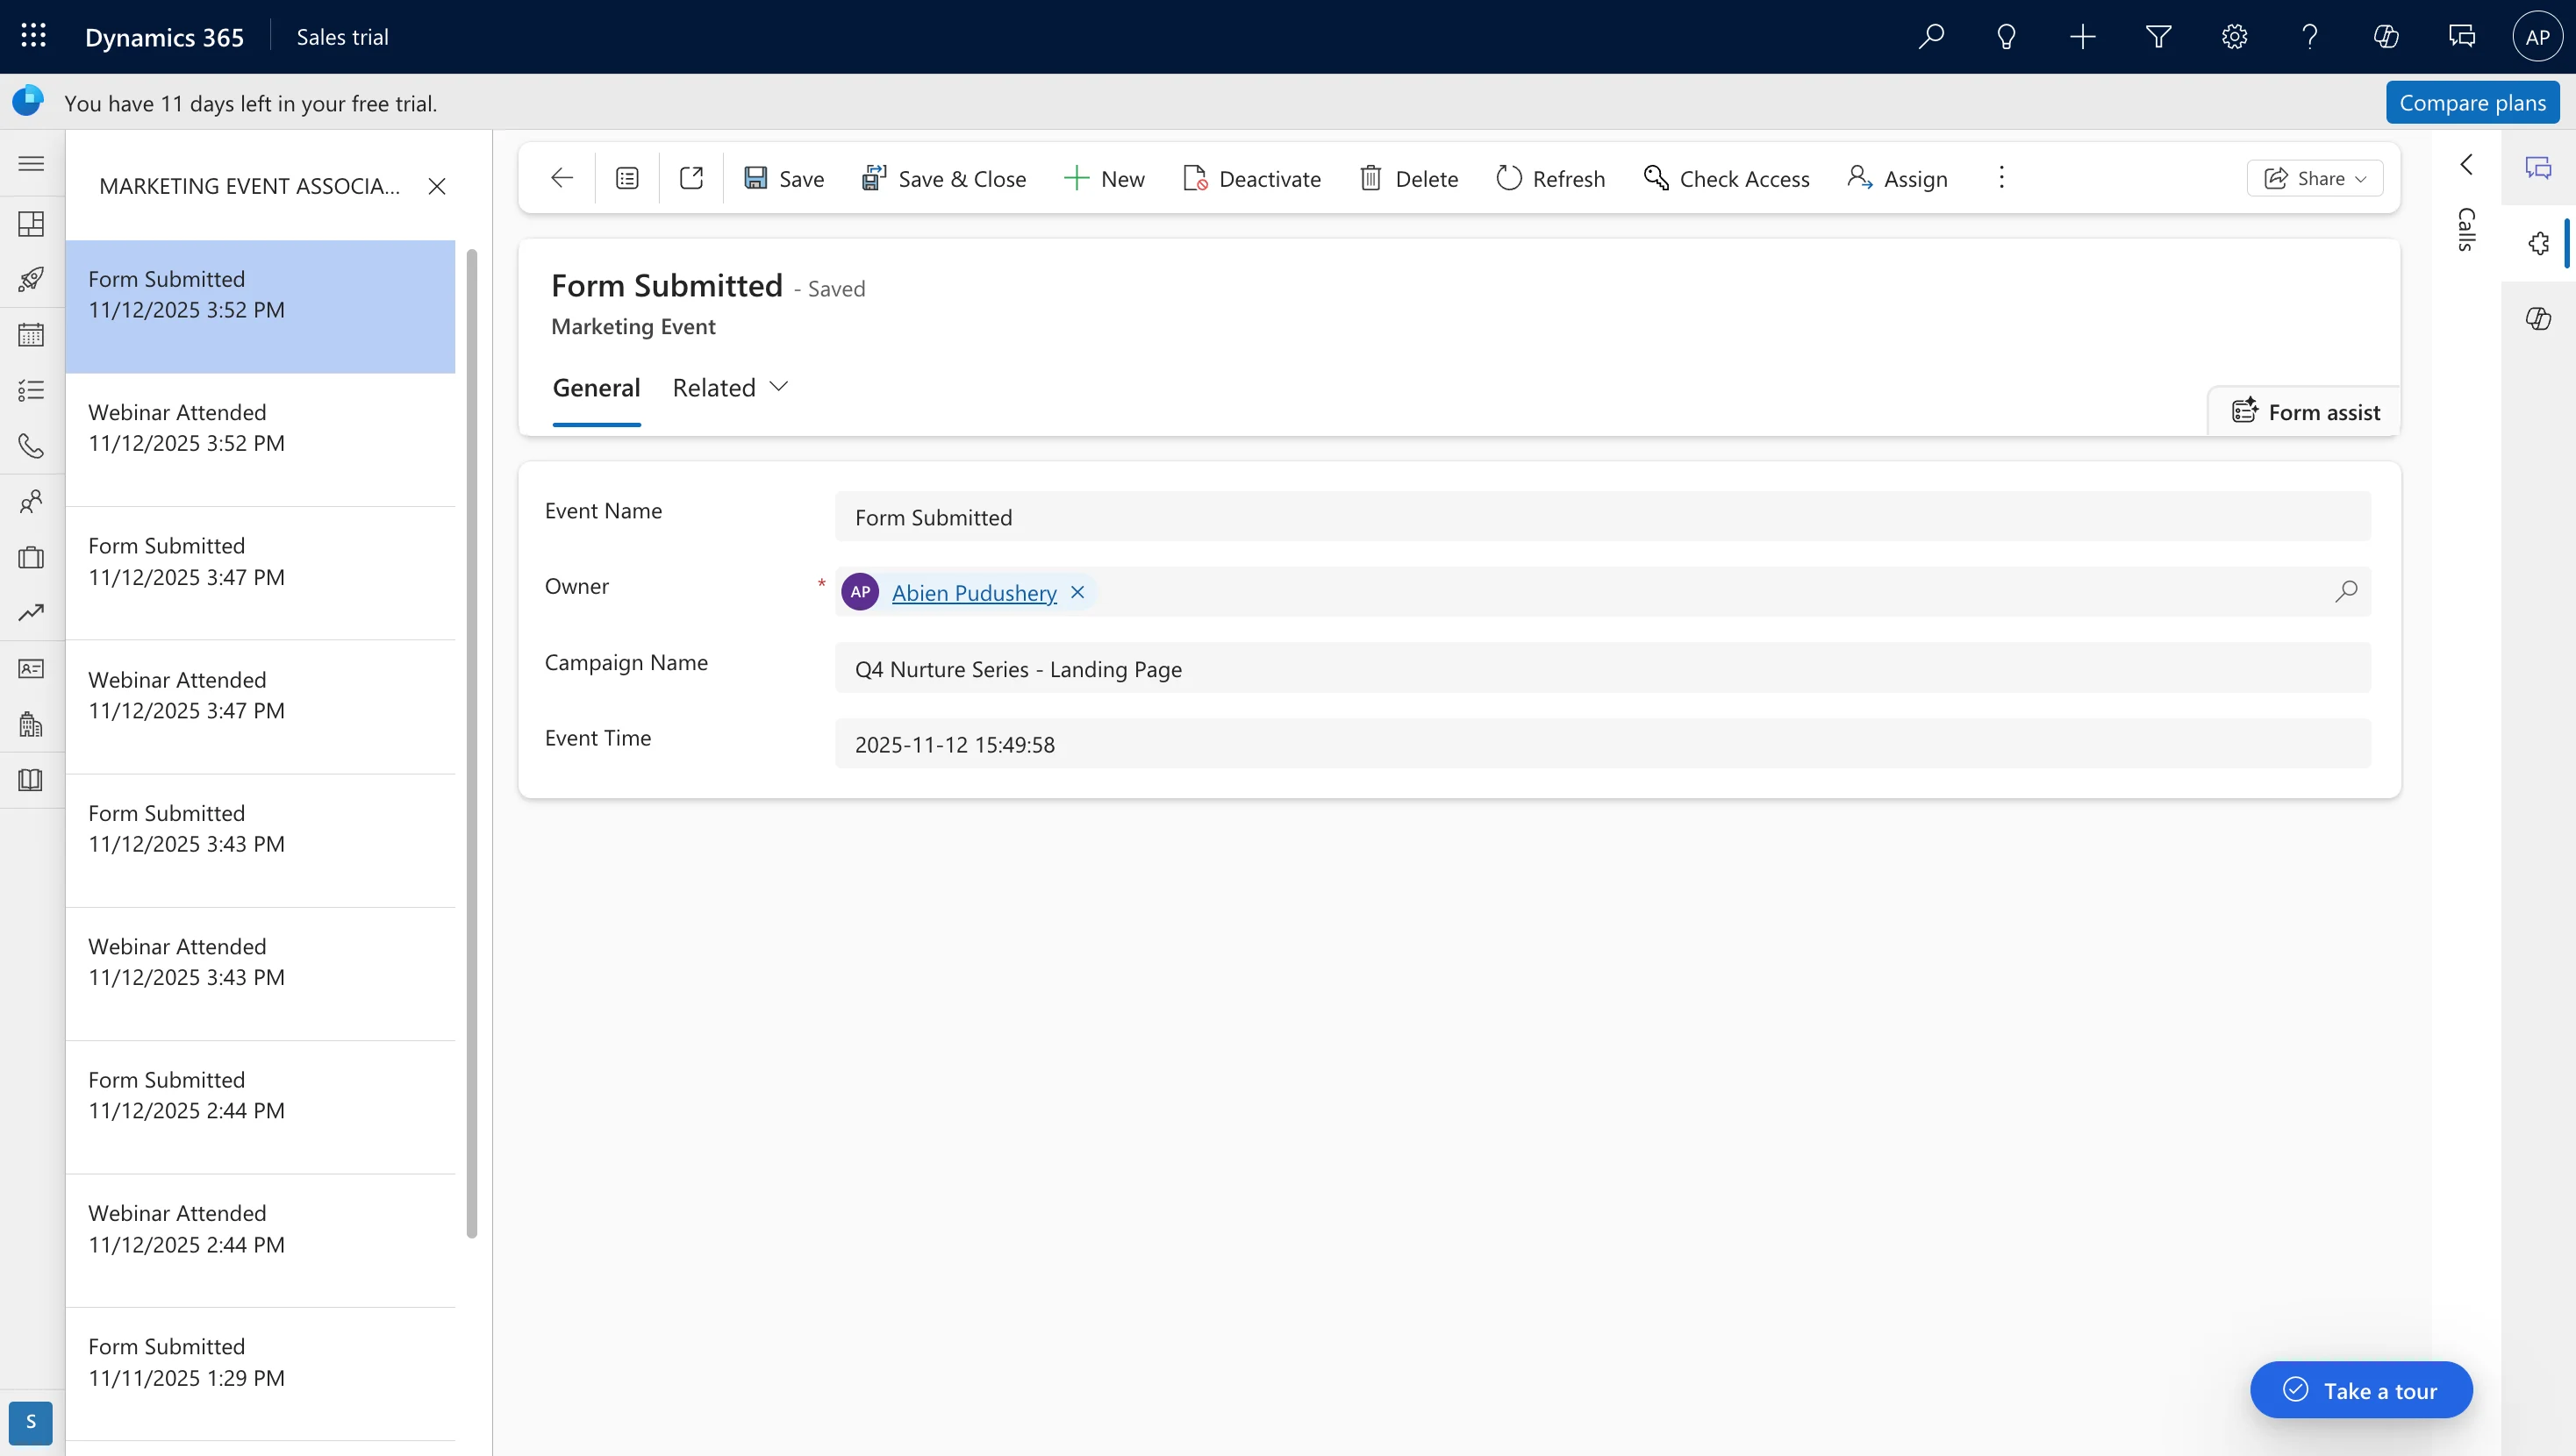
Go to your custom MoEngage Events table in Power Apps or D365.
Confirm a new event record was created with all the mapped data.
Confirm the Lead lookup field correctly points to the Lead record.
### Step 5: Test the integration
#### Test with a manual trigger
In Power Automate, click **Test** → **Manually**, then click **Test** again to start the flow in listening mode.
Use a tool like **Postman** or **cURL** to send a test payload to your webhook URL. Use the sample payload below.
```json Sample test payload theme={null}
{
"app_name": "App Name",
"source": "MOENGAGE",
"moe_request_id": "test_request_12345",
"events": [
{
"event_name": "Email Opened",
"event_code": "37930333",
"event_uuid": "moe_unique_event_id_001",
"event_time": 1731421200,
"event_type": "CAMPAIGN_EVENT",
"event_source": "MOENGAGE",
"email_id": "test@example.com",
"uid": "moe_customer_123",
"event_attributes": {
"campaign_id": "q4_nurture_series_001",
"campaign_name": "Q4 Nurture Series",
"campaign_type": "General",
"campaign_channel": "Email"
},
"user_attributes": {
"moengage_user_id": "moe_internal_user_id",
"d365_lead_id": ""
},
"device_attributes": {
"moengage_device_id": "moe_internal_device_id"
}
}
]
}
```
#### Verification steps
Open the flow in Power Automate and check the latest run.
Confirm green checkmarks appear on all actions.
Go to your custom MoEngage Events table in Power Apps or D365.
Confirm a new event record was created with all the mapped data.
Confirm the Lead lookup field correctly points to the Lead record.
 ### Step 6: Enable MoEngage Streams
Once you have successfully tested the integration, enable MoEngage Streams to start sending real-time event data to your Power Automate webhook.
**Configure MoEngage Streams**
1. Copy the **HTTP POST URL** from [Step 1](#step-1-create-the-http-request-trigger-in-power-automate) (your Power Automate webhook URL).
2. Follow the official MoEngage Streams documentation to enable and configure the stream: [MoEngage Streams documentation](https://developers.moengage.com/hc/en-us/articles/4952761690644-MoEngage-Streams#01H7YXY47G6F01SR4CZVRYYM31).
### Step 6: Enable MoEngage Streams
Once you have successfully tested the integration, enable MoEngage Streams to start sending real-time event data to your Power Automate webhook.
**Configure MoEngage Streams**
1. Copy the **HTTP POST URL** from [Step 1](#step-1-create-the-http-request-trigger-in-power-automate) (your Power Automate webhook URL).
2. Follow the official MoEngage Streams documentation to enable and configure the stream: [MoEngage Streams documentation](https://developers.moengage.com/hc/en-us/articles/4952761690644-MoEngage-Streams#01H7YXY47G6F01SR4CZVRYYM31).