MoEngage × Zoho Billing
When you integrate MoEngage and Zoho Billing, you can sync subscription and payment data to your MoEngage account. You can then automate communications based on billing events and personalize campaigns with subscription details.Use Cases
Integrating Zoho Billing with MoEngage helps you solve the following use case:- Send personalized communication : Use Zoho Billing data, such as subscription status, payment history, and upcoming renewals, to send targeted and personalized messages from MoEngage. For example, you can send renewal reminders, payment failure notifications, or upgrade offers to specific user segments.
- Automated lifecycle campaign : Create automated user journeys in MoEngage that are triggered by billing events in Zoho Billing. You can use these events to automatically onboard new subscribers, re-engage users who have churned, or send special promotions to long-term users.
Integration
You need the following to set up the integration:
- An active account with Zoho Billing.
- Permissions in your Zoho Billing account to create and manage webhooks.
Step 1: Get Your MoEngage Endpoint
To get a dedicated endpoint for your integration, please contact the MoEngage Support team. In your request, you must specify the common identifier used to link user profiles between MoEngage and the partner platform. For example, the common identifier is your email ID or the phone number of the user.Step 2: Set Up a Webhook in Zoho Billing
To set up a Webhook in Zoho Billing, perform the following steps:- On the Zoho Billing dashboard, navigate to Settings > Automation > Workflow Actions.
- Click the Webhooks tab.
- Click + New Webhook in the upper-right corner.
 Click + New Webhook in the upper-right corner.
 - Enter a descriptive name for your Webhook (for example, MoEngage Subscription Updates).
- Select the module that will trigger the Webhook (for example, Subscriptions or Invoices).
- Select the specific events that will send an update to MoEngage.
For certain modules like Subscriptions, Zoho Billing offers both Immediate Events and Scheduled Events. Select the event type that best suits your integration needs.
- In the Webhook configuration section, enter the following details:
| Field | Description |
|---|---|
| Action | Ensure the method is set to POST. Then, enter the MoEngage endpoint URL provided by our support team. |
| Headers | Add the following custom headers:
|
| Authorization Type | You must select Self Authorization as the Authorization Type. |
| Body | In the body section, you must perform one of the following: • To update only certain standard fields in MoEngage, select Default Payload. • If you want to implement a custom payload, select Raw in JSON format. Then, share the sample payload structure with the support team for webhook setup assistance. |
- Click Save.
- If the webhook fails to save or does not trigger as expected, re-check all entered values, especially the MoEngage endpoint URL and the authorization token.
- Ensure there are no leading or trailing spaces in the authorization token.
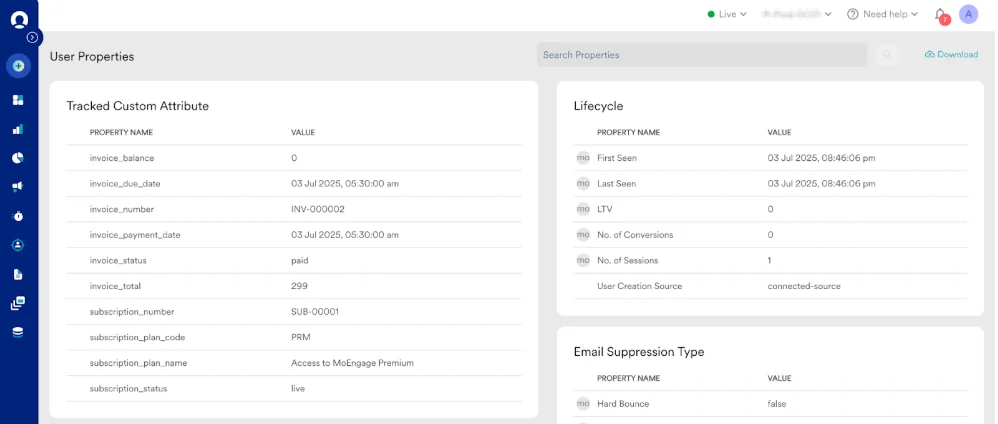
User Attributes Synced from Zoho Billing
By default, the Zoho Billing integration automatically syncs the following key subscription and invoice data to MoEngage as user attributes to enhance your ability to segment and personalize campaigns:Subscription Events
| Attribute name | Description |
|---|---|
| Subscription plan name | This displays the name of the subscription plan, which is often shown on invoices. |
| Subscription plan code | This is the unique code that identifies the user’s subscription plan. |
| Subscription status | This is the current status of the subscription (for example: live, trial, canceled). |
| Subscription number | This is the unique identifier for the user’s subscription. |
Invoice Events
| Attribute name | Description |
|---|---|
| Invoice number | This is the unique ID of an invoice (typically starts with INV). |
| Invoice total | This is the final amount due for the invoice after all credits are applied. |
| Invoice status | This is the current status of the invoice (for example: paid, sent, overdue, void). |
| Invoice due date | This is the date by which the invoice payment must be made to avoid being overdue. |
| Invoice payment date | This is the date on which the invoice was successfully paid. |
| Invoice balance | This is the remaining unpaid amount of an invoice. |
Step 3: Send Target Campaigns on MoEngage
After the integration is active, user attributes and events from Zoho Billing will appear in MoEngage. You can segment the users based on their data and send them targeted campaigns: