> ## Documentation Index
> Fetch the complete documentation index at: https://moengage.com/docs/llms.txt
> Use this file to discover all available pages before exploring further.
# Mailmodo
# Introduction
[Mailmodo](https://www.mailmodo.com/), one of MoEngage's Technology Partners, enables you to create interactive email templates to increase user engagement and marketing ROI using Emails.
# MoEngage × Mailmodo
Mailmodo is an AMP email solution and with the integration, you can:
* Use the MoEngage Segmentation module to send emails to targeted users.
* Use Mailmodo for email template creation and use MoEngage connector campaigns to trigger emails.
* Use the existing SendGrid account or set up Mailmodo SMTP to send emails from Mailmodo.
* Use Mailmodo's campaign activity data inside MoEngage while segmenting users or creating flows.
# Integration
**Prerequisites**
Ensure you have a Mailmodo account.
When you sign up for a new Mailmodo account, a default sender ID is automatically added to your account for testing the platform. To send your actual campaigns with Mailmodo, you must add your own custom sender email address. For example, if your domain is '[www.abc.com](http://www.abc.com/)', the custom sender email address could be '[hey@abc.com](mailto:hey@abc.com).'
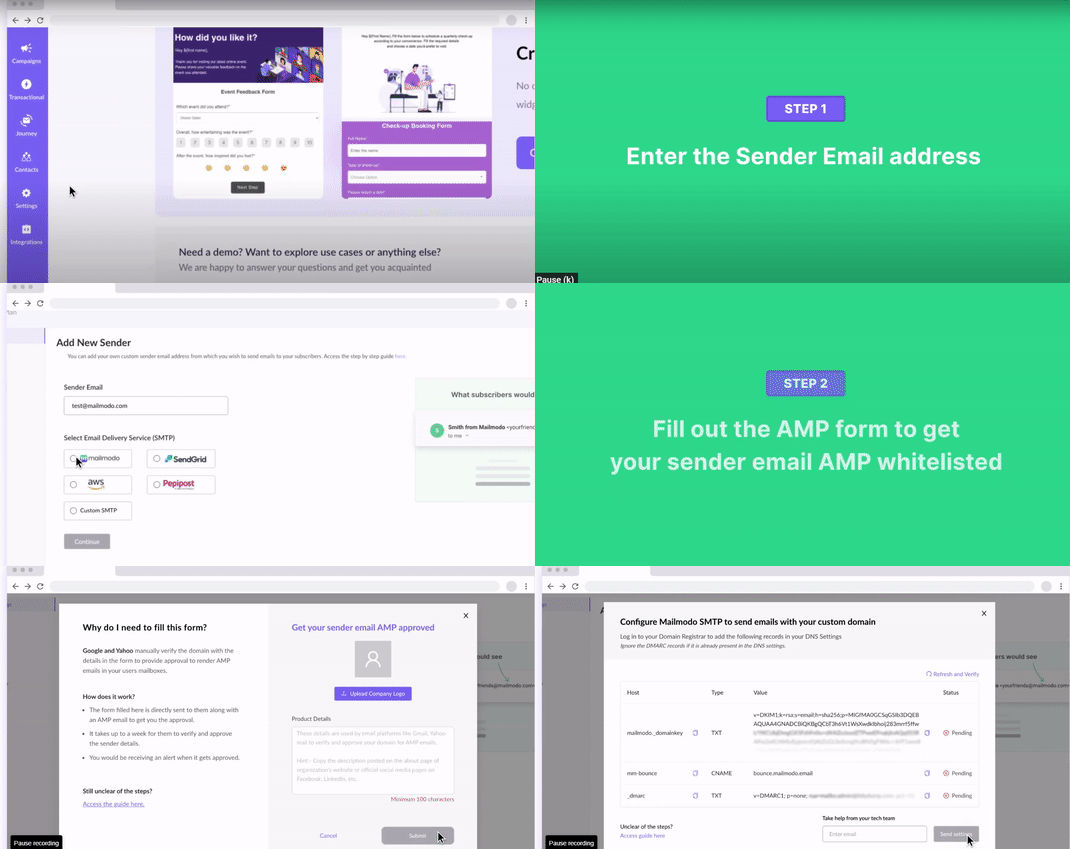 [To set up a custom domain,](https://support.mailmodo.com/support/solutions/articles/84000351435-adding-custom-sender-emails-in-mailmodo) go to the sender settings and enter the sender email. Then you have an option to select an email delivery service. After selecting one, a form appears, which you have to fill for it to be sent, requesting Google to whitelist your email address.
The approval process may take up to 7 days. You will get a confirmation email when it's completed. Once the email address has been whitelisted for AMP by Google, you will be able to send out dynamic AMP email campaigns through Mailmodo.
To learn more about adding a custom domain, read [this](https://support.mailmodo.com/support/solutions/articles/84000351435-adding-custom-sender-emails-in-mailmodo).
## **Setting up MoEngage Integration in Mailmodo**
* By setting up the MoEngage integration, you will be able to create segments, campaigns, flows, or dashboards in MoEngage using their campaign activity data, for emails triggered with MoEngage as an external trigger.
Please note campaign activity data of campaigns triggered with MoEngage as an external trigger will only be sent to MoEngage. The overall campaign statistics like email activity trends, AMP vs HTML performance, top email clients, link performance, submissions, insights, etc will also be available in the Mailmodo campaign dashboard.
Sample use cases include triggering a push campaign in MoEngage for all the users opening or clicking a particular campaign from Mailmodo, or creating a dashboard of all the users submitting a form from Mailmodo.
[To set up a custom domain,](https://support.mailmodo.com/support/solutions/articles/84000351435-adding-custom-sender-emails-in-mailmodo) go to the sender settings and enter the sender email. Then you have an option to select an email delivery service. After selecting one, a form appears, which you have to fill for it to be sent, requesting Google to whitelist your email address.
The approval process may take up to 7 days. You will get a confirmation email when it's completed. Once the email address has been whitelisted for AMP by Google, you will be able to send out dynamic AMP email campaigns through Mailmodo.
To learn more about adding a custom domain, read [this](https://support.mailmodo.com/support/solutions/articles/84000351435-adding-custom-sender-emails-in-mailmodo).
## **Setting up MoEngage Integration in Mailmodo**
* By setting up the MoEngage integration, you will be able to create segments, campaigns, flows, or dashboards in MoEngage using their campaign activity data, for emails triggered with MoEngage as an external trigger.
Please note campaign activity data of campaigns triggered with MoEngage as an external trigger will only be sent to MoEngage. The overall campaign statistics like email activity trends, AMP vs HTML performance, top email clients, link performance, submissions, insights, etc will also be available in the Mailmodo campaign dashboard.
Sample use cases include triggering a push campaign in MoEngage for all the users opening or clicking a particular campaign from Mailmodo, or creating a dashboard of all the users submitting a form from Mailmodo.
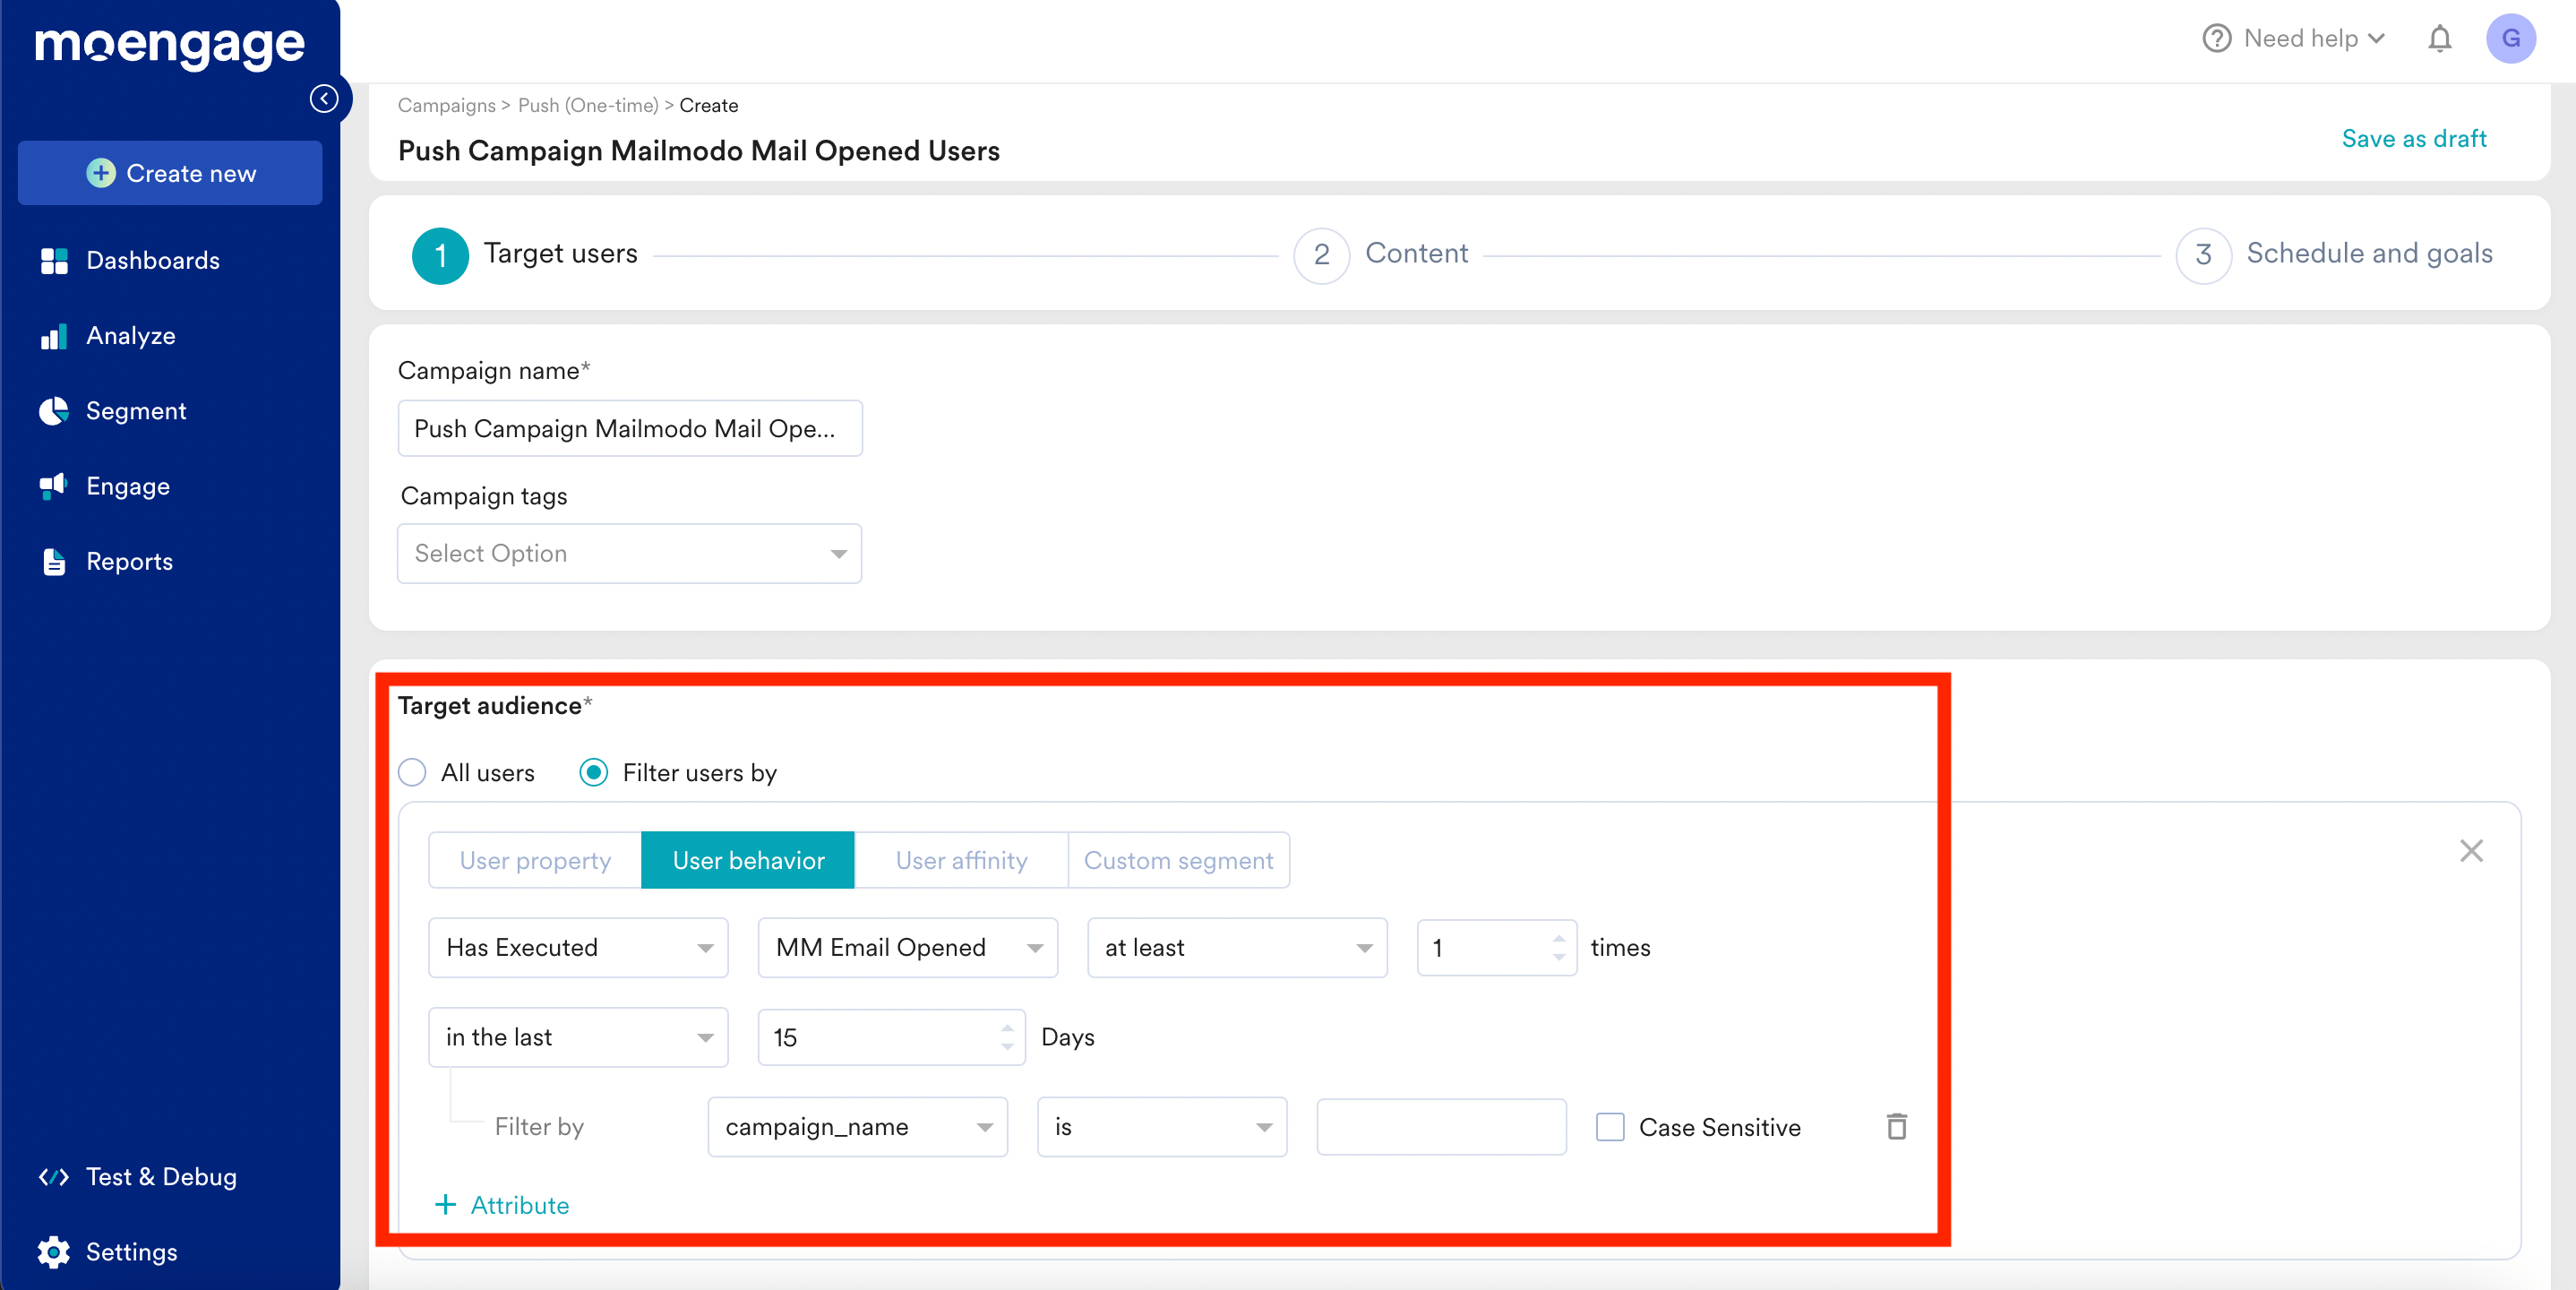 The below-mentioned data will be sent back to MoEngage via the Events endpoint as Tracked User Events:
* MM Email Opened
* Campaign Name
* Email Subject
* Campaign ID
* MM Email Link Clicked
* Campaign Name
* Email Subject
* Campaign ID
* Link URL
* MM Email Form Submitted
* Campaign Name
* Email Subject
* Campaign ID
* Template ID
* Template Name
* Form ID
* Form Name
* MM \ Form Submitted
* Campaign Name
* Email Subject
* Campaign ID
* Template ID
* Template Name
* Form ID
* Form Name
* Form Submissions
* MM Email Bounced
* Campaign Name
* Email Subject
* Campaign ID
### Steps to setup
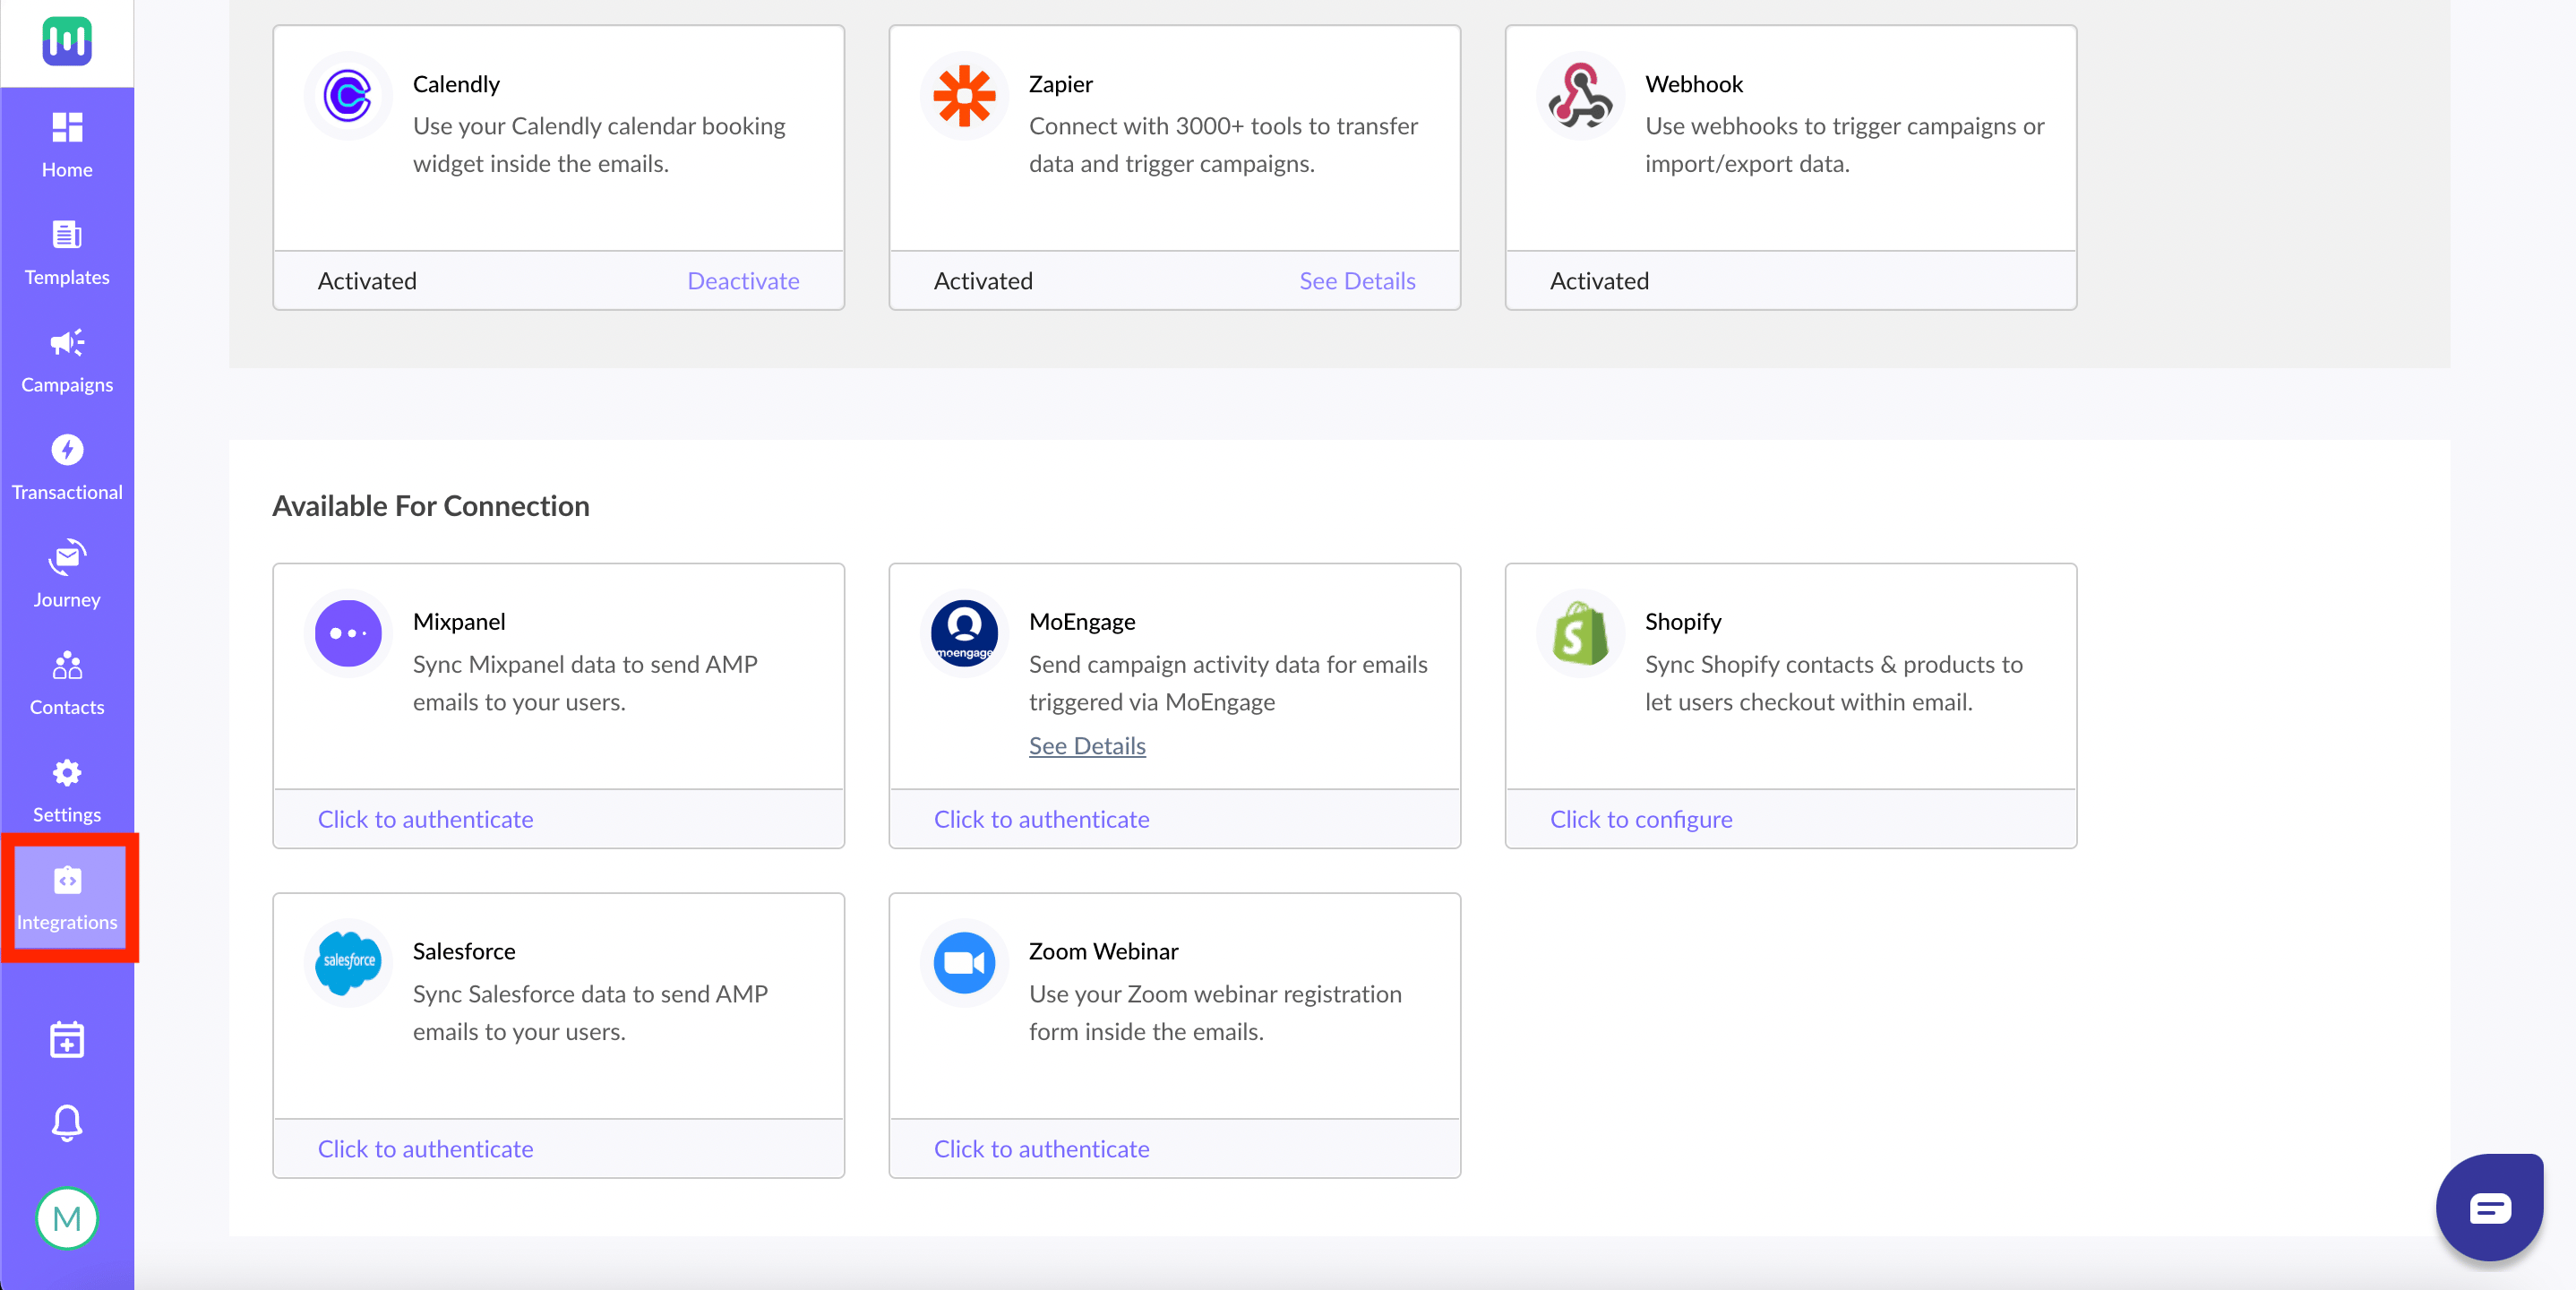
**Step 1:** Go to [Integrations](https://manage.mailmodo.com/app/integrations) from the left navigation menu
The below-mentioned data will be sent back to MoEngage via the Events endpoint as Tracked User Events:
* MM Email Opened
* Campaign Name
* Email Subject
* Campaign ID
* MM Email Link Clicked
* Campaign Name
* Email Subject
* Campaign ID
* Link URL
* MM Email Form Submitted
* Campaign Name
* Email Subject
* Campaign ID
* Template ID
* Template Name
* Form ID
* Form Name
* MM \ Form Submitted
* Campaign Name
* Email Subject
* Campaign ID
* Template ID
* Template Name
* Form ID
* Form Name
* Form Submissions
* MM Email Bounced
* Campaign Name
* Email Subject
* Campaign ID
### Steps to setup
**Step 1:** Go to [Integrations](https://manage.mailmodo.com/app/integrations) from the left navigation menu
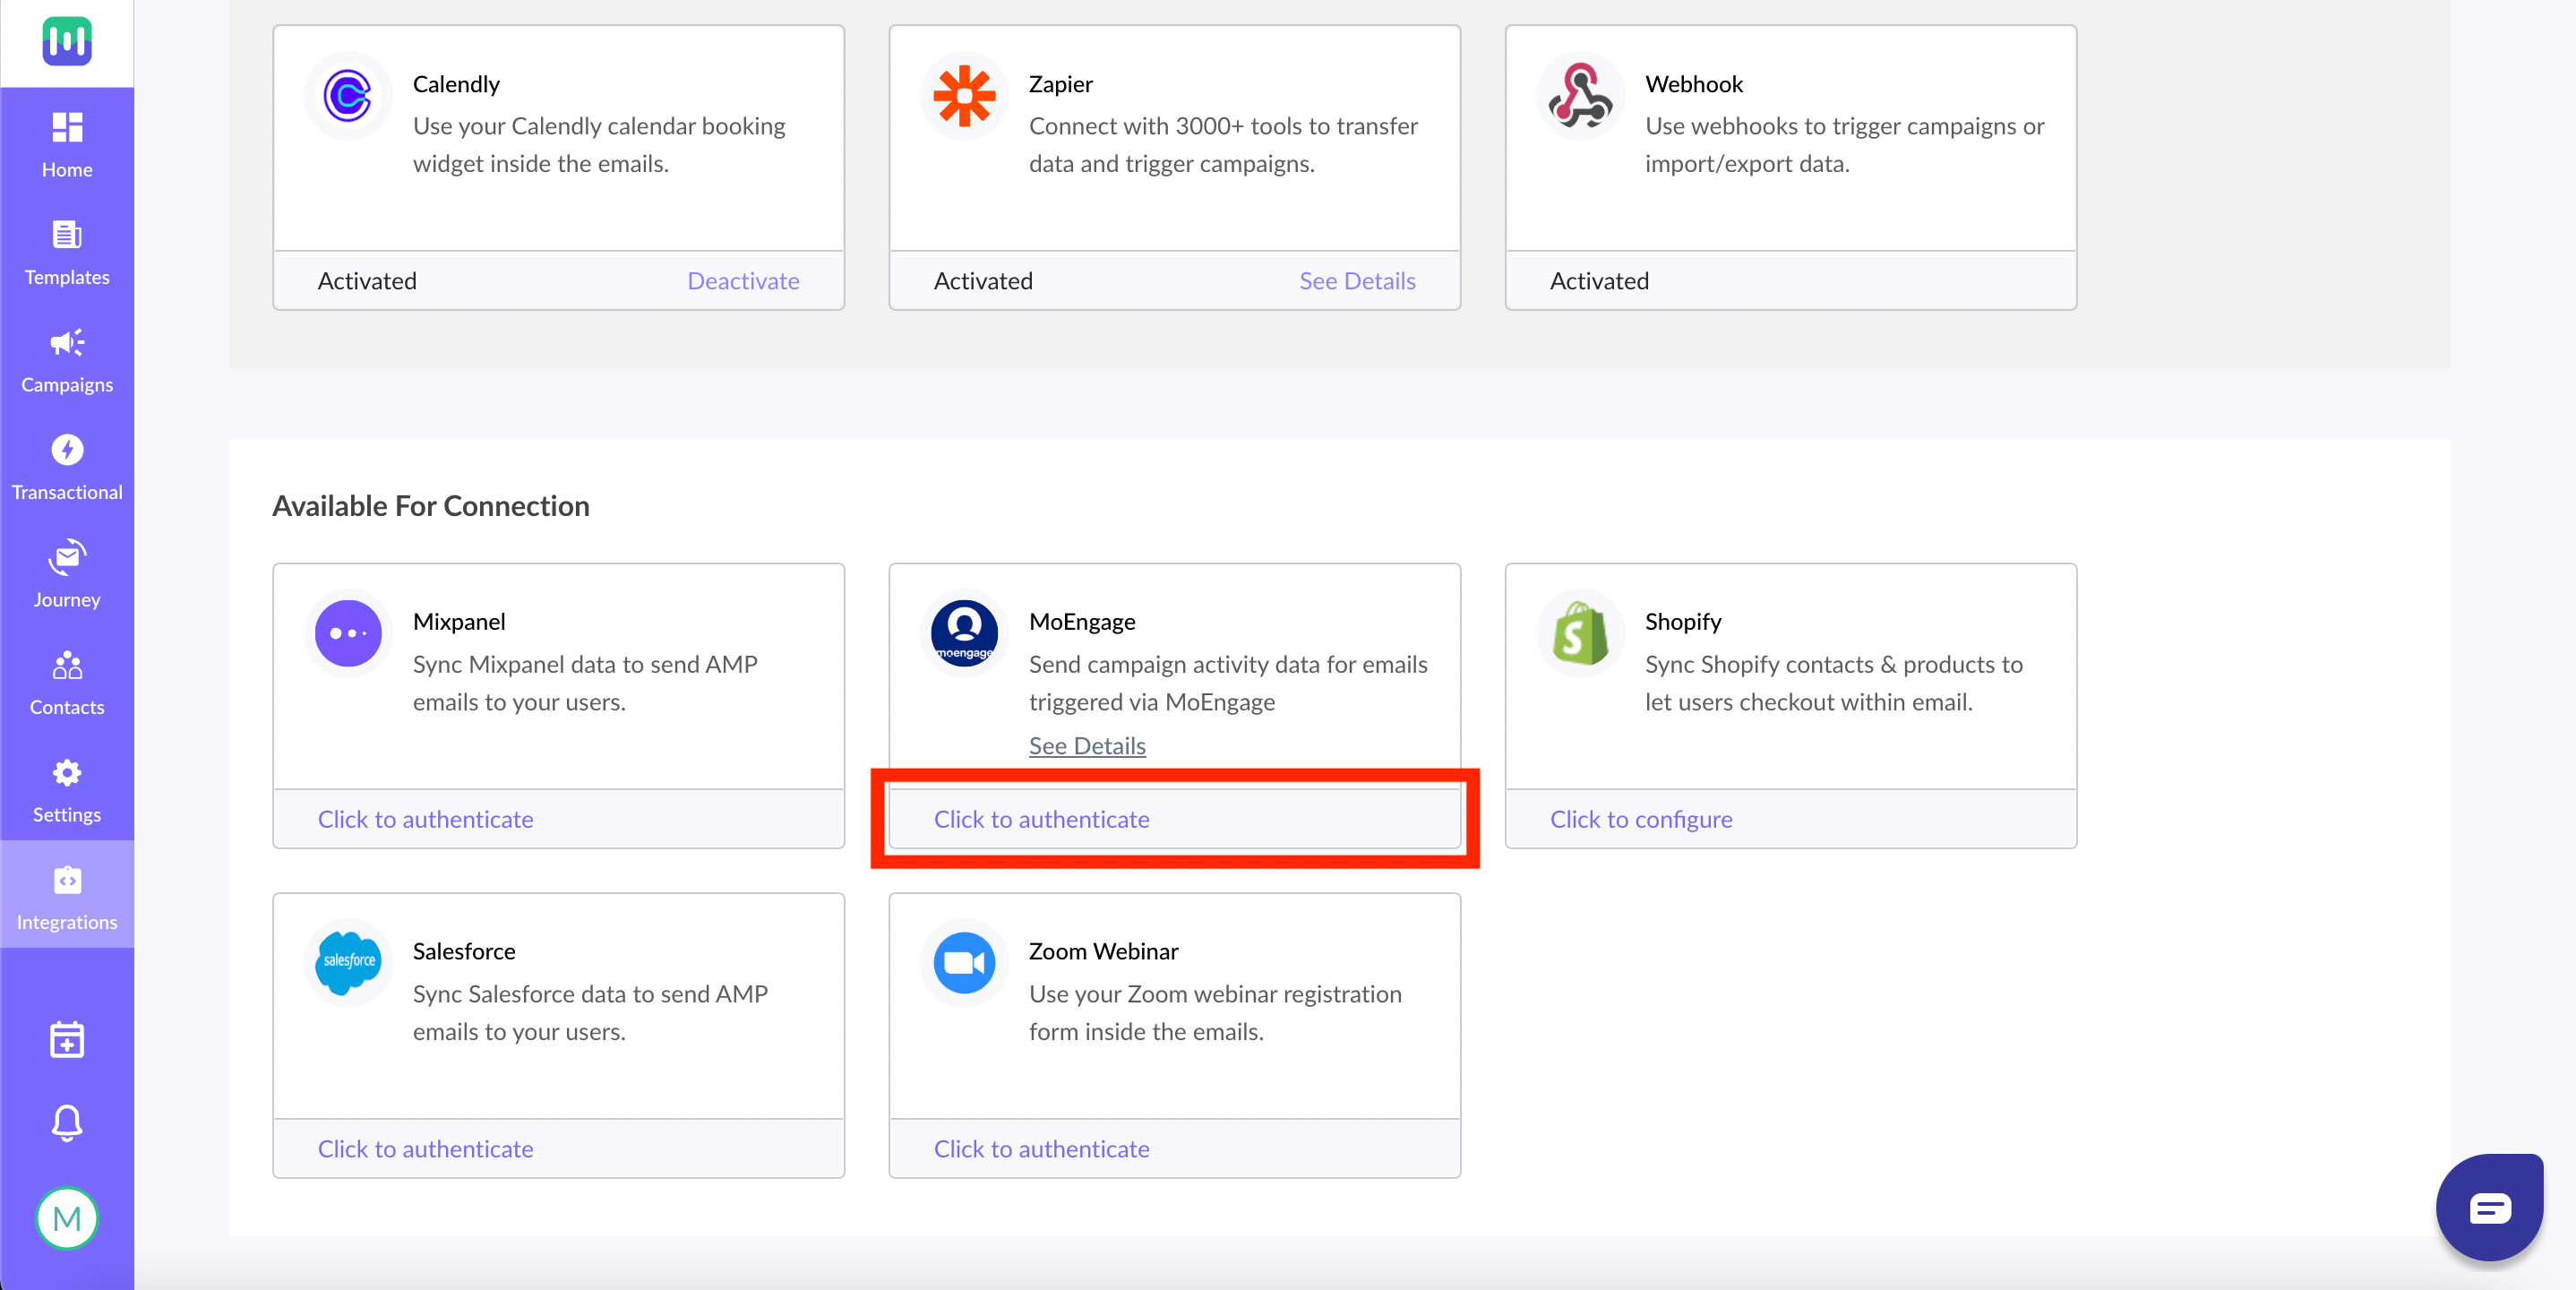
 **Step 2:** "Click to Authenticate" on the MoEngage card from the Available For Connection section
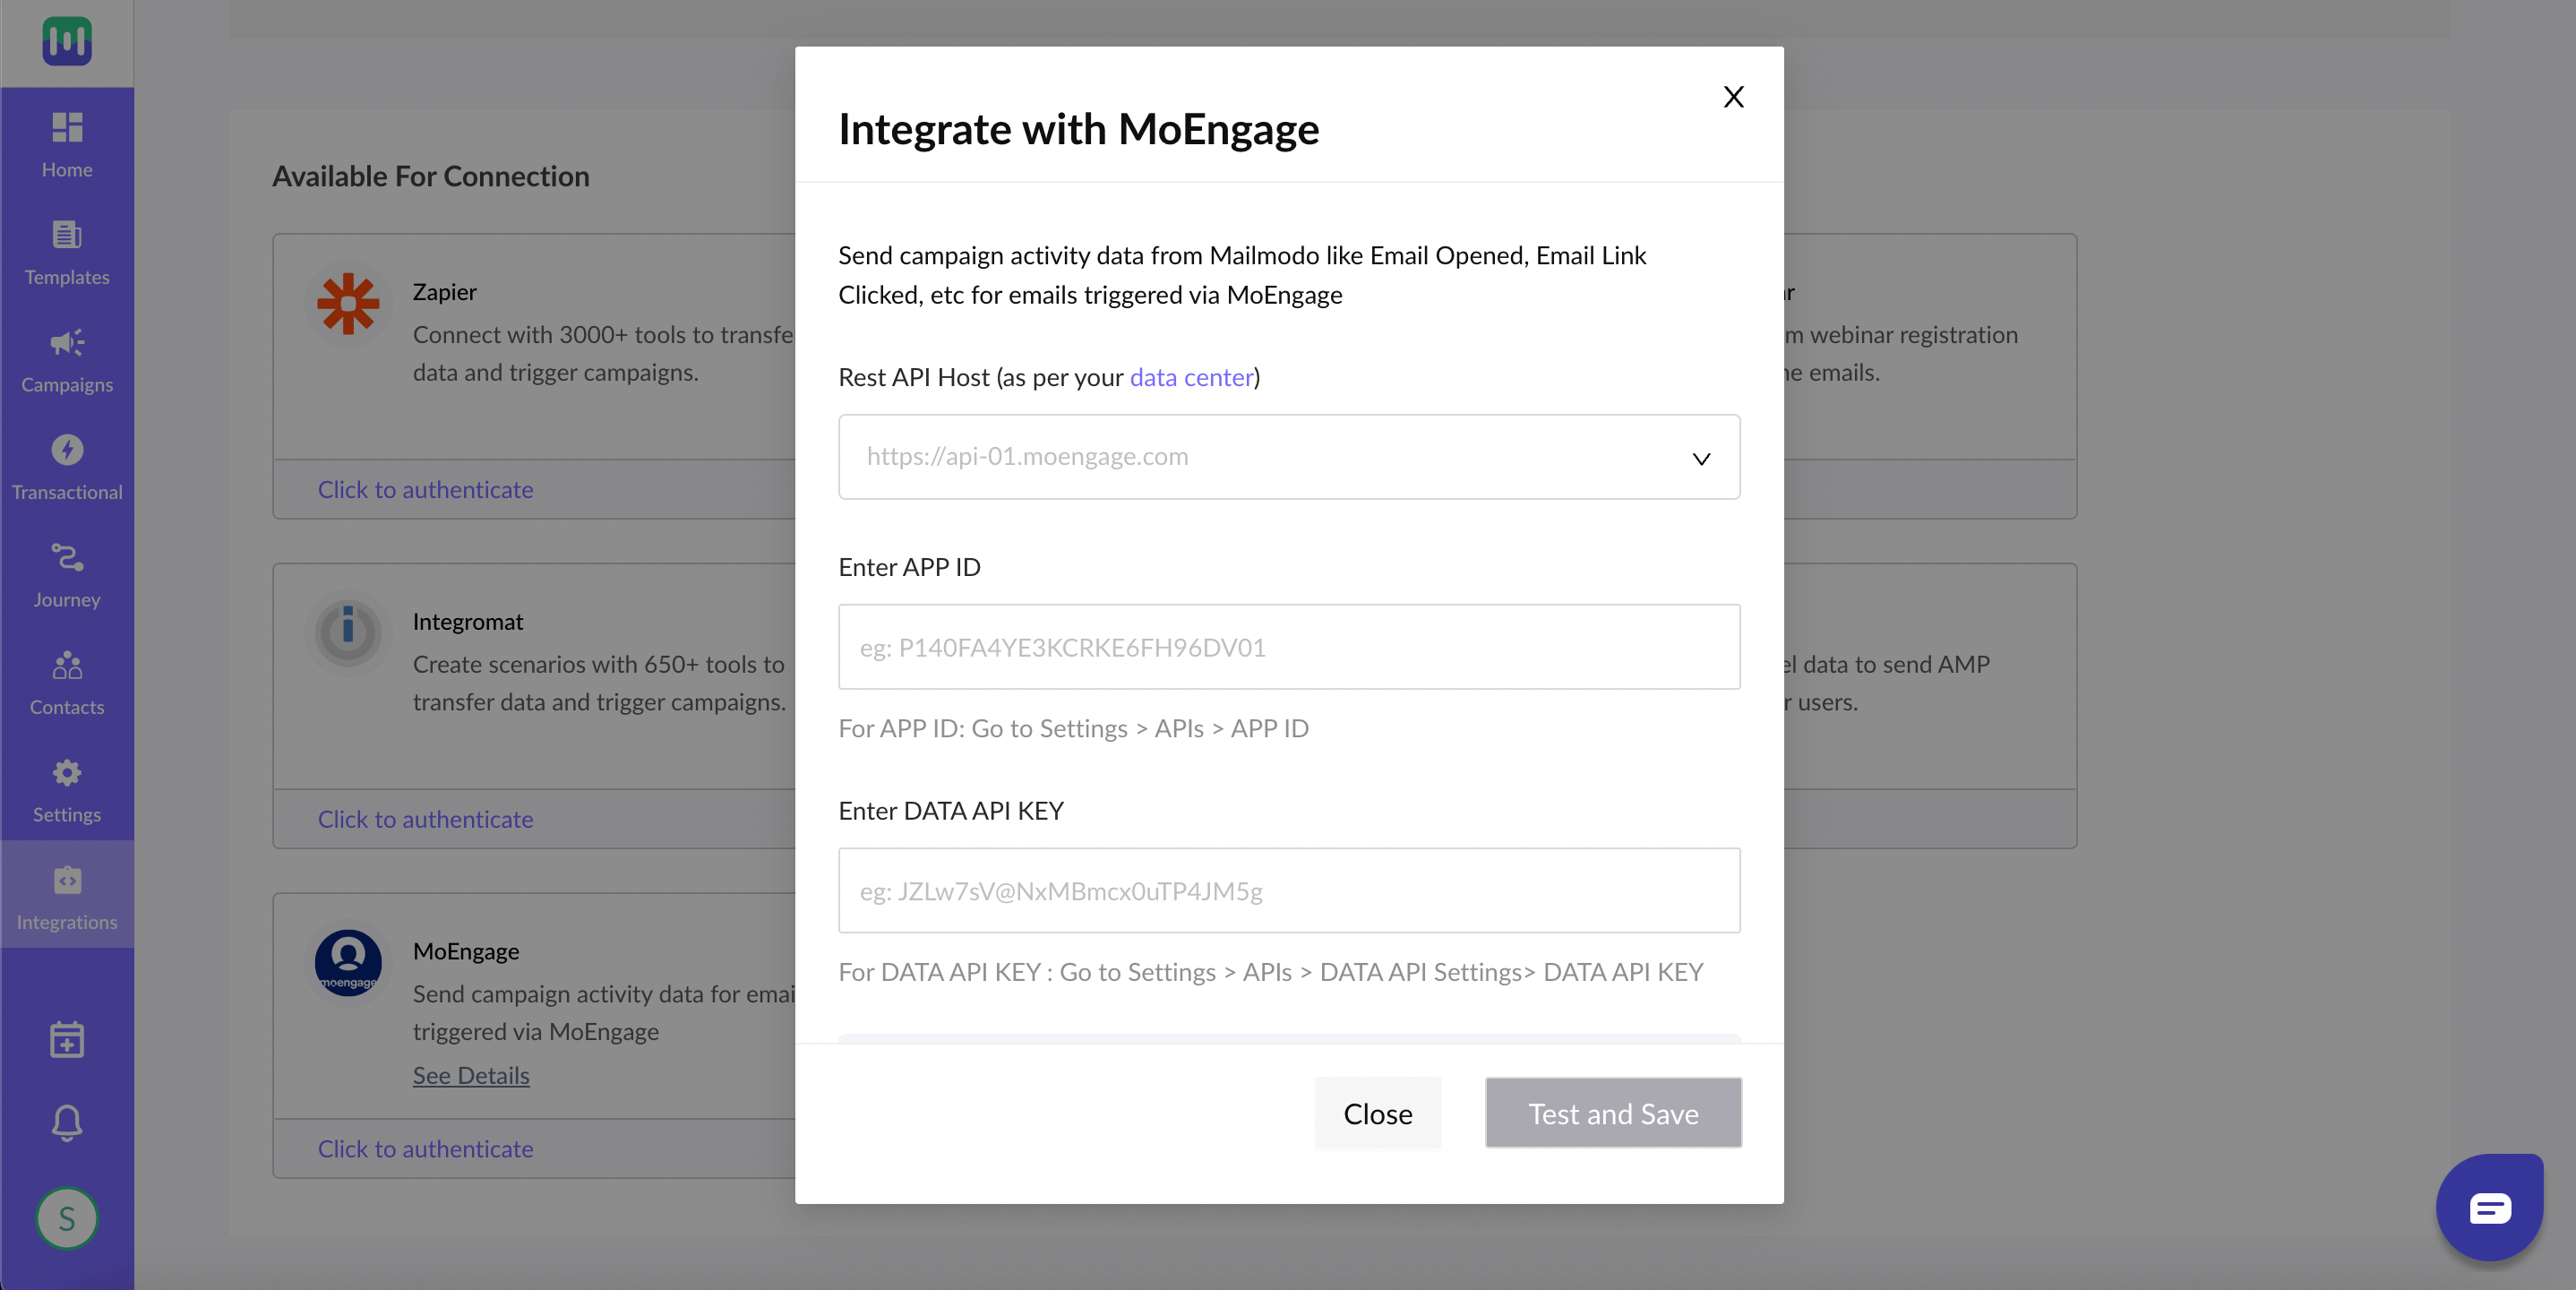 **Step 3:** Select your [Rest API Host](/user-guide/data/key-concepts/data-centers-in-moengage#list-of-data-centers) from the drop-down
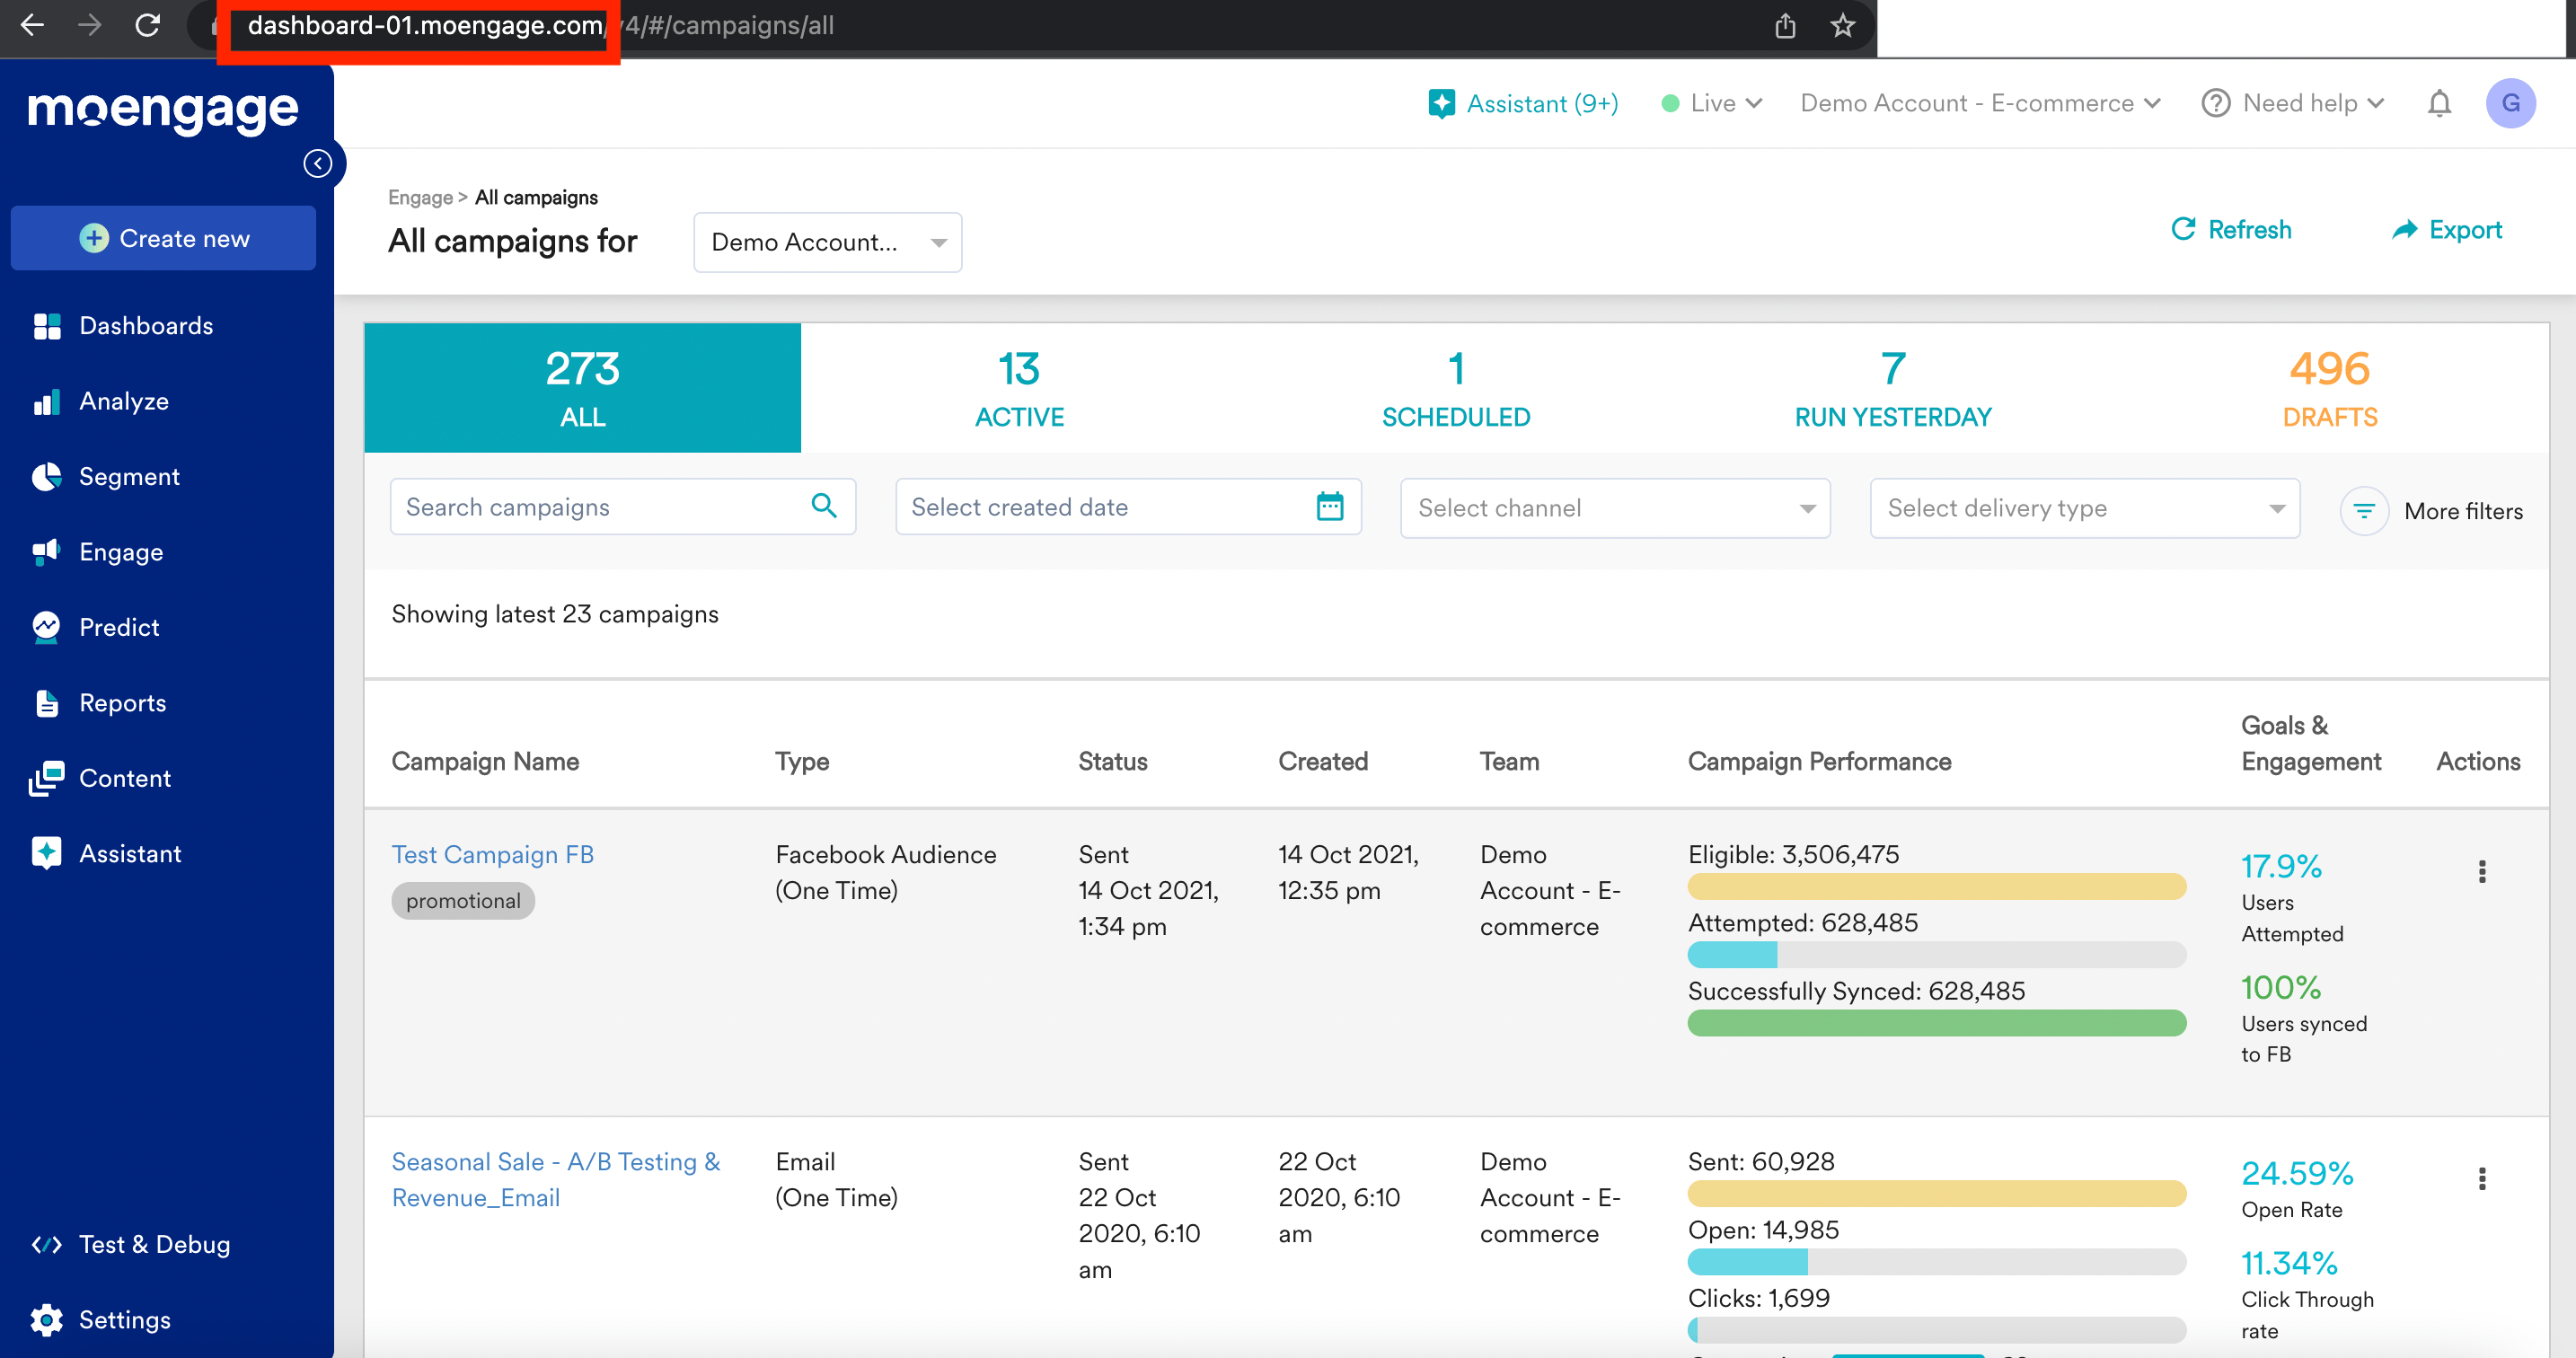
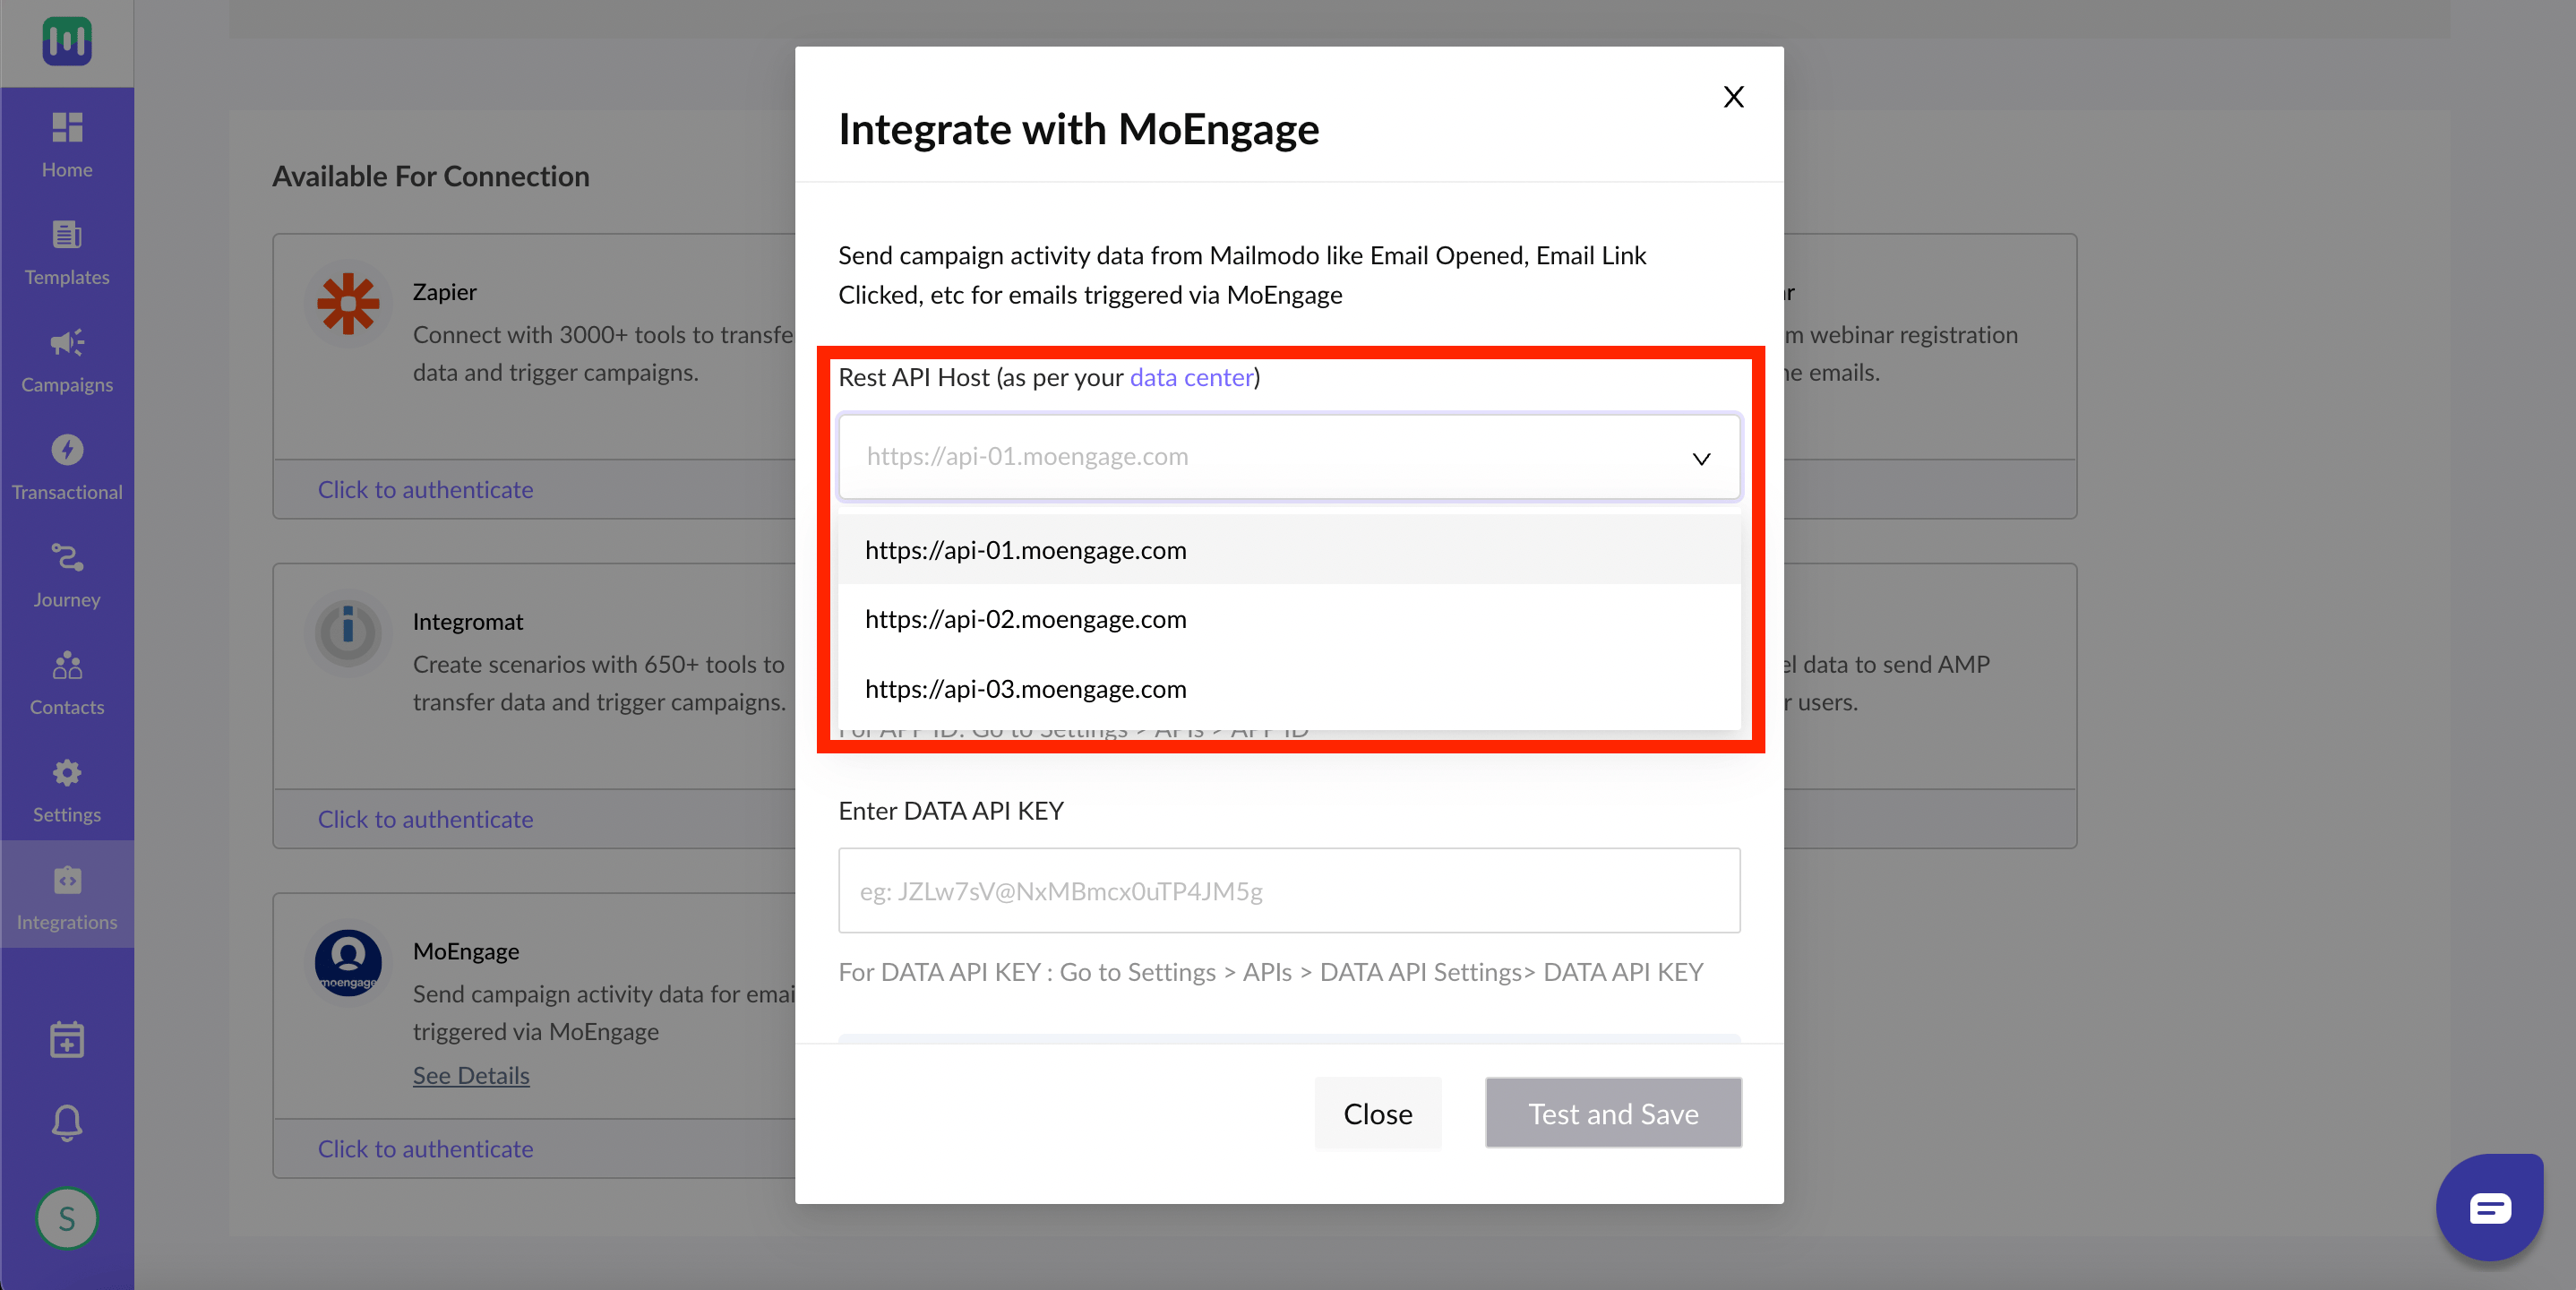 * Please select the Rest API Host as per your Dashboard URL. The following table describes the dashboard URL, and the REST API hostname associated with it.
| Dashboard URL | Rest API Host |
| ----------------------------------------------------------------------- | ----------------------------------------------------------- |
| [https://dashboard-01.moengage.com](https://dashboard-01.moengage.com/) | [https://api-01.moengage.com](https://api-01.moengage.com/) |
| [https://dashboard-02.moengage.com](https://dashboard-02.moengage.com/) | [https://api-02.moengage.com](https://api-02.moengage.com/) |
| [https://dashboard-03.moengage.com](https://dashboard-03.moengage.com/) | [https://api-03.moengage.com](https://api-03.moengage.com/) |
Please refer to the red highlighted box below for your Dashboard URL in MoEngage and select the associated Rest API Host from the above table
* Please select the Rest API Host as per your Dashboard URL. The following table describes the dashboard URL, and the REST API hostname associated with it.
| Dashboard URL | Rest API Host |
| ----------------------------------------------------------------------- | ----------------------------------------------------------- |
| [https://dashboard-01.moengage.com](https://dashboard-01.moengage.com/) | [https://api-01.moengage.com](https://api-01.moengage.com/) |
| [https://dashboard-02.moengage.com](https://dashboard-02.moengage.com/) | [https://api-02.moengage.com](https://api-02.moengage.com/) |
| [https://dashboard-03.moengage.com](https://dashboard-03.moengage.com/) | [https://api-03.moengage.com](https://api-03.moengage.com/) |
Please refer to the red highlighted box below for your Dashboard URL in MoEngage and select the associated Rest API Host from the above table
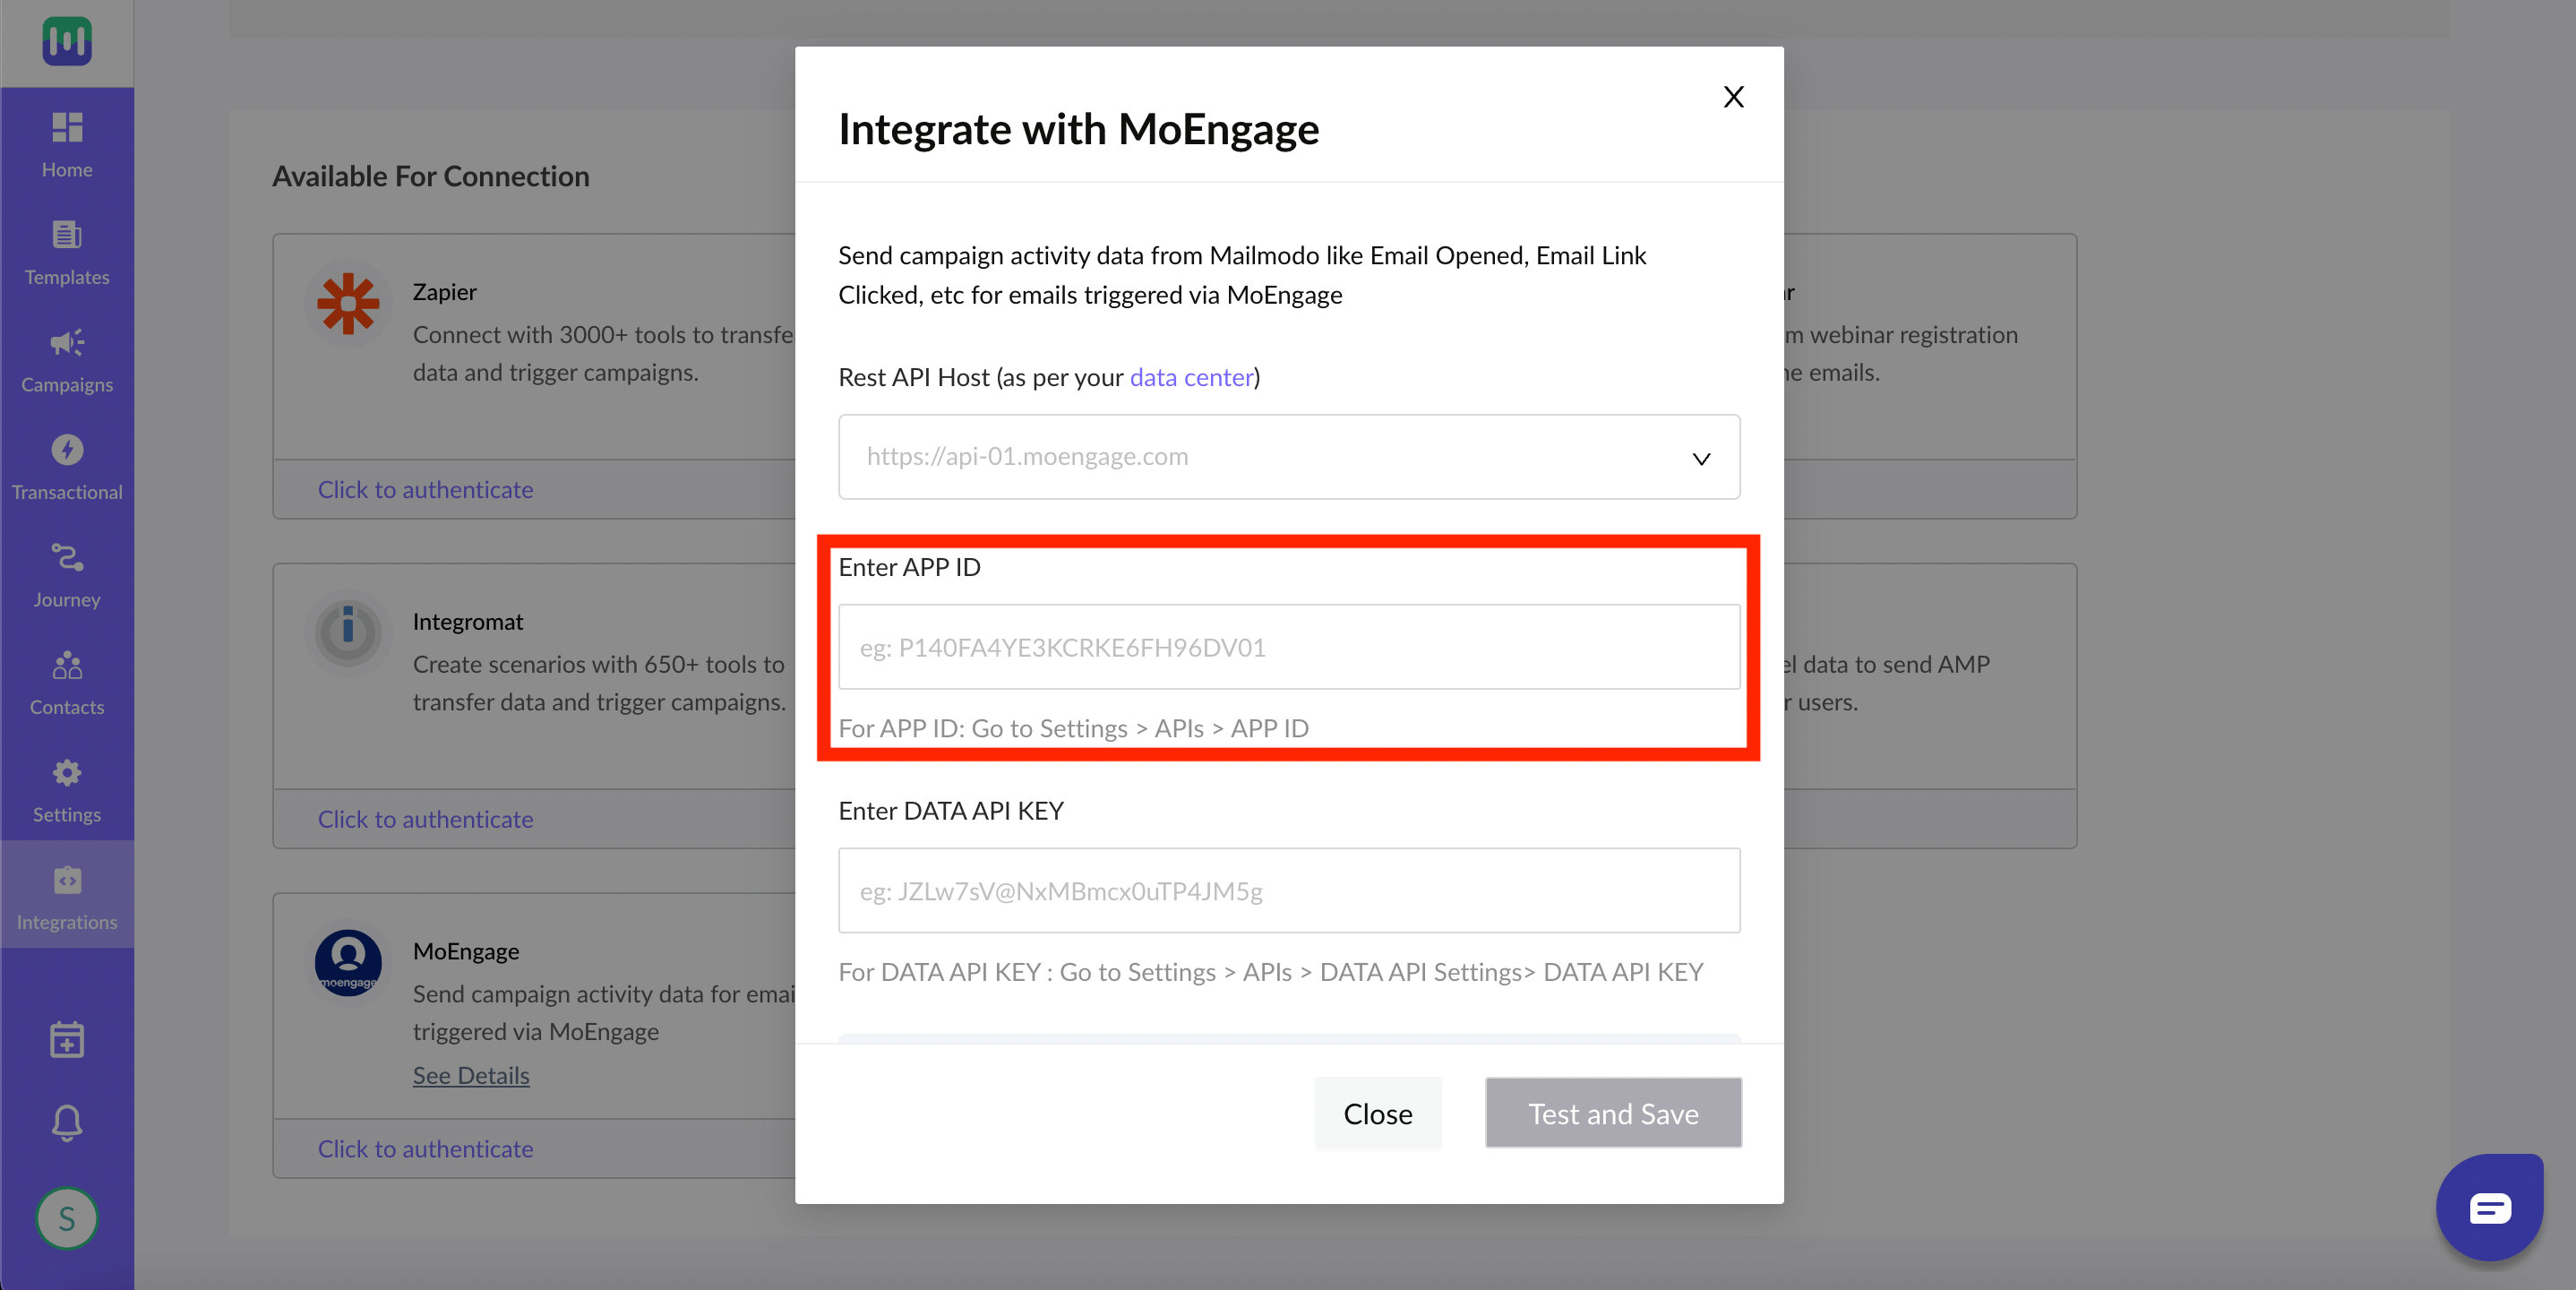
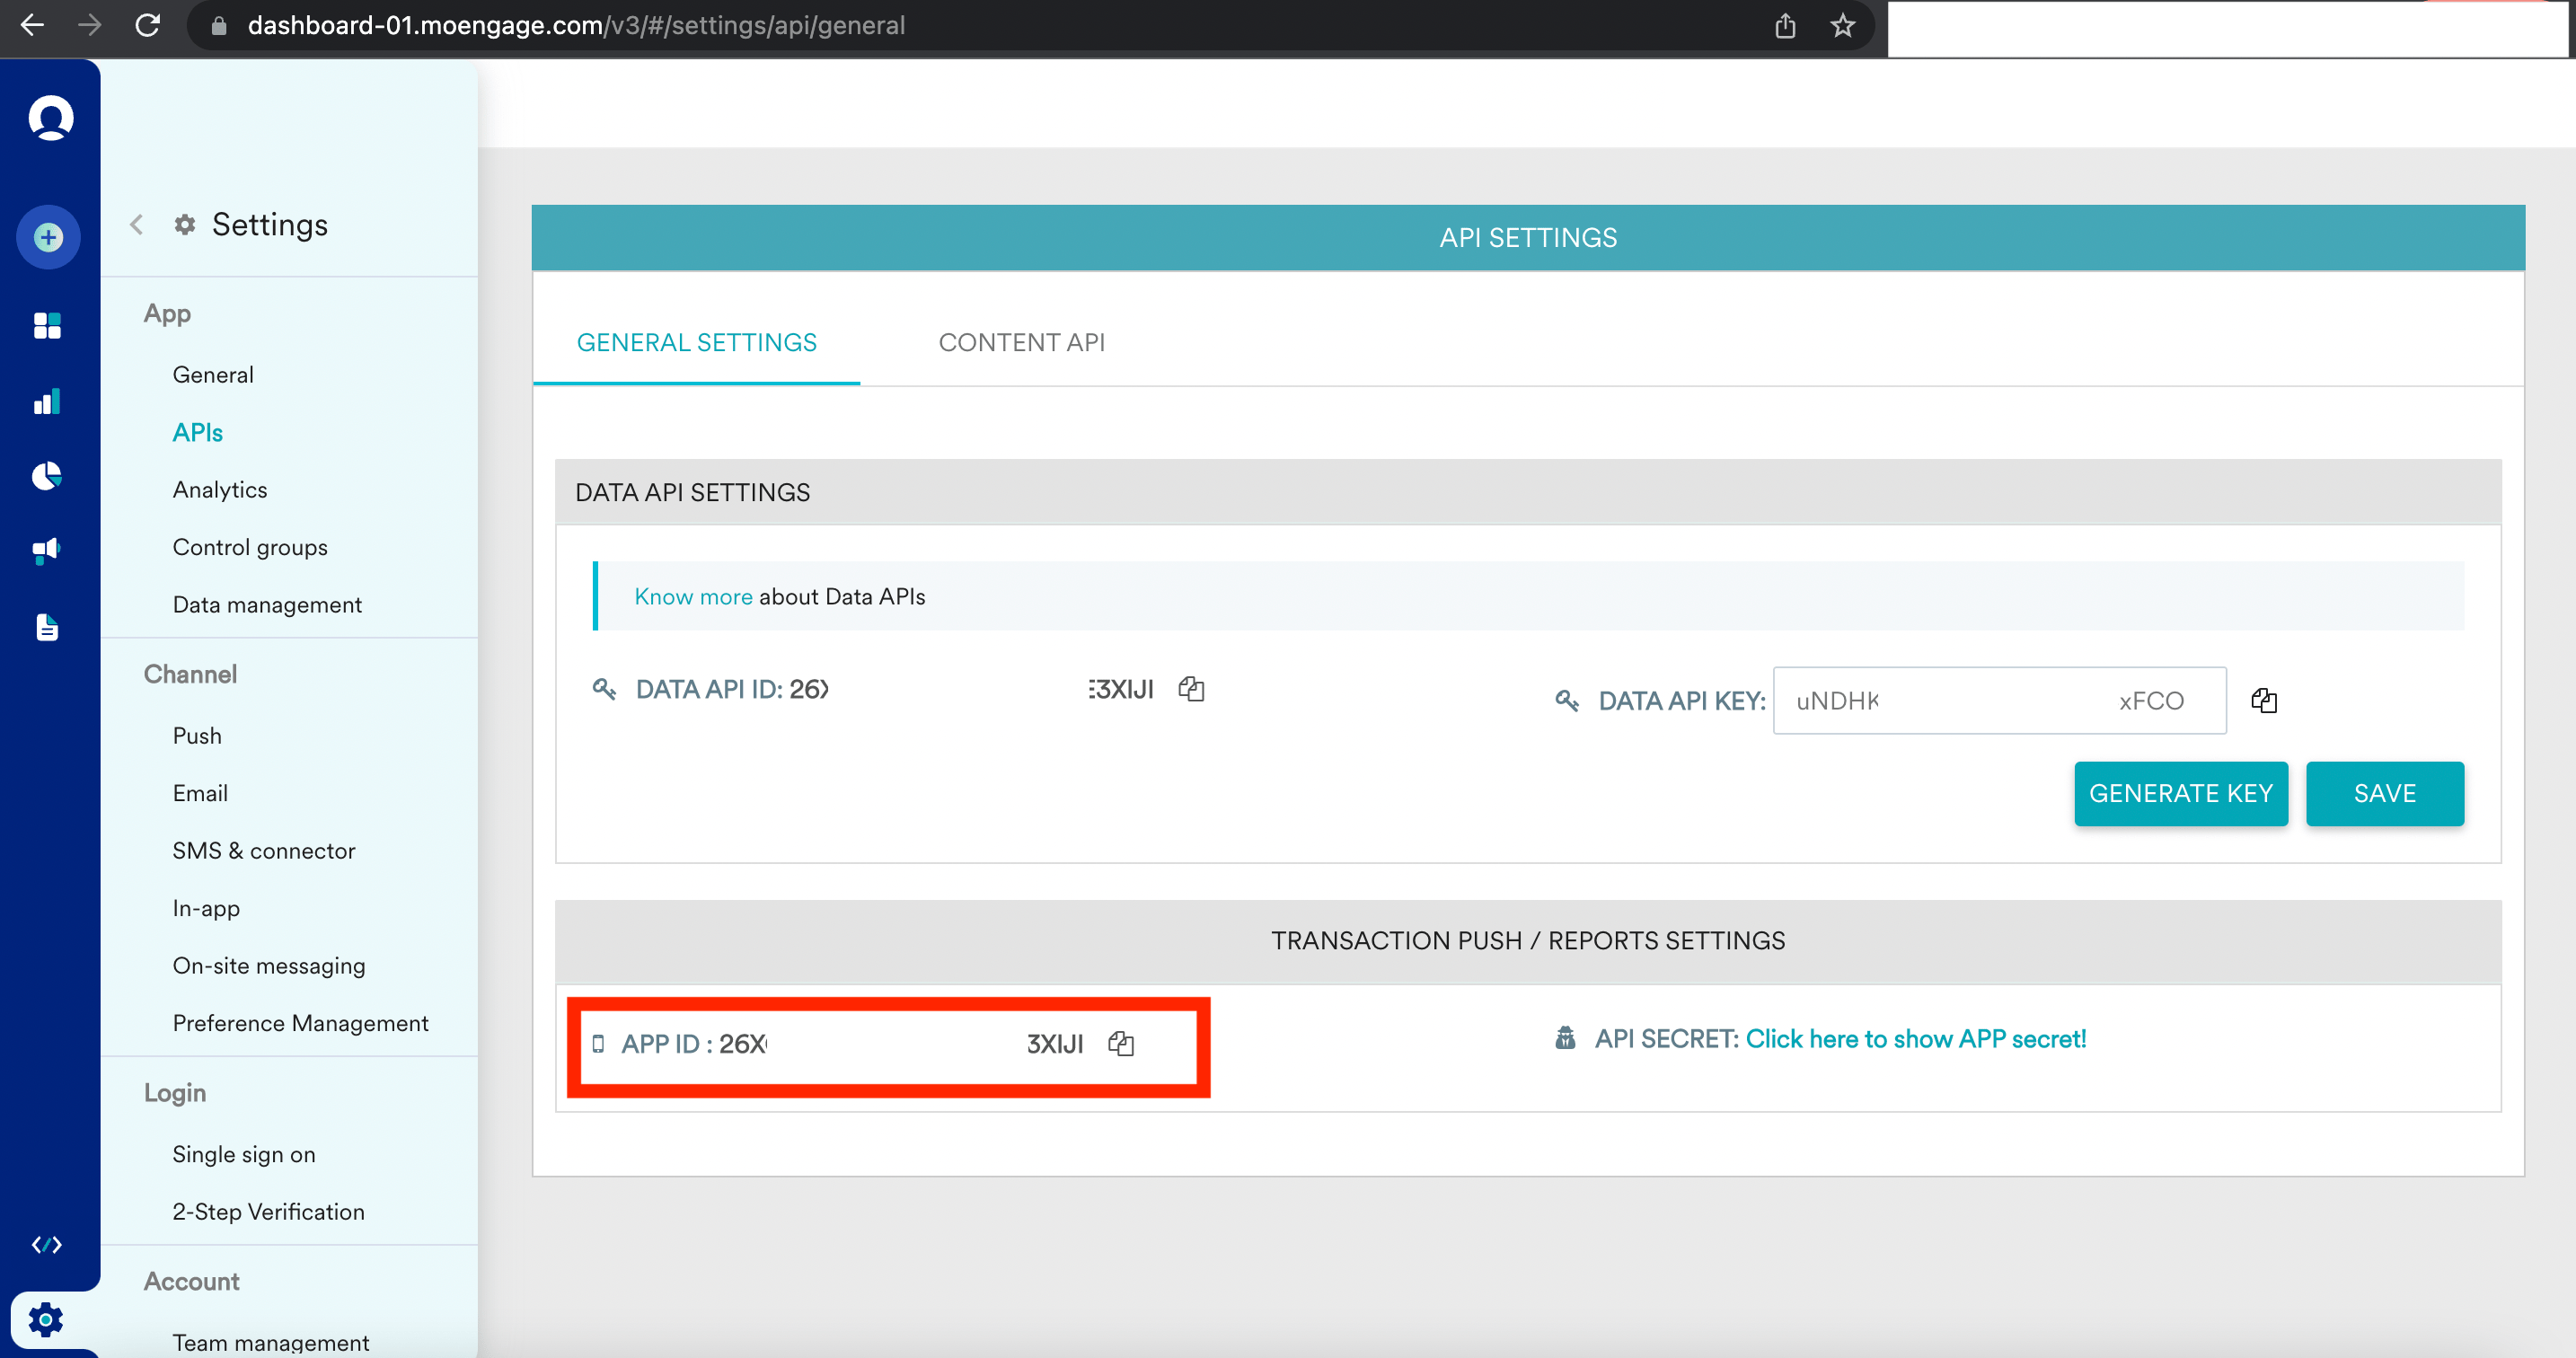
 **Step 4:** For the APP ID in Mailmodo:
The App ID of your MoEngage account is available at **Settings -> Account -> APIs -> Workspace ID (earlier App ID)**.
The Data API ID and the Workspace ID of your MoEngage account are the same.
**Step 4:** For the APP ID in Mailmodo:
The App ID of your MoEngage account is available at **Settings -> Account -> APIs -> Workspace ID (earlier App ID)**.
The Data API ID and the Workspace ID of your MoEngage account are the same.
 **Step 5:** For the Data API Key in Mailmodo:
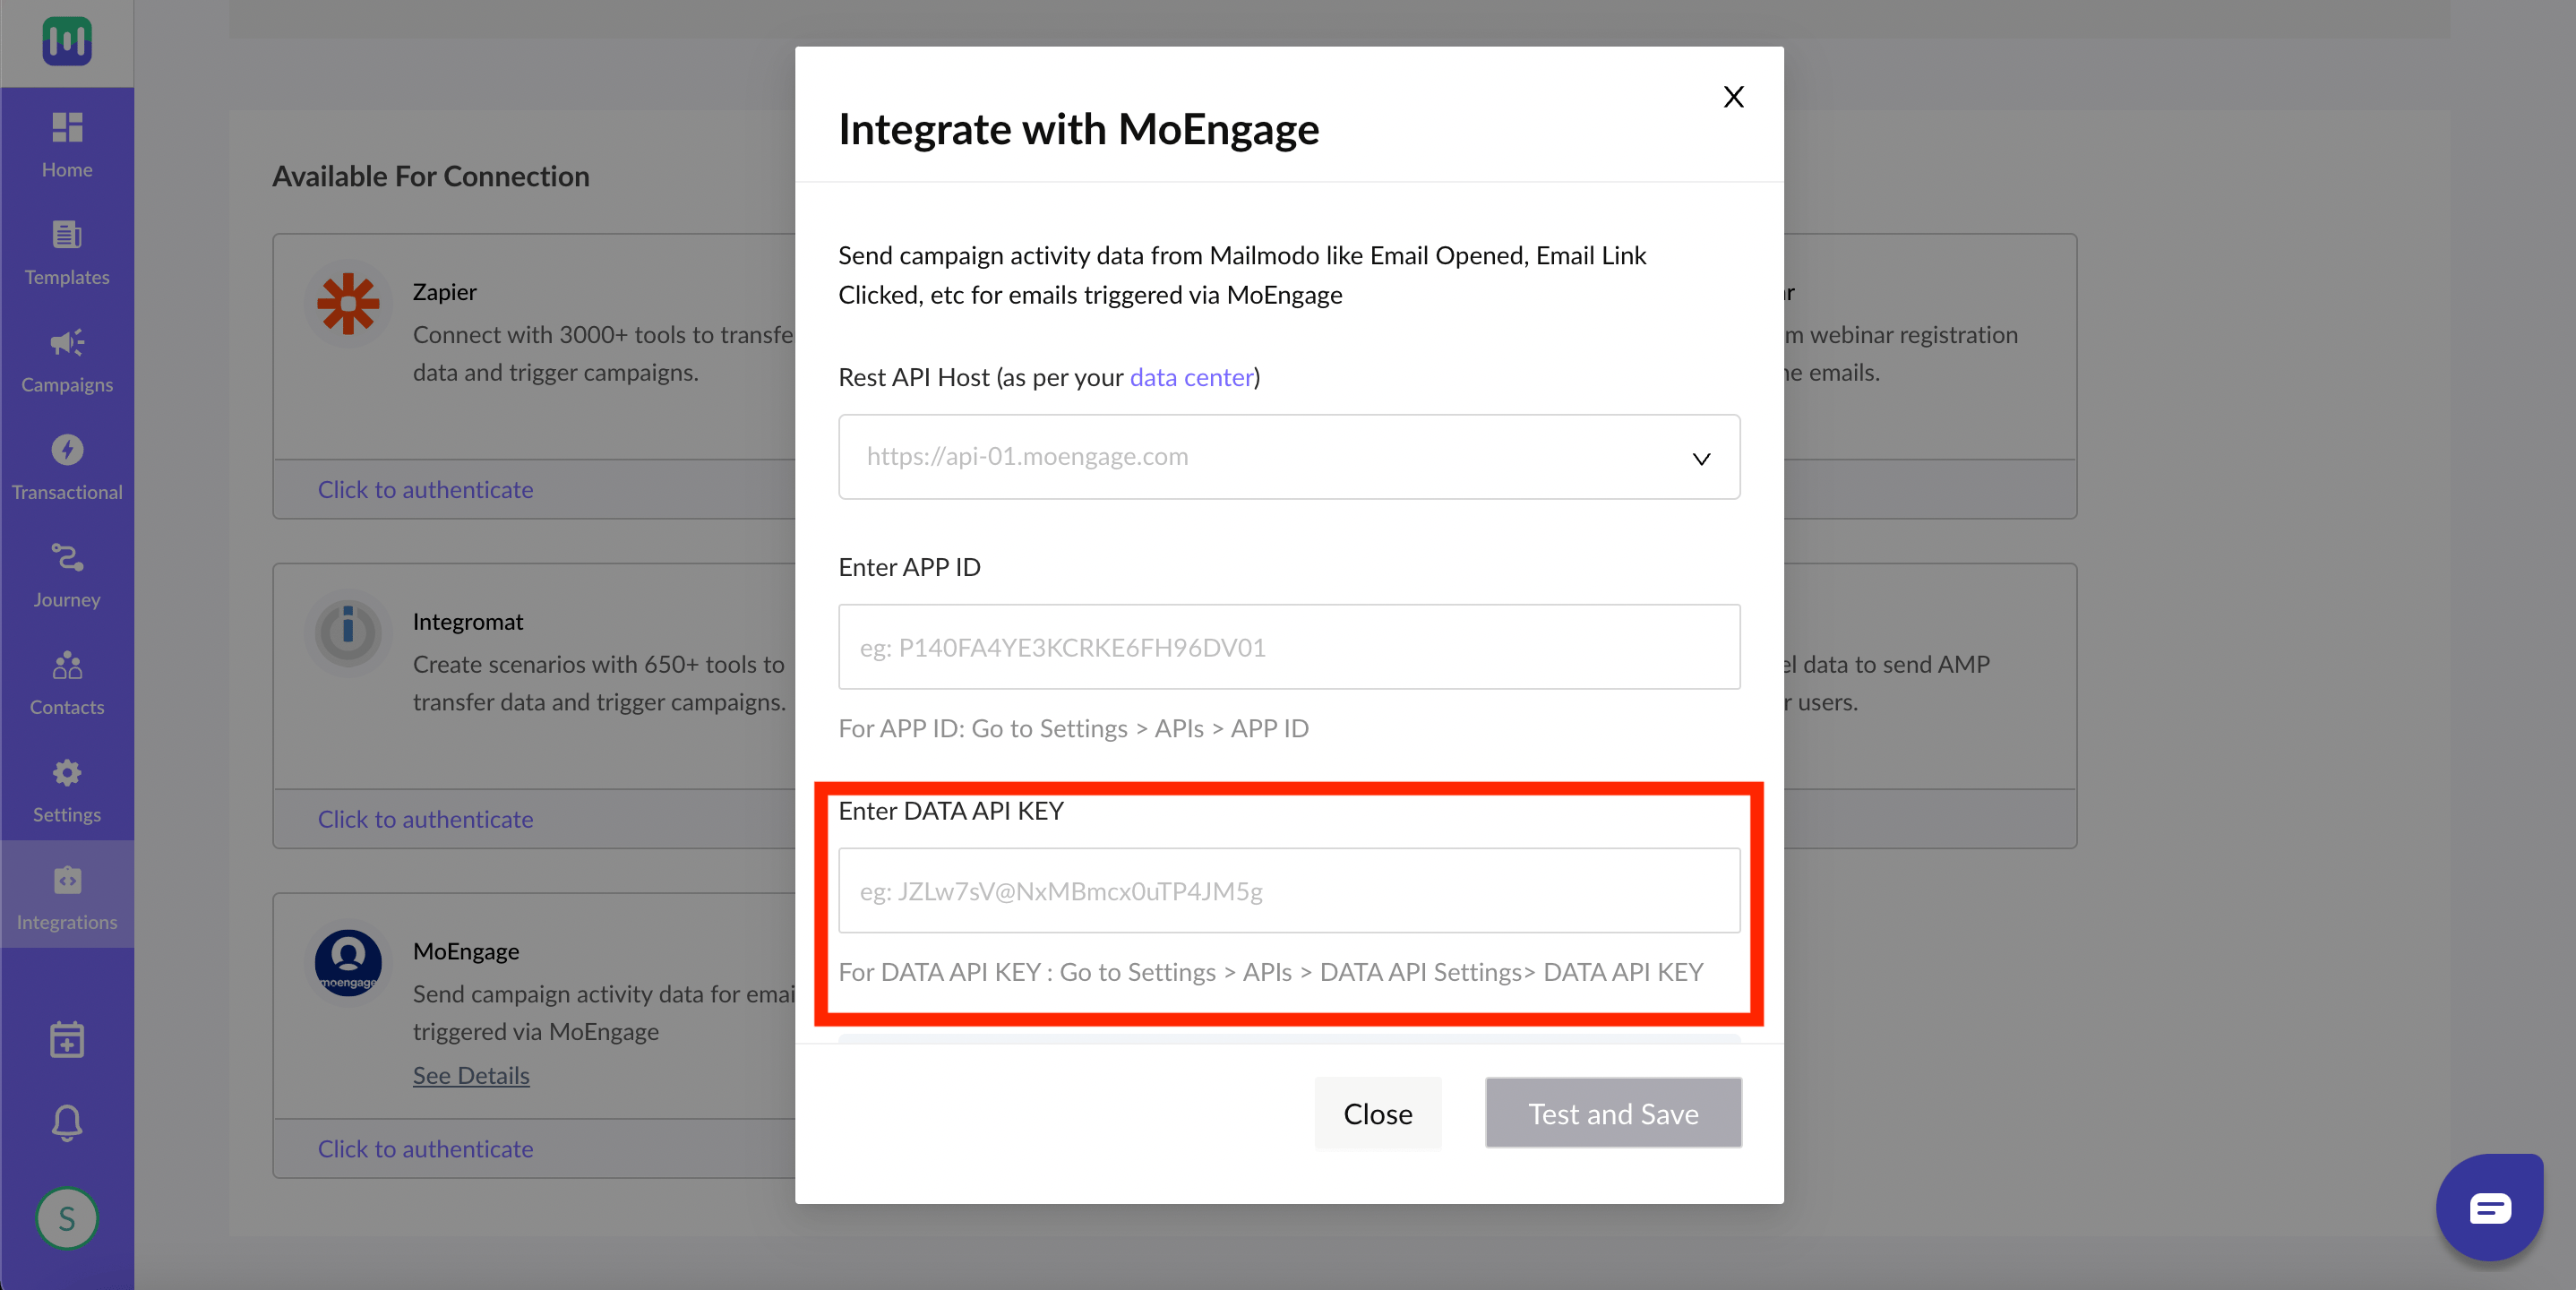
The Data API key of your MoEngage account is available at **Settings -> Account -> APIs -> API keys -> Data API settings**.
**Step 5:** For the Data API Key in Mailmodo:
The Data API key of your MoEngage account is available at **Settings -> Account -> APIs -> API keys -> Data API settings**.
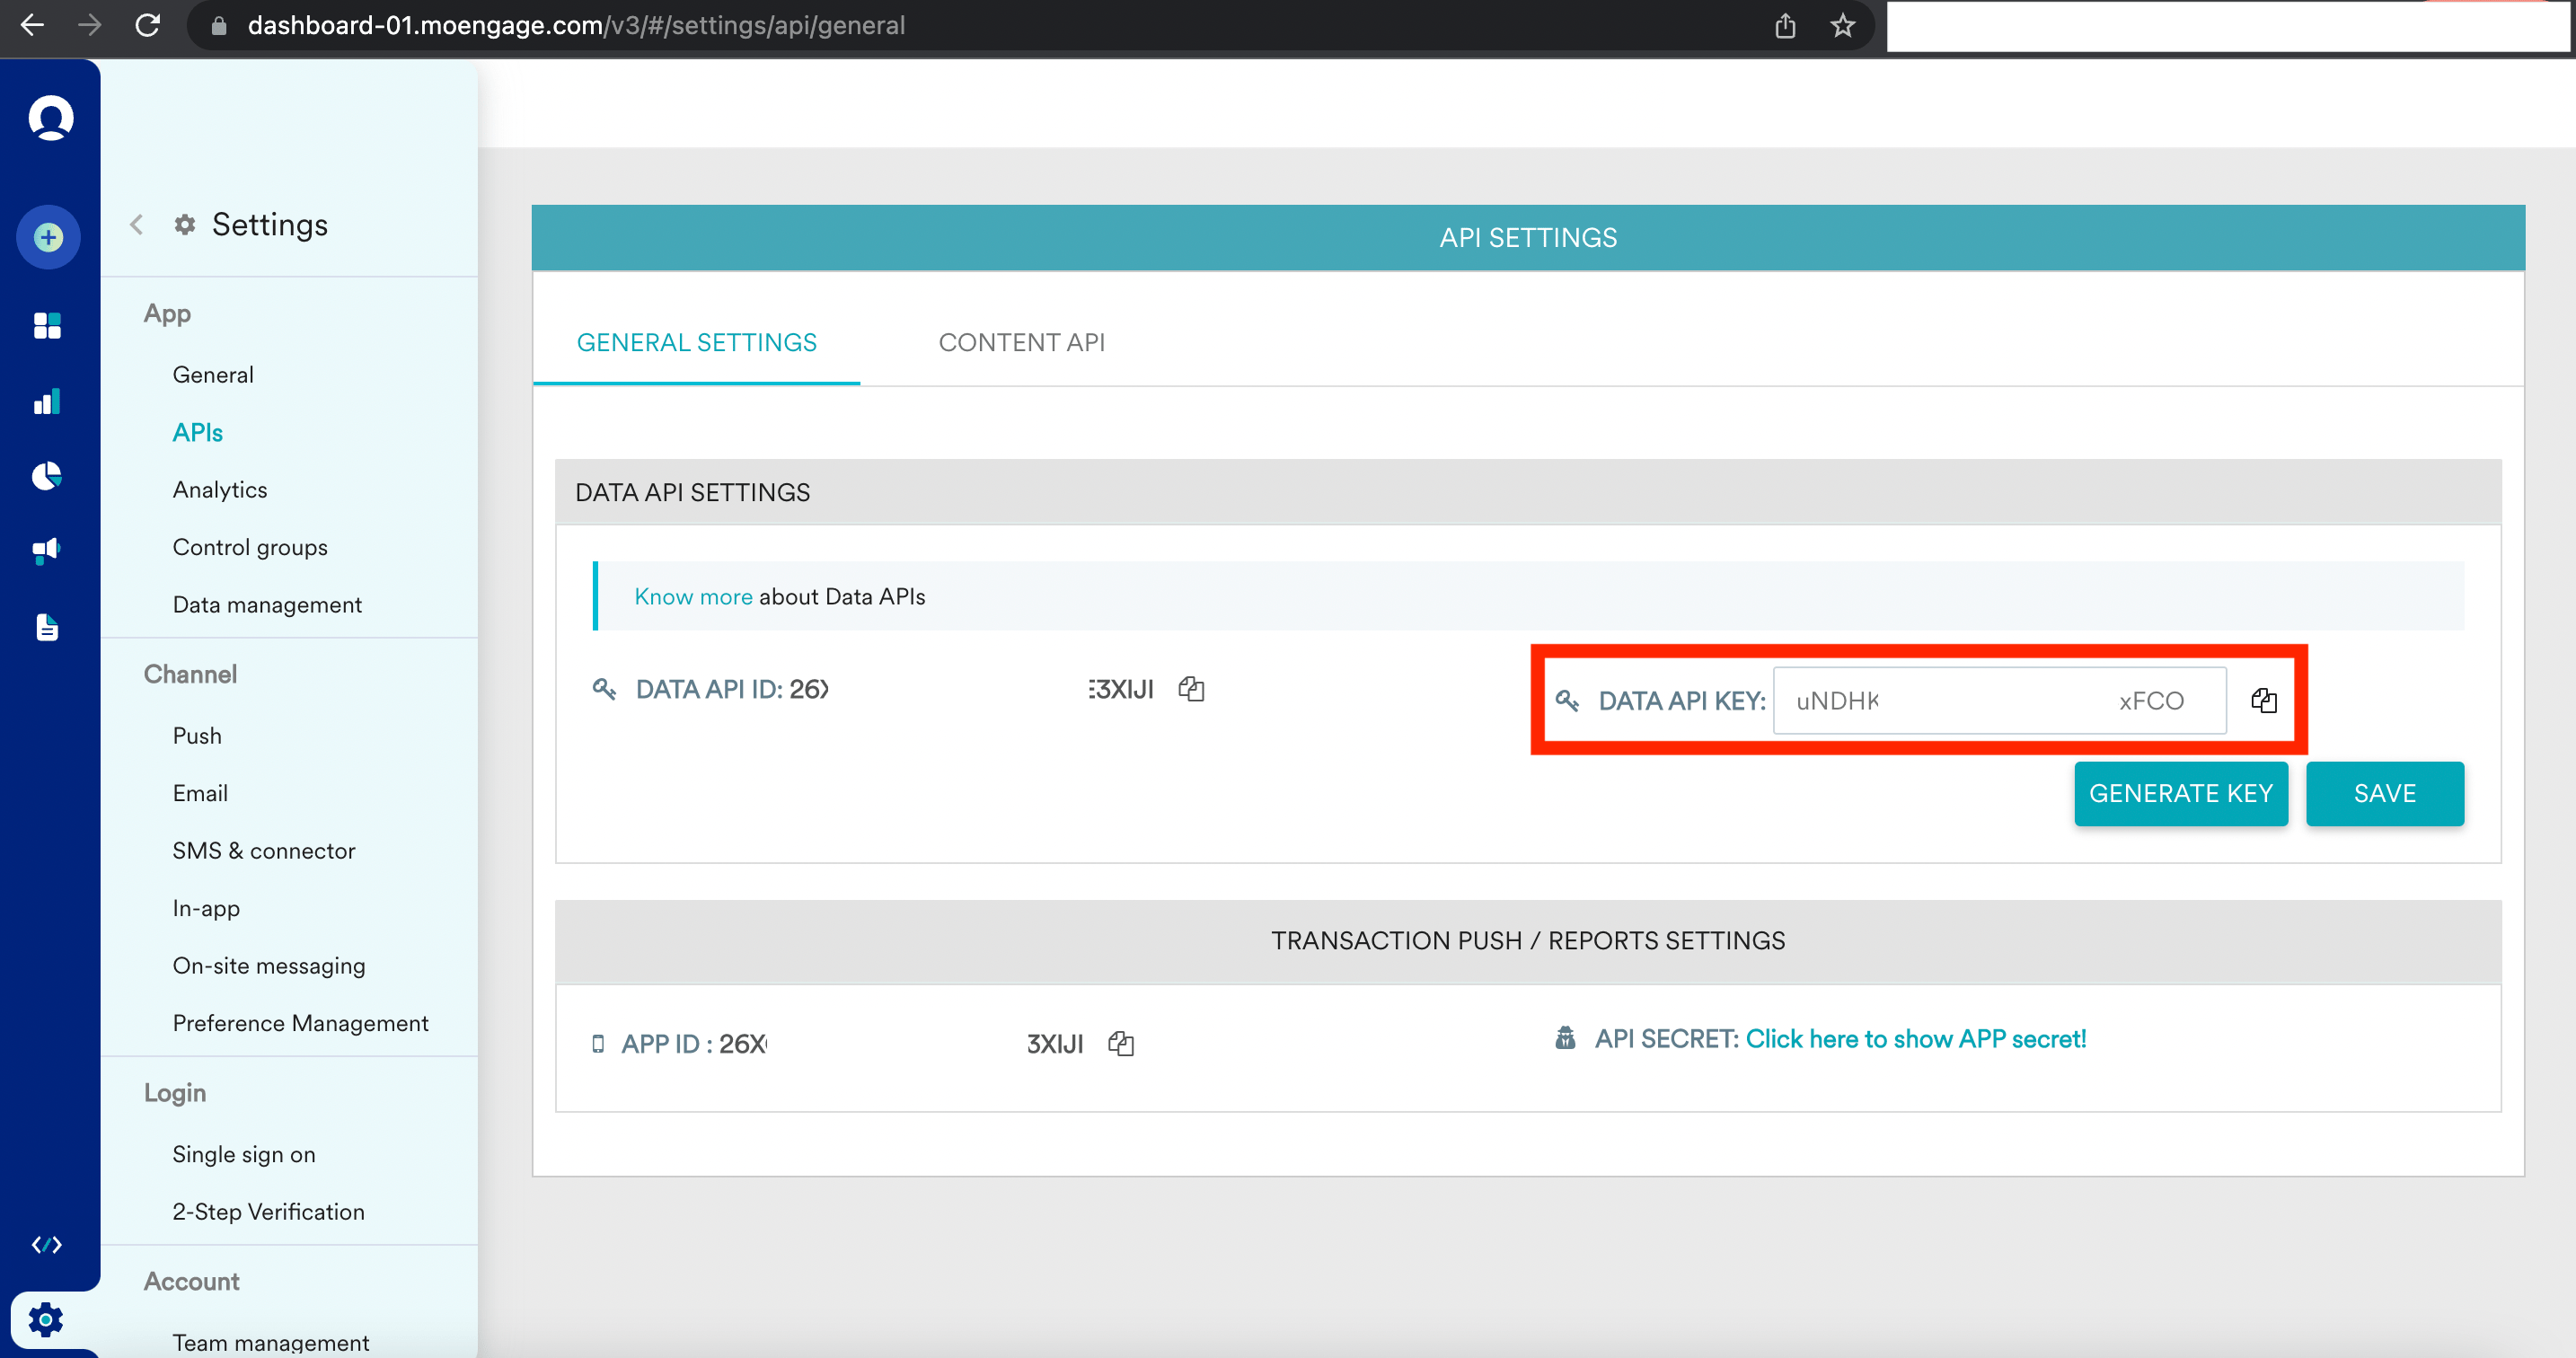 If you've not generated a key, you need to click on **GENERATE KEY** and **SAVE** before using the key.
**Step 6:** Click on Test and Save.
If you've not generated a key, you need to click on **GENERATE KEY** and **SAVE** before using the key.
**Step 6:** Click on Test and Save.
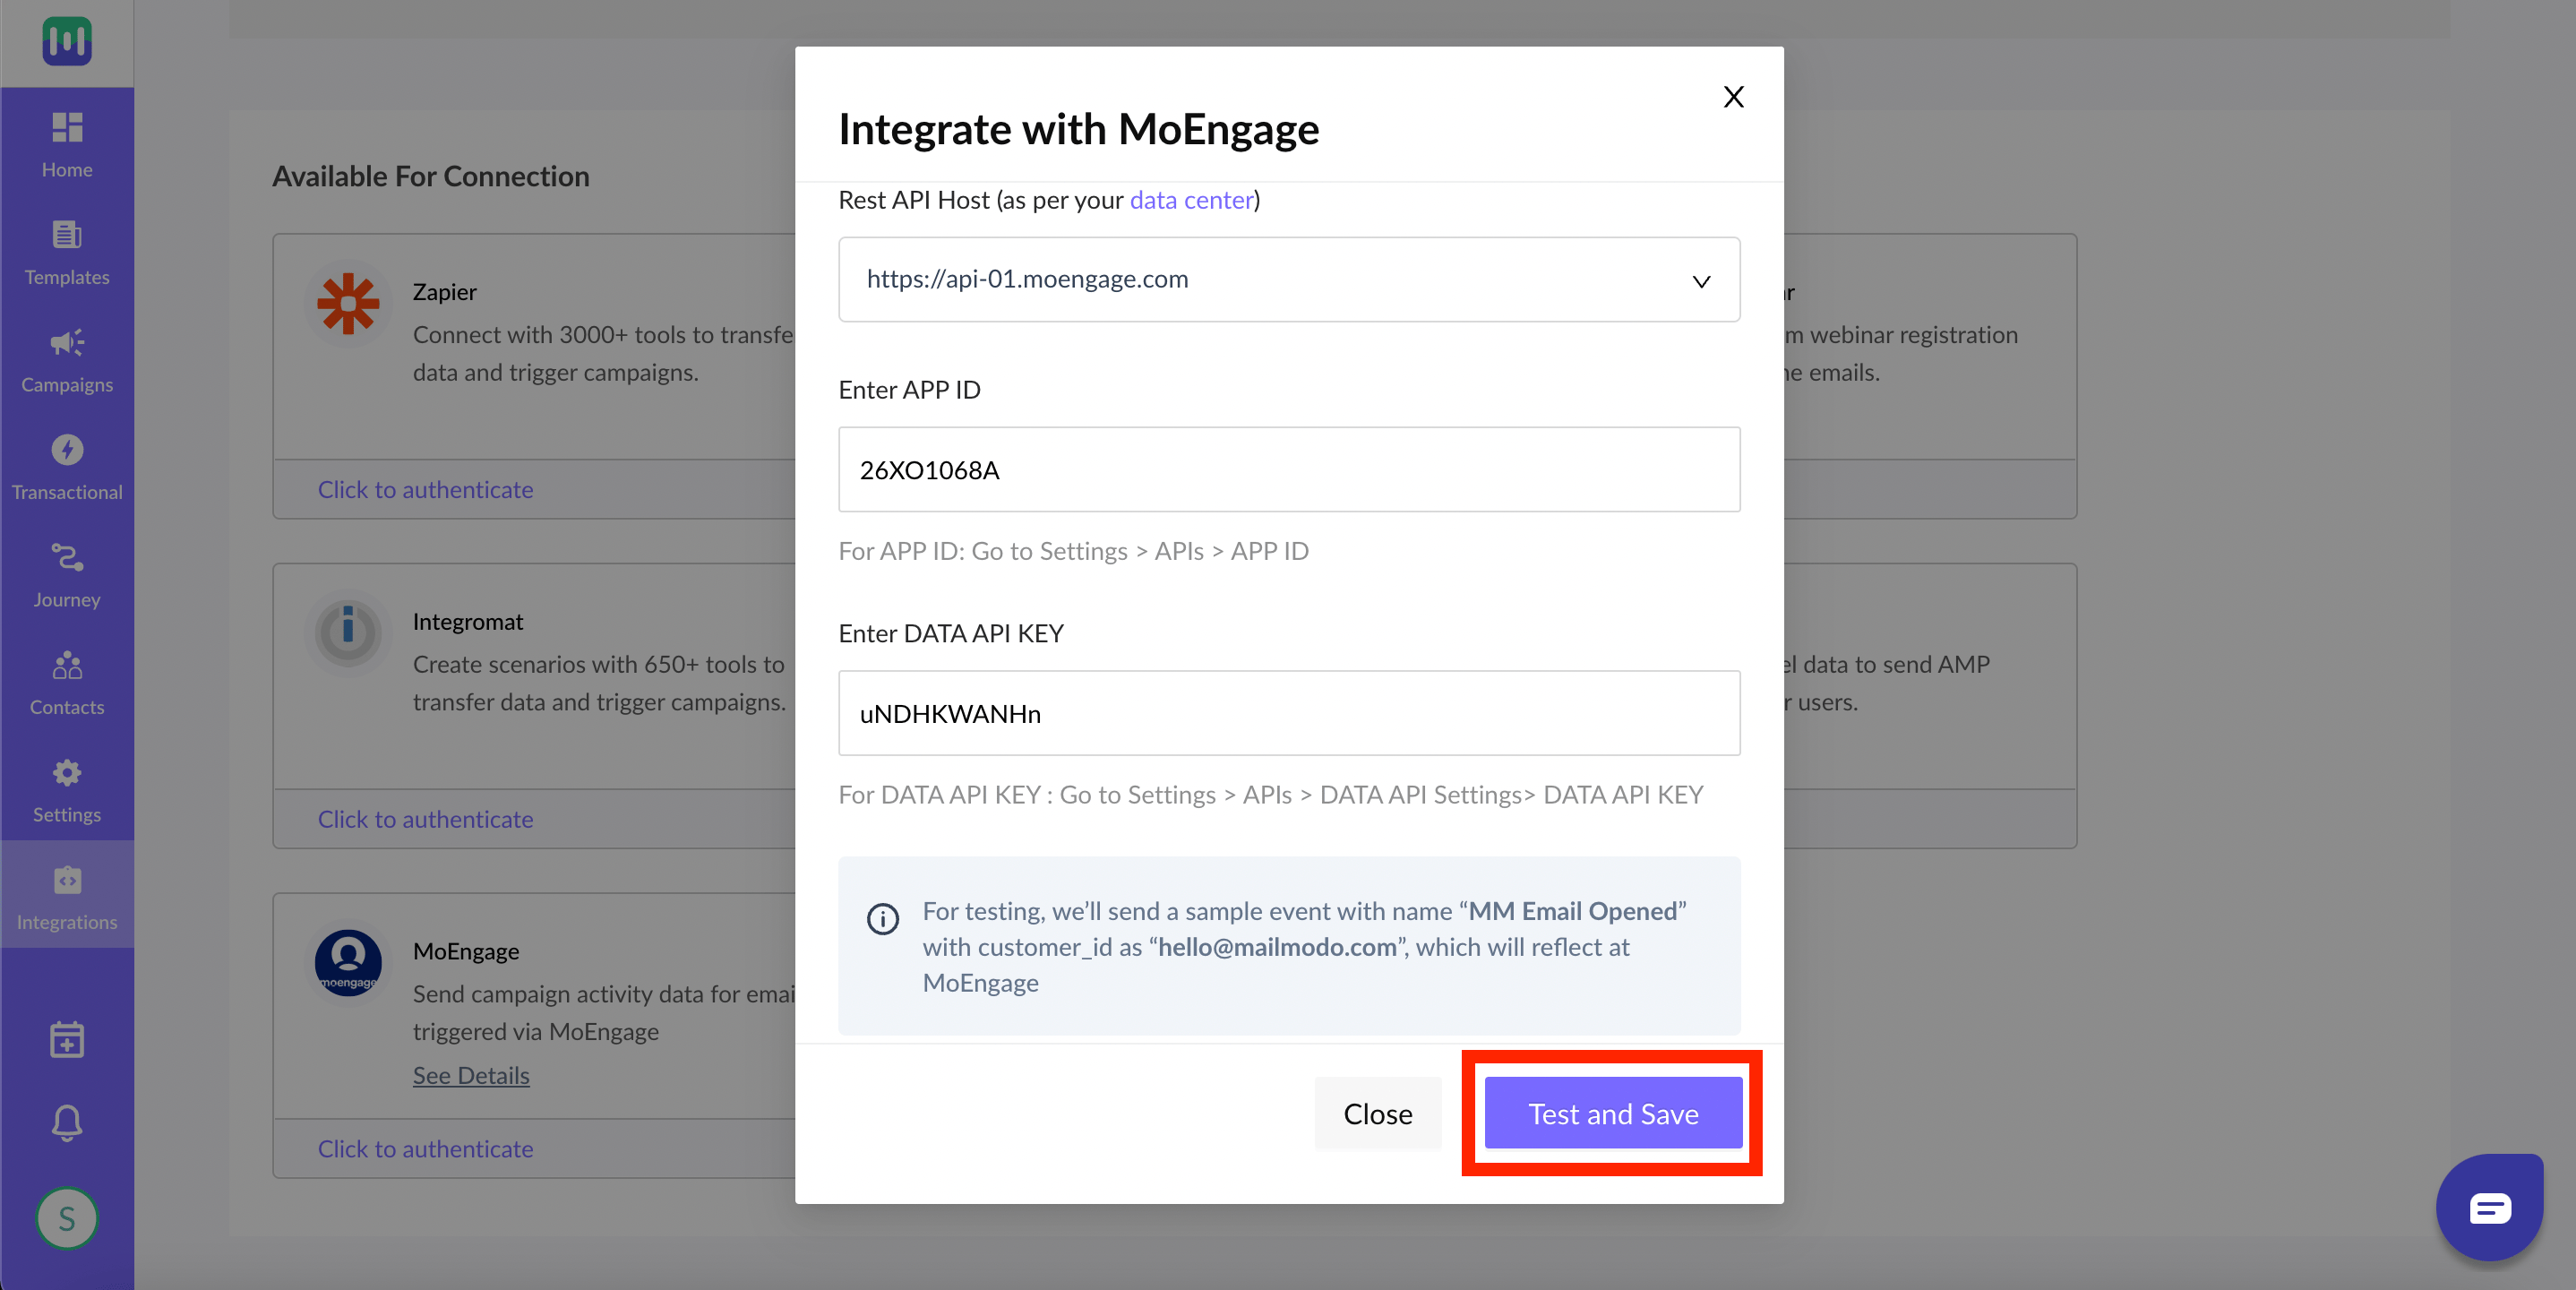 For testing, we'll send a sample event with the name "MM Email Opened" with customer\_id as "[hello@mailmodo.com](mailto:hello@mailmodo.com)", which will reflect at MoEngage.
* You're all set! If MoEngage sends a successful response, you'll see a "**Setup successful** " message, and the MoEngage card will move to the **Connected Platforms** section.
Please visit this [article](https://support.mailmodo.com/support/solutions/articles/84000364851-moengage-integration-overview) for more information MoEngage integration with Mailmodo.
# **Create Templates in Mailmodo**
Mailmodo’s no-code/low-code template editor lets you create templates as per your need without needing any expertise in coding. You just have to drag and drop the elements into the template. You can create various templates such as newsletter templates, promotional email templates, feedback email templates, etc.
For testing, we'll send a sample event with the name "MM Email Opened" with customer\_id as "[hello@mailmodo.com](mailto:hello@mailmodo.com)", which will reflect at MoEngage.
* You're all set! If MoEngage sends a successful response, you'll see a "**Setup successful** " message, and the MoEngage card will move to the **Connected Platforms** section.
Please visit this [article](https://support.mailmodo.com/support/solutions/articles/84000364851-moengage-integration-overview) for more information MoEngage integration with Mailmodo.
# **Create Templates in Mailmodo**
Mailmodo’s no-code/low-code template editor lets you create templates as per your need without needing any expertise in coding. You just have to drag and drop the elements into the template. You can create various templates such as newsletter templates, promotional email templates, feedback email templates, etc.
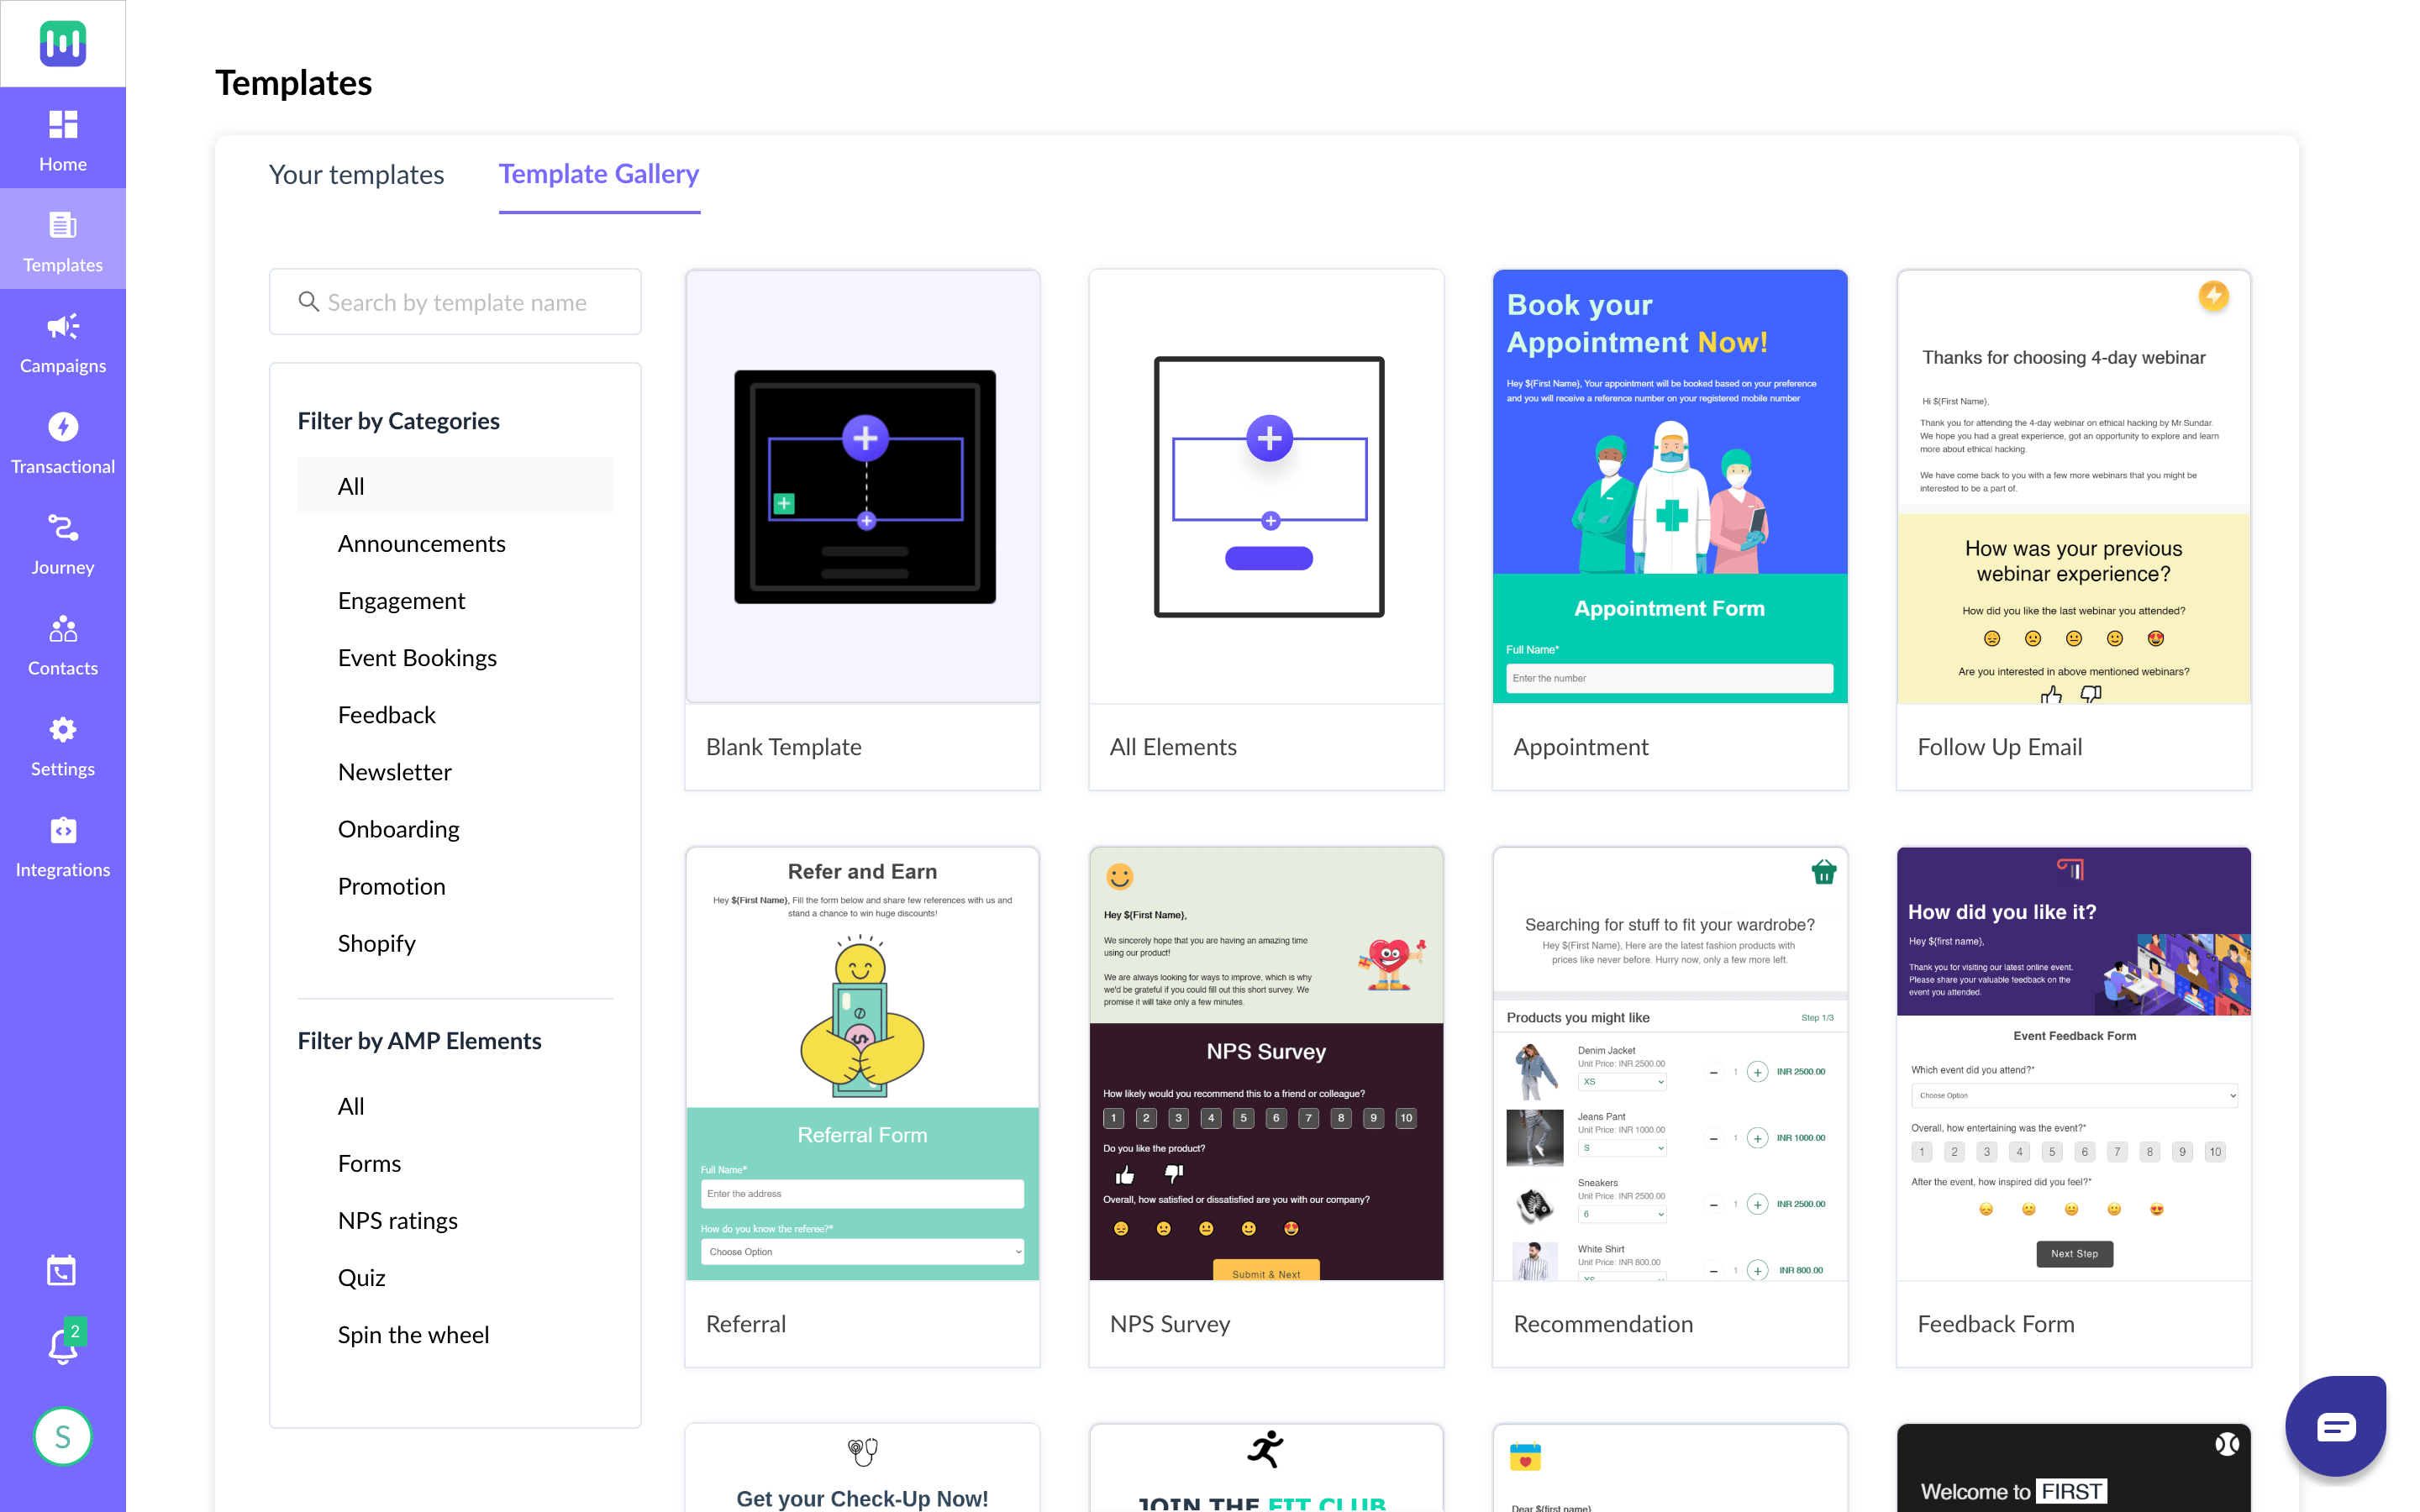 Mailmodo’s template also allows you to add different AMP widgets like Polls, Calendars, carts, Spin the wheel, Forms, etc. You can read [these](https://support.mailmodo.com/support/solutions/folders/84000248664) to find out how to add AMP widgets to your template. These widgets will help increase your engagement metrics.
The template editor also has options for personalization. You can add first name, last name, contact info., email, etc., in the template. You also have some [pre-made templates](https://www.mailmodo.com/email-templates/) to work with if you want to avoid making the whole thing from scratch.
Read [this](https://support.mailmodo.com/support/solutions/articles/84000351259-creating-an-email-template) to learn more about the process of creating a template.
# **Create Transactional Campaign in Mailmodo**
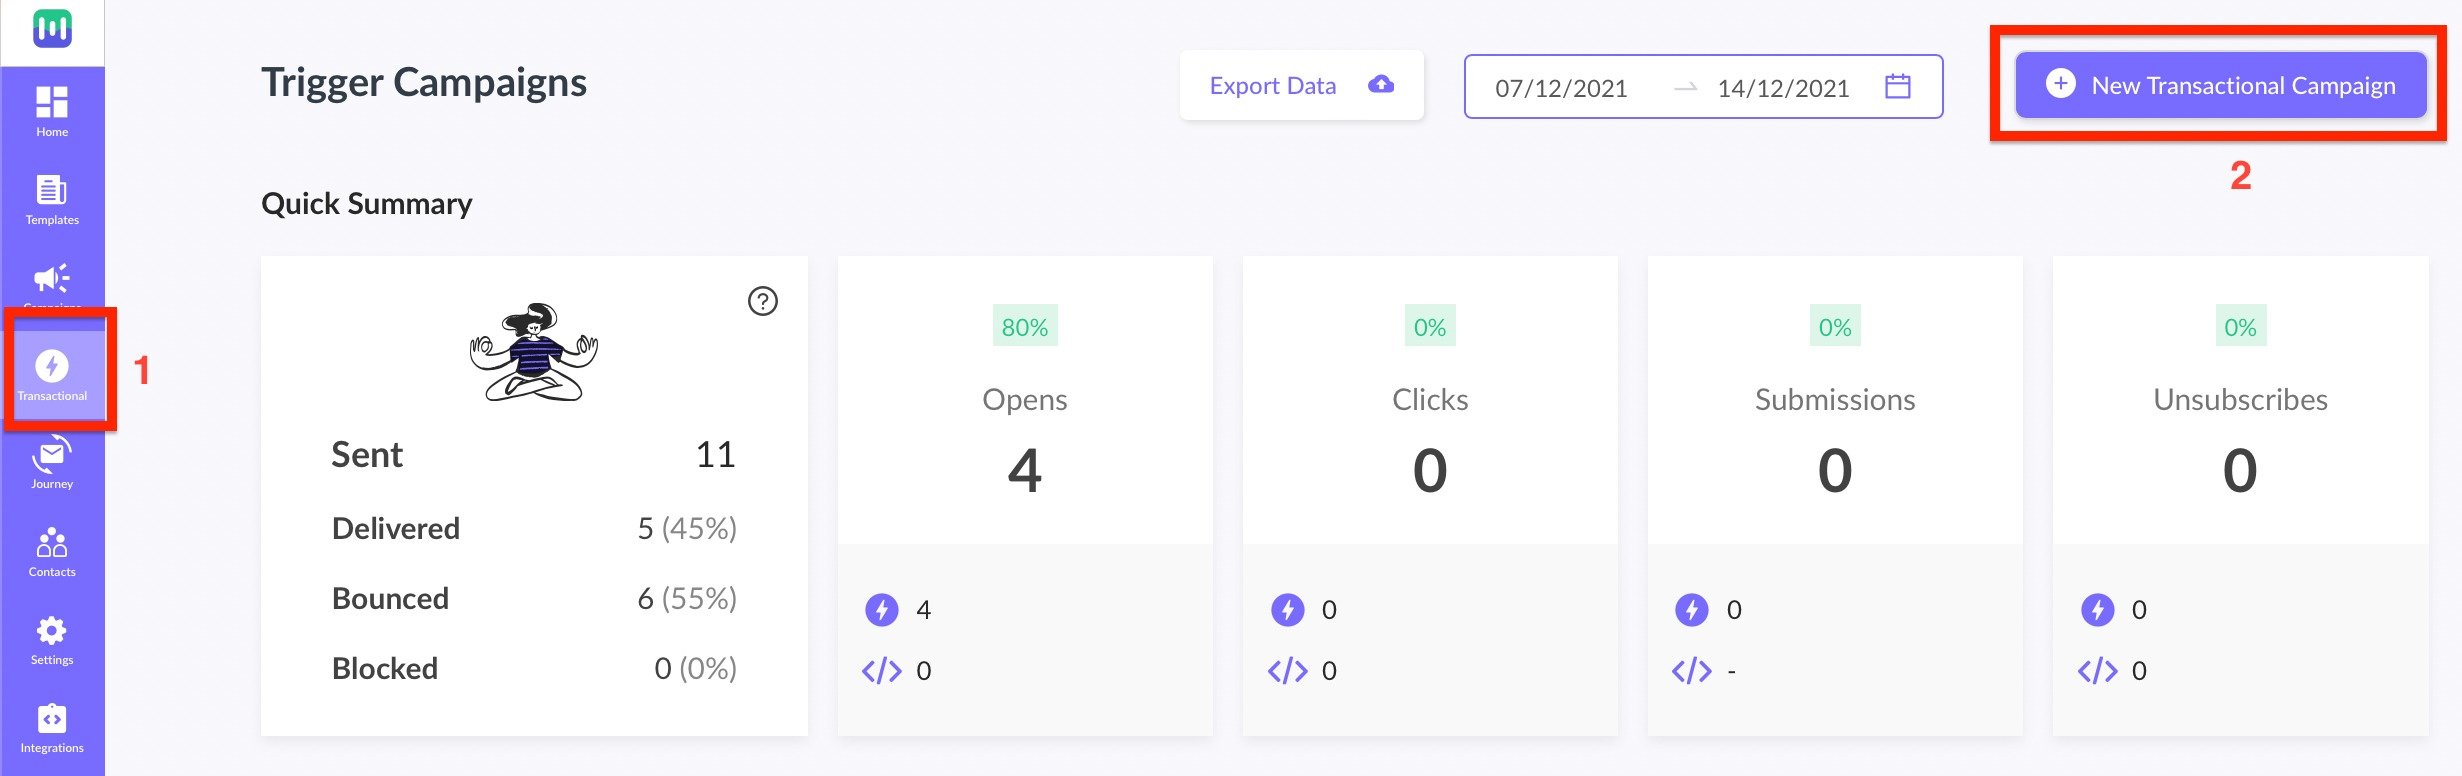
**Step 1:** Go to [Transactional](https://manage.mailmodo.com/app/transactionalList) campaigns from the left navigation menu and click on New Transactional Campaign.
Mailmodo’s template also allows you to add different AMP widgets like Polls, Calendars, carts, Spin the wheel, Forms, etc. You can read [these](https://support.mailmodo.com/support/solutions/folders/84000248664) to find out how to add AMP widgets to your template. These widgets will help increase your engagement metrics.
The template editor also has options for personalization. You can add first name, last name, contact info., email, etc., in the template. You also have some [pre-made templates](https://www.mailmodo.com/email-templates/) to work with if you want to avoid making the whole thing from scratch.
Read [this](https://support.mailmodo.com/support/solutions/articles/84000351259-creating-an-email-template) to learn more about the process of creating a template.
# **Create Transactional Campaign in Mailmodo**
**Step 1:** Go to [Transactional](https://manage.mailmodo.com/app/transactionalList) campaigns from the left navigation menu and click on New Transactional Campaign.
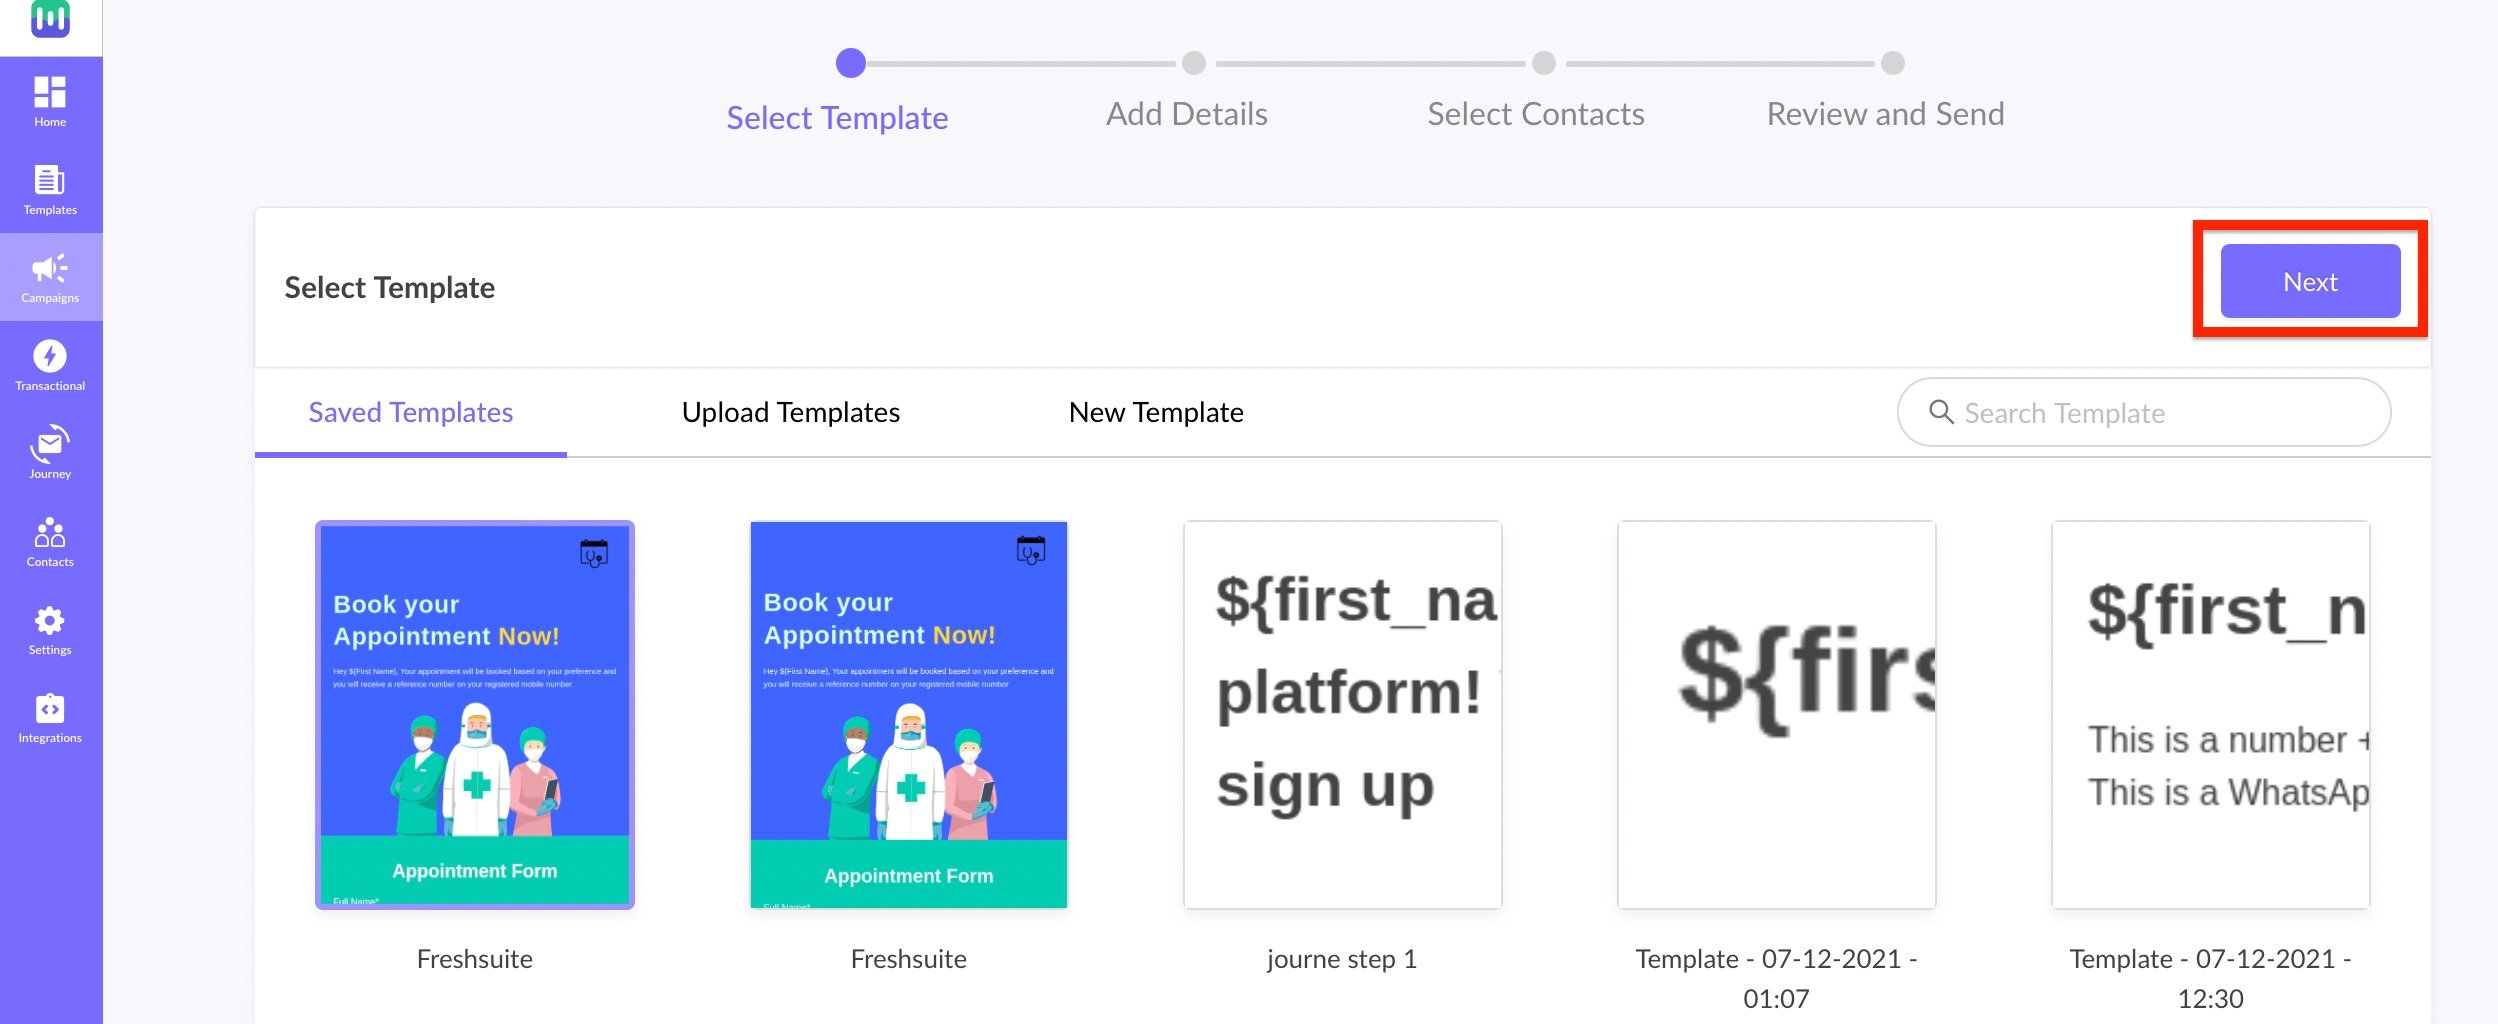
 **Step 2:** Select the required template and Click on Next.
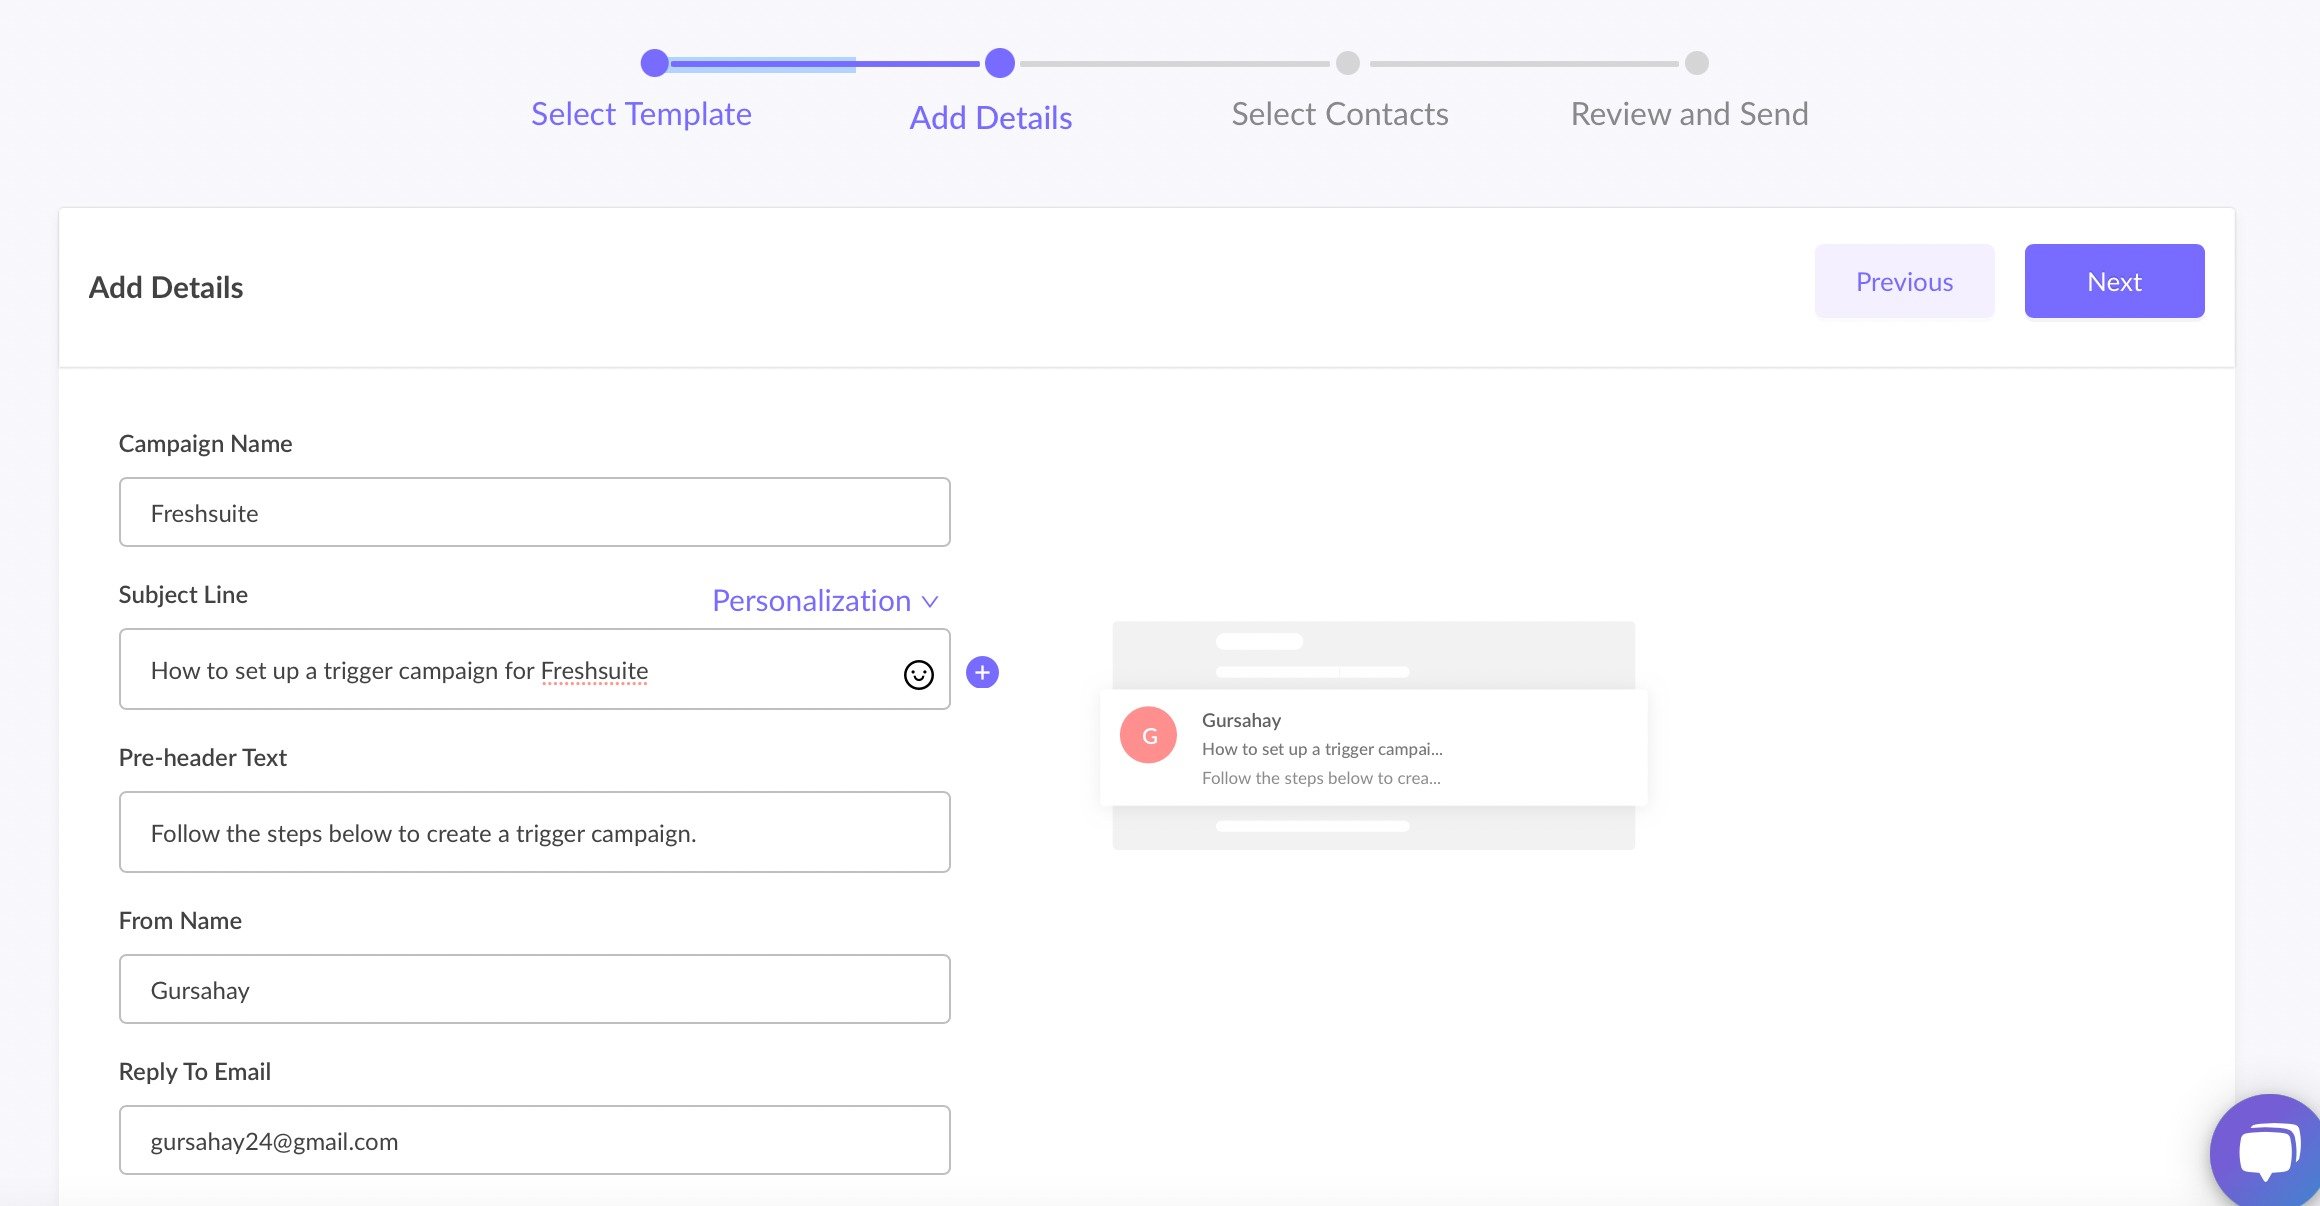
 **Step 3:** Add Campaign Name, Subject Line, Pre-header Text, From Name and Reply to Email and Click on Next.
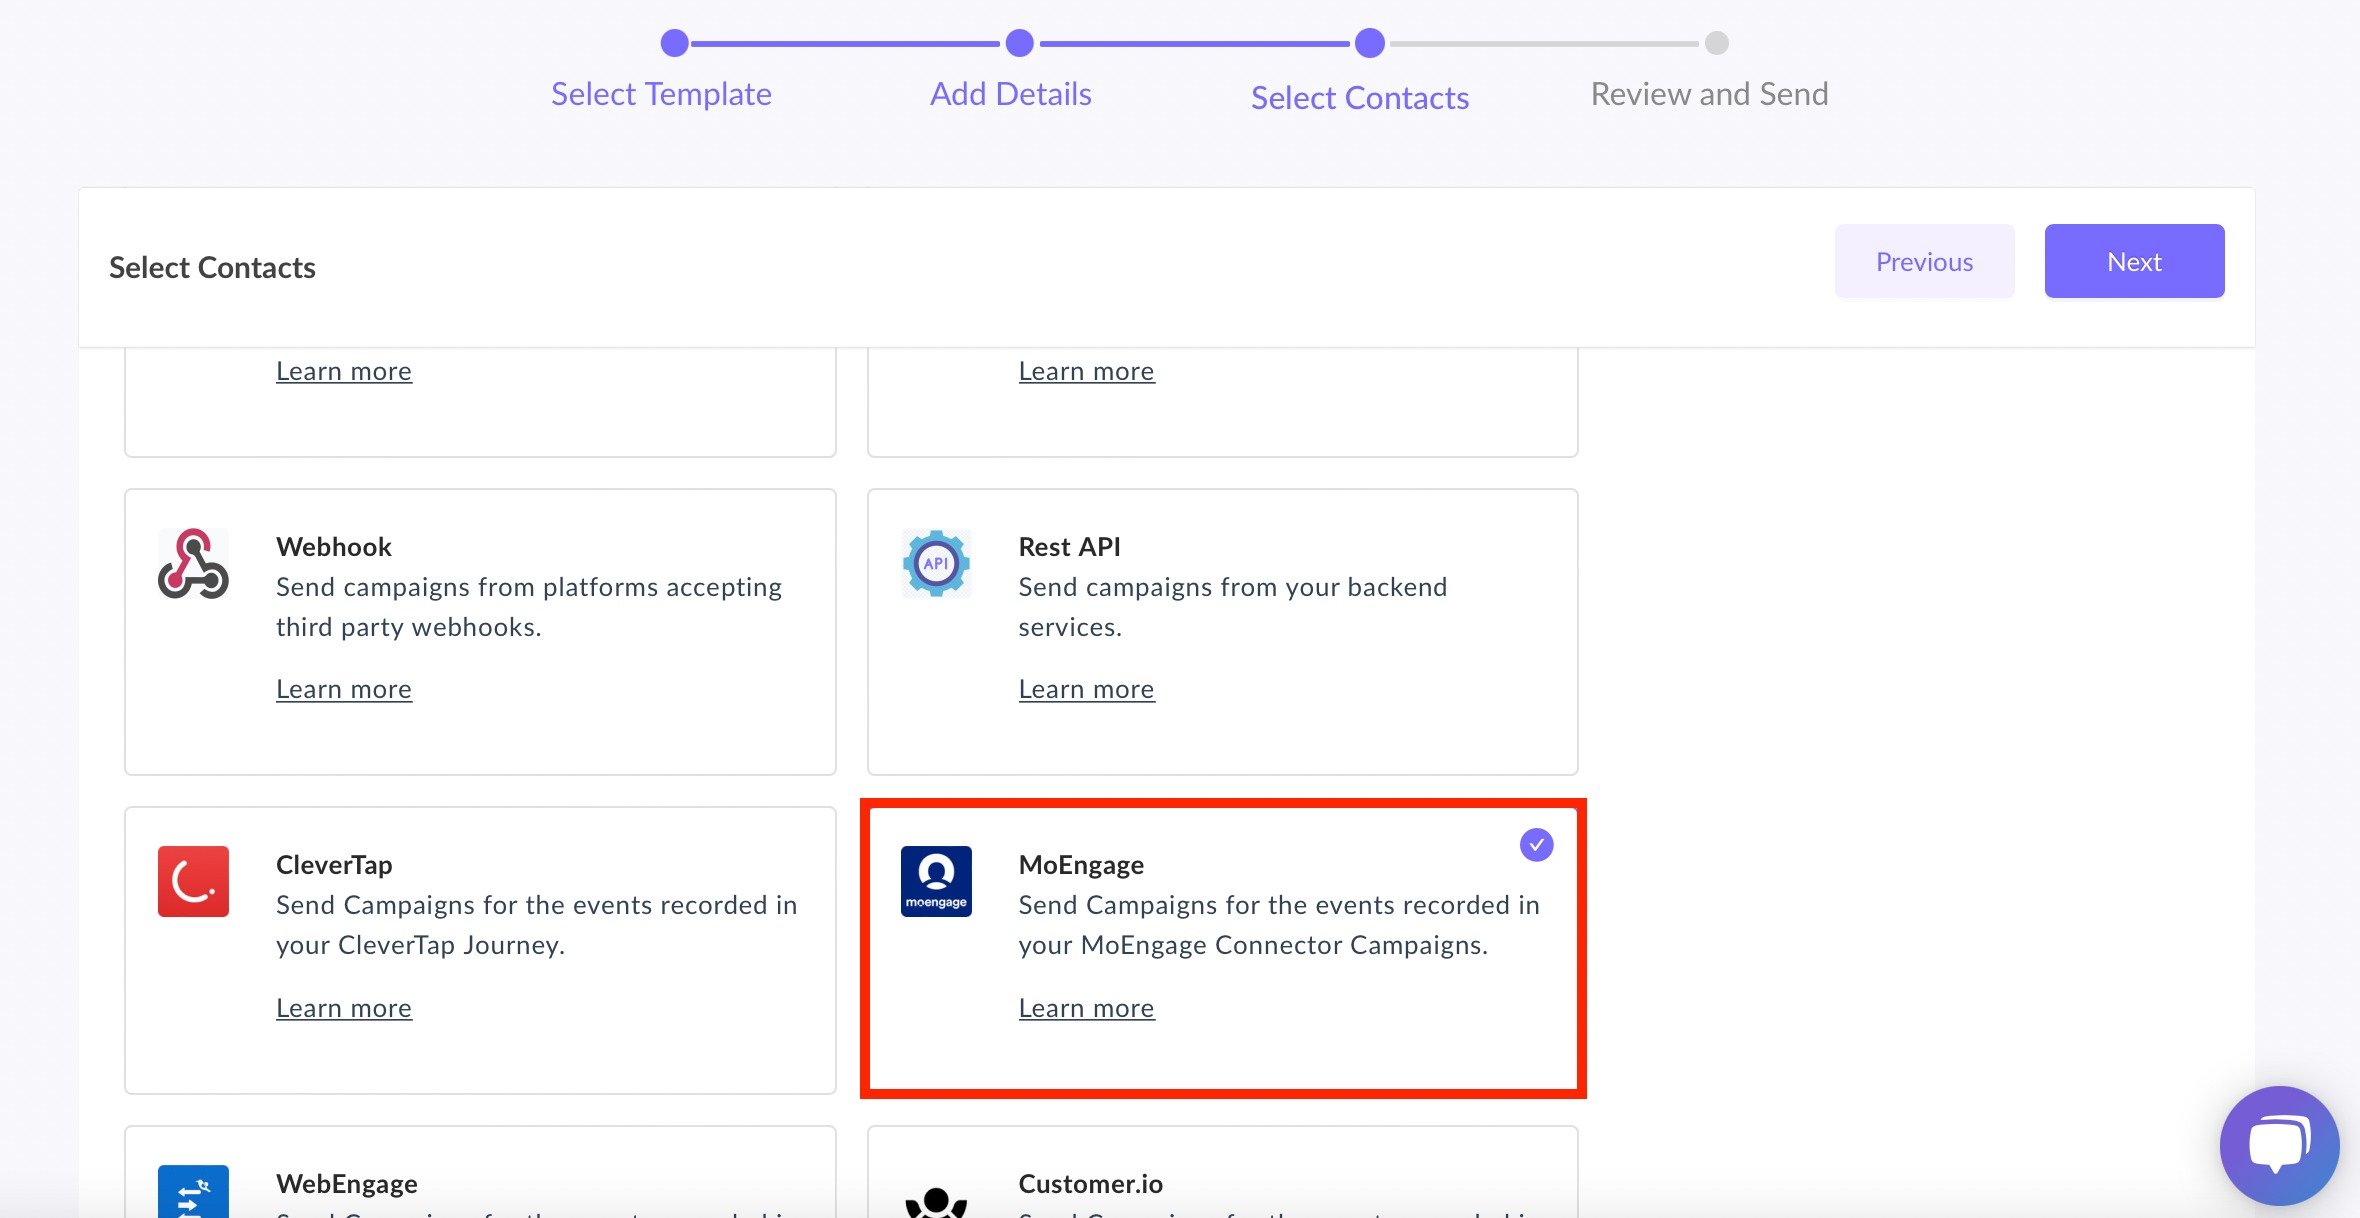
 **Step 4:** Select MoEngage as an External Trigger and Click on Next.
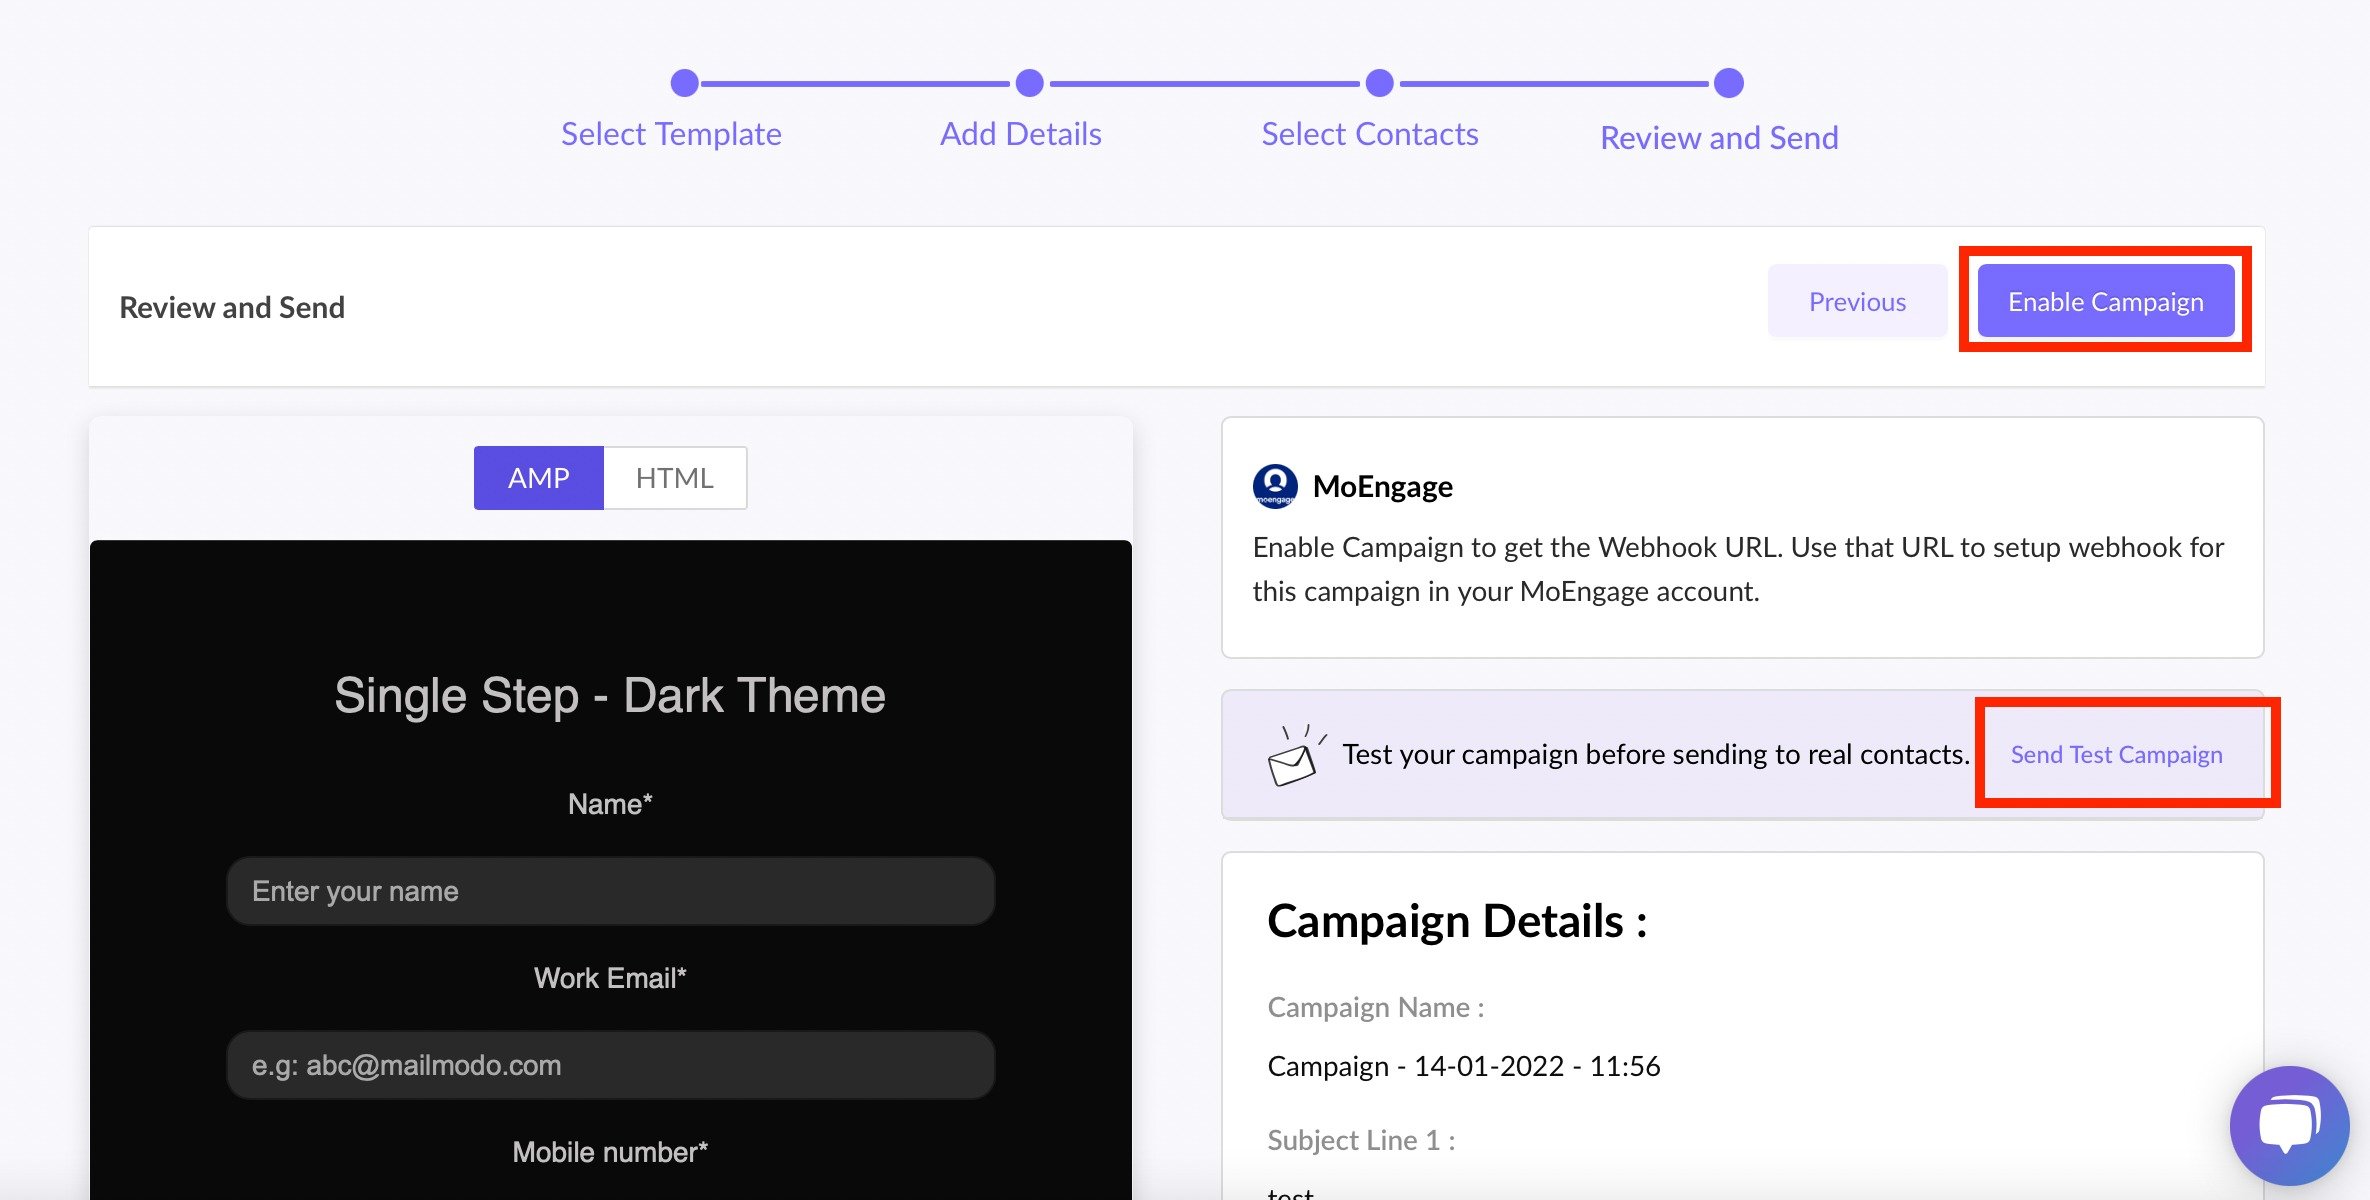
 **Step 5:** Click on Enable Campaign after reviewing and testing the campaign.
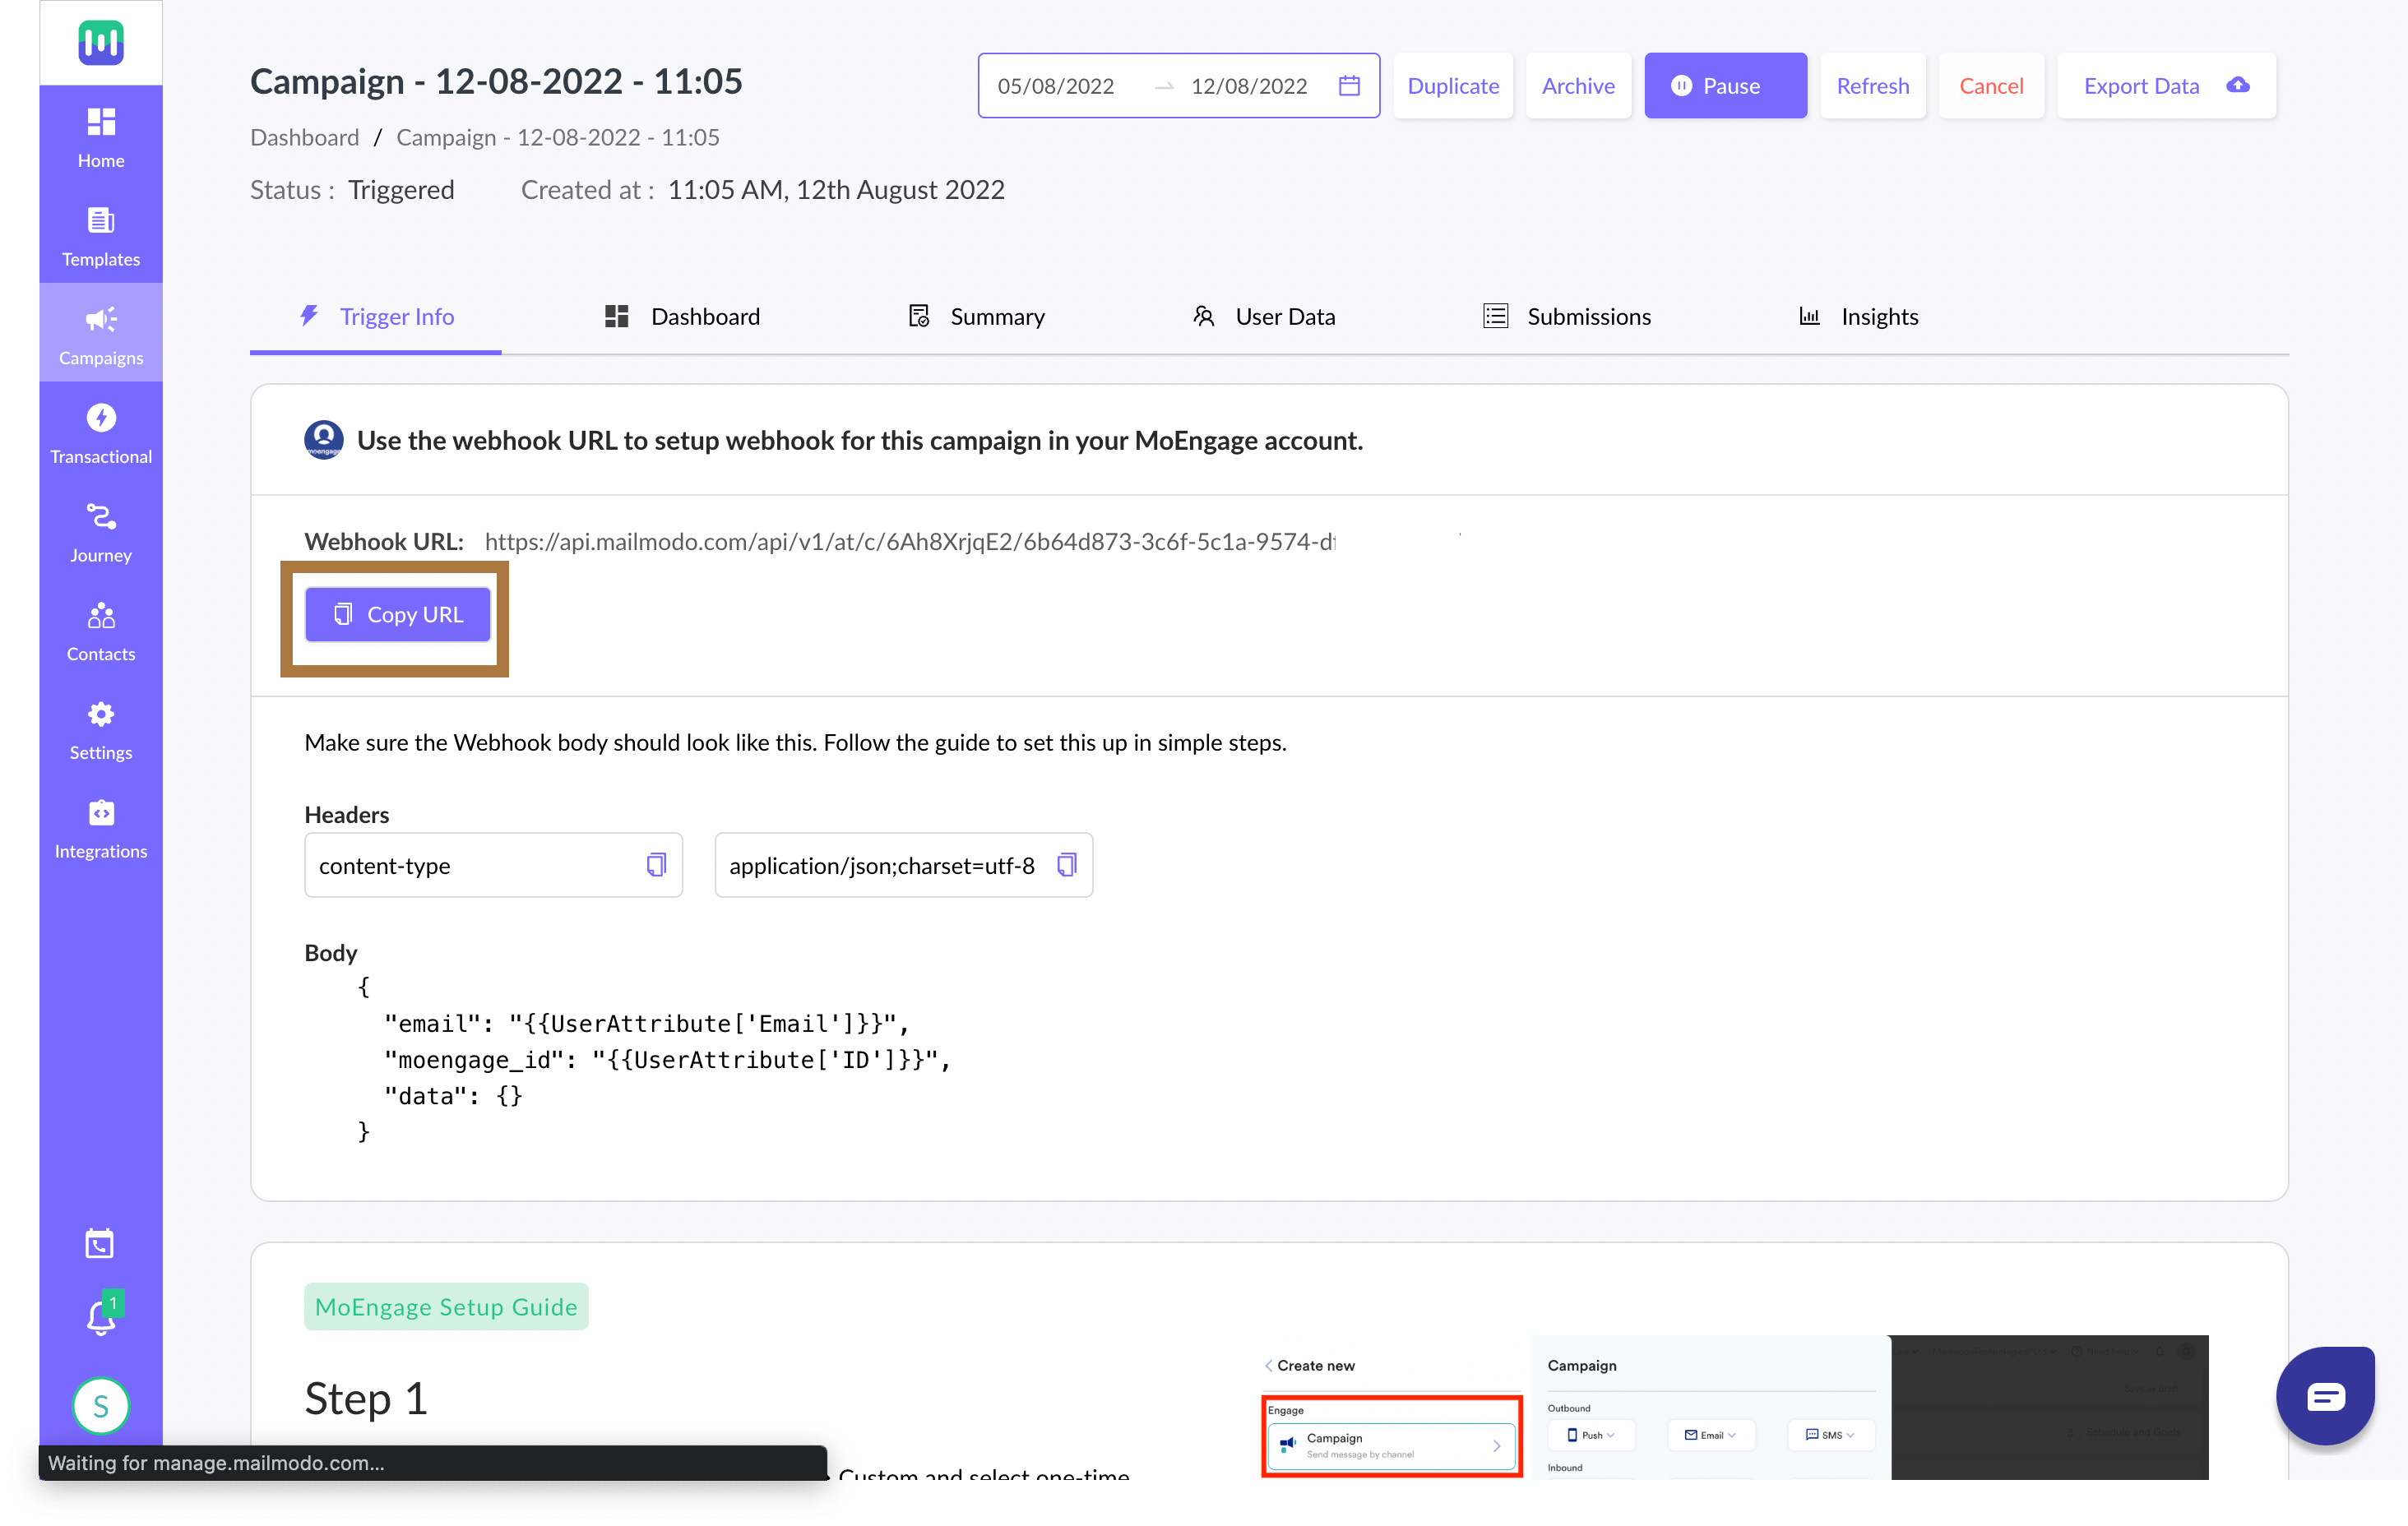
 **Step 6:** Copy the Webhook URL and use it for creating Connector Campaign in MoEngage.
 For more information, please refer to [Trigger Campaigns through MoEngage in Mailmodo](https://support.mailmodo.com/support/solutions/articles/84000351551-trigger-campaigns-through-moengage-in-mailmodo).
# **Send Email Campaigns from MoEngage**
Use the connector campaigns to send email campaigns from MoEngage. For more information, refer to [Connector Campaigns](/user-guide/campaigns-and-channels/connectors/create/create-a-connector-campaign).
Ensure you do the following in the MoEngage connector campaign when you send campaigns using MoEngage:
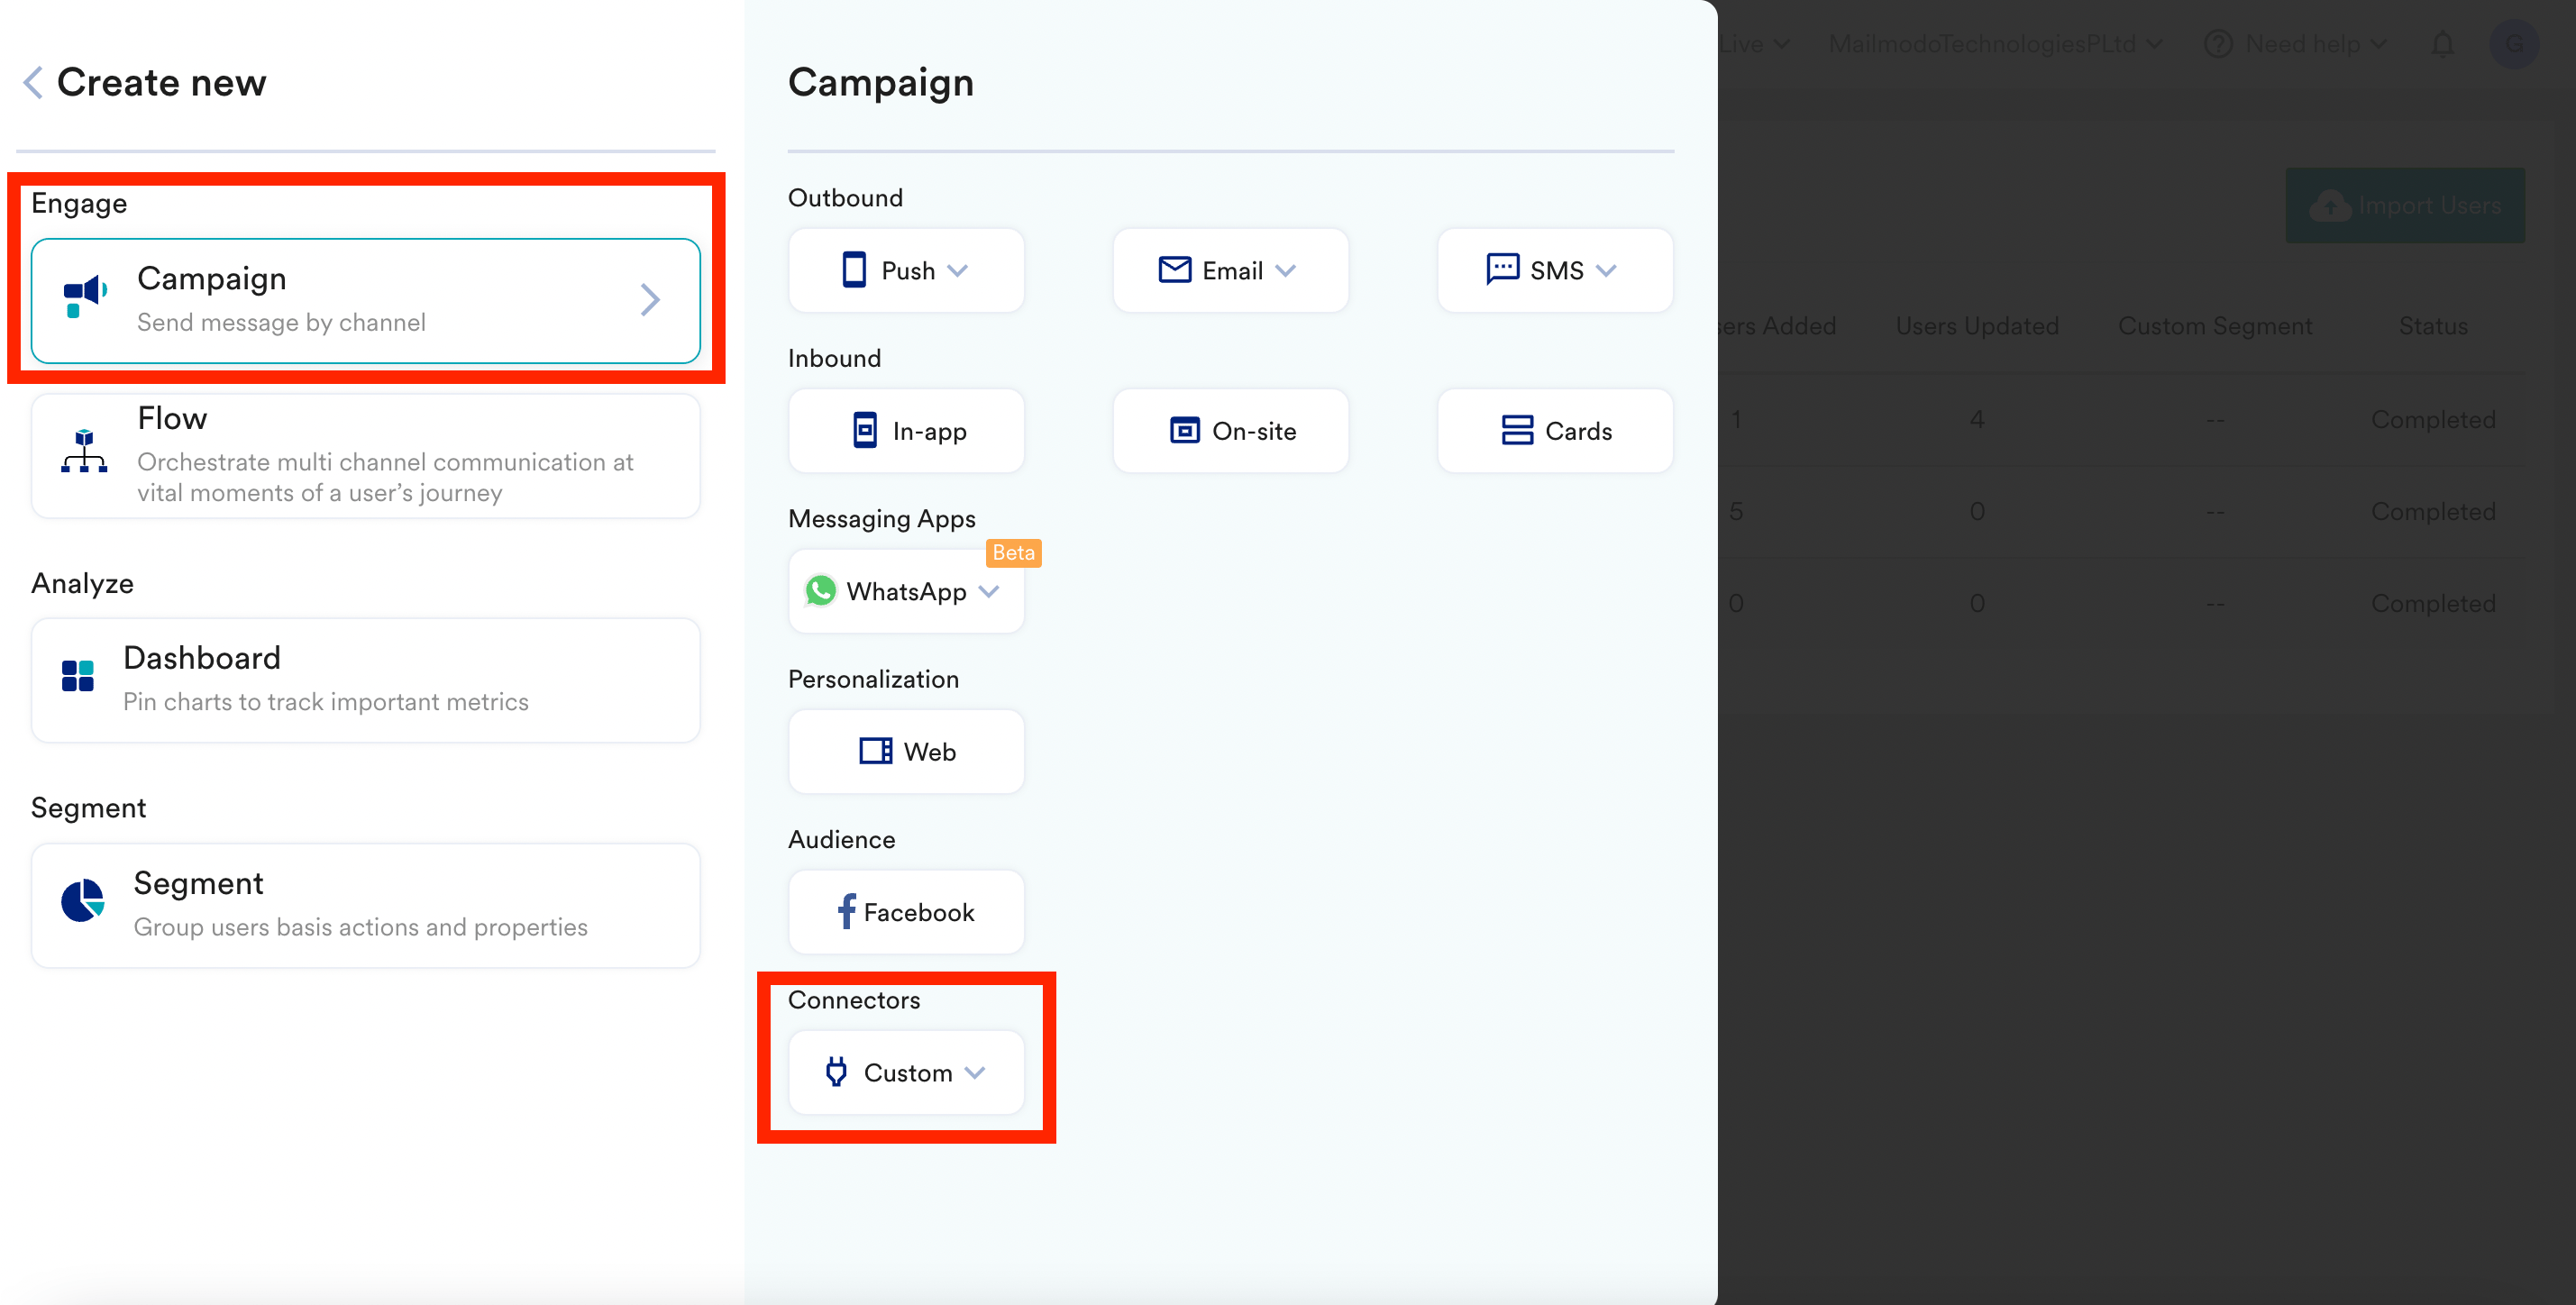
**Step 1:** Click Create New → Connector → Custom and Select one-time, periodic, or event-triggered as per your requirement.
For more information, please refer to [Trigger Campaigns through MoEngage in Mailmodo](https://support.mailmodo.com/support/solutions/articles/84000351551-trigger-campaigns-through-moengage-in-mailmodo).
# **Send Email Campaigns from MoEngage**
Use the connector campaigns to send email campaigns from MoEngage. For more information, refer to [Connector Campaigns](/user-guide/campaigns-and-channels/connectors/create/create-a-connector-campaign).
Ensure you do the following in the MoEngage connector campaign when you send campaigns using MoEngage:
**Step 1:** Click Create New → Connector → Custom and Select one-time, periodic, or event-triggered as per your requirement.
 **Step 2:** Add Campaign, name, Tags, and Select the audience as per your requirement, and Click on Next.
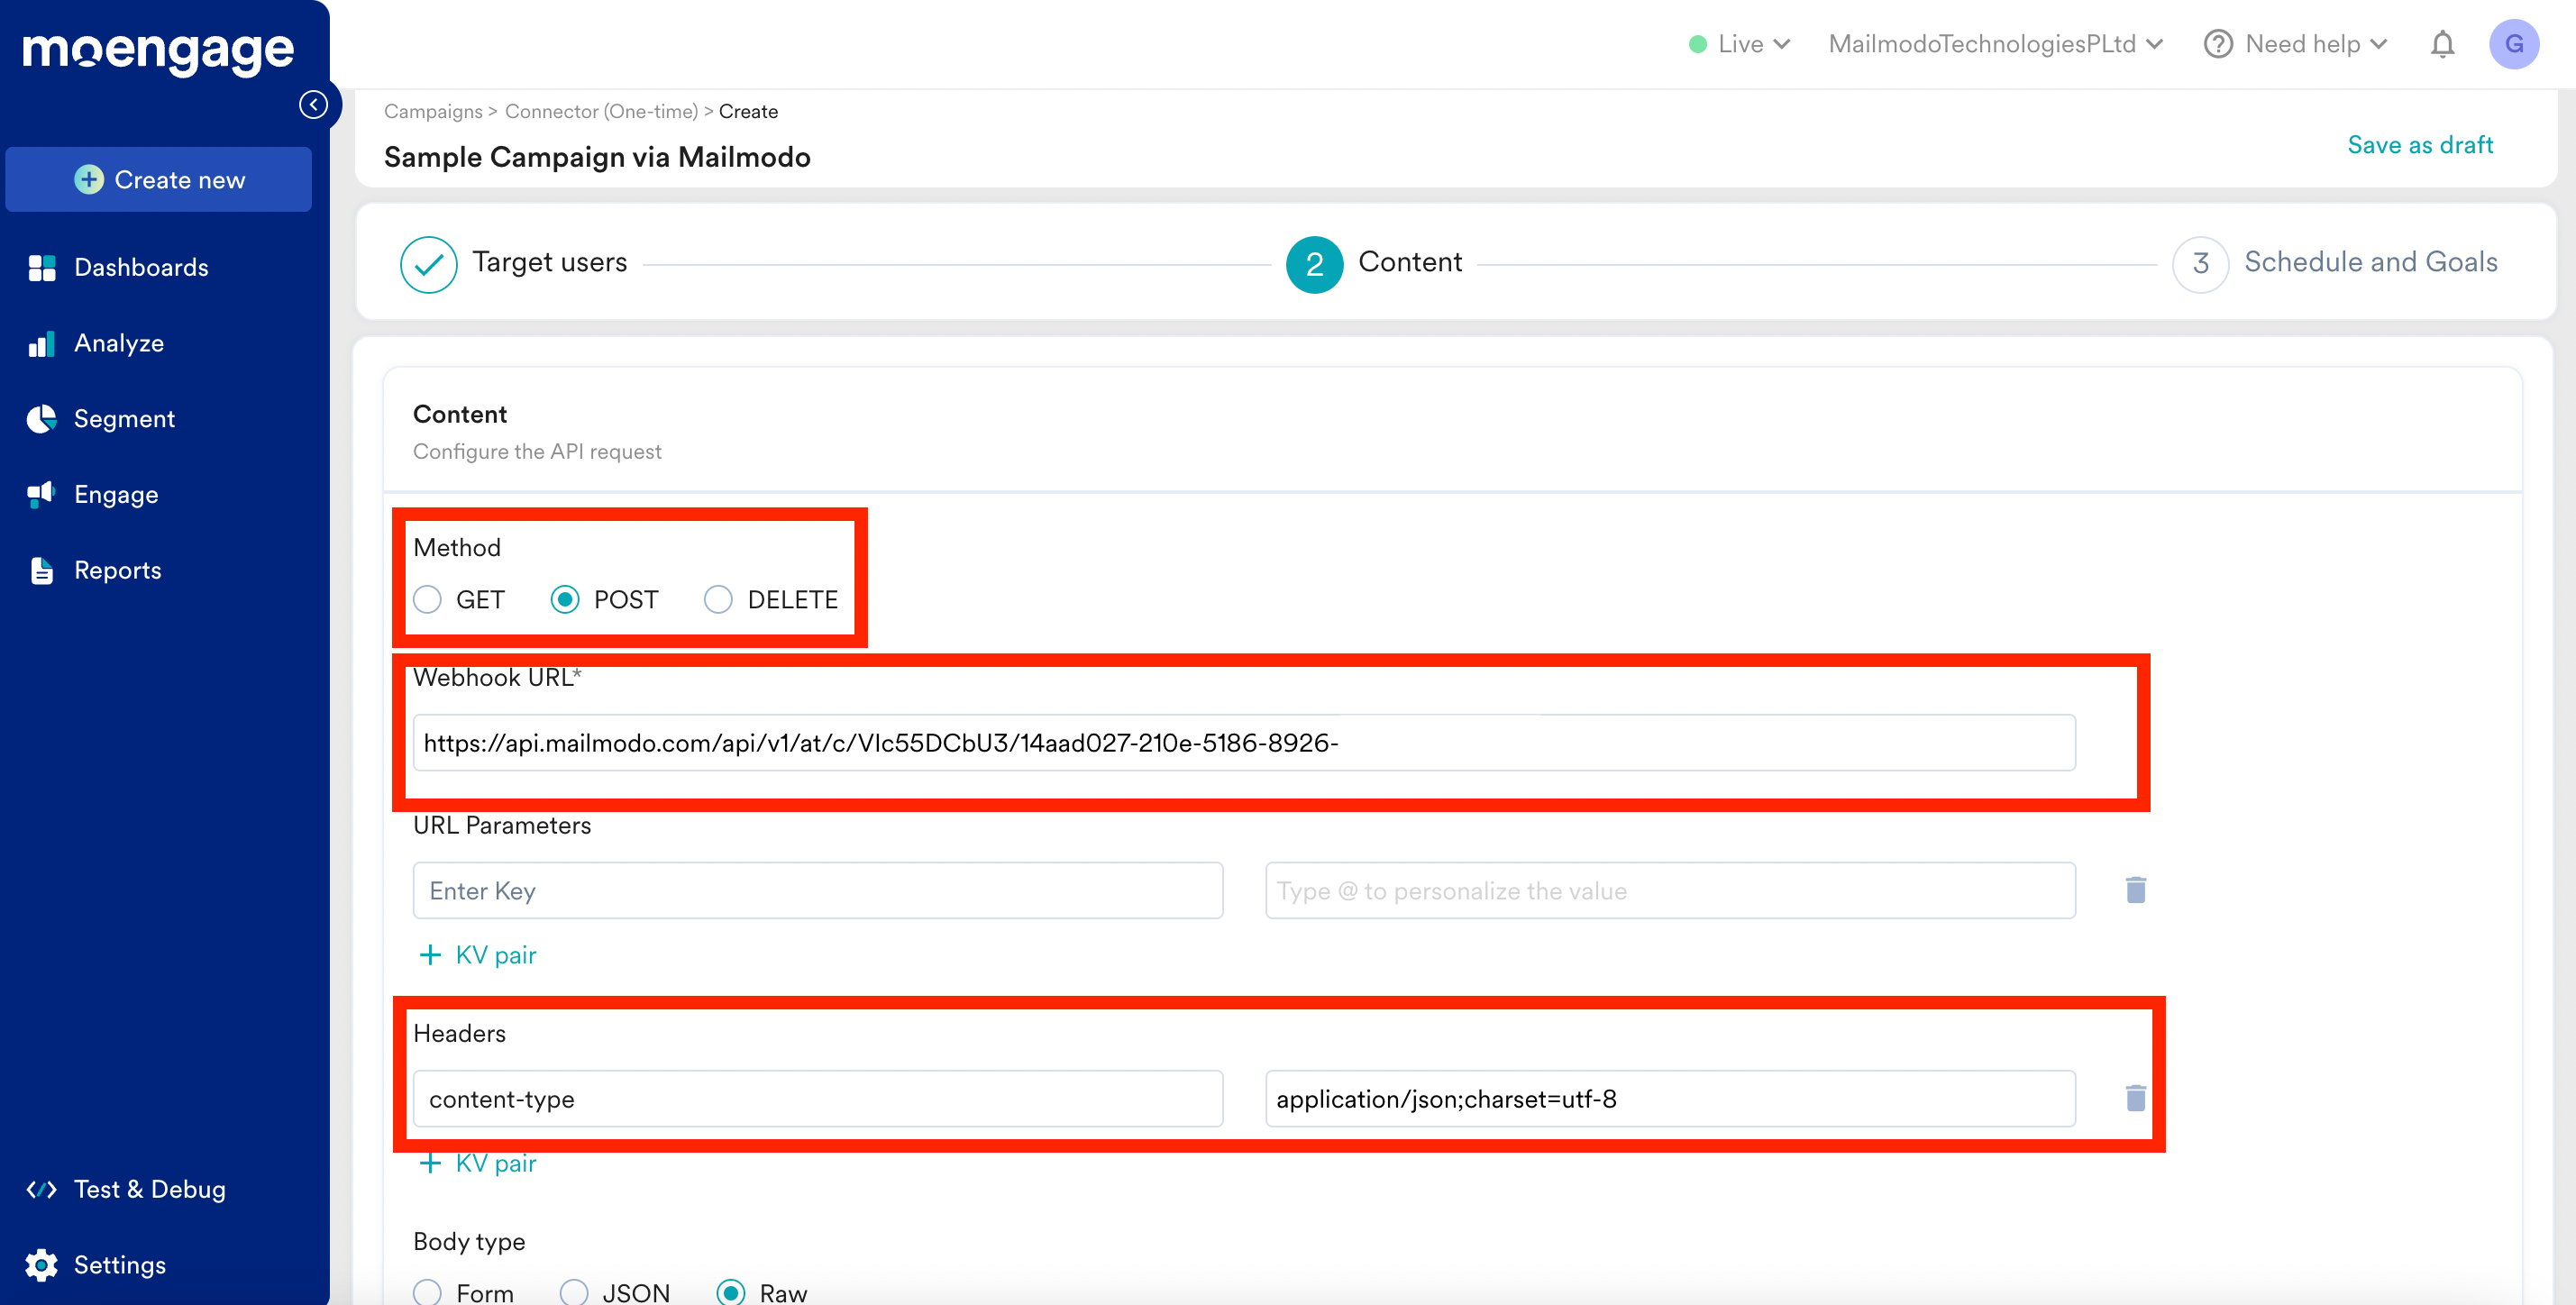
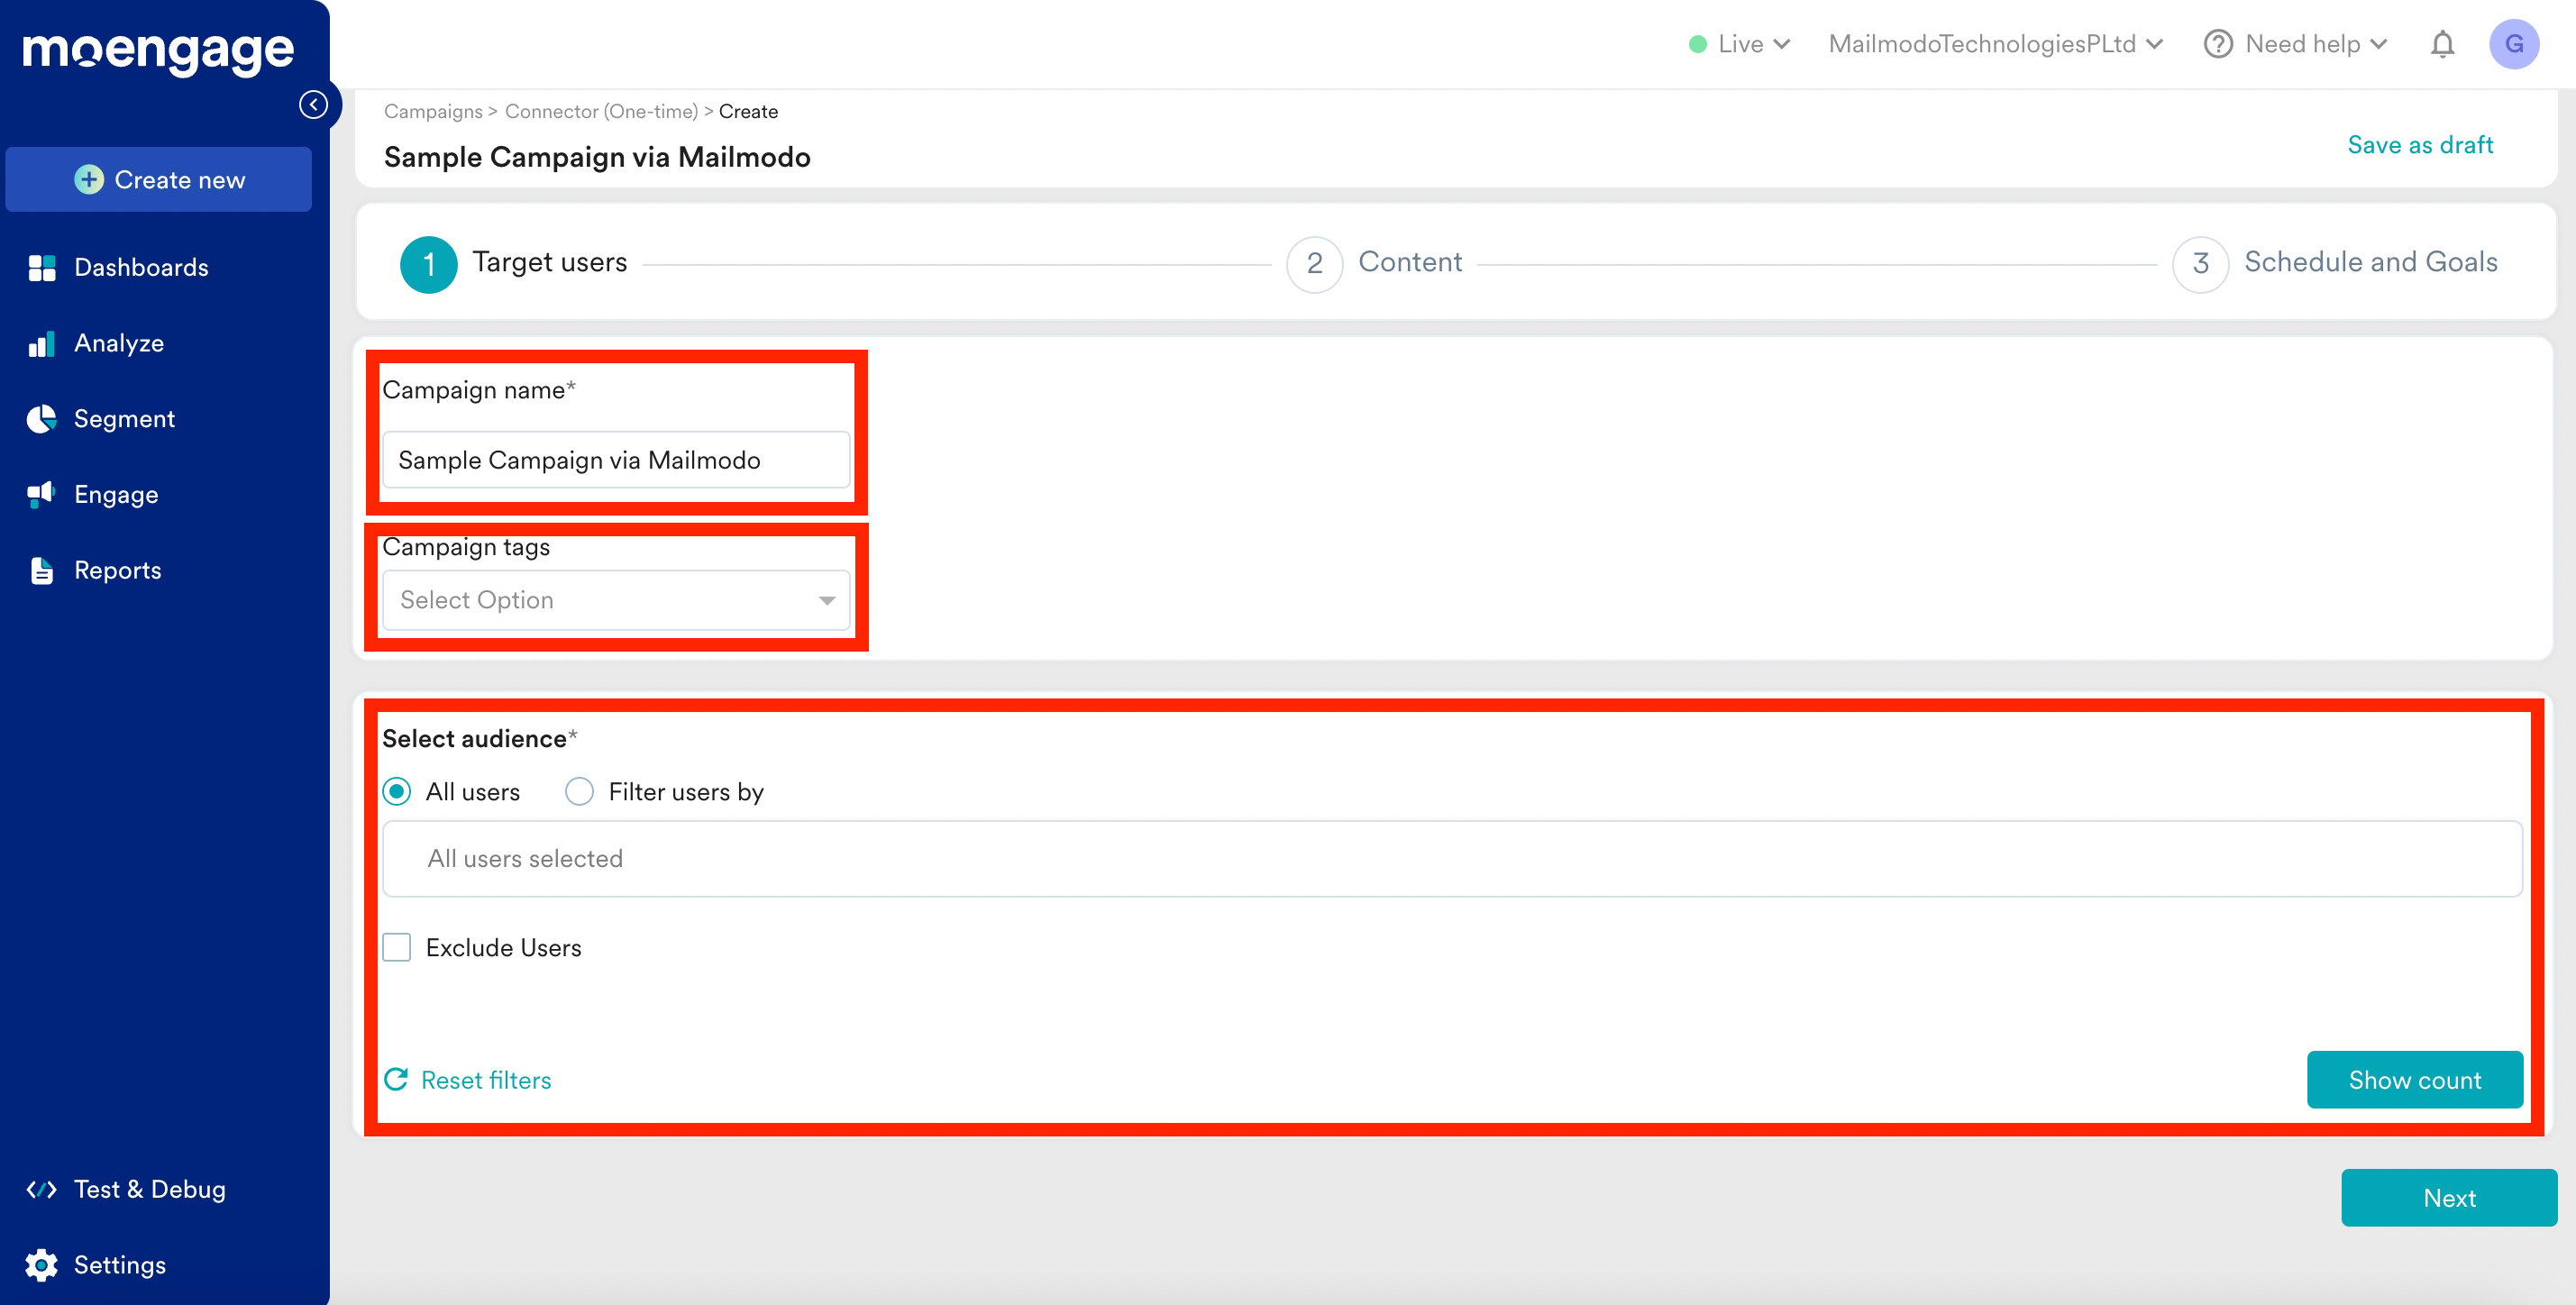 **Step 3:** Select POST under Method and from the Mailmodo Trigger Info section, copy and paste.
* The Webhook URL from Mailmodo under Webhook URL in MoEngage
* The Headers from Mailmodo under Headers in MoEngage
* Key : `content-type`
* Value : `application/json;charset=utf-8`
**Step 3:** Select POST under Method and from the Mailmodo Trigger Info section, copy and paste.
* The Webhook URL from Mailmodo under Webhook URL in MoEngage
* The Headers from Mailmodo under Headers in MoEngage
* Key : `content-type`
* Value : `application/json;charset=utf-8`
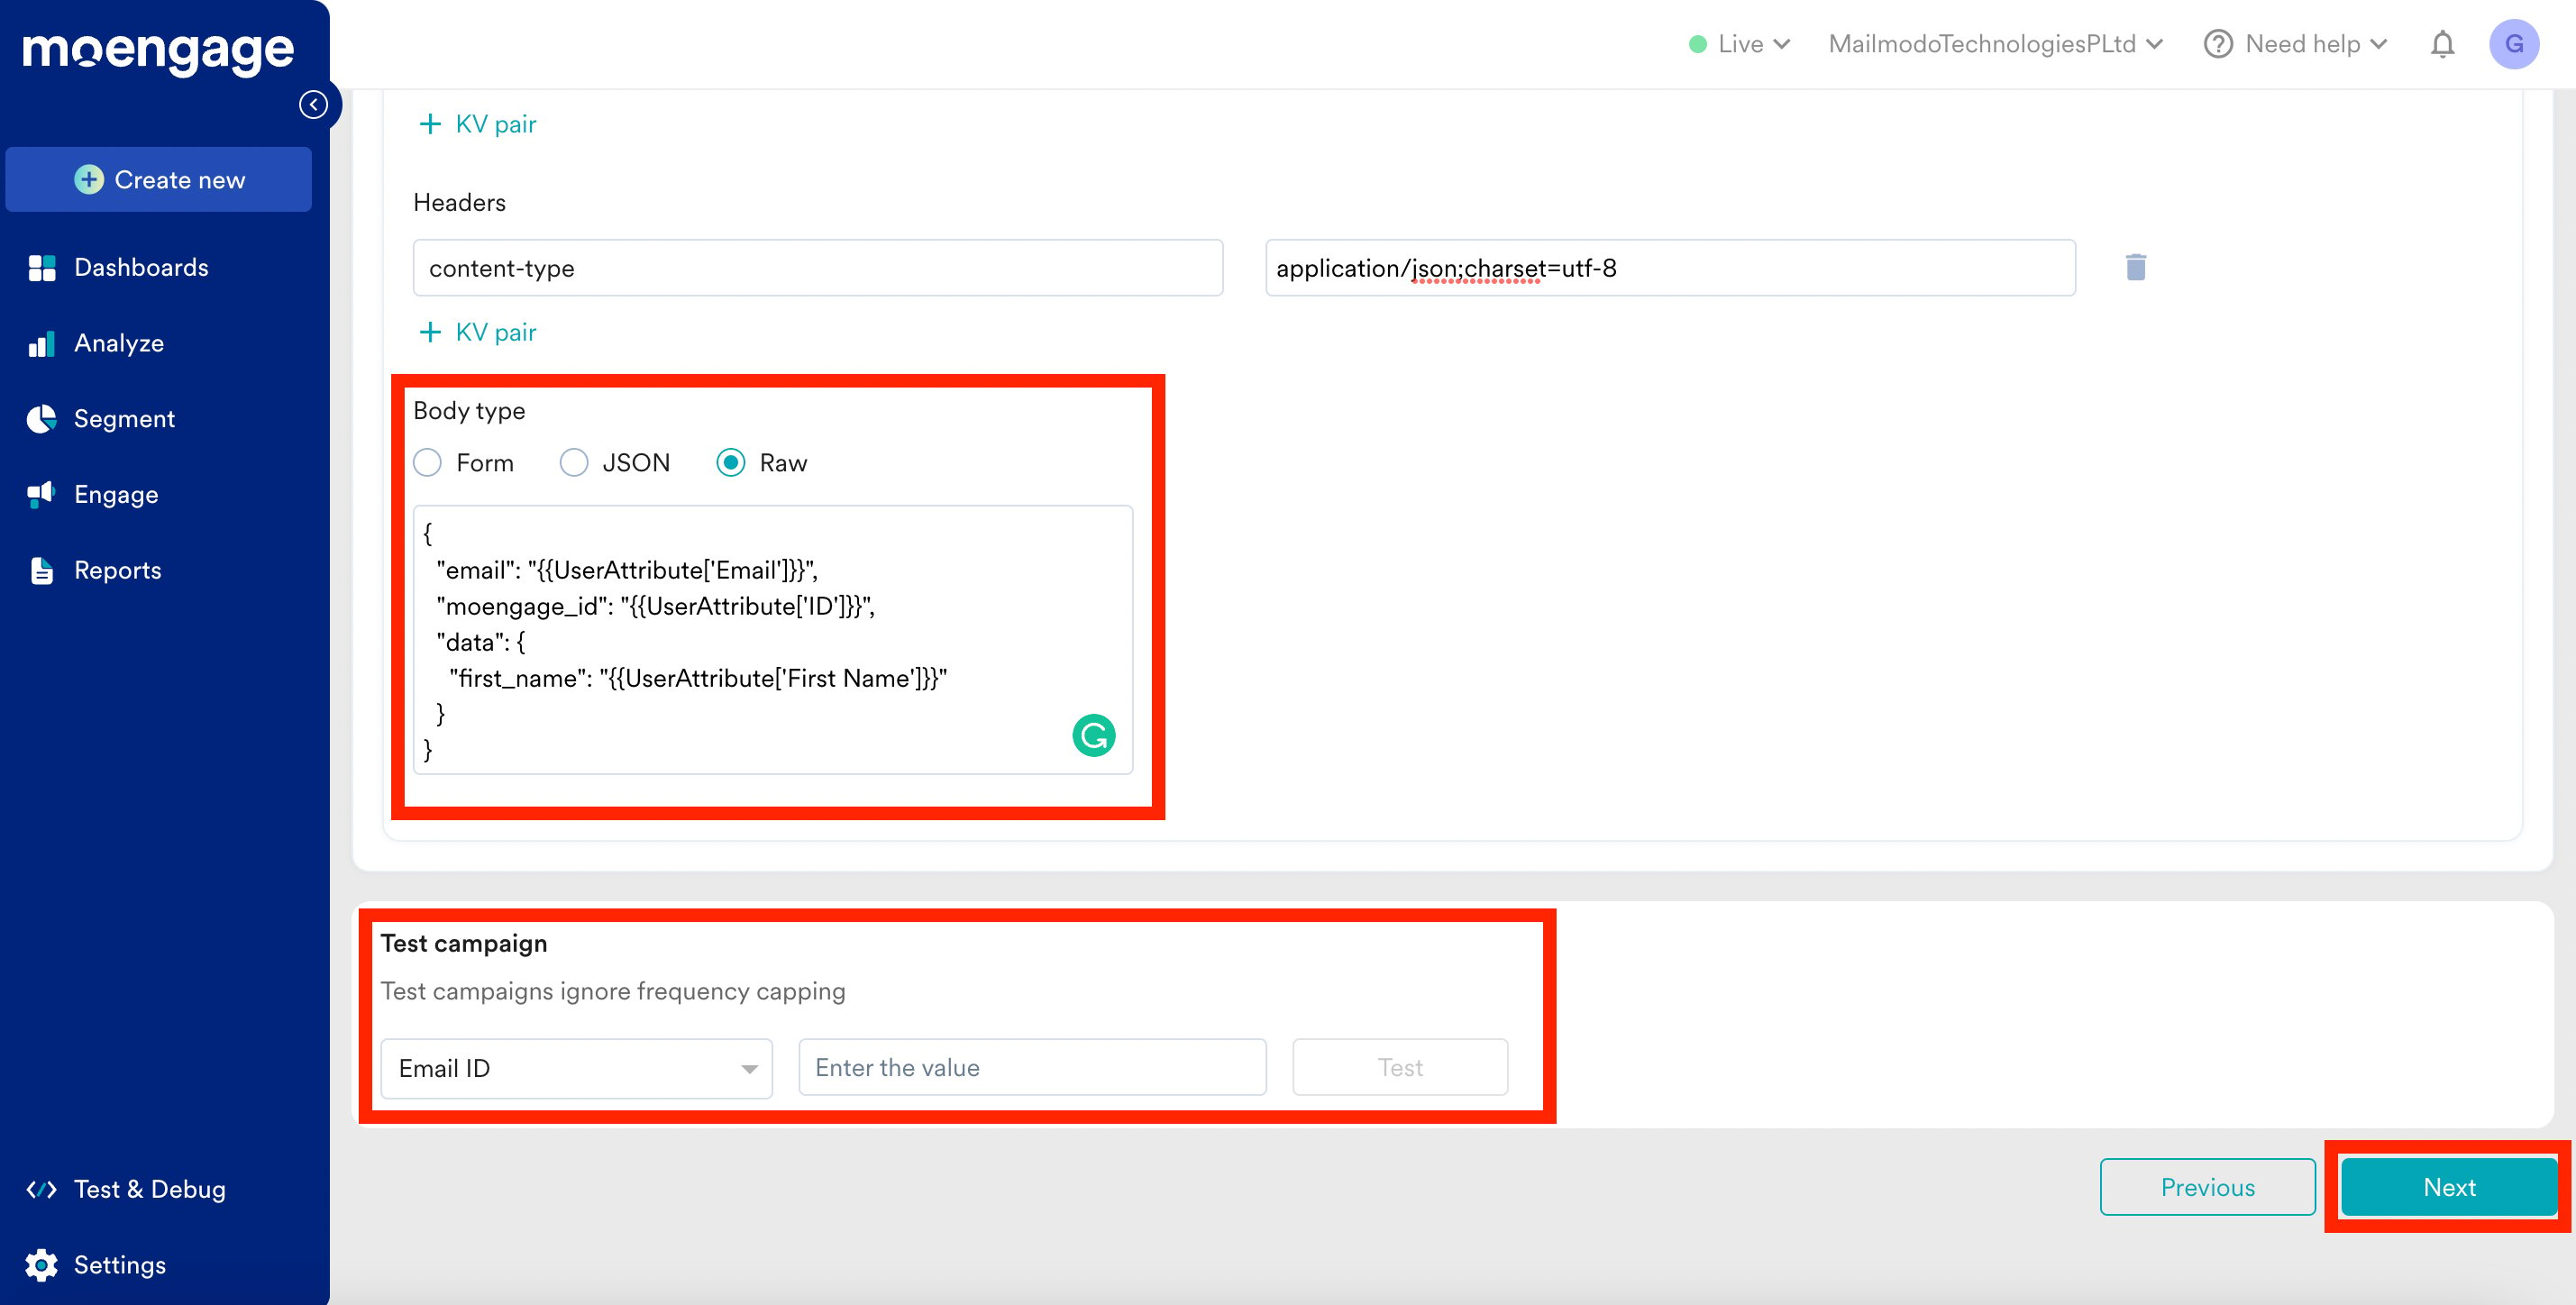
 **Step 4:** In the Body Type, select Raw and Paste the body from the Mailmodo Trigger Info section.
If your Mailmodo template has personalization, then delete \ in the MoEngage body, type @, and select the corresponding personalization attribute in MoEngage in the ensuing Connector Personalisation pop-up.
**Step 4:** In the Body Type, select Raw and Paste the body from the Mailmodo Trigger Info section.
If your Mailmodo template has personalization, then delete \ in the MoEngage body, type @, and select the corresponding personalization attribute in MoEngage in the ensuing Connector Personalisation pop-up.
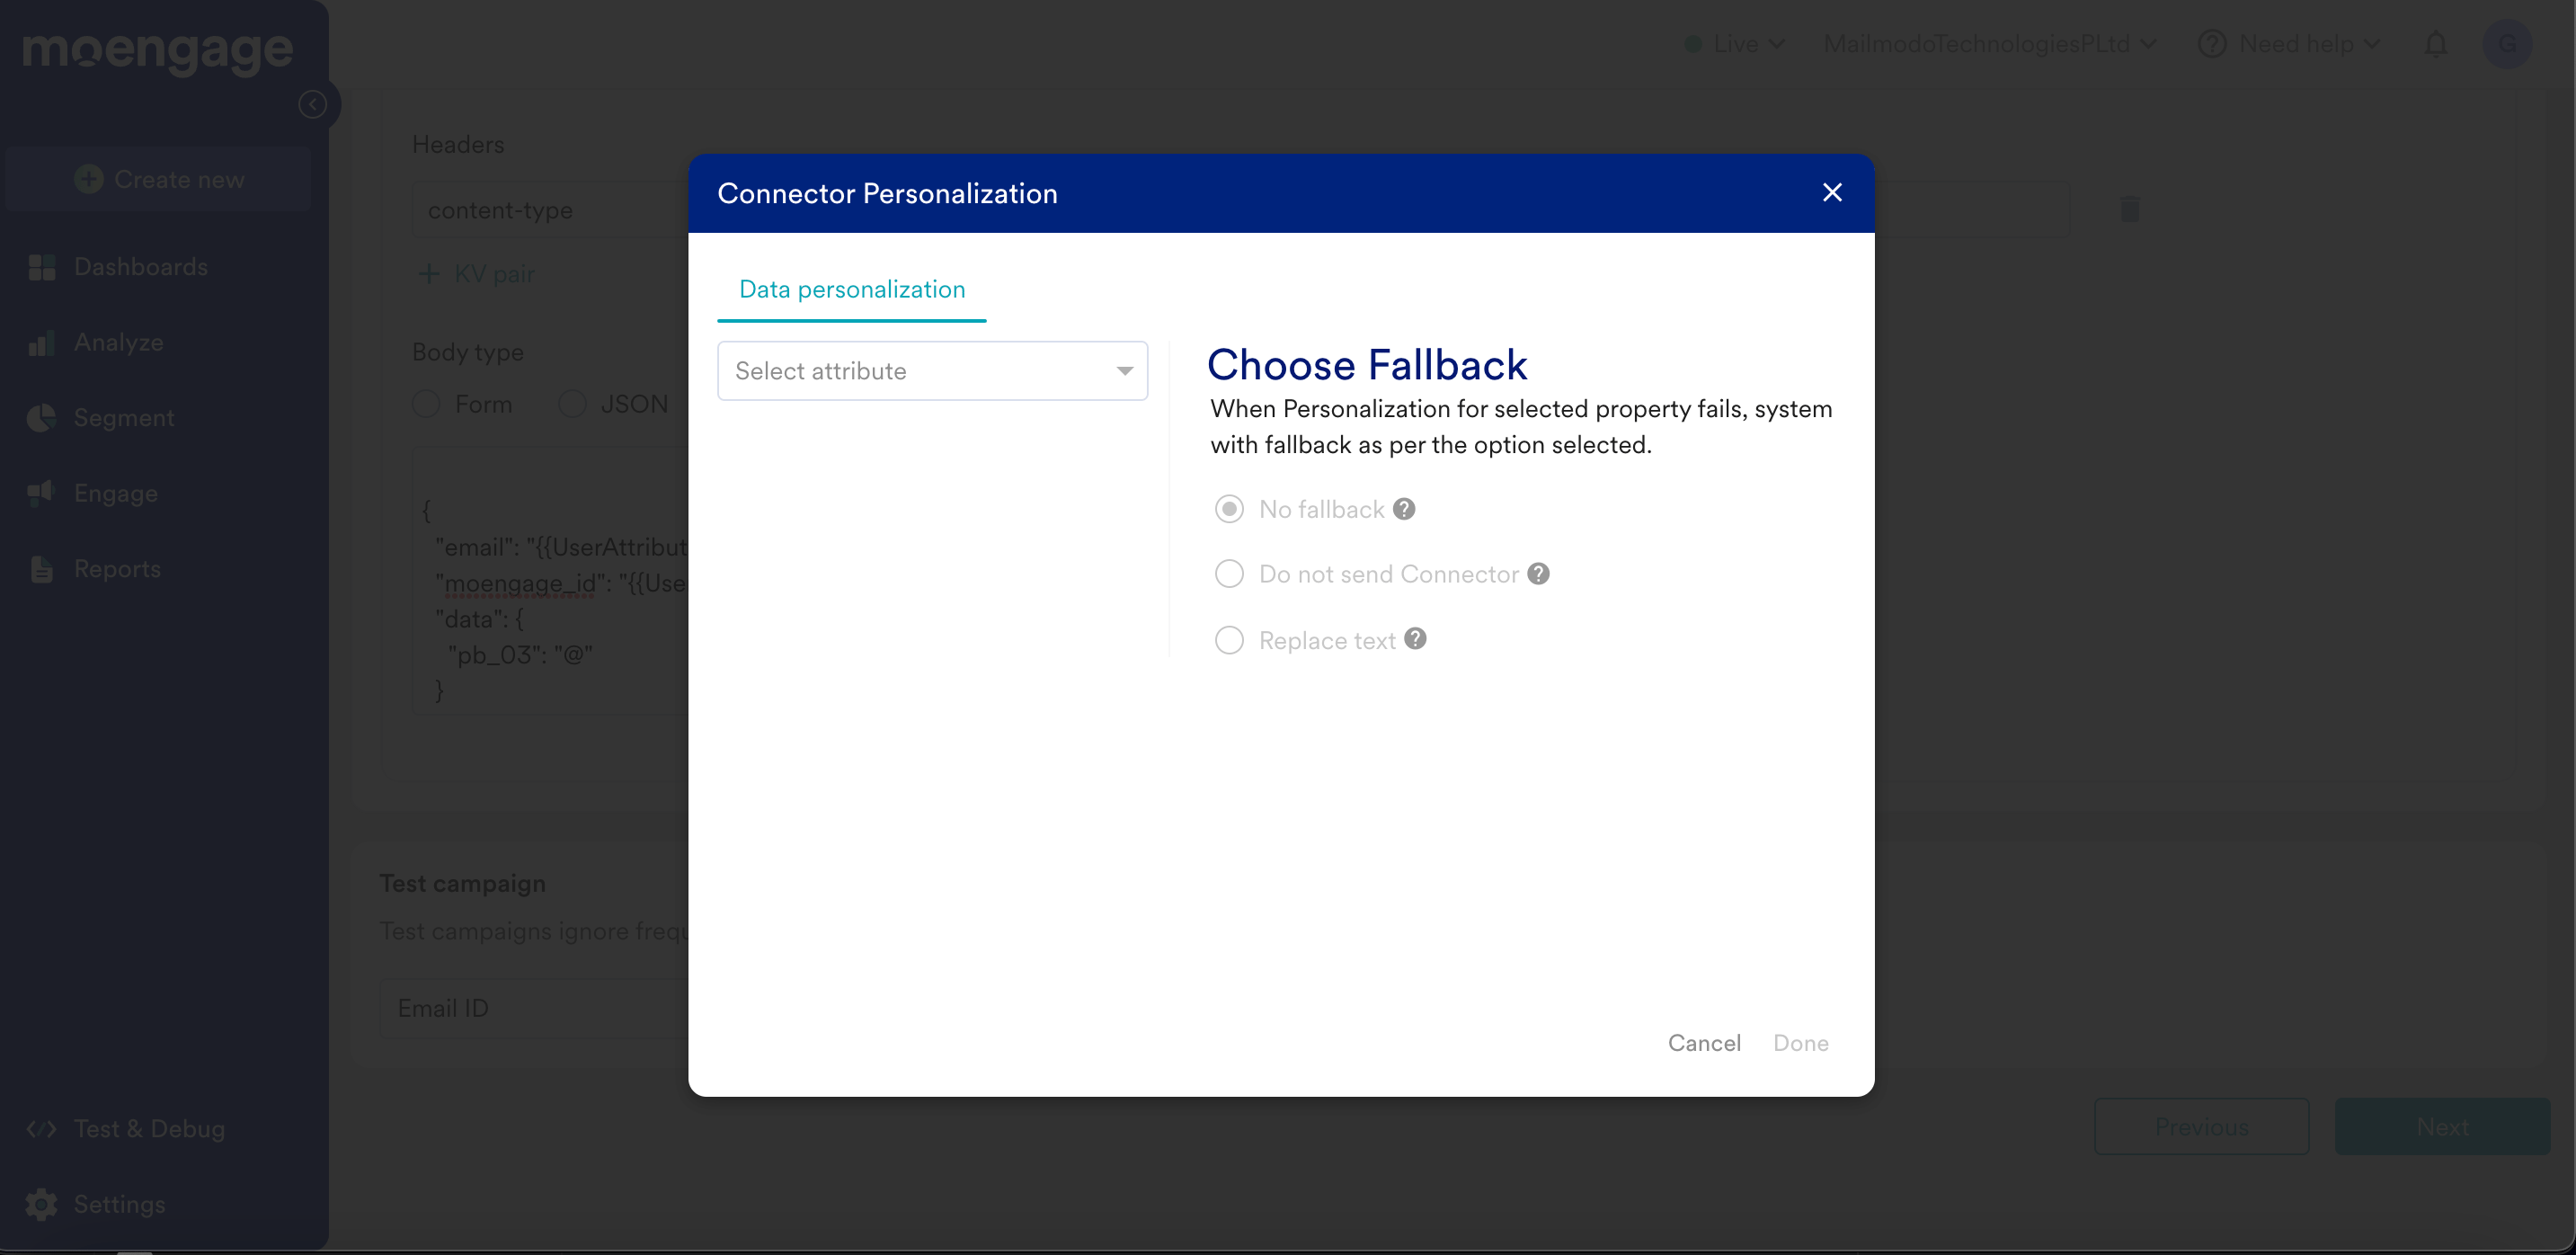 * Please choose fallback as per your requirement for when personalization fails for the selected property in the above pop-up
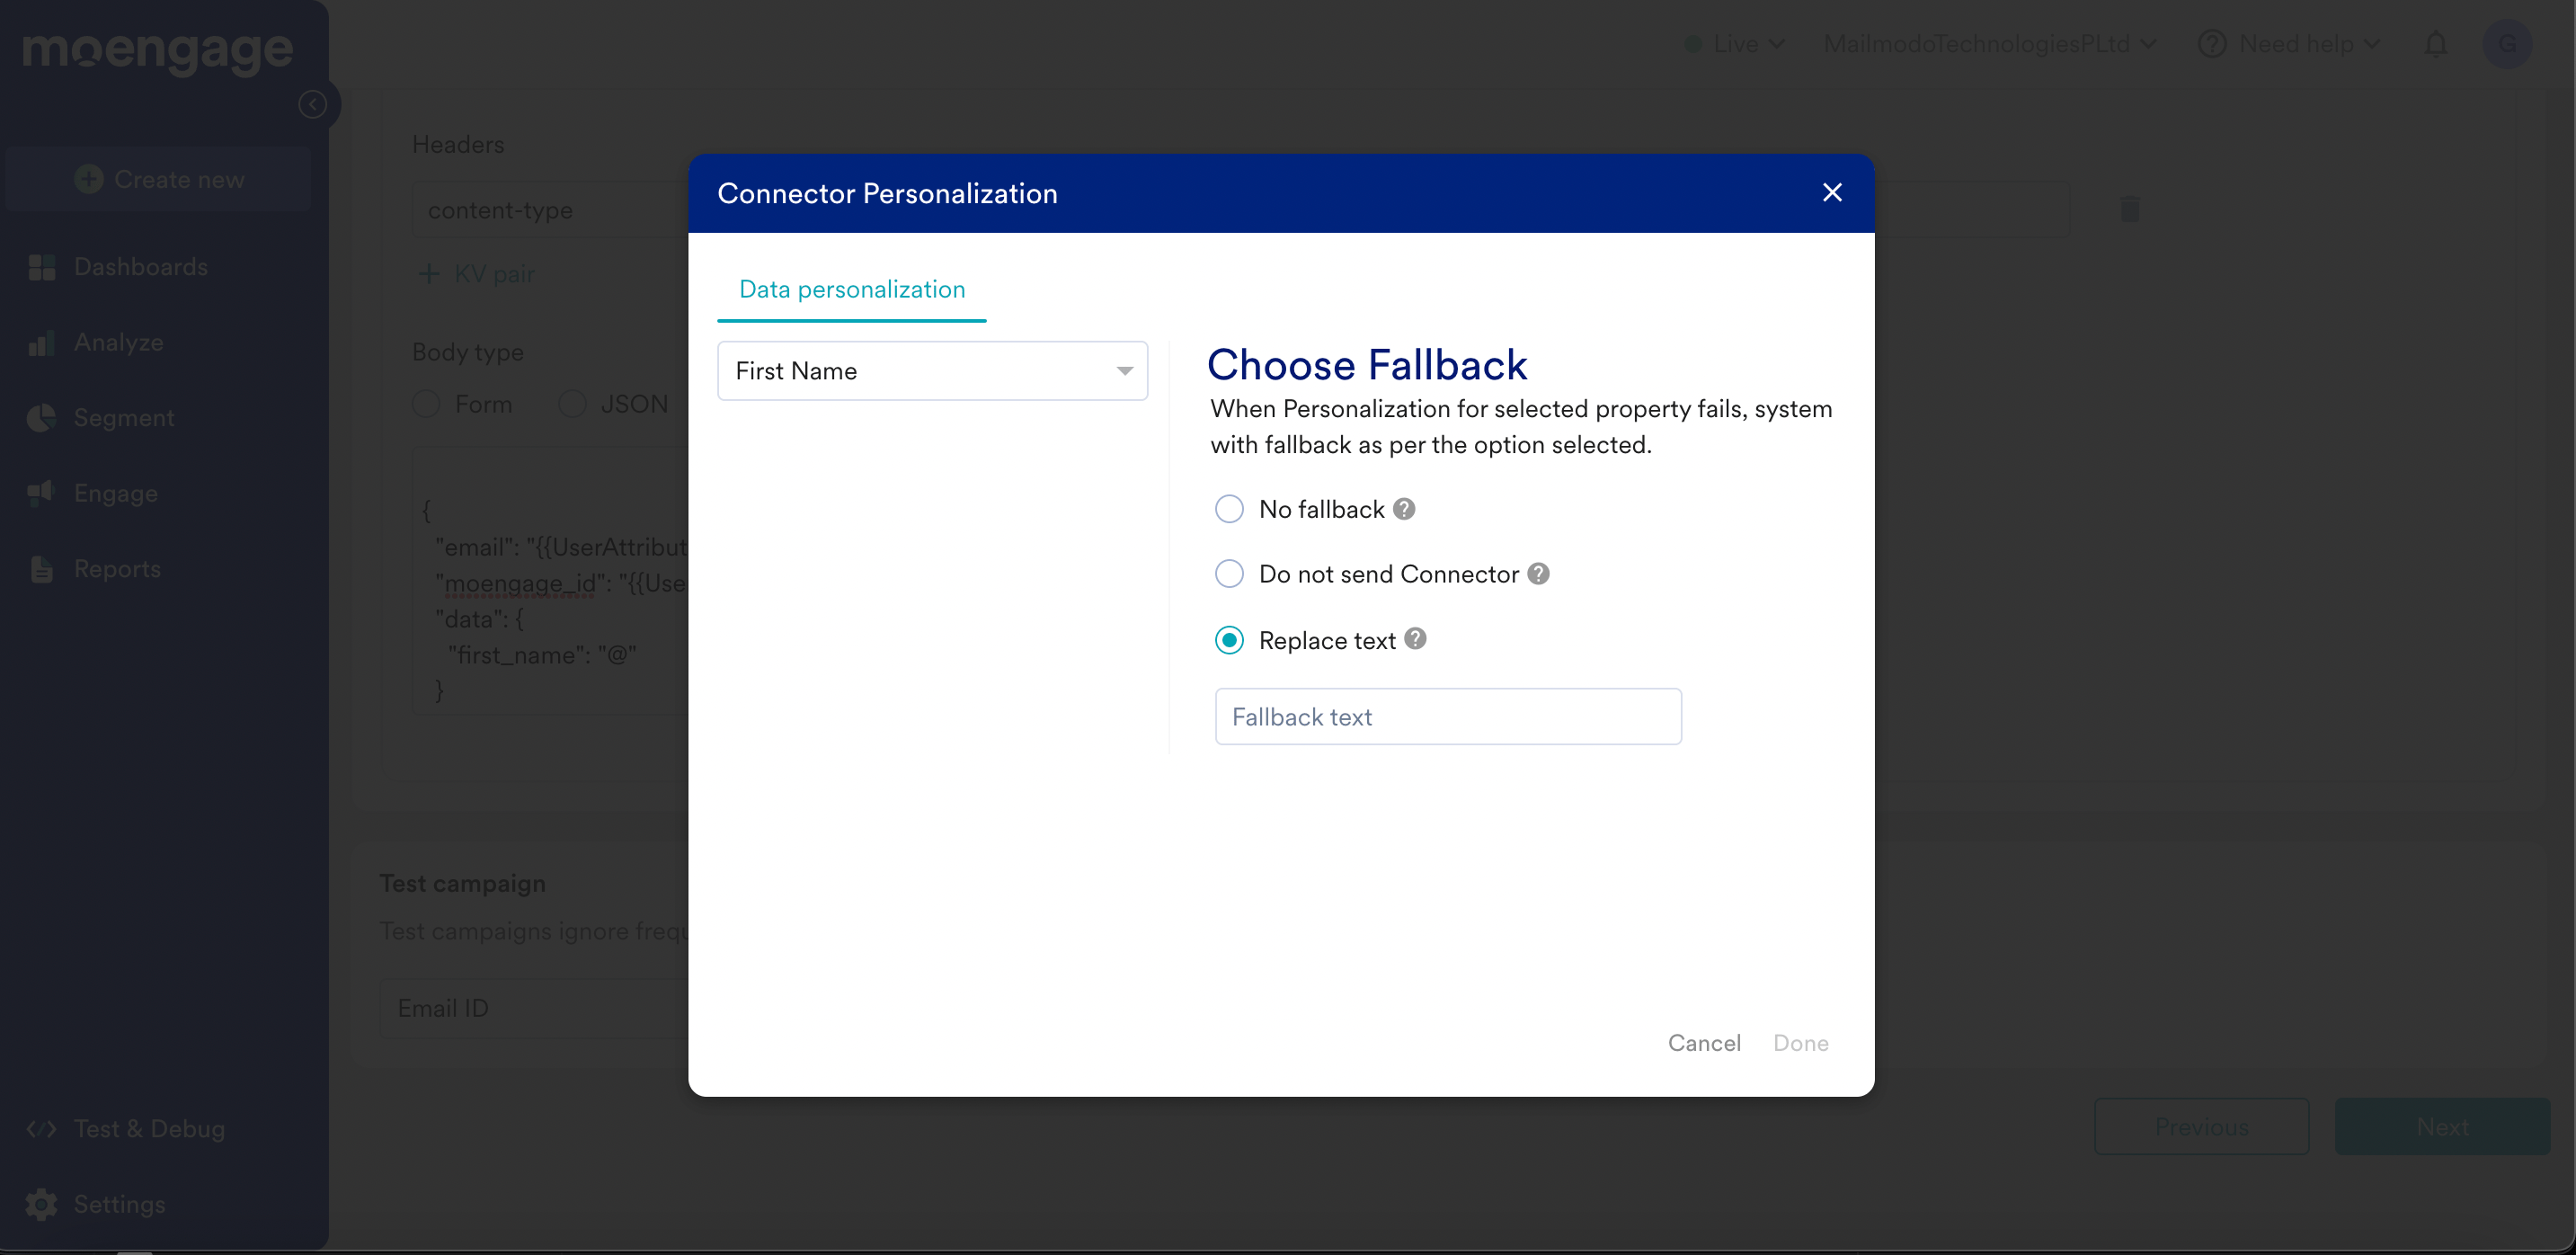
* For example, if your template has first\_name then delete \, type @, and select the First Name attribute in the ensuing pop-up.
* Please choose fallback as per your requirement for when personalization fails for the selected property in the above pop-up
* For example, if your template has first\_name then delete \, type @, and select the First Name attribute in the ensuing pop-up.
 **Body from Mailmodo**
```json JSON theme={null}
{
"email": "{{UserAttribute['Email']}}",
"moengage_id": "{{UserAttribute['ID']}}",
"data": {
"first_name": ""
}
}
```
**Body type in MoEngage after personalization mapping**
```json JSON theme={null}
{
"email": "{{UserAttribute['Email']}}",
"moengage_id": "{{UserAttribute['ID']}}",
"data": {
"first_name": "{{UserAttribute['First Name']}}"
}
}
```
* Both email and moengage\_id (customer\_id) are mapped by default in the Mailmodo body.
* If you're storing email ID in any other attribute, delete the `{{UserAttribute['Email']}}` value, type @, and map it to that attribute.
* Also, if you're manually mapping, map the moengage\_id to the **ID (a.k.a customer\_id)** attribute in MoEngage.
The moengage\_id (a.k.a ID or customer\_id in MoEngage) of the email recipients is mandatorily needed to push the campaign activity to MoEngage. Hence the same is configured in the body while setting up the MoEngage Transactional (Trigger) campaign. For more information, please refer to the [article](https://support.mailmodo.com/support/solutions/articles/84000364851-moengage-integration-overview)
* Test the campaign using email ID and click on Next.
**Body from Mailmodo**
```json JSON theme={null}
{
"email": "{{UserAttribute['Email']}}",
"moengage_id": "{{UserAttribute['ID']}}",
"data": {
"first_name": ""
}
}
```
**Body type in MoEngage after personalization mapping**
```json JSON theme={null}
{
"email": "{{UserAttribute['Email']}}",
"moengage_id": "{{UserAttribute['ID']}}",
"data": {
"first_name": "{{UserAttribute['First Name']}}"
}
}
```
* Both email and moengage\_id (customer\_id) are mapped by default in the Mailmodo body.
* If you're storing email ID in any other attribute, delete the `{{UserAttribute['Email']}}` value, type @, and map it to that attribute.
* Also, if you're manually mapping, map the moengage\_id to the **ID (a.k.a customer\_id)** attribute in MoEngage.
The moengage\_id (a.k.a ID or customer\_id in MoEngage) of the email recipients is mandatorily needed to push the campaign activity to MoEngage. Hence the same is configured in the body while setting up the MoEngage Transactional (Trigger) campaign. For more information, please refer to the [article](https://support.mailmodo.com/support/solutions/articles/84000364851-moengage-integration-overview)
* Test the campaign using email ID and click on Next.
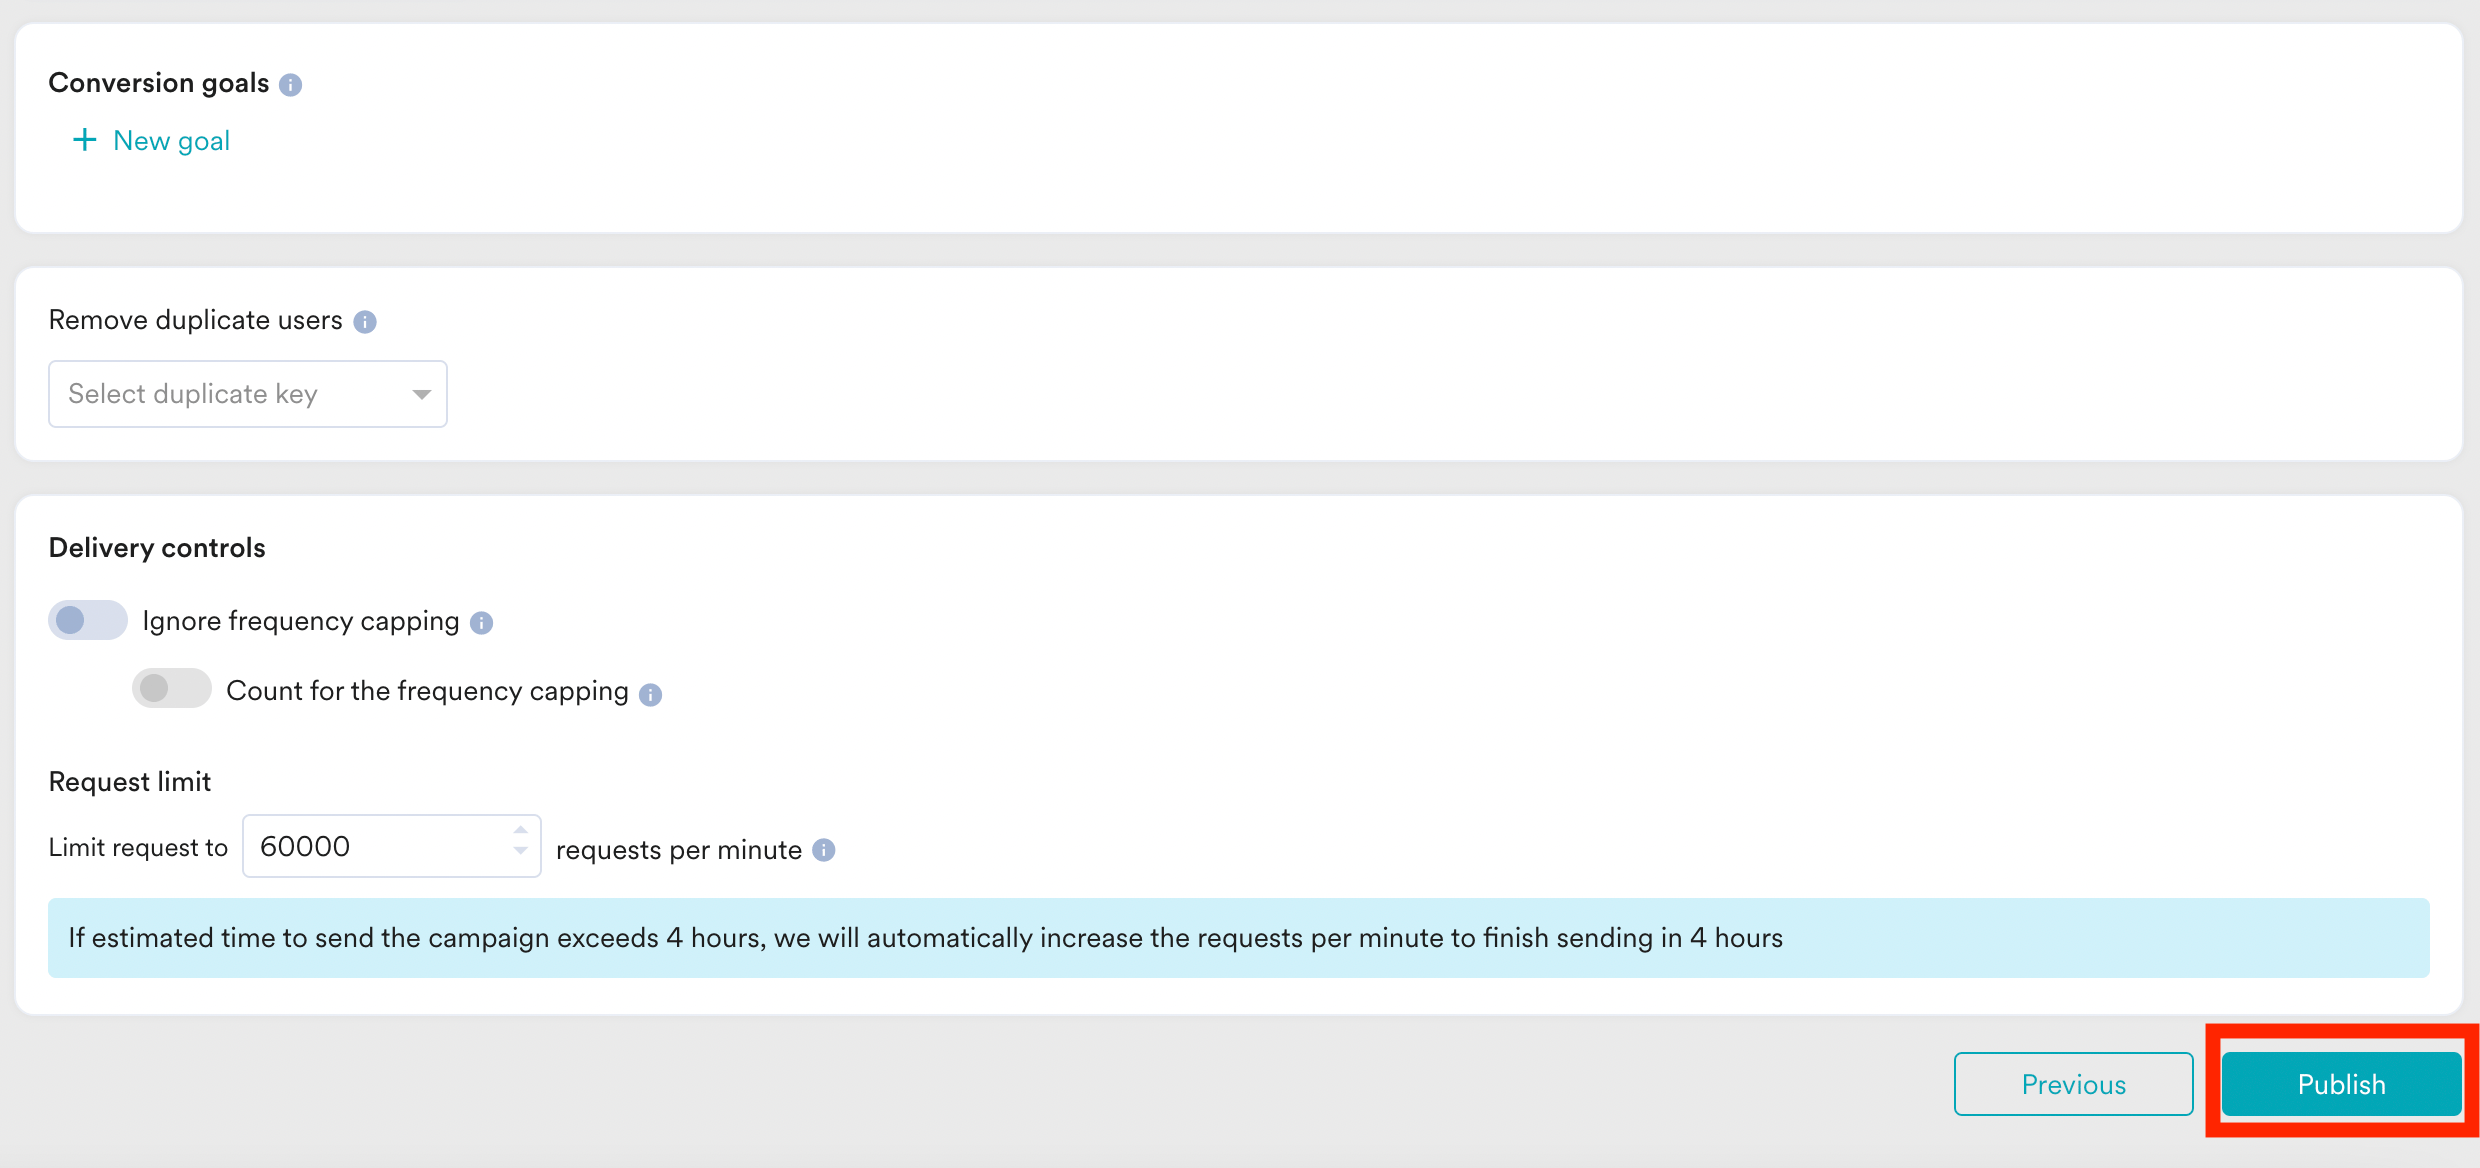
 **Step 5:** Publish the campaign after entering requisite details like schedule date and time, conversion goals, delivery controls, etc in the Schedule and Goals step.
 Sending Requirement Add Hard Bounce, Spam, and Unsubscribe criteria in Segmentation of the campaign creation manually to ensure your domain reputation is intact.
# **Personalization**
1. Use the personalization tag `'${attribute_name}'` to personalize subject lines, links, and images in Mailmodo.
2. Ensure that the attributes with respective values are passed in the API call from MoEngage to populate the same and personalize templates.
3. Ensure to use MoEngage User attributes in the attribute values to personalize the Mailmodo templates using MoEngage attribute personalization.
4. **Personalize Images in Mailmodo. For more about how to personalize images in Mailmodo Templates, refer to the [How to use dynamic image feature in your campaign](https://support.mailmodo.com/support/solutions/articles/84000351245-how-to-use-dynamic-image-feature-in-your-campaign).**
# Analyze Campaign Data in MoEngage
1. For more information about the analysis of campaigns, refer to [Analyze emails in MoEngage](/user-guide/campaigns-and-channels/email/analyze/email-analytics-and-info).
2. Export the response data from Mailmodo and use the exported data in MoEngage [Data APIs](/api/data/data-overview).
# Limitations of MoEngage × Mailmodo Integration
1. Templates created in Mailmodo cannot be synced back to MoEngage. Switch back to Mailmodo from MoEngage to view the AMP templates.
2. A/B testing is based on Subject Lines and the distribution is always 50-50%.
3. Locales are not available in Mailmodo Campaigns.
4. MoEngage Content API is not supported in Mailmodo Campaigns.
Sending Requirement Add Hard Bounce, Spam, and Unsubscribe criteria in Segmentation of the campaign creation manually to ensure your domain reputation is intact.
# **Personalization**
1. Use the personalization tag `'${attribute_name}'` to personalize subject lines, links, and images in Mailmodo.
2. Ensure that the attributes with respective values are passed in the API call from MoEngage to populate the same and personalize templates.
3. Ensure to use MoEngage User attributes in the attribute values to personalize the Mailmodo templates using MoEngage attribute personalization.
4. **Personalize Images in Mailmodo. For more about how to personalize images in Mailmodo Templates, refer to the [How to use dynamic image feature in your campaign](https://support.mailmodo.com/support/solutions/articles/84000351245-how-to-use-dynamic-image-feature-in-your-campaign).**
# Analyze Campaign Data in MoEngage
1. For more information about the analysis of campaigns, refer to [Analyze emails in MoEngage](/user-guide/campaigns-and-channels/email/analyze/email-analytics-and-info).
2. Export the response data from Mailmodo and use the exported data in MoEngage [Data APIs](/api/data/data-overview).
# Limitations of MoEngage × Mailmodo Integration
1. Templates created in Mailmodo cannot be synced back to MoEngage. Switch back to Mailmodo from MoEngage to view the AMP templates.
2. A/B testing is based on Subject Lines and the distribution is always 50-50%.
3. Locales are not available in Mailmodo Campaigns.
4. MoEngage Content API is not supported in Mailmodo Campaigns.