> ## Documentation Index
> Fetch the complete documentation index at: https://moengage.com/docs/llms.txt
> Use this file to discover all available pages before exploring further.
# Skycore
# Introduction
[Skycore](https://www.skycore.com/) helps issue personalized Mobile Wallet Passes to your customers through SMS, MMS, Web, QR code, or email. You can send multiple types of passes including coupons, gift cards, loyalty cards, event tickets, and boarding passes.
# MoEngage × Skycore
The MoEngage and Skycore integration can help take your loyalty or coupon program to the next level by sending passes generated by Skycore to your audience through MoEngage campaigns.
With this integration, you can -
1. Create passes using [Pass Issuance Links](https://www.skycore.com/help/pass-issuance-links-2/)
2. Update passes on the fly based on user actions (events)
# Integration
* Ensure you have access to your Skycore account.
* Ensure you have your Skycore API Key. You can access this by navigating to Settings >> API Settings on your Skycore dashboard.
* Ensure you have a Pass Template ready.
## Create passes using Pass Issuance Links
Within MoEngage campaigns, you can set up a Pass Issuance link to generate a unique URL for your customers to install their pass on either Android or iOS wallets. These can be sent via email or embedded into a website.
### Step 1: Create a new Pass Issuance Link on Skycore
1. Please follow the steps here to [Create a New Pass Issuance Link](https://www.skycore.com/help/pass-issuance-links-2/).
2. Once created, the link shows up on the *Pass Issuance Links* tab. *Note: MoEngage only supports SHA256 (with and without salt) encryptions.* 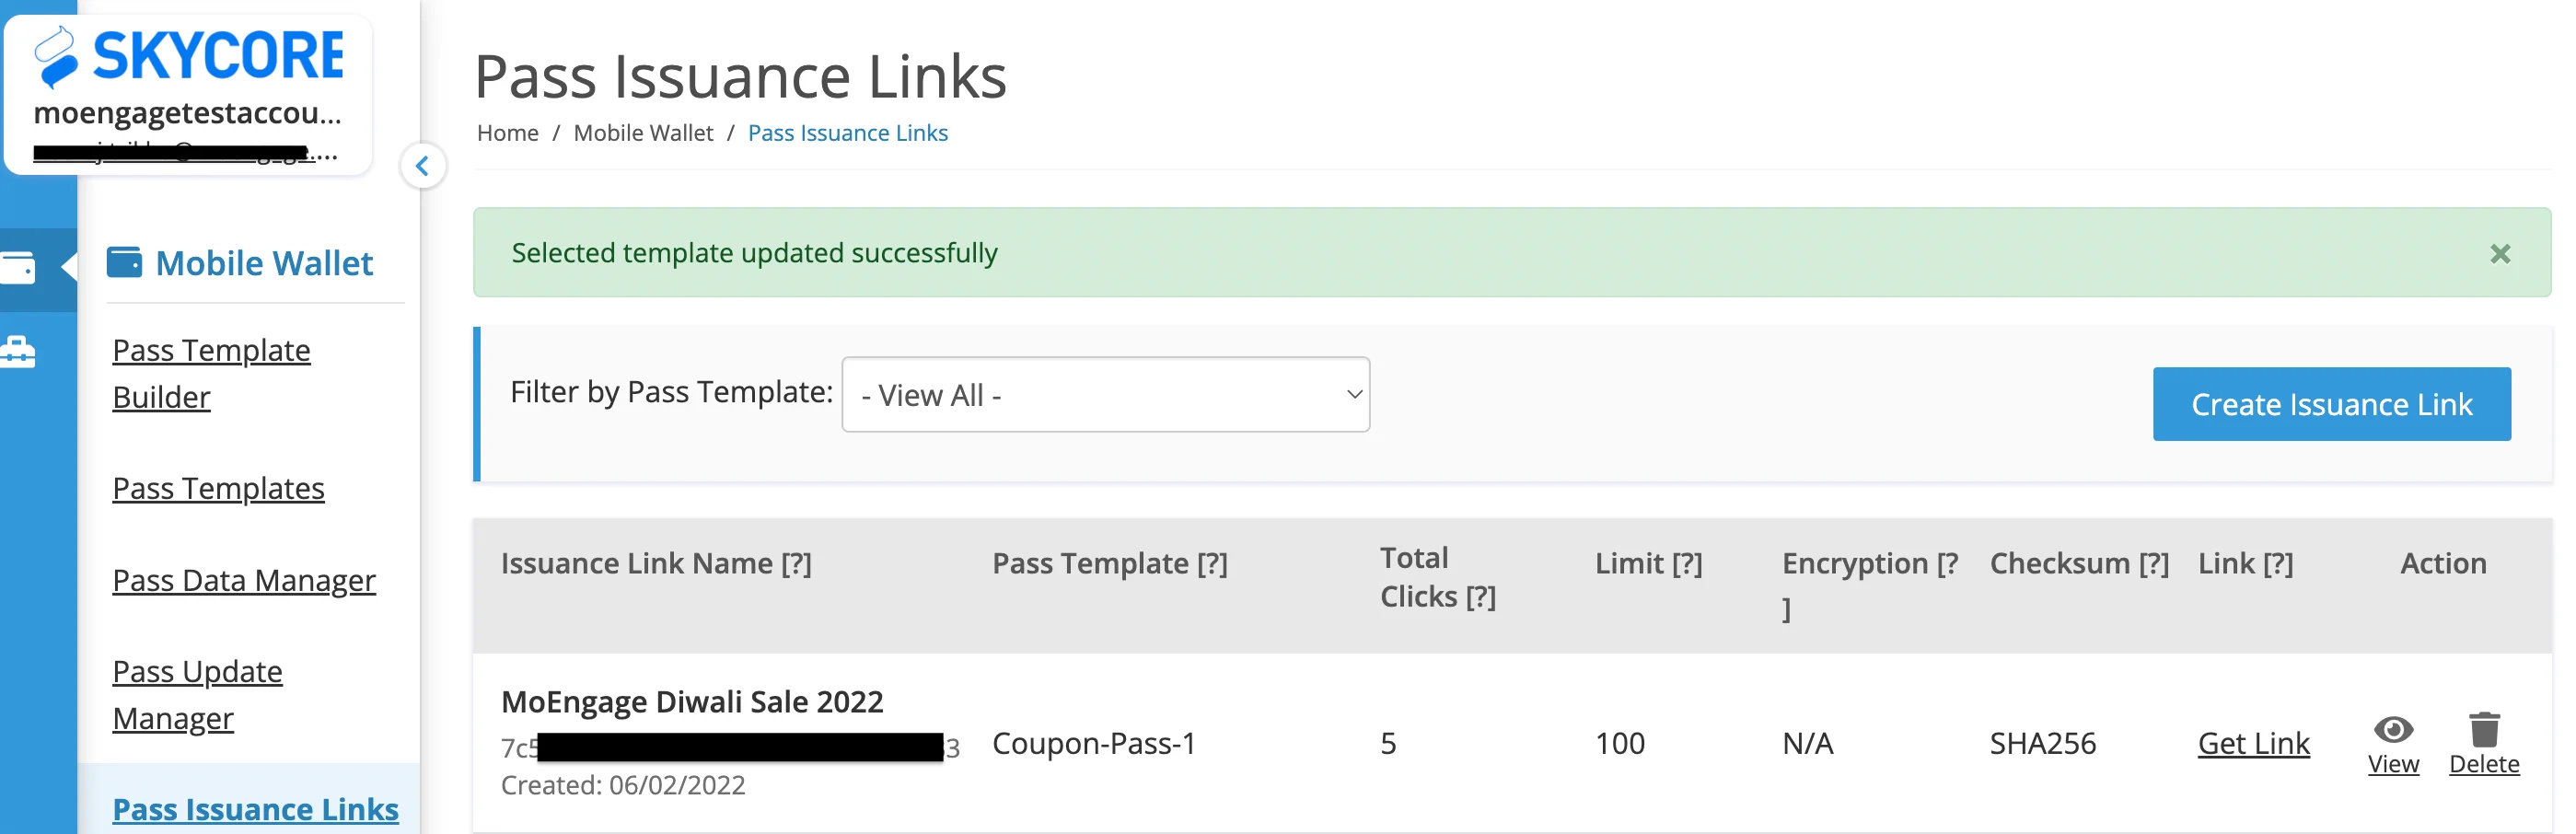 3. Click *Get Link*. Your link will look like this:
```text wrap theme={null}
https://d2c.skycore.com/wallet/gc/{Unique-Link-ID}?{Paramater-1}={Value-1}&{Paramater-2}={Value-2} ... &checksum={Hashed-Value}
```
### Step 2: Create and encode payload variable
1. Go to step 2 of your campaign creation.
3. Click *Get Link*. Your link will look like this:
```text wrap theme={null}
https://d2c.skycore.com/wallet/gc/{Unique-Link-ID}?{Paramater-1}={Value-1}&{Paramater-2}={Value-2} ... &checksum={Hashed-Value}
```
### Step 2: Create and encode payload variable
1. Go to step 2 of your campaign creation. 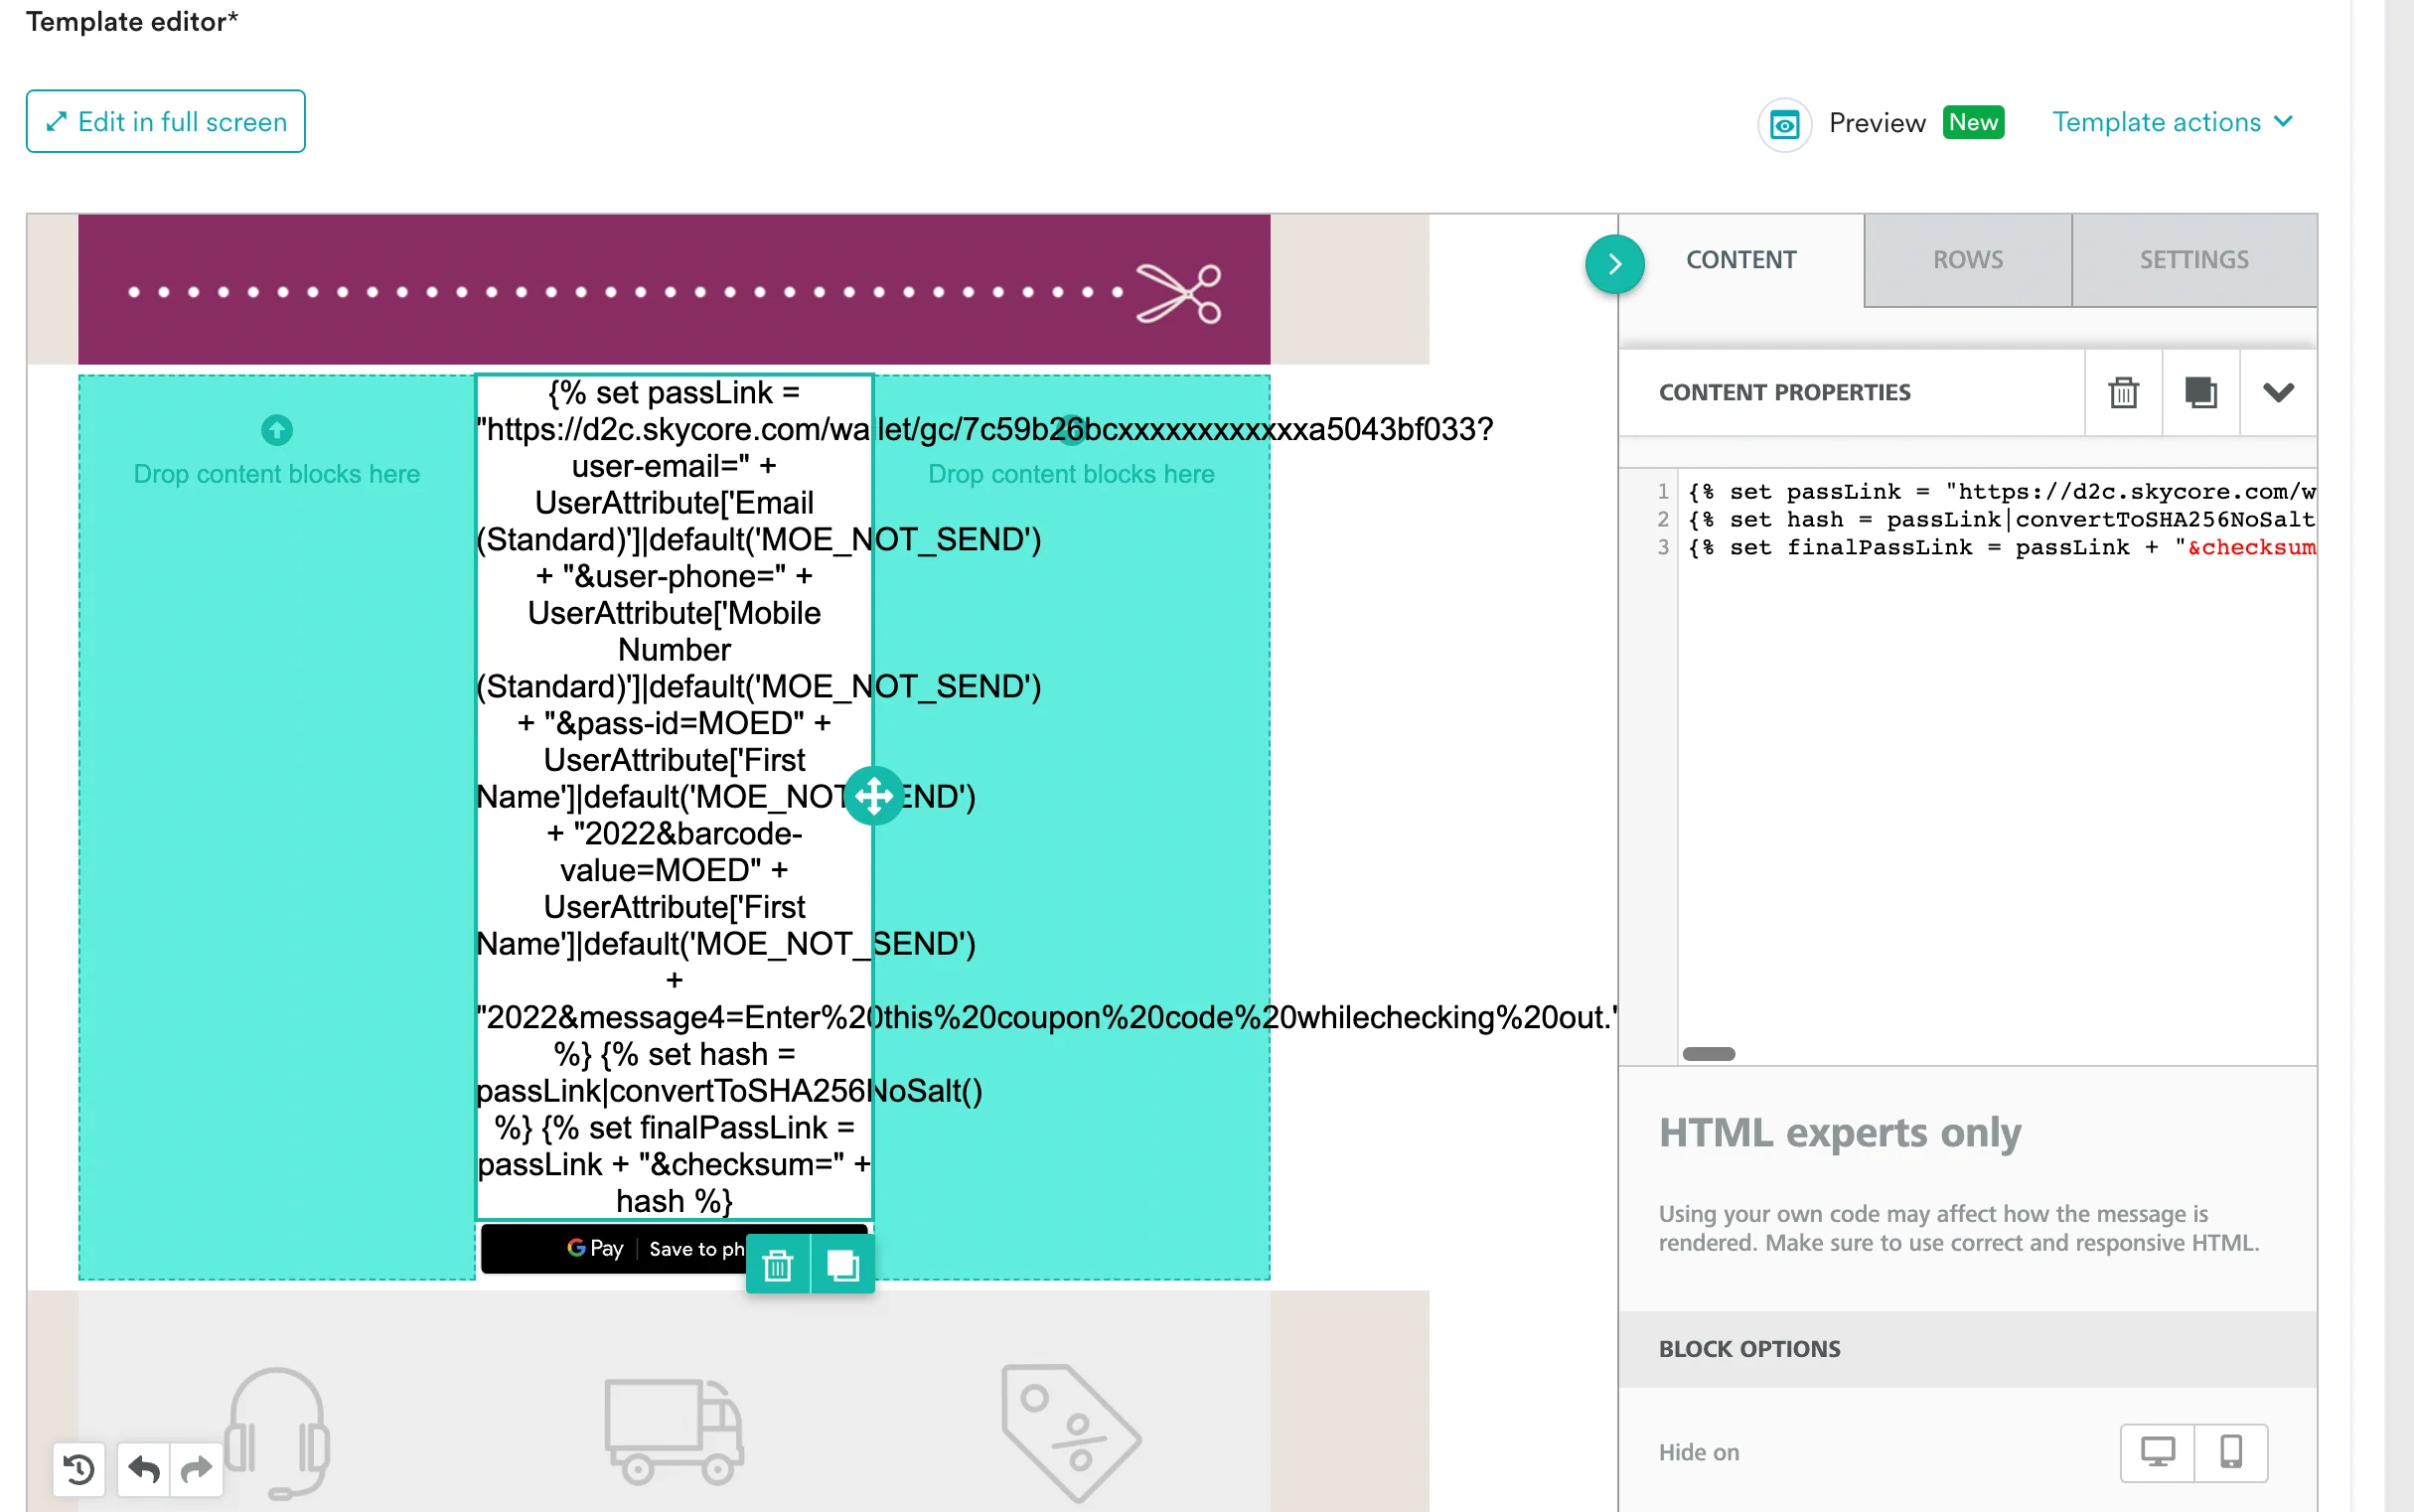 2. Inside your template, create a passlink (using the link copied in Step 1) within an HTML Block:
```html HTML wrap theme={null}
{% set passLink = "https://d2c.skycore.com/wallet/gc/7c59b26bcxxxxxxxxxxxxa5043bf033?user-email=" + {{UserAttribute['Email (Standard)']|default('MOE_NOT_SEND')}} + "&user-phone=" + {{UserAttribute['Mobile Number (Standard)']|default('MOE_NOT_SEND')}} + "&pass-id=MOED" + {{UserAttribute['First Name']|default('MOE_NOT_SEND')}} + "2022&barcode-value=MOED" + {{UserAttribute['First Name']|default('MOE_NOT_SEND')}} + "2022&message4=Enter this coupon code while checking out." %}
```
Hash the passlink using SHA256 (no salt):
```django theme={null}
{% set hash = passLink|convertToSHA256NoSalt() %}
```
Append this hash as a **checksum** parameter in the **passLink** variable:
```django theme={null}
{% set finalPassLink = passLink + "&checksum=" + hash %}
```
### Step 3: Preview your URL
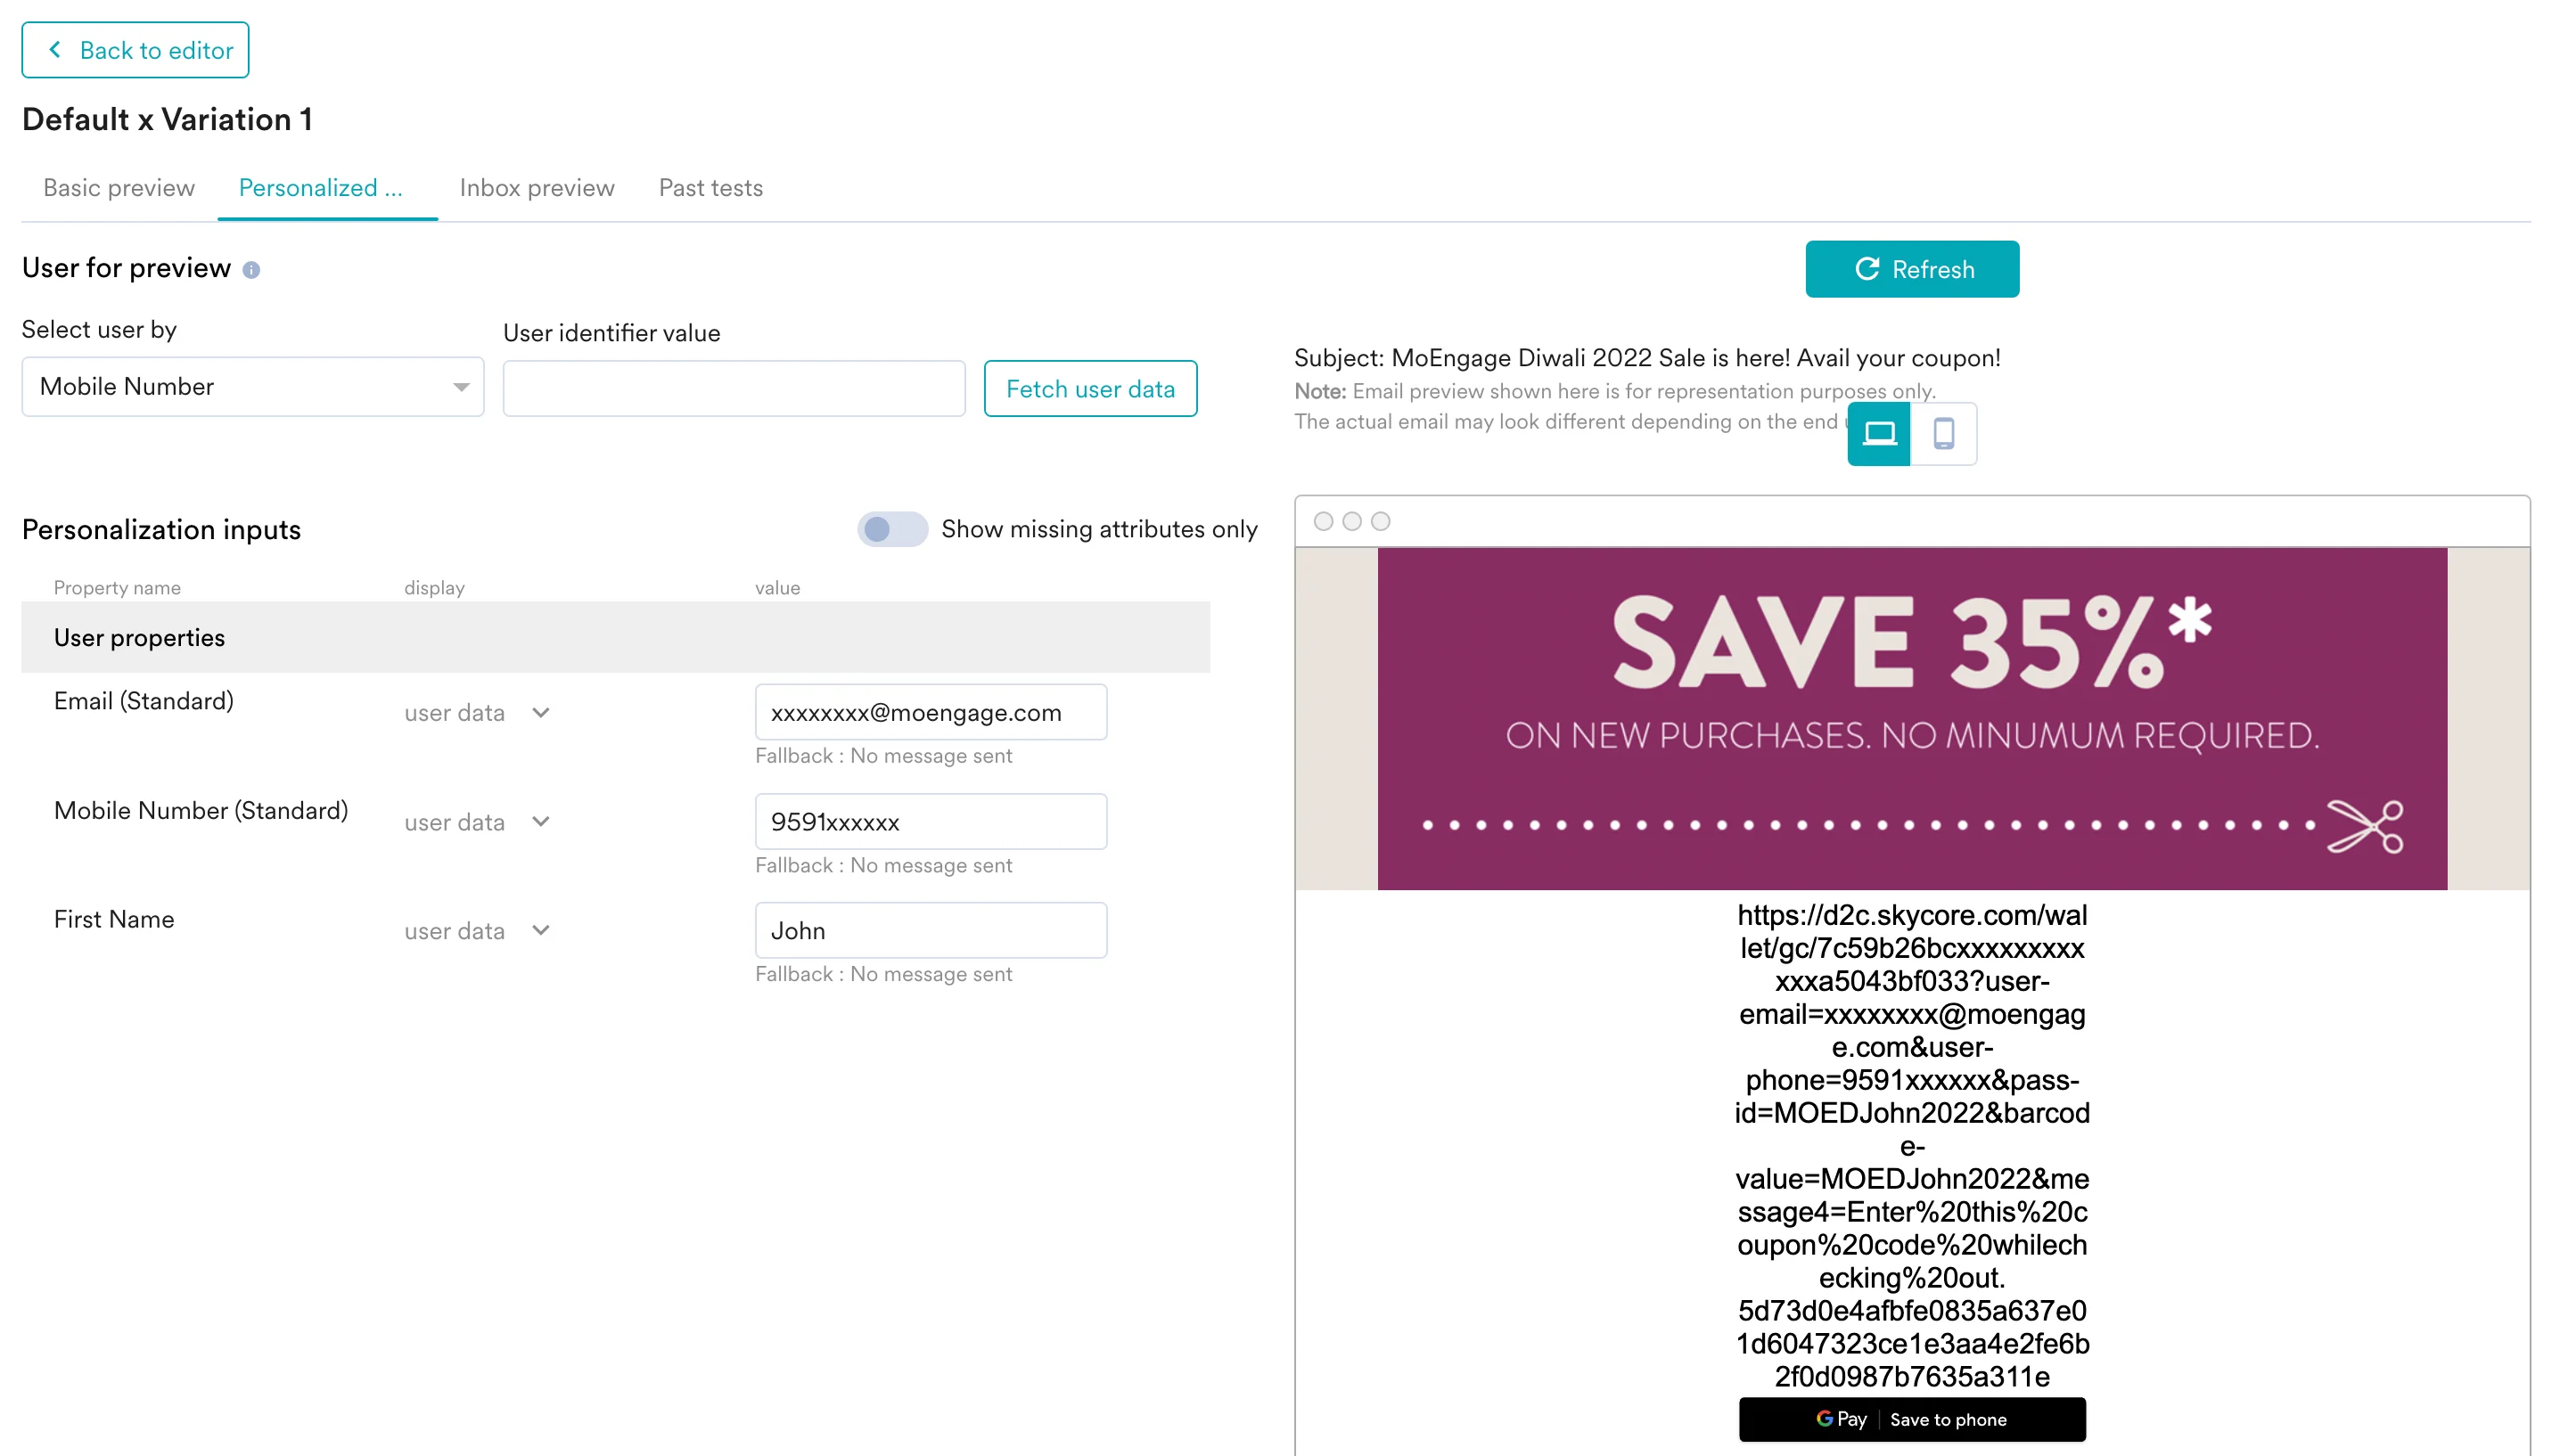
You can print the variables in the template or use the [Personalized Previews](/user-guide/campaigns-and-channels/getting-started/message-personalization/personalized-preview) to preview and validate
2. Inside your template, create a passlink (using the link copied in Step 1) within an HTML Block:
```html HTML wrap theme={null}
{% set passLink = "https://d2c.skycore.com/wallet/gc/7c59b26bcxxxxxxxxxxxxa5043bf033?user-email=" + {{UserAttribute['Email (Standard)']|default('MOE_NOT_SEND')}} + "&user-phone=" + {{UserAttribute['Mobile Number (Standard)']|default('MOE_NOT_SEND')}} + "&pass-id=MOED" + {{UserAttribute['First Name']|default('MOE_NOT_SEND')}} + "2022&barcode-value=MOED" + {{UserAttribute['First Name']|default('MOE_NOT_SEND')}} + "2022&message4=Enter this coupon code while checking out." %}
```
Hash the passlink using SHA256 (no salt):
```django theme={null}
{% set hash = passLink|convertToSHA256NoSalt() %}
```
Append this hash as a **checksum** parameter in the **passLink** variable:
```django theme={null}
{% set finalPassLink = passLink + "&checksum=" + hash %}
```
### Step 3: Preview your URL
You can print the variables in the template or use the [Personalized Previews](/user-guide/campaigns-and-channels/getting-started/message-personalization/personalized-preview) to preview and validate
 ### Step 4: Add Save Pass option in your MoEngage campaigns
Add a Save Pass Button according to your design specifications from [Google](https://developers.google.com/pay/passes/guides/get-started/api-guidelines/button-guidelines) (Android) and [Apple](https://developer.apple.com/wallet/Add-to-Apple-Wallet-Guidelines.pdf) (iOS) respectively.
1. Insert a new image inside your template.
2. In your File Manager, click **Import** and then select **URL**.
### Step 4: Add Save Pass option in your MoEngage campaigns
Add a Save Pass Button according to your design specifications from [Google](https://developers.google.com/pay/passes/guides/get-started/api-guidelines/button-guidelines) (Android) and [Apple](https://developer.apple.com/wallet/Add-to-Apple-Wallet-Guidelines.pdf) (iOS) respectively.
1. Insert a new image inside your template.
2. In your File Manager, click **Import** and then select **URL**.  For your reference, here are the URLs. For Android:
```text theme={null}
https://messagecontent-public.s3.amazonaws.com/wallet/add-to-wallet-buttons/Save_to_Google_Pay.svg
```
For Apple:
```text theme={null}
https://messagecontent-public.s3.amazonaws.com/wallet/add-to-wallet-buttons/Add_to_Apple_Wallet.svg
```
3. Select the appropriate image to show.
4. In the URL section, type:
```text theme={null}
{{finalPassLink}}
```
For your reference, here are the URLs. For Android:
```text theme={null}
https://messagecontent-public.s3.amazonaws.com/wallet/add-to-wallet-buttons/Save_to_Google_Pay.svg
```
For Apple:
```text theme={null}
https://messagecontent-public.s3.amazonaws.com/wallet/add-to-wallet-buttons/Add_to_Apple_Wallet.svg
```
3. Select the appropriate image to show.
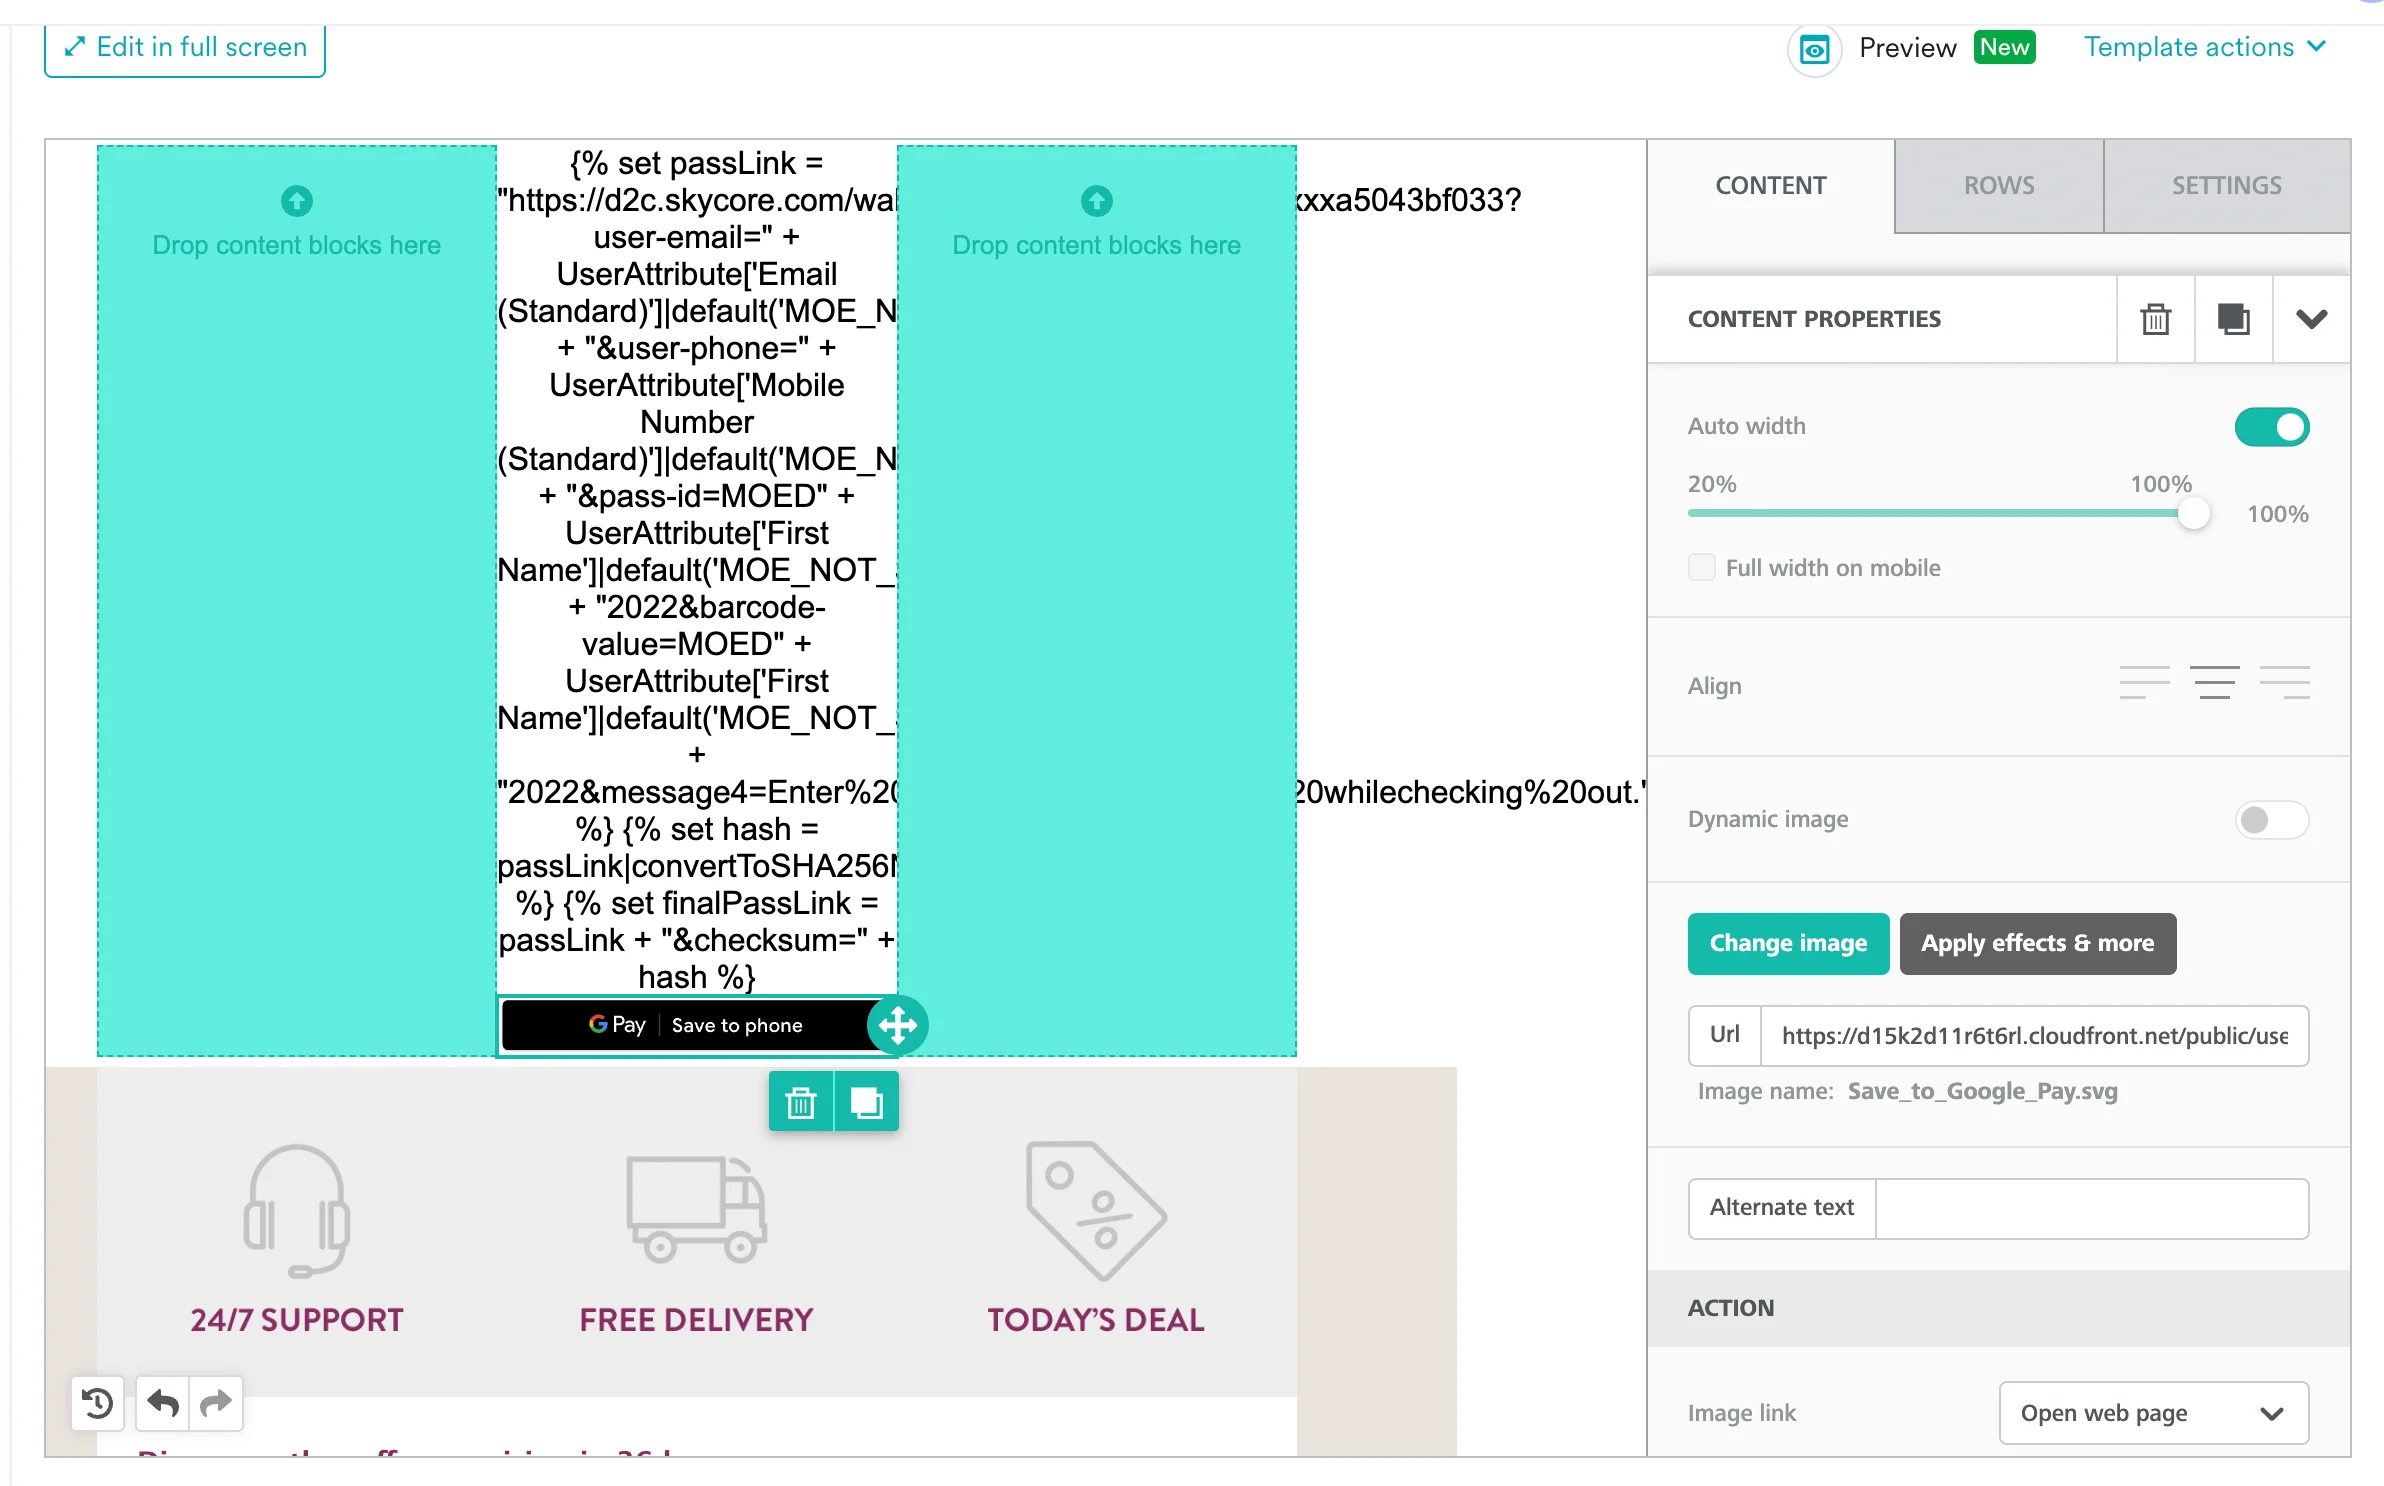
4. In the URL section, type:
```text theme={null}
{{finalPassLink}}
```
 Now you are all set. You can test the campaign and verify.
## Update passes dynamically based on user actions (events)
Within MoEngage, you can set up an *Event Triggered Connector Campaign* to update an existing pass based on your user’s behavior. Check out the following links for information on useful Skycore endpoints-
1. [Gift Card API](https://www.skycore.com/help/gift-card/)
2. [Coupon API](https://www.skycore.com/help/coupon/)
3. [Loyalty Card API](https://www.skycore.com/help/loyalty-card-api/)
4. [Event Ticket API](https://www.skycore.com/help/loyalty-card-api/)
5. [Boarding Pass API](https://www.skycore.com/help/boarding-pass/)
### Step 1: Define the right payload
Your payload varies depending on the type of pass and template that you want to update. Use the links shared above to get the relevant payload.
Let's consider the following use-case: *A marketer wants to mark the pass as void, if the user uninstalls the app.* So, we will be working with *Coupon APIs*. And will need to update the pass that was generated by the campaign earlier.
#### API endpoint
```text theme={null}
POST https://api.skycore.com/API/http/v3/
```
#### Payload
```json JSON theme={null}
{
"action": "updatepassdata",
"pass-id": "MOED{{UserAttribute['First Name']|default('MOE_NOT_SEND')}}2022",
"pass-template-id": "d5144e25f17*************************beaa",
"pass-data": {
"pass-status": "voided",
"pass-update-notification": "Your pass has expired."
}
}
```
### Step 2: Create a connector campaign on MoEngage
To create a connector campaign on MoEngage:
1. Navigate to **Create Campaign** > **Connectors** > **Custom** > **Event triggered**.
Now you are all set. You can test the campaign and verify.
## Update passes dynamically based on user actions (events)
Within MoEngage, you can set up an *Event Triggered Connector Campaign* to update an existing pass based on your user’s behavior. Check out the following links for information on useful Skycore endpoints-
1. [Gift Card API](https://www.skycore.com/help/gift-card/)
2. [Coupon API](https://www.skycore.com/help/coupon/)
3. [Loyalty Card API](https://www.skycore.com/help/loyalty-card-api/)
4. [Event Ticket API](https://www.skycore.com/help/loyalty-card-api/)
5. [Boarding Pass API](https://www.skycore.com/help/boarding-pass/)
### Step 1: Define the right payload
Your payload varies depending on the type of pass and template that you want to update. Use the links shared above to get the relevant payload.
Let's consider the following use-case: *A marketer wants to mark the pass as void, if the user uninstalls the app.* So, we will be working with *Coupon APIs*. And will need to update the pass that was generated by the campaign earlier.
#### API endpoint
```text theme={null}
POST https://api.skycore.com/API/http/v3/
```
#### Payload
```json JSON theme={null}
{
"action": "updatepassdata",
"pass-id": "MOED{{UserAttribute['First Name']|default('MOE_NOT_SEND')}}2022",
"pass-template-id": "d5144e25f17*************************beaa",
"pass-data": {
"pass-status": "voided",
"pass-update-notification": "Your pass has expired."
}
}
```
### Step 2: Create a connector campaign on MoEngage
To create a connector campaign on MoEngage:
1. Navigate to **Create Campaign** > **Connectors** > **Custom** > **Event triggered**. 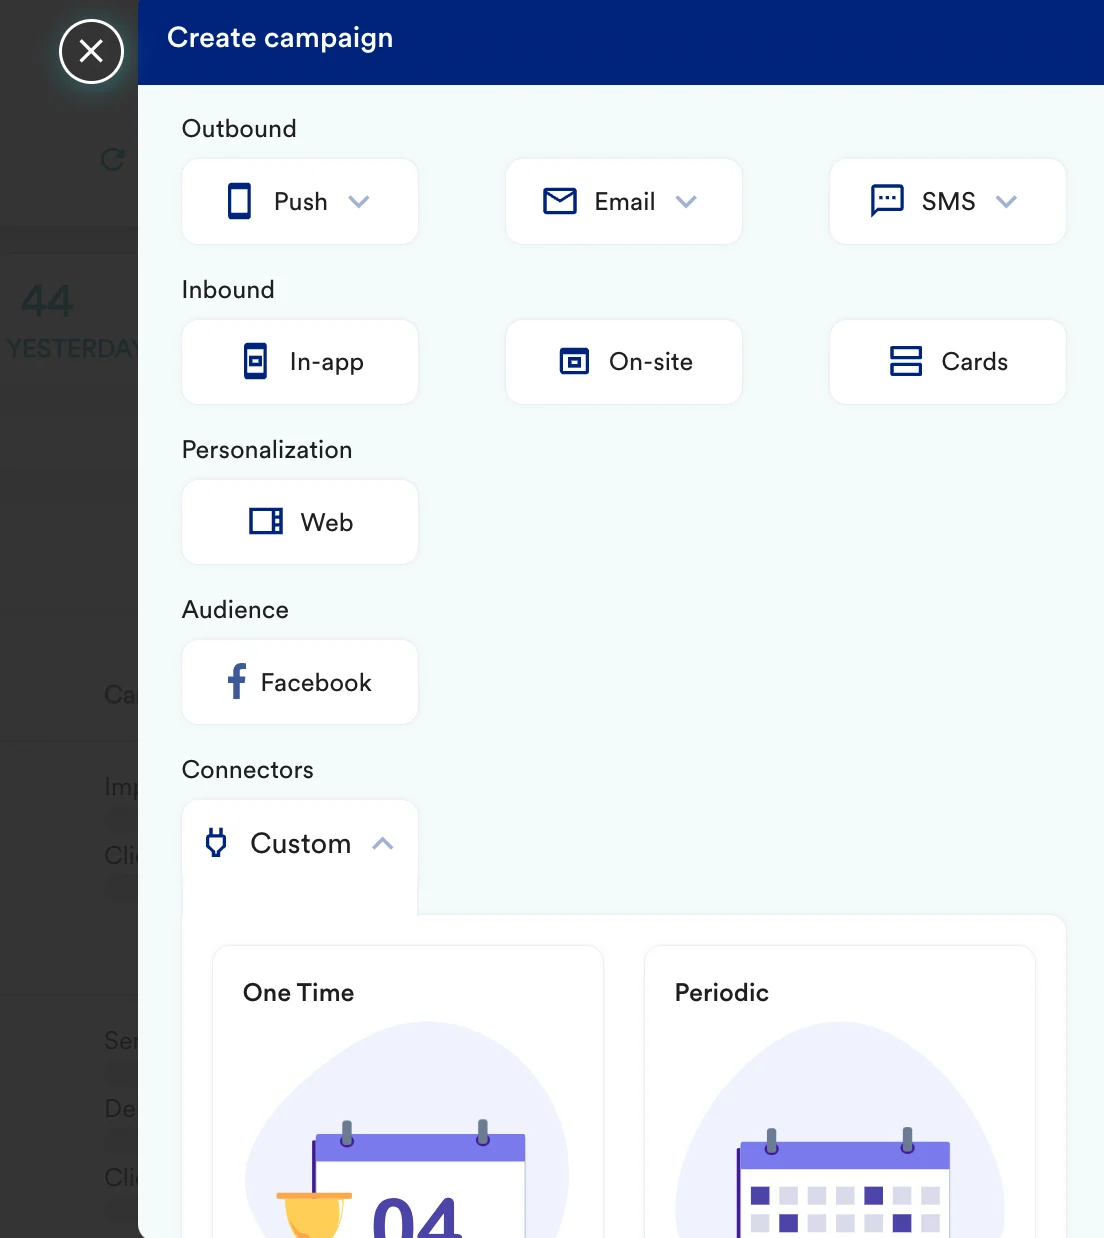 2. On step 2 of the campaign:
* Select the method as **POST**.
* Add the Webhook URL as: `https://api.skycore.com/API/http/v3/`
* In Headers, add:
* `X-Api-Key` as the API key you copied from the Skycore Settings page.
* `Content-Type` as `application/json`.
* In Body, choose **Raw** and type your customised payload. You can type "@" to add personalised content. For the example above, the payload looks like this:
```json JSON theme={null}
{
"action": "updatepassdata",
"pass-id": "MOED{{UserAttribute['First Name']|default('MOE_NOT_SEND')}}2022",
"pass-template-id": "d5144e25f17*************************beaa",
"pass-data": {
"pass-status": "voided",
"pass-update-notification": "Your pass has expired."
}
}
```
```json theme={null}
{kkk}
```
2. On step 2 of the campaign:
* Select the method as **POST**.
* Add the Webhook URL as: `https://api.skycore.com/API/http/v3/`
* In Headers, add:
* `X-Api-Key` as the API key you copied from the Skycore Settings page.
* `Content-Type` as `application/json`.
* In Body, choose **Raw** and type your customised payload. You can type "@" to add personalised content. For the example above, the payload looks like this:
```json JSON theme={null}
{
"action": "updatepassdata",
"pass-id": "MOED{{UserAttribute['First Name']|default('MOE_NOT_SEND')}}2022",
"pass-template-id": "d5144e25f17*************************beaa",
"pass-data": {
"pass-status": "voided",
"pass-update-notification": "Your pass has expired."
}
}
```
```json theme={null}
{kkk}
```
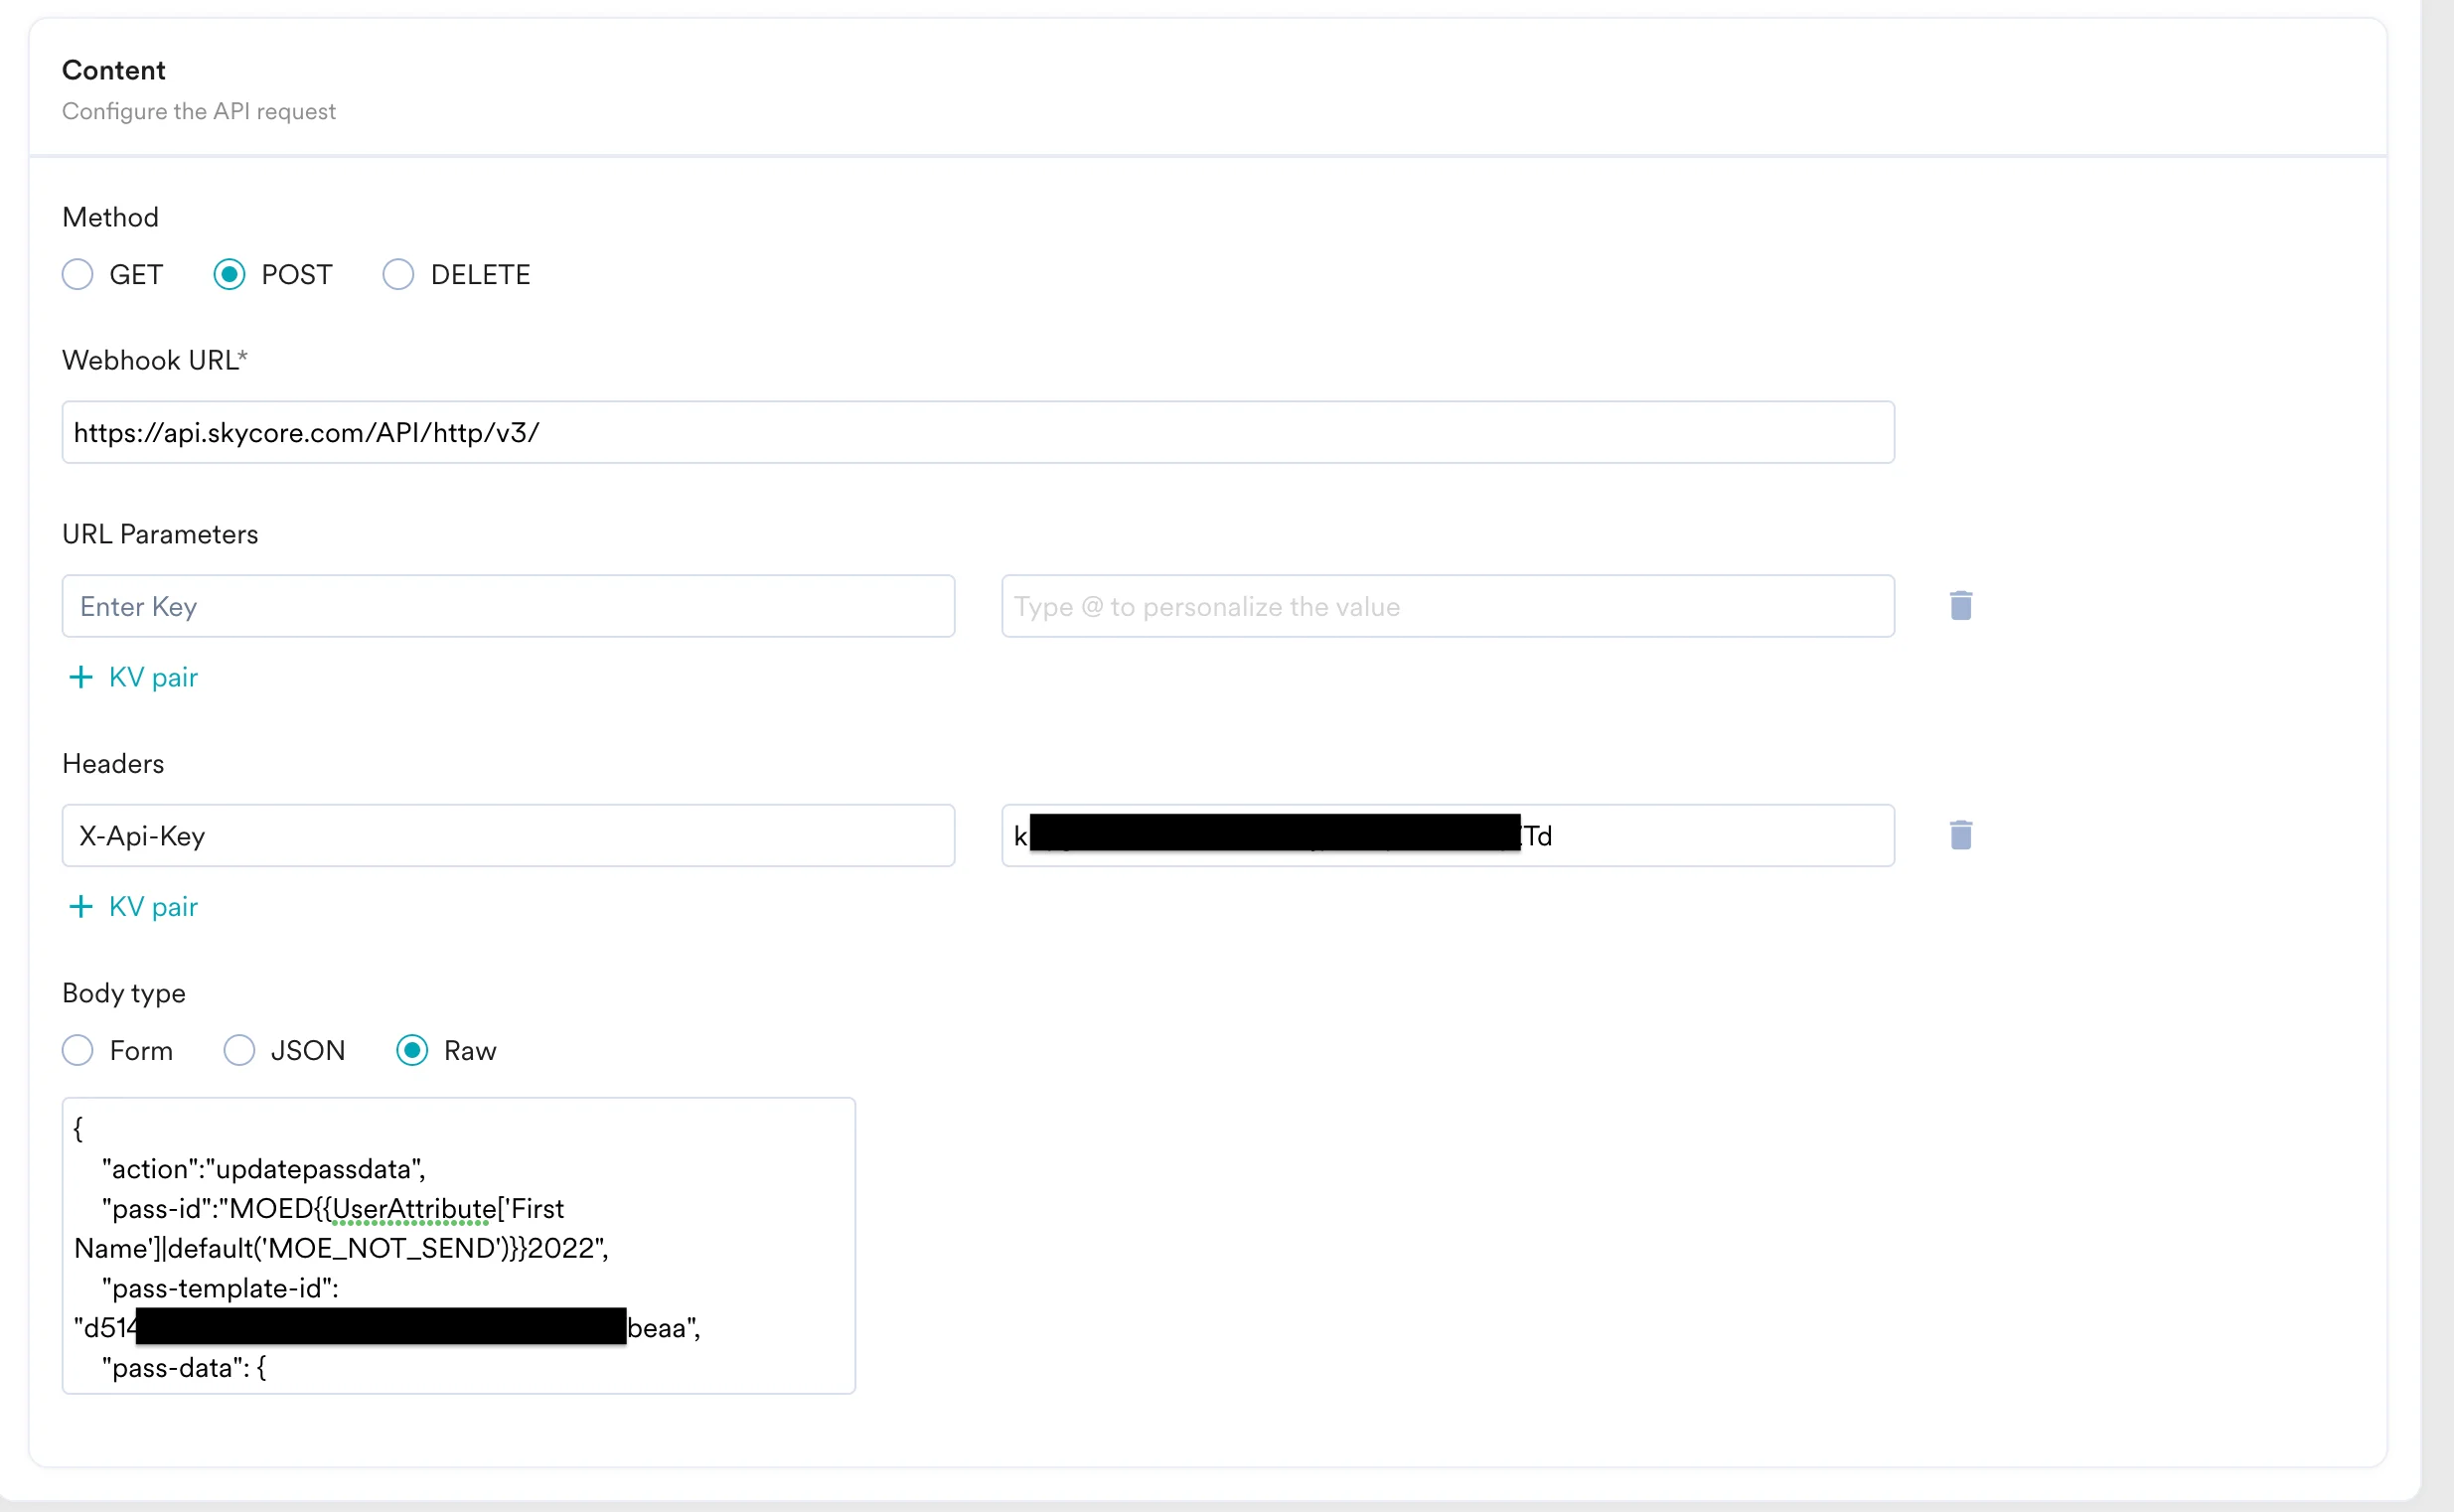 3. At this point, your campaign should be ready to test and send. You can also test your connector configuration using the Test functionality available on step 2 of Create Connector Campaign.
  If your test pass is successfully updated, your set-up is good to go. You can go ahead and Publish the campaign.
### Step 3: Preview your pass on Skycore
Click on the button in the test email and your new pass should be generated. You can choose to install it as well. To check whether Skycore is successfully capturing this,
1. Go to your Skycore's dashboard >> Mobile Wallet >> Pass Data Manager.
2. Click on the pass you want to view.
If your test pass is successfully updated, your set-up is good to go. You can go ahead and Publish the campaign.
### Step 3: Preview your pass on Skycore
Click on the button in the test email and your new pass should be generated. You can choose to install it as well. To check whether Skycore is successfully capturing this,
1. Go to your Skycore's dashboard >> Mobile Wallet >> Pass Data Manager.
2. Click on the pass you want to view.