> ## Documentation Index
> Fetch the complete documentation index at: https://moengage.com/docs/llms.txt
> Use this file to discover all available pages before exploring further.
# Alot Solutions
# Introduction
Alot Solutions is a leading communication platform that enables businesses to engage customers via SMS, WhatsApp, Voice, Email, RCS, and Chatbot. It provides secure, scalable, and personalized engagement strategies that optimize campaigns and enhance customer service. Enterprises of all sizes trust it.
Ensure you have access to your Alot Solutions dashboard and have the API key for your Alot Solutions account.
# Configure Alot Solutions as a Custom RCS Connector (Service Provider)
Perform the following steps to configure Alot Solutions as a connector:
1. On the left navigation menu in the MoEngage UI, go to **Settings** > **Channels** > **SMS & RCS** > **Sender configuration**.
2. On the **RCS** tab, click **+** **Add RCS Sender**.
3. Click the **alotdigital** tile.
4. On the Sender Details page, add the following details:  | Field | Description |
| ------------------- | ------------------------------------------------------------------------------------------------------------------------------------------------------------------------------------------------------------------------------------------------------------------------------------------------------------------------------------------------------------------------------------------------------------------------------------------------------------------------------------------------------------ |
| **Mark as default** | Turn this toggle on to mark the sender as the default sender for the service provider being configured. If marked as default, this sender will be used to send all RCS campaigns from MoEngage unless you select a different sender while creating the campaign. |
| **Sender type** | Select the sender type. The available options are:
| Field | Description |
| ------------------- | ------------------------------------------------------------------------------------------------------------------------------------------------------------------------------------------------------------------------------------------------------------------------------------------------------------------------------------------------------------------------------------------------------------------------------------------------------------------------------------------------------------ |
| **Mark as default** | Turn this toggle on to mark the sender as the default sender for the service provider being configured. If marked as default, this sender will be used to send all RCS campaigns from MoEngage unless you select a different sender while creating the campaign. |
| **Sender type** | Select the sender type. The available options are: - **Promotional**: Select this option when you are using the sender to send information about your brand, promote deals, or engage with users.
- **Transactional**: Select this option when you are using the sender to send alerts about transactions, security information, or any information that can be classified as transactional in nature.
- **OTP**: Select this option when you are using the sender to send OTPs.
|
| **Sender Name** | This field identifies the sender. Type the name of the sender here. |
| **Sender ID** | Enter the sender ID. This is the RCS agent/bot ID RBM uses to send RCS messages to users. |
| **API URL** | This field contains information about the URL that should be used to send an API request to the sender. Type the API Endpoint of the sender here. The API URL for Alot Solutions is: [https://web.rcspro.in/api/v1/rcsmt/sendMessage](https://web.rcspro.in/api/v1/rcsmt/sendMessage) |
| **Authorization** | This is the bearer token used for authorization. You can get this token from the Alot Solutions team. |
5. Click **Save** to save this sender configuration.\
Configuring delivery tracking enables you to monitor the status of message deliveries to end users. Similarly, to track user responses and take appropriate actions, you must set up an incoming message URL. To proceed, copy the URL from the MoEngage UI and send it via email to the Alot Solutions team for configuration.
# Configure SMS Fallback
Perform the following steps to configure SMS fallback:
1. On the left navigation menu in the MoEngage UI, go to **Settings** > **Channels** > **SMS & RCS** > **Sender configuration**.
2. On the **SMS** tab, click **+ Add custom service provider** in the upper-right corner.
3. On the Sender Details page, add the following details: 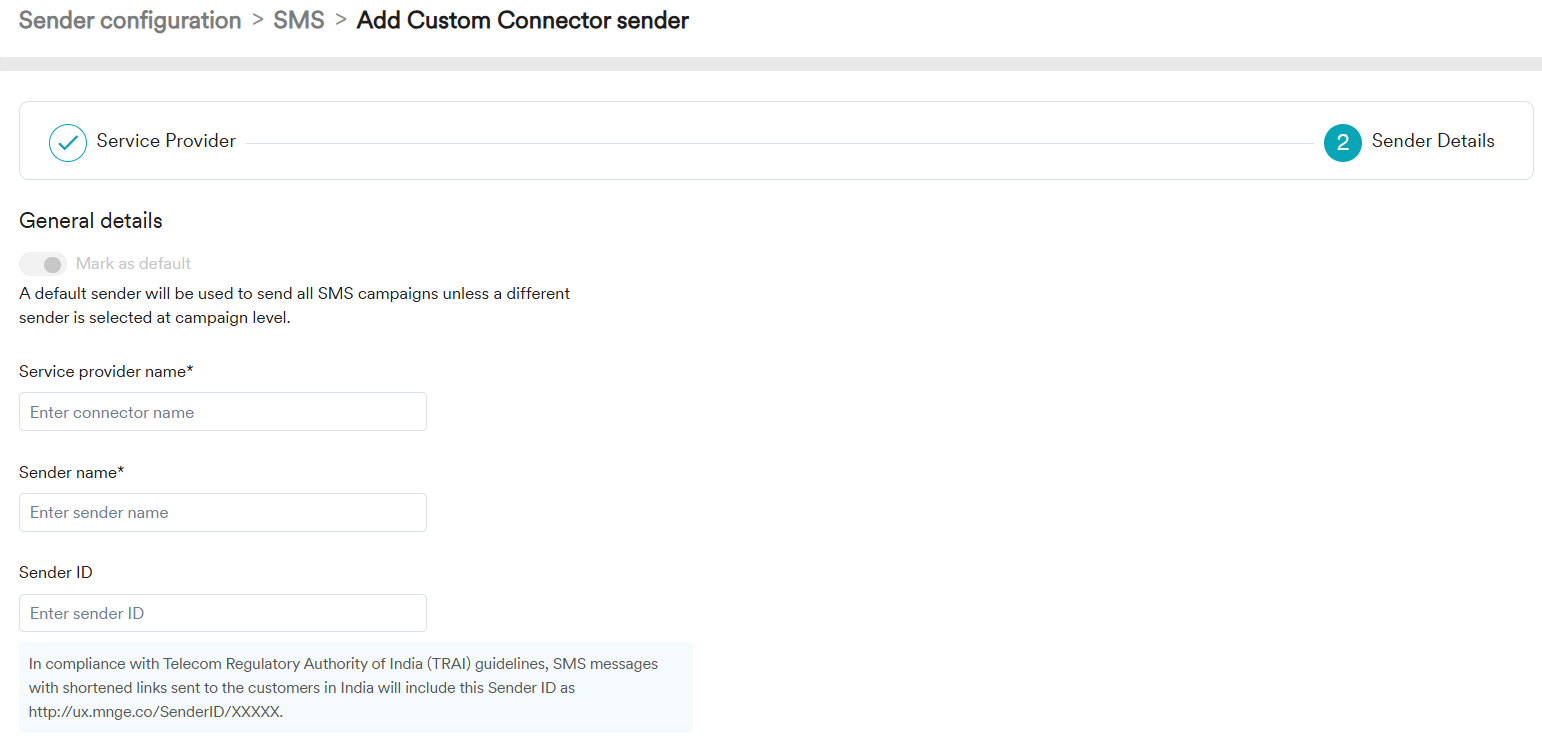 | Field | Description |
| ------------------------- | -------------------------------------------------------------------------------------------------------------------------------------------------------------------------------------------------------------------------------------------------------------------------------------- |
| **Mark as default** | Turn this toggle on to mark the sender as the default sender for the service provider being configured. If marked as default, this sender will be used to send all SMS campaigns from MoEngage unless you select a different sender while creating the campaign. |
| **Service Provider Name** | This field identifies the service provider you are configuring on the MoEngage UI and must be unique. Type the service provider's name here. |
| **Sender Name** | This field identifies the sender. Type the name of the sender here. |
| **Sender ID** | Enter the sender ID.
| Field | Description |
| ------------------------- | -------------------------------------------------------------------------------------------------------------------------------------------------------------------------------------------------------------------------------------------------------------------------------------- |
| **Mark as default** | Turn this toggle on to mark the sender as the default sender for the service provider being configured. If marked as default, this sender will be used to send all SMS campaigns from MoEngage unless you select a different sender while creating the campaign. |
| **Service Provider Name** | This field identifies the service provider you are configuring on the MoEngage UI and must be unique. Type the service provider's name here. |
| **Sender Name** | This field identifies the sender. Type the name of the sender here. |
| **Sender ID** | Enter the sender ID.
**Note**: In compliance with Telecom Regulatory Authority of India (TRAI) guidelines, SMS messages with shortened links sent to the customers in India will include this sender ID as [HTTP://ux.mnge.co/SenderID/XXXXX](HTTP://ux.mnge.co/SenderID/XXXXX). |
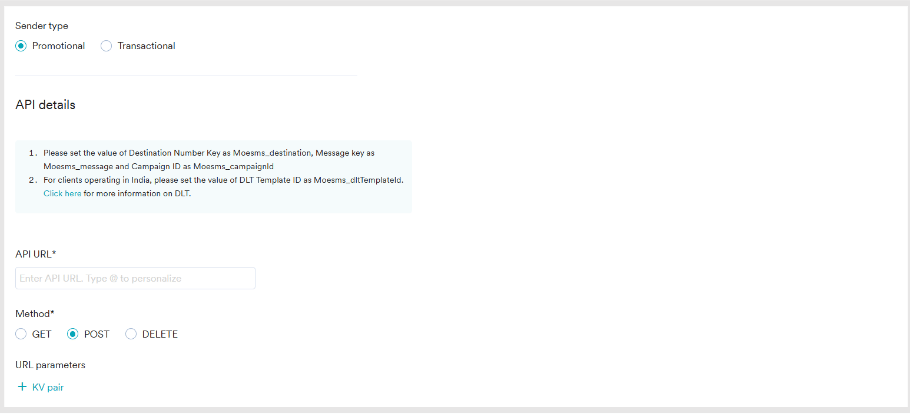 | Field | Description |
| ------------------ | ---------------------------------------------------------------------------------------------------------------------------------------------------------------------------------------------------------------------------------------------------------------------------------------------------------------------------------------------------------------------------------------------------------------------------------------- |
| **Sender type** | The sender type can be Promotional or Transactional.
| Field | Description |
| ------------------ | ---------------------------------------------------------------------------------------------------------------------------------------------------------------------------------------------------------------------------------------------------------------------------------------------------------------------------------------------------------------------------------------------------------------------------------------- |
| **Sender type** | The sender type can be Promotional or Transactional. - **Promotional**: Choose this option when you want to use the sender to send information about your brand, promote deals, or engage with users.
- **Transactional**: Choose this option when you want to use the sender to send alerts about transactions, OTPs, security information, or any information that can be classified as transactional in nature.
|
| **API URL** | This field contains information about the URL that should be used to send an API request to the Sender. You can get this information from the API documentation of the sender. Type the API Endpoint of the sender here. The API URL for Alot Solutions is: [https://web.rcspro.in/api/v1/rcsmt/sendMessage](https://web.rcspro.in/api/v1/rcsmt/sendMessage) |
| **Method** | Select **POST** as the HTTP method. |
| **URL Parameters** | Add the URL Parameters to be passed to the API as Key-Value pairs using this option. You can get this information from the API documentation of the sender. For example, if the API URL call uses the GET method, all the parameters, such as API Key, Authorization, and so on, are passed as URL Parameters. |
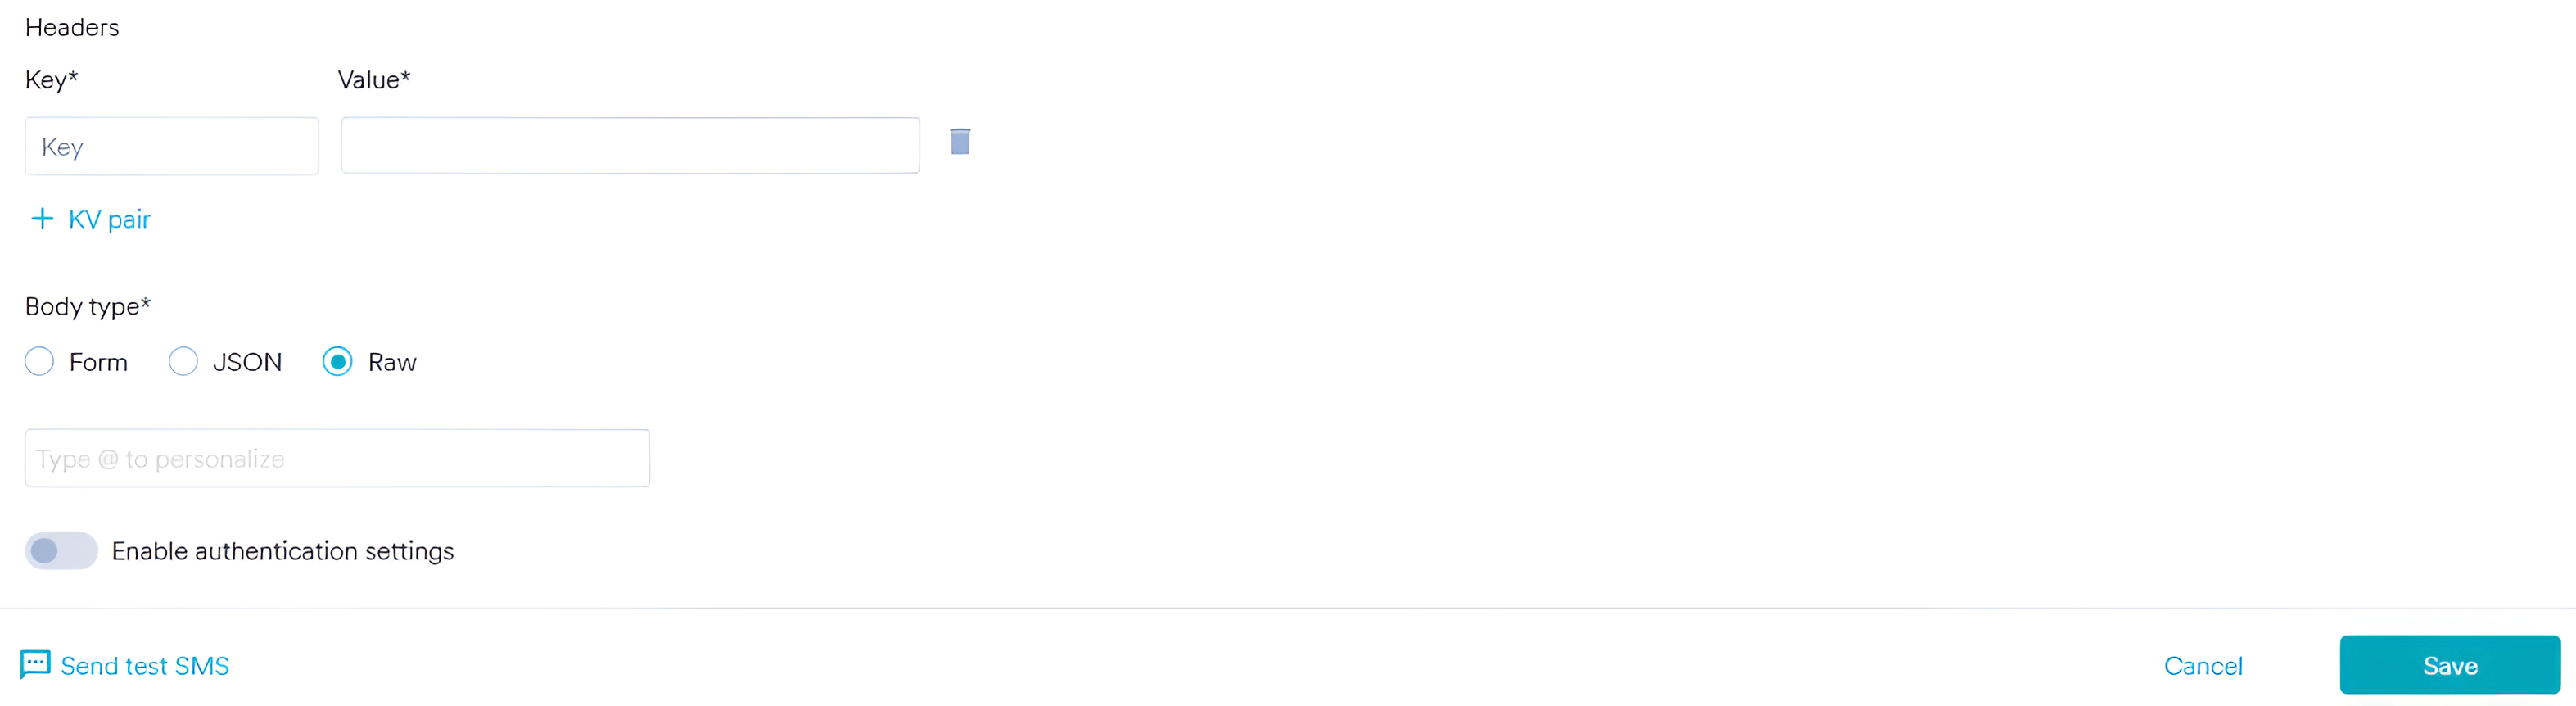 | Field | Description |
| ------------- | --------------------------------------------------------------------------------------------------- |
| **Headers** | Include the request headers with **Content-Type** as the key and **application/json** as the value. |
| **Body Type** | You must select the Body Type as **JSON** and add the following details: |
```json JSON theme={null}
{
"Account": {
"APIKey": "Your_API_Key_Here",
"SenderId": "Your_Sender_ID_Here",
"Channel": "Your_Route_Name_Here",
"DCS": 0,
"FlashSms": 0,
"PEID": "Your_Entity_ID_Here"
},
"Messages": [
{
"Number": "Moesms_destination",
"Text": "Moesms_message",
"DLTTemplateId": "Moesms_dltTemplateId"
}
]
}
```
**Notes** :
* **APIKey**: Enter the API key from your Alot Solutions account.
* **SenderId:** Replace with the sender ID authorized for your campaigns.
* **Channel**: Use the correct route name (like "TRANS" or "PROMO").
* **PEID**: Replace with your unique Entity ID provided by Alot Solutions.
4. **Send a test SMS** to verify your configuration.
5. Click **Save** to save the sender configuration.
6. You can configure delivery tracking after creating the sender in the MoEngage UI:
| Field | Description |
| ------------- | --------------------------------------------------------------------------------------------------- |
| **Headers** | Include the request headers with **Content-Type** as the key and **application/json** as the value. |
| **Body Type** | You must select the Body Type as **JSON** and add the following details: |
```json JSON theme={null}
{
"Account": {
"APIKey": "Your_API_Key_Here",
"SenderId": "Your_Sender_ID_Here",
"Channel": "Your_Route_Name_Here",
"DCS": 0,
"FlashSms": 0,
"PEID": "Your_Entity_ID_Here"
},
"Messages": [
{
"Number": "Moesms_destination",
"Text": "Moesms_message",
"DLTTemplateId": "Moesms_dltTemplateId"
}
]
}
```
**Notes** :
* **APIKey**: Enter the API key from your Alot Solutions account.
* **SenderId:** Replace with the sender ID authorized for your campaigns.
* **Channel**: Use the correct route name (like "TRANS" or "PROMO").
* **PEID**: Replace with your unique Entity ID provided by Alot Solutions.
4. **Send a test SMS** to verify your configuration.
5. Click **Save** to save the sender configuration.
6. You can configure delivery tracking after creating the sender in the MoEngage UI:  ## DLR Manual Field Mapping Guide
You must set up the DLR configuration with the following field mappings:
* Attribute storing unique ID: MessageData.\[0].MessageId
* Attribute storing unique delivery ID: MessageId
* Attribute storing delivery status: ErrorCode
* Success values for delivery status: 000, 001
* Attribute storing failure reason: MessageStatus
## DLR Manual Field Mapping Guide
You must set up the DLR configuration with the following field mappings:
* Attribute storing unique ID: MessageData.\[0].MessageId
* Attribute storing unique delivery ID: MessageId
* Attribute storing delivery status: ErrorCode
* Success values for delivery status: 000, 001
* Attribute storing failure reason: MessageStatus