> ## Documentation Index
> Fetch the complete documentation index at: https://moengage.com/docs/llms.txt
> Use this file to discover all available pages before exploring further.
# Configure Vonage
> Configure Vonage as an RCS connector in MoEngage to send RCS campaigns through your Vonage account.
# Introduction
Vonage is a global cloud communications provider that offers RCS as one of its core messaging channels within its Communications Platform as a Service (CPaaS). The Vonage MoEngage Connector is a self-service, no-code integration built on Vonage Cloud Runtime (VCR), bridging MoEngage's campaign execution layer with Vonage's messaging infrastructure to let brands send RCS campaigns at scale directly through Vonage.
For more information, refer to [Connector Overview](https://api.support.vonage.com/hc/en-us/articles/29661868078748-MoEngage-Connector-Overview).
**Prerequisites**
* Access to your [Vonage Dashboard](https://dashboard.nexmo.com/private/dashboard) to retrieve your API Key.
* Access to [Vonage Cloud Runtime](https://developer.vonage.com/en/cloud-runtime) to deploy the connector instance.
* A Vonage RCS Business Messaging account with a registered RCS agent. RCS agent registration is handled outside the VCR Marketplace flow by your Vonage Customer Success Associate (CSA) or Account Manager.
* Access to [Vonage Dashboard Settings](https://dashboard.vonage.com/settings) to obtain your Signature secret (Standalone mode only).
* Admin access to the MoEngage dashboard, with the RCS channel enabled on your MoEngage tenant.
* For Conversational Connect mode only:
* A Conversational Connect account with RCS configured.
* Access to the Conversational Connect Developer Portal.
* Region alignment between your Conversational Connect account and your Vonage Cloud Runtime deployment.
* For the complete list of prerequisites, refer to Section 2 of the [Vonage MoEngage Connector - RCS Channel Guide](https://api.support.vonage.com/hc/en-us/articles/30075035241372-Vonage-MoEngage-Connector-RCS-Channel-Guide).
# Configure RCS Connector (Service Provider)
Perform the following steps to configure Vonage as a connector on the MoEngage dashboard:
1. On the left navigation menu in the MoEngage dashboard, go to **Settings** > **Channels** > **SMS & RCS** > **Sender configuration**.
2. On the **RCS** tab, click **+ Add RCS Sender**.
3. Click the **Vonage** tile.
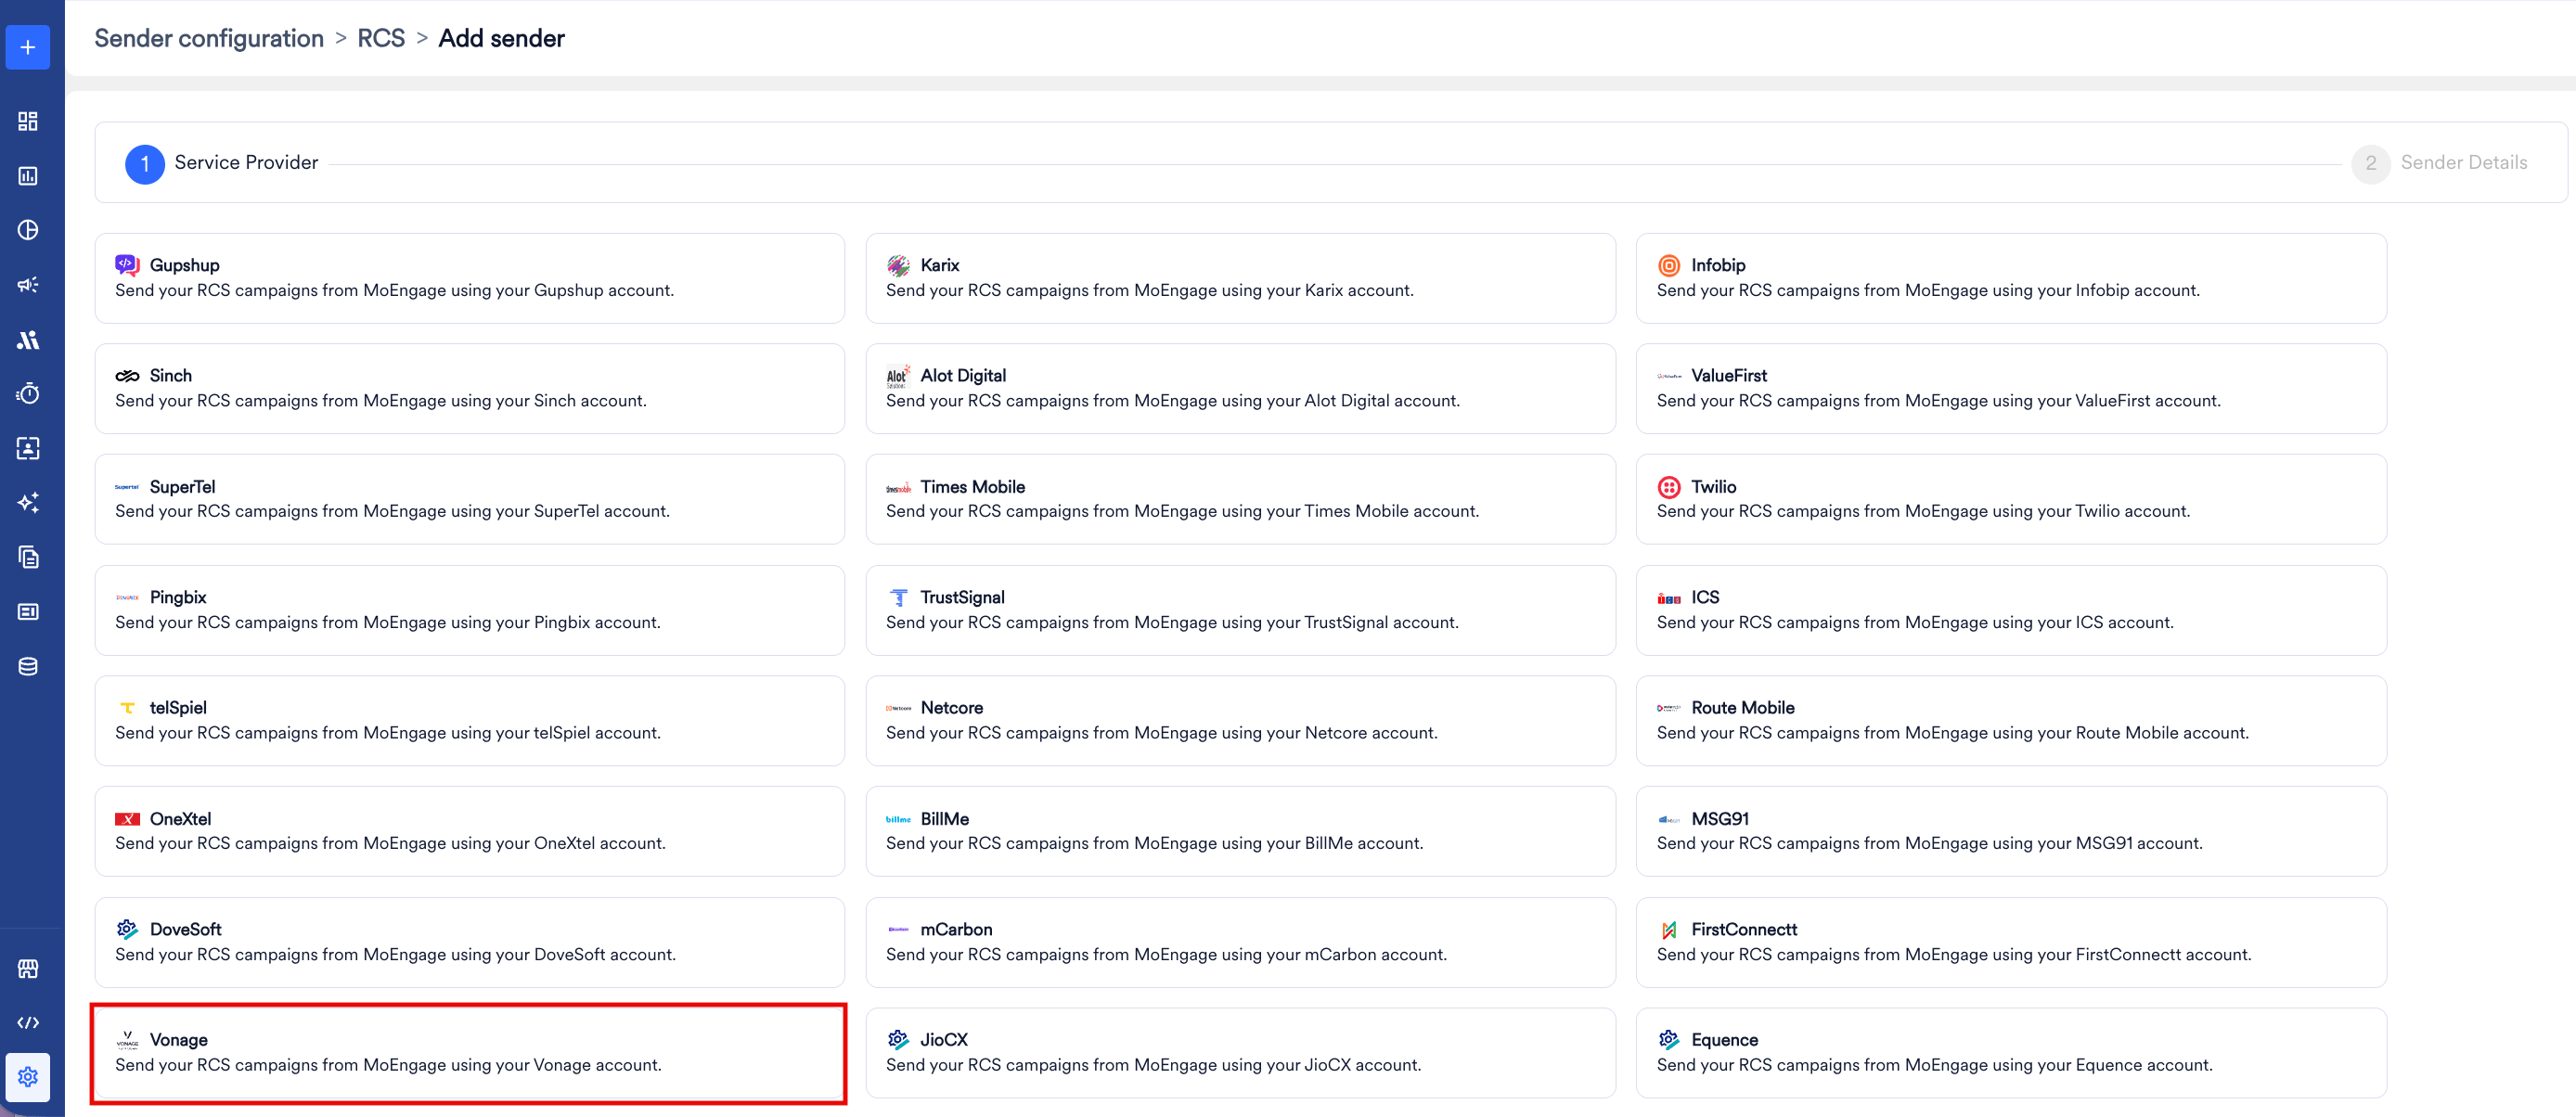 4. Keep this page open and deploy the Vonage Conversations for MoEngage connector on Vonage Cloud Runtime by following Section 3 (Conversational Connect mode) or Section 4 (Standalone mode) of the [Vonage MoEngage Connector - RCS Channel Guide](https://api.support.vonage.com/hc/en-us/articles/30075035241372-Vonage-MoEngage-Connector-RCS-Channel-Guide). Then return here to complete the Sender Details.
5. On the **Sender Details** page, add the following details:
4. Keep this page open and deploy the Vonage Conversations for MoEngage connector on Vonage Cloud Runtime by following Section 3 (Conversational Connect mode) or Section 4 (Standalone mode) of the [Vonage MoEngage Connector - RCS Channel Guide](https://api.support.vonage.com/hc/en-us/articles/30075035241372-Vonage-MoEngage-Connector-RCS-Channel-Guide). Then return here to complete the Sender Details.
5. On the **Sender Details** page, add the following details:
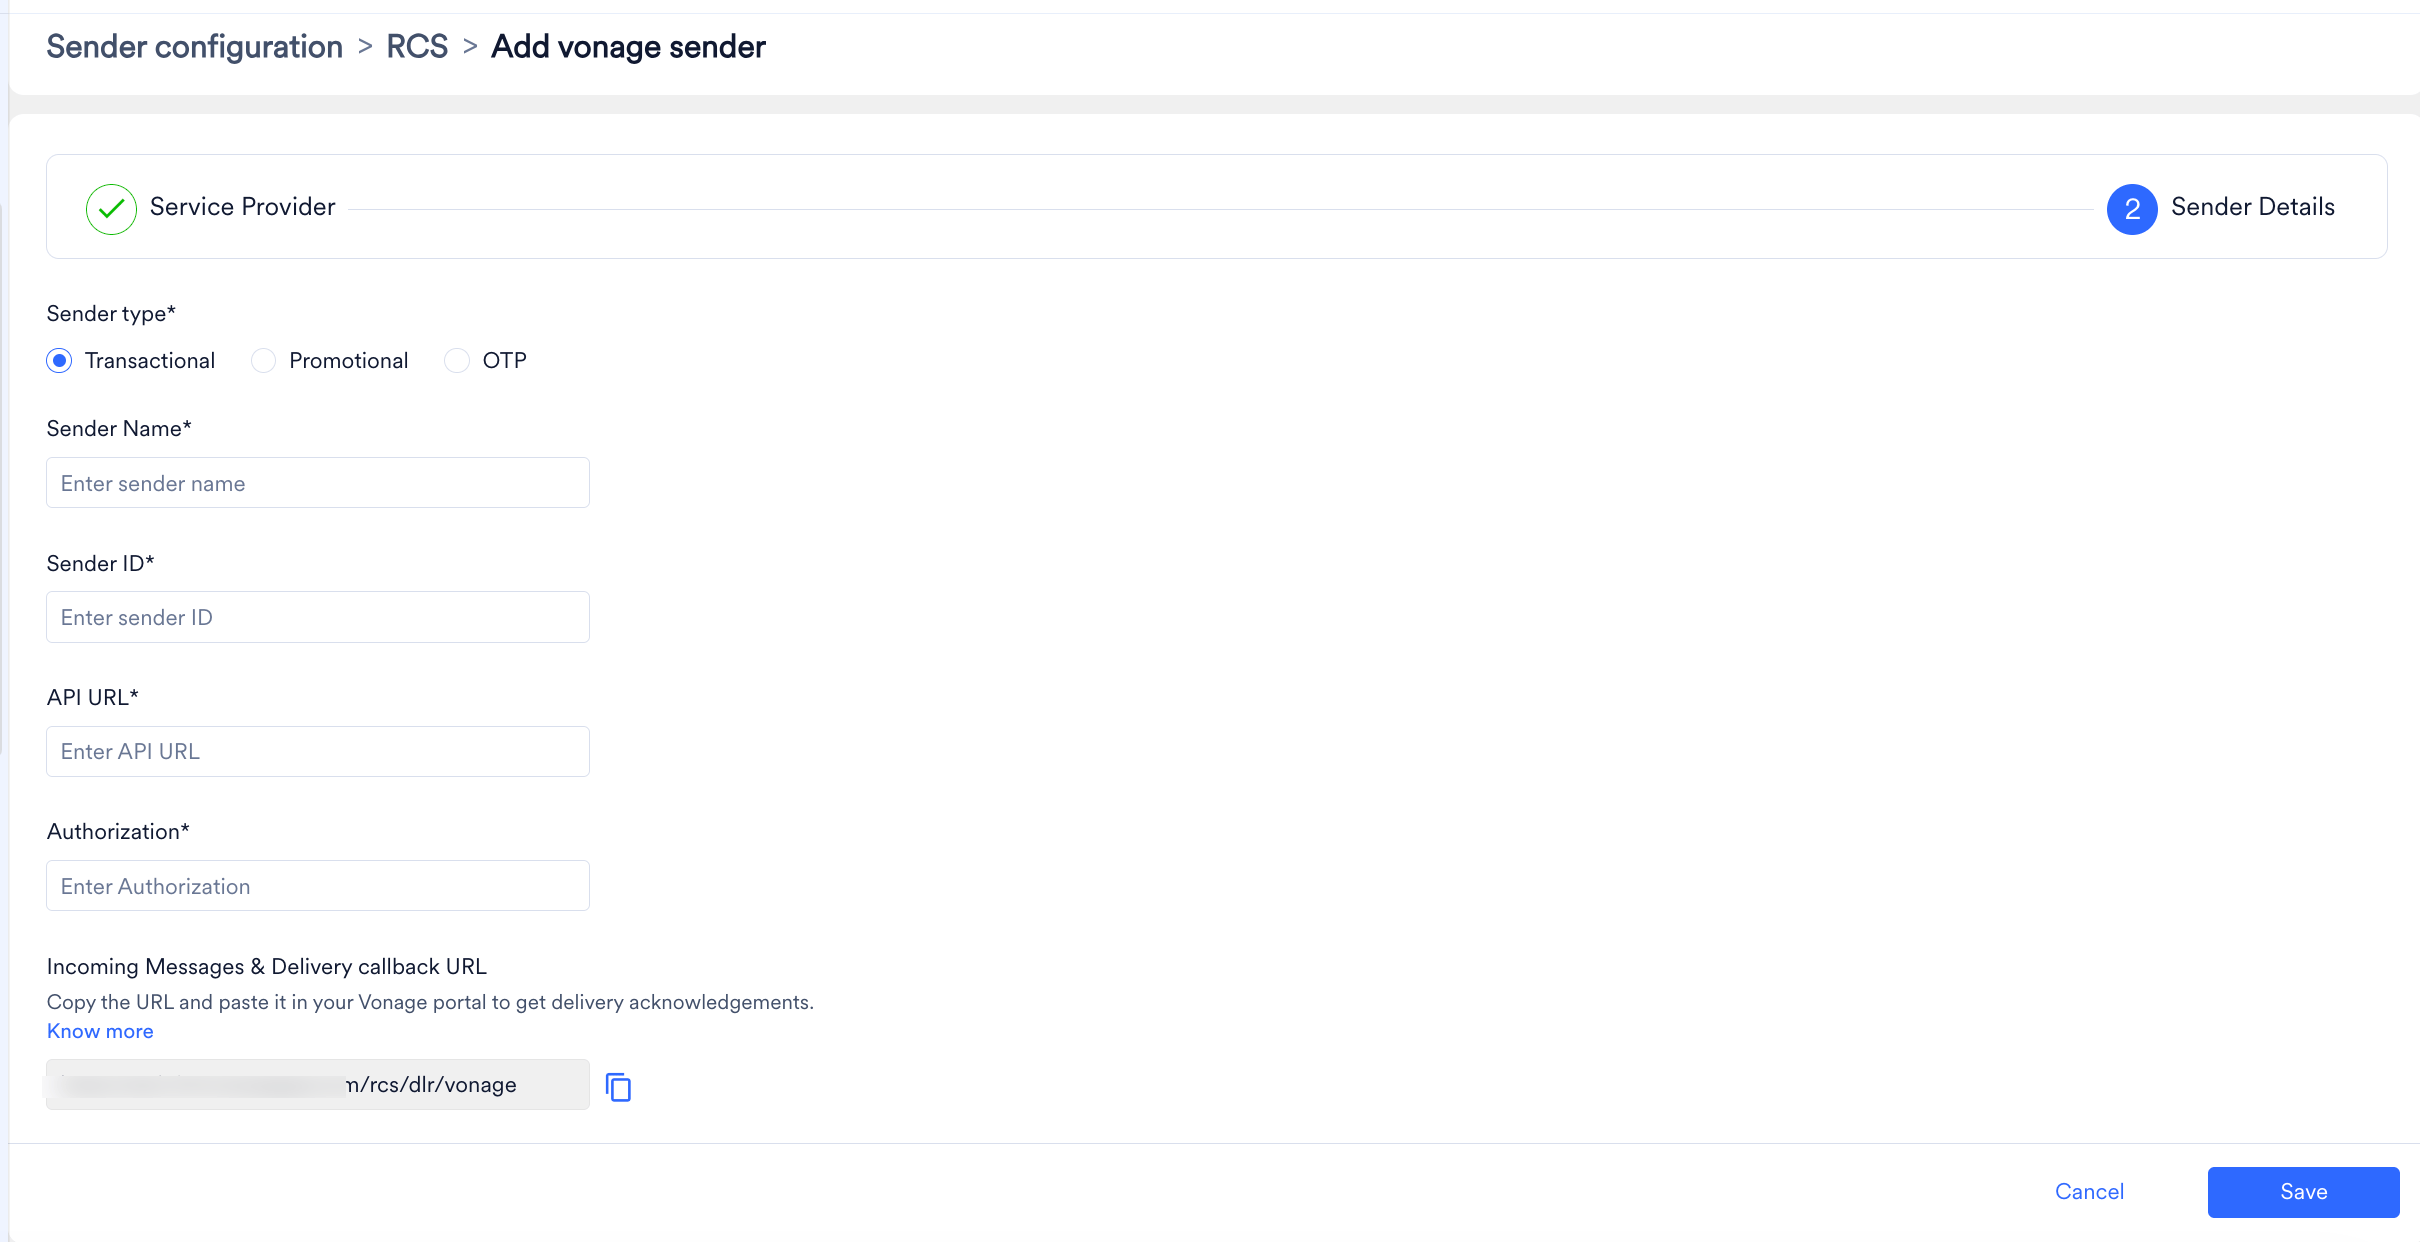 | Field | Description |
| - | - |
| **Mark as default** | Turn this toggle on to mark the sender as the default sender for the service provider being configured. If marked as default, this sender will be used to send all RCS campaigns from MoEngage unless you select a different sender while creating the campaign. |
| **Sender type** | Select the sender type. The available options are:
| Field | Description |
| - | - |
| **Mark as default** | Turn this toggle on to mark the sender as the default sender for the service provider being configured. If marked as default, this sender will be used to send all RCS campaigns from MoEngage unless you select a different sender while creating the campaign. |
| **Sender type** | Select the sender type. The available options are: - **Promotional** : Select this option when you are using the sender to send information about your brand, promote deals, or engage with users.
- **Transactional** : Select this option when you are using the sender to send alerts about transactions, OTPs, security information, or any information that can be classified as transactional in nature.
- **OTP** : Select this option when you are using the sender to send OTPs.
|
| **Sender Name** | Enter the name of the sender. This field identifies the readable sender name that can be used while creating a campaign or alert. |
| **Sender ID** | The RCS Sender ID (agent ID) that recipients will see as the source of the message. This must match the registered RCS agent linked to your Vonage account. |
| **API URL** | Paste the API URL copied from the **MoEngage - Instance API URL** field in the connector admin panel. Perform the steps described [here](https://api.support.vonage.com/hc/en-us/articles/30075035241372-Vonage-MoEngage-Connector-RCS-Channel-Guide#h_01M23KNZ5AX66C6BA7NZ23NGK9:~:text=Step%202%3A%20Retrieve%20the%20API%20URL%20from%20the%20Connector%20Admin%20Panel) to copy the URL from the connector admin panel. |
| **Authorization** | Set the value to `Bearer `, replacing `` with the bearer token you generated. Perform the steps described [here](https://api.support.vonage.com/hc/en-us/articles/30075035241372-Vonage-MoEngage-Connector-RCS-Channel-Guide#h_01M23KNZ5AX66C6BA7NZ23NGK9:~:text=Step%201%3A%20Generate%20a%20Bearer%20Token%20for%20Authentication) to generate the bearer token on the **Tokens** tab of the connector admin panel. |
6. Click **Save** to save this sender configuration.
7. **Incoming Messages and delivery callback URL**: Configuring delivery tracking allows you to monitor whether messages have been delivered to end users. Configuring incoming message URLs allows you to track messages' responses so that you can act on them accordingly. Copy this URL from the MoEngage dashboard and paste it into the **RCS MoEngage Delivery Tracking URL** field in the connector admin panel, as described [here](https://api.support.vonage.com/hc/en-us/articles/30075035241372-Vonage-MoEngage-Connector-RCS-Channel-Guide#h_01M23KNZ5AX66C6BA7NZ23NGK9:~:text=Step%205%3A%20Enter%20the%20Delivery%20URL%20in%20the%20Connector%20Admin%20Panel), and then click **Update configuration**.
For detailed information about this integration, refer to [Vonage MoEngage Connector - RCS Channel Guide](https://api.support.vonage.com/hc/en-us/articles/30075035241372-Vonage-MoEngage-Connector-RCS-Channel-Guide).
This documentation is built and hosted on [Mintlify](https://mintlify.com), a developer documentation platform.