> ## Documentation Index
> Fetch the complete documentation index at: https://moengage.com/docs/llms.txt
> Use this file to discover all available pages before exploring further.
# Mitto
# Introduction
Mitto is a global leader in omnichannel communication solutions, empowering business growth with advanced technology and seamless integration for SMS, voice, and chat apps.
**Prerequisites** Ensure you have access to your Mitto Dashboard and have the API key associated with your Mitto account.
# Configure Mitto as a Custom SMS Connector (Service Provider)
This article will help you set Mitto as a Custom Connector on the MoEngage dashboard.
1. Log in to the MoEngage dashboard.
2. Navigate to **Settings** > **Channel** > **SMS & Connectors**.
3. Click the SMS Connector Config tab.
4. Under **Custom Connectors** , click **+ Create**. 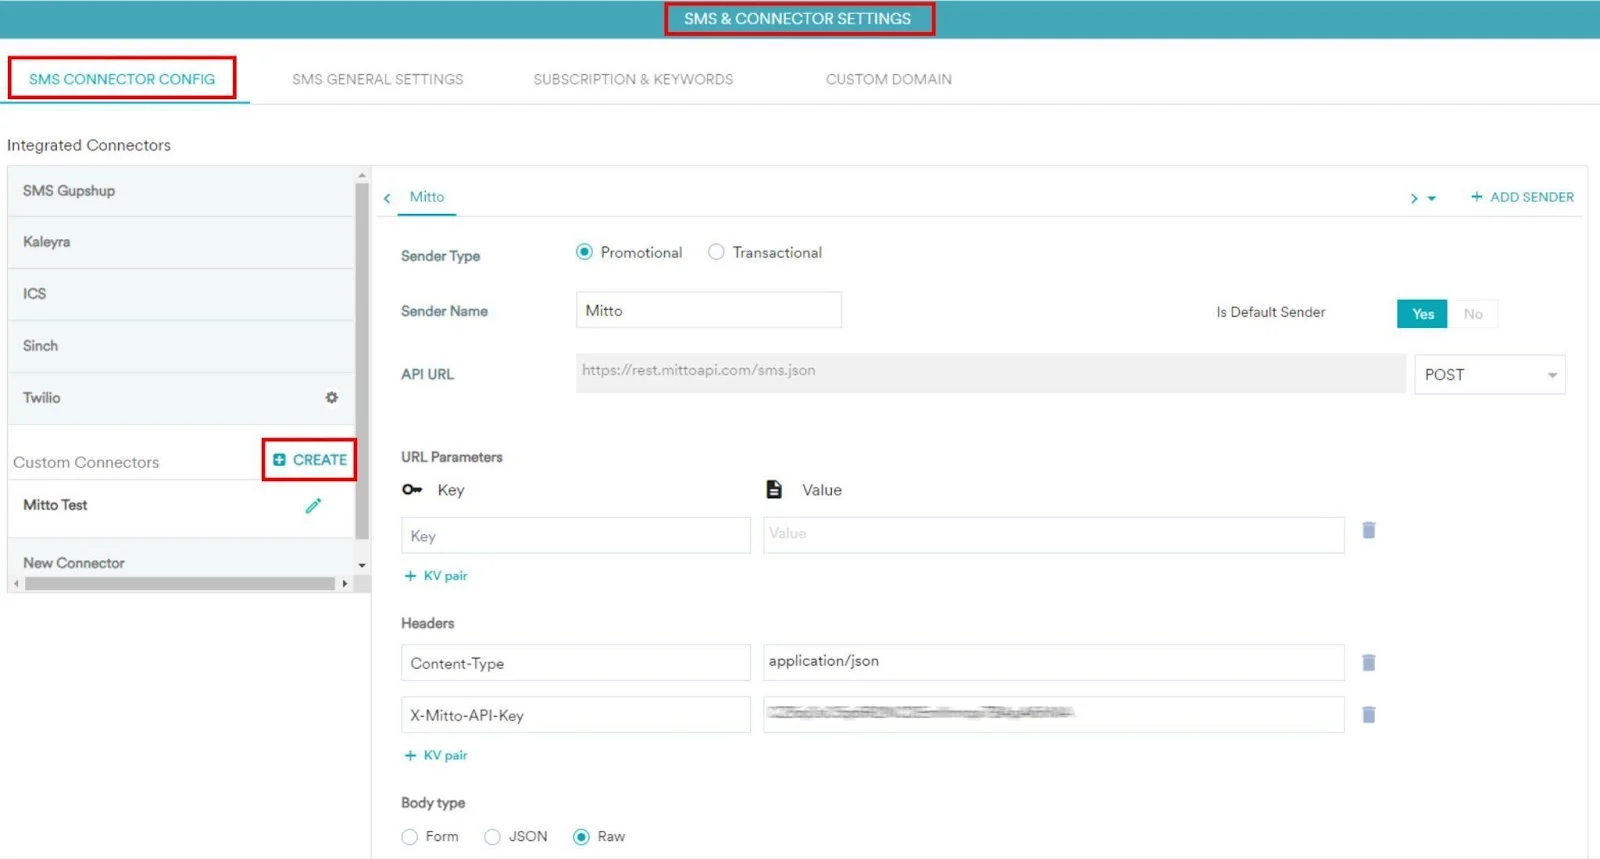 5. Add the following details:
* **Sender Type** : Select **Transactional** or **Promotional** as per your requirements. Set the Sender Type to **Promotional** when using the Sender for sending information about your brand, promoting deals, or engaging with users. Set the Sender Type to **Transactional** when you would be using the Sender for sending alerts about transactions, OTPs, security information, or any information that can be classified as transactional in nature.
5. Add the following details:
* **Sender Type** : Select **Transactional** or **Promotional** as per your requirements. Set the Sender Type to **Promotional** when using the Sender for sending information about your brand, promoting deals, or engaging with users. Set the Sender Type to **Transactional** when you would be using the Sender for sending alerts about transactions, OTPs, security information, or any information that can be classified as transactional in nature.  * **Connector Name** : This field identifies the custom connector you are configuring and has to be unique. Type the name of the connector here - **Mitto**.
* **Sender Name** : This field identifies the readable sender name that can be used while creating a campaign or alert.
* **Is Default Sender** : Select yes if you want to set this sender as the default sender.
* **API URL** : This is the base URL of the SMS service provider.
* URL: [https://rest.mittoapi.com/sms.json](https://rest.mittoapi.com/sms.json)
* Select POST from the dropdown.
* **Headers**
* **Content-Type** : Select application/json
* **X-Mitto-API-Key** : Enter your unique API key for Mitto.
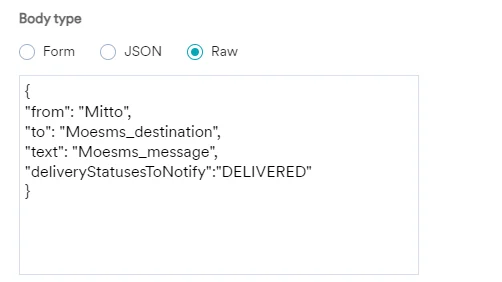
* **Body** : Select raw, and enter the following payload:
```json JSON theme={null}
{
"from": "Mitto",
"to": "Moesms_destination",
"text": "Moesms_message",
"deliveryStatusesToNotify":"DELIVERED"
}
```
* **Connector Name** : This field identifies the custom connector you are configuring and has to be unique. Type the name of the connector here - **Mitto**.
* **Sender Name** : This field identifies the readable sender name that can be used while creating a campaign or alert.
* **Is Default Sender** : Select yes if you want to set this sender as the default sender.
* **API URL** : This is the base URL of the SMS service provider.
* URL: [https://rest.mittoapi.com/sms.json](https://rest.mittoapi.com/sms.json)
* Select POST from the dropdown.
* **Headers**
* **Content-Type** : Select application/json
* **X-Mitto-API-Key** : Enter your unique API key for Mitto.
* **Body** : Select raw, and enter the following payload:
```json JSON theme={null}
{
"from": "Mitto",
"to": "Moesms_destination",
"text": "Moesms_message",
"deliveryStatusesToNotify":"DELIVERED"
}
```
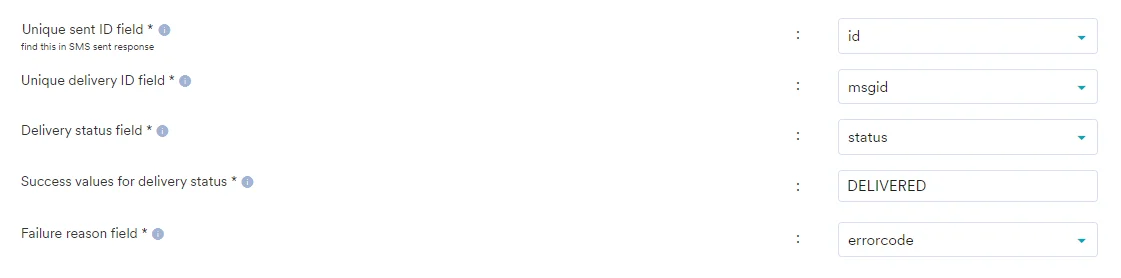
 6. Integrate delivery tracking URL.
 7. Map desired attributes and fields in the delivery response.
  8. Click **Save**. The settings have been configured.
You have successfully configured Mitto as an SMS provider with MoEngage.
8. Click **Save**. The settings have been configured.
You have successfully configured Mitto as an SMS provider with MoEngage.