> ## Documentation Index
> Fetch the complete documentation index at: https://moengage.com/docs/llms.txt
> Use this file to discover all available pages before exploring further.
# Storyly
## Storyly
[Storyly](https://storyly.io/) is the user engagement platform to embed Stories. Storyly empowers the marketing strategies of mobile brands by enabling them to engage with their audience beyond the limits of the mobile screen and create engaging experiences without any development efforts after integration.
## MoEngage × Storyly
MoEngage × Storyly integration allows you to:
1. Send Storyly audiences to MoEngage using Storyly's [Create Audiences](https://docs.storyly.io/page/create-audiences-from-the-outcome-of-interactive-components)
2. Send MoEngage segments to Storyly using [MoEngage's Custom destinations](https://www.moengage.com/docs/user-guide/data/exports/segments/outbound-segment-sync)
## Integration
**Prerequisites**
* Ensure you have a Storyly account.
* You have to have your custom parameter setup between Storyly SDK & your app. [Learn more](https://docs.storyly.io/page/exporting-audiences-to-moengage).
* Ensure that Custom destinations is enabled for your MoEngage account.
## Sync Storyly's audiences to MoEngage
### Step 1: Setup MoEngage on Storyly
Let's start with connecting MoEngage account on Storyly Dashboard.
1. On your Storyly Dashboard, go to **Settings** and find **Integrations** tab.
2. Under **Integrations**, you'll see **MoEngage**. Please click on **Connect**.
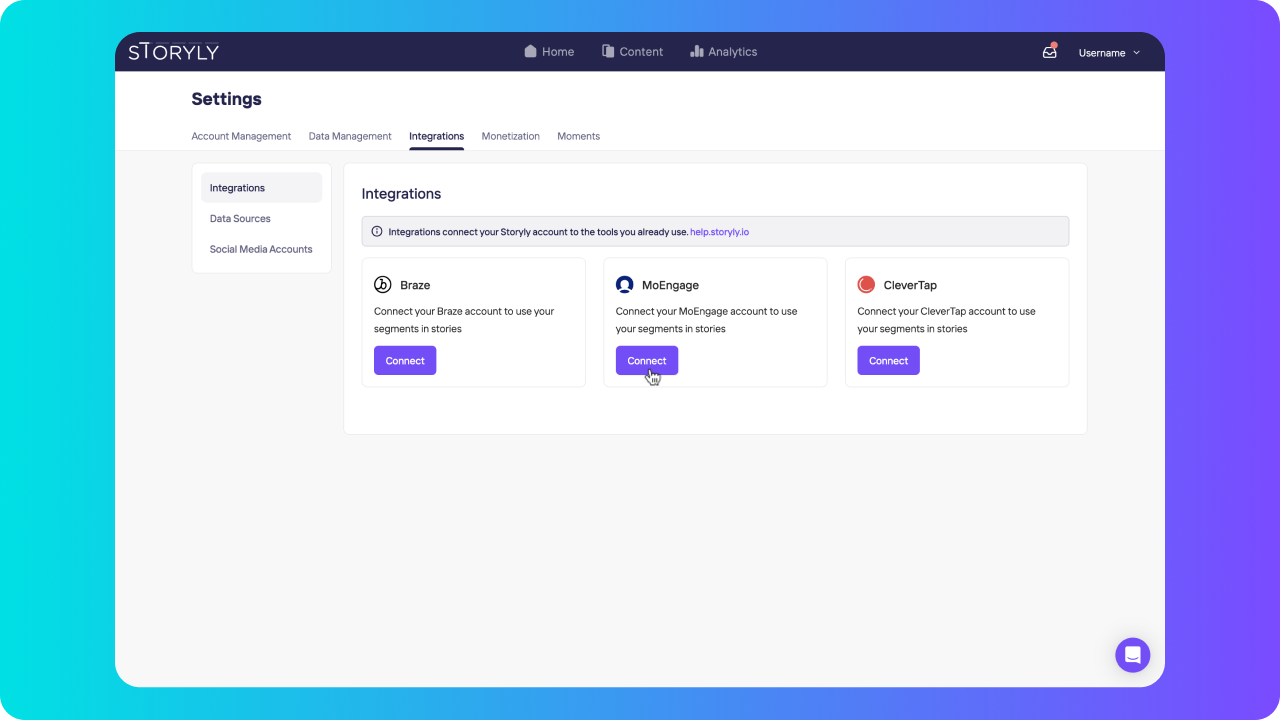
When you click on **Connect**, you'll be asked to fill 3 fields which are:
| Field Name | Description |
| ---------------- | ------------------------------------------------------------------------------------------------------------------------------------------------------------------------------------------------------------------ |
| Integration Name | You may have more than 1 integration, that's why you can give any name to Integration as you want, to differentiate one from another. |
| Workspace ID | API ID is the Workspace ID. The Workspace ID of your MoEngage account is available at **Settings -> Account -> APIs -> Workspace ID**. The Data API ID and the Workspace ID of your MoEngage account are the same. |
| API Key | The Data API key of your MoEngage account is available at **Settings -> Account -> APIs -> API keys -> Data** API settings. |
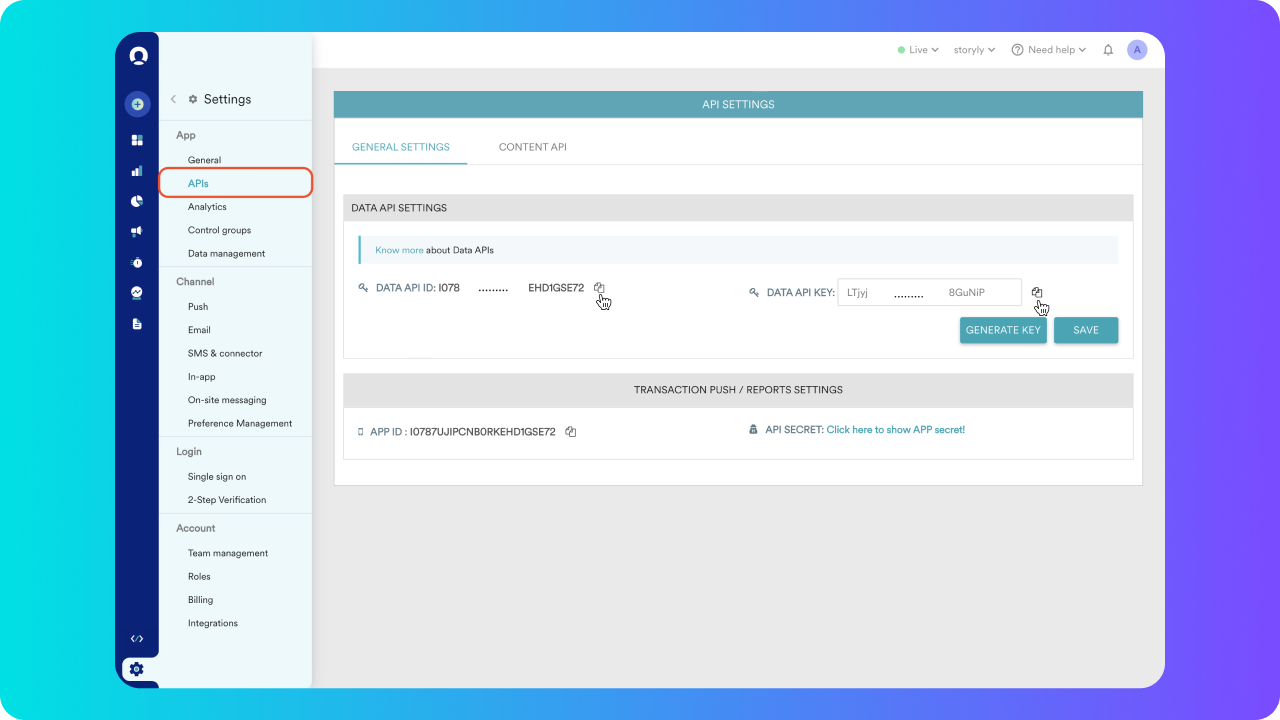
3. Copy **DATA API ID** and **DATA API Key**, then paste them in the corresponding fields on the **Storyly Dashboard**.
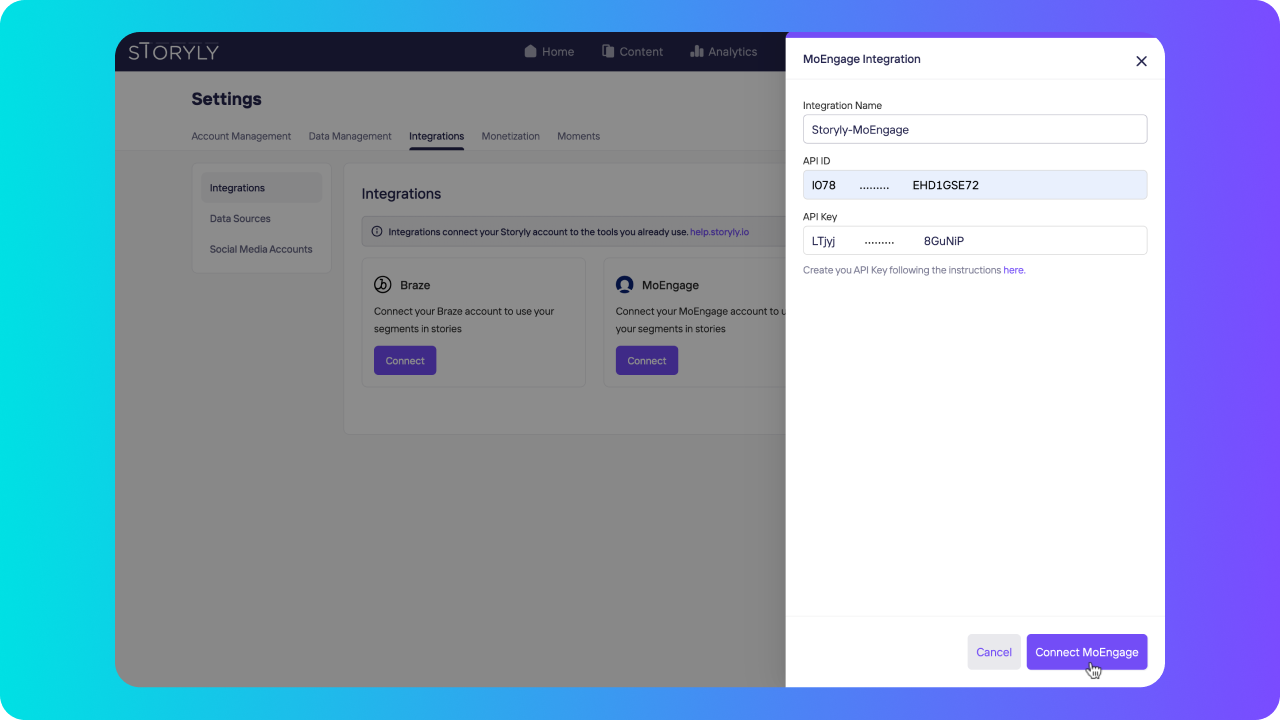
4. Once you click on **Connect MoEngage**, integration is completed!
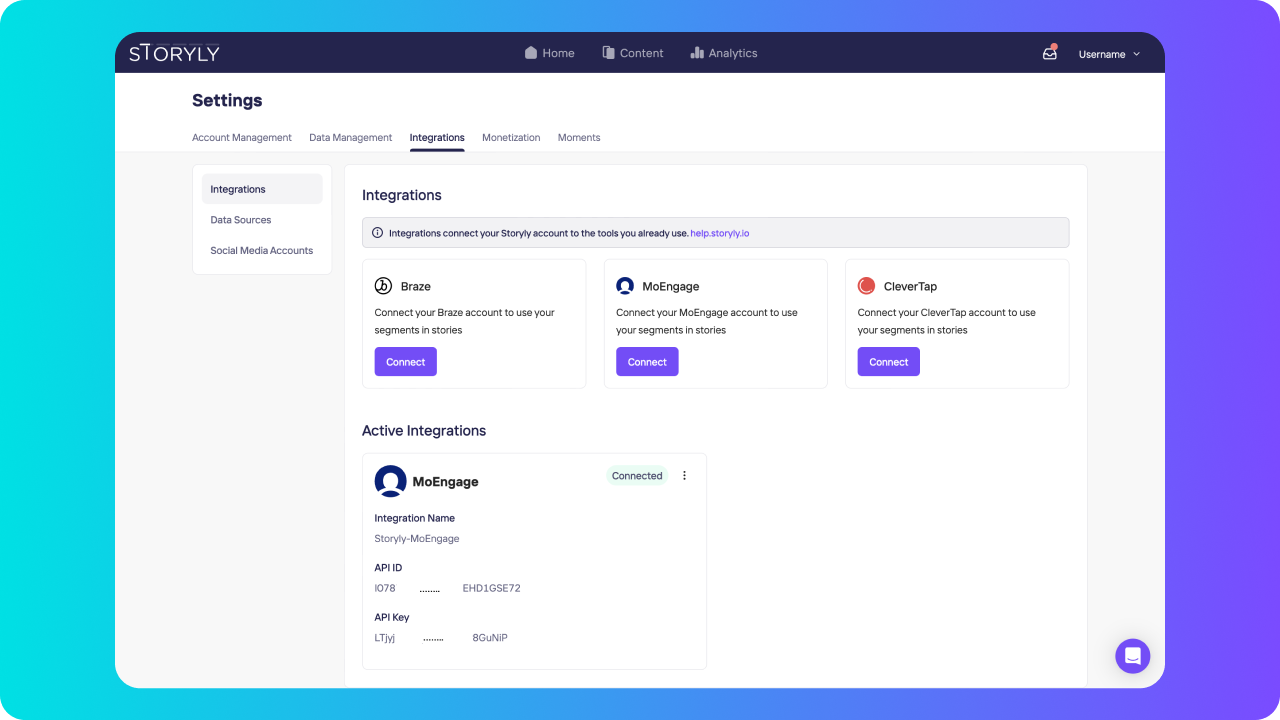
From here, as referenced above, if you've created audiences from the outcome of interactive components in Storyly, you'll have an option to Export these Audiences to MoEngage.
### Step 2: Send audiences to MoEngage
1. Under **Settings > Data Management > Audiences**, you can see audiences that you've created. If you click on **Export** button, you'll see **Send to MoEngage** option.
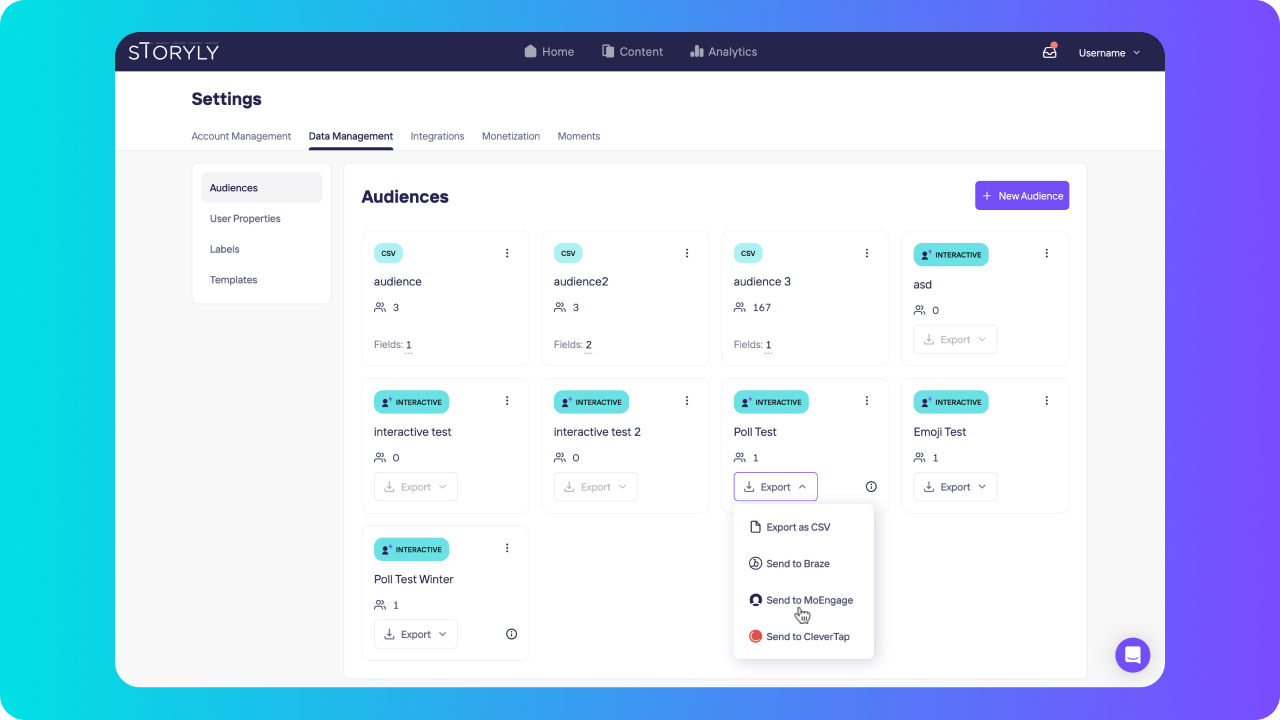
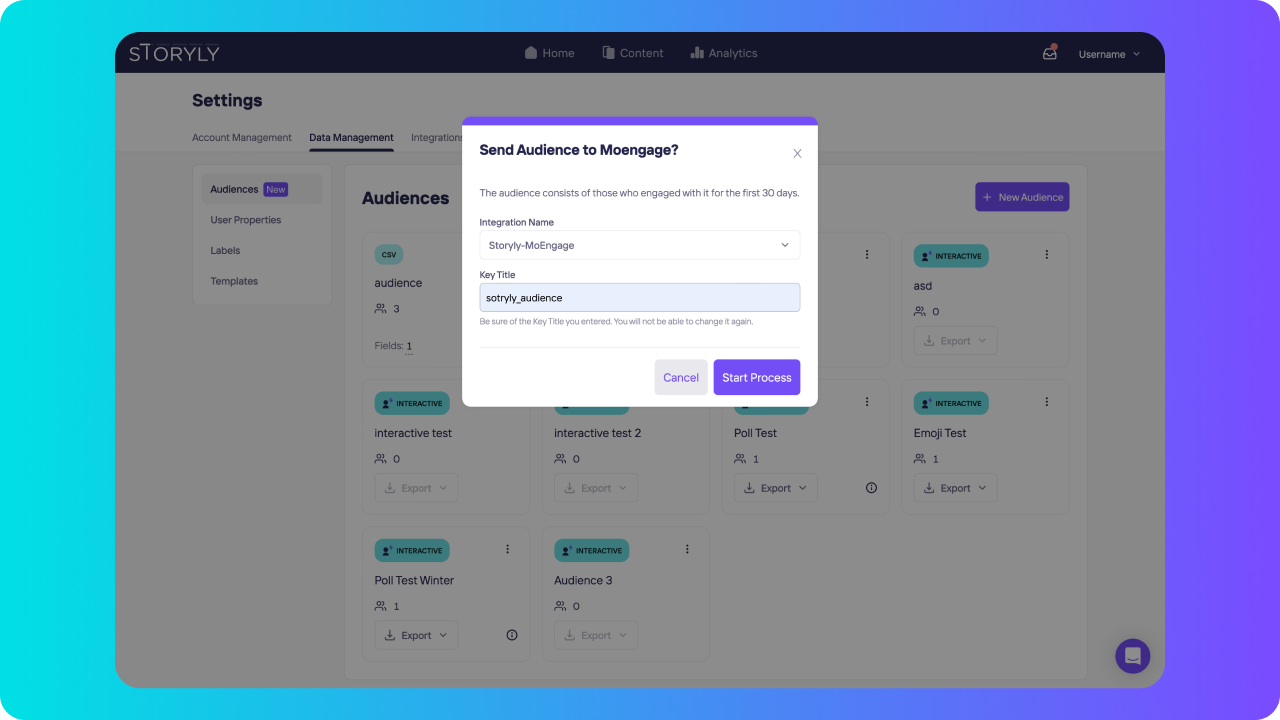
2. When you click on **Send to MoEngage**, you'll be asked to choose which integration that you'd like to use and to give a **Key Title** for the Custom Attribute that you'll see on MoEngage.
3. After you click on **Start Process**, depending on the audience's size, it'll take couple of minutes for process to be completed.
### Step 3: Create custom segments from Storyly Audiences
1. Once the process is completed, you can go to **MoEngage Dashboard**, navigate to **Segments** from the left pane and click on **Create Segment** option.
2. In that screen, please click on **User Property** and scroll down to find the custom attribute that you've exported from Storyly under **Tracked Custom Attribute** section.
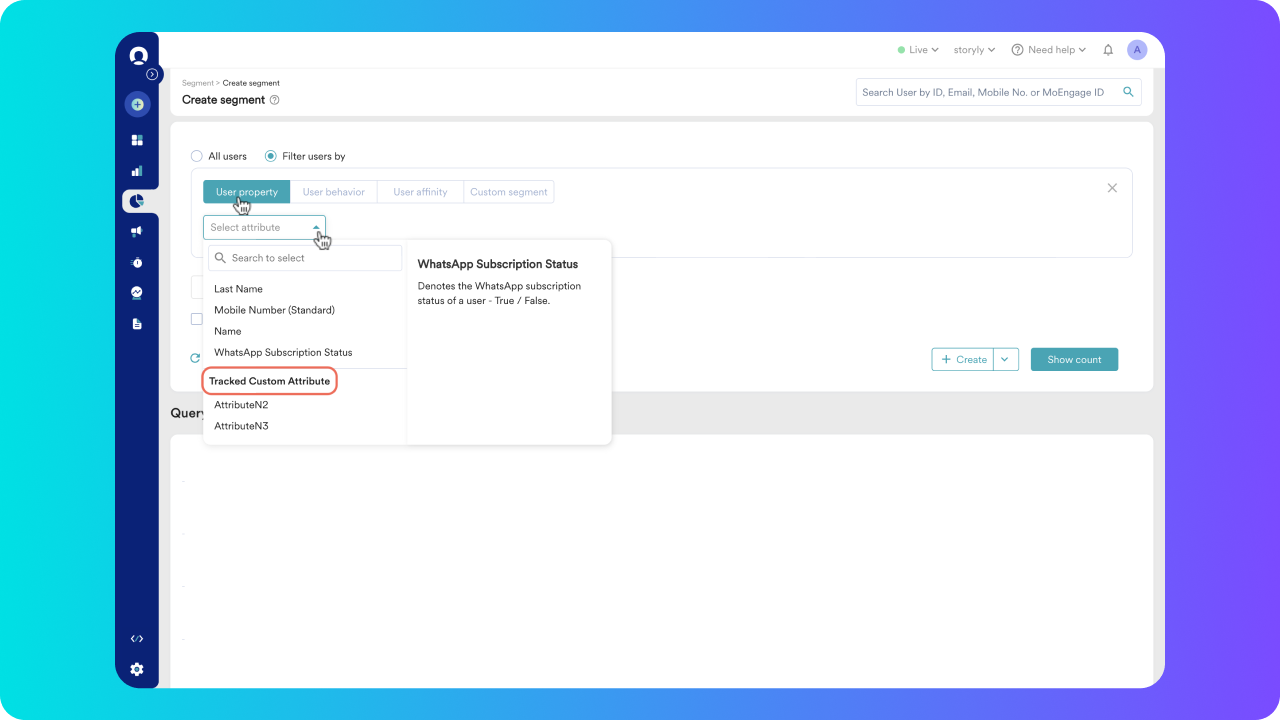
3. After selecting the custom attribute, if you go with the **"is"** and type in the name of your Audience on Storyly Dashboard, you'll be able to create a segment that includes all of the users in that Audience.
## Sync MoEngage segments to Storyly
### Step 1: Create new audience for MoEngage
1. Go to *Audiences* tab on *Storyly Dashboard* and click on *+ New Audience* at the top right. Select the *Create Audience for MoEngage* option. You can give a name to your Audience and click on *Continue*.
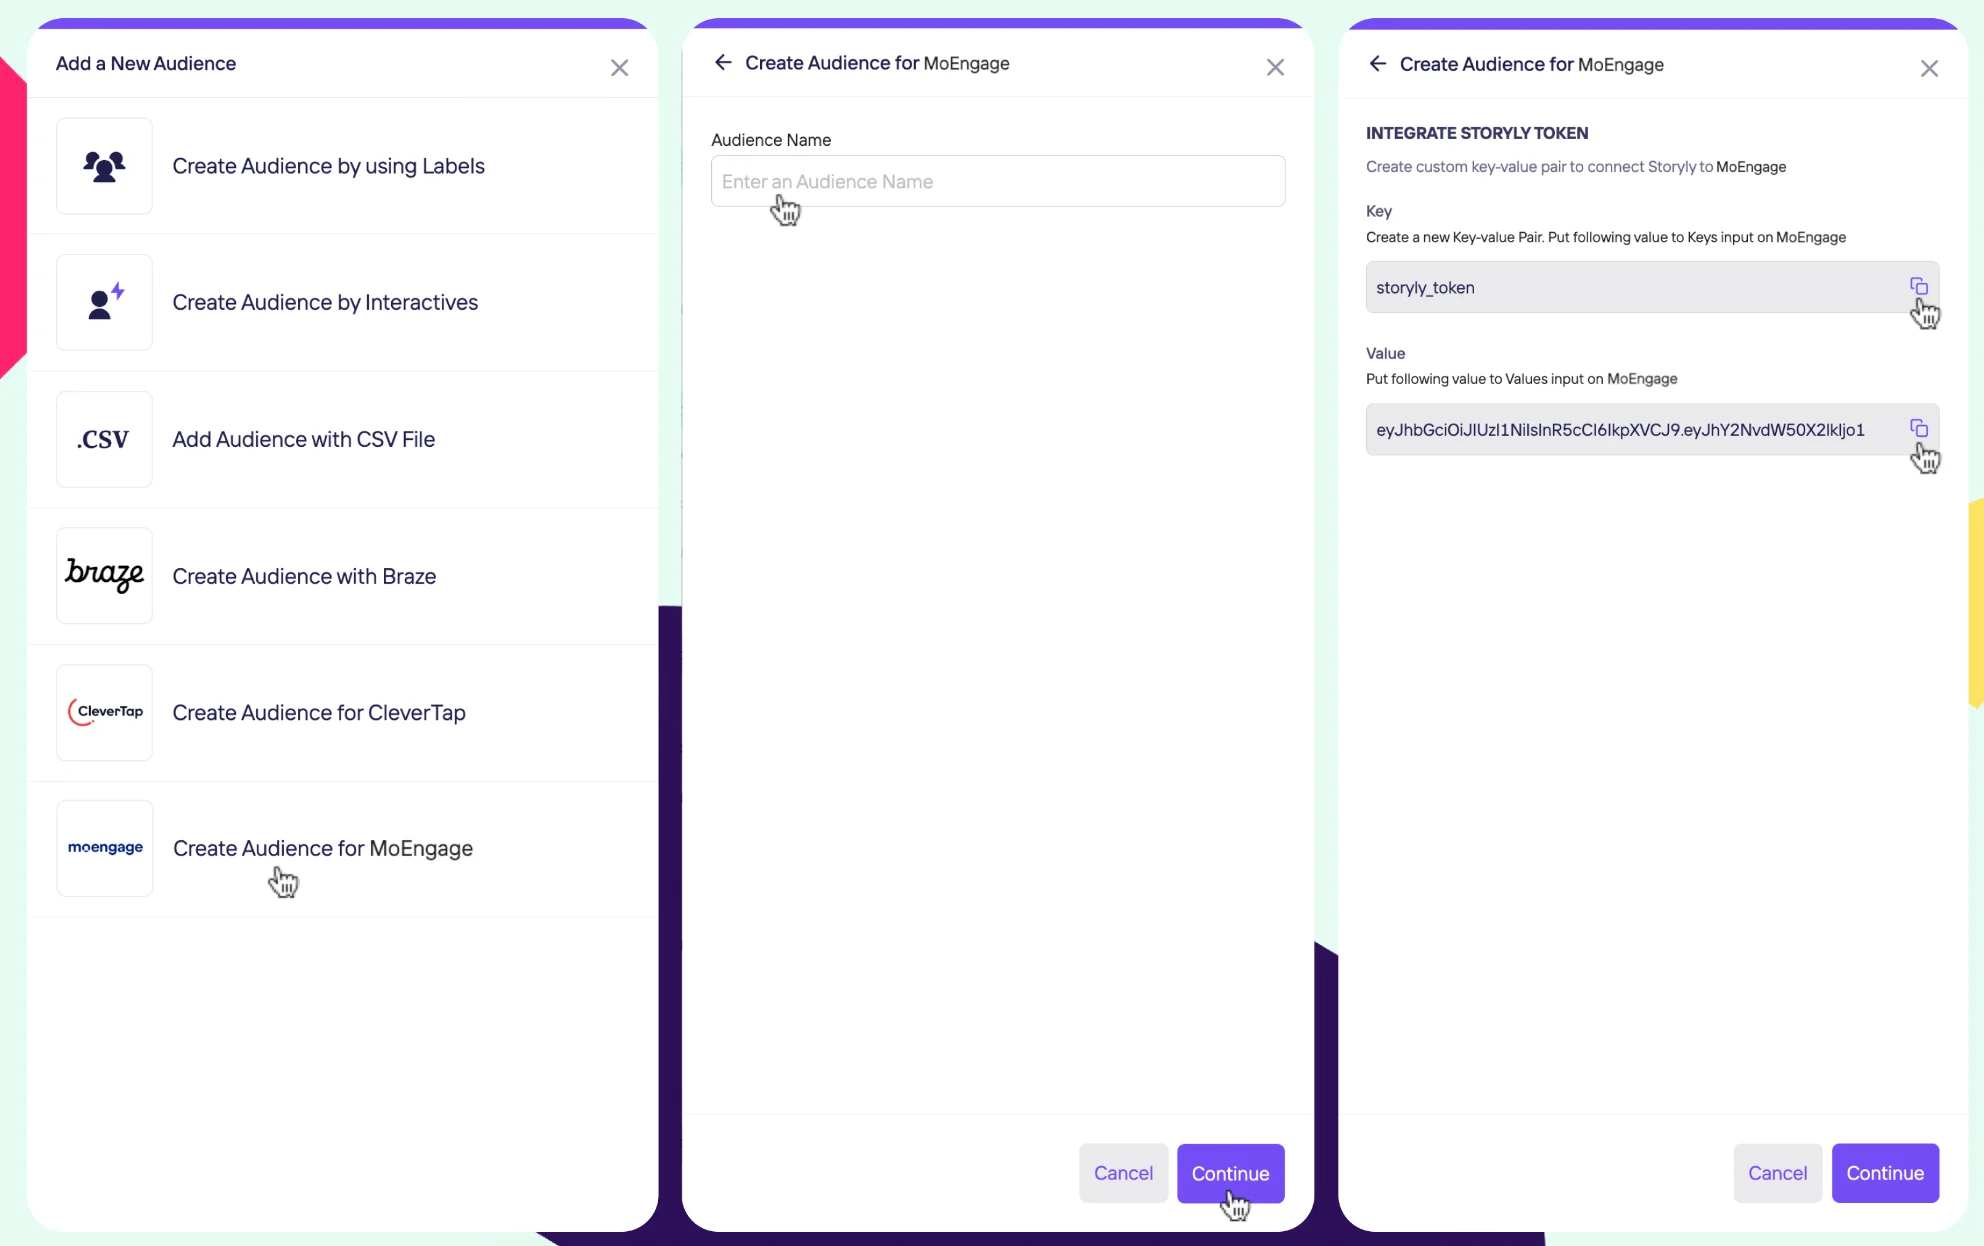 2. *Storyly* will generate a **Key** and unique Token as **Value** for your Audience. Please copy these values, and you'll paste them on the MoEngage Dashboard while configuring the integration.
### Step 2: Setup custom destination on MoEngage
1. Navigate to *App Marketplace >> Custom Destinations*
2. *Storyly* will generate a **Key** and unique Token as **Value** for your Audience. Please copy these values, and you'll paste them on the MoEngage Dashboard while configuring the integration.
### Step 2: Setup custom destination on MoEngage
1. Navigate to *App Marketplace >> Custom Destinations*
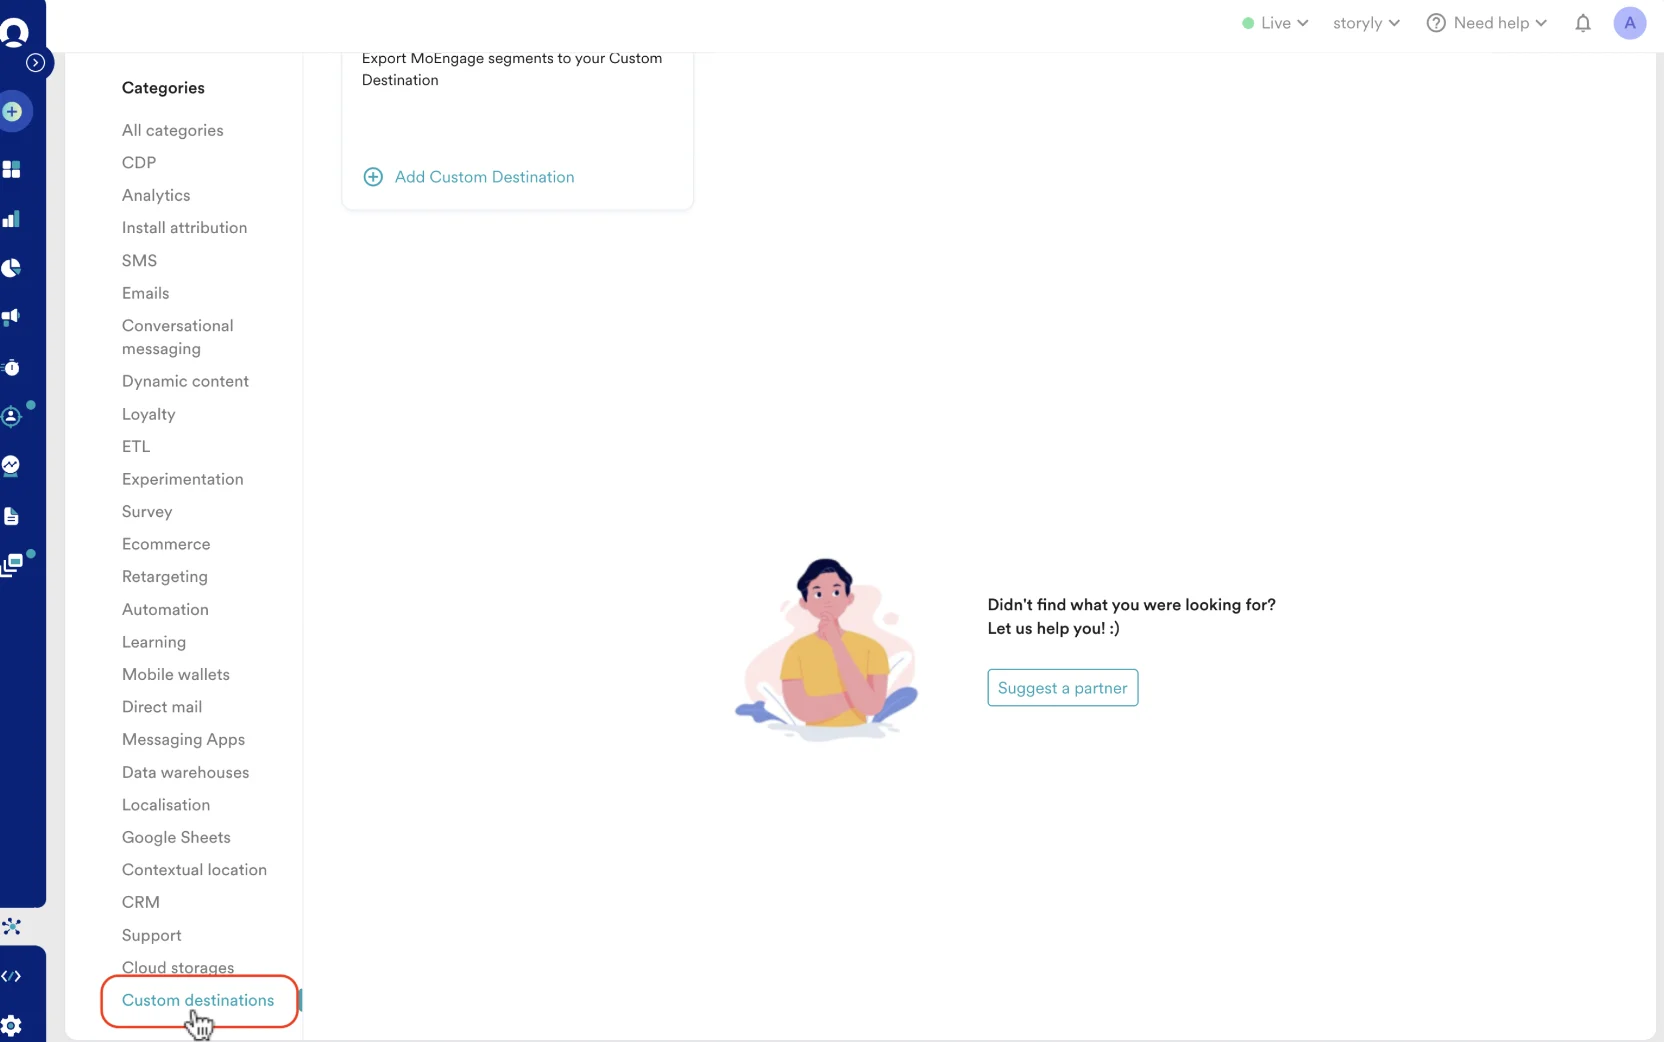 2. Click *Add Custom Destination.*
3. Add *Destination name* as *Storyly* and description (optional).
2. Click *Add Custom Destination.*
3. Add *Destination name* as *Storyly* and description (optional).
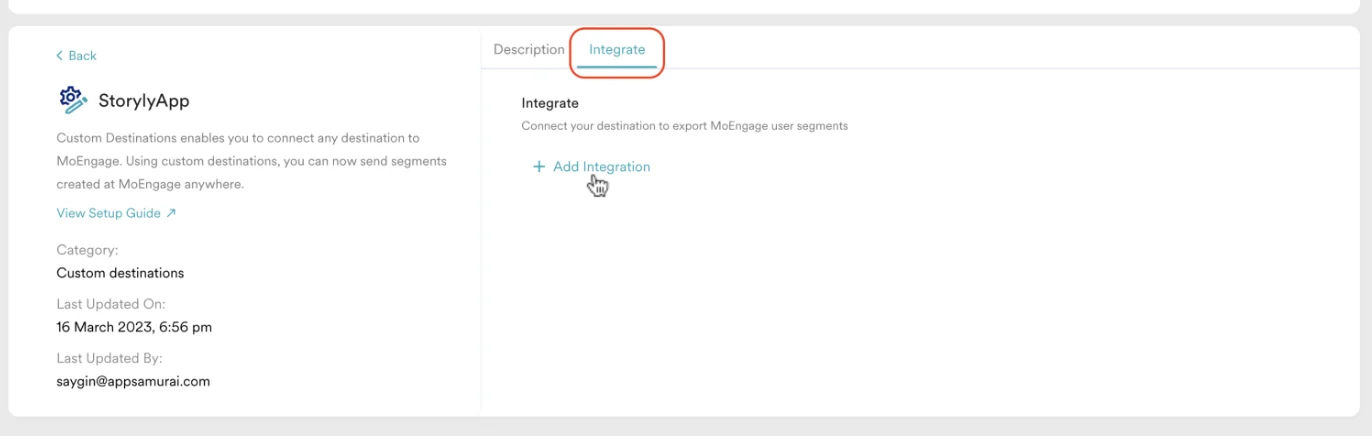
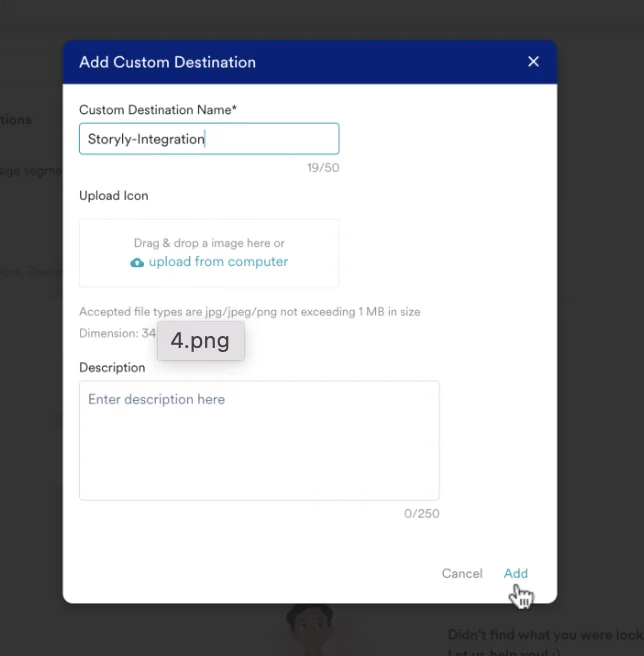 4. Navigate to *Integrate* tab and click *Add Integration*
 5. Now go back to the MoEngage Dashboard, and fill in the following details:
* **Integration name:** you can give any name you'd like.
* **Method:** Choose *POST* option.
* **URL endpoint:** Enter the endpoint: `https://core.storyly.io/audience/moengage/export-callback`
* **Parameters:** Click on *+KV pair* and paste the *Key* & *Value* that you've copied from the Storyly Dashboard in the previous step.
* **User identifier:** Choose the identifier that you already pass to Storyly via Custom Parameter, which can be ID, e-mail, etc. Then enter *identity* in the *Destination identifier* field.
5. Now go back to the MoEngage Dashboard, and fill in the following details:
* **Integration name:** you can give any name you'd like.
* **Method:** Choose *POST* option.
* **URL endpoint:** Enter the endpoint: `https://core.storyly.io/audience/moengage/export-callback`
* **Parameters:** Click on *+KV pair* and paste the *Key* & *Value* that you've copied from the Storyly Dashboard in the previous step.
* **User identifier:** Choose the identifier that you already pass to Storyly via Custom Parameter, which can be ID, e-mail, etc. Then enter *identity* in the *Destination identifier* field.
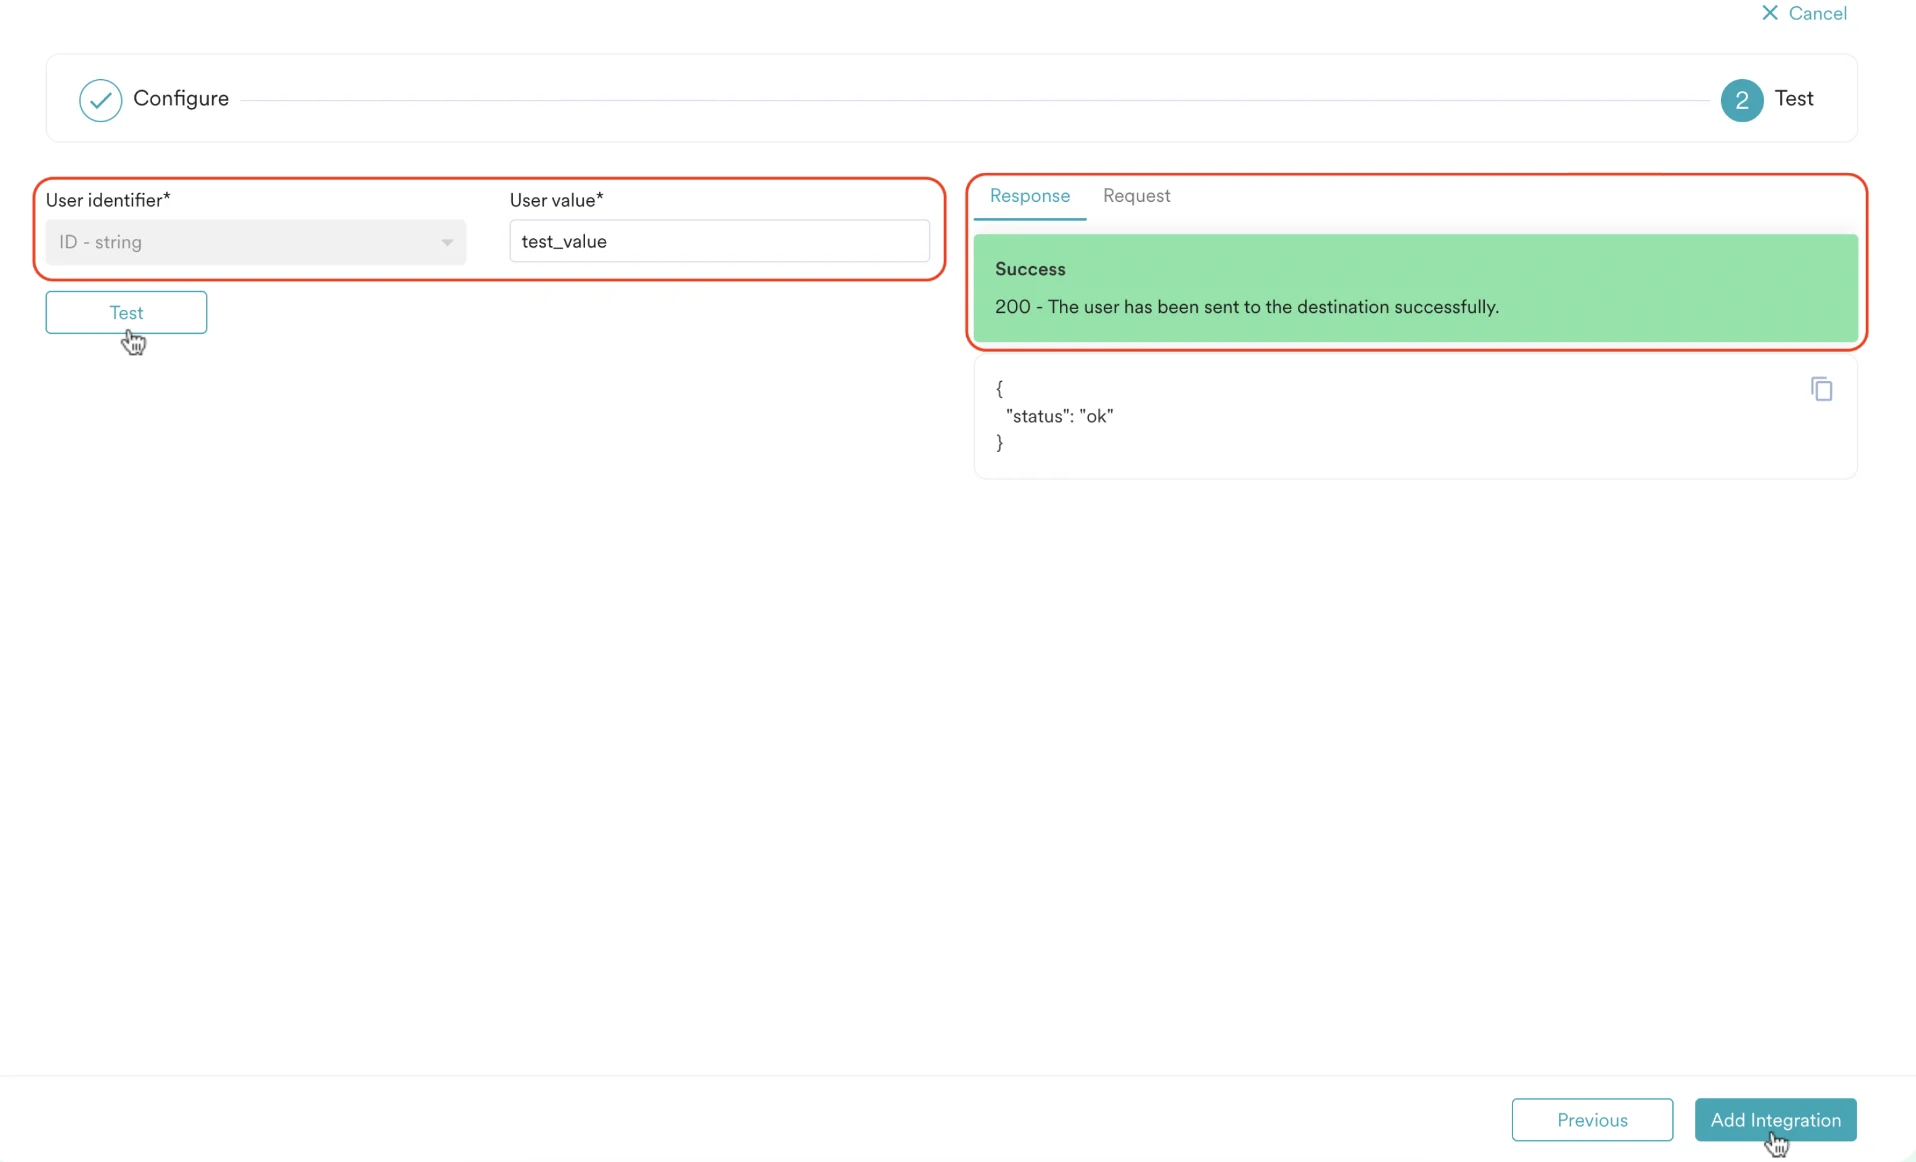
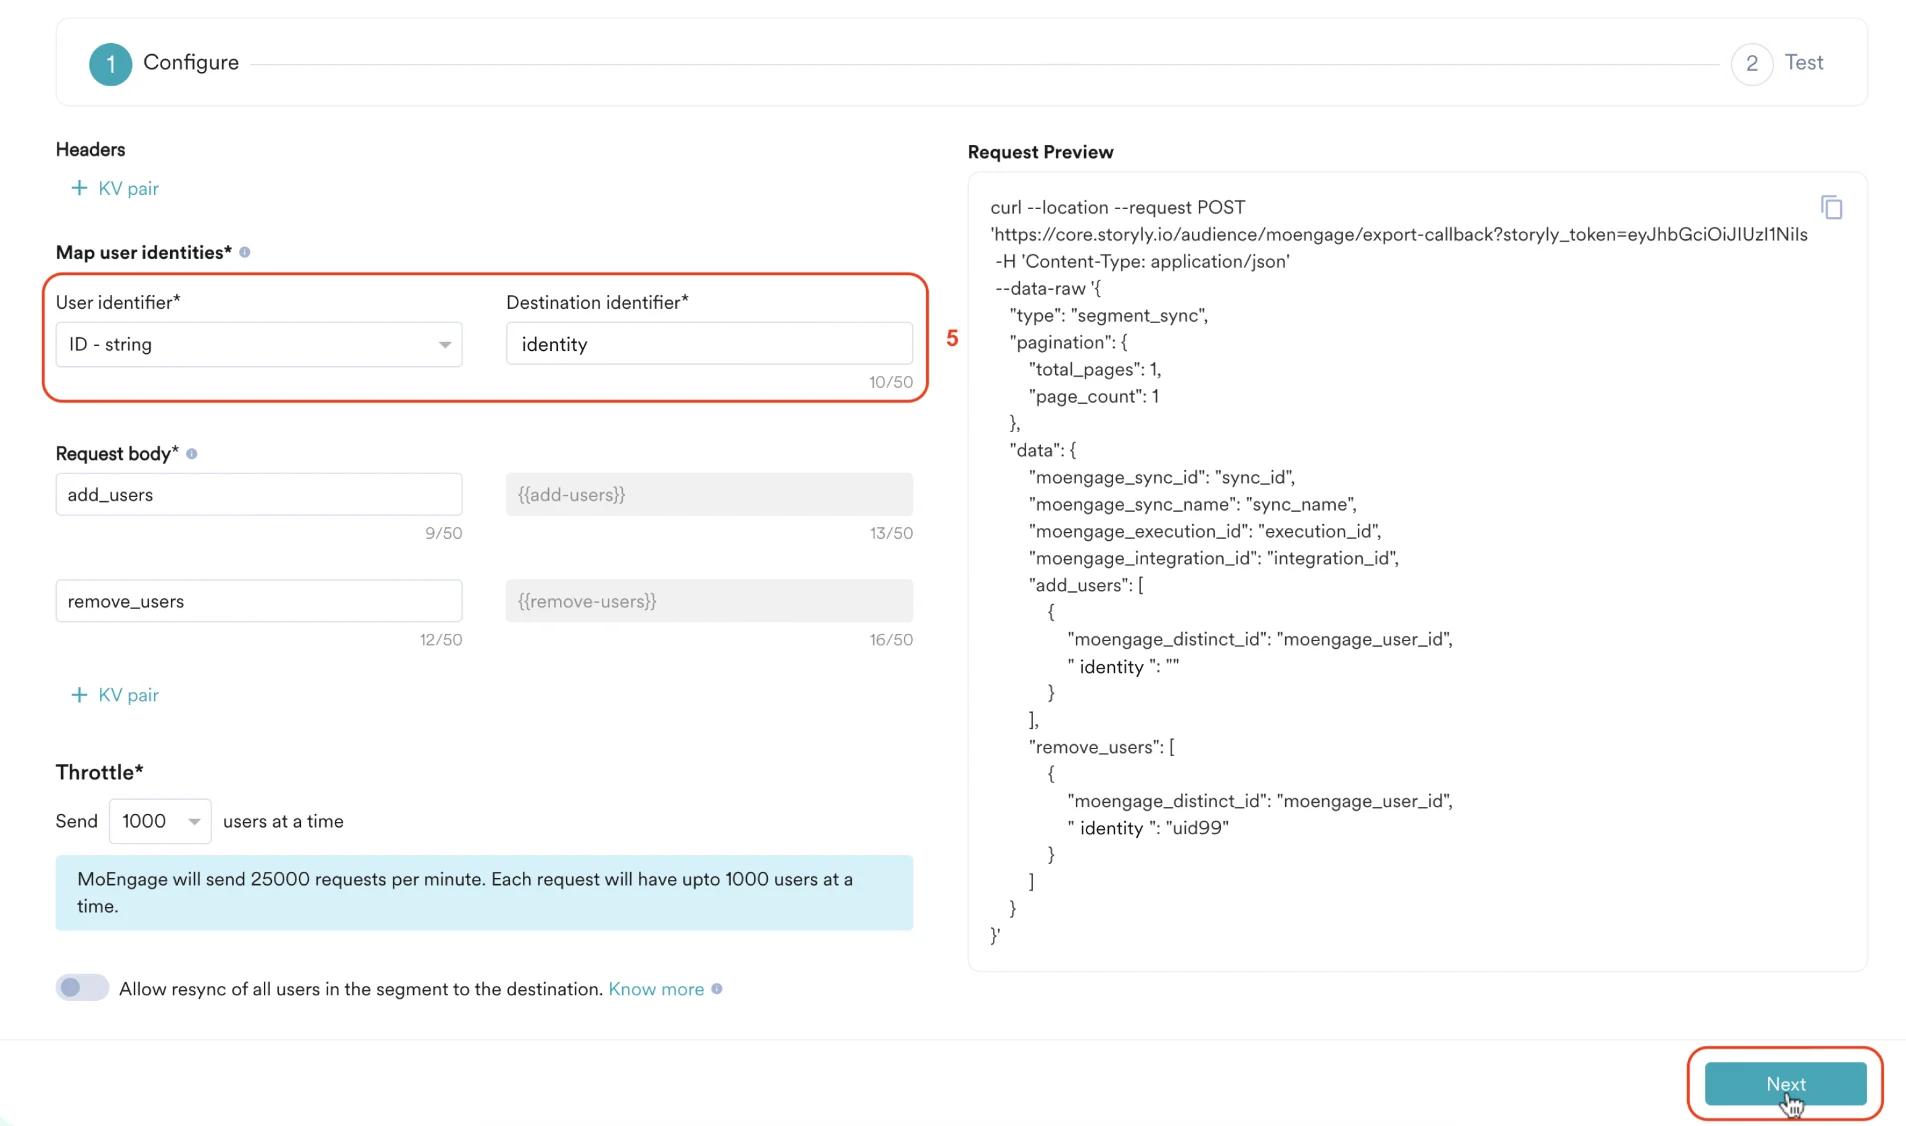 6. Click Next. You will now get an option to test the integration. You can enter a *User value* and click *Test* button. If the test is successful, you'll see the success message.
7. You can also choose to skip the test by directly clicking *Add Integration.*
6. Click Next. You will now get an option to test the integration. You can enter a *User value* and click *Test* button. If the test is successful, you'll see the success message.
7. You can also choose to skip the test by directly clicking *Add Integration.*
 ### Step 3: Send segment to Storyly
1. Navigate to the *Segment,* click on three dots right next to the segment that you'd like to Import, and select the *Sync Segment* option.
### Step 3: Send segment to Storyly
1. Navigate to the *Segment,* click on three dots right next to the segment that you'd like to Import, and select the *Sync Segment* option.
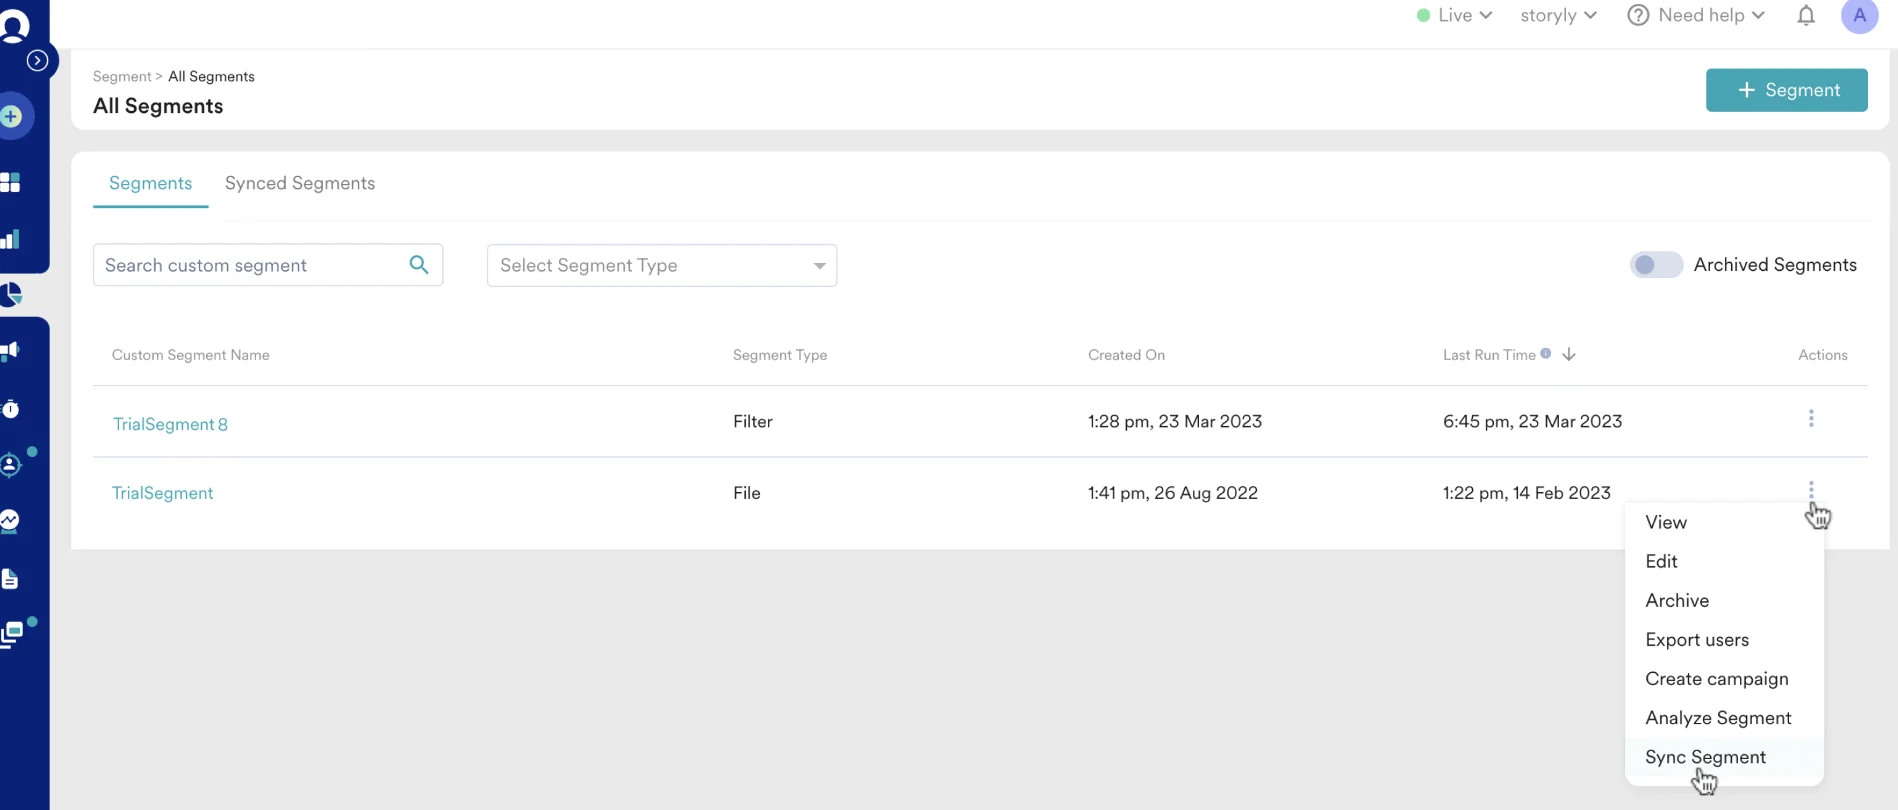 2. Select the *Destination* as the Custom Destination that you've set up.
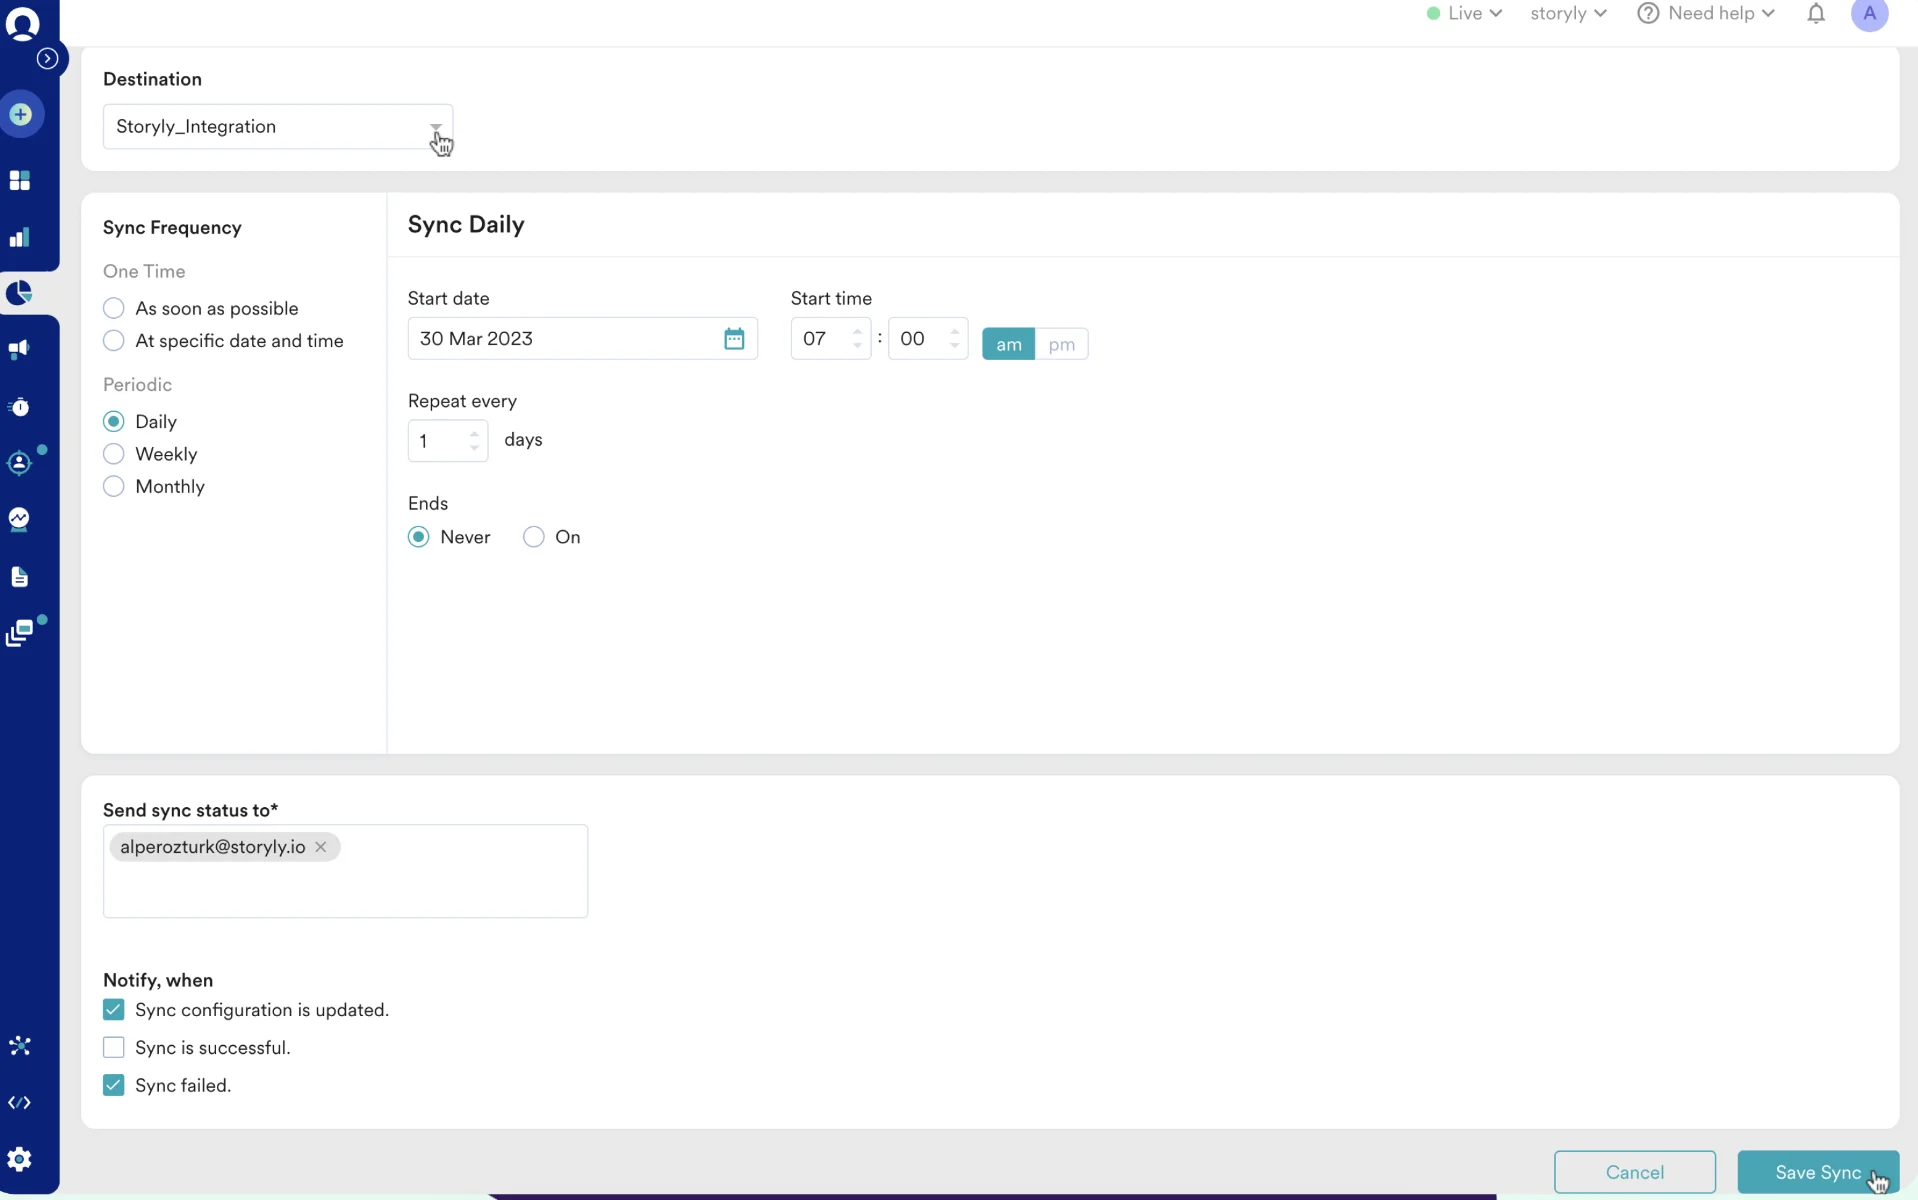 3. Select your *Sync Frequency* and other related details.
4. Click on *Save Sync*.
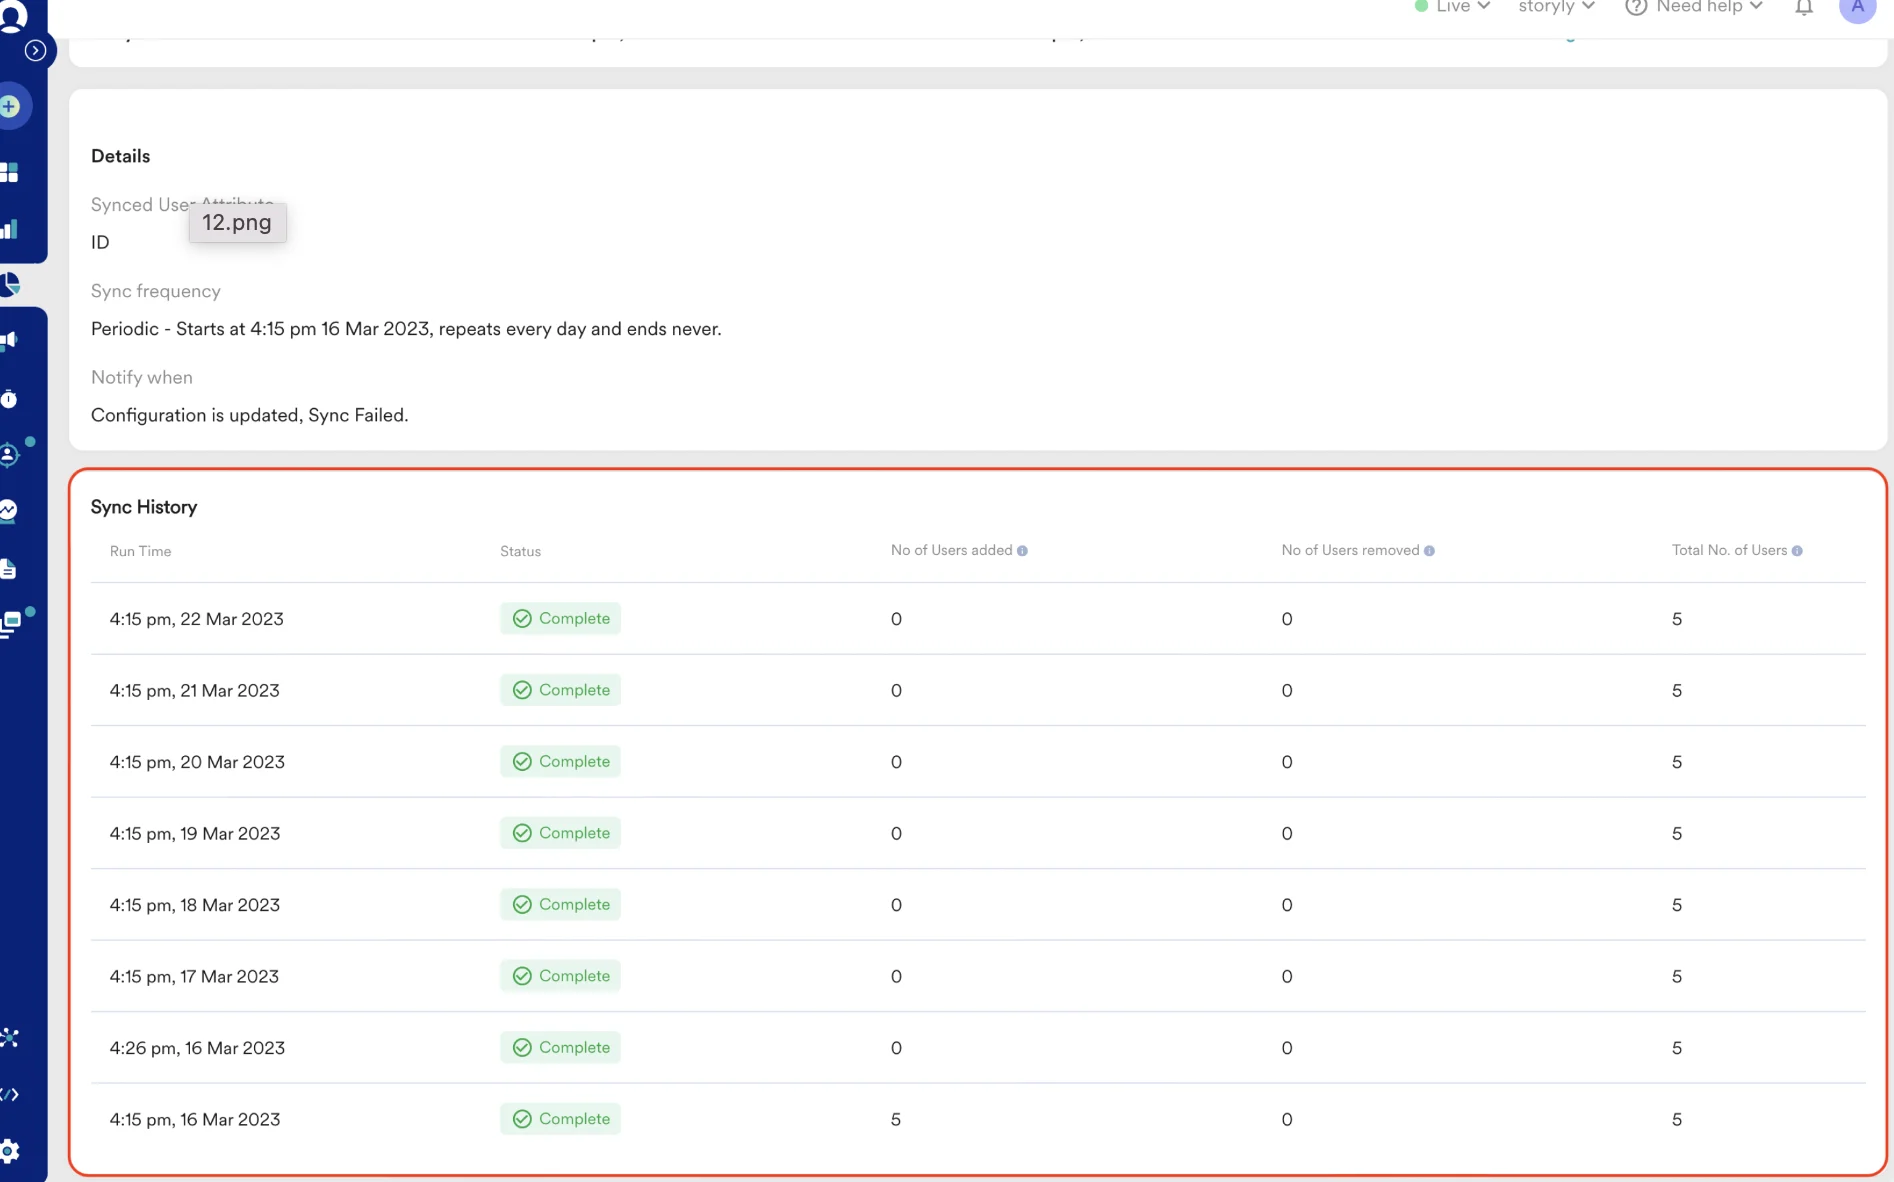
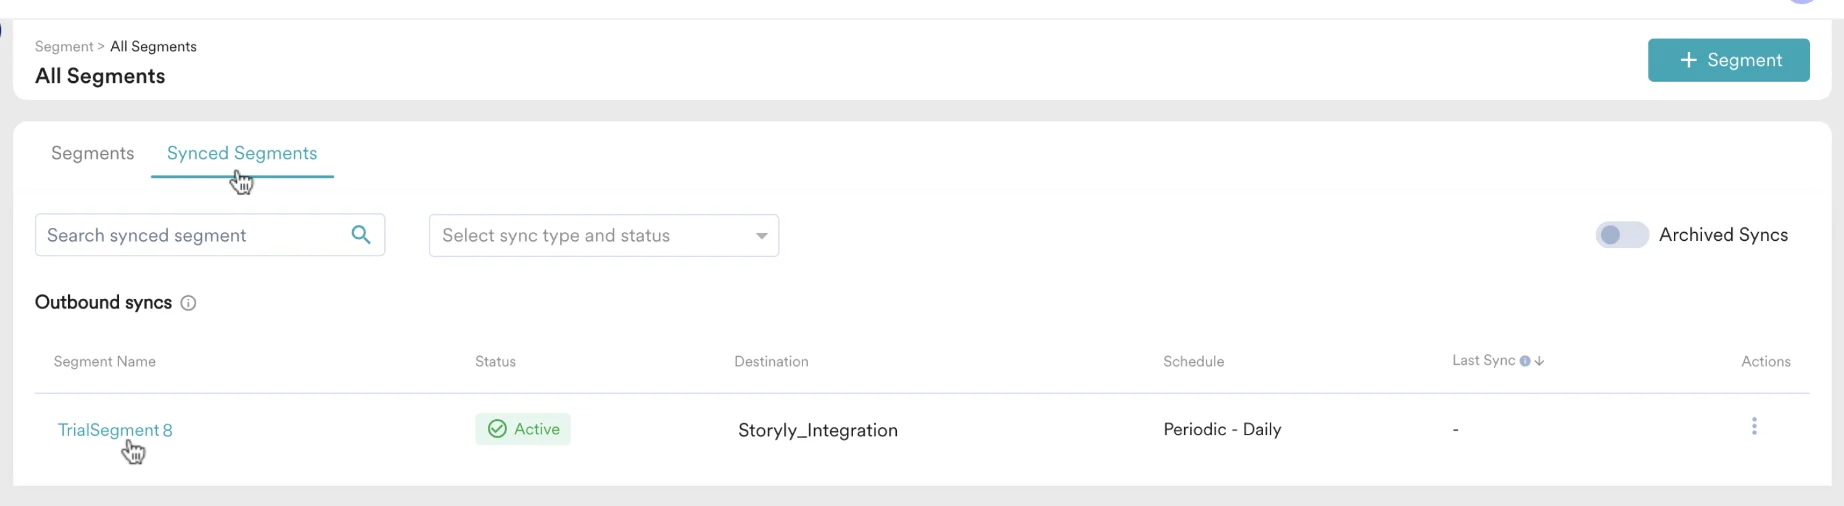
After this point, your MoEngage Segment will be synced to the Storyly Audience. You can view all your synced segments under the *Synced Segments* tab.
3. Select your *Sync Frequency* and other related details.
4. Click on *Save Sync*.
After this point, your MoEngage Segment will be synced to the Storyly Audience. You can view all your synced segments under the *Synced Segments* tab.