> ## Documentation Index
> Fetch the complete documentation index at: https://moengage.com/docs/llms.txt
> Use this file to discover all available pages before exploring further.
# Lokalise
## Introduction
Lokalise is a translation management platform designed for agile teams to efficiently manage multilingual content.
## MoEngage × Lokalise
The integration between MoEngage and Lokalise enables you to deliver real-time, localized content across your campaigns without manual translation coordination. With this integration, you can:
* Automatically fetch translations for all your campaign content through Lokalise and deliver high-quality, localized experiences to your users.
* Lokalise streamlines your translation workflow and frees up your teams to focus on campaign strategy and customer engagement.
## Key features
With this integration, you can:
* **Real-time translation management**: Automatically sync translations from Lokalise to MoEngage in real-time.
* **Multi-language support**: Deploy campaigns in multiple languages simultaneously with a single setup.
* **Dynamic content delivery**: Use language-based user attributes to serve language-specific content automatically.
* **AWS S3 integration**: Leverages secure cloud storage for translation file management.
* **Template-based translation keys**: Create once in Lokalise, reuse across all campaigns.
* **Simplified localization workflow**: Eliminates manual translation file management and reduces time-to-market.
## Use cases
Integrating Lokalise with MoEngage helps you with the following use cases:
* **Global campaign localization**: Deploy a single campaign template across 20+ countries with automatic language-specific content delivery. Each user automatically receives content in their preferred language, eliminating the need for separate campaigns per language.
* **Real-time content updates**: Update product descriptions, promotional messages, or campaign copy in Lokalise and see the changes reflected immediately in MoEngage campaigns. No need to recreate or republish campaigns — translations update instantly.
* **Multi-language customer support**: Deliver localized support messages, onboarding content, and FAQ responses to customers in their native language based on language preferences stored in their user profile.
* **Regulated market compliance**: Ensure compliance with regional marketing regulations by automatically serving legally required translated content and terms tailored to each language and region.
## Integration
**Prerequisites**
Before you begin, ensure you have the following requirements:
* An active Lokalise account with administrative access.
* A translation project created in Lokalise with at least one target language configured.
* A MoEngage account with Content API access enabled. A user attribute system set up in MoEngage to capture and track language preferences.
To set up this process, perform the following steps:
* [Step 1: Create a new Lokalise project](#step-1-create-a-new-lokalise-project)
* [Step 2: Define a user language attribute in MoEngage](#step-2-define-a-user-language-attribute-in-moengage)
* [Step 3: Create translation keys in Lokalise](#step-3-create-translation-keys-in-lokalise)
* [Step 4: Install the MoEngage app in Lokalise](#step-4-install-the-moengage-app-in-lokalise)
* [Step 5: Configure Content API in MoEngage](#step-5-configure-content-api-in-moengage)
* [Step 6: Use Content API in campaigns](#step-6-use-content-api-in-campaigns)
### Step 1: Create a new Lokalise project
Skip this step if you already have an existing Lokalise project. To create a new translation project, perform the following steps:
1. Log in to your Lokalise account.
2. Click **New Project**.
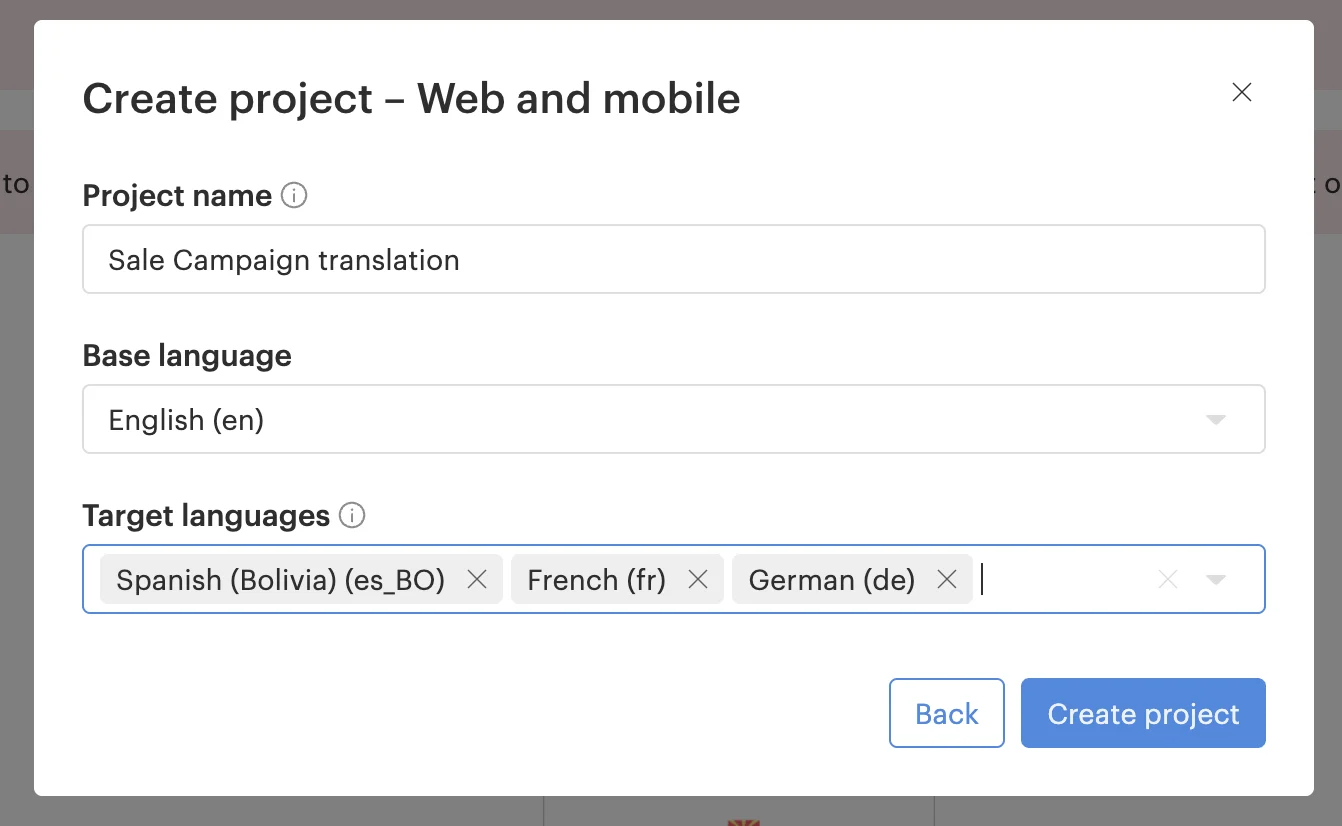
3. Enter the following project details:
1. **Project Name**: Enter a descriptive name (for example, `MoEngage Campaigns`).
2. **Base Language**: Select the language you will translate from (for example, English).
3. **Target Languages**: Add all languages you need for translations (for example, Spanish, French, German, Japanese).
4. **Project Type**: Click **Software Localization**.
4. Click **Create project**.
 ### Step 2: Define a user language attribute in MoEngage
To ensure MoEngage fetches the correct language variant from Lokalise, you must first define a user attribute for language preferences.
Create a new custom tracked user attribute called `user_language` in MoEngage using one of the following methods:
* [Method A: Use the User Data API](#method-a-use-the-user-data-api)
* [Method B: Use User Imports](#method-b-use-user-imports)
#### Method A: Use the User Data API
Here, you must send language data in your [User Data API](/api/user/track-user) calls with the property name `user_language`.
**Example API payload:**
```json theme={null}
{
"customer_id": "user123",
"user_language": "es"
}
```
#### Method B: Use User Imports
To use [User Imports](https://www.moengage.com/docs/user-guide/data/imports/file-based-imports/import-user-data-using-csv), perform the following steps:
1. On the MoEngage UI, navigate to **Segments** > **User Imports**.
2. Prepare a CSV with `customer_id` and `user_language` columns.
3. Upload the file and map the columns.
4. Complete the import process. For more information, see [Import User Data Using CSV](https://www.moengage.com/docs/user-guide/data/imports/file-based-imports/import-user-data-using-csv).
Language codes must match exactly across MoEngage and Lokalise. For example, if Lokalise uses `es-ES` for Spanish, use the same format in the MoEngage `user_language` attribute.
### Step 3: Create translation keys in Lokalise
To define the content for your campaign, you must first create translation keys in Lokalise.
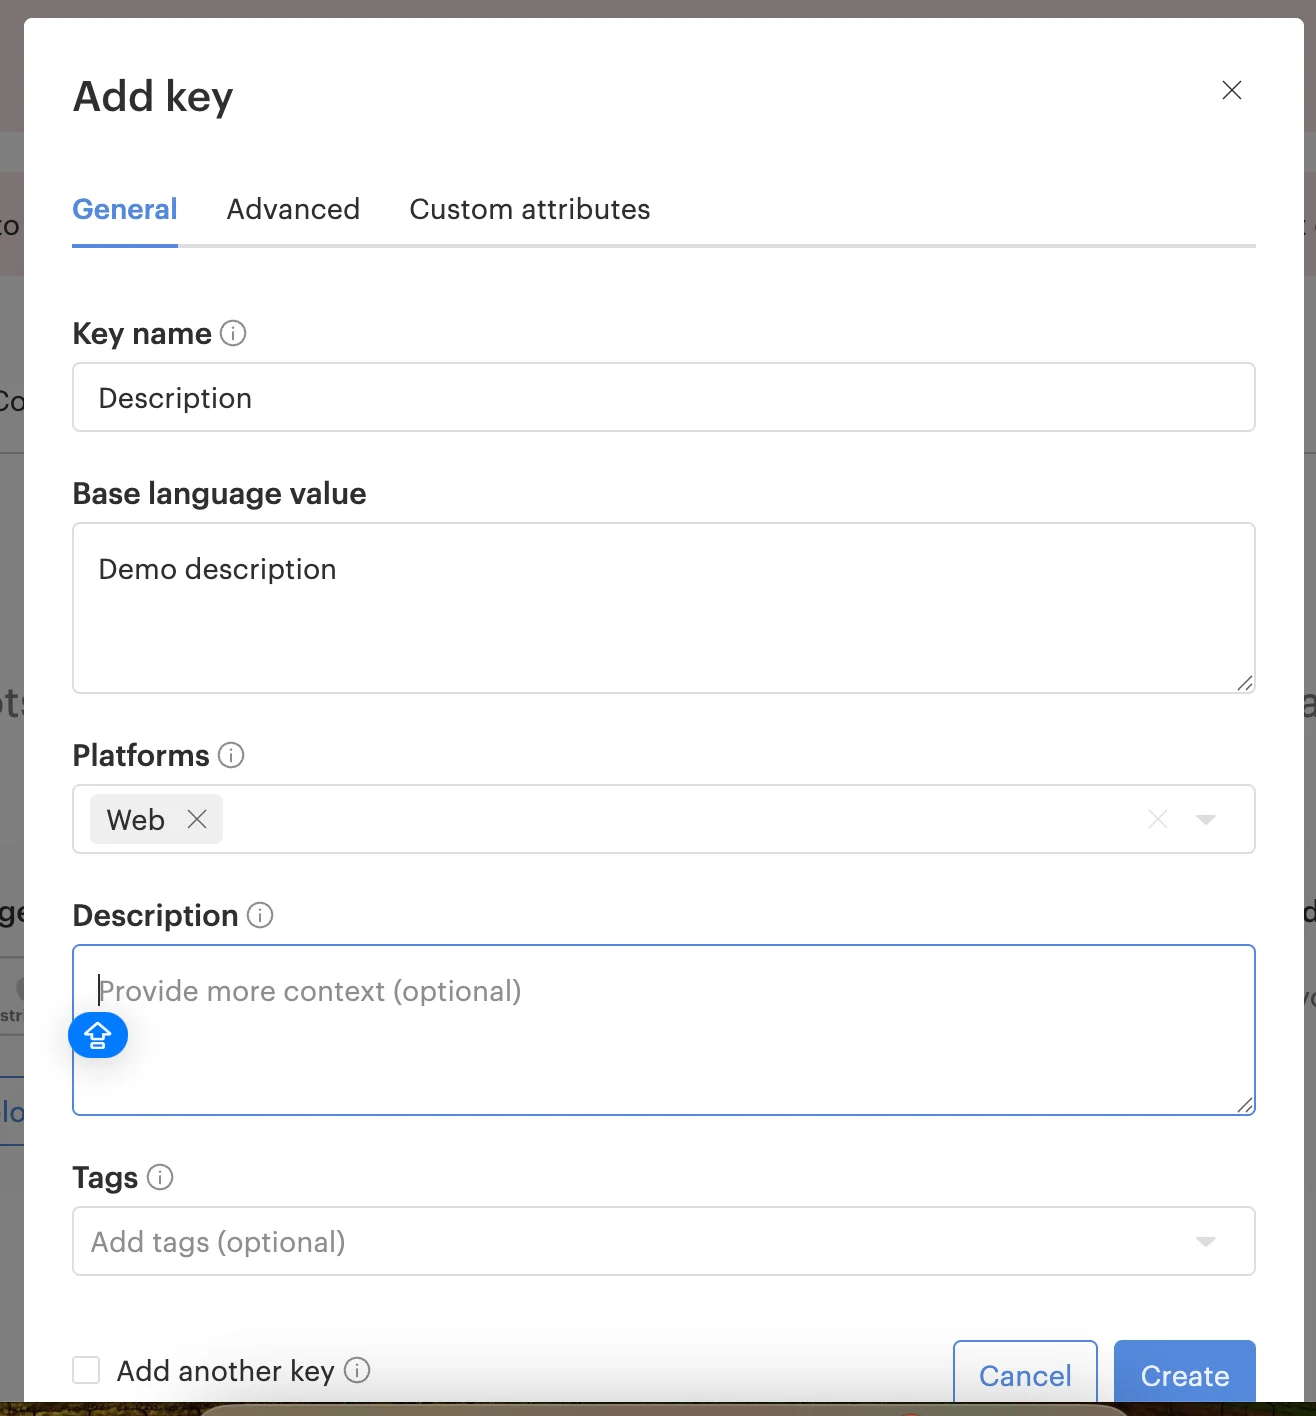
To create translation keys in Lokalise, perform the following steps:
1. Open your **Lokalise** project.
2. Click **Add Key**.
3. In the **Key name** box, enter the description.
4. In the **Base Language Value** box, enter the language value.
5. In the **Platforms** list, click **Web**.
6. Click **Save**.
### Step 2: Define a user language attribute in MoEngage
To ensure MoEngage fetches the correct language variant from Lokalise, you must first define a user attribute for language preferences.
Create a new custom tracked user attribute called `user_language` in MoEngage using one of the following methods:
* [Method A: Use the User Data API](#method-a-use-the-user-data-api)
* [Method B: Use User Imports](#method-b-use-user-imports)
#### Method A: Use the User Data API
Here, you must send language data in your [User Data API](/api/user/track-user) calls with the property name `user_language`.
**Example API payload:**
```json theme={null}
{
"customer_id": "user123",
"user_language": "es"
}
```
#### Method B: Use User Imports
To use [User Imports](https://www.moengage.com/docs/user-guide/data/imports/file-based-imports/import-user-data-using-csv), perform the following steps:
1. On the MoEngage UI, navigate to **Segments** > **User Imports**.
2. Prepare a CSV with `customer_id` and `user_language` columns.
3. Upload the file and map the columns.
4. Complete the import process. For more information, see [Import User Data Using CSV](https://www.moengage.com/docs/user-guide/data/imports/file-based-imports/import-user-data-using-csv).
Language codes must match exactly across MoEngage and Lokalise. For example, if Lokalise uses `es-ES` for Spanish, use the same format in the MoEngage `user_language` attribute.
### Step 3: Create translation keys in Lokalise
To define the content for your campaign, you must first create translation keys in Lokalise.
To create translation keys in Lokalise, perform the following steps:
1. Open your **Lokalise** project.
2. Click **Add Key**.
3. In the **Key name** box, enter the description.
4. In the **Base Language Value** box, enter the language value.
5. In the **Platforms** list, click **Web**.
6. Click **Save**.
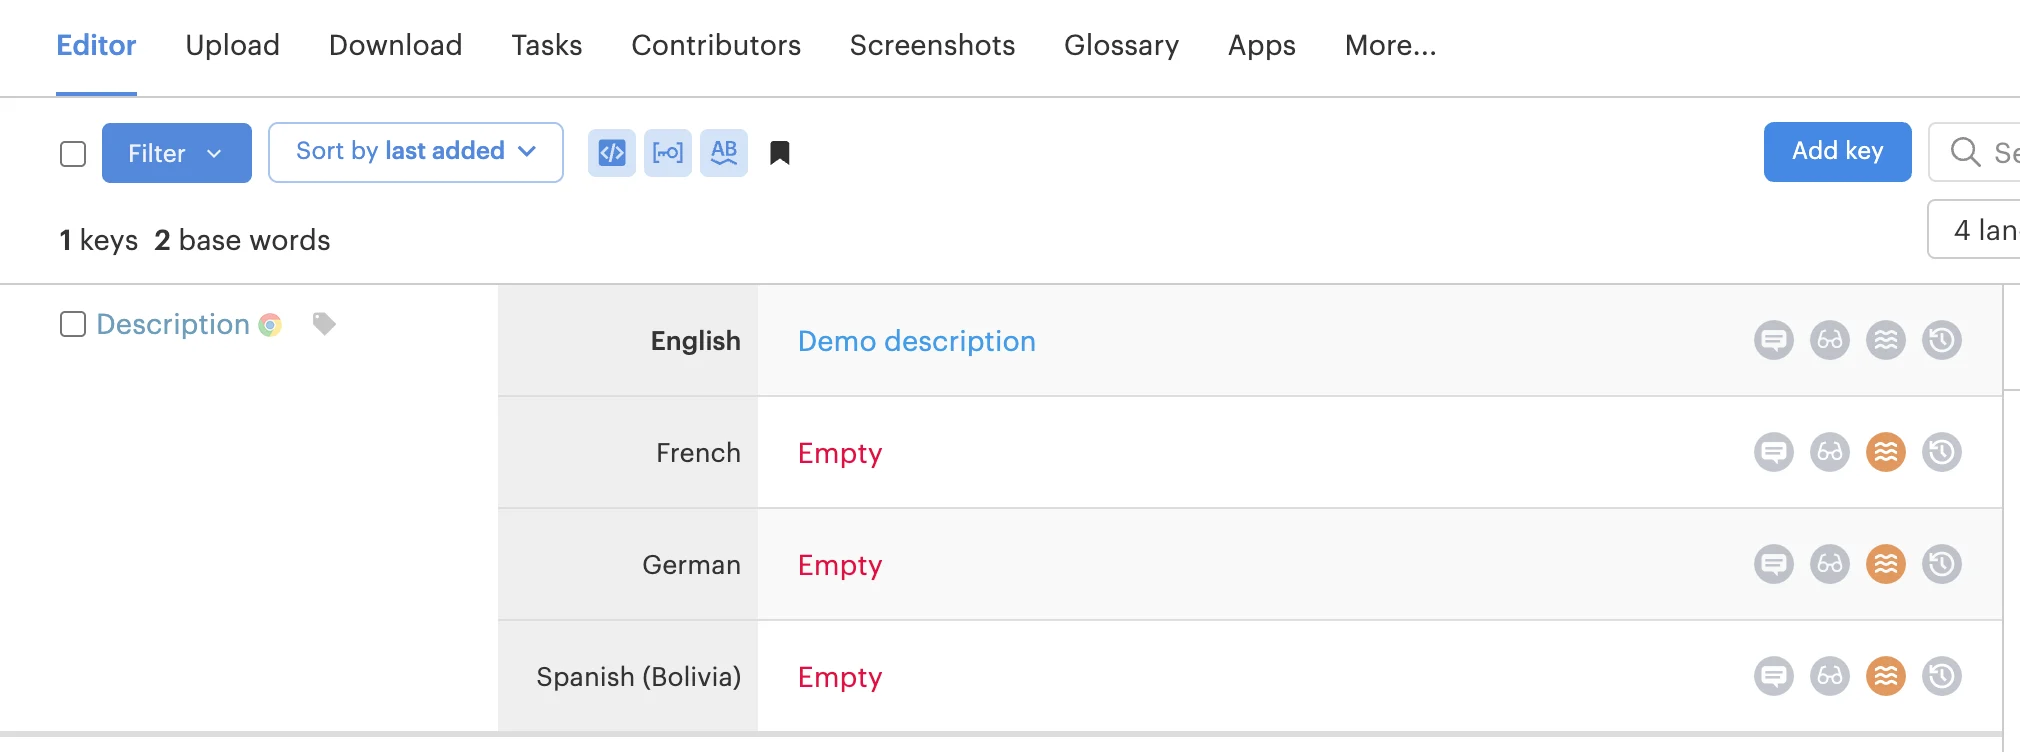
 Your key is now created and appears in the project editor.
#### Recommended translation keys
| Key name | Description |
| ---------------- | ----------------------------------------------- |
| `headline` | This is a campaign headline or main message. |
| `call_to_action` | This is a button text or CTA message. |
| `hero_image_alt` | This is an alternative text for hero images. |
| `product_title` | This is the name of a product or offer. |
| `discount_text` | This is a discount message or promotional text. |
#### Add translations
After creating the base language keys, provide the translations for your target languages:
1. In the project editor, select the key you want to translate.
2. Enter the translation in the corresponding target language field.
3. Click **Save**.
Your key is now created and appears in the project editor.
#### Recommended translation keys
| Key name | Description |
| ---------------- | ----------------------------------------------- |
| `headline` | This is a campaign headline or main message. |
| `call_to_action` | This is a button text or CTA message. |
| `hero_image_alt` | This is an alternative text for hero images. |
| `product_title` | This is the name of a product or offer. |
| `discount_text` | This is a discount message or promotional text. |
#### Add translations
After creating the base language keys, provide the translations for your target languages:
1. In the project editor, select the key you want to translate.
2. Enter the translation in the corresponding target language field.
3. Click **Save**.
 **Key naming conventions**
To ensure compatibility with MoEngage, follow the naming rules below:
* Use underscores for spacing. For example, use `my_translation_key`.
* Assign keys to the **Web** platform. All keys must be associated with the **Web** platform to sync correctly.
* Do not use periods. Periods (for example, `this.is.the.key`) will cause integration errors.
* Do not use `_on` in key names. For example, use `join_us_instagram` instead of `join_us_on_instagram`.
### Step 4: Install the MoEngage app in Lokalise
To install the MoEngage app in Lokalise, perform the following steps:
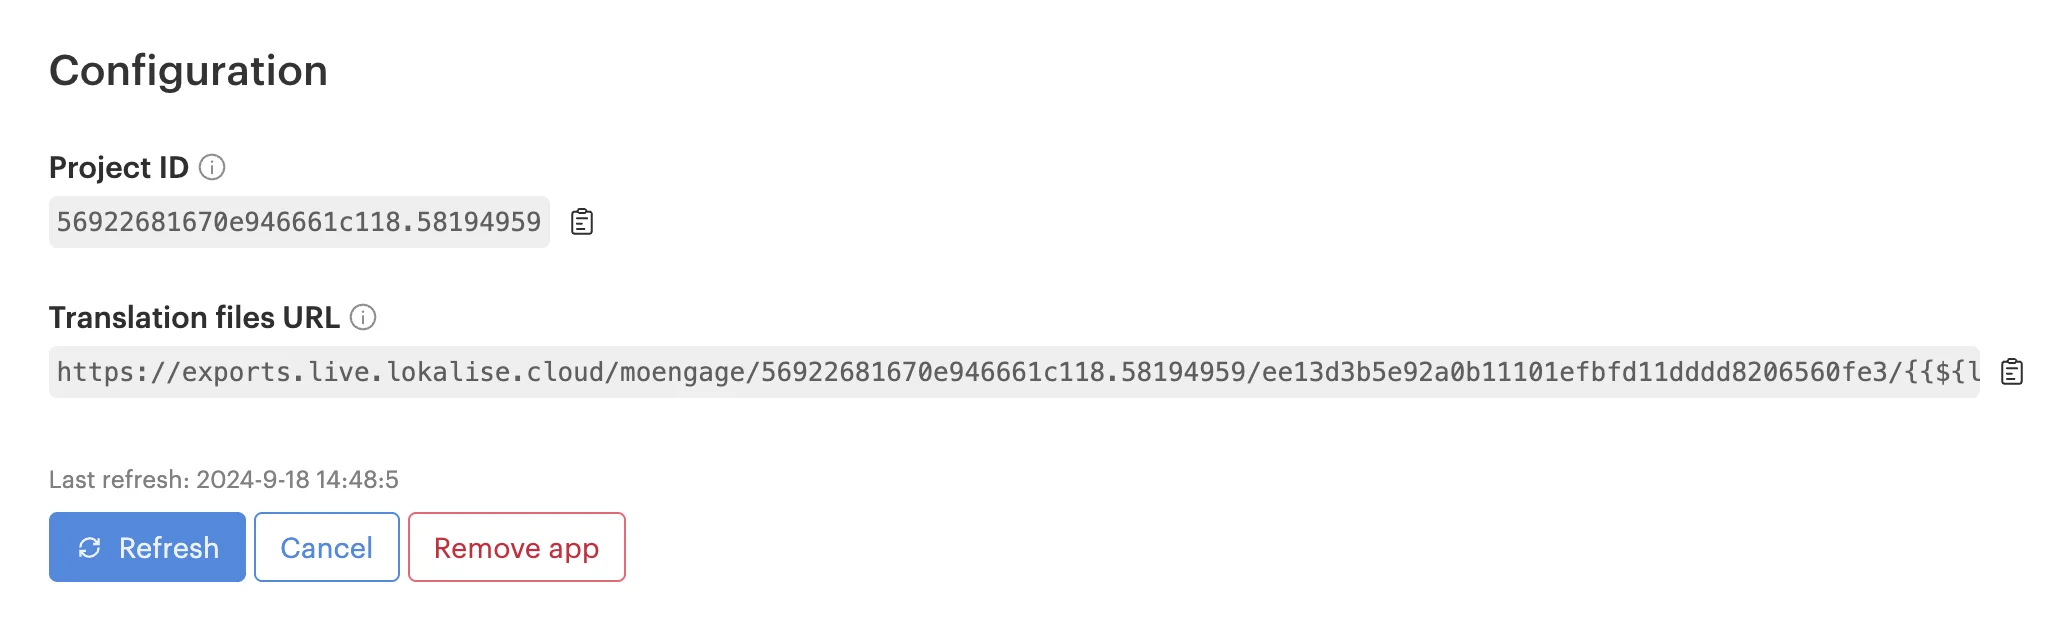
1. Open your Lokalise project and navigate to the **Apps** section.
2. Search for **MoEngage** and click **Install**.
3. After installation, the app generates a unique translation file URL. The URL format is:
```text theme={null}
https://exports.live.lokalise.cloud/moengage/[PROJECT_ID]/[API_TOKEN]/{{${language}}}.json
```
4. Click **Refresh** in the MoEngage app to generate or update the latest translation files on the server.
You must click **Refresh** every time you add new keys or update translations in Lokalise to ensure MoEngage fetches the latest version.
5. Copy the generated URL. This URL remains the same even after you update your content.
6. (Optional) Test the URL: Replace the `{{${language}}}` placeholder with an actual language code (for example, `en` or `es`) and open it in your browser. You should see a JSON file containing your translation keys and values.
**Key naming conventions**
To ensure compatibility with MoEngage, follow the naming rules below:
* Use underscores for spacing. For example, use `my_translation_key`.
* Assign keys to the **Web** platform. All keys must be associated with the **Web** platform to sync correctly.
* Do not use periods. Periods (for example, `this.is.the.key`) will cause integration errors.
* Do not use `_on` in key names. For example, use `join_us_instagram` instead of `join_us_on_instagram`.
### Step 4: Install the MoEngage app in Lokalise
To install the MoEngage app in Lokalise, perform the following steps:
1. Open your Lokalise project and navigate to the **Apps** section.
2. Search for **MoEngage** and click **Install**.
3. After installation, the app generates a unique translation file URL. The URL format is:
```text theme={null}
https://exports.live.lokalise.cloud/moengage/[PROJECT_ID]/[API_TOKEN]/{{${language}}}.json
```
4. Click **Refresh** in the MoEngage app to generate or update the latest translation files on the server.
You must click **Refresh** every time you add new keys or update translations in Lokalise to ensure MoEngage fetches the latest version.
5. Copy the generated URL. This URL remains the same even after you update your content.
6. (Optional) Test the URL: Replace the `{{${language}}}` placeholder with an actual language code (for example, `en` or `es`) and open it in your browser. You should see a JSON file containing your translation keys and values.
 ### Step 5: Configure Content API in MoEngage
To configure the Content API in MoEngage, perform the following steps:
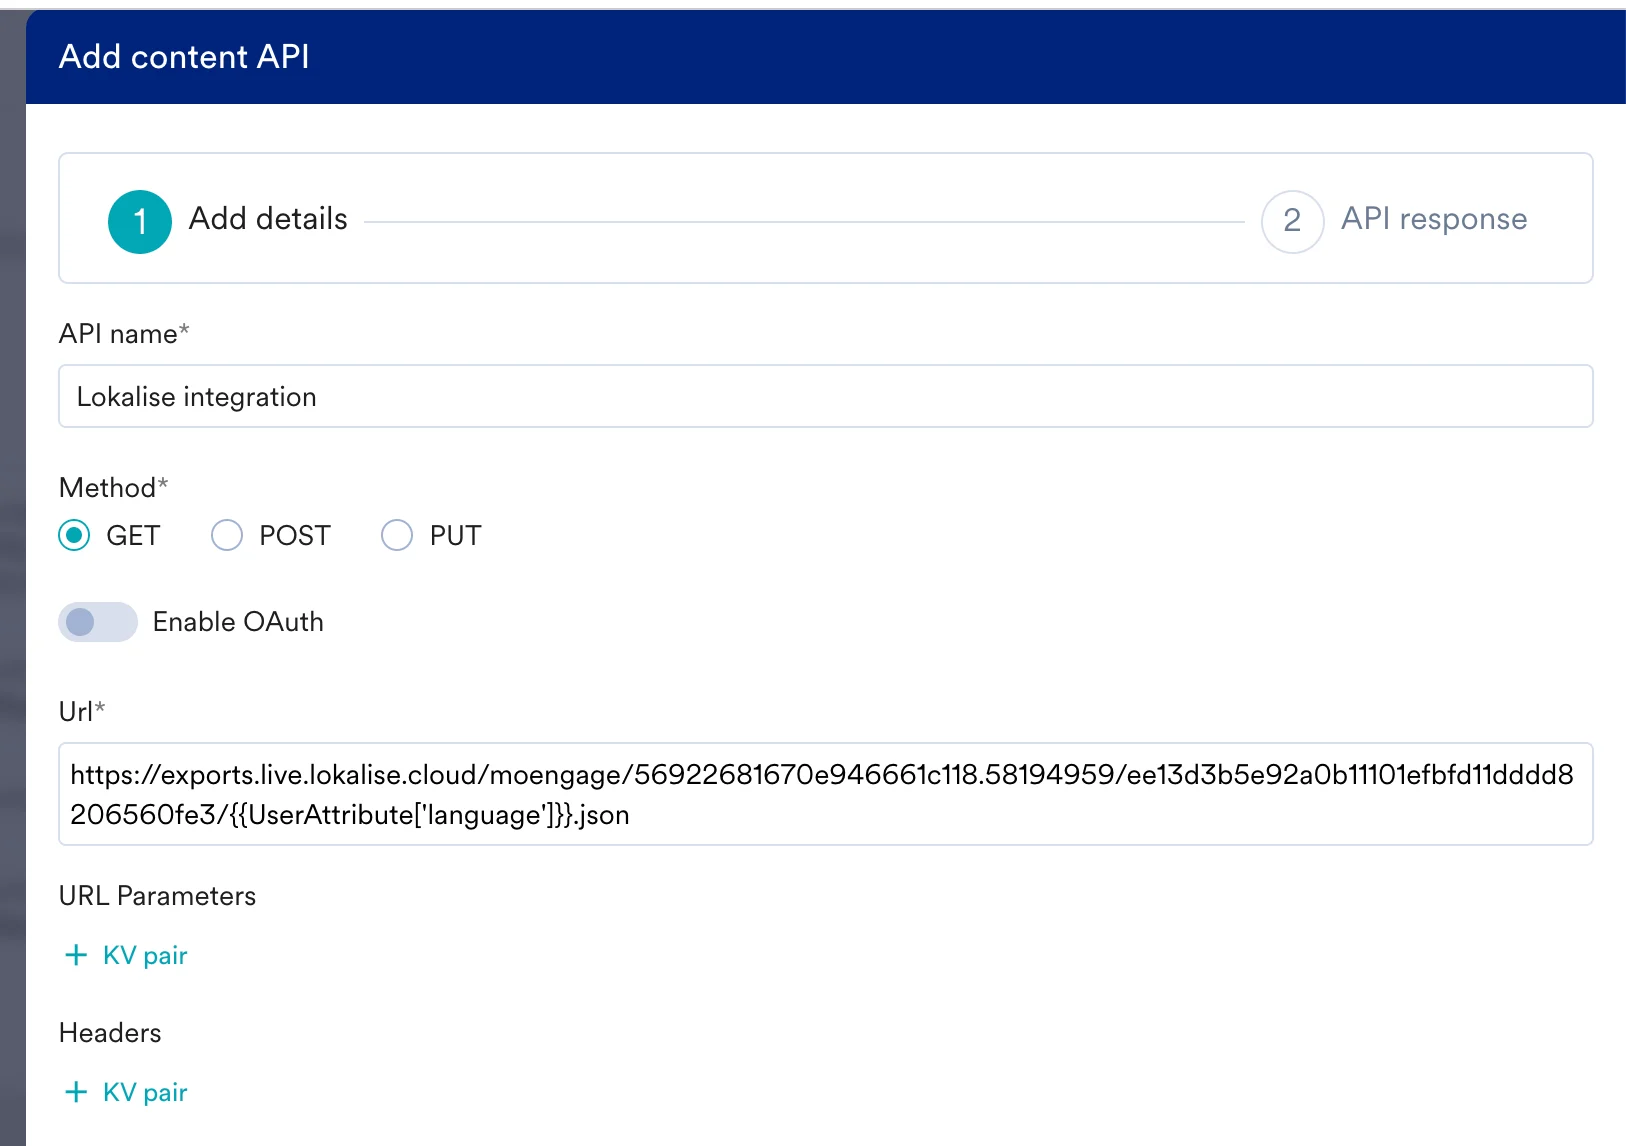
1. Log in to the MoEngage UI and navigate to **Settings** > **Advanced Settings** > **Content API**.
2. Click **+ Add Content API** in the upper-right corner.
3. Enter the following details:
1. **API name**: Enter a descriptive name (for example, `Lokalise Translations`).
2. Under **Method**, select **GET**.
3. **URL**: Paste the translation file URL you copied from Lokalise in the previous step. For example:
```text theme={null}
https://exports.live.lokalise.cloud/moengage/[PROJECT_ID]/[TOKEN]/{{UserAttribute['user_language']}}.json
```
4. **Map the attribute**: Replace the `{{${language}}}` part of the URL with your MoEngage user language attribute.
The attribute name (for example, `user_language`) must exactly match how you defined it in Step 2.
4. Click **Test**, enter a language code (for example, `es` for Spanish or `fr` for French), and verify the API returns a JSON response with your translation keys.
5. Click **Save** to complete the setup.
### Step 5: Configure Content API in MoEngage
To configure the Content API in MoEngage, perform the following steps:
1. Log in to the MoEngage UI and navigate to **Settings** > **Advanced Settings** > **Content API**.
2. Click **+ Add Content API** in the upper-right corner.
3. Enter the following details:
1. **API name**: Enter a descriptive name (for example, `Lokalise Translations`).
2. Under **Method**, select **GET**.
3. **URL**: Paste the translation file URL you copied from Lokalise in the previous step. For example:
```text theme={null}
https://exports.live.lokalise.cloud/moengage/[PROJECT_ID]/[TOKEN]/{{UserAttribute['user_language']}}.json
```
4. **Map the attribute**: Replace the `{{${language}}}` part of the URL with your MoEngage user language attribute.
The attribute name (for example, `user_language`) must exactly match how you defined it in Step 2.
4. Click **Test**, enter a language code (for example, `es` for Spanish or `fr` for French), and verify the API returns a JSON response with your translation keys.
5. Click **Save** to complete the setup.
 ### Step 6: Use Content API in campaigns
To use the Content API in campaigns, perform the following steps:
1. In the MoEngage UI, on **step 2 (Campaign Content)** of your campaign creation, type `@` in any text field (headline, body, or CTA). For more information, see [Content APIs](https://help.moengage.com/hc/en-us/articles/115003622346-Content-APIs).
2. In the dropdown menu, select the Lokalise Content API you configured in the previous step.
3. Select the specific translation key (for example, `headline` or `description`) to insert it into your content.
4. MoEngage automatically inserts the template `{{@.ContentAPI['key_name']}}`.
5. Complete your campaign setup and click **Publish**.
#### MoEngage template language
You can use the [MoEngage Templating Language](https://www.moengage.com/docs/user-guide/campaigns-and-channels/getting-started/message-personalization/jinja-templating-language) to manipulate how translations are displayed or to create fallback logic:
* Access a specific translation: `{{@.ContentAPI['key_name']}}`
* Combine multiple keys: `{{@.ContentAPI['headline']}} - {{@.ContentAPI['subheadline']}}`
* Conditional logic (display only if translation exists): `{{#if @.ContentAPI['discount_text']}}Special offer: {{@.ContentAPI['discount_text']}}{{/if}}`
#### Expected outcome
When the campaign is sent, MoEngage resolves the variables in real time by matching the user's `user_language` attribute to the Lokalise project files:
| User attribute | Translation delivered |
| --------------------- | ---------------------------------- |
| `user_language: "en"` | User receives the English version. |
| `user_language: "es"` | User receives the Spanish version. |
| `user_language: "fr"` | User receives the French version. |
### Step 6: Use Content API in campaigns
To use the Content API in campaigns, perform the following steps:
1. In the MoEngage UI, on **step 2 (Campaign Content)** of your campaign creation, type `@` in any text field (headline, body, or CTA). For more information, see [Content APIs](https://help.moengage.com/hc/en-us/articles/115003622346-Content-APIs).
2. In the dropdown menu, select the Lokalise Content API you configured in the previous step.
3. Select the specific translation key (for example, `headline` or `description`) to insert it into your content.
4. MoEngage automatically inserts the template `{{@.ContentAPI['key_name']}}`.
5. Complete your campaign setup and click **Publish**.
#### MoEngage template language
You can use the [MoEngage Templating Language](https://www.moengage.com/docs/user-guide/campaigns-and-channels/getting-started/message-personalization/jinja-templating-language) to manipulate how translations are displayed or to create fallback logic:
* Access a specific translation: `{{@.ContentAPI['key_name']}}`
* Combine multiple keys: `{{@.ContentAPI['headline']}} - {{@.ContentAPI['subheadline']}}`
* Conditional logic (display only if translation exists): `{{#if @.ContentAPI['discount_text']}}Special offer: {{@.ContentAPI['discount_text']}}{{/if}}`
#### Expected outcome
When the campaign is sent, MoEngage resolves the variables in real time by matching the user's `user_language` attribute to the Lokalise project files:
| User attribute | Translation delivered |
| --------------------- | ---------------------------------- |
| `user_language: "en"` | User receives the English version. |
| `user_language: "es"` | User receives the Spanish version. |
| `user_language: "fr"` | User receives the French version. |