> ## Documentation Index
> Fetch the complete documentation index at: https://moengage.com/docs/llms.txt
> Use this file to discover all available pages before exploring further.
# Rocketium
## Introduction
[Rocketium](https://rocketium.com/) is a creative automation platform helping brands and businesses improve in-app and website conversions through video and display banner automation. Its creative automation platform helps marketers and designers run more relevant campaigns faster across the customer life cycle.
## MoEngage × Rocketium
MoEngage Rocketium integration empowers you to use Rocketium creatives in MoEngage campaigns.
## Integration
**Prerequisites**
Ensure you have a Rocketium account.
There are two type of integrations supported:
1. Use your Rocketium creatives directly in MoEngage campaigns by adding them as image URLs.
2. Fetch personalised Rocketium creatives (rendered on the fly based on user attributes) in MoEngage
### 1. Using direct image URLs
#### Step 1: Create a project on Rocketium
1. Create a new project using the required template. 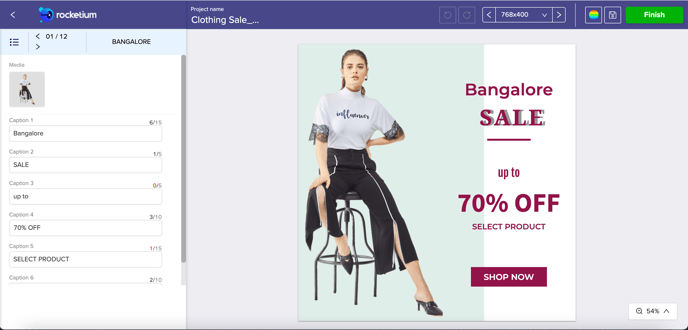 2. To create different variants (based on user personalised data), you can go through [Rocketium guide on spreadsheet imports](https://docs.rocketium.com/campaign/scale/spreadsheet-import) to build and publish the project. \
#### Step 2: Get your Rocketium project URL
1. Click on the Share button from the overflow menu.
2. To create different variants (based on user personalised data), you can go through [Rocketium guide on spreadsheet imports](https://docs.rocketium.com/campaign/scale/spreadsheet-import) to build and publish the project. \
#### Step 2: Get your Rocketium project URL
1. Click on the Share button from the overflow menu. 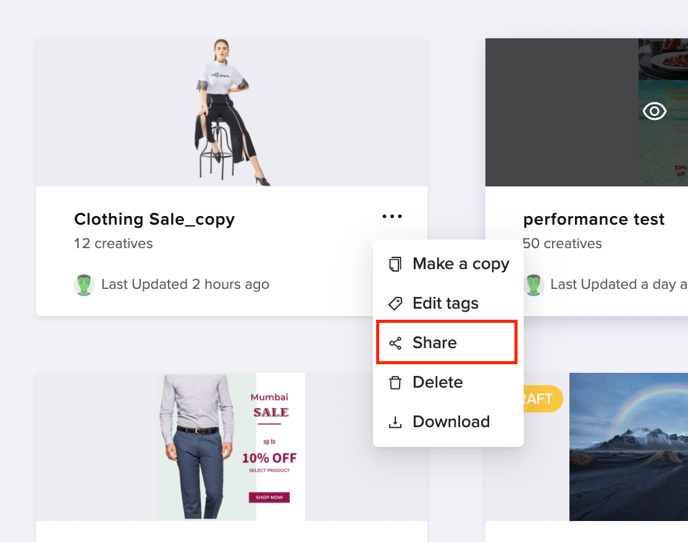 2. Copy the link from the bottom of this modal. This will be used in the next step while creating a campaign in MoEngage.
 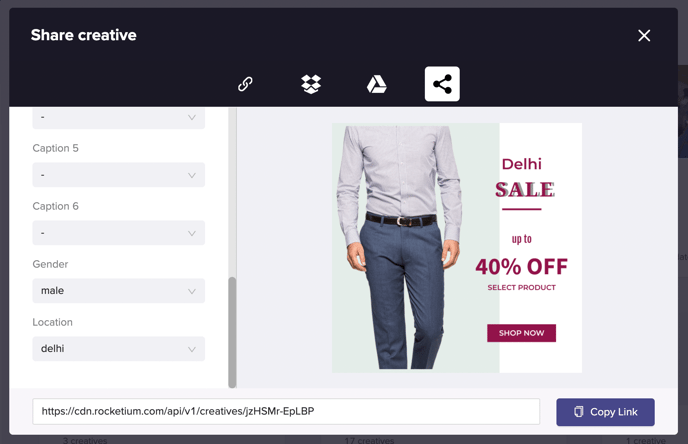 #### Step 3: Use Rocketium URL in MoEngage campaigns
To include the Rocketium URL in your MoEngage campaign, on the step 2 of campaign creation:
Paste the url in Image URL or Rich Landing URL depending on your use-case -
#### Step 3: Use Rocketium URL in MoEngage campaigns
To include the Rocketium URL in your MoEngage campaign, on the step 2 of campaign creation:
Paste the url in Image URL or Rich Landing URL depending on your use-case -
 Paste the url in Image URL or Rich Landing URL depending on your use-case -
 Paste the url in Image URL -

 #### In-App campaigns
Insert the Rocketium Ink url into your in-app image url
#### In-App campaigns
Insert the Rocketium Ink url into your in-app image url
 #### Email campaigns
Insert the Rocketium url directly in your email content
### 2. Use personalised URLs
If you want to use your Rocketium creative across campaigns, you can store it content APIs in MoEngage. Once you get your URL as mentioned in Step 1 and Step 2 above,
#### Step 1: Add content API on MoEngage
1. Navigate to **Settings** -> **Advanced settings** -> **Content API**. Click **+ Add content API** at the top right corner of the Content API screen.
#### Email campaigns
Insert the Rocketium url directly in your email content
### 2. Use personalised URLs
If you want to use your Rocketium creative across campaigns, you can store it content APIs in MoEngage. Once you get your URL as mentioned in Step 1 and Step 2 above,
#### Step 1: Add content API on MoEngage
1. Navigate to **Settings** -> **Advanced settings** -> **Content API**. Click **+ Add content API** at the top right corner of the Content API screen.  2. Add your Rocketium subdomain to the endpoint URL.
##### API URL
This URL should be the same as copied from the previous step.
`https://cdn.rocketium.com/api/v1/creatives/jzHSMr-EpLBP`
##### Parameters
Parameters give personalized parameter names which you have created in your spreadsheet.
2. Add your Rocketium subdomain to the endpoint URL.
##### API URL
This URL should be the same as copied from the previous step.
`https://cdn.rocketium.com/api/v1/creatives/jzHSMr-EpLBP`
##### Parameters
Parameters give personalized parameter names which you have created in your spreadsheet.
 3. Click Save. And you will see your Rocketium API added in MoEngage.
  **Note -** You can also test your APIs by clicking on the Test button. You can your API response and validate.
 #### Step 2: Using content APIs in MoEngage campaigns
You can now use these content APIs in your campaigns. [Read here](https://www.moengage.com/docs/user-guide/campaigns-and-channels/getting-started/campaign-content/content-apis) to know more about Content APIs
1. On step 2 on your campaign creation, enter `@`.
2. In the pop up, you can select the Rocketium Content API configured in Step 2.
#### Step 2: Using content APIs in MoEngage campaigns
You can now use these content APIs in your campaigns. [Read here](https://www.moengage.com/docs/user-guide/campaigns-and-channels/getting-started/campaign-content/content-apis) to know more about Content APIs
1. On step 2 on your campaign creation, enter `@`.
2. In the pop up, you can select the Rocketium Content API configured in Step 2.  3. Click done to include the response in your campaigns.
4. You can use MoEngage templating language to parse through the API response and use the content in your campaigns. Rocketium sends image urls in the key "Media". Sample rocketium response -
```json JSON wrap theme={null}
{
"Variation Name": "Bangalore",
"Media": "https://rocketium.com/images/v2/5dbfc45e87a3cc65f174f77d/resized/1587304799860.png",
"Caption 1": "Bangalore",
"Caption 2": "SALE",
"Caption 3": "up to",
"Caption 4": "70% OFF",
"Caption 5": "SELECT PRODUCT",
"Caption 6": "SHOP NOW",
"Gender": "Female",
"Location": "Bangalore",
"url": "https://rocketium.com/images/export/4fd4c2b6-7183-4483-0823-947b4ccf9f58/image-1618478395354_1080x1080.png"
}
```
3. Click done to include the response in your campaigns.
4. You can use MoEngage templating language to parse through the API response and use the content in your campaigns. Rocketium sends image urls in the key "Media". Sample rocketium response -
```json JSON wrap theme={null}
{
"Variation Name": "Bangalore",
"Media": "https://rocketium.com/images/v2/5dbfc45e87a3cc65f174f77d/resized/1587304799860.png",
"Caption 1": "Bangalore",
"Caption 2": "SALE",
"Caption 3": "up to",
"Caption 4": "70% OFF",
"Caption 5": "SELECT PRODUCT",
"Caption 6": "SHOP NOW",
"Gender": "Female",
"Location": "Bangalore",
"url": "https://rocketium.com/images/export/4fd4c2b6-7183-4483-0823-947b4ccf9f58/image-1618478395354_1080x1080.png"
}
```