> ## Documentation Index
> Fetch the complete documentation index at: https://moengage.com/docs/llms.txt
> Use this file to discover all available pages before exploring further.
# Meta Conversions
> Send web and offline conversion events from MoEngage to Meta's Conversions API to improve attribution and ad optimization.
# Introduction
The Meta Conversions integration establishes a secure, Server-to-Server (S2S) connection between MoEngage and Meta. By mitigating the impact of browser-side obstacles such as cookie restrictions and ad blockers, it ensures a more consistent and high-fidelity data stream for better attribution.
MoEngage supports the following distinct connectors for Meta:
* **Meta Web Conversions**: Streamline website events (for example, purchases, registrations, Add to Cart) captured by the MoEngage Web SDK directly to Meta's server.
* **Meta Offline Conversions**: Sync high-value offline data (for example, In-store Transactions, CRM leads, or Phone Orders) directly into Meta to measure the full impact of your omnichannel marketing.
## Use Cases
Integrating Meta Conversions with MoEngage allows you to sync event data to support the following use cases:
* **Signal resilience**: Recover "lost" conversions typically blocked by browser privacy settings or ad-blocking software.
* **Offline to online attribution**: Bridge the gap between physical storefront transactions and digital ad clicks to measure total ROI.
* **Return on Ad Spend (ROAS) optimization**: Provide high-quality, real-time data to Meta's machine-learning algorithms to lower your Cost Per Acquisition (CPA) and improve ad delivery.
## Prerequisites
**Prerequisites**
Before setting up, ensure you have the access to the following below:
* Pixel ID : You must obtain a [Pixel ID](https://www.facebook.com/business/help/952192354843755?id=1205376682832142) to use Conversions App. If you’ve already set up a Pixel for your website, we recommend that you use the same Pixel ID for your browser and server events.
* Business Manager : You also need a [Business Manager](https://business.facebook.com/). If you don't have a Business Manager yet, see the Help Center article on [how to Create a Business Manager](https://www.facebook.com/business/help/1710077379203657).
Meta Conversions is part of the **Connected Channels** add-on. Contact your dedicated MoEngage CSM (customer success manager) to enable it for your account.
**Supported Event Types**
* This integration supports only **Web** and **Offline** conversion events.
* **Business Messaging events** (ex: events sourced from Messenger, WhatsApp, or Instagram Direct) are **not supported** in this app.
# Integration Setup
## Step 1: Retrieve Your Pixel ID from Meta
Before connecting, retrieve your Pixel (Dataset) ID from Meta Events Manager:
### 1.1. Choose the Pixel you want to implement
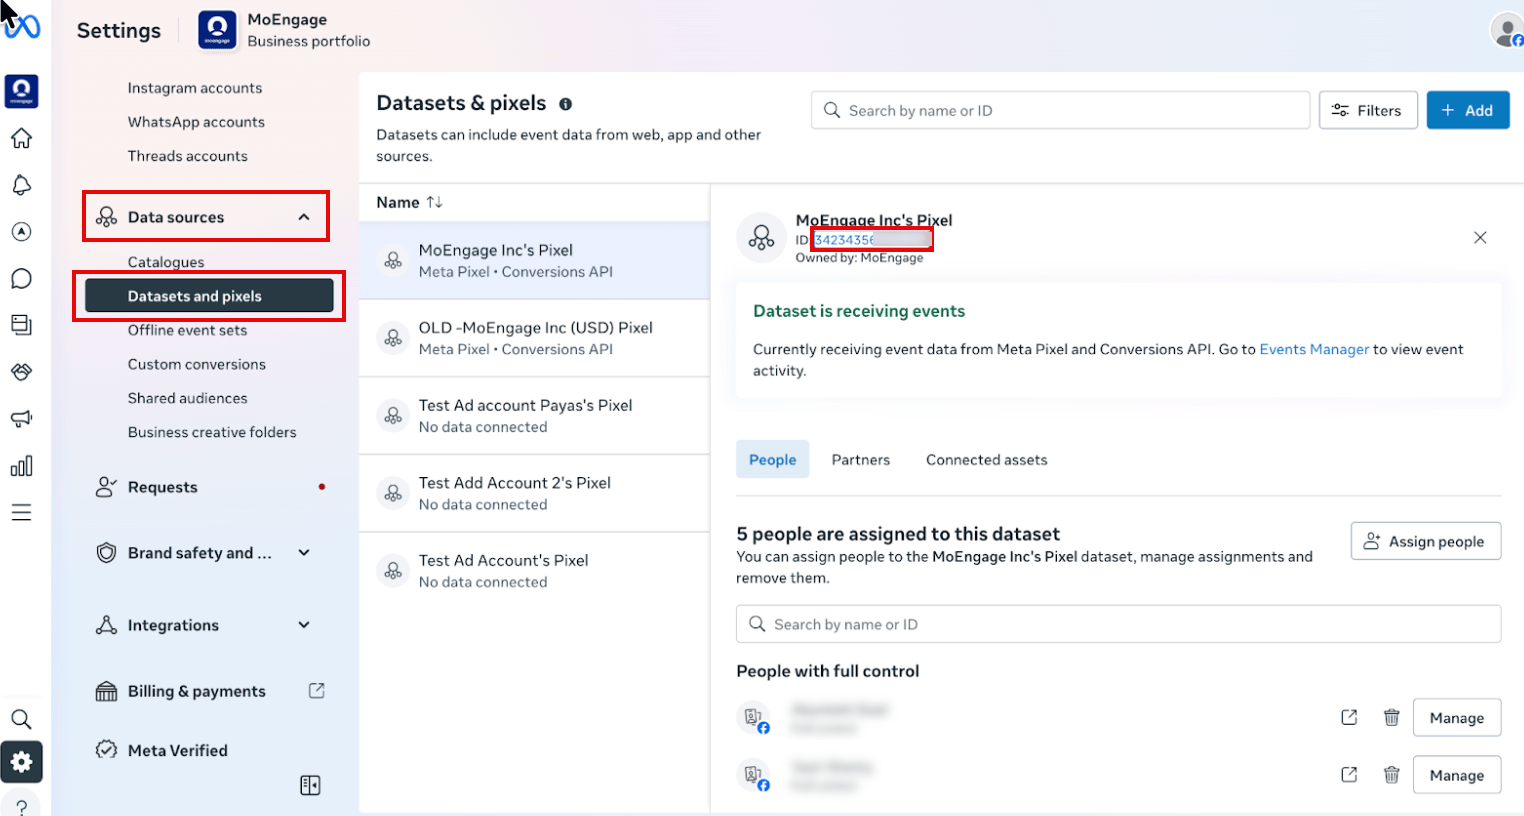
In [Events Manager](https://business.facebook.com/events_manager2/list/dataset/187333913263269/overview?business_id=382201902342752), go to **Data Sources** > **Datasets and Pixels**.
Select your dataset, and then copy the Pixel ID displayed.
 ### 1.2. Select the Settings tab
Once your Pixel is selected, navigate to the **Settings** tab to access configuration options.
### 1.2. Select the Settings tab
Once your Pixel is selected, navigate to the **Settings** tab to access configuration options.
 ## Step 2: Generate Access Token from Meta Events Manager
Inside Events Manager, follow these steps:
## Step 2: Generate Access Token from Meta Events Manager
Inside Events Manager, follow these steps:
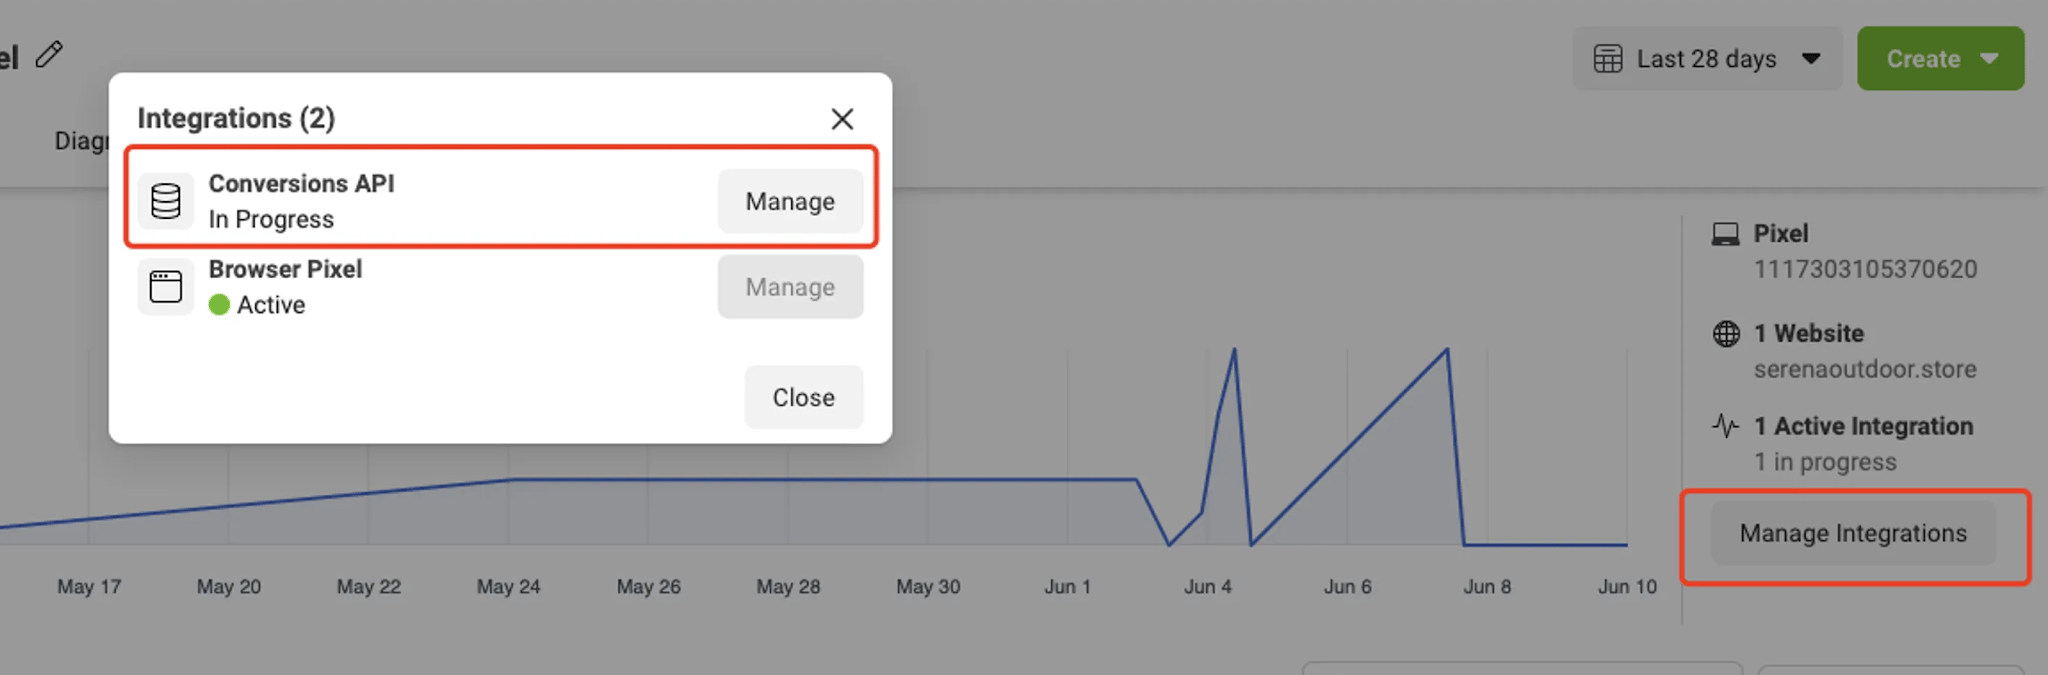
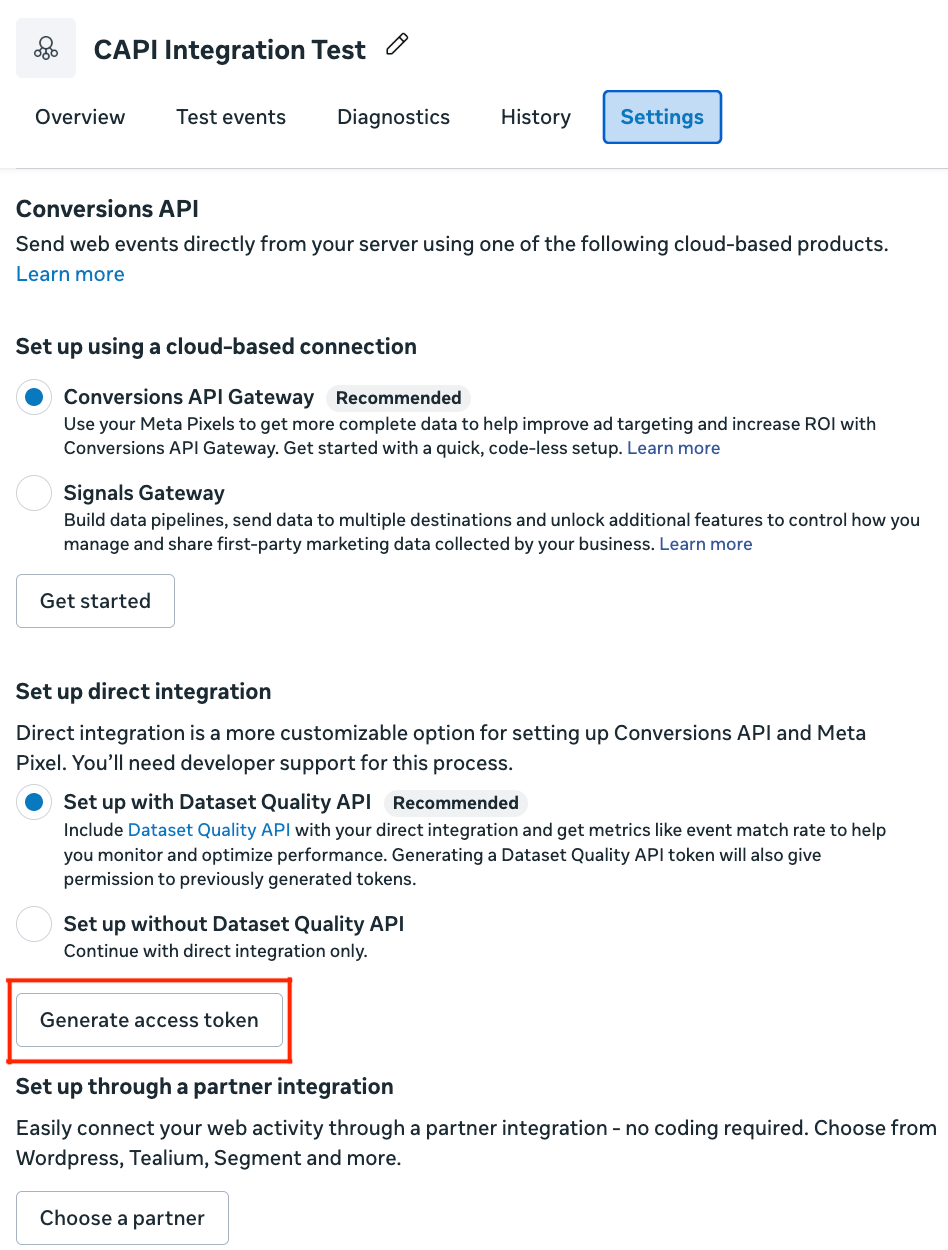 Once you have your token, click on the **Manage Integrations** button in the Overview tab in Events Manager. In the pop-up screen, click the **Manage** button next to Conversions API. This will automatically create a Conversions API app and Conversions API system user for you. *There is no need to go through App or share any permissions*.
 **Note:** The
**Generate access token**
link is only visible to users with developer privileges
for the business. The link is hidden from other users.
**Important:** If you generate a new
access
token, make sure to update it in MoEngage
before using the connector.
# Campaign Setup
Choose the integration type you want to set up. Both Web and Offline Conversions require the same authentication credentials but track different types of conversion events.
## Step 1: Connect Meta Web Conversions in the App Marketplace
To connect Meta Web Conversions in the App Marketplace, perform the following steps:
1. On the left navigation menu in the MoEngage UI, click **App Marketplace**.
2. On the **App Marketplace** page, search for **Meta Conversions**.
3. Click the **Meta Conversions** tile.
4. On the **Meta Conversions** page, click the **Integrate** tab.
5. Click the (
**Note:** The
**Generate access token**
link is only visible to users with developer privileges
for the business. The link is hidden from other users.
**Important:** If you generate a new
access
token, make sure to update it in MoEngage
before using the connector.
# Campaign Setup
Choose the integration type you want to set up. Both Web and Offline Conversions require the same authentication credentials but track different types of conversion events.
## Step 1: Connect Meta Web Conversions in the App Marketplace
To connect Meta Web Conversions in the App Marketplace, perform the following steps:
1. On the left navigation menu in the MoEngage UI, click **App Marketplace**.
2. On the **App Marketplace** page, search for **Meta Conversions**.
3. Click the **Meta Conversions** tile.
4. On the **Meta Conversions** page, click the **Integrate** tab.
5. Click the ( )down arrow key, and then click **Track Web Conversions**.
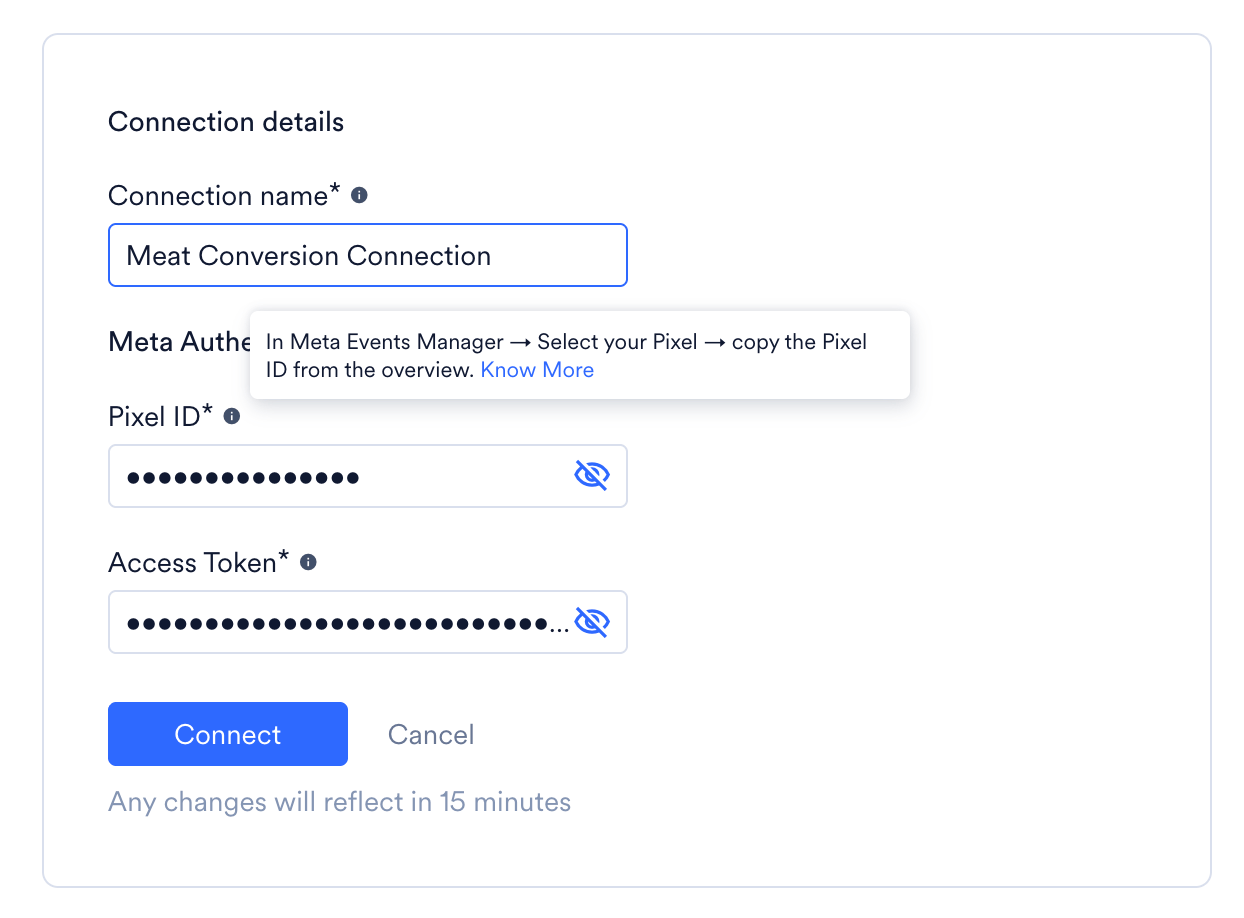
6. Enter the following details:
| Field | Required | Description |
| ------------------- | -------- | ----------------------------------------------------------- |
| **Connection name** | Yes | A unique internal name (for example, Meta Web Conversions). |
| **Pixel ID** | Yes | Your unique Meta Pixel ID. |
| **Access Token** | Yes | Paste the Access Token generated from Meta Events Manager. |
7. Click **Connect** to save your connection.
)down arrow key, and then click **Track Web Conversions**.
6. Enter the following details:
| Field | Required | Description |
| ------------------- | -------- | ----------------------------------------------------------- |
| **Connection name** | Yes | A unique internal name (for example, Meta Web Conversions). |
| **Pixel ID** | Yes | Your unique Meta Pixel ID. |
| **Access Token** | Yes | Paste the Access Token generated from Meta Events Manager. |
7. Click **Connect** to save your connection.
 ## Step 2: Create a Meta Web Conversions Campaign
To create a Meta Web Conversions campaign, perform the following steps:
1. On the left navigation menu in the MoEngage UI, click **Engage**, and then click **Campaigns**.
2. On the **All campaigns** page, click **+ Create campaign**.
3. In the **Create campaign** dialog box, under **Connected Apps**, click **Meta Conversions** and then click the most suitable delivery type.
4. In Step 1 (**Target Users**), select your audience.
5. In Step 2 (**Content**), select your Connector (**Track Web Conversions**) and your created connection.
6. Under **Conversion Details**, configure the following fields:
| Field | Required | Description |
| ----------------- | -------- | -------------------------------------------------------------------------------------------------------------------------------------------------------------------------------------------------- |
| Event Type | Yes | Select a standard Meta conversion event from the dropdown. |
| Event Source URL | Yes | The browser URL where the event happened. Must match your verified domain. Ex: '[https://example.com/checkout](https://example.com/checkout)'. |
| Event ID | No | Unique ID such as Lead or Transaction ID to avoid duplicate events. |
| Conversion Value | No | Revenue generated from the conversion. |
| Currency | No | Select the currency code from the dropdown |
| Click ID | No | Meta Click ID stored in the \_fbc browser cookie. Highly recommended for accurate attribution. The Meta Click ID (`fbclid`) captured in the user profile is used for matching events to ad clicks. |
| Client User Agent | No | The user agent for the browser corresponding to the event. **Example:** Mozilla/5.0 (Windows NT 10.0; Win64; x64) |
**Note:** Email and phone fields are auto-populated with standard MoEngage user attributes. These are automatically hashed using SHA-256 before transmission to protect user privacy.
## Step 2: Create a Meta Web Conversions Campaign
To create a Meta Web Conversions campaign, perform the following steps:
1. On the left navigation menu in the MoEngage UI, click **Engage**, and then click **Campaigns**.
2. On the **All campaigns** page, click **+ Create campaign**.
3. In the **Create campaign** dialog box, under **Connected Apps**, click **Meta Conversions** and then click the most suitable delivery type.
4. In Step 1 (**Target Users**), select your audience.
5. In Step 2 (**Content**), select your Connector (**Track Web Conversions**) and your created connection.
6. Under **Conversion Details**, configure the following fields:
| Field | Required | Description |
| ----------------- | -------- | -------------------------------------------------------------------------------------------------------------------------------------------------------------------------------------------------- |
| Event Type | Yes | Select a standard Meta conversion event from the dropdown. |
| Event Source URL | Yes | The browser URL where the event happened. Must match your verified domain. Ex: '[https://example.com/checkout](https://example.com/checkout)'. |
| Event ID | No | Unique ID such as Lead or Transaction ID to avoid duplicate events. |
| Conversion Value | No | Revenue generated from the conversion. |
| Currency | No | Select the currency code from the dropdown |
| Click ID | No | Meta Click ID stored in the \_fbc browser cookie. Highly recommended for accurate attribution. The Meta Click ID (`fbclid`) captured in the user profile is used for matching events to ad clicks. |
| Client User Agent | No | The user agent for the browser corresponding to the event. **Example:** Mozilla/5.0 (Windows NT 10.0; Win64; x64) |
**Note:** Email and phone fields are auto-populated with standard MoEngage user attributes. These are automatically hashed using SHA-256 before transmission to protect user privacy.
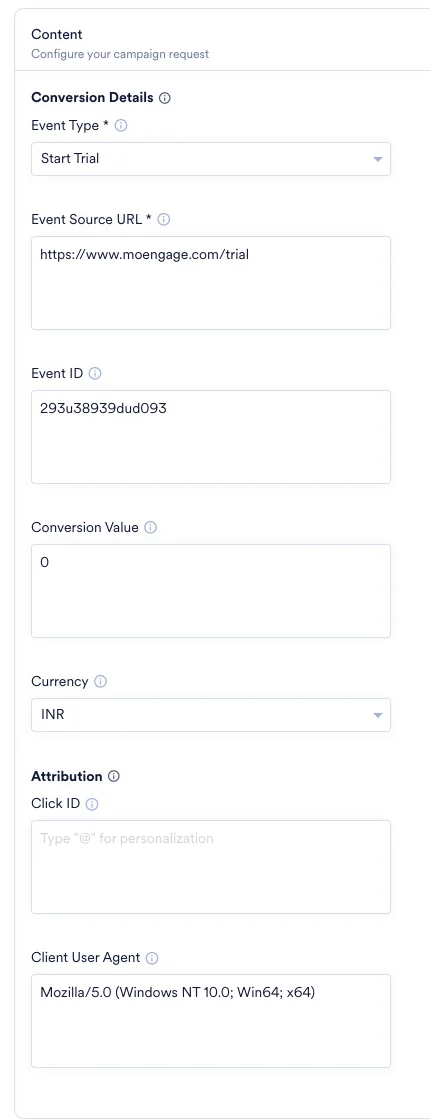 7. Your campaign is now ready to be tested and sent. Using the *Test* functionality, you can also test your connector configuration.
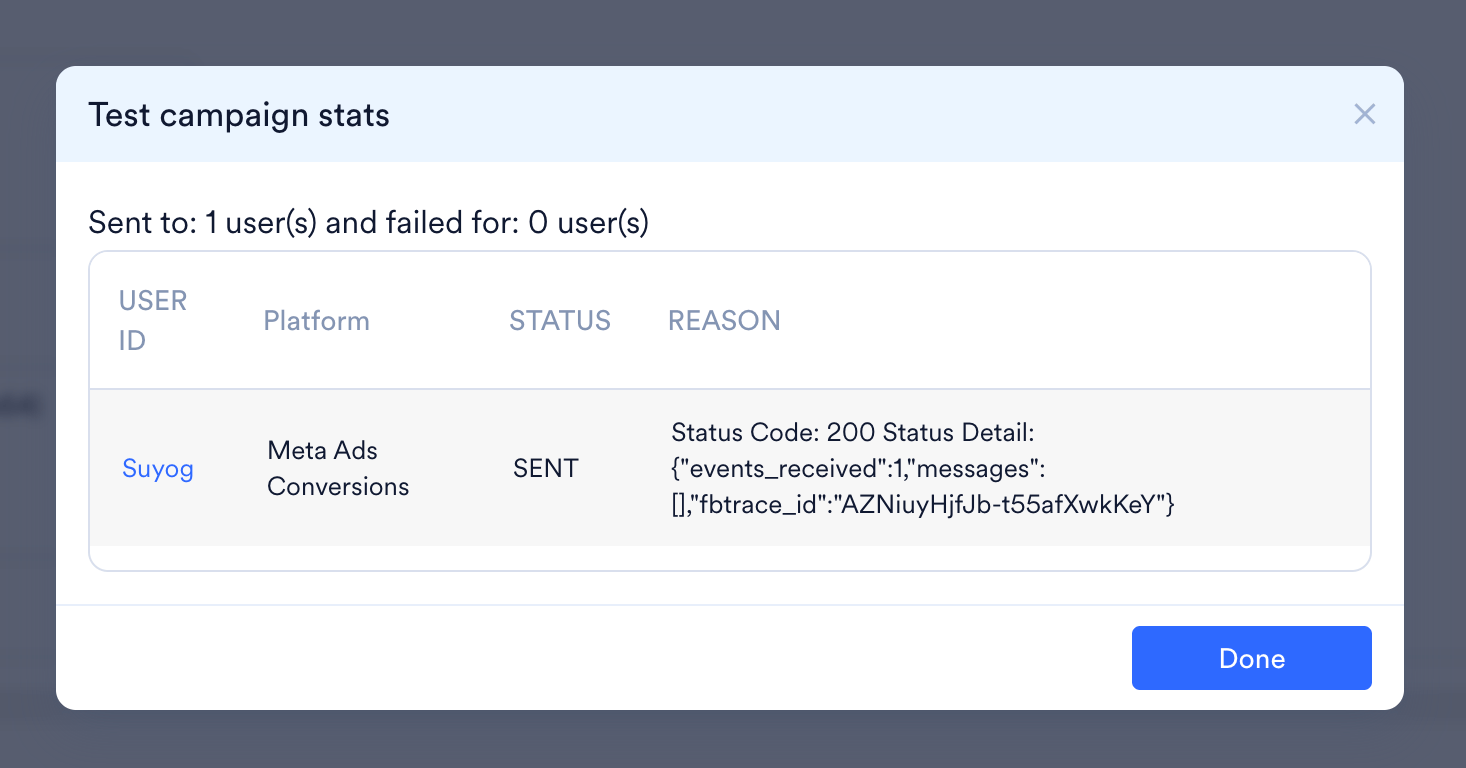
 8. You would receive a message as shown below, this confirms your setup is complete.
9. Publish the campaign.
8. You would receive a message as shown below, this confirms your setup is complete.
9. Publish the campaign.
 Event Time Limit for Web Events: The event time **must not be more than 7 days in the past** at the time of sending. If any event in the request has a time older than 7 days, Meta will reject the *request* and no events will be processed.
## Step 1: Connect Meta Offline Conversions in the App Marketplace
To connect Meta Offline Conversions in the App Marketplace, perform the following steps:
1. On the left navigation menu in the MoEngage UI, click **App Marketplace**.
2. On the **App Marketplace** page, search for **Meta Conversions**.
3. Click the **Meta Conversions** tile.
4. On the **Meta Conversions** page, click the **Integrate** tab.
5. Click the () down arrow key and then click **Track Offline Conversions**.
6. Enter the following details:
| Field | Required | Description |
| ------------------- | -------- | --------------------------------------------------------------- |
| **Connection name** | Yes | A unique internal name (for example, Meta Offline Conversions). |
| **Pixel ID** | Yes | Your unique Meta Pixel (Dataset) ID. |
| **Access Token** | Yes | Paste the Access Token generated from Meta Events Manager. |
7. Click **Connect** to save your connection.
## Step 2: Create a Meta Offline Conversions Campaign
To create a Meta Offline Conversions campaign, perform the following steps:
1. On the left navigation menu in the MoEngage UI, click **Engage**, and then click **Campaigns**
2. On the **All campaigns** page, click **+ Create campaign**.
3. In the **Create campaign** dialog box, under **Connected Apps**, click **Meta Conversions** and then click the most suitable delivery type.
4. In Step 1 (**Target Users**), select your audience.
5. In Step 2 (**Content**), select your Connector (**Track Offline Conversions**) and your created connection.
6. Under **Conversion Details**, configure the following fields:
| Field | Required | Description |
| ---------------- | -------- | ------------------------------------------------------------- |
| Event Type | Yes | Select a standard Meta conversion event from the dropdown. |
| Event ID | No | Unique ID such as a Transaction ID to avoid duplicate events. |
| Conversion Value | No | Revenue generated from the offline conversion. |
| Currency | No | Select the currency code from the dropdown |
| Order ID | No | The Order ID or Receipt Number for this transaction. |
**Note:** Email and phone fields are auto-populated with standard MoEngage user attributes. These are automatically hashed using SHA-256 before transmission to protect user privacy.
Event Time Limit for Web Events: The event time **must not be more than 7 days in the past** at the time of sending. If any event in the request has a time older than 7 days, Meta will reject the *request* and no events will be processed.
## Step 1: Connect Meta Offline Conversions in the App Marketplace
To connect Meta Offline Conversions in the App Marketplace, perform the following steps:
1. On the left navigation menu in the MoEngage UI, click **App Marketplace**.
2. On the **App Marketplace** page, search for **Meta Conversions**.
3. Click the **Meta Conversions** tile.
4. On the **Meta Conversions** page, click the **Integrate** tab.
5. Click the () down arrow key and then click **Track Offline Conversions**.
6. Enter the following details:
| Field | Required | Description |
| ------------------- | -------- | --------------------------------------------------------------- |
| **Connection name** | Yes | A unique internal name (for example, Meta Offline Conversions). |
| **Pixel ID** | Yes | Your unique Meta Pixel (Dataset) ID. |
| **Access Token** | Yes | Paste the Access Token generated from Meta Events Manager. |
7. Click **Connect** to save your connection.
## Step 2: Create a Meta Offline Conversions Campaign
To create a Meta Offline Conversions campaign, perform the following steps:
1. On the left navigation menu in the MoEngage UI, click **Engage**, and then click **Campaigns**
2. On the **All campaigns** page, click **+ Create campaign**.
3. In the **Create campaign** dialog box, under **Connected Apps**, click **Meta Conversions** and then click the most suitable delivery type.
4. In Step 1 (**Target Users**), select your audience.
5. In Step 2 (**Content**), select your Connector (**Track Offline Conversions**) and your created connection.
6. Under **Conversion Details**, configure the following fields:
| Field | Required | Description |
| ---------------- | -------- | ------------------------------------------------------------- |
| Event Type | Yes | Select a standard Meta conversion event from the dropdown. |
| Event ID | No | Unique ID such as a Transaction ID to avoid duplicate events. |
| Conversion Value | No | Revenue generated from the offline conversion. |
| Currency | No | Select the currency code from the dropdown |
| Order ID | No | The Order ID or Receipt Number for this transaction. |
**Note:** Email and phone fields are auto-populated with standard MoEngage user attributes. These are automatically hashed using SHA-256 before transmission to protect user privacy.
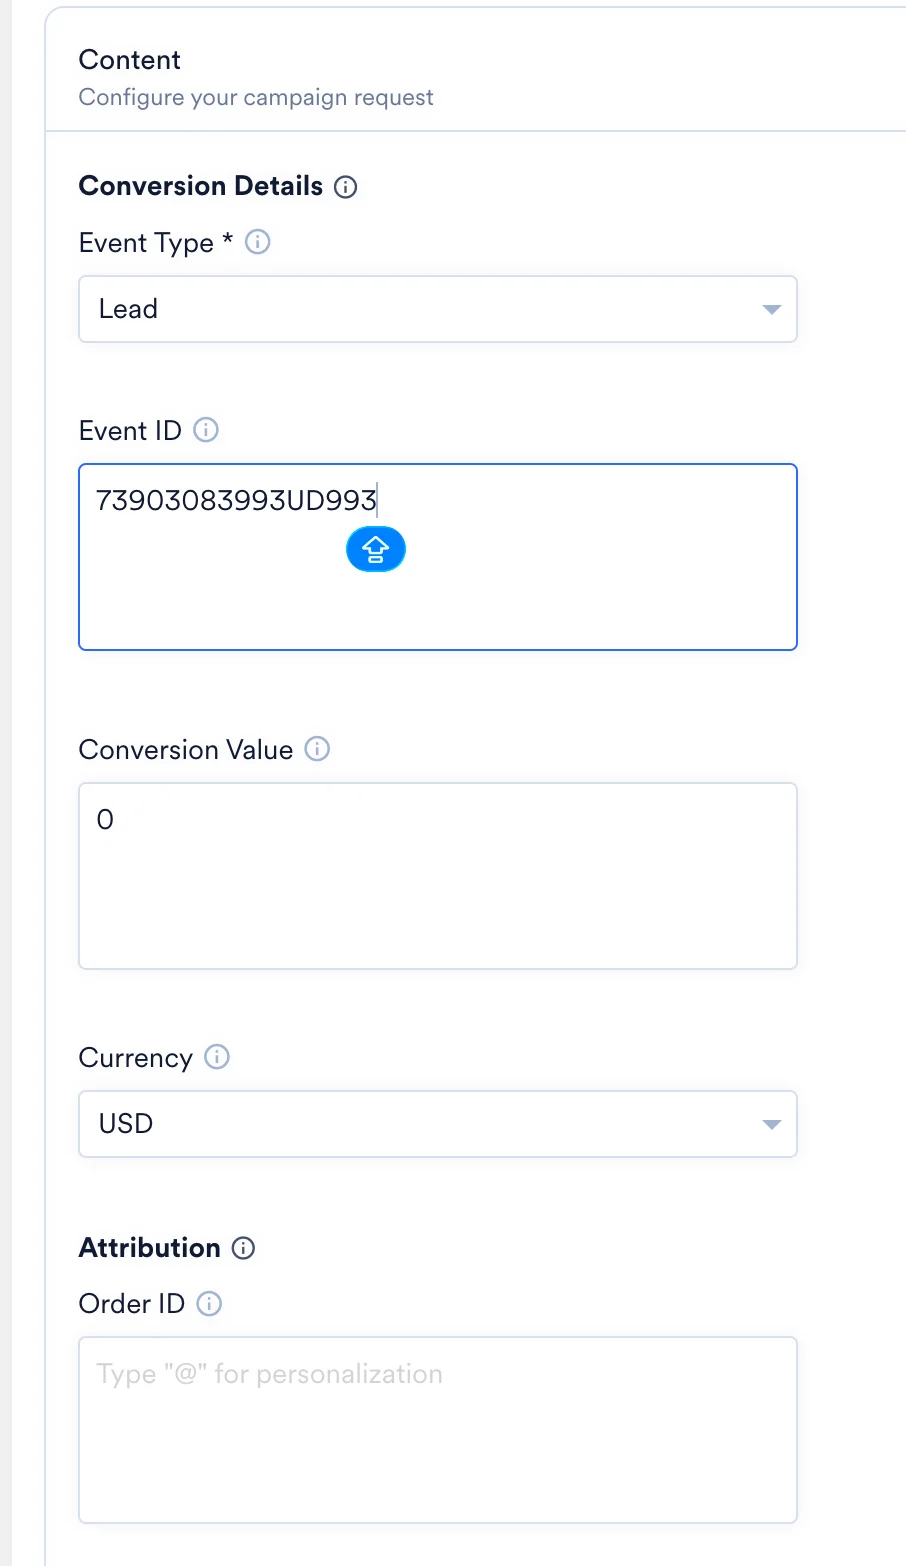 7. Your campaign is now ready to be tested and sent. Using the *Test* functionality, you can also test your connector configuration.
8. You would receive a message as shown below, this confirms your setup is complete.
9. Publish the campaign.
Event Time Limit for Offline Events
**Exception for physical store events:** If Offline Conversion is used, you may send transactions up to **62 days** after the conversion occurred.
7. Your campaign is now ready to be tested and sent. Using the *Test* functionality, you can also test your connector configuration.
8. You would receive a message as shown below, this confirms your setup is complete.
9. Publish the campaign.
Event Time Limit for Offline Events
**Exception for physical store events:** If Offline Conversion is used, you may send transactions up to **62 days** after the conversion occurred.