> ## Documentation Index
> Fetch the complete documentation index at: https://moengage.com/docs/llms.txt
> Use this file to discover all available pages before exploring further.
# Configure OneXtel
# Introduction
[OneXtel](https://www.onextel.com/) is a leading Communication Platform as a Service (CPaaS) provider, offering seamless, end-to-end communication solutions. Their product offering includes channels such as SMS, Voice, WhatsApp, Chatbot, RCS, and Email services tailored for businesses of all sizes.
MoEngage natively integrates with OneXtel to send WhatsApp templates directly from MoEngage to end users via Flows and campaigns. This enhances customer engagement by leveraging WhatsApp as a communication channel for automated messages and marketing campaigns.
Before integration, ensure you have the following:
* An active MoEngage account
* A WABA Number (WhatsApp Business API number)
## Step 1: Sender Configuration
To configure a sender from OneXtel WhatsApp, perform the following steps:
### **Step 1.2 Obtain the API Key from OneXtel**
Before configuring MoEngage, generate the API key from the OneXtel portal.
1. Log in to your OneXtel portal account.
2. Navigate to the **API** section.
3. Click **Show API Key** to view your existing key.
4. If no key is available, click **Generate API Key** to create a new one.
 ### **Step 1.3 Configure WhatsApp Outbound Sender in MoEngage**
To configure a sender from OneXtel on the MoEngage dashboard, perform the following steps:
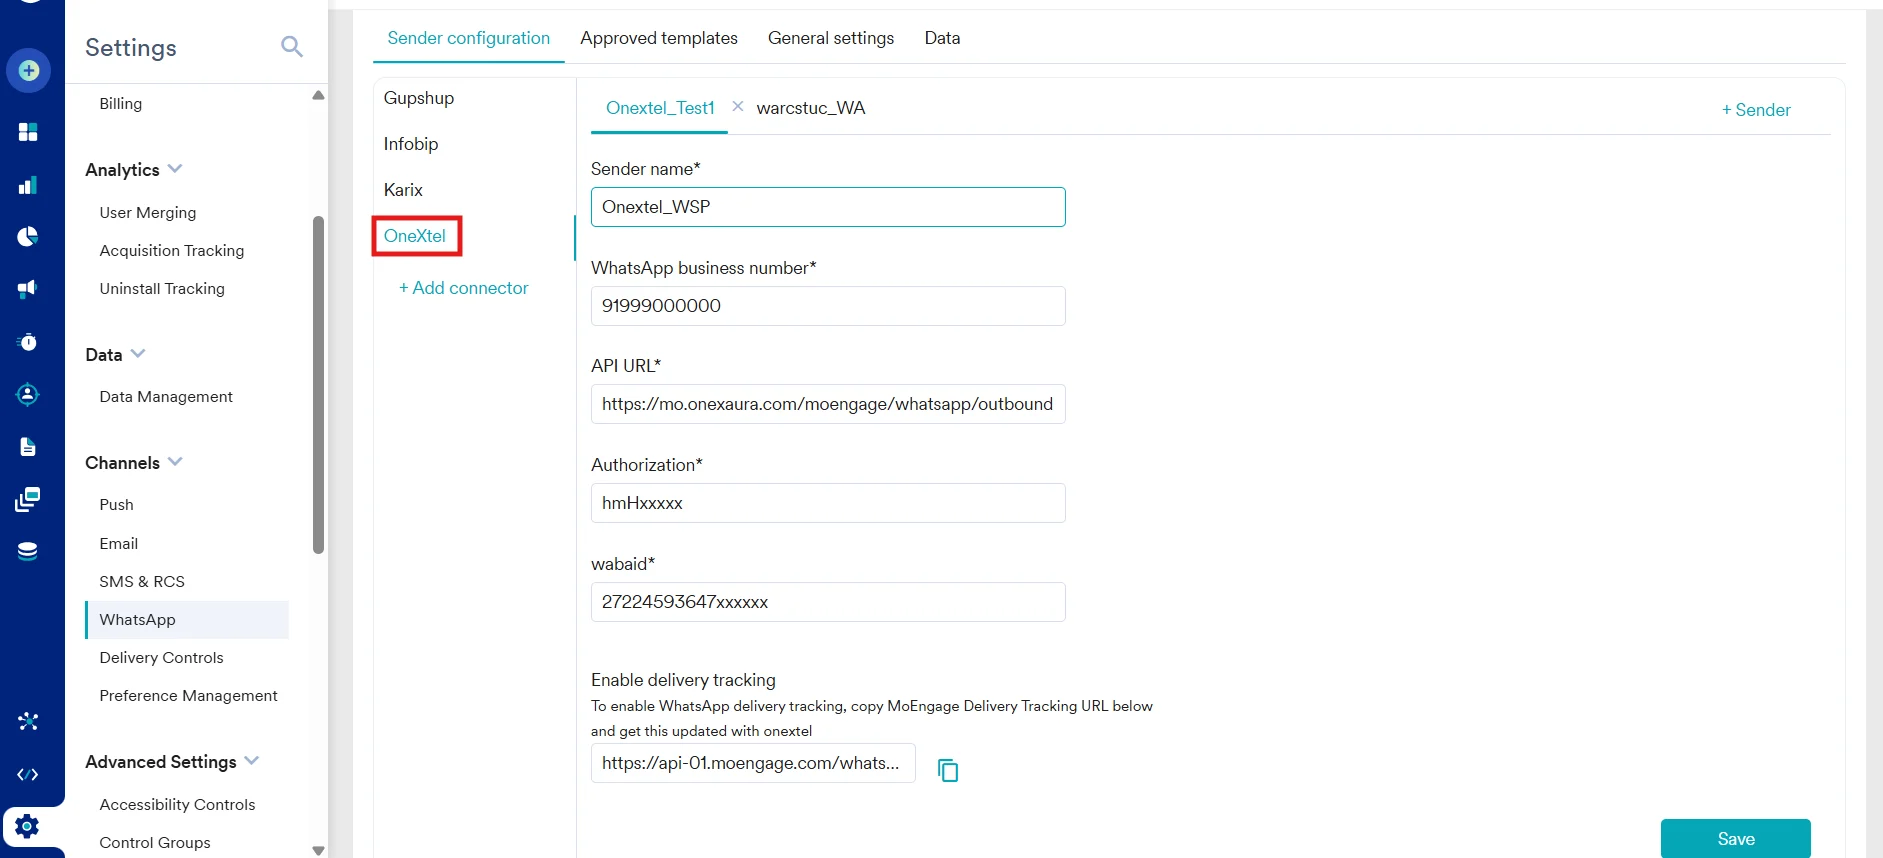
1. On the MoEngage dashboard, navigate to **Settings** > **WhatsApp** > **Sender Configuration**.
2. On the left navigation menu, click **OneXtel**, and then click **+ Sender**.
3. Enter the following details in the sender configuration window:
| **Field** | **Required Input Value / Action** |
| ----------------- | ------------------------------------------------------------------------------------------ |
| **URL** | Enter `https://mo.onexaura.com/moengage/whatsapp/outbound` |
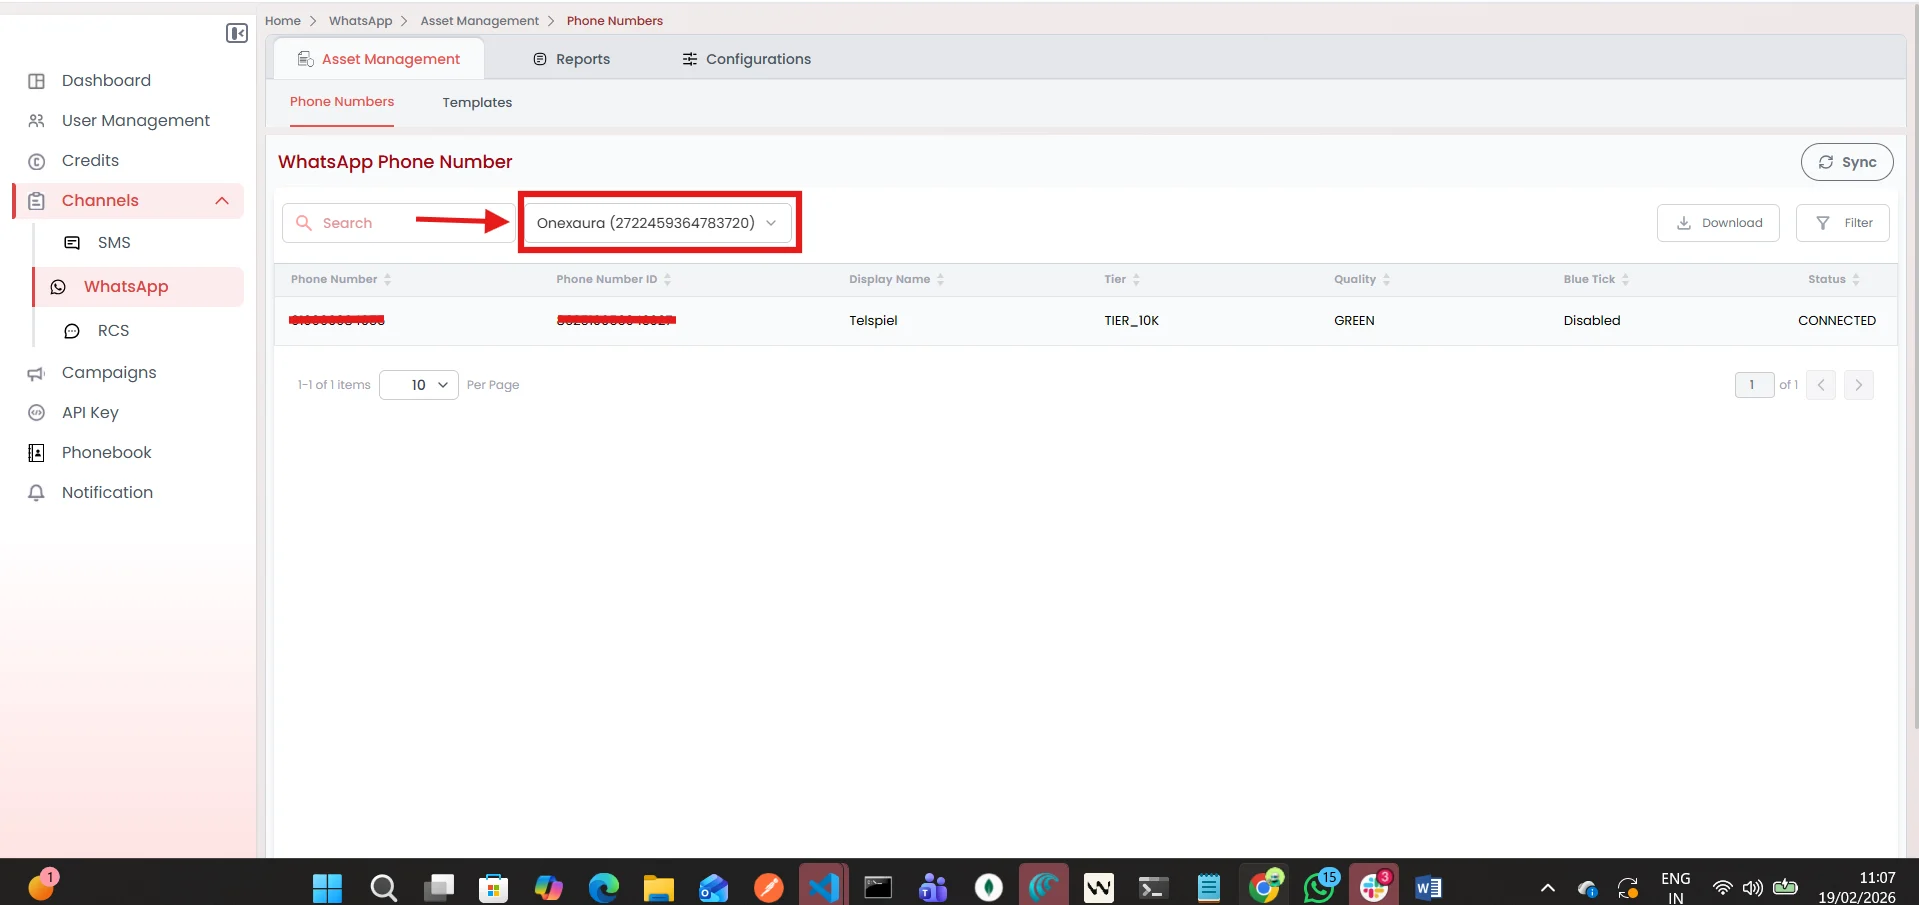
| **WABA ID** | Obtain this from the OneXtel dashboard under **Channel** > **WhatsApp**. |
| **Authorization** | Paste the API key generated in Step 1. |
| **WABA Number** | Enter the registered WhatsApp Business API number (retrieved from your OneXtel Dashboard). |
4. Click **Save** to complete and store the configuration.
### **Step 1.3 Configure WhatsApp Outbound Sender in MoEngage**
To configure a sender from OneXtel on the MoEngage dashboard, perform the following steps:
1. On the MoEngage dashboard, navigate to **Settings** > **WhatsApp** > **Sender Configuration**.
2. On the left navigation menu, click **OneXtel**, and then click **+ Sender**.
3. Enter the following details in the sender configuration window:
| **Field** | **Required Input Value / Action** |
| ----------------- | ------------------------------------------------------------------------------------------ |
| **URL** | Enter `https://mo.onexaura.com/moengage/whatsapp/outbound` |
| **WABA ID** | Obtain this from the OneXtel dashboard under **Channel** > **WhatsApp**. |
| **Authorization** | Paste the API key generated in Step 1. |
| **WABA Number** | Enter the registered WhatsApp Business API number (retrieved from your OneXtel Dashboard). |
4. Click **Save** to complete and store the configuration.
 ## **Step 2: Callback and Inbound Configuration**
### **Step 2.1 Configure Callback in OneXtel**
To configure delivery status tracking callbacks on OneXtel:
1. In your OneXtel dashboard, navigate to the **Configuration** section, and click **Add New Callback**.
2. In the **Title** field, enter an appropriate title.
3. In the **Channel** dropdown list, select **WhatsApp**, and in the **Callback Format Type** dropdown, select **MoEngage**.
4. Ensure that the same API Key used in your MoEngage configuration is selected.
5. Under the **Request Configuration** section, select **Delivery Notification** as the type, and select **POST** as the HTTP Method.
6. In the **URL** field, paste the callback URL you copied from your MoEngage dashboard, and then click **Save**.
## **Step 2: Callback and Inbound Configuration**
### **Step 2.1 Configure Callback in OneXtel**
To configure delivery status tracking callbacks on OneXtel:
1. In your OneXtel dashboard, navigate to the **Configuration** section, and click **Add New Callback**.
2. In the **Title** field, enter an appropriate title.
3. In the **Channel** dropdown list, select **WhatsApp**, and in the **Callback Format Type** dropdown, select **MoEngage**.
4. Ensure that the same API Key used in your MoEngage configuration is selected.
5. Under the **Request Configuration** section, select **Delivery Notification** as the type, and select **POST** as the HTTP Method.
6. In the **URL** field, paste the callback URL you copied from your MoEngage dashboard, and then click **Save**.
 ### **Step 2.2 Configure Inbound Messages and Button Clicks in OneXtel**
To receive inbound customer messages and quick reply button click events:
1. In your OneXtel dashboard, navigate to the **Configuration** section, and click **Add New Callback**.
2. Enter a title, select **WhatsApp** as the channel, and select **MoEngage** as the callback format type.
3. Under the **Request Configuration** section, select **Incoming** as the type, and select **POST** as the HTTP Method.
4. In the **URL** field, enter `https://mo.onexaura.com/moengage/whatsapp/inbound`.
5. Scroll down to the **Header** section and add the following attributes:
* **Key**: `callback_url`
* **Value**: The Delivery Report (DLR) URL of your MoEngage dashboard.
6. Click **Save** to complete the configuration.
### **Step 2.2 Configure Inbound Messages and Button Clicks in OneXtel**
To receive inbound customer messages and quick reply button click events:
1. In your OneXtel dashboard, navigate to the **Configuration** section, and click **Add New Callback**.
2. Enter a title, select **WhatsApp** as the channel, and select **MoEngage** as the callback format type.
3. Under the **Request Configuration** section, select **Incoming** as the type, and select **POST** as the HTTP Method.
4. In the **URL** field, enter `https://mo.onexaura.com/moengage/whatsapp/inbound`.
5. Scroll down to the **Header** section and add the following attributes:
* **Key**: `callback_url`
* **Value**: The Delivery Report (DLR) URL of your MoEngage dashboard.
6. Click **Save** to complete the configuration.
 **Note: Supporting Quick Reply Button Clicks**
Apply the same steps outlined in Step 4 to support Quick Reply button clicks. However, under the **Request Configuration** section, set the **Type** to **Button Click** (the HTTP Method remains **POST**).
The Inbound URL and Button Click URL are identical, and the Header key and value remain unchanged.
## Next Steps
After the templates are added, navigate to **Engage** > **Campaigns** to [create and launch a WhatsApp campaign](/user-guide/campaigns-and-channels/whatsapp/create/create-a-whatsapp-campaign).
**Note: Supporting Quick Reply Button Clicks**
Apply the same steps outlined in Step 4 to support Quick Reply button clicks. However, under the **Request Configuration** section, set the **Type** to **Button Click** (the HTTP Method remains **POST**).
The Inbound URL and Button Click URL are identical, and the Header key and value remain unchanged.
## Next Steps
After the templates are added, navigate to **Engage** > **Campaigns** to [create and launch a WhatsApp campaign](/user-guide/campaigns-and-channels/whatsapp/create/create-a-whatsapp-campaign).