> ## Documentation Index
> Fetch the complete documentation index at: https://moengage.com/docs/llms.txt
> Use this file to discover all available pages before exploring further.
# Add Calendar Invites to Emails
# Introduction
Marketers promote events, sales, and webinars by sending emails to users. Adding calendar invites to such emails would help users add the event to their calendars, increasing the campaign's effectiveness.
When you send an invite using a calendar app, it gets added to the recipient's calendar directly. However, when you send a bulk communication, as in the case of a campaign, the invites do not get added to the users' calendars directly. Thus, adding an option to add the invite to the user's calendar is beneficial. You can create calendar links or use an ICS file to send a calendar invite.
#### Advantages of adding calendar invites to Email campaigns
* **Increased attendance**: By making it easy for people to add events to their calendars, you reduce the likelihood of them forgetting or missing the event.
* **Convenience for attendees**: A single click to add the event to their calendar eliminates the hassle of manually entering details, saving time and effort. It boosts attendance by providing a convenient, one-click way for recipients to save events directly to their calendars, reducing friction and improving organization.
* **Improved organization**: Attendees can access all event details, including reminders and location, directly from their calendar, promoting better organization and reducing confusion.
* **Higher engagement rates**: Calendar invites integrate seamlessly with user workflows, bypassing the cluttered email inbox and increasing the likelihood of engagement.
* **Reduced no-shows**: By making it easy to save the event, people are more likely to commit to attending, leading to fewer no-shows.
You can achieve this use case in two steps:
1. [Create a Calendar Invite](/docs/use-cases/email/add-calendar-invites-to-emails#step-1-create-a-calendar-invite)
2. [Add a Calendar Invite to the Email Campaign](/docs/use-cases/email/add-calendar-invites-to-emails#step-2-add-a-calendar-invite-to-the-email-campaign)
# Expected Result
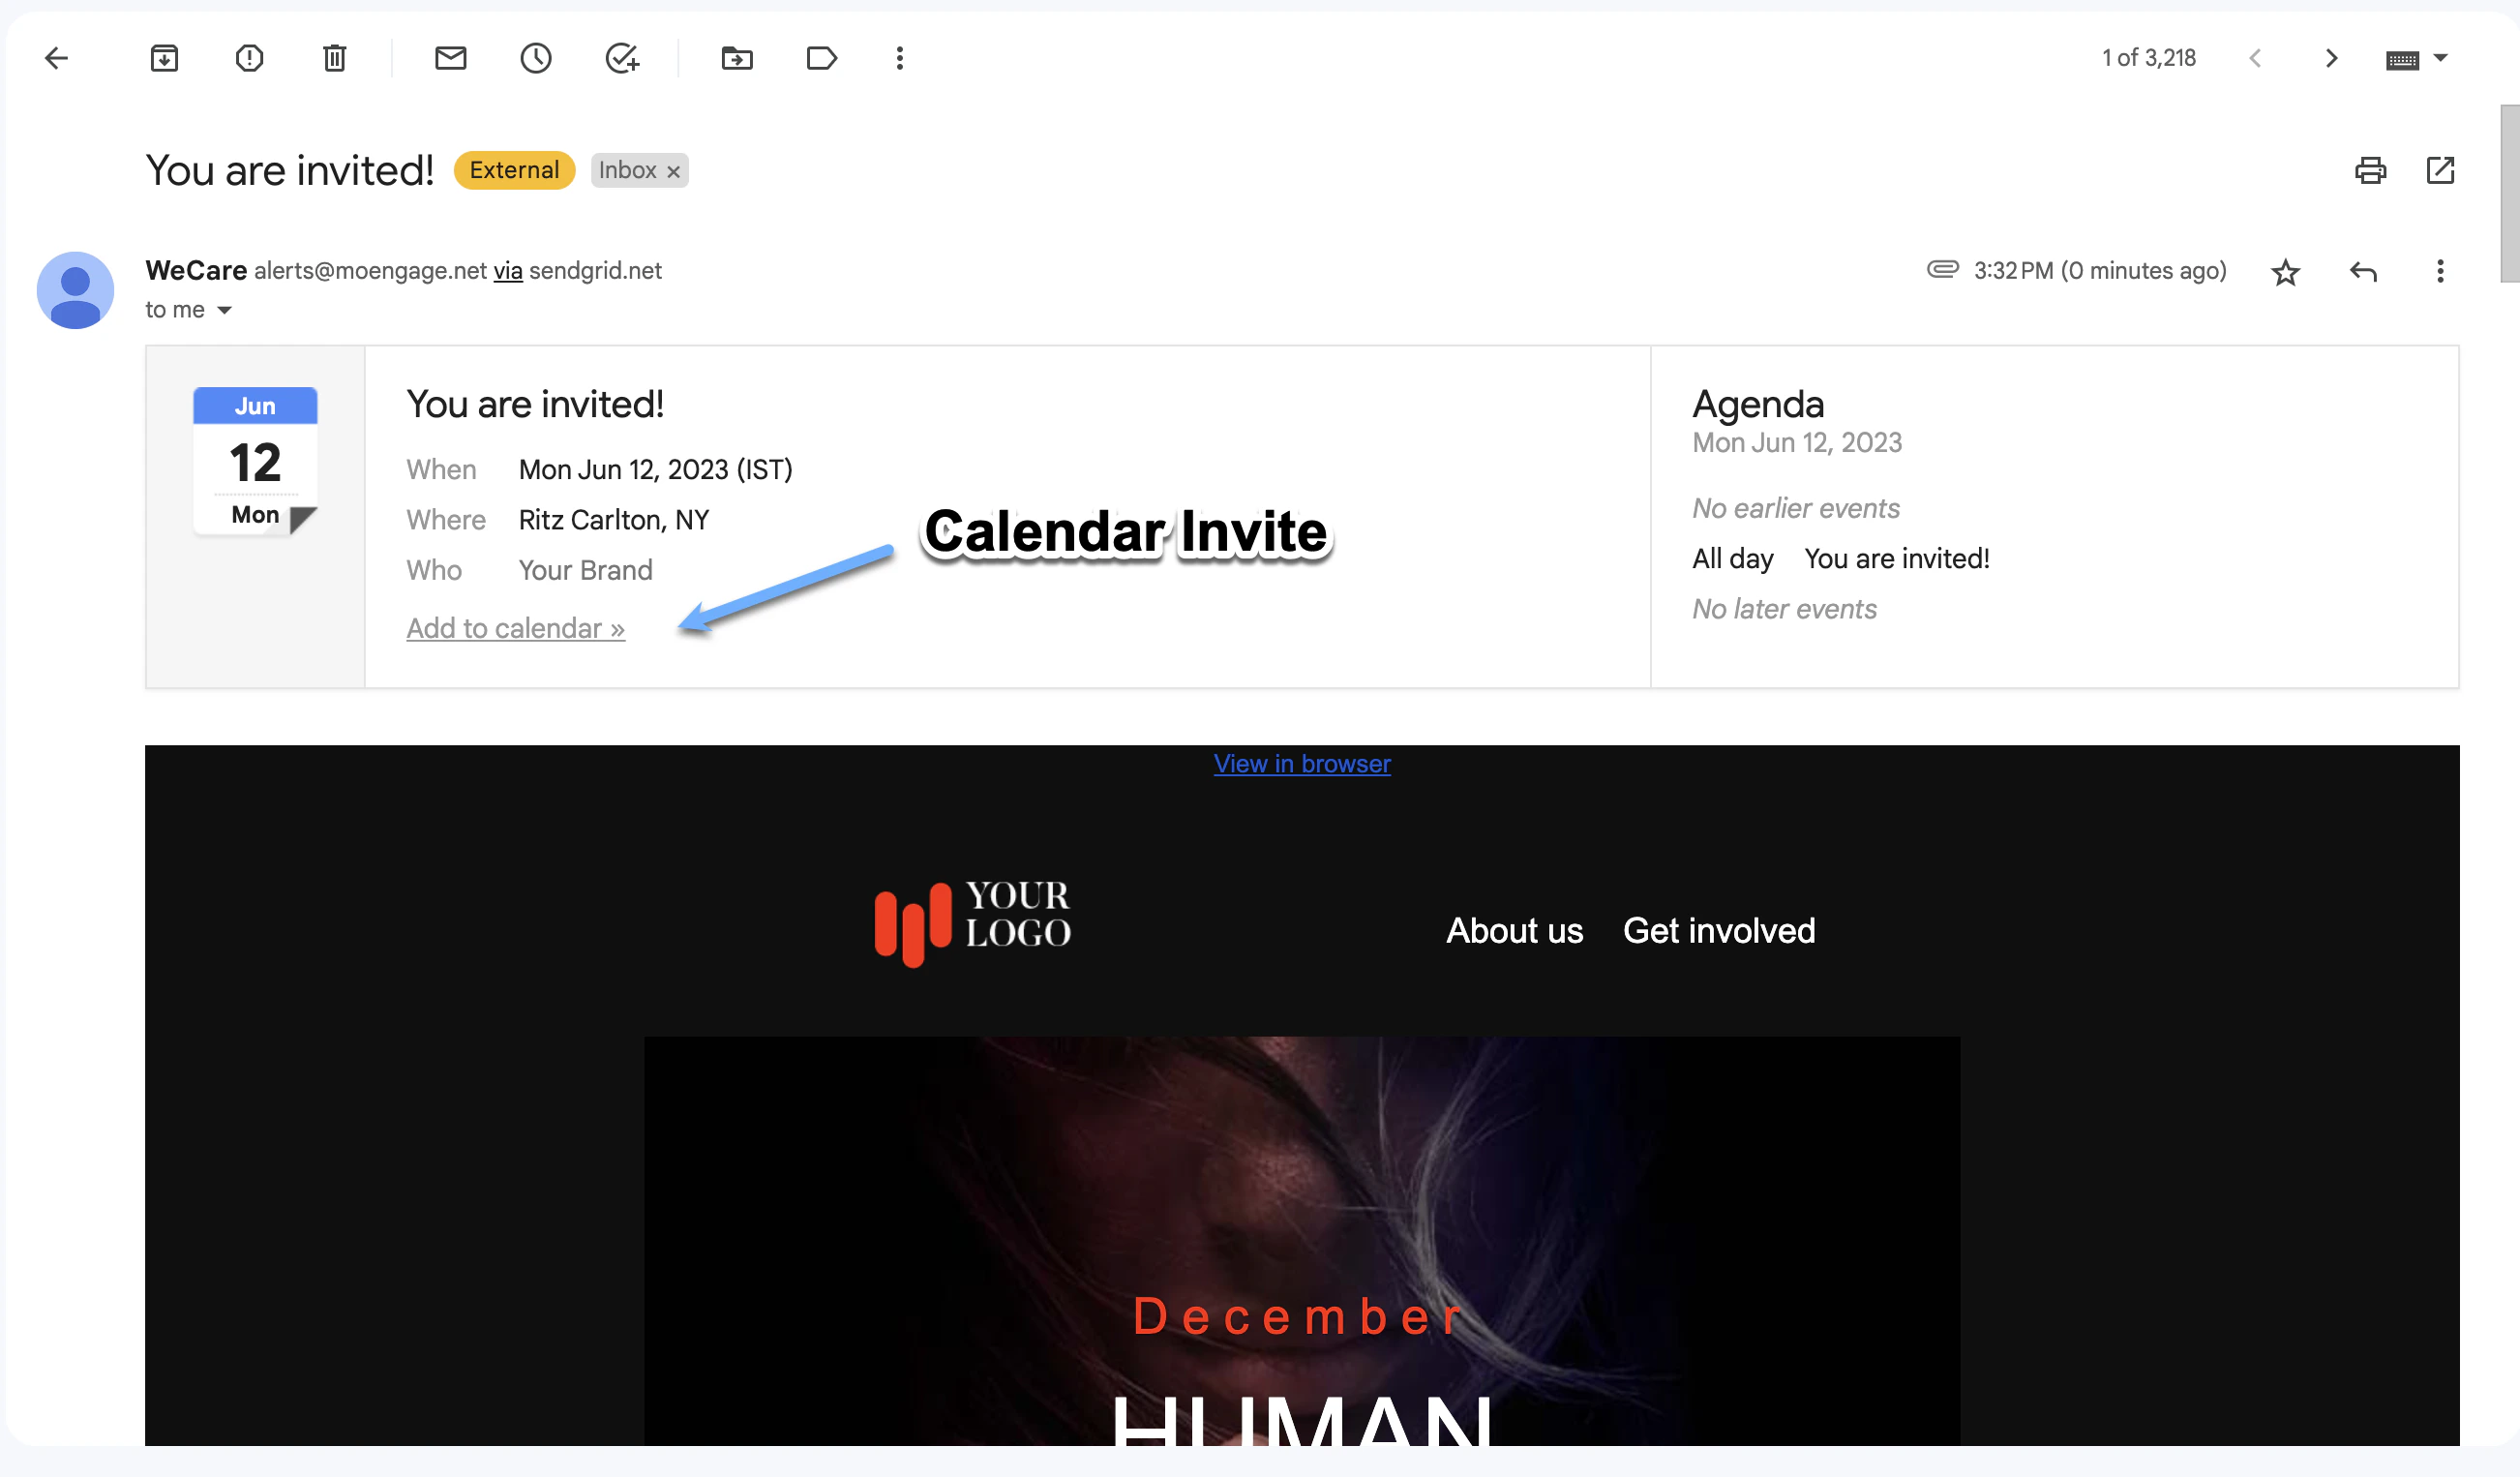
Users receive emails containing calendar invites, as shown below:

 # Step 1: Create a Calendar Invite
In this section, we will create calendar invites using the following methods:
* Create a calendar link
* Create an invite using an Internet Calendaring and Scheduling (ICS) file
We recommend using both methods and adding the invite to the email because some calendar apps do not support calendar links. Here is a list of the calendar types that support calendar links and ICS files.
| **Calendar Type** | **ICS Calendar File** | **Calendar Link** |
| ----------------- | --------------------- | ----------------- |
| AOL | ✓ | X |
| Apple Calendar | ✓ | X |
| Google Calendar | ✓ | ✓ |
| Office 365 | ✓ | ✓ |
| Outlook | ✓ | X |
| Outlook.com | ✓ | ✓ |
| Yahoo | ✓ | ✓ |
The invite must be created on a public calendar. For more information, refer to [Create & manage a public Google calendar](https://support.google.com/calendar/answer/37083?hl=en).
### Create a Link Invite
Perform the following steps to create a link invite using the Google Calendar app:
# Step 1: Create a Calendar Invite
In this section, we will create calendar invites using the following methods:
* Create a calendar link
* Create an invite using an Internet Calendaring and Scheduling (ICS) file
We recommend using both methods and adding the invite to the email because some calendar apps do not support calendar links. Here is a list of the calendar types that support calendar links and ICS files.
| **Calendar Type** | **ICS Calendar File** | **Calendar Link** |
| ----------------- | --------------------- | ----------------- |
| AOL | ✓ | X |
| Apple Calendar | ✓ | X |
| Google Calendar | ✓ | ✓ |
| Office 365 | ✓ | ✓ |
| Outlook | ✓ | X |
| Outlook.com | ✓ | ✓ |
| Yahoo | ✓ | ✓ |
The invite must be created on a public calendar. For more information, refer to [Create & manage a public Google calendar](https://support.google.com/calendar/answer/37083?hl=en).
### Create a Link Invite
Perform the following steps to create a link invite using the Google Calendar app:
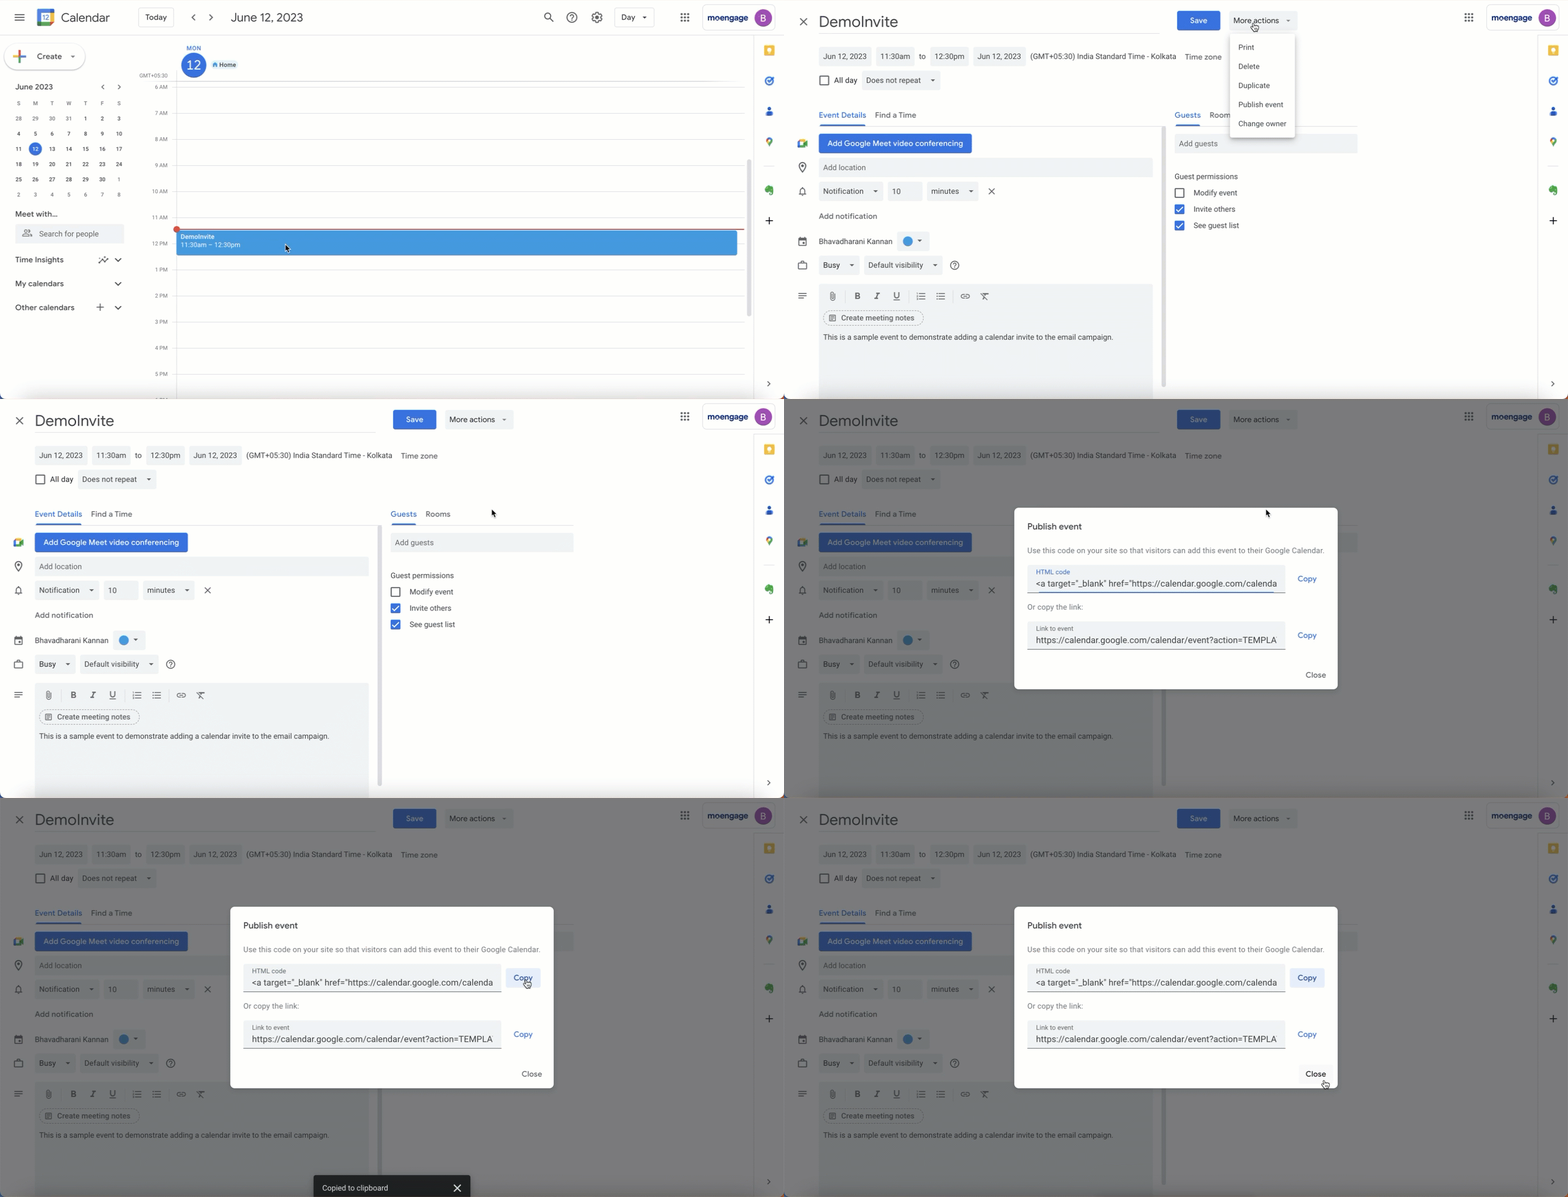 1. Navigate to the Calendar app.
2. Click **+ Create** in the upper-left corner and click **Event** in the list.
3. Specify the date, time, frequency, links, description, and notes.
4. Click **Save**. The event is now saved in your calendar.
5. Click the saved event in your calendar.
6. Click **Edit** event.
7. In the **More actions** list, click **Publish event**. This takes you to the publish event screen, where the HTML code for adding the invite to the event will be displayed.
8. Copy and add the HTML code to your campaign, as described below.\
Alternatively, you can create links for various calendar apps, such as Google Calendar, Microsoft Outlook, Office 365, and Yahoo! Calendar, using various online tools (such as [Labnol](https://www.labnol.org/calendar/)).
An ICS file is a calendar file saved in a universal calendar format used by several email and calendar programs, such as Microsoft Outlook, Google Calendar, and Apple Calendar. You can add an ICS file as an attachment to your email.
To generate .ics files, use an online tool like [iCal Event Maker](https://ical.marudot.com/).
# Step 2: Add a Calendar Invite to the Email Campaign
In this section, we will use the following to add a calendar invite to the email template in MoEngage:
* Add a calendar link to the Email campaign
* Add an ICS file to the Email campaign
After creating the calendar link, perform the following steps to add the calendar link to the email campaign of MoEngage:
1. Create an Email campaign with the desired campaign name, target audience, and control group.
2. In the second step, where the email template is defined, add the link to the calendar invite for the drag-and-drop editor as described below.
3. Add an icon for the invite link to the email template. In our example, the icon is named *ADD TO CALENDAR*. For more information, refer to [Add icons to the email template](/docs/user-guide/campaigns-and-channels/email/create/create-content-with-the-drag-and-drop-editor).
4. Click the icon, and in the content pane to the right of the drag-and-drop editor, turn on the **More options** toggle for the icon.
5. In the **Link type** section, paste the copied link from the publish calendar screen in the Link URL section, as shown below:
1. Navigate to the Calendar app.
2. Click **+ Create** in the upper-left corner and click **Event** in the list.
3. Specify the date, time, frequency, links, description, and notes.
4. Click **Save**. The event is now saved in your calendar.
5. Click the saved event in your calendar.
6. Click **Edit** event.
7. In the **More actions** list, click **Publish event**. This takes you to the publish event screen, where the HTML code for adding the invite to the event will be displayed.
8. Copy and add the HTML code to your campaign, as described below.\
Alternatively, you can create links for various calendar apps, such as Google Calendar, Microsoft Outlook, Office 365, and Yahoo! Calendar, using various online tools (such as [Labnol](https://www.labnol.org/calendar/)).
An ICS file is a calendar file saved in a universal calendar format used by several email and calendar programs, such as Microsoft Outlook, Google Calendar, and Apple Calendar. You can add an ICS file as an attachment to your email.
To generate .ics files, use an online tool like [iCal Event Maker](https://ical.marudot.com/).
# Step 2: Add a Calendar Invite to the Email Campaign
In this section, we will use the following to add a calendar invite to the email template in MoEngage:
* Add a calendar link to the Email campaign
* Add an ICS file to the Email campaign
After creating the calendar link, perform the following steps to add the calendar link to the email campaign of MoEngage:
1. Create an Email campaign with the desired campaign name, target audience, and control group.
2. In the second step, where the email template is defined, add the link to the calendar invite for the drag-and-drop editor as described below.
3. Add an icon for the invite link to the email template. In our example, the icon is named *ADD TO CALENDAR*. For more information, refer to [Add icons to the email template](/docs/user-guide/campaigns-and-channels/email/create/create-content-with-the-drag-and-drop-editor).
4. Click the icon, and in the content pane to the right of the drag-and-drop editor, turn on the **More options** toggle for the icon.
5. In the **Link type** section, paste the copied link from the publish calendar screen in the Link URL section, as shown below:  6. In Step 3 of the campaign creation, add the information about the campaign's delivery schedule and configure the delivery controls.
7. Publish the campaign. The user receives a [preview of the invite](/docs/use-cases/email/add-calendar-invites-to-emails#expected-result) in their inbox.
Perform the following steps to upload the ICS file as an attachment to the email:
1. Create an Email campaign with the desired campaign name, target audience, and control group.
2. In the second step, where the email template and the sender details are added, navigate to the **Attachments** tab in the **Email details** section.
3. Upload the ICS file using the upload option, as shown below:
6. In Step 3 of the campaign creation, add the information about the campaign's delivery schedule and configure the delivery controls.
7. Publish the campaign. The user receives a [preview of the invite](/docs/use-cases/email/add-calendar-invites-to-emails#expected-result) in their inbox.
Perform the following steps to upload the ICS file as an attachment to the email:
1. Create an Email campaign with the desired campaign name, target audience, and control group.
2. In the second step, where the email template and the sender details are added, navigate to the **Attachments** tab in the **Email details** section.
3. Upload the ICS file using the upload option, as shown below:  4. Add the file's path to the href element in the `` tag.
5. Preview the email to ensure that it looks as desired.
6. In Step 3 of the campaign creation, add the information about the campaign's delivery schedule and configure the delivery controls.
7. Publish the campaign. The user receives a [preview of the invite](/docs/use-cases/email/add-calendar-invites-to-emails#expected-result) in their inbox.
# Conclusion
In this use case, you have created a calendar invite and sent a campaign with it. Go to [Email Analytics and Info](/docs/user-guide/campaigns-and-channels/email/analyze/email-analytics-and-info) to see how your campaign is performing.
4. Add the file's path to the href element in the `` tag.
5. Preview the email to ensure that it looks as desired.
6. In Step 3 of the campaign creation, add the information about the campaign's delivery schedule and configure the delivery controls.
7. Publish the campaign. The user receives a [preview of the invite](/docs/use-cases/email/add-calendar-invites-to-emails#expected-result) in their inbox.
# Conclusion
In this use case, you have created a calendar invite and sent a campaign with it. Go to [Email Analytics and Info](/docs/user-guide/campaigns-and-channels/email/analyze/email-analytics-and-info) to see how your campaign is performing.