> ## Documentation Index
> Fetch the complete documentation index at: https://moengage.com/docs/llms.txt
> Use this file to discover all available pages before exploring further.
# Use GIFs in an Onboarding Walkthrough
# Introduction
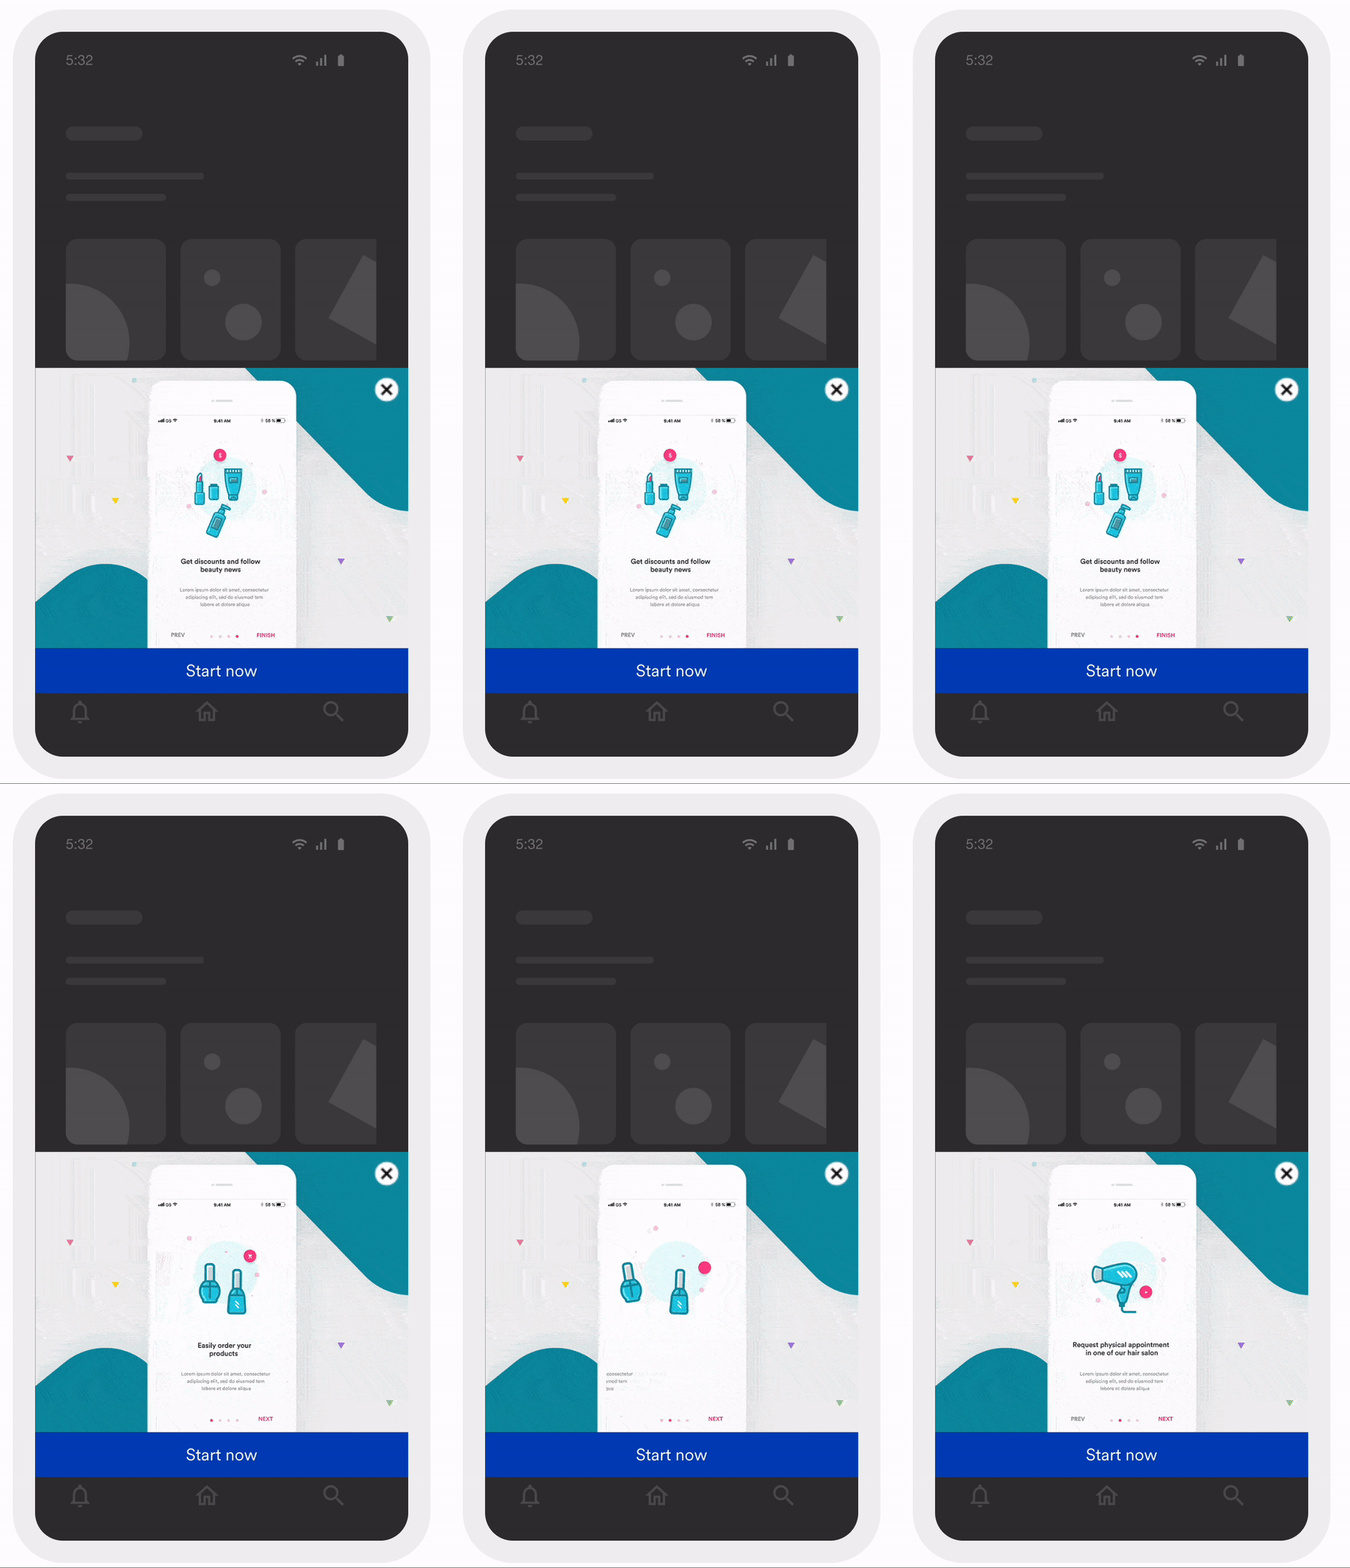
Effective user onboarding is crucial for driving app engagement and ensuring long-term retention. Leveraging GIFs within In-app messaging functionality offers a visually compelling and interactive means of guiding new users through initial interactions with the application.
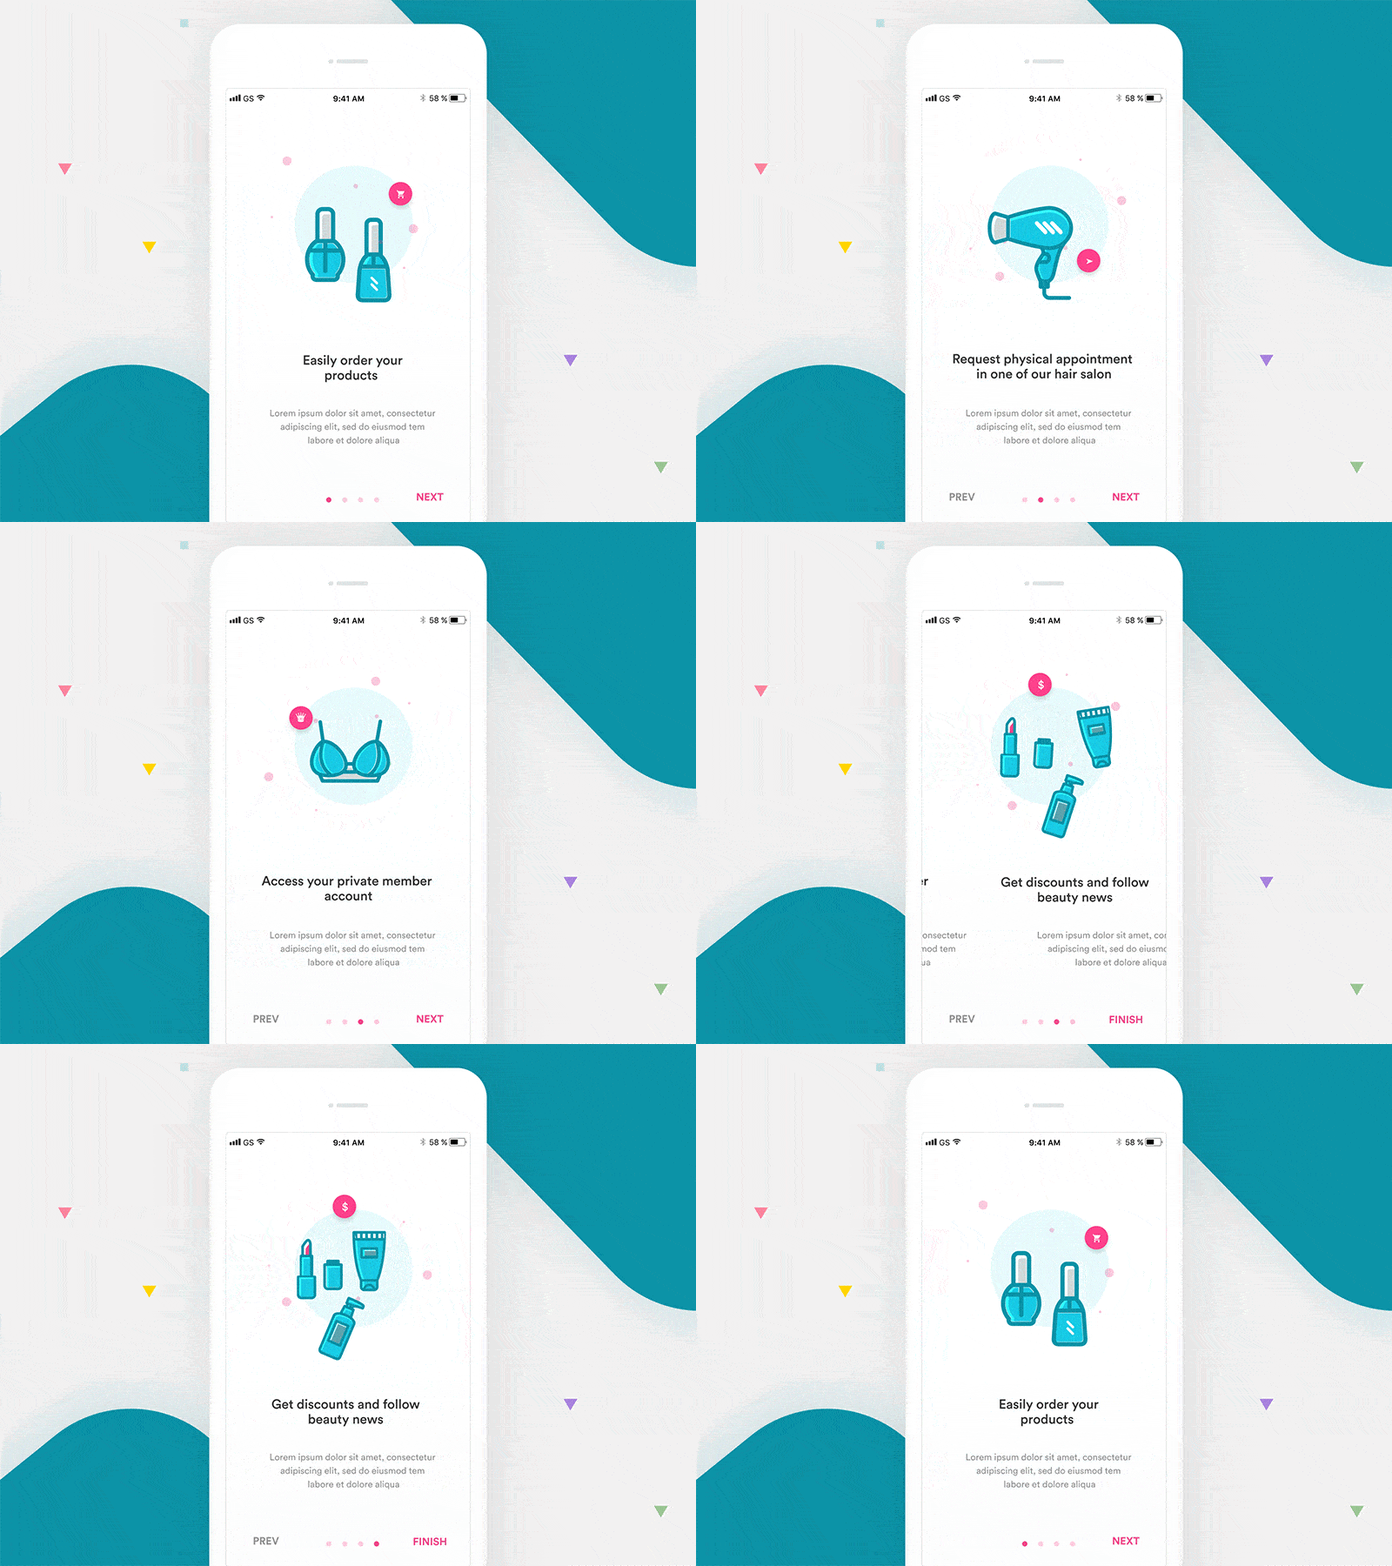
For instance, consider a new user who has downloaded a beauty application and requires clear guidance on navigating the app to facilitate product orders, access exclusive discounts, and stay informed on the latest beauty news.
#### Advantages of using GIFs in an onboarding walkthrough
* **Enhanced visual communication**: GIFs offer a simplified way to visually communicate an app's navigation and features, making complex processes easier to understand.
* **Demonstration of actions**: GIFs can quickly demonstrate core functionalities and actions within the app, reducing the need for extensive written instructions.
* **Engagement and fun**: Animated elements can more effectively capture users' attention than static images, making the onboarding process more enjoyable and memorable.
* **Contextual communication**: GIFs can effectively communicate context without relying on text, such as demonstrating a loading spinner or a success checkmark.
* **Instructional aid**: GIFs serve as mini-tutorials, making the learning process more intuitive and reducing the need for extensive written instructions.
* **Visual feedback**: GIFs can give users immediate visual feedback on their actions, enhancing their interaction with the app.
This article will outline the process of creating an engaging onboarding walkthrough using GIFs within In-app messages. We will achieve this use case in two steps:
1. [Identify the key onboarding steps and create GIFs](/user-guide/use-cases/in-app-message/use-gifs-in-an-onboarding-walkthrough#step-1-identify-the-key-onboarding-steps-and-create-gifs)
2. [Create an In-app Messaging campaign](/user-guide/use-cases/in-app-message/use-gifs-in-an-onboarding-walkthrough#step-2-create-an-in-app-messaging-campaign)
# Expected Result
Users will experience a smooth and engaging onboarding and quickly understand key app features, which leads to increased user satisfaction and higher retention rates. Users will also easily navigate the app to make their first purchase, apply discounts, and read beauty articles, resulting in more frequent app usage.
An event must be available in MoEngage to track the action of a user installing your app or signing up for your app and related information such as the platform, source, and app version in each event. In this example, we will use the event *User Installs the App*. To understand how to track events, refer to the [Developer Guide](/developer-guide/introduction).
# Step 1: Identify the Key Onboarding Steps and Create GIFs
1. **Identify Key Onboarding Moments**: Identify the essential steps and features that new users should understand during their initial interaction with the app. For our example, we aim to ensure that new users can effortlessly order products, discover and apply discounts, and access the latest beauty news.
2. **Create Informative GIFs**: Create a series of short, looping GIFs that effectively demonstrate each key feature or action. Ensure that the GIFs are visually captivating and easy to understand. For instance, include GIFs that include the essential steps that you identified previously. For example, inform new users about your products, explain how to apply discount codes, and guide users to the beauty news section. The following is a sample GIF:
# Step 2: Create an In-App Messaging Campaign
In this section, we will create an In-app Messaging campaign targeting new users or users who have recently installed the app. We will incorporate the GIF you created earlier to enhance user onboarding.
## Step 2.1: Target Users
1. On the left navigation menu in the MoEngage dashboard, click **Engage**, and then click **Campaigns**.
2. On the All campaigns page, click **+ Create campaign**.
3. Under **Inbound**, click **In-app**. You are taken to the first step, **Target users**, in defining your campaign.
4. Define your campaign with a name and tags.
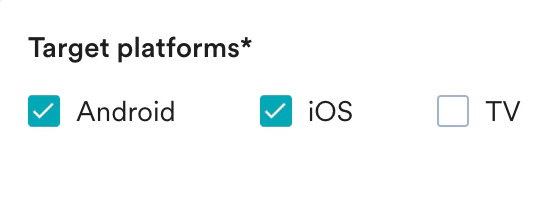
5. In the **Target Platforms** section, select **Android** and **iOS**.
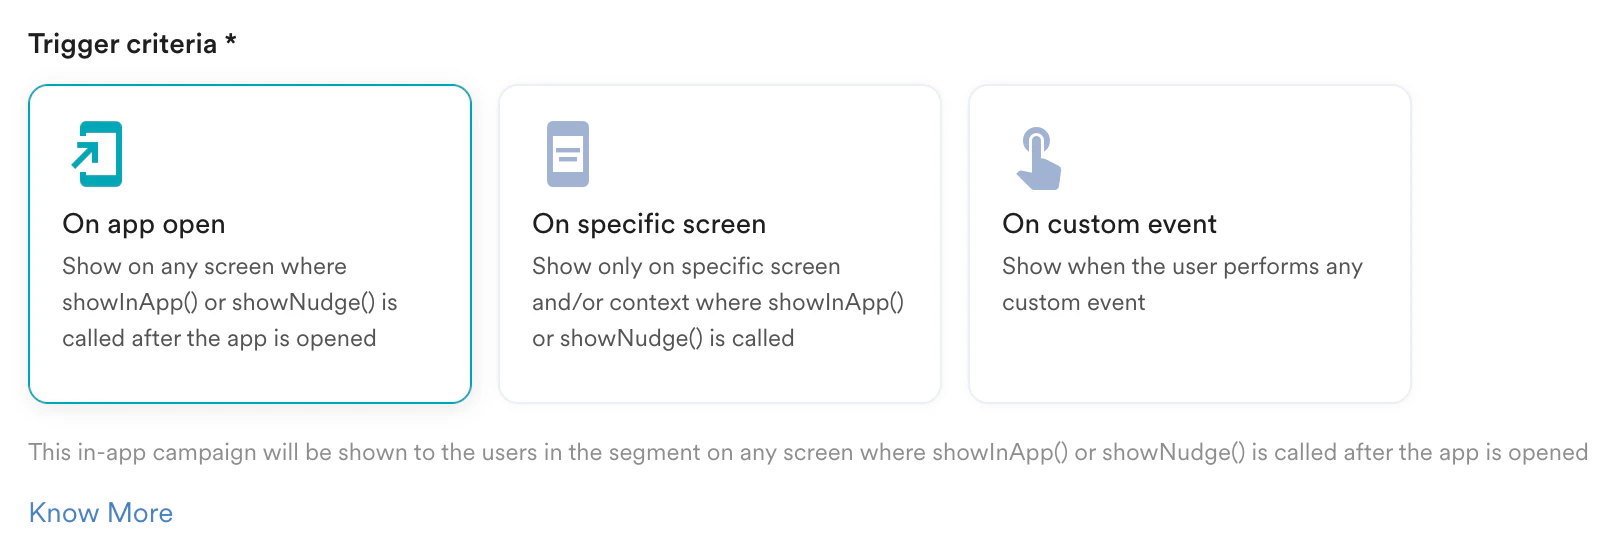
6. In the **Trigger Criteria** section, click the **On app open** card. This will ensure that the In-app message is displayed to the users during onboarding when the app is opened.
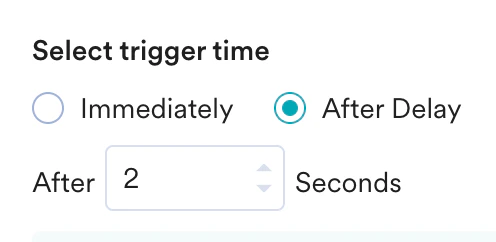
7. In the **Select trigger time** section, select **After Delay** and set the trigger time for the In-app message to appear after 2 seconds of opening the app.
8. In the **Target audience** section:
1. Select the **Filter users by** option.
2. On the **User behaviour** tab, segment the audience to target only those users who have newly installed the app in the last three days.
9. Click **Next** to move to the second step, **Content**, where we will define the content for your campaign.
## Step 2.2: Content
1. On the **Prebuilt and saved templates** tab, use the search box to search with the keyword *nudge* to find the nudge templates.
2. Select the **Nudge - Image, text & button** template.
3. Upload the created GIFs in the template in the **Image** section.
4. Add a concise and clear Call to action (CTA) text for the GIF.
5. Add navigation to the button so that when the user clicks it, they are redirected to the info page.
6. Modify the template's design accordingly. Follow the video below to edit the template's design.
7. Before publishing the campaign, test the In-app messages under the **Preview in-app section**. With this, you can ensure that GIFs and text display correctly on different devices and screen sizes.
## Step 2.3: Schedule and Goals
1. In the **Send campaign** section, define when you want to start and end your In-app messaging campaign.
2. In the **Conversion goals** section, add conversion goals that you would like to track.
3. In the **Campaign priority** section, assign a priority to this campaign. For example, selecting **Critical** ensures that the users will always see the campaign even when there are other campaigns for which they are eligible. For more information, refer to [Create In-App Campaign](/user-guide/campaigns-and-channels/in-app-message/create/create-in-app-campaign).
4. In the **Delivery controls** section, define the controls based on your requirements. For more information, refer to [Create In-App Campaign](/user-guide/campaigns-and-channels/in-app-message/create/create-in-app-campaign).
5. Click **Publish**.
After the In-app campaign is published, you can monitor its performance on the campaign analytics page. For more information, refer to [Analyze In-App Campaigns](/user-guide/campaigns-and-channels/in-app-message/analyze/analyze-in-app-campaigns).
# Analyze and Optimize
* Use the campaign analytics page to track user interactions with the In-app messages.
* Gather feedback and identify any drop-off points.
* Make necessary adjustments to the GIFs or message content based on user behaviour and feedback.
For more information, refer to [Analyze In-app Campaigns](/user-guide/campaigns-and-channels/in-app-message/analyze/analyze-in-app-campaigns).
# Conclusion
Implementing an onboarding walkthrough using GIFs in In-app messaging can significantly enhance the user experience, making the onboarding process more engaging and effective. By following the steps outlined in this use case, you can ensure new users quickly understand and appreciate the value of the app, leading to higher engagement and retention rates.
 # Step 2: Create an In-App Messaging Campaign
In this section, we will create an In-app Messaging campaign targeting new users or users who have recently installed the app. We will incorporate the GIF you created earlier to enhance user onboarding.
## Step 2.1: Target Users
1. On the left navigation menu in the MoEngage dashboard, click **Engage**, and then click **Campaigns**.
2. On the All campaigns page, click **+ Create campaign**.
3. Under **Inbound**, click **In-app**.
# Step 2: Create an In-App Messaging Campaign
In this section, we will create an In-app Messaging campaign targeting new users or users who have recently installed the app. We will incorporate the GIF you created earlier to enhance user onboarding.
## Step 2.1: Target Users
1. On the left navigation menu in the MoEngage dashboard, click **Engage**, and then click **Campaigns**.
2. On the All campaigns page, click **+ Create campaign**.
3. Under **Inbound**, click **In-app**. 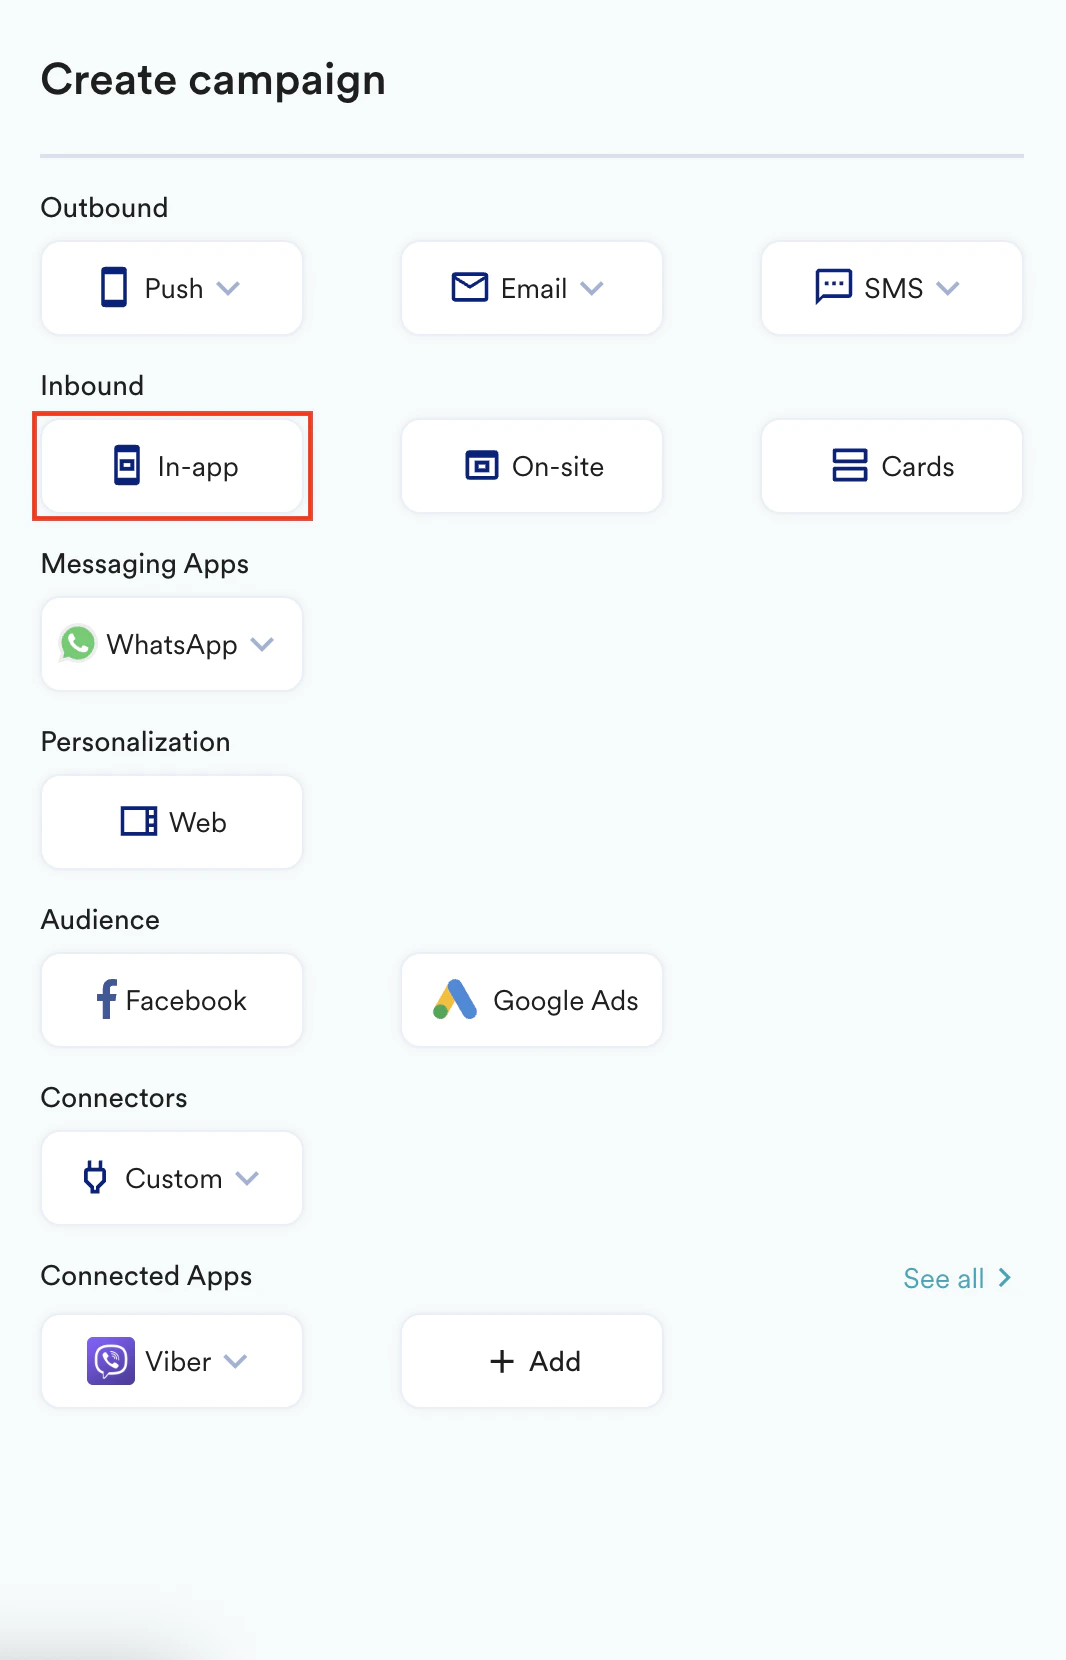 You are taken to the first step, **Target users**, in defining your campaign.
4. Define your campaign with a name and tags.
5. In the **Target Platforms** section, select **Android** and **iOS**.
You are taken to the first step, **Target users**, in defining your campaign.
4. Define your campaign with a name and tags.
5. In the **Target Platforms** section, select **Android** and **iOS**.
 6. In the **Trigger Criteria** section, click the **On app open** card. This will ensure that the In-app message is displayed to the users during onboarding when the app is opened.
  7. In the **Select trigger time** section, select **After Delay** and set the trigger time for the In-app message to appear after 2 seconds of opening the app.
 8. In the **Target audience** section:
1. Select the **Filter users by** option.
2. On the **User behaviour** tab, segment the audience to target only those users who have newly installed the app in the last three days.
8. In the **Target audience** section:
1. Select the **Filter users by** option.
2. On the **User behaviour** tab, segment the audience to target only those users who have newly installed the app in the last three days. 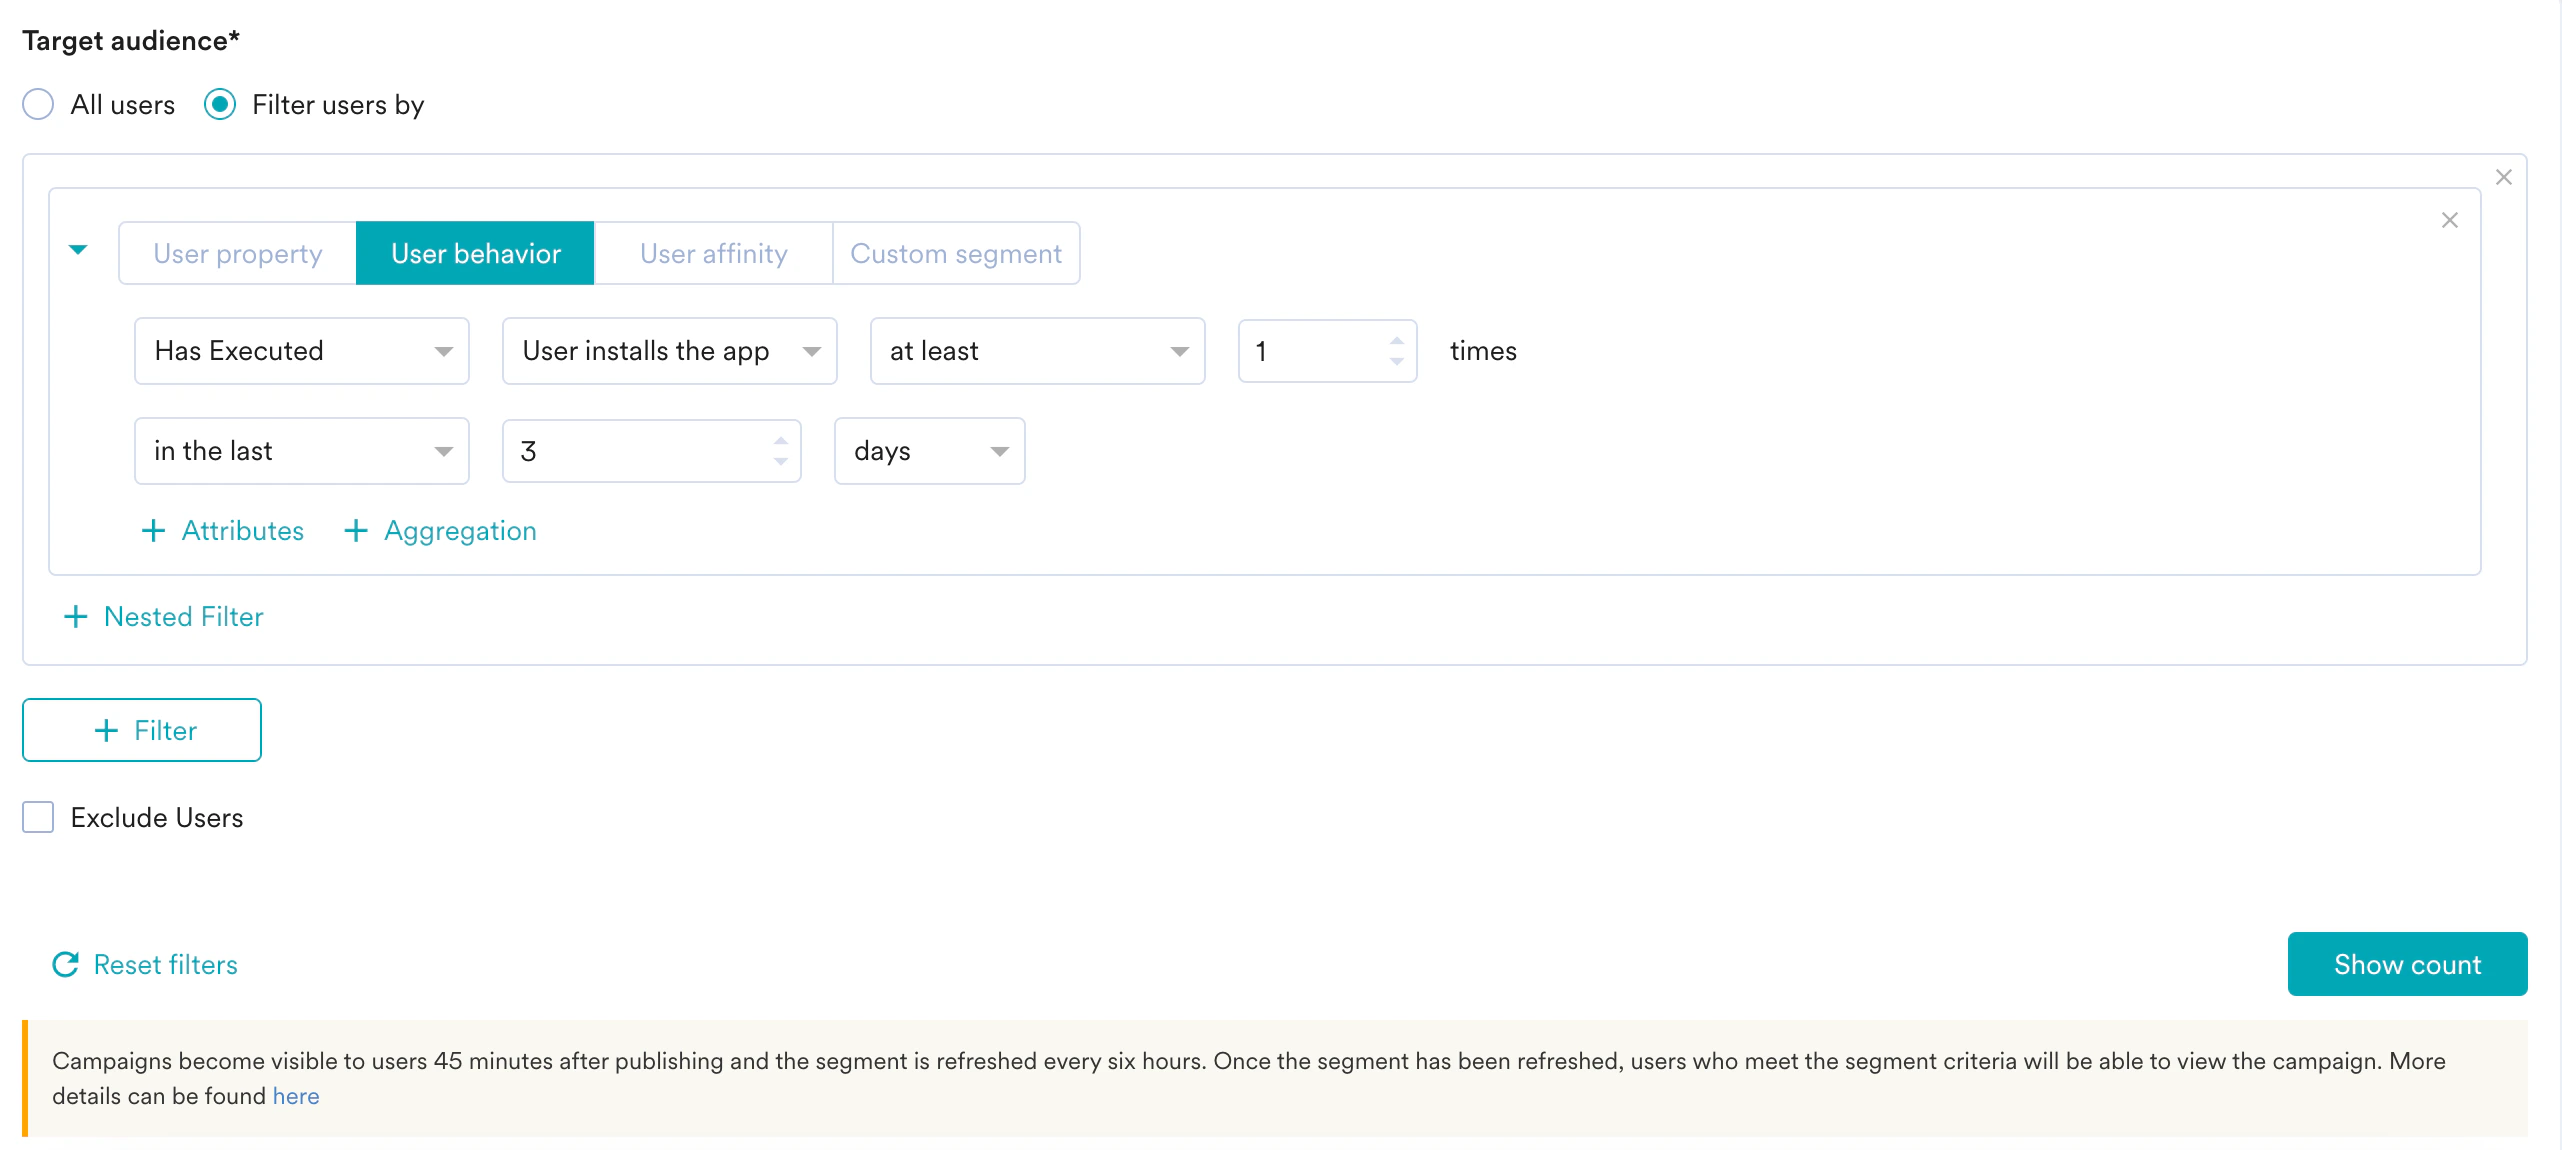 9. Click **Next** to move to the second step, **Content**, where we will define the content for your campaign.
## Step 2.2: Content
1. On the **Prebuilt and saved templates** tab, use the search box to search with the keyword *nudge* to find the nudge templates.
2. Select the **Nudge - Image, text & button** template.
9. Click **Next** to move to the second step, **Content**, where we will define the content for your campaign.
## Step 2.2: Content
1. On the **Prebuilt and saved templates** tab, use the search box to search with the keyword *nudge* to find the nudge templates.
2. Select the **Nudge - Image, text & button** template. 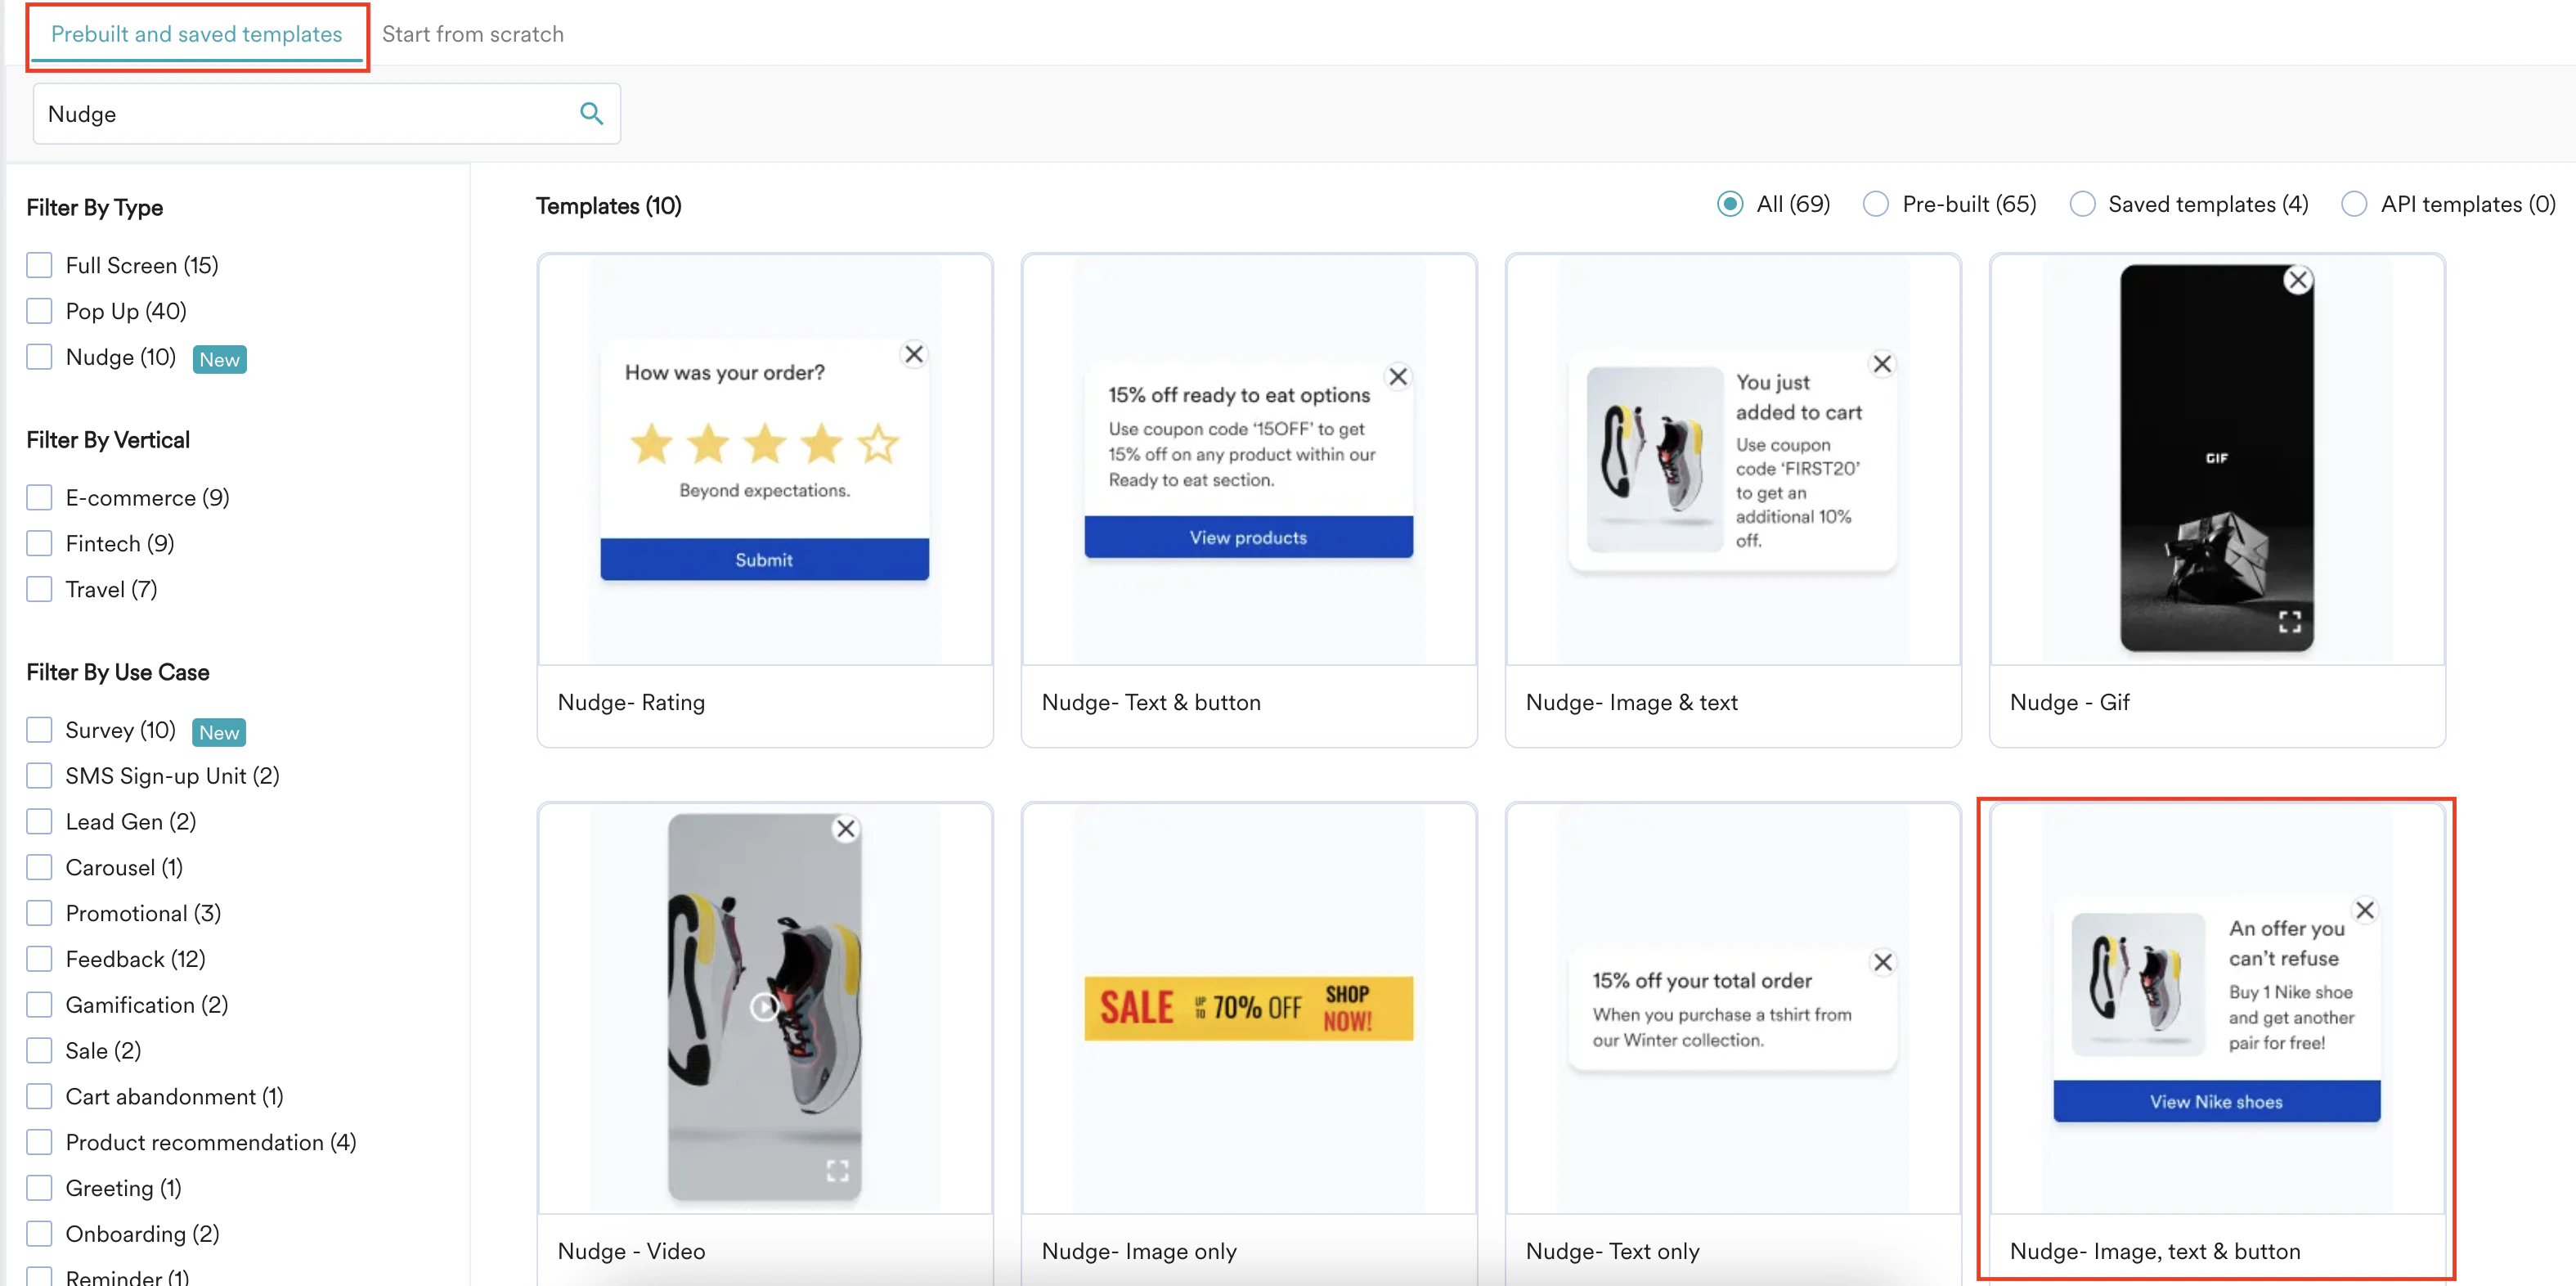 3. Upload the created GIFs in the template in the **Image** section.
 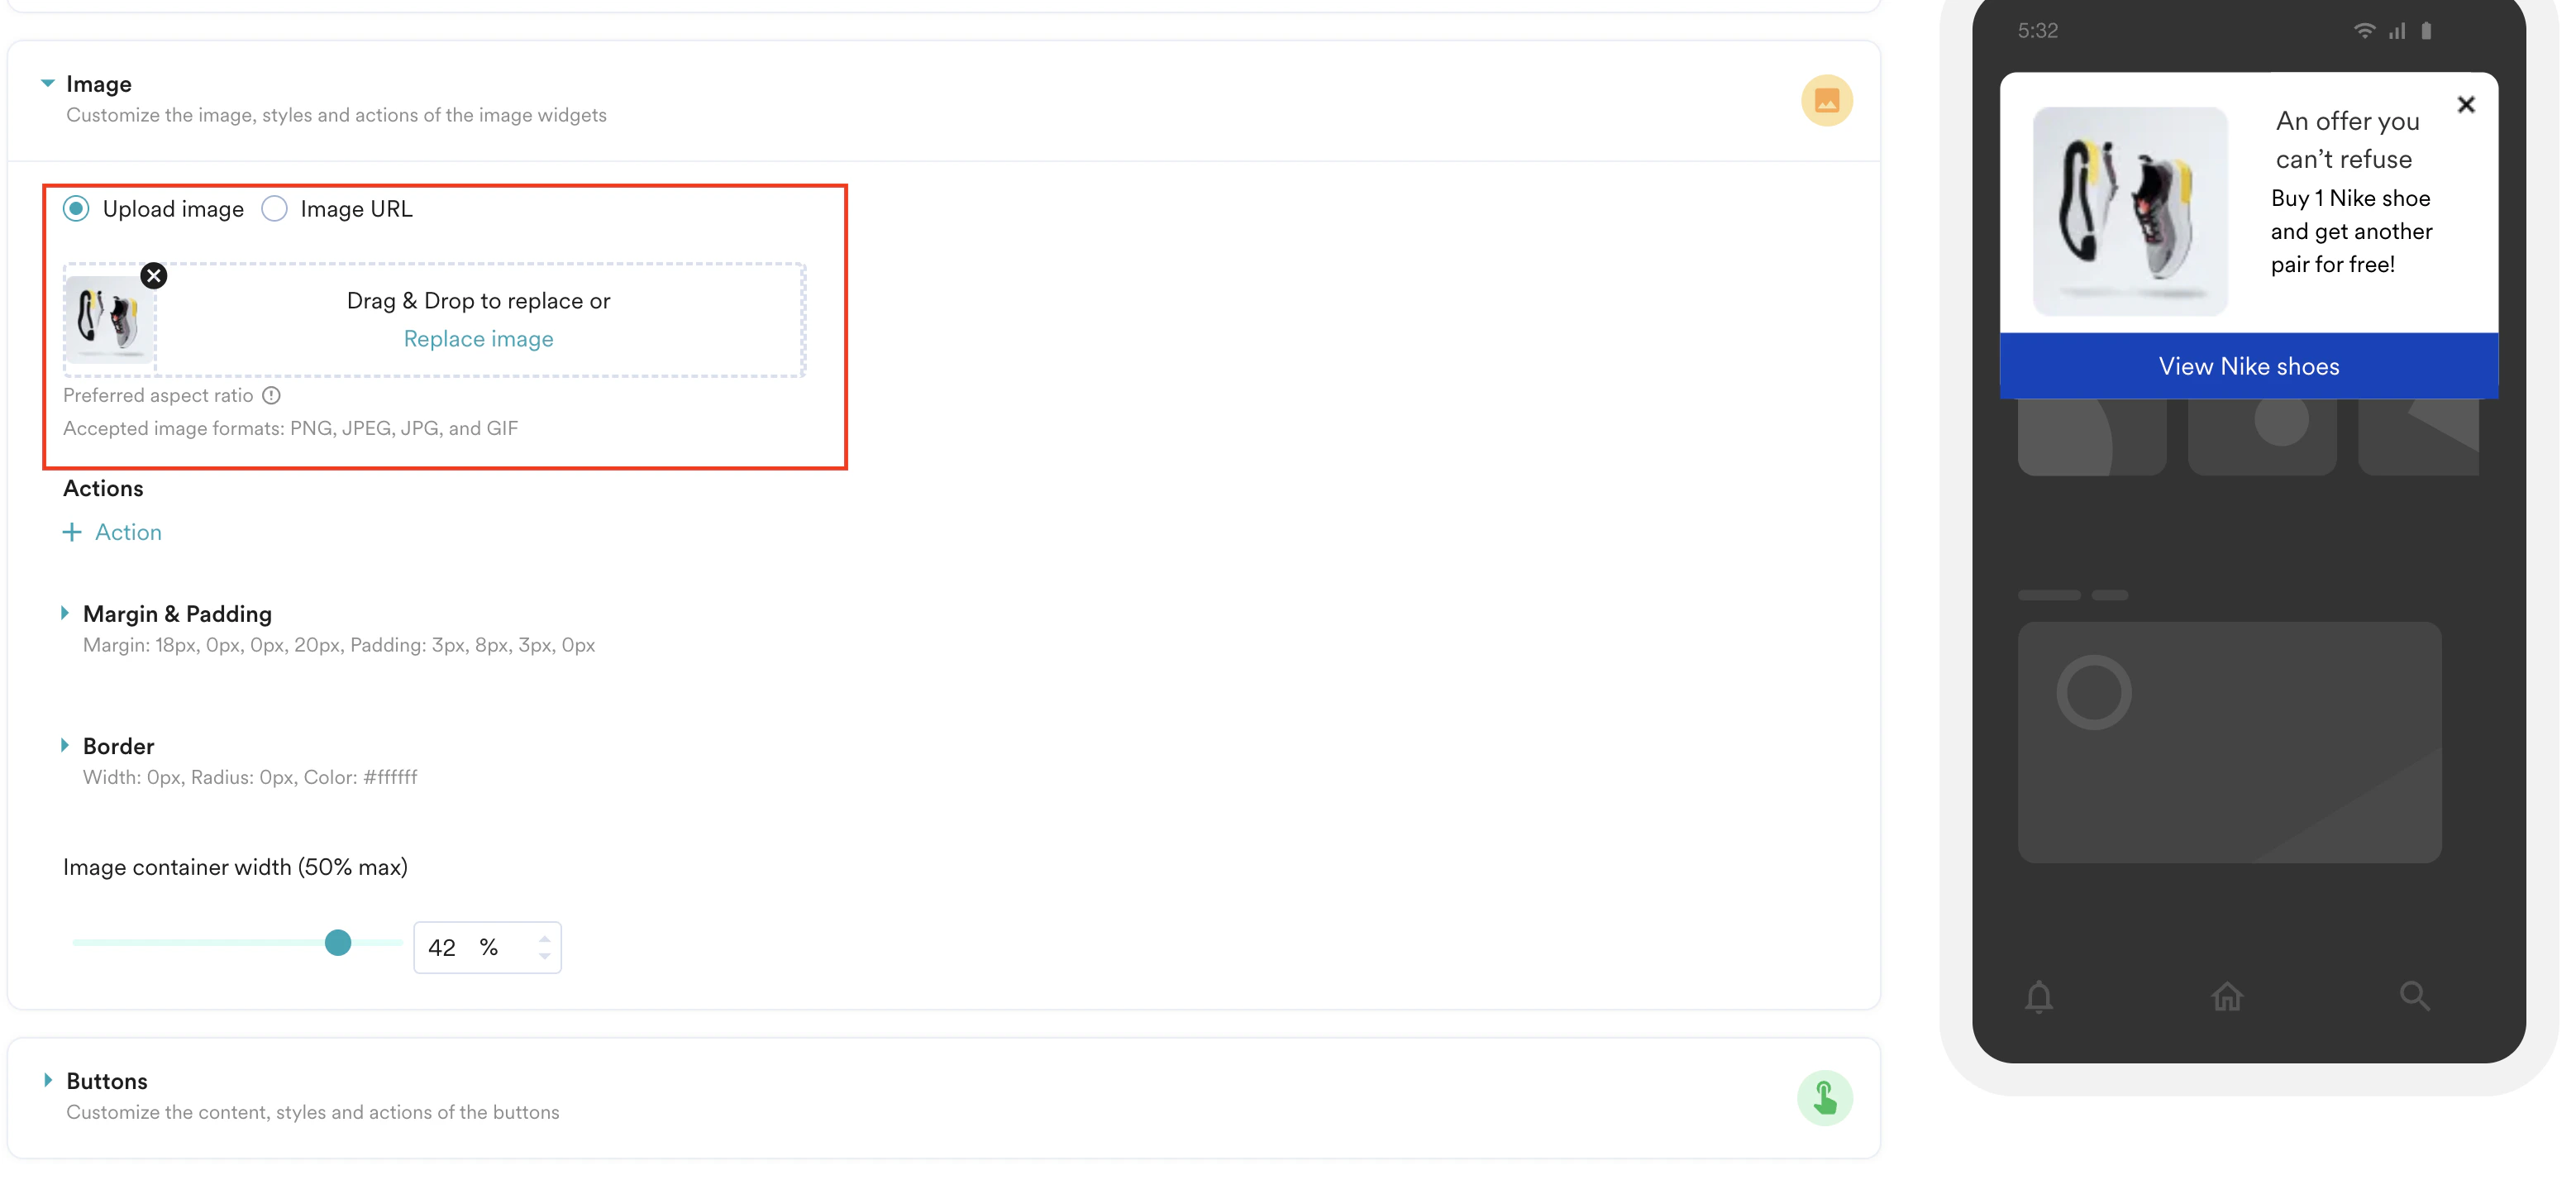 4. Add a concise and clear Call to action (CTA) text for the GIF.
5. Add navigation to the button so that when the user clicks it, they are redirected to the info page.
4. Add a concise and clear Call to action (CTA) text for the GIF.
5. Add navigation to the button so that when the user clicks it, they are redirected to the info page. 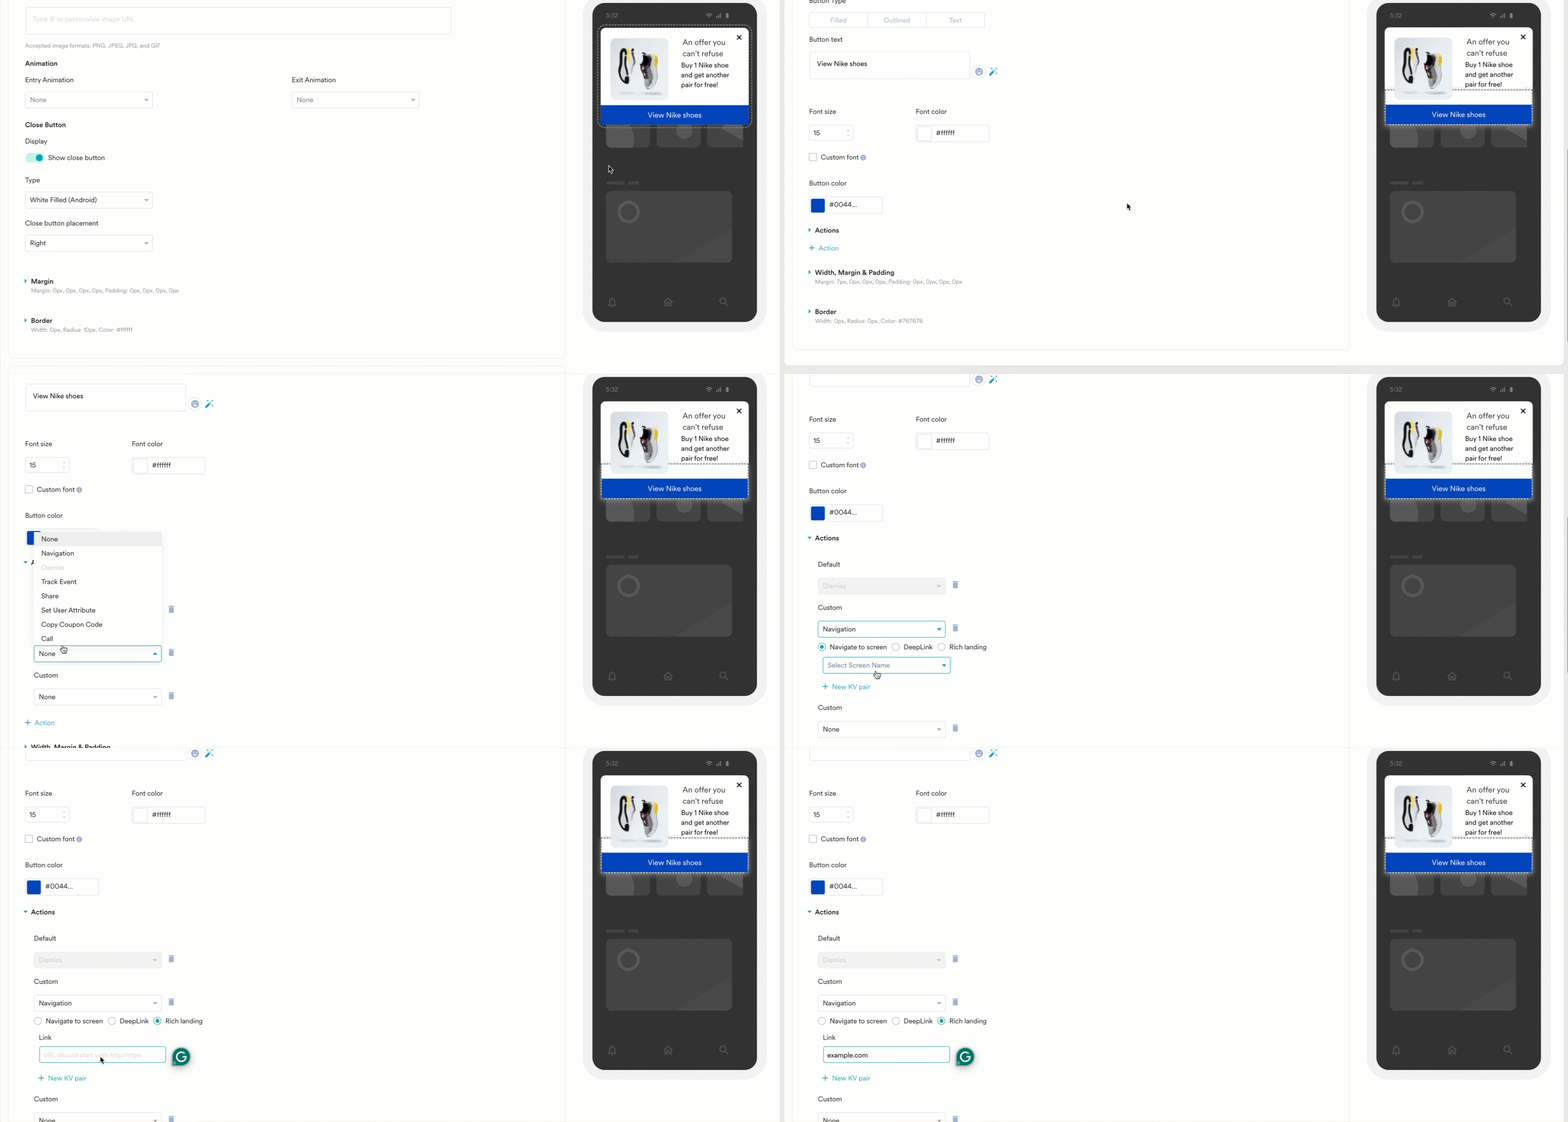 6. Modify the template's design accordingly. Follow the video below to edit the template's design.
7. Before publishing the campaign, test the In-app messages under the **Preview in-app section**. With this, you can ensure that GIFs and text display correctly on different devices and screen sizes.
6. Modify the template's design accordingly. Follow the video below to edit the template's design.
7. Before publishing the campaign, test the In-app messages under the **Preview in-app section**. With this, you can ensure that GIFs and text display correctly on different devices and screen sizes. 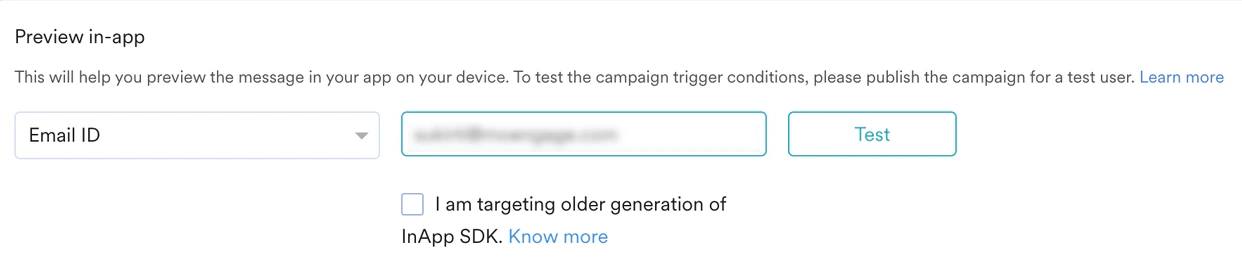 ## Step 2.3: Schedule and Goals
1. In the **Send campaign** section, define when you want to start and end your In-app messaging campaign.
## Step 2.3: Schedule and Goals
1. In the **Send campaign** section, define when you want to start and end your In-app messaging campaign. 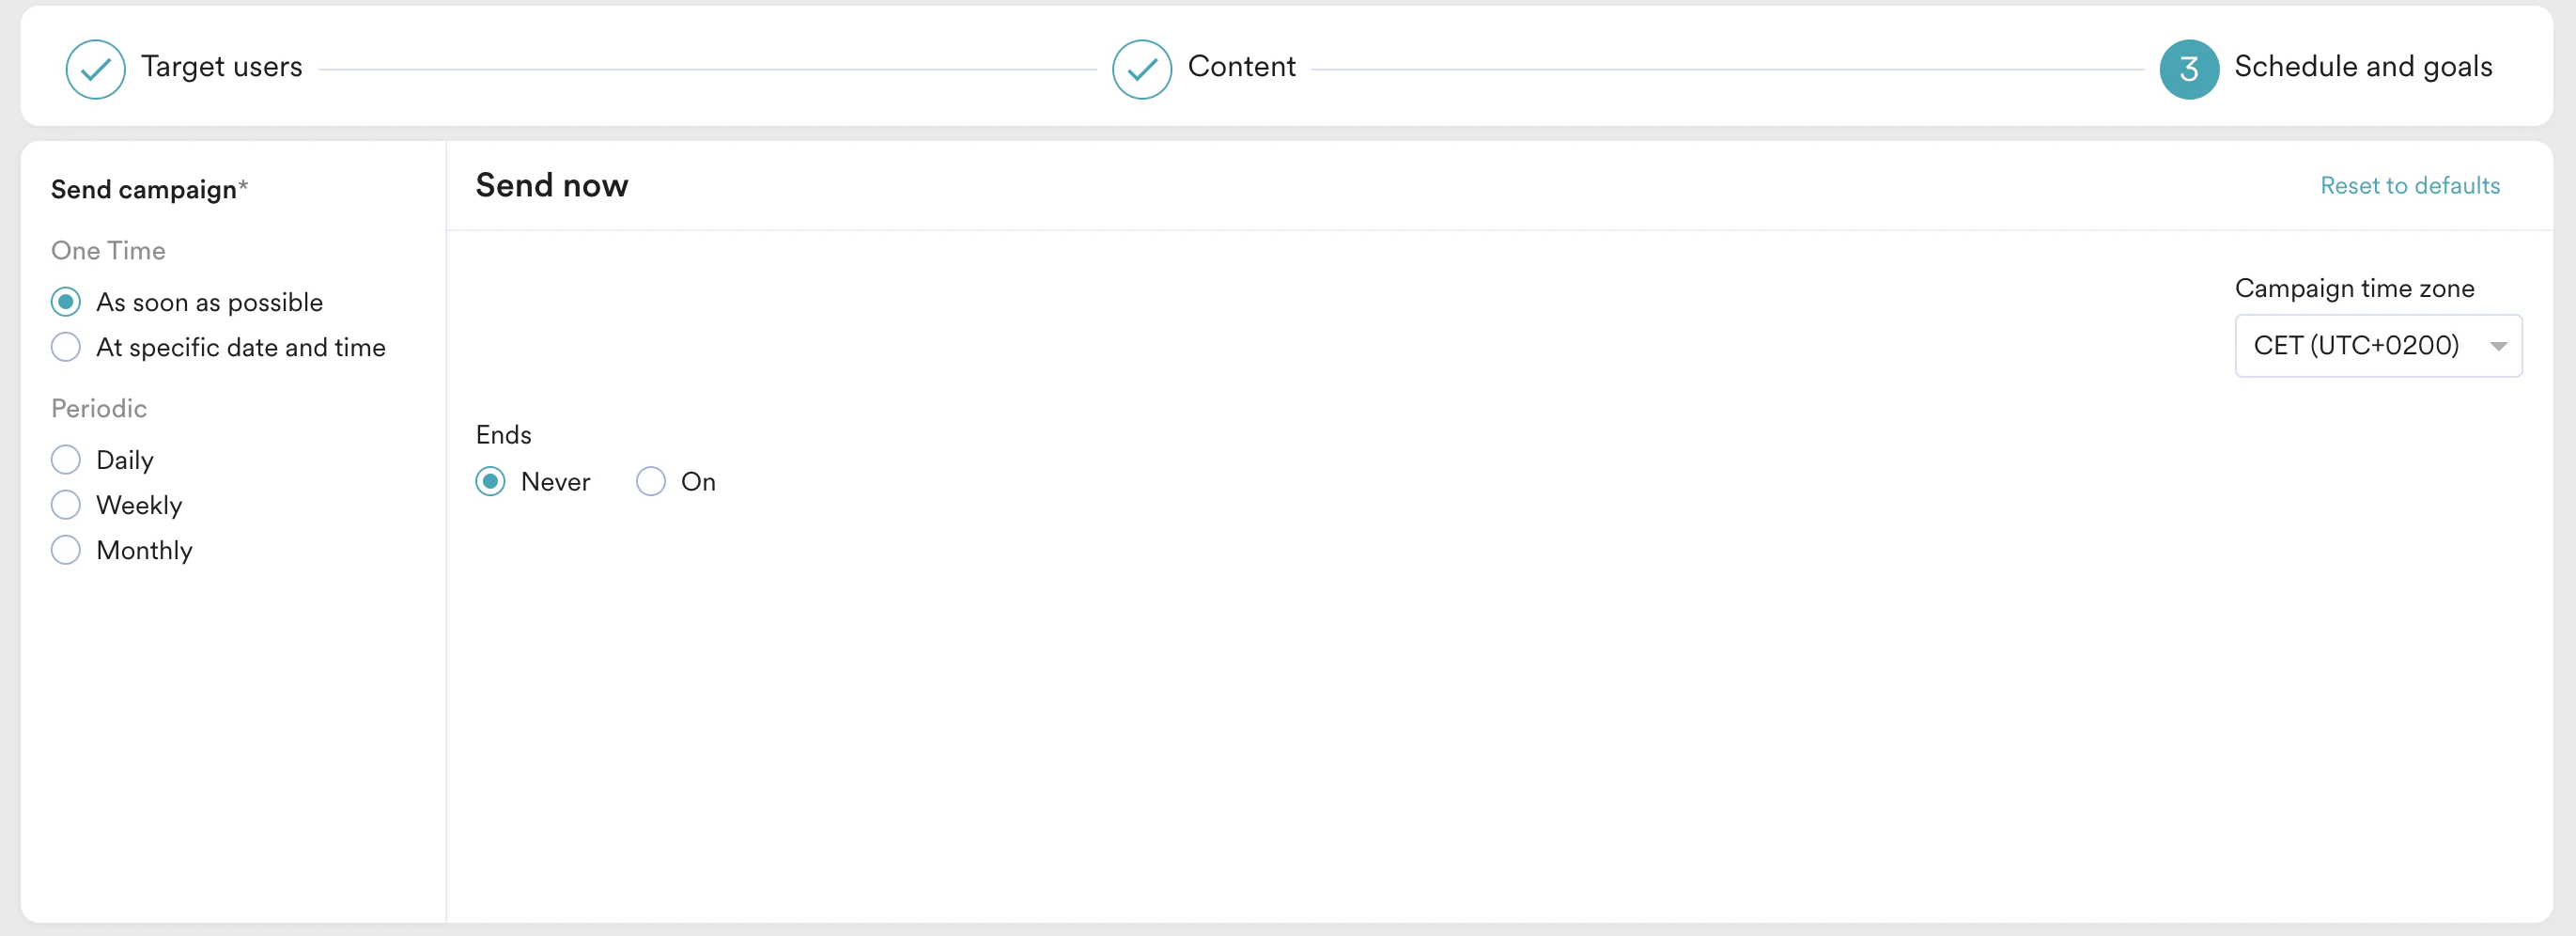 2. In the **Conversion goals** section, add conversion goals that you would like to track.
3. In the **Campaign priority** section, assign a priority to this campaign. For example, selecting **Critical** ensures that the users will always see the campaign even when there are other campaigns for which they are eligible. For more information, refer to [Create In-App Campaign](/user-guide/campaigns-and-channels/in-app-message/create/create-in-app-campaign).
4. In the **Delivery controls** section, define the controls based on your requirements. For more information, refer to [Create In-App Campaign](/user-guide/campaigns-and-channels/in-app-message/create/create-in-app-campaign).
2. In the **Conversion goals** section, add conversion goals that you would like to track.
3. In the **Campaign priority** section, assign a priority to this campaign. For example, selecting **Critical** ensures that the users will always see the campaign even when there are other campaigns for which they are eligible. For more information, refer to [Create In-App Campaign](/user-guide/campaigns-and-channels/in-app-message/create/create-in-app-campaign).
4. In the **Delivery controls** section, define the controls based on your requirements. For more information, refer to [Create In-App Campaign](/user-guide/campaigns-and-channels/in-app-message/create/create-in-app-campaign). 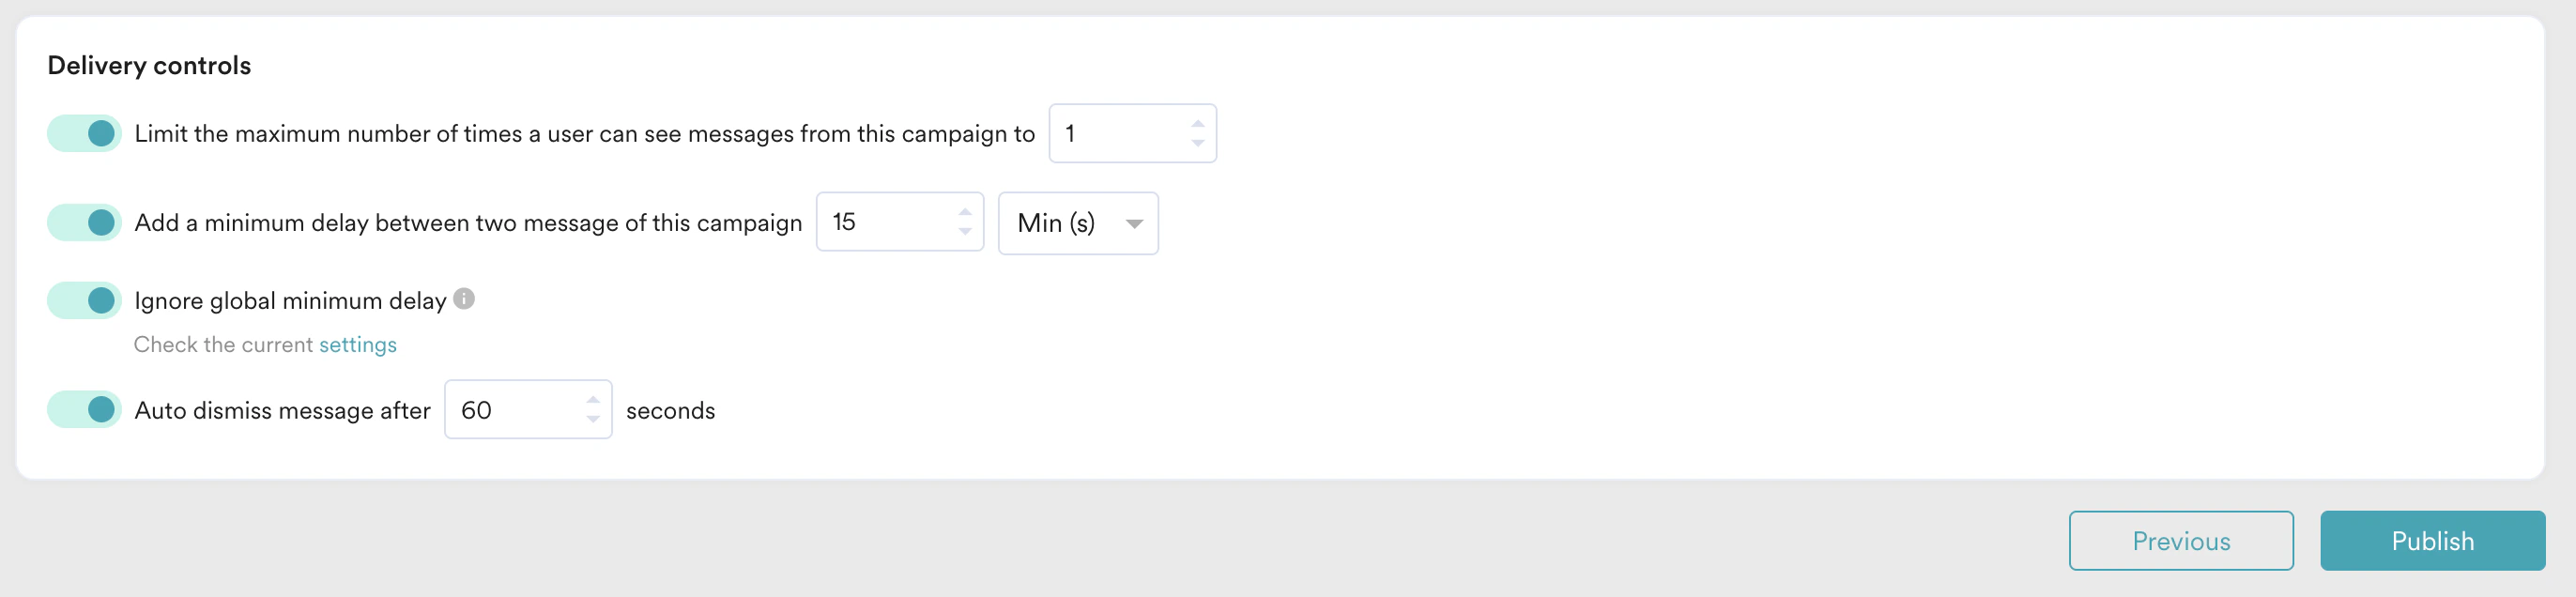 5. Click **Publish**.
After the In-app campaign is published, you can monitor its performance on the campaign analytics page. For more information, refer to [Analyze In-App Campaigns](/user-guide/campaigns-and-channels/in-app-message/analyze/analyze-in-app-campaigns).
# Analyze and Optimize
* Use the campaign analytics page to track user interactions with the In-app messages.
* Gather feedback and identify any drop-off points.
* Make necessary adjustments to the GIFs or message content based on user behaviour and feedback.
For more information, refer to [Analyze In-app Campaigns](/user-guide/campaigns-and-channels/in-app-message/analyze/analyze-in-app-campaigns).
# Conclusion
Implementing an onboarding walkthrough using GIFs in In-app messaging can significantly enhance the user experience, making the onboarding process more engaging and effective. By following the steps outlined in this use case, you can ensure new users quickly understand and appreciate the value of the app, leading to higher engagement and retention rates.
5. Click **Publish**.
After the In-app campaign is published, you can monitor its performance on the campaign analytics page. For more information, refer to [Analyze In-App Campaigns](/user-guide/campaigns-and-channels/in-app-message/analyze/analyze-in-app-campaigns).
# Analyze and Optimize
* Use the campaign analytics page to track user interactions with the In-app messages.
* Gather feedback and identify any drop-off points.
* Make necessary adjustments to the GIFs or message content based on user behaviour and feedback.
For more information, refer to [Analyze In-app Campaigns](/user-guide/campaigns-and-channels/in-app-message/analyze/analyze-in-app-campaigns).
# Conclusion
Implementing an onboarding walkthrough using GIFs in In-app messaging can significantly enhance the user experience, making the onboarding process more engaging and effective. By following the steps outlined in this use case, you can ensure new users quickly understand and appreciate the value of the app, leading to higher engagement and retention rates.