> ## Documentation Index
> Fetch the complete documentation index at: https://moengage.com/docs/llms.txt
> Use this file to discover all available pages before exploring further.
# Collect Leads from First-Time Users
# Introduction
Many new users visit websites daily but often leave after only a few minutes of browsing. To avoid losing potential customers and revenue, it is essential to collect their contact information before they exit.
#### Advantages of collecting leads from first-time users
* **Building a customer base**: By collecting leads, you can establish a database of potential customers, which is essential for future marketing campaigns and sales efforts.
* **Targeted marketing**: With a list of leads, you can personalize your marketing messages and tailor your offers to specific customer segments, increasing the chances of conversion.
* **Increased sales and revenue**: By nurturing relationships with early-stage prospects, you convert them into paying customers down the line. You can drive sales and increase your overall revenue by providing offers and discounts.
* **Improved customer understanding**: Lead capture helps you gain insights into your target audience, their needs, and preferences, which can inform product development and marketing strategies.
* **Staying ahead of the competition**: In today's competitive landscape, you need to actively seek out and engage with potential customers to stay ahead of the competition.
In this article, we will [create an On-site Messaging (OSM) campaign](/user-guide/use-cases/on-site-messaging-\(osm\)/collect-leads-from-first-time-users#create-an-osm-campaign) to collect contact details from your first-time users.
# Expected Result
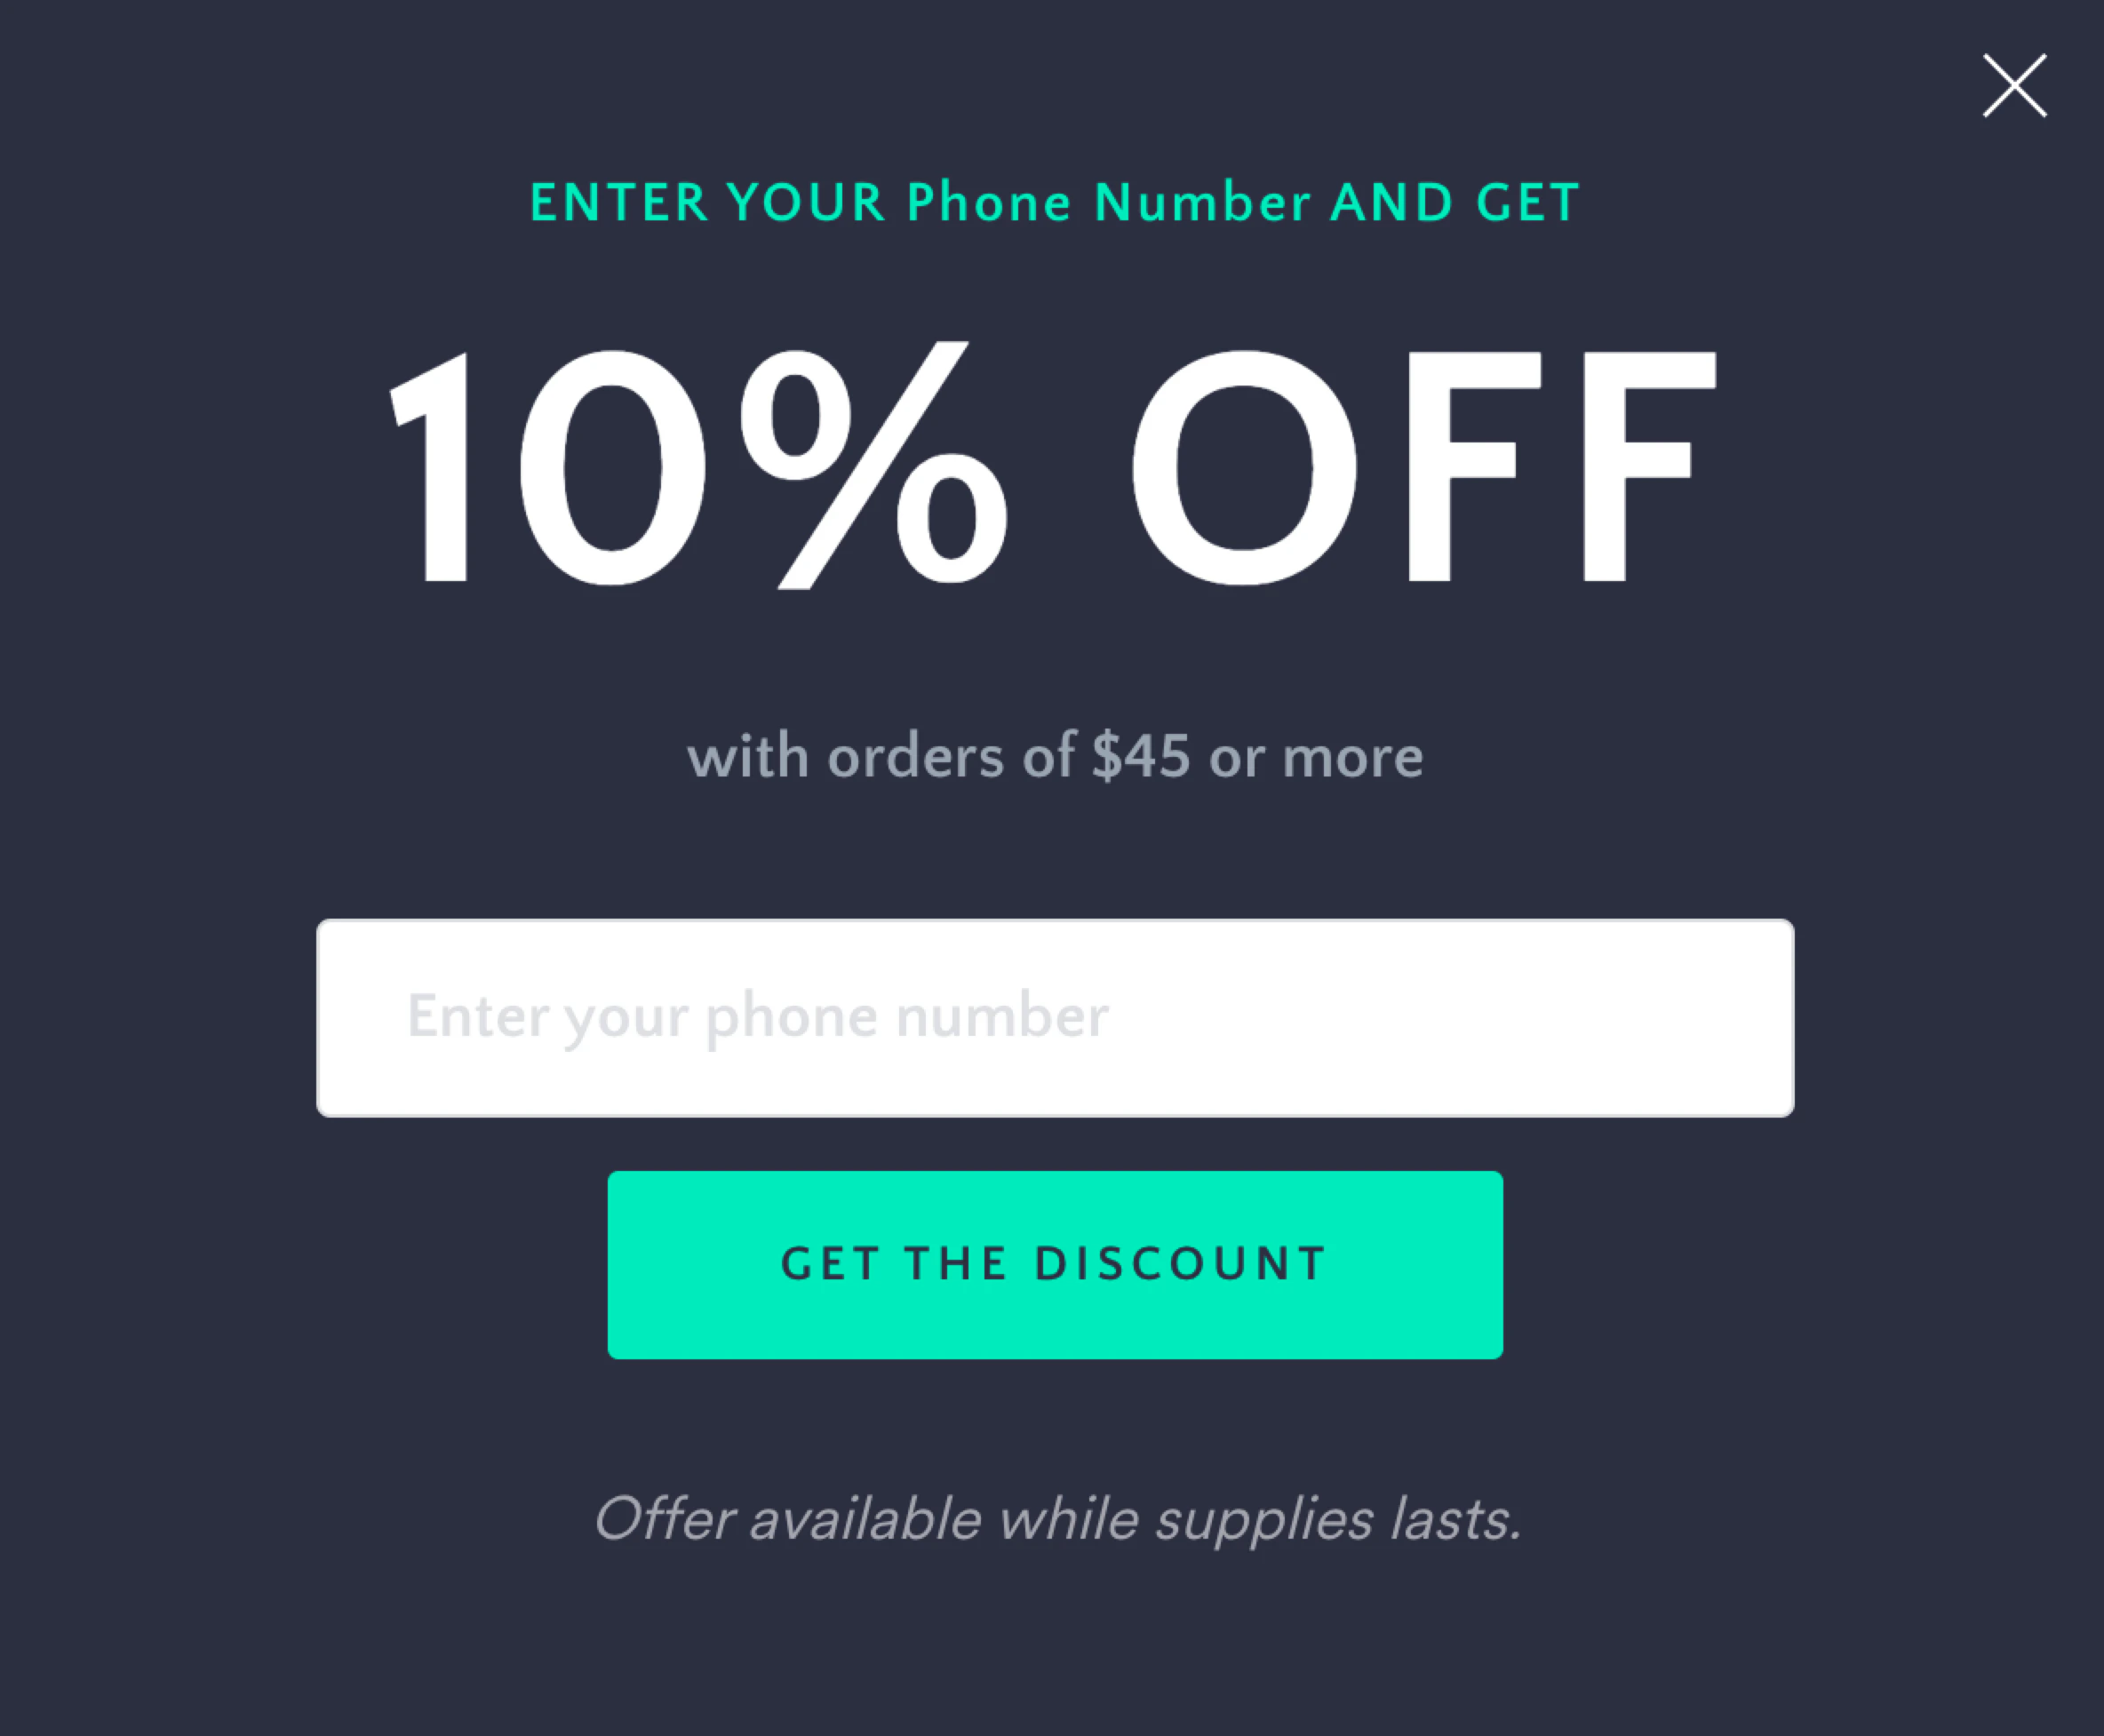
When users visit the website, they will see a pop-up message with a prompt to enter their phone number:
 * Your website must be integrated with the MoEngage Web SDK. For more information, refer to the [Web SDK](/developer-guide/web-sdk/web-sdk-overview/web-sdk-overview).
* The [On-site Messaging](/developer-guide/web-sdk/onsite-messaging/configure-and-integrate-on-site-messaging) channel must be configured.
# Create an OSM Campaign
In this section, we will create a campaign to collect contact details from your first-time users.
## Step 1: Target Users
1. On the left navigation menu in the MoEngage dashboard, click **Engage**, and then click **Campaigns**.
2. On the All campaigns page, click **+ Create campaign**.
3. Under **Inbound**, click **On-site**.
* Your website must be integrated with the MoEngage Web SDK. For more information, refer to the [Web SDK](/developer-guide/web-sdk/web-sdk-overview/web-sdk-overview).
* The [On-site Messaging](/developer-guide/web-sdk/onsite-messaging/configure-and-integrate-on-site-messaging) channel must be configured.
# Create an OSM Campaign
In this section, we will create a campaign to collect contact details from your first-time users.
## Step 1: Target Users
1. On the left navigation menu in the MoEngage dashboard, click **Engage**, and then click **Campaigns**.
2. On the All campaigns page, click **+ Create campaign**.
3. Under **Inbound**, click **On-site**. 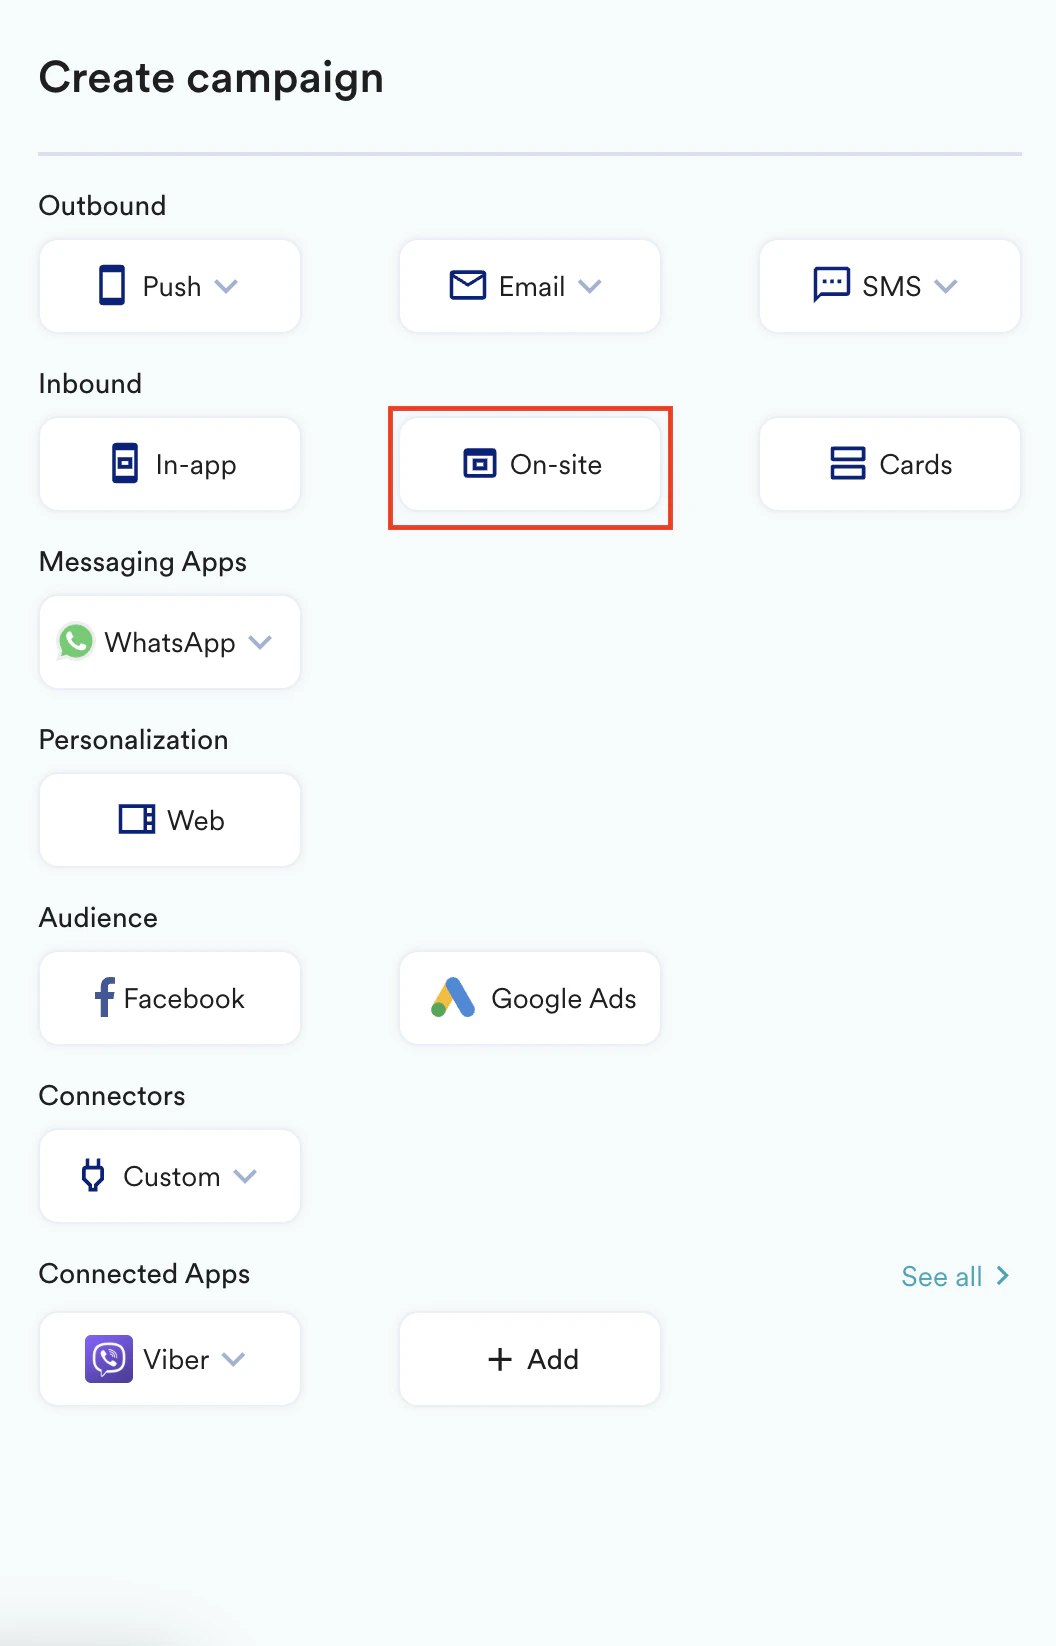 \
You are taken to the first step, **Target users**, in defining your campaign.
4. Define your campaign with a name and tags.
5. In the **Target platforms** section, select **Web** and **Mobile Web**.
\
You are taken to the first step, **Target users**, in defining your campaign.
4. Define your campaign with a name and tags.
5. In the **Target platforms** section, select **Web** and **Mobile Web**. 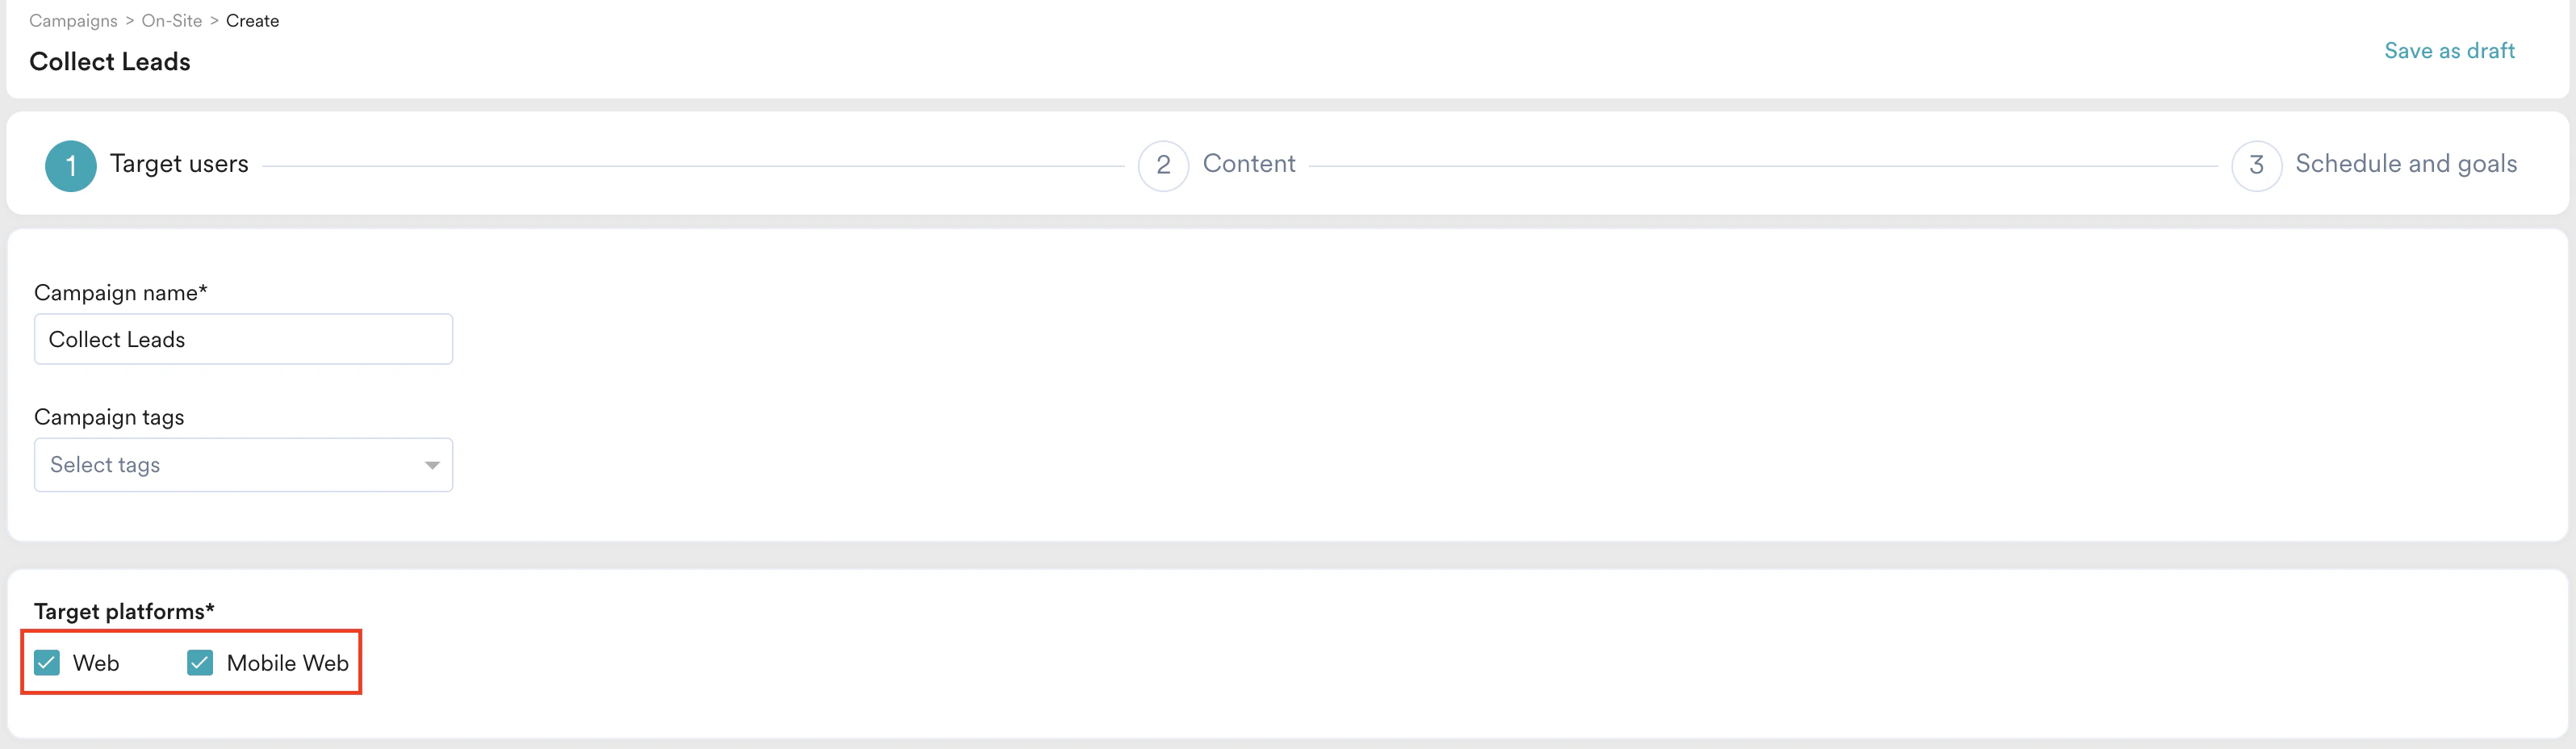 6. In the **Trigger Criteria** section, click the **On Exit Intent** card. This will ensure that the campaign is displayed to your users when they attempt to leave the page. For more information on defining exit intent, refer to [Exit Intent Technology](/user-guide/campaigns-and-channels/on-site-message/create/exit-intent-technology).
 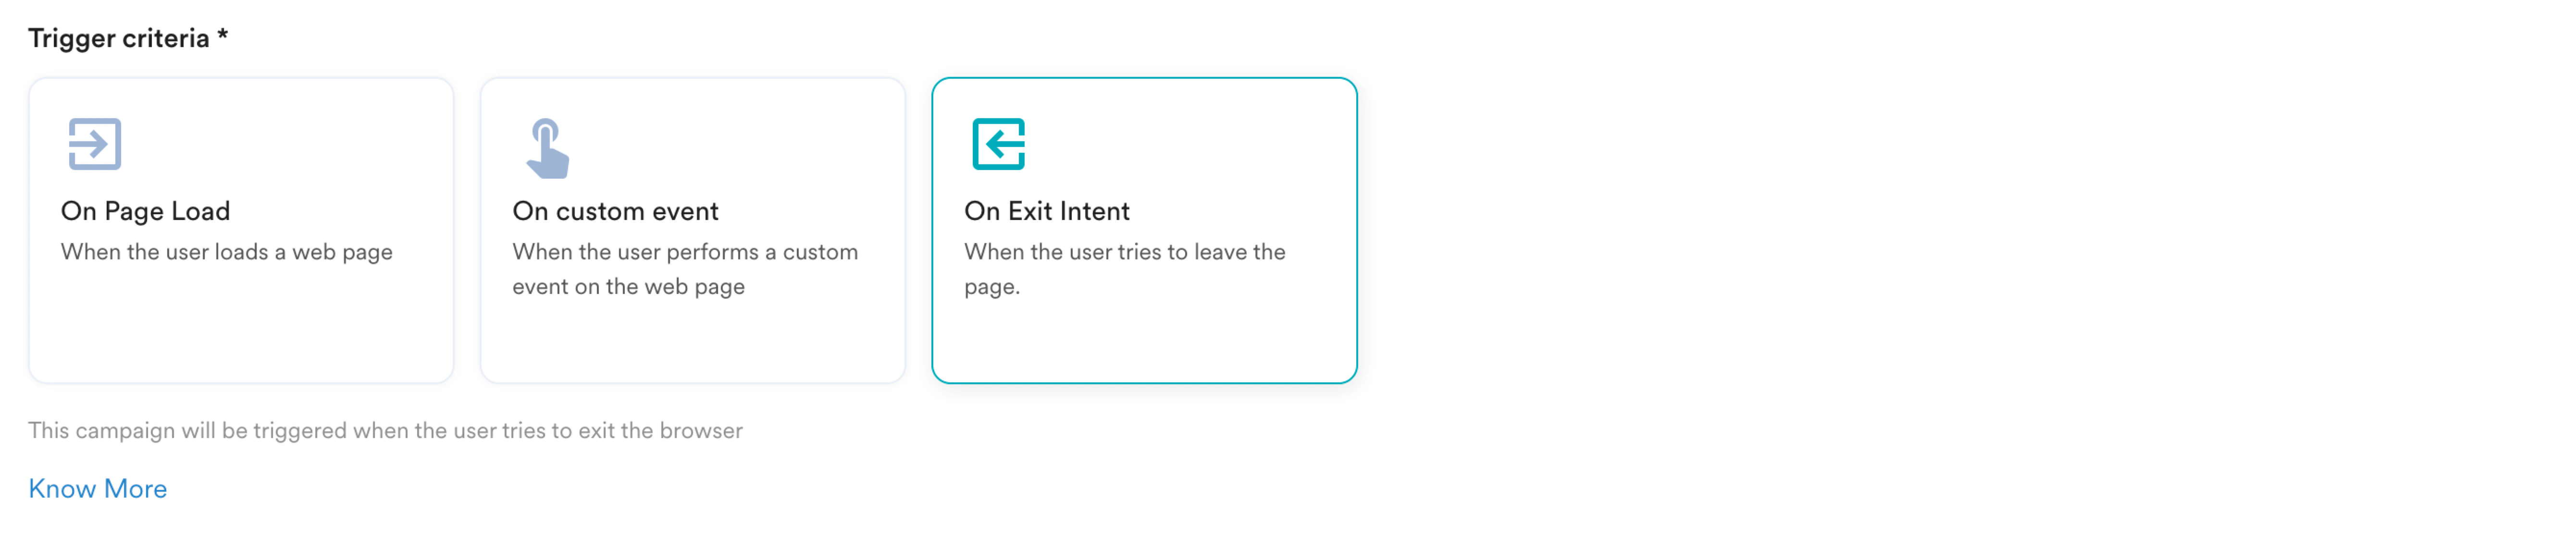 7. In the **Select pages** section, you will define where you would want to display the campaign. Select **Specific pages** to display the campaign on specific pages of your website. Define the condition shown in the following example to display the campaign on the website's product pricing page.
 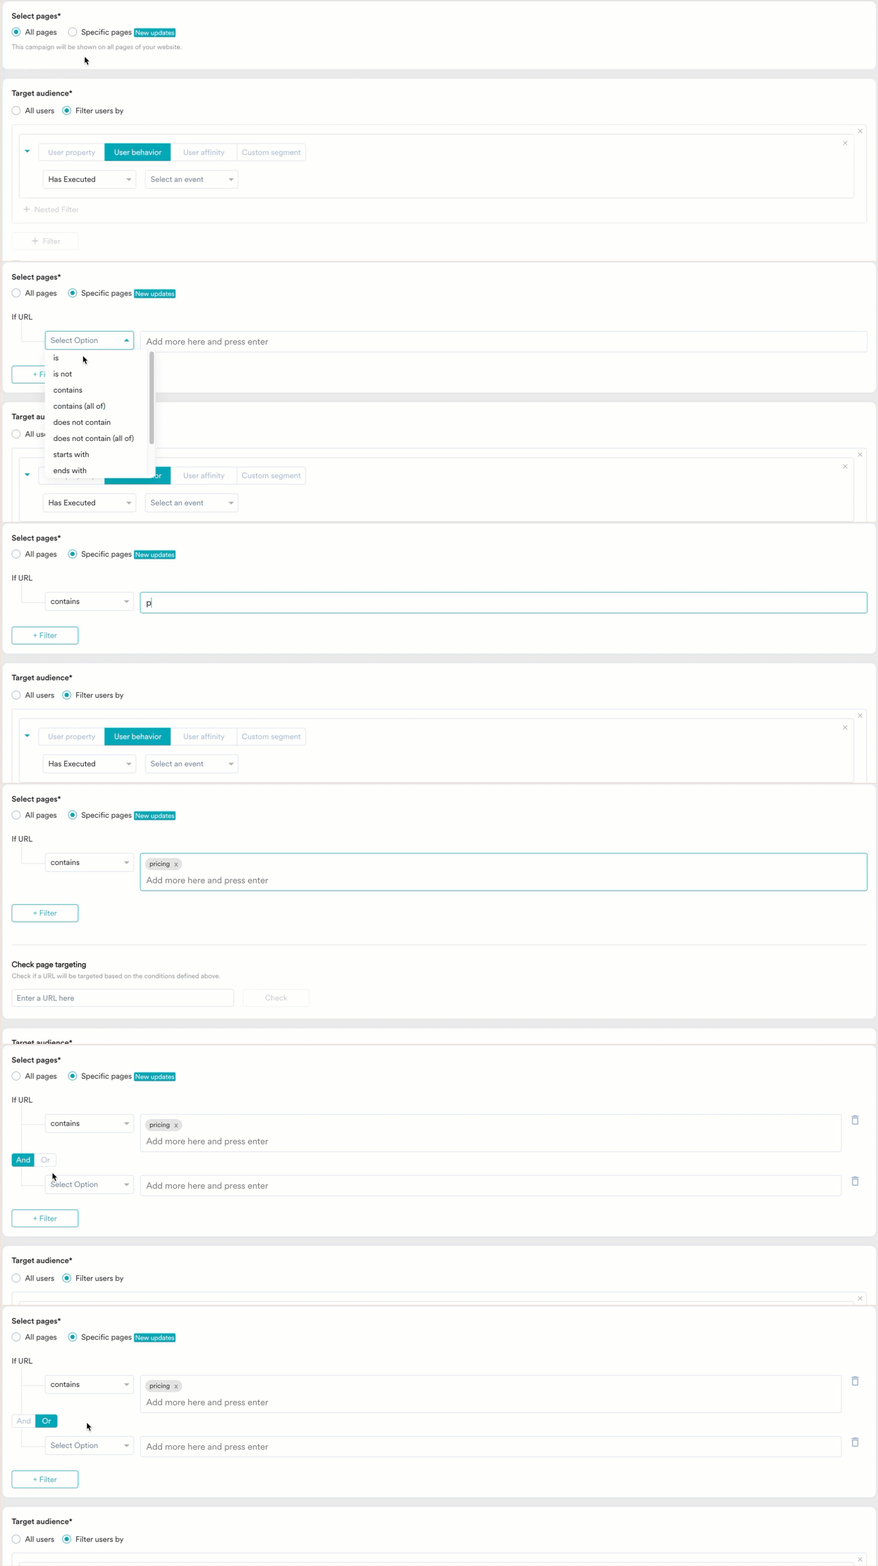 You can click **+ Filter** to add more conditions and click **And** or **Or** to define the logic to be applied.
8. In the **Target audience** section, click **Filter users by**. Under **User property**, select the attribute *ID* and define the condition *does not exist*. This will segment the first-time users.
You can click **+ Filter** to add more conditions and click **And** or **Or** to define the logic to be applied.
8. In the **Target audience** section, click **Filter users by**. Under **User property**, select the attribute *ID* and define the condition *does not exist*. This will segment the first-time users. 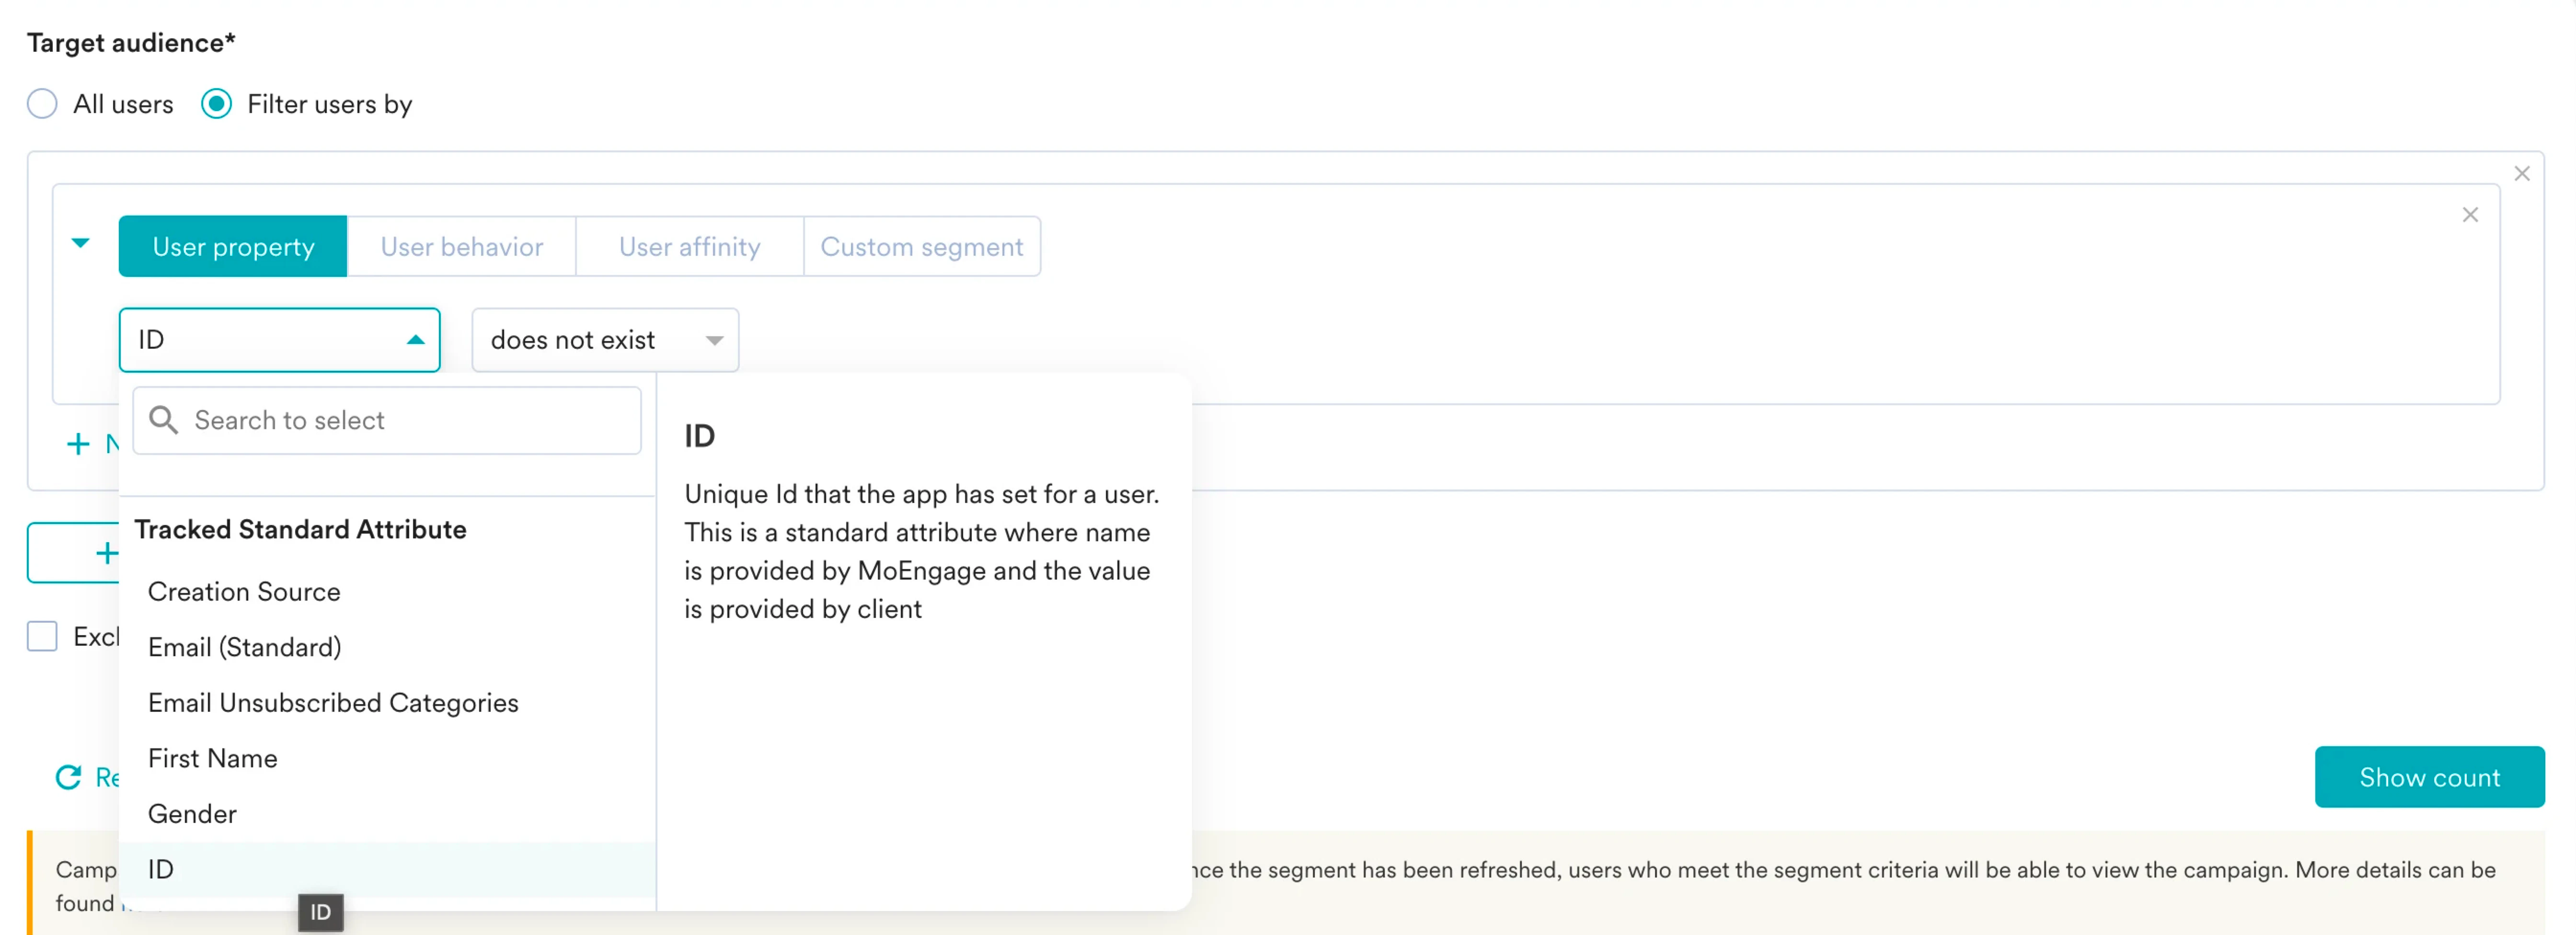 9. Click **Next** to move to the second step, **Content**, where we will define the content for your campaign.
## Step 2: Content
1. On the **Prebuilt and saved templates** tab, use the search box to search with the keyword *lead* to find the **Popup: Lead Gen** template.
2. Select the desired template from the **Templates** section. Alternatively, you can start from scratch and build your own template by selecting **Blank Popup Template** in the **Start from scratch** tab.
9. Click **Next** to move to the second step, **Content**, where we will define the content for your campaign.
## Step 2: Content
1. On the **Prebuilt and saved templates** tab, use the search box to search with the keyword *lead* to find the **Popup: Lead Gen** template.
2. Select the desired template from the **Templates** section. Alternatively, you can start from scratch and build your own template by selecting **Blank Popup Template** in the **Start from scratch** tab. 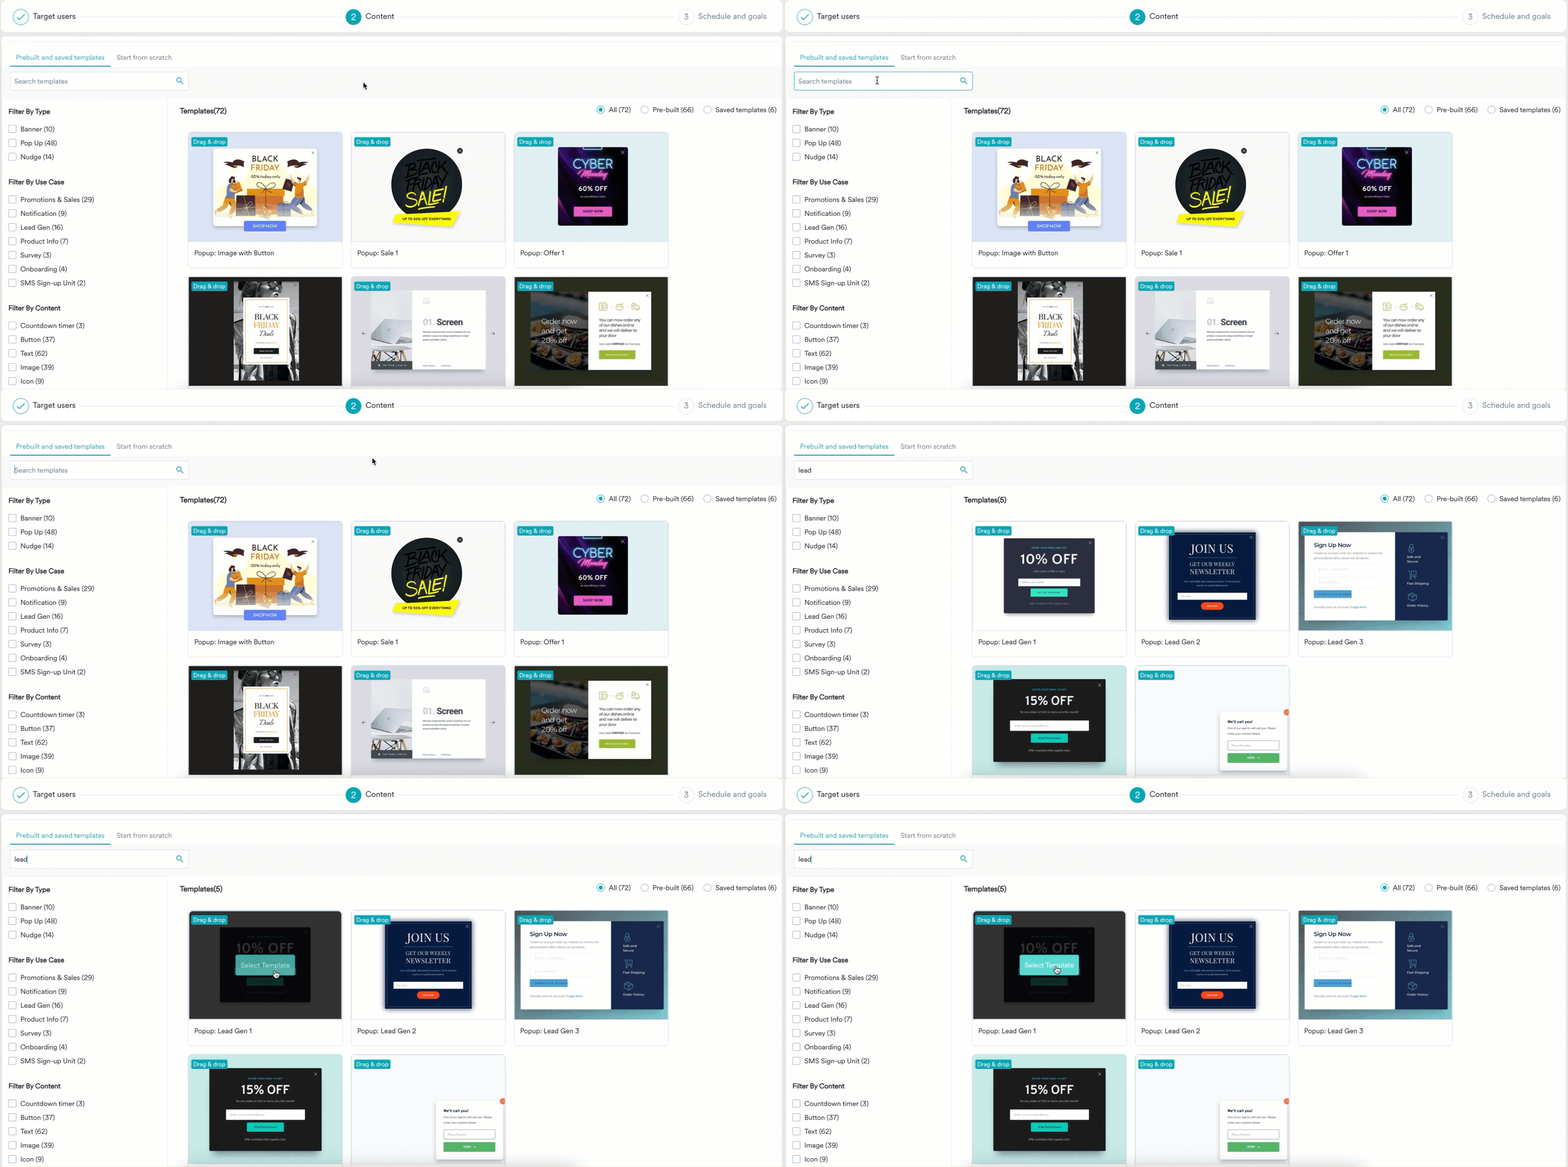 3. After the template loads, you can edit it and define the OSM according to your requirements. Click the **+** icon on the left to add new elements to your campaign.
 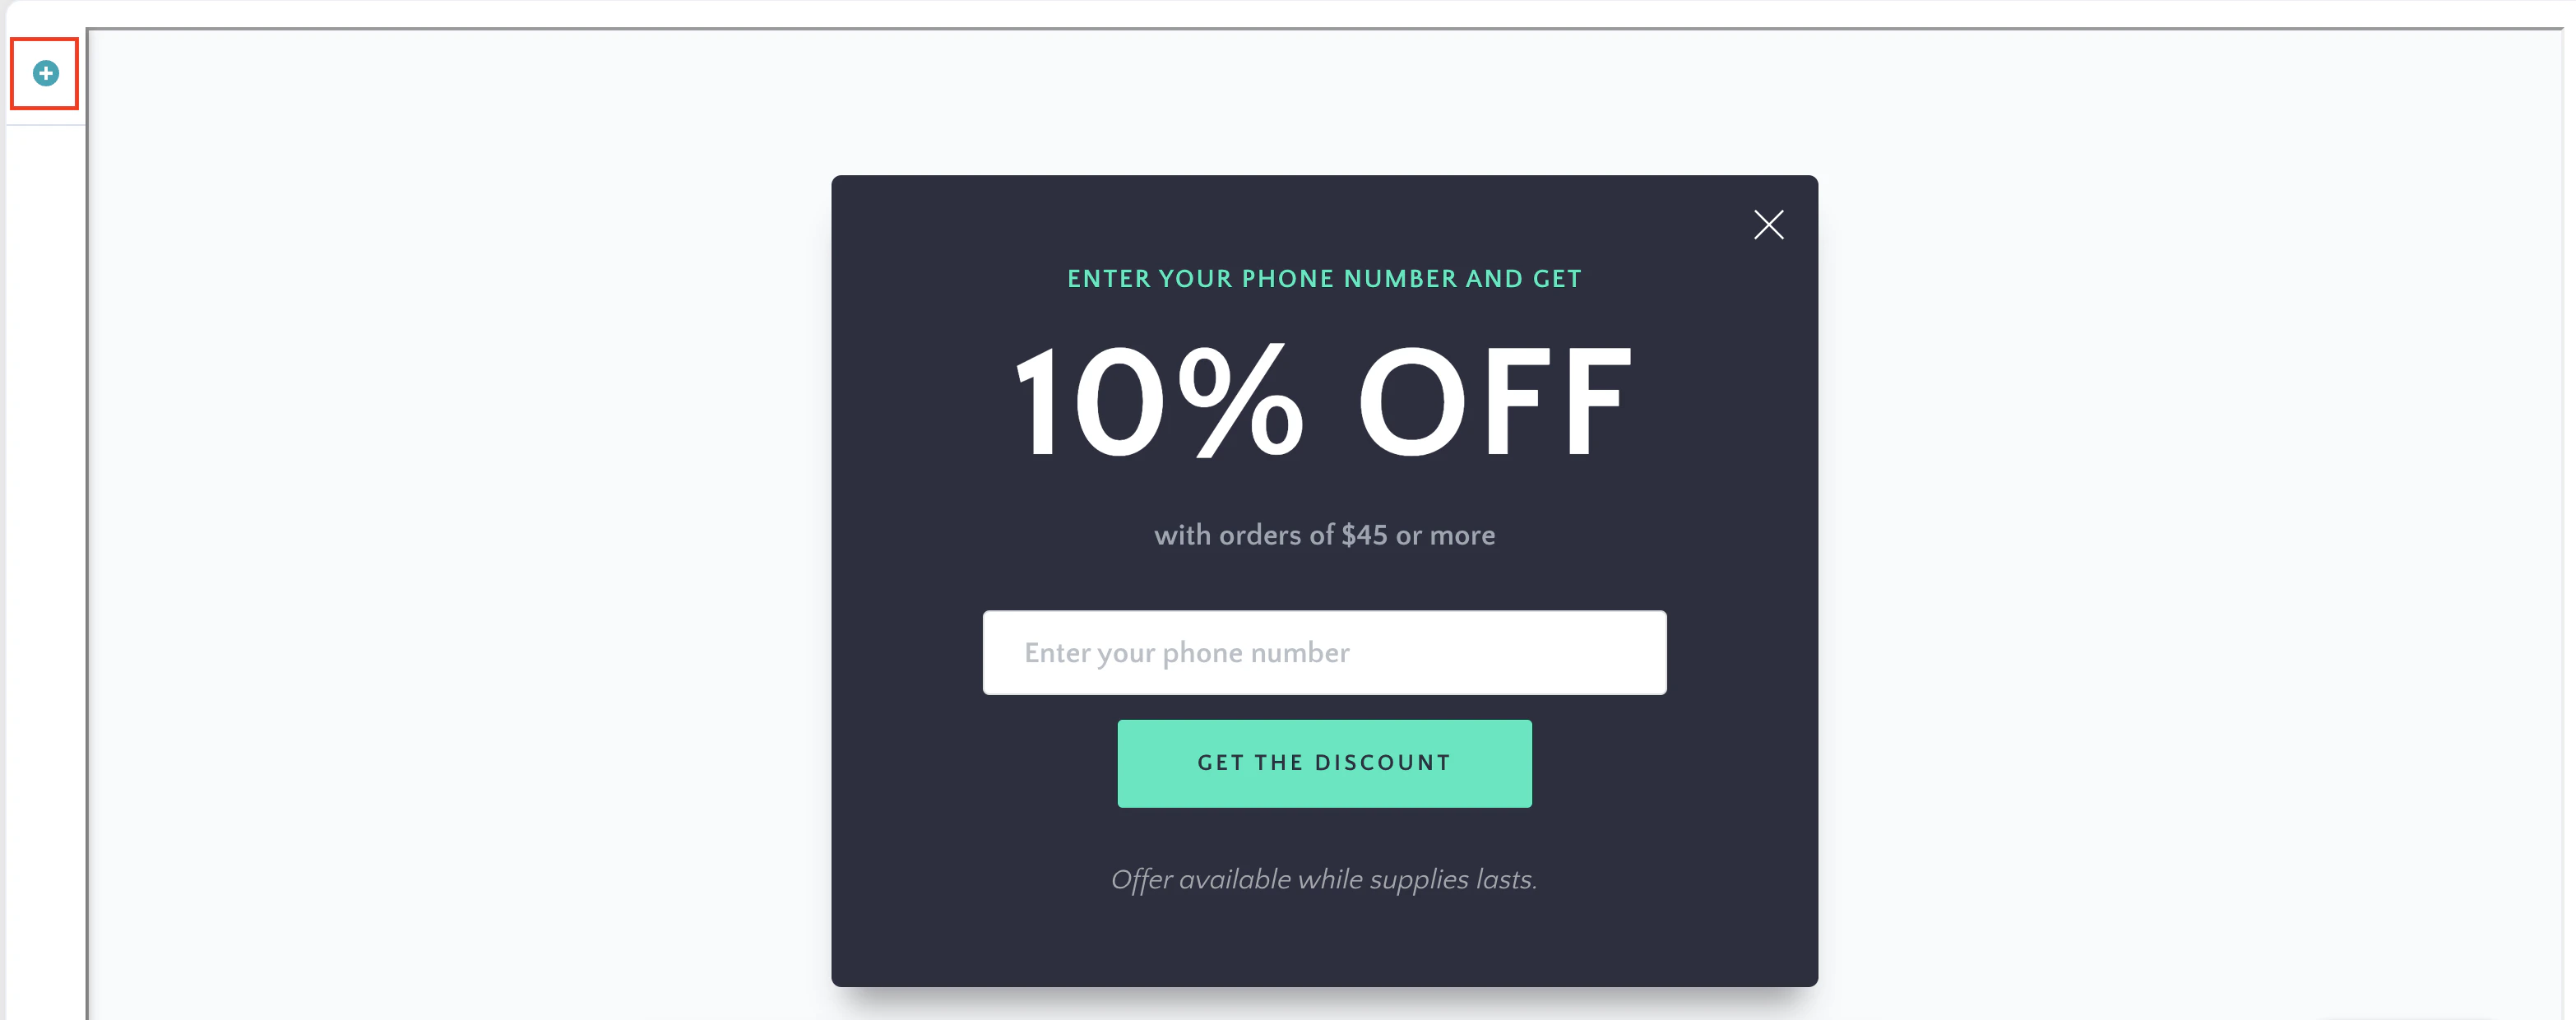 4. To define the OSM, click the input box and then click the first icon to get the settings shown in the image below:
 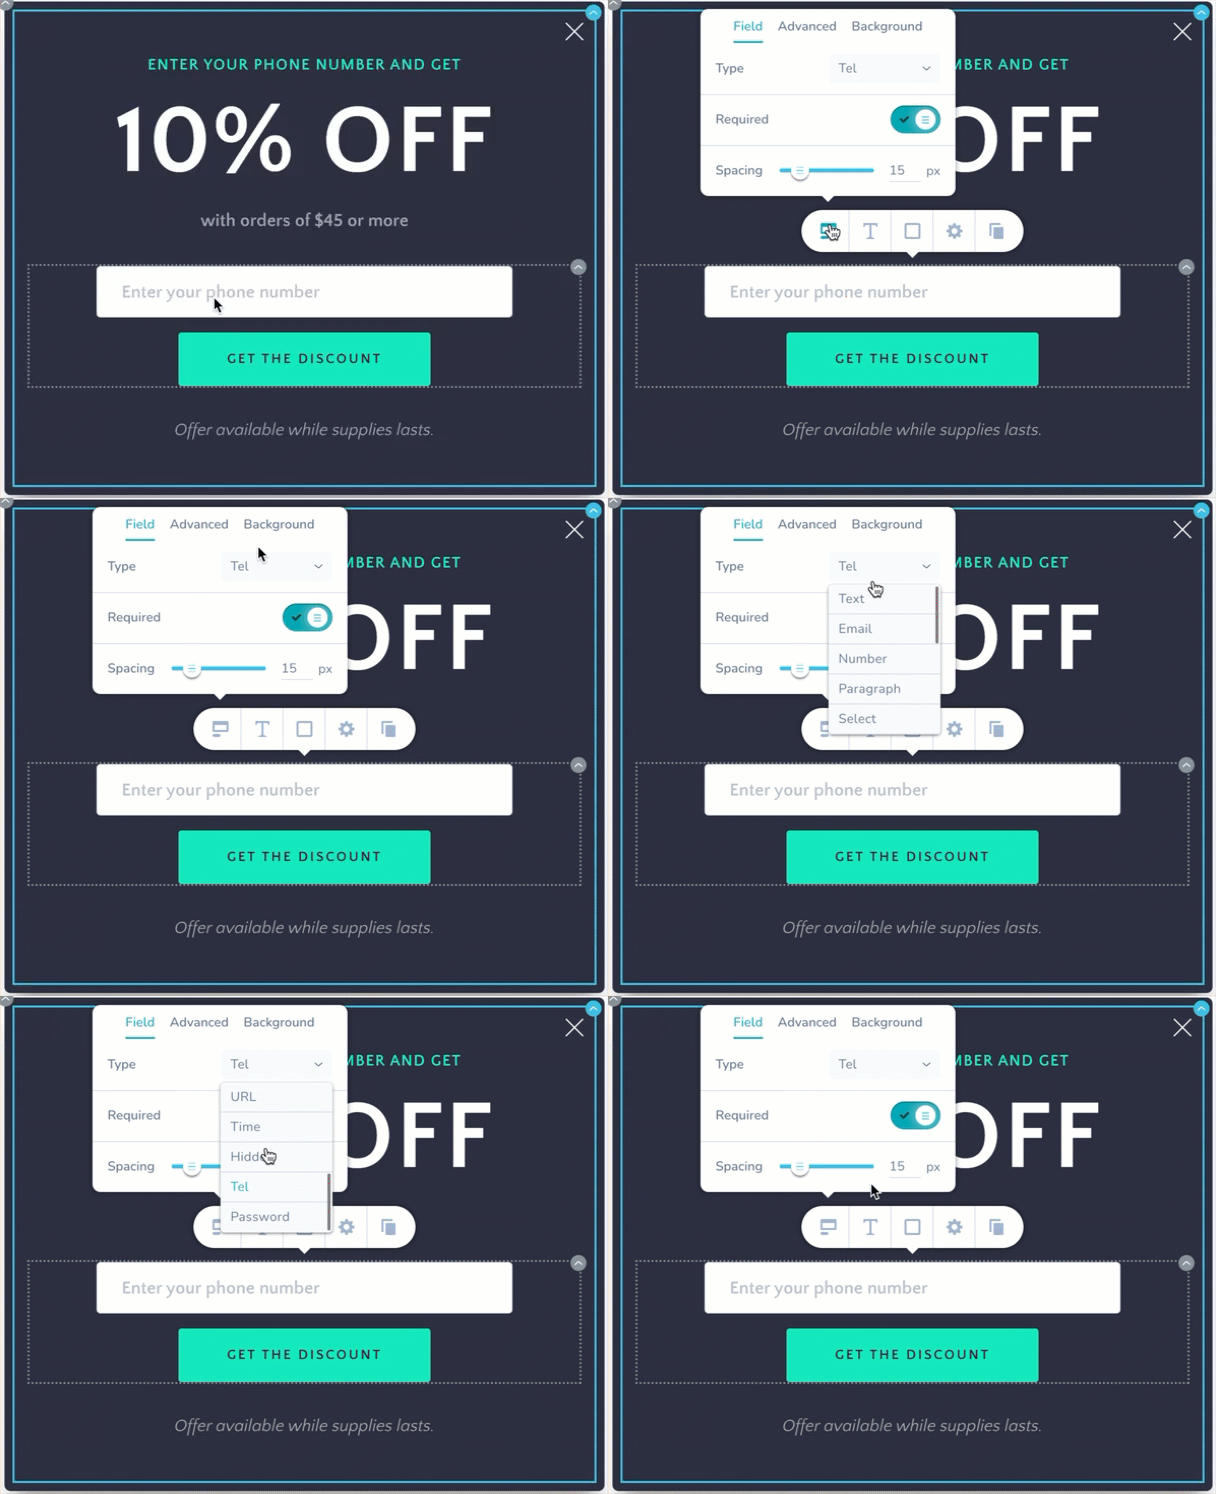 5. Here, you can implement basic checks. Selecting the *Tel* option from the **Type** list allows MoEngage to verify that users enter only their mobile numbers.
6. On the **Advanced** tab, you can select the attribute where you would like to store the input value to save it to the profile created at MoEngage. This will help you engage with them in the future.
5. Here, you can implement basic checks. Selecting the *Tel* option from the **Type** list allows MoEngage to verify that users enter only their mobile numbers.
6. On the **Advanced** tab, you can select the attribute where you would like to store the input value to save it to the profile created at MoEngage. This will help you engage with them in the future. 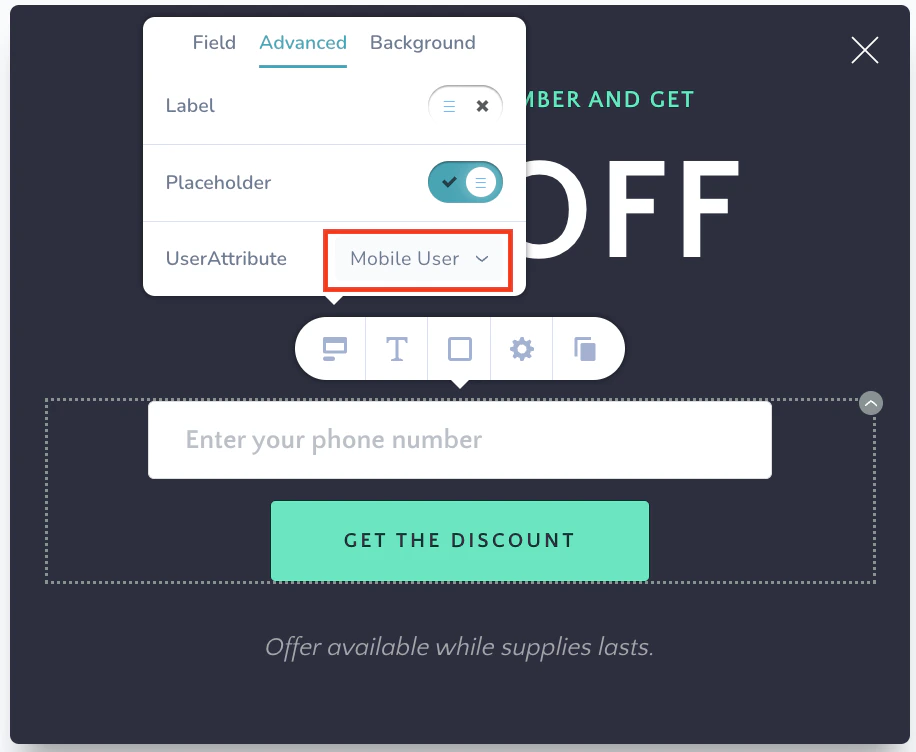 7. Click **Next** to move to the third step, **Schedule and goals**, where we will define your campaign's schedule and goals.
## Step 3: Schedule and Goals
1. In the **Send campaign** section, define when you want to start and end your OSM campaign.
7. Click **Next** to move to the third step, **Schedule and goals**, where we will define your campaign's schedule and goals.
## Step 3: Schedule and Goals
1. In the **Send campaign** section, define when you want to start and end your OSM campaign. 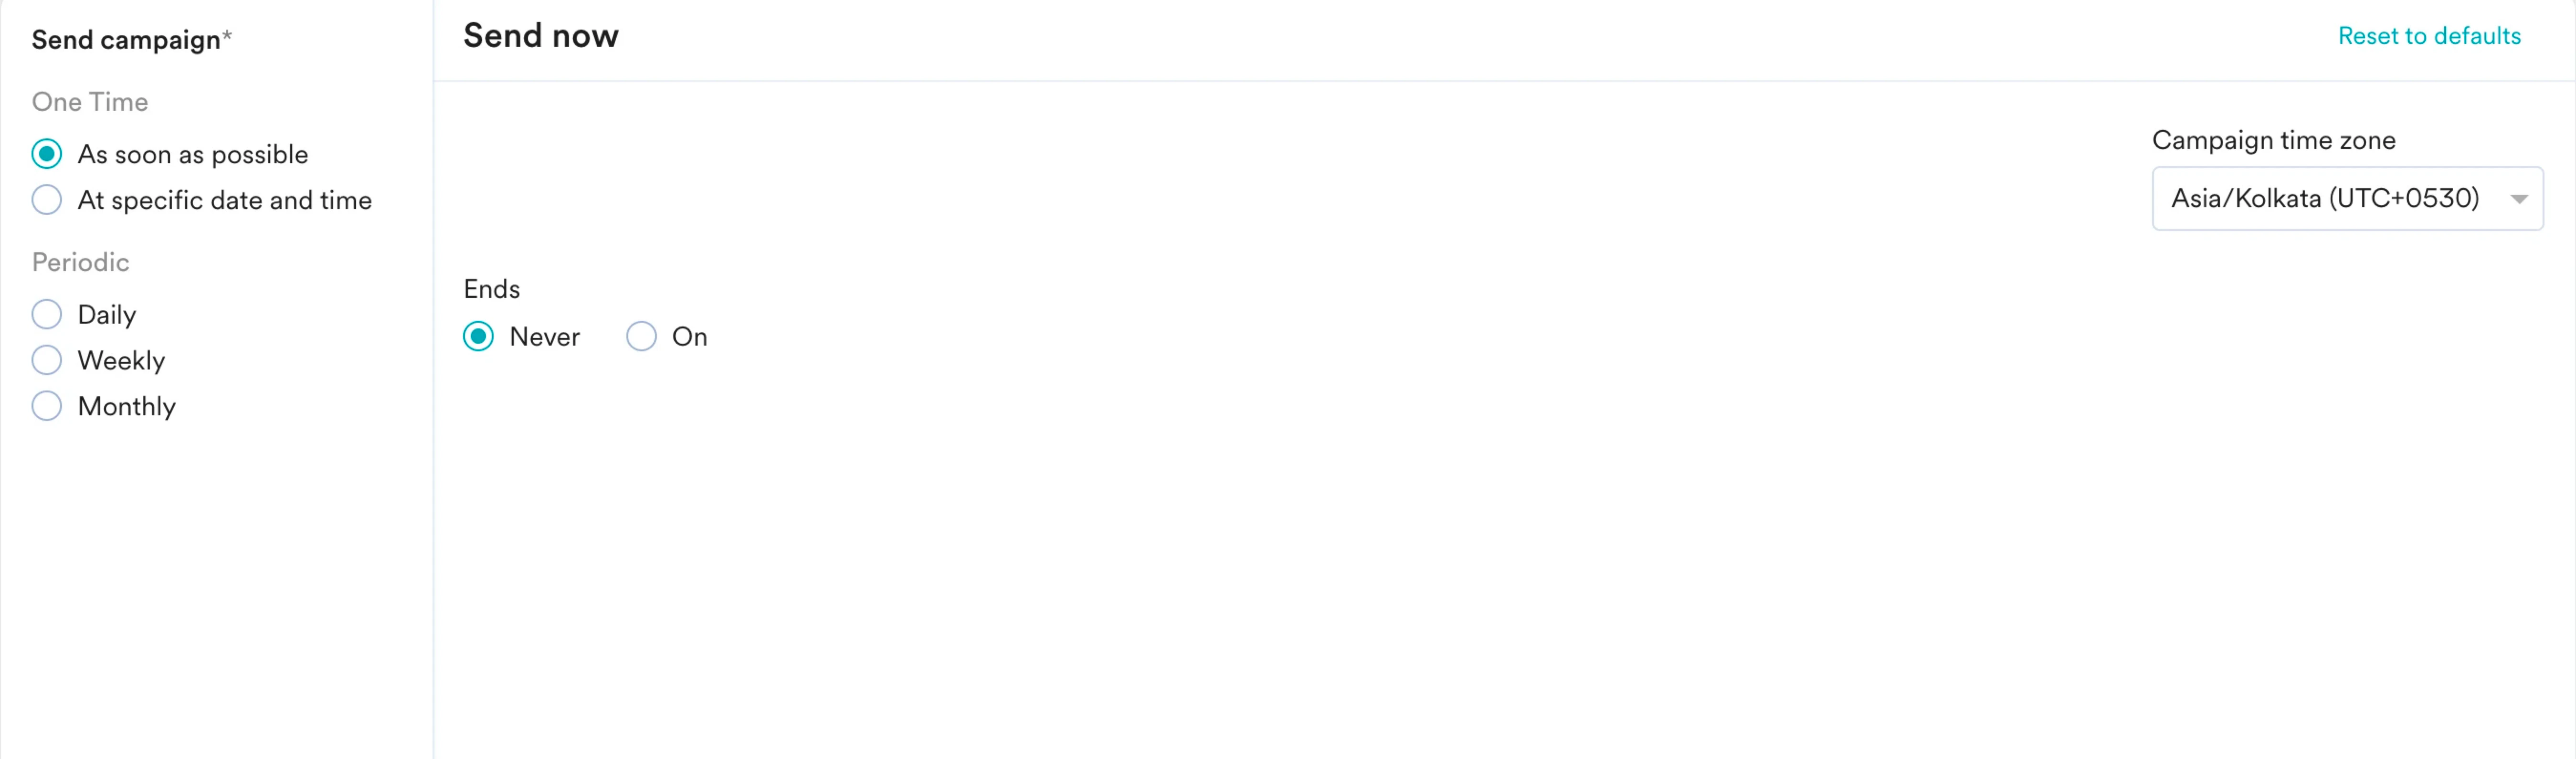 2. In the **Conversion goals** section, add conversion goals that you like to track. For more information, refer to [Conversion Goals](/user-guide/campaigns-and-channels/on-site-message/create/create-osm-campaign#conversion-goals).
3. In the **Campaign priority** section, assign a priority to this campaign. For example, selecting **Critical** ensures that the users will always see the campaign even when there are other campaigns for which they are eligible.
2. In the **Conversion goals** section, add conversion goals that you like to track. For more information, refer to [Conversion Goals](/user-guide/campaigns-and-channels/on-site-message/create/create-osm-campaign#conversion-goals).
3. In the **Campaign priority** section, assign a priority to this campaign. For example, selecting **Critical** ensures that the users will always see the campaign even when there are other campaigns for which they are eligible.  4. In the **Global Delivery controls** section, turn the **Ignore global minimum delay** toggle on to override the defined minimum delay between any two campaigns defined in settings.
5. In the **Local Delivery controls** section, define the controls based on your requirements. For more information, refer to [Create OSM Pro Campaign](/user-guide/campaigns-and-channels/on-site-message/create/create-osm-campaign).
4. In the **Global Delivery controls** section, turn the **Ignore global minimum delay** toggle on to override the defined minimum delay between any two campaigns defined in settings.
5. In the **Local Delivery controls** section, define the controls based on your requirements. For more information, refer to [Create OSM Pro Campaign](/user-guide/campaigns-and-channels/on-site-message/create/create-osm-campaign). 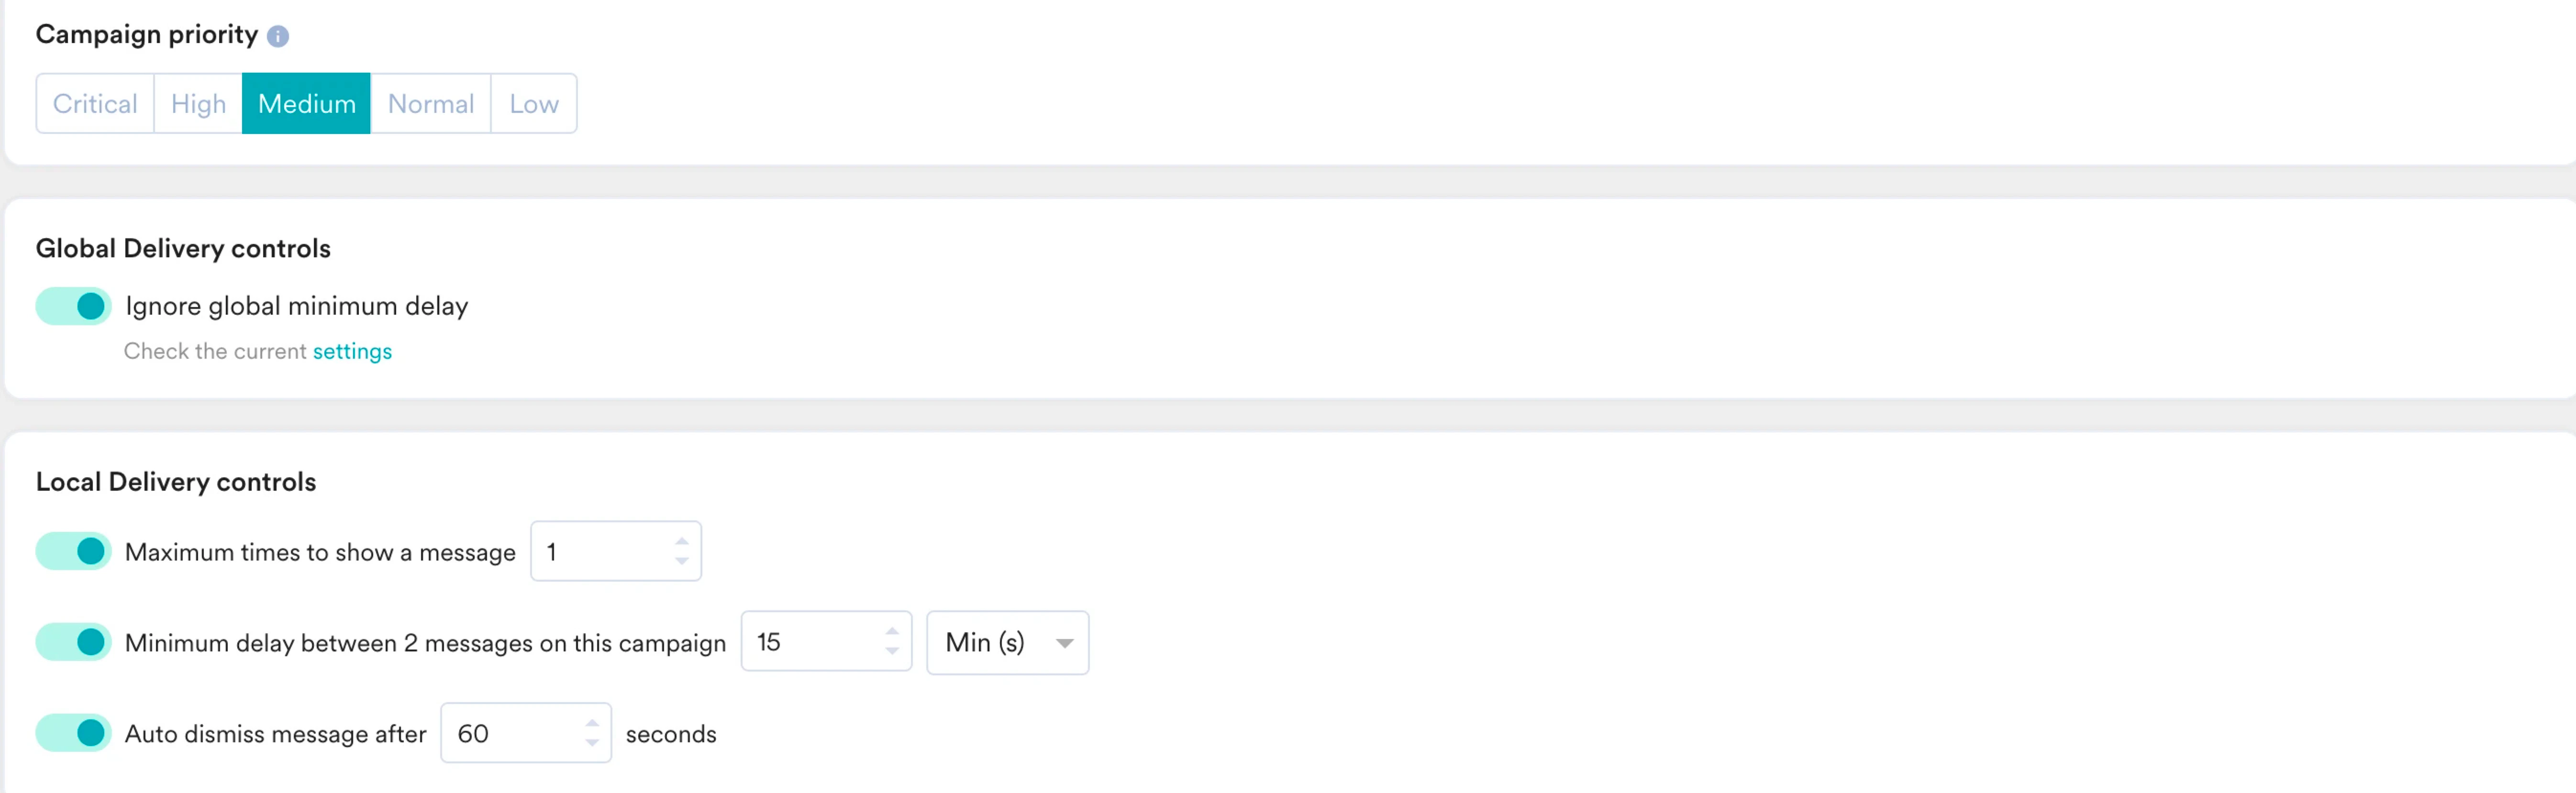 6. Click **Publish**.
The campaign is now published. The submitted response is stored in the user attribute in the MoEngage user profile.
# Conclusion
In this use case, we created an On-site Messaging (OSM) campaign to collect contact details from your first-time users.
Now that we have published the campaign, we can track our CTR and conversions (if defined) to understand its performance. For more information, refer to [Analyzing an On-site Campaign](/user-guide/campaigns-and-channels/on-site-message/analyze/analyze-on-site-messaging-campaigns).
6. Click **Publish**.
The campaign is now published. The submitted response is stored in the user attribute in the MoEngage user profile.
# Conclusion
In this use case, we created an On-site Messaging (OSM) campaign to collect contact details from your first-time users.
Now that we have published the campaign, we can track our CTR and conversions (if defined) to understand its performance. For more information, refer to [Analyzing an On-site Campaign](/user-guide/campaigns-and-channels/on-site-message/analyze/analyze-on-site-messaging-campaigns).