> ## Documentation Index
> Fetch the complete documentation index at: https://moengage.com/docs/llms.txt
> Use this file to discover all available pages before exploring further.
# Display a Non-Intrusive Countdown Timer Banner
# Introduction
As marketers, we use lightning deals, midnight deals, flash sales, product launches, event registrations, membership renewals, limited-time deals, and other time-bound offers to increase website/app traffic. Such campaigns often use countdown timers, which show how long they have to take action, to catch users' attention and create a fear of missing out (FOMO) emotion to nudge them towards purchasing.
#### Advantages of adding countdown timers in email campaigns
* **Boosting conversions**: The visible ticking clock prompts immediate action, making subscribers more likely to click through and purchase during a limited-time offer.
* **Increasing website/app traffic**: A countdown timer's visual element grabs attention and encourages interaction with the email.
* **Highlighting time-sensitive offers**: Perfect for flash sales, limited edition products, or upcoming events where a deadline is crucial.
* **Creating scarcity**: The perception of limited availability due to the countdown can motivate people to act faster.
* **Improving click-through rates**: Countdown timers often lead to higher click-through rates on email campaigns.
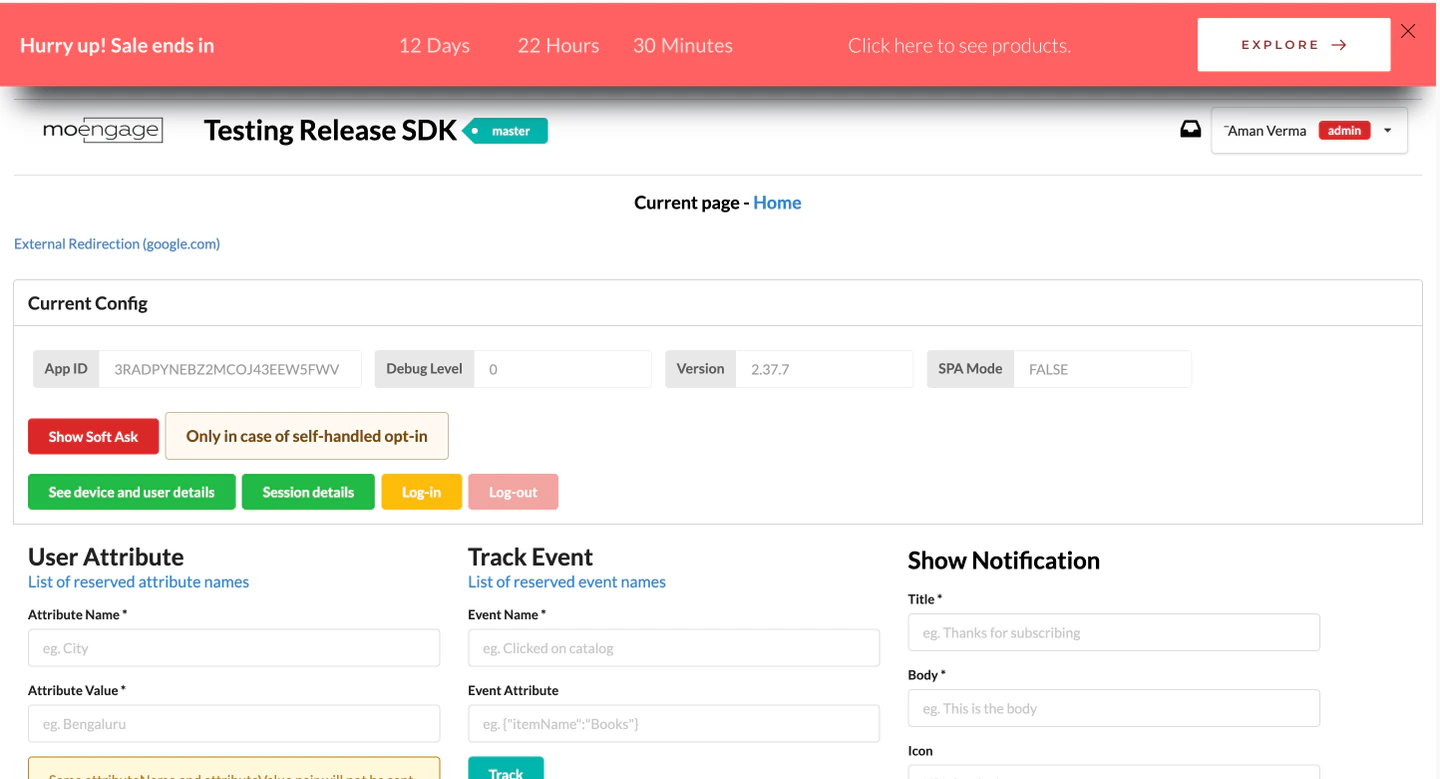
We will achieve this use case by creating a non-intrusive banner at the top of the website that displays a countdown timer for a sale. We will use the [On-site Messaging (OSM)](/user-guide/use-cases/on-site-messaging-\(osm\)/display-a-non-intrusive-countdown-timer-banner#create-an-osm-campaign) feature of MoEngage.
# Expected Result
Users will see a non-intrusive banner with a countdown timer at the top of the website, highlighting the remaining time for a sale. This will increase the sense of urgency and potentially boost sales during the promotional period.
# Create an OSM Campaign
In this section, let's create an OSM campaign to show a non-intrusive banner at the top of the website.
## Step 1: Target Users
1. Navigate to the sidebar on the left, click **Engage** > **Campaigns,** and click **+ Create campaign.**
2. Under **Inbound**, click **On-site**. You are taken to the first step, **Target users**, of defining your campaign.
3. Enter the following details:
* **Campaign name**: Enter a name for the campaign. For example, *Countdown Timer Banner*.
* **Campaign tags**: Select the relevant campaign tags.
4. In the **Target platforms** section, select **Web**.
5. In the **Trigger criteria** section, select **On Page Load**.
* Set the trigger to display the countdown banner when a user visits the website.
* Ensure the banner is shown after the user has been on the website for at least 5 seconds to avoid being too intrusive.
6. In the **Select pages** section, select **All pages**.
7. On the **Target audience** section, select **All users**to target all users who visit the website during the sale period.
8. Select the **Exclude Users** check box and define a condition to exclude users who have already made a purchase during the sale.
9. Click **Next** to move to the second step, **Content**, where you can define the content for your campaign.
## Step 2: Content
1. In the **Search templates** field, search with the keyword “countdown” to find a list of pop-up windows.
2. In the **Banner templates** section, hover over the **Banner: Countdown timer with button** template and click **Select Template**.
3. Design the countdown timer banner in the desktop view as follows:
* Add a title: *Hurry up! Sale ends in.*
* Style: Use a bold and attractive font to grab attention.
* Include a countdown timer: Display the remaining time for the sale. Ensure the timer counts down in real time.
* Add a call-to-action (CTA) button: *Shop Now*
* Link: Direct the button to the sale page.
* Style: Make the button stand out with a vibrant color and clear font.
* Design the pop-up in the mobile view: Reduce the text size of the elements and hide any element, if required.
* Ensure the banner is non-intrusive: Position the banner at the top of the website so it does not cover any content or disrupt the user experience. Select the **Push the content of the page down** check box to ensure the banner is non-intrusive.\\
4. Click **Next** to move to the third step, *Schedule and goals*, where you can define your campaign's schedule and goals.
## Step 3: Scheduling and goals
1. Set up campaign scheduling and delivery controls:
* Determine the duration for which the campaign will run, aligning with the sale period.
* Configure the banner to be shown only once per session to avoid repetitive prompts and enhance user experience.
* Configure the frequency and limits to ensure the message is shown appropriately.
2. After all the settings are verified, click **Publish** to launch the campaign.
# User Interaction
* Targeted users will visit the website during the sale period.
* After 5 seconds, the non-intrusive banner with the countdown timer will appear at the top of the website.
* Users can click the CTA button to explore the sale items or ignore the banner if they are uninterested.
# Conclusion
In this use case, we created a non-intrusive banner at the top of the website that displays a countdown timer for a sale. We used the OSM feature of MoEngage.
By implementing this countdown timer banner, users are subtly informed about the limited-time sale, creating a sense of urgency that encourages them to make a purchase before the sale ends. This approach helps to increase user engagement and boost sales during the promotional period.
 # Create an OSM Campaign
In this section, let's create an OSM campaign to show a non-intrusive banner at the top of the website.
## Step 1: Target Users
1. Navigate to the sidebar on the left, click **Engage** > **Campaigns,** and click **+ Create campaign.**
2. Under **Inbound**, click **On-site**.
# Create an OSM Campaign
In this section, let's create an OSM campaign to show a non-intrusive banner at the top of the website.
## Step 1: Target Users
1. Navigate to the sidebar on the left, click **Engage** > **Campaigns,** and click **+ Create campaign.**
2. Under **Inbound**, click **On-site**. 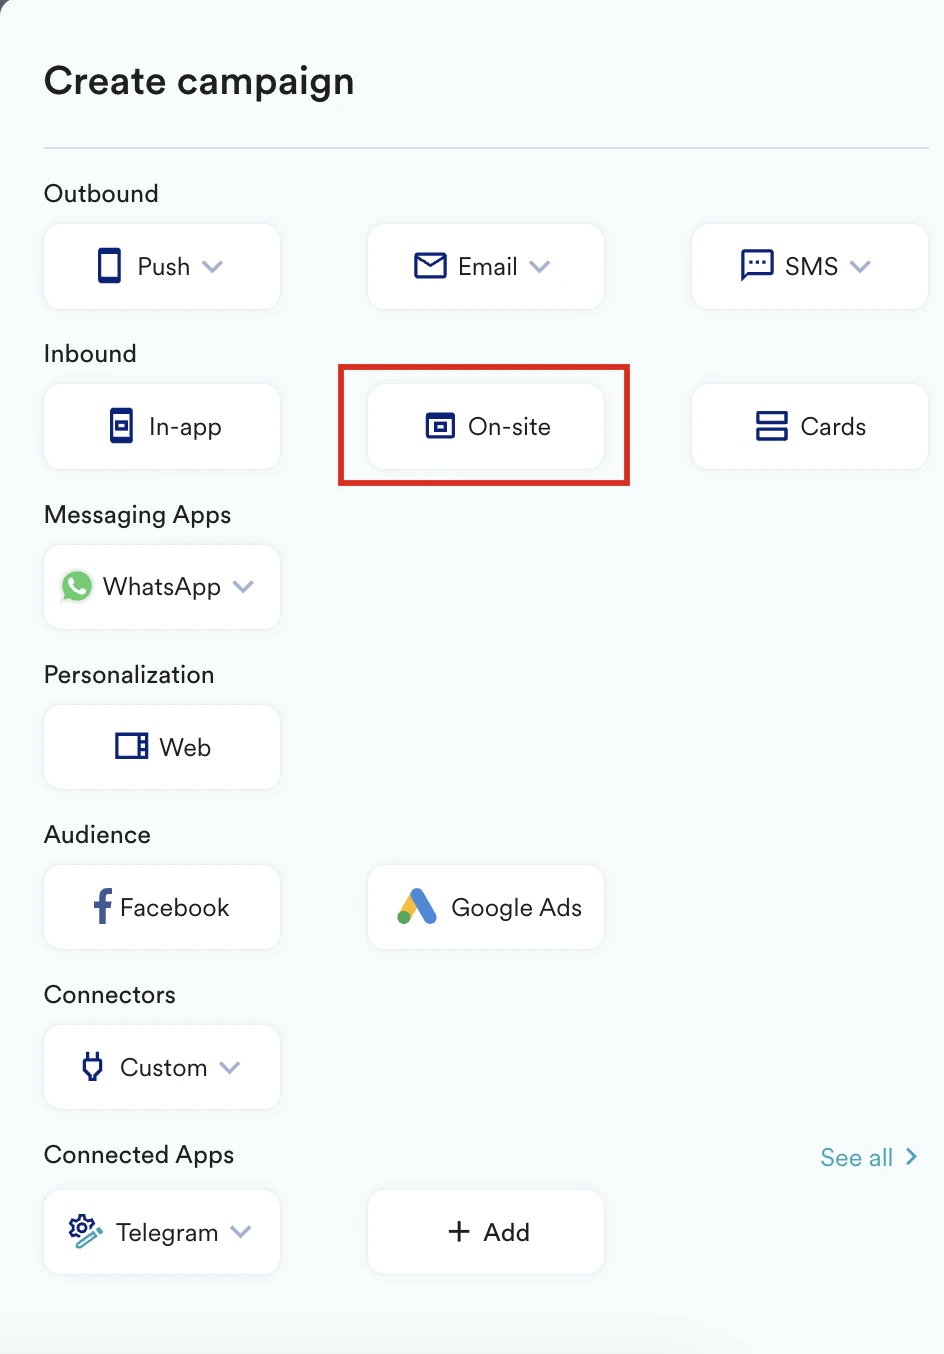 You are taken to the first step, **Target users**, of defining your campaign.
3. Enter the following details:
* **Campaign name**: Enter a name for the campaign. For example, *Countdown Timer Banner*.
* **Campaign tags**: Select the relevant campaign tags.
4. In the **Target platforms** section, select **Web**.
5. In the **Trigger criteria** section, select **On Page Load**.
* Set the trigger to display the countdown banner when a user visits the website.
* Ensure the banner is shown after the user has been on the website for at least 5 seconds to avoid being too intrusive.
You are taken to the first step, **Target users**, of defining your campaign.
3. Enter the following details:
* **Campaign name**: Enter a name for the campaign. For example, *Countdown Timer Banner*.
* **Campaign tags**: Select the relevant campaign tags.
4. In the **Target platforms** section, select **Web**.
5. In the **Trigger criteria** section, select **On Page Load**.
* Set the trigger to display the countdown banner when a user visits the website.
* Ensure the banner is shown after the user has been on the website for at least 5 seconds to avoid being too intrusive. 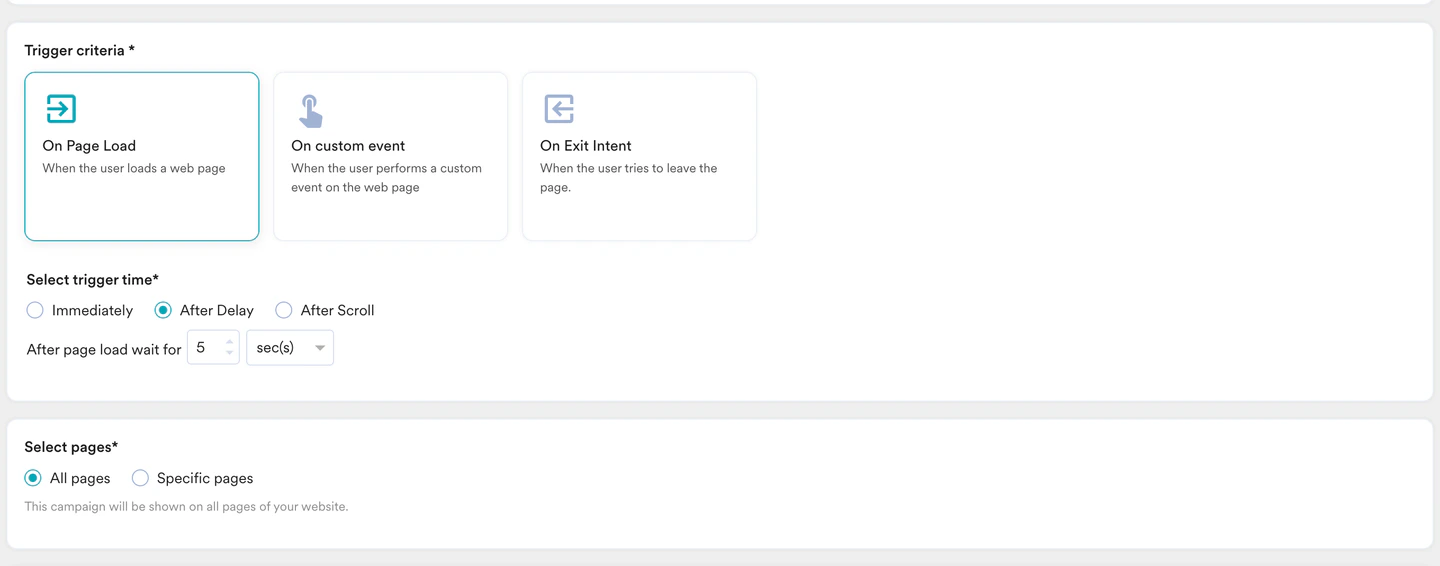 6. In the **Select pages** section, select **All pages**.
7. On the **Target audience** section, select **All users**to target all users who visit the website during the sale period.
8. Select the **Exclude Users** check box and define a condition to exclude users who have already made a purchase during the sale.
6. In the **Select pages** section, select **All pages**.
7. On the **Target audience** section, select **All users**to target all users who visit the website during the sale period.
8. Select the **Exclude Users** check box and define a condition to exclude users who have already made a purchase during the sale. 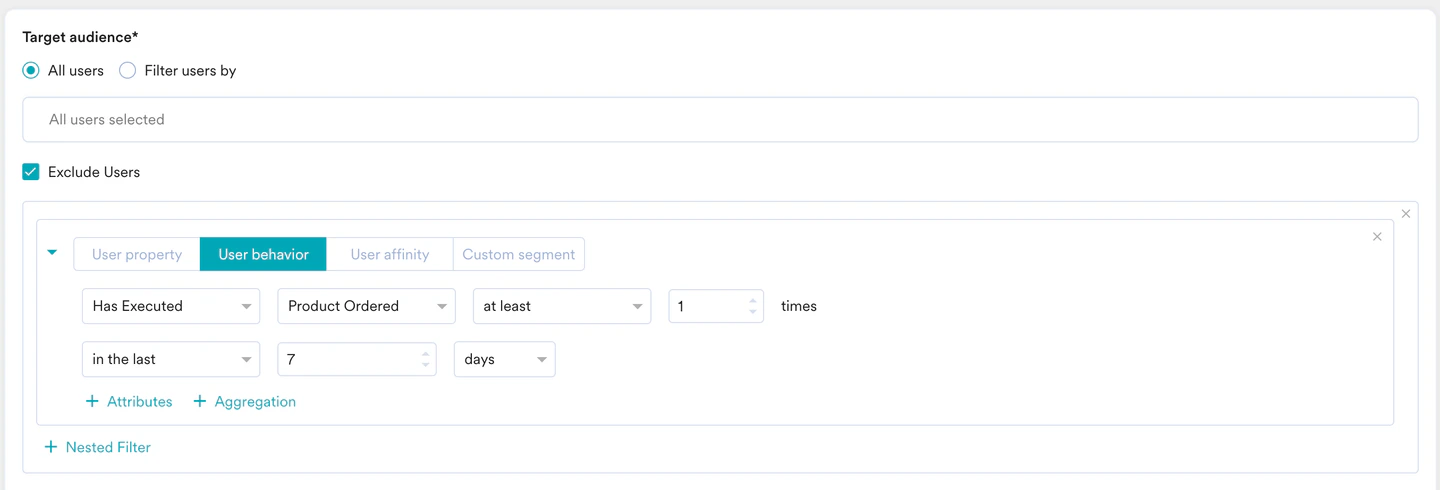 9. Click **Next** to move to the second step, **Content**, where you can define the content for your campaign.
## Step 2: Content
1. In the **Search templates** field, search with the keyword “countdown” to find a list of pop-up windows.
2. In the **Banner templates** section, hover over the **Banner: Countdown timer with button** template and click **Select Template**.
9. Click **Next** to move to the second step, **Content**, where you can define the content for your campaign.
## Step 2: Content
1. In the **Search templates** field, search with the keyword “countdown” to find a list of pop-up windows.
2. In the **Banner templates** section, hover over the **Banner: Countdown timer with button** template and click **Select Template**. 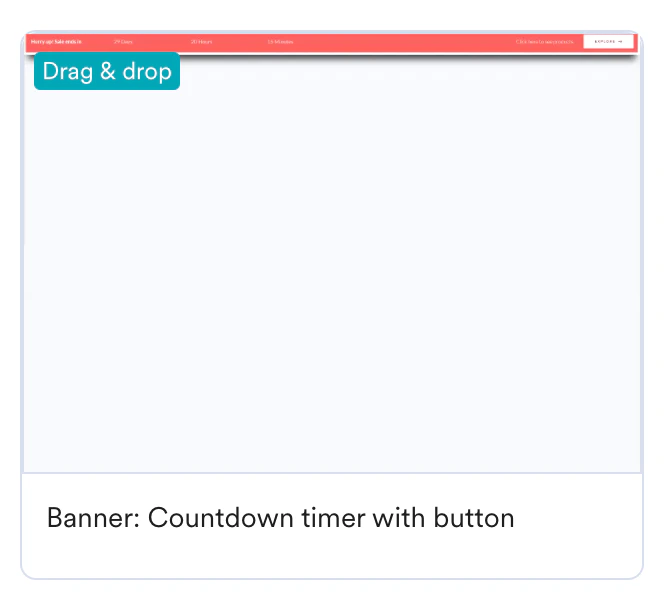 3. Design the countdown timer banner in the desktop view as follows:
* Add a title: *Hurry up! Sale ends in.*
* Style: Use a bold and attractive font to grab attention.
* Include a countdown timer: Display the remaining time for the sale. Ensure the timer counts down in real time.
* Add a call-to-action (CTA) button: *Shop Now*
* Link: Direct the button to the sale page.
* Style: Make the button stand out with a vibrant color and clear font.
* Design the pop-up in the mobile view: Reduce the text size of the elements and hide any element, if required.
* Ensure the banner is non-intrusive: Position the banner at the top of the website so it does not cover any content or disrupt the user experience. Select the **Push the content of the page down** check box to ensure the banner is non-intrusive.\\
4. Click **Next** to move to the third step, *Schedule and goals*, where you can define your campaign's schedule and goals.
## Step 3: Scheduling and goals
1. Set up campaign scheduling and delivery controls:
* Determine the duration for which the campaign will run, aligning with the sale period.
* Configure the banner to be shown only once per session to avoid repetitive prompts and enhance user experience.
* Configure the frequency and limits to ensure the message is shown appropriately.
3. Design the countdown timer banner in the desktop view as follows:
* Add a title: *Hurry up! Sale ends in.*
* Style: Use a bold and attractive font to grab attention.
* Include a countdown timer: Display the remaining time for the sale. Ensure the timer counts down in real time.
* Add a call-to-action (CTA) button: *Shop Now*
* Link: Direct the button to the sale page.
* Style: Make the button stand out with a vibrant color and clear font.
* Design the pop-up in the mobile view: Reduce the text size of the elements and hide any element, if required.
* Ensure the banner is non-intrusive: Position the banner at the top of the website so it does not cover any content or disrupt the user experience. Select the **Push the content of the page down** check box to ensure the banner is non-intrusive.\\
4. Click **Next** to move to the third step, *Schedule and goals*, where you can define your campaign's schedule and goals.
## Step 3: Scheduling and goals
1. Set up campaign scheduling and delivery controls:
* Determine the duration for which the campaign will run, aligning with the sale period.
* Configure the banner to be shown only once per session to avoid repetitive prompts and enhance user experience.
* Configure the frequency and limits to ensure the message is shown appropriately. 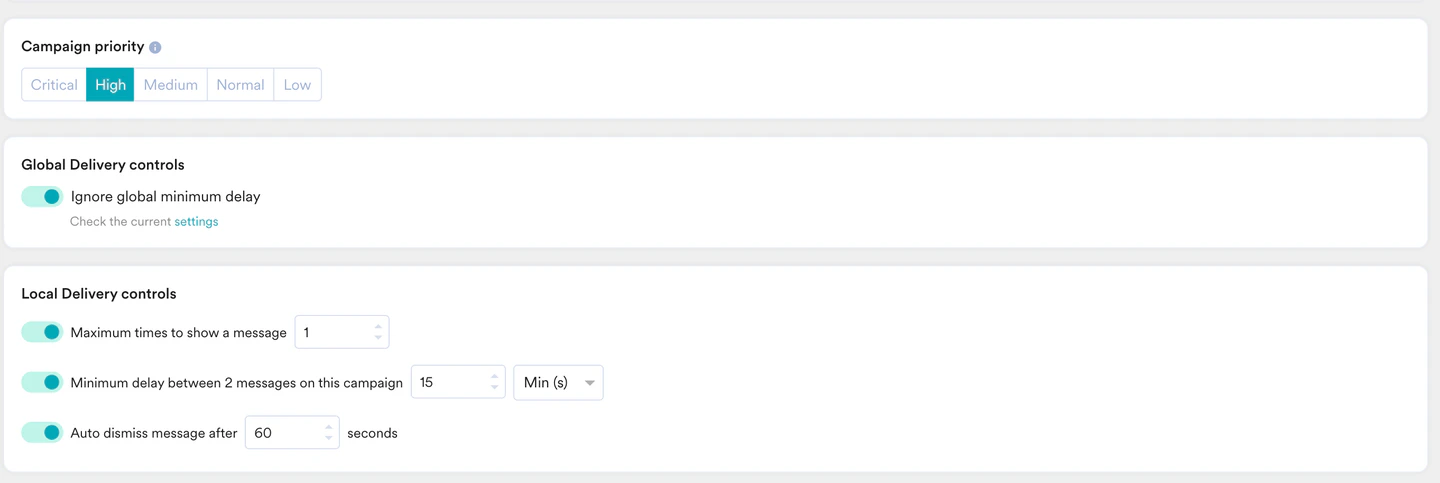 2. After all the settings are verified, click **Publish** to launch the campaign.
# User Interaction
* Targeted users will visit the website during the sale period.
* After 5 seconds, the non-intrusive banner with the countdown timer will appear at the top of the website.
* Users can click the CTA button to explore the sale items or ignore the banner if they are uninterested.
# Conclusion
In this use case, we created a non-intrusive banner at the top of the website that displays a countdown timer for a sale. We used the OSM feature of MoEngage.
By implementing this countdown timer banner, users are subtly informed about the limited-time sale, creating a sense of urgency that encourages them to make a purchase before the sale ends. This approach helps to increase user engagement and boost sales during the promotional period.
2. After all the settings are verified, click **Publish** to launch the campaign.
# User Interaction
* Targeted users will visit the website during the sale period.
* After 5 seconds, the non-intrusive banner with the countdown timer will appear at the top of the website.
* Users can click the CTA button to explore the sale items or ignore the banner if they are uninterested.
# Conclusion
In this use case, we created a non-intrusive banner at the top of the website that displays a countdown timer for a sale. We used the OSM feature of MoEngage.
By implementing this countdown timer banner, users are subtly informed about the limited-time sale, creating a sense of urgency that encourages them to make a purchase before the sale ends. This approach helps to increase user engagement and boost sales during the promotional period.