> ## Documentation Index
> Fetch the complete documentation index at: https://moengage.com/docs/llms.txt
> Use this file to discover all available pages before exploring further.
# How to Rearrange Elements on a Webpage Using Personalize
# Introduction
Rearranging elements on a website can play a significant role in personalizing the user experience (UX) by tailoring the layout and the content flow to better match the interests, behaviors, and preferences of the user. Here are several ways this enhances personalization:
* **Improved relevance**: Prominent placement of content or products that align with users' interests encourages engagement, as users feel the site is more catered to their needs.
* **Increased convenience**: Placing frequently used features or information where they are easily accessible caters to user behavior patterns, leading to a more intuitive and faster experience.
* **Behavioral data utilization**: Based on a user's previous interactions with the site, rearranging elements can make the shopping experience feel more bespoke.
* **Enhanced discoverability**: Websites can broaden the user's experience and encourage exploration by rearranging elements to showcase new or less visible content based on the user's profile or past behavior.
* **Adaptive content**: Dynamically rearranging site elements to display content more relevant to the user’s current context (such as location, time of day, or current trends) can make the website feel more live and tailored.
* **A/B testing and optimization**: Continual rearrangement based on A/B testing allows the site to evolve based on which layouts and content structures perform best for certain user segments.
By rearranging elements to suit individual user needs, websites can make their content more personally relevant and improve the user's efficiency and satisfaction, ultimately leading to higher engagement and conversion.
# Expected Result
Visitors will see the personalized experience on the web page(s) whenever they fulfill the criteria specified as part of In-Session behavior.
* The Personalize feature must be enabled for your account. Contact your account manager to enable this feature.
* The Personalize SDK must be integrated with the website. For instructions on setting this up, refer to the [Personalize SDK Integration Guide](/developer-guide/personalize-sdk/sdk-integration/web-personalization-v2).
* Events to track user activity on a website via MoEngage Web SDK must already be configured. Refer to the [Developer Guide](/developer-guide/web-sdk/data-tracking/web-sdk-events-tracking) to set this up.
# Create a Personalization Experience
In this section, let's create a personalization experience using the *MoEngage Experience* feature, which arranges elements to suit individual user needs.
## Step 1: Target Users
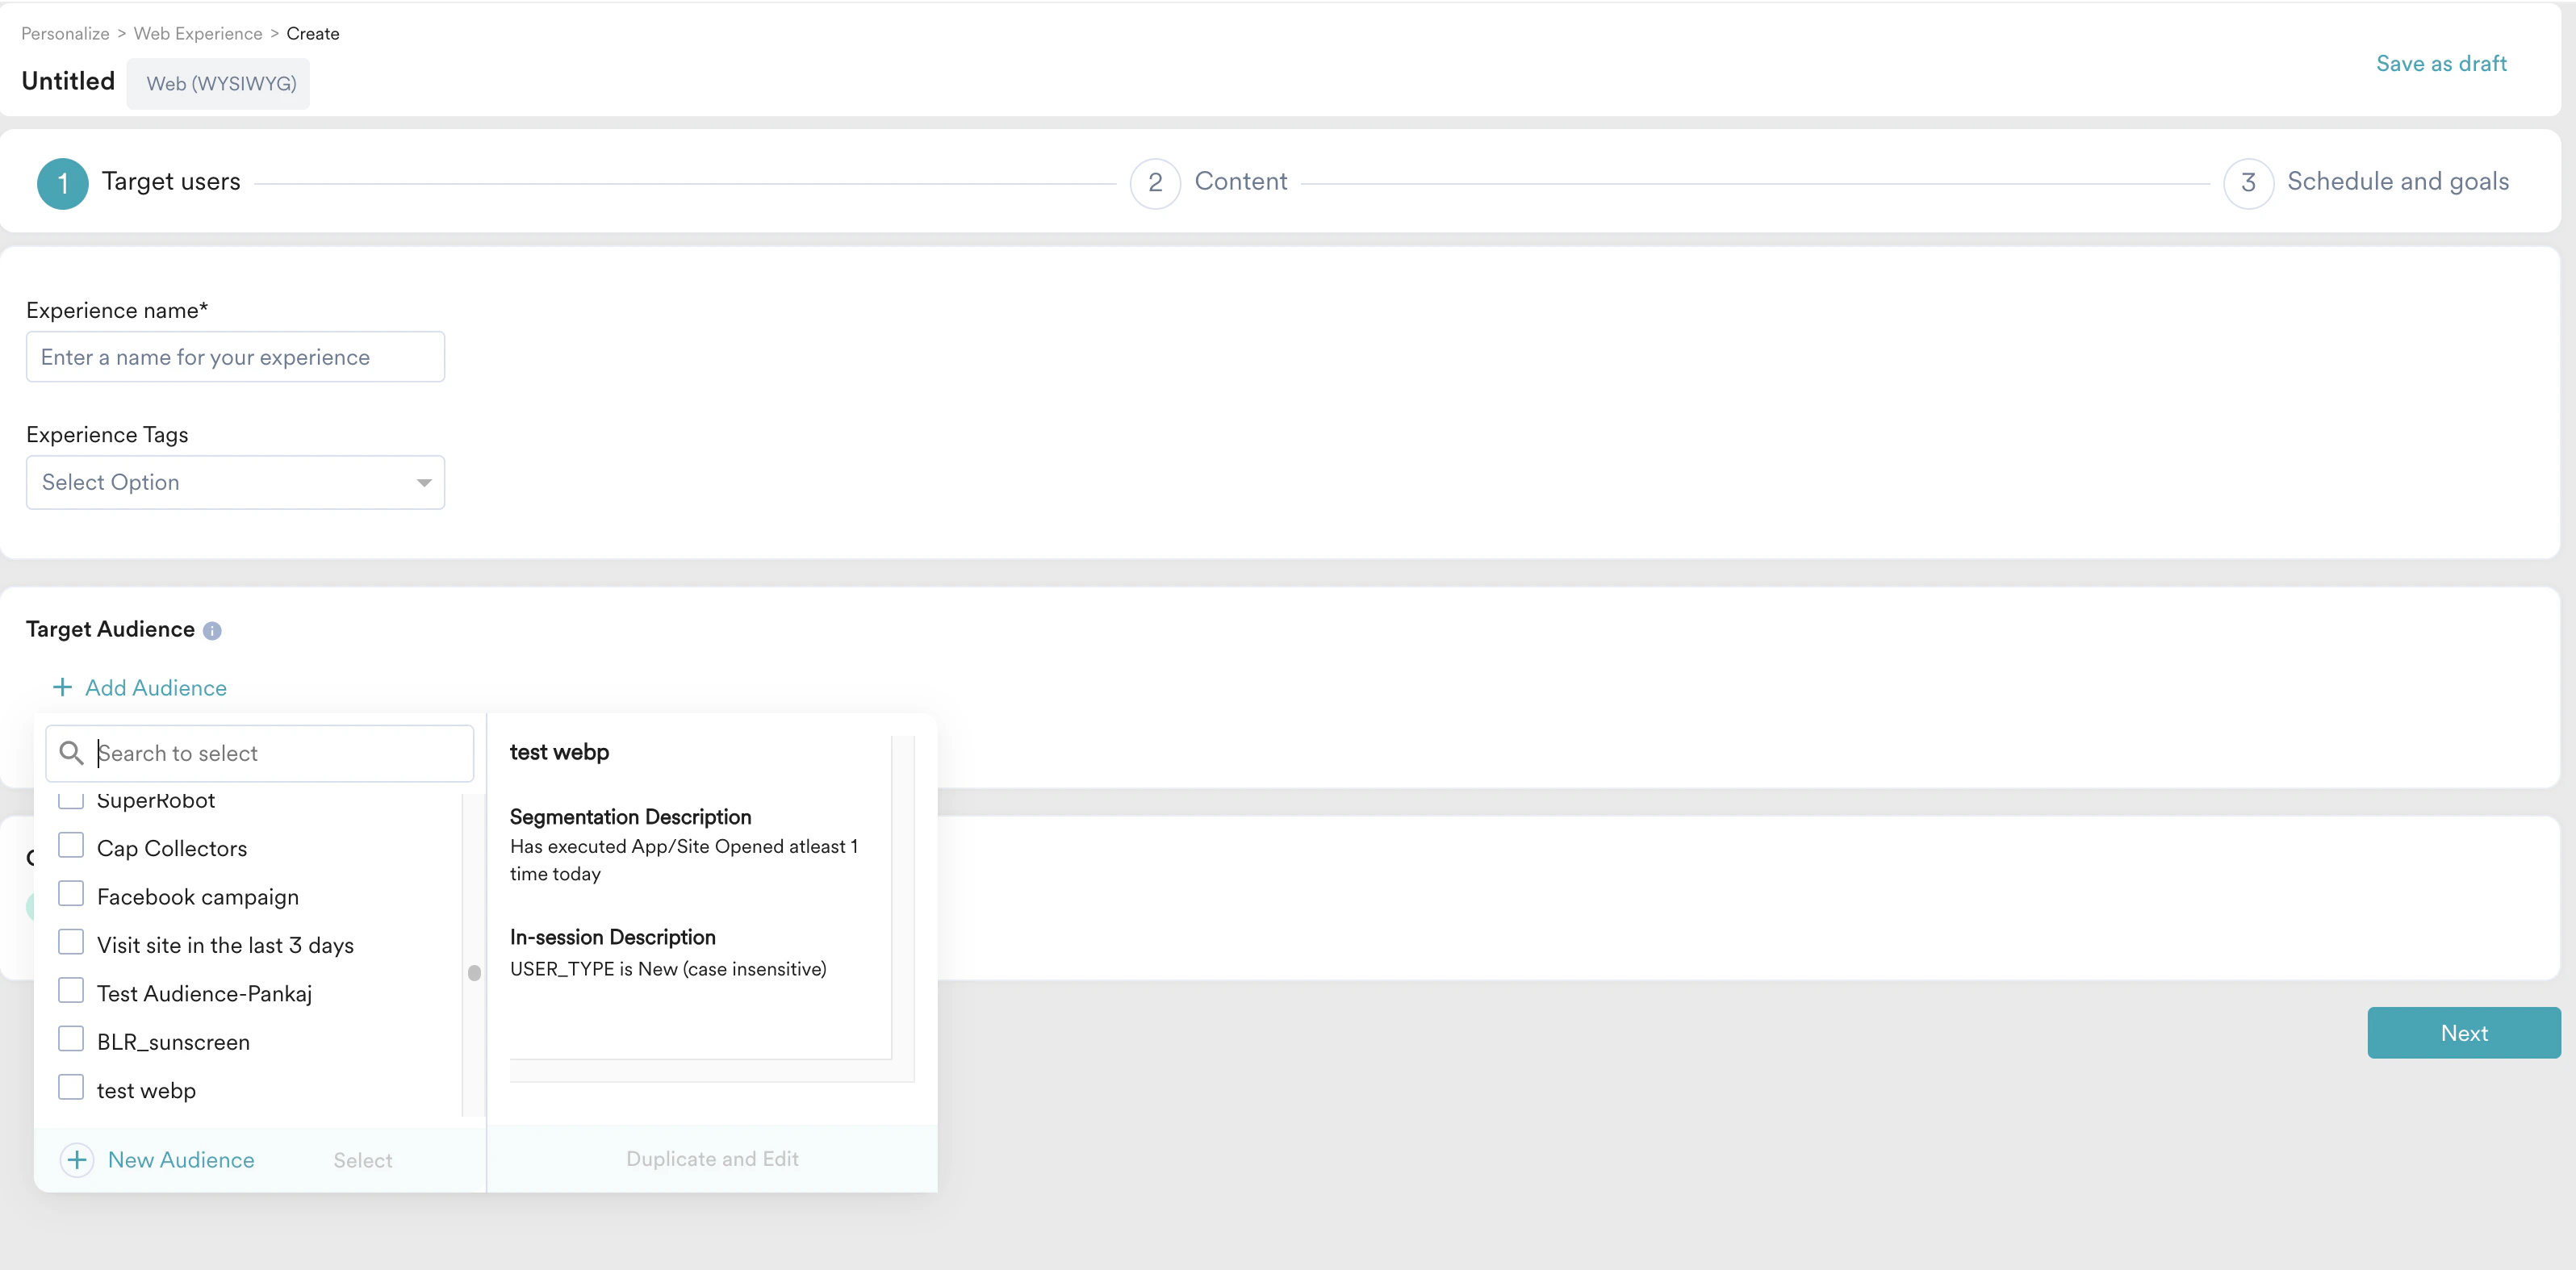
1. Navigate to the sidebar on the left and click **Personalize** **>** **All Experiences** and click **+ Experience** > **Web (WYSIWYG)** or click **+ Create new** > **Experience** > **Web** > **Web (WYSIWYG)**.
2. You are taken to the first step, "Target users," of defining a personalized experience.
3. Enter the following details:
* **Experience name**: A name for the personalization you are building.
* **Experience Tags**: Add tags here to identify this among the other personalized experiences you will have later.
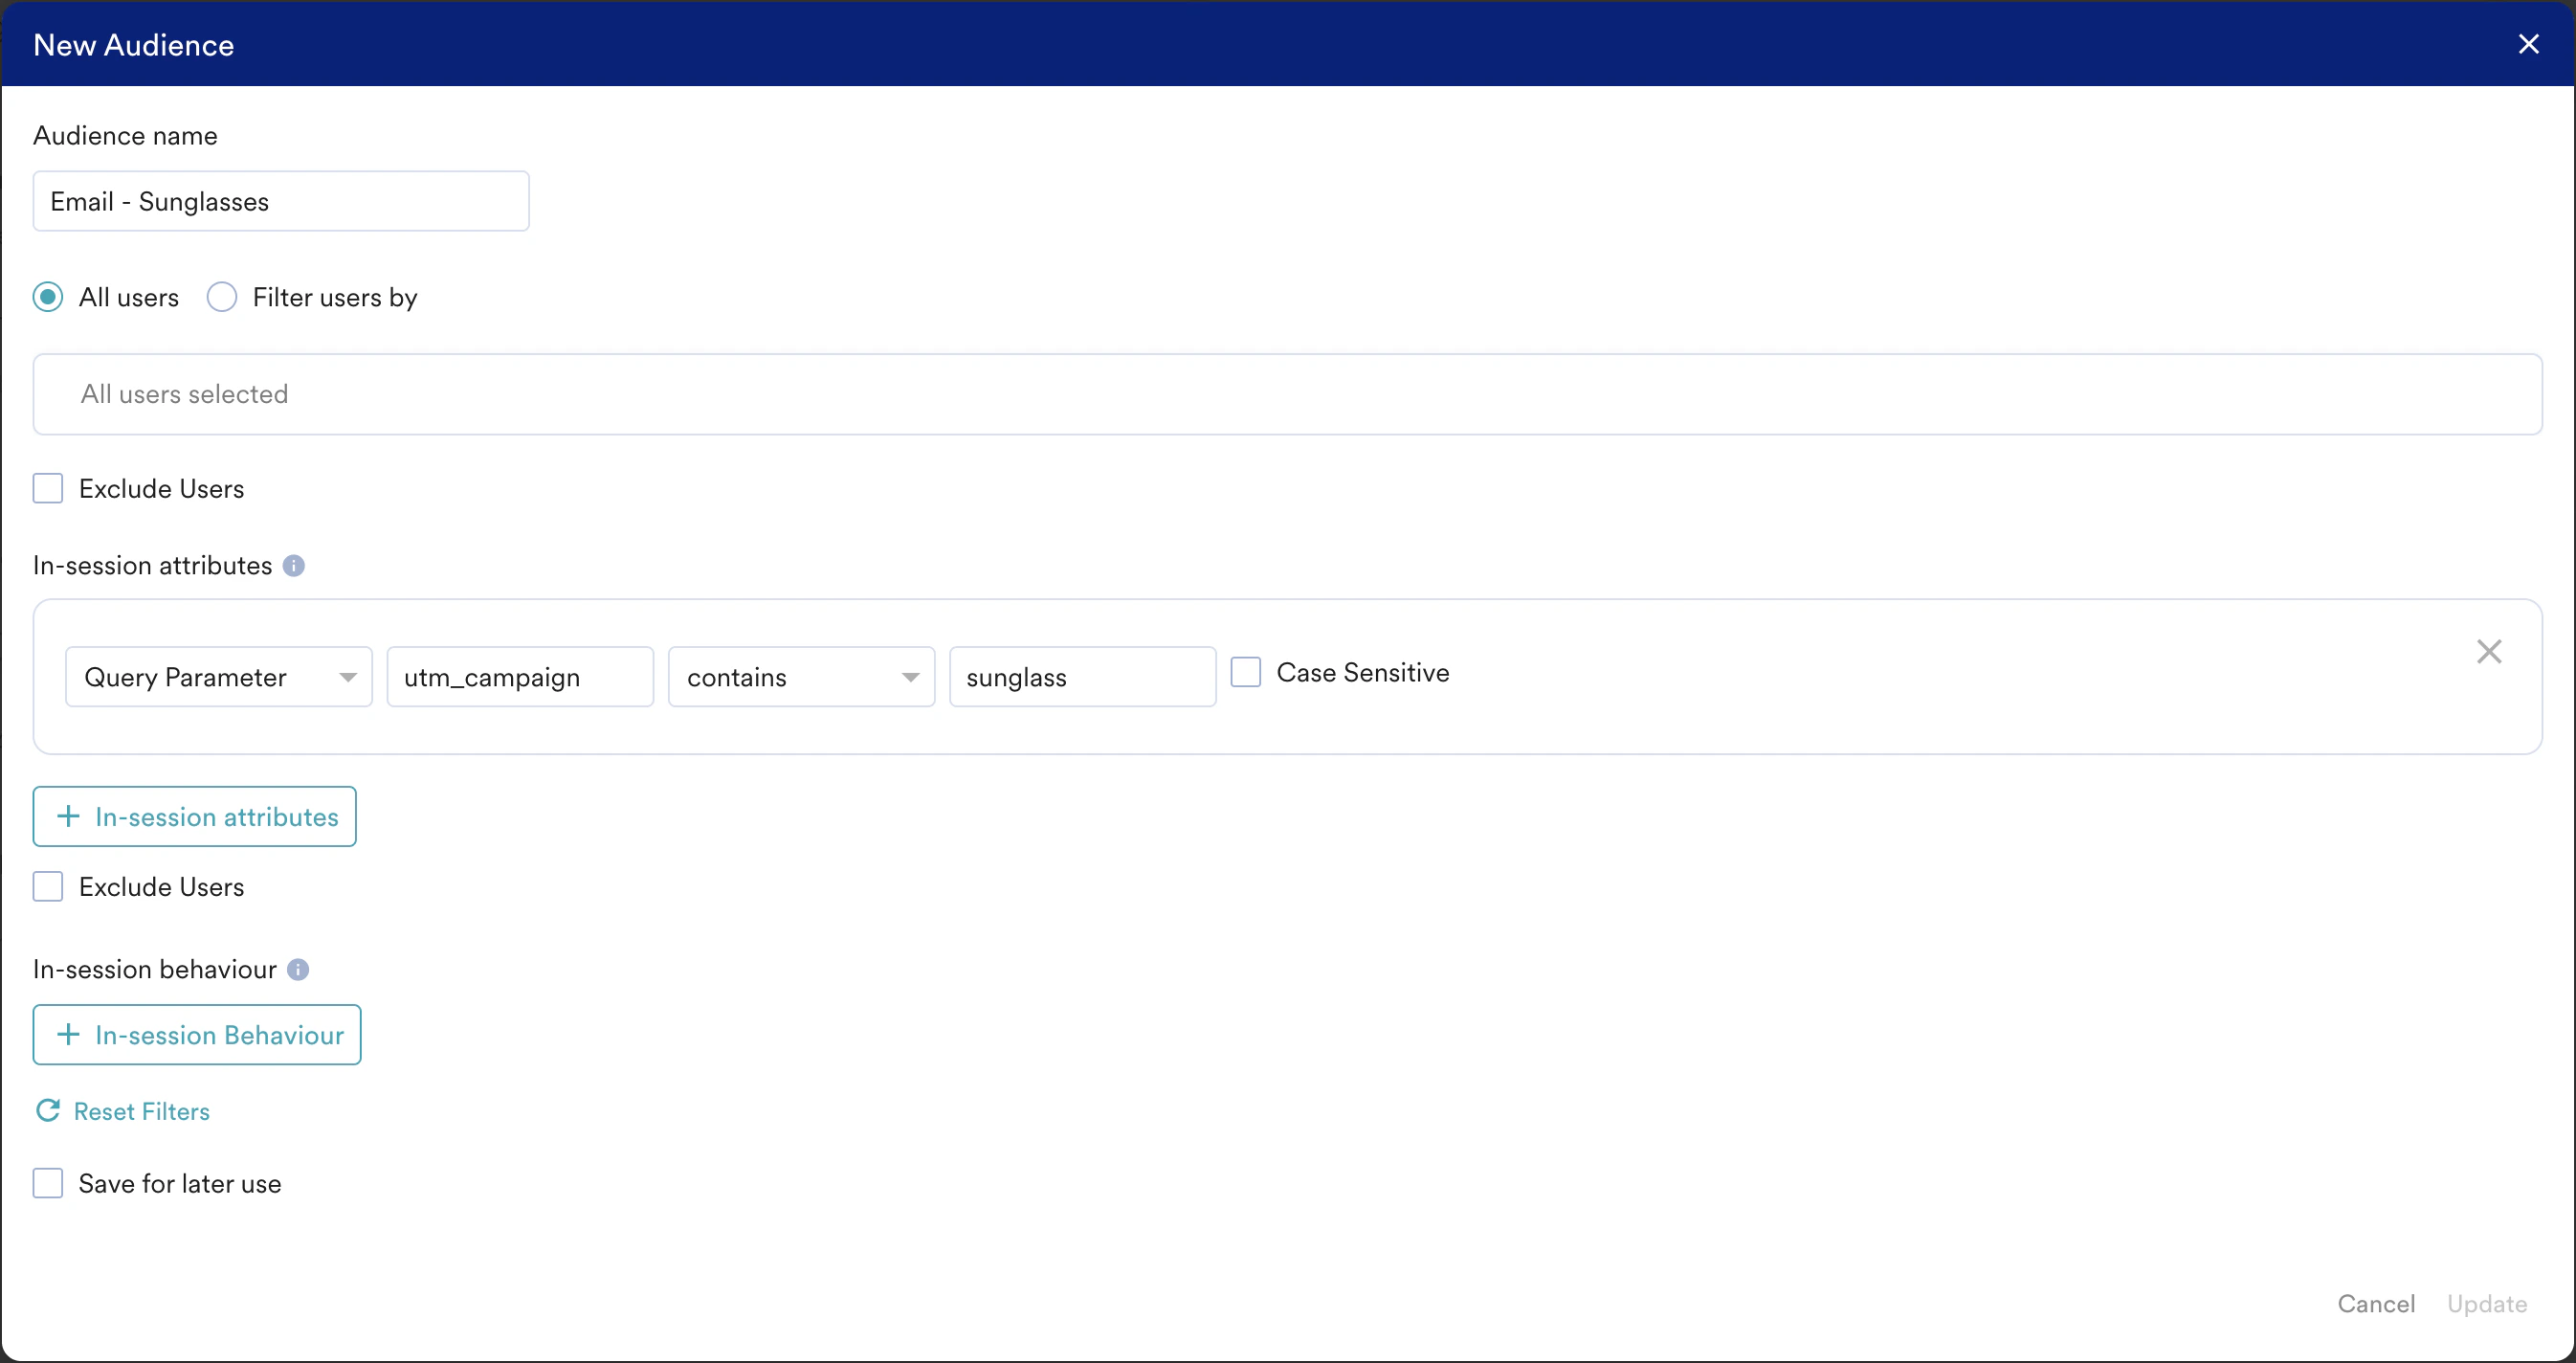
4. Under **Target Audience**, click **+ Audience** and select **New Audience** from the drop-down menu. For more information on creating a new audience, refer [here](/user-guide/personalize/client-side-personalization/client-side-personalization/create-client-side-personalization-experience).
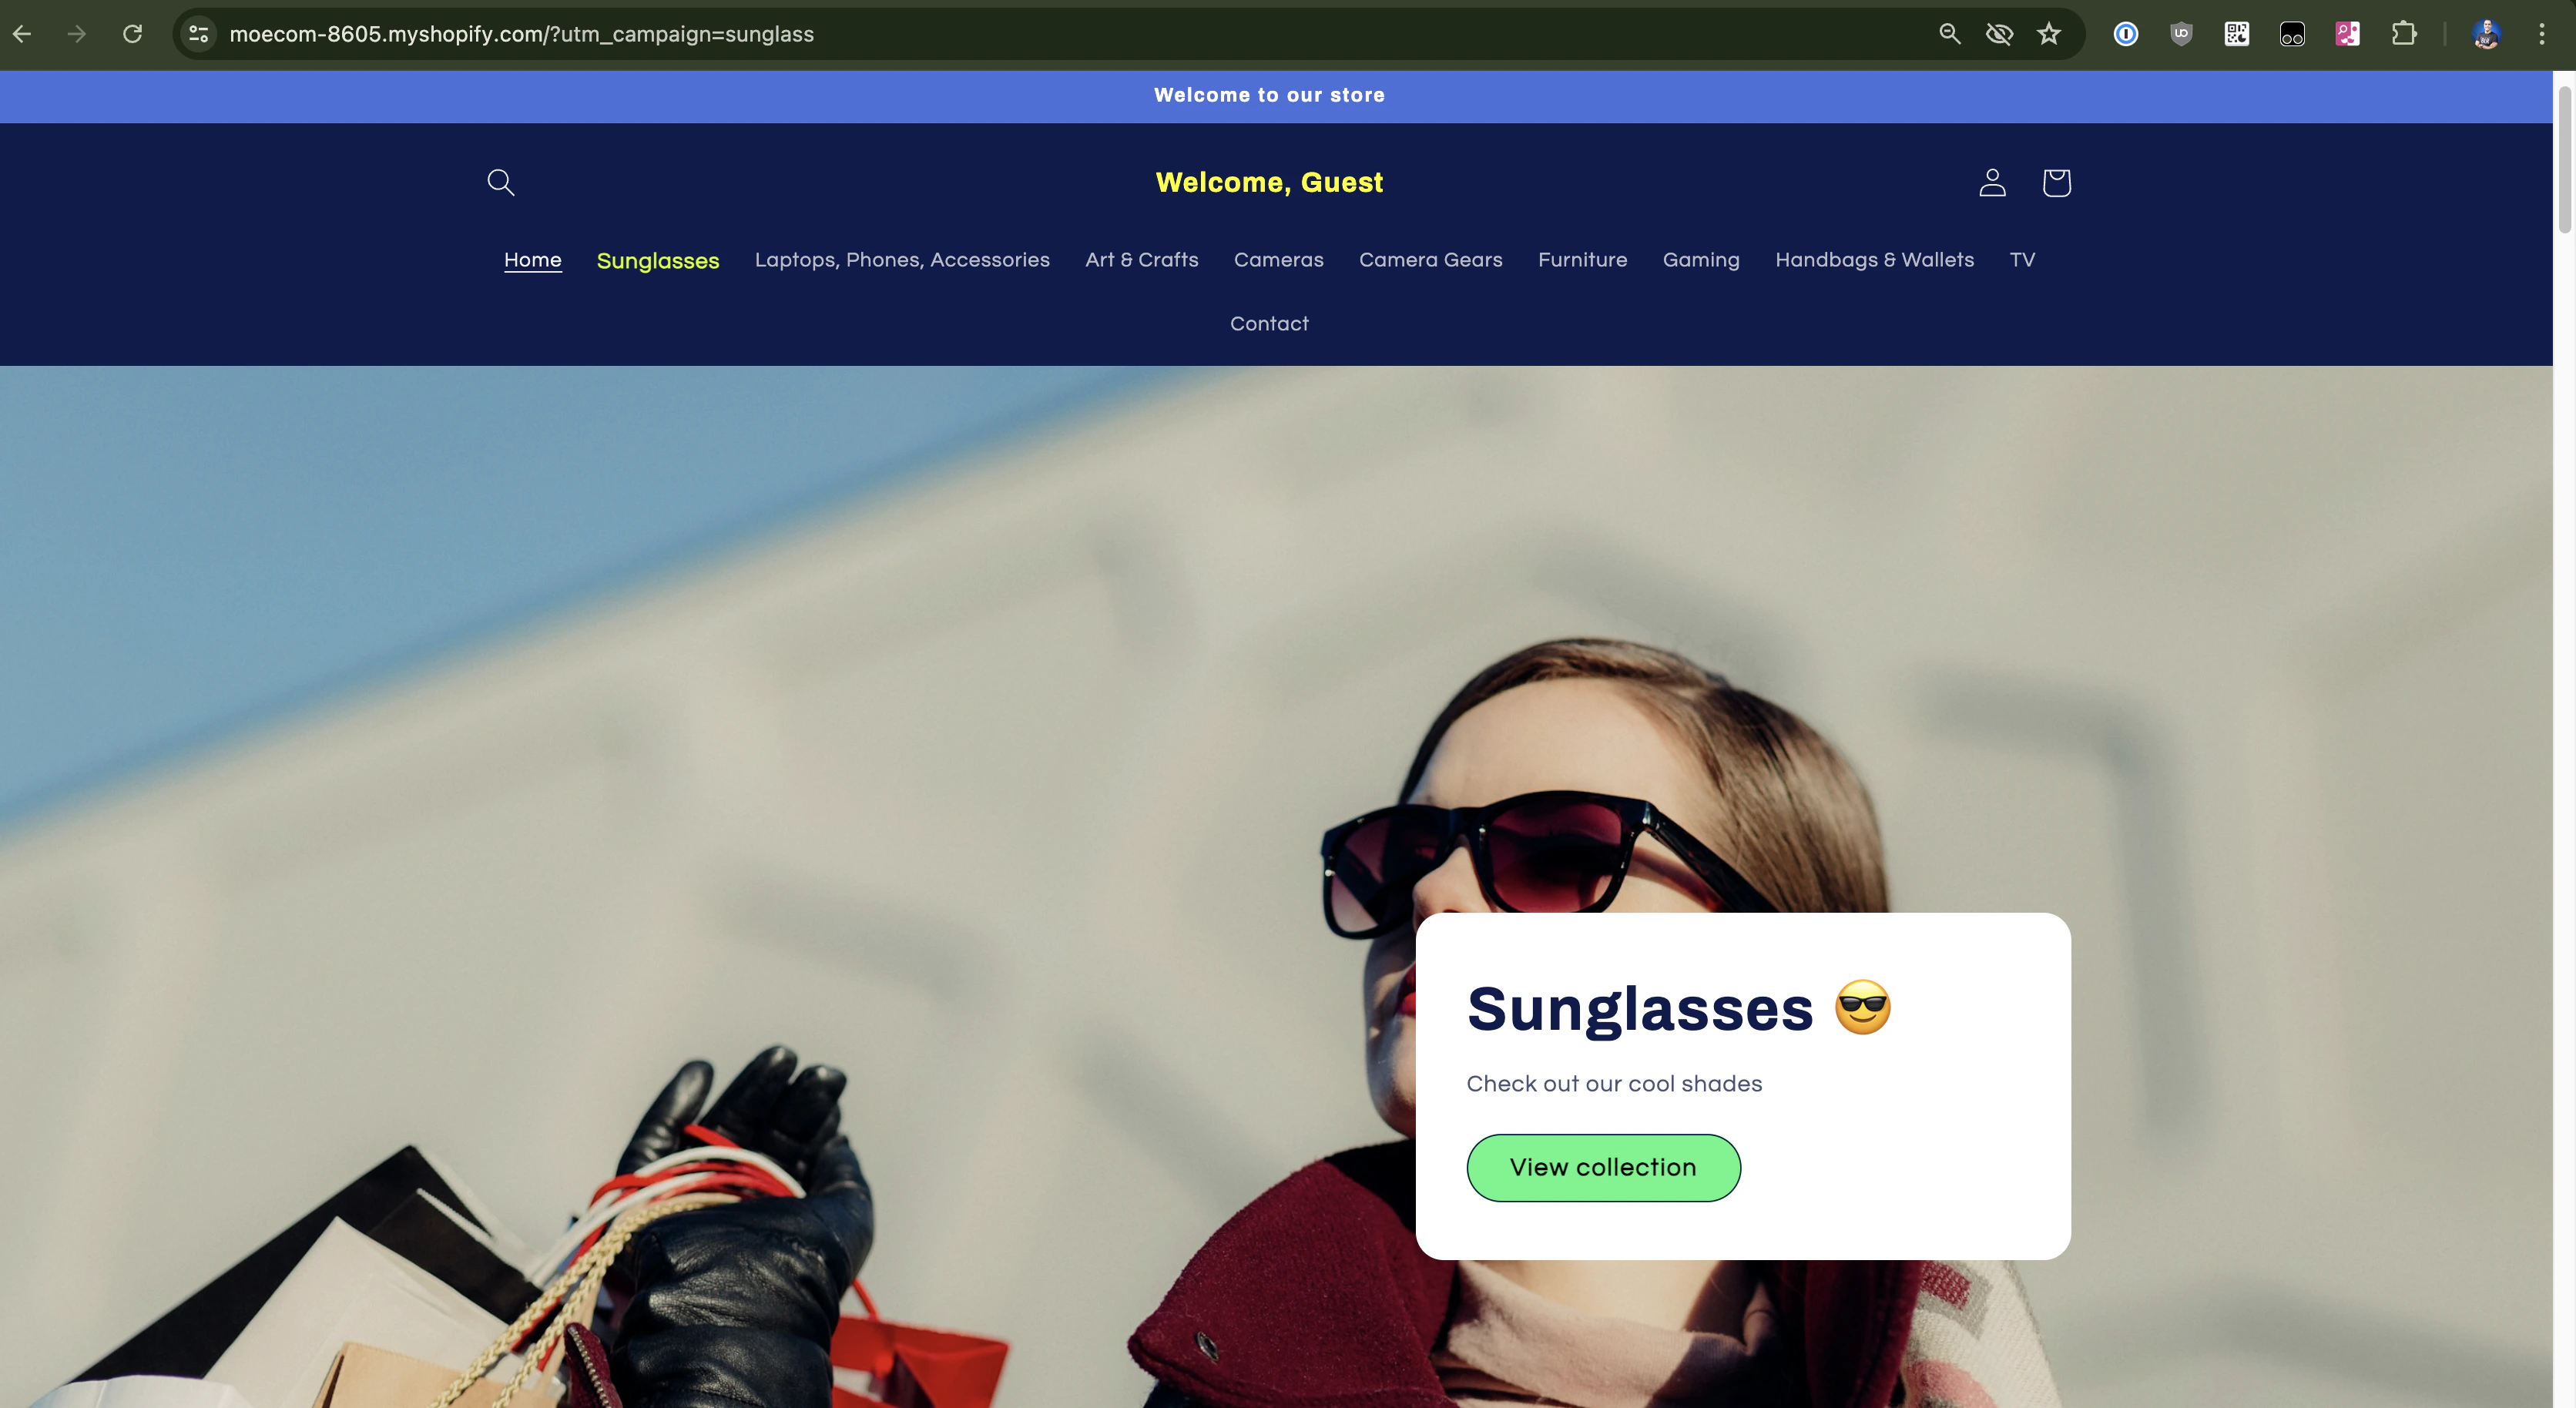
5. In this article, we will personalize the home page layout whenever the user lands on the website from a social media campaign identified by *utm\_campaign = sunglass.*
6. Click **Next** to move to the second step, "Content," where you can define the content that will go into your campaign. You can create audiences based on user attributes to highlight favorite categories upfront or use In-session behavior to bring recently viewed categories to prominence.
## Step 2: Content
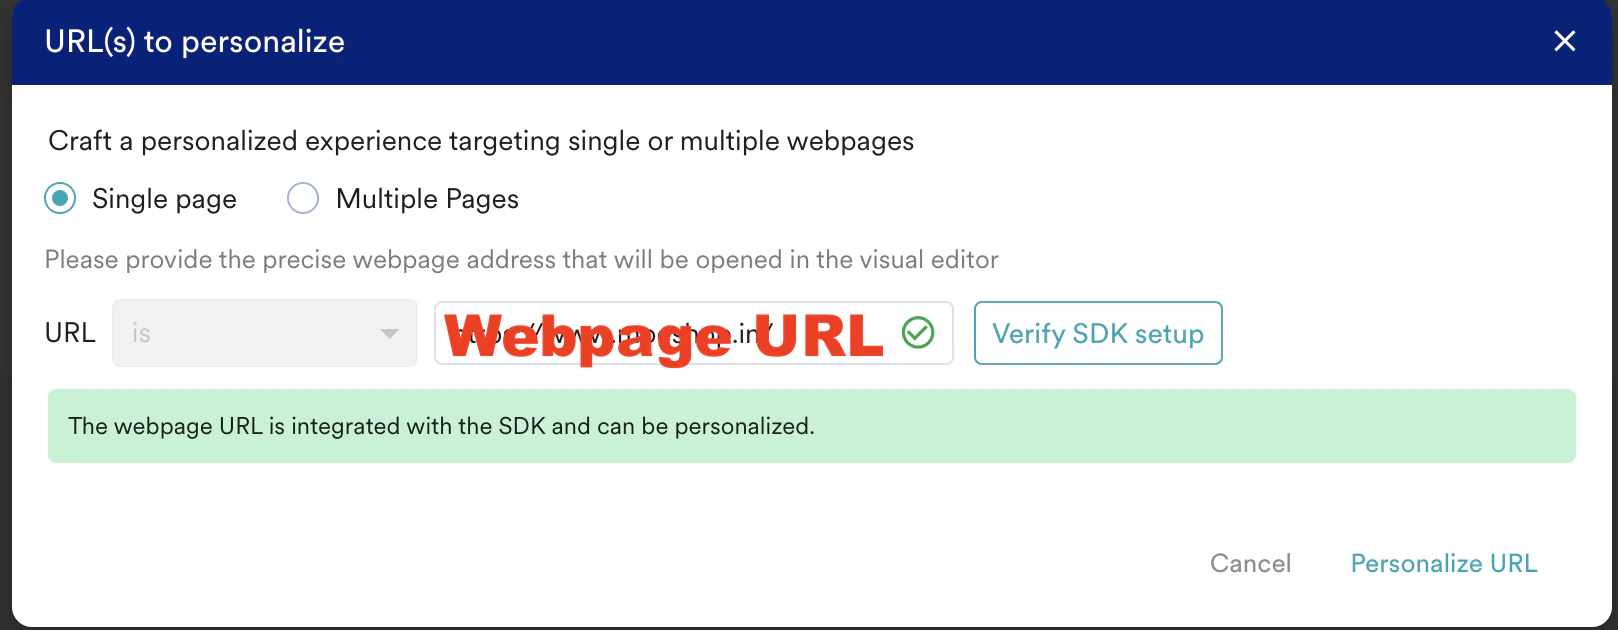
1. Clicking **Next** in the first step, "Target users," will display the URL(s) to personalize the pop-up. We can use this to define where we would like to show the personalization on our website. You can personalize either a single web page or multiple web pages.
* Please note that in the case of multiple web pages, the elements to be personalized must be present on every page and match the web page filtering criteria. If the element is absent, the personalization will not be shown to the user.
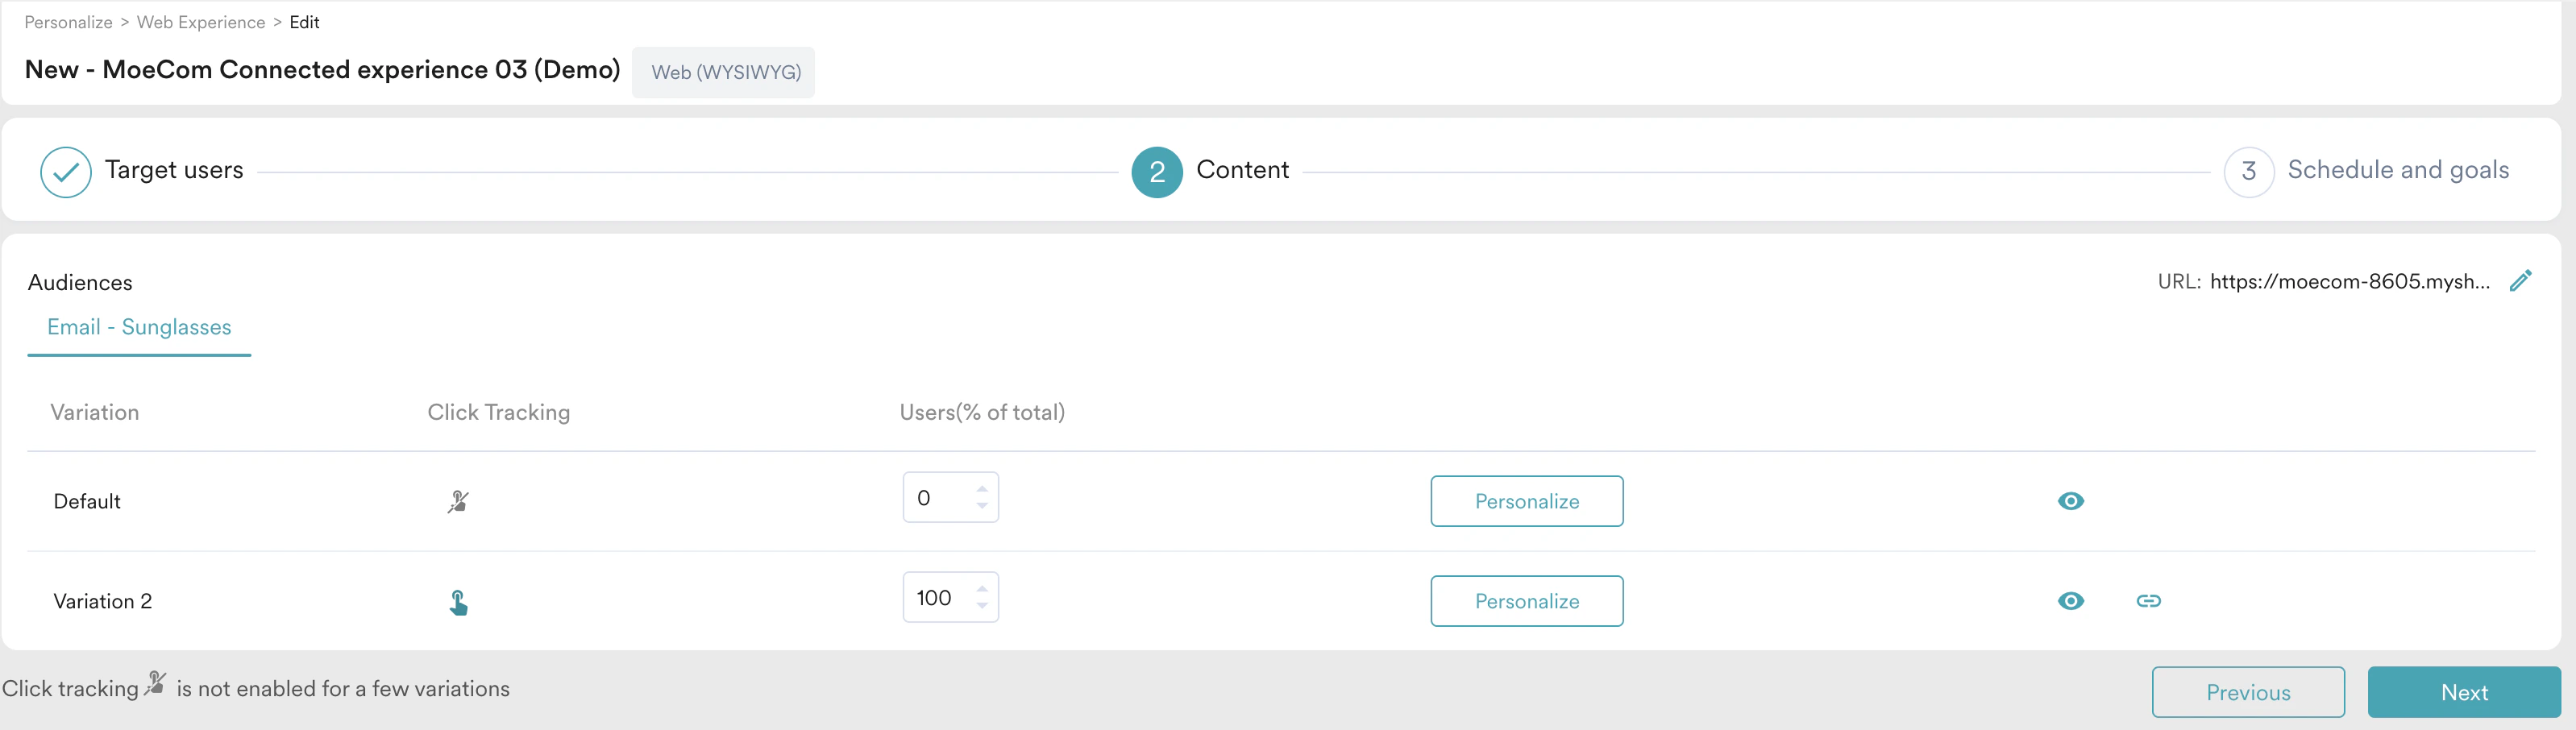
2. Click **Personalize URL** to move to the next step of personalizing the webpage using the What-You-See-Is-What-You-Get visual editor of MoEngage.
3. Click **Personalize** against the variation to open the editor.
4. You can also rearrange the home page layout.\\
5. Click **Next** to move to the third step, "Schedule and goals," where you can define the schedule and goals of your experience.
## Step 3: Schedule and Goals
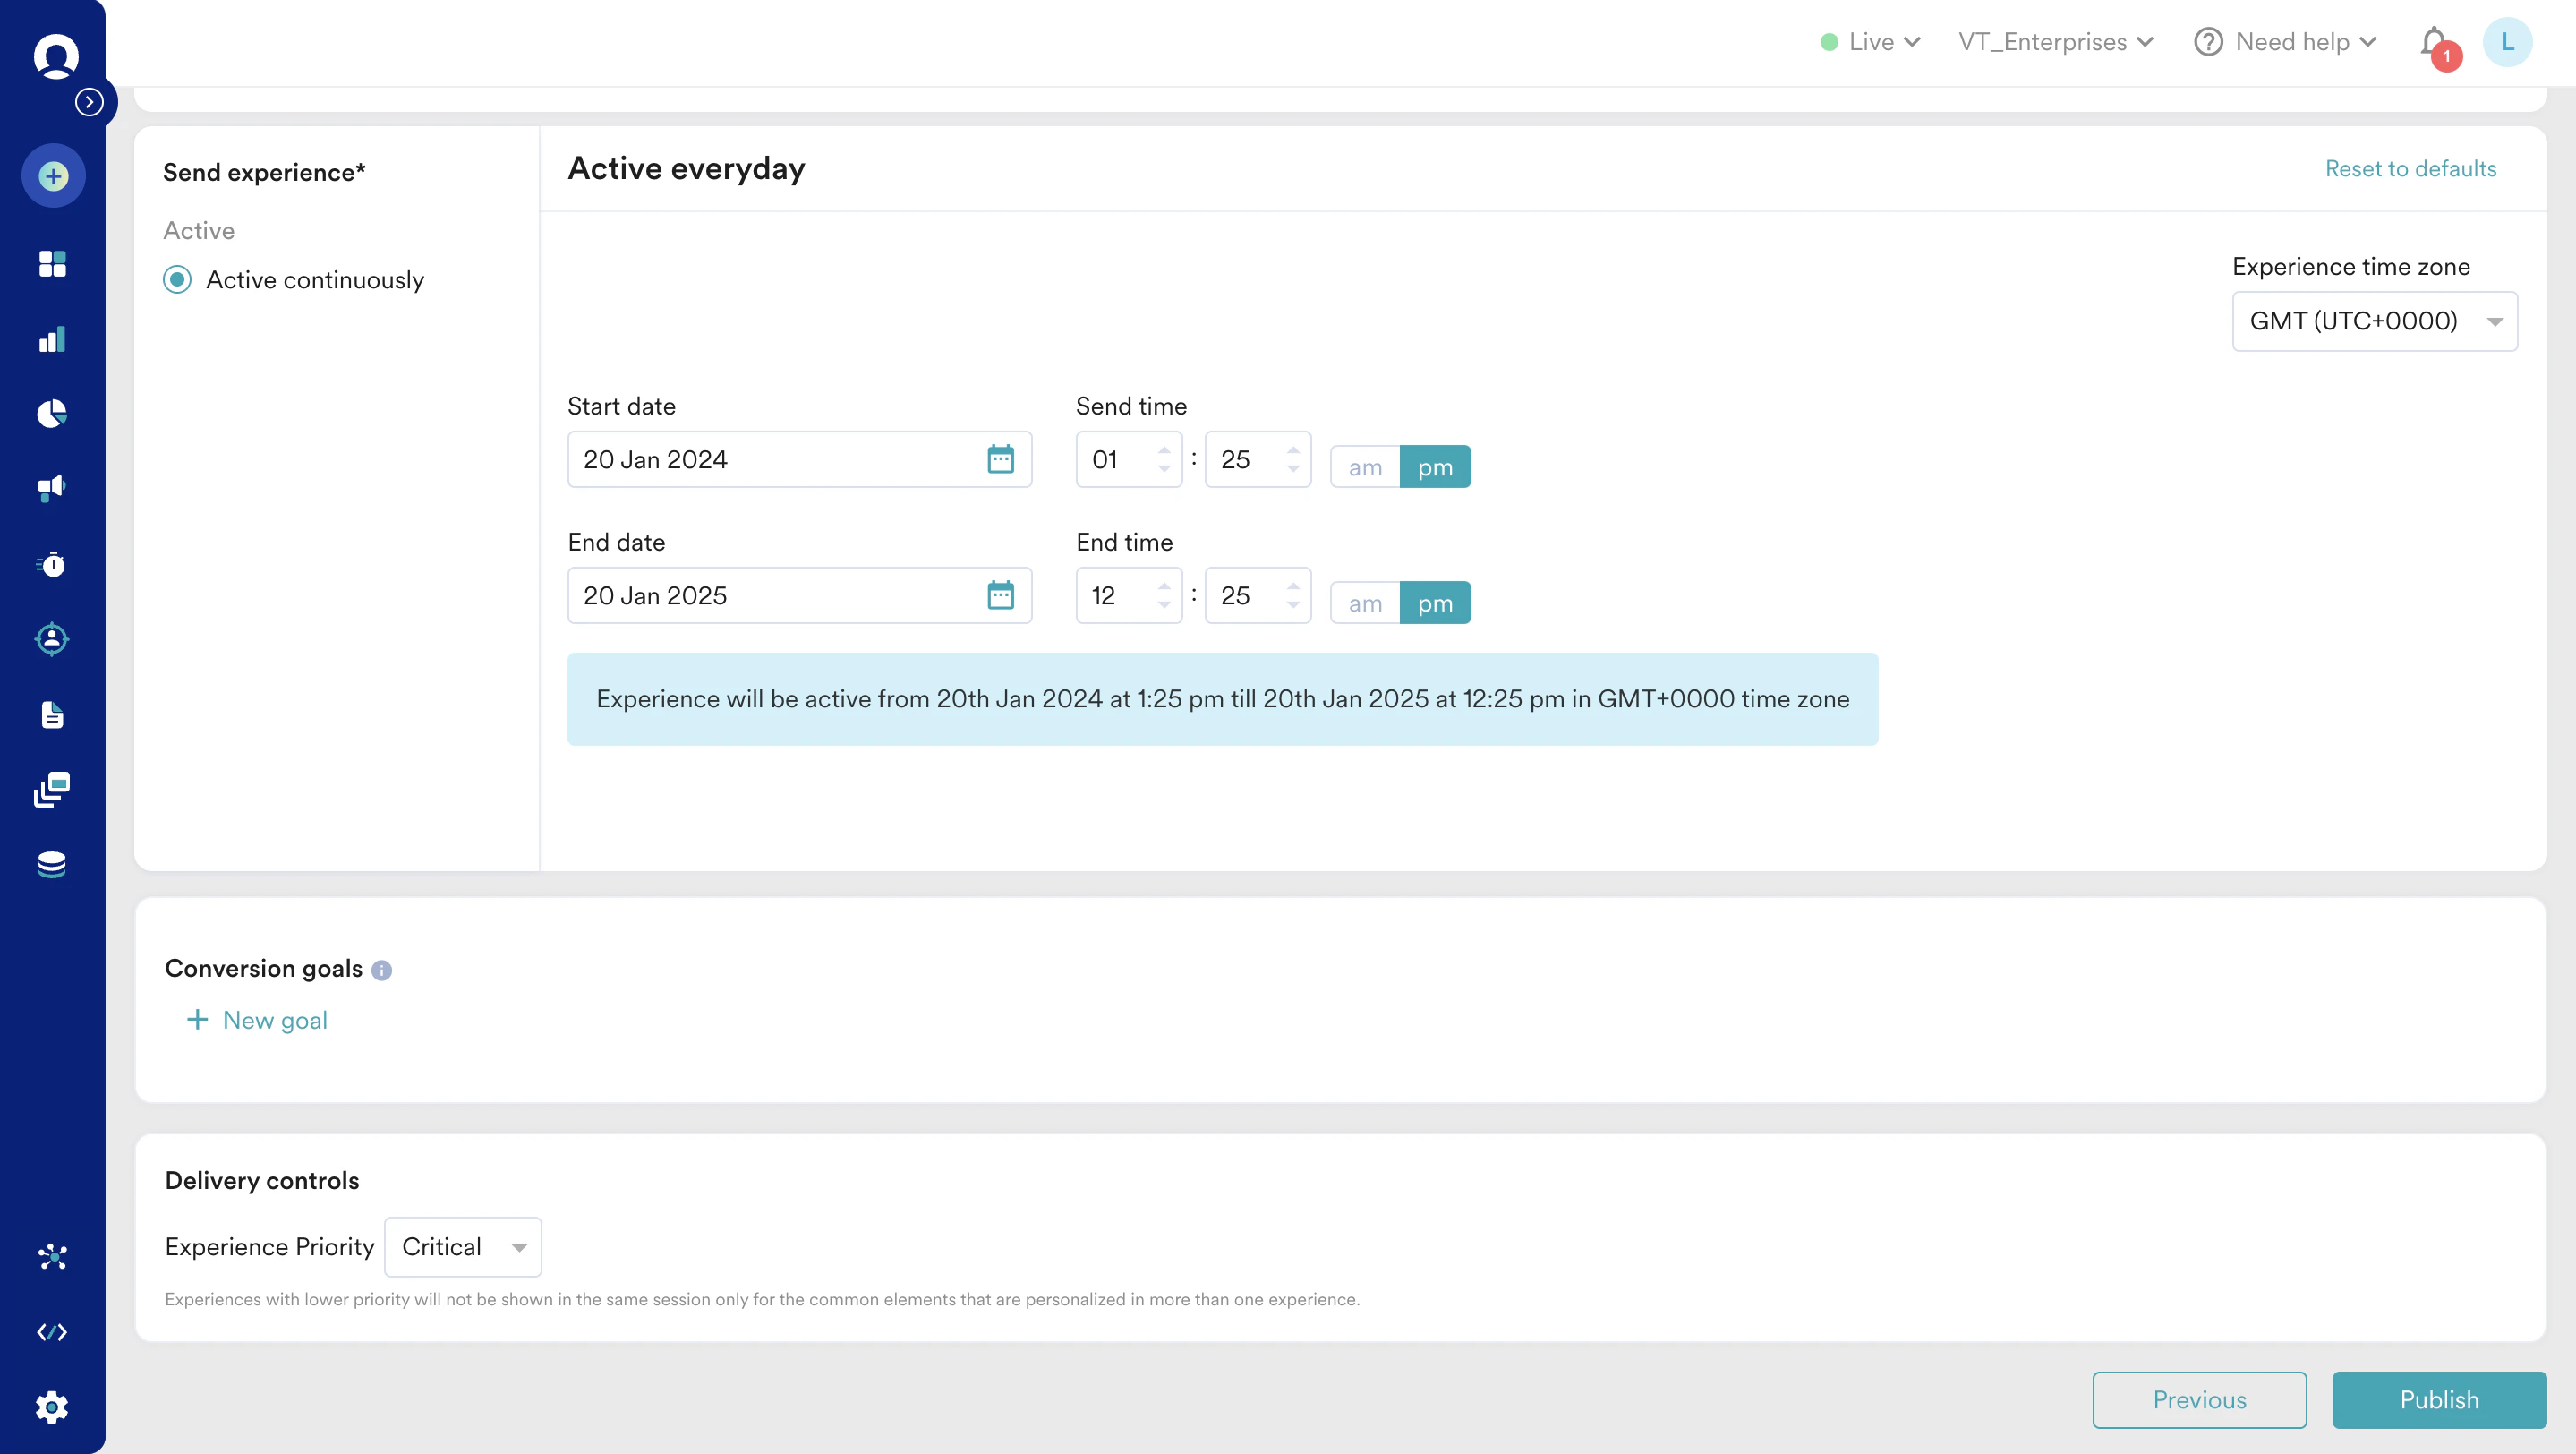
1. In the **Send experience** section, select **Active continuously** and define when to start and end this experience.
2. In the **Conversion goals** section, define the conversion goal based on your requirements.
3. Under **Delivery controls**, select a priority from the **Experience Priority** drop-down menu. For more information, refer to [Create Experience](/user-guide/personalize/client-side-personalization/client-side-personalization/create-client-side-personalization-experience).
4. Click **Publish**.
# Conclusion
Now that you've personalized a visitor’s home page layout, head to [Personalize Analytics](/user-guide/personalize/client-side-personalization/client-side-personalization/experience-analytics) to see how your experience performs.
 5. In this article, we will personalize the home page layout whenever the user lands on the website from a social media campaign identified by *utm\_campaign = sunglass.*
  6. Click **Next** to move to the second step, "Content," where you can define the content that will go into your campaign. You can create audiences based on user attributes to highlight favorite categories upfront or use In-session behavior to bring recently viewed categories to prominence.
## Step 2: Content
1. Clicking **Next** in the first step, "Target users," will display the URL(s) to personalize the pop-up. We can use this to define where we would like to show the personalization on our website. You can personalize either a single web page or multiple web pages.
* Please note that in the case of multiple web pages, the elements to be personalized must be present on every page and match the web page filtering criteria. If the element is absent, the personalization will not be shown to the user.
6. Click **Next** to move to the second step, "Content," where you can define the content that will go into your campaign. You can create audiences based on user attributes to highlight favorite categories upfront or use In-session behavior to bring recently viewed categories to prominence.
## Step 2: Content
1. Clicking **Next** in the first step, "Target users," will display the URL(s) to personalize the pop-up. We can use this to define where we would like to show the personalization on our website. You can personalize either a single web page or multiple web pages.
* Please note that in the case of multiple web pages, the elements to be personalized must be present on every page and match the web page filtering criteria. If the element is absent, the personalization will not be shown to the user.
 2. Click **Personalize URL** to move to the next step of personalizing the webpage using the What-You-See-Is-What-You-Get visual editor of MoEngage.
3. Click **Personalize** against the variation to open the editor.
2. Click **Personalize URL** to move to the next step of personalizing the webpage using the What-You-See-Is-What-You-Get visual editor of MoEngage.
3. Click **Personalize** against the variation to open the editor.
 4. You can also rearrange the home page layout.\\
5. Click **Next** to move to the third step, "Schedule and goals," where you can define the schedule and goals of your experience.
## Step 3: Schedule and Goals
1. In the **Send experience** section, select **Active continuously** and define when to start and end this experience.
4. You can also rearrange the home page layout.\\
5. Click **Next** to move to the third step, "Schedule and goals," where you can define the schedule and goals of your experience.
## Step 3: Schedule and Goals
1. In the **Send experience** section, select **Active continuously** and define when to start and end this experience.
 2. In the **Conversion goals** section, define the conversion goal based on your requirements.
3. Under **Delivery controls**, select a priority from the **Experience Priority** drop-down menu. For more information, refer to [Create Experience](/user-guide/personalize/client-side-personalization/client-side-personalization/create-client-side-personalization-experience).
4. Click **Publish**.
# Conclusion
Now that you've personalized a visitor’s home page layout, head to [Personalize Analytics](/user-guide/personalize/client-side-personalization/client-side-personalization/experience-analytics) to see how your experience performs.
2. In the **Conversion goals** section, define the conversion goal based on your requirements.
3. Under **Delivery controls**, select a priority from the **Experience Priority** drop-down menu. For more information, refer to [Create Experience](/user-guide/personalize/client-side-personalization/client-side-personalization/create-client-side-personalization-experience).
4. Click **Publish**.
# Conclusion
Now that you've personalized a visitor’s home page layout, head to [Personalize Analytics](/user-guide/personalize/client-side-personalization/client-side-personalization/experience-analytics) to see how your experience performs.