> ## Documentation Index
> Fetch the complete documentation index at: https://moengage.com/docs/llms.txt
> Use this file to discover all available pages before exploring further.
# How to use custom notification tone for my Android app
> Learn how to configure a custom notification tone for your Android app using notification channels, and map it to the MoEngage dashboard for campaign delivery.
# Introduction
In the realm of push notifications, the initial objective is to capture the user's attention. Android's Notification Channels enable app developers to categorize their notifications, allowing users to tailor the notifications to their preferences. Creating a notification channel permits the setting of specific visual and auditory features.You can achieve this with the use of custom sounds and other Android methods.
In this article, we will learn how to incorporate a custom notification tone for your Android app.
You need help of your Developer to achieve this.
# Create a Notification Channel with Custom Auditory and Visual Settings
Perform the following steps:
1. Get a reference to the NotificationManager.\
Before you can create a notification channel, you will need a reference to the NotificationManager:
```ruby Code wrap theme={null}
NotificationManager notificationManager = getSystemService(NotificationManager.class);
```
2. Create a notification channel.
```ruby Code wrap theme={null}
String channelId = "my_channel_id";
CharSequence channelName = "My Channel";
int importance = NotificationManager.IMPORTANCE_HIGH; // Set the importance level
NotificationChannel notificationChannel = new NotificationChannel(channelId, channelName, importance);
```
3. Set auditory properties.\
You can set custom sounds and vibration patterns for:
* **Sound**:
```ruby Code wrap theme={null}
// Define an audio attribute
AudioAttributes audioAttributes = new AudioAttributes.Builder()
.setContentType(AudioAttributes.CONTENT_TYPE_SONIFICATION)
.setUsage(AudioAttributes.USAGE_NOTIFICATION)
.build();
// Set the custom sound and audio attributes to the notification channel
notificationChannel.setSound(Uri.parse(ContentResolver.SCHEME_ANDROID_RESOURCE + "//"
+ getApplicationContext().getPackageName() + "/" + R.raw.your_sound_file), audioAttributes)
```
* **Vibration**:
```ruby Code wrap theme={null}
long[] vibrationPattern = {100, 200, 300, 400, 500, 400, 300, 200, 400}; // Define your custom pattern
notificationChannel.setVibrationPattern(vibrationPattern);
notificationChannel.enableVibration(true);
```
4. Set visual properties such as light color, lock screen visibility, and badges:
```ruby Code wrap theme={null}
notificationChannel.setLightColor(Color.RED); // Set the light color
notificationChannel.enableLights(true); // Enable lights
notificationChannel.setLockscreenVisibility(Notification.VISIBILITY_PRIVATE); // Set lock screen visibility
notificationChannel.setShowBadge(true); // Enable badges
```
5. Register the Notification Channel with the system.\
Create the notification channel through the *createNotificationChannel()* method:
```ruby Code wrap theme={null}
assert notificationManager != null;
notificationManager.createNotificationChannel(notificationChannel);
```
6. Send a notification that shows up in the notification center.\
Set the channel ID you specified earlier when building the notification:
```ruby Code wrap theme={null}
NotificationCompat.Builder builder = new NotificationCompat.Builder(this, channelId)
.setSmallIcon(R.drawable.notification_icon)
.setContentTitle("My notification")
.setContentText("Hello World!")
.setPriority(NotificationCompat.PRIORITY_HIGH); // Set the priority
notificationManager.notify(1, builder.build());
```
* The *assert notificationManager != null;* prevents a NullPointerException if the NotificationManager reference is null. Also, ensure that the entire notifying process runs in a background thread to not block the user interface.
* Replace *my\_channel\_id* with a unique ID for your channel and *My Channel* must be the human-readable name of the channel. These settings will take effect when the channel is first created.
* After you create a notification channel, you cannot change its behavior and the user has the final control over their notification preferences.
# Use the Notification Channel in MoEngage
For a detailed walkthrough of configuring notification channels in the MoEngage dashboard, refer to [Android Push Notification Channels](/user-guide/campaigns-and-channels/mobile-push/notification-features-and-behavior/android-push-notification-channels).
To use the Notification Channel, you must also update the MoEngage's Android SDK version to v8.0.00.
1. Navigate to step 2 "Content" of the Push notification.
2. In the **Basic details** section, add the notification channel:
1. Expand the **Notification channel** drop-down list and click \*\* Manage notification channel\*\*. 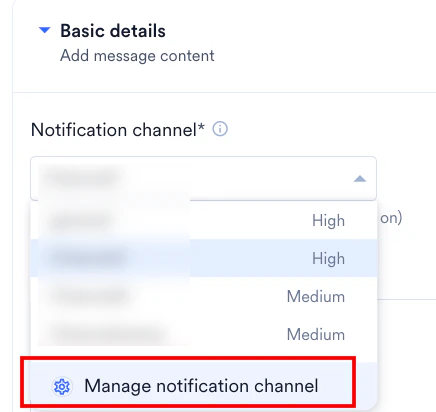 2. The Manage android notification channel pop-up window is displayed.
 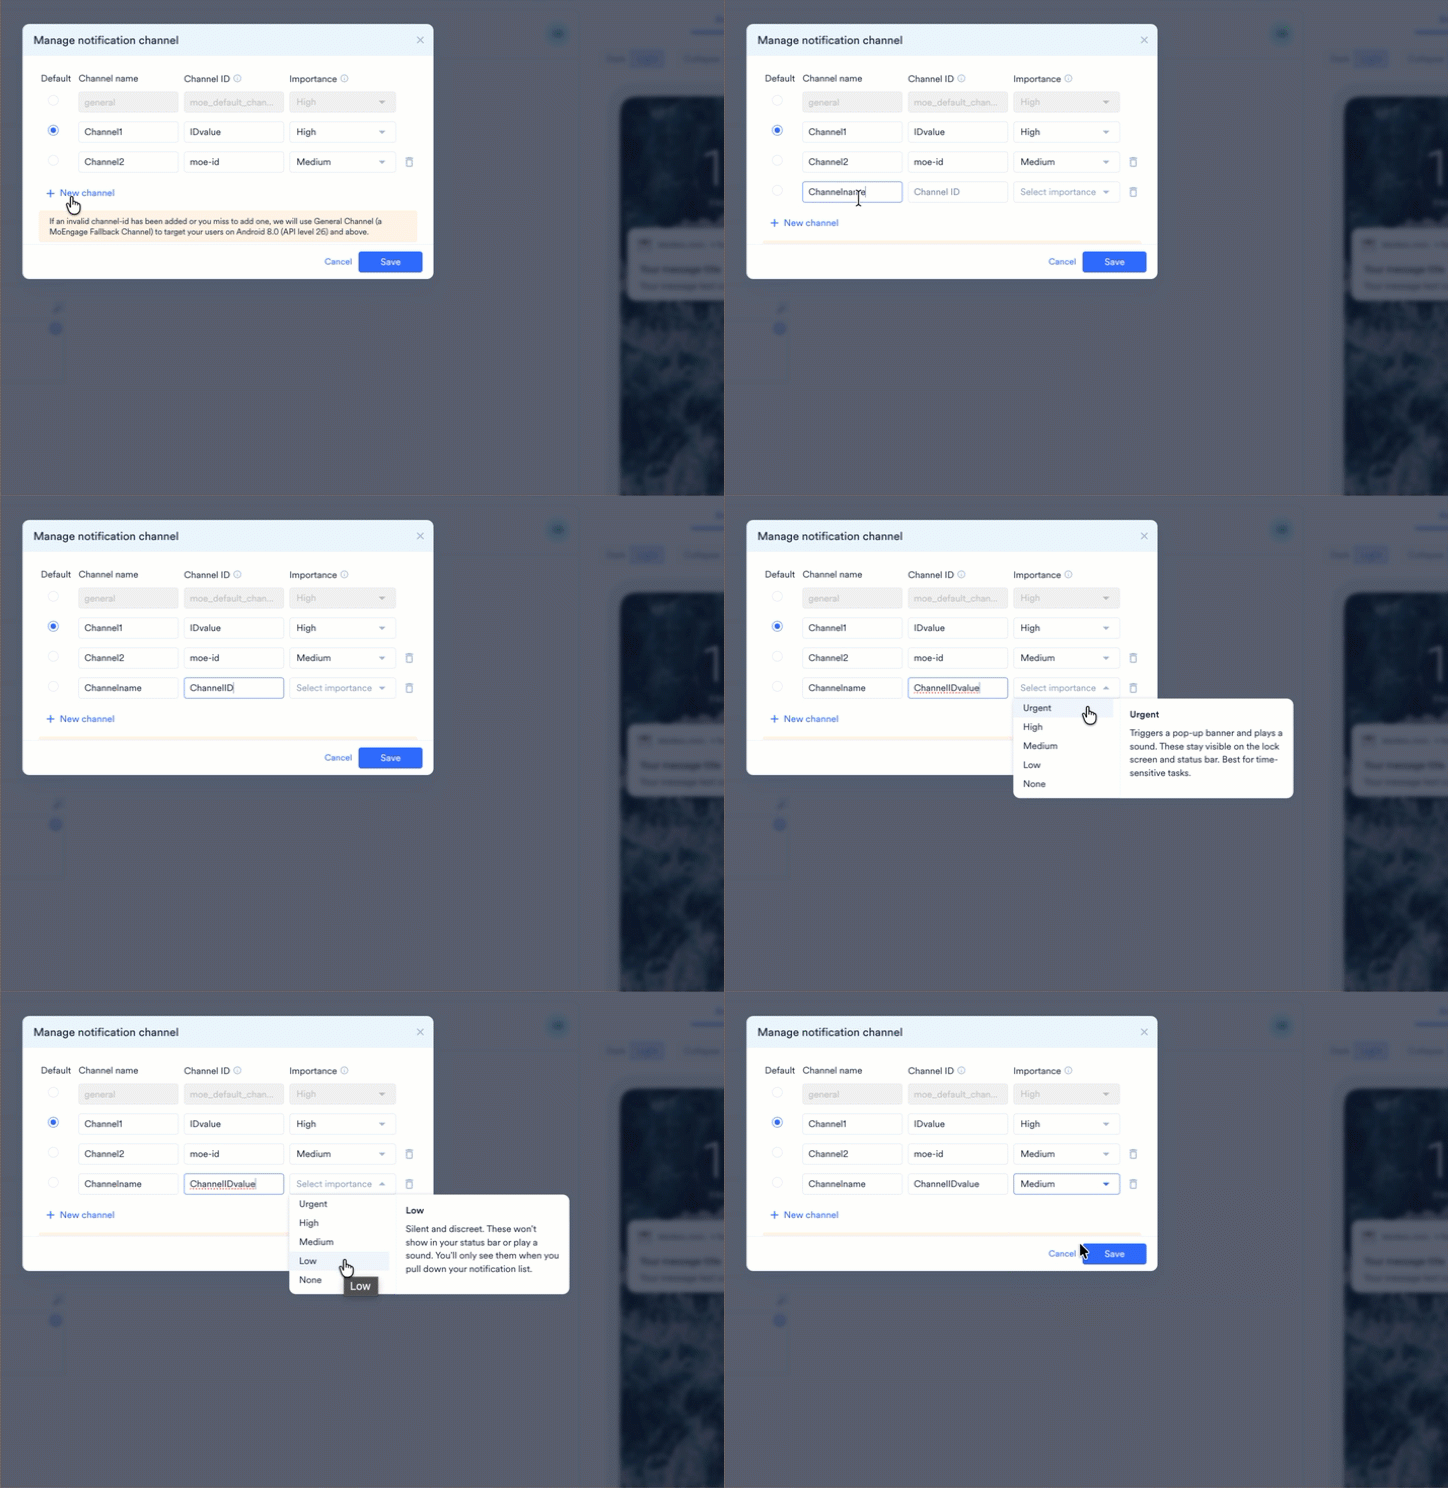 3. When you add the channel in **Manage notification channel**, set its **Importance** to match the level your developer configured in the app. This helps marketers identify which channels play a sound (Urgent or High) and which are silent (Medium, Low, or None) before selecting one for a campaign. For details on how importance levels map to app code, refer to the [Android SDK developer documentation](https://developer.android.com/develop/ui/views/notifications/channels).
4. Select the appropriate notification channel for your notification in the same section. After adding the channels, select any one of the channels for your campaign based on your requirement. All notifications posted to the same notification channel have the same behavior.
If an invalid channel ID is added or you miss adding one, MoEngage will use General Channel (a MoEngage Fallback Channel) to target your users on Android 8.0 (API level 26) and above.
# Conclusion
In this use case, we learnt how to incorporate a custom notification tone for your Android app. You can test the behavior using the **Test Campaign** option before you publish the campaign. For more information, refer [here](/user-guide/campaigns-and-channels/mobile-push/create/create-push-campaigns).
3. When you add the channel in **Manage notification channel**, set its **Importance** to match the level your developer configured in the app. This helps marketers identify which channels play a sound (Urgent or High) and which are silent (Medium, Low, or None) before selecting one for a campaign. For details on how importance levels map to app code, refer to the [Android SDK developer documentation](https://developer.android.com/develop/ui/views/notifications/channels).
4. Select the appropriate notification channel for your notification in the same section. After adding the channels, select any one of the channels for your campaign based on your requirement. All notifications posted to the same notification channel have the same behavior.
If an invalid channel ID is added or you miss adding one, MoEngage will use General Channel (a MoEngage Fallback Channel) to target your users on Android 8.0 (API level 26) and above.
# Conclusion
In this use case, we learnt how to incorporate a custom notification tone for your Android app. You can test the behavior using the **Test Campaign** option before you publish the campaign. For more information, refer [here](/user-guide/campaigns-and-channels/mobile-push/create/create-push-campaigns).