> ## Documentation Index
> Fetch the complete documentation index at: https://moengage.com/docs/llms.txt
> Use this file to discover all available pages before exploring further.
# My Studio
> Organize saved analyses in MoEngage My Studio with the updated interface — resume your work seamlessly and streamline your analytics workflow.
As the world continues to evolve, so do the challenges and opportunities data and analytics present. With MoEngage's **My Studio**, you can say goodbye to data management frustrations and hello to a streamlined and productive workflow. No longer will you have to worry about losing your progress due to unexpected disruptions, being delayed in making analytical decisions, or losing perspective in a sea of reports. **My Studio** offers a range of functionalities that allow you to store your saved analyses in one place, making it easy for you to retrieve and resume your work from where you left off. It streamlines the process of exploring popular analyses while also serving as a source of inspiration for your projects.
# Analytics Studio Overview
**Information**
* My Studio is a personal user-specific dashboard that cannot be accessed by any other user.
* A user can save a maximum of 50 analyses.
# Use Cases
* My Studio plays a crucial role in keeping your company on top of key performance indicators (KPIs). With a personal space, you can create a centralized hub for all your important metrics and reports.
* Searching, sorting, and filtering analyses are easier and more time-efficient, allowing you to organize your work according to your preferences and priorities.
* With My Studio's collaborative features, you can spark discussions, share ideas, and collectively work towards achieving your goals. It empowers your team to stay informed, engaged, and aligned with the company's overall vision.
# Navigating to My Studio
Let's first locate **My Studio** on your MoEngage dashboard before proceeding to create your saved analyses.
1. On the sidebar menu in MoEngage, hover over the **Analyze** menu item  . The **Analyze** menu appears.
2. Click **My Studio**.
. The **Analyze** menu appears.
2. Click **My Studio**.
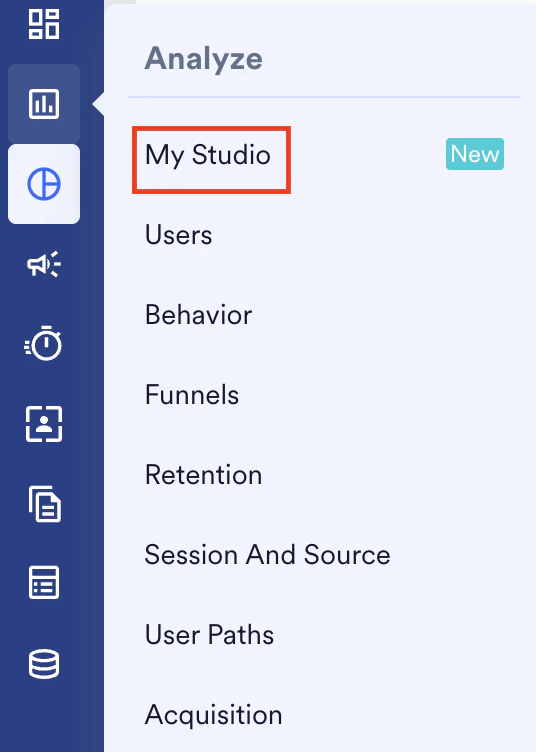 The My Studio page appears.
3. You'll see all your saved analyses with the following details:
| Name | Description | Last Updated | Analyses Type |
| ---------------------------------------- | ------------------------------------ | ------------------------------------------------ | ----------------------------------------------------------------------------------------------------- |
| Name of the user who saved the analysis. | A brief description of the analysis. | The date and time the analysis was last updated. | The category of analysis: - Users - Behavior - Funnels - Retention - Session and source - User paths |
You can use the search bar to find a saved analysis or filter the results based on the analysis type.
The My Studio page appears.
3. You'll see all your saved analyses with the following details:
| Name | Description | Last Updated | Analyses Type |
| ---------------------------------------- | ------------------------------------ | ------------------------------------------------ | ----------------------------------------------------------------------------------------------------- |
| Name of the user who saved the analysis. | A brief description of the analysis. | The date and time the analysis was last updated. | The category of analysis: - Users - Behavior - Funnels - Retention - Session and source - User paths |
You can use the search bar to find a saved analysis or filter the results based on the analysis type.
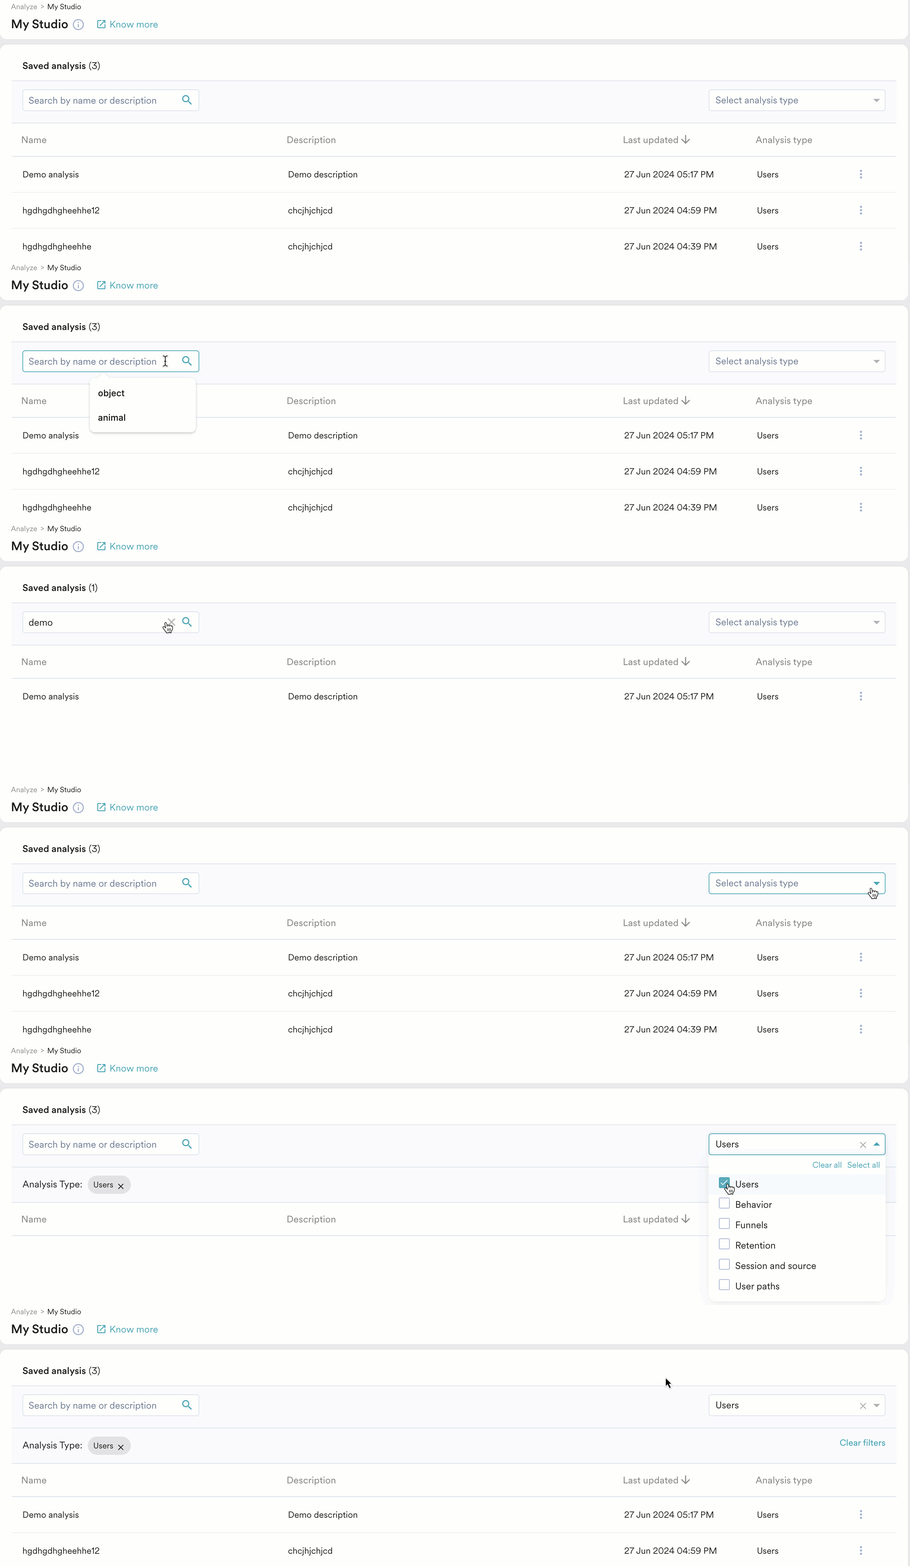 # Saved Analyses
When you execute the analysis and believe you will revisit it, MoEngage recommends saving the analysis to **My Studio**. You can accomplish this by clicking the **Save** dropdown and selecting your Workspace (Studio in this case) you want to save to. In this section, we will take the example of saving a **Users** analysis.
To create saved analyses, perform the following steps:
1. On the sidebar menu in MoEngage, hover over the **Analyze** menu item . The **Analyze** menu appears.
2. Click **Users**.
# Saved Analyses
When you execute the analysis and believe you will revisit it, MoEngage recommends saving the analysis to **My Studio**. You can accomplish this by clicking the **Save** dropdown and selecting your Workspace (Studio in this case) you want to save to. In this section, we will take the example of saving a **Users** analysis.
To create saved analyses, perform the following steps:
1. On the sidebar menu in MoEngage, hover over the **Analyze** menu item . The **Analyze** menu appears.
2. Click **Users**.
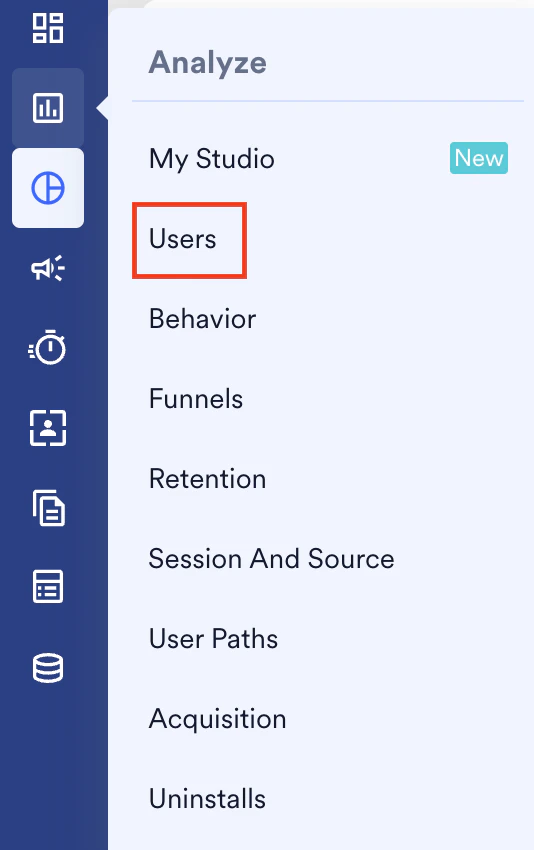 The User analysis page appears.
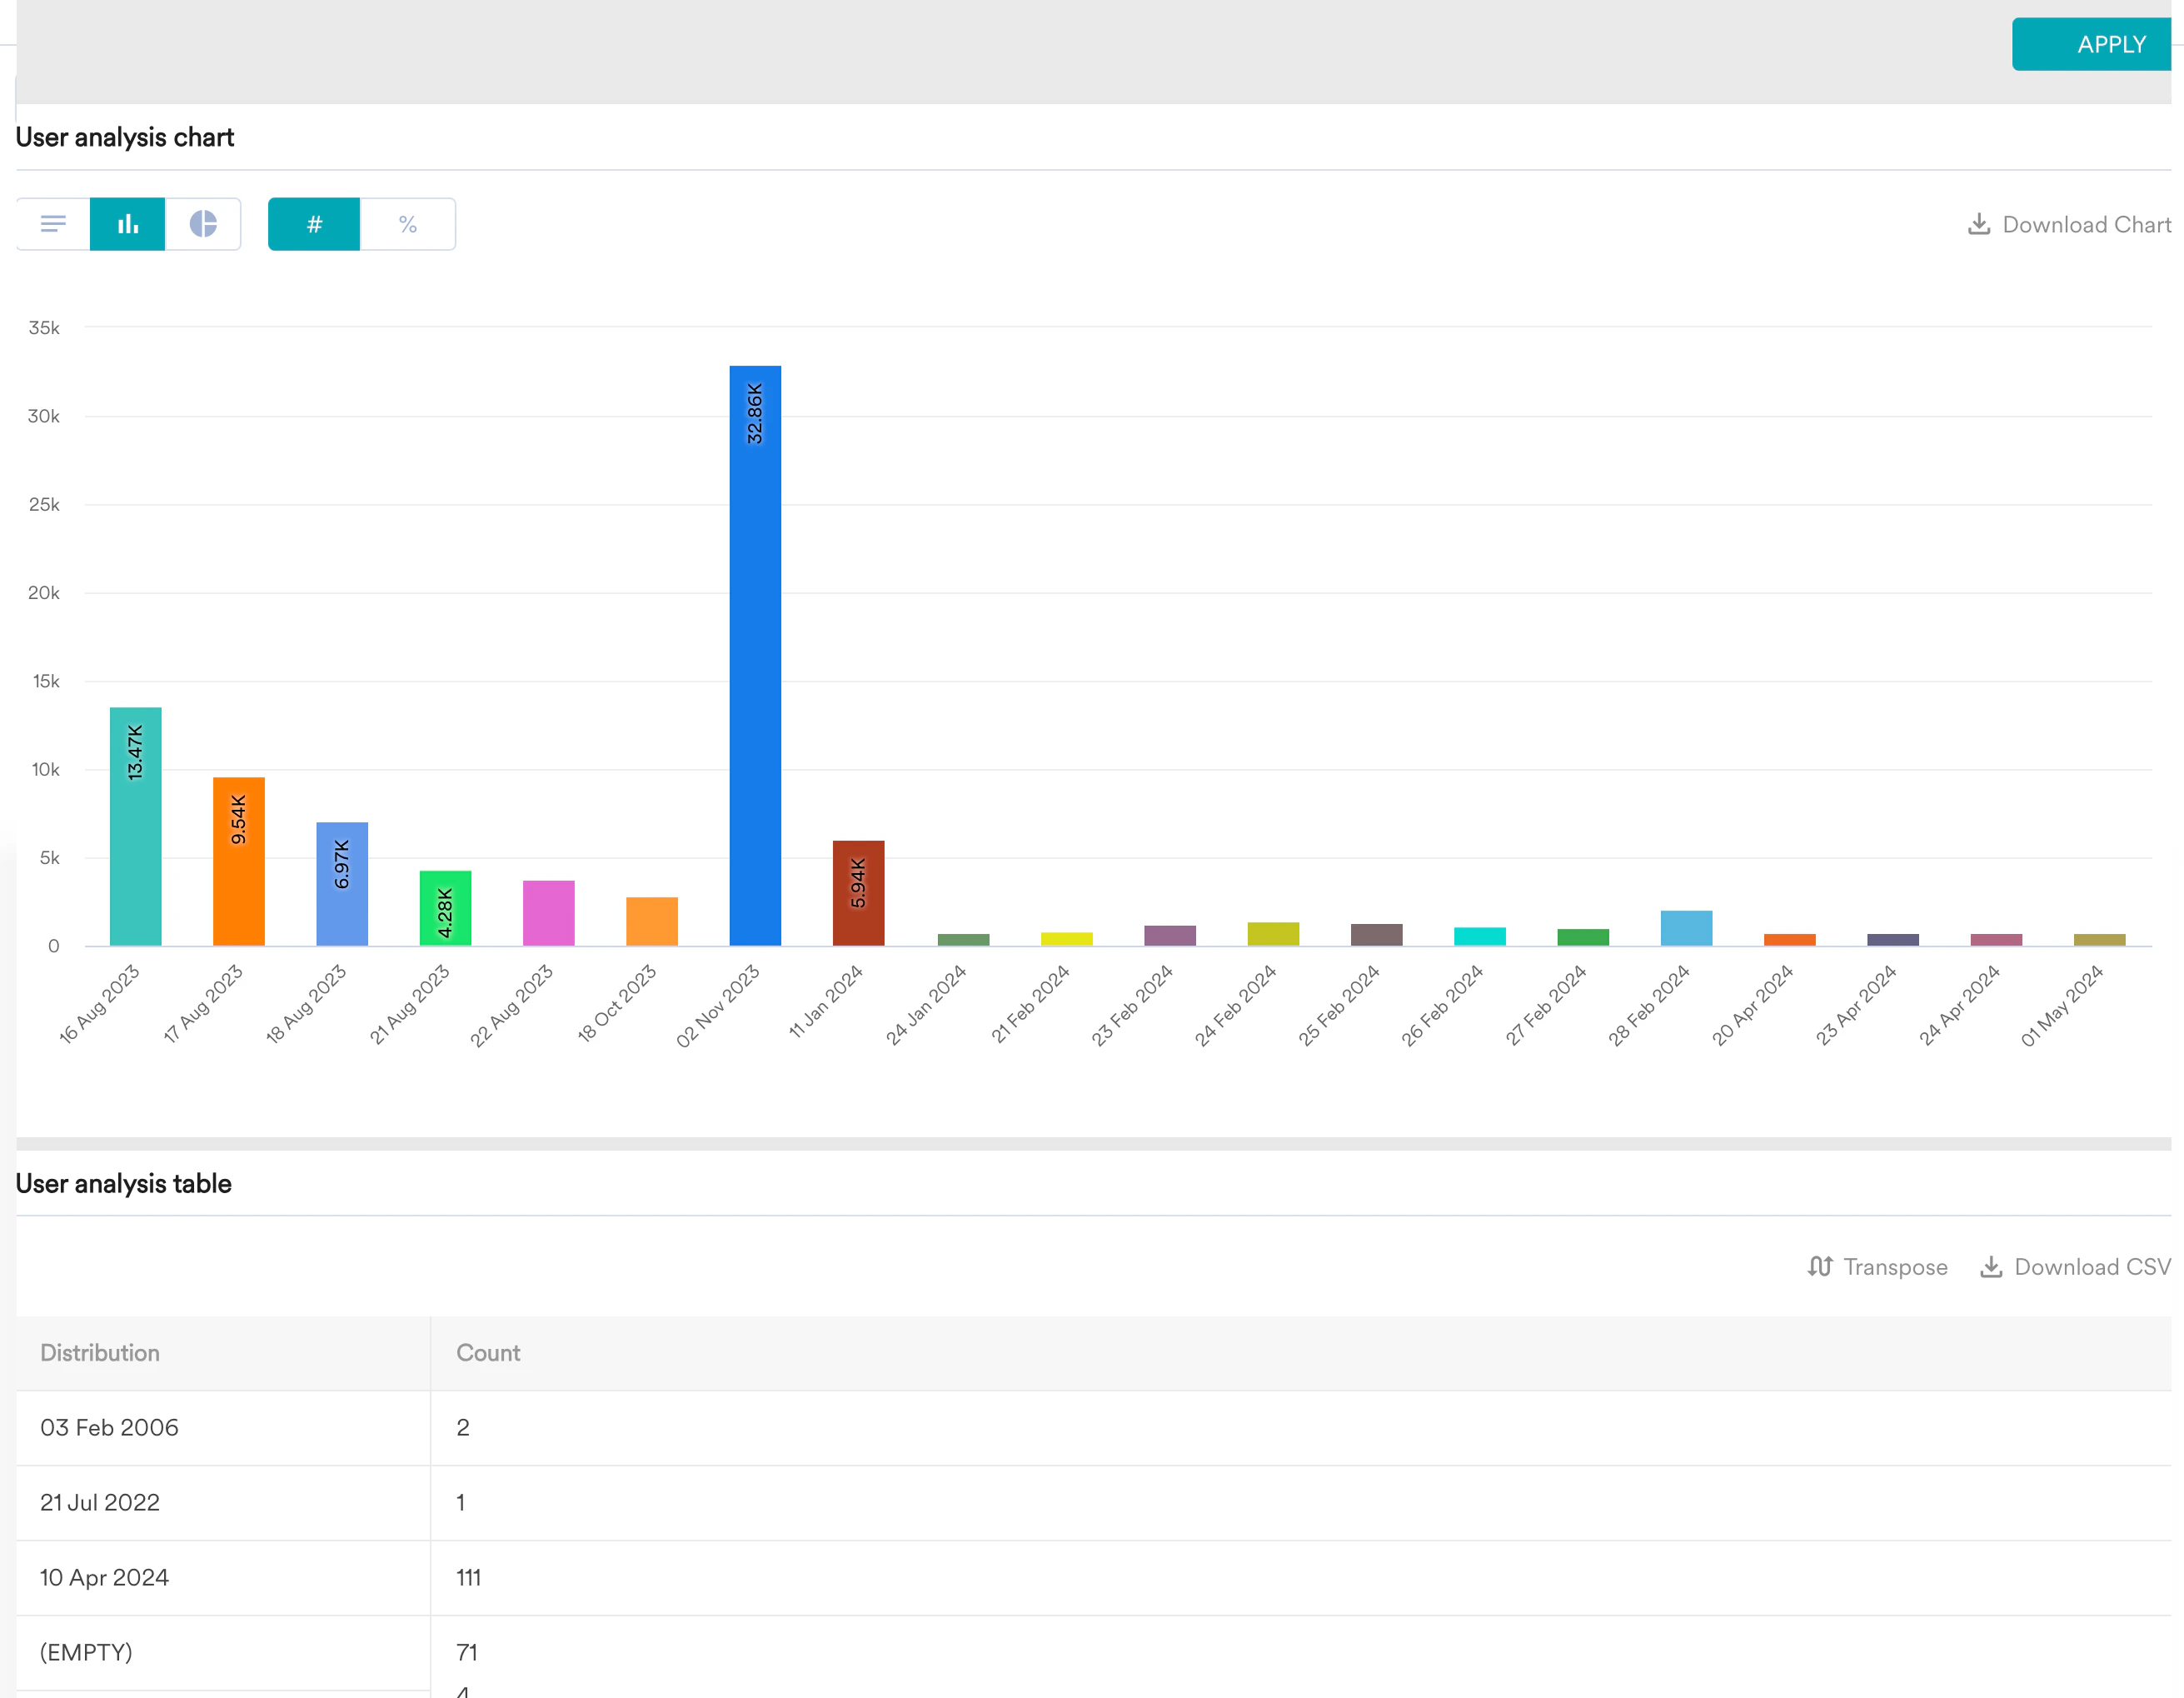
3. Select the appropriate User property(ies) for analysis from the **Select user property** dropdown and then click **APPLY** to execute the event.
The User analysis page appears.
3. Select the appropriate User property(ies) for analysis from the **Select user property** dropdown and then click **APPLY** to execute the event.
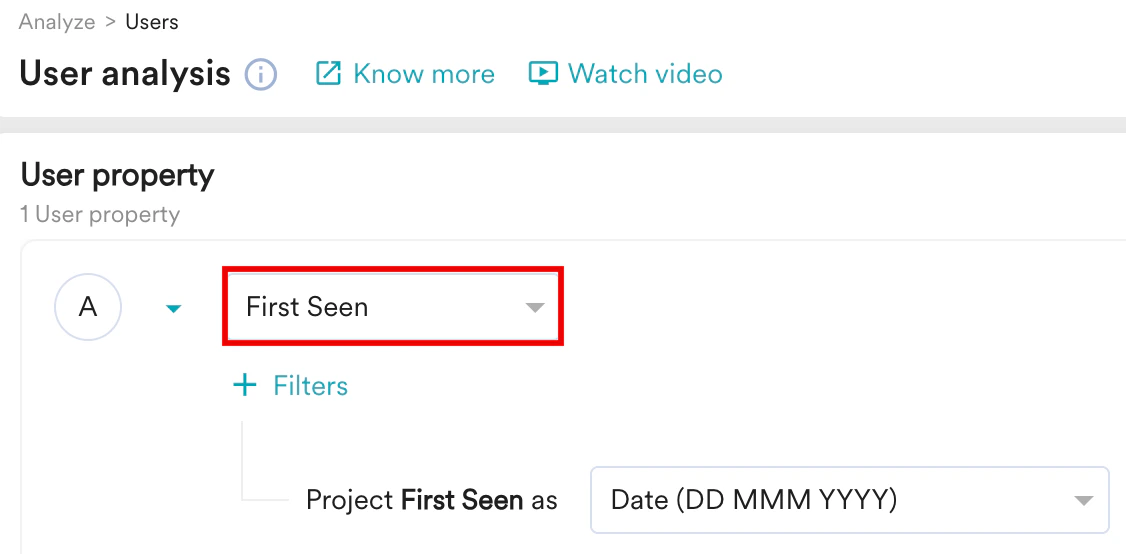 Clicking **APPLY** will allow you to examine the analysis data in both graphical and tabular format.
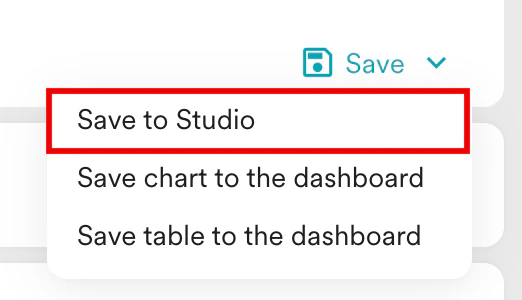
 4. Click the **Save** dropdown and then select **Save to Studio**.
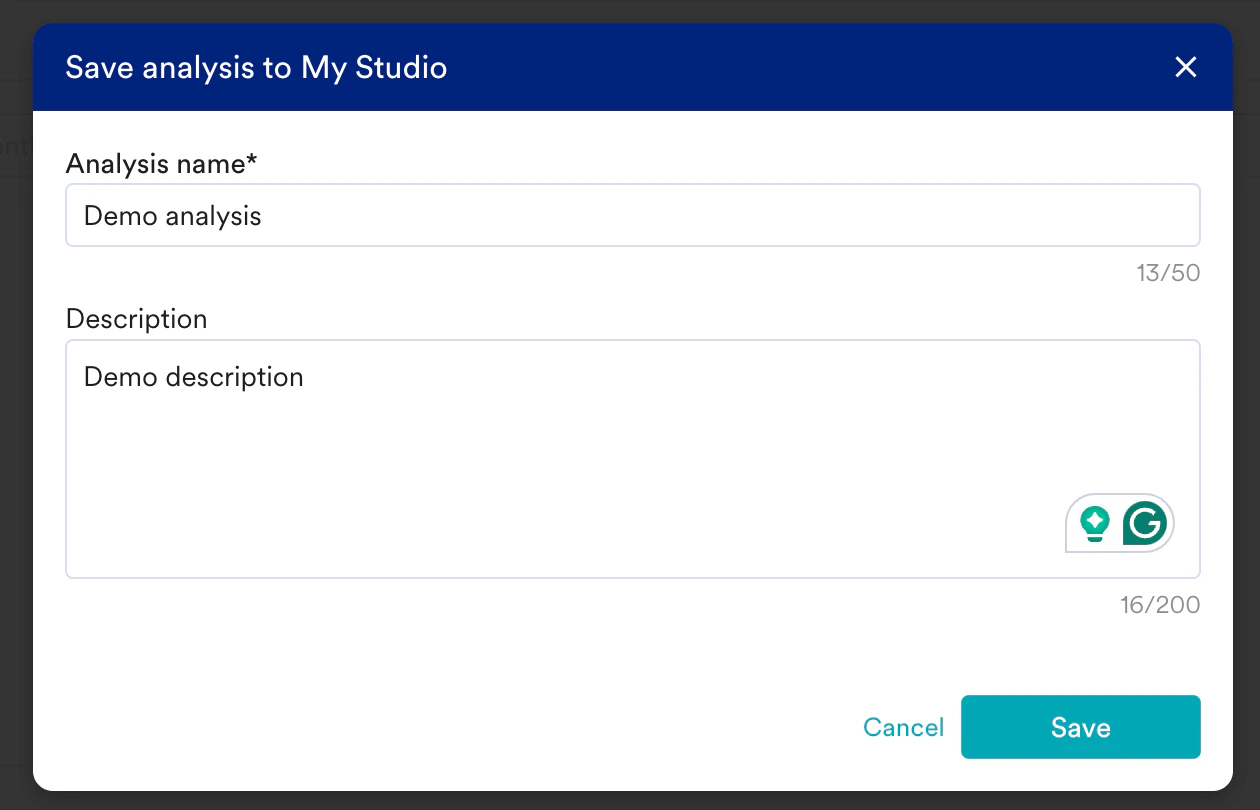
 5. On the pop-up, enter the name and description of your analysis and then click **Save** to confirm.
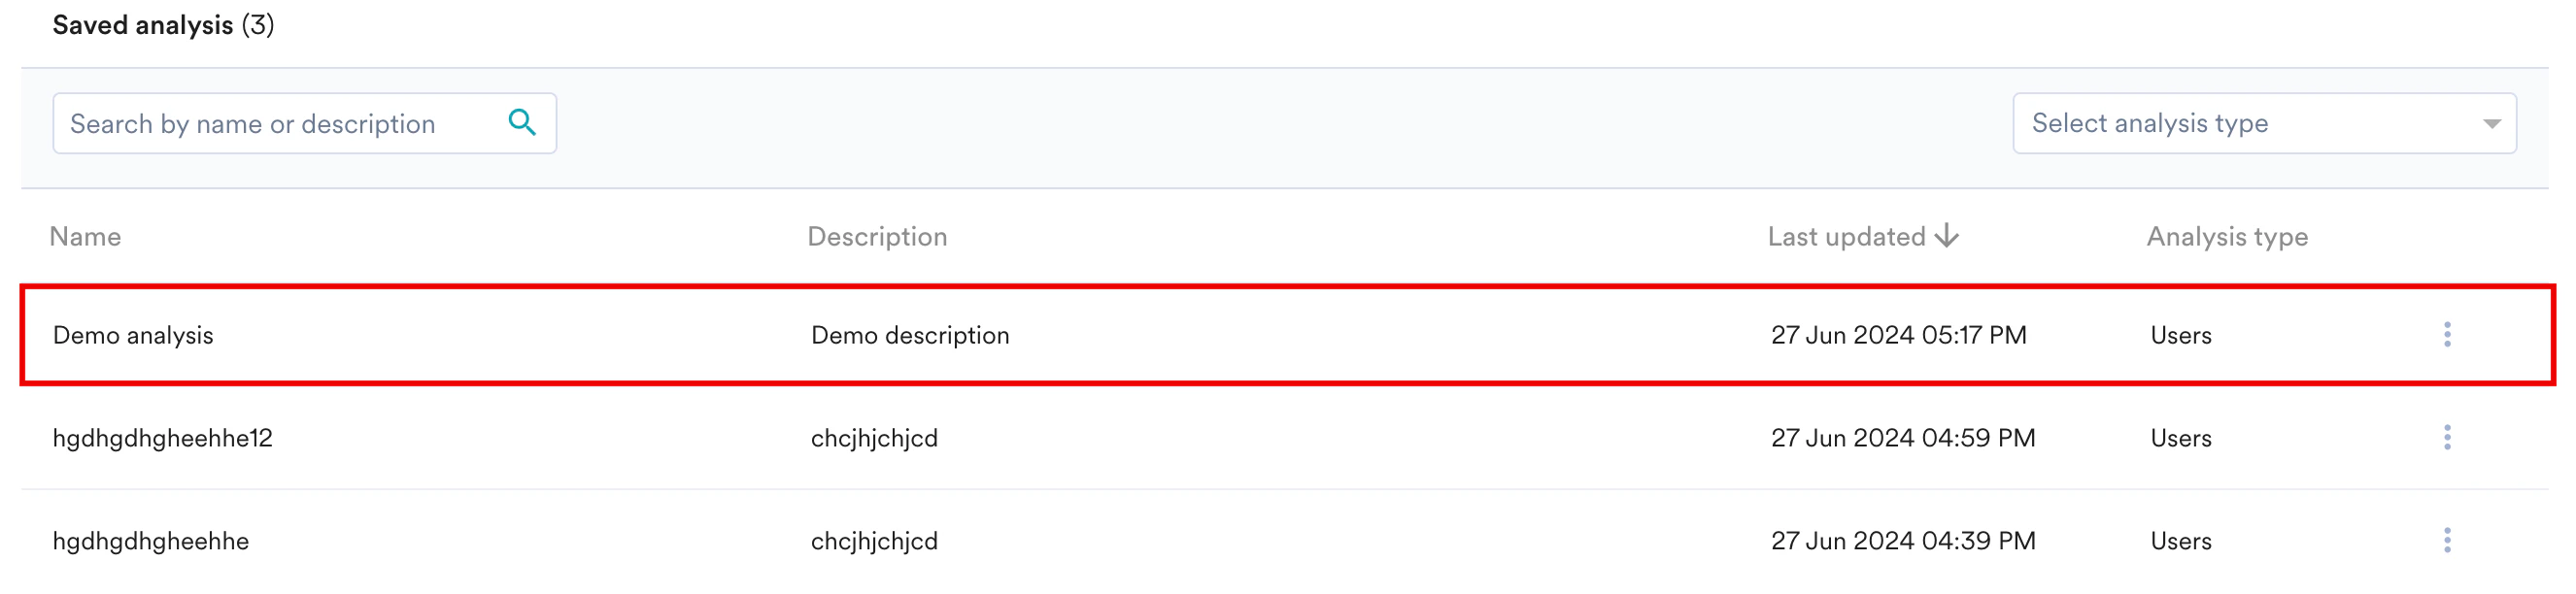
 You'll receive a success message "Analysis saved successfully".
6. Navigate to **My Studio** on your MoEngage dashboard to view the newly saved analysis.
You'll receive a success message "Analysis saved successfully".
6. Navigate to **My Studio** on your MoEngage dashboard to view the newly saved analysis.
 # Sharing Saved Analyses
Once an analysis is saved to My Studio, you can share it with team members or external audiences to facilitate collaboration and knowledge sharing. This feature provides detailed control over who can view or edit the analysis.
To share an analysis from the My Studio list view, perform the following steps:
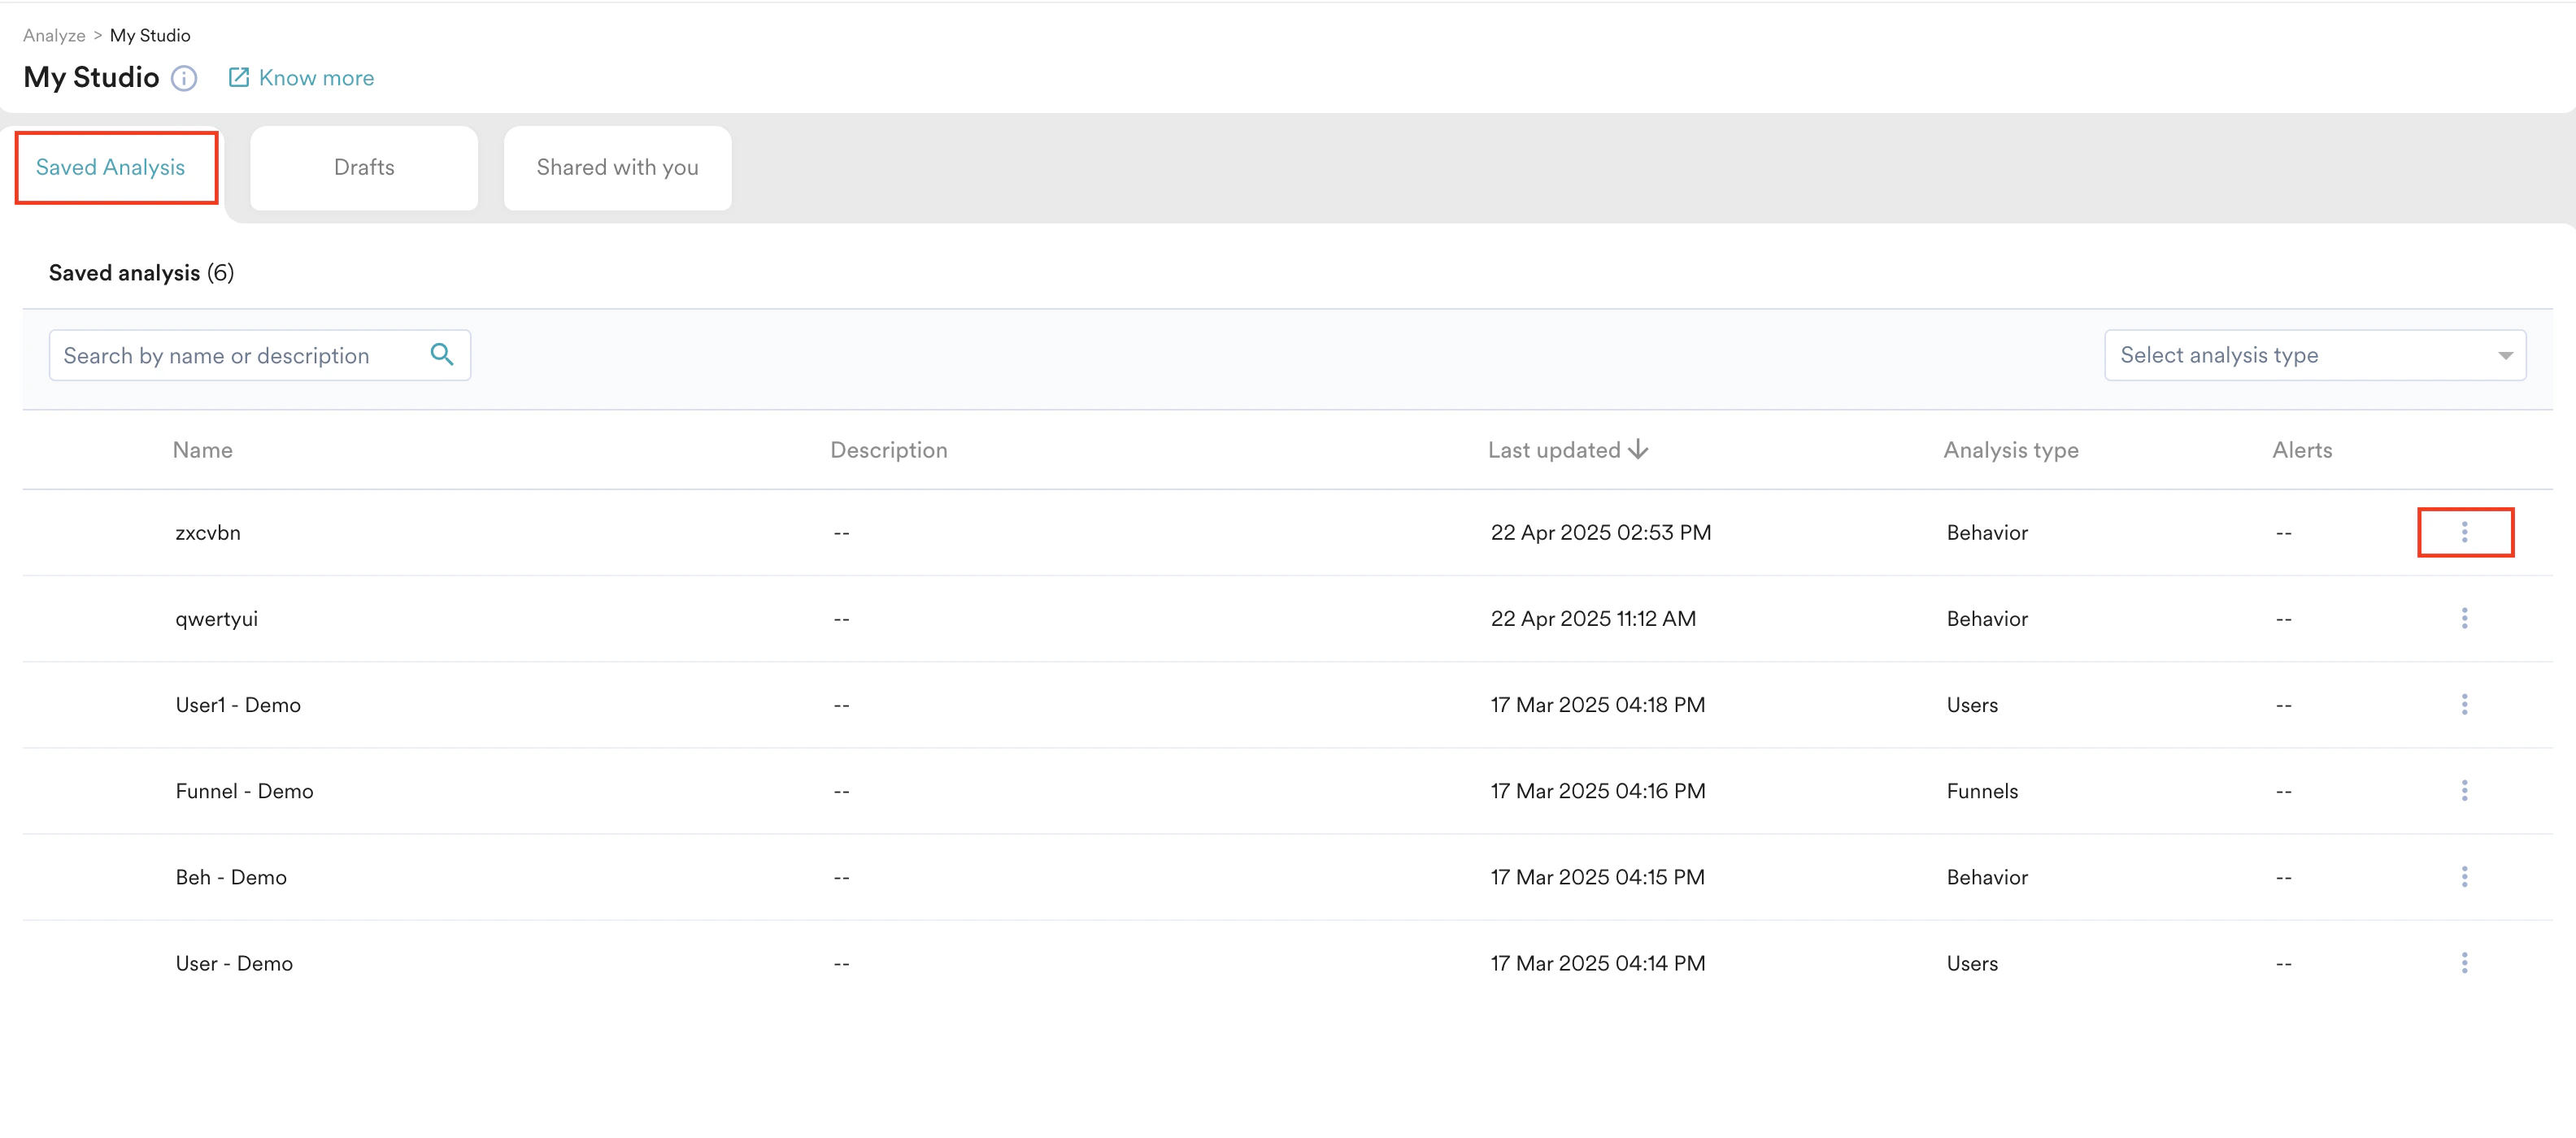
1. From the **Saved Analysis** tab in My Studio, locate the analysis you wish to share in the list.
2. Click the vertical ellipsis (...) next to the analysis name.
# Sharing Saved Analyses
Once an analysis is saved to My Studio, you can share it with team members or external audiences to facilitate collaboration and knowledge sharing. This feature provides detailed control over who can view or edit the analysis.
To share an analysis from the My Studio list view, perform the following steps:
1. From the **Saved Analysis** tab in My Studio, locate the analysis you wish to share in the list.
2. Click the vertical ellipsis (...) next to the analysis name.
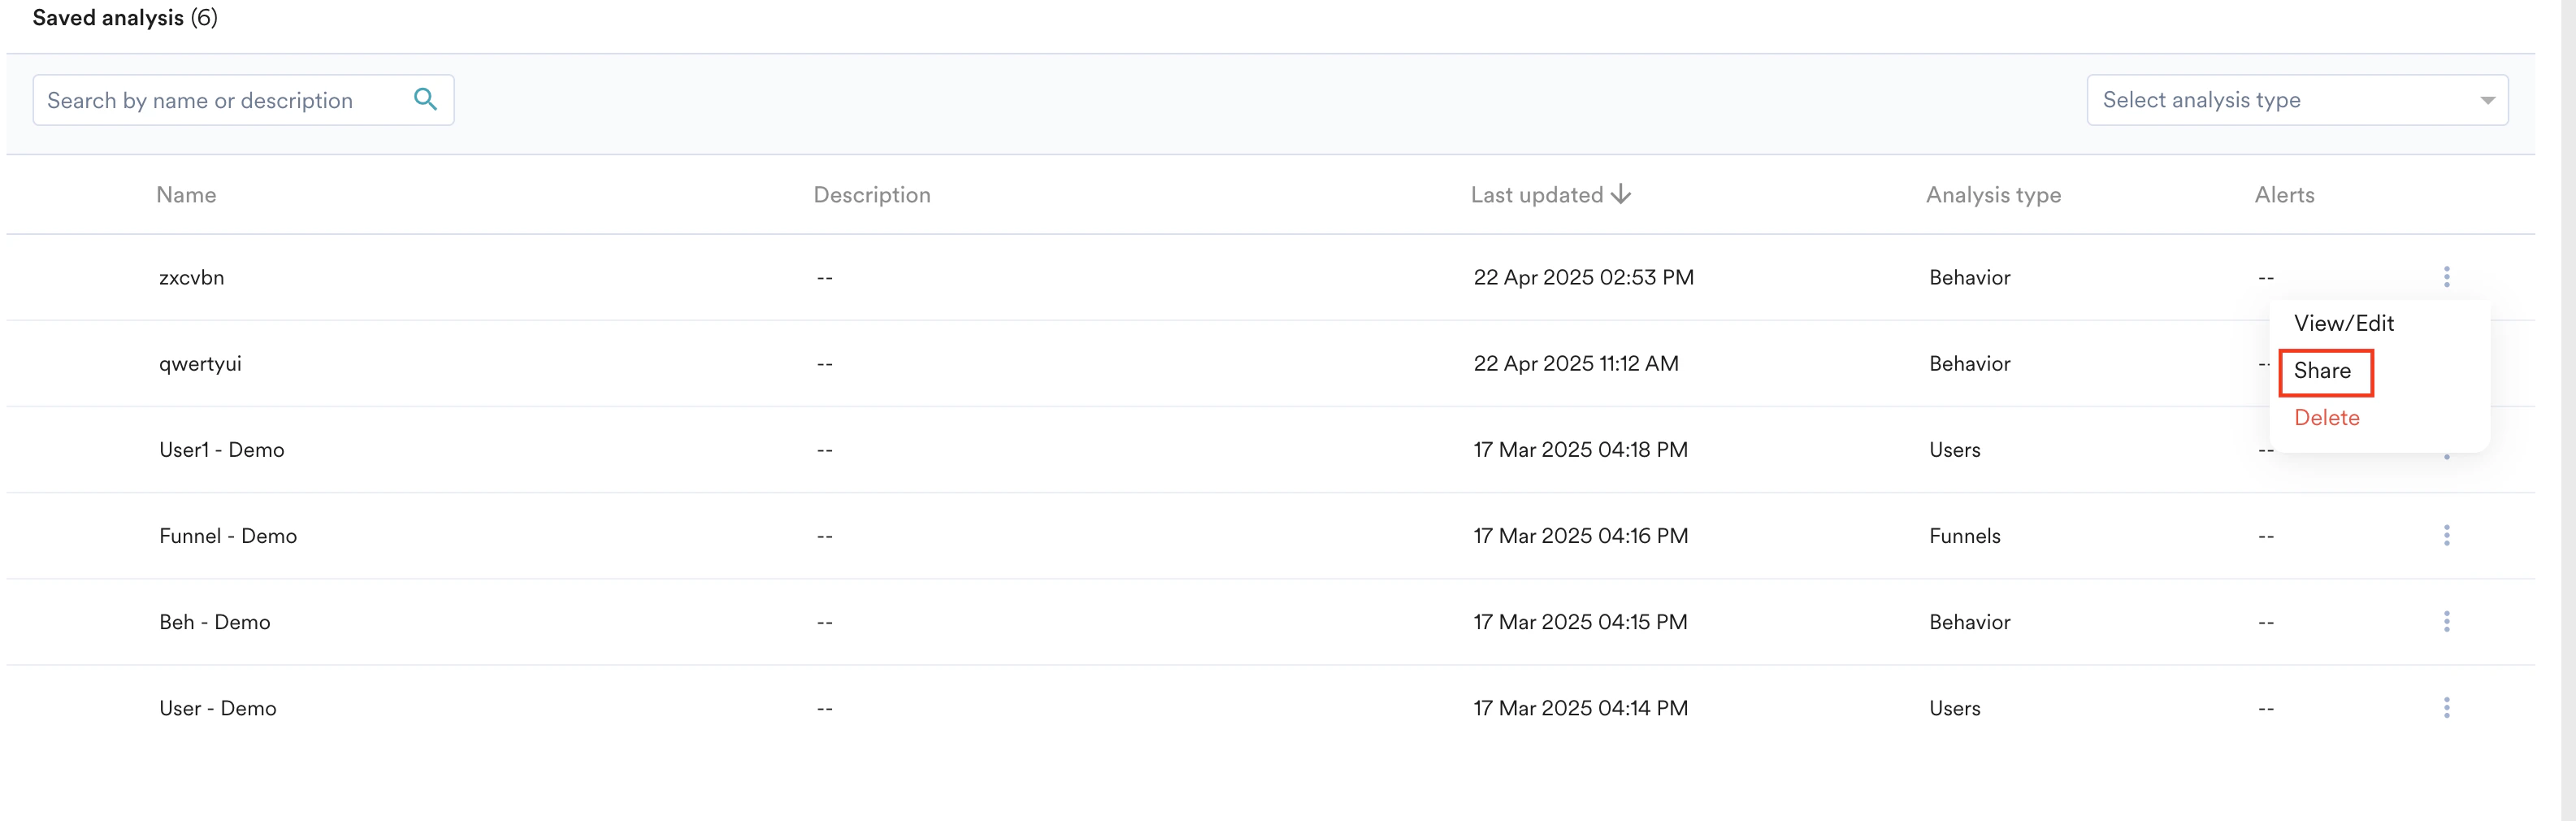
 3. Select **Share** from the list. The **Share** settings window will appear.
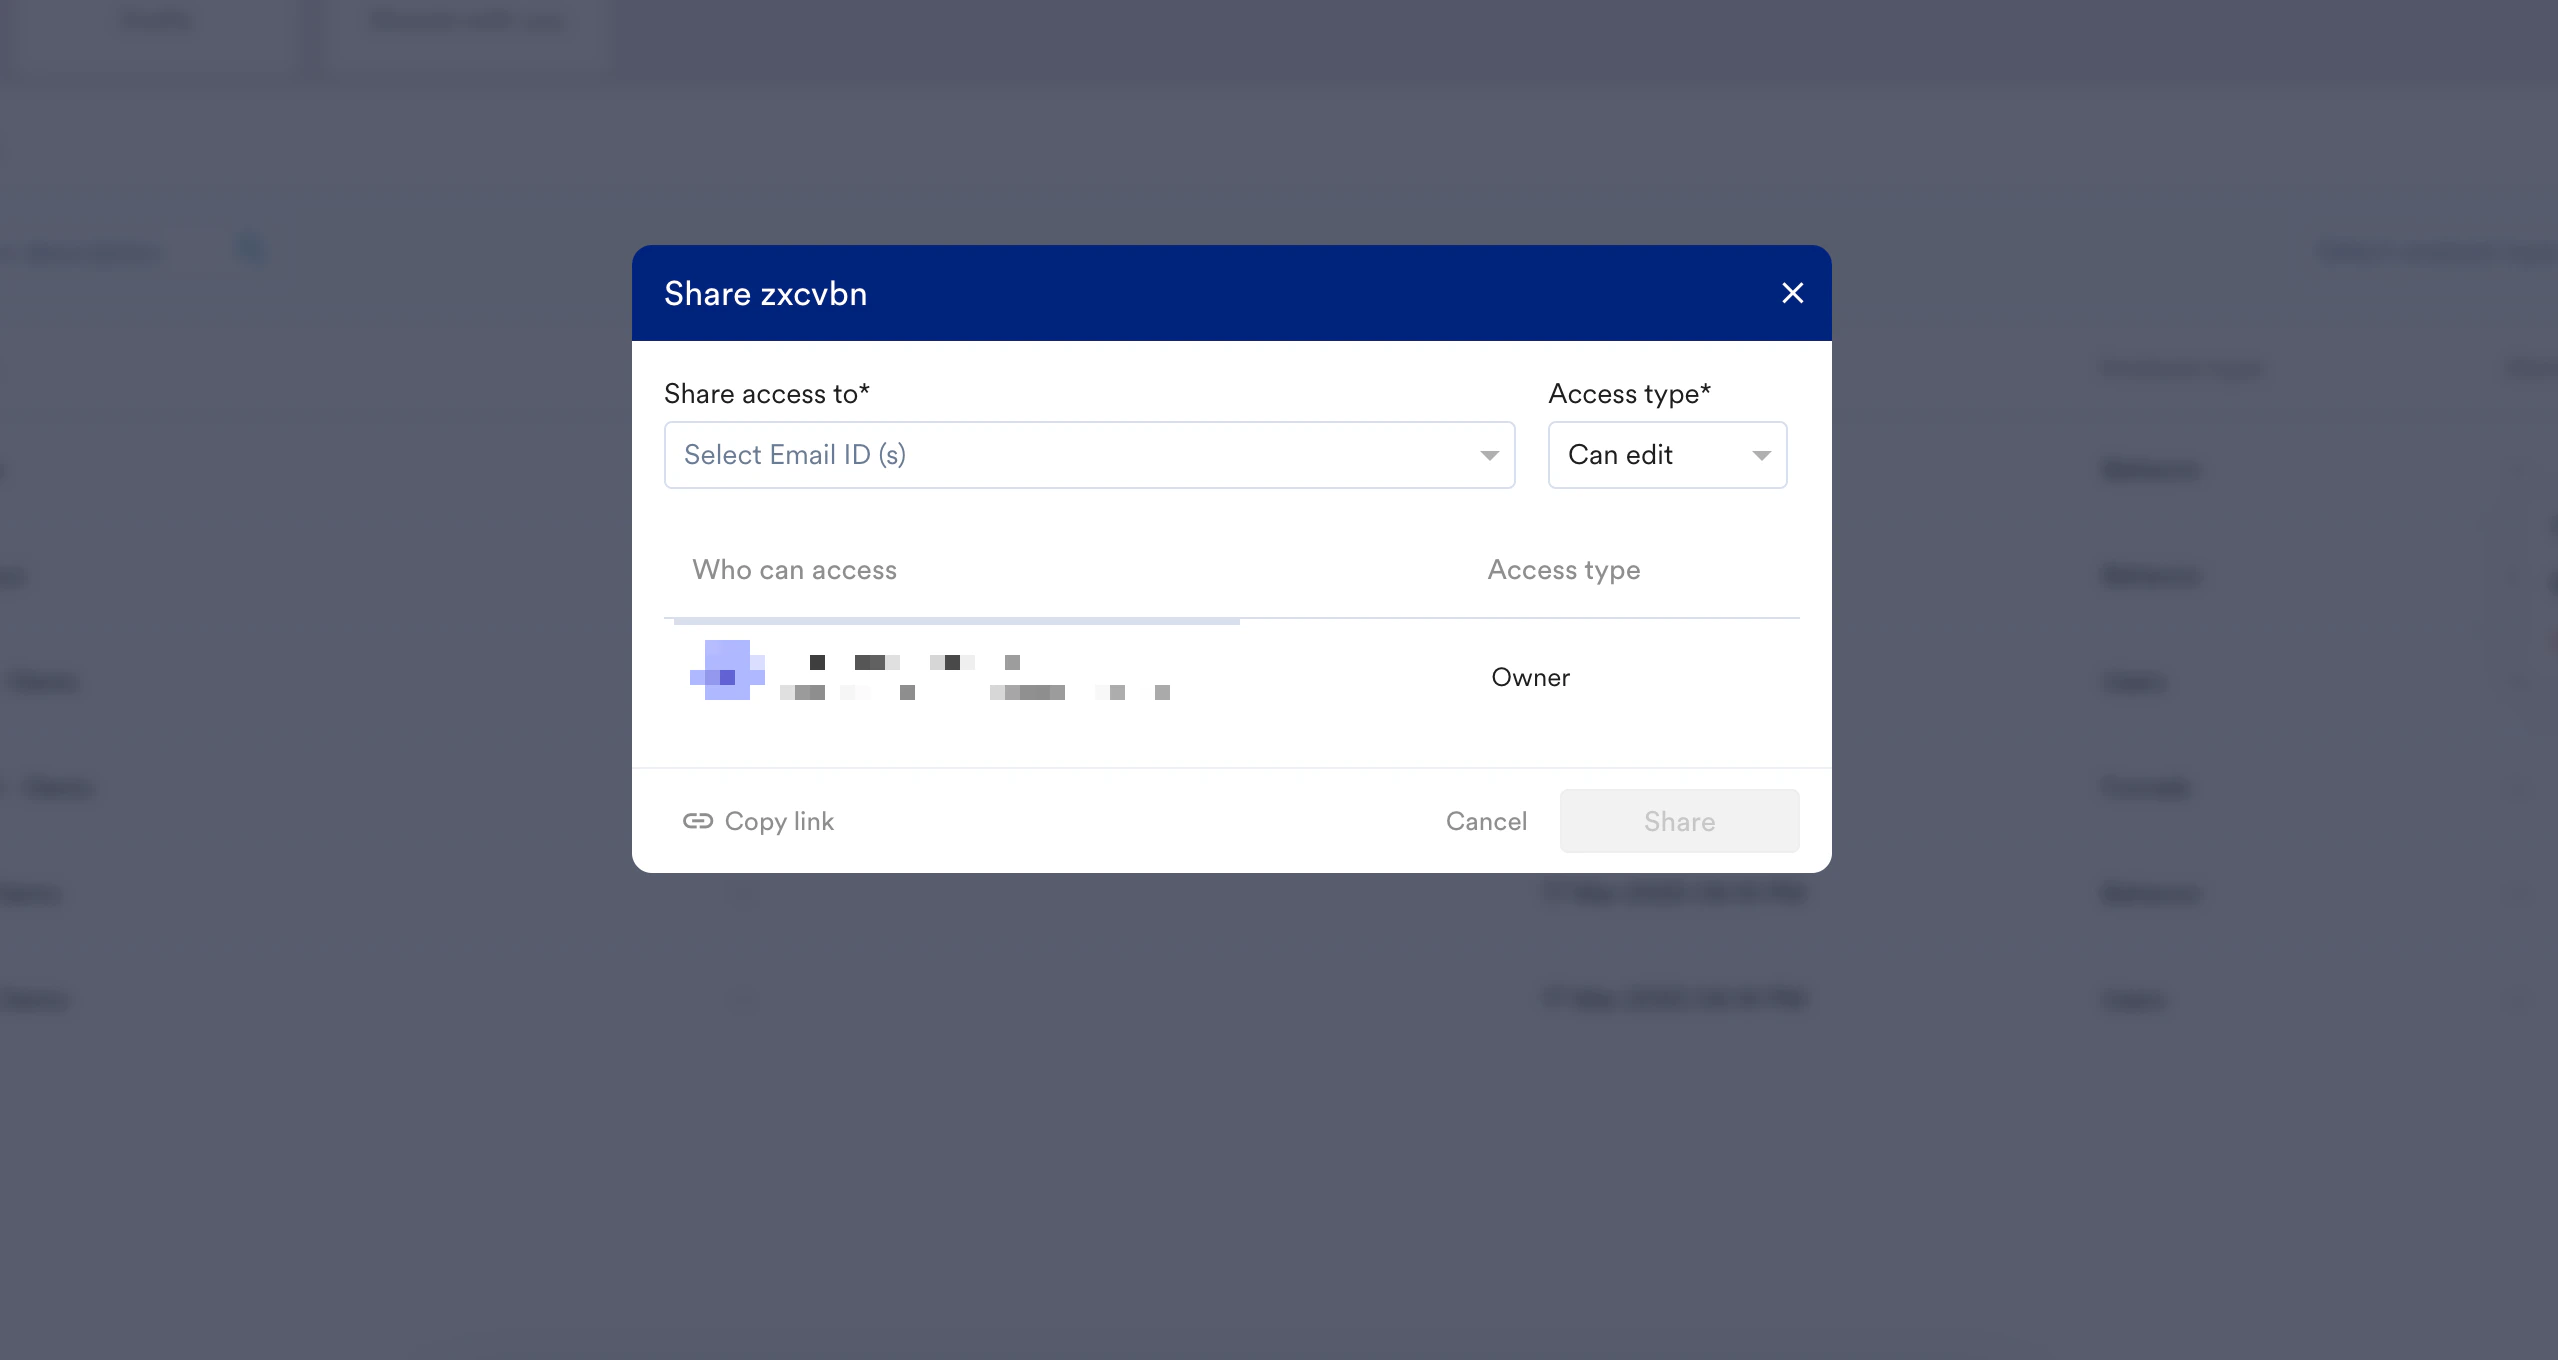
 4. Configure the sharing settings. For more information, refer to [Configuring Sharing Settings](/user-guide/analyze/dashboards/my-studio) below.
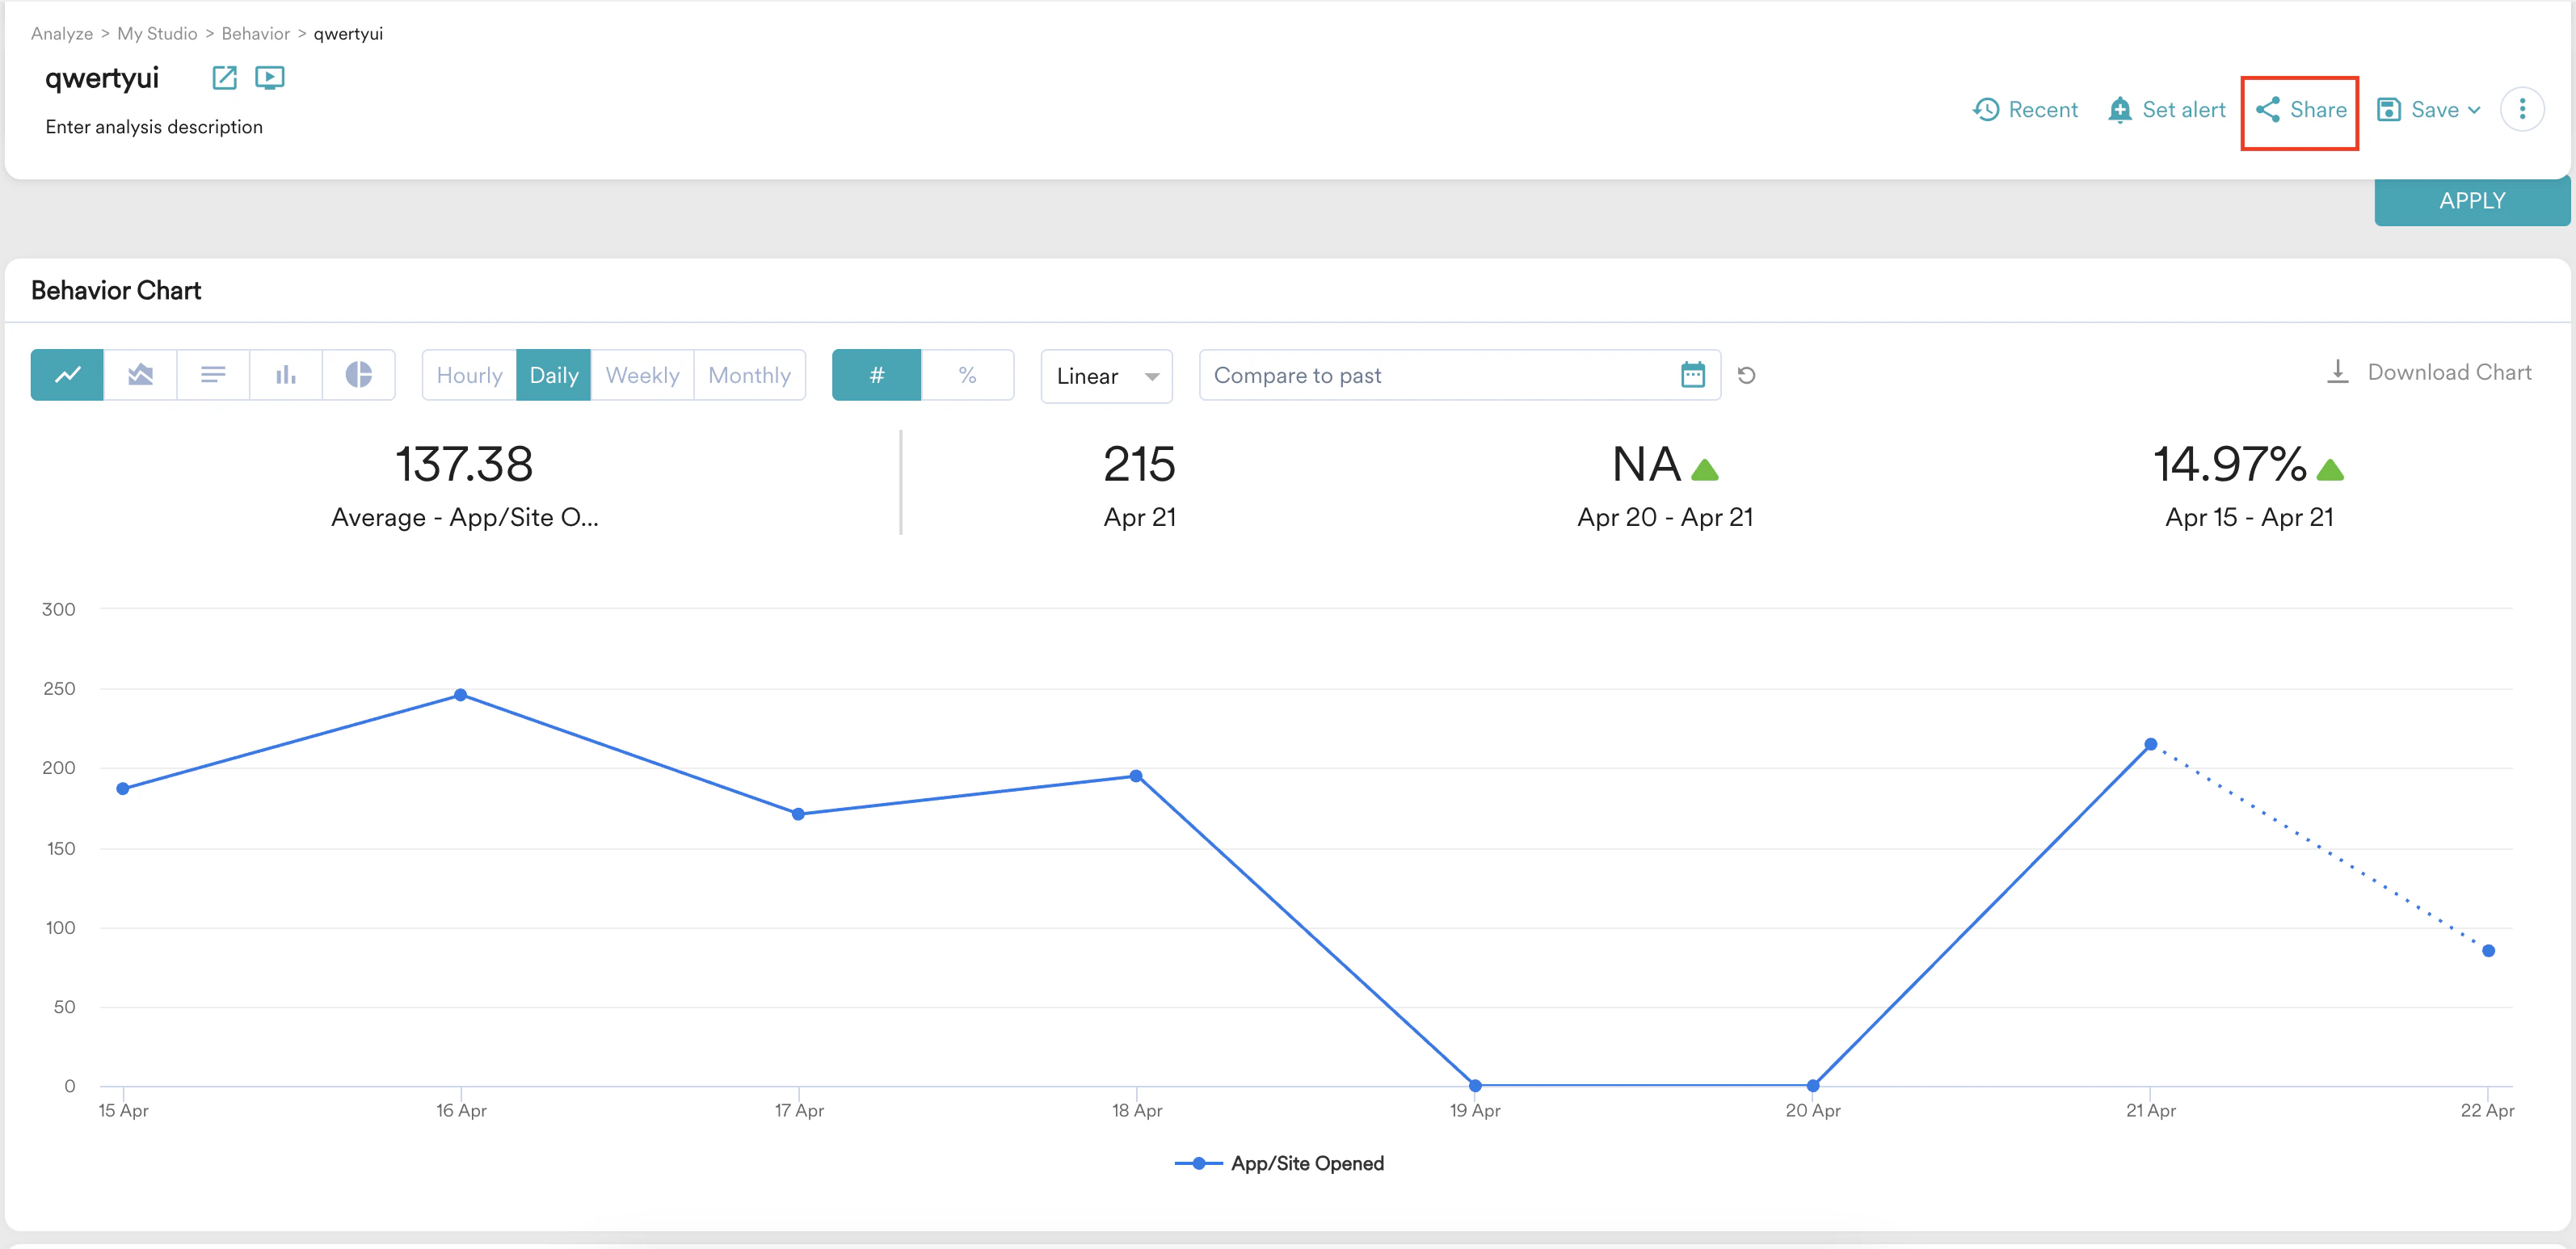
 Alternatively, you can share an analysis immediately after saving it or when viewing/editing it. To share from the analysis page, click the **Share** button in the upper-right corner of the page header.
 ## Configuring Sharing Settings
Regardless of the method used to initiate sharing, the same pop-up window appears, allowing you to configure access permissions.
### General Access Sharing
You can set general access permissions for anyone who receives the shareable link. To do so:
1. Click the **Copy Link** button to copy the unique, secure shareable link to your clipboard.
## Configuring Sharing Settings
Regardless of the method used to initiate sharing, the same pop-up window appears, allowing you to configure access permissions.
### General Access Sharing
You can set general access permissions for anyone who receives the shareable link. To do so:
1. Click the **Copy Link** button to copy the unique, secure shareable link to your clipboard.
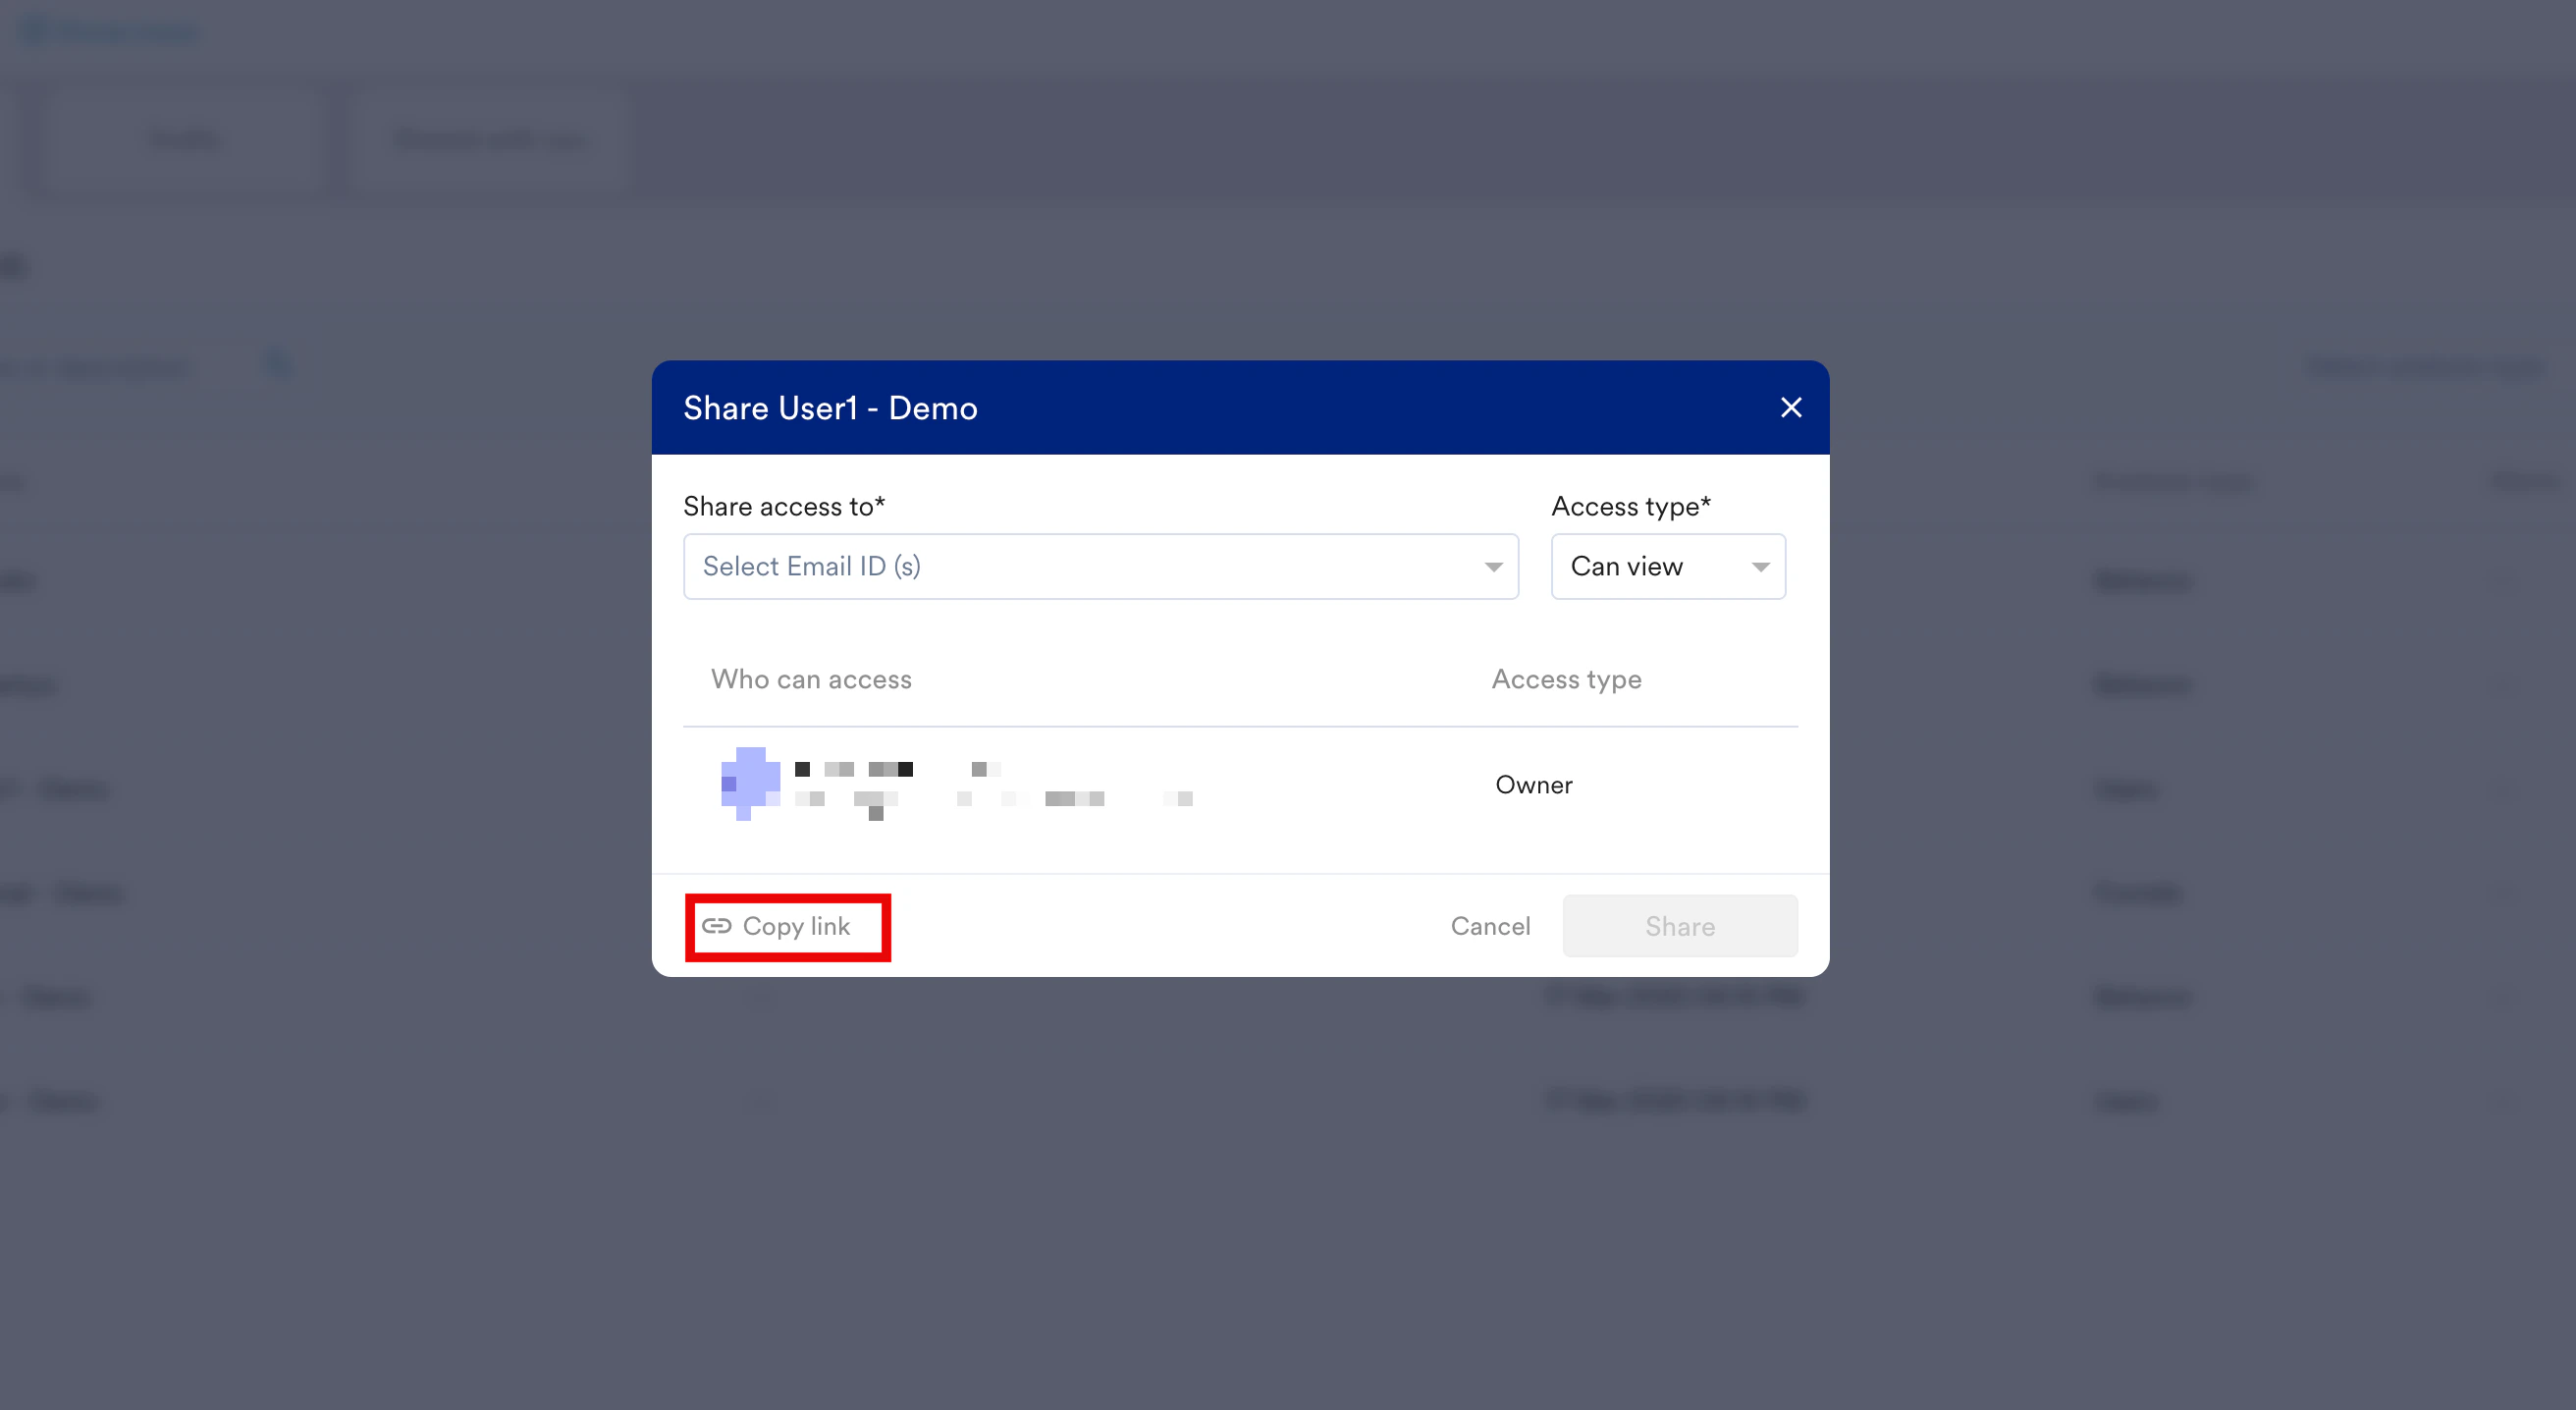 2. Set Edit or View permissions for general access. For more information, refer to [Understanding Permissions](/user-guide/analyze/dashboards/my-studio) below.
Share this link via email, chat, or other channels.
### Access to Specific Members
For more granular control, you can invite specific individuals via email and set their access levels independently. To invite specific members, perform the following steps in the **Share** pop-up window:
1. From the **Share access to** list, select the email addresses of the members you want to share the analysis with.
2. From the **Access type** list, select the desired permission level (**View** or **Edit**) for the specified user(s).
2. Set Edit or View permissions for general access. For more information, refer to [Understanding Permissions](/user-guide/analyze/dashboards/my-studio) below.
Share this link via email, chat, or other channels.
### Access to Specific Members
For more granular control, you can invite specific individuals via email and set their access levels independently. To invite specific members, perform the following steps in the **Share** pop-up window:
1. From the **Share access to** list, select the email addresses of the members you want to share the analysis with.
2. From the **Access type** list, select the desired permission level (**View** or **Edit**) for the specified user(s).
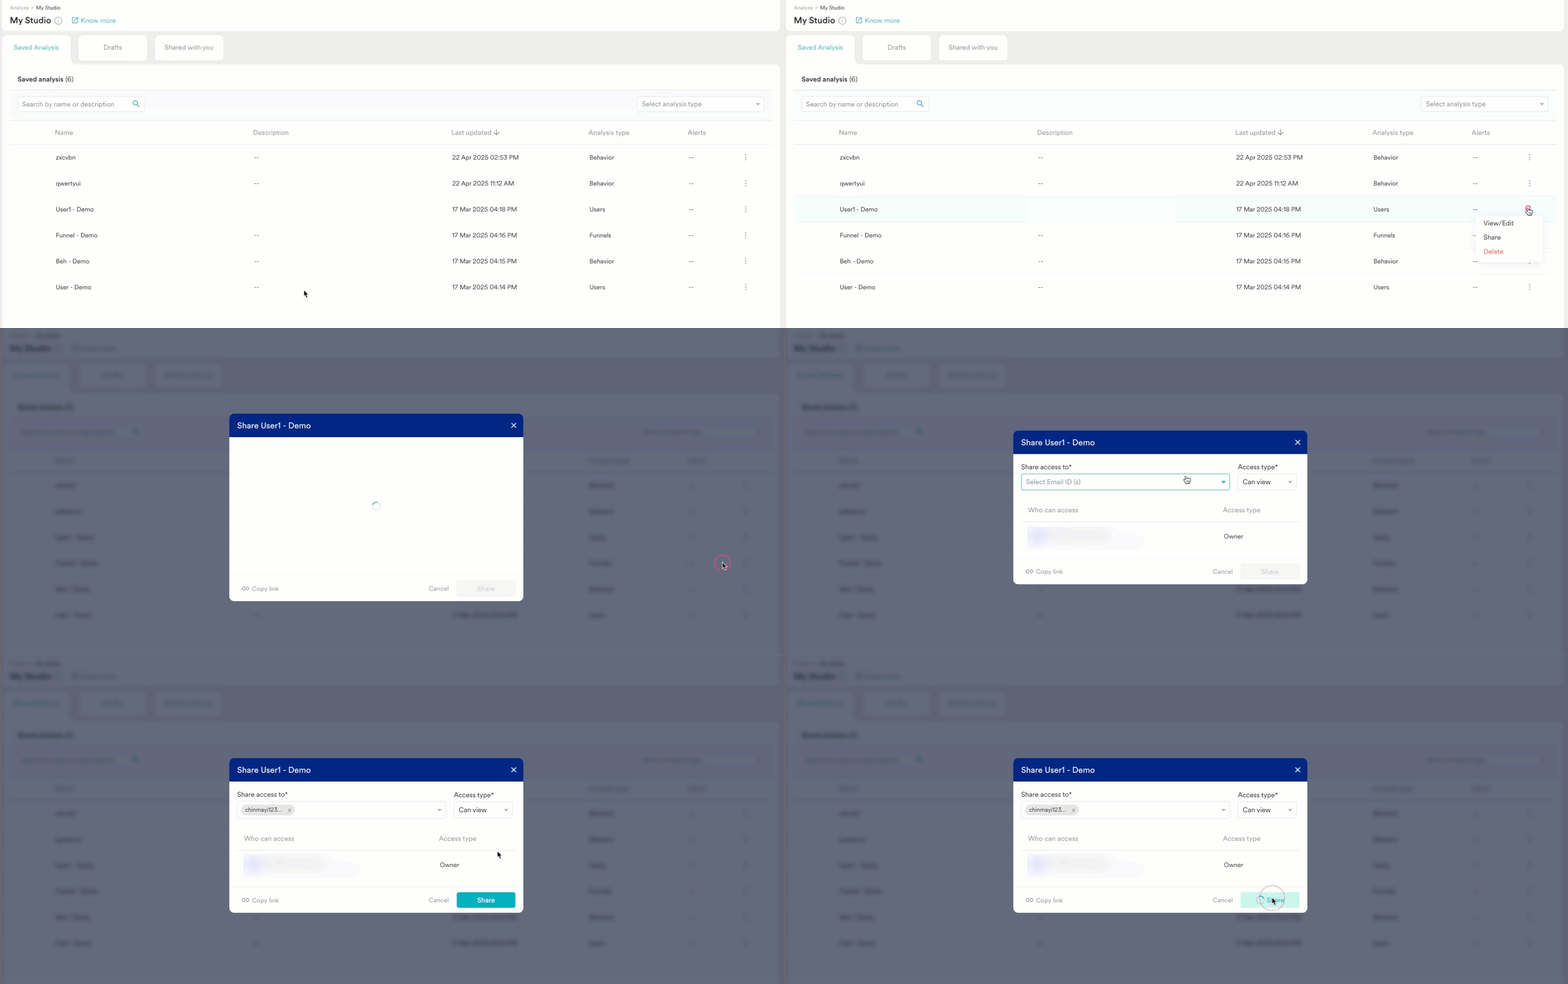 3. Click **Share**.
Invited users will receive an email notification containing a direct link to the shared analysis and a preview of the chart. Their names and permissions will appear in the list of users with access.
## Understanding Permissions
### Edit Access
Users granted **Edit** access have the following permissions:
* **Modify the analysis:** Make changes to the analysis parameters and setup.
* **Save changes:** Save updates to the analysis. Note that saving changes modifies the original analysis for all collaborators. Consider using **Save as a new analysis** if you want to preserve the original version.
* **Invite others:** Share the analysis with additional users, granting either View or Edit permissions.
* **Delete the analysis:** Remove the analysis entirely. A confirmation prompt will appear before deletion. The original owner will be notified via email if a collaborator deletes the analysis.
### View Access
Users granted **View** access have the following permissions:
* **View the analysis:** See the analysis configuration and results, and interact with visualizations.
* **Cannot edit:** They cannot make any changes to the analysis setup or save modifications.
* **Cannot invite others:** The option to share the analysis further is disabled for view-only users.
* **Request access (Indirect sharing):** If a user with View access shares the analysis URL with someone who doesn't have permission, the recipient can request access. This request is sent to the original owner of the saved analysis
# Drafts
This feature is only available in the Product Analytics package of MoEngage Analytics.
When you perform analyses within MoEngage Analytics, the progress is automatically saved as drafts. These drafts are conveniently accessible in the **Drafts** tab on the **My Studio** page. This tab serves as a central location for all your ongoing analyses, allowing you to easily resume your work exactly from where you left off.
3. Click **Share**.
Invited users will receive an email notification containing a direct link to the shared analysis and a preview of the chart. Their names and permissions will appear in the list of users with access.
## Understanding Permissions
### Edit Access
Users granted **Edit** access have the following permissions:
* **Modify the analysis:** Make changes to the analysis parameters and setup.
* **Save changes:** Save updates to the analysis. Note that saving changes modifies the original analysis for all collaborators. Consider using **Save as a new analysis** if you want to preserve the original version.
* **Invite others:** Share the analysis with additional users, granting either View or Edit permissions.
* **Delete the analysis:** Remove the analysis entirely. A confirmation prompt will appear before deletion. The original owner will be notified via email if a collaborator deletes the analysis.
### View Access
Users granted **View** access have the following permissions:
* **View the analysis:** See the analysis configuration and results, and interact with visualizations.
* **Cannot edit:** They cannot make any changes to the analysis setup or save modifications.
* **Cannot invite others:** The option to share the analysis further is disabled for view-only users.
* **Request access (Indirect sharing):** If a user with View access shares the analysis URL with someone who doesn't have permission, the recipient can request access. This request is sent to the original owner of the saved analysis
# Drafts
This feature is only available in the Product Analytics package of MoEngage Analytics.
When you perform analyses within MoEngage Analytics, the progress is automatically saved as drafts. These drafts are conveniently accessible in the **Drafts** tab on the **My Studio** page. This tab serves as a central location for all your ongoing analyses, allowing you to easily resume your work exactly from where you left off.
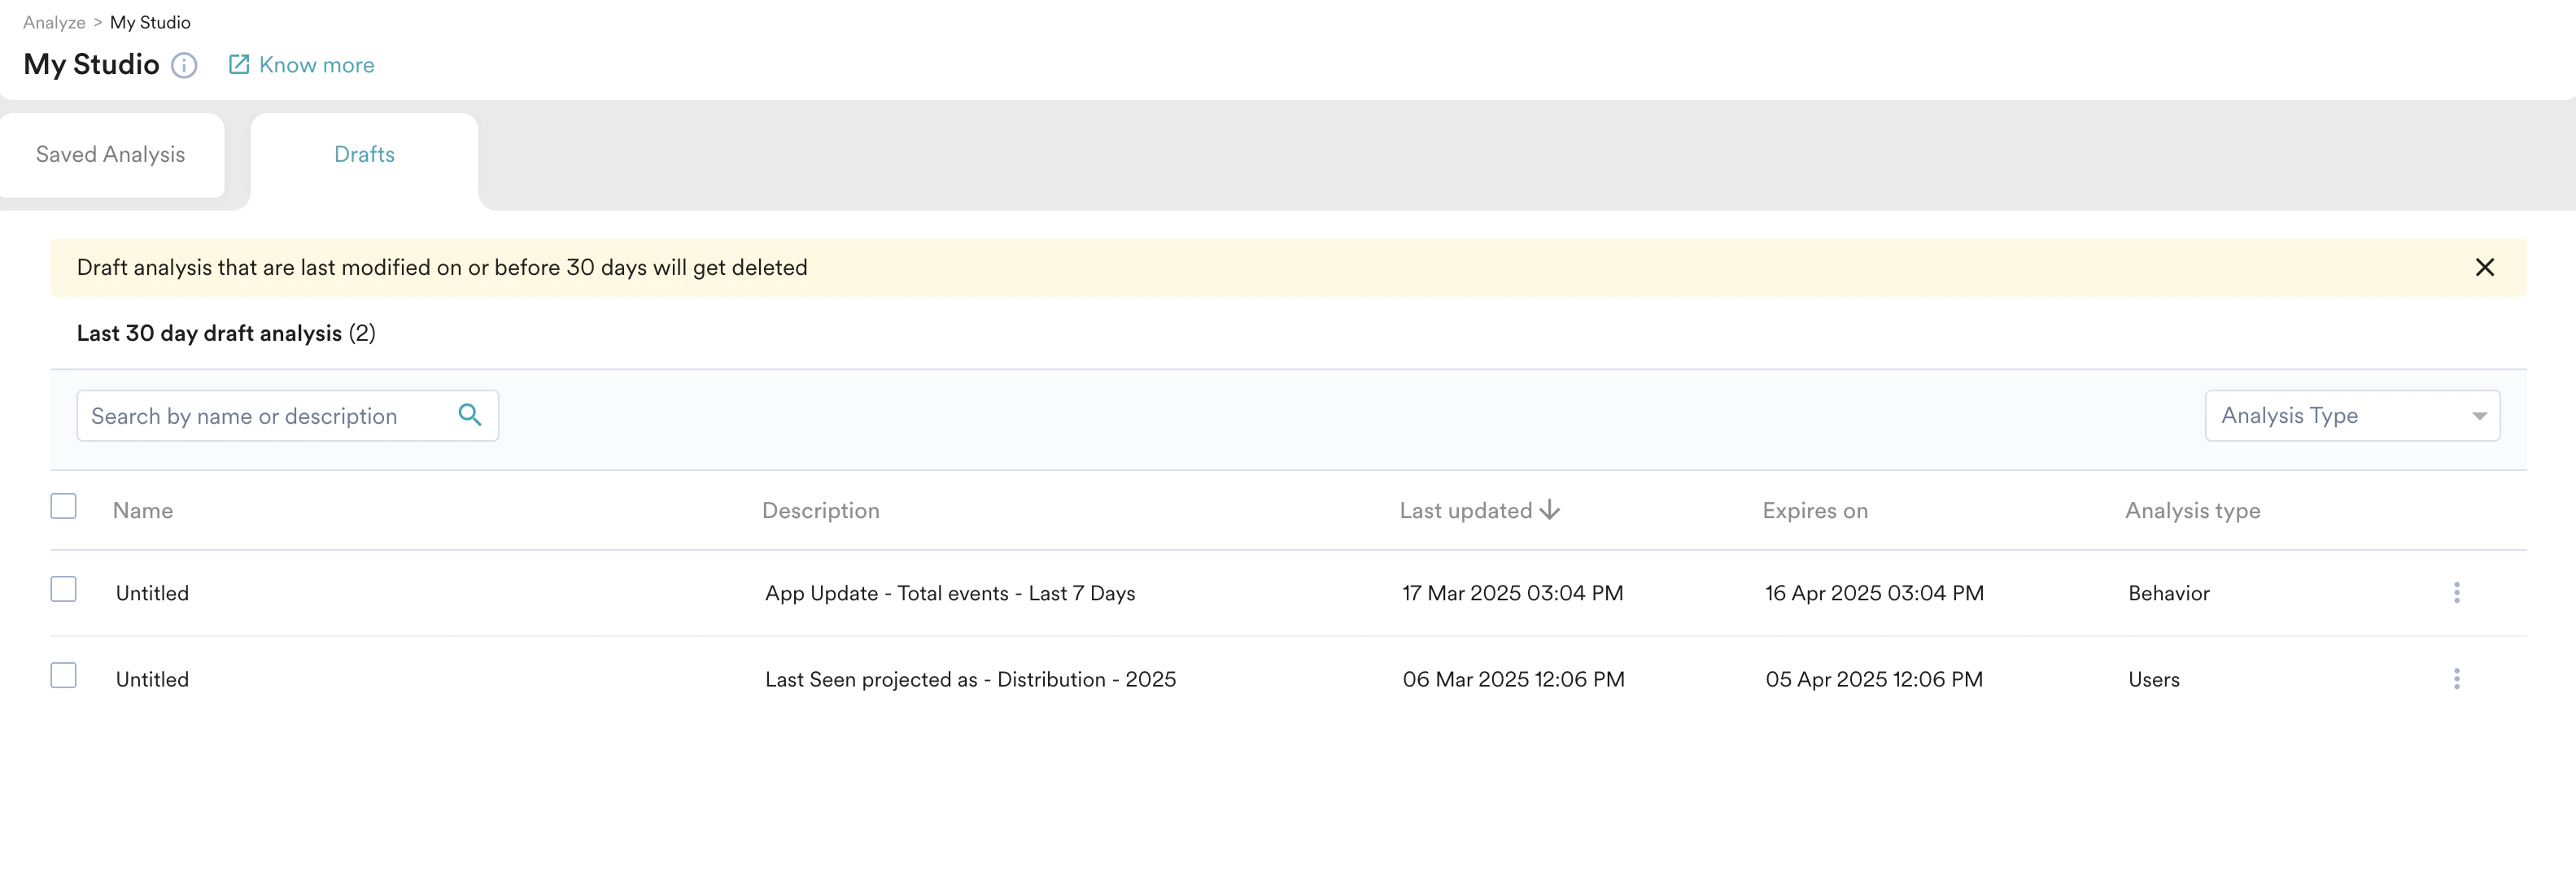 For each automatically saved draft, you can see its description, the date it was last updated, its expiration date, and the analysis type.
Draft analyses that were last modified 30 or more days ago will be automatically deleted.
## Recents
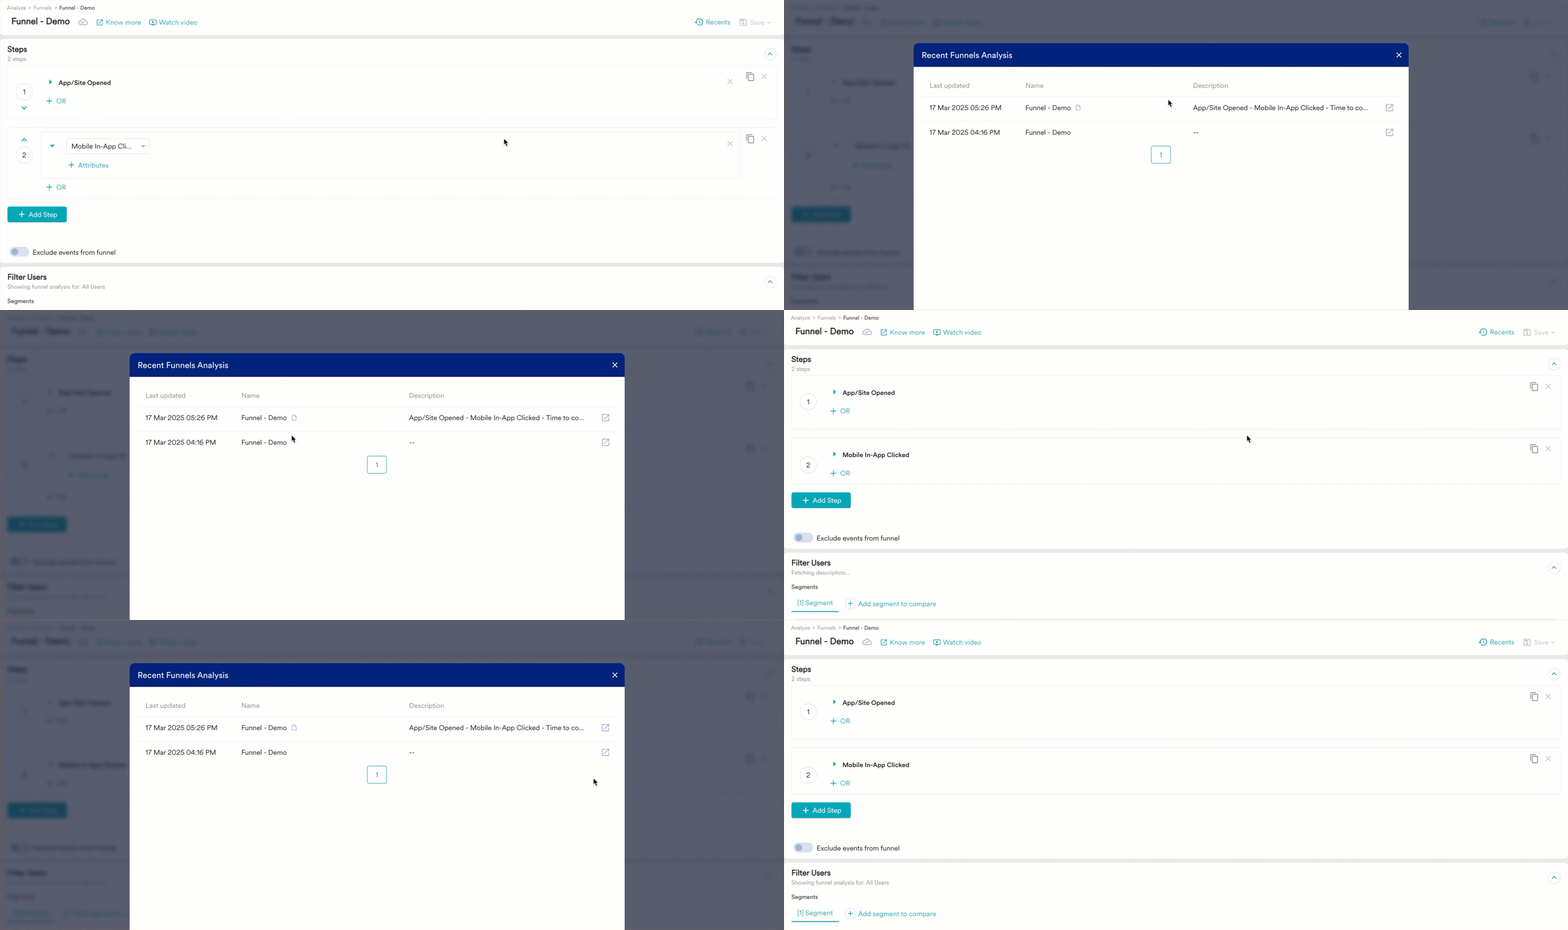
While performing an analysis, you can access your in-progress analyses. Click the **Recents** button in the upper-right corner to display a list of all analyses you have recently worked on. Drafts are identified by this
For each automatically saved draft, you can see its description, the date it was last updated, its expiration date, and the analysis type.
Draft analyses that were last modified 30 or more days ago will be automatically deleted.
## Recents
While performing an analysis, you can access your in-progress analyses. Click the **Recents** button in the upper-right corner to display a list of all analyses you have recently worked on. Drafts are identified by this  icon located next to the analysis name.
 ## Search and Filter
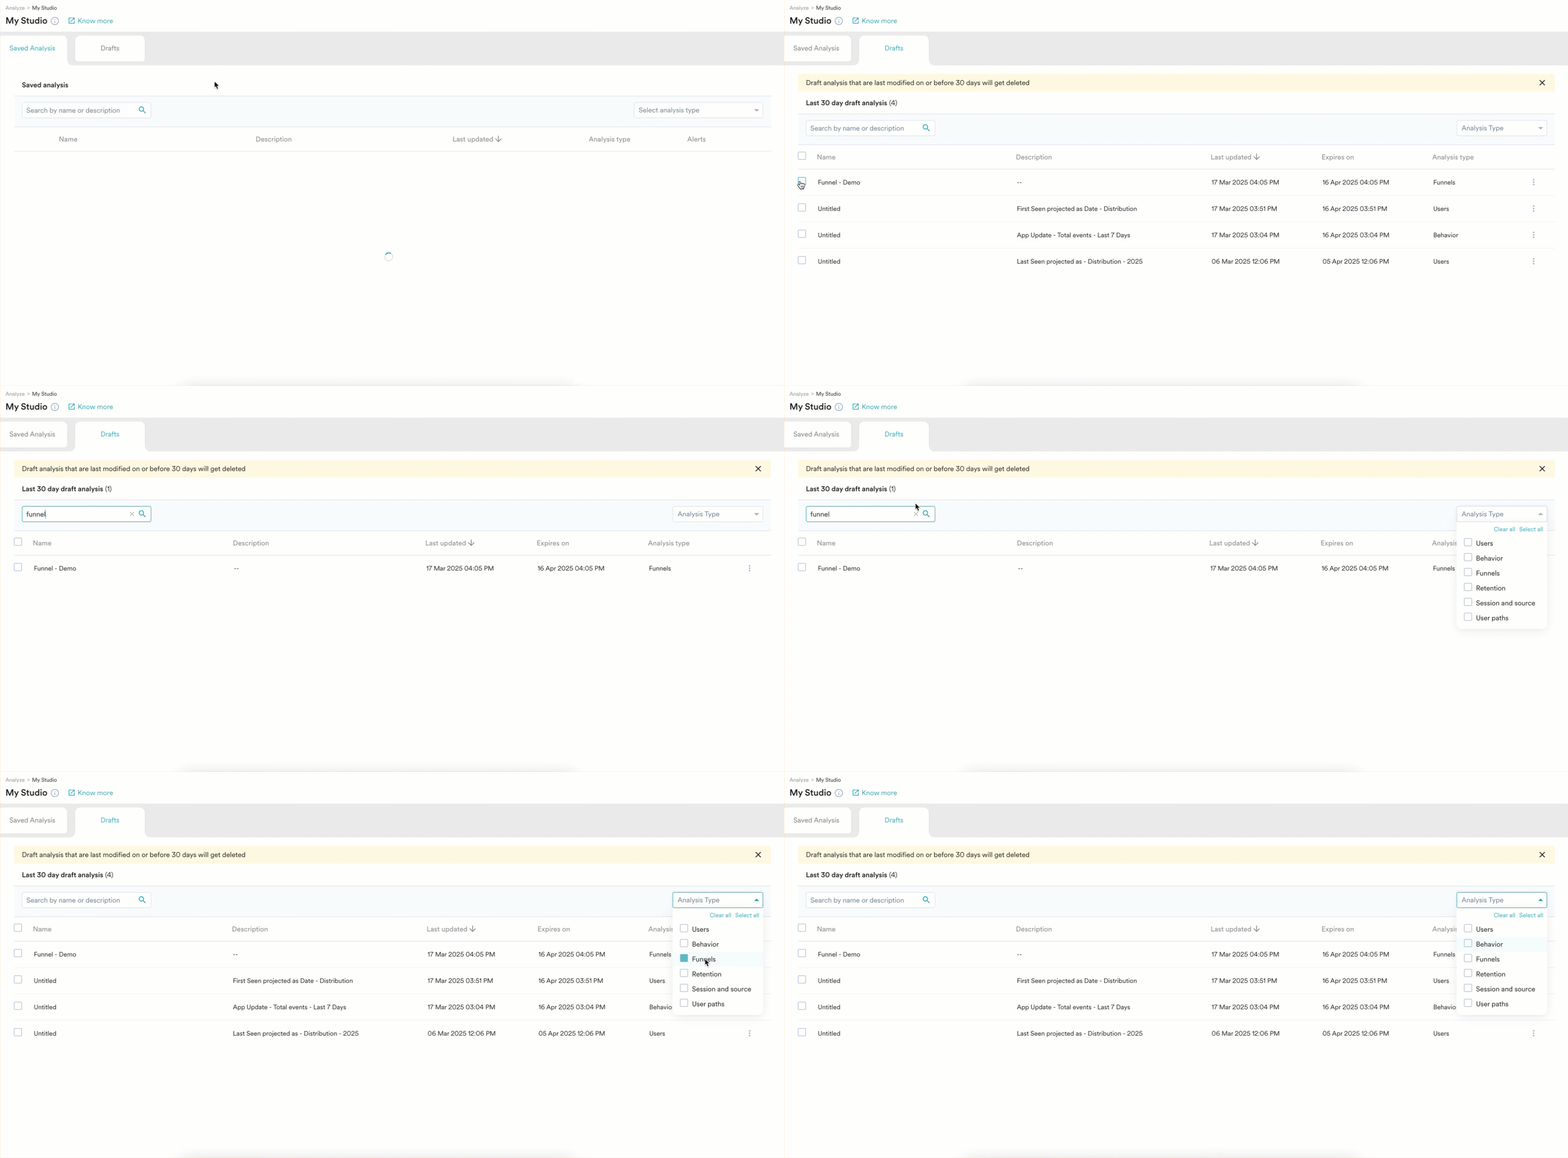
From the search box, you can search for your draft analyses by name. Additionally, you can filter the drafts by **Analysis Type** to conveniently group and locate specific analyses as shown below.
## Search and Filter
From the search box, you can search for your draft analyses by name. Additionally, you can filter the drafts by **Analysis Type** to conveniently group and locate specific analyses as shown below.
 # View, Edit, or Delete Analysis
 ## View/Edit
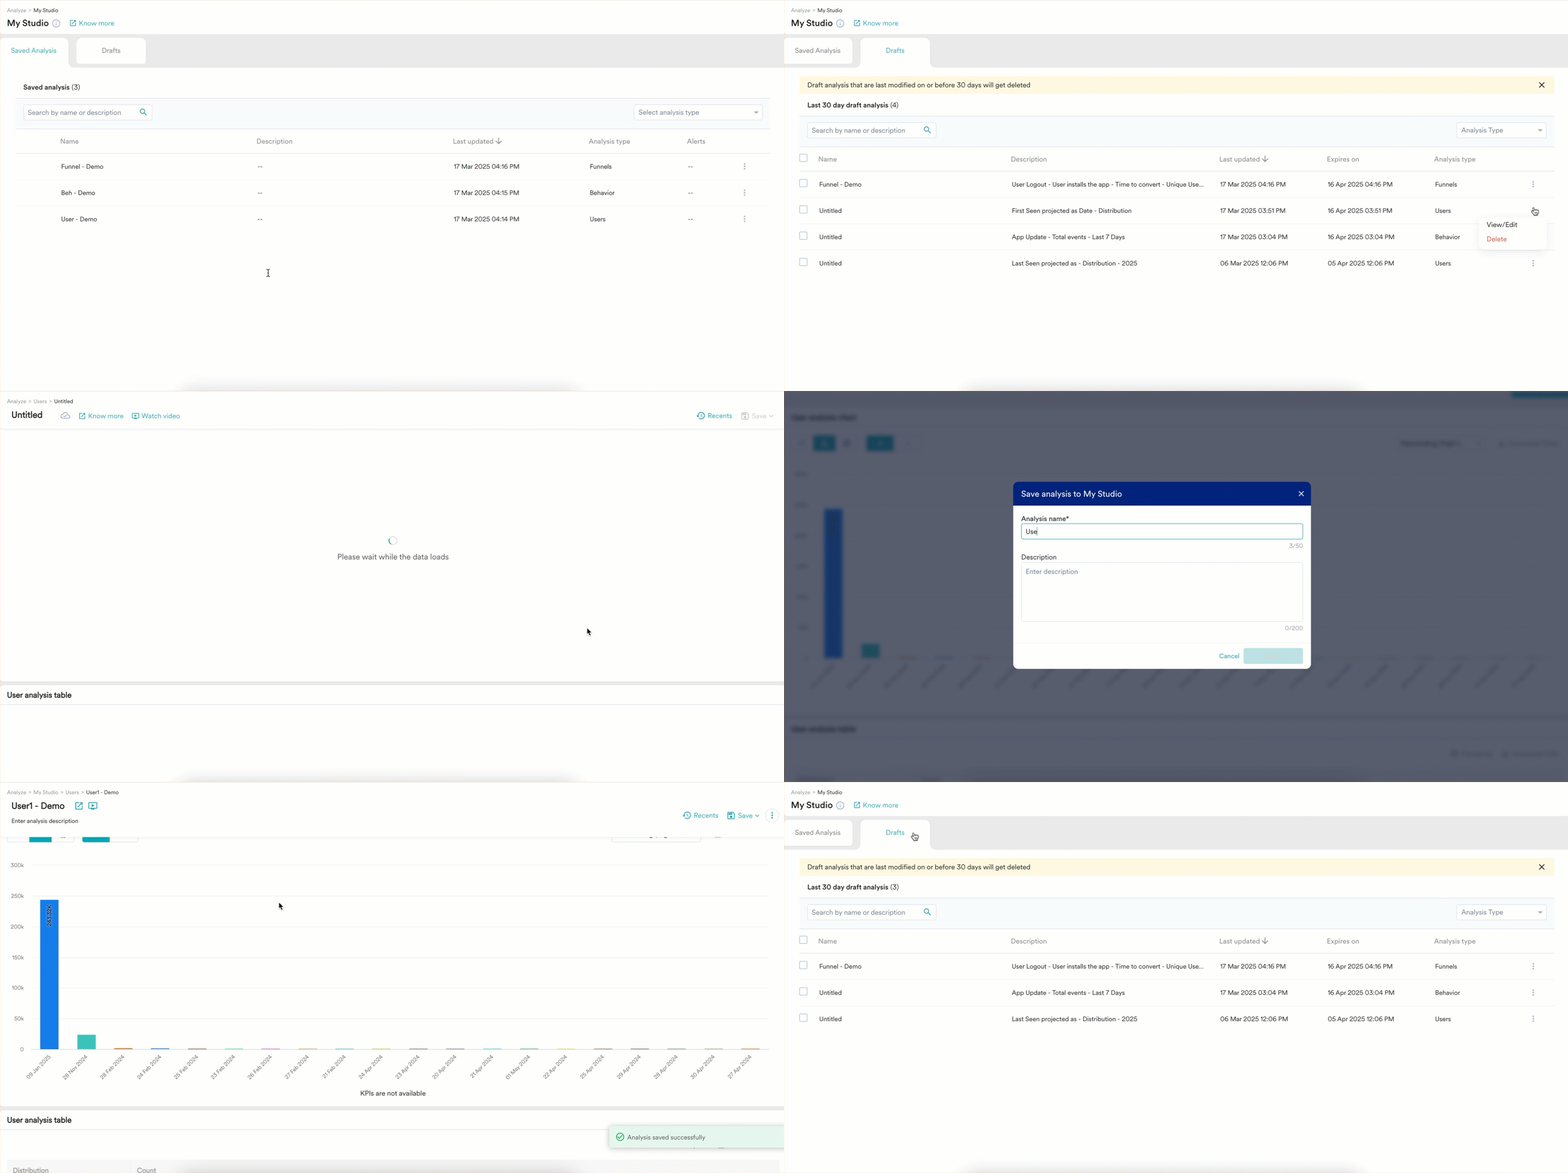
On your Studio, click the analysis row you want to view or edit, or click the vertical ellipsis and then select **View/Edit**.
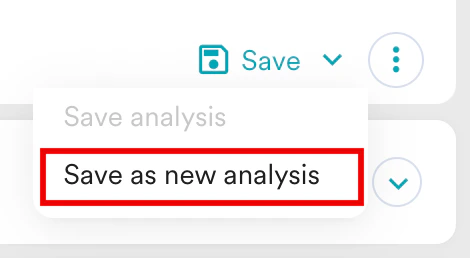
After editing a saved analysis, you need to select **Save as a new analysis** from the **Save** dropdown. This will generate a new draft for the same analysis and store it in your Studio.
## View/Edit
On your Studio, click the analysis row you want to view or edit, or click the vertical ellipsis and then select **View/Edit**.
After editing a saved analysis, you need to select **Save as a new analysis** from the **Save** dropdown. This will generate a new draft for the same analysis and store it in your Studio.
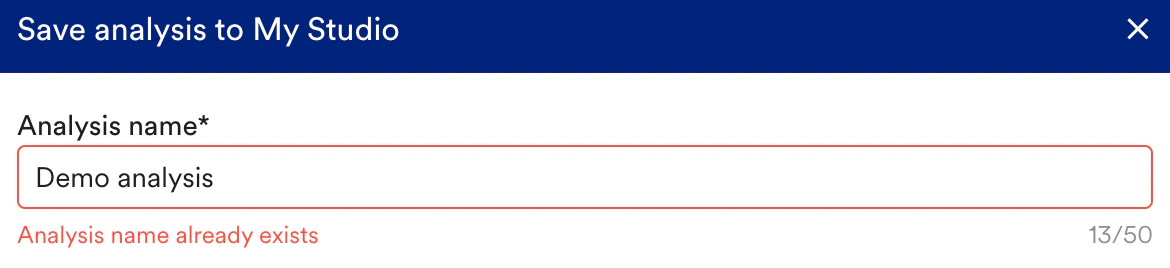
 An analysis will be saved only if you execute the specified event(s) and give a unique name to the analysis.
 ## Delete
On your My Studio dashboard, click the vertical ellipsis on the analysis you want to delete and then select **Delete**.
## Delete
On your My Studio dashboard, click the vertical ellipsis on the analysis you want to delete and then select **Delete**.