> ## Documentation Index
> Fetch the complete documentation index at: https://moengage.com/docs/llms.txt
> Use this file to discover all available pages before exploring further.
# Create Ad-hoc Campaign Reports
> Generate on-demand campaign reports in MoEngage with custom date ranges, metrics, and delivery breakdowns. Export in basic or advanced report formats.
You can utilize Campaign Exports in MoEngage to obtain detailed reports on your campaign performance. These reports help you analyze key metrics, including campaign attributes, target audience reach, delivery statistics, conversions, and performance, broken down by locale and variation. You can extract these reports for a specific date range or view data day by day.
You can export two types of campaign reports:
* **Basic**: This option allows you to generate a default report quickly.
* **Advanced**: This option allows you to select specific campaigns, customize report attributes, and schedule your exports.
## Export a Basic Report
To export a basic report, perform the following steps:
1. On the All campaigns page in the MoEngage UI, click **Export** in the upper-right side. 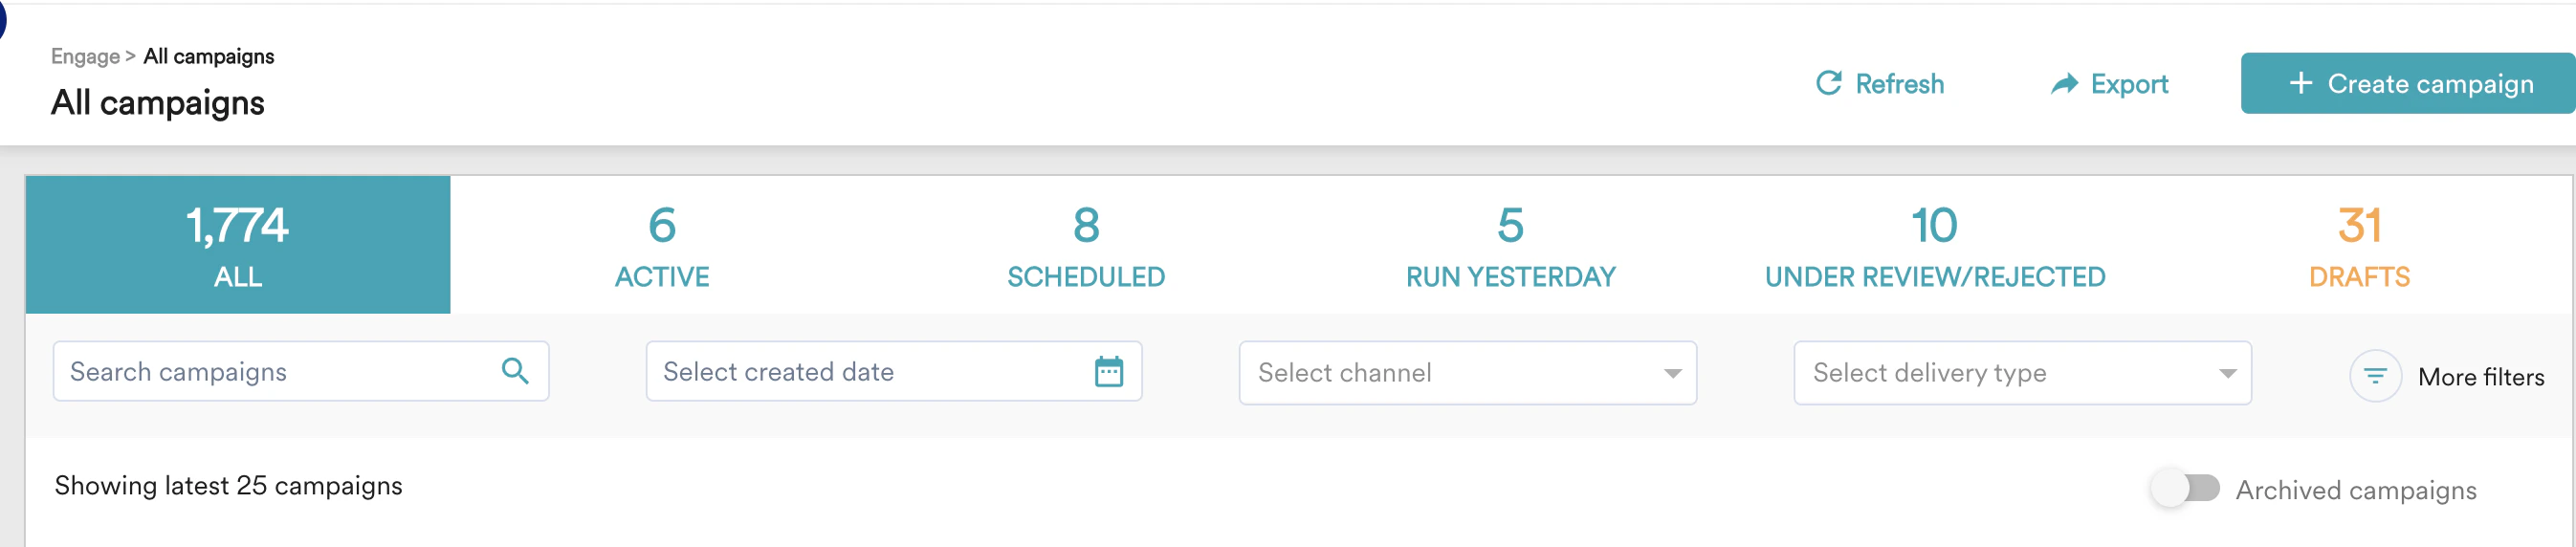 2. On the **Export campaign data** dialog box, click **Basic** and then click **Continue**.
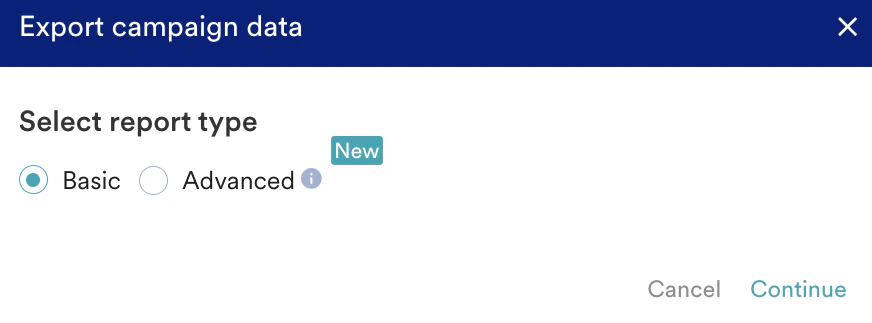 The **Export now** pane appears.
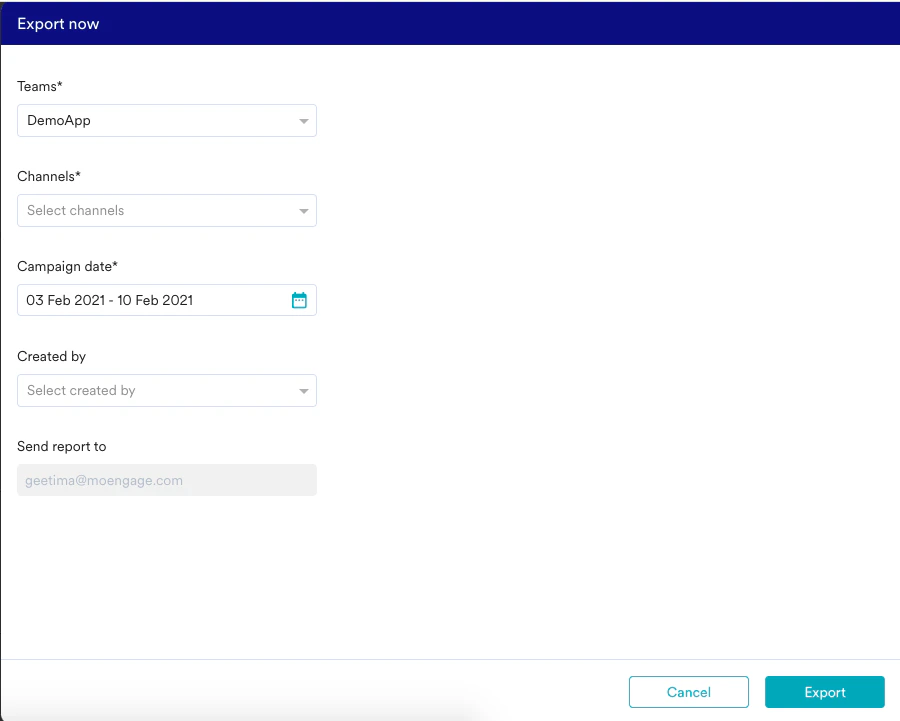 3. In the **Teams** list, select a team (note that this option is visible only if the Teams feature is enabled for your workspace). To create a report using data from multiple teams, simply select all desired teams from the list; just ensure you have the necessary access permissions for each team you include.
4. In the **Channels** list, select the channel types for which you want to export campaign data.
5. In the **Campaign date** field, enter the date range for your campaign selection. Only active campaigns within this selected range are included.\
For example, if you select January 1 to January 31, all campaigns with at least one impression during this period are included.
6. In the **Created by** list, select the required user names to filter campaigns created by specific users. This field is optional.
7. Click **Export**.
The report is sent to the email address of the logged-in user within 6 hours.
## Export an Advanced Report
To export an advanced report, follow these steps:
### Option 1
1. On the left navigation menu in the MoEngage UI, go to **Reports** > **Campaigns**.
3. In the **Teams** list, select a team (note that this option is visible only if the Teams feature is enabled for your workspace). To create a report using data from multiple teams, simply select all desired teams from the list; just ensure you have the necessary access permissions for each team you include.
4. In the **Channels** list, select the channel types for which you want to export campaign data.
5. In the **Campaign date** field, enter the date range for your campaign selection. Only active campaigns within this selected range are included.\
For example, if you select January 1 to January 31, all campaigns with at least one impression during this period are included.
6. In the **Created by** list, select the required user names to filter campaigns created by specific users. This field is optional.
7. Click **Export**.
The report is sent to the email address of the logged-in user within 6 hours.
## Export an Advanced Report
To export an advanced report, follow these steps:
### Option 1
1. On the left navigation menu in the MoEngage UI, go to **Reports** > **Campaigns**.
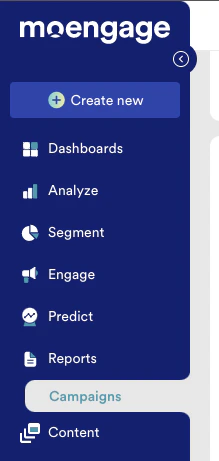 2. On the Campaign reports page, click the **+ New** **report** button in the upper-right corner.
  The Export campaigns page appears.
### Option 2
1. On the All campaigns page, click **Export** in the upper-right corner.
2. On the **Export campaign data** dialog box, click **Advanced** and then click **Continue**.
The Export campaigns page appears.
### Option 2
1. On the All campaigns page, click **Export** in the upper-right corner.
2. On the **Export campaign data** dialog box, click **Advanced** and then click **Continue**.
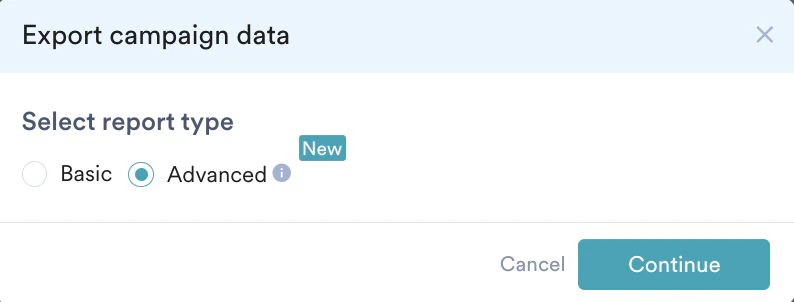 The Export campaigns page appears.
The advanced report process consists of three steps:
1. [Select Campaigns](/docs/user-guide/campaigns-and-channels/campaign-management-and-reports/create-ad-hoc-campaign-reports#step-1-select-campaigns)
2. [Report Format and Content](/docs/user-guide/campaigns-and-channels/campaign-management-and-reports/create-ad-hoc-campaign-reports#step-2-define-report-format-and-content)
3. [Scheduling and Delivery](/docs/user-guide/campaigns-and-channels/campaign-management-and-reports/create-ad-hoc-campaign-reports#step-3-schedule-and-deliver-reports)
### Step 1: Select Campaigns
You can filter and export specific campaigns to include in your report.
The Export campaigns page appears.
The advanced report process consists of three steps:
1. [Select Campaigns](/docs/user-guide/campaigns-and-channels/campaign-management-and-reports/create-ad-hoc-campaign-reports#step-1-select-campaigns)
2. [Report Format and Content](/docs/user-guide/campaigns-and-channels/campaign-management-and-reports/create-ad-hoc-campaign-reports#step-2-define-report-format-and-content)
3. [Scheduling and Delivery](/docs/user-guide/campaigns-and-channels/campaign-management-and-reports/create-ad-hoc-campaign-reports#step-3-schedule-and-deliver-reports)
### Step 1: Select Campaigns
You can filter and export specific campaigns to include in your report.
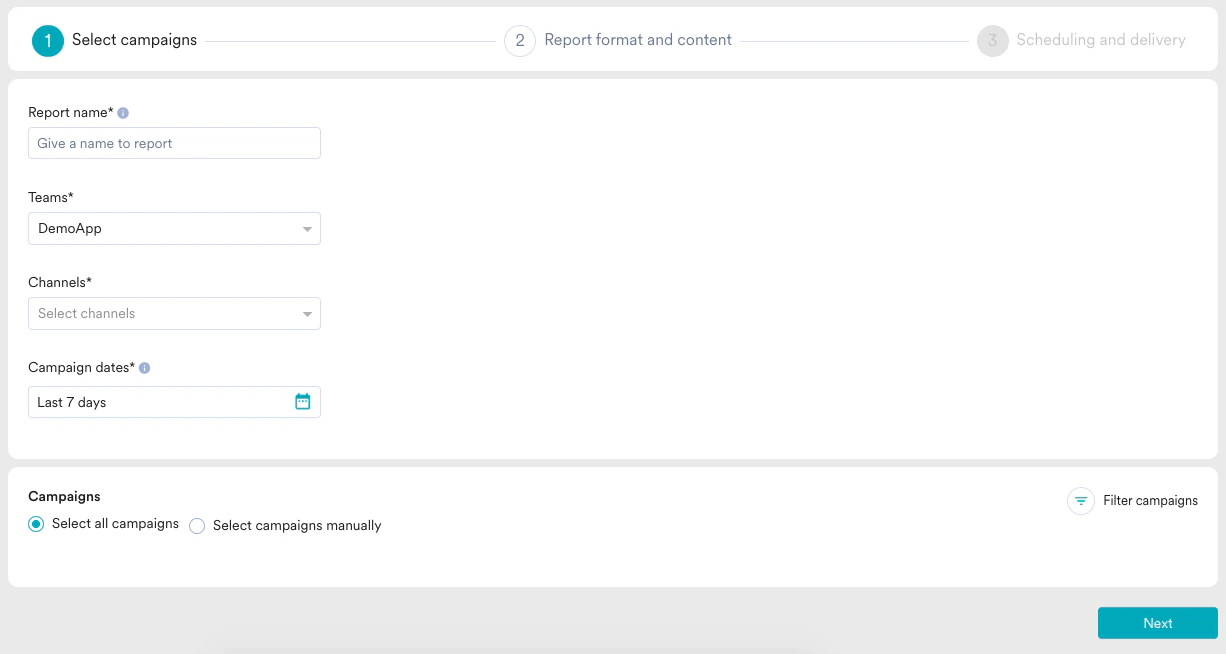 1. In the **Report name** field, enter a name for your report. The name must be alphanumeric, start with a letter, and be less than 128 characters long.
2. In the **Teams** list, select a team (note that this option is visible only if the Teams feature is enabled for your workspace). To create a report using data from multiple teams, simply select all desired teams from the list; just ensure you have the necessary access permissions for each team you include.
3. In the **Channels** list, select the channel types for which you want to export campaign data.
4. In the **Campaign dates** field, enter the date range for campaign selection. Campaigns that are active during this period are included, even if they have no impressions. For example, if you select January 1 to January 3, and a campaign (C1) was created on January 1 and had no impressions until January 5, C1 is still included in the report because it was active within the selected date range.
You can only export data for 90 days at a time. If you need to export for a longer duration, such as 180 days, create multiple reports (for example, Day 0 to Day 90 and Day 90 to Day 180).
5. In the **Campaigns** section, select campaigns to include in the report. You have two options:
* **Select all campaigns**: Includes all campaigns that meet the filter conditions.
* **Select campaigns manually**: Choose specific campaigns to include. Use the campaign search and sorting options to find the campaigns you need.
1. In the **Report name** field, enter a name for your report. The name must be alphanumeric, start with a letter, and be less than 128 characters long.
2. In the **Teams** list, select a team (note that this option is visible only if the Teams feature is enabled for your workspace). To create a report using data from multiple teams, simply select all desired teams from the list; just ensure you have the necessary access permissions for each team you include.
3. In the **Channels** list, select the channel types for which you want to export campaign data.
4. In the **Campaign dates** field, enter the date range for campaign selection. Campaigns that are active during this period are included, even if they have no impressions. For example, if you select January 1 to January 3, and a campaign (C1) was created on January 1 and had no impressions until January 5, C1 is still included in the report because it was active within the selected date range.
You can only export data for 90 days at a time. If you need to export for a longer duration, such as 180 days, create multiple reports (for example, Day 0 to Day 90 and Day 90 to Day 180).
5. In the **Campaigns** section, select campaigns to include in the report. You have two options:
* **Select all campaigns**: Includes all campaigns that meet the filter conditions.
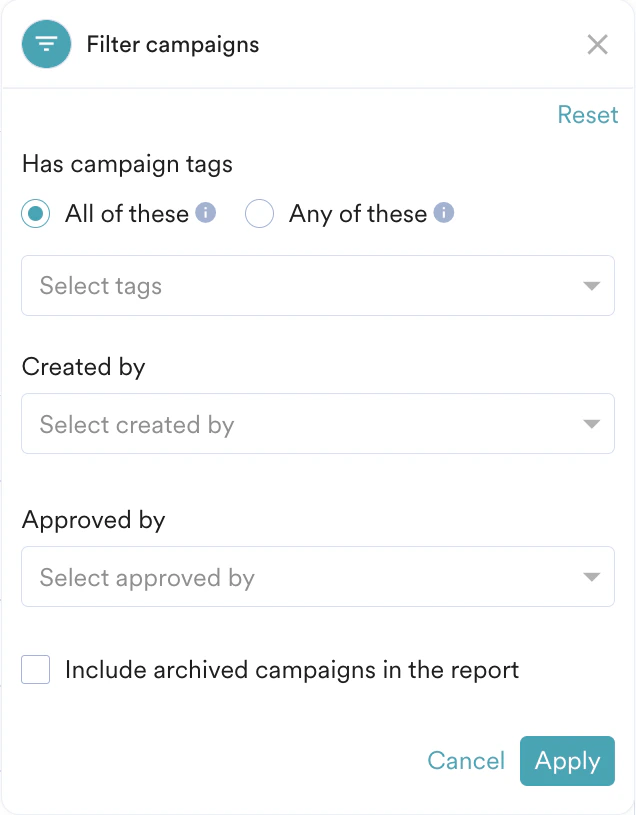
* **Select campaigns manually**: Choose specific campaigns to include. Use the campaign search and sorting options to find the campaigns you need. 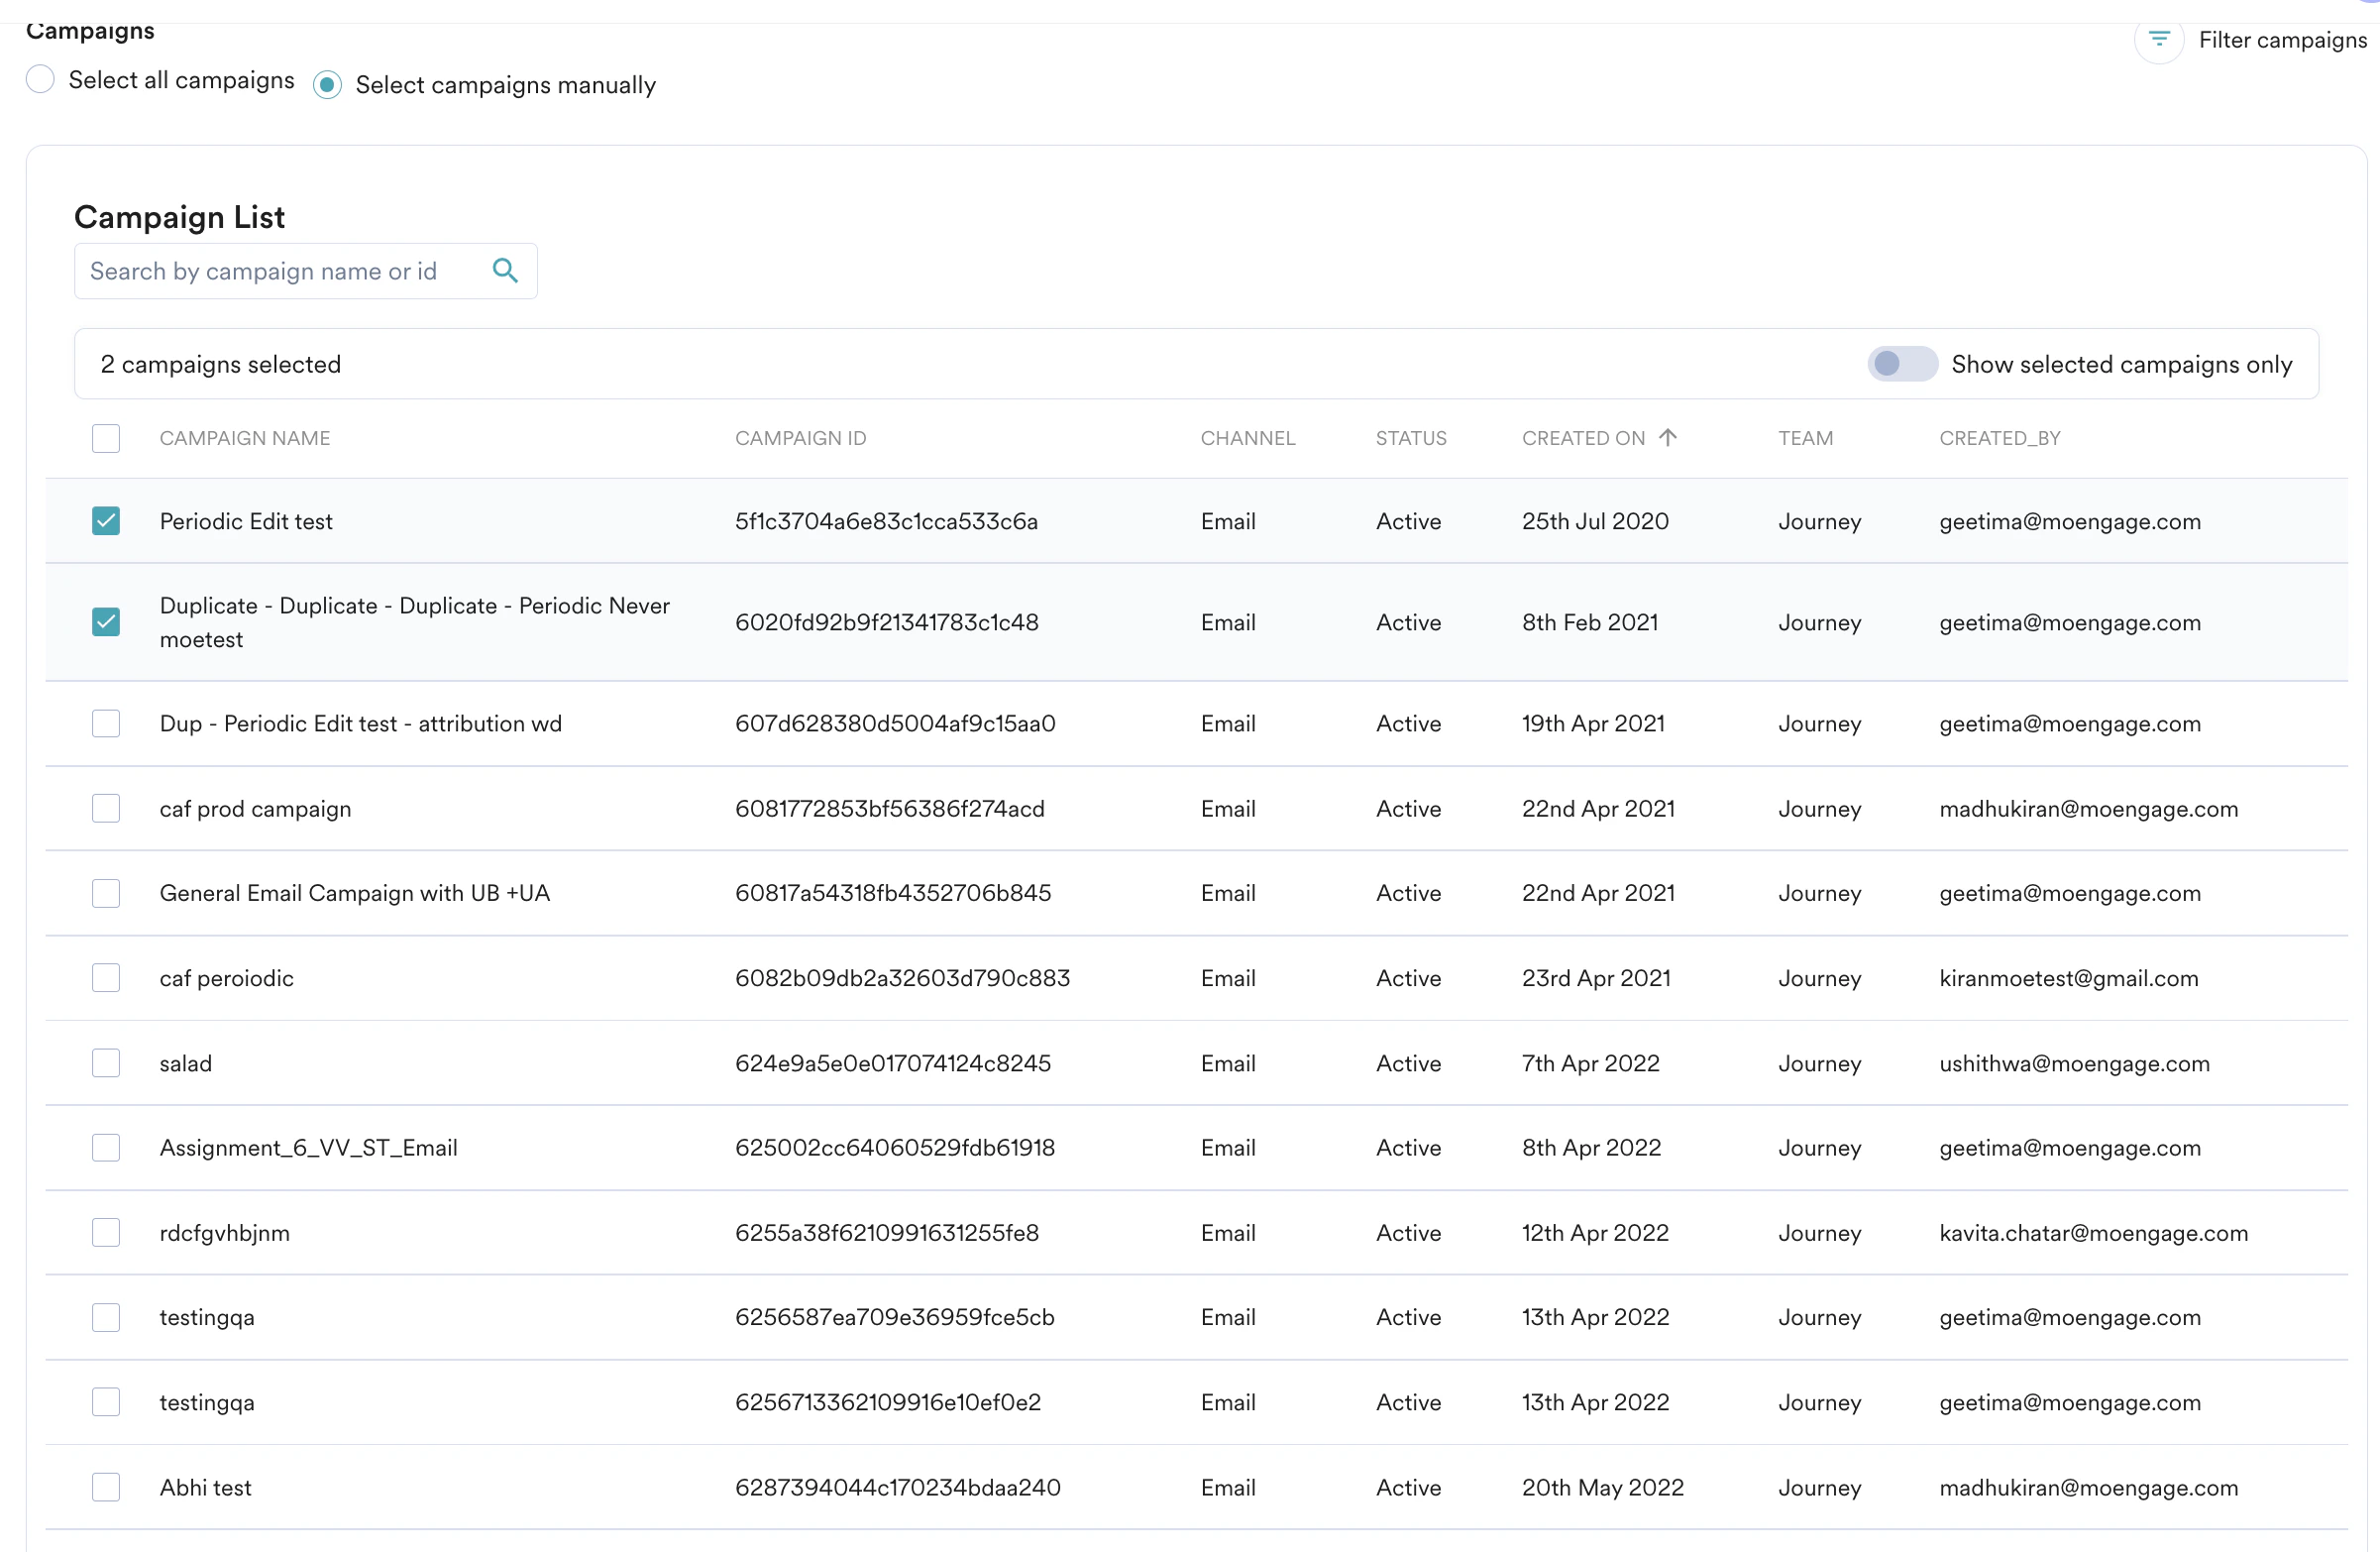 6. Click the **Filter campaigns** icon to apply advanced filters:
7. Under **Has campaign tags**, select an option.
* **All of these**: This option allows you to filter the campaigns that have all the selected tags.
* **Any of these**: This option allows you to filter the campaigns that have any of the selected tags.
8. In the **Select tags** list, select the required tags.
9. In the **Created by** list, select the user who created the campaign.
10. In the **Approved by** list, select the user who approved the campaign.
11. Select the **Include archived campaigns in the report** check box to include archived campaigns in your exports.
6. Click the **Filter campaigns** icon to apply advanced filters:
7. Under **Has campaign tags**, select an option.
* **All of these**: This option allows you to filter the campaigns that have all the selected tags.
* **Any of these**: This option allows you to filter the campaigns that have any of the selected tags.
8. In the **Select tags** list, select the required tags.
9. In the **Created by** list, select the user who created the campaign.
10. In the **Approved by** list, select the user who approved the campaign.
11. Select the **Include archived campaigns in the report** check box to include archived campaigns in your exports.
 12. Click **Next**.
This is an Early Access feature. To enable it for your account, please contact your MoEngage Customer Success Manager (CSM) or the Support team.
You can filter and export specific campaigns to include in your report.
12. Click **Next**.
This is an Early Access feature. To enable it for your account, please contact your MoEngage Customer Success Manager (CSM) or the Support team.
You can filter and export specific campaigns to include in your report.
 1. In the **Report name** field, enter a name for your report. The name must be alphanumeric, start with a letter, and be less than 128 characters long.
2. In the **Teams** list, select a team (note that this option is visible only if the Teams feature is enabled for your workspace). To create a report using data from multiple teams, simply select all desired teams from the list; just ensure you have the necessary access permissions for each team you include.
3. In the **Campaign channels** list, select the channel and delivery types for which you want to export campaign data. The number of selected combinations is displayed. You can hover over the number to see the list of selected channels and delivery types.
4. In the **Campaign dates** field, enter the date range for campaign selection. Campaigns that are active during this period are included, even if they have no impressions. For example, if you select January 1 to January 3, and a campaign (C1) was created on January 1 and had no impressions until January 5, C1 is still included in the report because it was active within the selected date range.\\
You can only export data for 90 days at a time. If you need to export for a longer duration, such as 180 days, create multiple reports (for example, Day 0 to Day 90 and Day 90 to Day 180).
5. In the **Include performance data** field, choose your preferred timeframe:
* **Only for the selected date range**: Restricts the data to your specifically chosen dates.
* **For the entire campaign duration**: Includes the lifetime performance data of the campaign, from start to finish.
6. In the **Campaigns** section, select campaigns to include in the report. You have two options:
* **Select all campaigns**: Includes all campaigns that meet the filter conditions.
* **Select campaigns manually**: Choose specific campaigns to include. Use the campaign search and sorting options to find the campaigns you need.\\
1. In the **Report name** field, enter a name for your report. The name must be alphanumeric, start with a letter, and be less than 128 characters long.
2. In the **Teams** list, select a team (note that this option is visible only if the Teams feature is enabled for your workspace). To create a report using data from multiple teams, simply select all desired teams from the list; just ensure you have the necessary access permissions for each team you include.
3. In the **Campaign channels** list, select the channel and delivery types for which you want to export campaign data. The number of selected combinations is displayed. You can hover over the number to see the list of selected channels and delivery types.
4. In the **Campaign dates** field, enter the date range for campaign selection. Campaigns that are active during this period are included, even if they have no impressions. For example, if you select January 1 to January 3, and a campaign (C1) was created on January 1 and had no impressions until January 5, C1 is still included in the report because it was active within the selected date range.\\
You can only export data for 90 days at a time. If you need to export for a longer duration, such as 180 days, create multiple reports (for example, Day 0 to Day 90 and Day 90 to Day 180).
5. In the **Include performance data** field, choose your preferred timeframe:
* **Only for the selected date range**: Restricts the data to your specifically chosen dates.
* **For the entire campaign duration**: Includes the lifetime performance data of the campaign, from start to finish.
6. In the **Campaigns** section, select campaigns to include in the report. You have two options:
* **Select all campaigns**: Includes all campaigns that meet the filter conditions.
* **Select campaigns manually**: Choose specific campaigns to include. Use the campaign search and sorting options to find the campaigns you need.\\
 7. Click the **Filter campaigns** icon to apply advanced filters:
1. Under **Has campaign tags**, select an option.
* **All of these**: This option allows you to filter the campaigns that have all the selected tags.
* **Any of these**: This option allows you to filter the campaigns that have any of the selected tags.
2. In the **Select tags** list, select the required tags.
3. In the **Created by** list, select the user who created the campaign.
4. In the **Approved by** list, select the user who approved the campaign.
5. Select the **Include archived campaigns in the report** check box to include archived campaigns in your exports.\\
7. Click the **Filter campaigns** icon to apply advanced filters:
1. Under **Has campaign tags**, select an option.
* **All of these**: This option allows you to filter the campaigns that have all the selected tags.
* **Any of these**: This option allows you to filter the campaigns that have any of the selected tags.
2. In the **Select tags** list, select the required tags.
3. In the **Created by** list, select the user who created the campaign.
4. In the **Approved by** list, select the user who approved the campaign.
5. Select the **Include archived campaigns in the report** check box to include archived campaigns in your exports.\\
 6. Click **Next**.
### Step 2: Define Report Format and Content
You can select the attributes for all channels you selected in the previous step:
6. Click **Next**.
### Step 2: Define Report Format and Content
You can select the attributes for all channels you selected in the previous step:
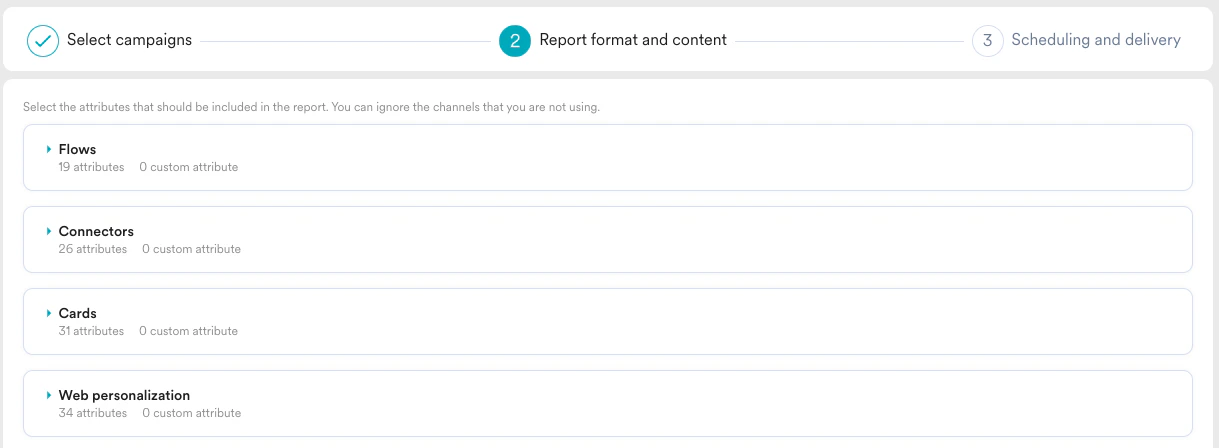 1. Click the channel type.
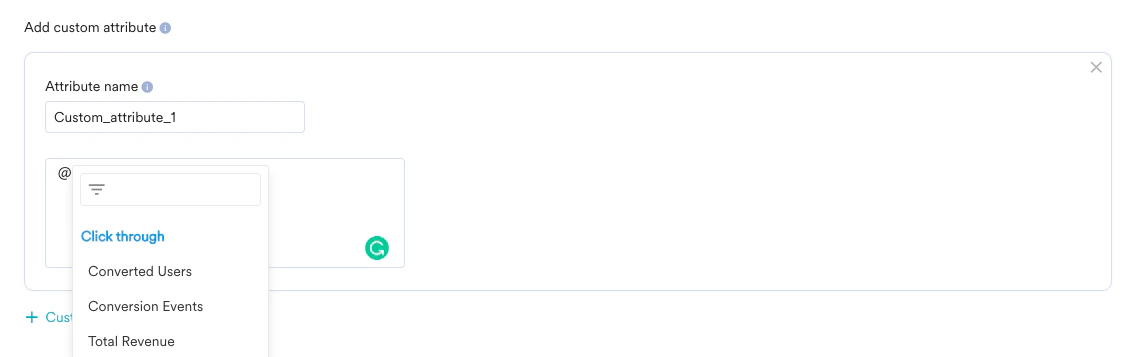
2. Select the attributes to include in the report. You can use the default selection or choose attributes manually. Each selected attribute appears as a new column in the report.
1. Click the channel type.
2. Select the attributes to include in the report. You can use the default selection or choose attributes manually. Each selected attribute appears as a new column in the report.
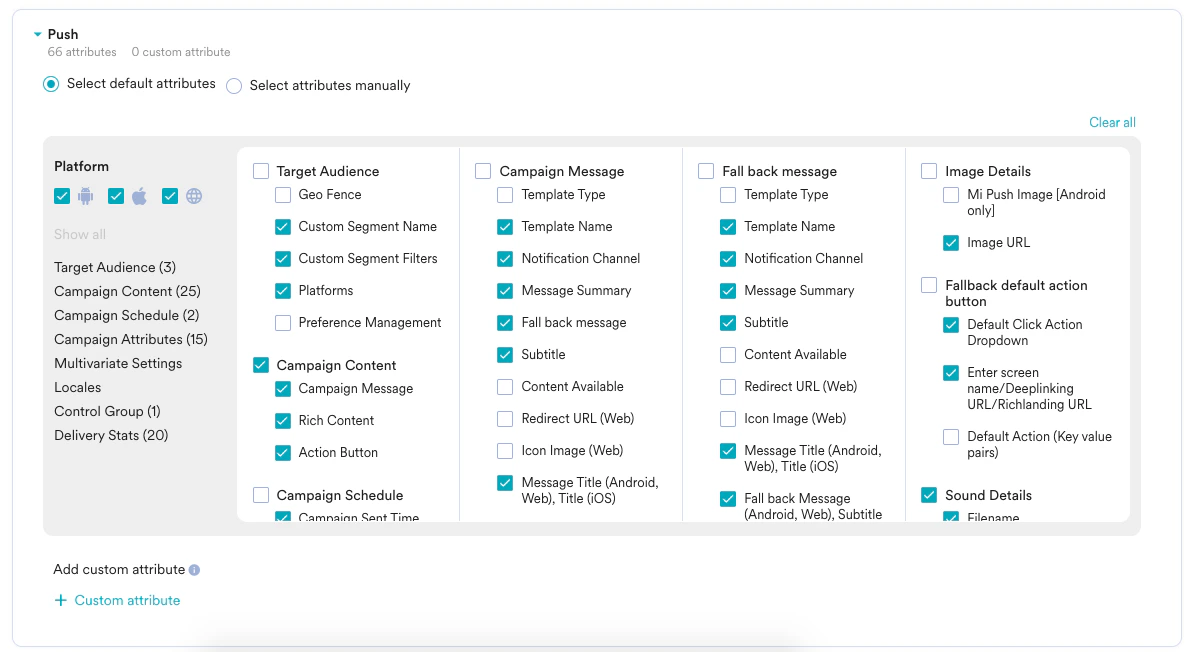 3. To add custom attributes, configure a mathematical combination of existing campaign statistics attributes.\
For example, if you want to add Click-Through Rate (CTR), set the attribute name as "CTR" and the attribute value as `@{campaign-stats.clicks} / @{campaign-stats.impressions}`.
3. To add custom attributes, configure a mathematical combination of existing campaign statistics attributes.\
For example, if you want to add Click-Through Rate (CTR), set the attribute name as "CTR" and the attribute value as `@{campaign-stats.clicks} / @{campaign-stats.impressions}`.
 4. Choose how to display campaign statistics:
5. **Aggregate:** View performance statistics aggregated over the campaign's lifetime.
6. **Day-wise:** View a daily performance breakdown for the campaign. For example, if a campaign is active for seven days, the report shows statistics (impressions, conversions) for each of those seven days.
4. Choose how to display campaign statistics:
5. **Aggregate:** View performance statistics aggregated over the campaign's lifetime.
6. **Day-wise:** View a daily performance breakdown for the campaign. For example, if a campaign is active for seven days, the report shows statistics (impressions, conversions) for each of those seven days.
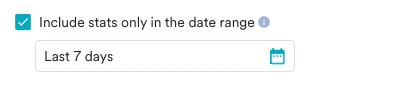
 5. Select the **Include stats only in the date range** check box to pull reports that include data only from your specified date range.
 6. Select the level of data granularity. You can export statistics broken down by variations and locales. This means the report will include a new row for each variation or locale.
 MoEngage does not support locale-level reporting for all channels. This is only supported for In-App, Push, Email,SMS,and RCS campaigns.
7. Select your export format.
MoEngage does not support locale-level reporting for all channels. This is only supported for In-App, Push, Email,SMS,and RCS campaigns.
7. Select your export format.
 8. Click **Next**.
All metrics are calculated and displayed in the App's Timezone.
This is an Early Access feature. To enable it for your account, please contact your MoEngage Customer Success Manager (CSM) or the Support team.
Use the left panel to select attributes for your chosen channels and view the report preview on the right.
8. Click **Next**.
All metrics are calculated and displayed in the App's Timezone.
This is an Early Access feature. To enable it for your account, please contact your MoEngage Customer Success Manager (CSM) or the Support team.
Use the left panel to select attributes for your chosen channels and view the report preview on the right.
 1. Click the channel type.
2. Select the attributes to include in the report. You can use the default selection or choose attributes manually. Each selected attribute appears as a new column in the report.
3. Use the **Search** bar to filter for the exact attributes you need.
4. If your channels share the same columns, click the **Copy** function to easily duplicate them. When the **Copy columns from another channel** window appears, review the list of columns that can be copied and columns that will be skipped. Then, choose how to apply the changes:
* **Keep existing selection**: Adds the new columns to your current list.
* **Override existing selection**: Replaces your current columns with the new ones.\\
1. Click the channel type.
2. Select the attributes to include in the report. You can use the default selection or choose attributes manually. Each selected attribute appears as a new column in the report.
3. Use the **Search** bar to filter for the exact attributes you need.
4. If your channels share the same columns, click the **Copy** function to easily duplicate them. When the **Copy columns from another channel** window appears, review the list of columns that can be copied and columns that will be skipped. Then, choose how to apply the changes:
* **Keep existing selection**: Adds the new columns to your current list.
* **Override existing selection**: Replaces your current columns with the new ones.\\
 5. Use **Expand All** or **Collapse All** to manage your view of the selections.
6. The **Report format preview** panel offers a real-time structural mockup. It displays the fields you select from the **Report configuration and columns** panel, without pulling in actual campaign data, allowing you to visualize and adjust the layout as you build it.\\
5. Use **Expand All** or **Collapse All** to manage your view of the selections.
6. The **Report format preview** panel offers a real-time structural mockup. It displays the fields you select from the **Report configuration and columns** panel, without pulling in actual campaign data, allowing you to visualize and adjust the layout as you build it.\\
 7. Select your preferred **Split data** options to categorize report rows by date, campaign, variation, or locale.
* **By date**\
Creates a unique row for every day within your selected time range. This is best for tracking performance trends over time.
* **By child reportType**\
Generates a separate row for each child campaign within a periodic campaign. Use this to see how specific segments of a recurring campaign are performing individually.
* **By variations**\
Breaks down data into individual rows for each version of an A/B test. This is essential for identifying which specific creative or copy variation is winning.
* **By locales**\
Produces a separate row for each geographical or linguistic market. This helps you compare performance across different regions or languages.
7. Select your preferred **Split data** options to categorize report rows by date, campaign, variation, or locale.
* **By date**\
Creates a unique row for every day within your selected time range. This is best for tracking performance trends over time.
* **By child reportType**\
Generates a separate row for each child campaign within a periodic campaign. Use this to see how specific segments of a recurring campaign are performing individually.
* **By variations**\
Breaks down data into individual rows for each version of an A/B test. This is essential for identifying which specific creative or copy variation is winning.
* **By locales**\
Produces a separate row for each geographical or linguistic market. This helps you compare performance across different regions or languages.
 8. Click **Next**.
All metrics are calculated and displayed in the App's Timezone.
### Step 3: Schedule and Deliver Reports
1. Configure the report schedule (Daily, Weekly, Monthly, or other options).
8. Click **Next**.
All metrics are calculated and displayed in the App's Timezone.
### Step 3: Schedule and Deliver Reports
1. Configure the report schedule (Daily, Weekly, Monthly, or other options).
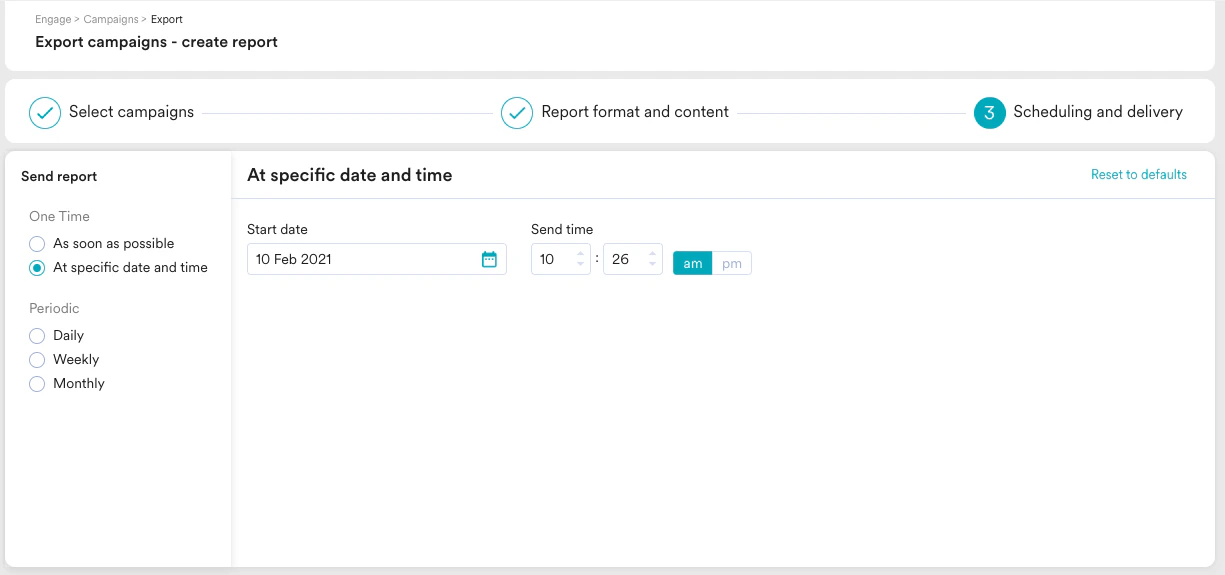 2. Select a **Delivery Mode**. You can receive reports via email or extract them using APIs. For more information, see [Campaign Report API](https://www.moengage.com/docs/api/campaign-reports/download-campaign-report).
  3. Click **Create report**.
This is an Early Access feature. To enable it for your account, please contact your MoEngage Customer Success Manager (CSM) or the Support team.
In this step, you can define when the report should be generated and how it should be delivered to you.
3. Click **Create report**.
This is an Early Access feature. To enable it for your account, please contact your MoEngage Customer Success Manager (CSM) or the Support team.
In this step, you can define when the report should be generated and how it should be delivered to you.
 1. Under **Send report** field, Select the frequency and timing for your report:
* **One Time**:
* **As soon as possible**: The report will be generated and sent immediately after you click "Create report".
* **At specific date and time**: Choose a specific future date and time for the report to be sent.
* **Periodic**: Schedule the report to be sent automatically at regular intervals:
* **Daily**: Sent every day at a specified time.
* **Weekly**: Sent on specific days of the week.
* **Monthly**: Sent on a specific date every month.
* **At specific date and time**\
If you selected a specific timing or periodic schedule, configure the following:
* **Start date**: Click the calendar icon to select the date you want the reporting to begin.
* **Send time**: Set the exact hour and minute, and select am or pm.
2. Under **Report** **Delivery** field, define the file technicalities and the destination for the report:
* **File format**: Choose between CSV or EXCEL.
* **Separator**: If CSV is selected, choose the delimiter for your data (Comma ,, Pipe |, Colon :, or Semicolon ;).
* **Compression**: Select the archive format for the file: Zip, Rar, or Tar.
* Send to:
* **Email**: Enter the email addresses where the report link should be sent. You can select from existing users in the dropdown. You can select a maximum of 15 recipients for email reports
* **REST API**: Select this if you wish to push the report to a configured endpoint via API.\
For more information, see [Campaign Report API](/docs/api/stats-report/stats-report-overview).
1. Under **Send report** field, Select the frequency and timing for your report:
* **One Time**:
* **As soon as possible**: The report will be generated and sent immediately after you click "Create report".
* **At specific date and time**: Choose a specific future date and time for the report to be sent.
* **Periodic**: Schedule the report to be sent automatically at regular intervals:
* **Daily**: Sent every day at a specified time.
* **Weekly**: Sent on specific days of the week.
* **Monthly**: Sent on a specific date every month.
* **At specific date and time**\
If you selected a specific timing or periodic schedule, configure the following:
* **Start date**: Click the calendar icon to select the date you want the reporting to begin.
* **Send time**: Set the exact hour and minute, and select am or pm.
2. Under **Report** **Delivery** field, define the file technicalities and the destination for the report:
* **File format**: Choose between CSV or EXCEL.
* **Separator**: If CSV is selected, choose the delimiter for your data (Comma ,, Pipe |, Colon :, or Semicolon ;).
* **Compression**: Select the archive format for the file: Zip, Rar, or Tar.
* Send to:
* **Email**: Enter the email addresses where the report link should be sent. You can select from existing users in the dropdown. You can select a maximum of 15 recipients for email reports
* **REST API**: Select this if you wish to push the report to a configured endpoint via API.\
For more information, see [Campaign Report API](/docs/api/stats-report/stats-report-overview).
 3. Click **Create report**.
## Manage Exported Reports
You can find exported reports using the following options:
* **Search by report name**: Locate reports by name.
* **Filter**: Narrow results by Report type, Report status, Created by, Team name.
The following fields are available on the Campaign Reports page:
| Field | Description |
| ---------------- | ------------------------------------------------------------------------------------------------------------------------------------------------ |
| **Report Name** | Displays the unique name given to the report. |
| **Created By** | Identifies the user who created the reports. |
| **Created At** | Displays the time and date when the reports were created. |
| **Scheduled At** | Displays the time and date when the report has to be generated. |
| **Teams** | Identifies the specific team it belongs to. |
| **Report Type** | Displays the type of each reports (for example, Onetime). |
| **Status** | Displays the status of the report (for example, **Successful**, **Failed**, **Queued**). |
| **Actions** | Click the three dots and select **Duplicate**, **Delete**, **Send to me**, or **Run again** for their respective actions on your desired report. |
3. Click **Create report**.
## Manage Exported Reports
You can find exported reports using the following options:
* **Search by report name**: Locate reports by name.
* **Filter**: Narrow results by Report type, Report status, Created by, Team name.
The following fields are available on the Campaign Reports page:
| Field | Description |
| ---------------- | ------------------------------------------------------------------------------------------------------------------------------------------------ |
| **Report Name** | Displays the unique name given to the report. |
| **Created By** | Identifies the user who created the reports. |
| **Created At** | Displays the time and date when the reports were created. |
| **Scheduled At** | Displays the time and date when the report has to be generated. |
| **Teams** | Identifies the specific team it belongs to. |
| **Report Type** | Displays the type of each reports (for example, Onetime). |
| **Status** | Displays the status of the report (for example, **Successful**, **Failed**, **Queued**). |
| **Actions** | Click the three dots and select **Duplicate**, **Delete**, **Send to me**, or **Run again** for their respective actions on your desired report. |
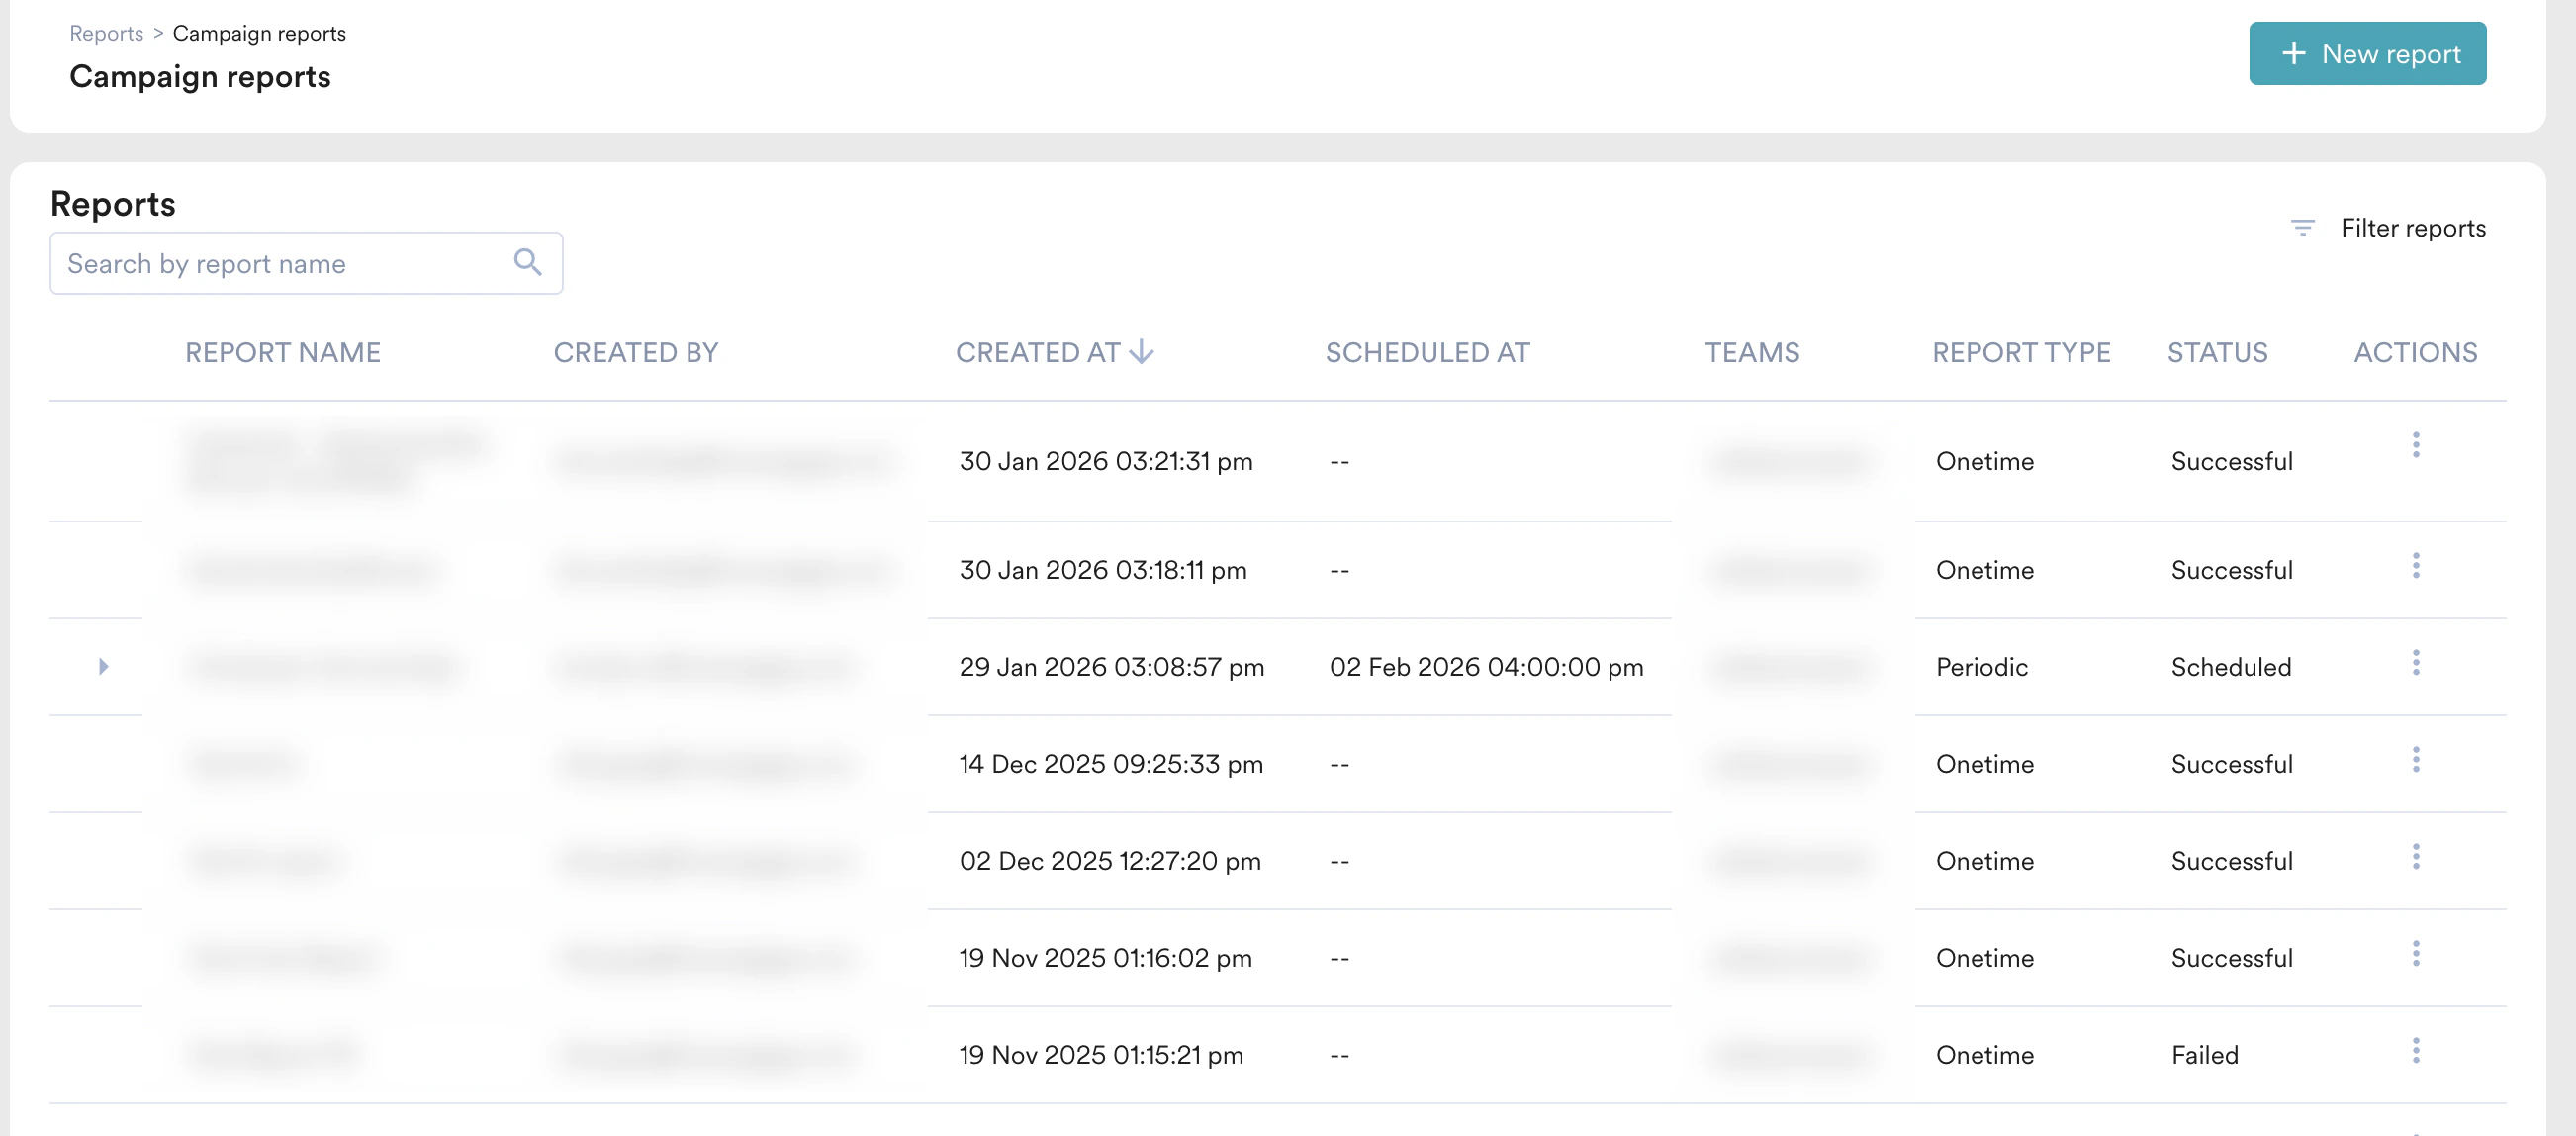 To view a report containing data from multiple teams, a user must have access permissions for every individual team included in that report. If a user lacks access to even one of the selected teams, they will not be able to view the report.
## Understand Report Output Format and Structure
If you choose email as the delivery mode, you will receive a .zip file. The file name combines:
1. The report name (same as entered in the Campaign Report Builder), with spaces replaced by underscores. For example: "Report test" becomes "Report\_test".
2. The report generation date in YYYYMMDD format. For example: "20210217" indicates the report generated on February 17, 2021.
3. The compression format, such as .zip.
For example, a final file name might be Report\_test\_20210217.zip.
### File Naming Convention
#### Channel-Level Reports
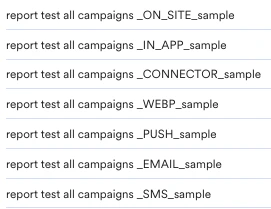
If you extract channel-level reports, the .zip file contains a separate file for each channel in the format ``\_``.
To view a report containing data from multiple teams, a user must have access permissions for every individual team included in that report. If a user lacks access to even one of the selected teams, they will not be able to view the report.
## Understand Report Output Format and Structure
If you choose email as the delivery mode, you will receive a .zip file. The file name combines:
1. The report name (same as entered in the Campaign Report Builder), with spaces replaced by underscores. For example: "Report test" becomes "Report\_test".
2. The report generation date in YYYYMMDD format. For example: "20210217" indicates the report generated on February 17, 2021.
3. The compression format, such as .zip.
For example, a final file name might be Report\_test\_20210217.zip.
### File Naming Convention
#### Channel-Level Reports
If you extract channel-level reports, the .zip file contains a separate file for each channel in the format ``\_``.
 #### Flow Reports
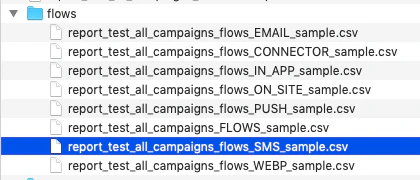
If you extract flow reports, the .zip file contains:
1. A flow file in the format ``\_``.
2. Separate files for each channel in the format ``\_``.
If you use only a few channels in your report, you will only receive reports for those channels within your selected flows. All metrics are calculated and displayed in GMT for point channel campaigns associated with Flows.
#### Flow Reports
If you extract flow reports, the .zip file contains:
1. A flow file in the format ``\_``.
2. Separate files for each channel in the format ``\_``.
If you use only a few channels in your report, you will only receive reports for those channels within your selected flows. All metrics are calculated and displayed in GMT for point channel campaigns associated with Flows.
 ### File Format
**Row:** Each row represents a distinct campaign, including all relevant details specific to that campaign within the row.
**Columns:** Each column represents a different attribute. These columns correspond to the customized attributes you selected in Step 2 of report creation.
1. **Periodic or Flow Campaigns:** Periodic or flow campaigns have multiple child instances. Each instance appears in a separate row in the output file. The column for the parent campaign ID is empty for parent campaigns.
2. **Day-wise Reports:** Day-wise reports include a "Date" column. Each row shows the statistics for that specific date.
### File Format
**Row:** Each row represents a distinct campaign, including all relevant details specific to that campaign within the row.
**Columns:** Each column represents a different attribute. These columns correspond to the customized attributes you selected in Step 2 of report creation.
1. **Periodic or Flow Campaigns:** Periodic or flow campaigns have multiple child instances. Each instance appears in a separate row in the output file. The column for the parent campaign ID is empty for parent campaigns.
2. **Day-wise Reports:** Day-wise reports include a "Date" column. Each row shows the statistics for that specific date.
 3. **Variation and Locale-Level Reports:** Variation and locale-level reports include "Variation" and "Locale" columns. Each row shows the statistics for a specific variation and locale.
 ## Understand Delivery Statistics
| # | Column Name in Report | Calculation |
| - | ------------------------ | ----------------------------- |
| 1 | Delivery Rate | Delivered or Sent |
| 2 | Open Rate | Unique Opens or Delivered |
| 3 | Click-Through Rate (CTR) | Unique Clicks or Delivered |
| 4 | Conversion Rate | Converted Events or Delivered |
| 5 | Hard Bounce Rate | Hard Bounces or Sent |
| 6 | Unsubscribe Rate | Unsubscribes or Sent |
## Understand Delivery Statistics
| # | Column Name in Report | Calculation |
| - | ------------------------ | ----------------------------- |
| 1 | Delivery Rate | Delivered or Sent |
| 2 | Open Rate | Unique Opens or Delivered |
| 3 | Click-Through Rate (CTR) | Unique Clicks or Delivered |
| 4 | Conversion Rate | Converted Events or Delivered |
| 5 | Hard Bounce Rate | Hard Bounces or Sent |
| 6 | Unsubscribe Rate | Unsubscribes or Sent |