> ## Documentation Index
> Fetch the complete documentation index at: https://moengage.com/docs/llms.txt
> Use this file to discover all available pages before exploring further.
# Create a Connector Campaign
> Create a connector campaign in MoEngage to push real-time data to third-party systems or pull data for cross-channel user targeting.
MoEngage acts as a central hub for your data, to which you can plug and connect any system for the duration of your choice. Connectors allow you to target users across all communication channels. The Connector campaign from MoEngage enables you to execute a variety of use cases such as:
* Retrieving real-time data from MoEngage
* Passing data to other owned or third-party analytics systems
To create a Connector campaign, perform the following steps:
If your connector endpoint requires IP whitelisting or IP whitelisting for using Content API, refer [here](/user-guide/settings/account/security/ip-whitelisting-in-moengage).
1. On the sidebar menu in MoEngage, hover over the **Engage** icon  . The **Engage** menu appears.
2. Click **+ New Campaign**.
. The **Engage** menu appears.
2. Click **+ New Campaign**.
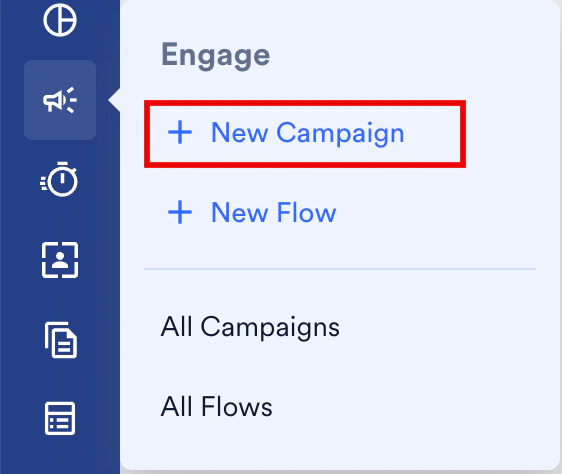 You can also click **All Campaigns** on the **Engage** menu and then click **+ Create campaign** on the **All campaigns** page.
3. On the **New Campaign** dialog box, under **Connectors**, click **Custom**.
4. Select one of the following campaign delivery types:
* One Time
* Periodic
* Event Triggered
For more information about delivery types, refer to [Delivery Types](/user-guide/campaigns-and-channels/getting-started/introduction/delivery-types-moengage-channels).
# Steps to Create a Connector Campaign
The following are the steps to create a Connector campaign:
1. [Target users](/user-guide/campaigns-and-channels/connectors/create/create-a-connector-campaign): Define the target audience for the campaign.
2. [Content](/user-guide/campaigns-and-channels/connectors/create/create-a-connector-campaign): Define the content of the Connector campaign to be sent.
3. [Schedule and Goals](/user-guide/campaigns-and-channels/connectors/create/create-a-connector-campaign): Define the campaign's delivery schedule and goals.
## Step 1: Target Users
This section contains the following:
### Campaign Details
The campaign details section contains the following fields:
| | |
| ------------------------------------------------------------------------------------------------------------------------------------------------------------------------------------------------------------------------------------------------------------------------------------------------------------------------------------------------------------------------------------------------------------------------------------------------------------------------------------------------------------------------------------------------------------------------------------------------------------------------------------------------------- | -------------------------------------------------------------------------------------------------------------------------------------------------------------------------------------------------------------------------------------------------------------------------------------------------------------------------------------------------------------------------------------------------------------------------------------------------------------------------------------------------------------------------------------------------------------------------------------------------------------------------------------------------------------------------------------------------------------------------------------------------------------------------------------------------------------------------------------------------------------------------------------------------------------------------------------------------------------------------------------------------------------------------------------------------------------------------------------------------------------------------------------------------------------------------------------------------------------------------------------------------------------------------------------------------------------------------------------------------------------------------------------------------- |
|
You can also click **All Campaigns** on the **Engage** menu and then click **+ Create campaign** on the **All campaigns** page.
3. On the **New Campaign** dialog box, under **Connectors**, click **Custom**.
4. Select one of the following campaign delivery types:
* One Time
* Periodic
* Event Triggered
For more information about delivery types, refer to [Delivery Types](/user-guide/campaigns-and-channels/getting-started/introduction/delivery-types-moengage-channels).
# Steps to Create a Connector Campaign
The following are the steps to create a Connector campaign:
1. [Target users](/user-guide/campaigns-and-channels/connectors/create/create-a-connector-campaign): Define the target audience for the campaign.
2. [Content](/user-guide/campaigns-and-channels/connectors/create/create-a-connector-campaign): Define the content of the Connector campaign to be sent.
3. [Schedule and Goals](/user-guide/campaigns-and-channels/connectors/create/create-a-connector-campaign): Define the campaign's delivery schedule and goals.
## Step 1: Target Users
This section contains the following:
### Campaign Details
The campaign details section contains the following fields:
| | |
| ------------------------------------------------------------------------------------------------------------------------------------------------------------------------------------------------------------------------------------------------------------------------------------------------------------------------------------------------------------------------------------------------------------------------------------------------------------------------------------------------------------------------------------------------------------------------------------------------------------------------------------------------------- | -------------------------------------------------------------------------------------------------------------------------------------------------------------------------------------------------------------------------------------------------------------------------------------------------------------------------------------------------------------------------------------------------------------------------------------------------------------------------------------------------------------------------------------------------------------------------------------------------------------------------------------------------------------------------------------------------------------------------------------------------------------------------------------------------------------------------------------------------------------------------------------------------------------------------------------------------------------------------------------------------------------------------------------------------------------------------------------------------------------------------------------------------------------------------------------------------------------------------------------------------------------------------------------------------------------------------------------------------------------------------------------------------- |
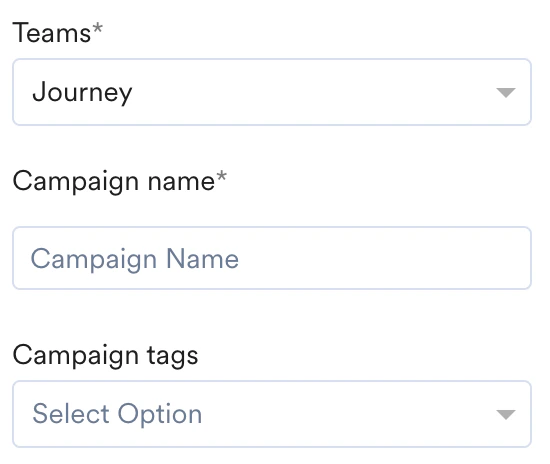
| - **Teams**: If your organization has teams enabled, select a team in the drop-down list. For more information, refer to [Teams in MoEngage](/user-guide/settings/account/team-management/teams-in-moengage).
- **Campaign name**: Enter the name of the campaign to manage and identify the campaign. The campaign name must have at least five characters, and the limit is 256.
- **Campaign tags**: Select campaign tags from the drop-down list. You can select a maximum of five tags. For more information, refer to [Campaign Tags](/user-guide/campaigns-and-channels/getting-started/introduction/campaign-tags).
|
 |
Event-triggered campaigns allow you to take personalized actions triggered by different user behaviors. For example, you can remind users about the item they added to the cart but have not purchased. For more information on creating such campaigns, refer to [Create an Event-Triggered Campaign](/user-guide/campaigns-and-channels/getting-started/triggers/event/create-an-event-triggered-campaign).
### Select Audience
This section contains segmentation filters that help you choose the target audience for your campaign. The following options are available:
This filter option allows you to send the campaign to all the app users. When you use this option, you cannot add multiple filters.
|
Event-triggered campaigns allow you to take personalized actions triggered by different user behaviors. For example, you can remind users about the item they added to the cart but have not purchased. For more information on creating such campaigns, refer to [Create an Event-Triggered Campaign](/user-guide/campaigns-and-channels/getting-started/triggers/event/create-an-event-triggered-campaign).
### Select Audience
This section contains segmentation filters that help you choose the target audience for your campaign. The following options are available:
This filter option allows you to send the campaign to all the app users. When you use this option, you cannot add multiple filters.
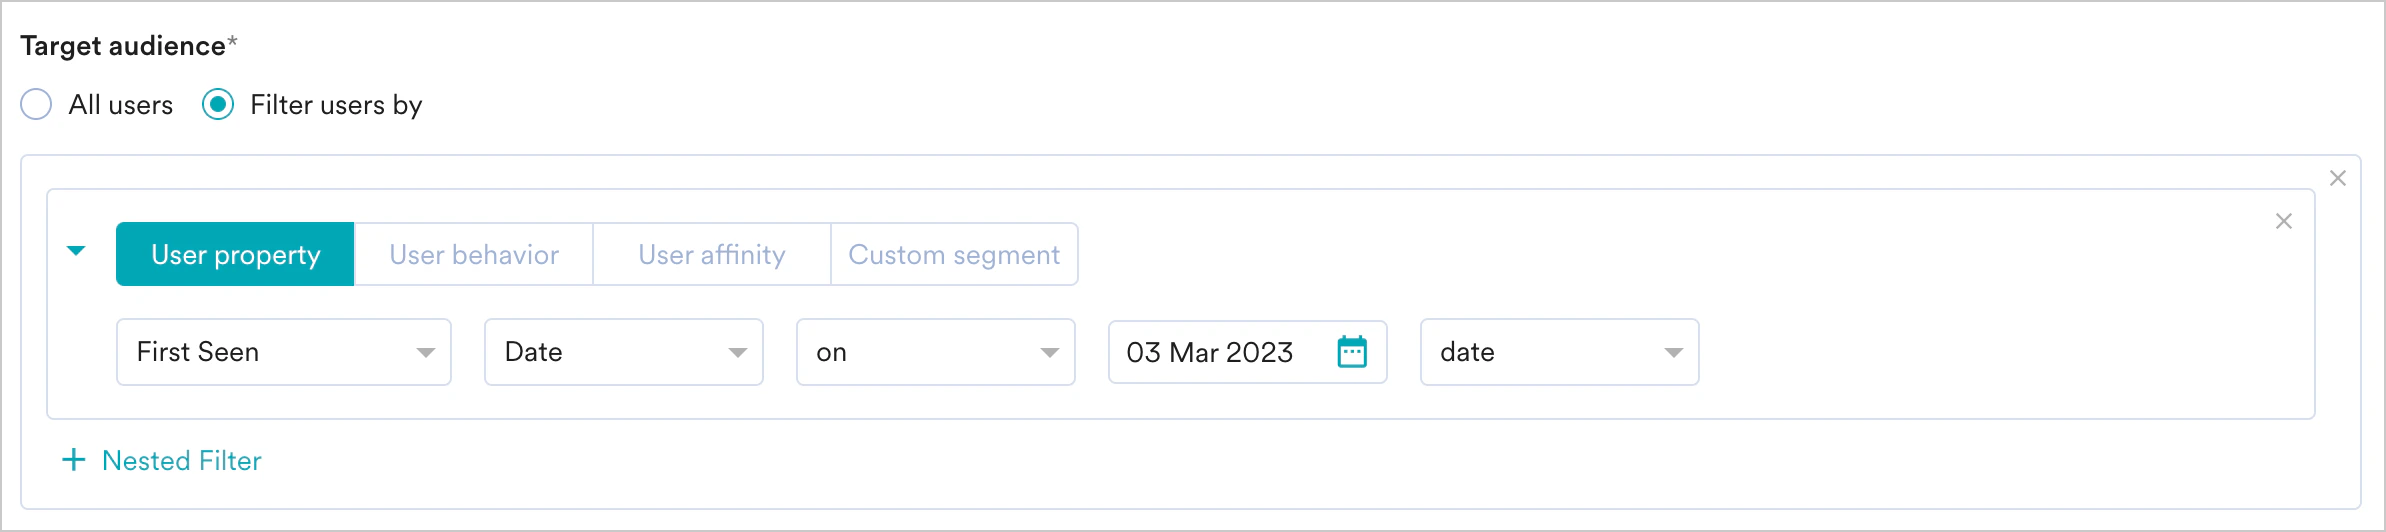
 This filter option allows you to target the users based on user properties such as first seen, last seen, city, and so on. Click the **User property** tab and do the following:
1. Select the desired attribute in the drop-down list. This enables the filters based on the attributes selected. For example, attributes that are numbers can have filter conditions such as 'is equal to', 'is not equal to', 'is between', and so on, while string attributes have different filters.
2. Enter the filter value(s) to create the desired user segment.
3. Click **+ Nested Filter** to add a filter to create nested AND or OR conditions. (This is optional)
For more information, refer to [Create Segments](/user-guide/segment/segment-operations/create-segments).
This filter option allows you to target the users based on user properties such as first seen, last seen, city, and so on. Click the **User property** tab and do the following:
1. Select the desired attribute in the drop-down list. This enables the filters based on the attributes selected. For example, attributes that are numbers can have filter conditions such as 'is equal to', 'is not equal to', 'is between', and so on, while string attributes have different filters.
2. Enter the filter value(s) to create the desired user segment.
3. Click **+ Nested Filter** to add a filter to create nested AND or OR conditions. (This is optional)
For more information, refer to [Create Segments](/user-guide/segment/segment-operations/create-segments).
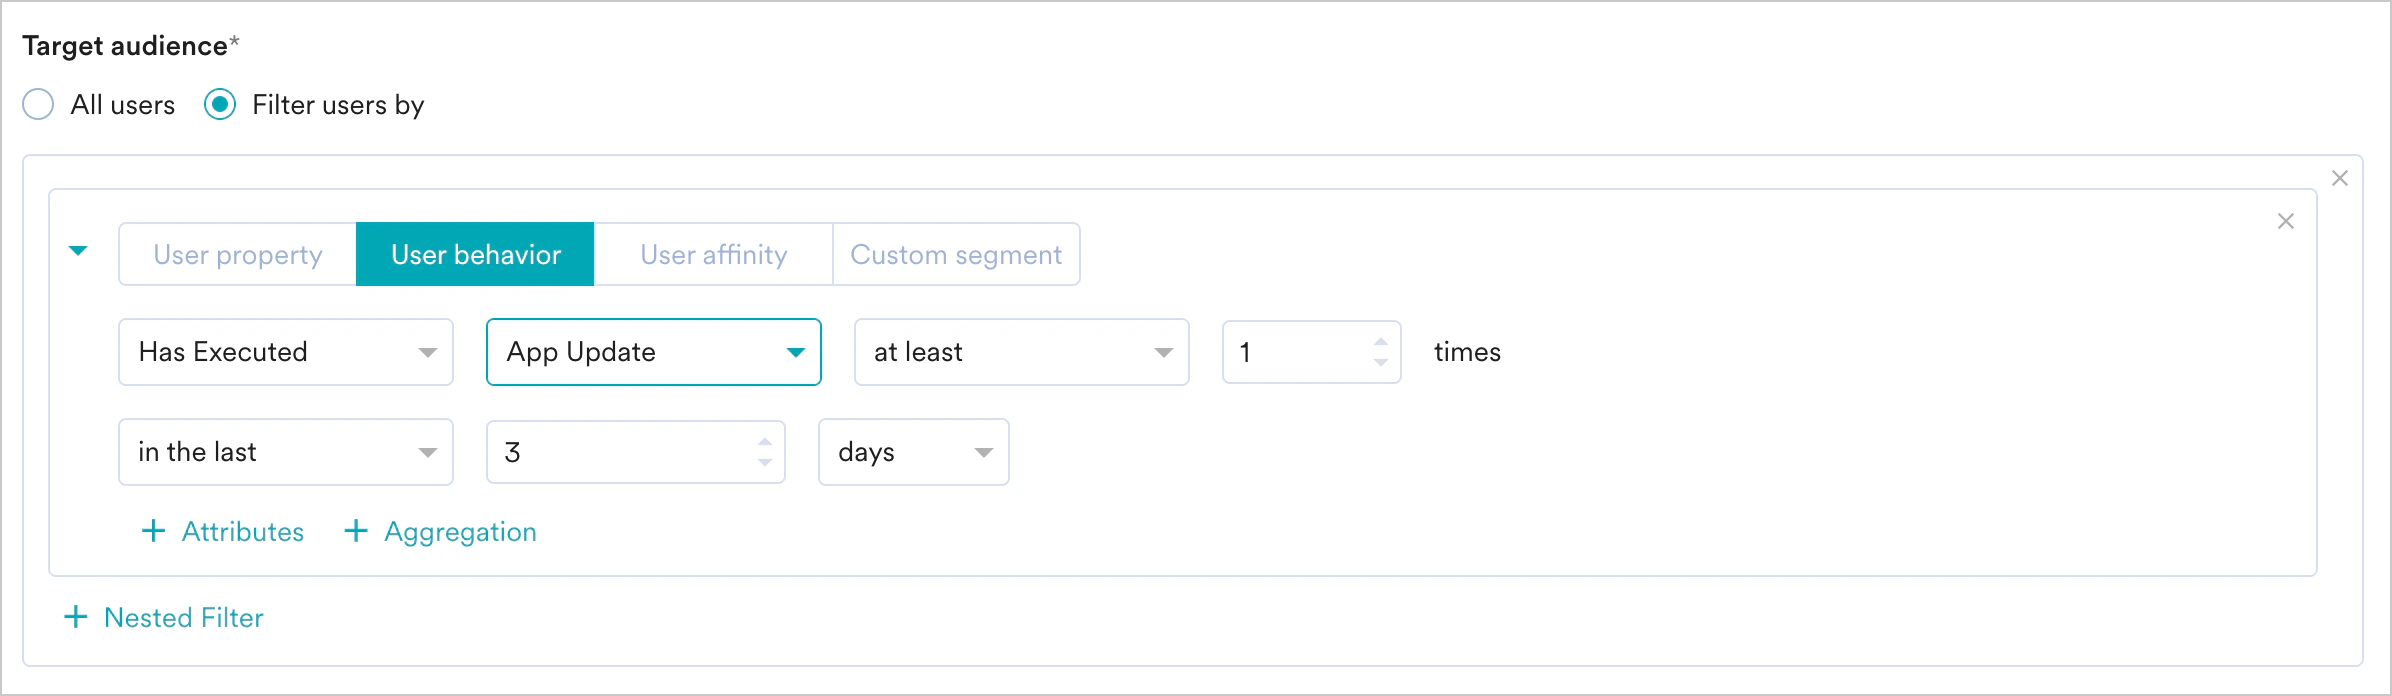
 This filter option allows you to target the users based on the behavior of the user or event, such as app/site opened, viewed product, and so on. Click **User Behavior** and do the following:
1. Select the execution condition and the desired user activity (event).
2. Enter the event frequency and time duration for the event execution.
3. Click **+ Attributes** and add an event attribute with a filter condition.
4. Enter the filter value(s) to create a rule.
5. Use the **+ Aggregation** button to add the aggregation functionality. For more information, refer to [Aggregation Operations](/user-guide/segment/advanced-concepts/aggregation-operations).
6. Click **+ Nested Filter** to add a filter to create nested AND or OR conditions. (This is optional)
For more information, refer to [Create Segments](/user-guide/segment/segment-operations/create-segments).
This filter option allows you to target the users based on the behavior of the user or event, such as app/site opened, viewed product, and so on. Click **User Behavior** and do the following:
1. Select the execution condition and the desired user activity (event).
2. Enter the event frequency and time duration for the event execution.
3. Click **+ Attributes** and add an event attribute with a filter condition.
4. Enter the filter value(s) to create a rule.
5. Use the **+ Aggregation** button to add the aggregation functionality. For more information, refer to [Aggregation Operations](/user-guide/segment/advanced-concepts/aggregation-operations).
6. Click **+ Nested Filter** to add a filter to create nested AND or OR conditions. (This is optional)
For more information, refer to [Create Segments](/user-guide/segment/segment-operations/create-segments).
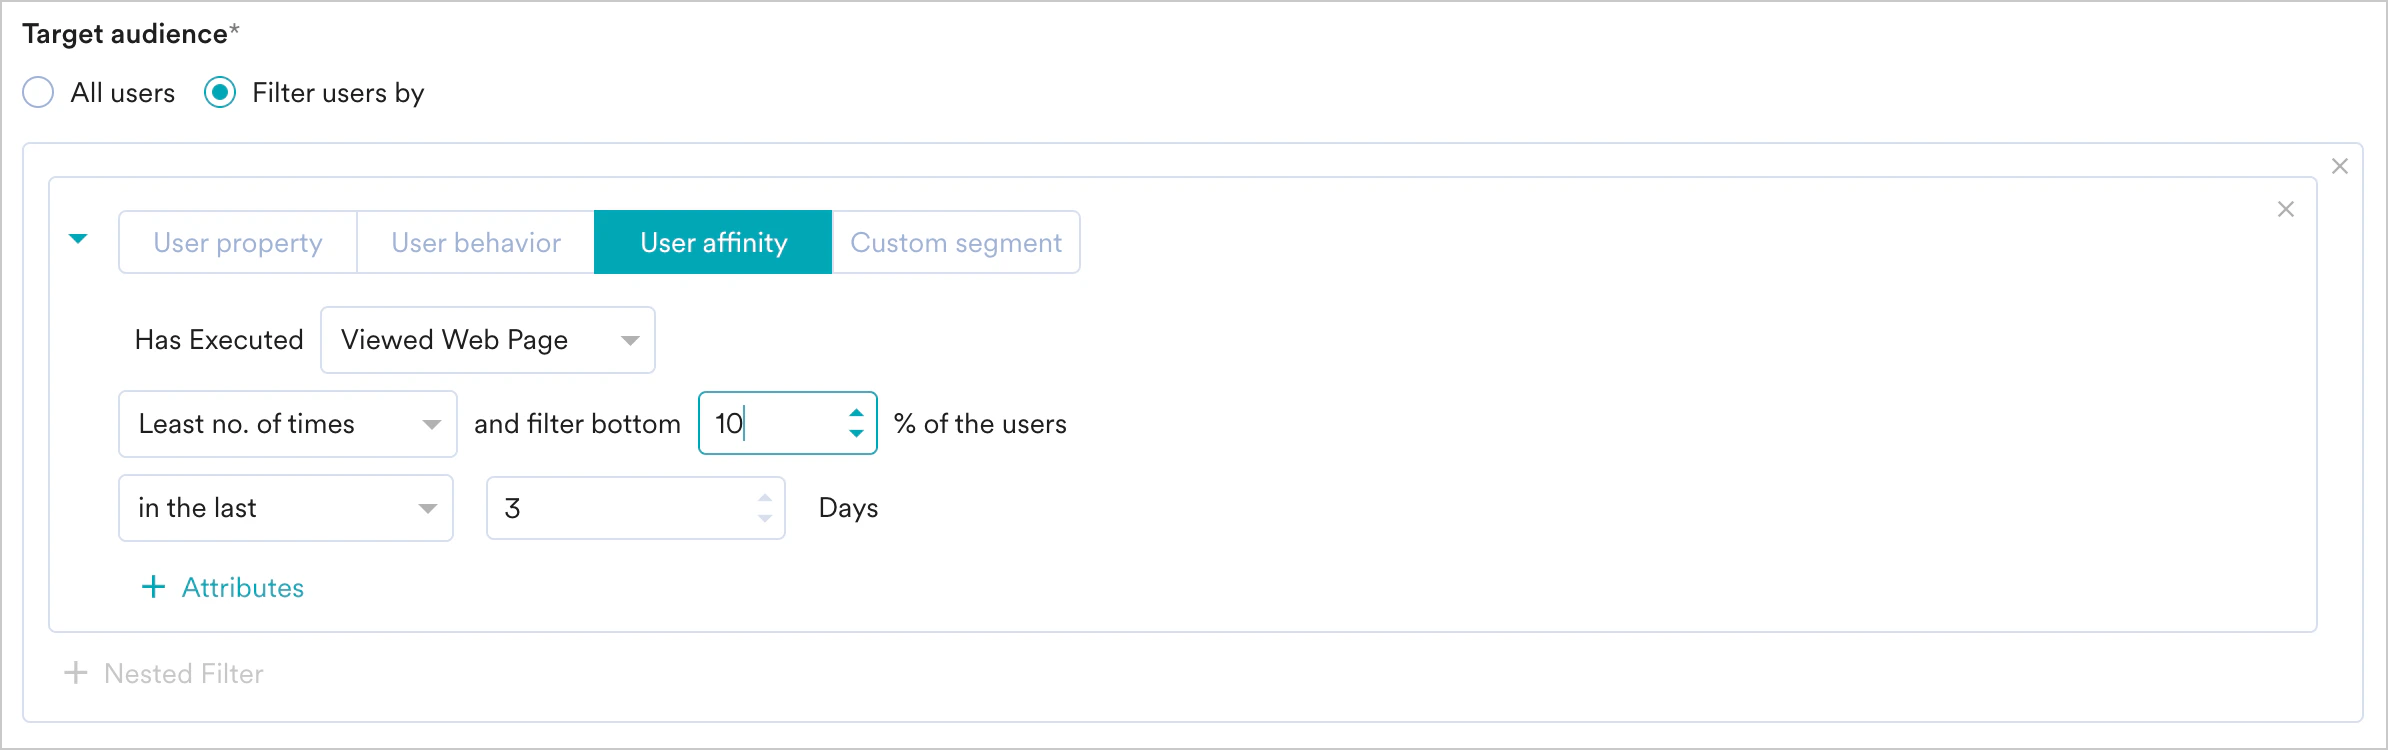
 This filter option allows you to target groups of users created based on the user performing an action with a specific attribute value. For more information, refer to User Affinity. Click **User Affinity** and do the following:
1. Select the desired user event or attribute.
2. Select the user affinity parameter from the following:
* **Predominantly**: Select affinity attribute with a filter condition and provide the affinity values.
* **For a minimum of**: Select affinity attribute with a filter condition and provide the affinity values.
* **Most no. of times**: Enter a value or use the arrows to provide the top percentage of users.
* **Least no. of times**: Enter a value or use the arrows to provide the bottom percentage of users.
3. Enter or use the arrows to provide the time duration for the event execution.
4. Click **+ Attribute** to add more attributes to the filter.
5. Click **+ Nested Filter** to add a filter to create nested AND or OR conditions. (This is optional)
For more information, refer to [Create Segments](/user-guide/segment/segment-operations/create-segments).
This filter option allows you to target groups of users created based on the user performing an action with a specific attribute value. For more information, refer to User Affinity. Click **User Affinity** and do the following:
1. Select the desired user event or attribute.
2. Select the user affinity parameter from the following:
* **Predominantly**: Select affinity attribute with a filter condition and provide the affinity values.
* **For a minimum of**: Select affinity attribute with a filter condition and provide the affinity values.
* **Most no. of times**: Enter a value or use the arrows to provide the top percentage of users.
* **Least no. of times**: Enter a value or use the arrows to provide the bottom percentage of users.
3. Enter or use the arrows to provide the time duration for the event execution.
4. Click **+ Attribute** to add more attributes to the filter.
5. Click **+ Nested Filter** to add a filter to create nested AND or OR conditions. (This is optional)
For more information, refer to [Create Segments](/user-guide/segment/segment-operations/create-segments).
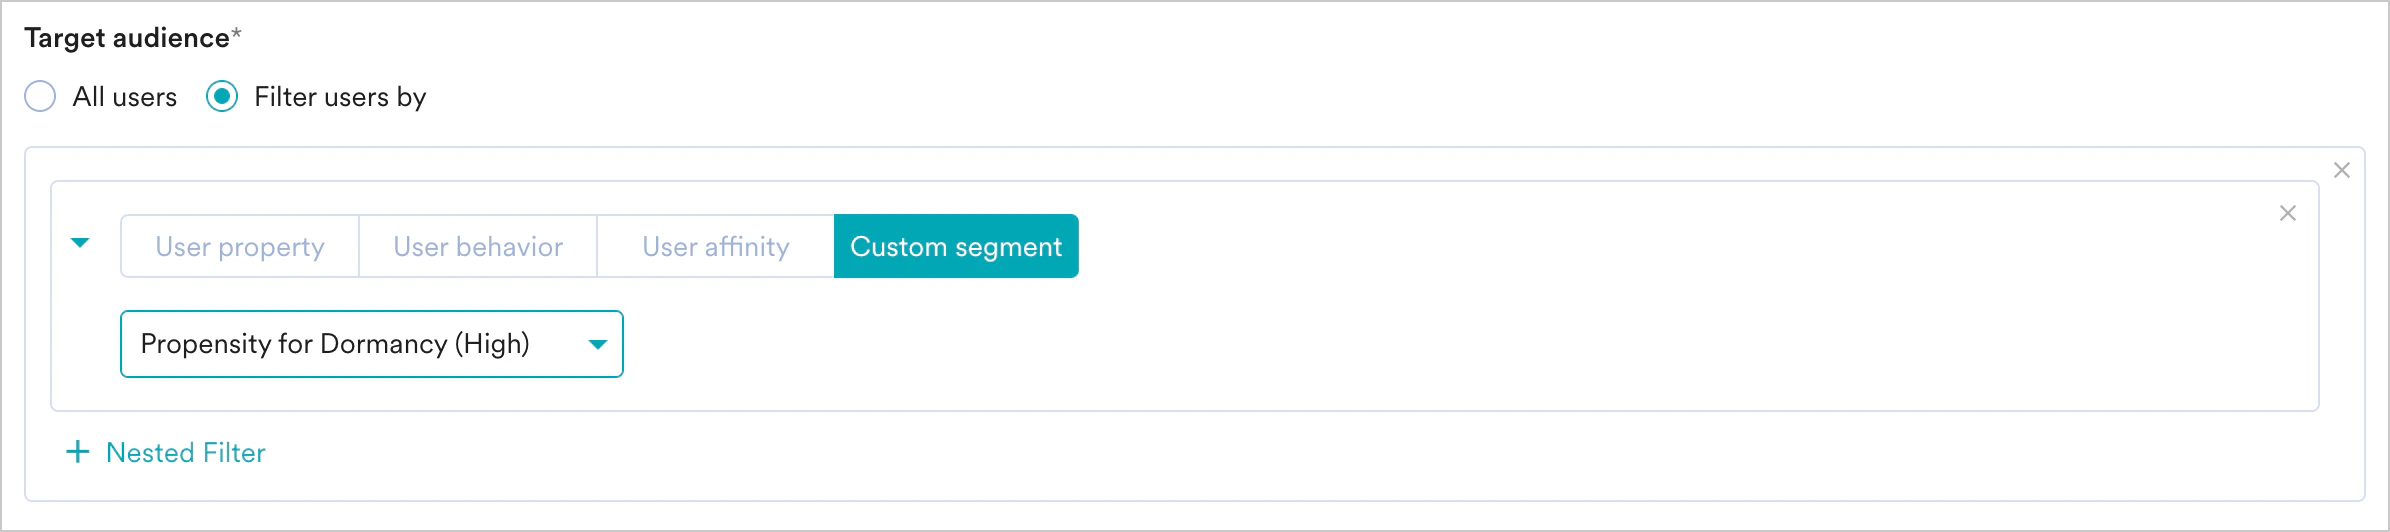
 This filter option allows you to select a custom segment as the target audience.
1. Select a custom segment as the target audience from the list of custom segments available.
2. Click **+ Nested Filter** to add a filter to create nested AND or OR conditions. (This is optional)
For more information, refer to [Custom Segments](/user-guide/segment/segment-operations/custom-segments).
This filter option allows you to select a custom segment as the target audience.
1. Select a custom segment as the target audience from the list of custom segments available.
2. Click **+ Nested Filter** to add a filter to create nested AND or OR conditions. (This is optional)
For more information, refer to [Custom Segments](/user-guide/segment/segment-operations/custom-segments).
 After selecting the filter criteria, you can do the following as well:
* **Create Multiple Filters**: You can create and combine multiple user property rules, user activity rules, and custom segment rules to create a complex user segment using this option.
1. Click **+ Filter**.
2. Click **AND** or **OR**.
3. Select the attribute or event and define the filter conditions.
* **Exclude Users**: Select this checkbox to define the filter criteria for users to be excluded from the campaign.
* **Reset Filters**: Click this option to reset the segmentation filters.
* **Show Count**: Click this button to display the total number of users who are currently in the configured segment.
After selecting the filter criteria, you can do the following as well:
* **Create Multiple Filters**: You can create and combine multiple user property rules, user activity rules, and custom segment rules to create a complex user segment using this option.
1. Click **+ Filter**.
2. Click **AND** or **OR**.
3. Select the attribute or event and define the filter conditions.
* **Exclude Users**: Select this checkbox to define the filter criteria for users to be excluded from the campaign.
* **Reset Filters**: Click this option to reset the segmentation filters.
* **Show Count**: Click this button to display the total number of users who are currently in the configured segment.
 If you have the [*Portfolio*](/user-guide/settings/account/portfolio/portfolio) feature enabled, you can create user segments by combining user data and behavior from different apps and websites (Projects) within your workspace. For more information, refer to [Segmentation in a Multi-Project Portfolio](/user-guide/segment/advanced-concepts/segmentation-in-a-multi-project-portfolio).
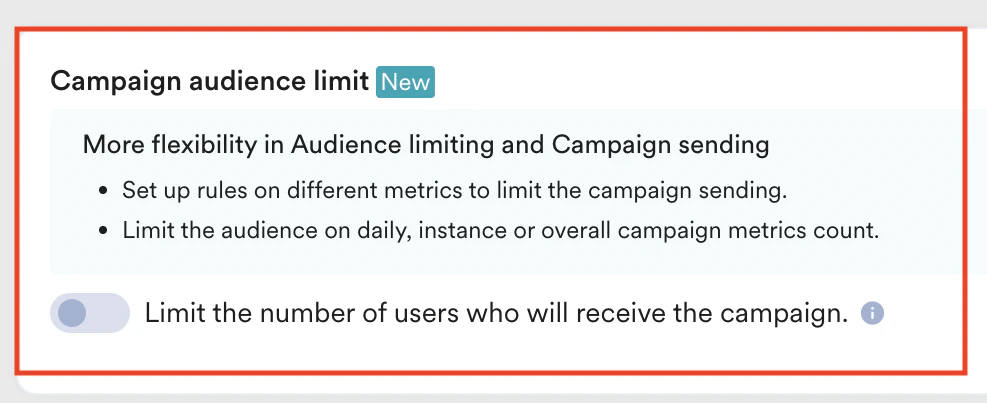
### Campaign Audience Limit
This feature empowers you to control campaign reach and expenditure by capping the number of users who receive it based on engagement metrics like sends, impressions, and conversions. It allows you to set total, daily, or instance-level limits to campaigns. For more information, refer to [Campaign Audience Limit.](/user-guide/settings/channels/delivery-controls/campaign-audience-limit)
If you have the [*Portfolio*](/user-guide/settings/account/portfolio/portfolio) feature enabled, you can create user segments by combining user data and behavior from different apps and websites (Projects) within your workspace. For more information, refer to [Segmentation in a Multi-Project Portfolio](/user-guide/segment/advanced-concepts/segmentation-in-a-multi-project-portfolio).
### Campaign Audience Limit
This feature empowers you to control campaign reach and expenditure by capping the number of users who receive it based on engagement metrics like sends, impressions, and conversions. It allows you to set total, daily, or instance-level limits to campaigns. For more information, refer to [Campaign Audience Limit.](/user-guide/settings/channels/delivery-controls/campaign-audience-limit)
 ### Control Group
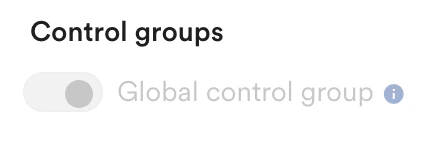
This section contains information about control groups for the campaign. To exclude users from the control groups, do the following:
In the **Control groups** section, enable the **Global control group** toggle to exclude the users from the campaign's target segment.
### Control Group
This section contains information about control groups for the campaign. To exclude users from the control groups, do the following:
In the **Control groups** section, enable the **Global control group** toggle to exclude the users from the campaign's target segment.
 For more information, refer to [Control Group](/user-guide/campaigns-and-channels/getting-started/introduction/control-groups).
Click **Next** or use the tabs on the top of the create campaign navigation to move to Step 2.
## Step 2: Content
Configure **Webhook URL** or target connector URL. You can use the following methods:
* GET
* POST
* PUT
* DELETE
For more information, refer to [Control Group](/user-guide/campaigns-and-channels/getting-started/introduction/control-groups).
Click **Next** or use the tabs on the top of the create campaign navigation to move to Step 2.
## Step 2: Content
Configure **Webhook URL** or target connector URL. You can use the following methods:
* GET
* POST
* PUT
* DELETE
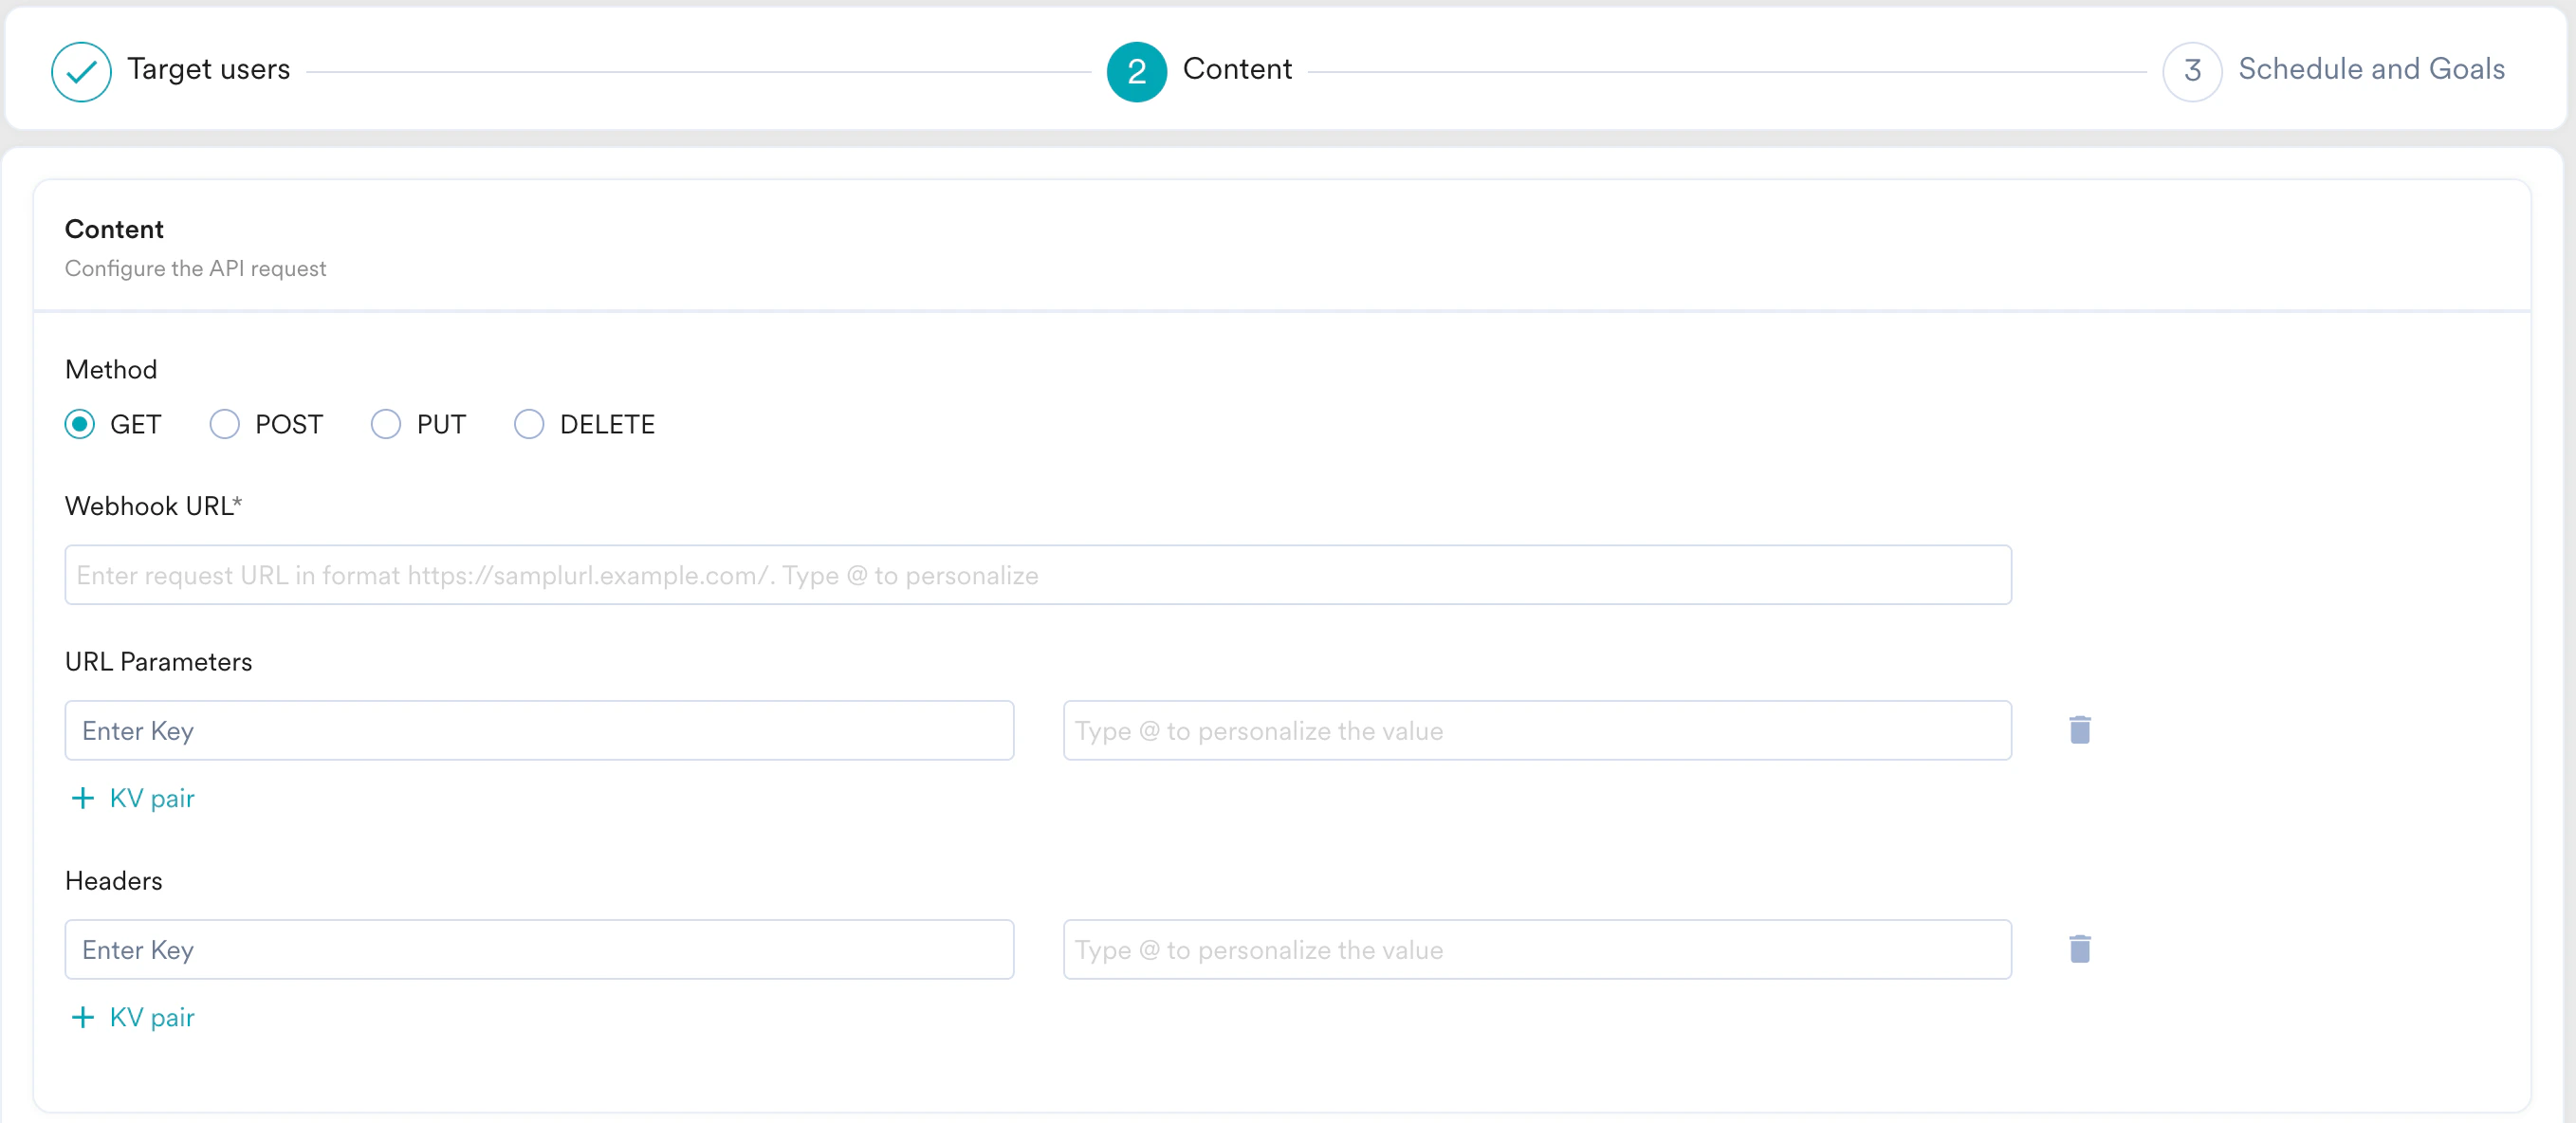 ### Common for GET, POST, PUT, and DELETE
| Field | Description |
| -------------- | ------------------------------------------------------------------------------------------------------------------------------------------------------------------------------- |
| Webhook URL | Enter the URL for the webhook to which you want to send the data. |
| URL Parameters | Enter the parameters for the API. If the URL has the parameters, the parameters are autofilled in the URL parameters field. Click **+ KV pair** to add another URL parameters. |
| Headers | Add the headers for the webhook. Click **+ KV pair** to add another header. |
### POST, PUT, and DELETE Body Type
Configure the Body for your requests using the following options:
Create the body based on the form-encoded serialization for the webhook. Click **+ KV pair** to add more form-encoded body.
### Common for GET, POST, PUT, and DELETE
| Field | Description |
| -------------- | ------------------------------------------------------------------------------------------------------------------------------------------------------------------------------- |
| Webhook URL | Enter the URL for the webhook to which you want to send the data. |
| URL Parameters | Enter the parameters for the API. If the URL has the parameters, the parameters are autofilled in the URL parameters field. Click **+ KV pair** to add another URL parameters. |
| Headers | Add the headers for the webhook. Click **+ KV pair** to add another header. |
### POST, PUT, and DELETE Body Type
Configure the Body for your requests using the following options:
Create the body based on the form-encoded serialization for the webhook. Click **+ KV pair** to add more form-encoded body.
 Create the body using JSON format. Click **+ KV pair** to add more JSON content.
 Create the body using the raw text format.
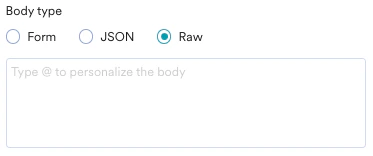 **Personalization**
You can also use personalized parameters using the **@** symbol. You can use the tracked user attributes to personalize your connector requests. Use personalization to send an SMS to a user-specific mobile number or send user-specific data to a third-party system using MoEngage connectors.
### Enable Authorization Settings
If your connector request involves a basic non-changing access token, you can simply add those as a key-value pair in the header.
If your connector request involves an OAuth 2.0 authentication, perform the following steps:
**Personalization**
You can also use personalized parameters using the **@** symbol. You can use the tracked user attributes to personalize your connector requests. Use personalization to send an SMS to a user-specific mobile number or send user-specific data to a third-party system using MoEngage connectors.
### Enable Authorization Settings
If your connector request involves a basic non-changing access token, you can simply add those as a key-value pair in the header.
If your connector request involves an OAuth 2.0 authentication, perform the following steps:
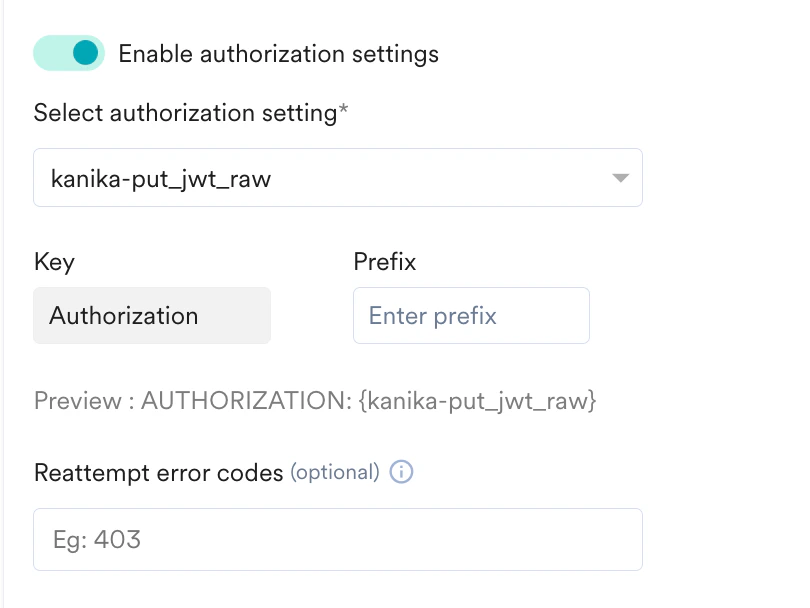 1. Turn on the **Enable authorization settings** toggle.
2. From the **Select** **authorization setting** drop-down list, select an OAuth configuration.
You can see the OAuth settings configured in the MoEngage system at **Settings** > **Advanced settings** > **Authorization configuration**. For more information, refer to [OAuth 2.0](/user-guide/settings/advanced-settings/authorization-configuration-with-oauth-20). You must select a healthy OAuth setting, which is in "Active" status. If you select an OAuth setting in "Failed" status, you cannot create a Connector campaign.
3. The **Key** field is populated as "Authorization" by default.
4. In the **Prefix** field, enter a prefix. You can enter the name of a prefix added in the selected OAuth configuration. You can also override those prefixes and create your own prefix.
5. In the **Reattempt error codes** field, enter error codes to initiate a reattempt in case of a failed response. For example, use the error code "400" for the expired error code to inform MoEngage to reattempt creating a Connector campaign.
Test campaigns enable previewing the campaign on a test device to ensure that your notification is conveyed in the manner that you desire.
You can test the campaign you created by selecting any of the following options and providing the value for the attribute chosen for your test user:
* Unique ID
* Email ID
* Mobile Number
* Google Advertising Identifier
* iOS Identifier For Advertising
* Device Push Token
* Custom Segment
1. Turn on the **Enable authorization settings** toggle.
2. From the **Select** **authorization setting** drop-down list, select an OAuth configuration.
You can see the OAuth settings configured in the MoEngage system at **Settings** > **Advanced settings** > **Authorization configuration**. For more information, refer to [OAuth 2.0](/user-guide/settings/advanced-settings/authorization-configuration-with-oauth-20). You must select a healthy OAuth setting, which is in "Active" status. If you select an OAuth setting in "Failed" status, you cannot create a Connector campaign.
3. The **Key** field is populated as "Authorization" by default.
4. In the **Prefix** field, enter a prefix. You can enter the name of a prefix added in the selected OAuth configuration. You can also override those prefixes and create your own prefix.
5. In the **Reattempt error codes** field, enter error codes to initiate a reattempt in case of a failed response. For example, use the error code "400" for the expired error code to inform MoEngage to reattempt creating a Connector campaign.
Test campaigns enable previewing the campaign on a test device to ensure that your notification is conveyed in the manner that you desire.
You can test the campaign you created by selecting any of the following options and providing the value for the attribute chosen for your test user:
* Unique ID
* Email ID
* Mobile Number
* Google Advertising Identifier
* iOS Identifier For Advertising
* Device Push Token
* Custom Segment
 Click **Next** or use the tabs on the top of the create campaign navigation to move to Step 3.
## Step 3: Schedule and Goals
This section contains the following:
* [Delivery Schedule](/user-guide/campaigns-and-channels/connectors/create/create-a-connector-campaign): Choose when the campaign should be delivered to your users and the periodicity of delivery.
* [Conversion Goals](/user-guide/campaigns-and-channels/connectors/create/create-a-connector-campaign): Choose the conversion goals and revenue metrics to be tracked for the campaign.
* [Delivery Controls](/user-guide/campaigns-and-channels/connectors/create/create-a-connector-campaign): Choose the advanced delivery control options such as throttling, frequency capping, and expiration settings for the notification.
### Delivery Schedule
Choose this option to send the campaign immediately to the target users.
Click **Next** or use the tabs on the top of the create campaign navigation to move to Step 3.
## Step 3: Schedule and Goals
This section contains the following:
* [Delivery Schedule](/user-guide/campaigns-and-channels/connectors/create/create-a-connector-campaign): Choose when the campaign should be delivered to your users and the periodicity of delivery.
* [Conversion Goals](/user-guide/campaigns-and-channels/connectors/create/create-a-connector-campaign): Choose the conversion goals and revenue metrics to be tracked for the campaign.
* [Delivery Controls](/user-guide/campaigns-and-channels/connectors/create/create-a-connector-campaign): Choose the advanced delivery control options such as throttling, frequency capping, and expiration settings for the notification.
### Delivery Schedule
Choose this option to send the campaign immediately to the target users.
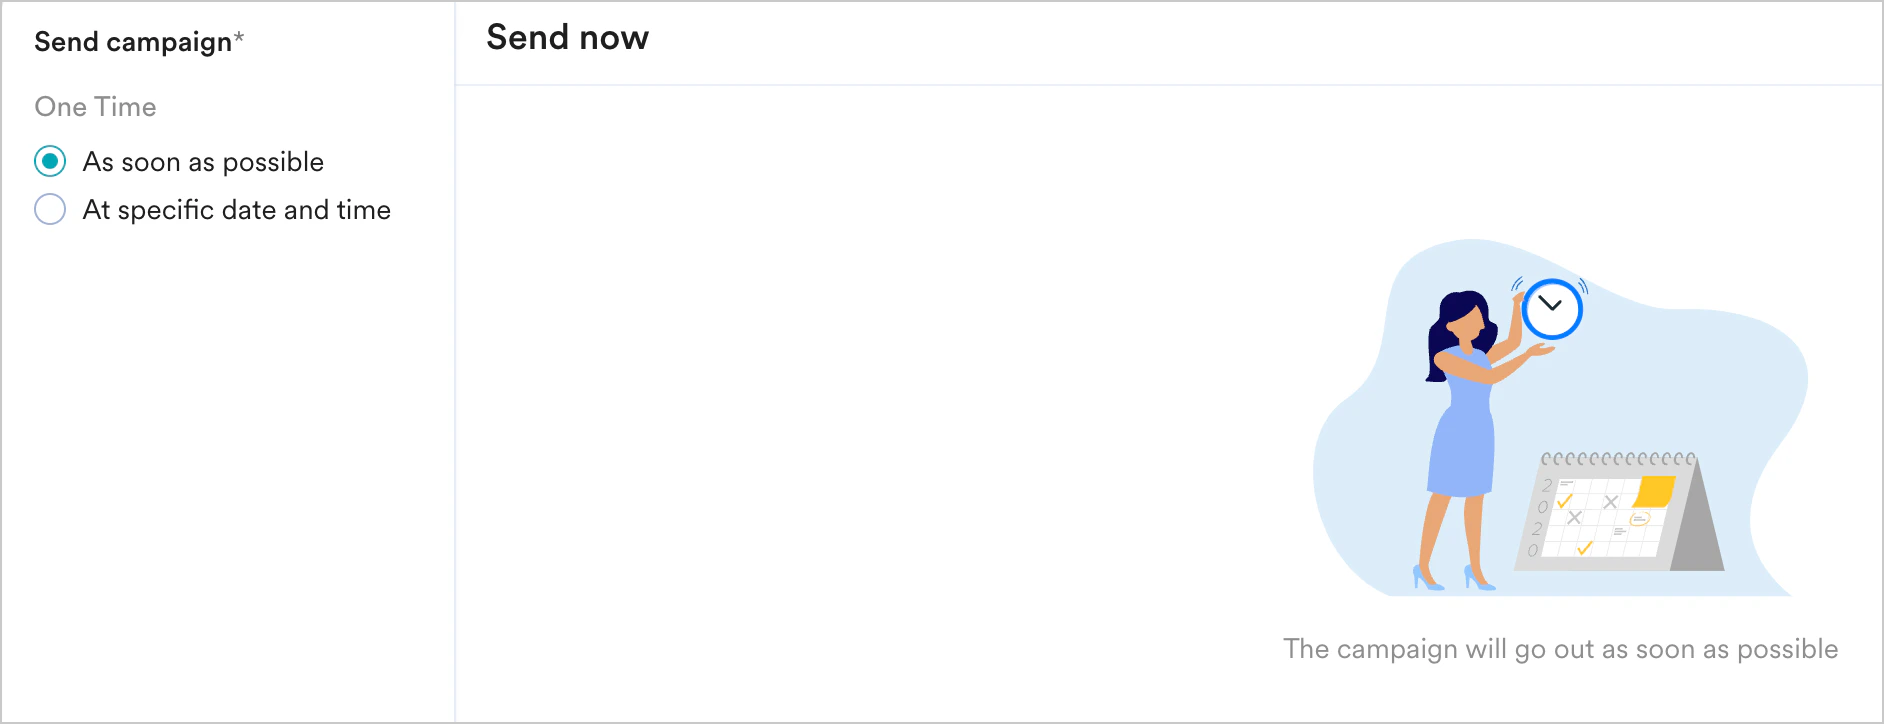 Choose this option to send the campaign at the specified time, time zone, or predicted time.
This section helps you send the campaign on a specific date and time, and it contains the following fields:
* **Campaign time zone**: the timezone in which the campaign should be sent.
* **Start date**: the date on which the campaign should be sent.
* **Send time**: the time at which the campaign should be sent. Select am or pm depending on when the time of day at which the campaign should be sent.
Choose this option to send the campaign at the specified time, time zone, or predicted time.
This section helps you send the campaign on a specific date and time, and it contains the following fields:
* **Campaign time zone**: the timezone in which the campaign should be sent.
* **Start date**: the date on which the campaign should be sent.
* **Send time**: the time at which the campaign should be sent. Select am or pm depending on when the time of day at which the campaign should be sent.
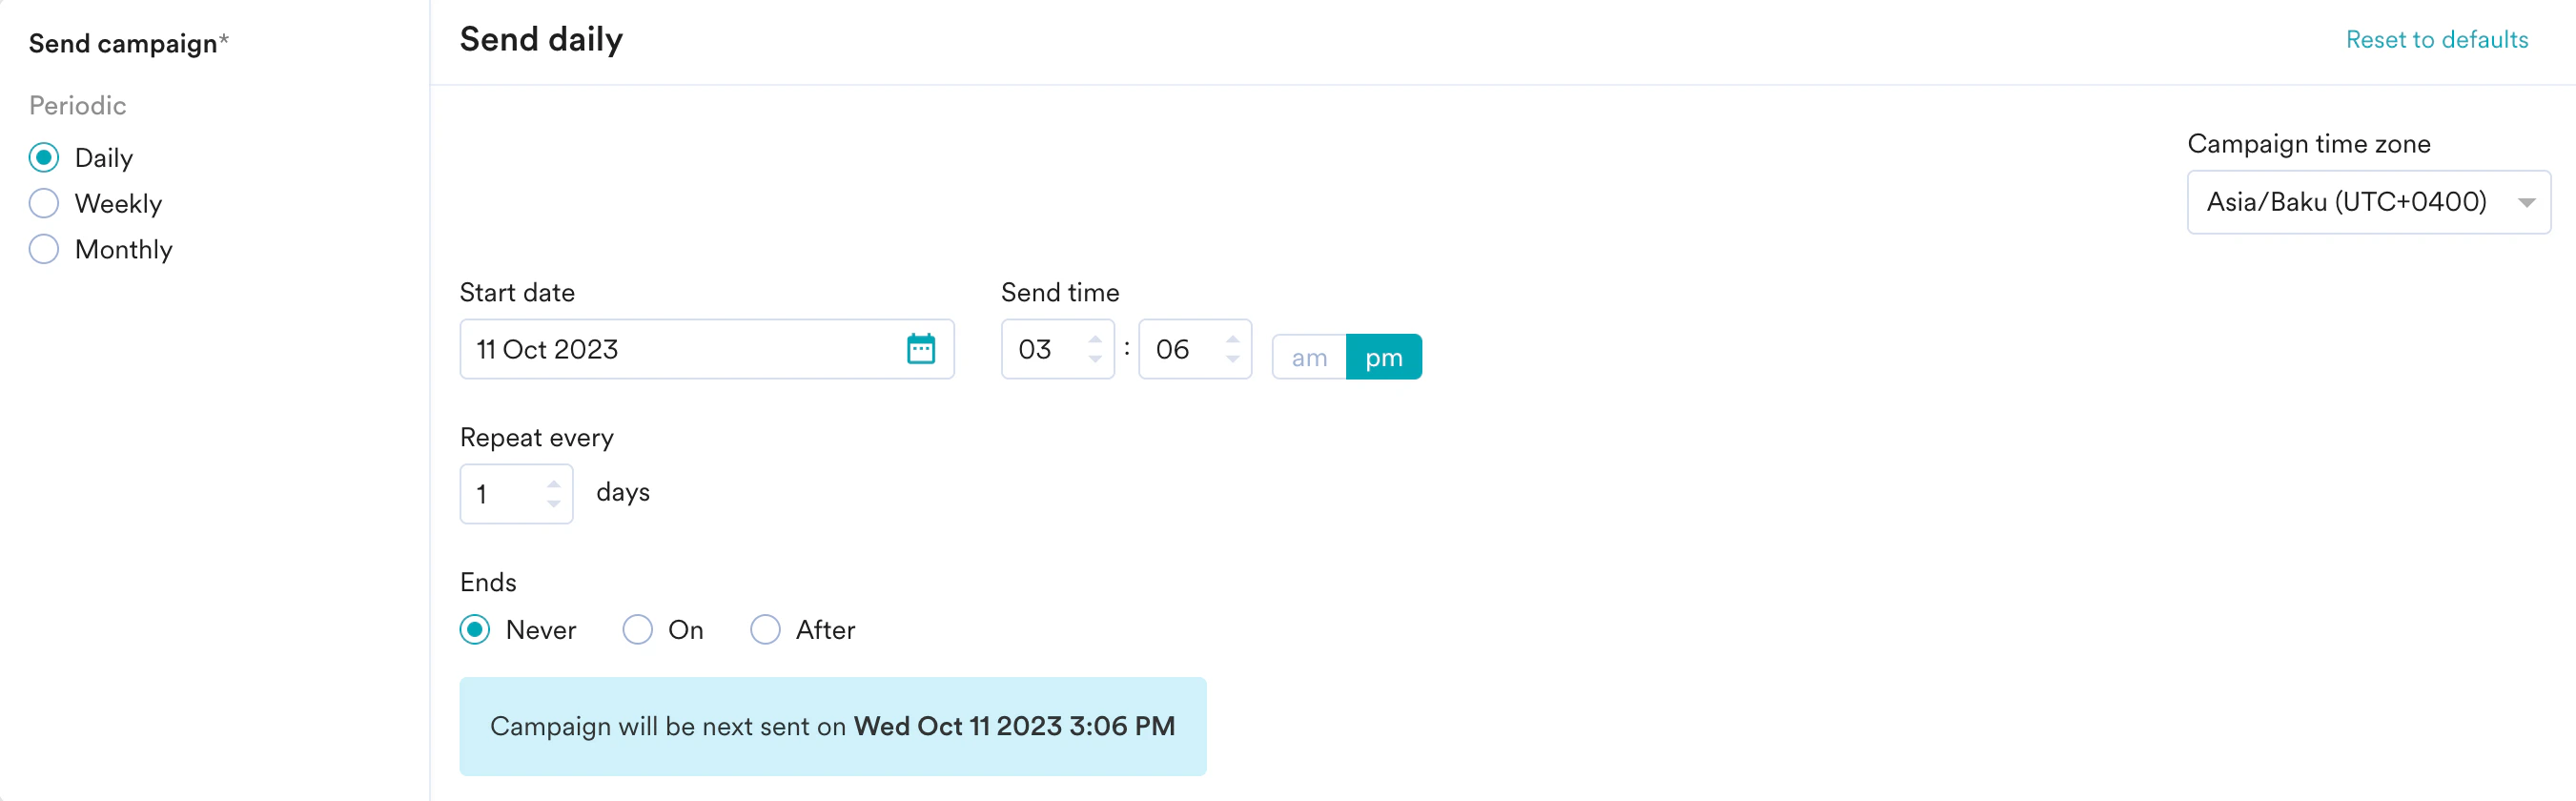
 Choose this option to send the campaign periodically on a specified date and time. The following fields are available in this section:
* **Campaign time zone**: the timezone in which the campaign should be sent.
* **Start date**: the date on which the campaign should be sent.
* **Send time**: the time at which the campaign should be sent. Select am or pm depending on when the time of day at which the campaign should be sent.
* **Periodic**: the periodicity of the campaign. You can choose from the following options available:
| Periodicity | Description |
| ----------- | ----------------------------------------------------------------------------------------------------------------------------------------------------------------------------------------------------------------------------------------------------------------------------------------------------------------------------------------------------------------------------------------------------------------------------------------------------------------------------------------------------------------------------------------------------------------------------------------------------------------------------------------------------------------------------------------------------------------------------------------------------------------------------------------------------------------------------------------------------------------------------------------------------------------------------------------------------------------------------------------------------------------------------------------------------------------------------------------------------------------------------------------------------------------------------------------------------------------------------------------------- |
| Daily | **Repeat every**: This option allows you to specify the number of days after which the campaign should be repeated. |
| Weekly | **Repeat every**: This option allows you to specify the number of weeks for which the campaign should be repeated.
Choose this option to send the campaign periodically on a specified date and time. The following fields are available in this section:
* **Campaign time zone**: the timezone in which the campaign should be sent.
* **Start date**: the date on which the campaign should be sent.
* **Send time**: the time at which the campaign should be sent. Select am or pm depending on when the time of day at which the campaign should be sent.
* **Periodic**: the periodicity of the campaign. You can choose from the following options available:
| Periodicity | Description |
| ----------- | ----------------------------------------------------------------------------------------------------------------------------------------------------------------------------------------------------------------------------------------------------------------------------------------------------------------------------------------------------------------------------------------------------------------------------------------------------------------------------------------------------------------------------------------------------------------------------------------------------------------------------------------------------------------------------------------------------------------------------------------------------------------------------------------------------------------------------------------------------------------------------------------------------------------------------------------------------------------------------------------------------------------------------------------------------------------------------------------------------------------------------------------------------------------------------------------------------------------------------------------------- |
| Daily | **Repeat every**: This option allows you to specify the number of days after which the campaign should be repeated. |
| Weekly | **Repeat every**: This option allows you to specify the number of weeks for which the campaign should be repeated.
**Repeat on**: This option allows you to specify the day(s) of the week on which the campaign should be sent (For example, if you wish to send the campaign every Monday, Wednesday, and Friday, select these days in this option). |
| Monthly | **Repeat every**: This option allows you to specify the number of months for which the campaign should be repeated.
**Repeat on**: This option allows you do the following: - Days of month: Choose this option for repeating campaigns that are date specific. Select the date(s) of the month the campaign should be sent (For example, to send the campaign on the 5th and the 25th of a month, select the 5th and 25th in the calendar widget.).
**Note**: If the selected date(s) do not exist in the month specified (as it is a shorter month), a campaign will be sent on the last date. (For example, if the 30th and 31st are selected and the month is February, one campaign would be sent on the 28th). - Days of week: Choose this option to specify the day(s) of the week on which the campaign should be sent (For example, if you wish to send the campaign every Monday, Wednesday, and Friday, select these days in this option).
**Note**: In case of a day of the week not existing in a month (for example, fifth Saturday), the campaign would be skipped for that instance. And in case of overlap (for example, 4th Monday and last Monday), only one instance would be sent.
|
* **Ends:** the date on which the campaign should end. The following options are available:
* **Never**: the campaign runs daily.
* **On**: the campaign ends on the end date specified in the **End Date** field.
* **After:** the campaign ends after the number of occurrences specified in the **occurrences** field.
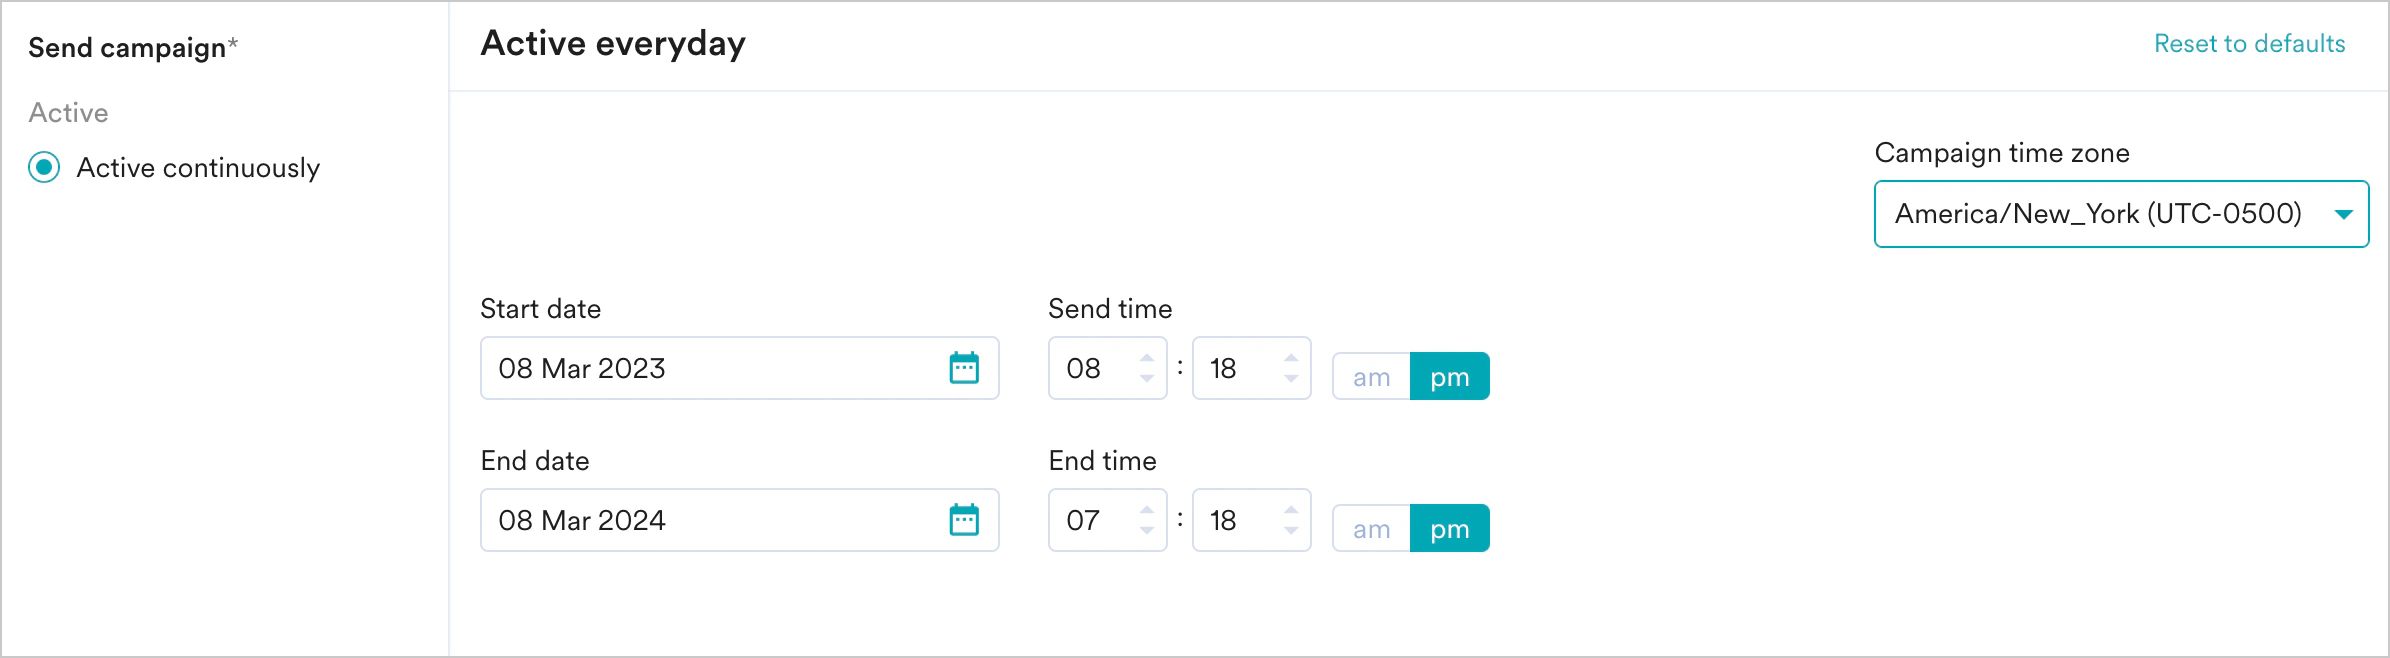
 Choose this option to engage the right users (through segmentation) at the right time (through event triggering). The **Active continuously** option is selected by default under **Send campaign** and the following fields are available in this section:
* **Campaign time zone**: the timezone in which the campaign should be sent.
* **Start date**: the date on which the campaign should be sent.
* **Send time**: the time at which the campaign should be sent. Select am or pm depending on when the time of day at which the campaign should be sent.
* **End date**: the date on which the campaign should be stopped.
* **End time**: the time at which the campaign should be stopped. Select am or pm depending on when the time of day at which the campaign should be stopped.
Choose this option to engage the right users (through segmentation) at the right time (through event triggering). The **Active continuously** option is selected by default under **Send campaign** and the following fields are available in this section:
* **Campaign time zone**: the timezone in which the campaign should be sent.
* **Start date**: the date on which the campaign should be sent.
* **Send time**: the time at which the campaign should be sent. Select am or pm depending on when the time of day at which the campaign should be sent.
* **End date**: the date on which the campaign should be stopped.
* **End time**: the time at which the campaign should be stopped. Select am or pm depending on when the time of day at which the campaign should be stopped.
 **When will event-triggered campaigns be sent?**
The campaign will be sent only when:
* The event property or attribute, which is used to create these type of triggers (such as flight\_time in previous example), is in a valid date-time format. If it is not in date-time format, the string should have data in one of the [supported formats](/user-guide/campaigns-and-channels/mobile-push/create/create-push-campaigns). If the selected attributes do not contain data in any of these formats, the campaigns are not sent to the users.
* The date or time value from the attribute is greater than the time at which the trigger condition is fulfilled.
* The date or time value from the attribute is less than 30 Days + the time at which the trigger condition is fulfilled. For example, if your trigger condition is fulfilled at date D, the notification is sent only when the attribute value is less than D+30.
* The intelligent delay optimization (**With Delay**) does not work for campaigns sent on relative timing.
### Conversion Goals
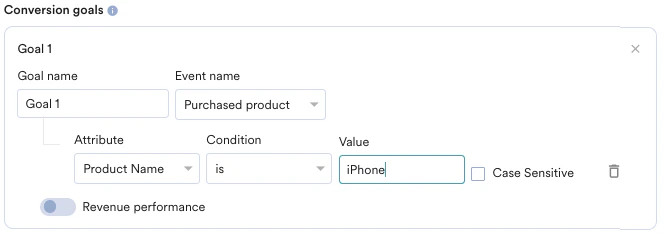
You can add conversion goals to track the business metrics for your campaigns. You can track a maximum of five conversion goals. You can choose any app event as a conversion goal activity and set more than one conversion goal. The first goal will be treated as a primary goal.
For example, if you want to track the number of customers who have purchased an iPhone after your campaign was sent. (Event: Purchase event, Product: iPhone). Your conversion goal setup might be similar to the following image:
**When will event-triggered campaigns be sent?**
The campaign will be sent only when:
* The event property or attribute, which is used to create these type of triggers (such as flight\_time in previous example), is in a valid date-time format. If it is not in date-time format, the string should have data in one of the [supported formats](/user-guide/campaigns-and-channels/mobile-push/create/create-push-campaigns). If the selected attributes do not contain data in any of these formats, the campaigns are not sent to the users.
* The date or time value from the attribute is greater than the time at which the trigger condition is fulfilled.
* The date or time value from the attribute is less than 30 Days + the time at which the trigger condition is fulfilled. For example, if your trigger condition is fulfilled at date D, the notification is sent only when the attribute value is less than D+30.
* The intelligent delay optimization (**With Delay**) does not work for campaigns sent on relative timing.
### Conversion Goals
You can add conversion goals to track the business metrics for your campaigns. You can track a maximum of five conversion goals. You can choose any app event as a conversion goal activity and set more than one conversion goal. The first goal will be treated as a primary goal.
For example, if you want to track the number of customers who have purchased an iPhone after your campaign was sent. (Event: Purchase event, Product: iPhone). Your conversion goal setup might be similar to the following image:
 With multiple conversion goals, you can track more than one business metric or visualize a funnel for your user actions. For example, if you want to check the following, you can do so with multiple conversion goals.
* How many users have viewed the product page?
* How many of them added that product to the cart?
* How many of them made a successful order?
| | |
| --------------------------------------------------------------------------------------------------------------------------------------------------------------------------------------------------------------------------------------------------------------------------------------------------------------------------------------------------------------------------------------------------------------------------------------- | --------------------------------------------------------------------------------------------------------------------------------------------------------------------------------------------------------------------------------------------------------------------------------------------------------------------------------------------------------------------------------------------------------------------------------------------------------------------------------------------------------------------------------------------------------------------------------------------------------------------------------------------------------------------------------------------------------------------------------------------------------------------------------------------------------------------------------------------------------------------------------------------------------------------------------------------------------------------------------------------------------------------------------------------------------------------------------------------------------------------------------------------------------------------------------------------------------------------------------------------------------------------------------------------------------------------------------------------------------------------------------------------------------------------------------- |
| With MoEngage, you can track the revenue generated by your campaigns. For example, you can track the revenue generated by your product after sending a communication. To track revenue performance, enable the **Revenue performance** toggle for the conversion goal for which you want to track the revenue. In the example here, to track revenue for *orderSuccessful* events, you must enable the **Revenue performance** toggle. |
With multiple conversion goals, you can track more than one business metric or visualize a funnel for your user actions. For example, if you want to check the following, you can do so with multiple conversion goals.
* How many users have viewed the product page?
* How many of them added that product to the cart?
* How many of them made a successful order?
| | |
| --------------------------------------------------------------------------------------------------------------------------------------------------------------------------------------------------------------------------------------------------------------------------------------------------------------------------------------------------------------------------------------------------------------------------------------- | --------------------------------------------------------------------------------------------------------------------------------------------------------------------------------------------------------------------------------------------------------------------------------------------------------------------------------------------------------------------------------------------------------------------------------------------------------------------------------------------------------------------------------------------------------------------------------------------------------------------------------------------------------------------------------------------------------------------------------------------------------------------------------------------------------------------------------------------------------------------------------------------------------------------------------------------------------------------------------------------------------------------------------------------------------------------------------------------------------------------------------------------------------------------------------------------------------------------------------------------------------------------------------------------------------------------------------------------------------------------------------------------------------------------------------- |
| With MoEngage, you can track the revenue generated by your campaigns. For example, you can track the revenue generated by your product after sending a communication. To track revenue performance, enable the **Revenue performance** toggle for the conversion goal for which you want to track the revenue. In the example here, to track revenue for *orderSuccessful* events, you must enable the **Revenue performance** toggle. | 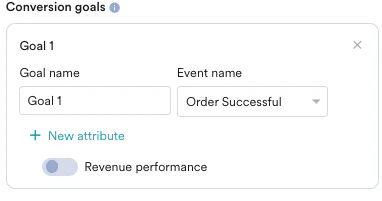 |
| After choosing the goal, you can select the numeric attribute that captures the order's total monetary value. In this example, *cartValue* contains the total order value. You can choose the currency in which your monetary value is being reported. |
|
| After choosing the goal, you can select the numeric attribute that captures the order's total monetary value. In this example, *cartValue* contains the total order value. You can choose the currency in which your monetary value is being reported. | 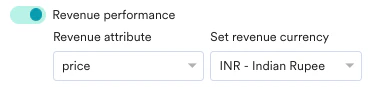 |
| **Set Attribution window**: You can set an attribution window (a time period or window that is calculated since the user has received the campaign, for which you want to attribute the conversion goals to a specific campaign.) By default, it is set for 36 hours. |
|
| **Set Attribution window**: You can set an attribution window (a time period or window that is calculated since the user has received the campaign, for which you want to attribute the conversion goals to a specific campaign.) By default, it is set for 36 hours. |  |
### Remove Duplicate Users
Applicable to One Time and Periodic campaigns only.
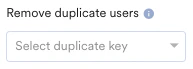
Select the user attributes using which you can delete the duplicate users.
|
### Remove Duplicate Users
Applicable to One Time and Periodic campaigns only.
Select the user attributes using which you can delete the duplicate users.
 ### Delivery Controls
This section contains the following options:
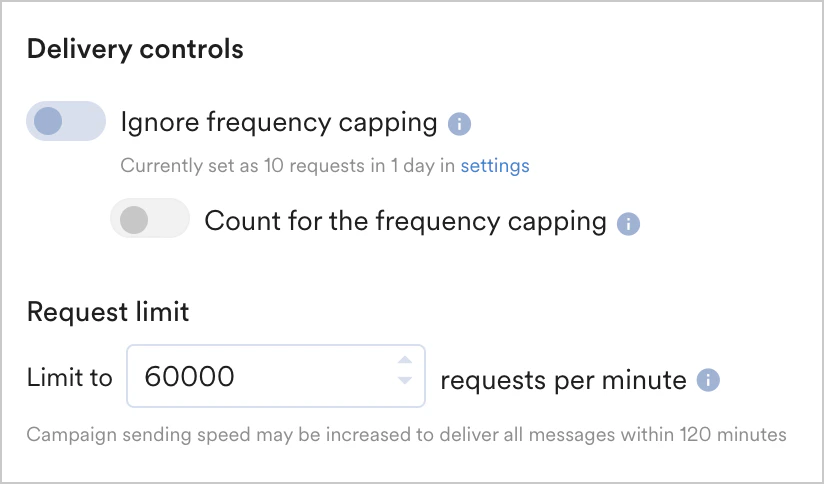
* **Ignore frequency capping**: Enable this toggle to ignore the frequency capping limit for this Connector campaign. For more information, refer to [Frequency Capping](/user-guide/settings/channels/delivery-controls/frequency-capping).
* **Count for the frequency capping**: Enable this toggle if you want this connector to be counted for frequency capping limit.
* **Request limit**: Set the request limit to send the Connector campaign notifications. The maximum throughput is 200000 requests per minute.\
**Note:** If the estimated time to send the campaign exceeds 4 hours, MoEngage automatically increases the requests per minute to finish sending in 4 hours. If multiple campaigns are running in parallel, campaigns might be delayed.
### Delivery Controls
This section contains the following options:
* **Ignore frequency capping**: Enable this toggle to ignore the frequency capping limit for this Connector campaign. For more information, refer to [Frequency Capping](/user-guide/settings/channels/delivery-controls/frequency-capping).
* **Count for the frequency capping**: Enable this toggle if you want this connector to be counted for frequency capping limit.
* **Request limit**: Set the request limit to send the Connector campaign notifications. The maximum throughput is 200000 requests per minute.\
**Note:** If the estimated time to send the campaign exceeds 4 hours, MoEngage automatically increases the requests per minute to finish sending in 4 hours. If multiple campaigns are running in parallel, campaigns might be delayed.
 This section contains the following options:
| | |
| ----------------------------------------------------------------------------------------------------------------------------------------------------------------------------------------------------------------------------------------------------------------------------------------------------------------------------------------------------------------------------------------------------------------------------------------------------------------------------------------------------------------------------------------------------------------------------------------------------------- | ----------------------------------------------------------------------------------------------------------------------------------------------------------------------------------------------------------------------------------------------------------------------------------------------------------------------------------------------------------------------------------------------------------------------------------------------------------------------------------------------------------------------------------------------------------------------------------------------------------------------------------------------------------------------------------------------------------------------------------------------------------------------------------------------------------------------------------------------------------------------------------------------------------------------------------------------------------------------------------------------------------------------------------------------------------------------------------------------------------------------------------------------------------------------------------------------------------------------------------------------------------------------------------------------------------------------------------------------------------------------------------------------------------------------- |
|
This section contains the following options:
| | |
| ----------------------------------------------------------------------------------------------------------------------------------------------------------------------------------------------------------------------------------------------------------------------------------------------------------------------------------------------------------------------------------------------------------------------------------------------------------------------------------------------------------------------------------------------------------------------------------------------------------- | ----------------------------------------------------------------------------------------------------------------------------------------------------------------------------------------------------------------------------------------------------------------------------------------------------------------------------------------------------------------------------------------------------------------------------------------------------------------------------------------------------------------------------------------------------------------------------------------------------------------------------------------------------------------------------------------------------------------------------------------------------------------------------------------------------------------------------------------------------------------------------------------------------------------------------------------------------------------------------------------------------------------------------------------------------------------------------------------------------------------------------------------------------------------------------------------------------------------------------------------------------------------------------------------------------------------------------------------------------------------------------------------------------------------------- |
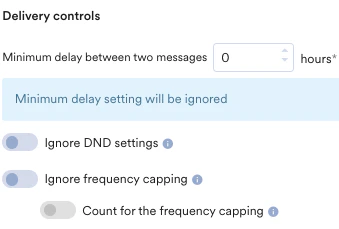
| - **Minimum delay between two messages**: Set the minimum time gap between two messages received by the same user.
- **Ignore DND settings**: Enable this toggle to ignore the DND settings.
- **Ignore frequency capping**: Enable this toggle to ignore the frequency capping limit for this Connector campaign. For more information, refer to [Frequency Capping](/user-guide/settings/channels/delivery-controls/frequency-capping).
- **Count for the frequency capping**: Enable this toggle if you want this connector to be counted for frequency capping limit.
|  |
# Next Steps
* [Campaign Analytics for Connectors](/user-guide/campaigns-and-channels/connectors/analyze/connector-campaign-analytics).
|
# Next Steps
* [Campaign Analytics for Connectors](/user-guide/campaigns-and-channels/connectors/analyze/connector-campaign-analytics).