> ## Documentation Index
> Fetch the complete documentation index at: https://moengage.com/docs/llms.txt
> Use this file to discover all available pages before exploring further.
# Create an Email Campaign
> Step-by-step guide to creating email campaigns in MoEngage. Choose delivery types, set up targeting, design content, and schedule your email send.
Before you start creating email campaigns, make sure you have configured [email settings](/user-guide/campaigns-and-channels/email/getting-started-with-email/configure-email-channel).
To create an Email campaign, perform the following steps:
1. On the sidebar menu in MoEngage, hover over the Engage menu item  . The **Engage** menu appears.
2. Click **+ New Campaign**.
. The **Engage** menu appears.
2. Click **+ New Campaign**.
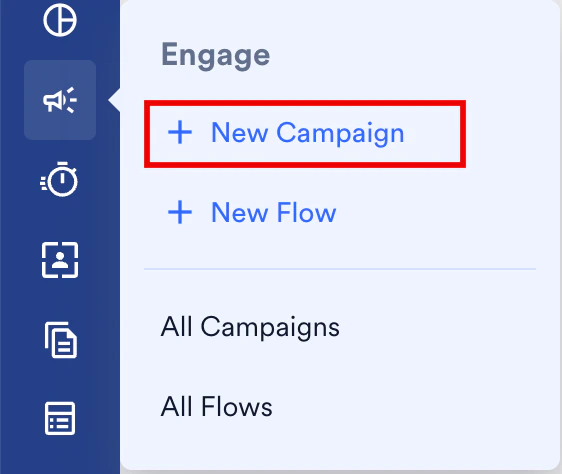 You can also click **All Campaigns** on the **Engage** menu and then click **+ Create campaign** on the All campaigns page.
3. On the **New Campaign** dialog box, under **Outbound**, click **Email**.
You can also click **All Campaigns** on the **Engage** menu and then click **+ Create campaign** on the All campaigns page.
3. On the **New Campaign** dialog box, under **Outbound**, click **Email**.
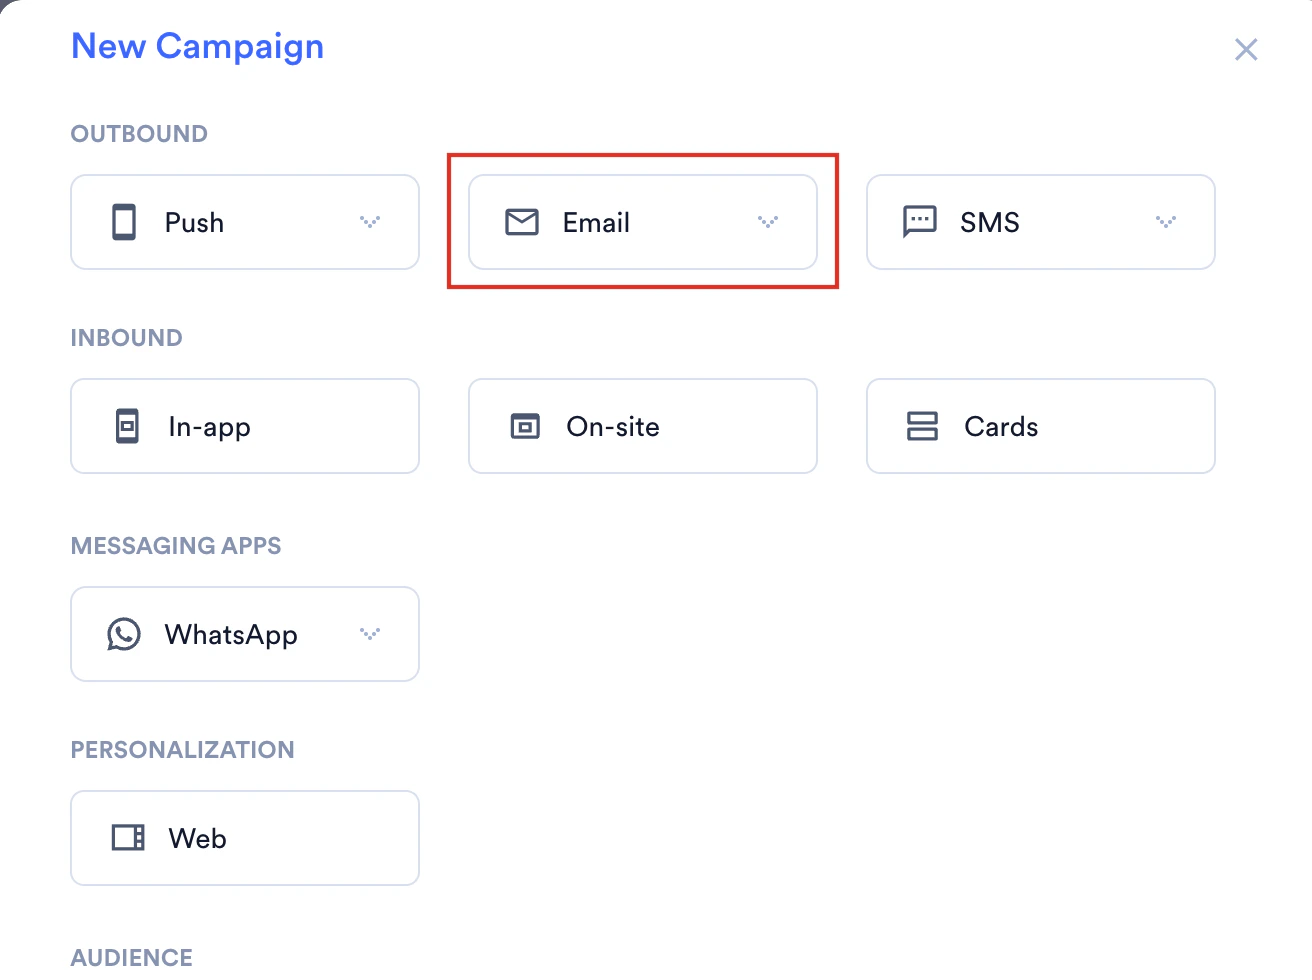 4. Click one of the following campaign delivery types:
* **One Time**
* **Periodic**
* **Event Triggered**
* **Business Event Triggered** For more information about delivery types, refer to [Delivery Types.](/user-guide/campaigns-and-channels/getting-started/introduction/delivery-types-moengage-channels)
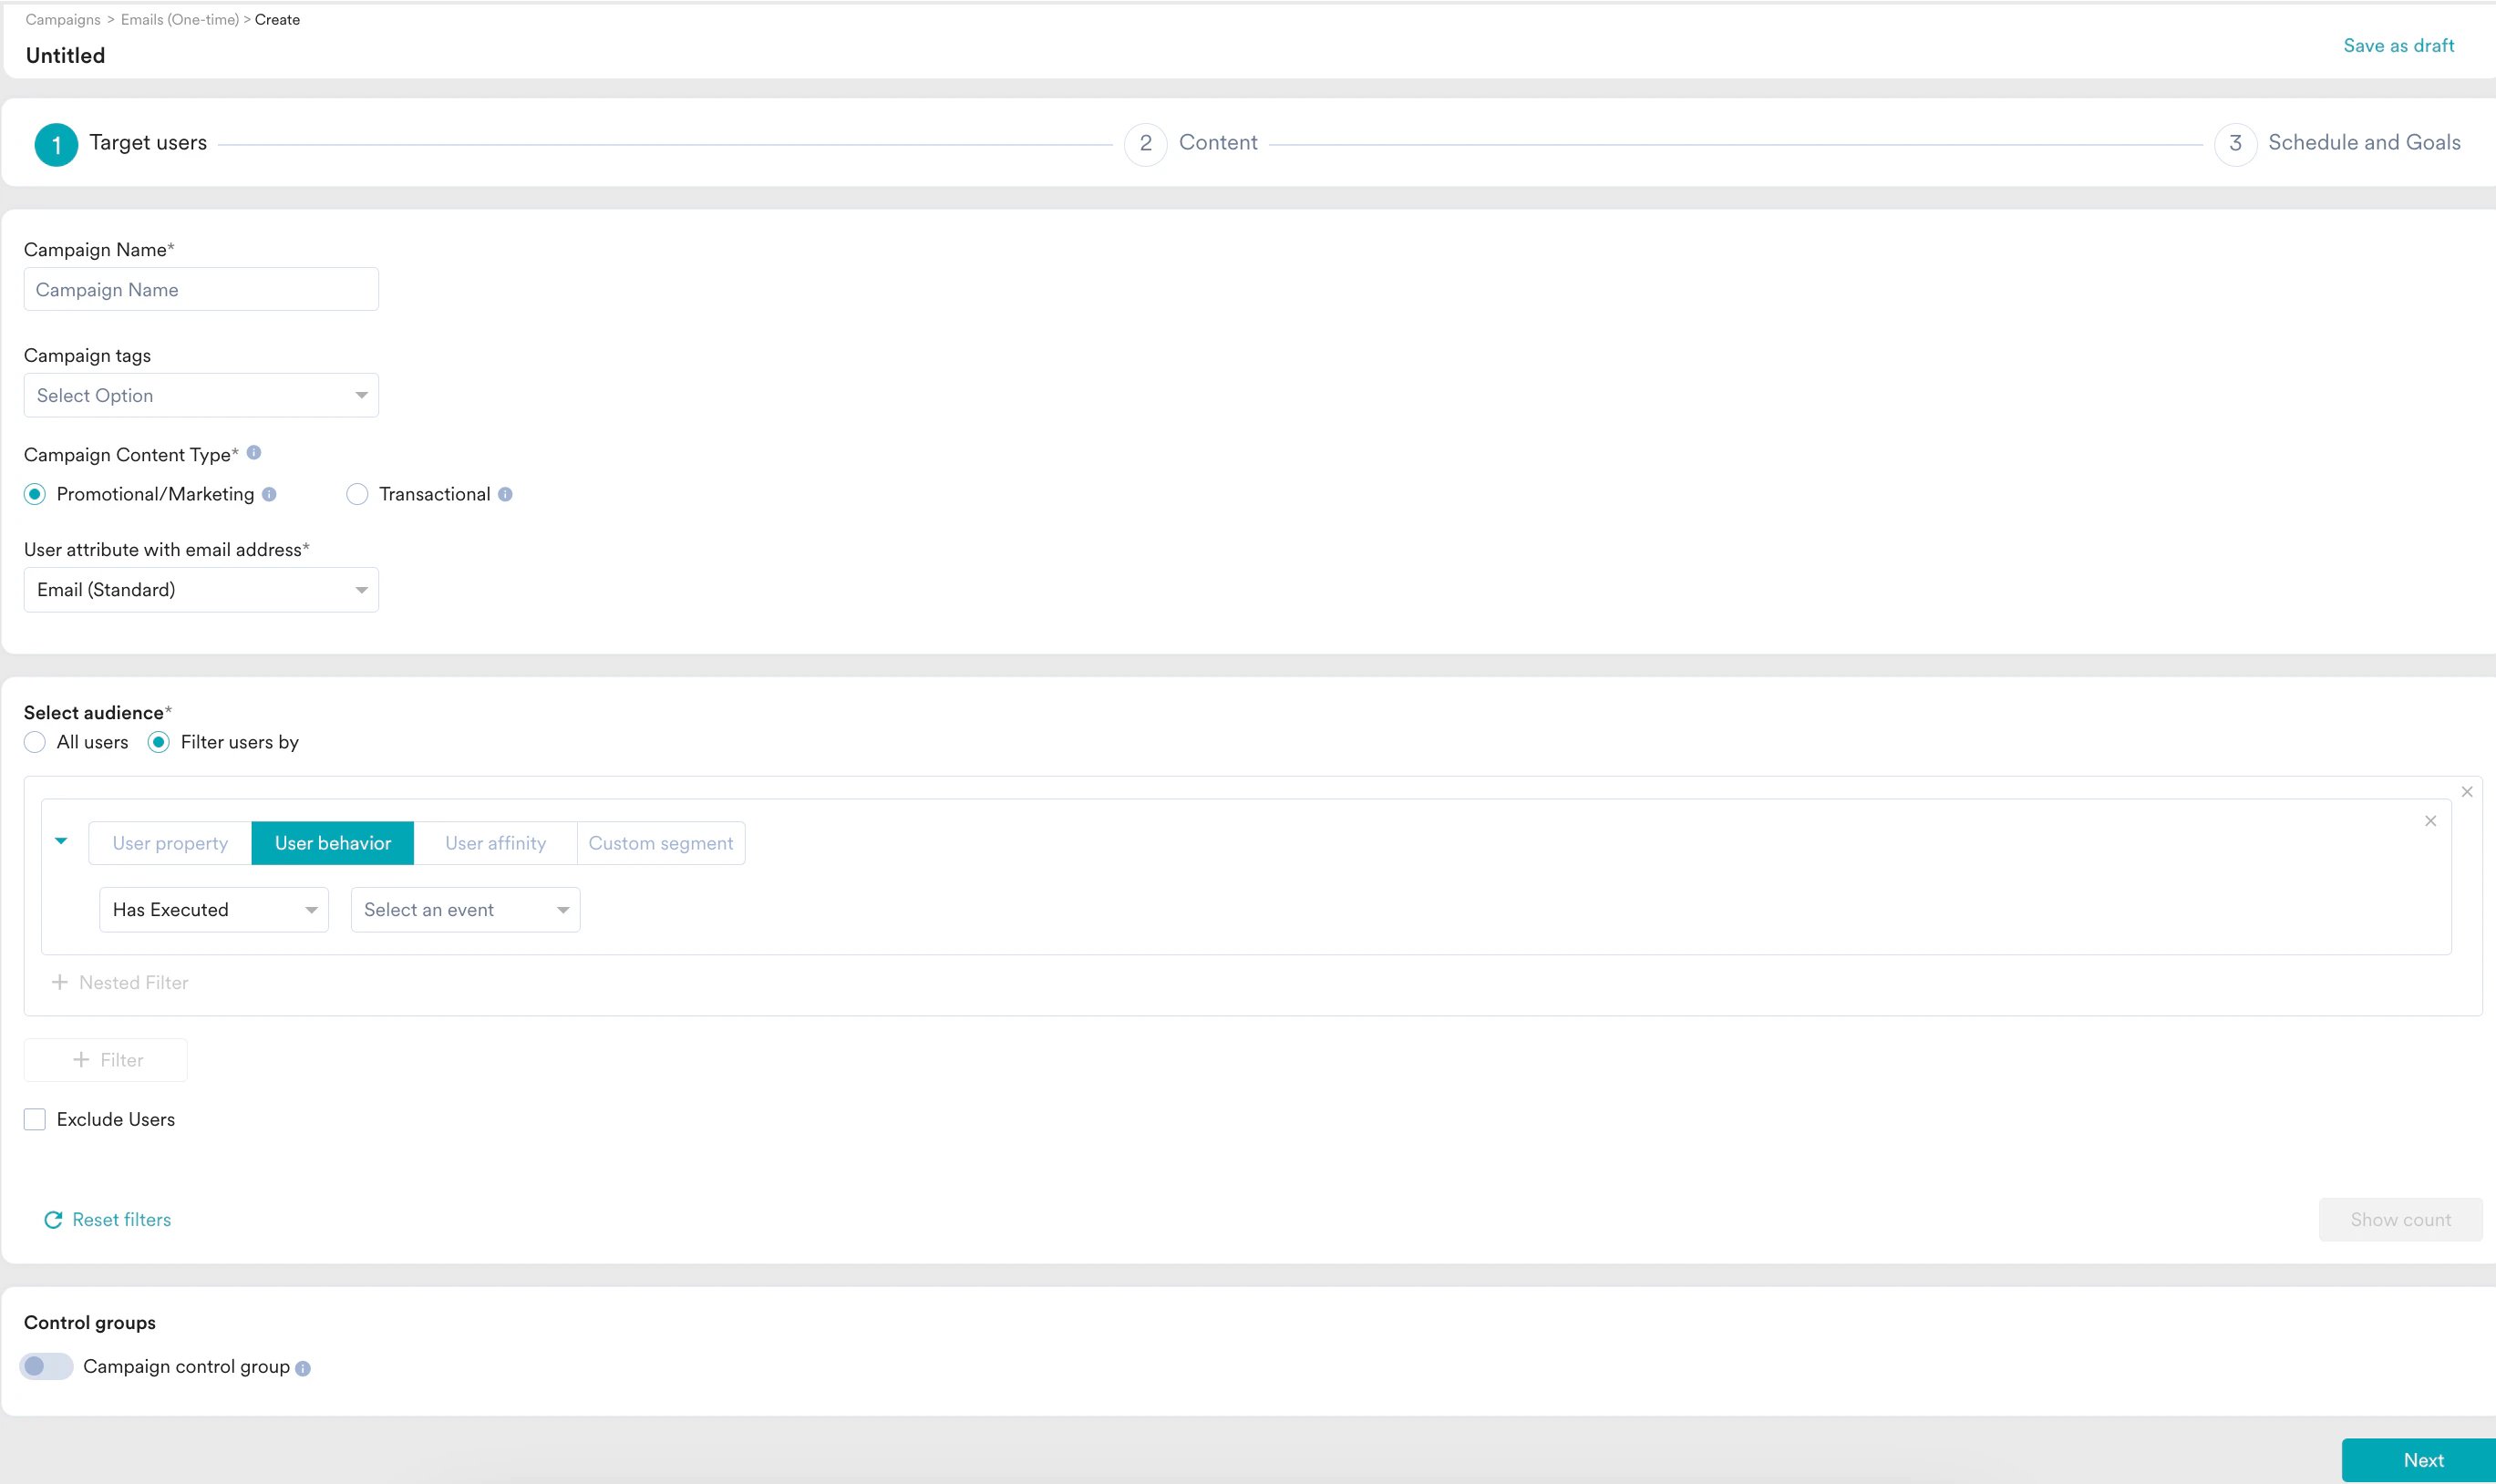
5. The Email creation page is displayed.
4. Click one of the following campaign delivery types:
* **One Time**
* **Periodic**
* **Event Triggered**
* **Business Event Triggered** For more information about delivery types, refer to [Delivery Types.](/user-guide/campaigns-and-channels/getting-started/introduction/delivery-types-moengage-channels)
5. The Email creation page is displayed.
 # Steps to Create an Email Campaign
The following are the steps to create an Email campaign:
1. [Target users](/user-guide/campaigns-and-channels/email/create/create-an-email-campaign#step-1-target-users): Define the target audience for the campaign.
2. [Content](/user-guide/campaigns-and-channels/email/create/create-an-email-campaign#step-2-content): Define the content of the Email campaign to be sent.
3. [Schedule and Goals](/user-guide/campaigns-and-channels/email/create/create-an-email-campaign#step-3-schedule-and-goals): Define the campaign's delivery schedule and goals.
## Step 1: Target Users
This section contains the following:
### Campaign Details
The campaign details section contains the following fields:
* **Teams**: If your organization has teams enabled, select a team in the drop-down list. For more information, refer to [Teams in MoEngage](/user-guide/settings/account/team-management/teams-in-moengage).
* **Campaign Name**: Enter the name of the campaign to manage and identify the campaign. The campaign name must have at least five characters, and the limit is 256.
* **Campaign tags**: Campaign tags are used to provide context about the campaigns and describe the nature of the campaign or the campaign's central theme. Select campaign tags from the drop-down list. You can select a maximum of five tags. For more information, refer to [Campaign Tags](/user-guide/campaigns-and-channels/getting-started/introduction/campaign-tags).
* **Campaign Content Type**: There are two types of campaigns that you can send using MoEngage, and they are promotional and transactional. For more information, refer to [Promotional Campaigns vs. Transactional Campaigns](/user-guide/campaigns-and-channels/email/getting-started-with-email/promotional-campaigns-vs-transactional-campaigns).
# Steps to Create an Email Campaign
The following are the steps to create an Email campaign:
1. [Target users](/user-guide/campaigns-and-channels/email/create/create-an-email-campaign#step-1-target-users): Define the target audience for the campaign.
2. [Content](/user-guide/campaigns-and-channels/email/create/create-an-email-campaign#step-2-content): Define the content of the Email campaign to be sent.
3. [Schedule and Goals](/user-guide/campaigns-and-channels/email/create/create-an-email-campaign#step-3-schedule-and-goals): Define the campaign's delivery schedule and goals.
## Step 1: Target Users
This section contains the following:
### Campaign Details
The campaign details section contains the following fields:
* **Teams**: If your organization has teams enabled, select a team in the drop-down list. For more information, refer to [Teams in MoEngage](/user-guide/settings/account/team-management/teams-in-moengage).
* **Campaign Name**: Enter the name of the campaign to manage and identify the campaign. The campaign name must have at least five characters, and the limit is 256.
* **Campaign tags**: Campaign tags are used to provide context about the campaigns and describe the nature of the campaign or the campaign's central theme. Select campaign tags from the drop-down list. You can select a maximum of five tags. For more information, refer to [Campaign Tags](/user-guide/campaigns-and-channels/getting-started/introduction/campaign-tags).
* **Campaign Content Type**: There are two types of campaigns that you can send using MoEngage, and they are promotional and transactional. For more information, refer to [Promotional Campaigns vs. Transactional Campaigns](/user-guide/campaigns-and-channels/email/getting-started-with-email/promotional-campaigns-vs-transactional-campaigns).
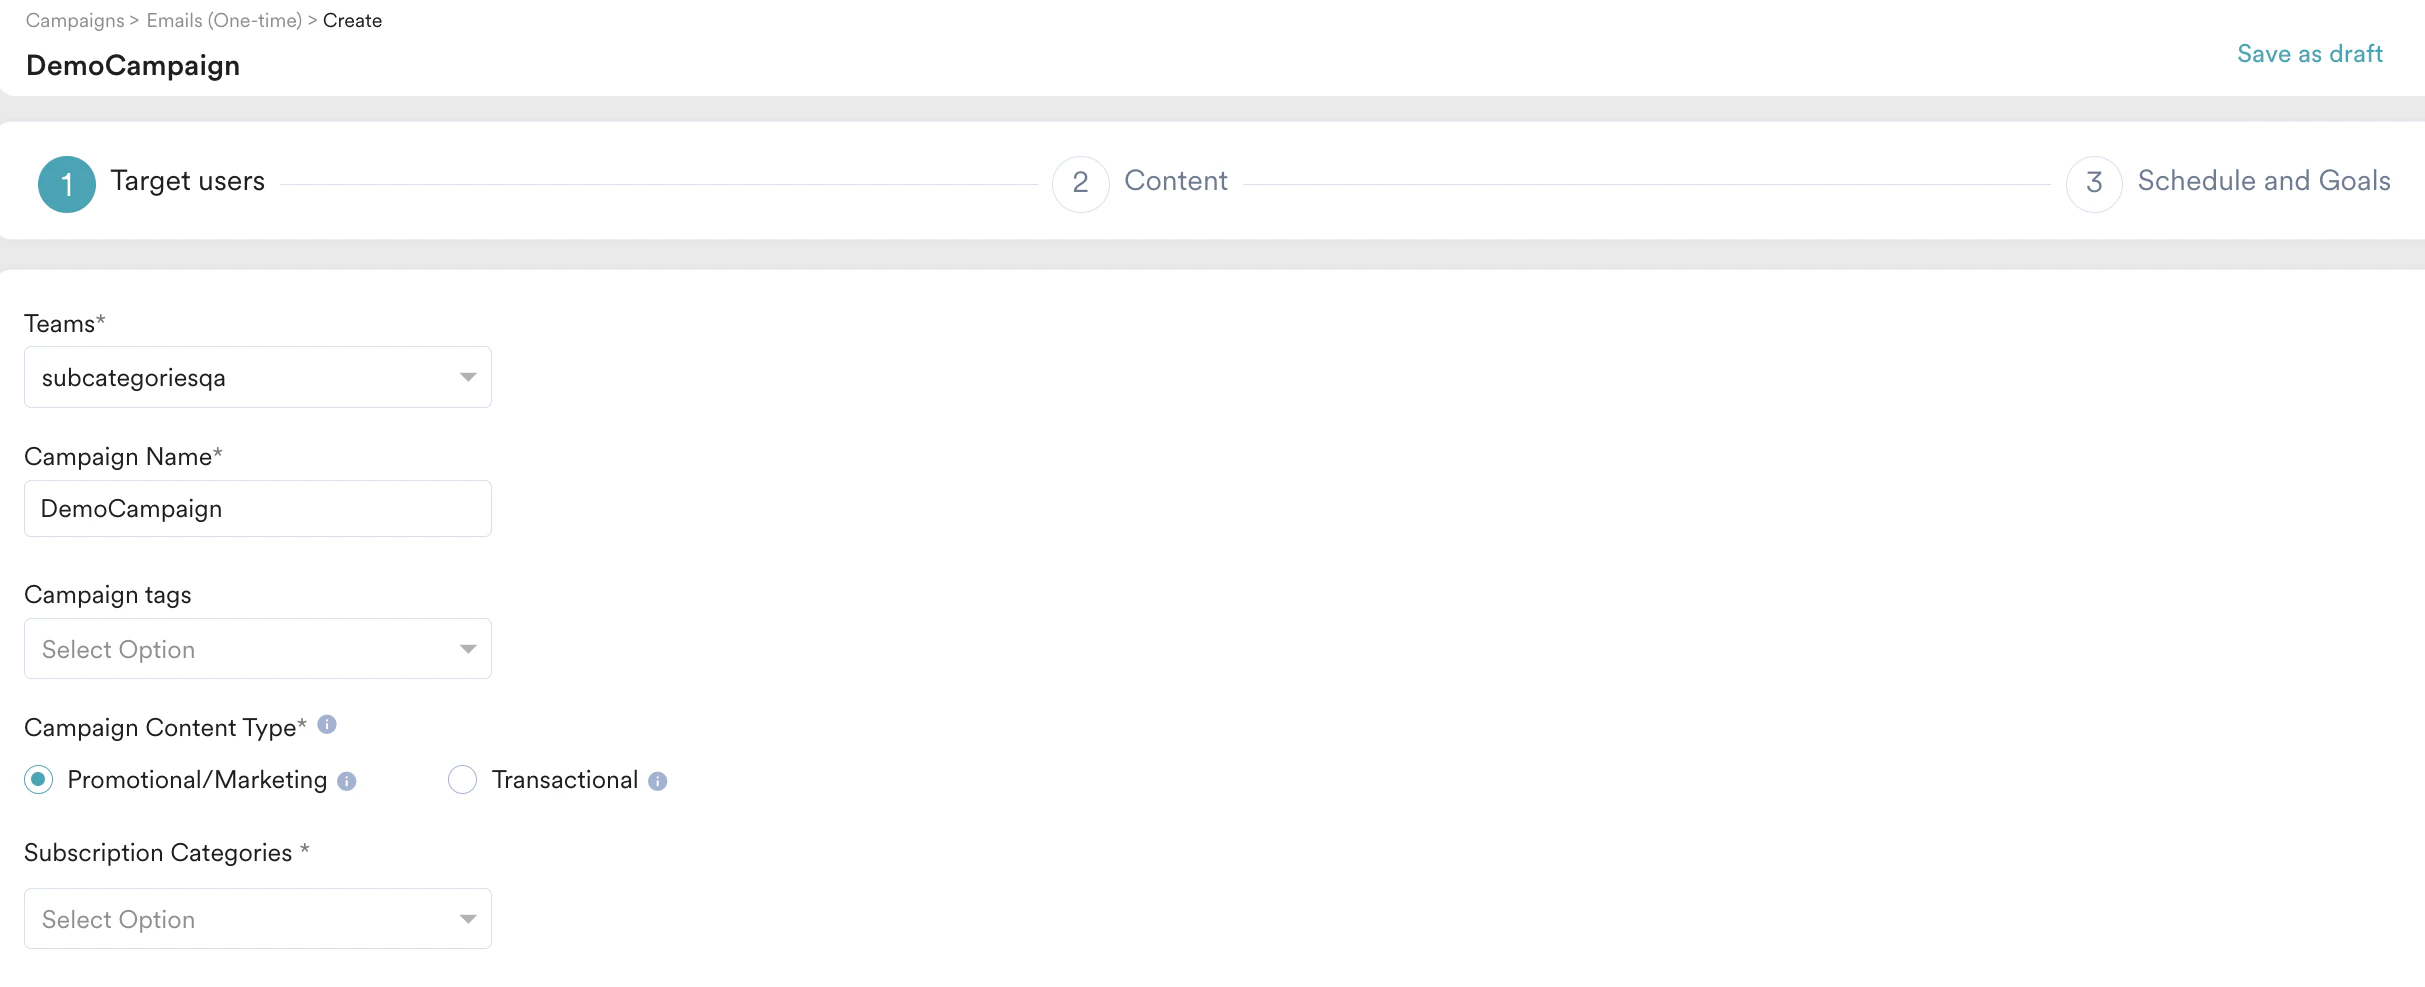 * **Subscription Categories**: Subscription categories are a means to help users choose the type of communication they receive from your brand. They can be configured in the Email Channel settings. For more information, refer to [subscription categories](/user-guide/campaigns-and-channels/email/getting-started-with-email/configure-subscription-categories).
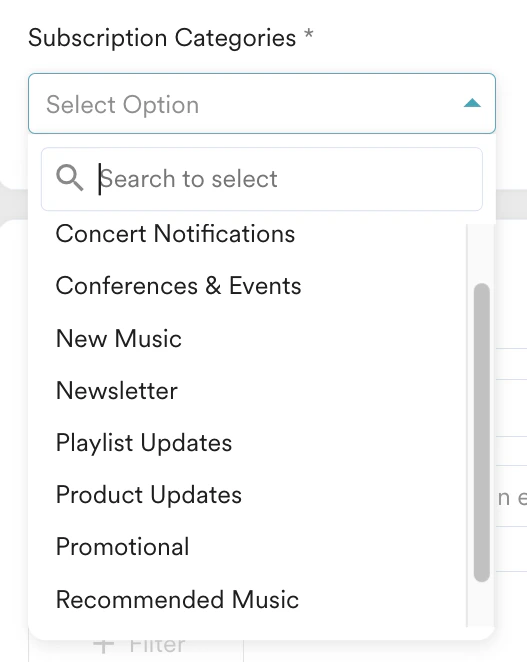 You can choose a subscription category for your email campaign using this field. This would help you target only those users who have opted-in to receive communication about a specific category. For example, a travel company could have recommendations, updates, and deals as subscription categories. To email users who have opted to receive communication about recommendations, choose the subscription category in this field.
This is a mandatory field when subscription categories are enabled. However, if subscription categories are enabled and no categories have been added yet or all the categories have been archived or disabled, this field will not be available in the Target Users step of email campaign creation.
Once you have started collecting preferences from the user, make sure you respect those preferences. Sending an email from a category that the user has not subscribed to may result in fines and also jeopardize the relationship with the user.
**How does Subscription Category affect reachability?**
The Subscription Category acts as an additional filter for the target audience chosen. For example, if a user is present in the Target Audience and if they have not opted to receive recommendations from the brand, they will be removed from the target audience list.
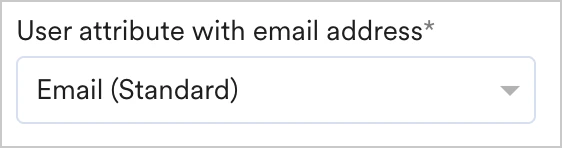
* **User attribute with email address**: This field indicates the user attribute that stores the email address. When configuring the email channel, the user attribute that stores the email address is configured in the [General Settings](https://moengage-user-guide.mintlify.app/user-guide/campaigns-and-channels/email/getting-started-with-email/configure-email-channel#general-settings-tab). The attribute configured in the settings is selected in the *User attribute with email address* by default. You can override the same at the campaign level by selecting another attribute (from the dropdown)that contains the email address.
You can choose a subscription category for your email campaign using this field. This would help you target only those users who have opted-in to receive communication about a specific category. For example, a travel company could have recommendations, updates, and deals as subscription categories. To email users who have opted to receive communication about recommendations, choose the subscription category in this field.
This is a mandatory field when subscription categories are enabled. However, if subscription categories are enabled and no categories have been added yet or all the categories have been archived or disabled, this field will not be available in the Target Users step of email campaign creation.
Once you have started collecting preferences from the user, make sure you respect those preferences. Sending an email from a category that the user has not subscribed to may result in fines and also jeopardize the relationship with the user.
**How does Subscription Category affect reachability?**
The Subscription Category acts as an additional filter for the target audience chosen. For example, if a user is present in the Target Audience and if they have not opted to receive recommendations from the brand, they will be removed from the target audience list.
* **User attribute with email address**: This field indicates the user attribute that stores the email address. When configuring the email channel, the user attribute that stores the email address is configured in the [General Settings](https://moengage-user-guide.mintlify.app/user-guide/campaigns-and-channels/email/getting-started-with-email/configure-email-channel#general-settings-tab). The attribute configured in the settings is selected in the *User attribute with email address* by default. You can override the same at the campaign level by selecting another attribute (from the dropdown)that contains the email address.
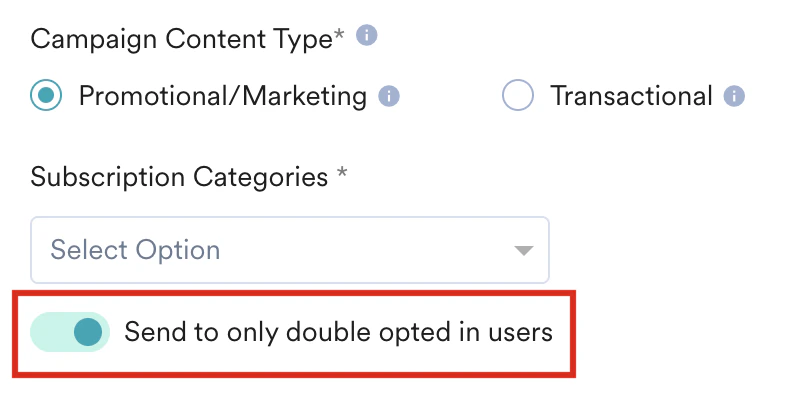
 * If you selected the **Double Opt-in** method in the **Subscription management** > **Opt-in management** tab of your [email settings](/user-guide/campaigns-and-channels/getting-started-with-email/configure-email-channel#opt-in-management), the **Send to only double opted in users** toggle appears while creating the email campaign and is turned on by default. Note that this toggle appears only when the **Campaign Content type** is **Promotional/Marketing**. For more information, refer to [Opt-in management](/user-guide/campaigns-and-channels/email/getting-started-with-email/opt-in-management).
* When this toggle is on, MoEngage filters out previously unsubscribed users, hard-bounced users, and users whose opt-in status is not Double Opt-in. The campaign is then sent to the remaining group of users.
* When this toggle is off, you can send campaigns to every user regardless of their opt-in status. This means that even though the opt-in status attribute exists for every user, MoEngage ignores its value and filters out only previously unsubscribed and hard-bounced users. The campaign is then sent to the remaining group of users, considering unsubscription settings and subscription categories. \\
* If you selected the **Double Opt-in** method in the **Subscription management** > **Opt-in management** tab of your [email settings](/user-guide/campaigns-and-channels/getting-started-with-email/configure-email-channel#opt-in-management), the **Send to only double opted in users** toggle appears while creating the email campaign and is turned on by default. Note that this toggle appears only when the **Campaign Content type** is **Promotional/Marketing**. For more information, refer to [Opt-in management](/user-guide/campaigns-and-channels/email/getting-started-with-email/opt-in-management).
* When this toggle is on, MoEngage filters out previously unsubscribed users, hard-bounced users, and users whose opt-in status is not Double Opt-in. The campaign is then sent to the remaining group of users.
* When this toggle is off, you can send campaigns to every user regardless of their opt-in status. This means that even though the opt-in status attribute exists for every user, MoEngage ignores its value and filters out only previously unsubscribed and hard-bounced users. The campaign is then sent to the remaining group of users, considering unsubscription settings and subscription categories. \\
 Event-triggered campaigns allow you to send personalized messages triggered by different user action events. For example, you can remind users about the item they added to the cart but have not purchased. For more information on creating such campaigns, refer to [Create an Event-Triggered Campaign](/user-guide/campaigns-and-channels/event/create-an-event-triggered-campaign).
If [*Portfolio*](/user-guide/settings/account/portfolio/portfolio) is enabled for your workspace, you can create advanced event-triggered campaigns that are initiated by user actions in one project (brand) to send a message from another project (brand).
| | |
| ---------------------------------------------------------------------------------------------------------------------------------------------------------------------------------------------------------------------------------- | ----------------------------------------------------------------------------------------------------------------------------------------------------------------------------------------------------------------------------------------------------------------------------------------------------------------------------------------------------------------------------------------------------------------------------------------------------------------------------------------------------------------------------------------------------------------------------------------------------------------------------------------------------------------------------------------------------------------------------------------------------------------------------------------------------------------------------------------------------------------------------------------------------------------------------------------------------------------------------------------------------------------------------------------------------------------------------------------------------------------------------------------------------------------------------------------------------------------------------------------------------------------------------------------------------------------------------------------------------------------------------------------------------------- |
| For business event-triggered campaigns, you can select the business event to be mapped to the campaign using the *Select business event* dropdown. The dropdown contains all the business events created in your MoEngage account. |
Event-triggered campaigns allow you to send personalized messages triggered by different user action events. For example, you can remind users about the item they added to the cart but have not purchased. For more information on creating such campaigns, refer to [Create an Event-Triggered Campaign](/user-guide/campaigns-and-channels/event/create-an-event-triggered-campaign).
If [*Portfolio*](/user-guide/settings/account/portfolio/portfolio) is enabled for your workspace, you can create advanced event-triggered campaigns that are initiated by user actions in one project (brand) to send a message from another project (brand).
| | |
| ---------------------------------------------------------------------------------------------------------------------------------------------------------------------------------------------------------------------------------- | ----------------------------------------------------------------------------------------------------------------------------------------------------------------------------------------------------------------------------------------------------------------------------------------------------------------------------------------------------------------------------------------------------------------------------------------------------------------------------------------------------------------------------------------------------------------------------------------------------------------------------------------------------------------------------------------------------------------------------------------------------------------------------------------------------------------------------------------------------------------------------------------------------------------------------------------------------------------------------------------------------------------------------------------------------------------------------------------------------------------------------------------------------------------------------------------------------------------------------------------------------------------------------------------------------------------------------------------------------------------------------------------------------------- |
| For business event-triggered campaigns, you can select the business event to be mapped to the campaign using the *Select business event* dropdown. The dropdown contains all the business events created in your MoEngage account. | 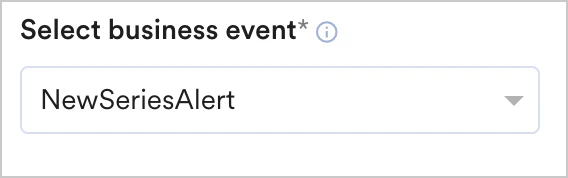 |
Once the business event is selected, the event attributes associated with the business event are available in the segmentation filters. Business event attributes are available in the following segmentation filters:
* segment by user property: you can map the user property to the business event attribute
* segment by user behavior: you can map the attribute of an event executed by the user to that of the business event attribute
* segment by user affinity: you can map the attribute of an event executed by the user to that of the business event attribute
- The data types of the user attribute or event attribute chosen should match with that of the business event attribute for segmentation to work.
- Show count is disabled for business event-triggered campaigns as business events are modeled to run on dynamic segmentation (based on the values with which the business event is triggered).
### Select Audience
Select this filter option to send the campaign to all app users. When you use this option, you cannot add multiple filters.
|
Once the business event is selected, the event attributes associated with the business event are available in the segmentation filters. Business event attributes are available in the following segmentation filters:
* segment by user property: you can map the user property to the business event attribute
* segment by user behavior: you can map the attribute of an event executed by the user to that of the business event attribute
* segment by user affinity: you can map the attribute of an event executed by the user to that of the business event attribute
- The data types of the user attribute or event attribute chosen should match with that of the business event attribute for segmentation to work.
- Show count is disabled for business event-triggered campaigns as business events are modeled to run on dynamic segmentation (based on the values with which the business event is triggered).
### Select Audience
Select this filter option to send the campaign to all app users. When you use this option, you cannot add multiple filters.
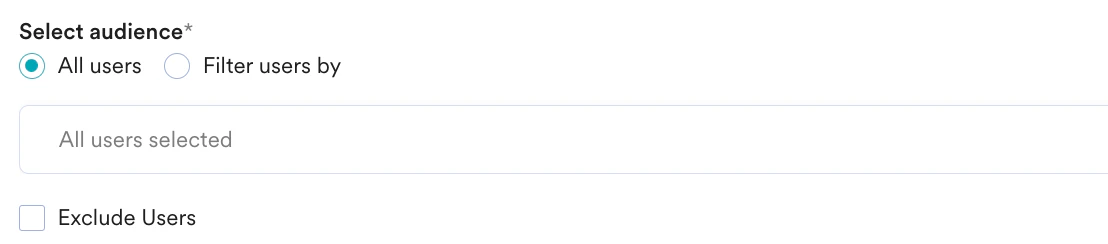 Select this filter option to target users based on user properties such as first seen, last seen, city, and so on. Click the **User property** tab and perform the following:
1. Select the desired attribute in the drop-down list. This enables the filters based on the attributes selected. For example, attributes that are numbers can have filter conditions such as 'is equal to', 'is not equal to', 'is between', and so on, while string attributes have different filters.
2. Enter the filter value(s) to create the desired user segment.
3. Click **+ Nested Filter** to add a filter to create nested AND or OR conditions (this is optional).
For more information, refer to [Create Segments](/user-guide/segment/segment-operations/create-segments).
Select this filter option to target users based on user properties such as first seen, last seen, city, and so on. Click the **User property** tab and perform the following:
1. Select the desired attribute in the drop-down list. This enables the filters based on the attributes selected. For example, attributes that are numbers can have filter conditions such as 'is equal to', 'is not equal to', 'is between', and so on, while string attributes have different filters.
2. Enter the filter value(s) to create the desired user segment.
3. Click **+ Nested Filter** to add a filter to create nested AND or OR conditions (this is optional).
For more information, refer to [Create Segments](/user-guide/segment/segment-operations/create-segments).  Select this filter option to target users based on their behavior, such as app/site opened, viewed product, and so on. Click the **User Behavior** tab and perform the following:
1. Select the execution condition and the desired user activity (event).
2. Enter the event frequency and time duration for the event execution.
3. Click **+ Attributes** and add an event attribute with a filter condition.
4. Enter the filter value(s) to create a rule.
5. Use the **+ Aggregation** button to add the aggregation functionality. For more information, refer to [Aggregation Operations](/user-guide/segment/advanced-concepts/aggregation-operations).
6. Click **+ Nested Filter** to add a filter to create nested AND or OR conditions (this is optional).
For more information, refer to [Create Segments](/user-guide/segment/segment-operations/create-segments).
Select this filter option to target users based on their behavior, such as app/site opened, viewed product, and so on. Click the **User Behavior** tab and perform the following:
1. Select the execution condition and the desired user activity (event).
2. Enter the event frequency and time duration for the event execution.
3. Click **+ Attributes** and add an event attribute with a filter condition.
4. Enter the filter value(s) to create a rule.
5. Use the **+ Aggregation** button to add the aggregation functionality. For more information, refer to [Aggregation Operations](/user-guide/segment/advanced-concepts/aggregation-operations).
6. Click **+ Nested Filter** to add a filter to create nested AND or OR conditions (this is optional).
For more information, refer to [Create Segments](/user-guide/segment/segment-operations/create-segments).
 Select this filter option to target groups of users created based on the user performing an action with a specific attribute value. For more information, refer to [User Affinity](/user-guide/segment/segment-operations/affinity-segments). Click the **User Affinity** tab and perform the following:
1. Select the desired user event or attribute.
2. Select the user affinity parameter from the following:
* **Predominantly**: Select the affinity attribute with a filter condition and provide the affinity values.
* **For a minimum of**: Select the affinity attribute with a filter condition and provide the affinity values.
* **Most no. of times**: Enter a value or use the arrows to provide the top percentage of users.
* **Least no. of times**: Enter a value or use the arrows to provide the bottom percentage of users.
3. Enter or use the arrows to provide the time duration for the event execution.
4. Click **+ Attribute** to add more attributes to the filter.
5. Click **+ Nested Filter** to add a filter to create nested AND or OR conditions (this is optional).
For more information, refer to [Create Segments](/user-guide/segment/segment-operations/create-segments).
Select this filter option to target groups of users created based on the user performing an action with a specific attribute value. For more information, refer to [User Affinity](/user-guide/segment/segment-operations/affinity-segments). Click the **User Affinity** tab and perform the following:
1. Select the desired user event or attribute.
2. Select the user affinity parameter from the following:
* **Predominantly**: Select the affinity attribute with a filter condition and provide the affinity values.
* **For a minimum of**: Select the affinity attribute with a filter condition and provide the affinity values.
* **Most no. of times**: Enter a value or use the arrows to provide the top percentage of users.
* **Least no. of times**: Enter a value or use the arrows to provide the bottom percentage of users.
3. Enter or use the arrows to provide the time duration for the event execution.
4. Click **+ Attribute** to add more attributes to the filter.
5. Click **+ Nested Filter** to add a filter to create nested AND or OR conditions (this is optional).
For more information, refer to [Create Segments](/user-guide/segment/segment-operations/create-segments).
 Select this filter option to select a custom segment as the target audience.
1. Select a custom segment as the target audience from the list of custom segments available.
2. Click **+ Nested Filter** to add a filter to create nested AND or OR conditions (this is optional).
For more information, refer to [Custom Segments](/user-guide/segment/segment-operations/custom-segments).
Select this filter option to select a custom segment as the target audience.
1. Select a custom segment as the target audience from the list of custom segments available.
2. Click **+ Nested Filter** to add a filter to create nested AND or OR conditions (this is optional).
For more information, refer to [Custom Segments](/user-guide/segment/segment-operations/custom-segments).
 If you have the Portfolio feature enabled, you can create user segments by combining user data and behavior from different apps and websites (Projects) within your workspace. For more information, refer to [Segmentation in a Multi-Project Portfolio](/user-guide/segment/advanced-concepts/segmentation-in-a-multi-project-portfolio).
If teams are enabled for your account, you will be able to see the custom segments created by your team. The segmentation criteria specified for the team for which you are creating the campaign will get appended to the segmentation filters with an AND condition. For example, if the segmentation criteria for your team is the set of \_users whose last known city is Los Angeles\_and you have selected *users who've purchased a product within the last three days* as the target audience for your campaign, your target audience would be *users who have purchased a product within the last three days and whose last known city is Los Angeles*. For more information, refer to [Teams in MoEngage](/user-guide/settings/account/team-management/teams-in-moengage).
This is an add-on feature. Please contact your MoEngage CSM (customer success manager) or the [Support](/user-guide/contact-support/contact-support/raise-a-support-ticket-through-moengage-dashboard) team to enable it for your account.
After selecting the filter criteria, you can do the following as well:
* **Create Multiple Filters**: You can create and combine multiple user property rules, user activity rules, and custom segment rules to create a complex user segment using this option.
1. Click **+ Filter**.
2. Click **AND** or **OR**.
3. Select the attribute or event and define the filter conditions.
* **Exclude Users**: Select this checkbox to define the filter criteria for users to be excluded from the campaign. For more information, refer to [Preference Management](https://moengage-user-guide.mintlify.app/user-guide/campaigns-and-channels/email/getting-started-with-email/configure-email-channel#subscription-management-tab).
* **Reset filters**: Click this option to reset the segmentation filters.
* **Show count**: Click this button to display the total number of users who are currently in the configured segment.
If you have the Portfolio feature enabled, you can create user segments by combining user data and behavior from different apps and websites (Projects) within your workspace. For more information, refer to [Segmentation in a Multi-Project Portfolio](/user-guide/segment/advanced-concepts/segmentation-in-a-multi-project-portfolio).
If teams are enabled for your account, you will be able to see the custom segments created by your team. The segmentation criteria specified for the team for which you are creating the campaign will get appended to the segmentation filters with an AND condition. For example, if the segmentation criteria for your team is the set of \_users whose last known city is Los Angeles\_and you have selected *users who've purchased a product within the last three days* as the target audience for your campaign, your target audience would be *users who have purchased a product within the last three days and whose last known city is Los Angeles*. For more information, refer to [Teams in MoEngage](/user-guide/settings/account/team-management/teams-in-moengage).
This is an add-on feature. Please contact your MoEngage CSM (customer success manager) or the [Support](/user-guide/contact-support/contact-support/raise-a-support-ticket-through-moengage-dashboard) team to enable it for your account.
After selecting the filter criteria, you can do the following as well:
* **Create Multiple Filters**: You can create and combine multiple user property rules, user activity rules, and custom segment rules to create a complex user segment using this option.
1. Click **+ Filter**.
2. Click **AND** or **OR**.
3. Select the attribute or event and define the filter conditions.
* **Exclude Users**: Select this checkbox to define the filter criteria for users to be excluded from the campaign. For more information, refer to [Preference Management](https://moengage-user-guide.mintlify.app/user-guide/campaigns-and-channels/email/getting-started-with-email/configure-email-channel#subscription-management-tab).
* **Reset filters**: Click this option to reset the segmentation filters.
* **Show count**: Click this button to display the total number of users who are currently in the configured segment.
 ### Campaign Audience Limit
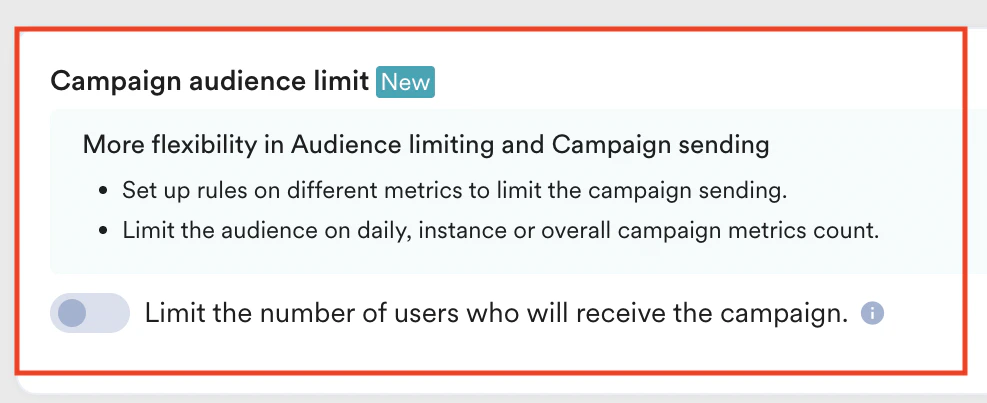
This feature empowers you to control campaign reach and expenditure by capping the number of users who receive it based on engagement metrics like sends, impressions, and conversions. It allows you to set total, daily, or instance-level limits to campaigns. For more information, refer to [Campaign Audience Limit.](/user-guide/settings/channels/delivery-controls/campaign-audience-limit)
### Campaign Audience Limit
This feature empowers you to control campaign reach and expenditure by capping the number of users who receive it based on engagement metrics like sends, impressions, and conversions. It allows you to set total, daily, or instance-level limits to campaigns. For more information, refer to [Campaign Audience Limit.](/user-guide/settings/channels/delivery-controls/campaign-audience-limit)
 ### Control Groups
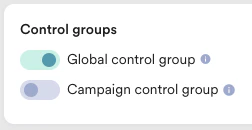
This section contains information about control groups for the campaign. Control Groups are enabled only for promotional campaigns. They are not applicable for transactional campaigns. You can enable the control groups to which you want to send the promotional campaign.
| | |
| ---------------------------------------------------------------------------------------------------------------------------------------------------------------------------------------------------------------------------------------------------------------------------------------------------------------------------------------------------------------------------------------------------------------------- | ------------------------------------------------------------------------------------------------------------------------------------------------------------------------------------------------------------------------------------------------------------------------------------------------------------------------------------------------------------------------------------------------------------------------------------------------------------------------------------------------------------------------------------------------------------------------------------------------------------------------------------------------------------------------------------------------------------------------------------------------------------------------------------------------------------------------------------------------------------------------------------------------------------------------------------------------------------------------------------------------------------------------------------------------------------------------------------------------------------------------------------------------------------------------------------------------------------------------------------------------------------------------------------------------------------------------------------------------------------------------------------------------------------- |
| In the **Control groups** section:
### Control Groups
This section contains information about control groups for the campaign. Control Groups are enabled only for promotional campaigns. They are not applicable for transactional campaigns. You can enable the control groups to which you want to send the promotional campaign.
| | |
| ---------------------------------------------------------------------------------------------------------------------------------------------------------------------------------------------------------------------------------------------------------------------------------------------------------------------------------------------------------------------------------------------------------------------- | ------------------------------------------------------------------------------------------------------------------------------------------------------------------------------------------------------------------------------------------------------------------------------------------------------------------------------------------------------------------------------------------------------------------------------------------------------------------------------------------------------------------------------------------------------------------------------------------------------------------------------------------------------------------------------------------------------------------------------------------------------------------------------------------------------------------------------------------------------------------------------------------------------------------------------------------------------------------------------------------------------------------------------------------------------------------------------------------------------------------------------------------------------------------------------------------------------------------------------------------------------------------------------------------------------------------------------------------------------------------------------------------------------------- |
| In the **Control groups** section: - Turn the **Global control group** toggle on to not send the campaign to all the users in the control group
- Turn the **Campaign control group** toggle on to not send the particular campaign to the control group.
For more information, refer to [Control Group](/user-guide/campaigns-and-channels/getting-started/introduction/control-groups). |
 |
Click **Next** or use the tabs at the top of the create campaign navigation to move to Step 2 **Content**.
## Step 2: Content
To create email content you can choose between Drag and drop editor (either blank or pre-built WYSIWYG templates), and Custom HTML editor where you can upload your templates in HTML format or previously saved templates under *My* s\_aved templates\_ after you have saved your created templates. You can also import custom templates and template groups. For more information, refer to [Import and Use Template Groups in Email Content](/user-guide/campaigns-and-channels/email/create/import-and-use-template-groups-in-email-content).
|
Click **Next** or use the tabs at the top of the create campaign navigation to move to Step 2 **Content**.
## Step 2: Content
To create email content you can choose between Drag and drop editor (either blank or pre-built WYSIWYG templates), and Custom HTML editor where you can upload your templates in HTML format or previously saved templates under *My* s\_aved templates\_ after you have saved your created templates. You can also import custom templates and template groups. For more information, refer to [Import and Use Template Groups in Email Content](/user-guide/campaigns-and-channels/email/create/import-and-use-template-groups-in-email-content).
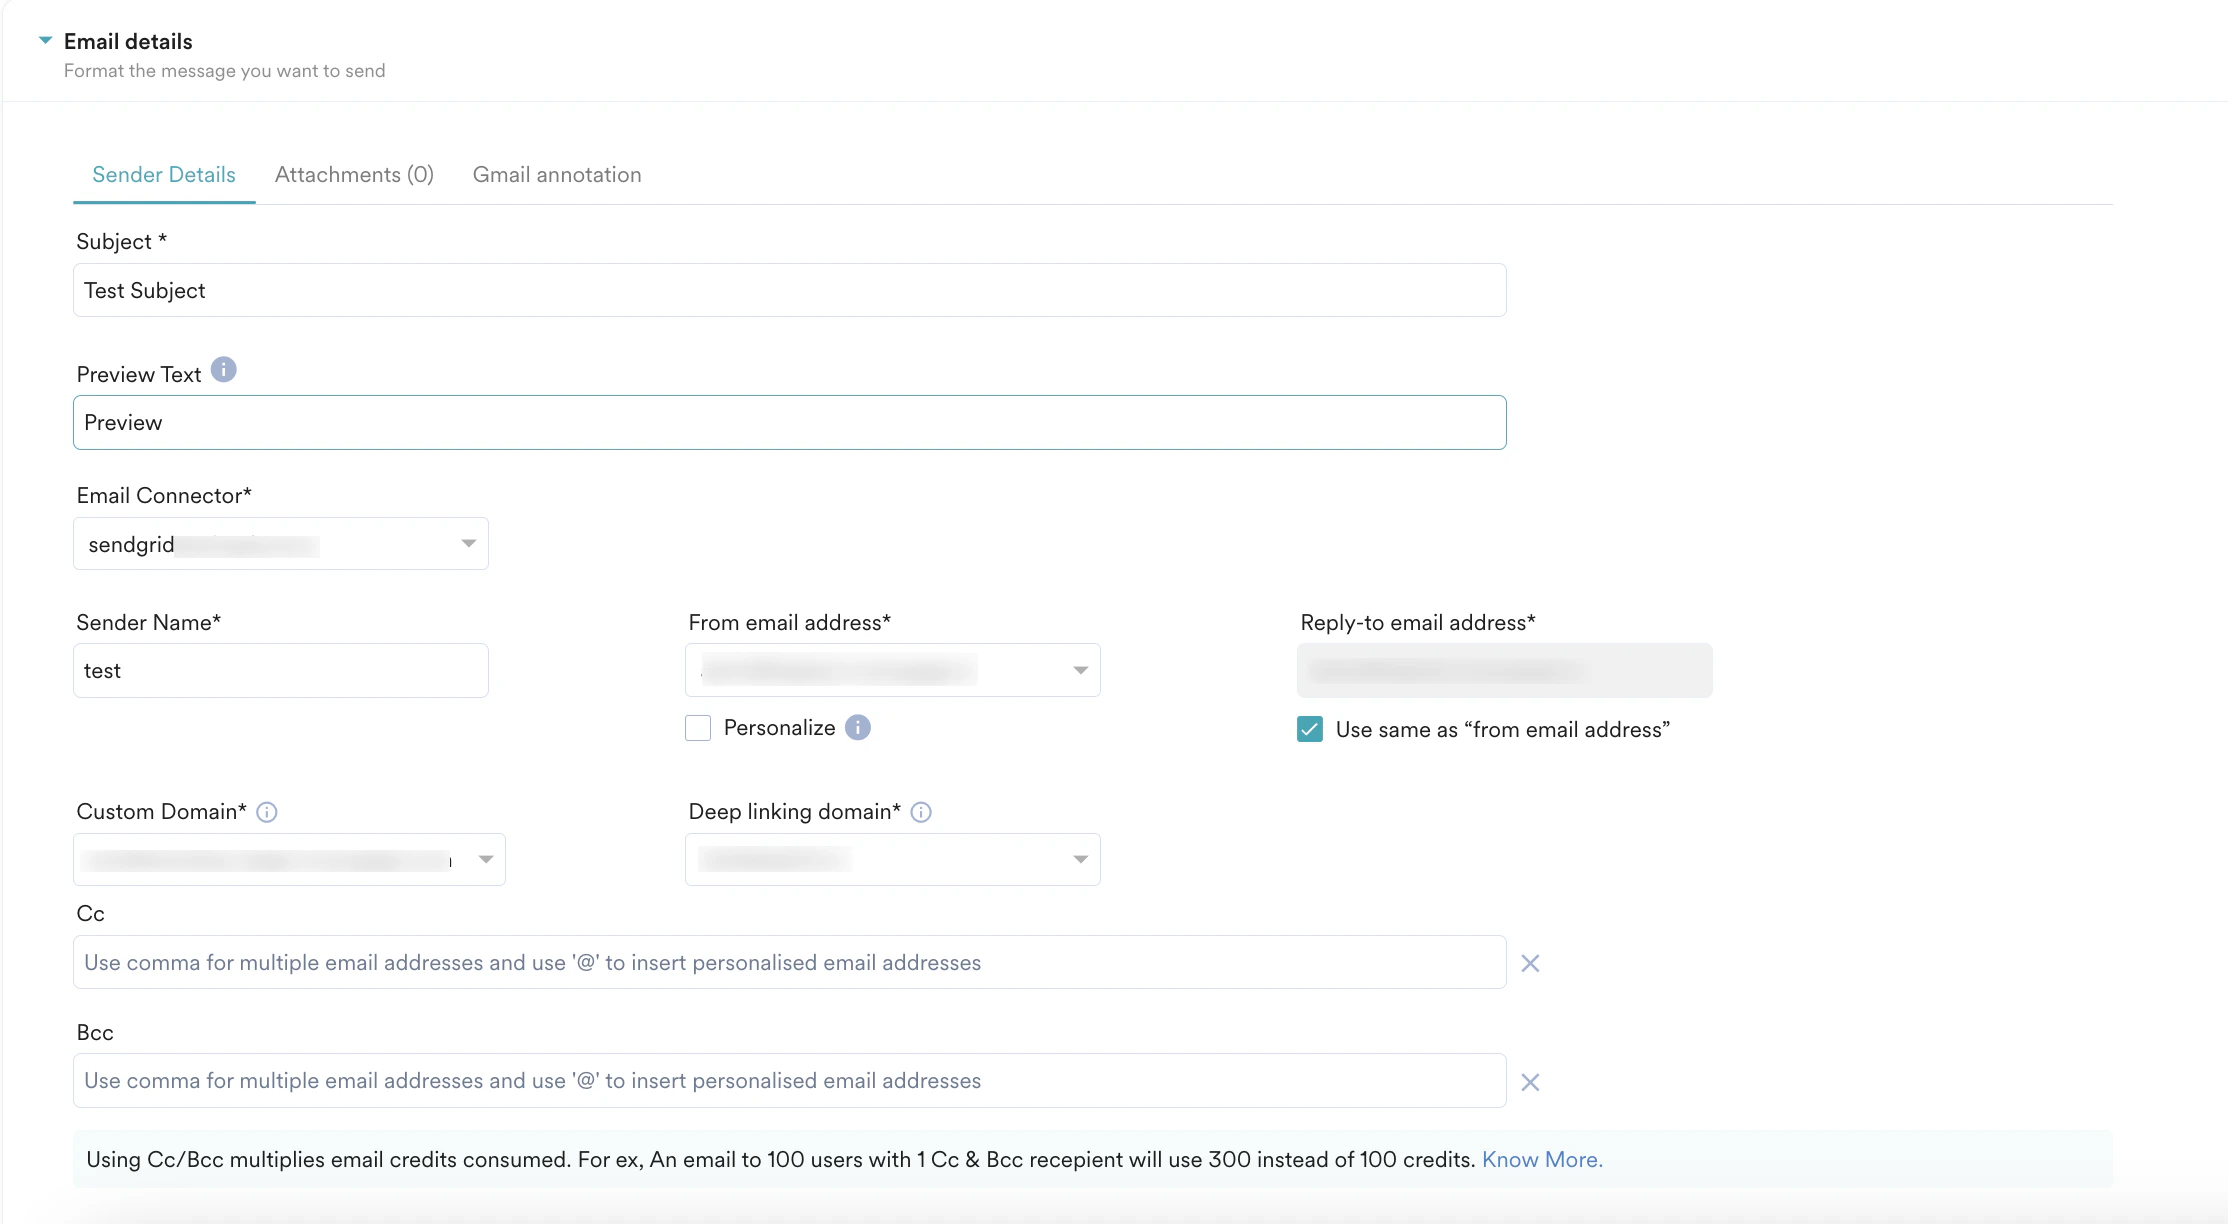
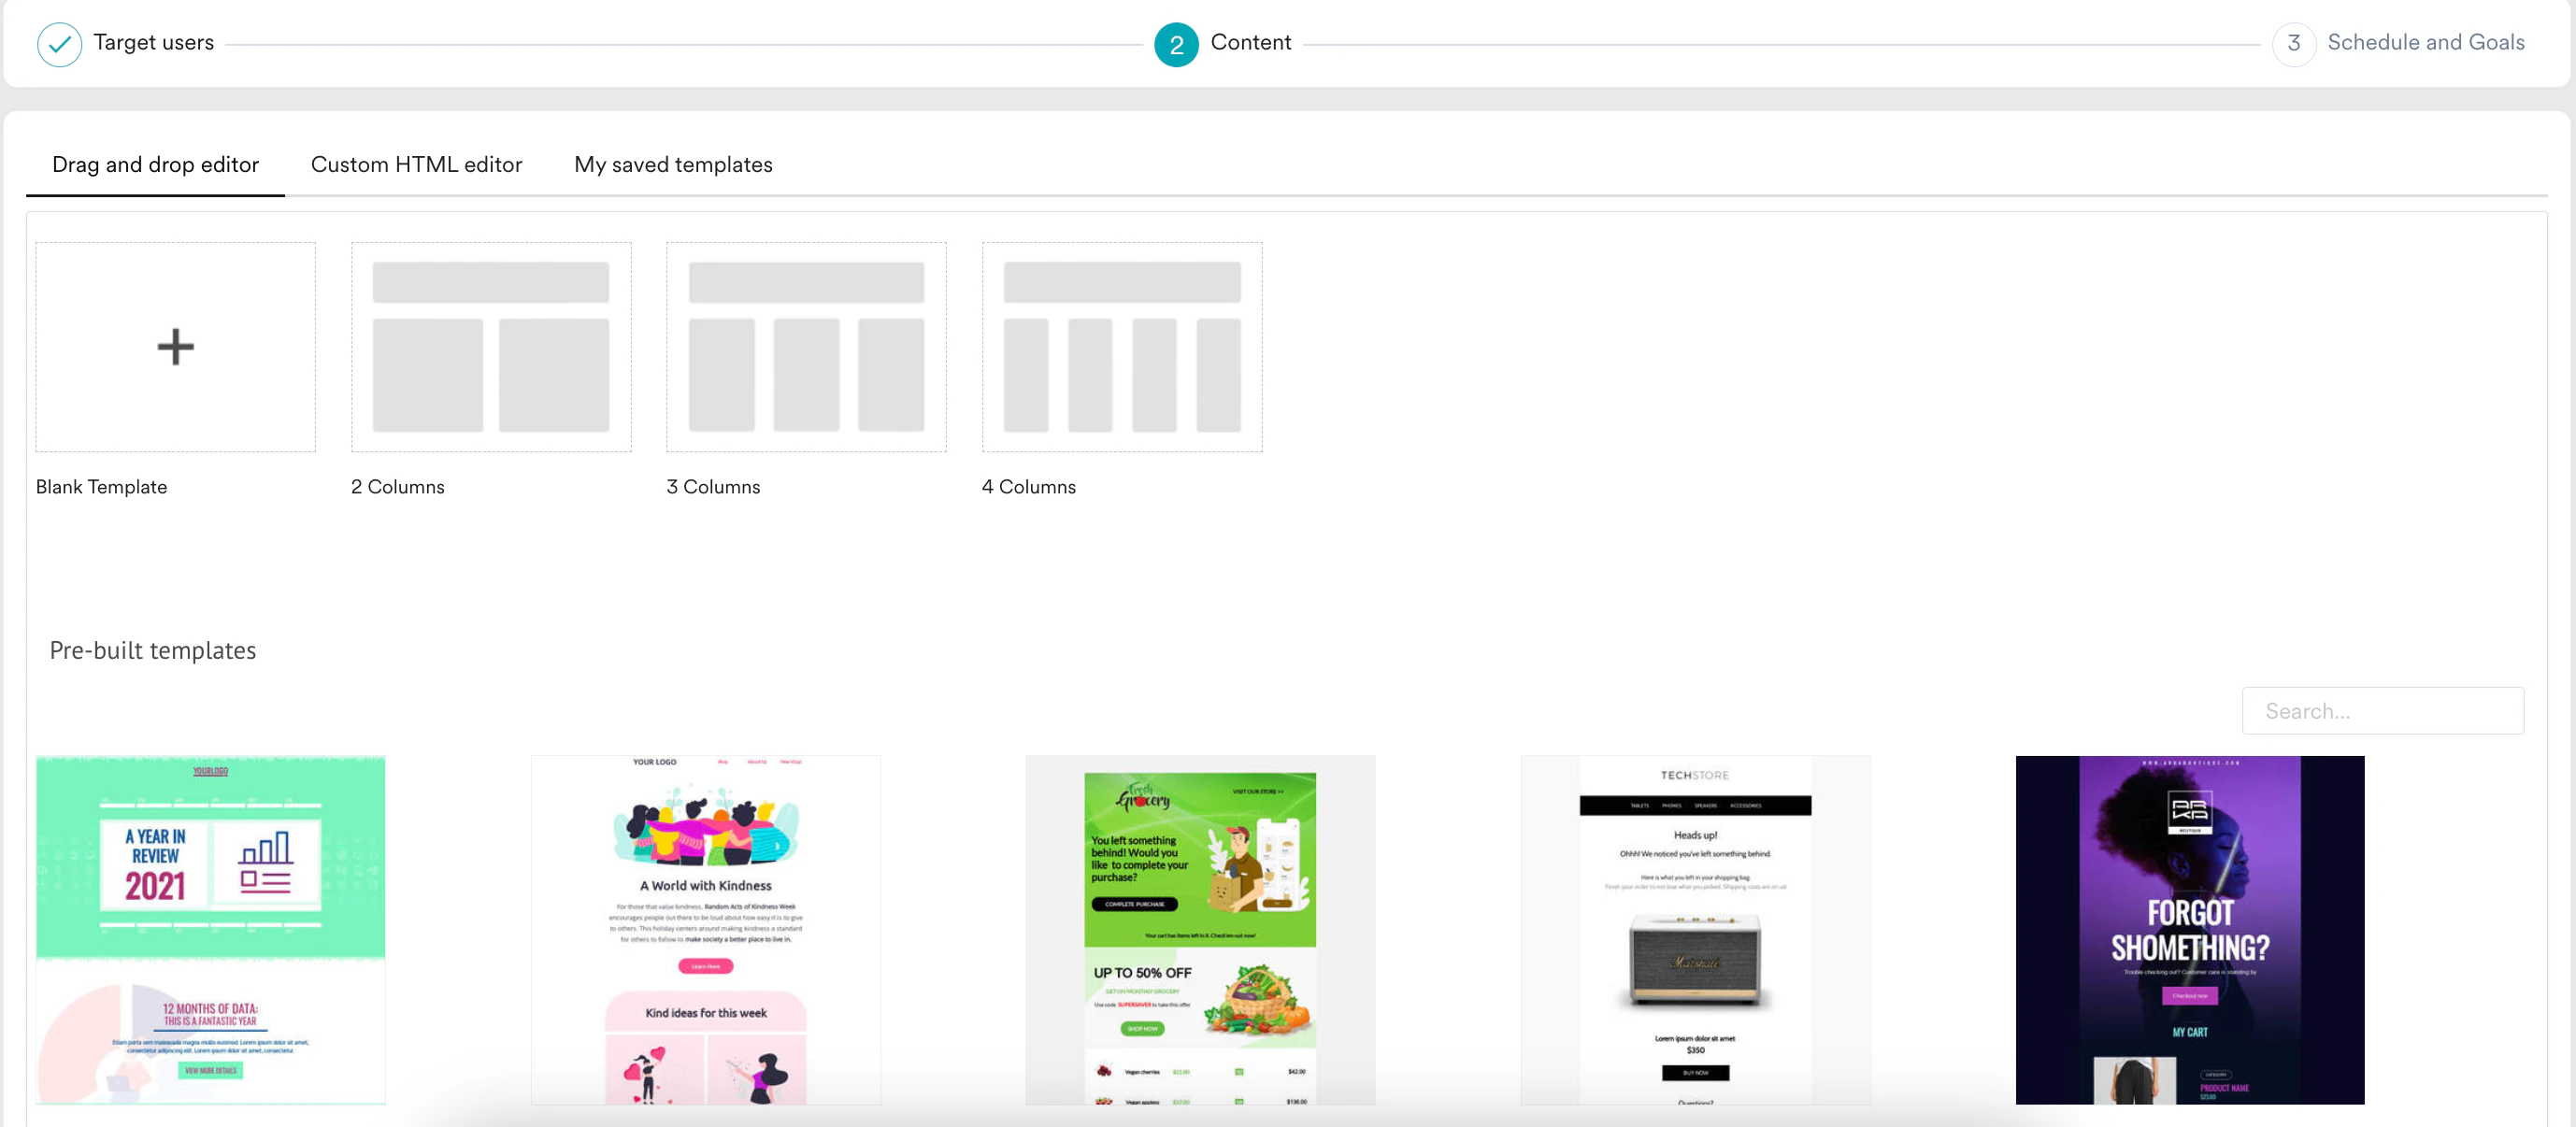 After you select a template, on the next screen, you can enter email credentials and edit the content as follows:
 ### Sender Details
#### Personalization in Emails
You can personalize the following:
* **Email Subject**: Personalizing the subject using the customer's name or their topic of interest can help you get more opens and clicks. Choose the user attribute to personalize in the personalization editor.
* **From email address**
* **Reply-to email address**: When a customer, lead, or prospect replies to your email, the reply-to email address should be directed to the relationship manager or personnel handling them rather than to a static or generic email address. You can do so by personalizing the **Reply-to email address**. Select the user attribute that stores the email address of the relationship manager for the customer in the personalization editor.
* **Sender Name**: Personalizing your sender name helps you optimize your open rate, click-through rate, and conversions. For instance, the sender name could be your brand name or could be *xyz from BrandName.* Such sender names make your brand more personable and result in higher open rates.
* **Email Content** (including any URLs)
* **CC** and **BCC**
* **Custom Domain**: Customizing your domain increases open rates as the recipients are likely to trust and open an email coming from a familiar domain. For more information, refer [Configure Custom Domain](/user-guide/settings/advanced-settings/configure-custom-domain-link-branding).
* **Deep linking Domain**: Deep linking your domain allows for a smoother and more direct user experience. Deep linking allows an app to be accessed and launched from a URL. For more information, refer to [Configure Deeplinking Domain](/user-guide/campaigns-and-channels/email/deliverability/domain-reputation/domain-reputation-in-moengage).
Type "@" and select among the list of user attributes. You will also need to select a fallback mechanism that applies when a personalization attribute is missing for a user. Read more about personalizing emails [here](/user-guide/campaigns-and-channels/email/create/personalize-email-content)
* The *Sender Name* should be less than 320 characters while using Amazon SES (as it supports only up to 320 characters). When the Sender Name exceeds this limit, Test Campaigns will result in a "*Transaction failed: Address length is more than 320 characters long*" error, and published campaigns that send out emails will experience *SMTPDataError*.
* The personalized Sender Name will be sent as plain text. For example, if a link gets added as part of personalization, the link will be treated and sent as text instead of being treated as a URL.
### Attachments
You can attach one or more files as part of the message in the email campaigns. For more information, refer to [Add File Attachments to Email](/user-guide/campaigns-and-channels/email/create/add-file-attachments-to-email).
### Gmail annotation
Gmail annotations help customers conveniently view and engage with your promotions from their inboxes. For more information, refer to [Gmail Annotations](/user-guide/campaigns-and-channels/email/create/gmail-annotations).
### Preview Text
Preview text is the text that appears below the subject line in the inbox. Preview text can help you connect with your users and increase your open rate. If you do not specify the preview text, the email clients pull the first line of test from the email content and display the preview text in the inbox (this may not be as appealing to the user as you writing the purpose of your email succinctly). In the Sender details section, you can add the preview text in the Preview Text field.
For example, if you were to add the following in the Sender Details:
*Subject - Let Your Summer Look Shine!*
*Preview text - Summer Sale - Infuse freshness in your wardrobe with our latest offerings.*
The message would appear in the inbox as shown below.
### Sender Details
#### Personalization in Emails
You can personalize the following:
* **Email Subject**: Personalizing the subject using the customer's name or their topic of interest can help you get more opens and clicks. Choose the user attribute to personalize in the personalization editor.
* **From email address**
* **Reply-to email address**: When a customer, lead, or prospect replies to your email, the reply-to email address should be directed to the relationship manager or personnel handling them rather than to a static or generic email address. You can do so by personalizing the **Reply-to email address**. Select the user attribute that stores the email address of the relationship manager for the customer in the personalization editor.
* **Sender Name**: Personalizing your sender name helps you optimize your open rate, click-through rate, and conversions. For instance, the sender name could be your brand name or could be *xyz from BrandName.* Such sender names make your brand more personable and result in higher open rates.
* **Email Content** (including any URLs)
* **CC** and **BCC**
* **Custom Domain**: Customizing your domain increases open rates as the recipients are likely to trust and open an email coming from a familiar domain. For more information, refer [Configure Custom Domain](/user-guide/settings/advanced-settings/configure-custom-domain-link-branding).
* **Deep linking Domain**: Deep linking your domain allows for a smoother and more direct user experience. Deep linking allows an app to be accessed and launched from a URL. For more information, refer to [Configure Deeplinking Domain](/user-guide/campaigns-and-channels/email/deliverability/domain-reputation/domain-reputation-in-moengage).
Type "@" and select among the list of user attributes. You will also need to select a fallback mechanism that applies when a personalization attribute is missing for a user. Read more about personalizing emails [here](/user-guide/campaigns-and-channels/email/create/personalize-email-content)
* The *Sender Name* should be less than 320 characters while using Amazon SES (as it supports only up to 320 characters). When the Sender Name exceeds this limit, Test Campaigns will result in a "*Transaction failed: Address length is more than 320 characters long*" error, and published campaigns that send out emails will experience *SMTPDataError*.
* The personalized Sender Name will be sent as plain text. For example, if a link gets added as part of personalization, the link will be treated and sent as text instead of being treated as a URL.
### Attachments
You can attach one or more files as part of the message in the email campaigns. For more information, refer to [Add File Attachments to Email](/user-guide/campaigns-and-channels/email/create/add-file-attachments-to-email).
### Gmail annotation
Gmail annotations help customers conveniently view and engage with your promotions from their inboxes. For more information, refer to [Gmail Annotations](/user-guide/campaigns-and-channels/email/create/gmail-annotations).
### Preview Text
Preview text is the text that appears below the subject line in the inbox. Preview text can help you connect with your users and increase your open rate. If you do not specify the preview text, the email clients pull the first line of test from the email content and display the preview text in the inbox (this may not be as appealing to the user as you writing the purpose of your email succinctly). In the Sender details section, you can add the preview text in the Preview Text field.
For example, if you were to add the following in the Sender Details:
*Subject - Let Your Summer Look Shine!*
*Preview text - Summer Sale - Infuse freshness in your wardrobe with our latest offerings.*
The message would appear in the inbox as shown below.
 **Note**: It is recommended to keep your preview text within 40 - 130 characters so that it looks ideal across email clients and devices. If the preview text exceeds the character limit, it will be shown only up to the maximum character limit in the inbox. If the preview text is too short (falls short of the lower limit of 40 characters), MoEngage will add an adequate number of non-breaking spaces (approx 100) to ensure that the preview text length is compatible with all devices.
#### From email address
Select a "from" email address from the drop-down. If you do not see any email addresses in the drop-down, it is likely that you have not *added/verified "from" email addresses* in email settings.
While selecting a "from" email address, you can see the current reputation of each domain. For more information, refer to [Domain Reputation](/user-guide/campaigns-and-channels/domain-reputation/domain-reputation-in-moengage).
#### Other options
There are additional options to:
* Personalize [*URLs*](https://moengage-user-guide.mintlify.app/user-guide/campaigns-and-channels/email/create/personalize-email-content#personalize-urls) & [images](https://moengage-user-guide.mintlify.app/user-guide/campaigns-and-channels/email/create/personalize-email-content#personalize-images)
* [Preview your template in different environments and devices](/user-guide/campaigns-and-channels/email/create/inbox-previews)
* [Check for potential Spam Folder landing](/user-guide/campaigns-and-channels/email/create/inbox-previews#spam-checker)
* See Email Tips
* Preview the email for laptop/mobile
* Save the template being created
* To save a newly created template, you can click on the "Save Template" option under "Template actions" present on the right top of the email editor. You can give a unique name to the template and save the same. You can find this newly saved template in the "Saved Templates" section.
* While saving the updates to a template, you can choose to update the existing template version with the new edits made. Note that once the current template is updated, the previous versions cannot be restored.
**Note**: It is recommended to keep your preview text within 40 - 130 characters so that it looks ideal across email clients and devices. If the preview text exceeds the character limit, it will be shown only up to the maximum character limit in the inbox. If the preview text is too short (falls short of the lower limit of 40 characters), MoEngage will add an adequate number of non-breaking spaces (approx 100) to ensure that the preview text length is compatible with all devices.
#### From email address
Select a "from" email address from the drop-down. If you do not see any email addresses in the drop-down, it is likely that you have not *added/verified "from" email addresses* in email settings.
While selecting a "from" email address, you can see the current reputation of each domain. For more information, refer to [Domain Reputation](/user-guide/campaigns-and-channels/domain-reputation/domain-reputation-in-moengage).
#### Other options
There are additional options to:
* Personalize [*URLs*](https://moengage-user-guide.mintlify.app/user-guide/campaigns-and-channels/email/create/personalize-email-content#personalize-urls) & [images](https://moengage-user-guide.mintlify.app/user-guide/campaigns-and-channels/email/create/personalize-email-content#personalize-images)
* [Preview your template in different environments and devices](/user-guide/campaigns-and-channels/email/create/inbox-previews)
* [Check for potential Spam Folder landing](/user-guide/campaigns-and-channels/email/create/inbox-previews#spam-checker)
* See Email Tips
* Preview the email for laptop/mobile
* Save the template being created
* To save a newly created template, you can click on the "Save Template" option under "Template actions" present on the right top of the email editor. You can give a unique name to the template and save the same. You can find this newly saved template in the "Saved Templates" section.
* While saving the updates to a template, you can choose to update the existing template version with the new edits made. Note that once the current template is updated, the previous versions cannot be restored. 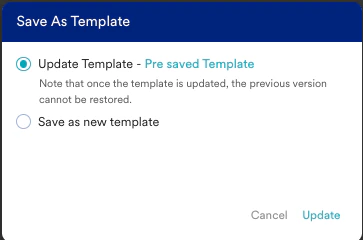 * Additionally, you can save the updates as a new template instead of updating the previous version. You can find this newly saved template in the **Saved Templates** section.
* You can change the email template and choose a new one by clicking **Change Template**.
* Additionally, you can save the updates as a new template instead of updating the previous version. You can find this newly saved template in the **Saved Templates** section.
* You can change the email template and choose a new one by clicking **Change Template**.
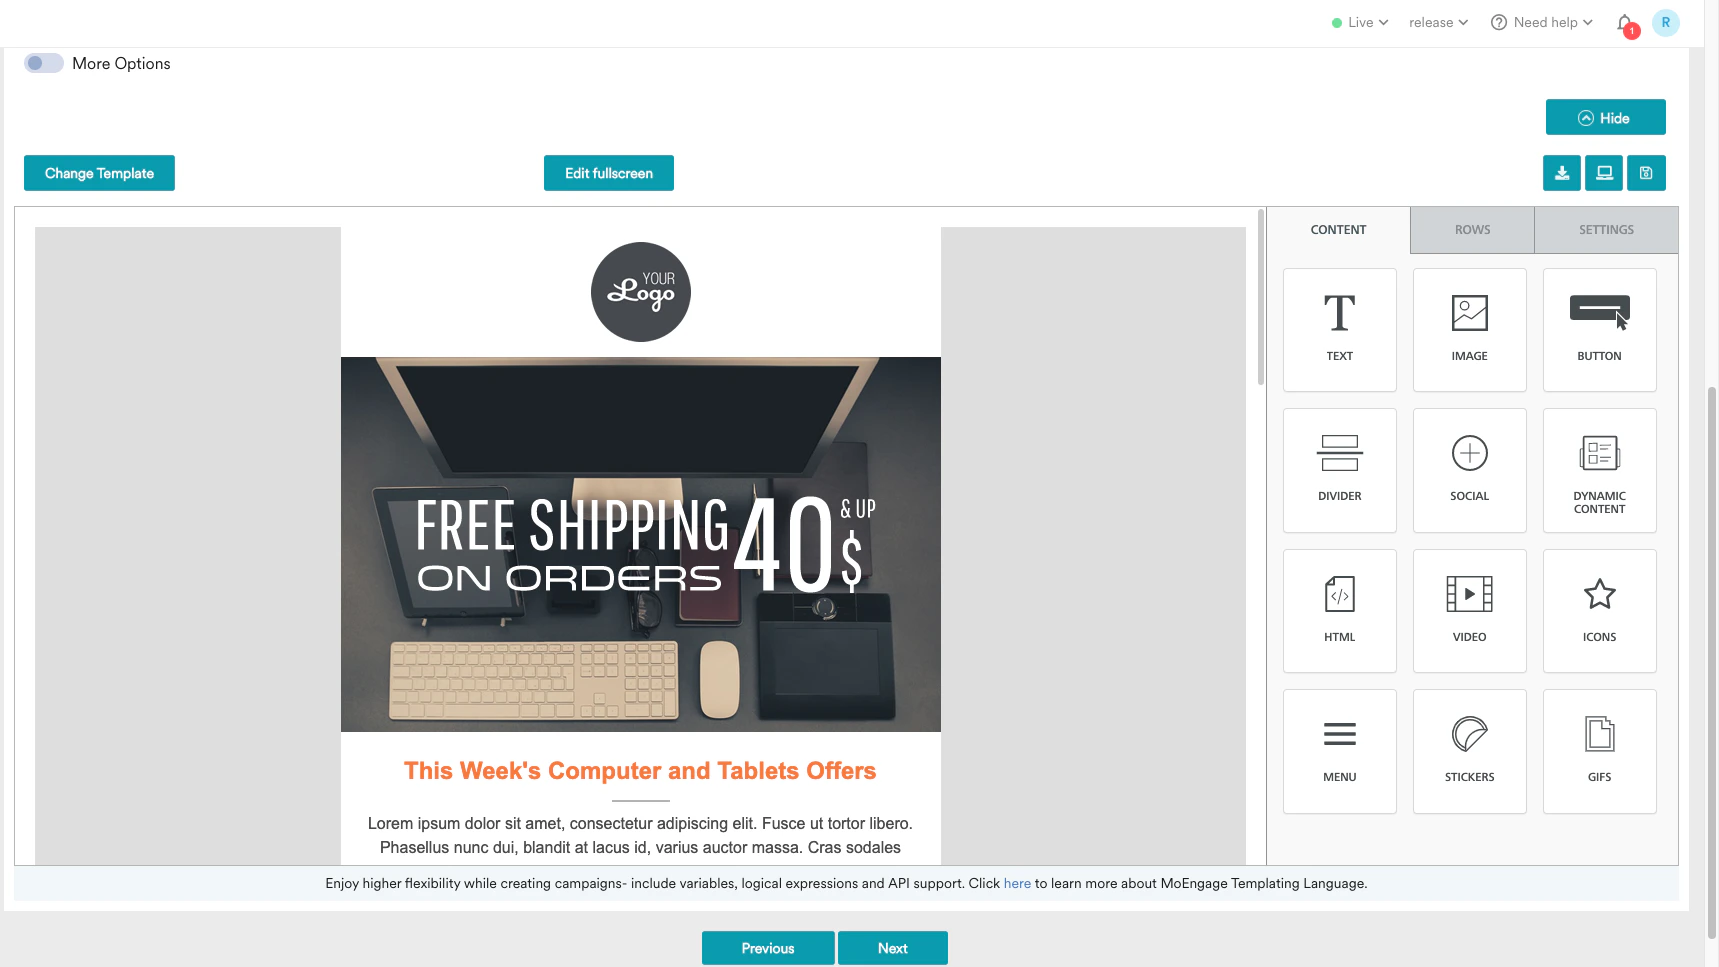 Use change templates to toggle between WYSIWYG and upload HTML. When you toggle the previously created email message is not retained or saved as a draft.
Do not forget to insert an unsubscribe link in your email template. Read more about the unsubscribe tracking mechanism [here](/user-guide/campaigns-and-channels/email/create/track-email-unsubscribes).
If the UTM parameters are enabled in the general settings, the **UTM parameters** toggle for the current email campaign is turned on. For more information, refer to [Setting Up General UTM Parameters at Account Level](/user-guide/settings/advanced-settings/configure-general-utm-parameters-at-account-level).
You can set UTM parameters for campaigns individually. The changes you make in the UTM parameters for a campaign override the general settings. The changes are applicable only to the specific campaign you are creating or editing, and they do not impact the general settings. For more information, refer to [Adding UTM Parameters to Email](/user-guide/settings/advanced-settings/add-utm-parameters-to-campaigns).
Test campaigns are a crucial step for quality assurance before campaign launch. They allow you to proactively validate the email's layout, confirm personalization accuracy across different user segments, and check all links and media. For more information, refer to [Test Email Campaign](/user-guide/campaigns-and-channels/email/create/test-email-campaign).
After composing the email, click **Next** or use the tabs at the top of the create campaign navigation to move to Step 3 **Schedule and Goals**.
## Step 3: Schedule and Goals
This section contains the following:
* [Delivery Schedule](/user-guide/campaigns-and-channels/email/create/create-an-email-campaign#delivery-schedule): Choose when the campaign should be delivered to your users and the periodicity of delivery.
* [Conversion Goals](/user-guide/campaigns-and-channels/email/create/create-an-email-campaign#conversion-goals): Choose the conversion goals and revenue metrics to be tracked for the campaign.
* [Delivery Controls](/user-guide/campaigns-and-channels/email/create/create-an-email-campaign#delivery-controls): Choose the advanced delivery control options such as throttling, frequency capping, and expiration settings for the notification.
### Delivery Schedule
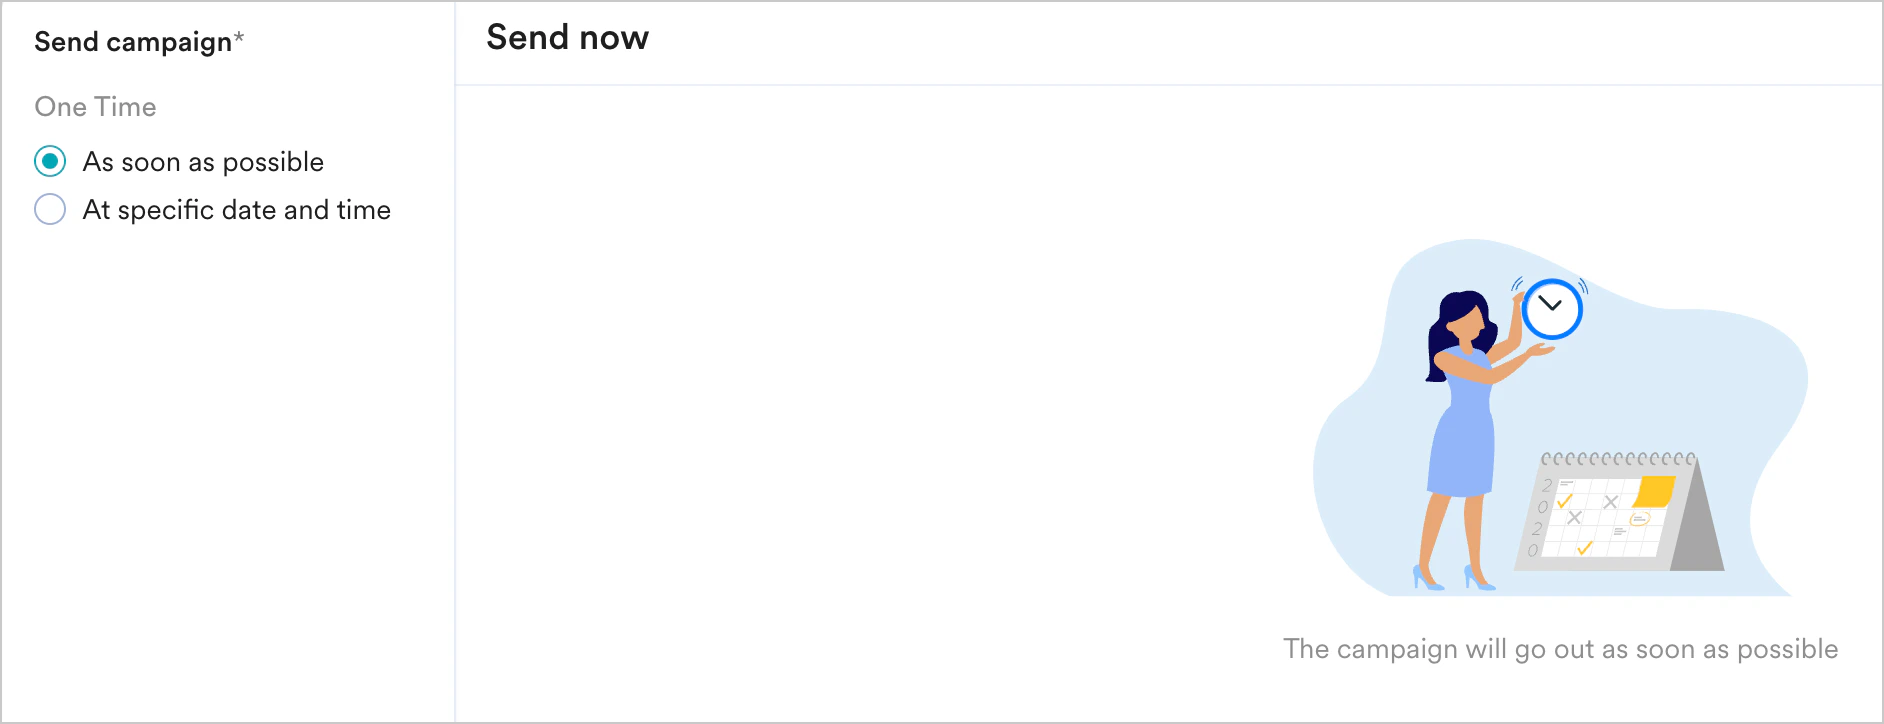
Send the campaign immediately to the target users.
Use change templates to toggle between WYSIWYG and upload HTML. When you toggle the previously created email message is not retained or saved as a draft.
Do not forget to insert an unsubscribe link in your email template. Read more about the unsubscribe tracking mechanism [here](/user-guide/campaigns-and-channels/email/create/track-email-unsubscribes).
If the UTM parameters are enabled in the general settings, the **UTM parameters** toggle for the current email campaign is turned on. For more information, refer to [Setting Up General UTM Parameters at Account Level](/user-guide/settings/advanced-settings/configure-general-utm-parameters-at-account-level).
You can set UTM parameters for campaigns individually. The changes you make in the UTM parameters for a campaign override the general settings. The changes are applicable only to the specific campaign you are creating or editing, and they do not impact the general settings. For more information, refer to [Adding UTM Parameters to Email](/user-guide/settings/advanced-settings/add-utm-parameters-to-campaigns).
Test campaigns are a crucial step for quality assurance before campaign launch. They allow you to proactively validate the email's layout, confirm personalization accuracy across different user segments, and check all links and media. For more information, refer to [Test Email Campaign](/user-guide/campaigns-and-channels/email/create/test-email-campaign).
After composing the email, click **Next** or use the tabs at the top of the create campaign navigation to move to Step 3 **Schedule and Goals**.
## Step 3: Schedule and Goals
This section contains the following:
* [Delivery Schedule](/user-guide/campaigns-and-channels/email/create/create-an-email-campaign#delivery-schedule): Choose when the campaign should be delivered to your users and the periodicity of delivery.
* [Conversion Goals](/user-guide/campaigns-and-channels/email/create/create-an-email-campaign#conversion-goals): Choose the conversion goals and revenue metrics to be tracked for the campaign.
* [Delivery Controls](/user-guide/campaigns-and-channels/email/create/create-an-email-campaign#delivery-controls): Choose the advanced delivery control options such as throttling, frequency capping, and expiration settings for the notification.
### Delivery Schedule
Send the campaign immediately to the target users.
 Send the campaign at the specified time, time zone, or predicted time. Select one of the following:
| Field | Description |
| ------------------------------ | ----------------------------------------------------------------------------------------------------------------------------------------------------------------------------------------------------------------------------------------------------------------------------------------------------------------------------------------------------------------------------------------------------------------------------------------------------------------------------------------------------------------------------------------------------------------------------------------------------------------------------------------------------------------------------------------------------------------------------------------------------------------------------------------------------------------------------------------------------------------------------------------------------------------------------------------------------------------------------------------------------------------------------------------------------------------------------------------------------------------------------------------------------------------------------------------------------------------------------------------------------------------------------------------------------------------------------------------------------------------------------------------------------------------------------------------------------------------------------------------------------------------------------------------------------------------------------------------------------------------------------------------------------------------------------------------------------------------------------------------------------------------------------------------- |
| **At fixed time** | This section helps you send the campaign on a specific date and time and contains the following fields:
Send the campaign at the specified time, time zone, or predicted time. Select one of the following:
| Field | Description |
| ------------------------------ | ----------------------------------------------------------------------------------------------------------------------------------------------------------------------------------------------------------------------------------------------------------------------------------------------------------------------------------------------------------------------------------------------------------------------------------------------------------------------------------------------------------------------------------------------------------------------------------------------------------------------------------------------------------------------------------------------------------------------------------------------------------------------------------------------------------------------------------------------------------------------------------------------------------------------------------------------------------------------------------------------------------------------------------------------------------------------------------------------------------------------------------------------------------------------------------------------------------------------------------------------------------------------------------------------------------------------------------------------------------------------------------------------------------------------------------------------------------------------------------------------------------------------------------------------------------------------------------------------------------------------------------------------------------------------------------------------------------------------------------------------------------------------------------------- |
| **At fixed time** | This section helps you send the campaign on a specific date and time and contains the following fields: - **Campaign time zone:** The timezone in which the campaign should be sent.
- **Start date**: The date on which the campaign should be sent.
- **Send time**: The time at which the campaign should be sent. Select AM or PM depending on the time of day.
|
| **Send in user time zone** | This section helps you send the campaign on a specific date and time within the time zone of the user and contains the following fields: - **Campaign time zone**: The timezone in which the campaign should be sent.
- **Start date**: The date on which the campaign should be sent.
- **Send time**: The time at which the campaign should be sent. Select am or pm depending on the time of day.
- **Send if the user time zone has passed:** If the campaign's start time has passed in the user's timezone, you have the option to do the following:
- **Yes, send it**: Send the campaign to the user even if the specified start time has passed in their timezone.
- **No, don't send it**: Do not send the campaign to the user as the specified start time has passed in their timezone.
|
| Best time for user (Merlin AI) | This section helps you send the campaign based on the MoEngage intelligence-determined date and time and contains the following fields: - **Campaign time zone**: The timezone in which the campaign should be sent.
- **Start date:** The date on which the campaign should be sent.
- **Start time**: The time at which the campaign should be sent. Select am or pm depending on the time of day.
- **Send messages based on best time only till**: The time until which the campaign should be sent based on the best time to send (BTS). Select **am** or **pm** depending on the time of day. Click **View best time distribution** to see the best time for sending push notifications, represented in a graphical manner.
- **If user's best time is outside this time window**: You choose when the campaign is to be sent when the user's BTS is outside the time window selected. You can do the following:
- Send the campaign to the user either at the start or end time by selecting **Send message at start time or end time**.
- Avoid sending the campaign to the user by selecting **Do not send message**.
- **If user's best time is not available**: You choose when the campaign is to be sent when the user does not have BTS. You can do the following:
- Send the campaign to the user at the start time by selecting **Yes, send at start time**.
- Send the campaign to the user at the app's best time by selecting **Yes, send at the app's best time**.
- Avoid sending the campaign to the user by selecting **Do not send message**.
For more information, refer to the Best time to send [BTS](/user-guide/ai-and-intelligence/timing/best-time-to-send). |
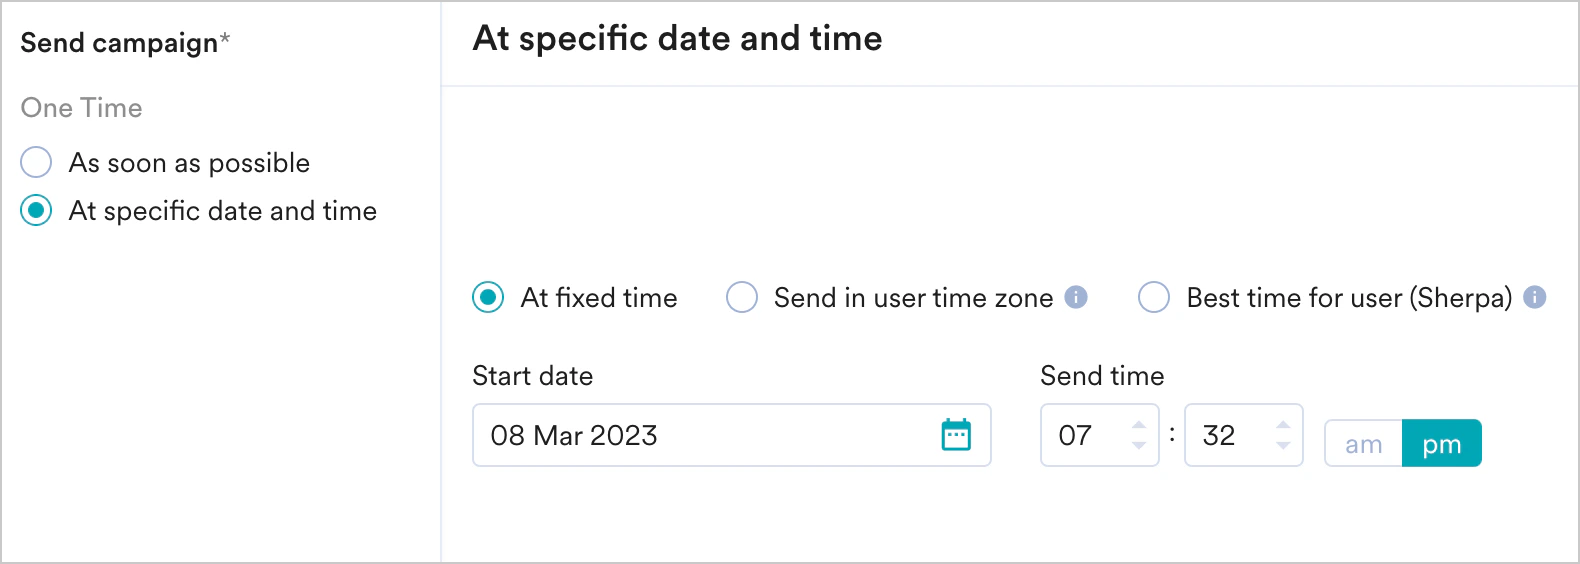 Choose this option to send the campaign on a specified date and time. The following fields are available in this section:
* **Campaign time zone**: The timezone in which the campaign should be sent.
* **Start date**: The date on which the campaign should be sent.
* **Send time**: The time at which the campaign should be sent. Select **am** or **pm** depending on the time of day.
* **Periodic:** The periodicity of the campaign. You have the following options: **Daily**, **Weekly**, and **Monthly**.
| Periodicity | Description |
| :---------- | :-------------------------------------------------------------------------------------------------------------------------------------------------------------------------------------------------------------------------------------------------------------------------------------------------------------------------------------------------------------------------------------------------------------------------------------------------------------------------------------------------------------------------------------------------------------------------------------------------------------------------------------------------------------------------------------------------------------------------------------------------------------------------------------------------------------------------------------------------------------------------------------------------------------------------------------------------------------------------------------------------------------------------------------------------------------------------------------------------------------------------------------------------------------------------------------------------------------------------------------------------------------------------------------------------------------------------------------------------------------------------------------- |
| **Daily** | **Repeat every**: This option lets you specify the number of days after which the campaign should be repeated. For example, if you choose to repeat every 3 days and the campaign starts on Monday, it will run again on Thursday. |
| **Weekly** |
Choose this option to send the campaign on a specified date and time. The following fields are available in this section:
* **Campaign time zone**: The timezone in which the campaign should be sent.
* **Start date**: The date on which the campaign should be sent.
* **Send time**: The time at which the campaign should be sent. Select **am** or **pm** depending on the time of day.
* **Periodic:** The periodicity of the campaign. You have the following options: **Daily**, **Weekly**, and **Monthly**.
| Periodicity | Description |
| :---------- | :-------------------------------------------------------------------------------------------------------------------------------------------------------------------------------------------------------------------------------------------------------------------------------------------------------------------------------------------------------------------------------------------------------------------------------------------------------------------------------------------------------------------------------------------------------------------------------------------------------------------------------------------------------------------------------------------------------------------------------------------------------------------------------------------------------------------------------------------------------------------------------------------------------------------------------------------------------------------------------------------------------------------------------------------------------------------------------------------------------------------------------------------------------------------------------------------------------------------------------------------------------------------------------------------------------------------------------------------------------------------------------------- |
| **Daily** | **Repeat every**: This option lets you specify the number of days after which the campaign should be repeated. For example, if you choose to repeat every 3 days and the campaign starts on Monday, it will run again on Thursday. |
| **Weekly** | - **Repeat every**: This option lets you specify the number of weeks after which the campaign should be repeated.For example, if you choose to repeat every 3 weeks and the campaign starts in the first week, it will run again in the fourth week.
- **Repeat on**: This option lets you specify the day(s) of the week on which the campaign is to be sent. For example, if you wish to send the campaign every Monday, Wednesday, and Friday, select these days in this option.
|
| **Monthly** | - **Repeat every**: This option lets you specify the number of months after which the campaign should be repeated. For example, if you choose to repeat every 3 months and the campaign starts in January, it will run again in April.
- **Repeat on**: This option lets you do the following:
- **Days of month**: Choose this option for repeating campaigns that are date-specific. Select the date(s) of the month the campaign is to be sent. For example, to send the campaign on the 5th and the 25th of a month, select the 5th and 25th in the calendar widget.
**Note**: If the selected date(s) doesn't exist in the specified month (as it is a shorter month), a campaign will be sent on the last date. For example, if the 30th and 31st are selected and the month is February, one campaign would be sent on the 28th. - **Days of week**: Choose this option to specify the day(s) of the week on which the campaign is to be sent. For example, if you wish to send the campaign every Monday, Wednesday, and Friday, select these days in this option.
**Note**: In case of a day of the week not existing in a month (for example, fifth Saturday), the campaign would be skipped for that instance. And in case of overlap (for example, 4th Monday and last Monday), only one instance would be sent.
|
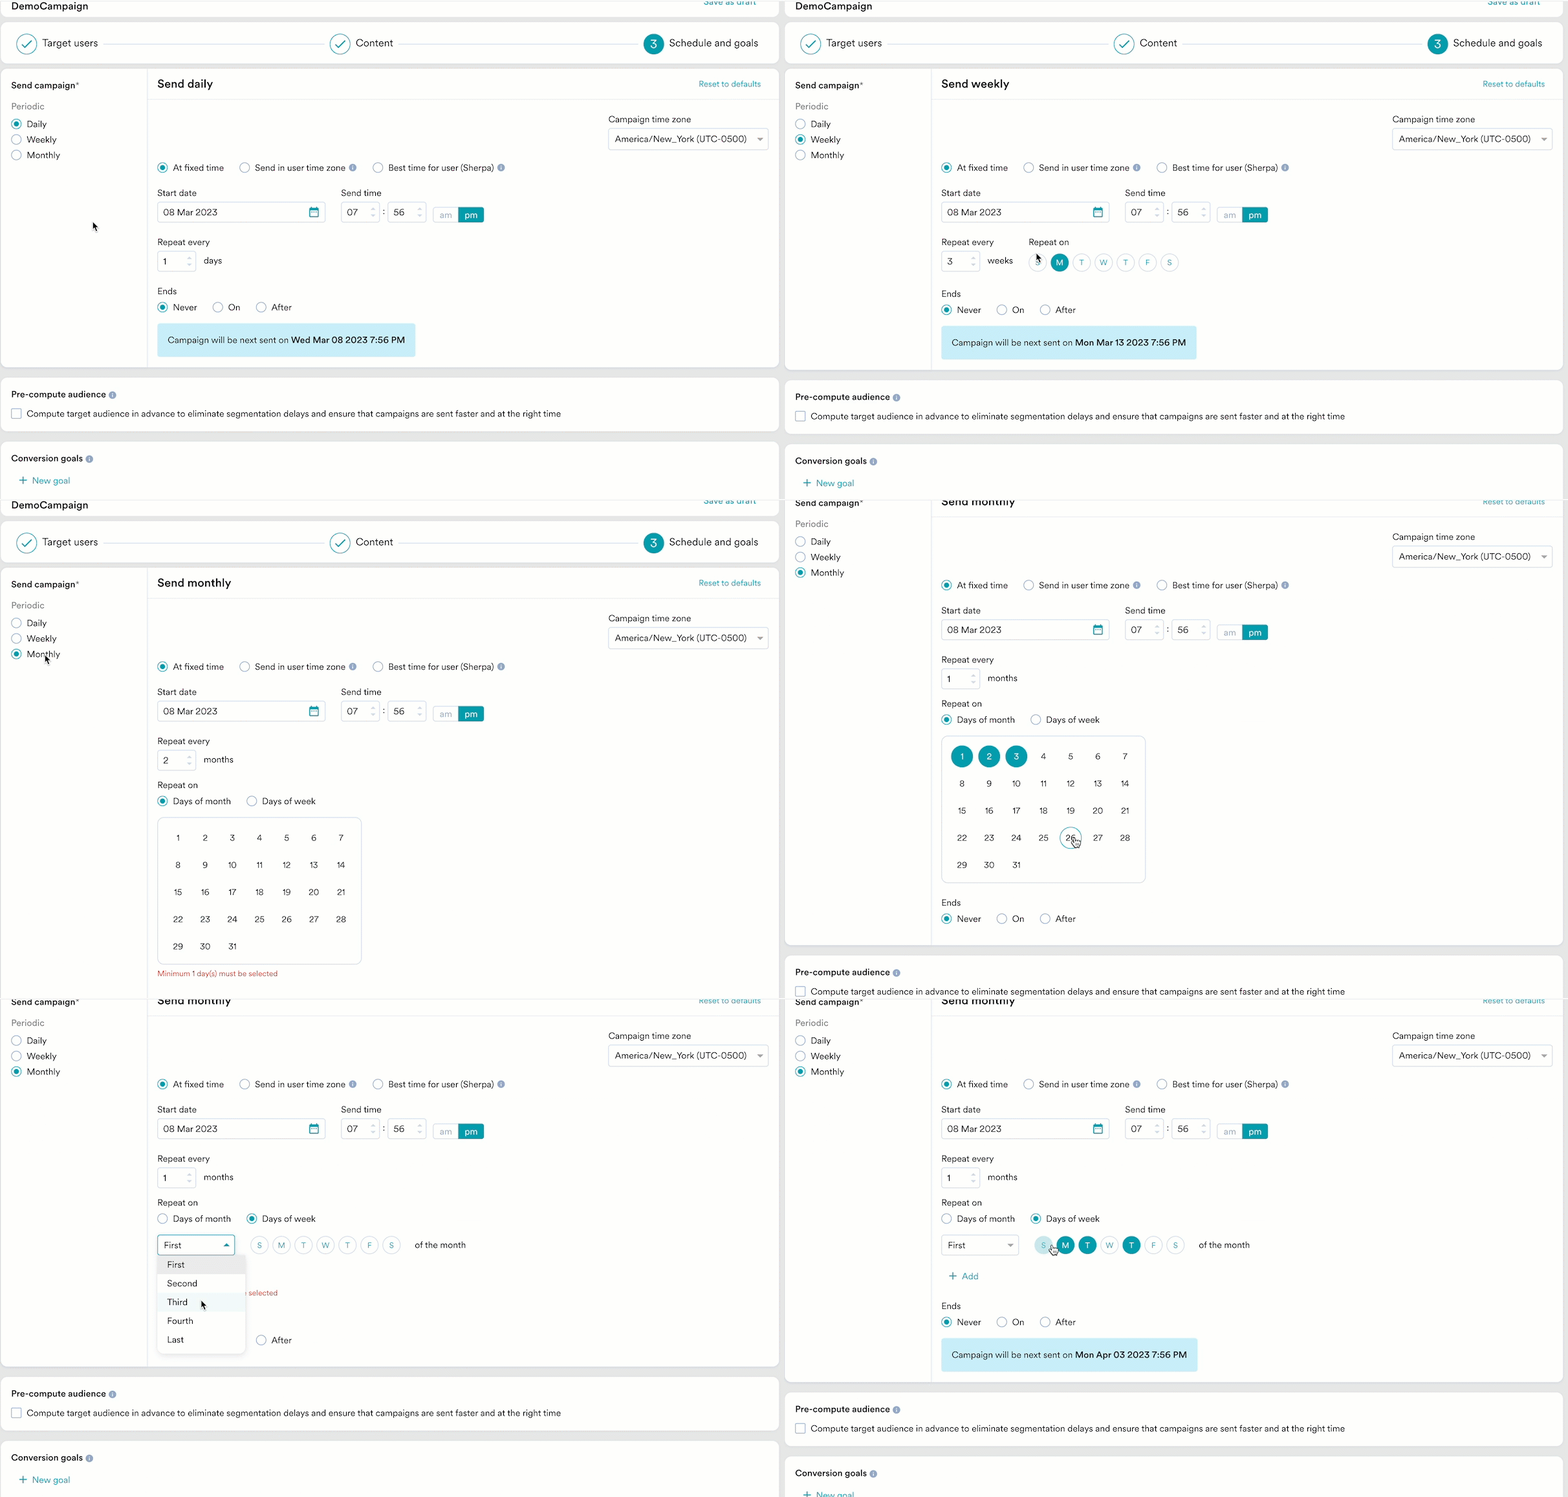 * **Ends**: The date on which the campaign ends. The following options are available:
* **Never**: The campaign is scheduled to run daily.
* **On**: The campaign ends on the date specified in the **End Date** field.
* **After**: The campaign ends after the number of occurrences specified in the **occurrences** field.
Choose this option to send the campaign on a specified date and time. The following fields are available in this section:
* **Campaign time zone**: The timezone in which the campaign should be sent.
* **Start date**: The date on which the campaign should be sent.
* **Send time**: The time at which the campaign should be sent. Select **am** or **pm** depending on the time of day.
* **Periodic:** The periodicity of the campaign. You have the following options: **Daily**, **Weekly**, and **Monthly**.
| Periodicity | Description |
| ----------- | --------------------------------------------------------------------------------------------------------------------------------------------------------------------------------------------------------------------------------------------------------------------------------------------------------------------------------------------------------------------------------------------------------------------------------------------------------------------------------------------------------------------------------------------------------------------------------------------------------------------------------------------------------------------------------------------------------------------------------------------------------------------------------------------------------------------------------------------------------------------------------------------------------------------------------------------------------------------------------------------------------------------------------------------------------------------------------------------------------------------------------------------------------------------------------------------------------------------------------------------------------------------------------------------------------------------------------------------------------------------------------- |
| **Daily** | **Repeat every**: This option lets you specify the number of days after which the campaign should be repeated. For example, if you choose to repeat every 3 days and the campaign starts on Monday, it will run again on Thursday. |
| **Weekly** |
* **Ends**: The date on which the campaign ends. The following options are available:
* **Never**: The campaign is scheduled to run daily.
* **On**: The campaign ends on the date specified in the **End Date** field.
* **After**: The campaign ends after the number of occurrences specified in the **occurrences** field.
Choose this option to send the campaign on a specified date and time. The following fields are available in this section:
* **Campaign time zone**: The timezone in which the campaign should be sent.
* **Start date**: The date on which the campaign should be sent.
* **Send time**: The time at which the campaign should be sent. Select **am** or **pm** depending on the time of day.
* **Periodic:** The periodicity of the campaign. You have the following options: **Daily**, **Weekly**, and **Monthly**.
| Periodicity | Description |
| ----------- | --------------------------------------------------------------------------------------------------------------------------------------------------------------------------------------------------------------------------------------------------------------------------------------------------------------------------------------------------------------------------------------------------------------------------------------------------------------------------------------------------------------------------------------------------------------------------------------------------------------------------------------------------------------------------------------------------------------------------------------------------------------------------------------------------------------------------------------------------------------------------------------------------------------------------------------------------------------------------------------------------------------------------------------------------------------------------------------------------------------------------------------------------------------------------------------------------------------------------------------------------------------------------------------------------------------------------------------------------------------------------------- |
| **Daily** | **Repeat every**: This option lets you specify the number of days after which the campaign should be repeated. For example, if you choose to repeat every 3 days and the campaign starts on Monday, it will run again on Thursday. |
| **Weekly** | - **Repeat every**: This option lets you specify the number of weeks after which the campaign should be repeated. For example, if you choose to repeat every 3 weeks and the campaign starts in the first week, it will run again in the fourth week.
- **Repeat on**: This option lets you specify the day(s) of the week on which the campaign is to be sent. For example, if you wish to send the campaign every Monday, Wednesday, and Friday, select these days in this option.
|
| **Monthly** | - **Repeat every**: This option lets you specify the number of months after which the campaign should be repeated. For example, if you choose to repeat every 3 months and the campaign starts in January, it will run again in April.
- **Repeat on**: This option lets you do the following:
- **Days of month**: Choose this option for repeating campaigns that are date-specific. Select the date(s) of the month the campaign is to be sent. For example, to send the campaign on the 5th and the 25th of a month, select the 5th and 25th in the calendar widget. **Note**: If the selected date(s) doesn't exist in the specified month (as it is a shorter month), a campaign will be sent on the last date. For example, if the 30th and 31st are selected and the month is February, one campaign would be sent on the 28th.
- **Days of week**: Choose this option to specify the day(s) of the week on which the campaign is to be sent. For example, if you wish to send the campaign every Monday, Wednesday, and Friday, select these days in this option.
**Note**: In case of a day of the week not existing in a month (for example, fifth Saturday), the campaign would be skipped for that instance. And in case of overlap (for example, 4th Monday and last Monday), only one instance would be sent.
|
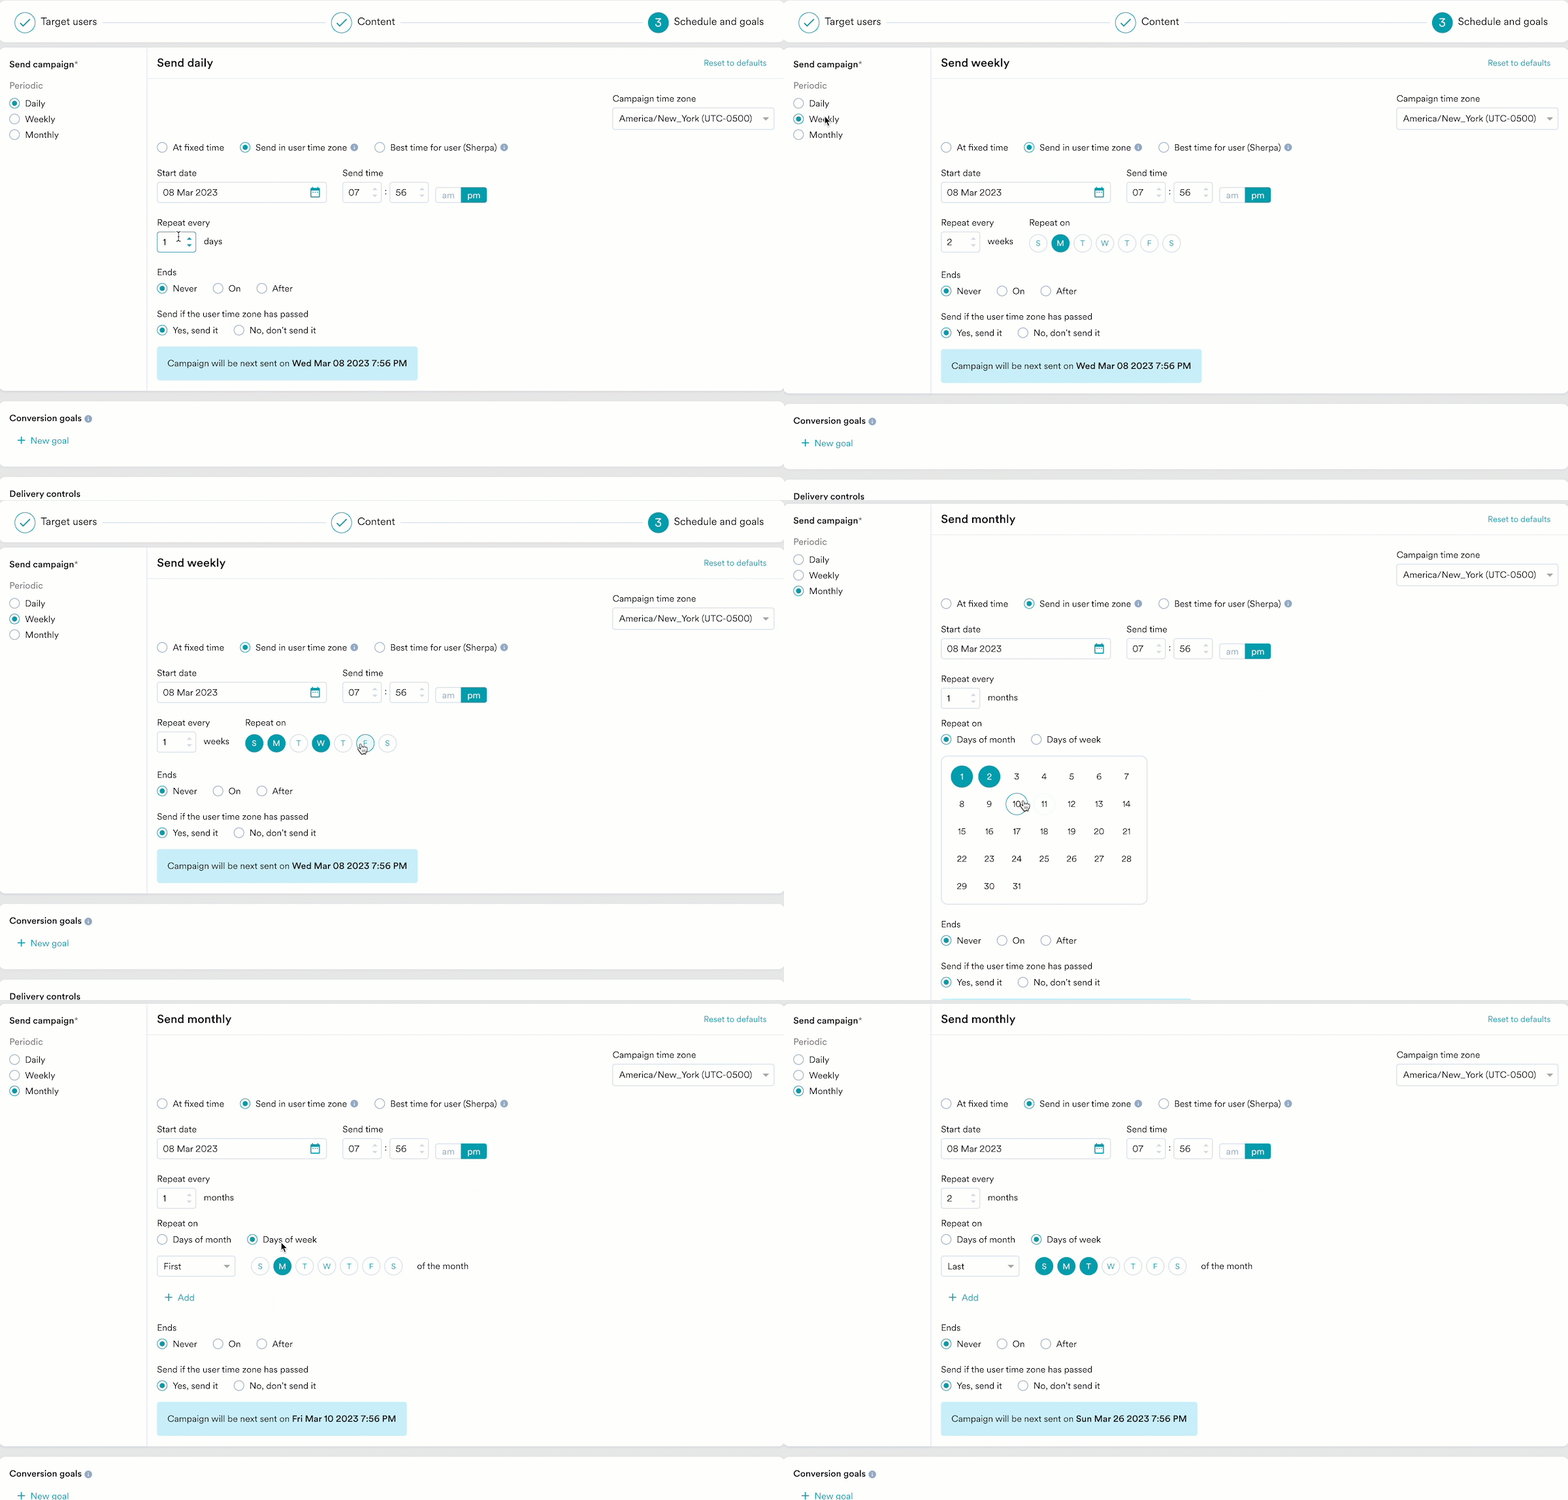 * **Ends**: The date on which the campaign ends. The following options are available:
* **Never**: The campaign is scheduled to run daily.
* **On**: The campaign ends on the date specified in the **End Date** field.
* **After**: The campaign ends after the number of occurrences specified in the **occurrences** field.
* **Send if the user time zone has passed**: if the campaign's start time has passed in the user's timezone, you have the option to do the following:
* **Yes, send it**: Send the campaign to the user even if the specified start time has passed in their timezone.
* **No, don't send it**: Do not send the campaign to the user as the specified start time has passed in their timezone.
Choose this option to send the campaign on a specified date and time. The following fields are available in this section:
* **Campaign time zone**: The timezone in which the campaign should be sent.
* **Start date**: The date on which the campaign should be sent.
* **Start time**: The time at which the campaign should be sent. Select **am** or **pm** depending on the time of day.
* **Send messages based on best time only till**: The time until which the campaign should be sent based on the best time to send (BTS). Select **am** or **pm** depending on the time of day. Click **View best time distribution** to see the best time for sending push notifications, represented in a graphical manner.
* **If user's best time is outside this time window**: You can choose the time when the campaign is to be sent when the user's BTS is outside the time window selected. You can do the following:
* * Send the campaign to the user either at the start or end time by selecting **Send message at start time or end time**.
* Avoid sending the campaign to the user by selecting **Do not send message**.
* **If user's best time is not available**: You can choose the time when the campaign is to be sent when the user does not have BTS. You can do the following:
* * Send the campaign to the user at the start time by selecting **Yes, send at start time**\*.\*
* Send the campaign to the user at the app's best time by selecting **Yes, send at the app's best time**\*.\*
* Avoid sending the campaign to the user by selecting **Do not send message**.\
For more information, refer to the [Best time to send (BTS)](/user-guide/ai-and-intelligence/timing/best-time-to-send).
* **Periodic**: Denotes the periodicity of the campaign. The following options are available: **Daily**, **Weekly**, and **Monthly**.
| Periodicity | Description |
| ----------- | --------------------------------------------------------------------------------------------------------------------------------------------------------------------------------------------------------------------------------------------------------------------------------------------------------------------------------------------------------------------------------------------------------------------------------------------------------------------------------------------------------------------------------------------------------------------------------------------------------------------------------------------------------------------------------------------------------------------------------------------------------------------------------------------------------------------------------------------------------------------------------------------------------------------------------------------------------------------------------------------------------------------------------------------------------------------------------------------------------------------------------------------------------------------------------------------------------------------------------------------------------------------------------------------------------------------------------------------------------------------------------- |
| **Daily** | **Repeat every**: This option lets you specify the number of days after which the campaign should be repeated. For example, if you choose to repeat every 3 days and the campaign starts on Monday, it will run again on Thursday. |
| **Weekly** |
* **Ends**: The date on which the campaign ends. The following options are available:
* **Never**: The campaign is scheduled to run daily.
* **On**: The campaign ends on the date specified in the **End Date** field.
* **After**: The campaign ends after the number of occurrences specified in the **occurrences** field.
* **Send if the user time zone has passed**: if the campaign's start time has passed in the user's timezone, you have the option to do the following:
* **Yes, send it**: Send the campaign to the user even if the specified start time has passed in their timezone.
* **No, don't send it**: Do not send the campaign to the user as the specified start time has passed in their timezone.
Choose this option to send the campaign on a specified date and time. The following fields are available in this section:
* **Campaign time zone**: The timezone in which the campaign should be sent.
* **Start date**: The date on which the campaign should be sent.
* **Start time**: The time at which the campaign should be sent. Select **am** or **pm** depending on the time of day.
* **Send messages based on best time only till**: The time until which the campaign should be sent based on the best time to send (BTS). Select **am** or **pm** depending on the time of day. Click **View best time distribution** to see the best time for sending push notifications, represented in a graphical manner.
* **If user's best time is outside this time window**: You can choose the time when the campaign is to be sent when the user's BTS is outside the time window selected. You can do the following:
* * Send the campaign to the user either at the start or end time by selecting **Send message at start time or end time**.
* Avoid sending the campaign to the user by selecting **Do not send message**.
* **If user's best time is not available**: You can choose the time when the campaign is to be sent when the user does not have BTS. You can do the following:
* * Send the campaign to the user at the start time by selecting **Yes, send at start time**\*.\*
* Send the campaign to the user at the app's best time by selecting **Yes, send at the app's best time**\*.\*
* Avoid sending the campaign to the user by selecting **Do not send message**.\
For more information, refer to the [Best time to send (BTS)](/user-guide/ai-and-intelligence/timing/best-time-to-send).
* **Periodic**: Denotes the periodicity of the campaign. The following options are available: **Daily**, **Weekly**, and **Monthly**.
| Periodicity | Description |
| ----------- | --------------------------------------------------------------------------------------------------------------------------------------------------------------------------------------------------------------------------------------------------------------------------------------------------------------------------------------------------------------------------------------------------------------------------------------------------------------------------------------------------------------------------------------------------------------------------------------------------------------------------------------------------------------------------------------------------------------------------------------------------------------------------------------------------------------------------------------------------------------------------------------------------------------------------------------------------------------------------------------------------------------------------------------------------------------------------------------------------------------------------------------------------------------------------------------------------------------------------------------------------------------------------------------------------------------------------------------------------------------------------------- |
| **Daily** | **Repeat every**: This option lets you specify the number of days after which the campaign should be repeated. For example, if you choose to repeat every 3 days and the campaign starts on Monday, it will run again on Thursday. |
| **Weekly** | - **Repeat every**: This option lets you specify the number of weeks after which the campaign should be repeated. For example, if you choose to repeat every 3 weeks and the campaign starts in the first week, it will run again in the fourth week.
- **Repeat on**: This option lets you specify the day(s) of the week on which the campaign is to be sent. For example, if you wish to send the campaign every Monday, Wednesday, and Friday, select these days in this option.
|
| **Monthly** | - **Repeat every**: This option lets you specify the number of months after which the campaign should be repeated. For example, if you choose to repeat every 3 months and the campaign starts in January, it will run again in April.
- **Repeat on**: This option lets you do the following:
- **Days of month**: Choose this option for repeating campaigns that are date-specific. Select the date(s) of the month the campaign is to be sent. For example, to send the campaign on the 5th and the 25th of a month, select the 5th and 25th in the calendar widget. **Note**: If the selected date(s) doesn't exist in the specified month (as it is a shorter month), a campaign will be sent on the last date. For example, if the 30th and 31st are selected and the month is February, one campaign would be sent on the 28th.
- **Days of week**: Choose this option to specify the day(s) of the week on which the campaign is to be sent. For example, if you wish to send the campaign every Monday, Wednesday, and Friday, select these days in this option.
**Note**: In case of a day of the week not existing in a month (for example, fifth Saturday), the campaign would be skipped for that instance. And in case of overlap (for example, 4th Monday and last Monday), only one instance would be sent.
|
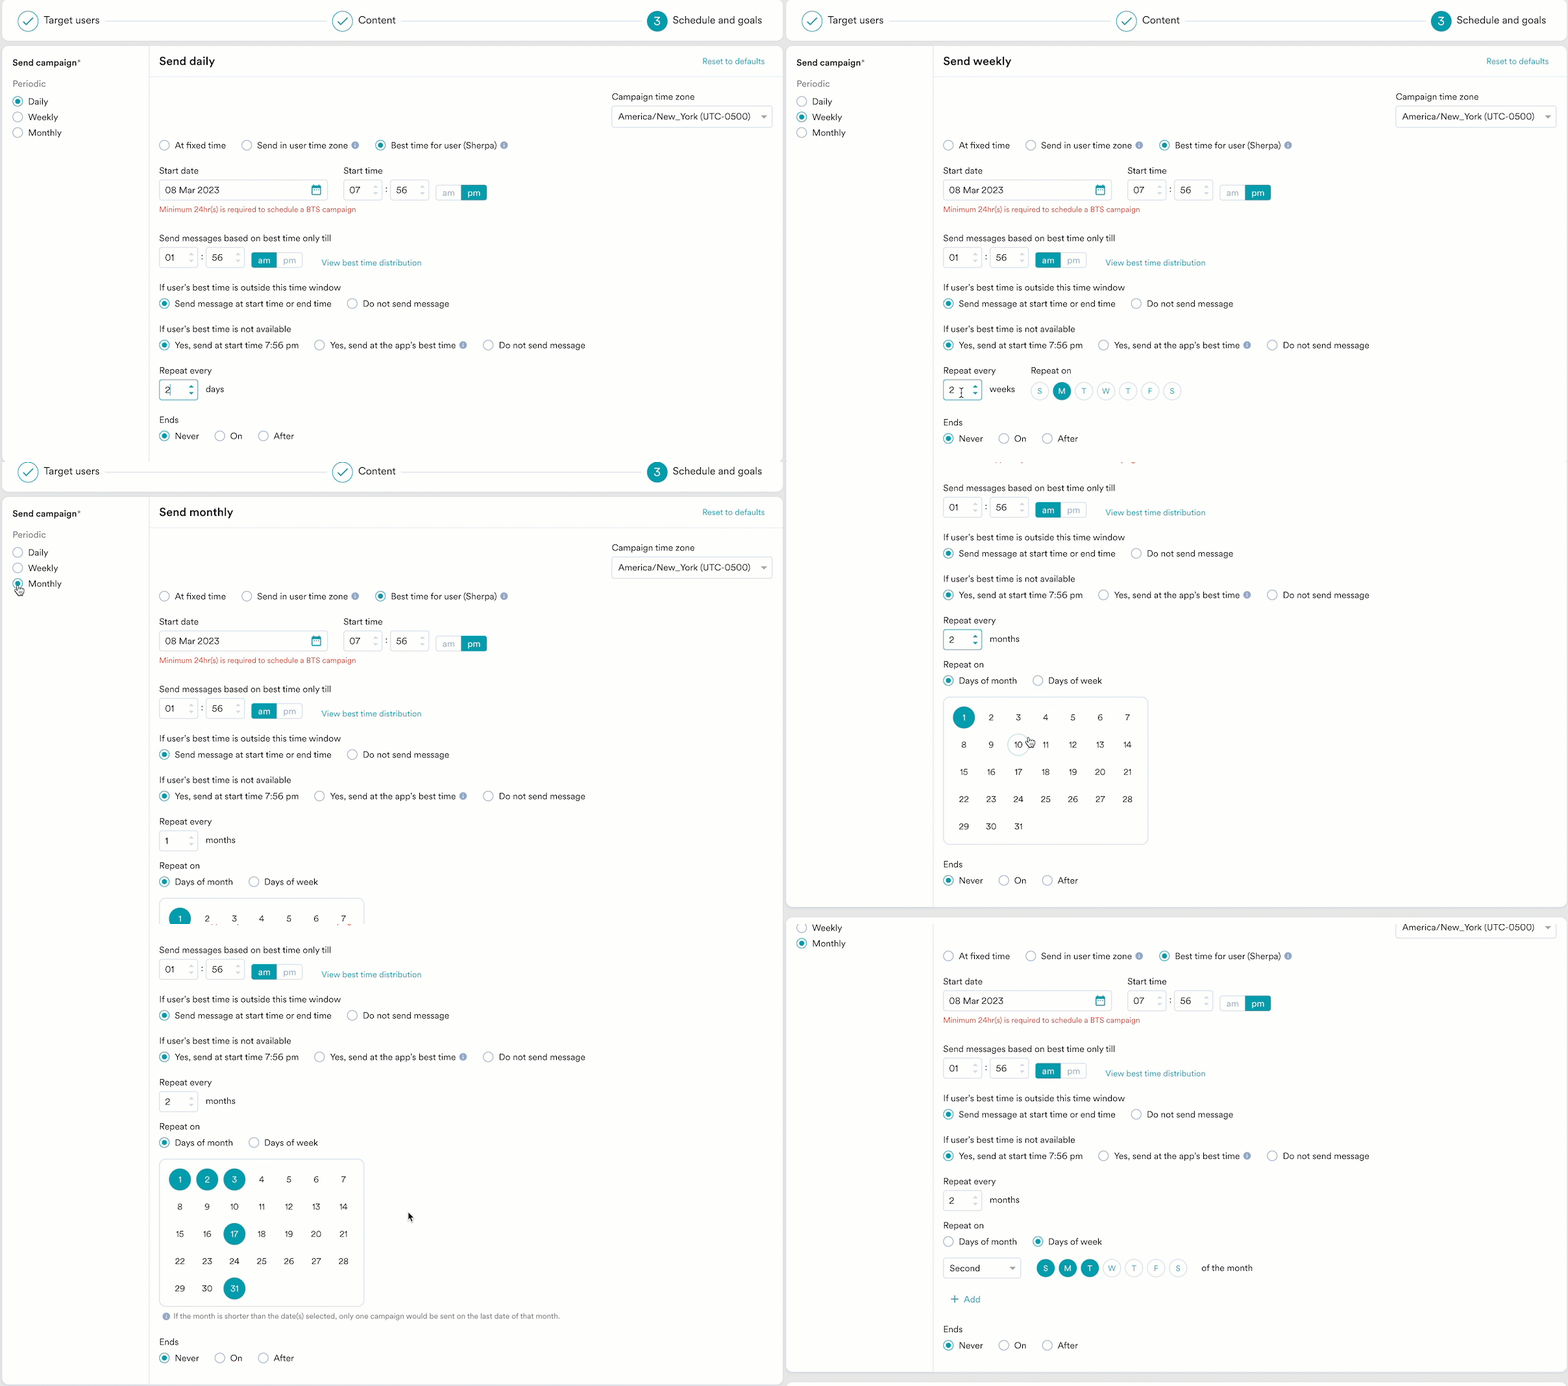 * **Ends:** Denotes the date on which the campaign ends. The following options are available:
* **Never**: The campaign is scheduled to run daily.
* **On**: The campaign ends on the date specified in the **End Date** field.
* **After**: The campaign ends after the number of occurrences specified in the **occurrences** field.
Click **Active continuously** under **Send campaign** and do the following:
| Field | Description |
| ---------------------- | ------------------------------------------------------------------------------- |
| **Campaign time zone** | Select the campaign time zone in which the campaign is sent |
| **Start date** | Set the start date at which the campaign is sent. |
| **Send time** | - Set the send time at which the campaign is sent. - Select **am** or **pm**. |
| **End date** | Set the end date at which the campaign is stopped. |
| **End time** | - Set the end time at which the campaign is stopped. - Select **am** or **pm**. |
**When will event triggered campaigns be sent?**
The campaign will be sent only when:
* The event property/attribute being used to create these types of triggers (like the flight\_time example) is in a valid date-time format. If it is not in a date-time format, the string should have data in one of the [supported formats](/user-guide/campaigns-and-channels/getting-started/triggers/event/create-an-event-triggered-campaign#supported-formats). If the selected attributes do not contain data in any of these formats, the campaign won't be sent to your users.
* The date/time value from the attribute is greater than the time at which the trigger condition is fulfilled.
* The date/time value from the attribute is less than 30 Days + the time at which the trigger condition is fulfilled. For example, if your trigger condition is fulfilled at date D, your notification will be sent only when the attribute value is less than D+30.
* The intelligent delay optimization (**With Delay**) does not work for campaigns sent on relative timing.
* **Ends:** Denotes the date on which the campaign ends. The following options are available:
* **Never**: The campaign is scheduled to run daily.
* **On**: The campaign ends on the date specified in the **End Date** field.
* **After**: The campaign ends after the number of occurrences specified in the **occurrences** field.
Click **Active continuously** under **Send campaign** and do the following:
| Field | Description |
| ---------------------- | ------------------------------------------------------------------------------- |
| **Campaign time zone** | Select the campaign time zone in which the campaign is sent |
| **Start date** | Set the start date at which the campaign is sent. |
| **Send time** | - Set the send time at which the campaign is sent. - Select **am** or **pm**. |
| **End date** | Set the end date at which the campaign is stopped. |
| **End time** | - Set the end time at which the campaign is stopped. - Select **am** or **pm**. |
**When will event triggered campaigns be sent?**
The campaign will be sent only when:
* The event property/attribute being used to create these types of triggers (like the flight\_time example) is in a valid date-time format. If it is not in a date-time format, the string should have data in one of the [supported formats](/user-guide/campaigns-and-channels/getting-started/triggers/event/create-an-event-triggered-campaign#supported-formats). If the selected attributes do not contain data in any of these formats, the campaign won't be sent to your users.
* The date/time value from the attribute is greater than the time at which the trigger condition is fulfilled.
* The date/time value from the attribute is less than 30 Days + the time at which the trigger condition is fulfilled. For example, if your trigger condition is fulfilled at date D, your notification will be sent only when the attribute value is less than D+30.
* The intelligent delay optimization (**With Delay**) does not work for campaigns sent on relative timing.
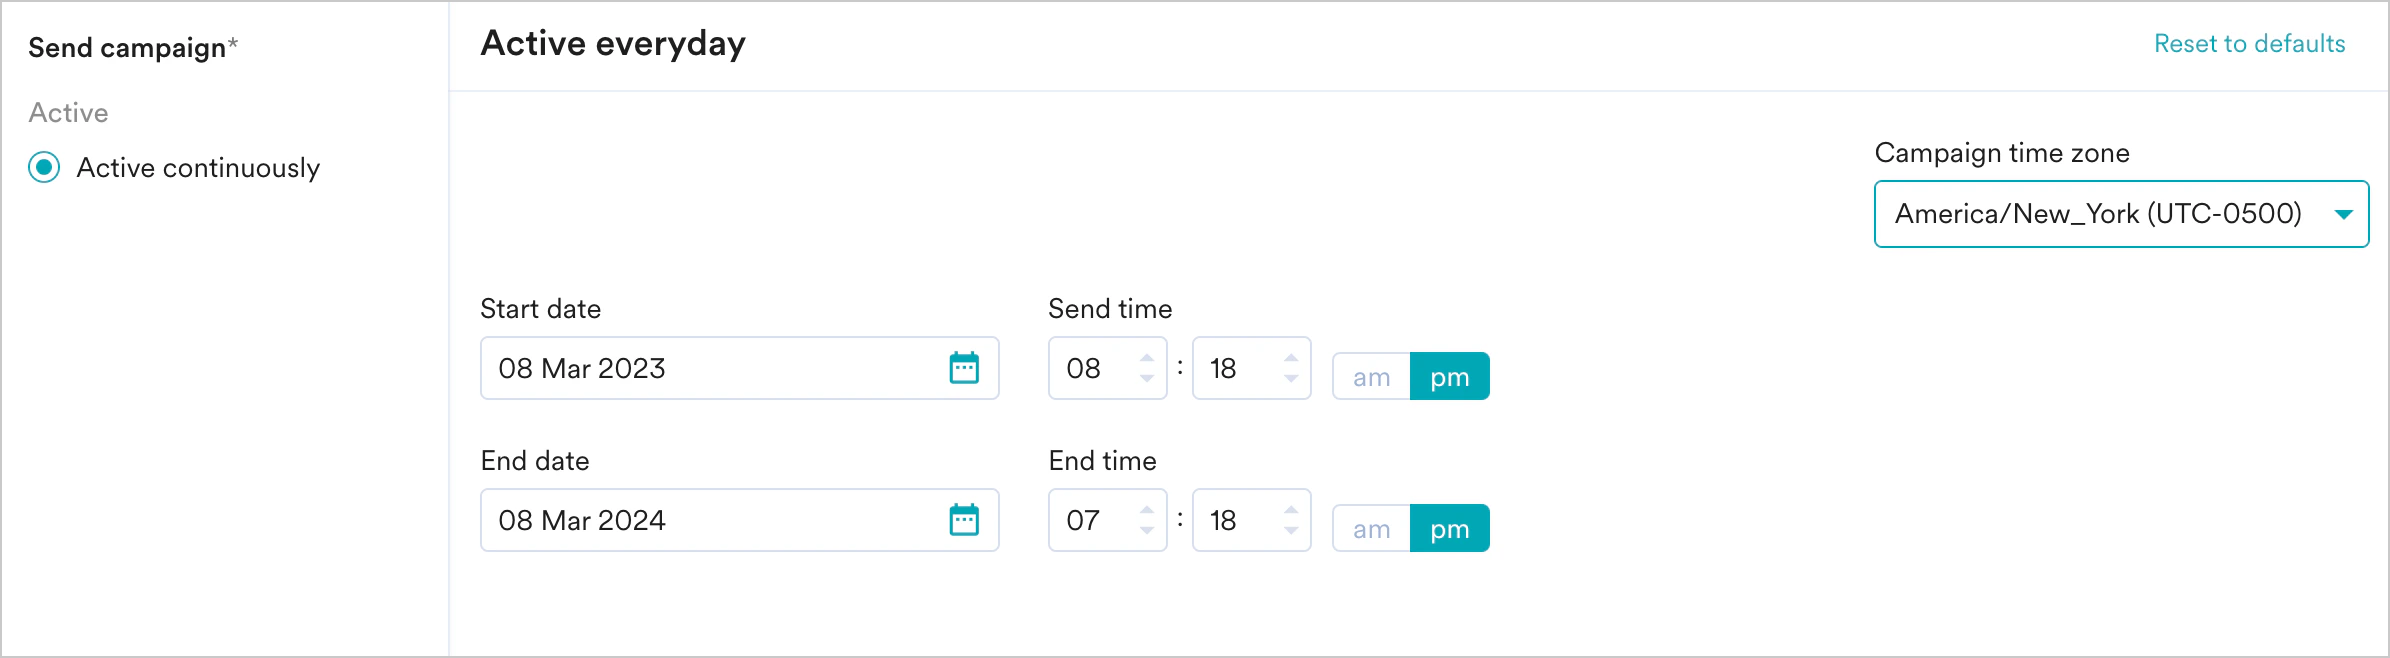 Click **Active continuously** under **Send campaign** and do the following:
| Field | Description |
| ---------------------- | ---------------------------------------------------------------------------------- |
| **Campaign time zone** | Select the campaign time zone in which the campaign should be sent. |
| **Start date** | Set the start date at which the campaign should be sent. |
| **Send time** | Set the send time at which the campaign should be sent. Select **am** or **pm**. |
| **End date** | Set the end date at which the campaign should be stopped. |
| **End time** | Set the end time at which the campaign should be stopped. Select **am** or **pm**. |
**When will business event-triggered campaigns be sent?**
The campaign will be sent only when:
* The data type(s) of the user attribute(s) or event attribute(s) mapped to the data type(s) of the business event's attribute(s) match.
* The attribute(s) used in segmentation are passed in the trigger request for the business event.
* The intelligent delay optimization (**With Delay**) does not work for campaigns sent on relative timing.
### Conversion Goals
You can add conversion goals to track the business metrics for your campaigns. You can track a maximum of five conversion goals. You can choose any app event as a conversion goal activity and set more than one conversion goal. The first goal will be treated as a primary goal.
For example, if you want to track the number of customers who have purchased an iPhone after your campaign was sent. (Event: Purchase event, Product: iPhone). Your conversion goal setup might be similar to the following image:
Click **Active continuously** under **Send campaign** and do the following:
| Field | Description |
| ---------------------- | ---------------------------------------------------------------------------------- |
| **Campaign time zone** | Select the campaign time zone in which the campaign should be sent. |
| **Start date** | Set the start date at which the campaign should be sent. |
| **Send time** | Set the send time at which the campaign should be sent. Select **am** or **pm**. |
| **End date** | Set the end date at which the campaign should be stopped. |
| **End time** | Set the end time at which the campaign should be stopped. Select **am** or **pm**. |
**When will business event-triggered campaigns be sent?**
The campaign will be sent only when:
* The data type(s) of the user attribute(s) or event attribute(s) mapped to the data type(s) of the business event's attribute(s) match.
* The attribute(s) used in segmentation are passed in the trigger request for the business event.
* The intelligent delay optimization (**With Delay**) does not work for campaigns sent on relative timing.
### Conversion Goals
You can add conversion goals to track the business metrics for your campaigns. You can track a maximum of five conversion goals. You can choose any app event as a conversion goal activity and set more than one conversion goal. The first goal will be treated as a primary goal.
For example, if you want to track the number of customers who have purchased an iPhone after your campaign was sent. (Event: Purchase event, Product: iPhone). Your conversion goal setup might be similar to the following image:
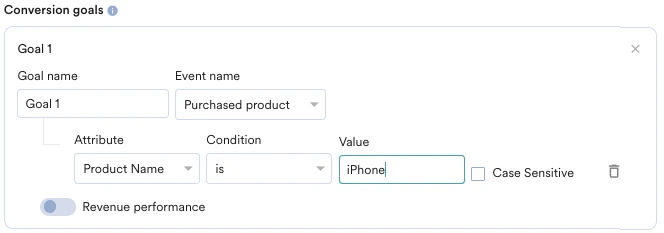 With multiple conversion goals, you can track more than one business metric or visualize a funnel for your user actions. For example, if you want to check the following, you can do so with multiple conversion goals.
* How many users have viewed the product page?
* How many of them added that product to the cart?
* How many of them made a successful order?
| | |
| --------------------------------------------------------------------------------------------------------------------------------------------------------------------------------------------------------------------------------------------------------------------------------------------------------------------------------------------------------------------------------------------------------------------------------------- | ------------------------------------------------------------------------------------------------------------------------------------------------------------------------------------------------------------------------------------------------------------------------------------------------------------------------------------------------------------------------------------------------------------------------------------------------------------------------------------------------------------------------------------------------------------------------------------------------------------------------------------------------------------------------------------------------------------------------------------------------------------------------------------------------------------------------------------------------------------------------------------------------------------------------------------------------------------------------------------------------------------------------------------------------------------------------------------------------------------------------------------------------------------------------------------------------------------------------------------------------------------------------------------------------------------------------------------------------------------------------------------------------------------------------ |
| With MoEngage, you can track the revenue generated by your campaigns. For example, you can track the revenue generated by your product after sending a communication. To track revenue performance, enable the **Revenue performance** toggle for the conversion goal for which you want to track the revenue. In the example here, to track revenue for *orderSuccessful* events, you must enable the **Revenue performance** toggle. |
With multiple conversion goals, you can track more than one business metric or visualize a funnel for your user actions. For example, if you want to check the following, you can do so with multiple conversion goals.
* How many users have viewed the product page?
* How many of them added that product to the cart?
* How many of them made a successful order?
| | |
| --------------------------------------------------------------------------------------------------------------------------------------------------------------------------------------------------------------------------------------------------------------------------------------------------------------------------------------------------------------------------------------------------------------------------------------- | ------------------------------------------------------------------------------------------------------------------------------------------------------------------------------------------------------------------------------------------------------------------------------------------------------------------------------------------------------------------------------------------------------------------------------------------------------------------------------------------------------------------------------------------------------------------------------------------------------------------------------------------------------------------------------------------------------------------------------------------------------------------------------------------------------------------------------------------------------------------------------------------------------------------------------------------------------------------------------------------------------------------------------------------------------------------------------------------------------------------------------------------------------------------------------------------------------------------------------------------------------------------------------------------------------------------------------------------------------------------------------------------------------------------------ |
| With MoEngage, you can track the revenue generated by your campaigns. For example, you can track the revenue generated by your product after sending a communication. To track revenue performance, enable the **Revenue performance** toggle for the conversion goal for which you want to track the revenue. In the example here, to track revenue for *orderSuccessful* events, you must enable the **Revenue performance** toggle. | 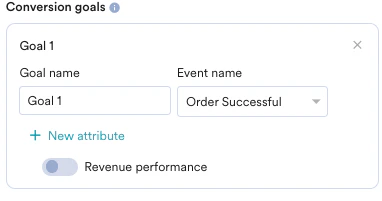 |
| | |
| ------------------------------------------------------------------------------------------------------------------------------------------------------------------------------------------------------------------------------------------------------ | -------------------------------------------------------------------------------------------------------------------------------------------------------------------------------------------------------------------------------------------------------------------------------------------------------------------------------------------------------------------------------------------------------------------------------------------------------------------------------------------------------------------------------------------------------------------------------------------------------------------------------------------------------------------------------------------------------------------------------------------------------------------------------------------------------------------------------------------------------------------------------------------------------------------------------------------------------------------------------------------------------------------------------------------------------------------------------------------------------------------------------------------------------------------------------------------------------------------------------------------------------------------------------------------------------------------------------------------------------------------------------------------------------------- |
| After choosing the goal, you can select the numeric attribute that captures the order's total monetary value. In this example, *cartValue* contains the total order value. You can choose the currency in which your monetary value is being reported. |
|
| | |
| ------------------------------------------------------------------------------------------------------------------------------------------------------------------------------------------------------------------------------------------------------ | -------------------------------------------------------------------------------------------------------------------------------------------------------------------------------------------------------------------------------------------------------------------------------------------------------------------------------------------------------------------------------------------------------------------------------------------------------------------------------------------------------------------------------------------------------------------------------------------------------------------------------------------------------------------------------------------------------------------------------------------------------------------------------------------------------------------------------------------------------------------------------------------------------------------------------------------------------------------------------------------------------------------------------------------------------------------------------------------------------------------------------------------------------------------------------------------------------------------------------------------------------------------------------------------------------------------------------------------------------------------------------------------------------------- |
| After choosing the goal, you can select the numeric attribute that captures the order's total monetary value. In this example, *cartValue* contains the total order value. You can choose the currency in which your monetary value is being reported. | 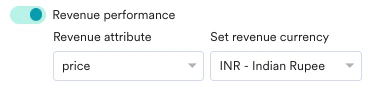 |
| | |
| ----------------------------------------------------------------------------------------------------------------------------------------------------------------------------------------------------------------------------------------------------------------------------------------------------------------------------------------------------------------------------------------------------------- | ---------------------------------------------------------------------------------------------------------------------------------------------------------------------------------------------------------------------------------------------------------------------------------------------------------------------------------------------------------------------------------------------------------------------------------------------------------------------------------------------------------------------------------------------------------------------------------------------------------------------------------------------------------------------------------------------------------------------------------------------------------------------------------------------------------------------------------------------------------------------------------------------------------------------------------------------------------------------------------------------------------------------------------------------------------------------------------------------------------------------------------------------------------------------------------------------------------------------------------------------------------------------------------------------------------------------------------------------------------------------------------------------------------------- |
| **Set Attribution window**: You can set an attribution window (a time period or window that is calculated since the user has received/clicked the campaign, for which you want to attribute the conversion goals to a specific campaign.) By default, it is set for 36 hours while the maximum attribution window can be set up to 10 days. In the example below, the attribution window is set to 10 days. |
|
| | |
| ----------------------------------------------------------------------------------------------------------------------------------------------------------------------------------------------------------------------------------------------------------------------------------------------------------------------------------------------------------------------------------------------------------- | ---------------------------------------------------------------------------------------------------------------------------------------------------------------------------------------------------------------------------------------------------------------------------------------------------------------------------------------------------------------------------------------------------------------------------------------------------------------------------------------------------------------------------------------------------------------------------------------------------------------------------------------------------------------------------------------------------------------------------------------------------------------------------------------------------------------------------------------------------------------------------------------------------------------------------------------------------------------------------------------------------------------------------------------------------------------------------------------------------------------------------------------------------------------------------------------------------------------------------------------------------------------------------------------------------------------------------------------------------------------------------------------------------------------- |
| **Set Attribution window**: You can set an attribution window (a time period or window that is calculated since the user has received/clicked the campaign, for which you want to attribute the conversion goals to a specific campaign.) By default, it is set for 36 hours while the maximum attribution window can be set up to 10 days. In the example below, the attribution window is set to 10 days. |  |
### Delivery Controls
This section contains the following options:
**Frequency Capping**
This feature helps control the number of MMS messages sent to a user in a day.
* **Ignore frequency capping**: Enable this toggle to ignore the frequency capping limit for this MMS campaign. Click **Ignore frequency capping** to ignore the capping for your MMS campaigns when you want to ignore the capping but want this campaign to be counted. For example, the frequency capping value is set to three. You have sent three campaigns today to a group of users. You realize that the MMS messages triggered by this campaign are urgent and should go on high priority, even though some customers have already received three campaigns. If you use the Ignore Frequency Cap, people who have already received 3 campaigns will receive this one as well. For more information, refer to [Frequency Capping](/user-guide/settings/channels/delivery-controls/frequency-capping).
* **Count for the frequency capping**: Enable this toggle if you want this connector to be counted for the frequency capping limit. If you use **Count for frequency capping**, people who would have received 2 communications already and send this as well, their receipt count will become 3 after this campaign is sent.
**Throttling**
Throttling is a feature that allows you to control the sending rate of MMS campaigns. In the **Request limit** section, enter the number of requests per minute sent for the MMS campaigns. For example, send the request URL with a default of 60,000 rpm (minimum of 60,000 requests per minute and maximum of 200,000 requests per minute). For more information, refer to [Throttlling](/user-guide/settings/channels/delivery-controls/throttling). \\
|
### Delivery Controls
This section contains the following options:
**Frequency Capping**
This feature helps control the number of MMS messages sent to a user in a day.
* **Ignore frequency capping**: Enable this toggle to ignore the frequency capping limit for this MMS campaign. Click **Ignore frequency capping** to ignore the capping for your MMS campaigns when you want to ignore the capping but want this campaign to be counted. For example, the frequency capping value is set to three. You have sent three campaigns today to a group of users. You realize that the MMS messages triggered by this campaign are urgent and should go on high priority, even though some customers have already received three campaigns. If you use the Ignore Frequency Cap, people who have already received 3 campaigns will receive this one as well. For more information, refer to [Frequency Capping](/user-guide/settings/channels/delivery-controls/frequency-capping).
* **Count for the frequency capping**: Enable this toggle if you want this connector to be counted for the frequency capping limit. If you use **Count for frequency capping**, people who would have received 2 communications already and send this as well, their receipt count will become 3 after this campaign is sent.
**Throttling**
Throttling is a feature that allows you to control the sending rate of MMS campaigns. In the **Request limit** section, enter the number of requests per minute sent for the MMS campaigns. For example, send the request URL with a default of 60,000 rpm (minimum of 60,000 requests per minute and maximum of 200,000 requests per minute). For more information, refer to [Throttlling](/user-guide/settings/channels/delivery-controls/throttling). \\
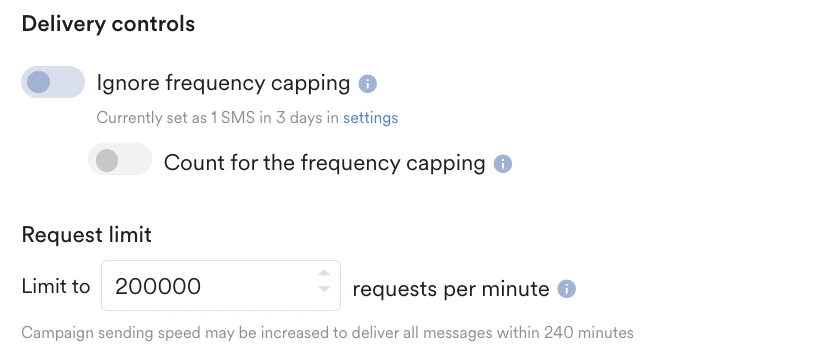 This section contains the following options:
| | |
| --------------------------------------------------------------------------------------------------------------------------------------------------------------------------------------------------------------------------------------------------------------------------------------------------------------------------------------------------------------------------------------------------------------------------------------------------------------------------------------------------------------------------------------------------------------------------------------------------------------- | --------------------------------------------------------------------------------------------------------------------------------------------------------------------------------------------------------------------------------------------------------------------------------------------------------------------------------------------------------------------------------------------------------------------------------------------------------------------------------------------------------------------------------------------------------------------------------------------------------------------------------------------------------------------------------------------------------------------------------------------------------------------------------------------------------------------------------------------------------------------------------------------------------------------------------------------------------------------------------------------------------------------------------------------------------------------------------------------------------------------------------------------------------------------------------------------------------------------------------------------------------------------------------------------------------------------------------------------------------------------------------------------------------------------------------------------------------------------- |
|
This section contains the following options:
| | |
| --------------------------------------------------------------------------------------------------------------------------------------------------------------------------------------------------------------------------------------------------------------------------------------------------------------------------------------------------------------------------------------------------------------------------------------------------------------------------------------------------------------------------------------------------------------------------------------------------------------- | --------------------------------------------------------------------------------------------------------------------------------------------------------------------------------------------------------------------------------------------------------------------------------------------------------------------------------------------------------------------------------------------------------------------------------------------------------------------------------------------------------------------------------------------------------------------------------------------------------------------------------------------------------------------------------------------------------------------------------------------------------------------------------------------------------------------------------------------------------------------------------------------------------------------------------------------------------------------------------------------------------------------------------------------------------------------------------------------------------------------------------------------------------------------------------------------------------------------------------------------------------------------------------------------------------------------------------------------------------------------------------------------------------------------------------------------------------------------- |
| - **Minimum delay between two messages**: Set the minimum time gap between two messages received by the same user.
- **Ignore DND settings**: Enable this toggle to ignore the DND settings.
- **Ignore frequency capping**: Enable this toggle to ignore the frequency capping limit for this Connector campaign. For more information, refer to [Frequency Capping](/user-guide/settings/channels/delivery-controls/frequency-capping).
- **Count for the frequency capping**: Enable this toggle if you want this connector to be counted for the frequency capping limit.
|
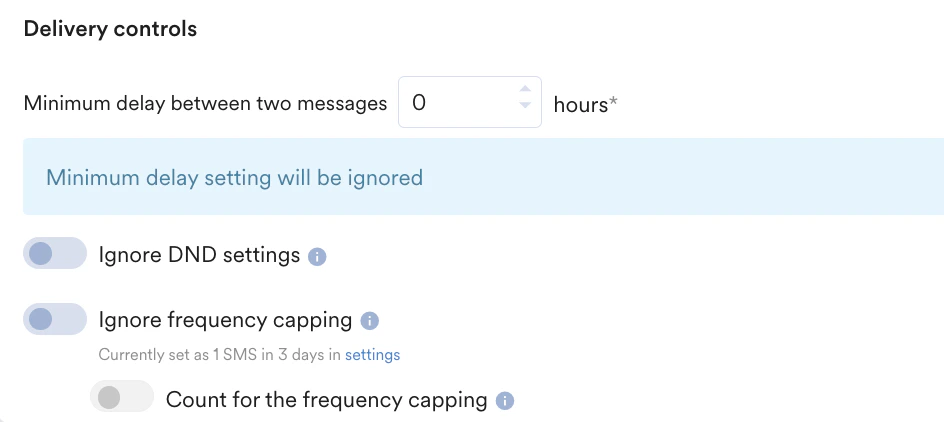 |
Your campaign is now ready to be sent. Click **Publish**, confirm in the dialog box, and your campaign is created.
# Next Steps
If you have successfully created the campaign, you will be taken to the Analytics page. For more information, refer to [Email Campaign Analytics](/user-guide/campaigns-and-channels/email/analyze/email-analytics-and-info).
All MoEngage AI products, which were previously referred to as *Sherpa AI*, are now known as *Merlin AI*.
|
Your campaign is now ready to be sent. Click **Publish**, confirm in the dialog box, and your campaign is created.
# Next Steps
If you have successfully created the campaign, you will be taken to the Analytics page. For more information, refer to [Email Campaign Analytics](/user-guide/campaigns-and-channels/email/analyze/email-analytics-and-info).
All MoEngage AI products, which were previously referred to as *Sherpa AI*, are now known as *Merlin AI*.