> ## Documentation Index
> Fetch the complete documentation index at: https://moengage.com/docs/llms.txt
> Use this file to discover all available pages before exploring further.
# Configure Sendgrid Email Settings
> Step-by-step instructions to set up SendGrid as your email connector in MoEngage, covering domain authentication and DNS record configuration.
This article provides step-by-step instructions to configure email settings in SendGrid.
# Introduction
SendGrid is a cloud-based SMTP provider that allows you to send email without maintaining email servers. SendGrid manages all technical details, from scaling the infrastructure to ISP outreach and reputation monitoring to whitelist services and real-time analytics.
Ensure that you have admin access to your SendGrid account.
# Configure SendGrid Account
You can sign up for [SendGrid](https://sendgrid.com/pricing) and select your pricing plan.
## Add Domains in SendGrid
To send emails from your domain using SendGrid, you need to set up domain authentication. This involves generating DNS records for your domain and dedicated IPs, adding these records to your DNS servers, and then validating them in SendGrid.
For more information, refer to the following articles:
* To set up a domain, refer to [How to Set Up Domain Authentication](https://www.twilio.com/docs/sendgrid/ui/account-and-settings/how-to-set-up-domain-authentication).
* To set up link branding, refer to [How to set up link branding](https://www.twilio.com/docs/sendgrid/ui/account-and-settings/how-to-set-up-link-branding).
* To set up reverse DNS for a dedicated IP, refer to [How to set up reverse DNS](https://www.twilio.com/docs/sendgrid/ui/account-and-settings/how-to-set-up-reverse-dns).
* To set up SSL for click tracking domain, refer to [Setup SSL for Click Tracking](https://www.twilio.com/docs/sendgrid/ui/analytics-and-reporting/click-tracking-ssl).
* To set up Sign in with Apple, refer to [Configuring Sign in with Apple](https://www.twilio.com/docs/sendgrid/ui/account-and-settings/configuring-sign-in-with-apple).
## Create API Keys in SendGrid
Create API keys with full access. For more information, refer to the [API Keys](https://www.twilio.com/docs/sendgrid/ui/account-and-settings/api-keys)
Make sure to note the API key in a secure location. You cannot view it again after creation.
# Configure SendGrid Settings in MoEngage UI
1. Log in to your MoEngage dashboard.
2. Navigate to **Settings** > Under **Channels** > **Email** > **Sender Configuration** tab> Click **Add Sender**
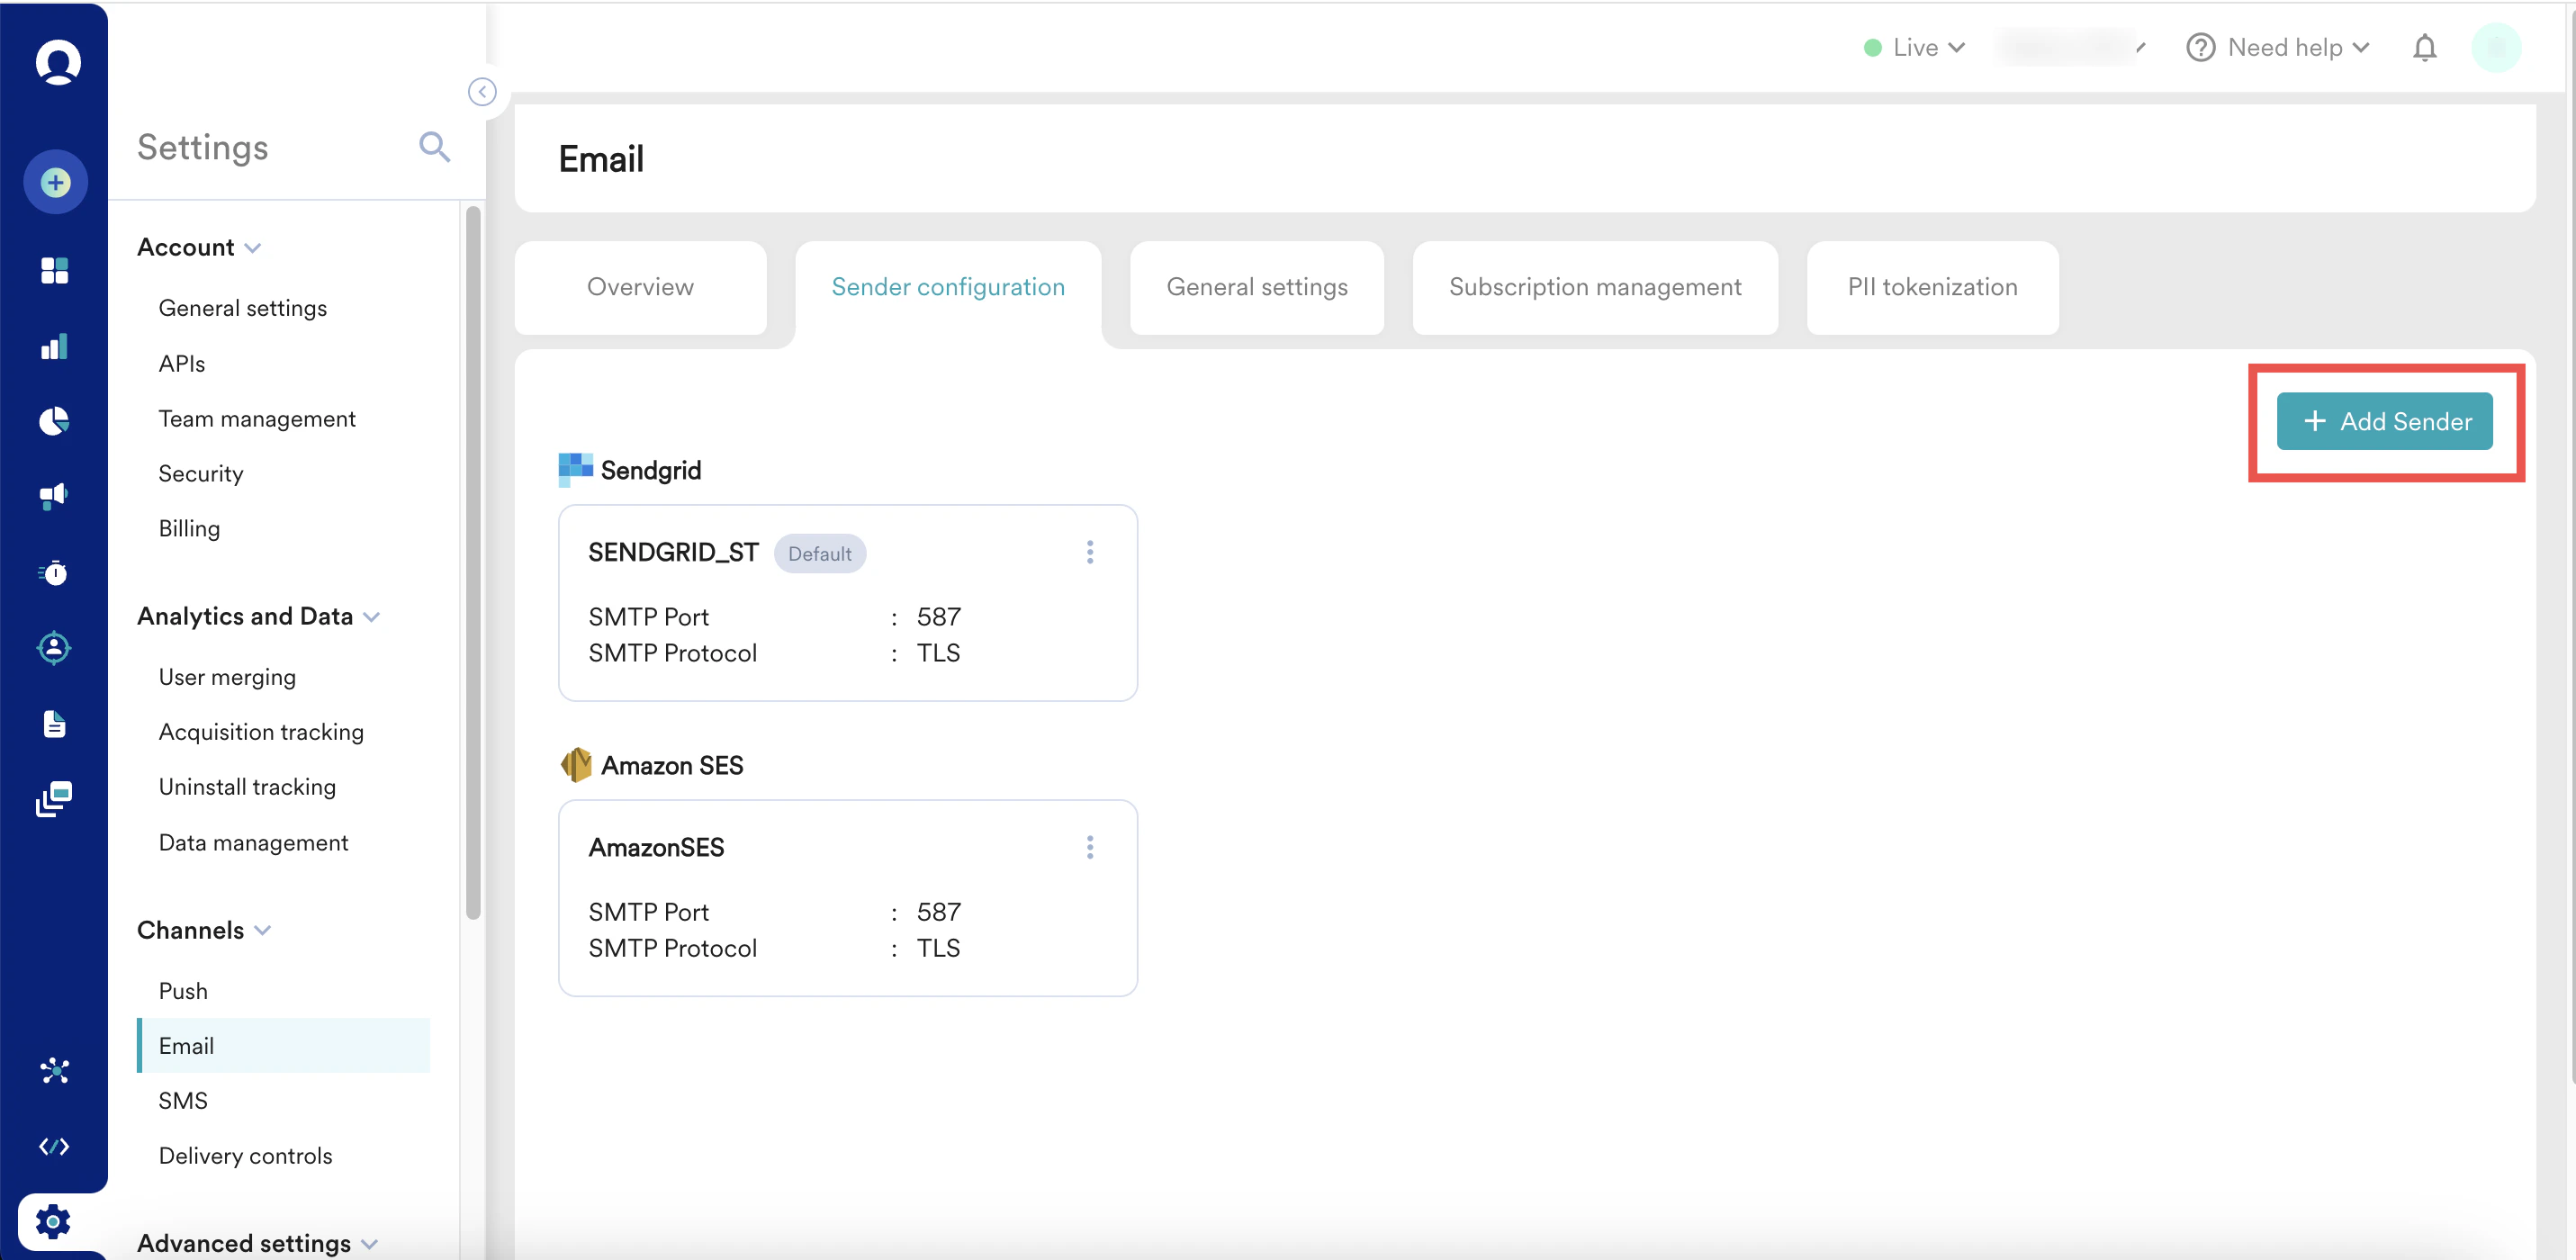 3. In the following **Add Sender** screen, add the following SMTP details as shown below:
 All of the following details are case-sensitive.
| Field | Description |
| -------------- | ------------------------------------------------------------------------------------------------------------------------------------------------------------------------------------------- |
| Sender Name | Enter a sender name. |
| SMTP Host Name | Enter **smtp.sendgrid.net** |
| SMTP Port | Enter **587**. Port 587 is recommended to avoid rate limits set by some companies. |
| SMTP Protocol | Select **TLS**. |
| SMTP Password | Enter the password. This is the [API key created above](/user-guide/campaigns-and-channels/email/getting-started-with-email/configure-sendgrid-email-settings#create-api-keys-in-sendgrid). |
| WebApi Key | Enter the key. This is the [API key created above](/user-guide/campaigns-and-channels/email/getting-started-with-email/configure-sendgrid-email-settings#create-api-keys-in-sendgrid). |
4. Configure **Unsubscribe Settings** based on your requirements. For more information, refer to [Track Email Unsubscribes](/user-guide/campaigns-and-channels/email/getting-started-with-email/handle-unsubscribes-in-emails).
5. Configure the **List unsubscribe email** settings based on your requirements. For more information, refer to [List Unsubscribe Email](/user-guide/campaigns-and-channels/email/getting-started-with-email/list-unsubscribe-email).
6. Click **Save**. The added connector is listed under the **Sender configuration** tab.
7. Navigate to the **General Settings** tab.
8. From the **Set a default sender** drop-down, select the sender you added.
9. From the **User Attribute that stores the user’s email address** drop-down, select **Email (Standard)**.
10. In the "**From" email address(s)** field, add the from address. The domain (the part after @) must be a [validated one on SendGrid](#h_01HTPHYKKZQJYE5PEYRZ1WP3VZ).
All of the following details are case-sensitive.
| Field | Description |
| -------------- | ------------------------------------------------------------------------------------------------------------------------------------------------------------------------------------------- |
| Sender Name | Enter a sender name. |
| SMTP Host Name | Enter **smtp.sendgrid.net** |
| SMTP Port | Enter **587**. Port 587 is recommended to avoid rate limits set by some companies. |
| SMTP Protocol | Select **TLS**. |
| SMTP Password | Enter the password. This is the [API key created above](/user-guide/campaigns-and-channels/email/getting-started-with-email/configure-sendgrid-email-settings#create-api-keys-in-sendgrid). |
| WebApi Key | Enter the key. This is the [API key created above](/user-guide/campaigns-and-channels/email/getting-started-with-email/configure-sendgrid-email-settings#create-api-keys-in-sendgrid). |
4. Configure **Unsubscribe Settings** based on your requirements. For more information, refer to [Track Email Unsubscribes](/user-guide/campaigns-and-channels/email/getting-started-with-email/handle-unsubscribes-in-emails).
5. Configure the **List unsubscribe email** settings based on your requirements. For more information, refer to [List Unsubscribe Email](/user-guide/campaigns-and-channels/email/getting-started-with-email/list-unsubscribe-email).
6. Click **Save**. The added connector is listed under the **Sender configuration** tab.
7. Navigate to the **General Settings** tab.
8. From the **Set a default sender** drop-down, select the sender you added.
9. From the **User Attribute that stores the user’s email address** drop-down, select **Email (Standard)**.
10. In the "**From" email address(s)** field, add the from address. The domain (the part after @) must be a [validated one on SendGrid](#h_01HTPHYKKZQJYE5PEYRZ1WP3VZ).
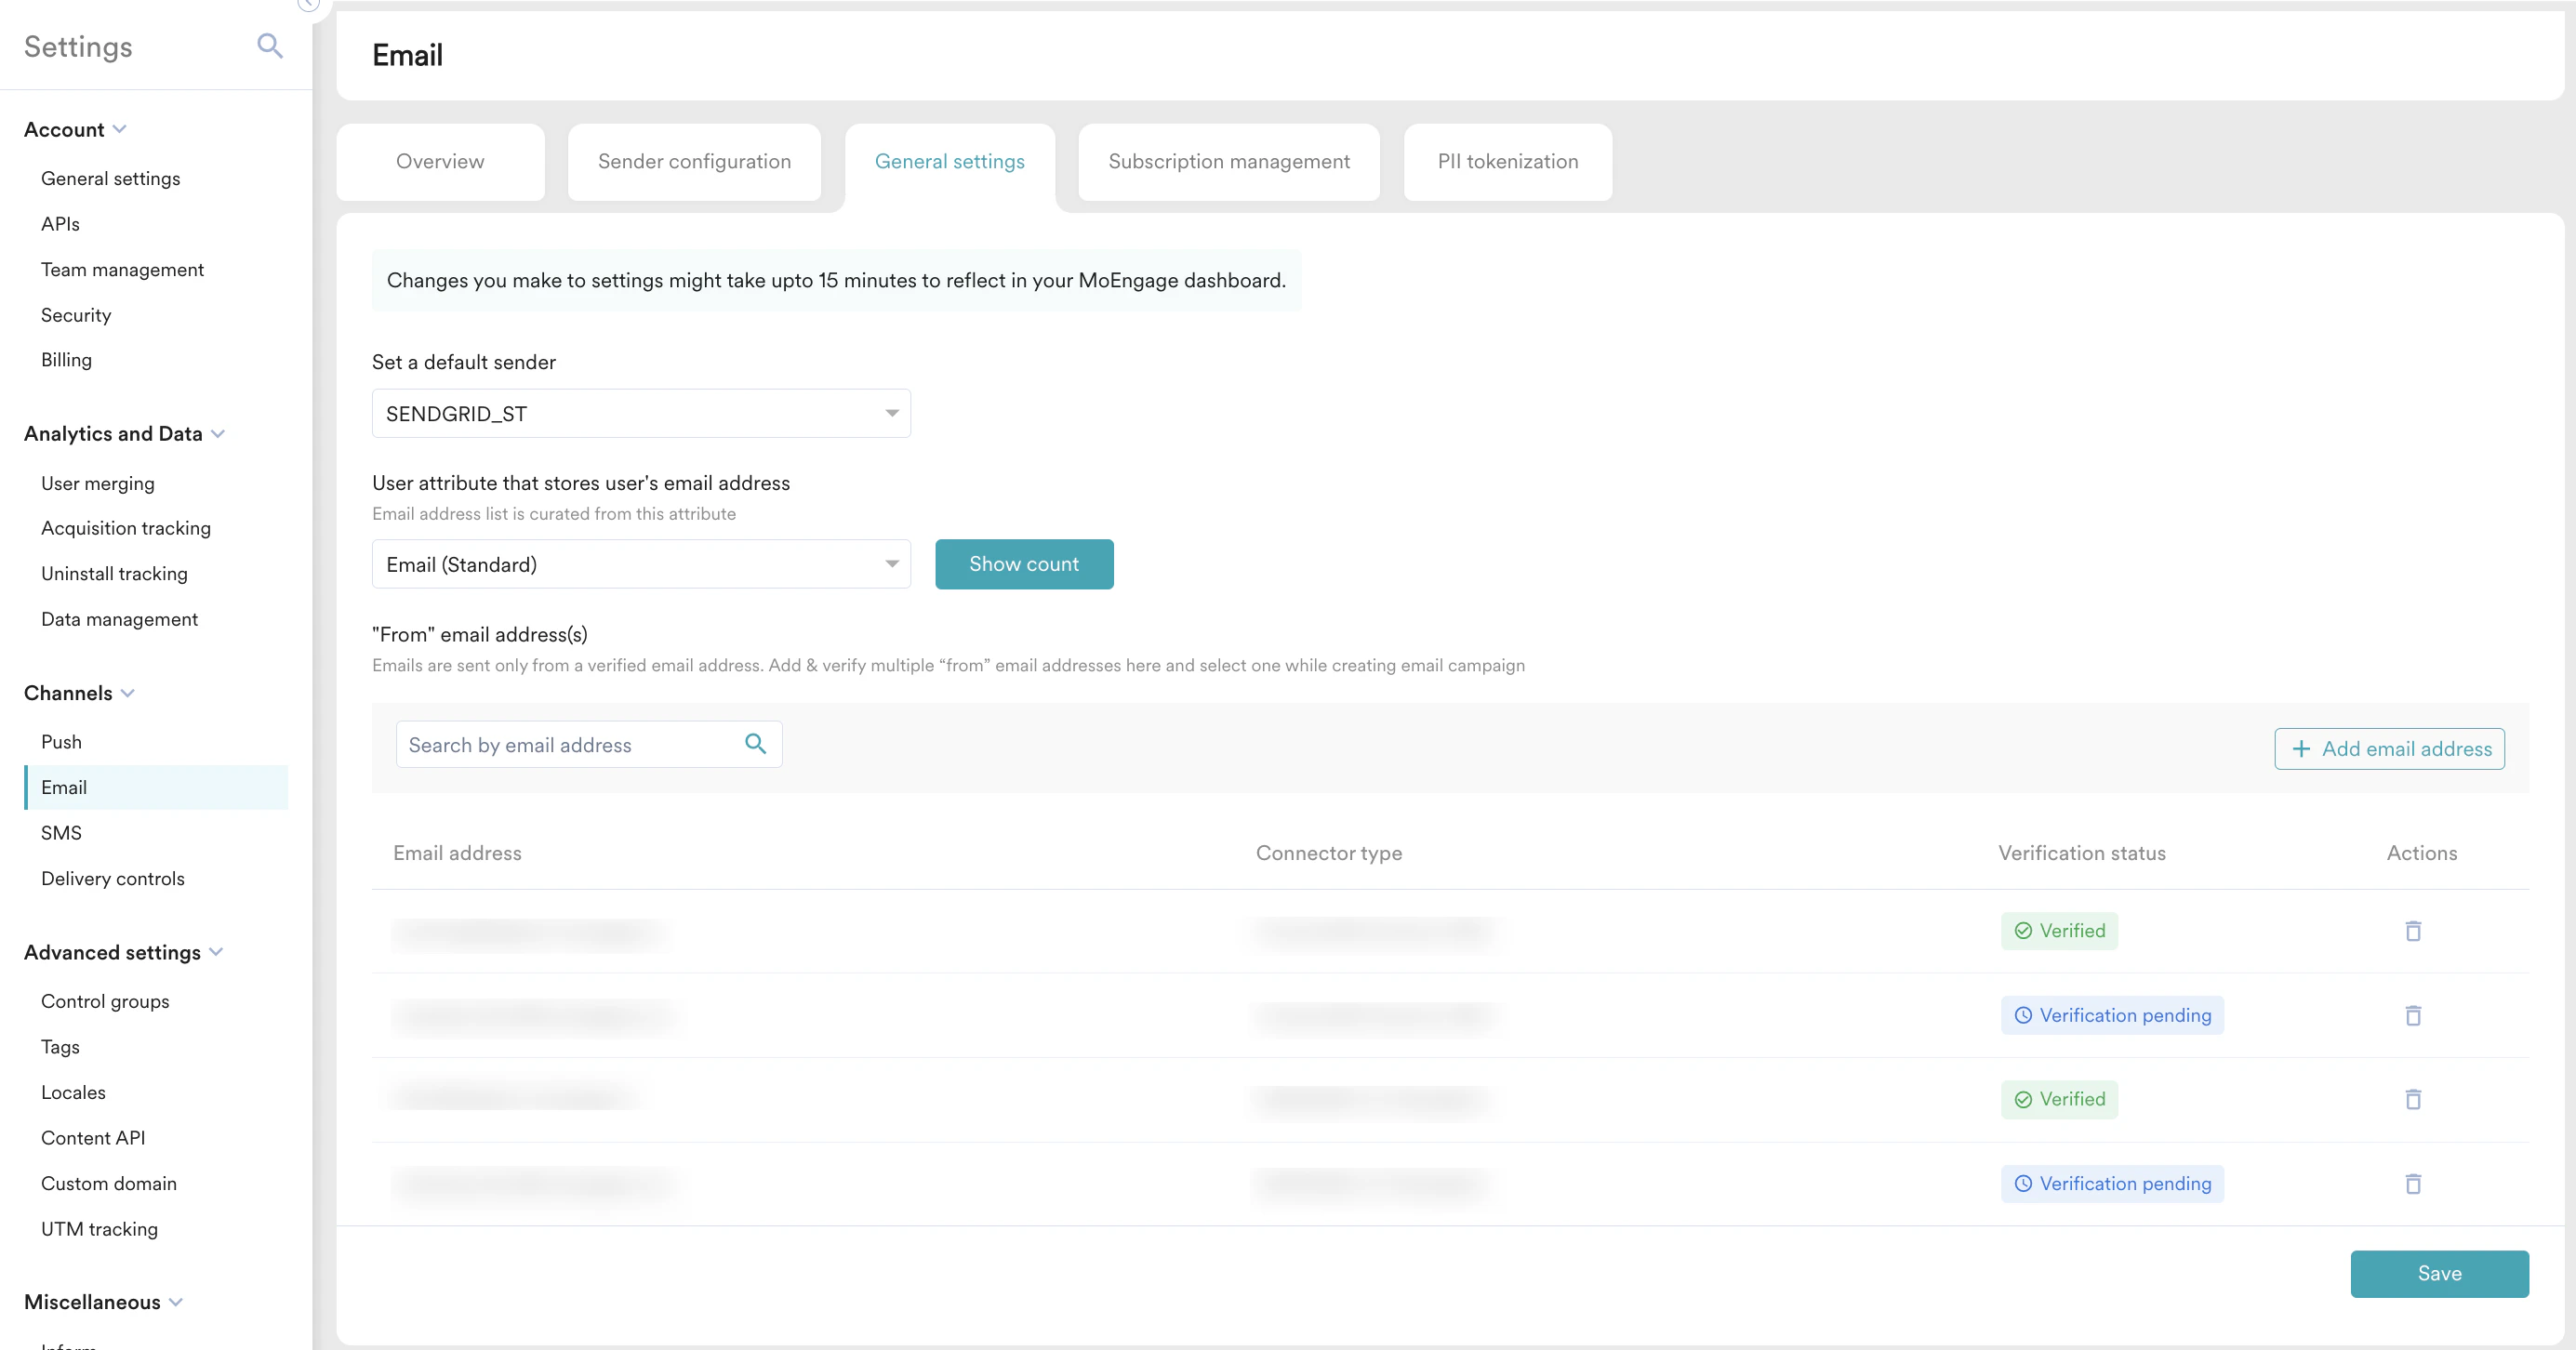 11. **Save** the settings. The “from address” mailbox added above will receive a verification email.
12. Click the confirmation link to validate the same.
From Address:\
Promo - info@, emails@, fashion@, offers@, deals@\
Triggered - updates@, news@, alerts@
## Configure SendGrid Bounce and Complaint Settings.
1. Copy the URL in the **Bounce & Complaint Tracking** from email settings.
11. **Save** the settings. The “from address” mailbox added above will receive a verification email.
12. Click the confirmation link to validate the same.
From Address:\
Promo - info@, emails@, fashion@, offers@, deals@\
Triggered - updates@, news@, alerts@
## Configure SendGrid Bounce and Complaint Settings.
1. Copy the URL in the **Bounce & Complaint Tracking** from email settings.
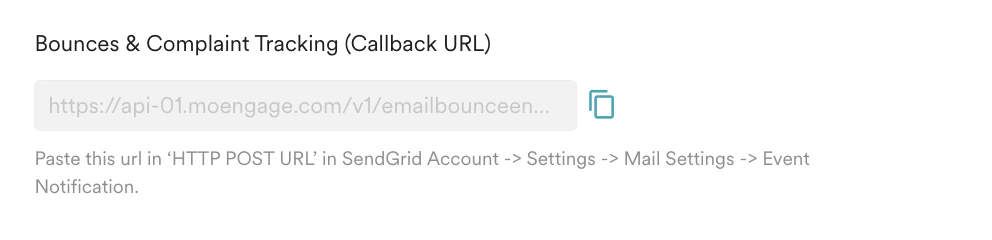 2. Use the below API to configure event webhook:
```curl cURL wrap theme={null}
curl --location 'https://api.sendgrid.com/v3/user/webhooks/event/settings' \
--header 'Content-Type: application/json' \
--header 'Authorization: Bearer API_KEY_GENERATE_ABOVE' \
--data '{
"url": "Bounce and Complaint tracking URL from Step 1",
"enabled": true,
"group_resubscribe": true,
"delivered": true,
"group_unsubscribe": true,
"spam_report": true,
"bounce": true,
"deferred": true,
"unsubscribe": true,
"processed": false,
"open": true,
"click": true,
"dropped": true,
"friendly\_name": "MOE App name"
}'
```
To successfully configure the event webhook, make sure to add the following inputs to the API:
1. Enter the API key obtained from the above [Create API Keys from SendGrid](/user-guide/campaigns-and-channels/email/getting-started-with-email/configure-sendgrid-email-settings#create-api-keys-in-sendgrid) section by replacing `API_KEY_GENERATE_ABOVE` in the API.
2. Paste the URL obtained from step 1 in the above API, by replacing `"Bounce and Complaint tracking URL from Step 1"`
3. Enter your dashboard name, by replacing `"MOE App name"` in the above API.
## Test Email Settings
For more information, refer to [Test the Email Settings](/user-guide/campaigns-and-channels/email/getting-started-with-email/email-setup-and-content-validation).
# Next Steps
After your SendGrid sender is configured, you can proceed to create and send your email campaigns in MoEngage. For more information, refer to [Create Email Campaign](/user-guide/campaigns-and-channels/email/create/create-an-email-campaign).
2. Use the below API to configure event webhook:
```curl cURL wrap theme={null}
curl --location 'https://api.sendgrid.com/v3/user/webhooks/event/settings' \
--header 'Content-Type: application/json' \
--header 'Authorization: Bearer API_KEY_GENERATE_ABOVE' \
--data '{
"url": "Bounce and Complaint tracking URL from Step 1",
"enabled": true,
"group_resubscribe": true,
"delivered": true,
"group_unsubscribe": true,
"spam_report": true,
"bounce": true,
"deferred": true,
"unsubscribe": true,
"processed": false,
"open": true,
"click": true,
"dropped": true,
"friendly\_name": "MOE App name"
}'
```
To successfully configure the event webhook, make sure to add the following inputs to the API:
1. Enter the API key obtained from the above [Create API Keys from SendGrid](/user-guide/campaigns-and-channels/email/getting-started-with-email/configure-sendgrid-email-settings#create-api-keys-in-sendgrid) section by replacing `API_KEY_GENERATE_ABOVE` in the API.
2. Paste the URL obtained from step 1 in the above API, by replacing `"Bounce and Complaint tracking URL from Step 1"`
3. Enter your dashboard name, by replacing `"MOE App name"` in the above API.
## Test Email Settings
For more information, refer to [Test the Email Settings](/user-guide/campaigns-and-channels/email/getting-started-with-email/email-setup-and-content-validation).
# Next Steps
After your SendGrid sender is configured, you can proceed to create and send your email campaigns in MoEngage. For more information, refer to [Create Email Campaign](/user-guide/campaigns-and-channels/email/create/create-an-email-campaign).