> ## Documentation Index
> Fetch the complete documentation index at: https://moengage.com/docs/llms.txt
> Use this file to discover all available pages before exploring further.
# Email Setup and Content Validation
> Validate your MoEngage email setup by testing campaigns, verifying authentication, checking SSL branded links, and confirming delivery statistics.
After your email setup is complete, execute the following steps to validate the configurations done on your dashboard:
* [Publish a test campaign to yourself](/user-guide/campaigns-and-channels/email/getting-started-with-email/email-setup-and-content-validation#publish-a-test-campaign-to-yourself)
* [Compliance check](/user-guide/campaigns-and-channels/email/getting-started-with-email/email-setup-and-content-validation#compliance-check)
* [SSL-branded links verification](/user-guide/campaigns-and-channels/email/getting-started-with-email/email-setup-and-content-validation#verify-ssl-branded-links)
* [Test the unsubscribe link](/user-guide/campaigns-and-channels/email/getting-started-with-email/email-setup-and-content-validation#test-the-unsubscribe-link)
* [Stats validation](/user-guide/campaigns-and-channels/email/getting-started-with-email/email-setup-and-content-validation#stats-validation)
## Publish a Test Campaign to Yourself
To perform any test (such as authentication test, Unsubscribe Link test, stats validation) to verify email settings, you must publish a test email campaign to yourself first. Follow the below steps to send a test email campaign to yourself.
1. In your MoEngage Dashboard, go to **Segment** > **User Imports** and click **Import Users**.
2. Upload a CSV file with your email address.
* Include an @gmail.com or G-Suite-hosted email address.
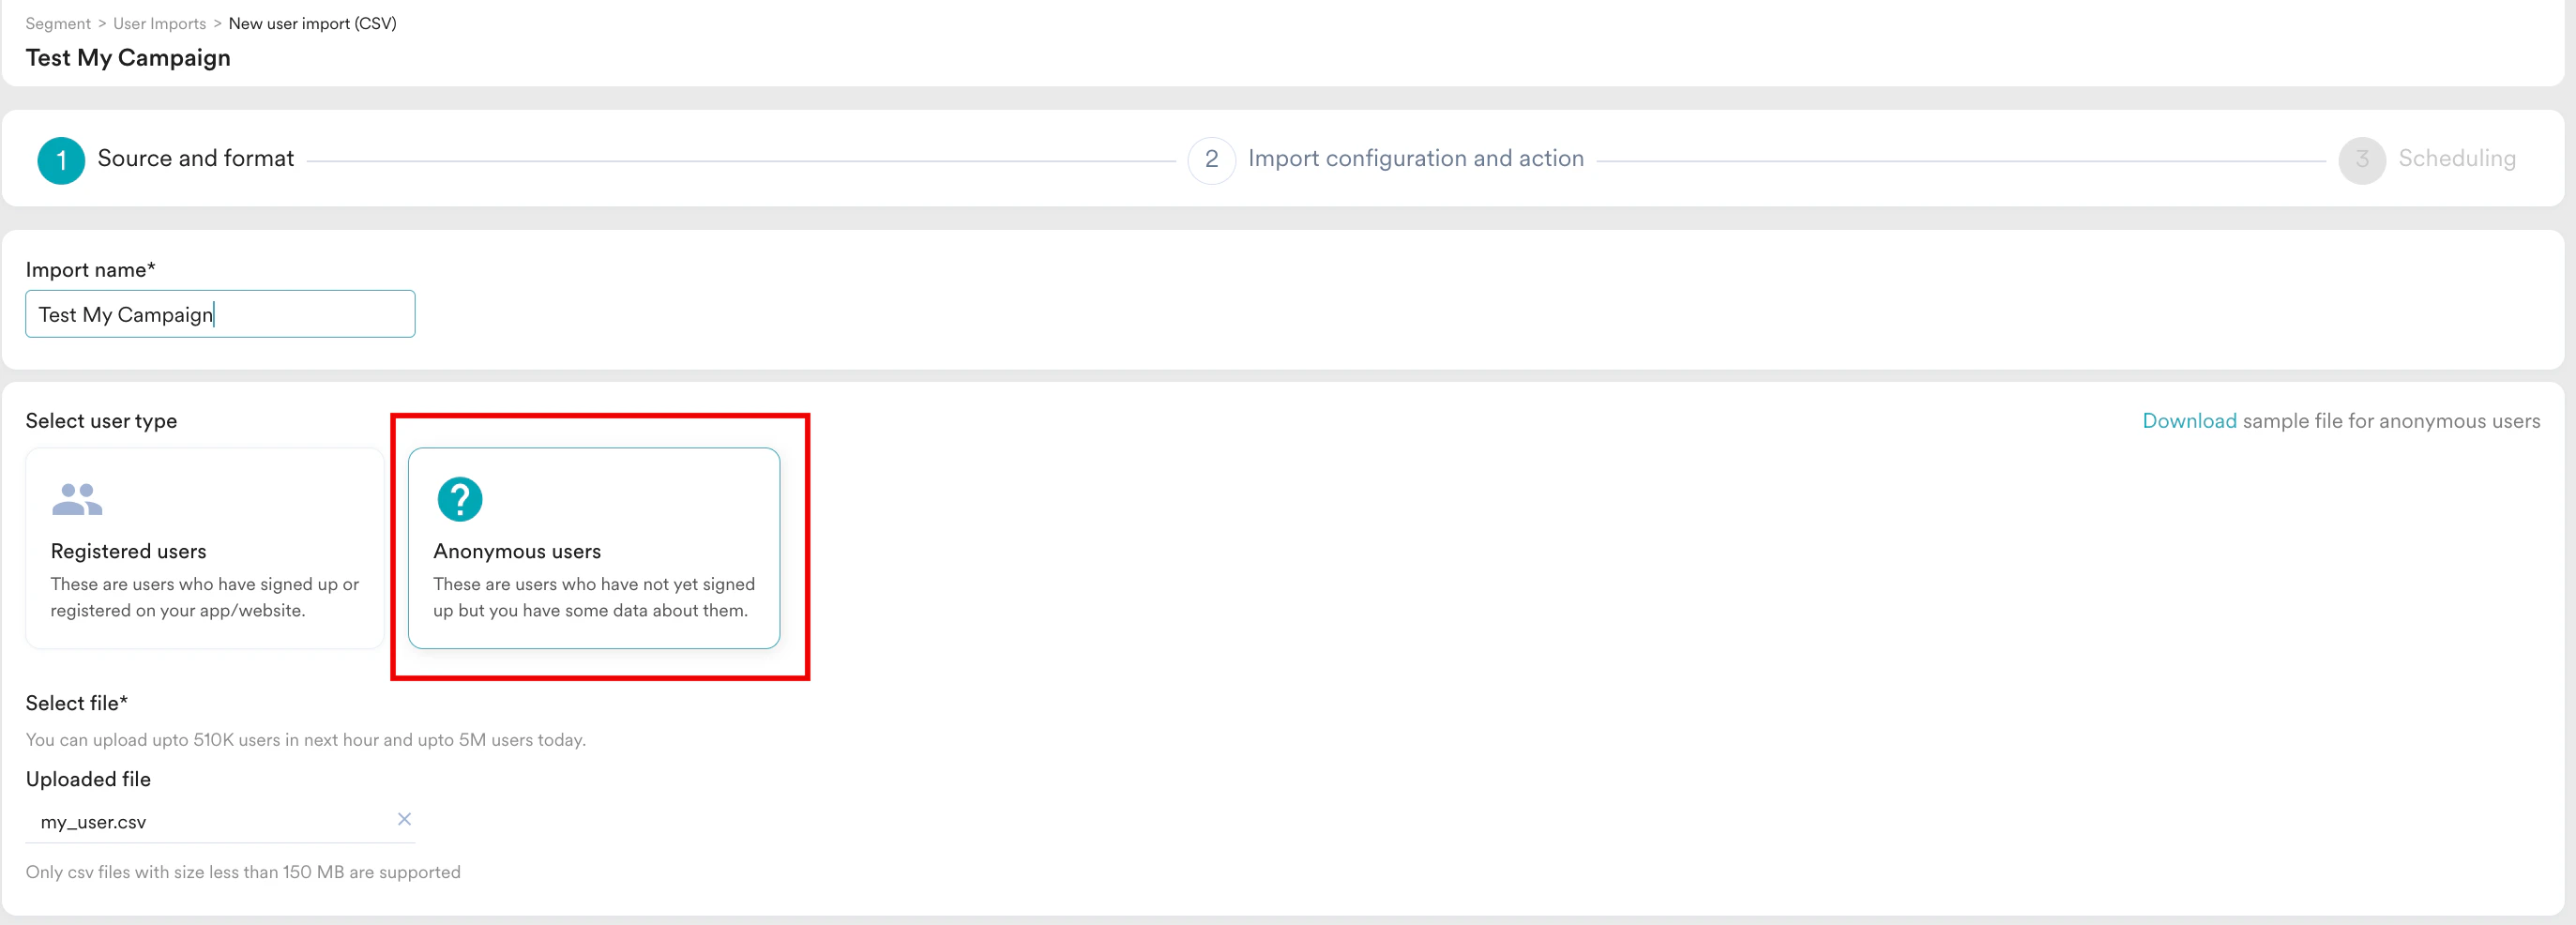
* You must select **Anonymous users** under **Select user type** while uploading a CSV file. For more information, refer to [Import User Data](/user-guide/data/imports/file-based-imports/import-user-data-using-csv).
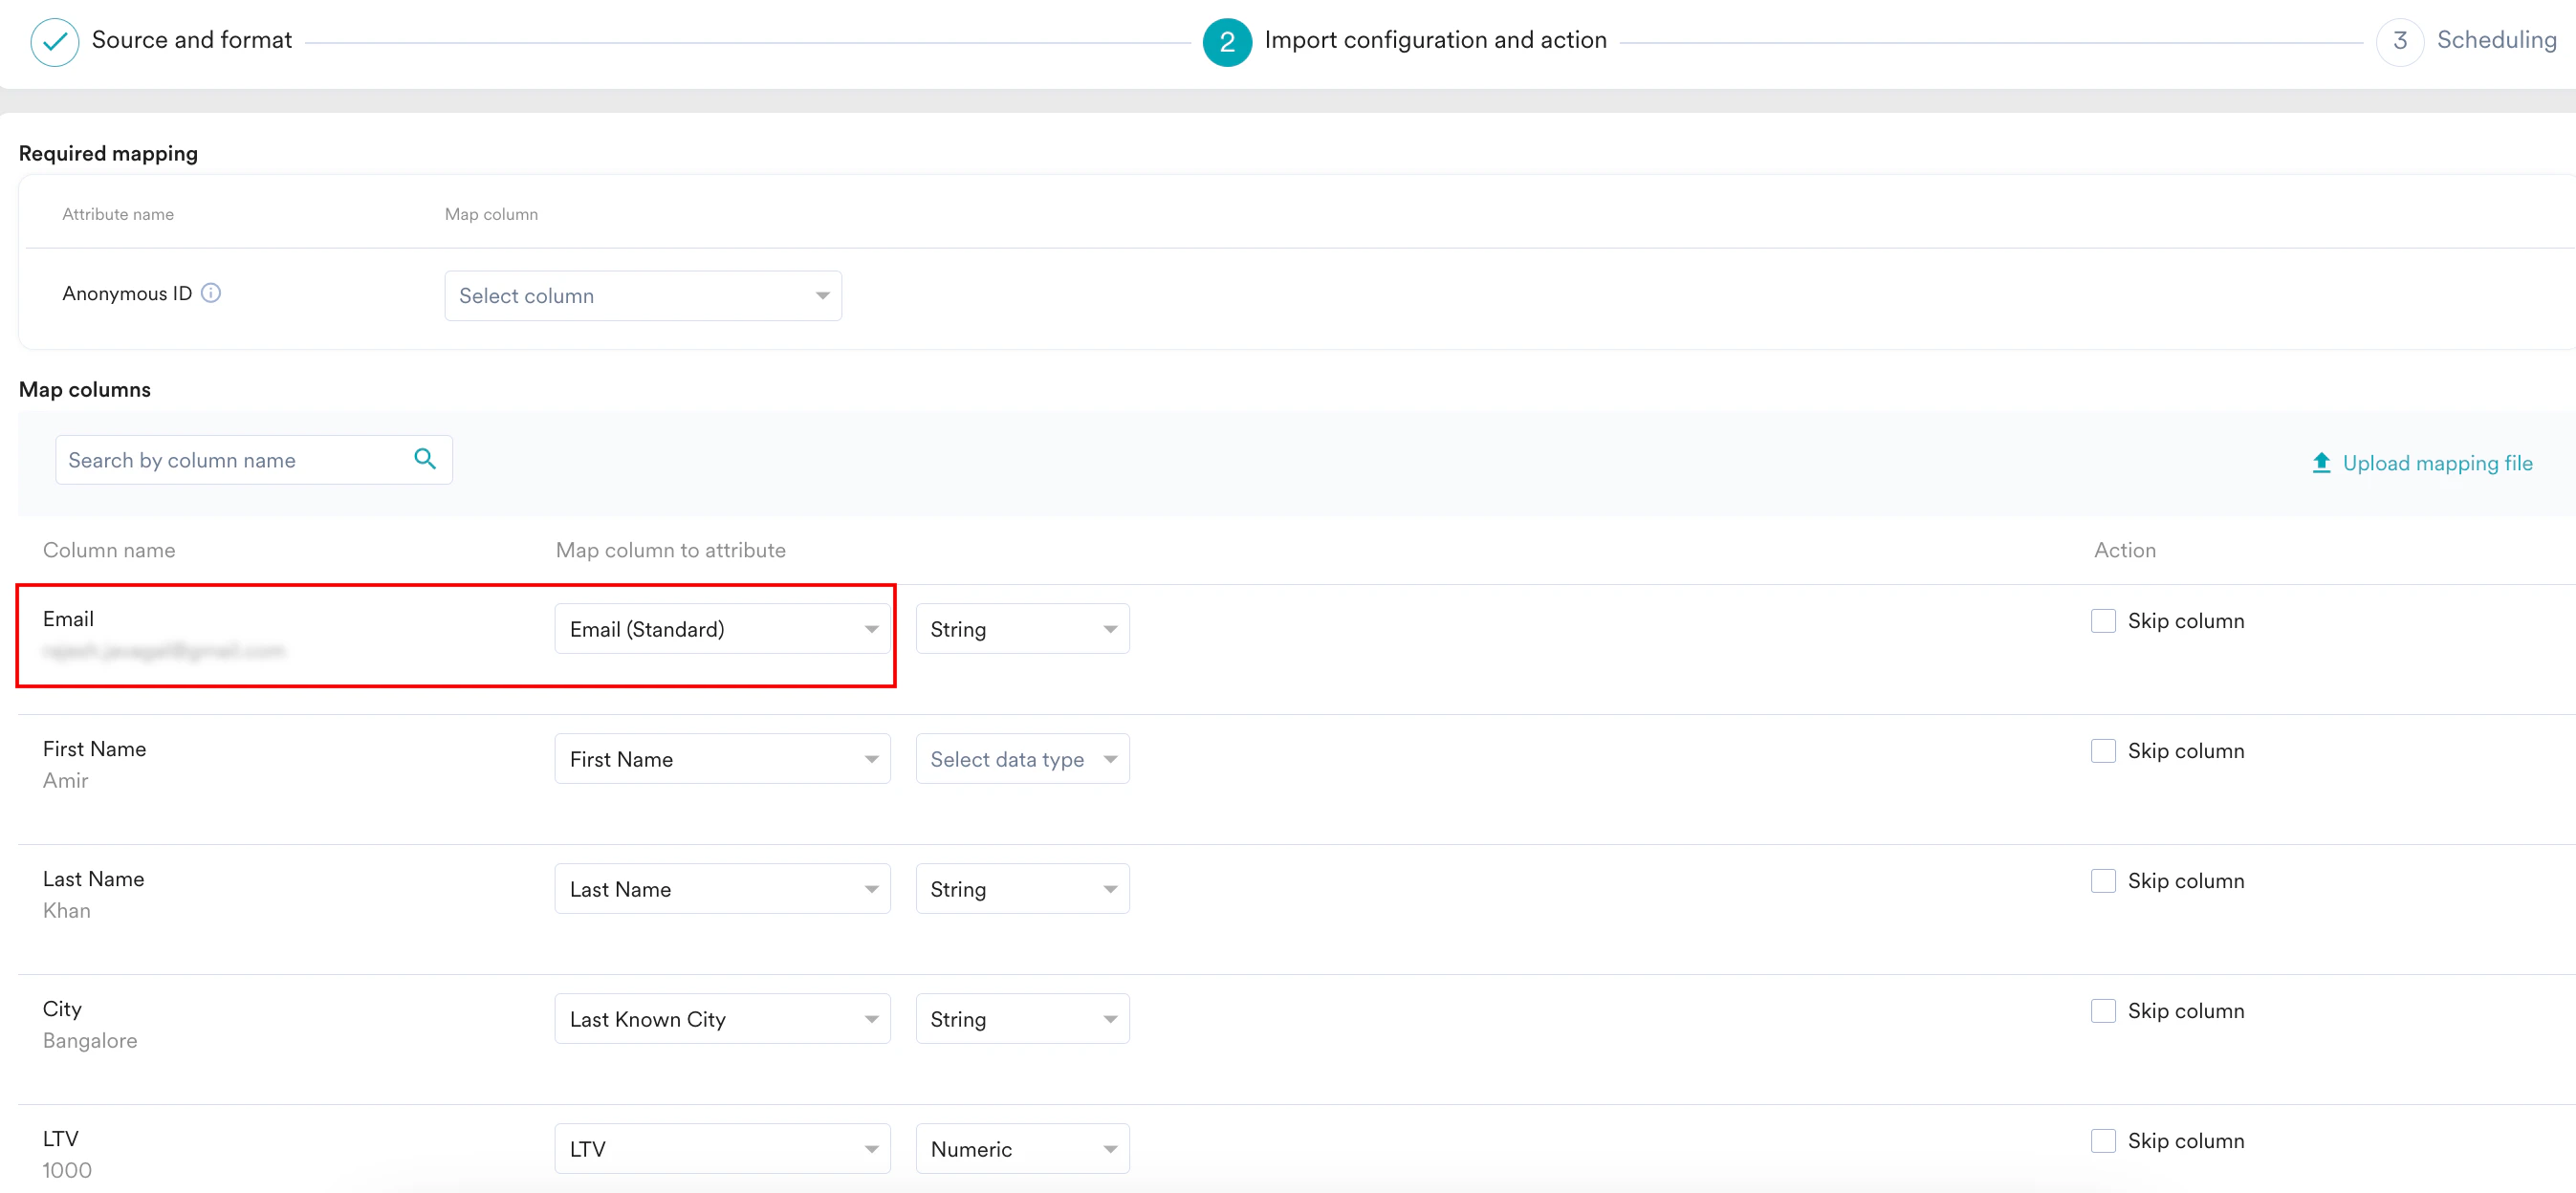
 * Under **Map columns**, you must map the **Email** column with the existing profile attribute **Email (Standard)**.
 3. Create a custom segment and save it as **test\_email\_settings**. For more information, refer to [Custom Segments](/user-guide/segment/segment-operations/custom-segments).
4. Create a test email campaign and send it to the custom segment created above. For more information, refer to [Create Email Campaign](/user-guide/campaigns-and-channels/email/create/create-an-email-campaign).
* The email body can contain any generic content, but make sure to include a regular link and an unsubscribe link.
* You can use the correct replacement tags for the unsubscribe link. You cannot add the unsubscribe link if the unsubscribe option is selected as **None** in the **Unsubscribe Settings** section.
## Compliance Check
### Step 1: Publish a Test Campaign to Yourself
To publish a test campaign yourself, refer to the above [section](/user-guide/campaigns-and-channels/email/getting-started-with-email/email-setup-and-content-validation#publish-a-test-campaign-to-yourself).
### Step 2: Open the Test Email Header
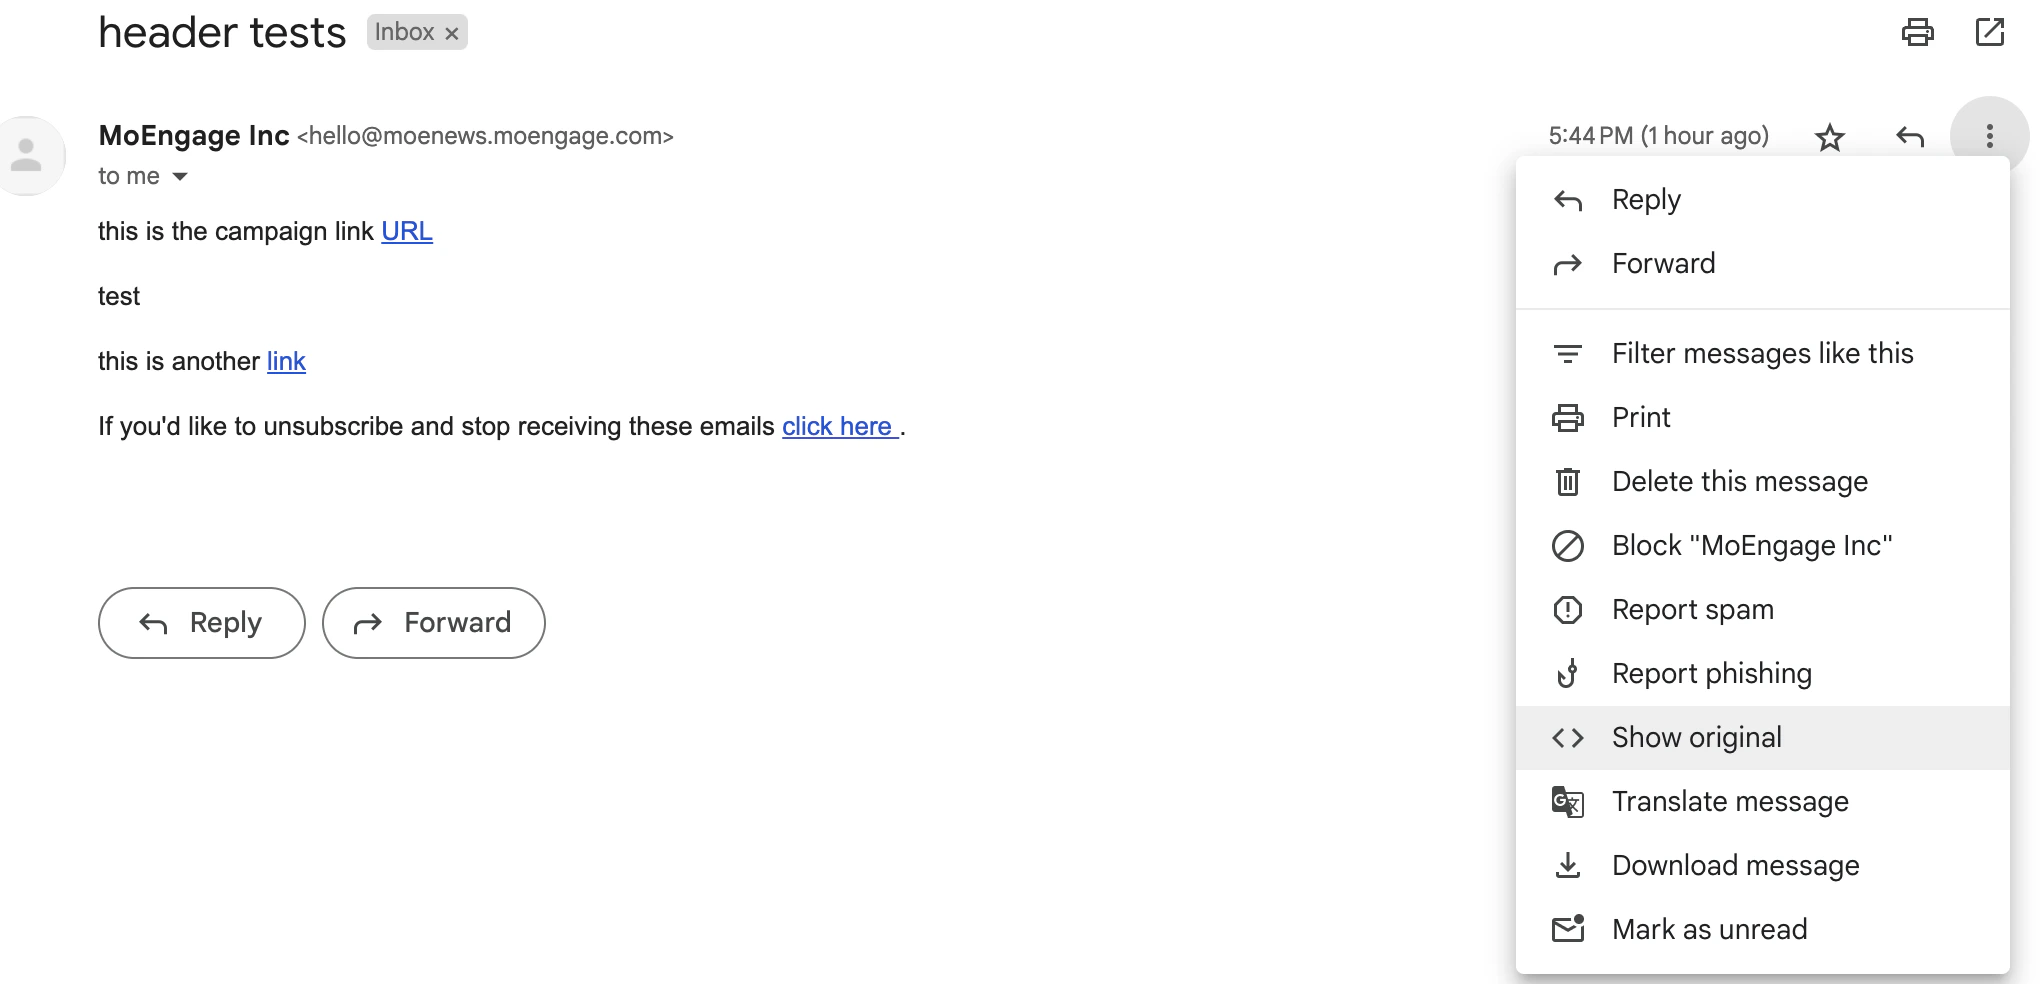
Open the test email campaign you sent yourself and click **Show Original** as shown in the following image:
3. Create a custom segment and save it as **test\_email\_settings**. For more information, refer to [Custom Segments](/user-guide/segment/segment-operations/custom-segments).
4. Create a test email campaign and send it to the custom segment created above. For more information, refer to [Create Email Campaign](/user-guide/campaigns-and-channels/email/create/create-an-email-campaign).
* The email body can contain any generic content, but make sure to include a regular link and an unsubscribe link.
* You can use the correct replacement tags for the unsubscribe link. You cannot add the unsubscribe link if the unsubscribe option is selected as **None** in the **Unsubscribe Settings** section.
## Compliance Check
### Step 1: Publish a Test Campaign to Yourself
To publish a test campaign yourself, refer to the above [section](/user-guide/campaigns-and-channels/email/getting-started-with-email/email-setup-and-content-validation#publish-a-test-campaign-to-yourself).
### Step 2: Open the Test Email Header
Open the test email campaign you sent yourself and click **Show Original** as shown in the following image:
 ### Step 3: Look for the Headers Necessary for Compliance
In the following HTML page, look for the headers listed below necessary for compliance.
* Search for **Authentication-Results**:
* Results must have [SPF](/user-guide/campaigns-and-channels/email/getting-started-with-email/email-glossary#spf), [DKIM](/user-guide/campaigns-and-channels/email/getting-started-with-email/email-glossary#dkim), and [DMARC](/user-guide/campaigns-and-channels/email/getting-started-with-email/email-glossary#dmarc).
* Results must be PASS for all three (SPF, DKIM, and DMARC).
* To prevent spoofing of your domain, add strict [DMARC](/user-guide/campaigns-and-channels/email/getting-started-with-email/email-glossary#dmarc).
```text Code wrap theme={null}
Authentication-Results: atlas-production.v2-mail-prod1-gq1.omega.yahoo.com;
dkim=pass header.i=@moenews.moengage.com header.s=pmt;
dkim=pass header.i=@sendgrid.info header.s=smtpapi;
spf=pass smtp.mailfrom=pmt.moenews.moengage.com;
dmarc=pass(p=REJECT,sp=REJECT) header.from=moenews.moengage.com;
```
You can start with a p=none; sp=none policy. Send the reports to a DMARC monitoring tool. Monitor, fix authentications, and slowly enforce 100% strict DMARC.
* Search for **Received: from**
* You will see the IP with its forward DNS.
* Gmail rejects emails sent from IPs without a valid forward and reverse DNS.
* In the same **Received: from**, you can also see the TLS version.
```text Code wrap theme={null}
Received: from o1704.dba.appalerts.moengage.com (o1704.dba.appalerts.moengage.com [159.183.136.128])
by mx.google.com with ESMTPS id af79cd13be357-794b4bb4bb4si515498585a.305.2024.05.27.08.36.30
for
(Version=TLS1_3 cipher =TLS_AES_128_GCM_SHA256 bits=128/256);
```
* Search for **List-Unsubscribe**:\
You must see two headers:
* **List-Unsubscribe: `<>`**
* It must include an HTTPS URL.
* **List-Unsubscribe-Post: List-Unsubscribe=One-Click**
* It is static and fixed.
```text Code wrap theme={null}
List-Unsubscribe: ,
List-Unsubscribe-Post: List-Unsubscribe=One-Click
```
## Verify SSL Branded Links
This verification is required to check whether your links are secured or not.
### Step 1: Publish a Test Campaign to Yourself
To publish a test campaign yourself, refer to the above [section](/user-guide/campaigns-and-channels/email/getting-started-with-email/email-setup-and-content-validation#publish-a-test-campaign-to-yourself).
### Step 2: Hover Over Any URL/CTA Button
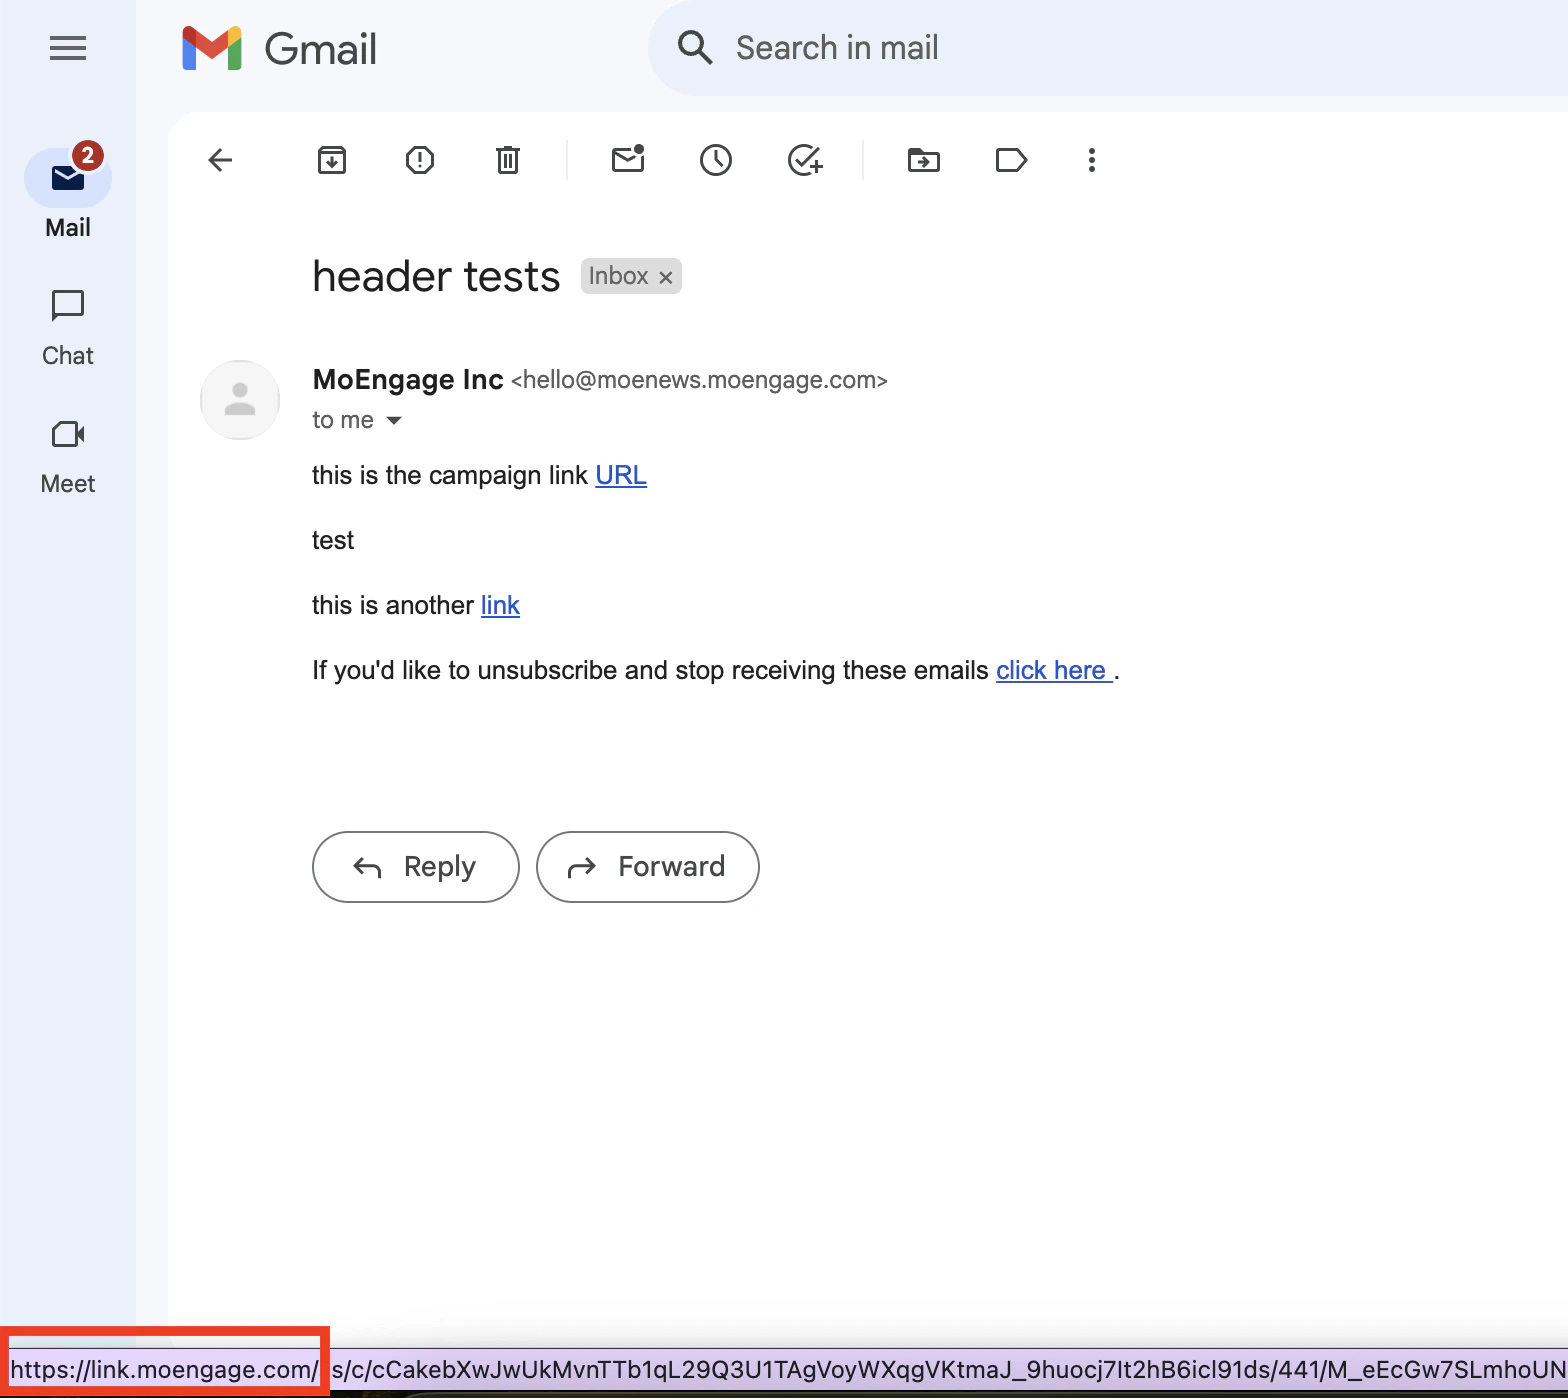
* Open the email and hover over any link or button.
* The URL you see in the bottom left must be your domain.
* The URL should be HTTPS (it might take a few seconds for HTTPS to show up).
* Alternatively, you can copy the URL and paste it into any text editor.
* The domain must be your domain.
* The link must start with HTTPS.
### Step 3: Look for the Headers Necessary for Compliance
In the following HTML page, look for the headers listed below necessary for compliance.
* Search for **Authentication-Results**:
* Results must have [SPF](/user-guide/campaigns-and-channels/email/getting-started-with-email/email-glossary#spf), [DKIM](/user-guide/campaigns-and-channels/email/getting-started-with-email/email-glossary#dkim), and [DMARC](/user-guide/campaigns-and-channels/email/getting-started-with-email/email-glossary#dmarc).
* Results must be PASS for all three (SPF, DKIM, and DMARC).
* To prevent spoofing of your domain, add strict [DMARC](/user-guide/campaigns-and-channels/email/getting-started-with-email/email-glossary#dmarc).
```text Code wrap theme={null}
Authentication-Results: atlas-production.v2-mail-prod1-gq1.omega.yahoo.com;
dkim=pass header.i=@moenews.moengage.com header.s=pmt;
dkim=pass header.i=@sendgrid.info header.s=smtpapi;
spf=pass smtp.mailfrom=pmt.moenews.moengage.com;
dmarc=pass(p=REJECT,sp=REJECT) header.from=moenews.moengage.com;
```
You can start with a p=none; sp=none policy. Send the reports to a DMARC monitoring tool. Monitor, fix authentications, and slowly enforce 100% strict DMARC.
* Search for **Received: from**
* You will see the IP with its forward DNS.
* Gmail rejects emails sent from IPs without a valid forward and reverse DNS.
* In the same **Received: from**, you can also see the TLS version.
```text Code wrap theme={null}
Received: from o1704.dba.appalerts.moengage.com (o1704.dba.appalerts.moengage.com [159.183.136.128])
by mx.google.com with ESMTPS id af79cd13be357-794b4bb4bb4si515498585a.305.2024.05.27.08.36.30
for
(Version=TLS1_3 cipher =TLS_AES_128_GCM_SHA256 bits=128/256);
```
* Search for **List-Unsubscribe**:\
You must see two headers:
* **List-Unsubscribe: `<>`**
* It must include an HTTPS URL.
* **List-Unsubscribe-Post: List-Unsubscribe=One-Click**
* It is static and fixed.
```text Code wrap theme={null}
List-Unsubscribe: ,
List-Unsubscribe-Post: List-Unsubscribe=One-Click
```
## Verify SSL Branded Links
This verification is required to check whether your links are secured or not.
### Step 1: Publish a Test Campaign to Yourself
To publish a test campaign yourself, refer to the above [section](/user-guide/campaigns-and-channels/email/getting-started-with-email/email-setup-and-content-validation#publish-a-test-campaign-to-yourself).
### Step 2: Hover Over Any URL/CTA Button
* Open the email and hover over any link or button.
* The URL you see in the bottom left must be your domain.
* The URL should be HTTPS (it might take a few seconds for HTTPS to show up).
* Alternatively, you can copy the URL and paste it into any text editor.
* The domain must be your domain.
* The link must start with HTTPS.
 ### Step 3: Verify Click Tracking
To verify click tracking, click on any link inside the email body.
* You must be redirected to the original URL you added in the email.
* The email campaign analytics must display the *click event*. For more information on email campaign analytics, refer [here](/user-guide/campaigns-and-channels/email/analyze/email-analytics-and-info).
* The **Activity** section in your [user profile](/user-guide/segment/reachability/user-reachability#user-profile) must display the *click even*t.
## Test the Unsubscribe Link
### Step 1: Publish a Test Campaign to Yourself
To publish a test campaign yourself, refer to the above [section](#h_01HTWMMAYG6CXV7ZB9Y3YDDC91).
### Step 2: Click the Unsubscribe Link
* Open the email and click the unsubscribe link.
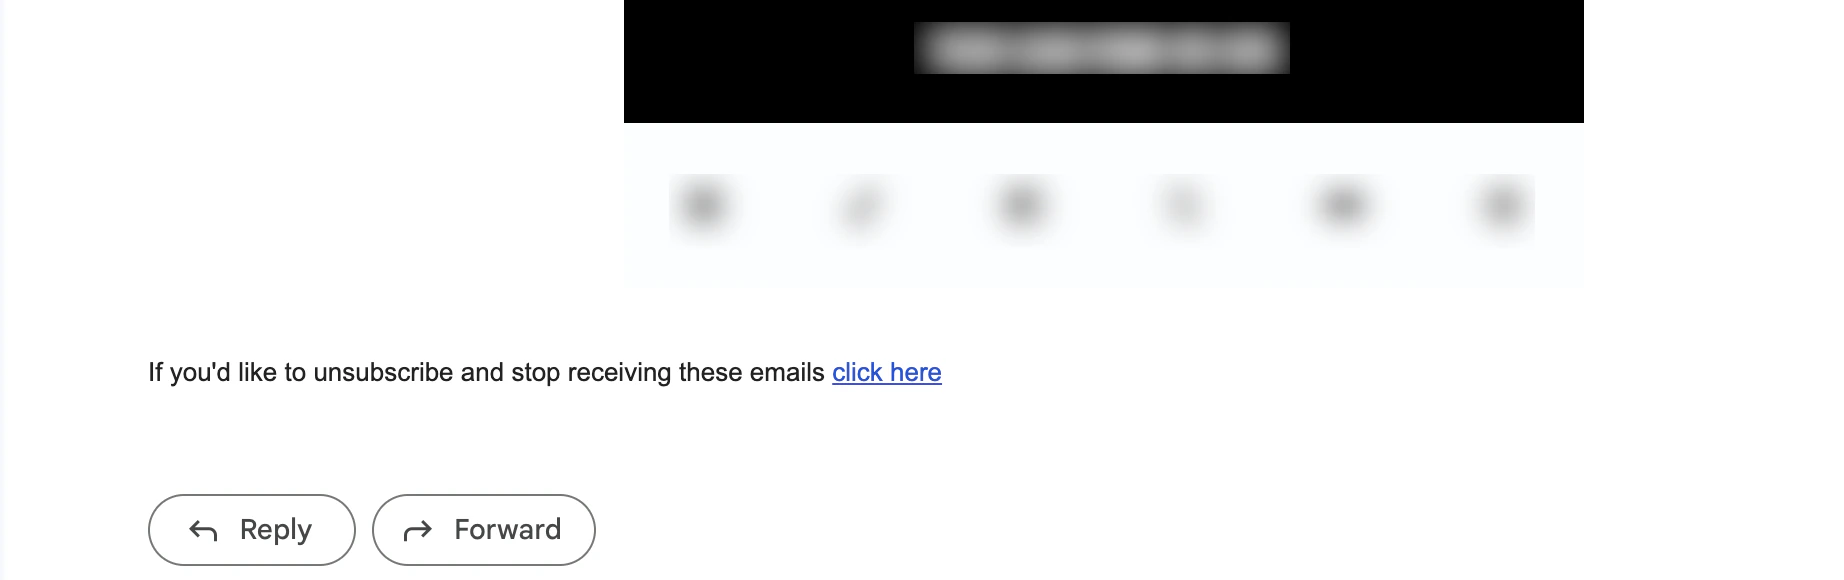
* If you have used the replacement tags, the unsubscribe link must be within the email body. Otherwise, it will be outside the email body as shown in the following image:
### Step 3: Verify Click Tracking
To verify click tracking, click on any link inside the email body.
* You must be redirected to the original URL you added in the email.
* The email campaign analytics must display the *click event*. For more information on email campaign analytics, refer [here](/user-guide/campaigns-and-channels/email/analyze/email-analytics-and-info).
* The **Activity** section in your [user profile](/user-guide/segment/reachability/user-reachability#user-profile) must display the *click even*t.
## Test the Unsubscribe Link
### Step 1: Publish a Test Campaign to Yourself
To publish a test campaign yourself, refer to the above [section](#h_01HTWMMAYG6CXV7ZB9Y3YDDC91).
### Step 2: Click the Unsubscribe Link
* Open the email and click the unsubscribe link.
* If you have used the replacement tags, the unsubscribe link must be within the email body. Otherwise, it will be outside the email body as shown in the following image:
 ### Step 3: Verify Unsubscribe Status and Reachability
* Click the unsubscribe link.
* Verify if the landing page or unsubscribe flow is working as you expected.
* Go back to the MoEngage UI and verify if:
* Unsubscribe is tracked in the [stats](/user-guide/campaigns-and-channels/email/getting-started-with-email/email-setup-and-content-validation#stats-validation).
* [Reachability](/user-guide/segment/reachability/user-reachability) is updated in your profile.
## Stats Validation
### Step 1: Publish a Test Campaign to Yourself
To publish a test campaign yourself, refer to the above [section](/user-guide/campaigns-and-channels/email/getting-started-with-email/email-setup-and-content-validation#publish-a-test-campaign-to-yourself).
### Step 2: Engage with the Email You Have Received
* Open the email.
* Click any link in the email body.
* Click the unsubscribe link.
### Step 3: Verify the Stats
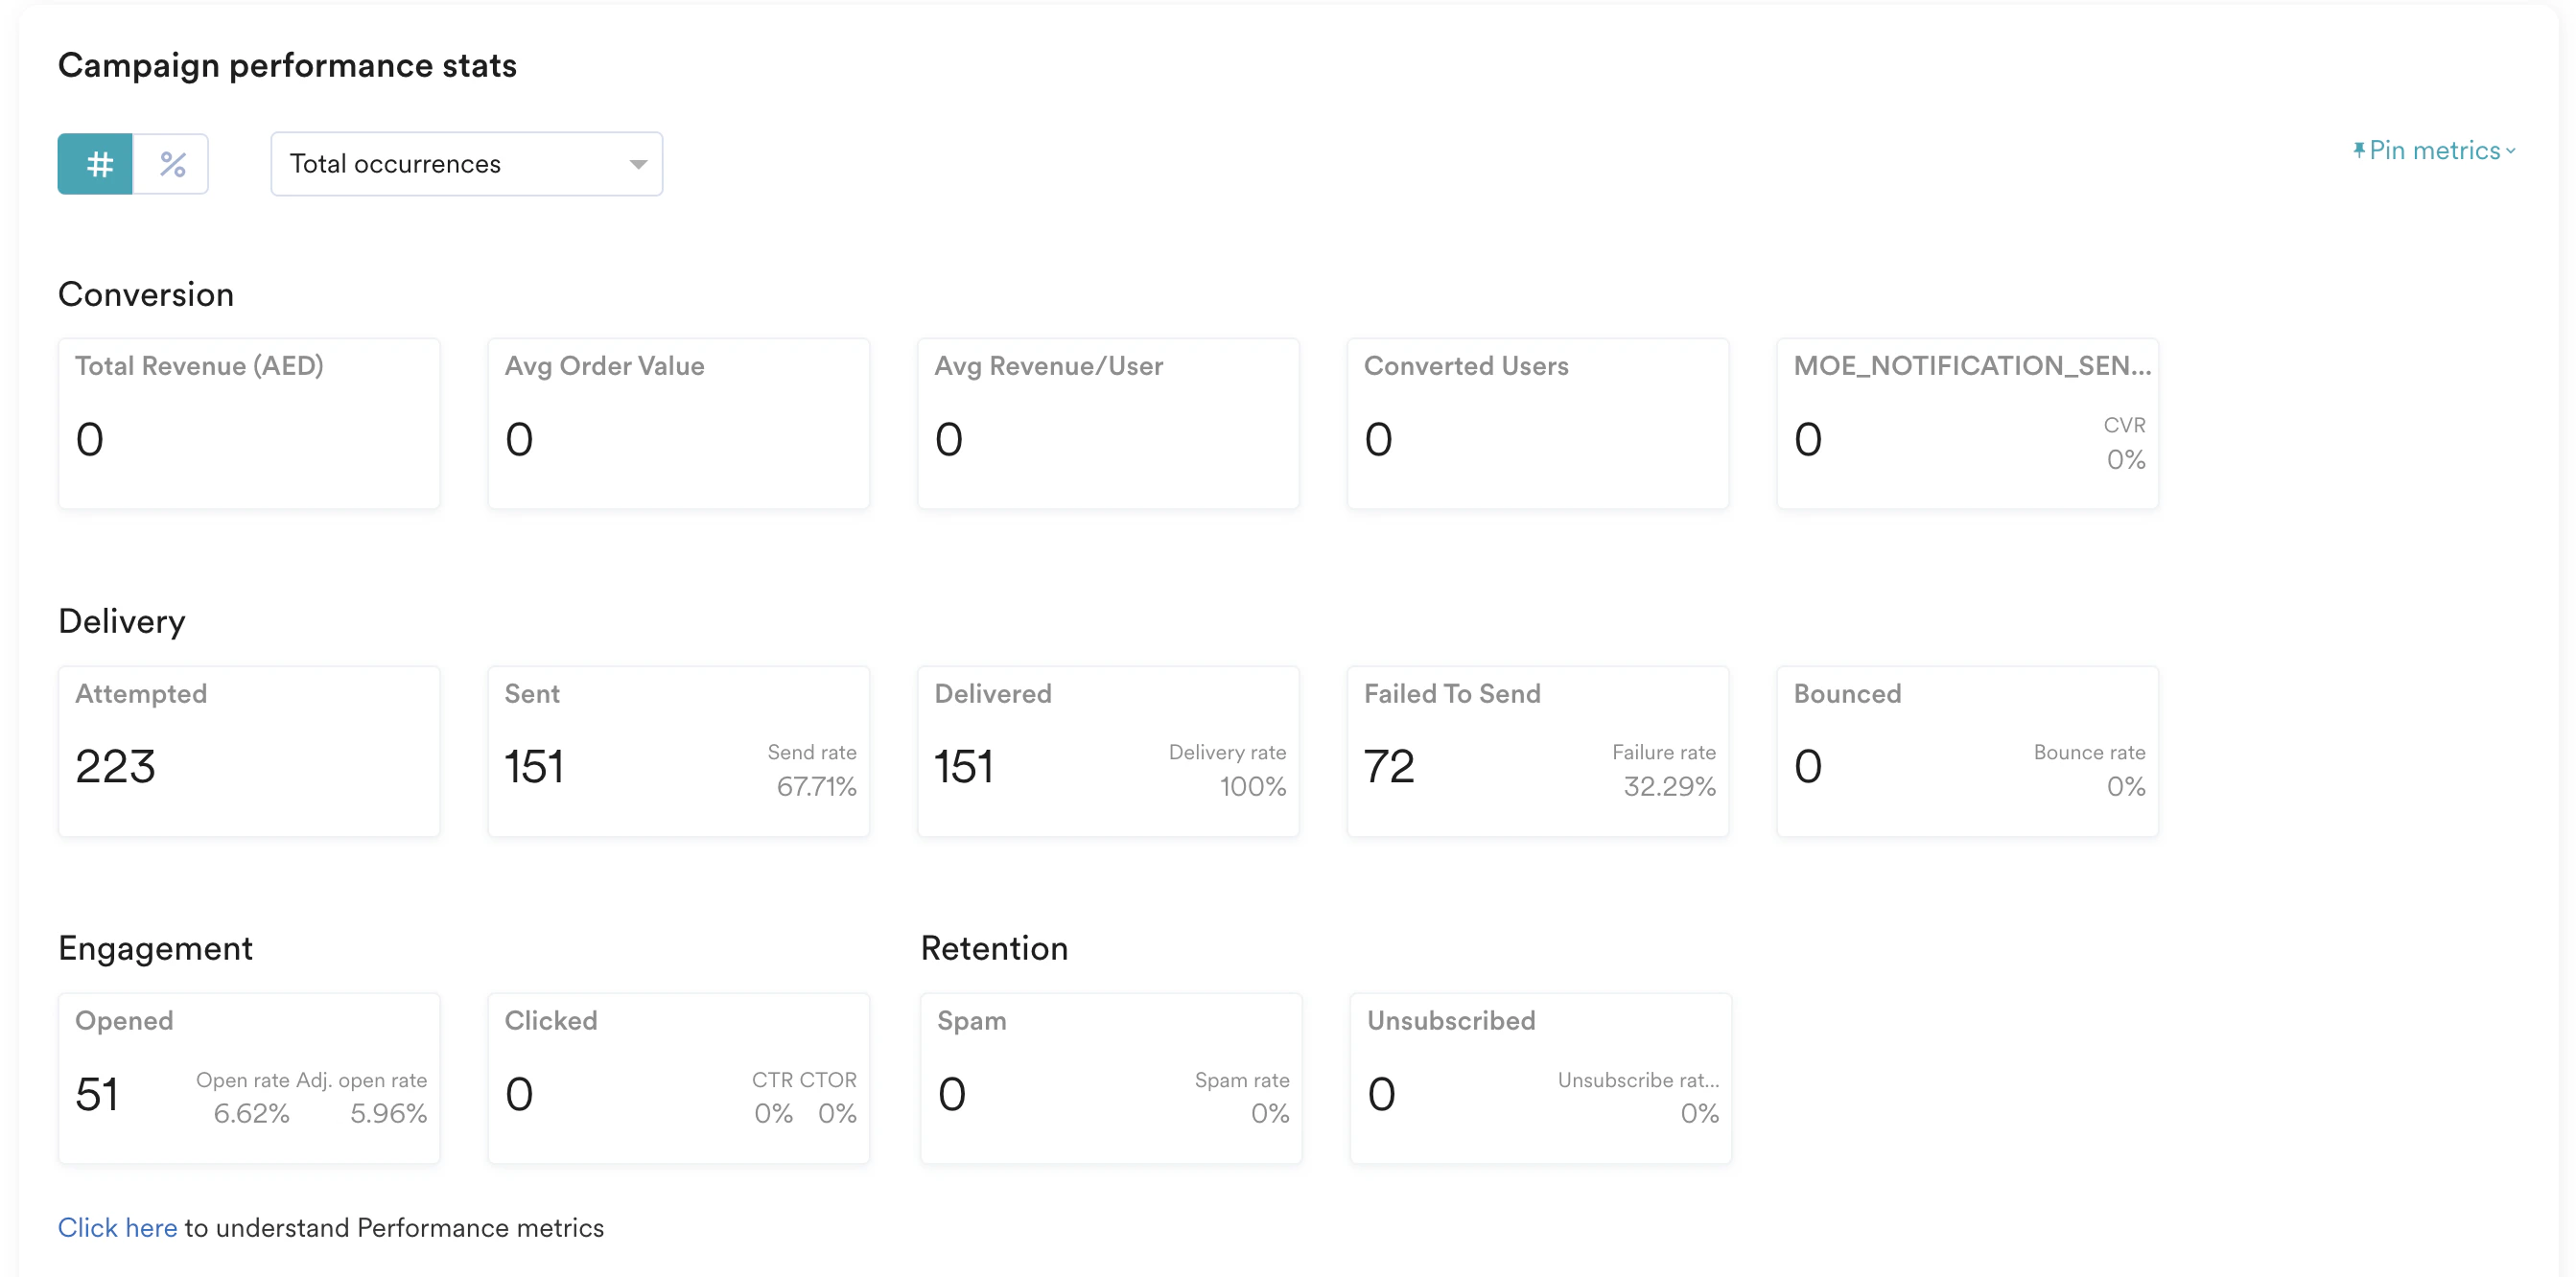
Verify if events are populating as expected. Campaign stats must show:
* Sent
* Delivered
* Open
* Click
* Unsubscribe
### Step 3: Verify Unsubscribe Status and Reachability
* Click the unsubscribe link.
* Verify if the landing page or unsubscribe flow is working as you expected.
* Go back to the MoEngage UI and verify if:
* Unsubscribe is tracked in the [stats](/user-guide/campaigns-and-channels/email/getting-started-with-email/email-setup-and-content-validation#stats-validation).
* [Reachability](/user-guide/segment/reachability/user-reachability) is updated in your profile.
## Stats Validation
### Step 1: Publish a Test Campaign to Yourself
To publish a test campaign yourself, refer to the above [section](/user-guide/campaigns-and-channels/email/getting-started-with-email/email-setup-and-content-validation#publish-a-test-campaign-to-yourself).
### Step 2: Engage with the Email You Have Received
* Open the email.
* Click any link in the email body.
* Click the unsubscribe link.
### Step 3: Verify the Stats
Verify if events are populating as expected. Campaign stats must show:
* Sent
* Delivered
* Open
* Click
* Unsubscribe
 It might take a few minutes for the stats and user profile to populate.
# Validations to be Performed Before Publishing the Email
Executing the steps above helps you test the email settings after the setup. You are advised to use the features below before publishing a campaign to ensure your emails work as you expect:
## Check the Email Campaign Content
* **Preview the Email Content in the Editor:** Preview the email content while creating it using the [drag-and-drop](/user-guide/campaigns-and-channels/email/create/create-content-with-the-drag-and-drop-editor) or [Custom HTML editor](/user-guide/campaigns-and-channels/email/create/create-content-with-custom-html-editor). Use this method to perform a sanity check on the rendering of your email content. Note that the addition of unsubscribe or manage preference links and open/click tracking related changes do not occur since no email has been sent.
* **Inbox Previews:** Preview your email content across a combination of devices, email clients, and web browsers. Use this method to check the email is rendering properly on the combinations used by your email subscribers. Since no email has been sent, the addition of links or tracking related changes doesn't occur here either. For more information, refer to [Inbox Previews](/user-guide/campaigns-and-channels/email/create/inbox-previews).
* **Test Campaign**: This method helps you check the email content by sending an actual email. Since an email is sent out, clicks and open stats, unsubscribe and manage preference links all get included in this email. Use this method to perform the final rendering check and validate the link's redirection before publishing a campaign.
It might take a few minutes for the stats and user profile to populate.
# Validations to be Performed Before Publishing the Email
Executing the steps above helps you test the email settings after the setup. You are advised to use the features below before publishing a campaign to ensure your emails work as you expect:
## Check the Email Campaign Content
* **Preview the Email Content in the Editor:** Preview the email content while creating it using the [drag-and-drop](/user-guide/campaigns-and-channels/email/create/create-content-with-the-drag-and-drop-editor) or [Custom HTML editor](/user-guide/campaigns-and-channels/email/create/create-content-with-custom-html-editor). Use this method to perform a sanity check on the rendering of your email content. Note that the addition of unsubscribe or manage preference links and open/click tracking related changes do not occur since no email has been sent.
* **Inbox Previews:** Preview your email content across a combination of devices, email clients, and web browsers. Use this method to check the email is rendering properly on the combinations used by your email subscribers. Since no email has been sent, the addition of links or tracking related changes doesn't occur here either. For more information, refer to [Inbox Previews](/user-guide/campaigns-and-channels/email/create/inbox-previews).
* **Test Campaign**: This method helps you check the email content by sending an actual email. Since an email is sent out, clicks and open stats, unsubscribe and manage preference links all get included in this email. Use this method to perform the final rendering check and validate the link's redirection before publishing a campaign.