> ## Documentation Index
> Fetch the complete documentation index at: https://moengage.com/docs/llms.txt
> Use this file to discover all available pages before exploring further.
# Opt-in Management
> Manage email opt-in and user consent effectively in MoEngage. Implement double opt-in, subscription preferences, and stay regulation-compliant.
# Overview
As a marketer, ensuring proper opt-in management is crucial for building trust with your audience and complying with regulations. Opt-in management describes the practices you employ to obtain and manage user consent for communications, primarily through emails. This includes two essential actions:
* Obtain explicit user consent for email communications.
* Empower recipients to control what email communications they receive.
Understanding these opt-in practices is essential for effective and compliant email marketing. To help you implement these principles, MoEngage offers the following opt-in methods:
* [Single Opt-in](/user-guide/campaigns-and-channels/email/getting-started-with-email/opt-in-management#single-opt-in)
* [Double Opt-in](/user-guide/campaigns-and-channels/email/getting-started-with-email/opt-in-management#double-opt-in)
# Single Opt-in
Single Opt-in is an email subscription method where a user subscribes to receive communications immediately after providing their email address, typically during a website signup process. This method assumes that by providing their email address during signup, the user has implicitly consented to receive communications.
By default, MoEngage implements the single opt-in method whenever a user profile is created in your dashboard. MoEngage assumes that the user providing their email ID makes them eligible to receive emails. This method prioritizes ease of sign-up with the assumption of immediate consent.
This method is commonly used in the Southeast Asian Region, including India. In contrast, European regulations often require explicit confirmation for marketing communications, with transactional emails being an exception.
* Single Opt-in operates on the assumption of consent.
* Though straightforward, Single Opt-in can sometimes lead to less engaged subscribers or include email addresses entered by mistake.
* The regulations of some regions, aiming for higher engagement quality, highlight the significance of [Double Opt-in](/user-guide/campaigns-and-channels/email/getting-started-with-email/opt-in-management#double-opt-in).
# Double Opt-in
Double Opt-in is a subscription method in which users must take an additional step to confirm their subscription after initially providing their email address during signup. Typically, this involves clicking a confirmation link in an email sent to the address provided. Only after this confirmation are users subscribed to receive promotional emails. This method prioritizes subscriber verification and engagement through an extra confirmation step.
Double opt-in helps you in the following ways:
* **Higher quality email list**: Double Opt-in verifies that subscribers are genuinely interested, resulting in a list of more engaged users. This can lead to better open rates, click-through rates, and overall campaign performance.
* **Reduced spam complaints**: By requiring explicit confirmation, Double Opt-in significantly reduces the likelihood of users marking emails as spam. This protects the sender's reputation and improves email deliverability.
* **Improved deliverability**: Email providers view Double Opt-in as a sign of legitimate email practices. This can enhance deliverability rates, ensuring that emails reach the intended recipients' inboxes.
* **Greater accuracy of email addresses**: Double Opt-in helps to ensure that the email addresses collected are valid and correctly entered. This reduces bounce rates caused by typos or fake addresses.
* **Enhanced sender reputation**: Sending emails to engaged subscribers who have confirmed their interest improves the sender's reputation with email providers. A good sender reputation is crucial for email deliverability.
## Double Opt-in in MoEngage
Whenever a user profile is created, MoEngage tracks whether the user has provided a double opt-in confirmation using the attribute **Email** **Opt-in Status**. This attribute can have the following values:
* **Optin pending**: This value indicates that the user has not yet provided consent to receive email communications. Additionally, user profiles in MoEngage that do not contain the Email Opt-in status attribute will be treated as users with the value *Optin pending*.
* **Double opted in**: This value indicates that the user has provided their explicit consent to receive email communications.
* **Opted out**: This value indicates that the user has unsubscribed from receiving email communications.
### How Email Opt-in Status Is Updated
When Double Opt-in is enabled, the **Email Opt-in Status** attribute is **not** automatically created or populated for existing or new user profiles. The attribute is only created and updated when MoEngage receives an explicit opt-in status update for that user — through one of the supported methods such as the [Opt-in Management API](https://www.moengage.com/docs/api/opt-in-management/update-user-email-opt-in-preferences), user interaction with consent-seeking emails, CSV imports, or a subscription-related update on the user profile.
This means that if you enable Double Opt-in and then look at a user profile that has not yet received any opt-in status update, the **Email Opt-in Status** attribute will not be visible on the profile.
User profiles that do not have the **Email Opt-in Status** attribute are treated the same as users with the value *Optin pending*.
### How Email Opt-in Status Affects Email Delivery
Before sending an email, the system checks the **Email Opt-in Status** user attribute to determine whether the user is eligible to receive the email:
* If the attribute exists for the user and the value indicates that the user has opted in (that is, the value is *Double opted in*), the email is sent.
* If the attribute does not exist or has any other value (such as *Optin pending* or *Opted out*), the user does not receive the email.
This check applies when the **Send only to double-opted-in users** toggle is enabled for the email campaign. For more information, refer to [Balance Engagement and Reachability Using Double Opt-in](/user-guide/campaigns-and-channels/email/getting-started-with-email/opt-in-management#balance-engagement-and-reachability-using-double-opt-in).
The following scenarios explain how user interactions affect opt-in status:
### Scenario 1: New user signs up after you adopt Double Opt-in
John signed up for your website. Upon signing up:
* MoEngage creates a profile for John in your workspace.
* MoEngage sets John's opt-in status to *Optin pending*.
* You send a consent-seeking email to John, requesting his preferences.
John can then:
* **Not respond to consent-seeking email**: John's **Email Opt-in Status** remains *Optin pending* because he has not provided consent.
* **Interact with the consent-seeking email**: John clicks the confirmation link and selects his subscription category preferences while providing his consent. MoEngage changes John's **Email Opt-in Status** to *Double opted in*.
* **Change his preferences after providing consent**: MoEngage updates the preferences accordingly, and the **Email Opt-in Status** remains as *Double opted in*.
* **Unsubscribe from your email**: John's **Email Opt-in Status** changes to *Opted out*.
### Scenario 2: Existing user signed up before you adopted Double Opt-in
David is an existing user of your website. He existed before your website implemented double Opt-in. For such a user:
* MoEngage sets David's opt-in status to *Optin pending* because he has not shared his preferences yet.
* You send a consent-seeking email to John, requesting his preferences.
* David can receive other promotional emails based on the campaign settings that were made live previously.
David can then:
* **Not respond to consent-seeking email**: David's **Email Opt-in Status** remains *Optin pending* because he has not provided consent.
* **Interact with the consent-seeking email**: David clicks the confirmation link and selects his subscription category preferences while providing his consent. MoEngage changes David's **Email Opt-in Status** to *Double opted in*.
* **Change his preferences:**
* **After providing consent**: David changes his preferences after providing his consent. MoEngage updates the subscription category preferences accordingly, and the **Email Opt-in Status** remains as *Double opted in*.
* **Interact with an older email**: David interacts with an older email and changes his preferences. MoEngage updates the subscription category preferences accordingly, and the **Email Opt-in Status** changes from *Optin pending* to *Double opted in*.
* **Unsubscribe from your email:**
* **After providing consent**: David unsubscribed from your email after providing his consent. David's **Email Opt-in Status** changes from *Double opted in* to *Opted out*.
* **Interact with an older email**: David interacts with an older email and unsubscribes from your email. MoEngage unsubscribes David, and the **Email Opt-in Status** changes from *Optin pending* to *Opted out*.
Whenever there is a change in opt-in status through any emails or landing pages, an event named *Email Opt-in Status Updated* is triggered to track all these actions.
# Configure Double Opt-in in MoEngage
You can access the Double Opt-in method from the **Subscription Management** > **Opt-in Management** tab of [Email settings](/user-guide/campaigns-and-channels/email/getting-started-with-email/configure-email-channel).
To move to the Double Opt-in Method, make sure you implement the following instructions, based on whether Inform or Landing Page is enabled for your workspace:
**If you have a record of your existing users' opt-in status and wish to update it in MoEngage, you can perform a bulk update using one of the following methods:**
* Trigger the Track User Data API of MoEngage to update the opt-in status. For more information, refer to [Track User](https://www.moengage.com/docs/api/user/track-user).
**Important considerations when using the Track User API for Email Opt-in Status:**
The Track User API is a general-purpose API designed to create or update user attributes. Since it can update multiple attributes in a single call, it expects readable names and does not perform strict validation for specific attributes such as **Email Opt-in Status**. This means the API may accept values that are not valid opt-in statuses without returning an error, which could lead to unexpected behavior.
When using the Track User API to update Email Opt-in Status, pass the values as plain text front-end names:
* `Optin pending`
* `Double opted in`
* `Opted out`
These values are case-insensitive.
**Recommended alternative:** For updating the **Email Opt-in Status**, especially for new users, use the [Opt-in Management API](https://www.moengage.com/docs/api/opt-in-management/update-user-email-opt-in-preferences) instead. This API is purpose-built for managing opt-in preferences, performs validation on the values passed, and only accepts the following backend-defined values: `DOUBLE_OPTED_IN`, `OPTED_OUT`, and `OPT_IN_PENDING`. If any other value is passed, the data is dropped.
* Update the Opt-in status using the [user imports capability](/user-guide/data/imports/file-based-imports/import-user-data-using-csv) of MoEngage. Perform the following steps to upload the opt-in via CSV upload for your users:
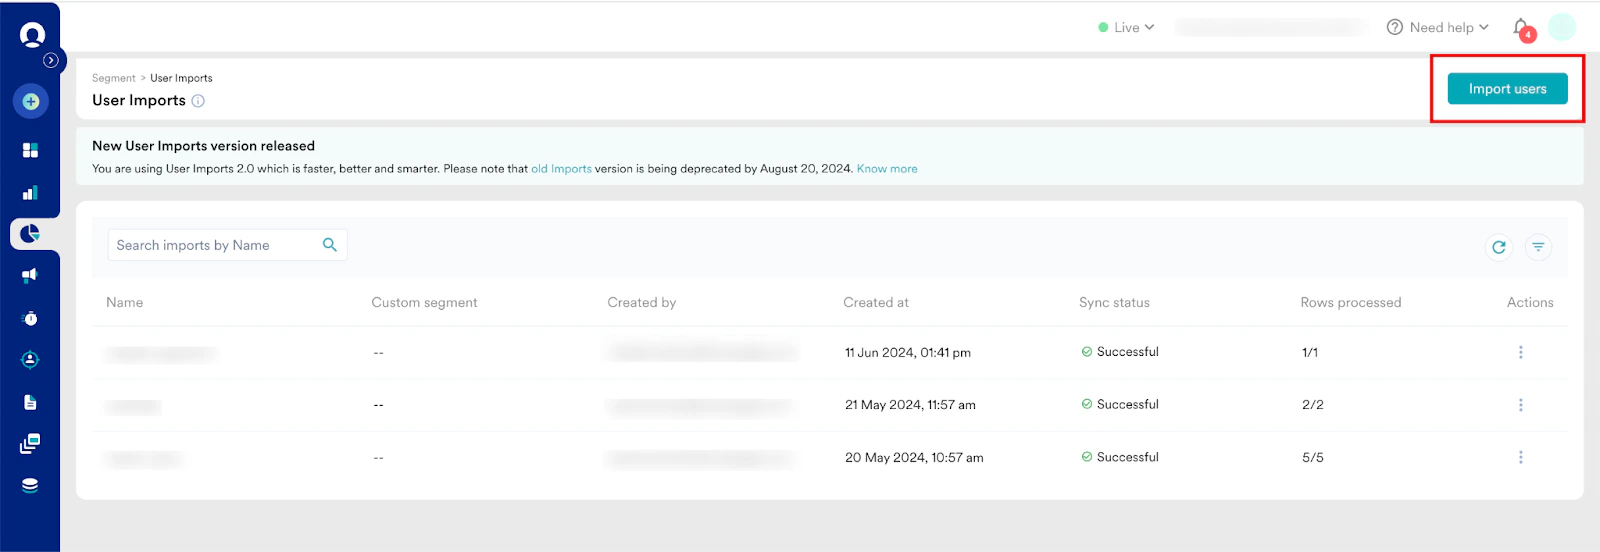
1. On the left navigation menu in the MoEngage dashboard, click Engage **Segment**, and then click **User Imports**.
2. On the **User Imports** page, click **Import users** in the upper-right corner.
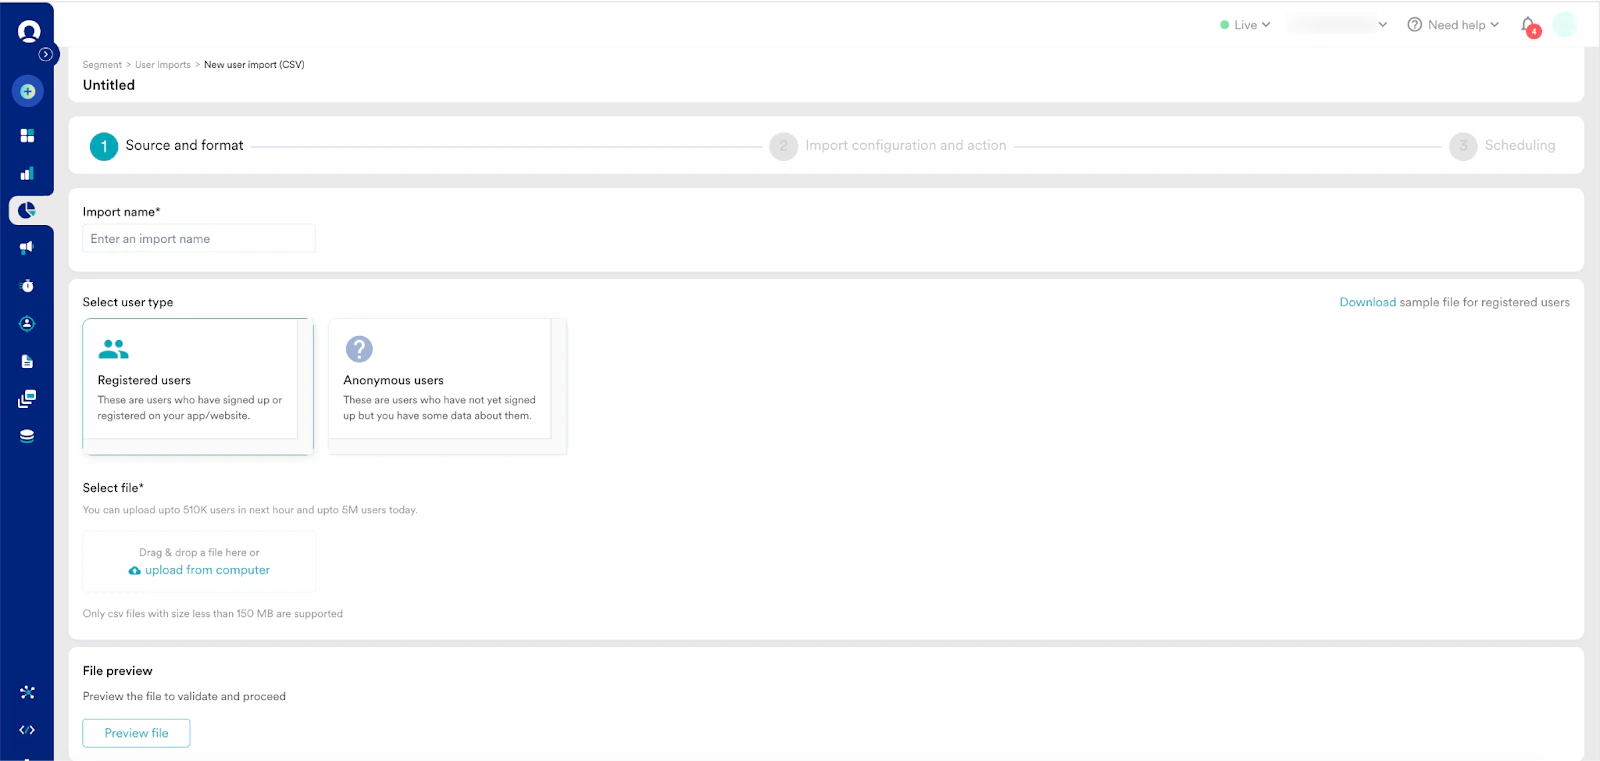
 3. On the **New user import (CSV)** page, enter a name for the import in the **Import name** field.
4. Select user type as **Registered users**.
5. Click upload from the computer in the **Select file** section to upload the CSV file. Make sure to follow the points below while uploading the CSV file. In the CSV file to be uploaded:
* One column should be reserved for IDs. These are the customer IDs that you use to uniquely identify your users. For example, they could be your users' email IDs.
* Maintain another column for the user's opt-in status that needs to be updated. The values of the Opt-in status can be *Optin pending*, *Double opted in*, or *Opted out,* and they are case in-sensitive.
3. On the **New user import (CSV)** page, enter a name for the import in the **Import name** field.
4. Select user type as **Registered users**.
5. Click upload from the computer in the **Select file** section to upload the CSV file. Make sure to follow the points below while uploading the CSV file. In the CSV file to be uploaded:
* One column should be reserved for IDs. These are the customer IDs that you use to uniquely identify your users. For example, they could be your users' email IDs.
* Maintain another column for the user's opt-in status that needs to be updated. The values of the Opt-in status can be *Optin pending*, *Double opted in*, or *Opted out,* and they are case in-sensitive.
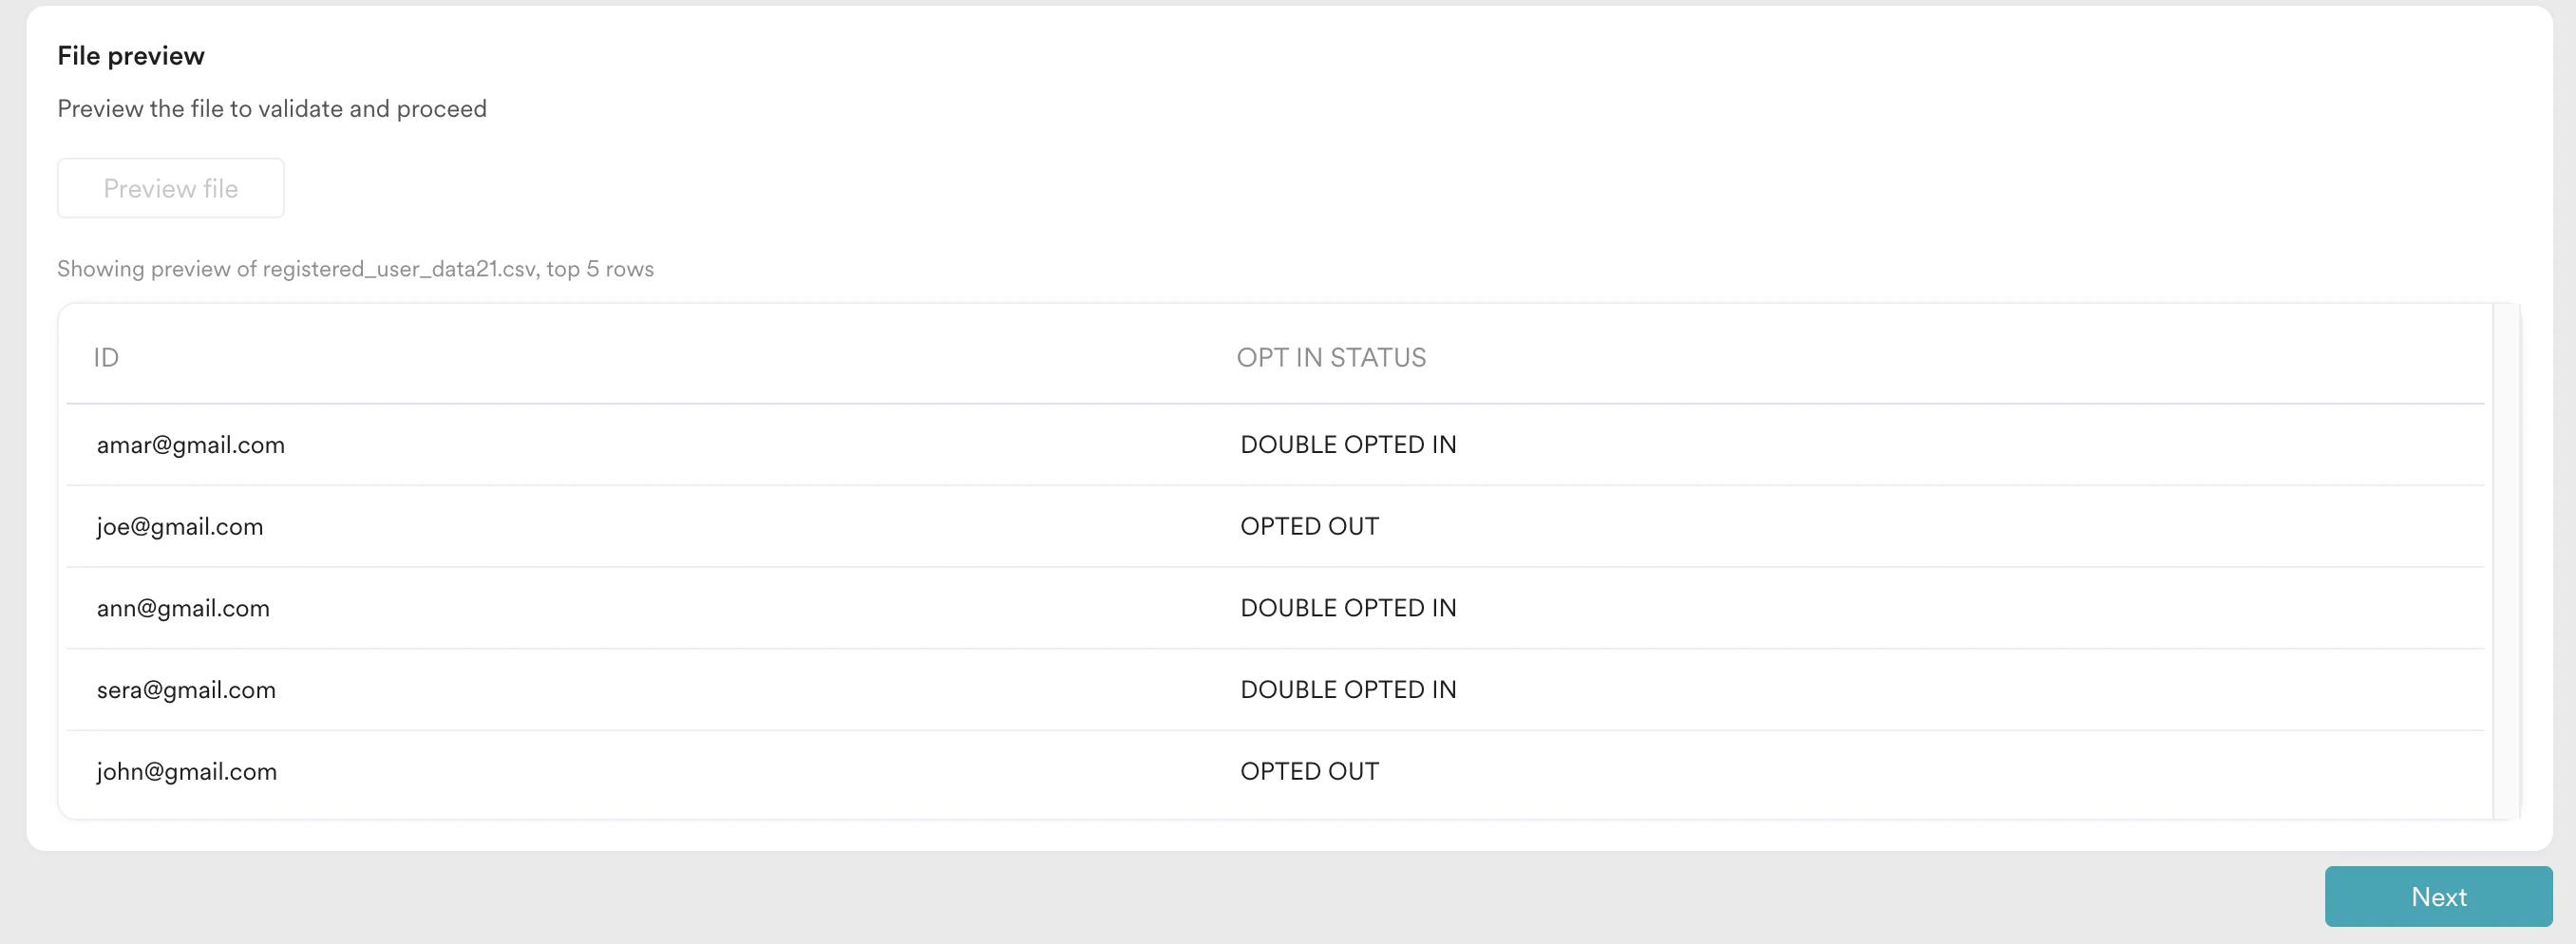
 6. After uploading the file, click **Preview file** to preview the uploaded file. Click **Next**.
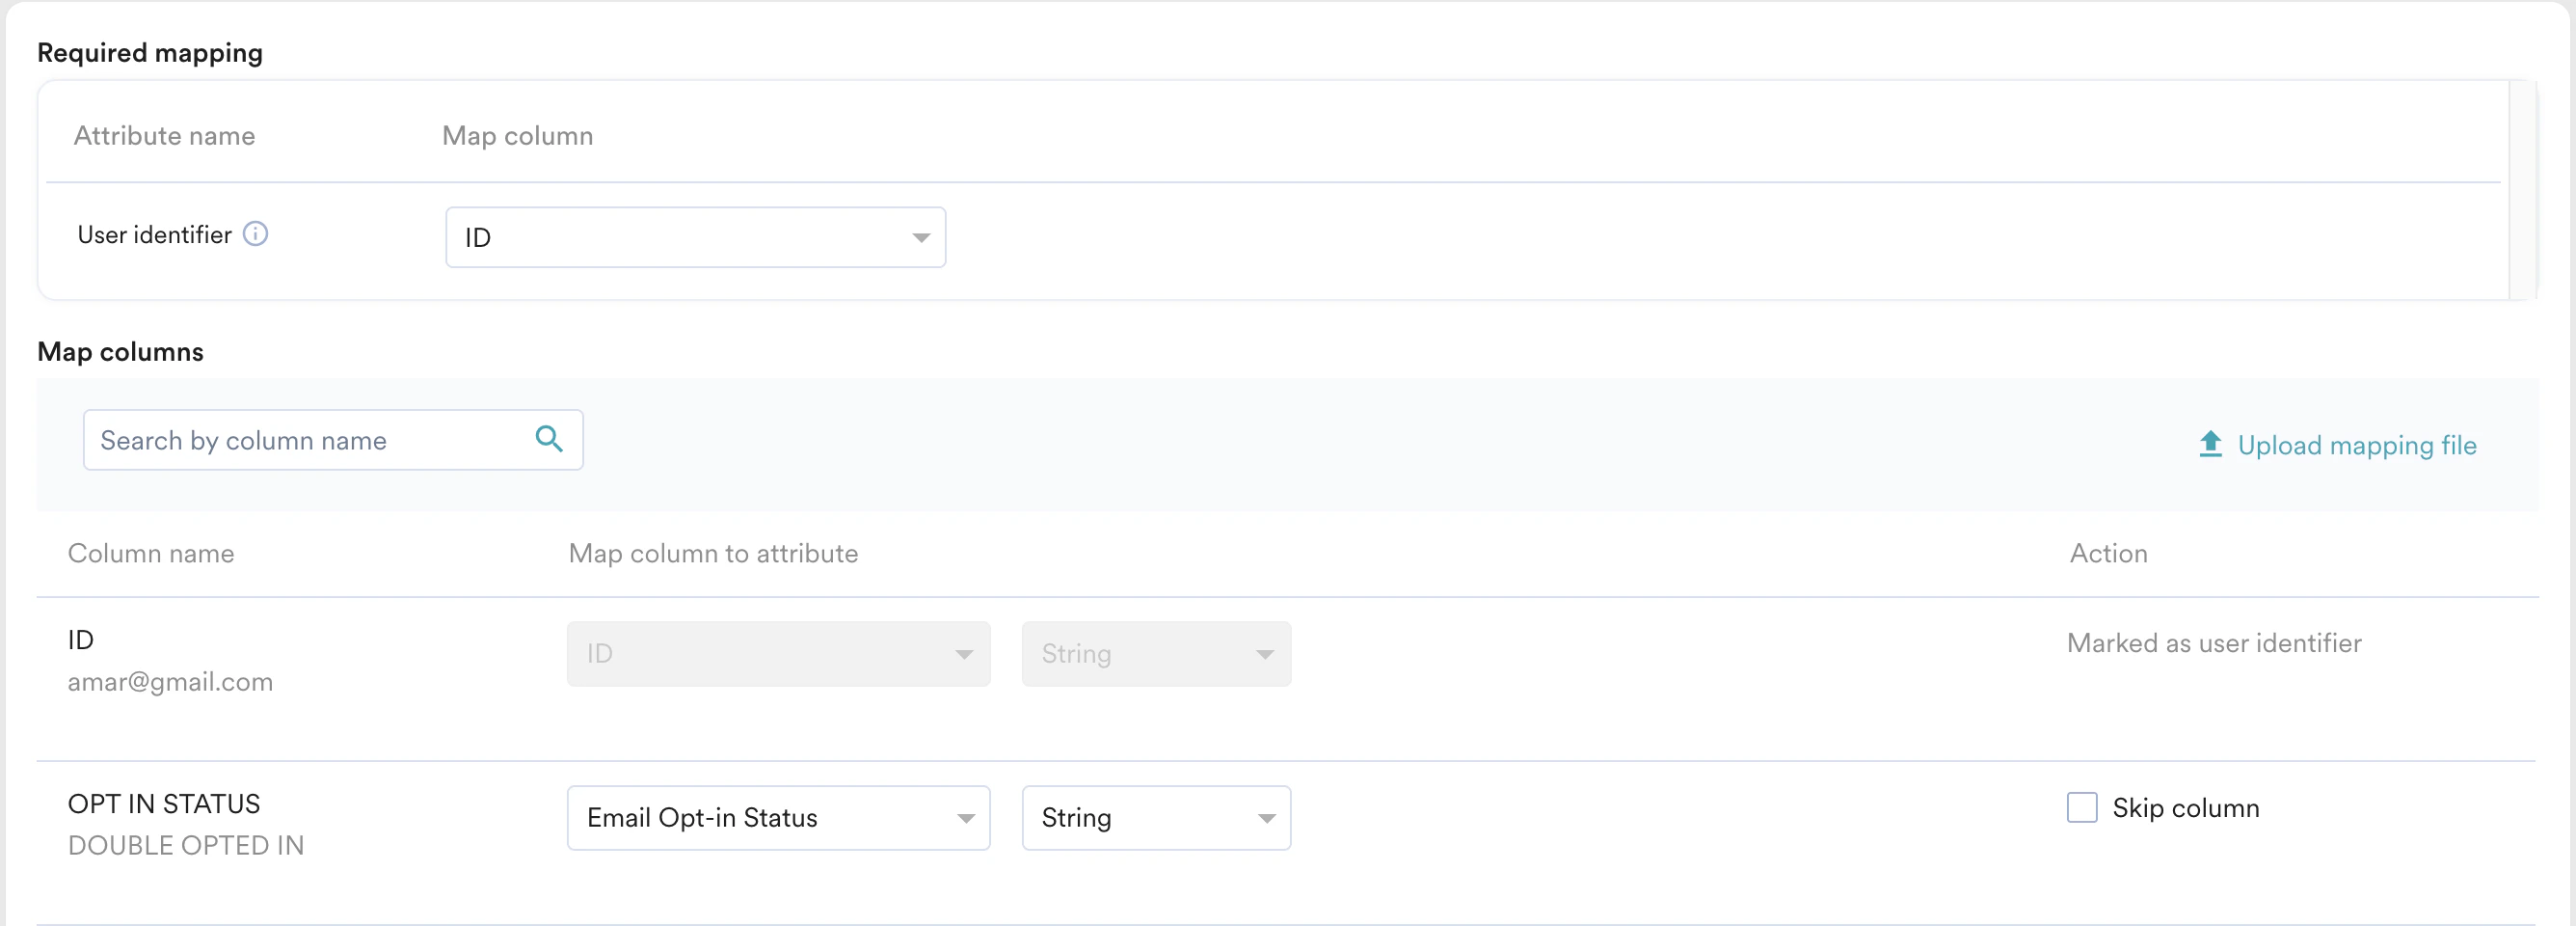
 7. Under **Map columns**, map your *Identifier* column (in this example, the Email ID) to **ID** and Opt-in status column to the *Email Opt-in Status* attribute. The categories are preloaded in a **String** format.
 8. Select the **Do not create new users** option if you want to exclusively modify the profiles of users who are already in your MoEngage account.
9. Turn the **Save as a file segment** toggle on if you want the users in the uploaded CSV file to be saved as a segment.
10. Turn the **Send import status** toggle on and select an email ID to send the import status to that ID. Click **Next**.
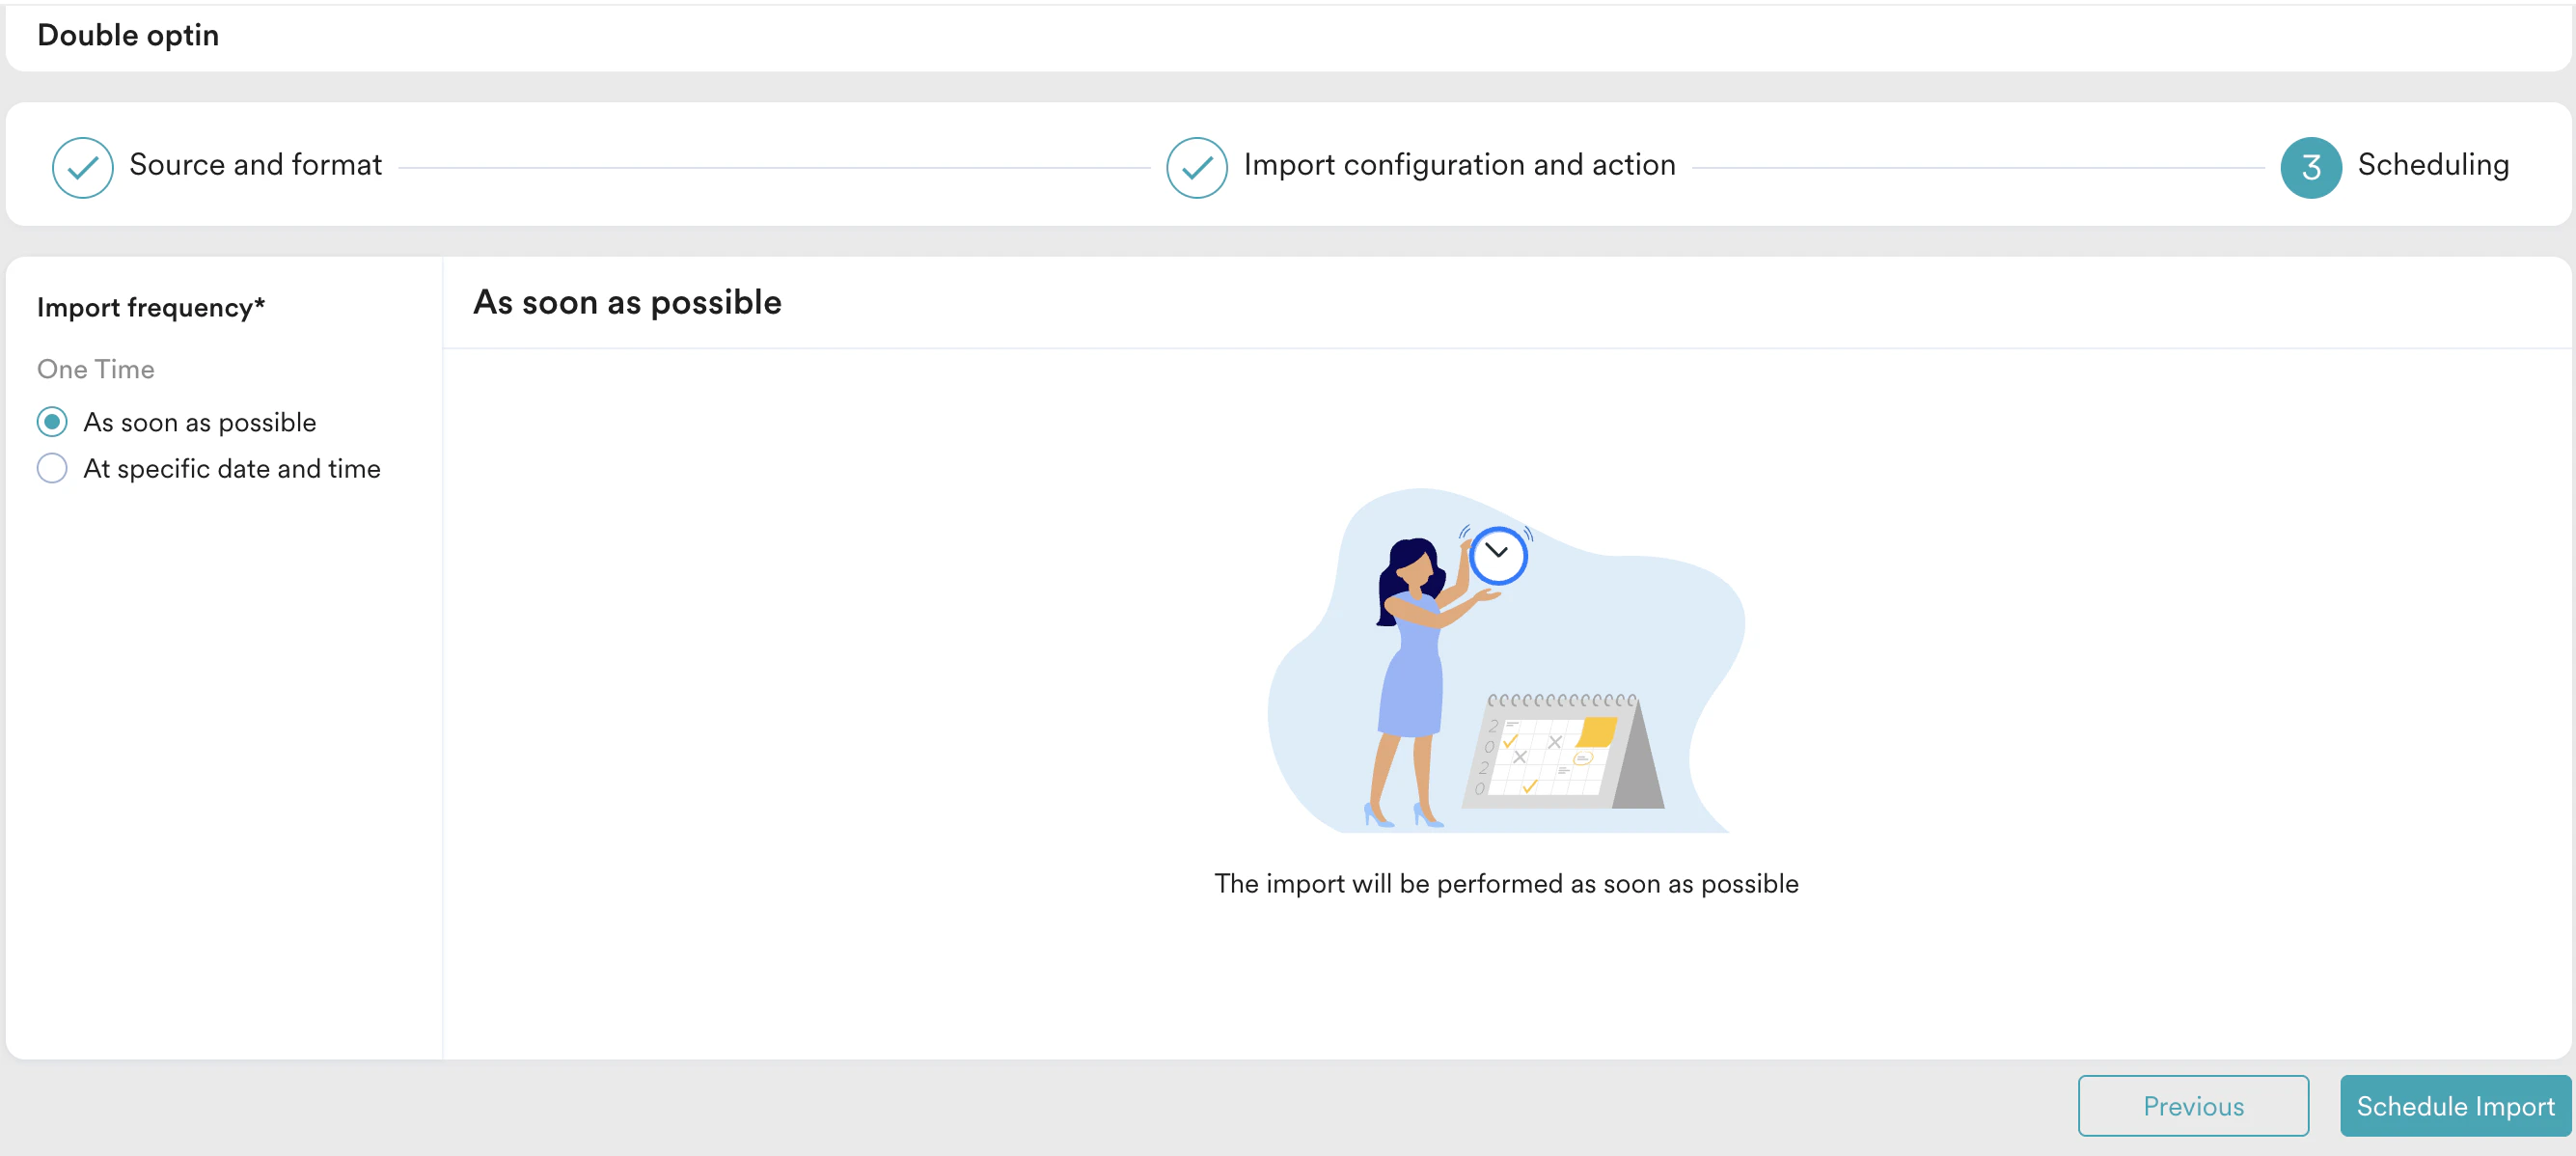
11. On the following screen, select the **Import frequency**. Click **Schedule Import**.
8. Select the **Do not create new users** option if you want to exclusively modify the profiles of users who are already in your MoEngage account.
9. Turn the **Save as a file segment** toggle on if you want the users in the uploaded CSV file to be saved as a segment.
10. Turn the **Send import status** toggle on and select an email ID to send the import status to that ID. Click **Next**.
11. On the following screen, select the **Import frequency**. Click **Schedule Import**.
 12. After the sync is successful, navigate to User Profiles to verify the same. Perform the following steps to access user profiles:
1. Navigate to **Segment** > **Create Segment**.
2. On the **Create segment** page, search for ID or name in the search bar in the upper-right corner.
3. After searching, the modal loads with the required information. Clicking the user profile name takes you to the user profile.
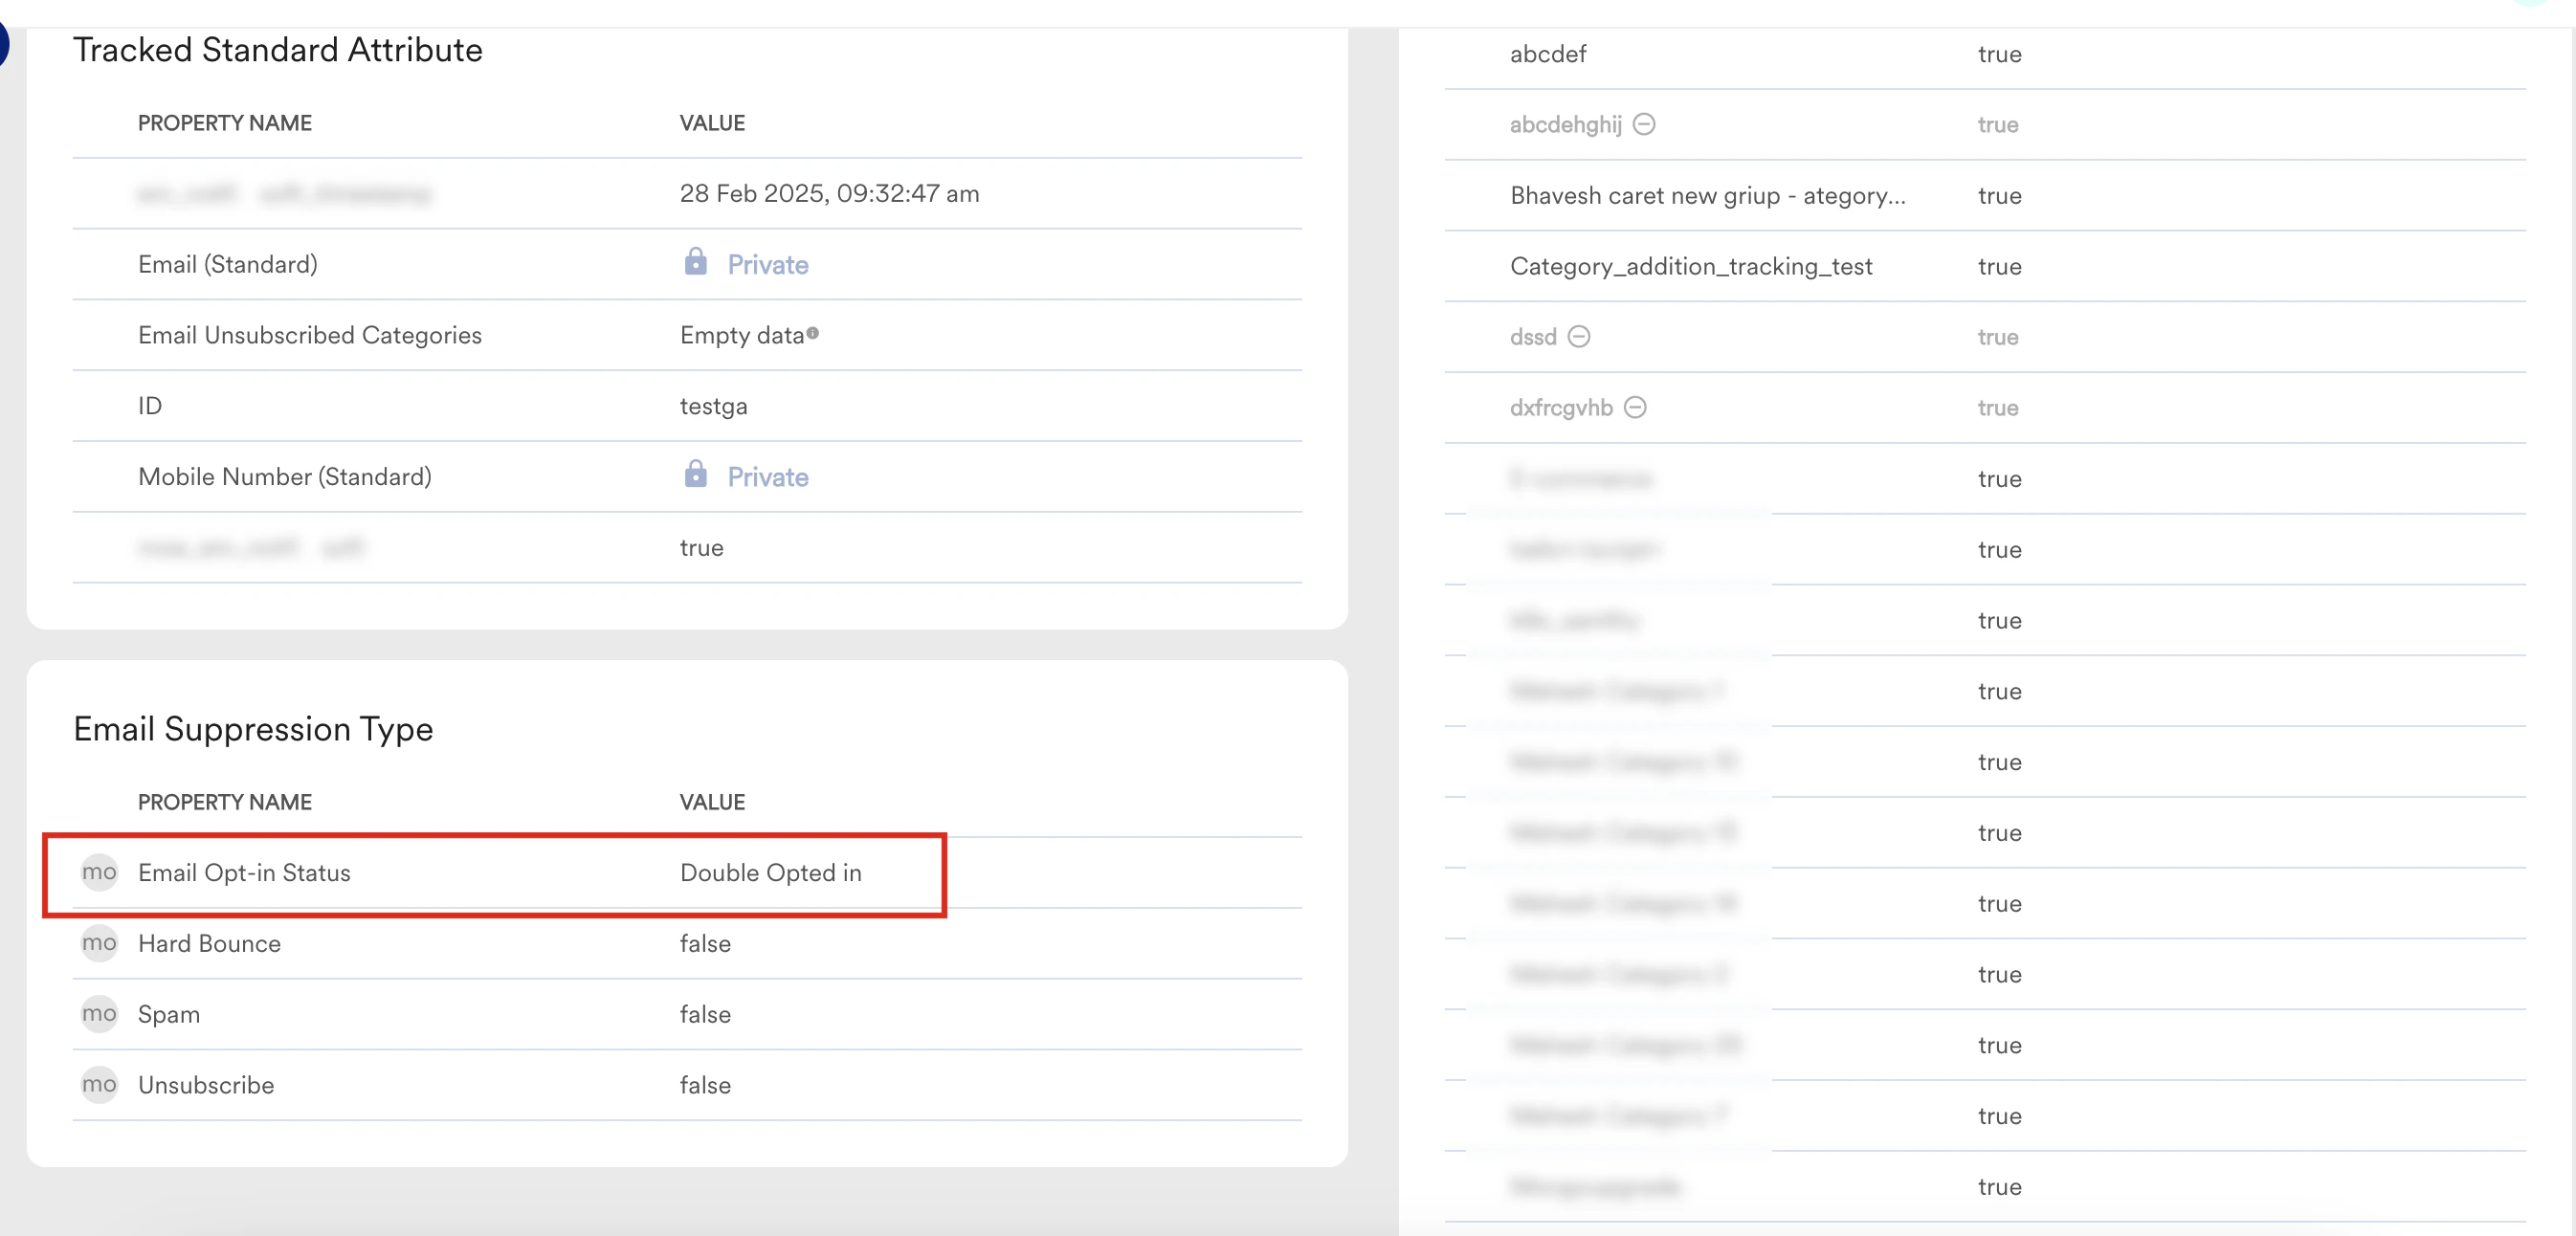
4. In the User Profile, you can view the **Email Opt-in Status** in the **Email Suppression Type**.
12. After the sync is successful, navigate to User Profiles to verify the same. Perform the following steps to access user profiles:
1. Navigate to **Segment** > **Create Segment**.
2. On the **Create segment** page, search for ID or name in the search bar in the upper-right corner.
3. After searching, the modal loads with the required information. Clicking the user profile name takes you to the user profile.
4. In the User Profile, you can view the **Email Opt-in Status** in the **Email Suppression Type**.
 **If you are using the double opt-in mechanism for the first time, perform the following steps to update the opt-in status of users:**
1. **Create a Landing Page**: This page helps capture the user's consent.
* **Landing page is enabled for your account**: Create a landing page in the MoEngage dashboard. For more information, refer to [Create a Landing Page](/user-guide/content/landing-pages/create/create-a-landing-page).
* **Landing page is not enabled for your account**: Create your own landing page to collect the double opt-in preference of the user. Trigger the [Email Opt-in Management API of MoEngage](https://www.moengage.com/docs/api/opt-in-management/update-user-email-opt-in-preferences) to pass this information back to MoEngage.
2. **Create a Periodic Flow campaign**: This helps send follow-up emails asking the users for explicit permission. While creating the periodic flow campaign, define the following:
1. In step 2, **When will users enter the flow**, define the flow entry condition.
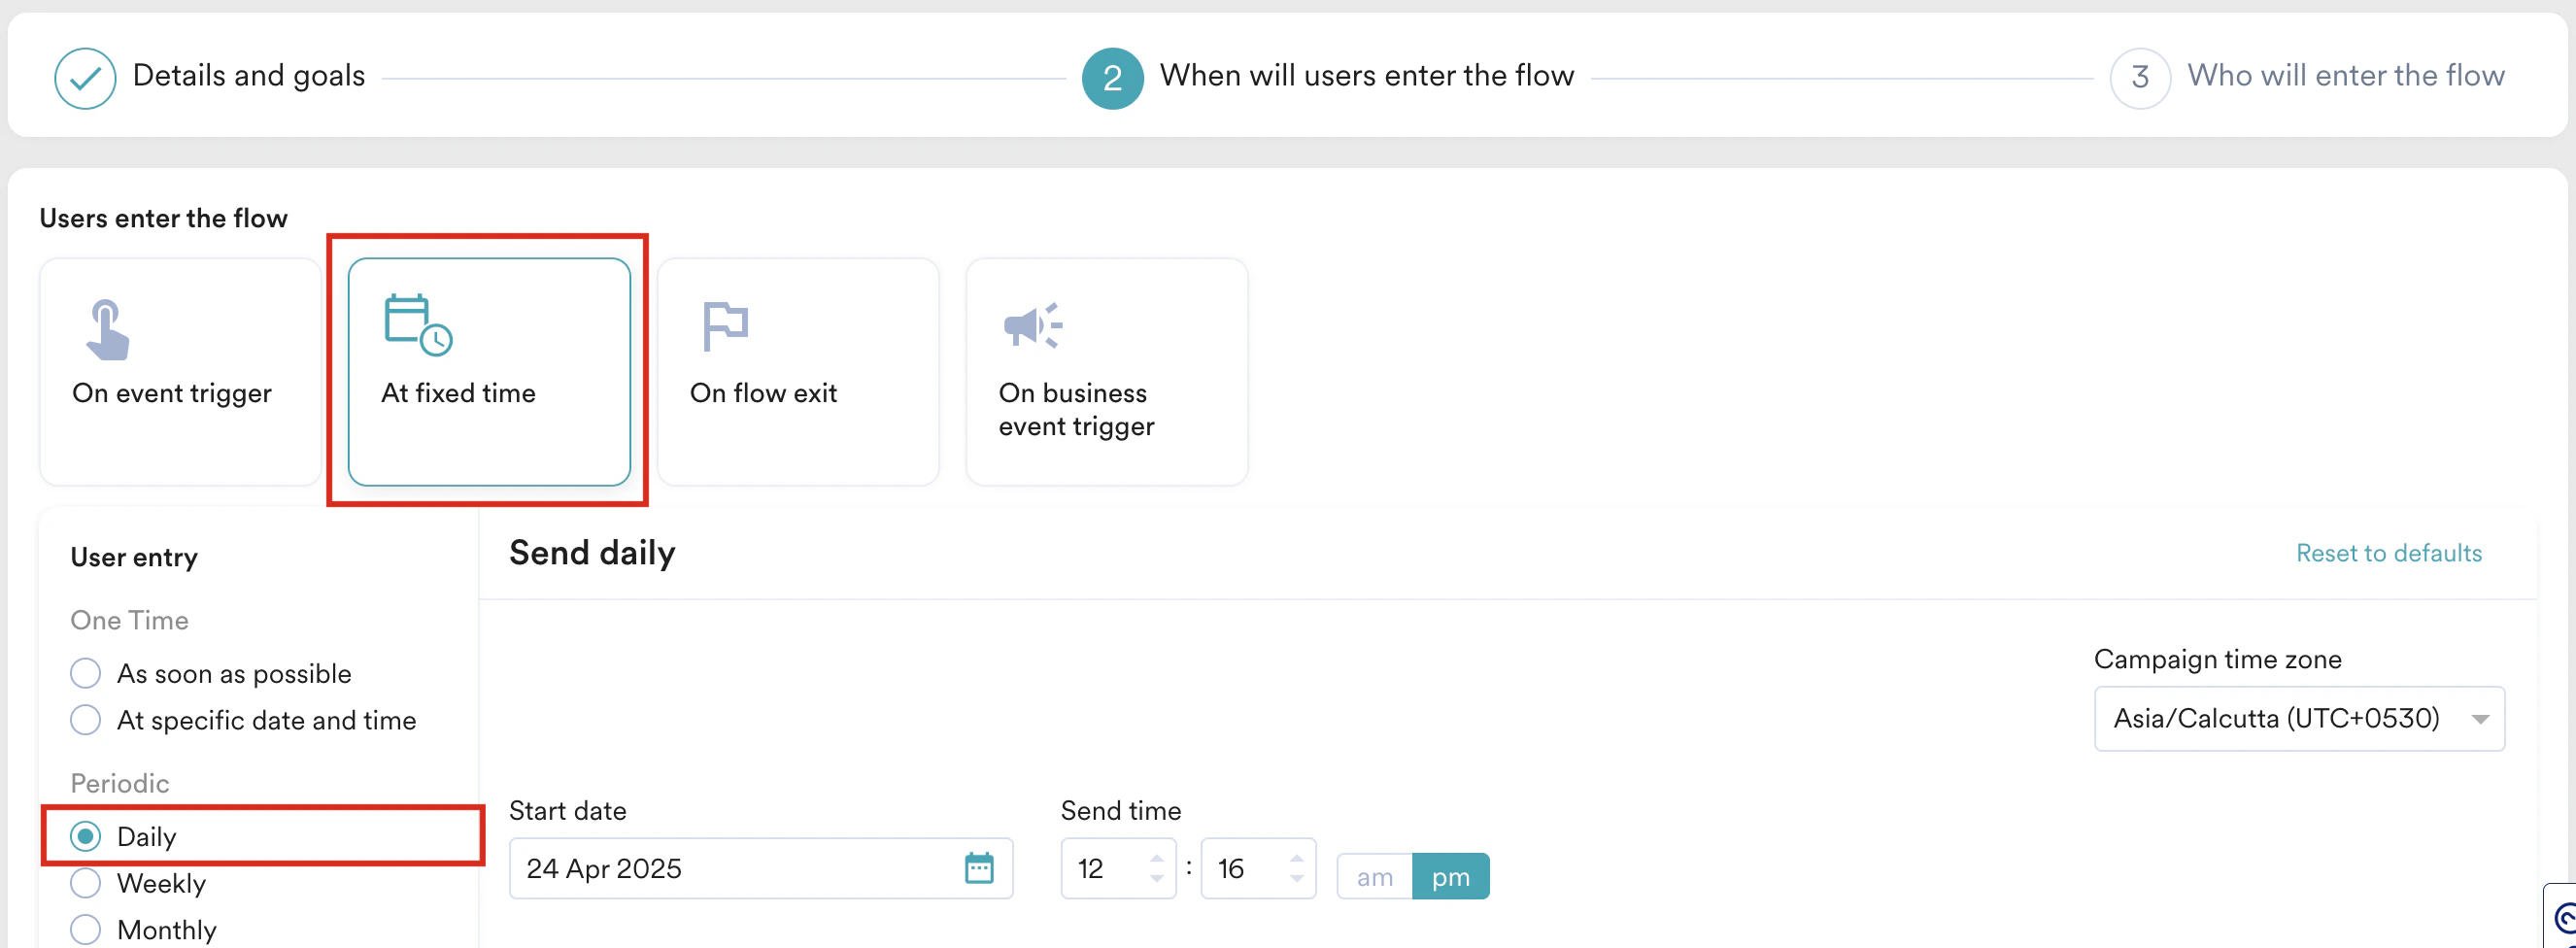
1. Under **User enter the flow**, click **At fixed time**.
2. Under **Periodic**, click **Daily**.
**If you are using the double opt-in mechanism for the first time, perform the following steps to update the opt-in status of users:**
1. **Create a Landing Page**: This page helps capture the user's consent.
* **Landing page is enabled for your account**: Create a landing page in the MoEngage dashboard. For more information, refer to [Create a Landing Page](/user-guide/content/landing-pages/create/create-a-landing-page).
* **Landing page is not enabled for your account**: Create your own landing page to collect the double opt-in preference of the user. Trigger the [Email Opt-in Management API of MoEngage](https://www.moengage.com/docs/api/opt-in-management/update-user-email-opt-in-preferences) to pass this information back to MoEngage.
2. **Create a Periodic Flow campaign**: This helps send follow-up emails asking the users for explicit permission. While creating the periodic flow campaign, define the following:
1. In step 2, **When will users enter the flow**, define the flow entry condition.
1. Under **User enter the flow**, click **At fixed time**.
2. Under **Periodic**, click **Daily**.
 2. In step 3, **Who will enter the flow**, define the target audience.
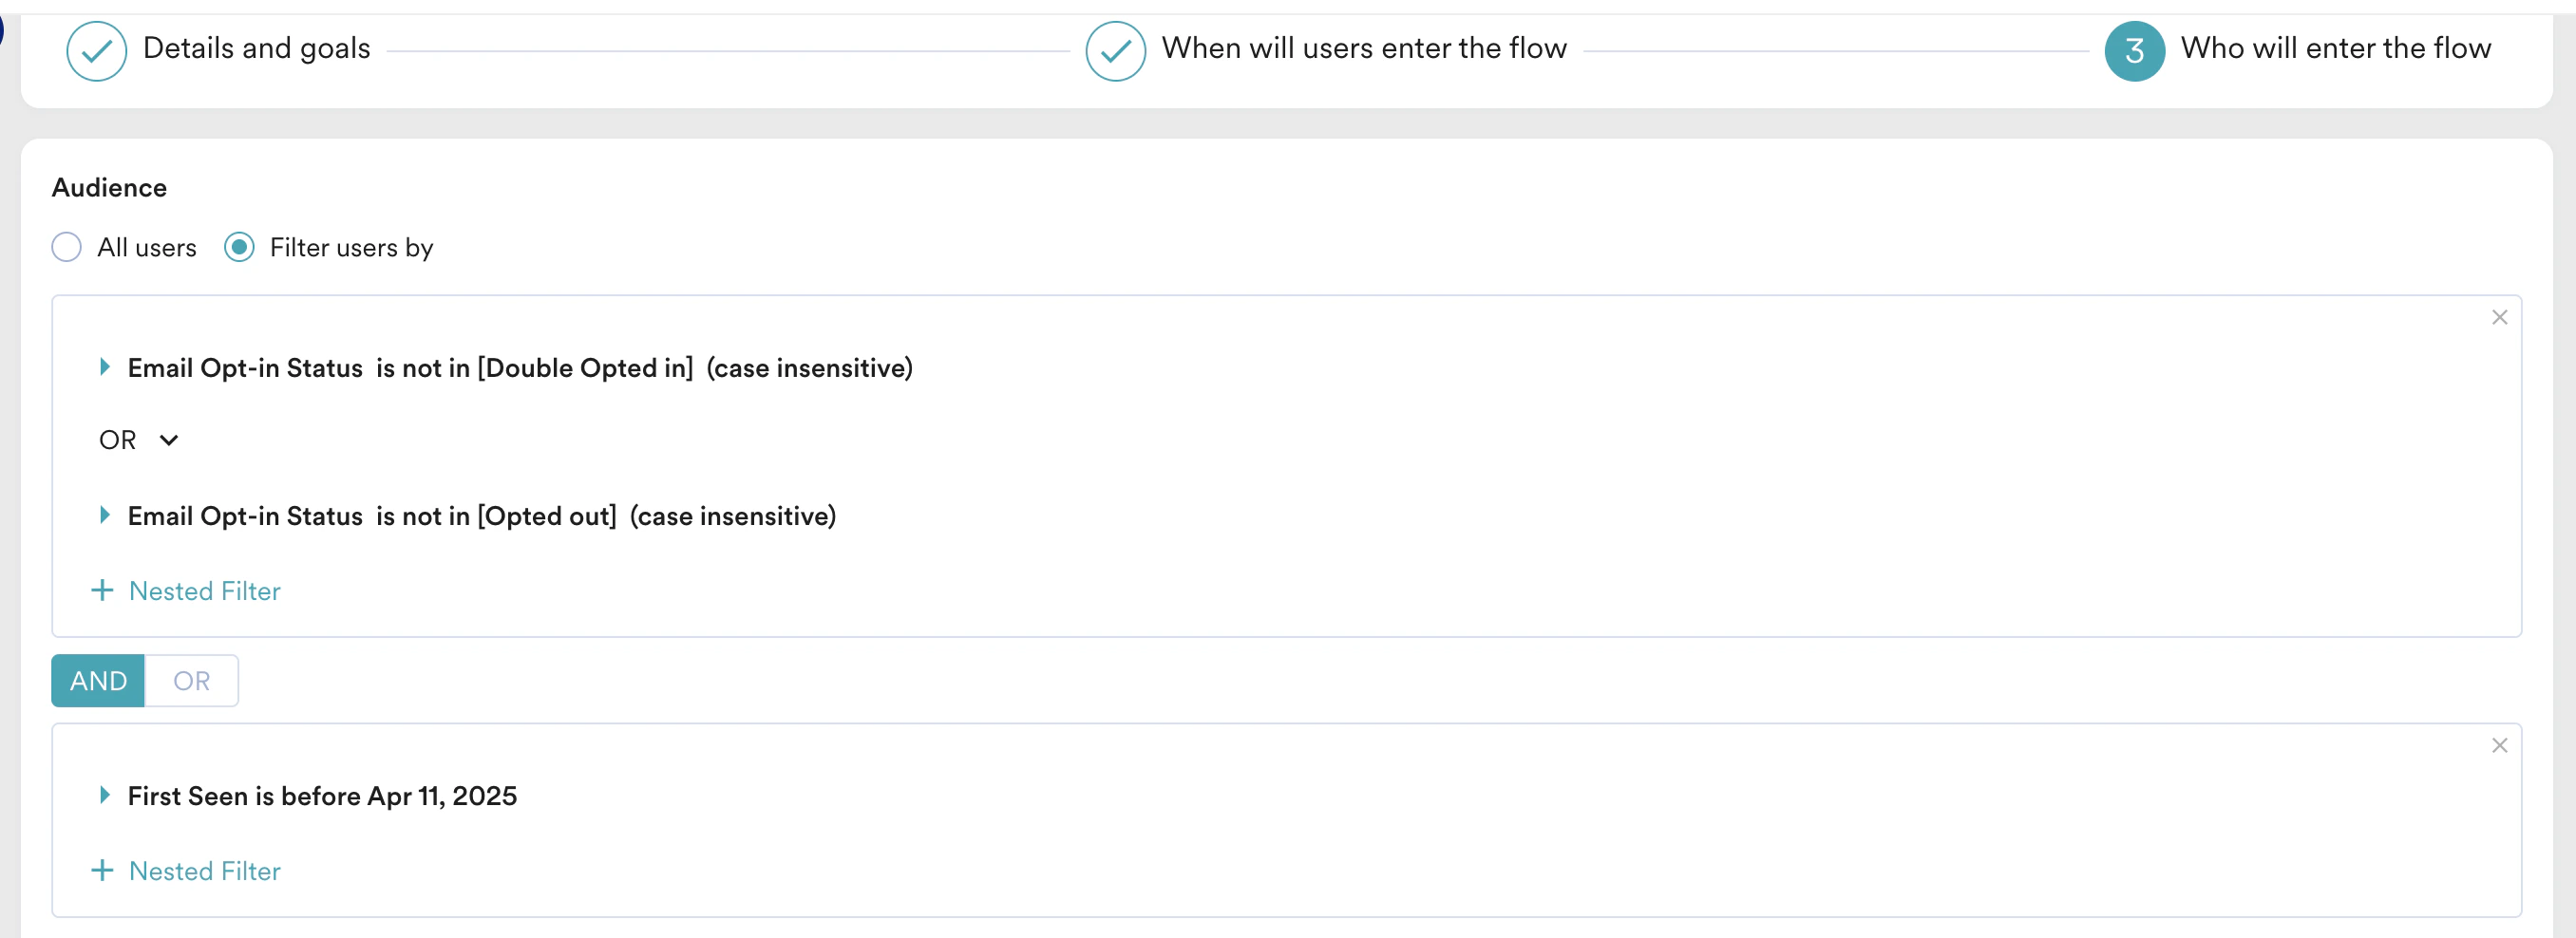
1. Under **Audience**, click the **Filter users by** option and then click the **User property** tab.
2. Select the **Email Opt-in Status** attribute as not equal to *Double opted in*.
3. Click **+ Nested Filter** and select **OR**.
4. Select the **Email Opt-in Status** attribute as not equal to *Opted out*.
5. Click **+ Filter** and click **AND**.
6. Click the **User property** tab.
7. Select **First Seen** as before the day you configured Double opt-in (in the image below, consider the double opt-in is configured on April 12, 2025). For more information, refer to [Create a Flow](/user-guide/flows-cross-channel-messaging/create/create-flows/create-a-flow).
2. In step 3, **Who will enter the flow**, define the target audience.
1. Under **Audience**, click the **Filter users by** option and then click the **User property** tab.
2. Select the **Email Opt-in Status** attribute as not equal to *Double opted in*.
3. Click **+ Nested Filter** and select **OR**.
4. Select the **Email Opt-in Status** attribute as not equal to *Opted out*.
5. Click **+ Filter** and click **AND**.
6. Click the **User property** tab.
7. Select **First Seen** as before the day you configured Double opt-in (in the image below, consider the double opt-in is configured on April 12, 2025). For more information, refer to [Create a Flow](/user-guide/flows-cross-channel-messaging/create/create-flows/create-a-flow).
 3. Define the series of communication at a frequency of your choice.
**Perform the following steps to update the opt-in status of new users:**
1. **Create a Landing Page**: This page helps capture the user's consent. Create a landing page in the MoEngage dashboard. For more information, refer to [Create a Landing Page](/user-guide/content/landing-pages/create/create-a-landing-page).
2. **Create an email alert**: This alert helps deliver the consent-seeking email when the user signs up. Make sure to follow the points below while [creating an email alert](/user-guide/settings/reports-and-alerts/alert-management/getting-started/create-an-alert):
* Define the email alert content for your consent-seeking email.
* Add the link to the landing page created above as the primary CTA in your alert content.
3. **Create a Connector campaign**: This helps update the opt-in status of users submitting preferences on the created landing page by making an API call to the [Email Optin Management API](https://www.moengage.com/docs/api/opt-in-management/update-user-email-opt-in-preferences) of MoEngage. Perform the following steps to create a connector campaign:
1. Select the delivery type as **Event Triggered**.
2. In step 1, **Target users**, define the **Trigger criteria** as users who have executed the *Response Submitted* event with the attribute **Landing Page Id**\*.
3. Define the series of communication at a frequency of your choice.
**Perform the following steps to update the opt-in status of new users:**
1. **Create a Landing Page**: This page helps capture the user's consent. Create a landing page in the MoEngage dashboard. For more information, refer to [Create a Landing Page](/user-guide/content/landing-pages/create/create-a-landing-page).
2. **Create an email alert**: This alert helps deliver the consent-seeking email when the user signs up. Make sure to follow the points below while [creating an email alert](/user-guide/settings/reports-and-alerts/alert-management/getting-started/create-an-alert):
* Define the email alert content for your consent-seeking email.
* Add the link to the landing page created above as the primary CTA in your alert content.
3. **Create a Connector campaign**: This helps update the opt-in status of users submitting preferences on the created landing page by making an API call to the [Email Optin Management API](https://www.moengage.com/docs/api/opt-in-management/update-user-email-opt-in-preferences) of MoEngage. Perform the following steps to create a connector campaign:
1. Select the delivery type as **Event Triggered**.
2. In step 1, **Target users**, define the **Trigger criteria** as users who have executed the *Response Submitted* event with the attribute **Landing Page Id**\*.
 3. Under **Select audience**, click **All users**.
4. In step 2, **Content**, select **Method** as **PUT** and add **Webhook URL** as\
`https://api-{{0X}}.moengage.com/v1.0/opt-in-management/user-preferences`.
The 'X' in the API Endpoint URL refers to the MoEngage Data Center (DC). MoEngage maintains different data centres for different clients. You can find your DC number (value of X) and replace the value of 'X' in the URL by referring to the DC and API endpoint mapping [here](/user-guide/data/key-concepts/data-centers-in-moengage).
5. Provide **Headers** as:
1. Content-Type: application/json
2. Authorization: Basic Base64\_ENCODED\_APPKEY\_APIKEY
3. MOE-APPKEY: Workspace ID
For more information, refer to [Email Optin Management API](https://www.moengage.com/docs/api/opt-in-management/update-user-email-opt-in-preferences).
6. Select the **Body type** as **Raw** and add the following Jinja code: Jinja
```jinja wrap theme={null}
{
"user_preferences": {
"customer_id": "{{UserAttribute['ID']}}",
"email_id": "{{UserAttribute['Email (Standard)']}}",
"categories": {% set data = {} %}{% for i in %} {% set _ = data.update({i|replace(" ","_"):true}) %}{% endfor %}{{data|replace("'",'"')|replace("True","true")}},
"opt_in_status": "DOUBLE_OPTED_IN",
"channel": "email"
}
}
```
* The Jinja above assumes that you track Double opt-in at the Subcategory level and that the Category Name is the same as the Category Display Name with "\_" instead of spaces.
* Make sure to replace `` with the event attribute of the *Response Submitted* event that contains the user's selected categories.
7. Publish the connector campaign.
4. **Create a Periodic Flow campaign**: This helps send follow-up emails asking the users for explicit permission. While creating the periodic flow campaign, make sure to define the following:
1. In step 2, **When will users enter the flow**, define the flow entry criteria.
2. Under **User enter the flow**, click **At fixed time**.
3. Under **Periodic**, click **Daily**.
3. Under **Select audience**, click **All users**.
4. In step 2, **Content**, select **Method** as **PUT** and add **Webhook URL** as\
`https://api-{{0X}}.moengage.com/v1.0/opt-in-management/user-preferences`.
The 'X' in the API Endpoint URL refers to the MoEngage Data Center (DC). MoEngage maintains different data centres for different clients. You can find your DC number (value of X) and replace the value of 'X' in the URL by referring to the DC and API endpoint mapping [here](/user-guide/data/key-concepts/data-centers-in-moengage).
5. Provide **Headers** as:
1. Content-Type: application/json
2. Authorization: Basic Base64\_ENCODED\_APPKEY\_APIKEY
3. MOE-APPKEY: Workspace ID
For more information, refer to [Email Optin Management API](https://www.moengage.com/docs/api/opt-in-management/update-user-email-opt-in-preferences).
6. Select the **Body type** as **Raw** and add the following Jinja code: Jinja
```jinja wrap theme={null}
{
"user_preferences": {
"customer_id": "{{UserAttribute['ID']}}",
"email_id": "{{UserAttribute['Email (Standard)']}}",
"categories": {% set data = {} %}{% for i in %} {% set _ = data.update({i|replace(" ","_"):true}) %}{% endfor %}{{data|replace("'",'"')|replace("True","true")}},
"opt_in_status": "DOUBLE_OPTED_IN",
"channel": "email"
}
}
```
* The Jinja above assumes that you track Double opt-in at the Subcategory level and that the Category Name is the same as the Category Display Name with "\_" instead of spaces.
* Make sure to replace `` with the event attribute of the *Response Submitted* event that contains the user's selected categories.
7. Publish the connector campaign.
4. **Create a Periodic Flow campaign**: This helps send follow-up emails asking the users for explicit permission. While creating the periodic flow campaign, make sure to define the following:
1. In step 2, **When will users enter the flow**, define the flow entry criteria.
2. Under **User enter the flow**, click **At fixed time**.
3. Under **Periodic**, click **Daily**. 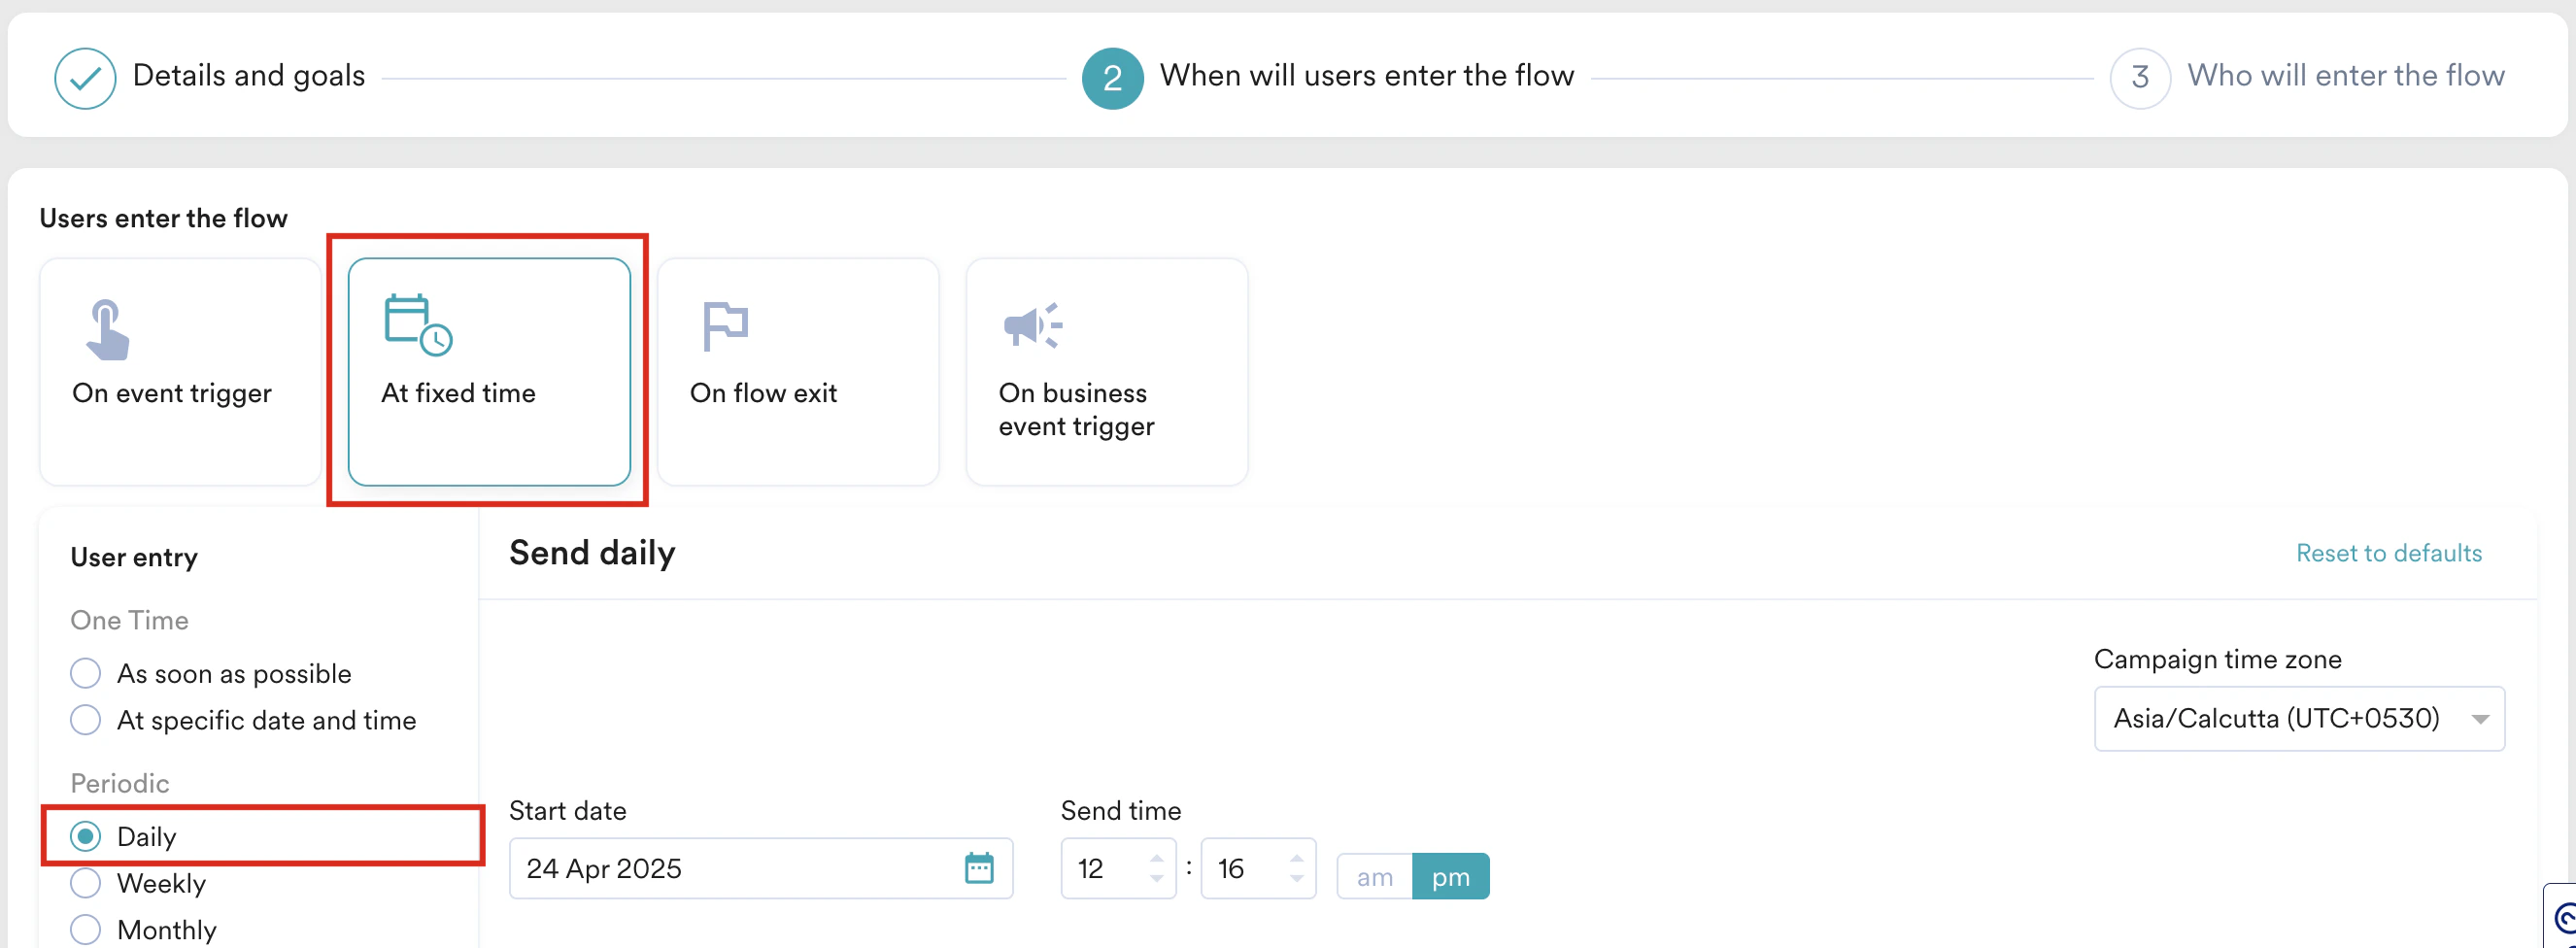 4. In step 3, **Who will enter the flow,** define the audience.
5. Under **Audience**, click the **Filter users by** option and then click the **User behavior** tab.
6. Select users who have executed the *Signup Activity* event (your sign-up event) at least once in the last 30 Days.
7. Click **+ Filter** and click **AND**.
8. Click the **User property** tab and select the **Email Opt-in Status** attribute as not equal to *Double opted in*.
9. Click **+ Nested Filter** and select **OR**.
10. Click the **User property** tab and select the **Email Opt-in Status** attribute as not equal to *Opted out*. For more information, refer to [Create a Flow](/user-guide/flows-cross-channel-messaging/create/create-flows/create-a-flow).
4. In step 3, **Who will enter the flow,** define the audience.
5. Under **Audience**, click the **Filter users by** option and then click the **User behavior** tab.
6. Select users who have executed the *Signup Activity* event (your sign-up event) at least once in the last 30 Days.
7. Click **+ Filter** and click **AND**.
8. Click the **User property** tab and select the **Email Opt-in Status** attribute as not equal to *Double opted in*.
9. Click **+ Nested Filter** and select **OR**.
10. Click the **User property** tab and select the **Email Opt-in Status** attribute as not equal to *Opted out*. For more information, refer to [Create a Flow](/user-guide/flows-cross-channel-messaging/create/create-flows/create-a-flow). 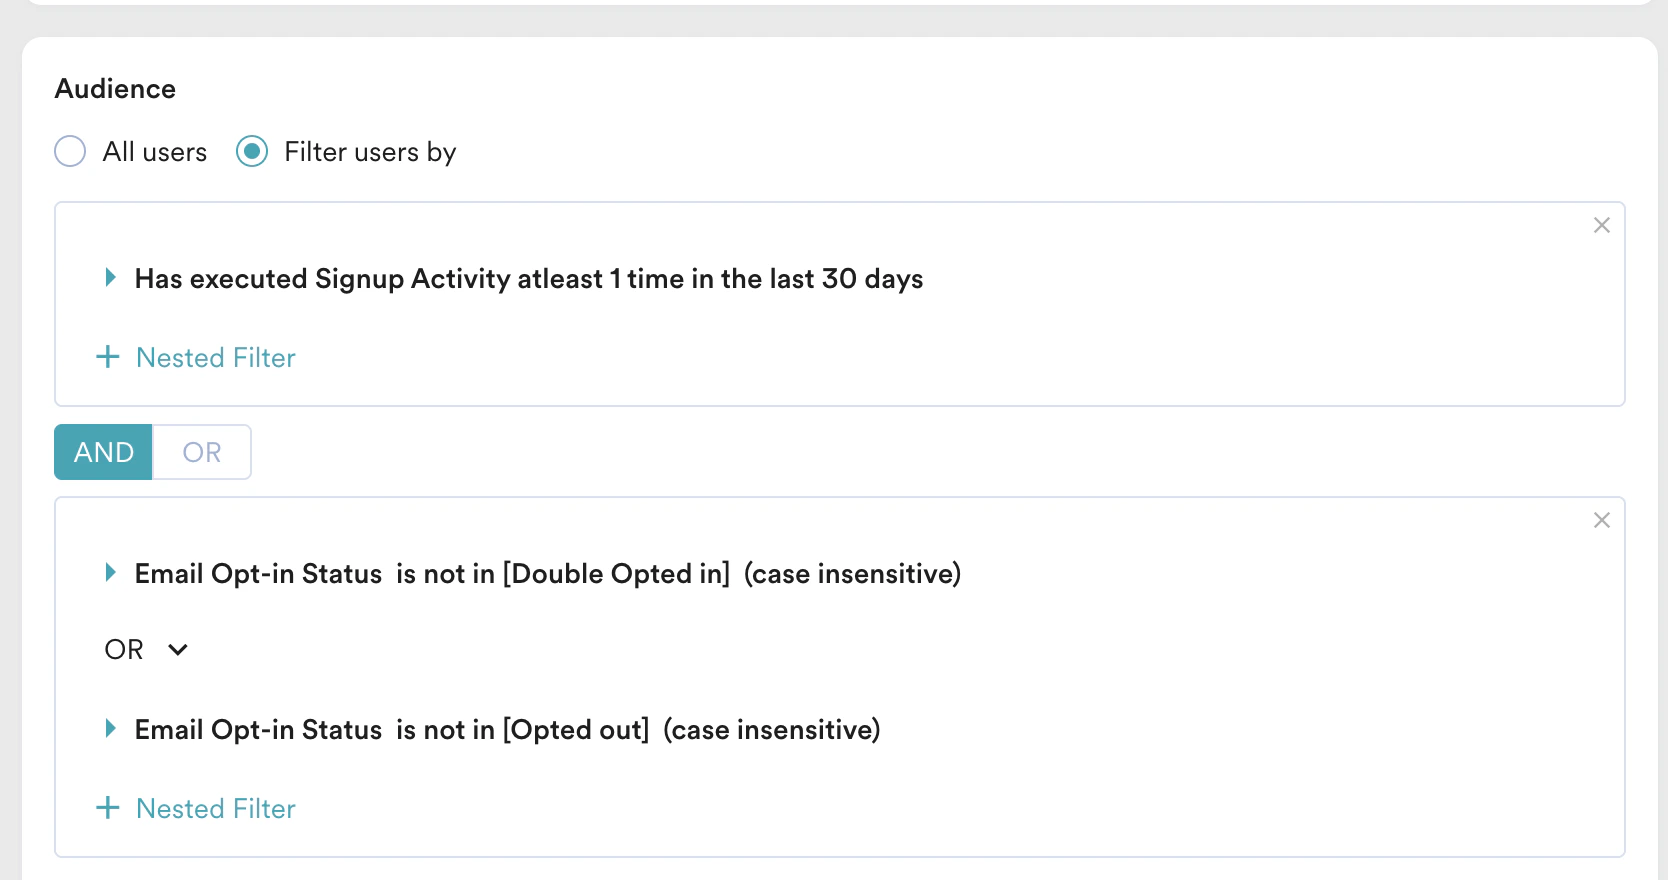 11. Add a wait stage to have a suitable gap between the first email alert and the reminders.
12. The series of communication at a frequency of your choice.
Perform the following steps to update the opt-in status of new users:
1. **Create a Landing Page**: This page helps capture the user's consent. Create your own landing page to collect the user's double opt-in preference. Trigger the [Email Opt-in Management API of MoEngage](https://www.moengage.com/docs/api/opt-in-management/update-user-email-opt-in-preferences) to pass this information back to MoEngage.
2. **Create an email alert**: This alert helps deliver the consent-seeking email when the user signs up. Make sure to follow the points below while creating an email alert:
* Define the alert content of your consent-seeking email.
* Add the link to the landing page created above as the primary CTA in your alert content.
3. **Create a Periodic Flow campaign**: This helps send follow-up emails asking the users for explicit permission. While creating the periodic flow campaign, make sure to define the following:
1. In step 2, **When will users enter the flow**, define the flow entry condition.
2. Under **User enter the flow**, click **At fixed time**.
3. Under **Periodic**, click **Daily**.
4. In step 3, **Who will enter the flow**, define the target audience.
5. Under **Audience**, click the **Filter users by** option and then click the **User behavior** tab.
6. Select users who have executed the *Signup Activity* event (your sign-up event) at least once in the last 30 Days.
7. Click **+ Filter** and click **AND**.
8. Click the **User property** tab and select the **Email Opt-in Status** attribute as not equal to *Double opted in*.
9. Click **+ Nested Filter** and select **OR**.
10. Click the **User property** tab and select the **Email Opt-in Status** attribute as not equal to *Opted out*. For more information, refer to [Create a Flow](/user-guide/flows-cross-channel-messaging/create/create-flows/create-a-flow).
11. Add a wait stage to have a suitable gap between the first email alert and the reminders.
12. The series of communication at a frequency of your choice.
**Perform the following steps to update the opt-in status of new users:**
1. **Create a Landing Page**: This page helps capture the user's consent. Create a landing page in the MoEngage dashboard. For more information, refer to [Create a Landing Page](/user-guide/content/landing-pages/create/create-a-landing-page).
2. **Create an Event Triggered email**: This campaign helps deliver the consent-seeking email when the user signs up. Make sure to follow the points below while creating an event-triggered email:
* Define the content type of your event-triggered email to be **Transactional**.
* Define your campaign content for your consent-seeking email.
* Add the link to the landing page created above to the primary CTA in your email's content.
3. **Create a Connector campaign**: This helps update the opt-in status of users submitting preferences in the created landing page by making an API call to the [Email Optin Management API](https://www.moengage.com/docs/api/opt-in-management/update-user-email-opt-in-preferences) of MoEngage. Make sure to follow the points below while creating a connector campaign:
1. Select the delivery type as **Event Triggered**.
2. In step 1, **Target users**, define the **Trigger criteria** as users who have executed the\_Response Submitted\_ event with the attribute **Landing Page Id**\*.\\
3. Under **Select audience**, click **All users**.
4. In step 2, **Content**, select **Method** as **PUT** and add **Webhook URL** as\
`https://api-{{0X}}.moengage.com/v1.0/opt-in-management/user-preferences`.
11. Add a wait stage to have a suitable gap between the first email alert and the reminders.
12. The series of communication at a frequency of your choice.
Perform the following steps to update the opt-in status of new users:
1. **Create a Landing Page**: This page helps capture the user's consent. Create your own landing page to collect the user's double opt-in preference. Trigger the [Email Opt-in Management API of MoEngage](https://www.moengage.com/docs/api/opt-in-management/update-user-email-opt-in-preferences) to pass this information back to MoEngage.
2. **Create an email alert**: This alert helps deliver the consent-seeking email when the user signs up. Make sure to follow the points below while creating an email alert:
* Define the alert content of your consent-seeking email.
* Add the link to the landing page created above as the primary CTA in your alert content.
3. **Create a Periodic Flow campaign**: This helps send follow-up emails asking the users for explicit permission. While creating the periodic flow campaign, make sure to define the following:
1. In step 2, **When will users enter the flow**, define the flow entry condition.
2. Under **User enter the flow**, click **At fixed time**.
3. Under **Periodic**, click **Daily**.
4. In step 3, **Who will enter the flow**, define the target audience.
5. Under **Audience**, click the **Filter users by** option and then click the **User behavior** tab.
6. Select users who have executed the *Signup Activity* event (your sign-up event) at least once in the last 30 Days.
7. Click **+ Filter** and click **AND**.
8. Click the **User property** tab and select the **Email Opt-in Status** attribute as not equal to *Double opted in*.
9. Click **+ Nested Filter** and select **OR**.
10. Click the **User property** tab and select the **Email Opt-in Status** attribute as not equal to *Opted out*. For more information, refer to [Create a Flow](/user-guide/flows-cross-channel-messaging/create/create-flows/create-a-flow).
11. Add a wait stage to have a suitable gap between the first email alert and the reminders.
12. The series of communication at a frequency of your choice.
**Perform the following steps to update the opt-in status of new users:**
1. **Create a Landing Page**: This page helps capture the user's consent. Create a landing page in the MoEngage dashboard. For more information, refer to [Create a Landing Page](/user-guide/content/landing-pages/create/create-a-landing-page).
2. **Create an Event Triggered email**: This campaign helps deliver the consent-seeking email when the user signs up. Make sure to follow the points below while creating an event-triggered email:
* Define the content type of your event-triggered email to be **Transactional**.
* Define your campaign content for your consent-seeking email.
* Add the link to the landing page created above to the primary CTA in your email's content.
3. **Create a Connector campaign**: This helps update the opt-in status of users submitting preferences in the created landing page by making an API call to the [Email Optin Management API](https://www.moengage.com/docs/api/opt-in-management/update-user-email-opt-in-preferences) of MoEngage. Make sure to follow the points below while creating a connector campaign:
1. Select the delivery type as **Event Triggered**.
2. In step 1, **Target users**, define the **Trigger criteria** as users who have executed the\_Response Submitted\_ event with the attribute **Landing Page Id**\*.\\
3. Under **Select audience**, click **All users**.
4. In step 2, **Content**, select **Method** as **PUT** and add **Webhook URL** as\
`https://api-{{0X}}.moengage.com/v1.0/opt-in-management/user-preferences`.
The 'X' in the API Endpoint URL refers to the MoEngage Data Center (DC). MoEngage maintains different data centres for different clients. You can find your DC number (value of X) and replace the value of 'X' in the URL by referring to the DC and API endpoint mapping [here](/user-guide/data/key-concepts/data-centers-in-moengage).
5. Provide **Headers** as:
1. Content-Type: application/json
2. Authorization: Basic Base64\_ENCODED\_APPKEY\_APIKEY
3. MOE-APPKEY: Workspace ID\
For more information, refer to [Email Optin Management API](https://www.moengage.com/docs/api/opt-in-management/update-user-email-opt-in-preferences).
6. Select the **Body type** as **Raw** and add the following Jinja code: Jinja
```jinja wrap theme={null}
{
"user_preferences": {
"customer_id": "{{UserAttribute['ID']}}",
"email_id": "{{UserAttribute['Email (Standard)']}}",
"categories": {% set data = {} %}{% for i in %} {% set _ = data.update({i|replace(" ","_"):true}) %}{% endfor %}{{data|replace("'",'"')|replace("True","true")}},
"opt_in_status": "DOUBLE_OPTED_IN",
"channel": "email"
}
}
```
* The above Jinja assumes that you track Double opt-in at the Subcategory level and that the Category Name is the same as the Category Display Name with "\_" instead of spaces.
* Make sure to replace `` with the event attribute of the *Response Submitted* event that contains the user's selected categories.
7. Publish the connector campaign.
4. **Create a Periodic Flow campaign**: This helps send follow-up emails asking the users for explicit permission. While creating the periodic flow campaign, make sure to define the following:
1. In step 2, **When will users enter the flow**, define the flow entry condition.
2. Under **User enter the flow**, click **At fixed time**.
3. Under **Periodic**, click **Daily**.
4. In step 3, **Who will enter the flow**, define the target audience.
5. Under **Audience**, click the **Filter users by** option and then click the **User behavior** tab.
6. Select users who have executed the *Signup Activity* event (your sign-up event) at least once in the last 30 Days.
7. Click **+ Filter** and click **AND**.
8. Click the **User property** tab and select the **Email Opt-in Status** attribute as not equal to *Double opted in*.
9. Click **+ Nested Filter** and select **OR**.
10. Click the **User property** tab and select the **Email Opt-in Status** attribute as not equal to *Opted out*. For more information, refer to [Create a Flow](/user-guide/flows-cross-channel-messaging/create/create-flows/create-a-flow).
11. Add a wait stage to have a suitable gap between the first email alert and the reminders.
12. The series of communication at a frequency of your choice.
Perform the following steps to update the opt-in status of new users:
1. **Create a Landing Page**: This page helps capture the user's consent. Create your own landing page to collect the user's double opt-in preference. Trigger the [Email Opt-in Management API of MoEngage](https://www.moengage.com/docs/api/opt-in-management/update-user-email-opt-in-preferences) to pass this information back to MoEngage.
2. **Create an Event Triggered email**: This campaign helps deliver the consent-seeking email when the user signs up. Make sure to follow the points below while creating an event-triggered email:
* Define the content type of your event-triggered email to be **Transactional**.
* Define the campaign content for your consent-seeking email.
* Add the link to the landing page created above to the Primary CTA in your email's content.
3. **Create a Periodic Flow campaign**: This helps send follow-up emails asking the users for explicit permission. While creating the periodic flow campaign, make sure to define the following:
1. In step 2, **When will users enter the flow**, define the flow entry condition.
2. Under **User enter the flow**, click **At fixed time**.
3. Under **Periodic**, click **Daily**.
4. In step 3, **Who will enter the flow**, define the target audience.
5. Under **Audience**, click the **Filter users by** option and then click the **User behavior** tab.
6. Select users who have executed the *Signup Activity* event (your sign-up event) at least once in the last 30 Days.
7. Click **+ Filter** and click **AND**.
8. Click the **User property** tab and select the **Email Opt-in Status** attribute as not equal to *Double opted in*.
9. Click **+ Nested Filter** and select **OR**.
10. Click the **User property** tab and select the **Email Opt-in Status** attribute as not equal to *Opted out*. For more information, refer to [Create a Flow](/user-guide/flows-cross-channel-messaging/create/create-flows/create-a-flow).
11. Add a wait stage to have a suitable gap between the first email alert and the reminders.
12. The series of communication at a frequency of your choice.
# Balance Engagement and Reachability Using Double Opt-in
While the Double Opt-in method allows you to engage primarily with subscribers who have demonstrated a high level of interest, it's important to acknowledge that this approach can significantly reduce the overall number of subscribers on your list. This trade-off between subscriber quality and quantity is a key consideration for you.
For brands with a presence across different geographical regions, the decision to implement Double Opt-in can be strategically applied at a regional level. This flexibility recognizes that email marketing best practices and legal requirements regarding consent can vary substantially from one part of the world to another.
The [Double Opt-in](/user-guide/campaigns-and-channels/email/getting-started-with-email/configure-email-channel#subscription-management-tab) option of MoEngage allows you to enable or disable the **Send only to double-opted-in users** toggle based on these regional considerations while creating the email campaign. This allows for a tailored approach to email list management. For more information, refer [here](/user-guide/campaigns-and-channels/email/create/create-an-email-campaign).
# FAQs
* If the workspace moves to Double opt-in method, all the existing active campaigns will continue to send to reachable users part of the target audience without considering the *Email Opt-in Status* user attribute's value. While any new promotional email campaign created would consider the **Email Opt-in Status** user attribute's value by default. The same can be changed at a campaign level at the creator's discretion.
* If the workspace moves to Singe Opt-in method from Double Opt-in method, all the active promotional email campaigns would start ignoring the **Email Opt-in Status** user attribute's value to decide the reachability status of the user.
By default, yes, they are carried forward. If user A and B have the same email ID and received consent from A, both A and B are marked as double opted in. However, you can always control this. To do so, please contact the MoEngage Team.
User merge is a process of MoEngage merging the anonymous profile with the identified profile. So at any point in time the merged profile's value is retained.
The user attribute mentioned in the General Settings of email will be used to search for the user with the provided email as the value in the API. If the API is provided with the customer ID, MoEngage uses that to find the user.
* Anytime the users' opt-in status gets updated using the [Email Opt-in Management API](https://www.moengage.com/docs/api/opt-in-management/update-user-email-opt-in-preferences), [Resubscribe API](https://www.moengage.com/docs/api/resubscribe/bulk-resubscribe-users#bulk-resubscribe-users), [Update Subscription Preference API](https://www.moengage.com/docs/api/subscription-preferences/update-subscription-preferences), or via the end-users' interaction, MoEngage raises an event called *Email Optin Status Updated* with the necessary information.\
**Note**: The retention of this event would be the same as any other event tracked in MoEngage. If you want to store this for a longer period, use Streams or other export options provided by MoEngage to store it on your side. Click here to know [more](/user-guide/data/exports).
* If you use PII Tokenization for your emails, ensure you pass the user ID when calling the [Email Opt-in Management API](https://www.moengage.com/docs/api/opt-in-management/update-user-email-opt-in-preferences). MoEngage uses this user ID to locate the user and update their opt-in status. Passing the email ID is ineffective in this case, as MoEngage does not store it.
* If you use PII Encryption to send emails, ensure you pass either the user ID or the decrypted email ID. MoEngage uses this information to locate the associated user and update their opt-in status, or to update the opt-in status of all users having that email ID.
When you enable Double Opt-in, the **Email Opt-in Status** attribute is not automatically created for all existing or new user profiles. The attribute is only created when an explicit opt-in status update is received for that user — such as through the [Opt-in Management API](https://www.moengage.com/docs/api/opt-in-management/update-user-email-opt-in-preferences), user interaction with consent-seeking emails, CSV imports, or other subscription-related updates. User profiles without this attribute are treated the same as users with the value *Optin pending*.
It is recommended to use the [Opt-in Management API](https://www.moengage.com/docs/api/opt-in-management/update-user-email-opt-in-preferences) for updating the **Email Opt-in Status**, especially for new users. This API performs validation on the values passed and only accepts the following backend-defined values: `DOUBLE_OPTED_IN`, `OPTED_OUT`, and `OPT_IN_PENDING`. If any other value is passed, the data is dropped.
While the [Track User API](https://www.moengage.com/docs/api/user/track-user) can also update the **Email Opt-in Status** attribute, it is designed for general-purpose attribute updates and does not perform strict validation on opt-in status values. When using the Track User API, pass the values as readable names: *Optin pending*, *Double opted in*, or *Opted out*.
The valid values differ based on the API you use:
* **Opt-in Management API** (backend-defined values): `DOUBLE_OPTED_IN`, `OPTED_OUT`, `OPT_IN_PENDING`. This API validates the values and drops any data with invalid values.
* **Track User API / CSV imports** (readable names): `Optin pending`, `Double opted in`, `Opted out`. These values are case-insensitive.
Both sets of values map to the same opt-in statuses. Use the format appropriate for the API you are calling.