> ## Documentation Index
> Fetch the complete documentation index at: https://moengage.com/docs/llms.txt
> Use this file to discover all available pages before exploring further.
# Self-Service for Email Onboarding
> Onboard your email channel in MoEngage with the self-service setup flow. Configure domain authentication, email servers, and deliverability settings.
This is an Early Access feature. To get it enabled for your account, contact your MoEngage Customer Success Manager (CSM) or the Support team.
# Overview
Email onboarding refers to the process of setting up the necessary infrastructure and configurations to send emails through the MoEngage platform. This includes setting up email servers, domain authentication, and other technical requirements to ensure that emails sent from the platform are delivered to the intended recipients. Email onboarding is necessary to comply with the latest deliverability guidelines from major mailbox providers such as Google, Yahoo, and Microsoft.
Email onboarding setup is often a lengthy and complex process involving multiple stakeholders and handoffs, which delays time-to-value. MoEngage streamlines this with a self-service capability that accelerates setup, empowers you with autonomy, ensures compliance, and reduces reliance on support provided by MoEngage. In addition to these overall self-service advantages, configuring your domain specifically offers crucial benefits for email deliverability and branding. For a detailed overview of these domain-specific advantages, refer to [Importance of Domains in Email Marketing](/user-guide/campaigns-and-channels/email/getting-started-with-email/ip-addresses-and-domains).
This feature is accessible only if you are using the MoEngage SendGrid delivery.
On the left navigation menu of the MoEngage dashboard, click **Settings** > **Channels** > **Email.** You land on the **Overview** tab to access the self-service feature. The details about self-service onboarding are available on the following tabs:
* [Overview](/user-guide/campaigns-and-channels/email/getting-started-with-email/self-service-for-email-onboarding#overview-tab)
* [Sender Configuration](/user-guide/campaigns-and-channels/email/getting-started-with-email/self-service-for-email-onboarding#sender-configuration-tab)
## Overview Tab
The **Overview** tab serves as your to-do list for setting up and managing the MoEngage email channel, detailing both required and recommended steps. Here, you can track your progress on these steps to ensure a thorough and compliant setup. This tab displays the following information:
* Required and recommended steps for email sender configuration.
* The total number of senders added.
* The completion status of configuration steps for each sender.
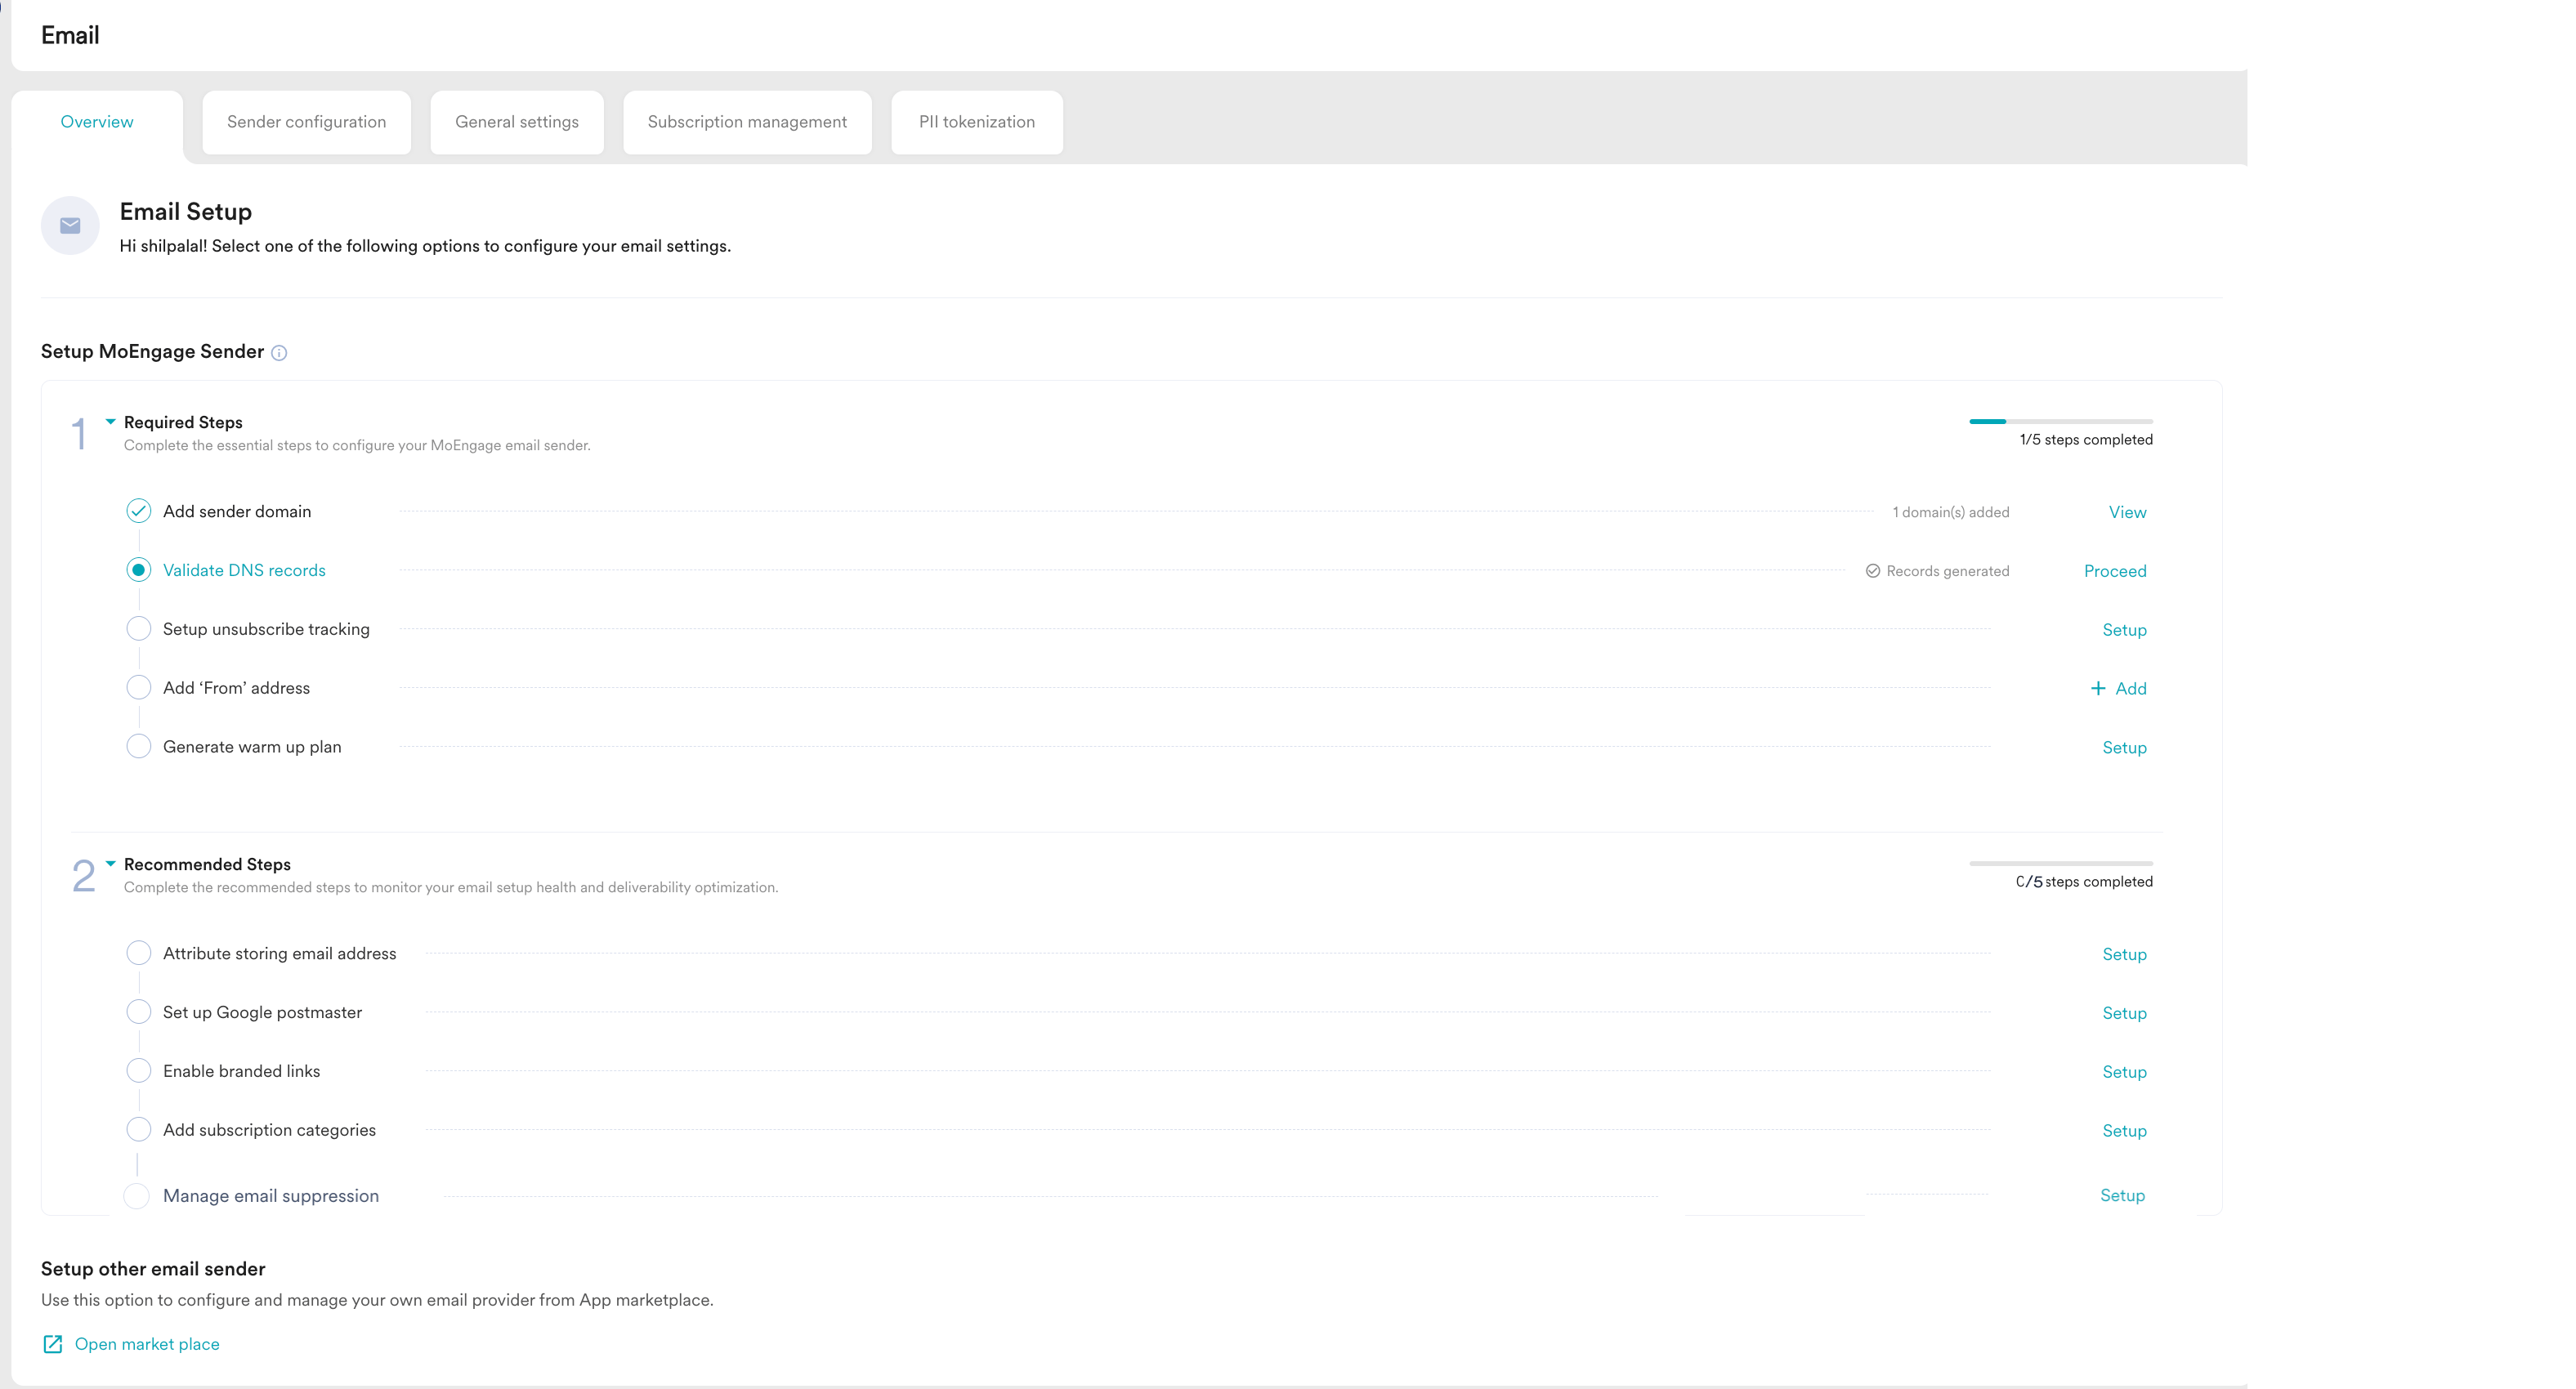 This tab helps you configure MoEngage as your ESP or configure your own ESP from the MoEngage App Marketplace. On the **Overview** tab, you can view the following sections:
* **Setup MoEngage Sender** (recommended)\
MoEngage functions as your ESP, directly managing email deliverability on your behalf. It is recommended to use the MoEngage sender due to its capabilities for proactive deliverability monitoring, adherence to evolving email compliance requirements, and efficient identification and communication regarding any issues with mailbox providers. MoEngage will proactively keep you informed about all these critical aspects. The MoEngage sender setup involves two categories:
* **Required Steps**: To begin sending emails, you must complete the essential configurations mentioned in the required steps during onboarding. For more information, refer to [Configure the Required Steps](/user-guide/campaigns-and-channels/email/getting-started-with-email/self-service-for-email-onboarding#configure-the-required-steps).
* **Recommended Steps**: While these steps are optional, MoEngage highly recommends configuring these steps during your onboarding to help monitor email setup health and optimize deliverability. For more information, refer to [Configure the Recommended Steps](/user-guide/campaigns-and-channels/email/getting-started-with-email/self-service-for-email-onboarding#configure-recommended-steps).
If you return to configure additional sender domains, you can always access the next pending action for any required or recommended step by clicking **View** against the respective step within the **Overview** tab.\
For example, you added a sender domain, validated and configured unsubscribe tracking, and then navigated away. When you return to configure more sender domains, you can see **View** against the **Setup unsubscribe tracking** step within the **Overview** tab, as shown in the following image:
This tab helps you configure MoEngage as your ESP or configure your own ESP from the MoEngage App Marketplace. On the **Overview** tab, you can view the following sections:
* **Setup MoEngage Sender** (recommended)\
MoEngage functions as your ESP, directly managing email deliverability on your behalf. It is recommended to use the MoEngage sender due to its capabilities for proactive deliverability monitoring, adherence to evolving email compliance requirements, and efficient identification and communication regarding any issues with mailbox providers. MoEngage will proactively keep you informed about all these critical aspects. The MoEngage sender setup involves two categories:
* **Required Steps**: To begin sending emails, you must complete the essential configurations mentioned in the required steps during onboarding. For more information, refer to [Configure the Required Steps](/user-guide/campaigns-and-channels/email/getting-started-with-email/self-service-for-email-onboarding#configure-the-required-steps).
* **Recommended Steps**: While these steps are optional, MoEngage highly recommends configuring these steps during your onboarding to help monitor email setup health and optimize deliverability. For more information, refer to [Configure the Recommended Steps](/user-guide/campaigns-and-channels/email/getting-started-with-email/self-service-for-email-onboarding#configure-recommended-steps).
If you return to configure additional sender domains, you can always access the next pending action for any required or recommended step by clicking **View** against the respective step within the **Overview** tab.\
For example, you added a sender domain, validated and configured unsubscribe tracking, and then navigated away. When you return to configure more sender domains, you can see **View** against the **Setup unsubscribe tracking** step within the **Overview** tab, as shown in the following image: 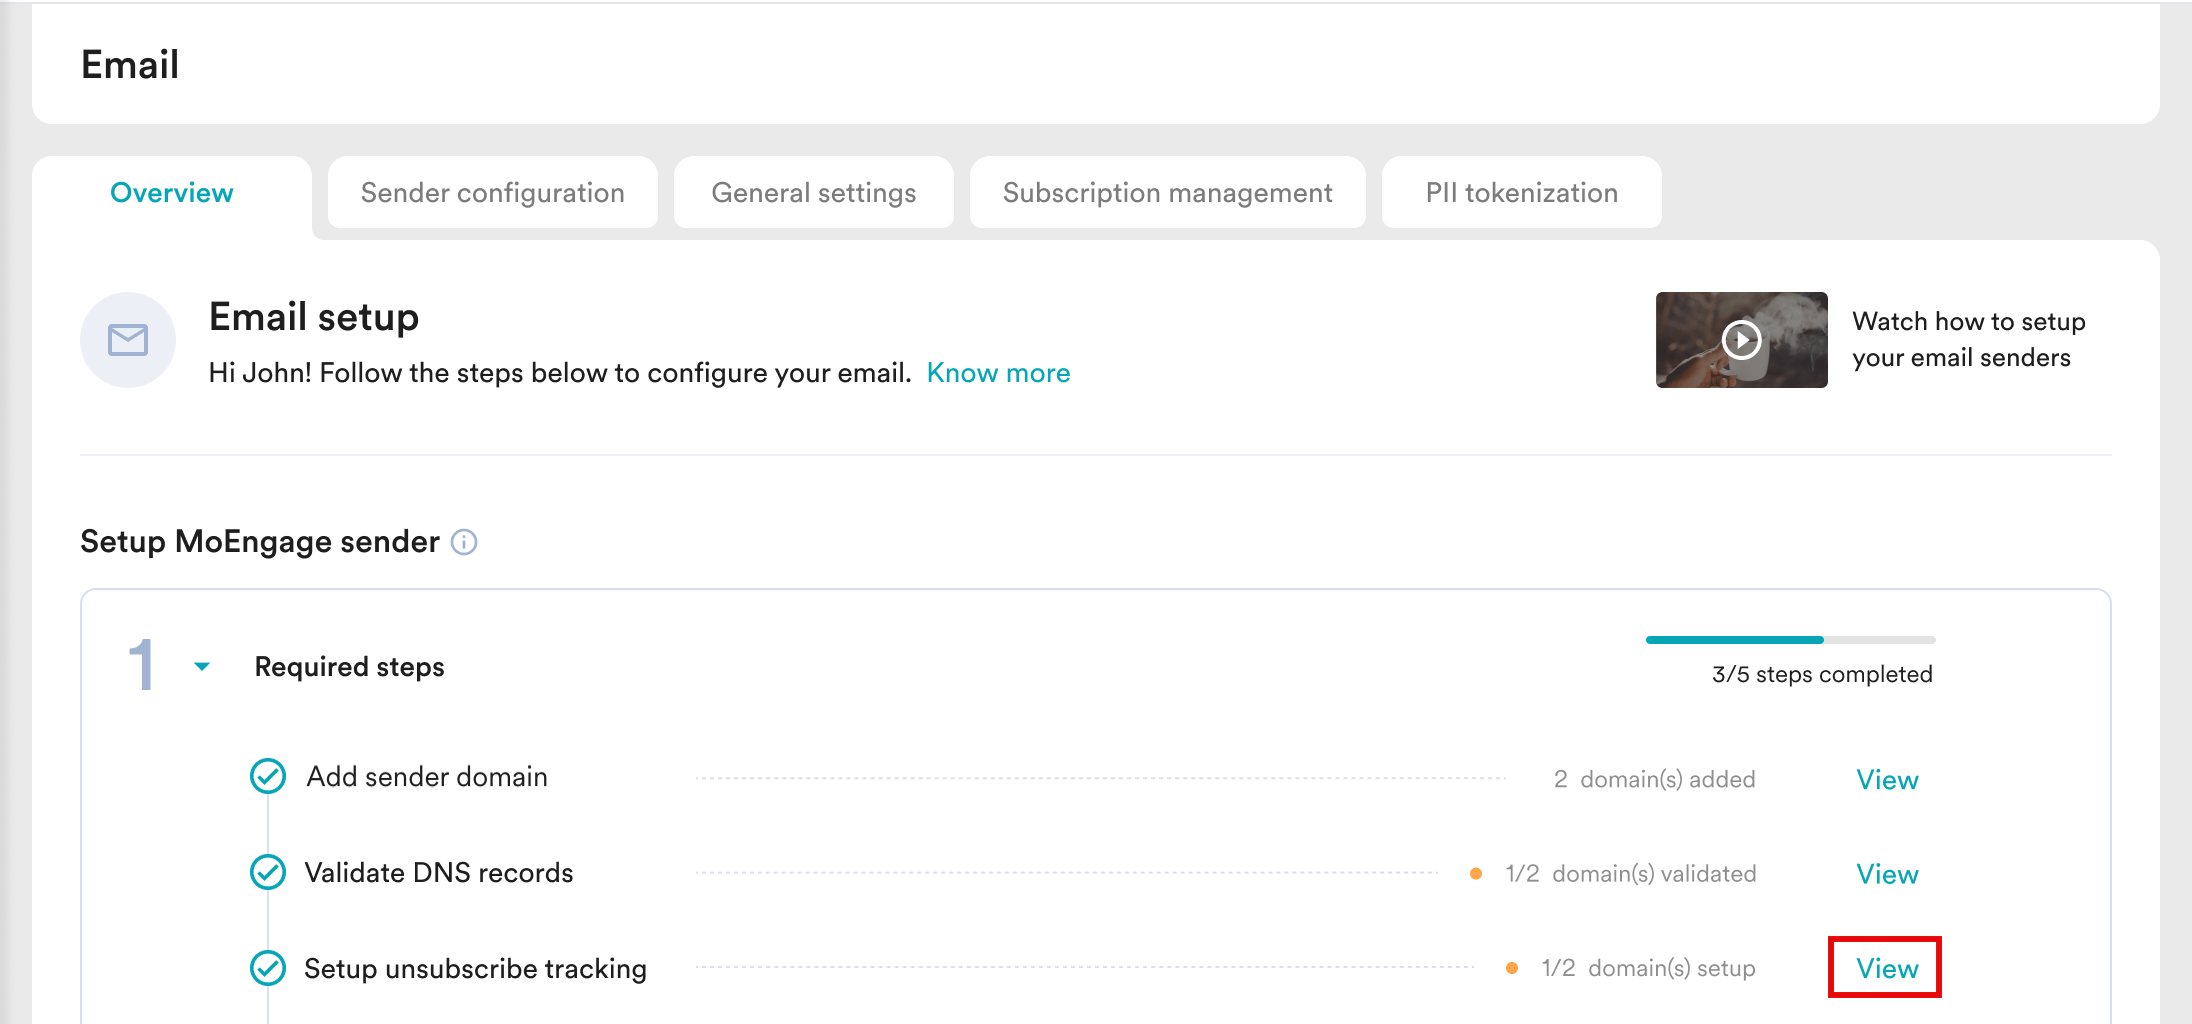 Clicking this takes you to the **Domain Details** page, where you can complete the configuration for that sender.
* **Setup other email sender**\
You can bring your own ESP to integrate with MoEngage. The [MoEngage App Marketplace](https://partners.moengage.com/hc/en-us/articles/4951315997972-App-Marketplace) allows you to configure and manage these external email senders. Note that by using your own ESP, you are responsible for troubleshooting all email delivery and deliverability issues, coordinating directly with your ESP as required. For more information on other email senders, refer to [Email Senders](https://partners.moengage.com/hc/en-us/categories/4431372584596-Email).
Clicking this takes you to the **Domain Details** page, where you can complete the configuration for that sender.
* **Setup other email sender**\
You can bring your own ESP to integrate with MoEngage. The [MoEngage App Marketplace](https://partners.moengage.com/hc/en-us/articles/4951315997972-App-Marketplace) allows you to configure and manage these external email senders. Note that by using your own ESP, you are responsible for troubleshooting all email delivery and deliverability issues, coordinating directly with your ESP as required. For more information on other email senders, refer to [Email Senders](https://partners.moengage.com/hc/en-us/categories/4431372584596-Email). 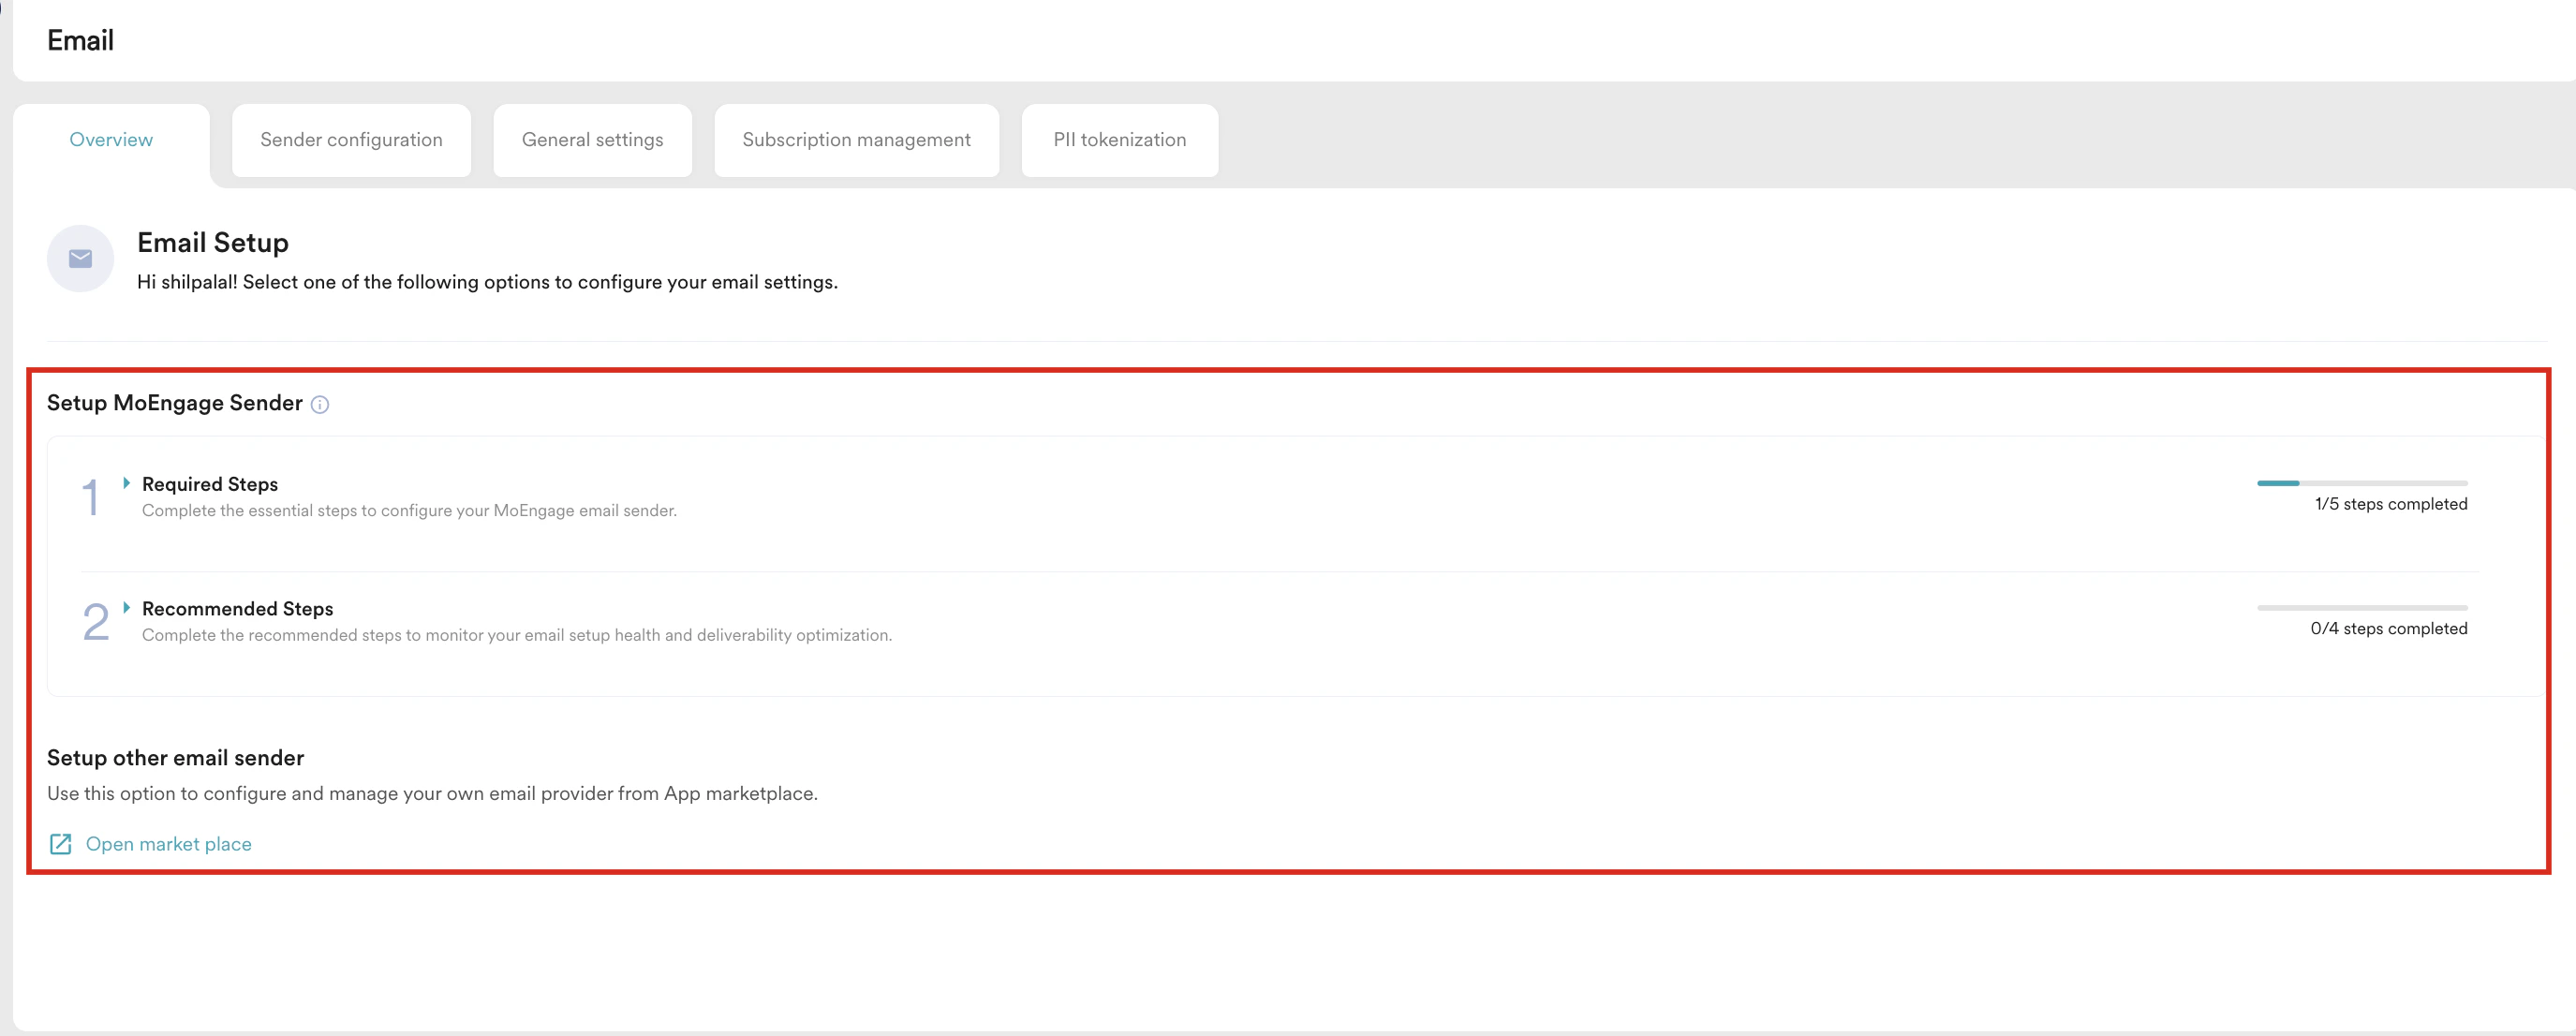 ## Sender Configuration Tab
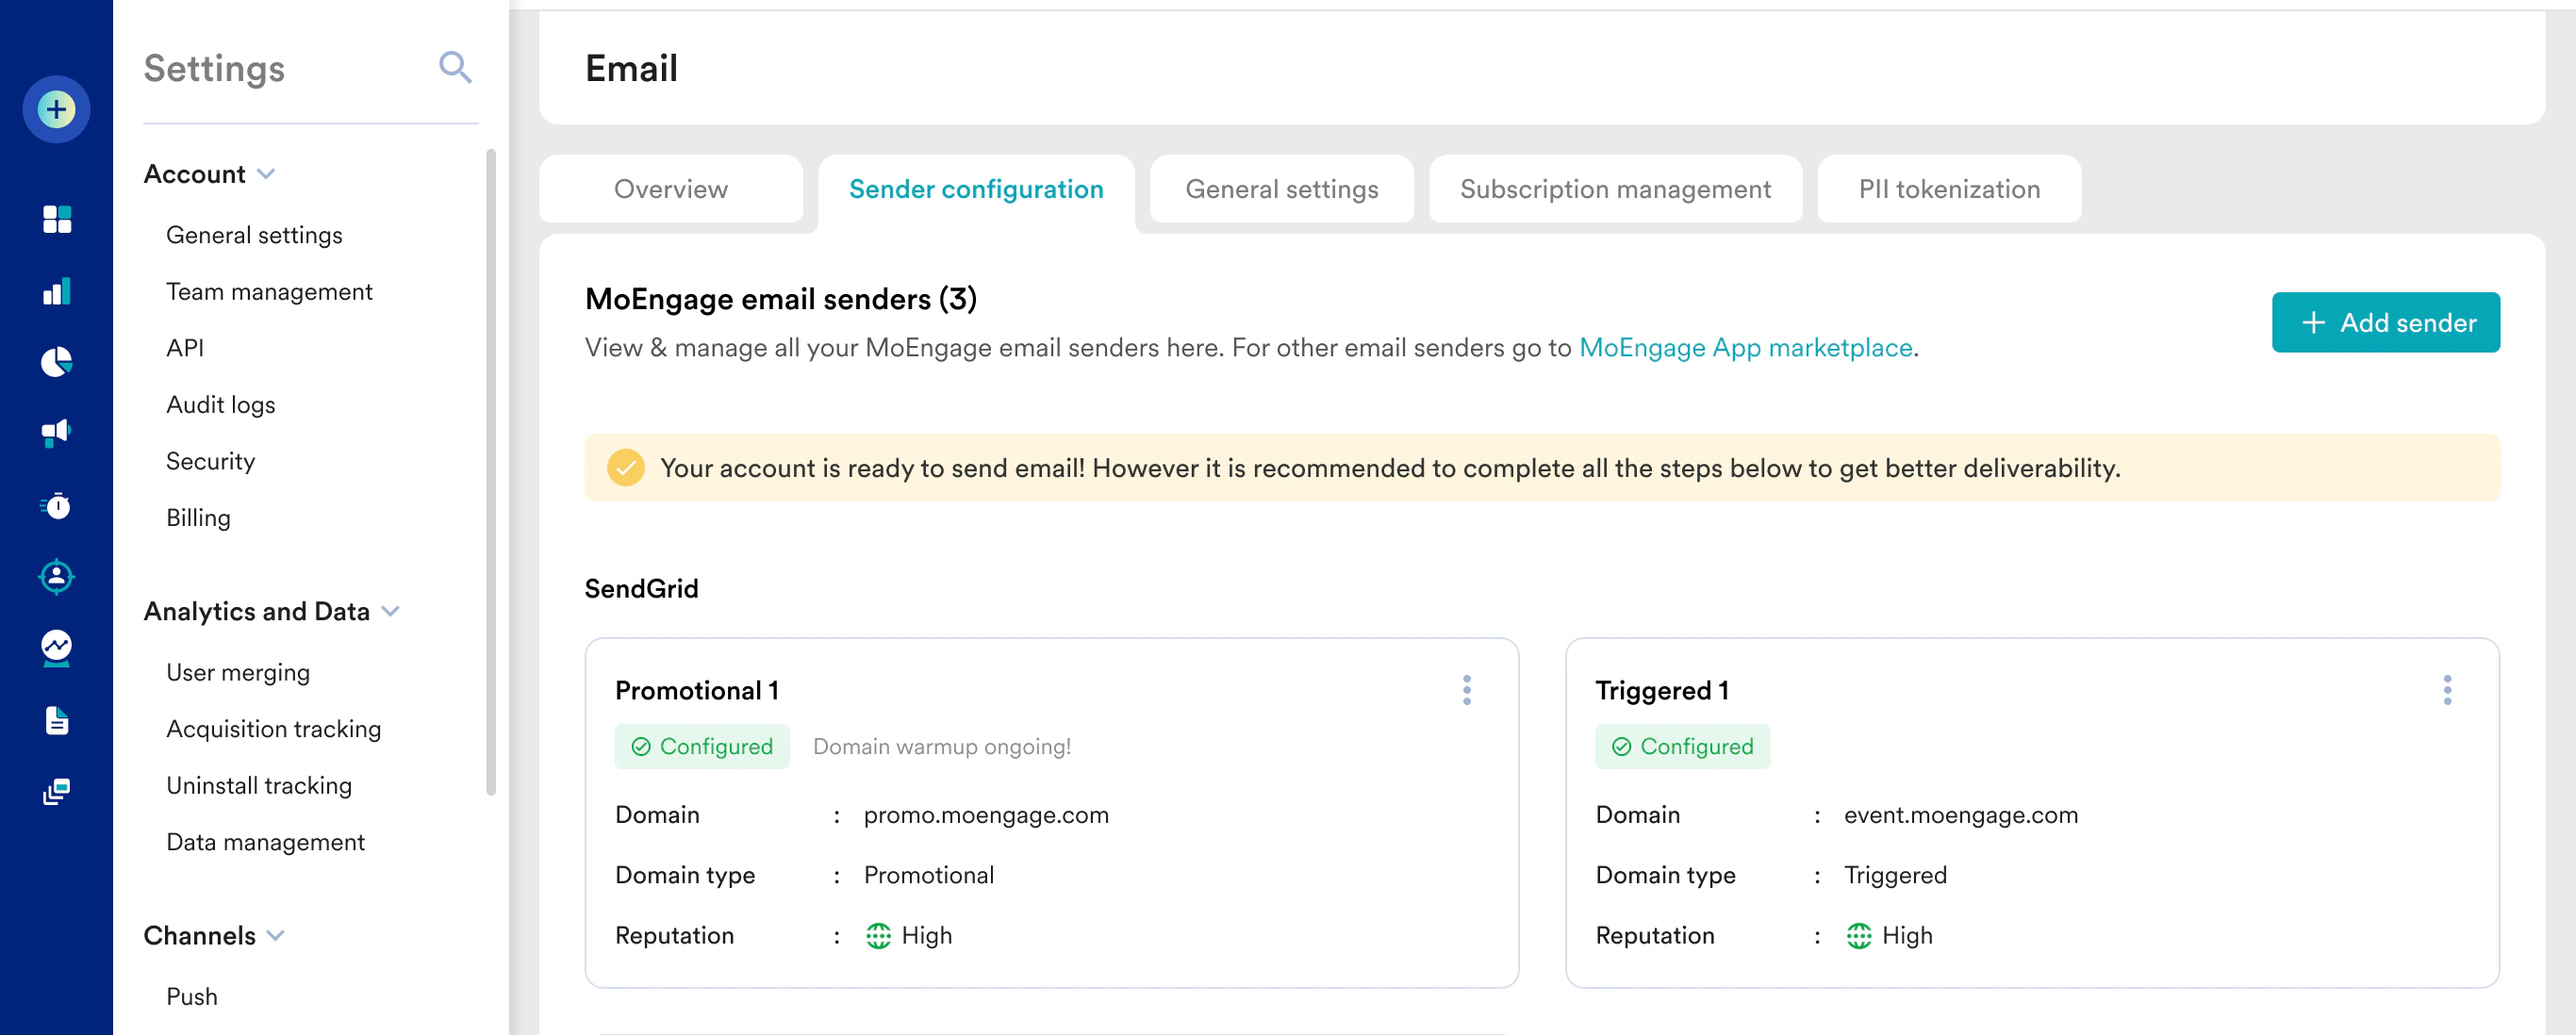
The **Sender configuration** tab displays a dedicated card for each sender you have created. Each sender card provides the following key information:
* The status of each sender is displayed on its card. For example, the current status is **Pending Configuration** in the following image. Note that the status changes to **Configured** when all the required and recommended steps are configured.
## Sender Configuration Tab
The **Sender configuration** tab displays a dedicated card for each sender you have created. Each sender card provides the following key information:
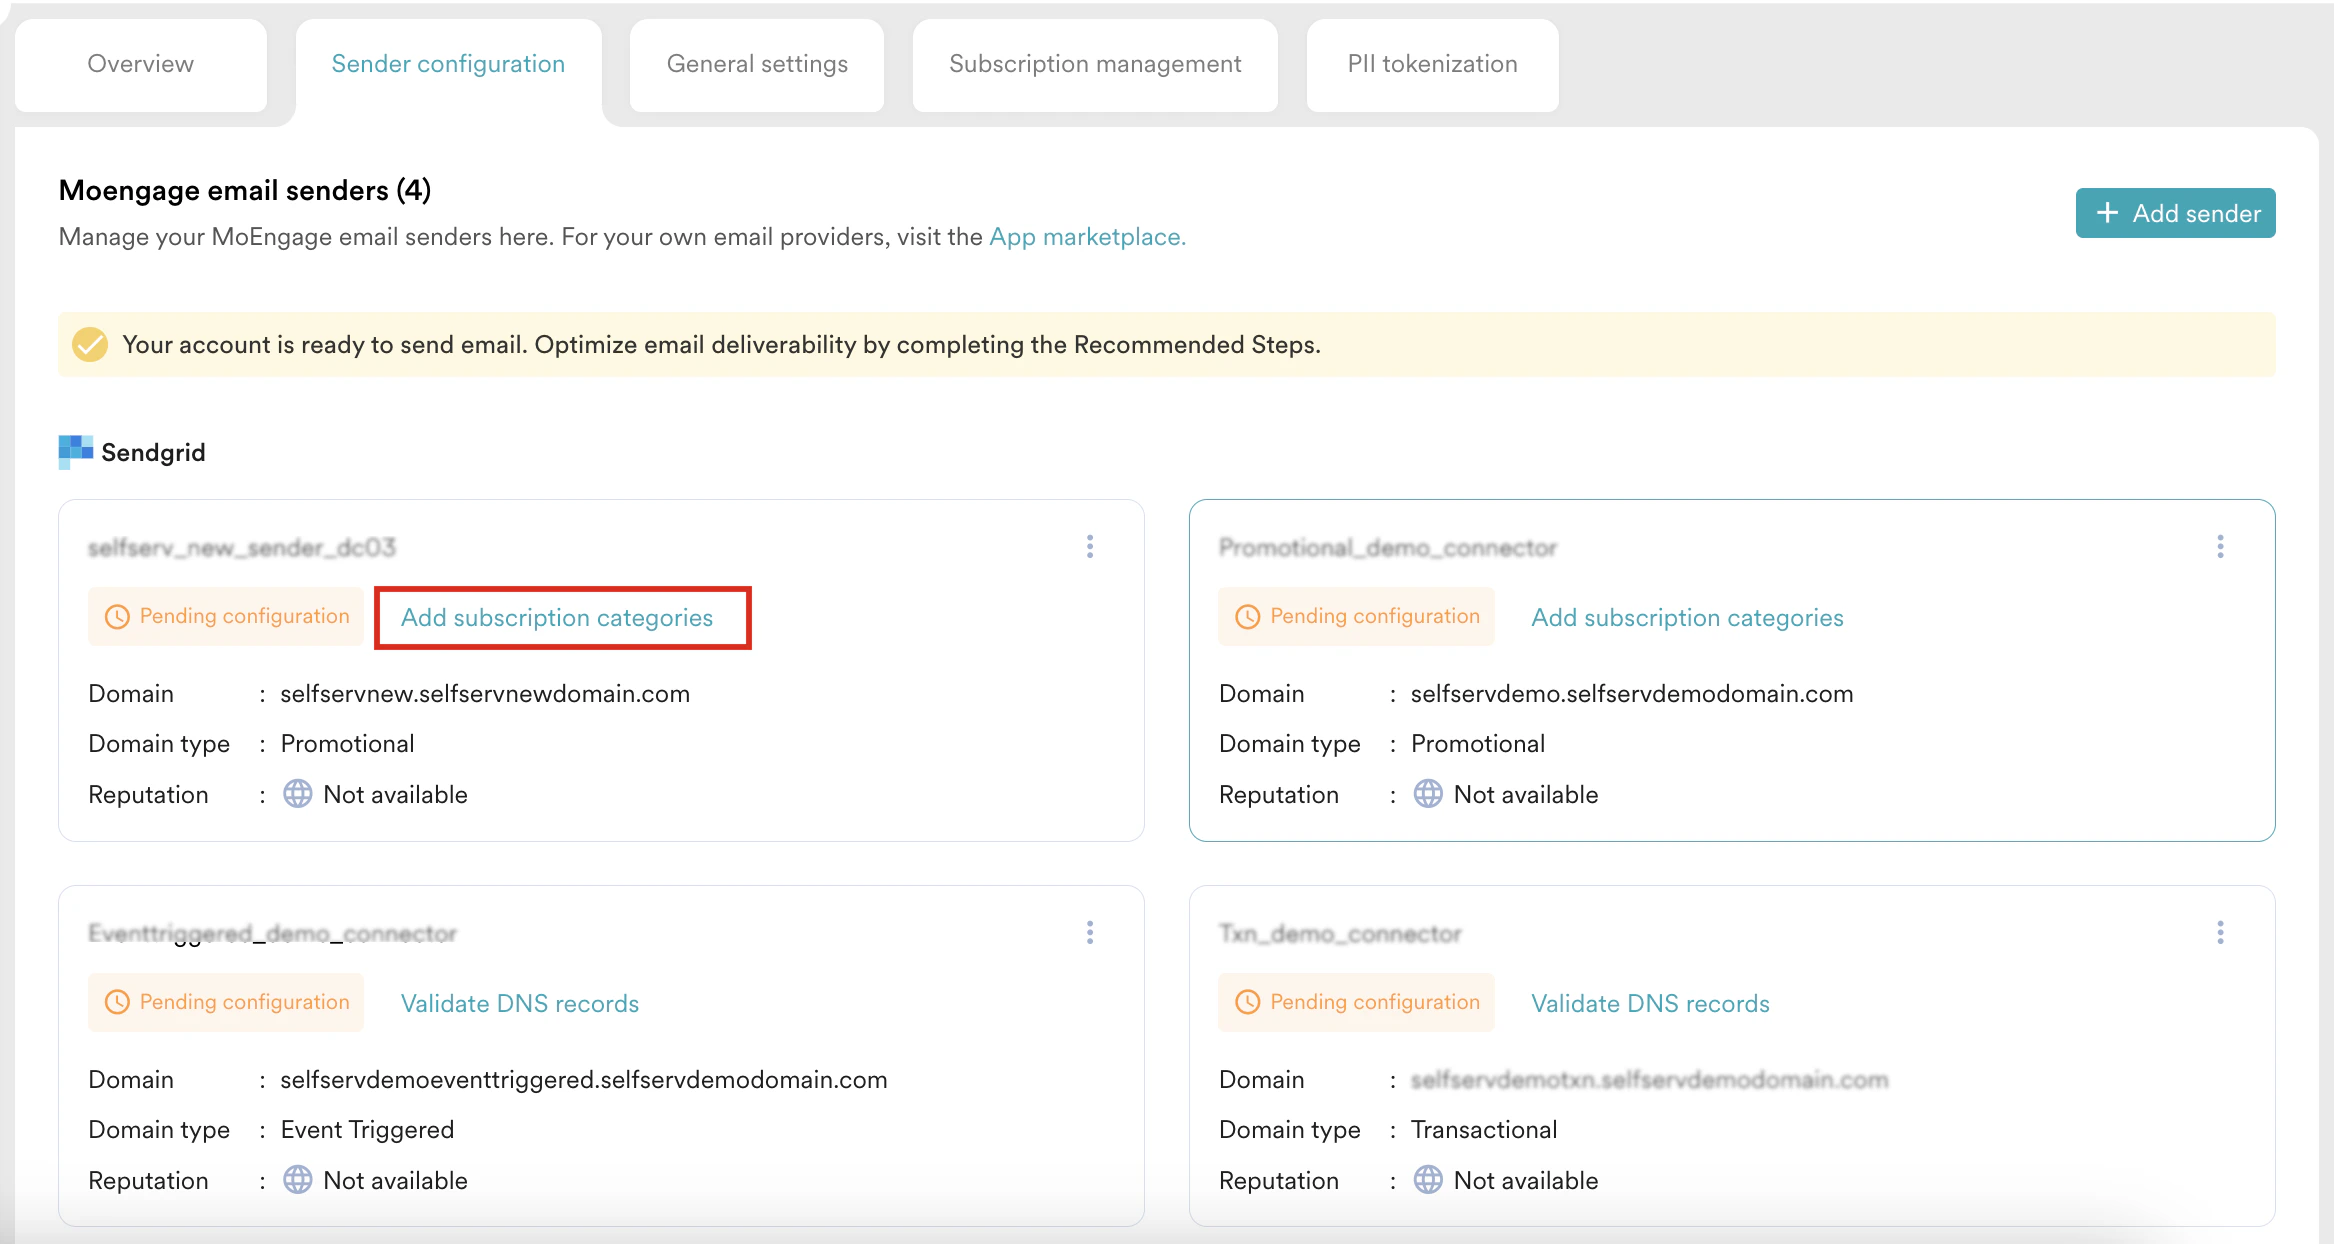
* The status of each sender is displayed on its card. For example, the current status is **Pending Configuration** in the following image. Note that the status changes to **Configured** when all the required and recommended steps are configured. 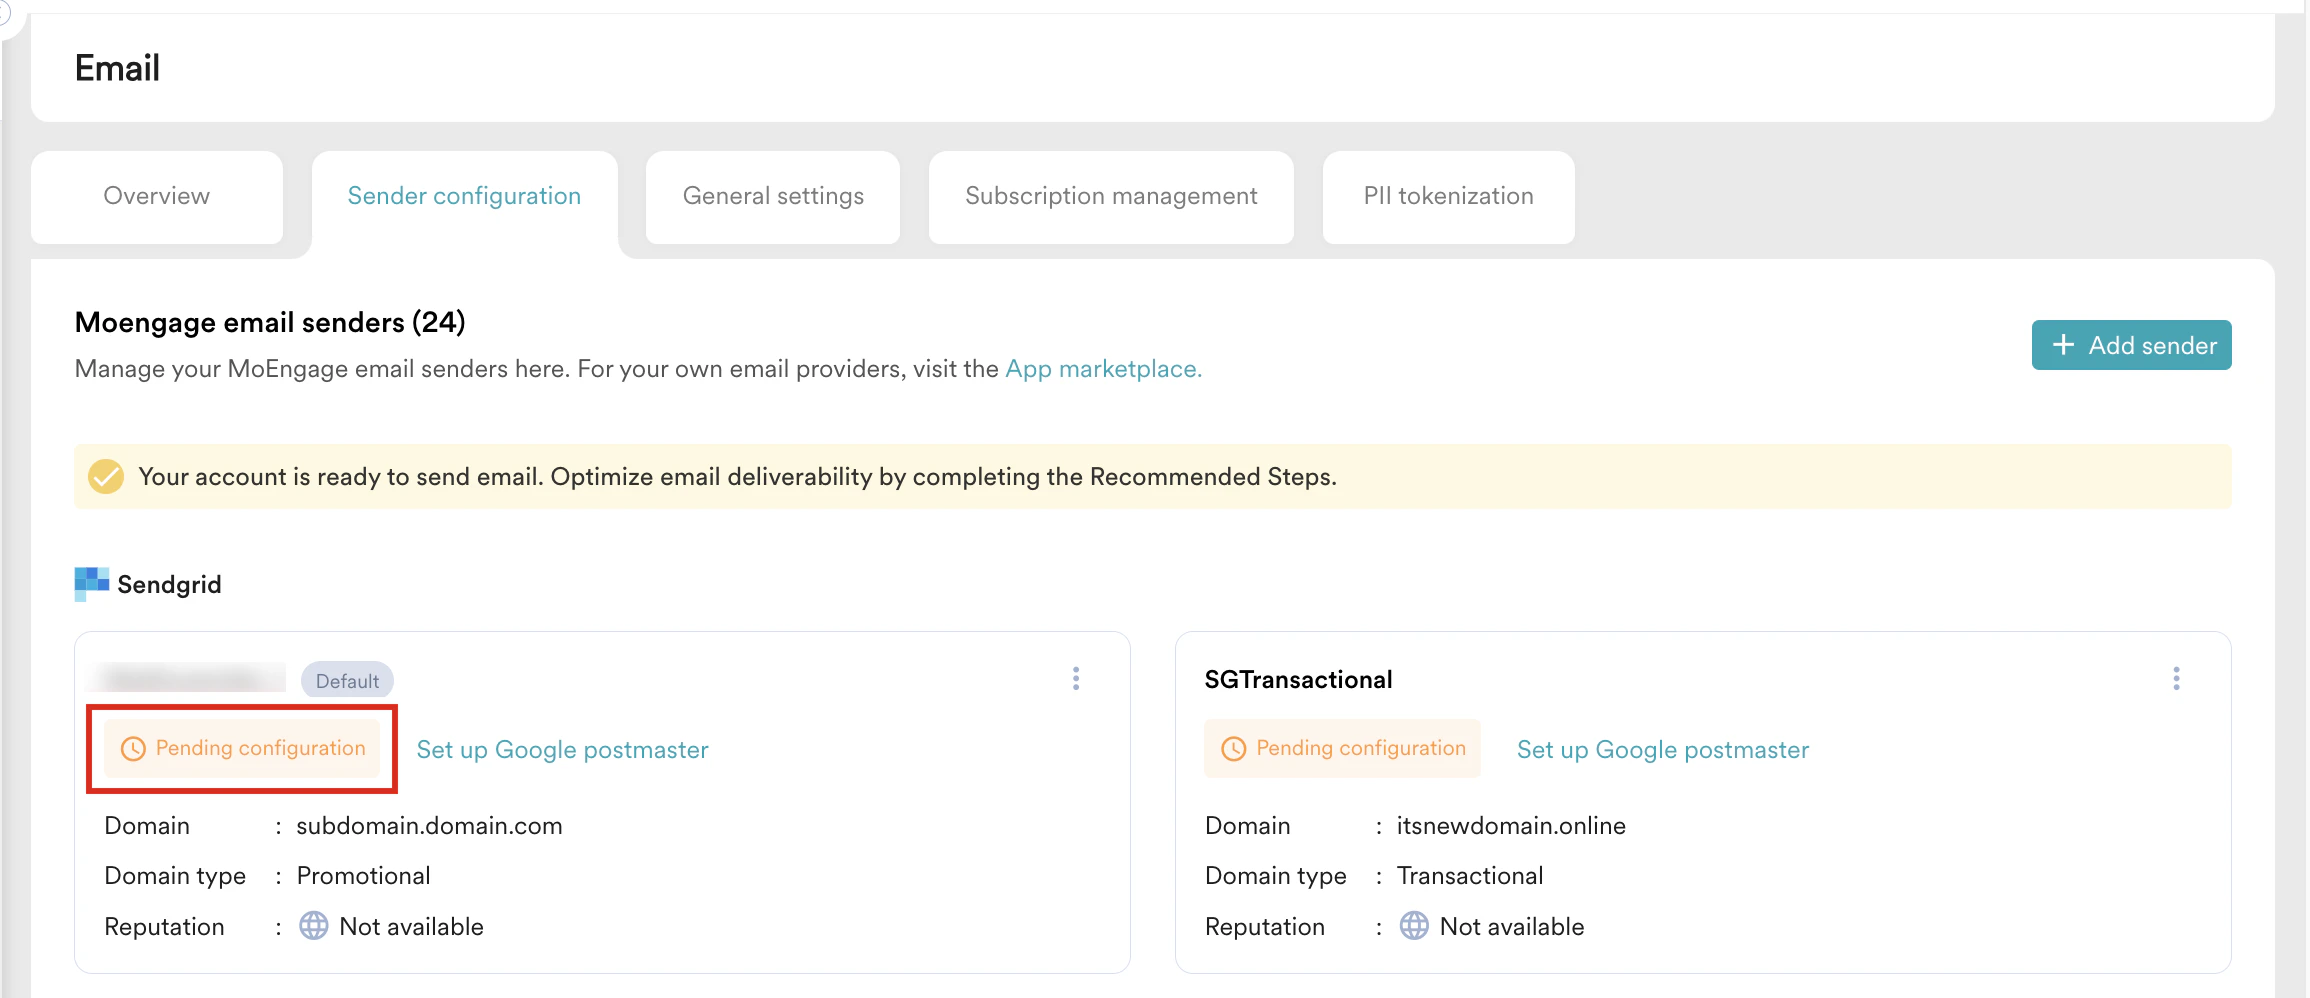 * The next pending step for each sender. Clicking the next pending step navigates to the corresponding steps for the specific user on the **Domain details** page, where you can complete its configuration. For example, **Add subscription categories** is the next pending step in the following image:
  * The domain you added for each sender.
* The type of domain added for each sender.
* The sender's reputation. This data is available only after a consistent email volume is sent, as Gmail establishes sender reputation metrics based on a sustained and consistent sending history.
* Click the ellipsis icon to **Edit** and **Send test email**.
* The domain you added for each sender.
* The type of domain added for each sender.
* The sender's reputation. This data is available only after a consistent email volume is sent, as Gmail establishes sender reputation metrics based on a sustained and consistent sending history.
* Click the ellipsis icon to **Edit** and **Send test email**. 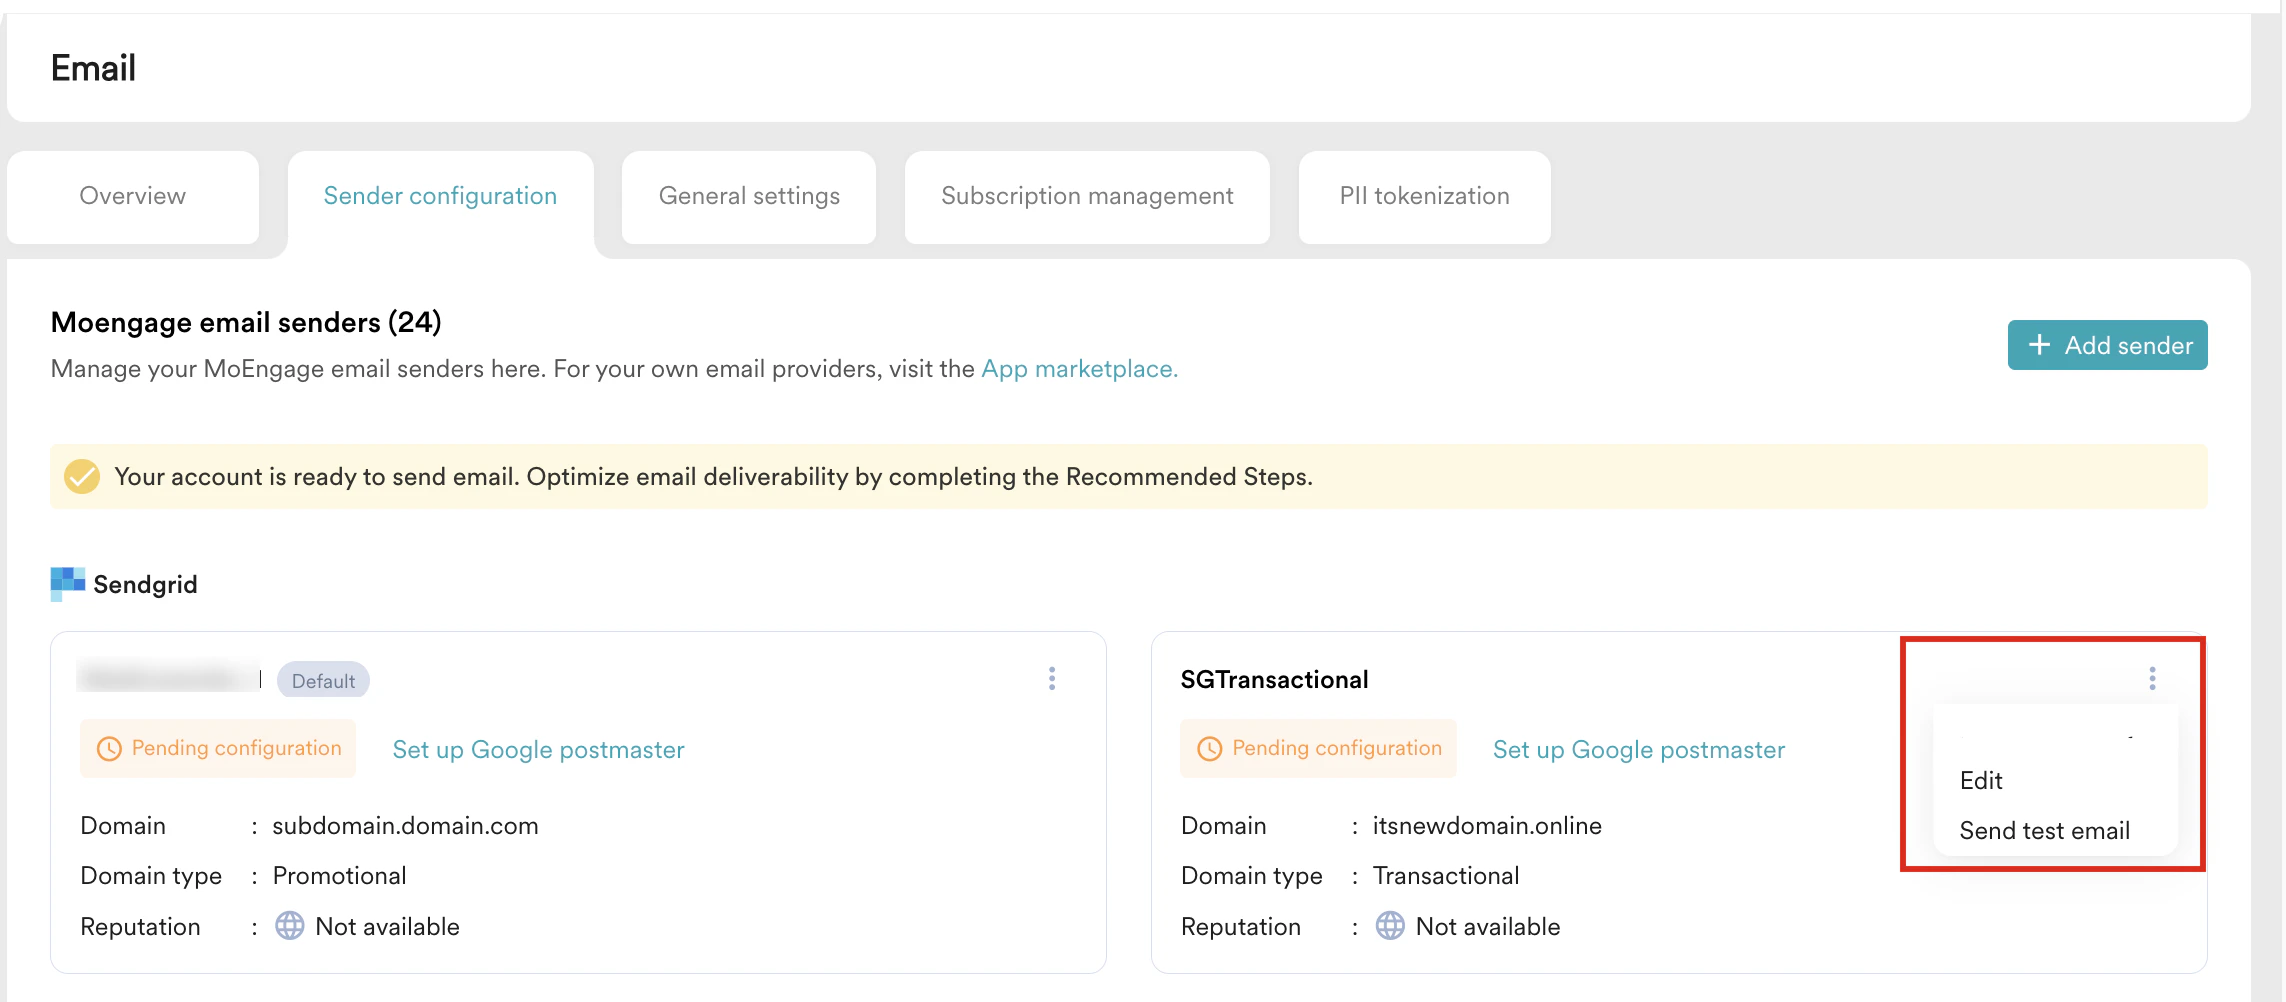 If you are returning to configure additional sender domains, you can access the next pending action for any required or recommended step directly from the **Sender configuration** tab by clicking the specific step on the corresponding sender card.\
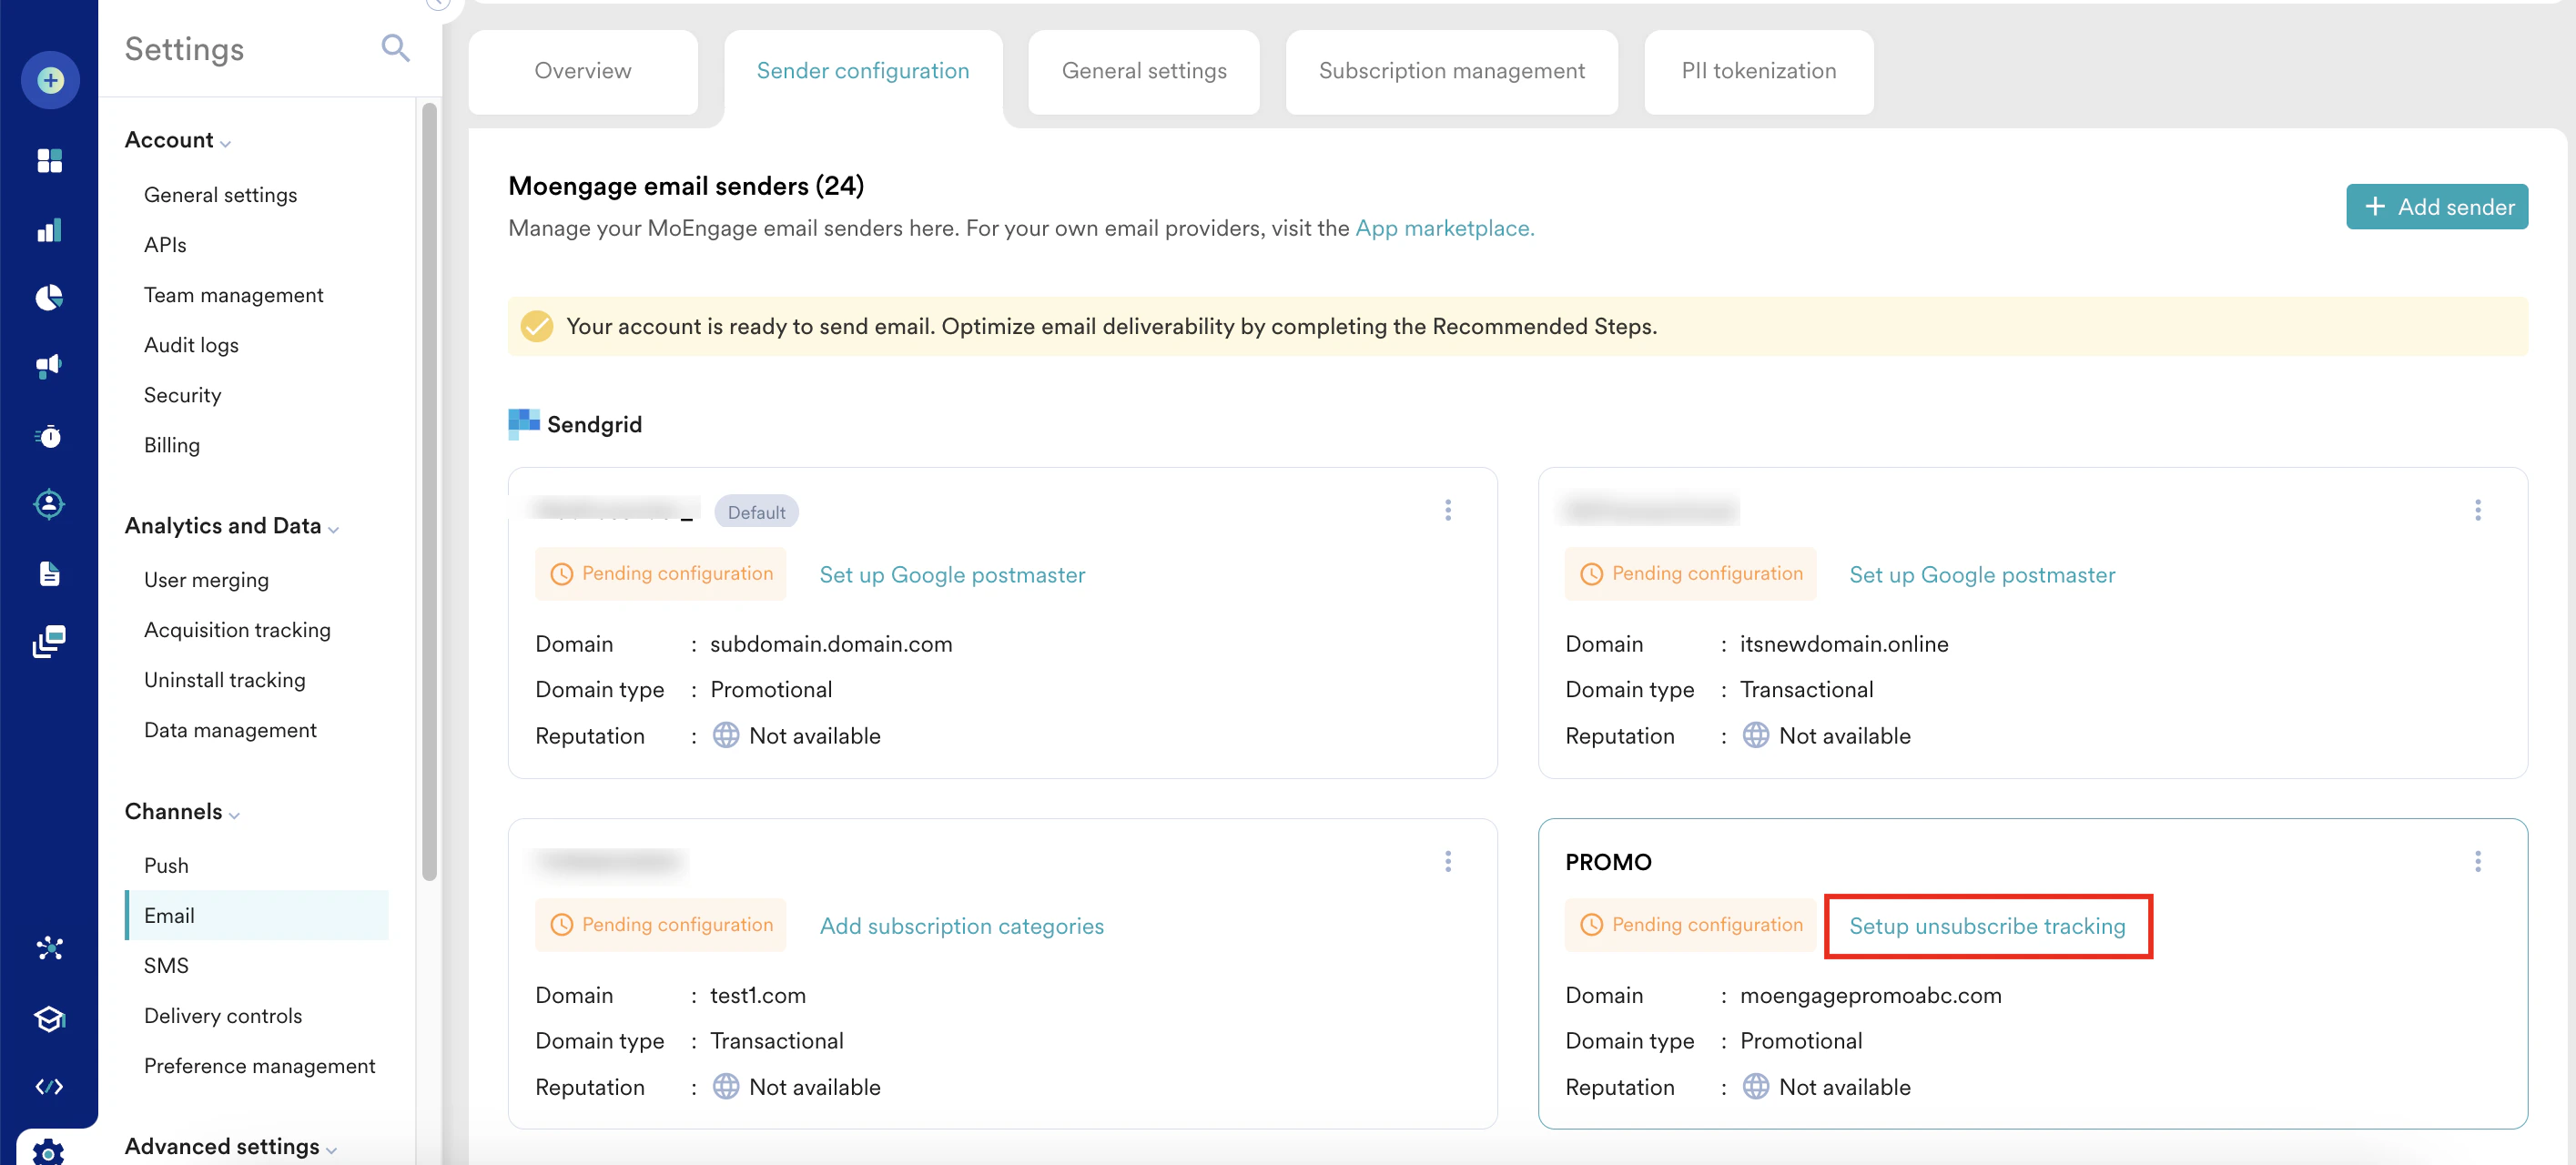
For example, you added the *PROMO* sender domain, validated the DNS records, and then navigated away. When you return to configure more sender domains, you can see the next pending step (Setup unsubscribe tracking) on that sender domain card within the **Sender configuration** tab, as shown in the following image:
If you are returning to configure additional sender domains, you can access the next pending action for any required or recommended step directly from the **Sender configuration** tab by clicking the specific step on the corresponding sender card.\
For example, you added the *PROMO* sender domain, validated the DNS records, and then navigated away. When you return to configure more sender domains, you can see the next pending step (Setup unsubscribe tracking) on that sender domain card within the **Sender configuration** tab, as shown in the following image:
 Clicking this takes you to the **Domain Details** page, where you can complete the configuration for that sender.
Decide whether to send Promotional, Transactional, or Event-triggered emails because you must configure domains for each type.
# Configure the Required Steps
The **Required Steps** contain the following:
1. [Add sender domain](/user-guide/campaigns-and-channels/email/getting-started-with-email/self-service-for-email-onboarding#add-a-sender-domain)
2. [Validate DNS records](/user-guide/campaigns-and-channels/email/getting-started-with-email/self-service-for-email-onboarding#validate-dns-records)
3. [Set up unsubscribe tracking](/user-guide/campaigns-and-channels/email/getting-started-with-email/self-service-for-email-onboarding#set-up-unsubscribe-tracking)
4. [Add 'From' address](/user-guide/campaigns-and-channels/email/getting-started-with-email/self-service-for-email-onboarding#add-from-address)
5. [Generate warm-up plan](/user-guide/campaigns-and-channels/email/getting-started-with-email/self-service-for-email-onboarding#generate-a-warm-up-plan)
After configuring the required steps of at least one sender, MoEngage allows you to send emails, but it is always recommended that you complete the recommended steps as well.
## Add a Sender Domain
Adding the sender domain enables you to send emails from a chosen/preferred domain. Domain authentication is required to verify you as a trusted email sender.
Perform the following steps to add the sender domain:
1. On the **Overview** tab, click **+ Add** against the **Add sender domain** step.
Clicking this takes you to the **Domain Details** page, where you can complete the configuration for that sender.
Decide whether to send Promotional, Transactional, or Event-triggered emails because you must configure domains for each type.
# Configure the Required Steps
The **Required Steps** contain the following:
1. [Add sender domain](/user-guide/campaigns-and-channels/email/getting-started-with-email/self-service-for-email-onboarding#add-a-sender-domain)
2. [Validate DNS records](/user-guide/campaigns-and-channels/email/getting-started-with-email/self-service-for-email-onboarding#validate-dns-records)
3. [Set up unsubscribe tracking](/user-guide/campaigns-and-channels/email/getting-started-with-email/self-service-for-email-onboarding#set-up-unsubscribe-tracking)
4. [Add 'From' address](/user-guide/campaigns-and-channels/email/getting-started-with-email/self-service-for-email-onboarding#add-from-address)
5. [Generate warm-up plan](/user-guide/campaigns-and-channels/email/getting-started-with-email/self-service-for-email-onboarding#generate-a-warm-up-plan)
After configuring the required steps of at least one sender, MoEngage allows you to send emails, but it is always recommended that you complete the recommended steps as well.
## Add a Sender Domain
Adding the sender domain enables you to send emails from a chosen/preferred domain. Domain authentication is required to verify you as a trusted email sender.
Perform the following steps to add the sender domain:
1. On the **Overview** tab, click **+ Add** against the **Add sender domain** step. 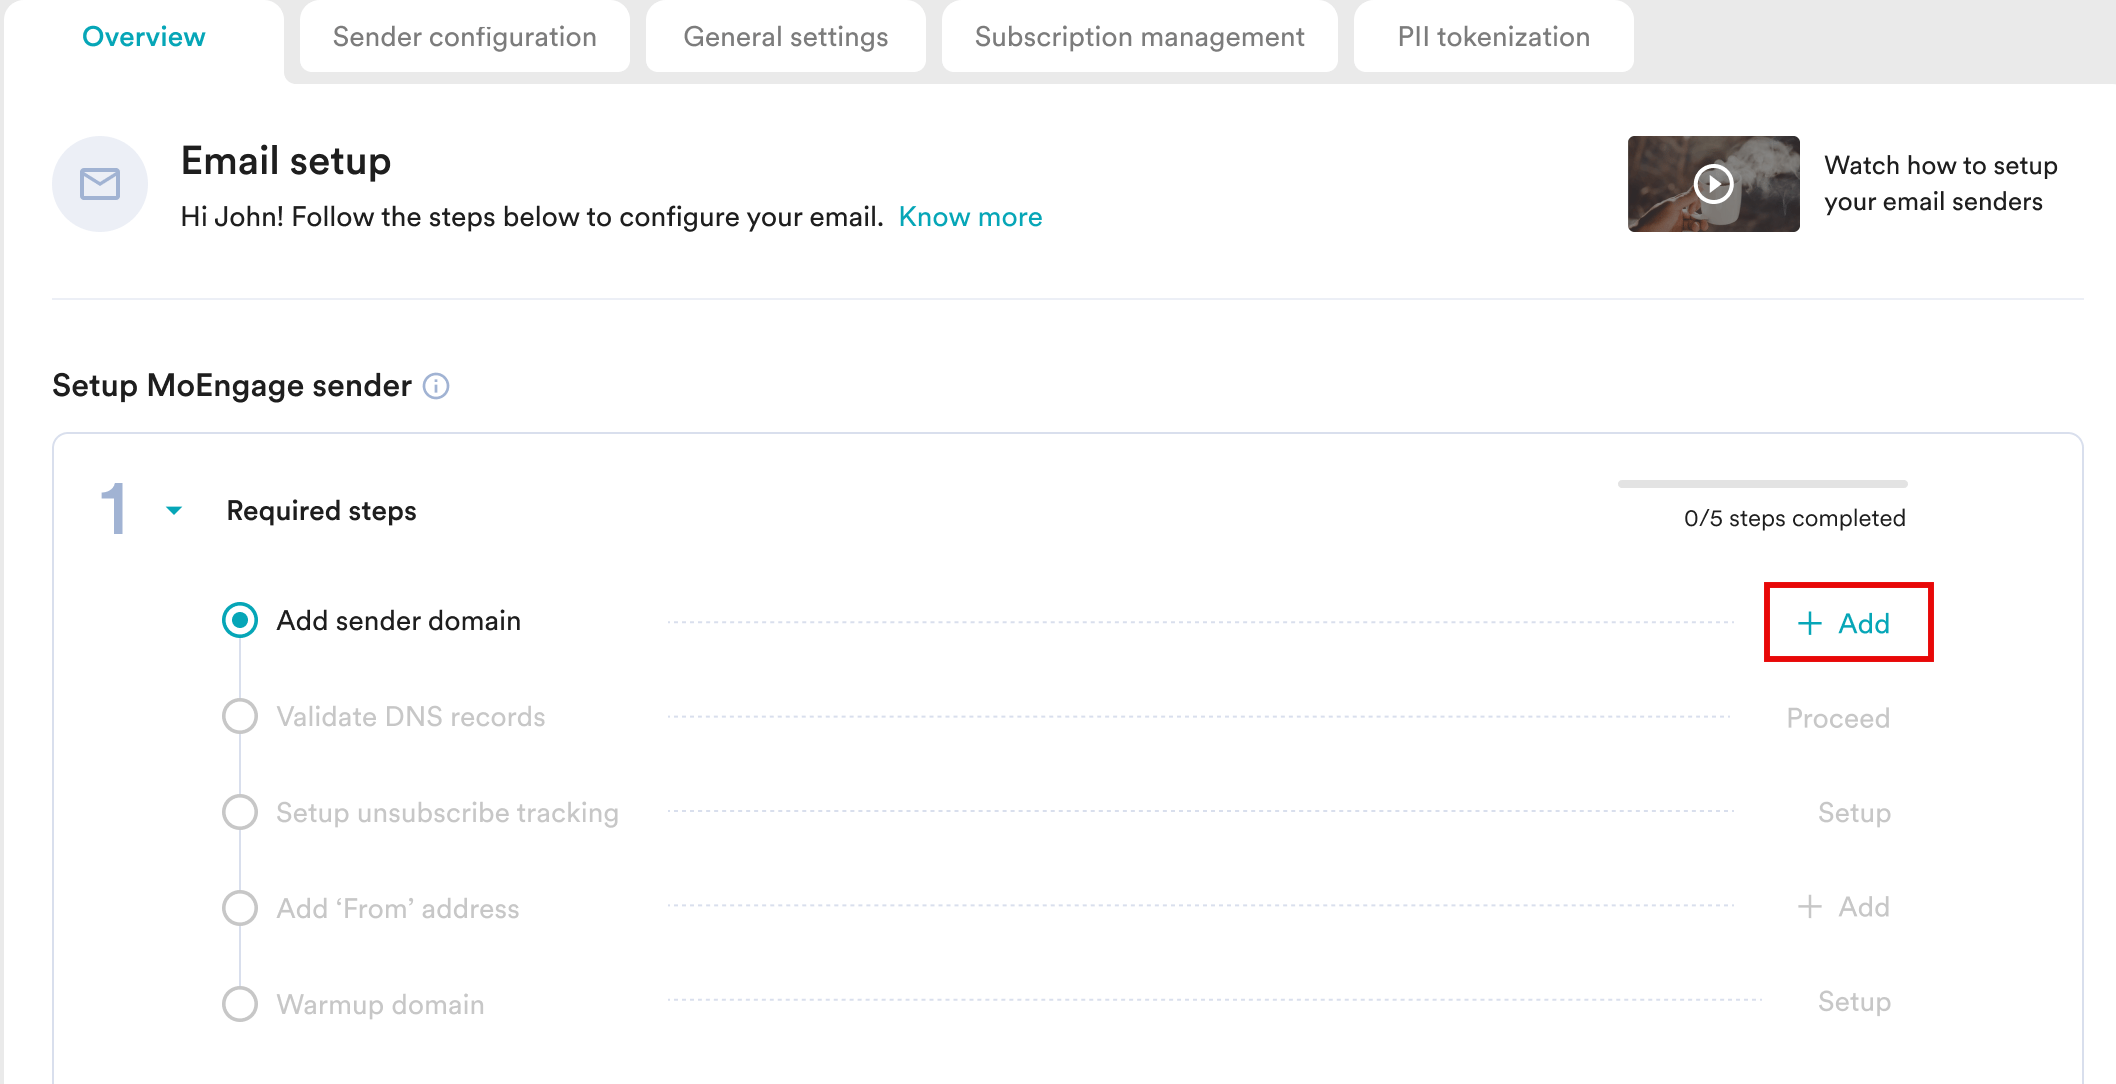 You can also click **+ Add sender** on the **Sender configuration** tab.
 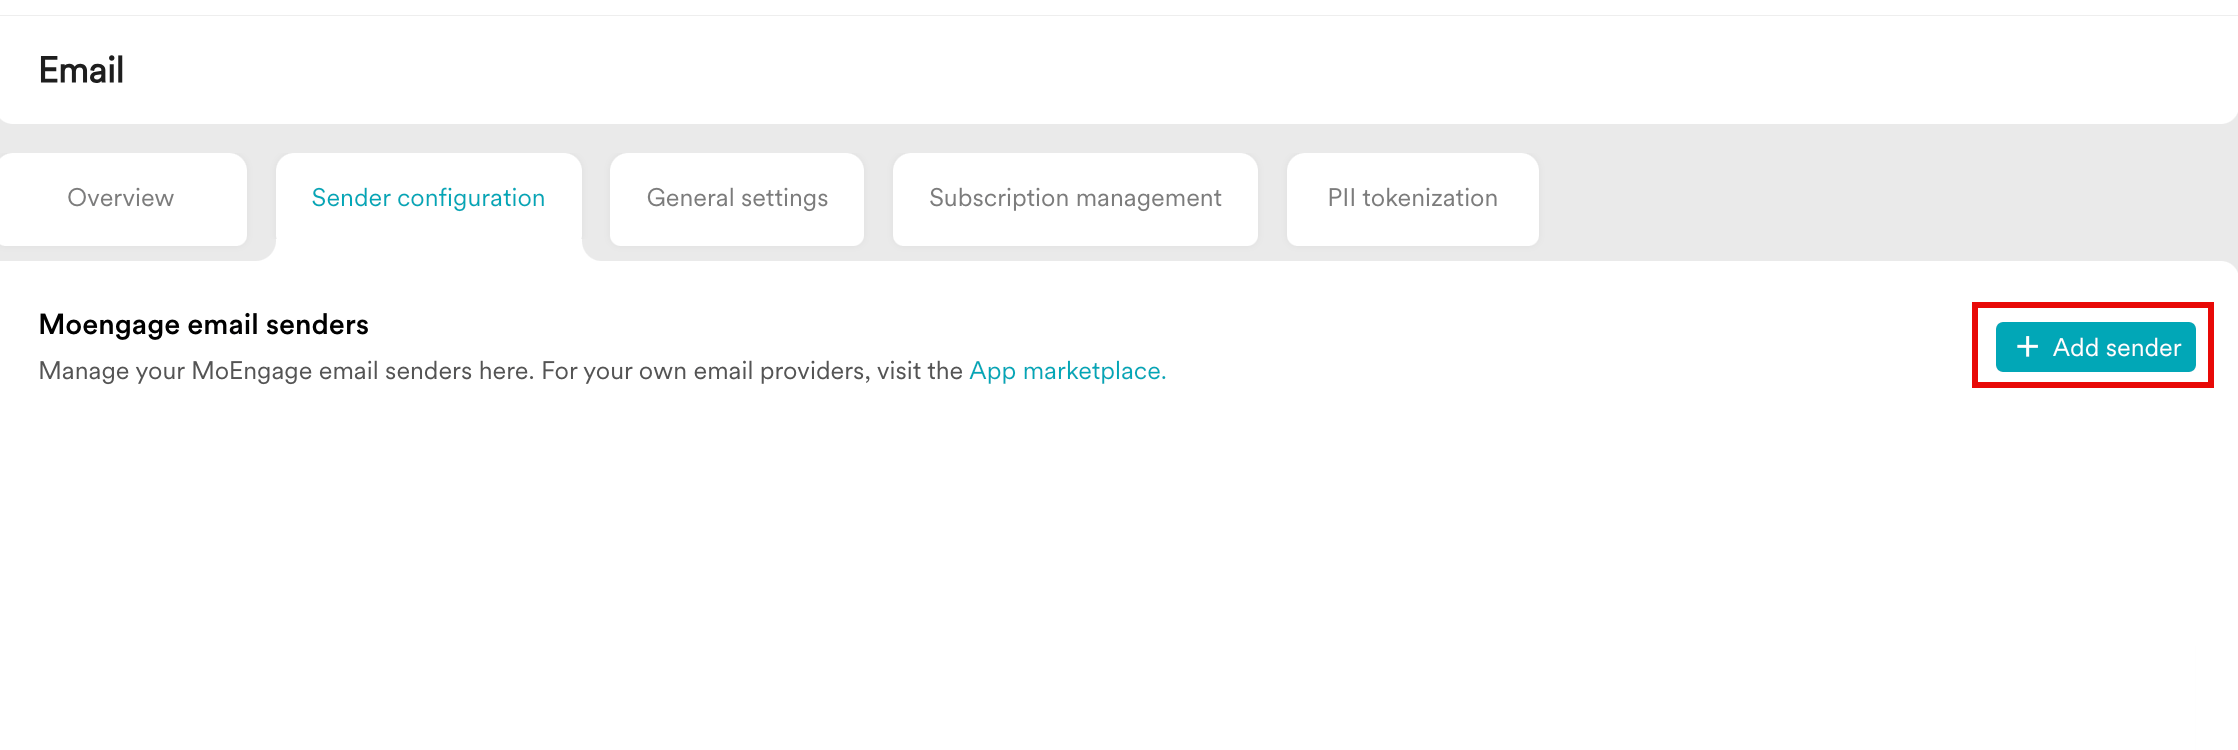 2. On the **Add MoEngage sender domain(s)** page, you can specify up to two unique sender domains for each email type: Promotional, Event-triggered, or Transactional.
Make sure to adhere to the following guidelines when adding sender domains:
* You cannot add duplicate domains.
* For Promotional and Event-triggered emails, avoid using the root domain.
* Use different domains for different use cases to prevent any impact of one domain's performance on another.
* Do not use the same domain for both Transactional and Promotional emails.
* You can add up to six sender domains at a time. Note that whenever you add a sender domain, a dedicated IP is allocated for that domain.\
For more information on the number of domains that can be added, refer to [IP Addresses and Domain](/user-guide/campaigns-and-channels/email/getting-started-with-email/ip-addresses-and-domains).
Enter the following details:
1. **Sender domain**: Enter the domain from which you want to send the email.
2. **Sender configuration name**: This is the name of the email sender. After onboarding, the sender configuration name is listed in the **Email connector** list while creating email campaigns.
3. Click **Add**.
2. On the **Add MoEngage sender domain(s)** page, you can specify up to two unique sender domains for each email type: Promotional, Event-triggered, or Transactional.
Make sure to adhere to the following guidelines when adding sender domains:
* You cannot add duplicate domains.
* For Promotional and Event-triggered emails, avoid using the root domain.
* Use different domains for different use cases to prevent any impact of one domain's performance on another.
* Do not use the same domain for both Transactional and Promotional emails.
* You can add up to six sender domains at a time. Note that whenever you add a sender domain, a dedicated IP is allocated for that domain.\
For more information on the number of domains that can be added, refer to [IP Addresses and Domain](/user-guide/campaigns-and-channels/email/getting-started-with-email/ip-addresses-and-domains).
Enter the following details:
1. **Sender domain**: Enter the domain from which you want to send the email.
2. **Sender configuration name**: This is the name of the email sender. After onboarding, the sender configuration name is listed in the **Email connector** list while creating email campaigns.
3. Click **Add**. 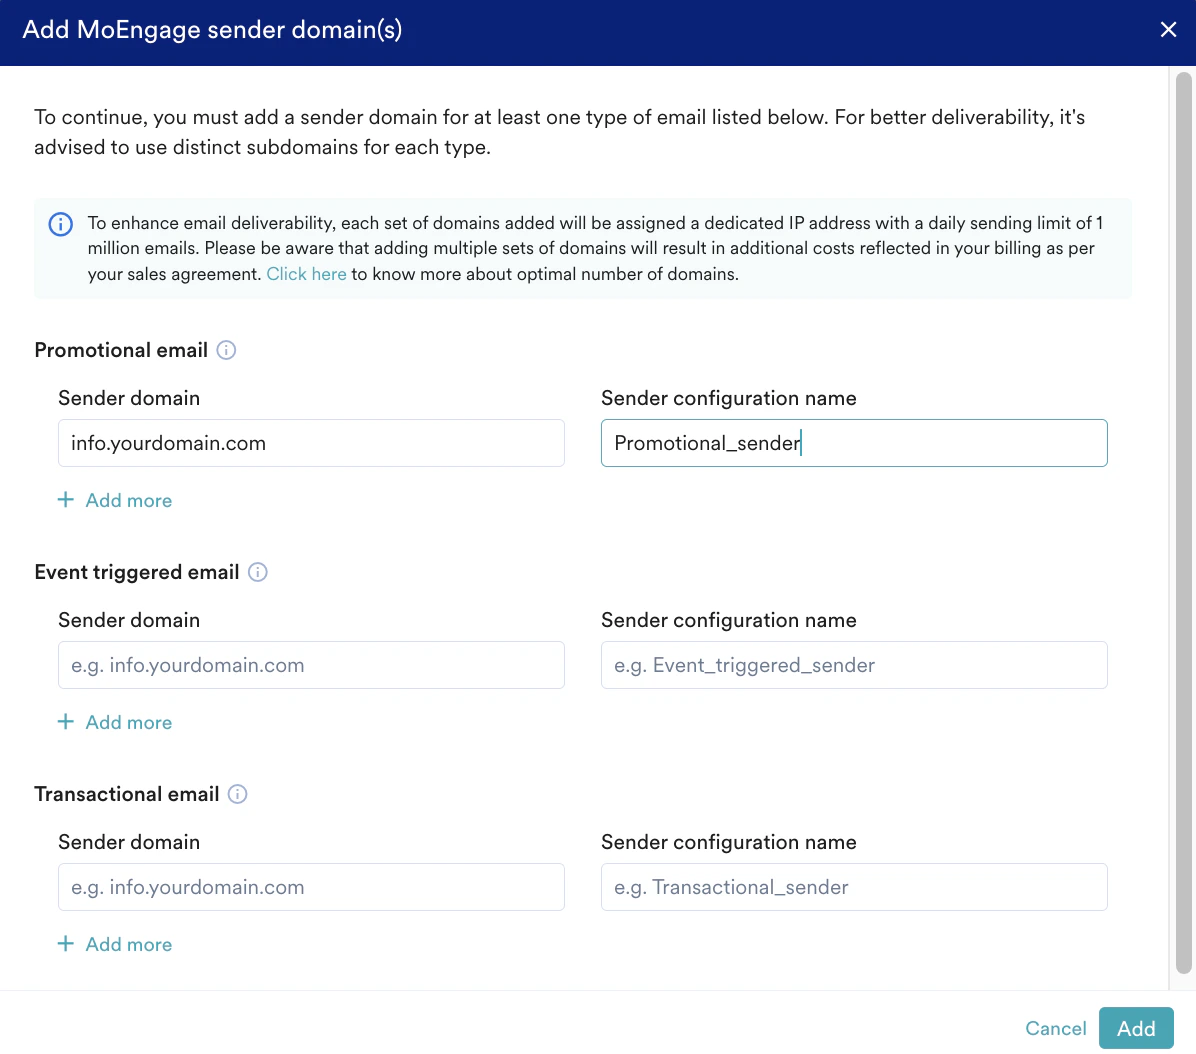 3. The addition of DNS records usually takes about a minute. After they're successfully updated, these records are saved, so you can safely leave this page and continue with your other tasks. While sender domains are getting added, you can view the following on the **Overview** tab:
* If the sender domain is added, DNS records start getting generated. The status is displayed against the **Validate DNS records** step.
3. The addition of DNS records usually takes about a minute. After they're successfully updated, these records are saved, so you can safely leave this page and continue with your other tasks. While sender domains are getting added, you can view the following on the **Overview** tab:
* If the sender domain is added, DNS records start getting generated. The status is displayed against the **Validate DNS records** step. 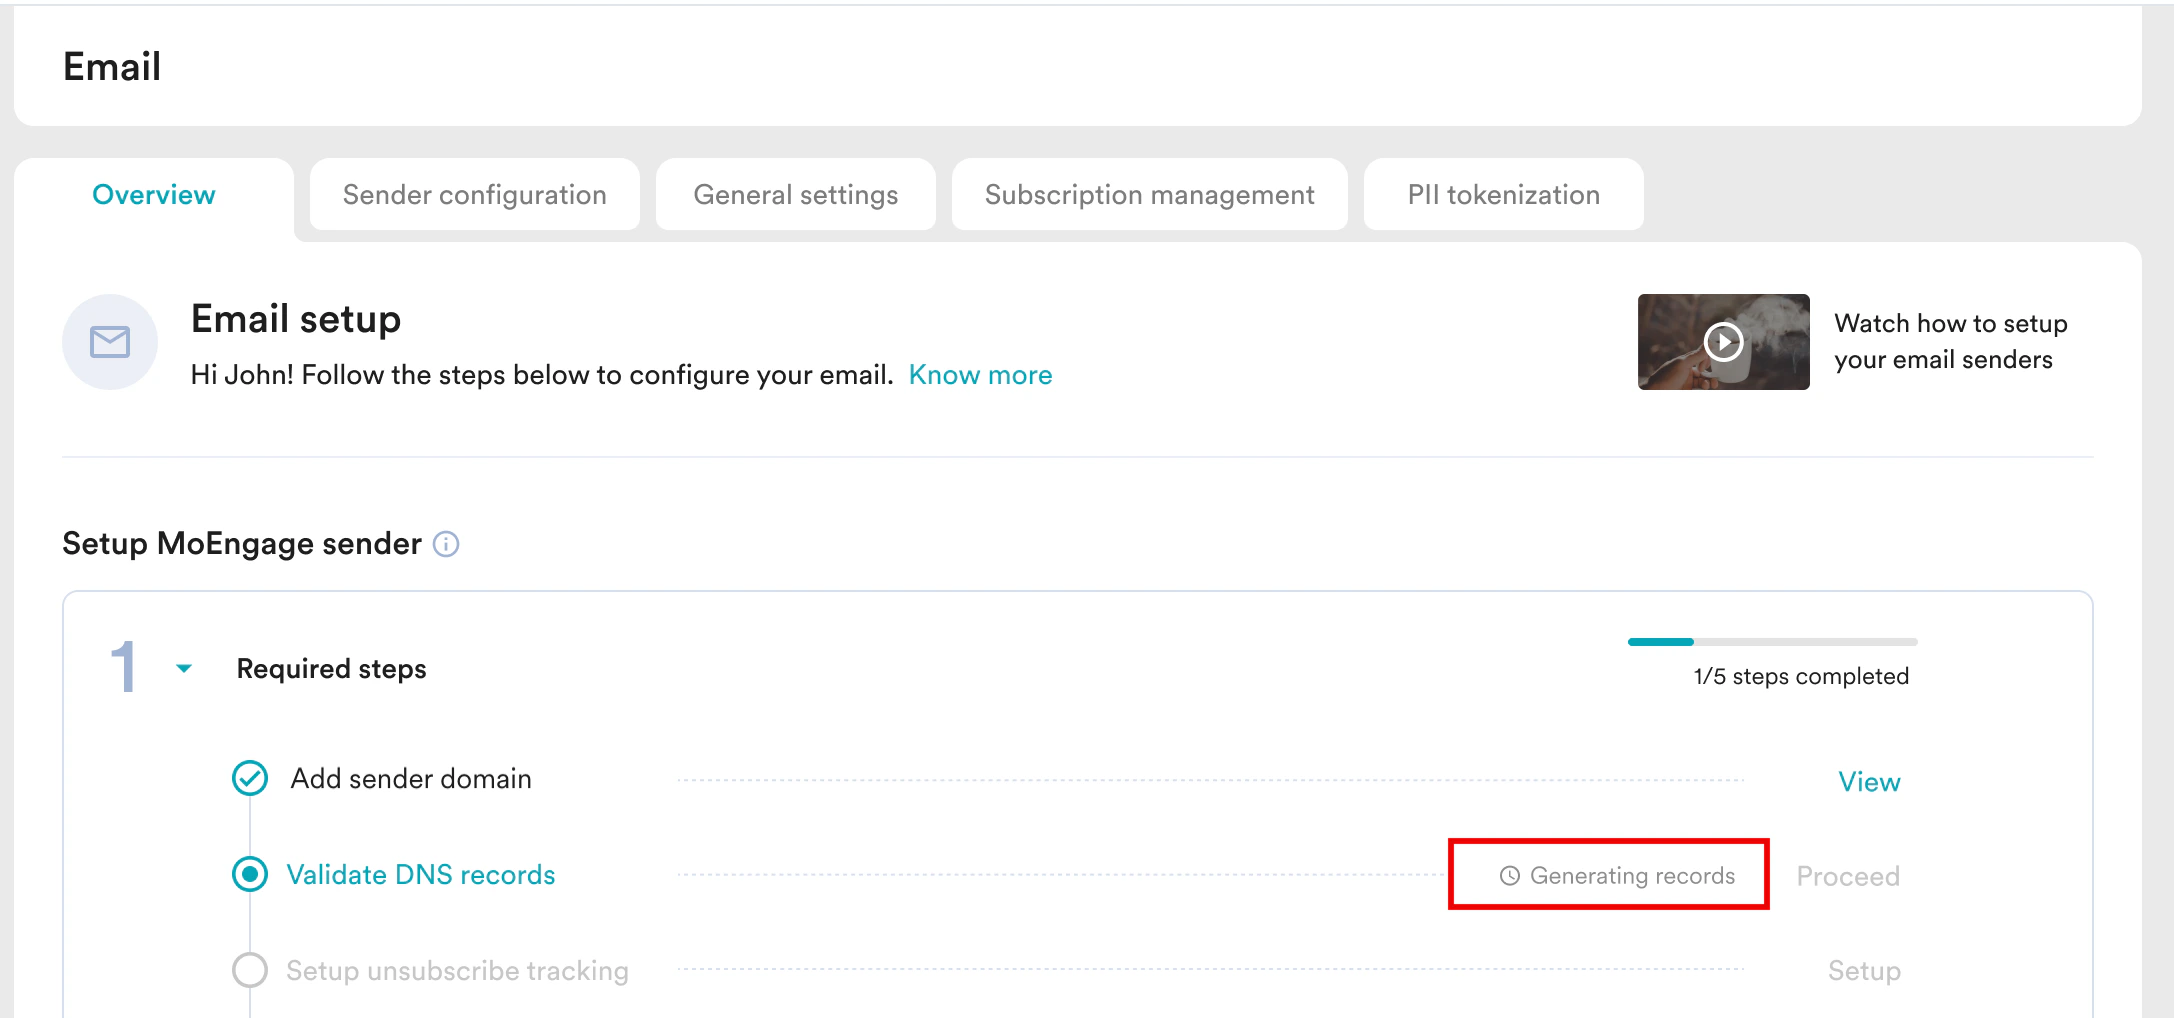 * Click **View** against the **Add sender domain** step to view the added senders.
 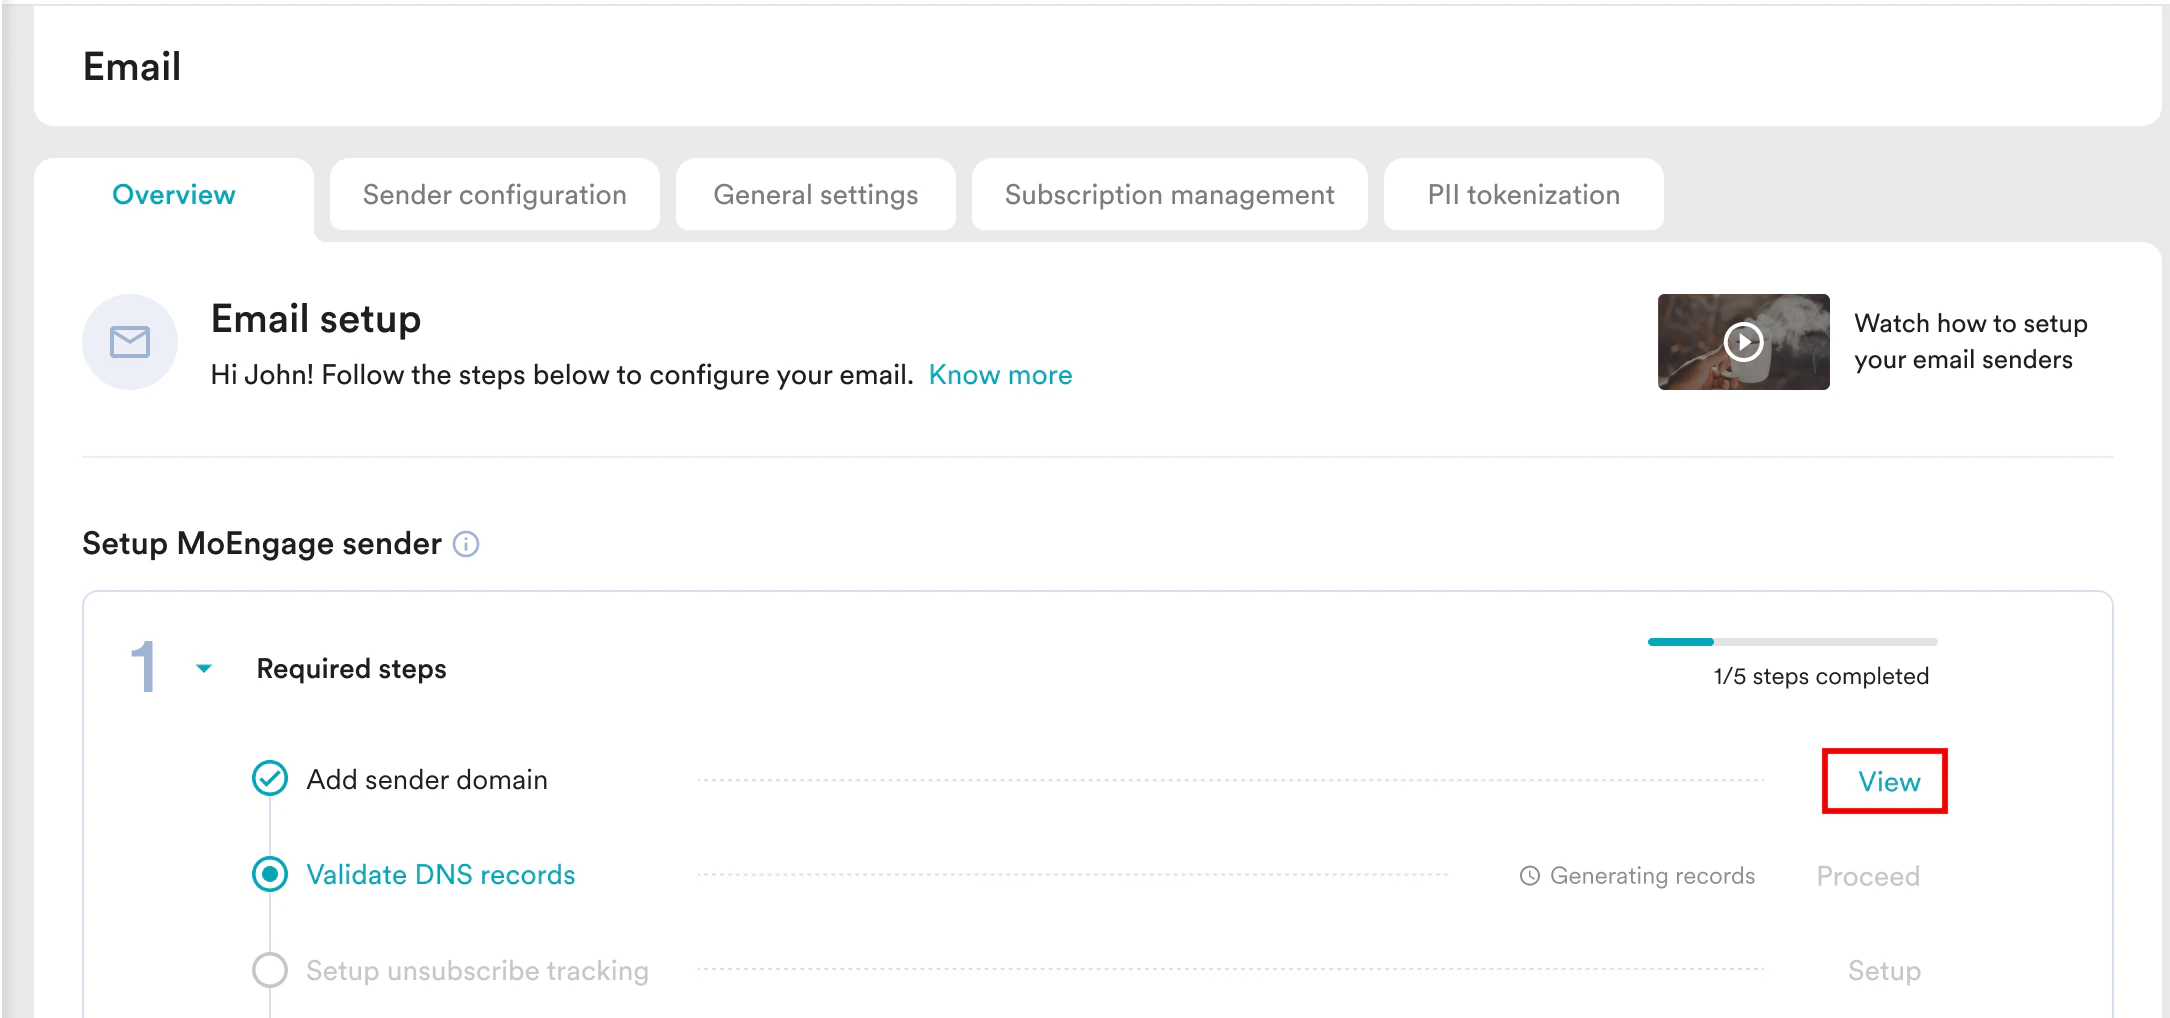 * On the **Domain details** page, the added senders are listed as tabs.
 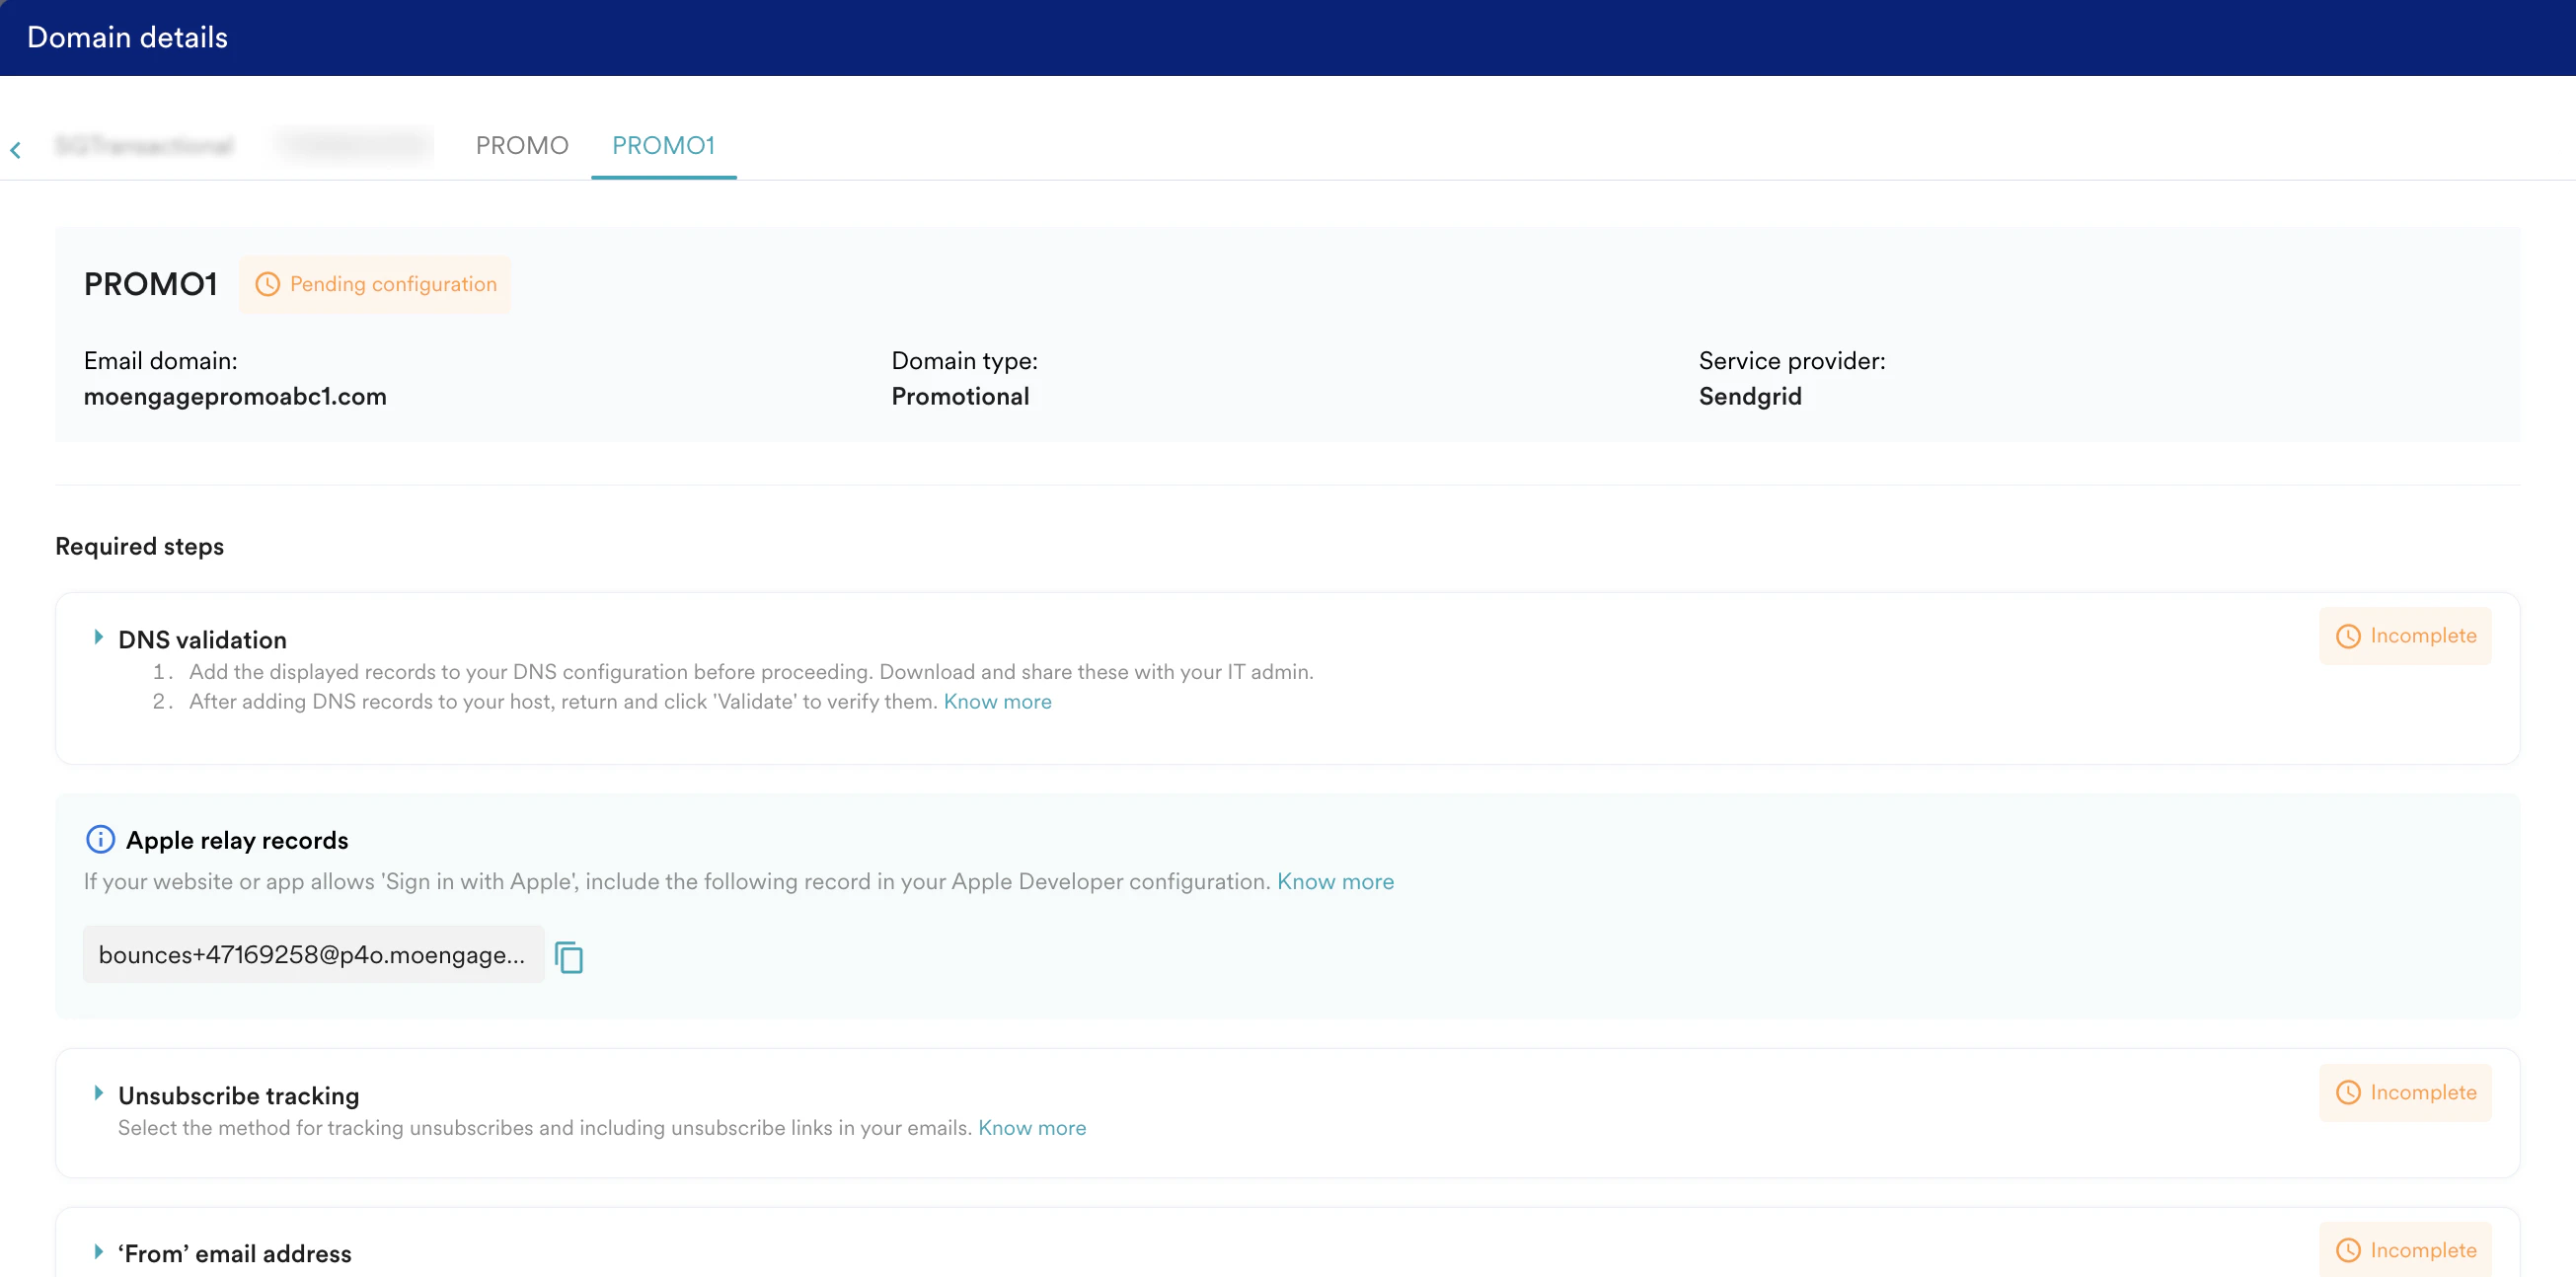 * When clicking each sender, you can view the **Email domain**, **Domain type**, and **Service provider** of that sender.
* Click each sender to view their required and recommended steps. After adding the domain, you can view the status of the generated DNS records under the **DNS validation** section.
* When clicking each sender, you can view the **Email domain**, **Domain type**, and **Service provider** of that sender.
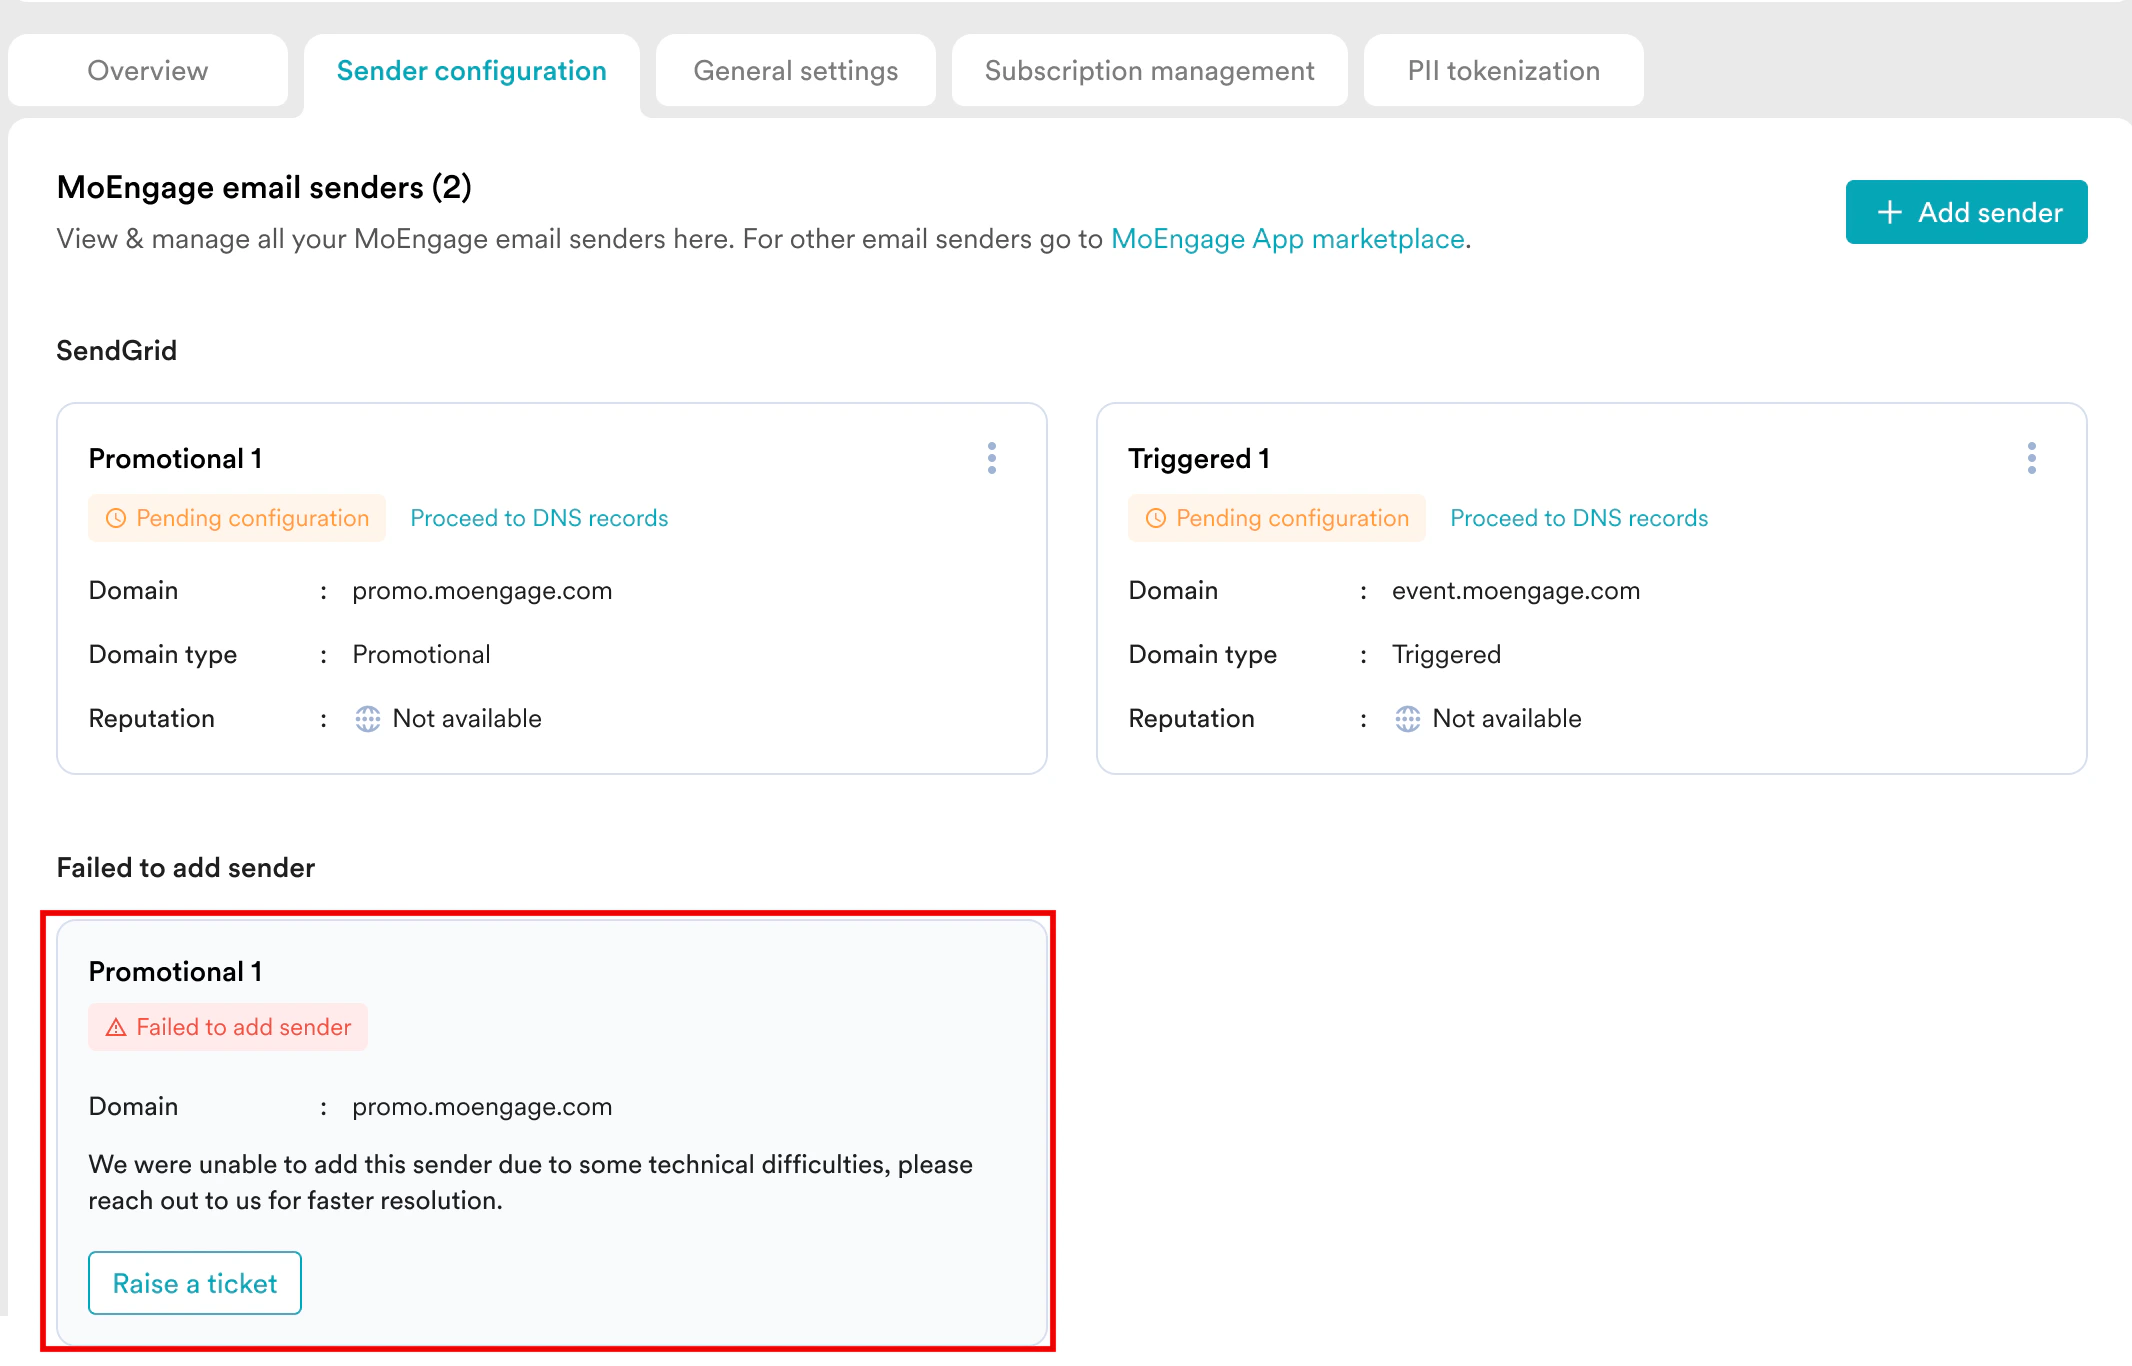
* Click each sender to view their required and recommended steps. After adding the domain, you can view the status of the generated DNS records under the **DNS validation** section. 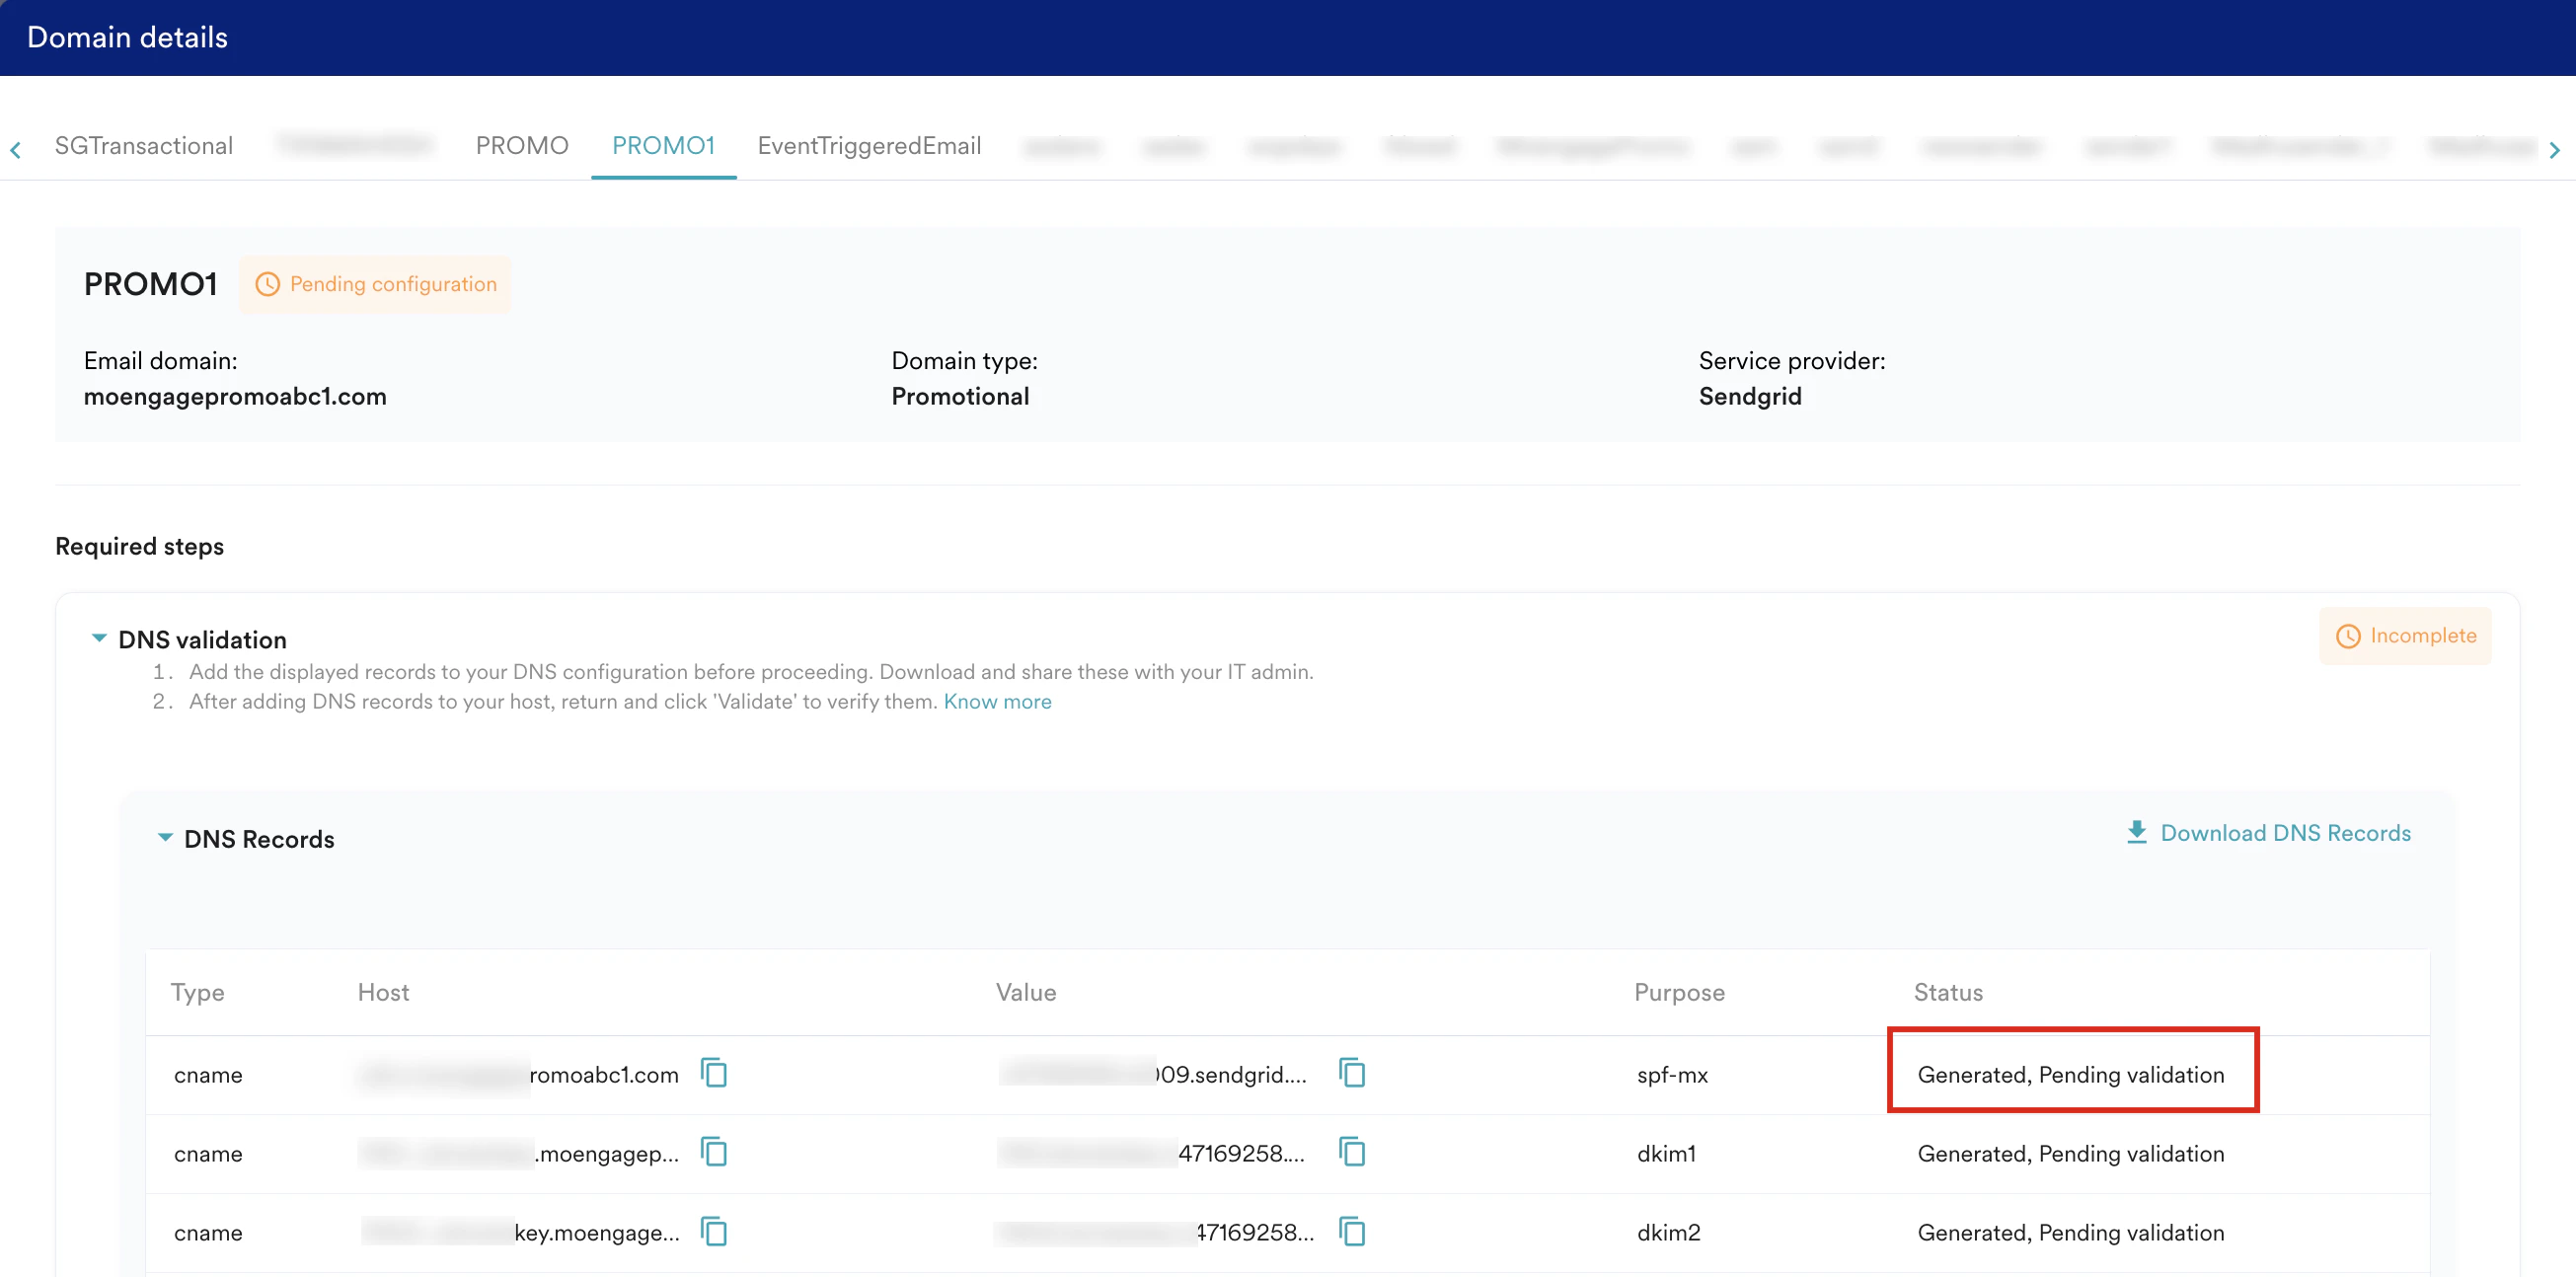 * A **Failed to add sender** warning appears if adding sender domains is unsuccessful. You can retry adding them. If the issue persists, please contact your MoEngage Customer Success Manager (CSM) or the Support team.
  ## Validate DNS Records
Validation of DNS records on the domain is necessary to:
* Communicate to the receiving email servers that you own the domain from which the email was sent.
* Verify that you have given the sending email server permission to send email on behalf of the domain.
* Ensure the optimal deliverability of your emails. This enhances your email delivery rates and boosts trustworthiness with both email inbox providers and recipients. For more information, refer to [Email Authentication Basics](/user-guide/campaigns-and-channels/email/getting-started-with-email/email-authentication-basics).
After the DNS records are generated, perform the following steps to validate DNS records:
1. On the **Overview** tab, click **Proceed** against the **Validate DNS records** step.
## Validate DNS Records
Validation of DNS records on the domain is necessary to:
* Communicate to the receiving email servers that you own the domain from which the email was sent.
* Verify that you have given the sending email server permission to send email on behalf of the domain.
* Ensure the optimal deliverability of your emails. This enhances your email delivery rates and boosts trustworthiness with both email inbox providers and recipients. For more information, refer to [Email Authentication Basics](/user-guide/campaigns-and-channels/email/getting-started-with-email/email-authentication-basics).
After the DNS records are generated, perform the following steps to validate DNS records:
1. On the **Overview** tab, click **Proceed** against the **Validate DNS records** step. 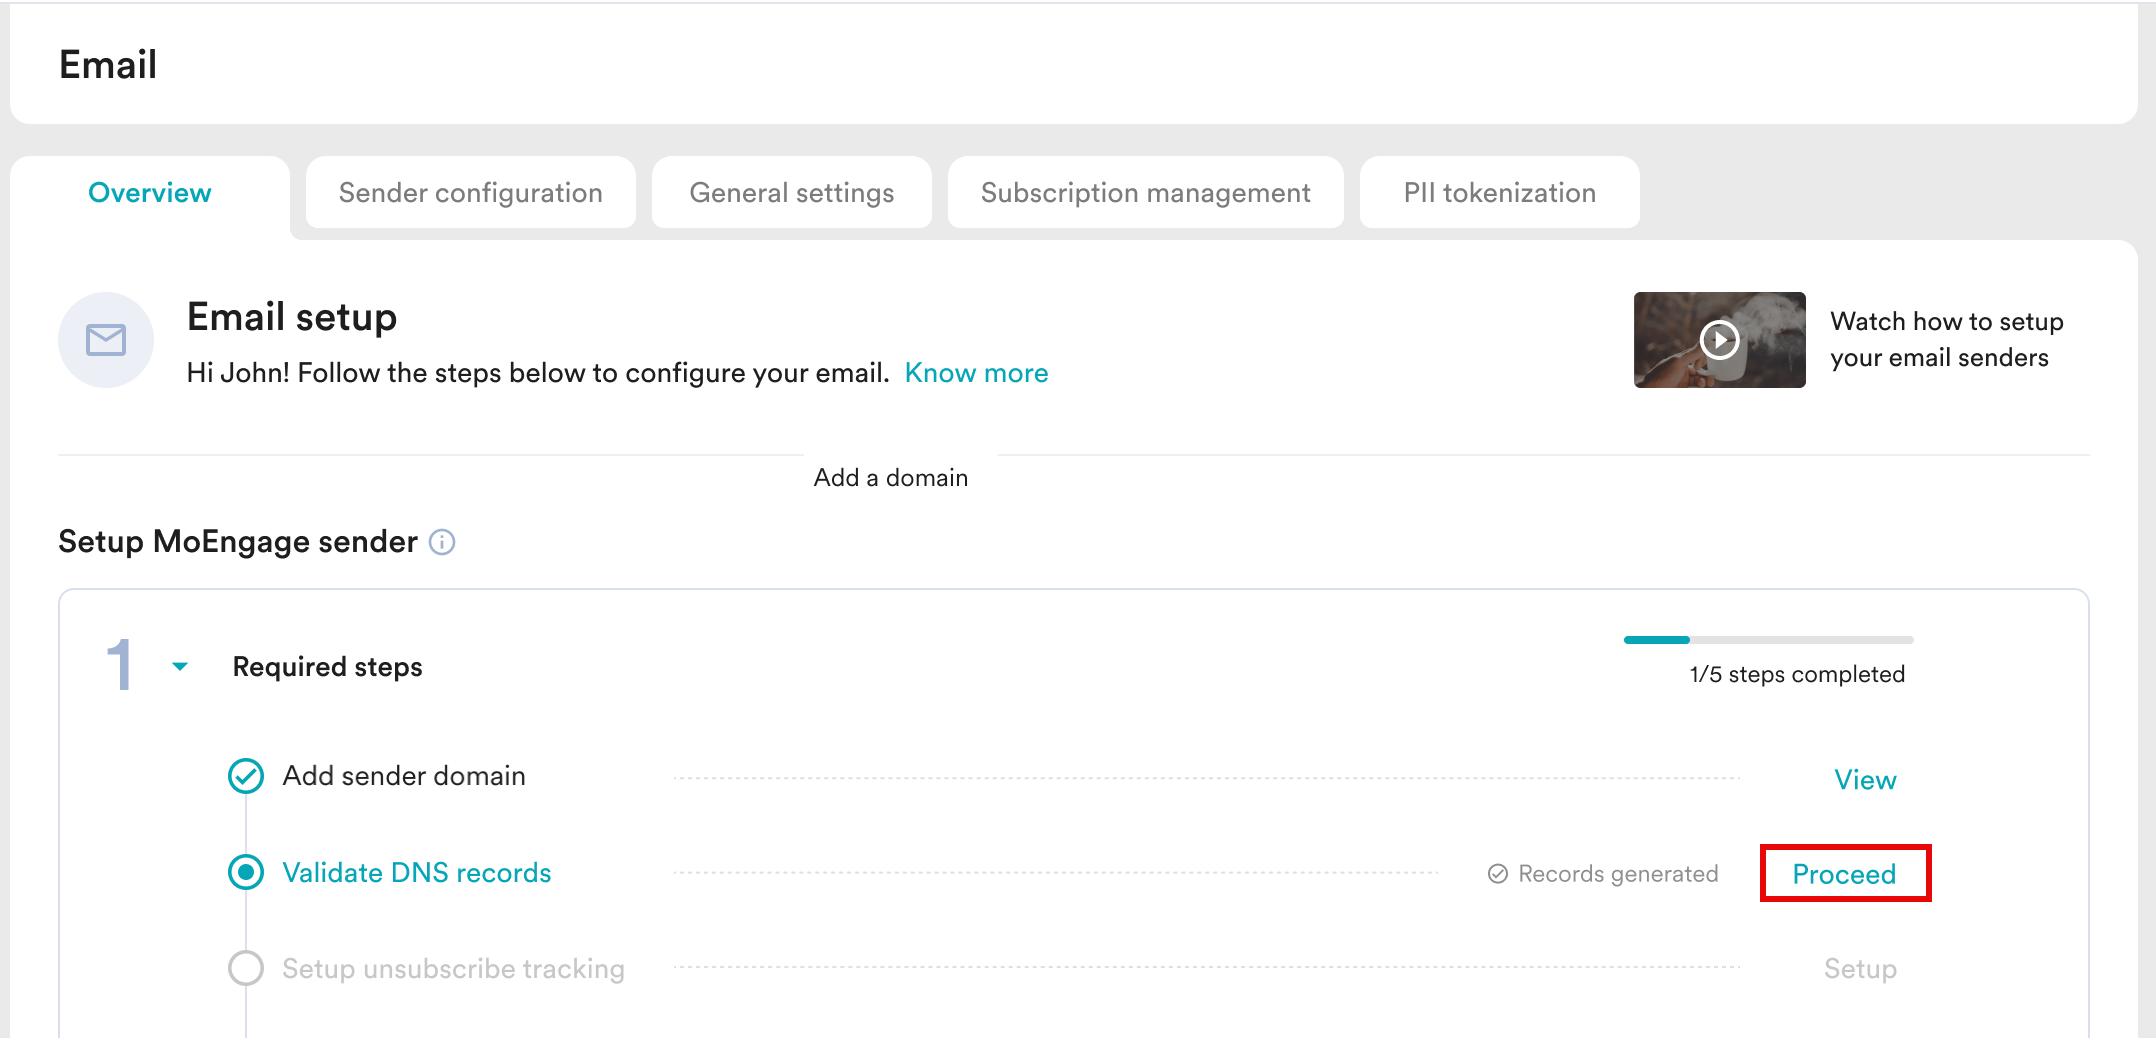 You can also click **Validate DNS records** on the **Sender configuration** tab.\
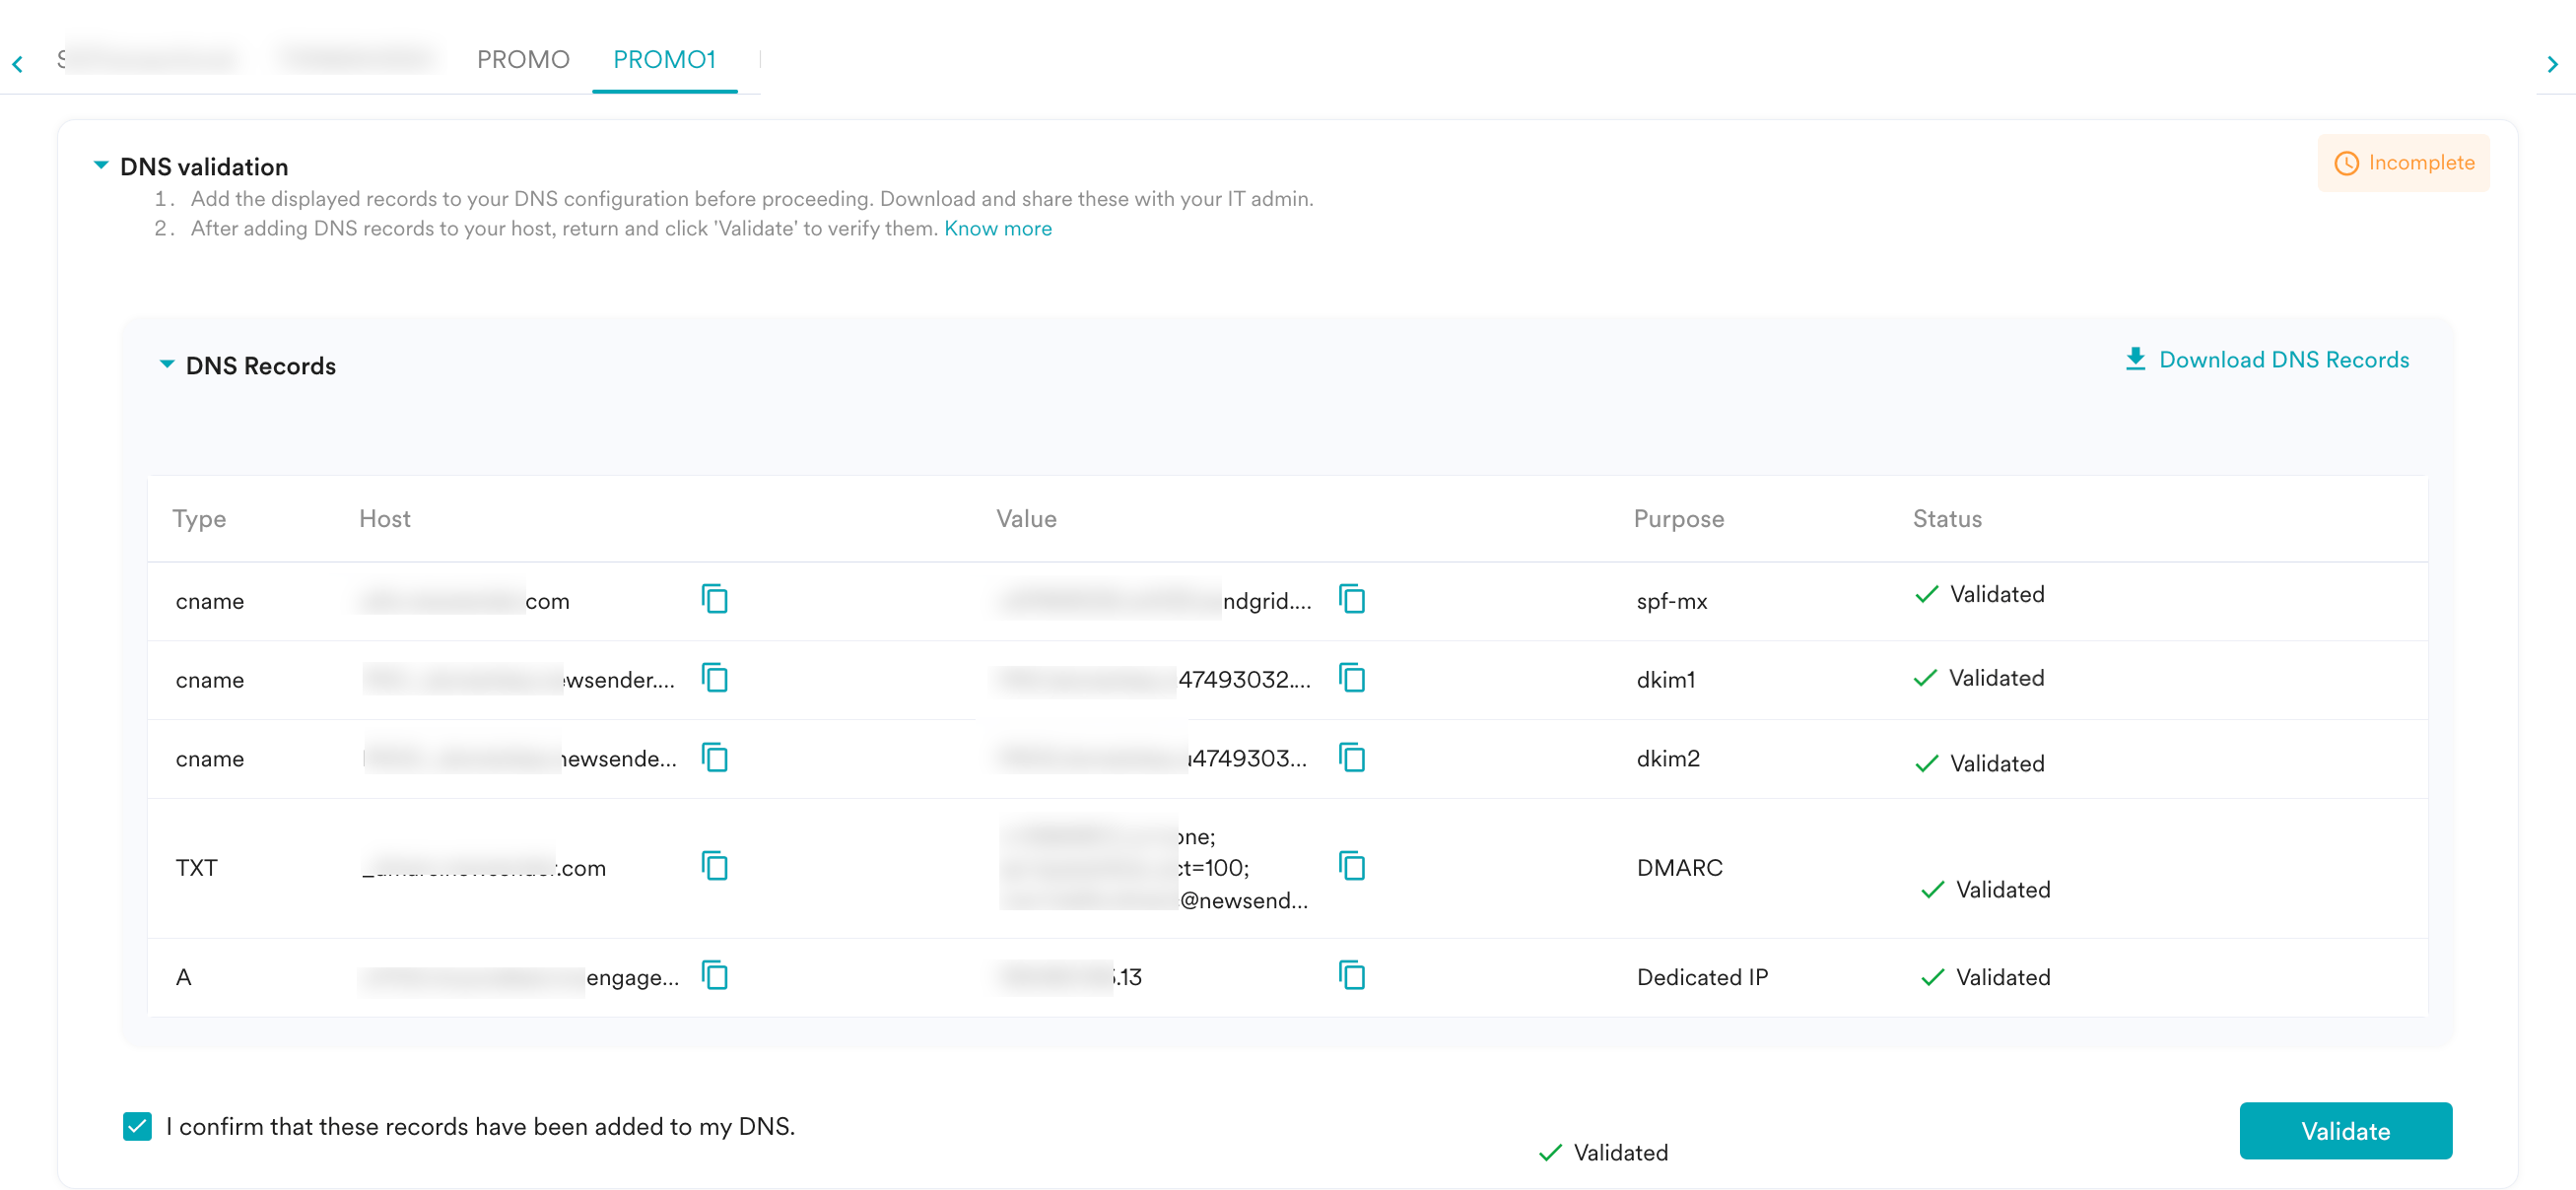
 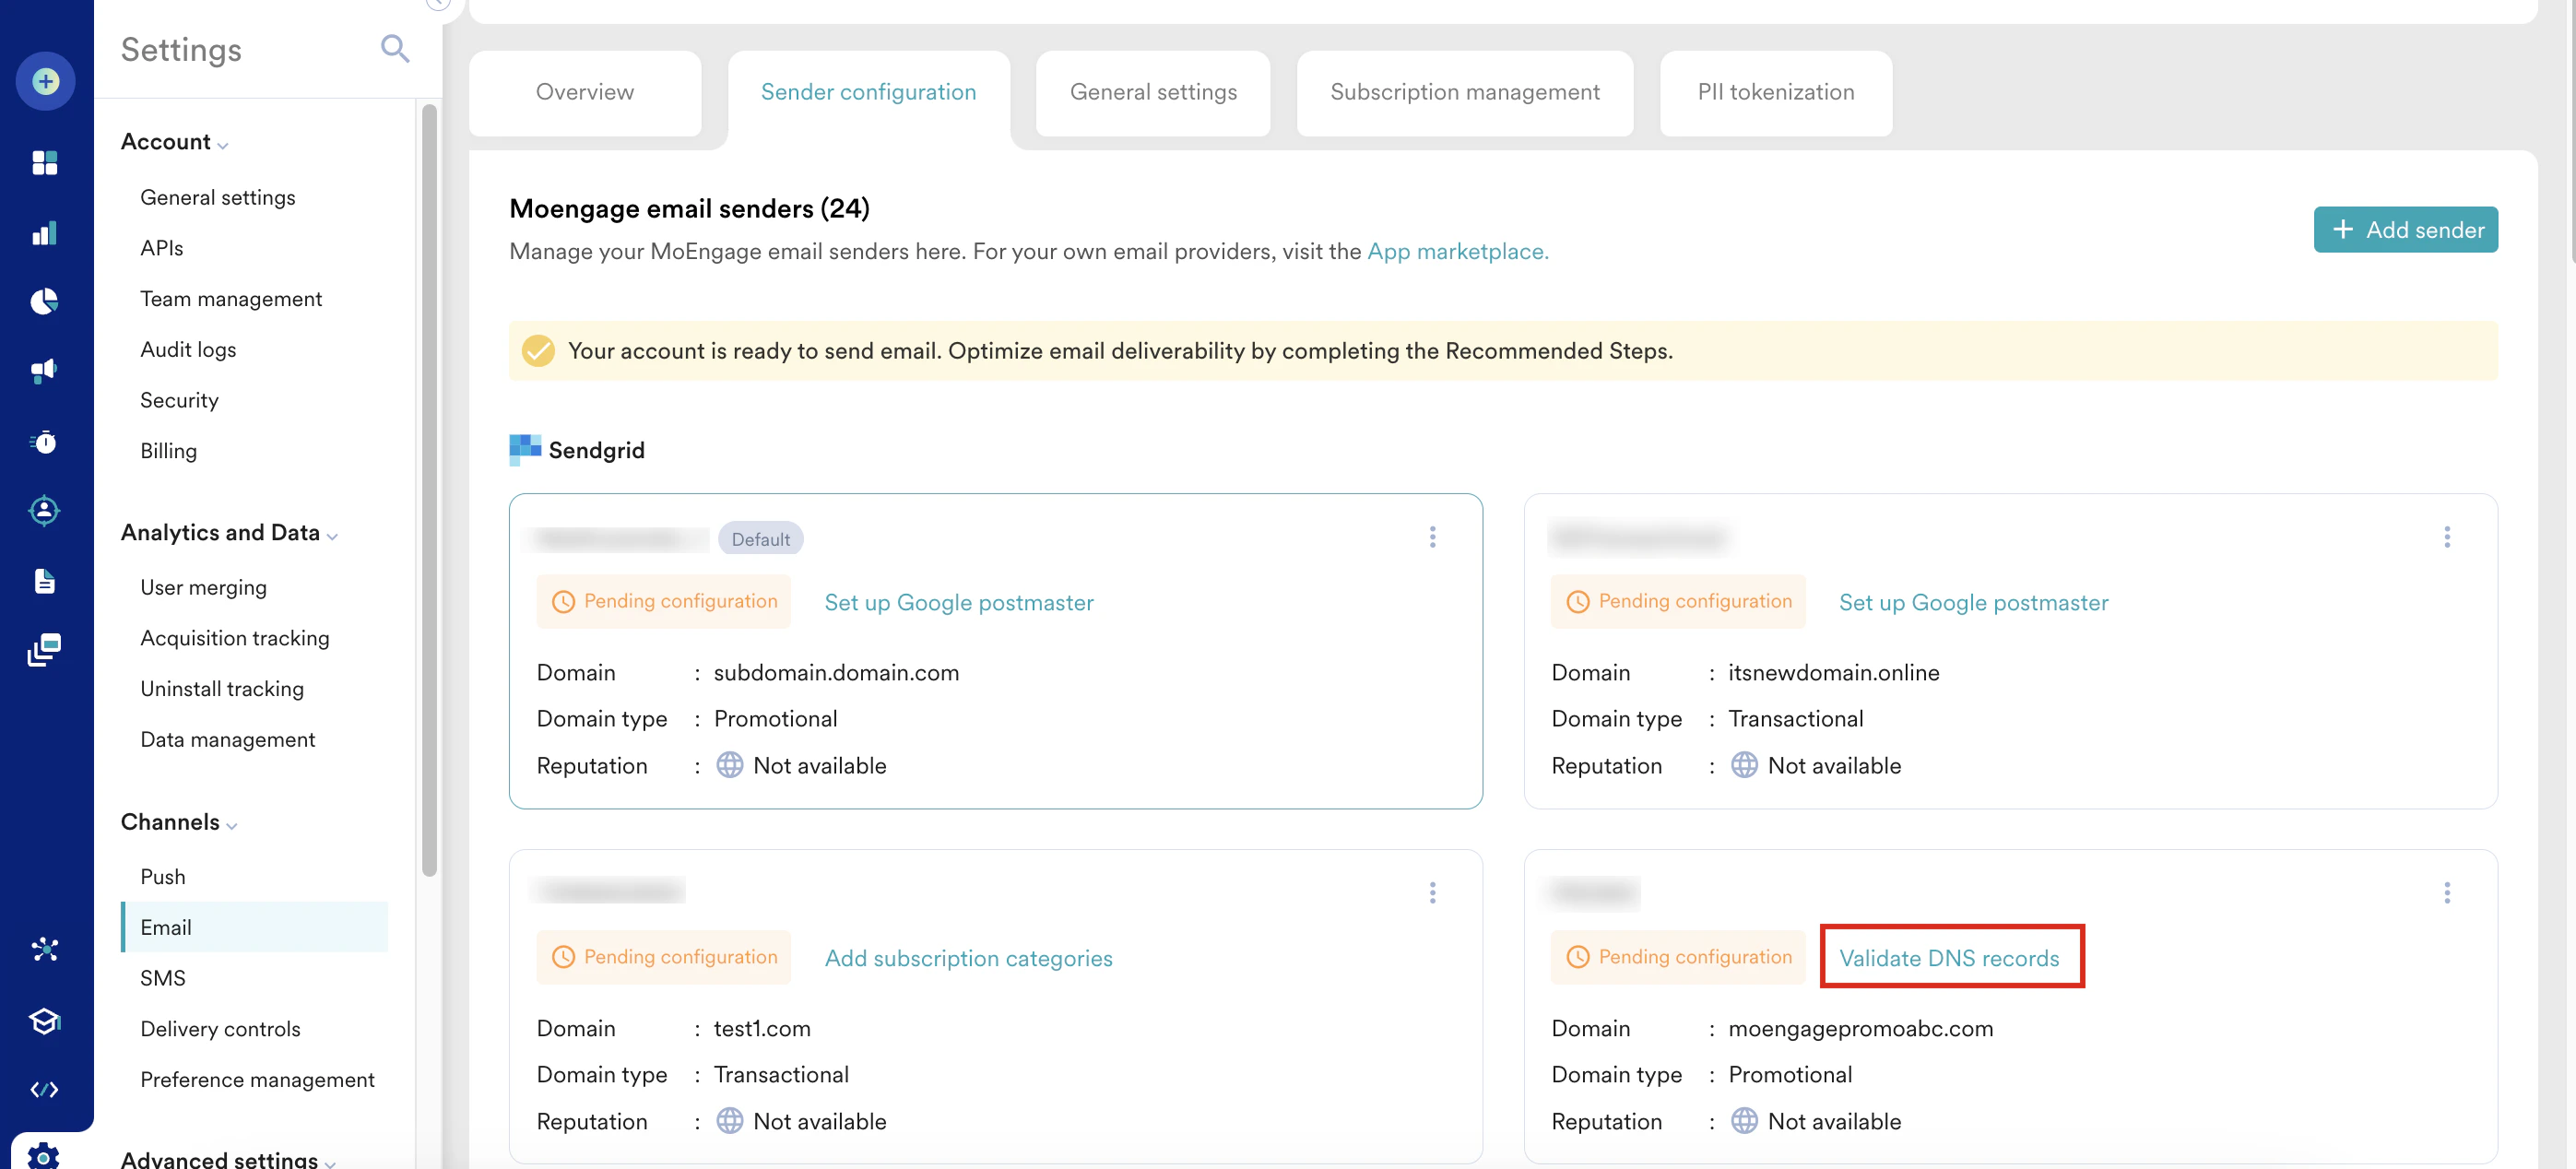 2. On the **Domain details** page, the added senders appear in tabs. Click the sender you want to configure.
3. Expand the **DNS validation** section to view the DNS records of the respective senders.
4. If you have access to your DNS console, you can copy individual records and configure them directly in your DNS settings. If you are sharing these records with your IT team, click **Download DNS records** to download them in PDF format and share them.
The downloaded PDF version contains the DNS records of all the domains you have added so far, so that you can access all your DNS records from one place.
5. After the records are updated in your DNS configuration, select the **I confirm that these records have been added to my DNS** check box and click **Validate**.
6. If the validation is successful, the DNS records display the **Validated** status.\
2. On the **Domain details** page, the added senders appear in tabs. Click the sender you want to configure.
3. Expand the **DNS validation** section to view the DNS records of the respective senders.
4. If you have access to your DNS console, you can copy individual records and configure them directly in your DNS settings. If you are sharing these records with your IT team, click **Download DNS records** to download them in PDF format and share them.
The downloaded PDF version contains the DNS records of all the domains you have added so far, so that you can access all your DNS records from one place.
5. After the records are updated in your DNS configuration, select the **I confirm that these records have been added to my DNS** check box and click **Validate**.
6. If the validation is successful, the DNS records display the **Validated** status.\
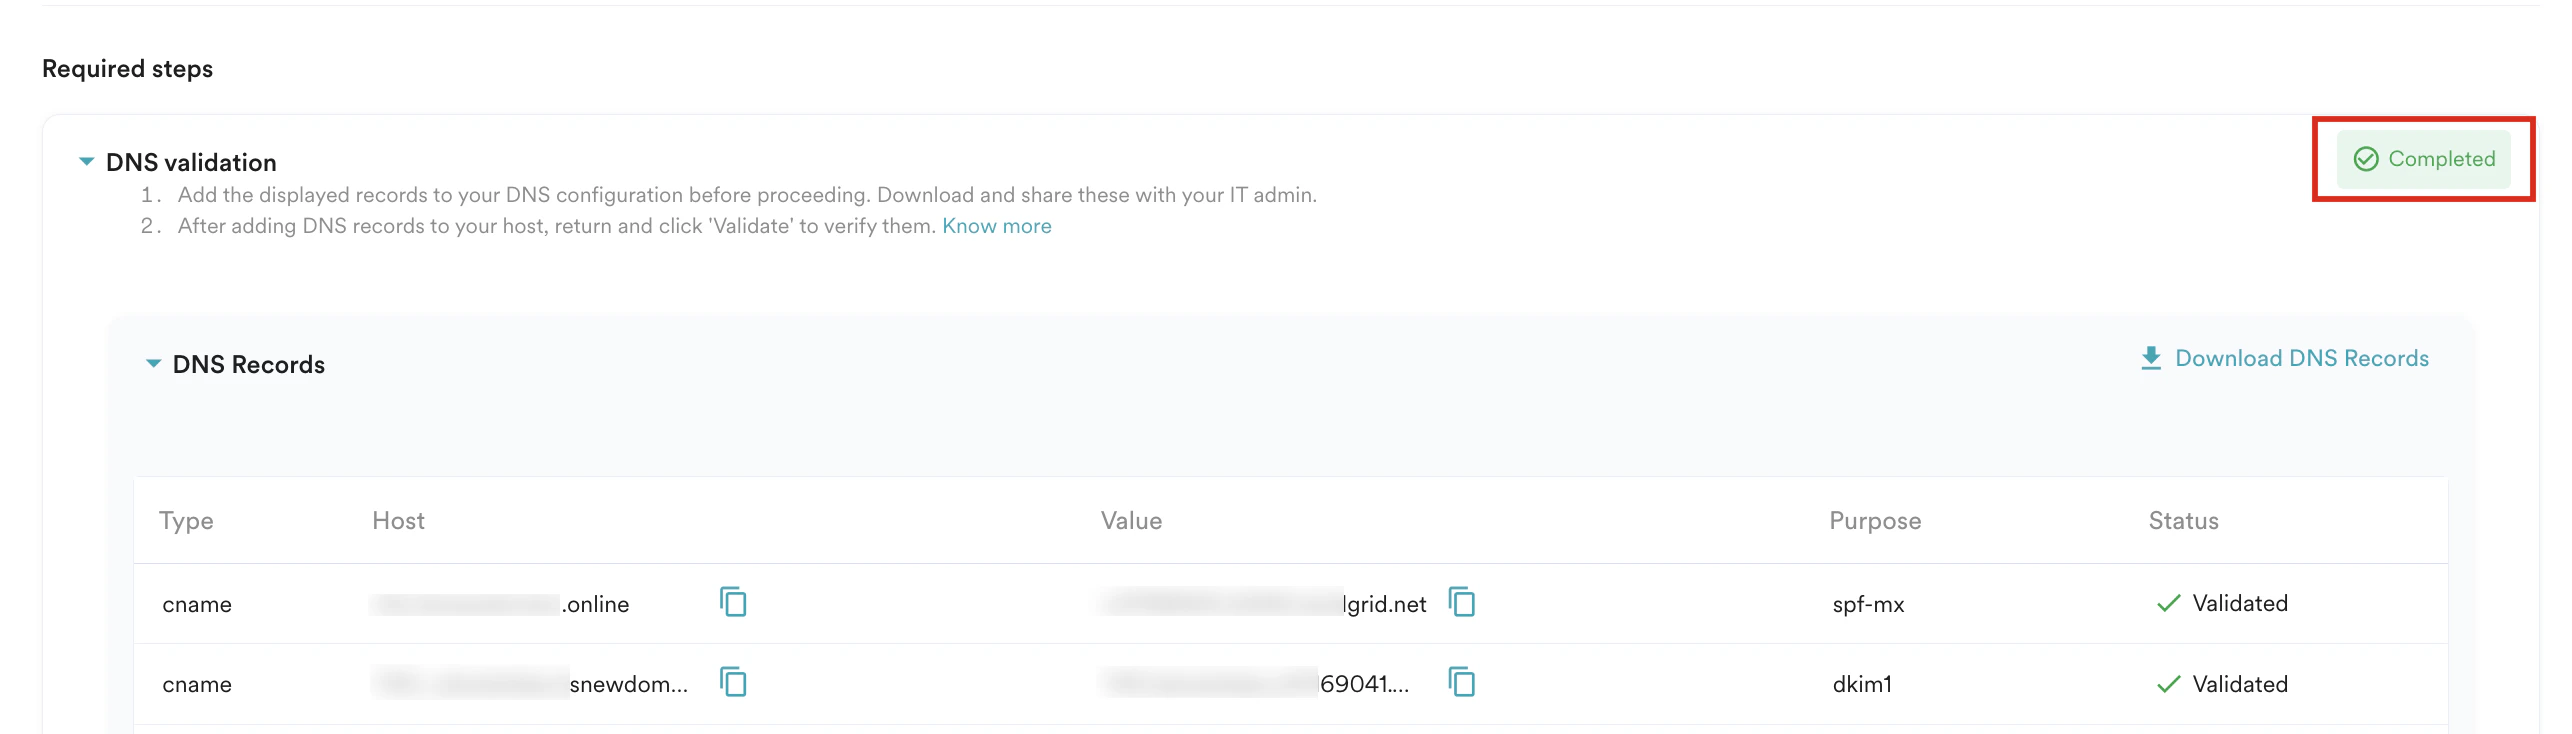
 After DNS records are validated, the DNS validation status changes to **Completed**. If any records fail validation, you need to ensure there is no typo or mistake when setting the exact record generated.
  ### Apple Relay Records
If your app or website supports Sign In With Apple, you must configure the same in Apple developer configuration to ensure your emails are delivered to users with Apple Relay IDs (ending with @privaterelay.appleid.com). For more information, refer to [Sign In With Apple](/user-guide/campaigns-and-channels/email/getting-started-with-email/sign-in-with-apple).
## Set Up Unsubscribe Tracking
In this step, you can configure the unsubscribe tracking of your emails. When users unsubscribe from your marketing emails, MoEngage ensures that no further emails are sent to them. You can manage these unsubscribes in different ways, as explained in this section.
After validating the DNS records, perform the following steps to set up unsubscribe tracking:
1. On the **Overview** tab, click **Setup** against the **Setup unsubscribe tracking** step.
### Apple Relay Records
If your app or website supports Sign In With Apple, you must configure the same in Apple developer configuration to ensure your emails are delivered to users with Apple Relay IDs (ending with @privaterelay.appleid.com). For more information, refer to [Sign In With Apple](/user-guide/campaigns-and-channels/email/getting-started-with-email/sign-in-with-apple).
## Set Up Unsubscribe Tracking
In this step, you can configure the unsubscribe tracking of your emails. When users unsubscribe from your marketing emails, MoEngage ensures that no further emails are sent to them. You can manage these unsubscribes in different ways, as explained in this section.
After validating the DNS records, perform the following steps to set up unsubscribe tracking:
1. On the **Overview** tab, click **Setup** against the **Setup unsubscribe tracking** step. 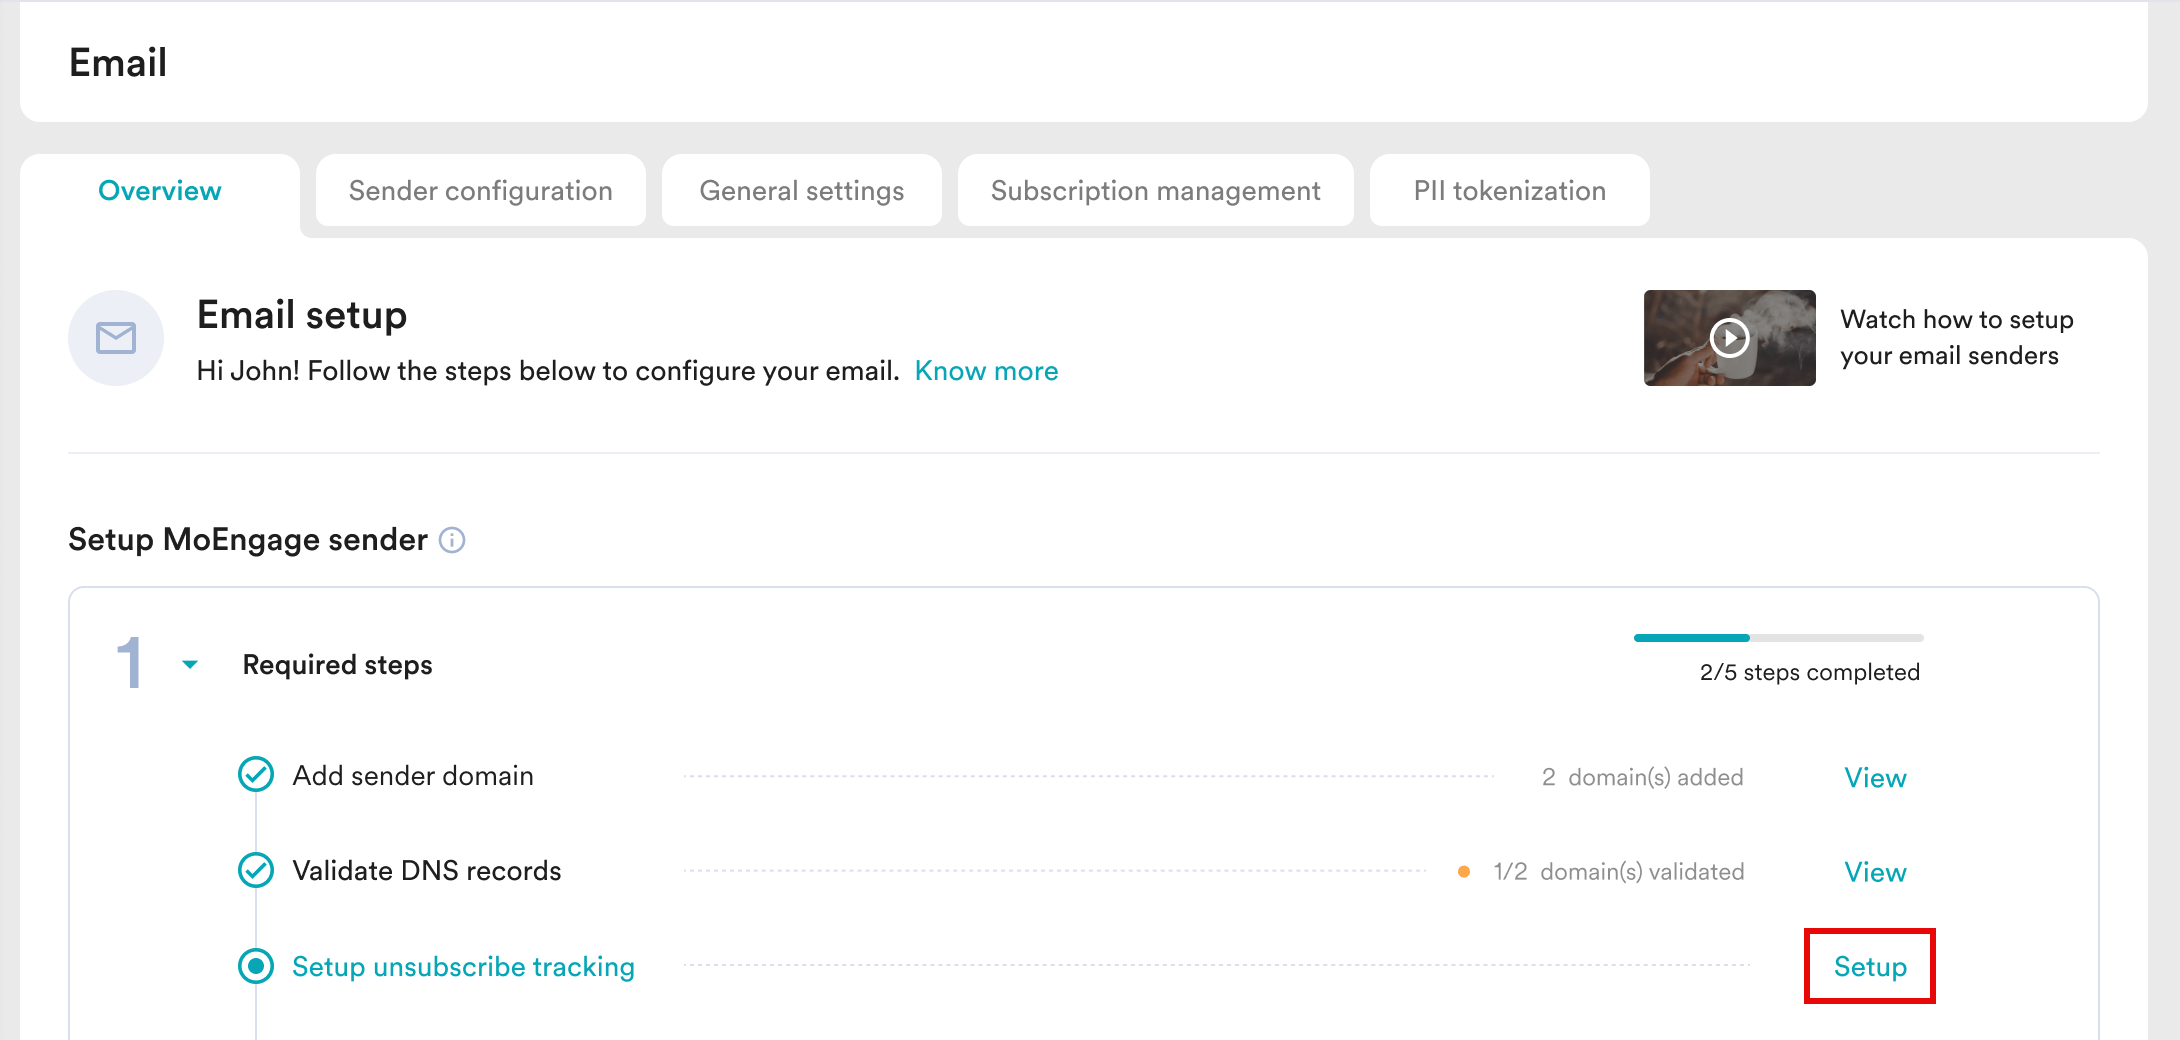 You can also click **Setup unsubscribe tracking** on the **Sender configuration** tab.
2. On the **Domain details** page, the added senders appear in tabs. Click the sender you want to configure.
3. Expand the **Unsubscribe tracking** section of that sender.
1. In the **Email body un-subscription management** section, select any one of the following options:
* **MoEngage Tracking**: If you choose this option, MoEngage ensures that an unsubscribe link is included in the body of your non-transactional email. When a recipient clicks this link, their unsubscribe status is automatically updated on their user profile, effectively suppressing them from receiving future email campaigns. In the **Unsubscribe Page URL** field, you can specify a custom URL for the unsubscribe landing page, instead of using MoEngage's default page. When a recipient clicks the unsubscribe link, MoEngage updates their unsubscribe status and then redirects them to the URL you have specified.
* ****Self-Managed:**** If you select this option, MoEngage expects you to manage this process from your end to remain compliant. You need to ensure that subscription tracking or unsubscribe settings are disabled on the connected email service provider. Include your unsubscribe URL in the email template. This will not get tracked under the unsubscribe event, and you have to capture and manage the unsubscribe requests from your end. Pass this data back to MoEngage using the Data API to update the corresponding user profile in the MoEngage dashboard. For more information, refer to [Track Email Unsubscribes](/user-guide/campaigns-and-channels/email/create/track-email-unsubscribes).
2. In the **One-click unsubscribe** section, select any one of the following options:\
One-click unsubscribe used to be a best practice that you could follow, but since 2024, this is a mandatory compliance to be fulfilled according to Google and Yahoo.
* **MoEngage tracking**: If you select this option, MoEngage adds its unsubscribe URL and an email ID in the email header under the HTTPS URL section and mail-to section, respectively. While the former helps users unsubscribe with a click, the latter unsubscribes the user via the mail-to method of list-unsubscribe. Also, MoEngage processes all requests and updates the preferences of the users in your workspace.
* **Self Managed**: If you select this option, you must provide an unsubscribe URL and an email ID. MoEngage adds these to the HTTPS URL and mail-to sections of the email header while sending any email. However, you will be responsible for further processing of unsubscribes via this. Also, to be compliant, you must process unsubscribes within 48 hours. You must pass the updated preference back to MoEngage so that MoEngage can automatically ignore the unsubscribed users in the future.
* **One-click unsubscribe URL:** Provide a direct unsubscribe link that, upon confirmation, immediately unsubscribes the user.
* Ensure to add the parameters using JINJA to this URL so that you can identify the user who requested to unsubscribe and act accordingly.
* Ensure that this link has no redirection or landing page and directs to the unsubscribe instead.
* **One-click unsubscribe email**: Provide an email ID that will get added to the mail-to section of the email header. Upon providing an email ID, the **User Identifier field** is displayed for identification purposes.\
For more information, refer to [List-Unsubscribe Email](/user-guide/campaigns-and-channels/email/getting-started-with-email/list-unsubscribe-email).
4. Click **Save**. After the unsubscribe tracking is set up, the **Unsubscribe tracking** status changes to **Completed**.
You can also click **Setup unsubscribe tracking** on the **Sender configuration** tab.
2. On the **Domain details** page, the added senders appear in tabs. Click the sender you want to configure.
3. Expand the **Unsubscribe tracking** section of that sender.
1. In the **Email body un-subscription management** section, select any one of the following options:
* **MoEngage Tracking**: If you choose this option, MoEngage ensures that an unsubscribe link is included in the body of your non-transactional email. When a recipient clicks this link, their unsubscribe status is automatically updated on their user profile, effectively suppressing them from receiving future email campaigns. In the **Unsubscribe Page URL** field, you can specify a custom URL for the unsubscribe landing page, instead of using MoEngage's default page. When a recipient clicks the unsubscribe link, MoEngage updates their unsubscribe status and then redirects them to the URL you have specified.
* ****Self-Managed:**** If you select this option, MoEngage expects you to manage this process from your end to remain compliant. You need to ensure that subscription tracking or unsubscribe settings are disabled on the connected email service provider. Include your unsubscribe URL in the email template. This will not get tracked under the unsubscribe event, and you have to capture and manage the unsubscribe requests from your end. Pass this data back to MoEngage using the Data API to update the corresponding user profile in the MoEngage dashboard. For more information, refer to [Track Email Unsubscribes](/user-guide/campaigns-and-channels/email/create/track-email-unsubscribes).
2. In the **One-click unsubscribe** section, select any one of the following options:\
One-click unsubscribe used to be a best practice that you could follow, but since 2024, this is a mandatory compliance to be fulfilled according to Google and Yahoo.
* **MoEngage tracking**: If you select this option, MoEngage adds its unsubscribe URL and an email ID in the email header under the HTTPS URL section and mail-to section, respectively. While the former helps users unsubscribe with a click, the latter unsubscribes the user via the mail-to method of list-unsubscribe. Also, MoEngage processes all requests and updates the preferences of the users in your workspace.
* **Self Managed**: If you select this option, you must provide an unsubscribe URL and an email ID. MoEngage adds these to the HTTPS URL and mail-to sections of the email header while sending any email. However, you will be responsible for further processing of unsubscribes via this. Also, to be compliant, you must process unsubscribes within 48 hours. You must pass the updated preference back to MoEngage so that MoEngage can automatically ignore the unsubscribed users in the future.
* **One-click unsubscribe URL:** Provide a direct unsubscribe link that, upon confirmation, immediately unsubscribes the user.
* Ensure to add the parameters using JINJA to this URL so that you can identify the user who requested to unsubscribe and act accordingly.
* Ensure that this link has no redirection or landing page and directs to the unsubscribe instead.
* **One-click unsubscribe email**: Provide an email ID that will get added to the mail-to section of the email header. Upon providing an email ID, the **User Identifier field** is displayed for identification purposes.\
For more information, refer to [List-Unsubscribe Email](/user-guide/campaigns-and-channels/email/getting-started-with-email/list-unsubscribe-email).
4. Click **Save**. After the unsubscribe tracking is set up, the **Unsubscribe tracking** status changes to **Completed**. 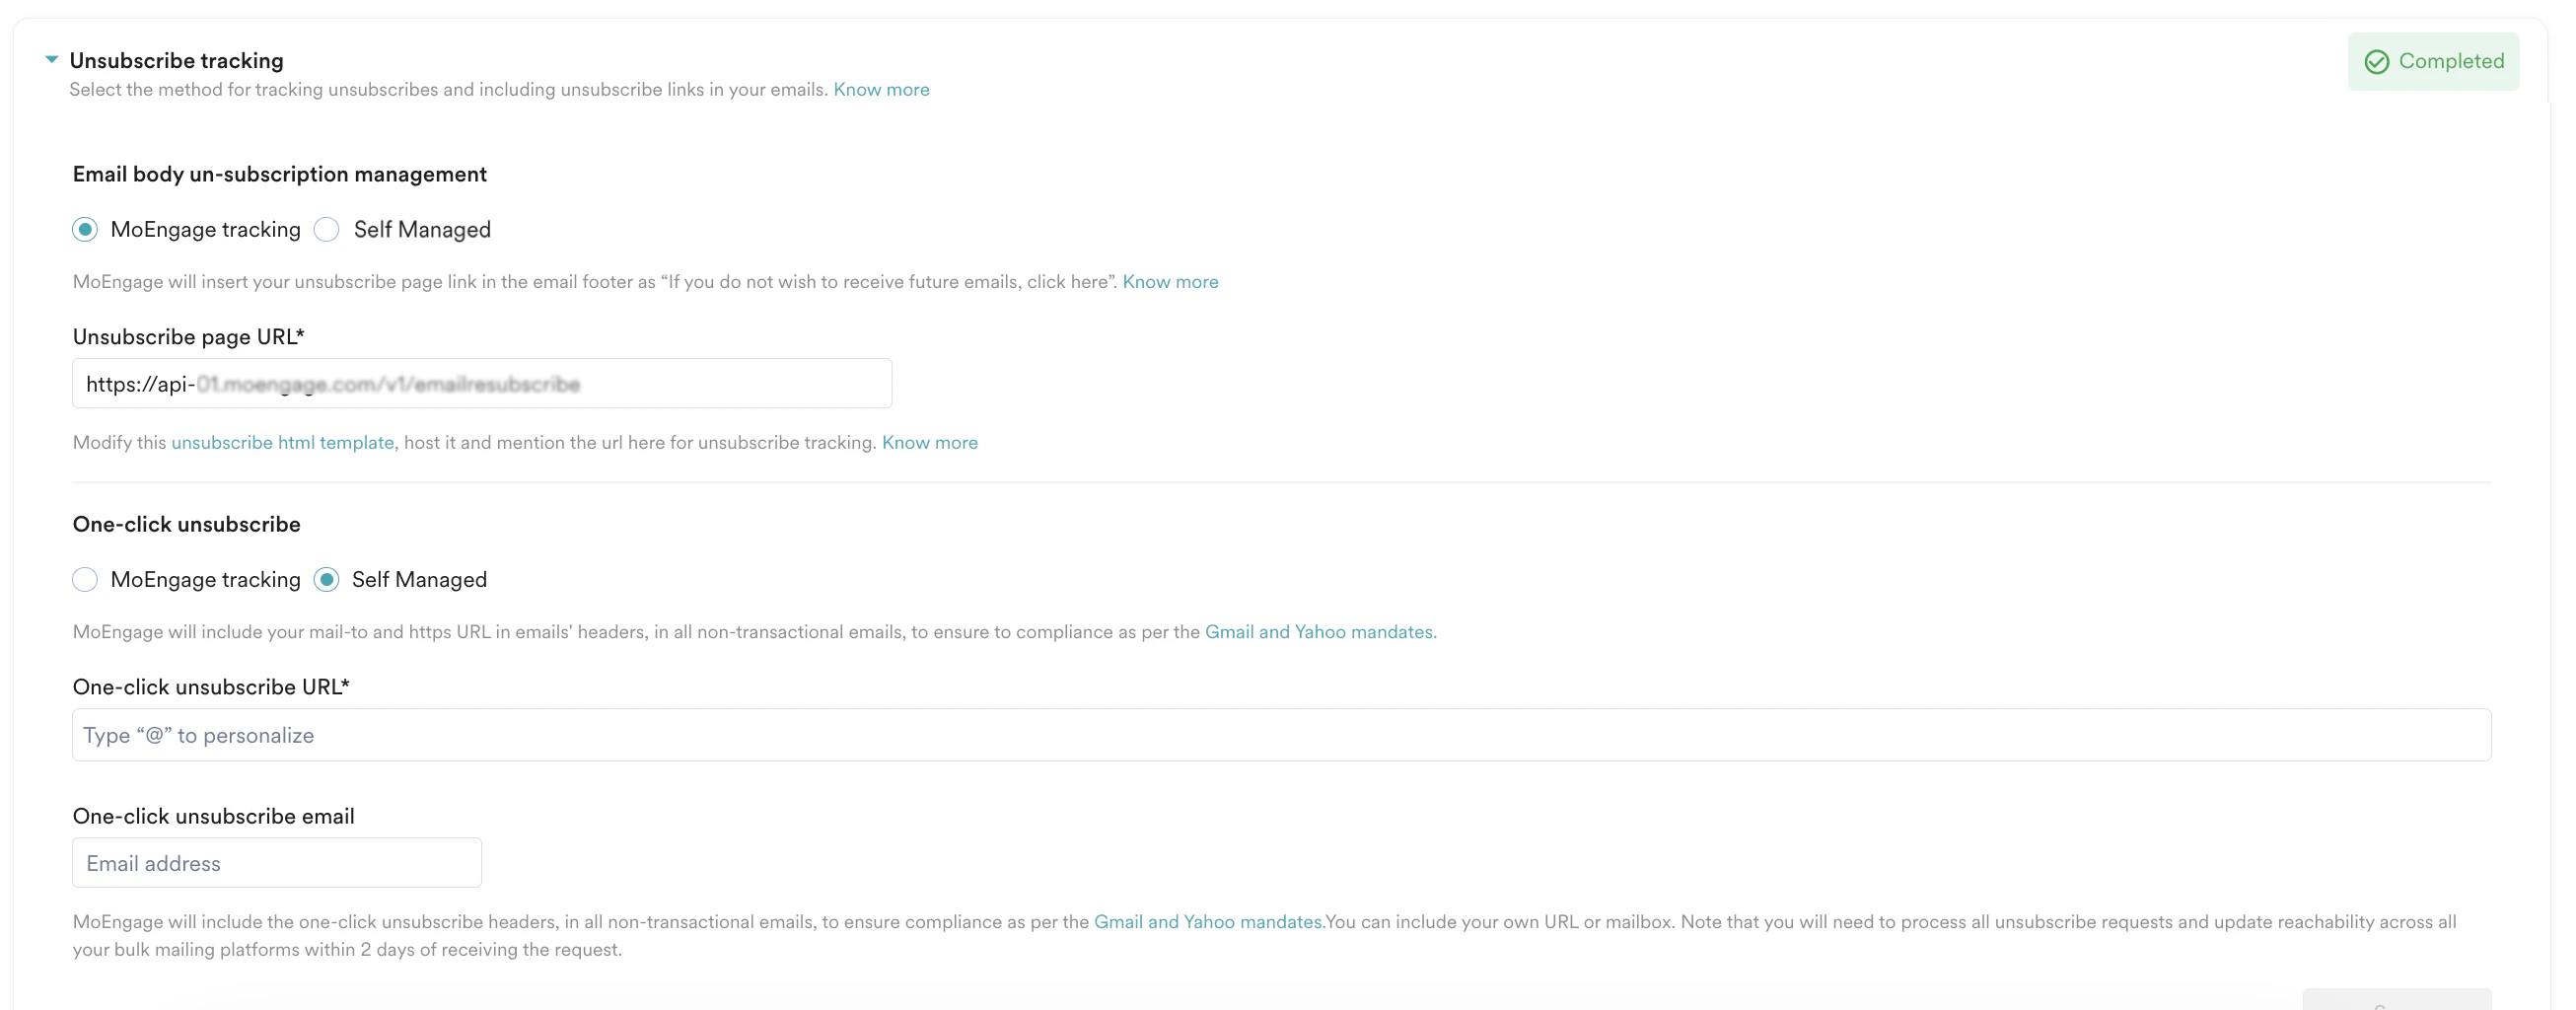 ## Add From address
The *From address* is the email address from which your users receive campaigns. Verifying this address is crucial for successful campaign delivery. The *From address* configured here is listed in the\
**From email address** list while creating the email campaign.
After setting up the unsubscribe tracking, perform the following steps to add a *From address*:
1. On the **Overview** tab, click **+ Add** against the **Add 'From' address** step.
## Add From address
The *From address* is the email address from which your users receive campaigns. Verifying this address is crucial for successful campaign delivery. The *From address* configured here is listed in the\
**From email address** list while creating the email campaign.
After setting up the unsubscribe tracking, perform the following steps to add a *From address*:
1. On the **Overview** tab, click **+ Add** against the **Add 'From' address** step. 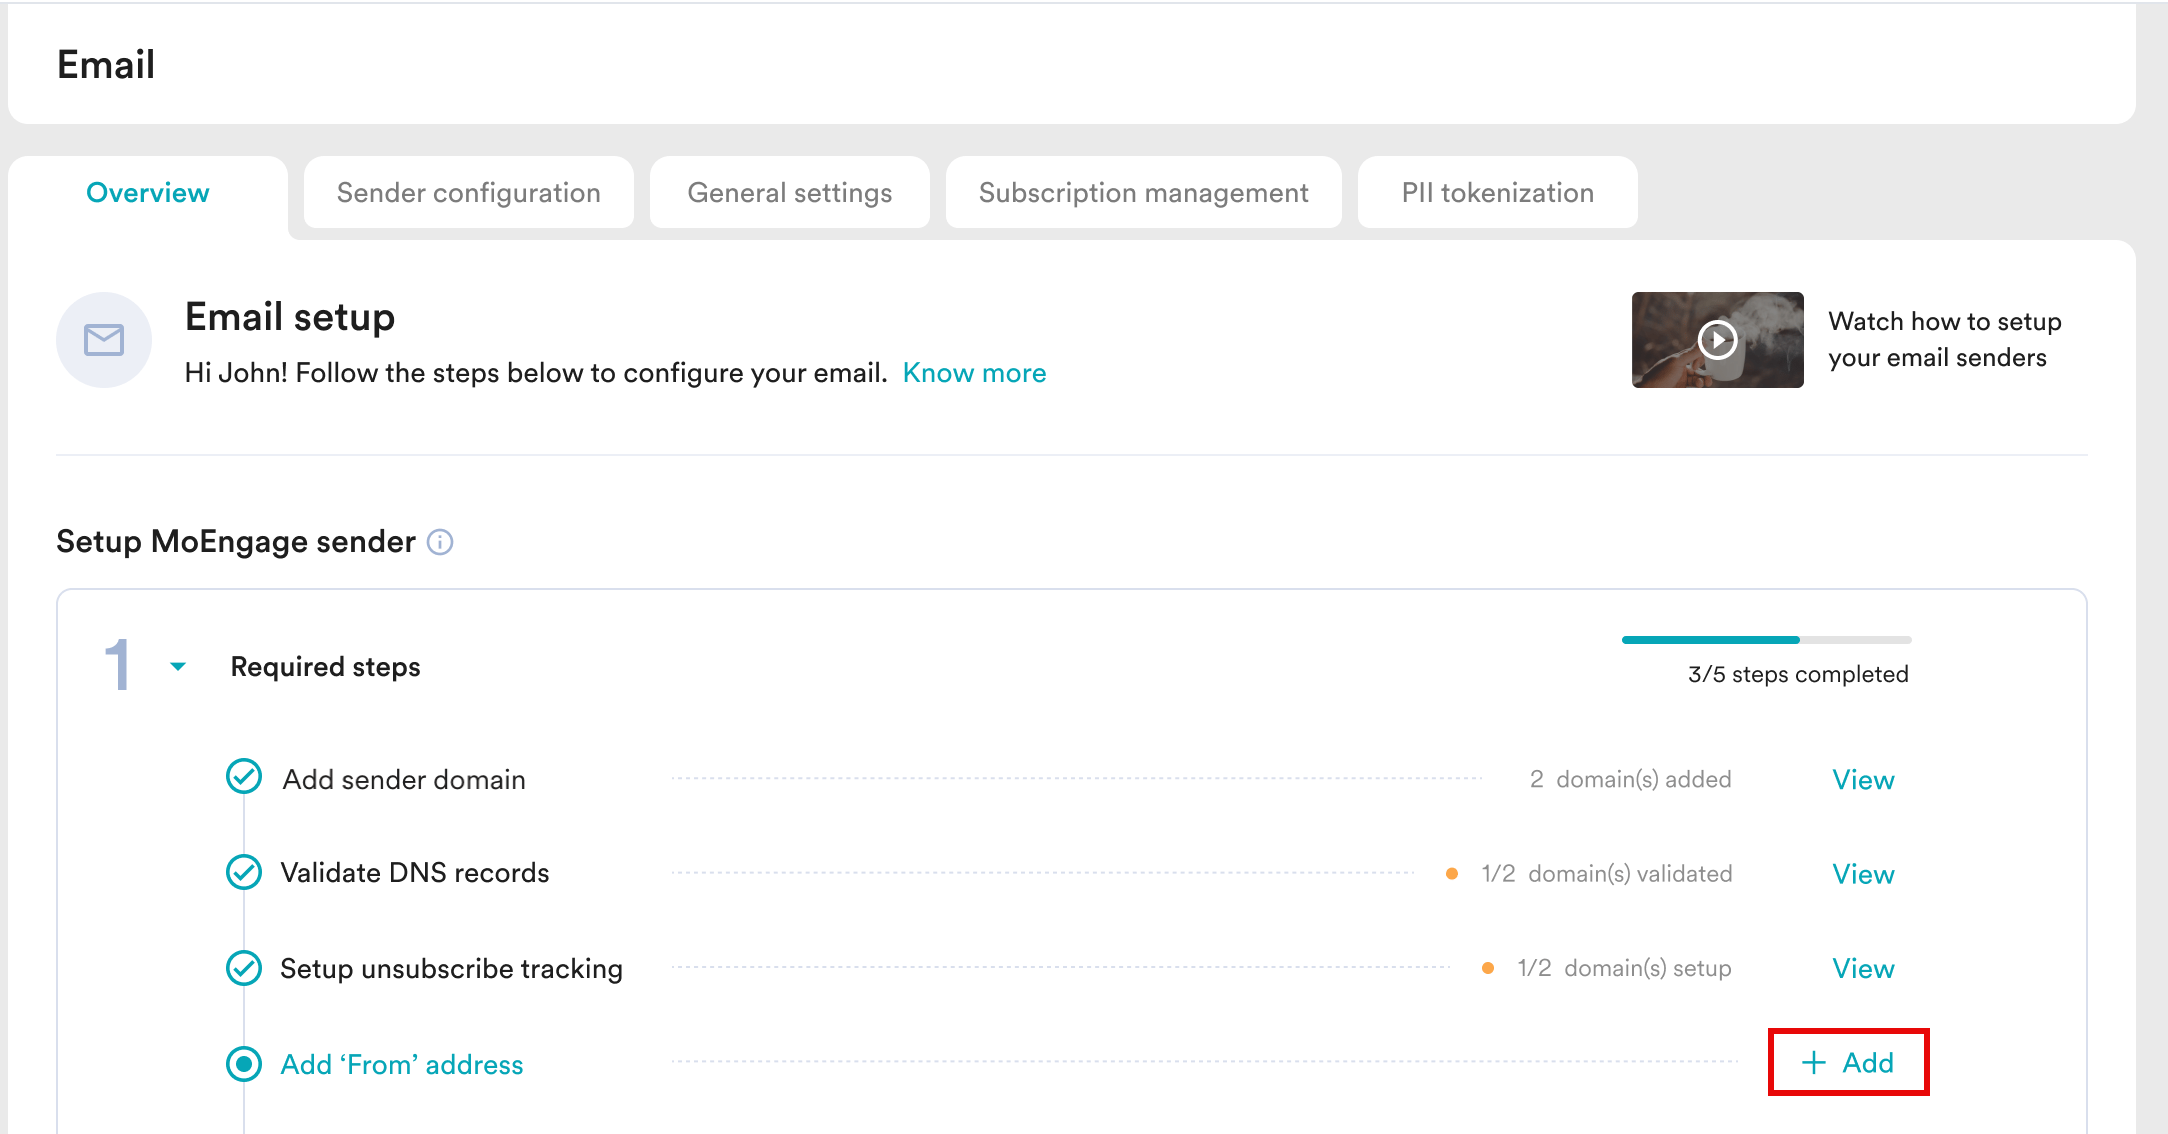 You can also click **Add 'From' address** on the **Sender configuration** tab.
 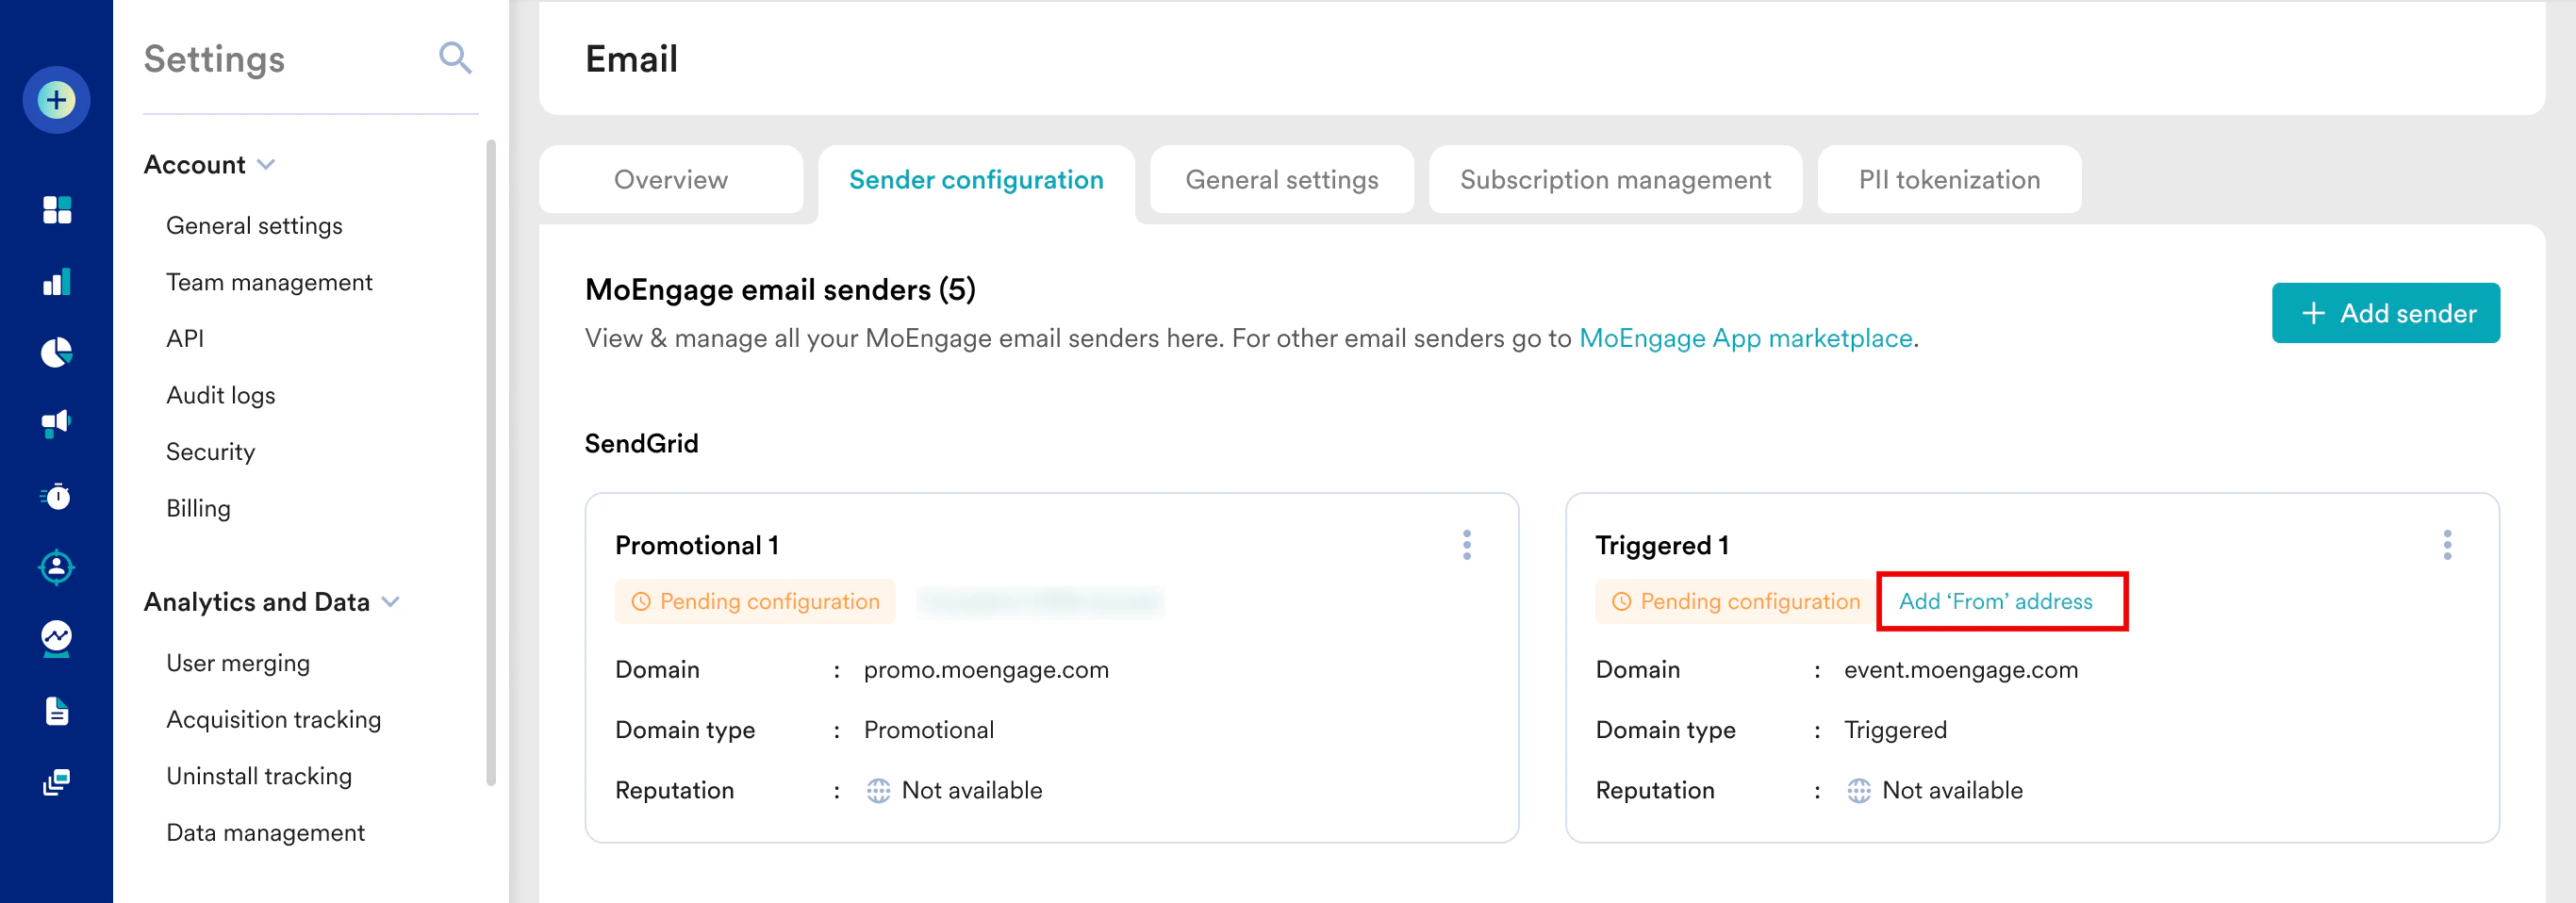 2. On the **Domain details** page, the added senders appear in tabs. Click the sender you want to configure.
3. Expand the **From email address** section of that sender.
4. Click **+ Add email** to add multiple From addresses. Note that it is also possible to add addresses later for domains that are already onboarded. Make sure that the From address indicates your use cases. For example, for promotional campaigns, you can use [\_promo@yourdomain\_.com](mailto:_promo@yourdomain_.com).
5. Click **Save**. The status changes to **Completed**.
2. On the **Domain details** page, the added senders appear in tabs. Click the sender you want to configure.
3. Expand the **From email address** section of that sender.
4. Click **+ Add email** to add multiple From addresses. Note that it is also possible to add addresses later for domains that are already onboarded. Make sure that the From address indicates your use cases. For example, for promotional campaigns, you can use [\_promo@yourdomain\_.com](mailto:_promo@yourdomain_.com).
5. Click **Save**. The status changes to **Completed**.  ## Generate a Warm-up Plan
Warm-up is required to build trust for an email sending domain and IP with the inbox service providers (ISPs). This process involves sending emails from a new email account, starting with a smaller number and gradually increasing the number of emails each day. For more information, refer to [Email Warm-up](/user-guide/campaigns-and-channels/email/getting-started-with-email/email-warm-up).
After adding the *From address*, perform the following steps to generate a warm-up plan:
1. On the **Overview** tab, click **Setup** against the **Generate warm up plan** step.
## Generate a Warm-up Plan
Warm-up is required to build trust for an email sending domain and IP with the inbox service providers (ISPs). This process involves sending emails from a new email account, starting with a smaller number and gradually increasing the number of emails each day. For more information, refer to [Email Warm-up](/user-guide/campaigns-and-channels/email/getting-started-with-email/email-warm-up).
After adding the *From address*, perform the following steps to generate a warm-up plan:
1. On the **Overview** tab, click **Setup** against the **Generate warm up plan** step. 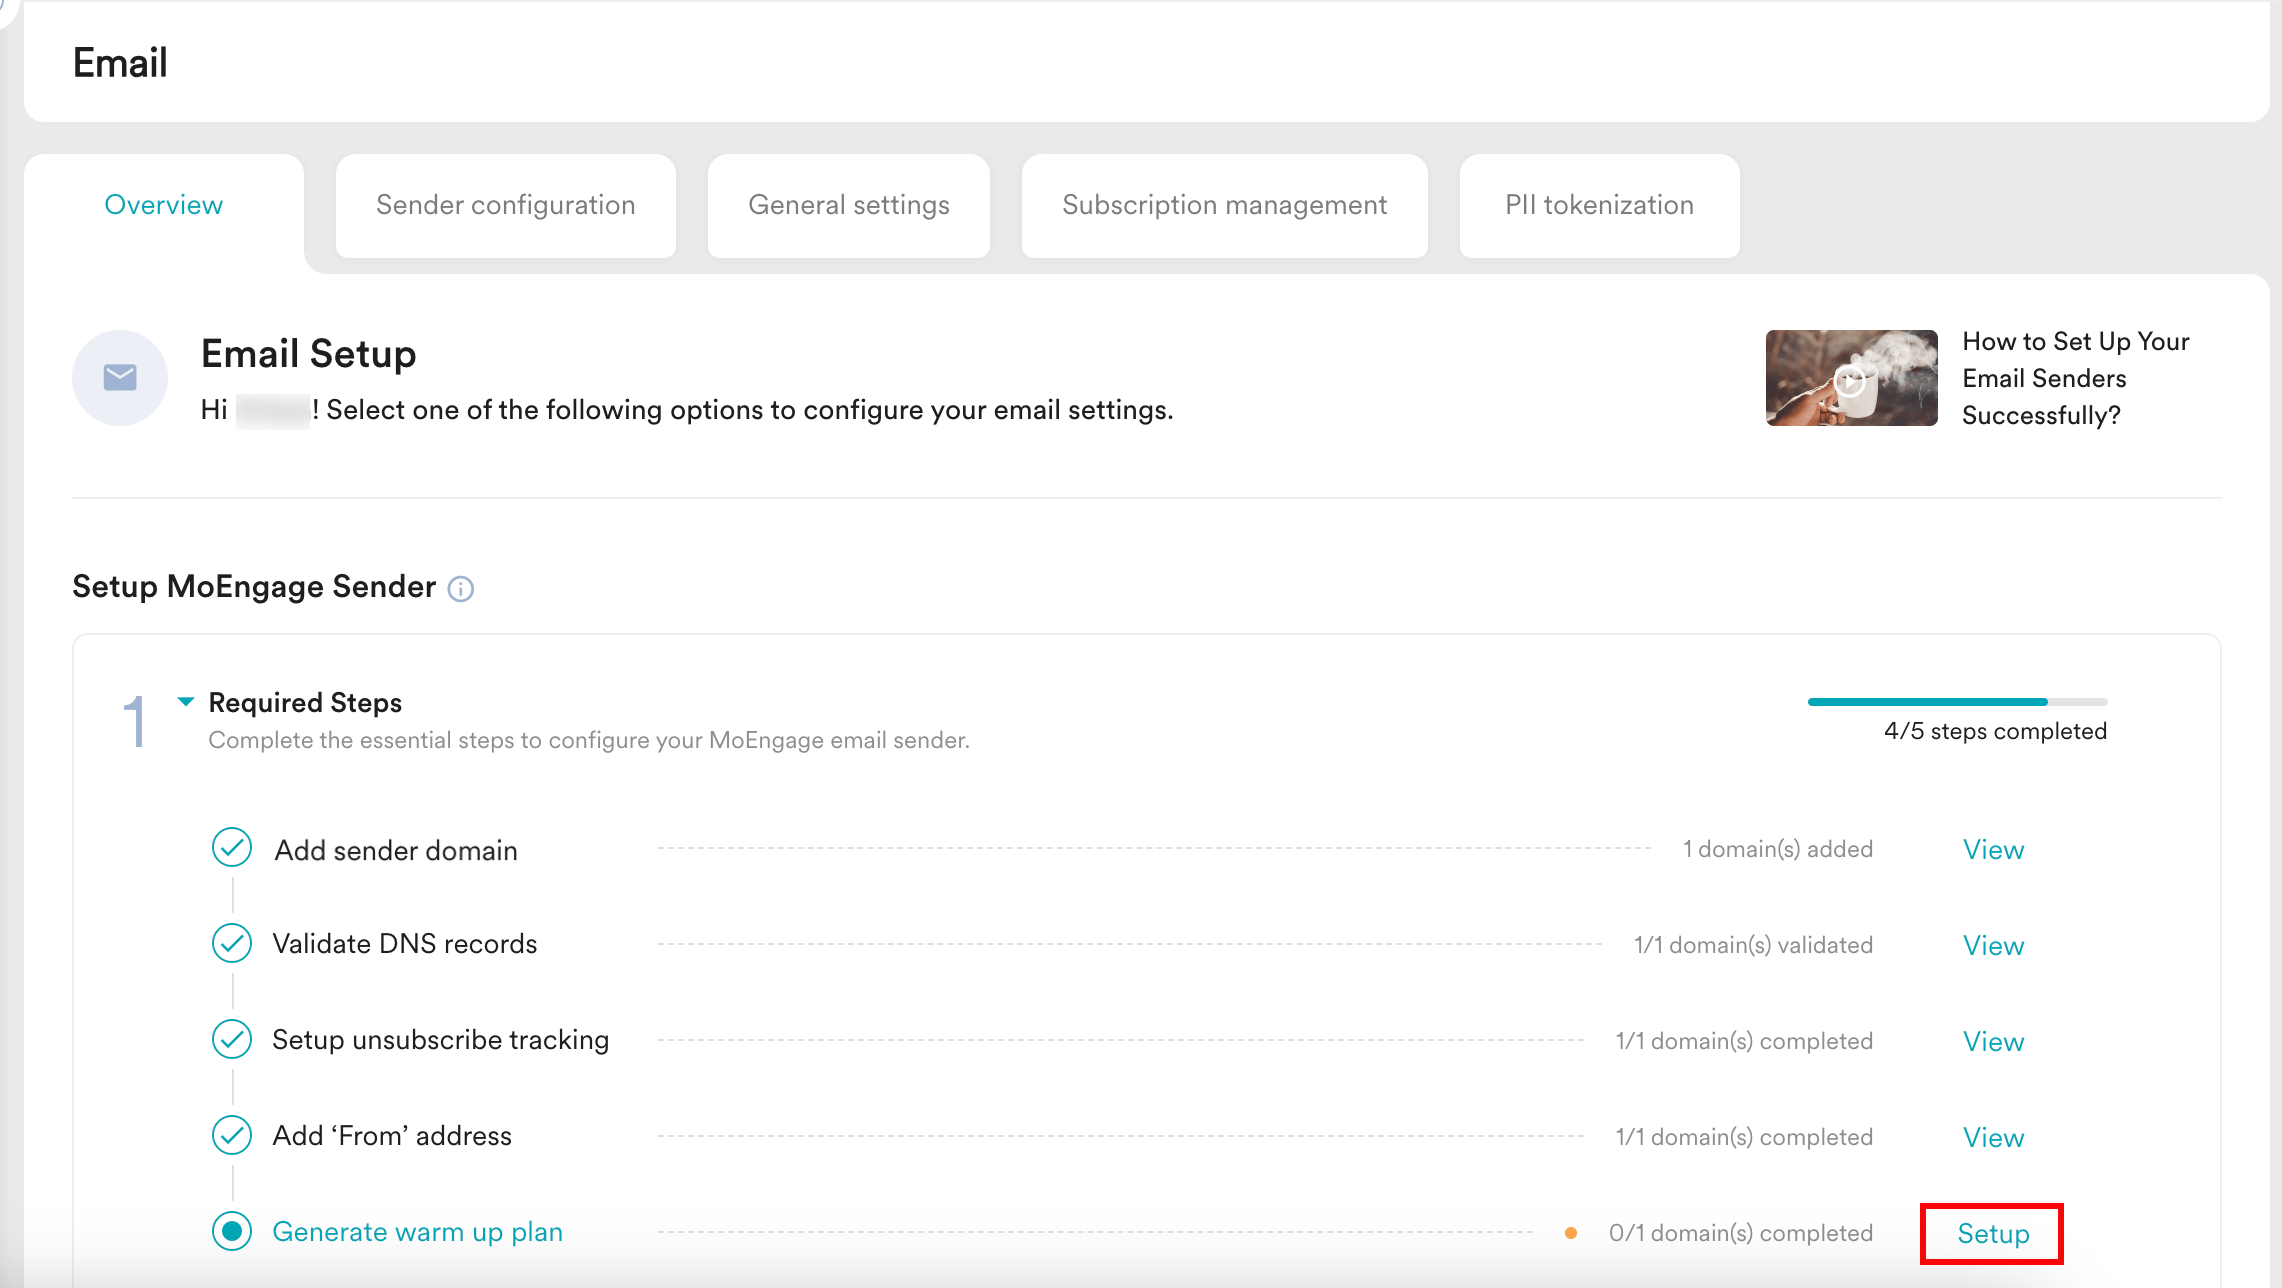 You can also click **Generate warm up plan** on the **Sender configuration** tab.
 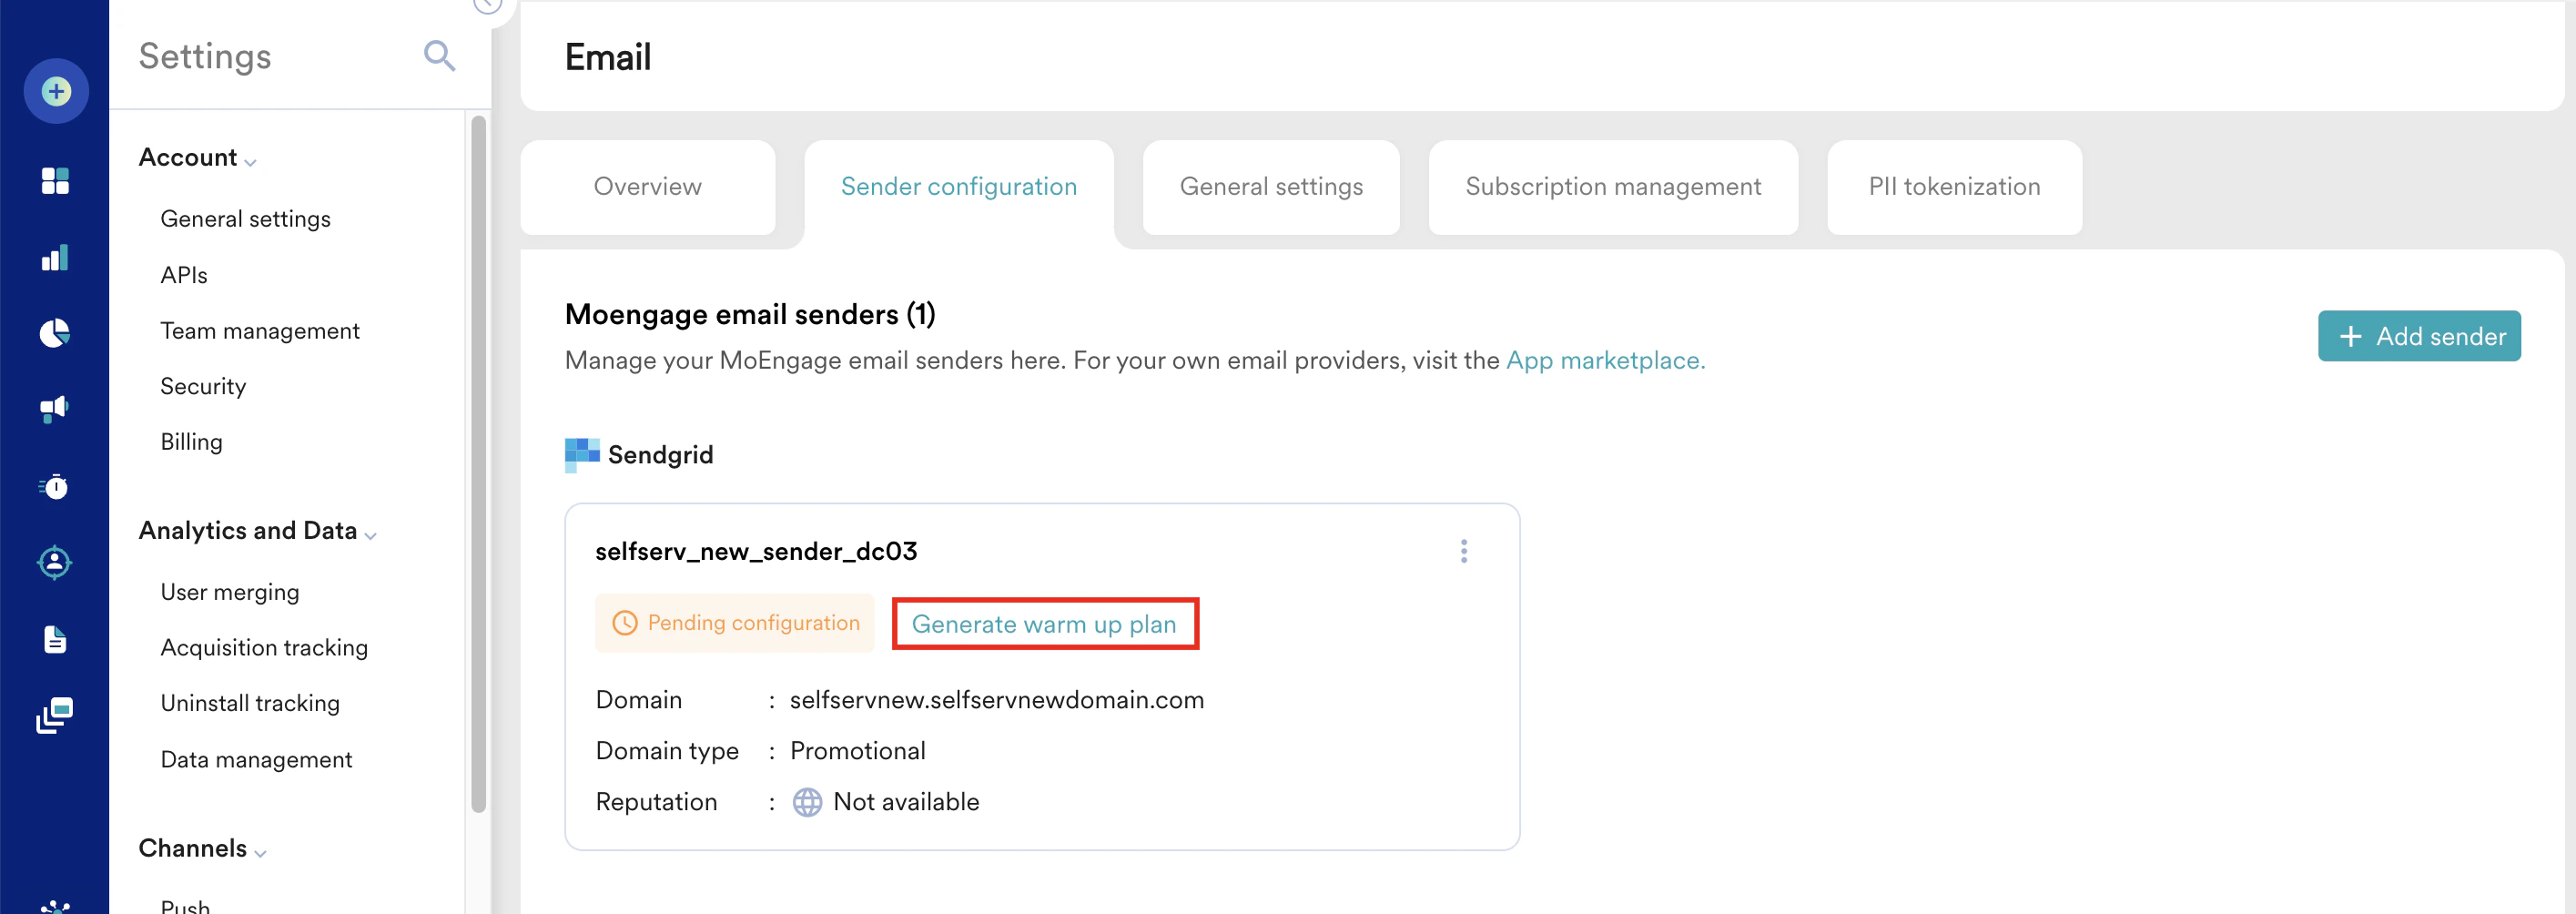 2. On the **Domain details** page, the added senders appear in tabs. Click the sender you want to configure.
3. Expand the **Domain Warmup** section of that sender.
4. Select the peak volume from the **Daily peak email volume** list. After you select it, the system generates a custom warm-up plan for you, which you can view and download.\
Note that you can skip the traditional warm-up for event-triggered and transactional emails, because these emails are typically sent at lower, more staggered volumes.
1. Click **View warm-up schedule** to view the warm-up schedule.
2. Click **Download schedule** to download the warm-up schedule.
2. On the **Domain details** page, the added senders appear in tabs. Click the sender you want to configure.
3. Expand the **Domain Warmup** section of that sender.
4. Select the peak volume from the **Daily peak email volume** list. After you select it, the system generates a custom warm-up plan for you, which you can view and download.\
Note that you can skip the traditional warm-up for event-triggered and transactional emails, because these emails are typically sent at lower, more staggered volumes.
1. Click **View warm-up schedule** to view the warm-up schedule.
2. Click **Download schedule** to download the warm-up schedule.  5. Click **Save**. The status changes to **Completed**.\
After saving, the backend limits get enabled on your dashboard to ensure the sending volumes don't exceed the daily permissible limit. For information on best practices during warmup, refer to [Best Practices to be Followed for Warm Up](/user-guide/campaigns-and-channels/email/deliverability/best-practices/best-practices-to-be-followed-for-warm-up).
After completing the **Required Steps** above, you can start sending emails, but the status shows as **Configuration pending**. You must also complete the **Recommended Steps** to improve email deliverability, and then the status changes to **Completed**.
# Configure Recommended Steps
The **Recommended Steps** contain the following steps:
1. [Attribute storing email address](/user-guide/campaigns-and-channels/email/getting-started-with-email/self-service-for-email-onboarding#attribute-storing-email-address)
2. [Setup Google postmaster](/user-guide/campaigns-and-channels/email/getting-started-with-email/self-service-for-email-onboarding#set-up-google-postmaster)
3. [Enable branded links](/user-guide/campaigns-and-channels/email/getting-started-with-email/self-service-for-email-onboarding#enable-branded-links)
4. [Add subscription categories](/user-guide/campaigns-and-channels/email/getting-started-with-email/self-service-for-email-onboarding#add-subscription-categories)
5. [Manage email suppression](/user-guide/campaigns-and-channels/email/getting-started-with-email/self-service-for-email-onboarding#manage-email-suppression)
## Attribute Storing Email Address
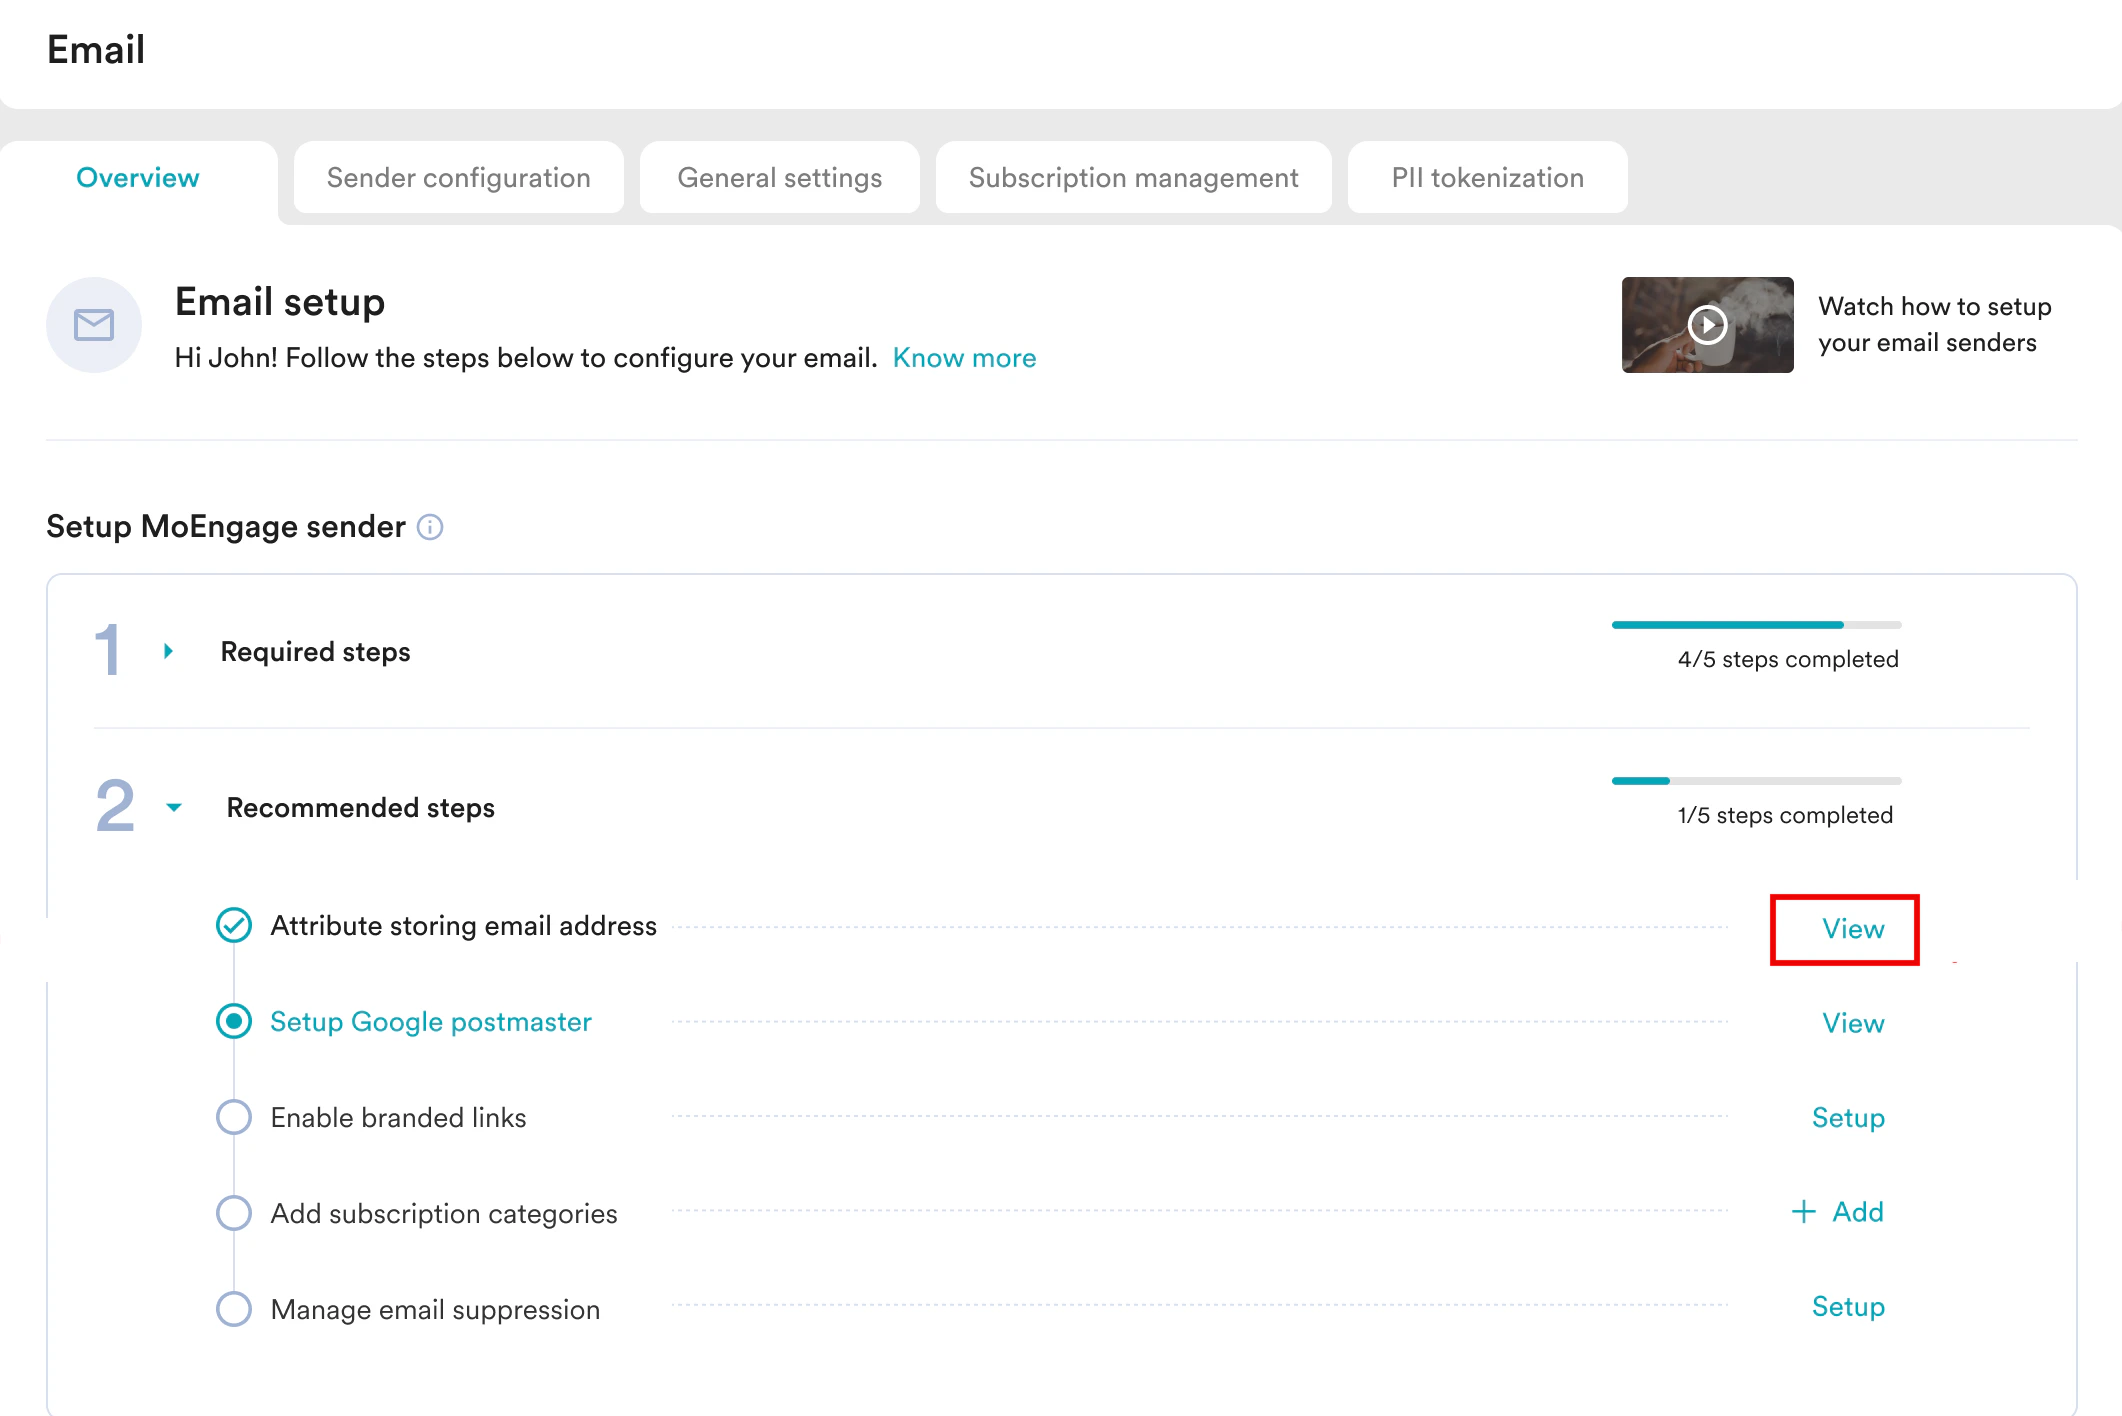
The attribute storing email address step is completed by default. On the **Overview** tab, click **View** on the **Attribute storing email address** step, which redirects you to the [General Settings](/user-guide/campaigns-and-channels/email/getting-started-with-email/configure-email-channel#general-settings-tab) tab of Email settings. In the **General settings** tab, by default, MoEngage stores the email address in the **Email Standard** attribute. If you prefer to use a different attribute, you can change it here.
5. Click **Save**. The status changes to **Completed**.\
After saving, the backend limits get enabled on your dashboard to ensure the sending volumes don't exceed the daily permissible limit. For information on best practices during warmup, refer to [Best Practices to be Followed for Warm Up](/user-guide/campaigns-and-channels/email/deliverability/best-practices/best-practices-to-be-followed-for-warm-up).
After completing the **Required Steps** above, you can start sending emails, but the status shows as **Configuration pending**. You must also complete the **Recommended Steps** to improve email deliverability, and then the status changes to **Completed**.
# Configure Recommended Steps
The **Recommended Steps** contain the following steps:
1. [Attribute storing email address](/user-guide/campaigns-and-channels/email/getting-started-with-email/self-service-for-email-onboarding#attribute-storing-email-address)
2. [Setup Google postmaster](/user-guide/campaigns-and-channels/email/getting-started-with-email/self-service-for-email-onboarding#set-up-google-postmaster)
3. [Enable branded links](/user-guide/campaigns-and-channels/email/getting-started-with-email/self-service-for-email-onboarding#enable-branded-links)
4. [Add subscription categories](/user-guide/campaigns-and-channels/email/getting-started-with-email/self-service-for-email-onboarding#add-subscription-categories)
5. [Manage email suppression](/user-guide/campaigns-and-channels/email/getting-started-with-email/self-service-for-email-onboarding#manage-email-suppression)
## Attribute Storing Email Address
The attribute storing email address step is completed by default. On the **Overview** tab, click **View** on the **Attribute storing email address** step, which redirects you to the [General Settings](/user-guide/campaigns-and-channels/email/getting-started-with-email/configure-email-channel#general-settings-tab) tab of Email settings. In the **General settings** tab, by default, MoEngage stores the email address in the **Email Standard** attribute. If you prefer to use a different attribute, you can change it here.
 ## Set Up Google Postmaster
To fetch the domain reputation data for your domains, you must authorize MoEngage. Setting up Google Postmaster allows you to monitor the domain reputation on the MoEngage dashboard and take corrective actions before the domain reputation drops to *low*. To achieve this, DNS records must be generated in Google Postmaster, and make sure to update them in your DNS configuration. For more information, refer to [Google Postmaster Setup](/user-guide/campaigns-and-channels/email/deliverability/domain-reputation/google-postmaster-setup).
After configuring the required steps, perform the following steps to set up Google Postmaster:
1. On the **Overview** tab, click **Setup** against the **Setup Google postmaster** step.
## Set Up Google Postmaster
To fetch the domain reputation data for your domains, you must authorize MoEngage. Setting up Google Postmaster allows you to monitor the domain reputation on the MoEngage dashboard and take corrective actions before the domain reputation drops to *low*. To achieve this, DNS records must be generated in Google Postmaster, and make sure to update them in your DNS configuration. For more information, refer to [Google Postmaster Setup](/user-guide/campaigns-and-channels/email/deliverability/domain-reputation/google-postmaster-setup).
After configuring the required steps, perform the following steps to set up Google Postmaster:
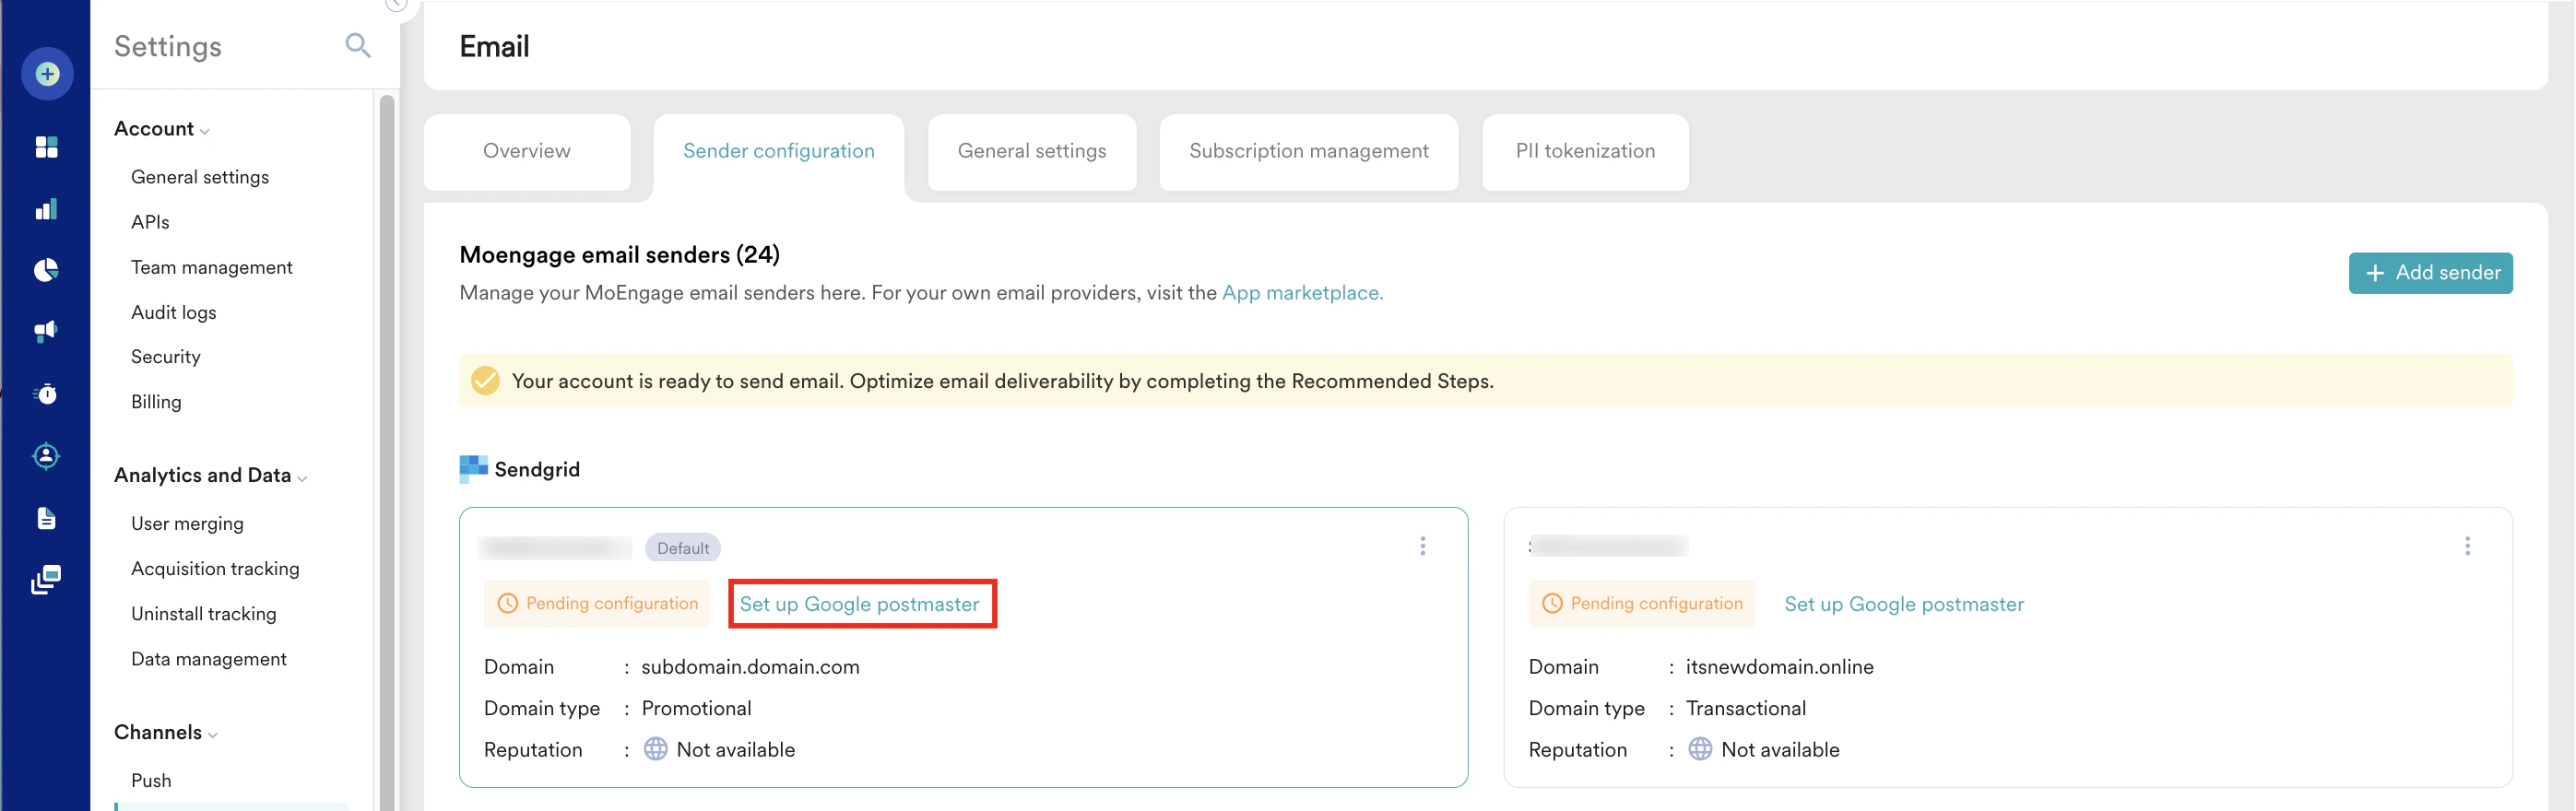
1. On the **Overview** tab, click **Setup** against the **Setup Google postmaster** step. 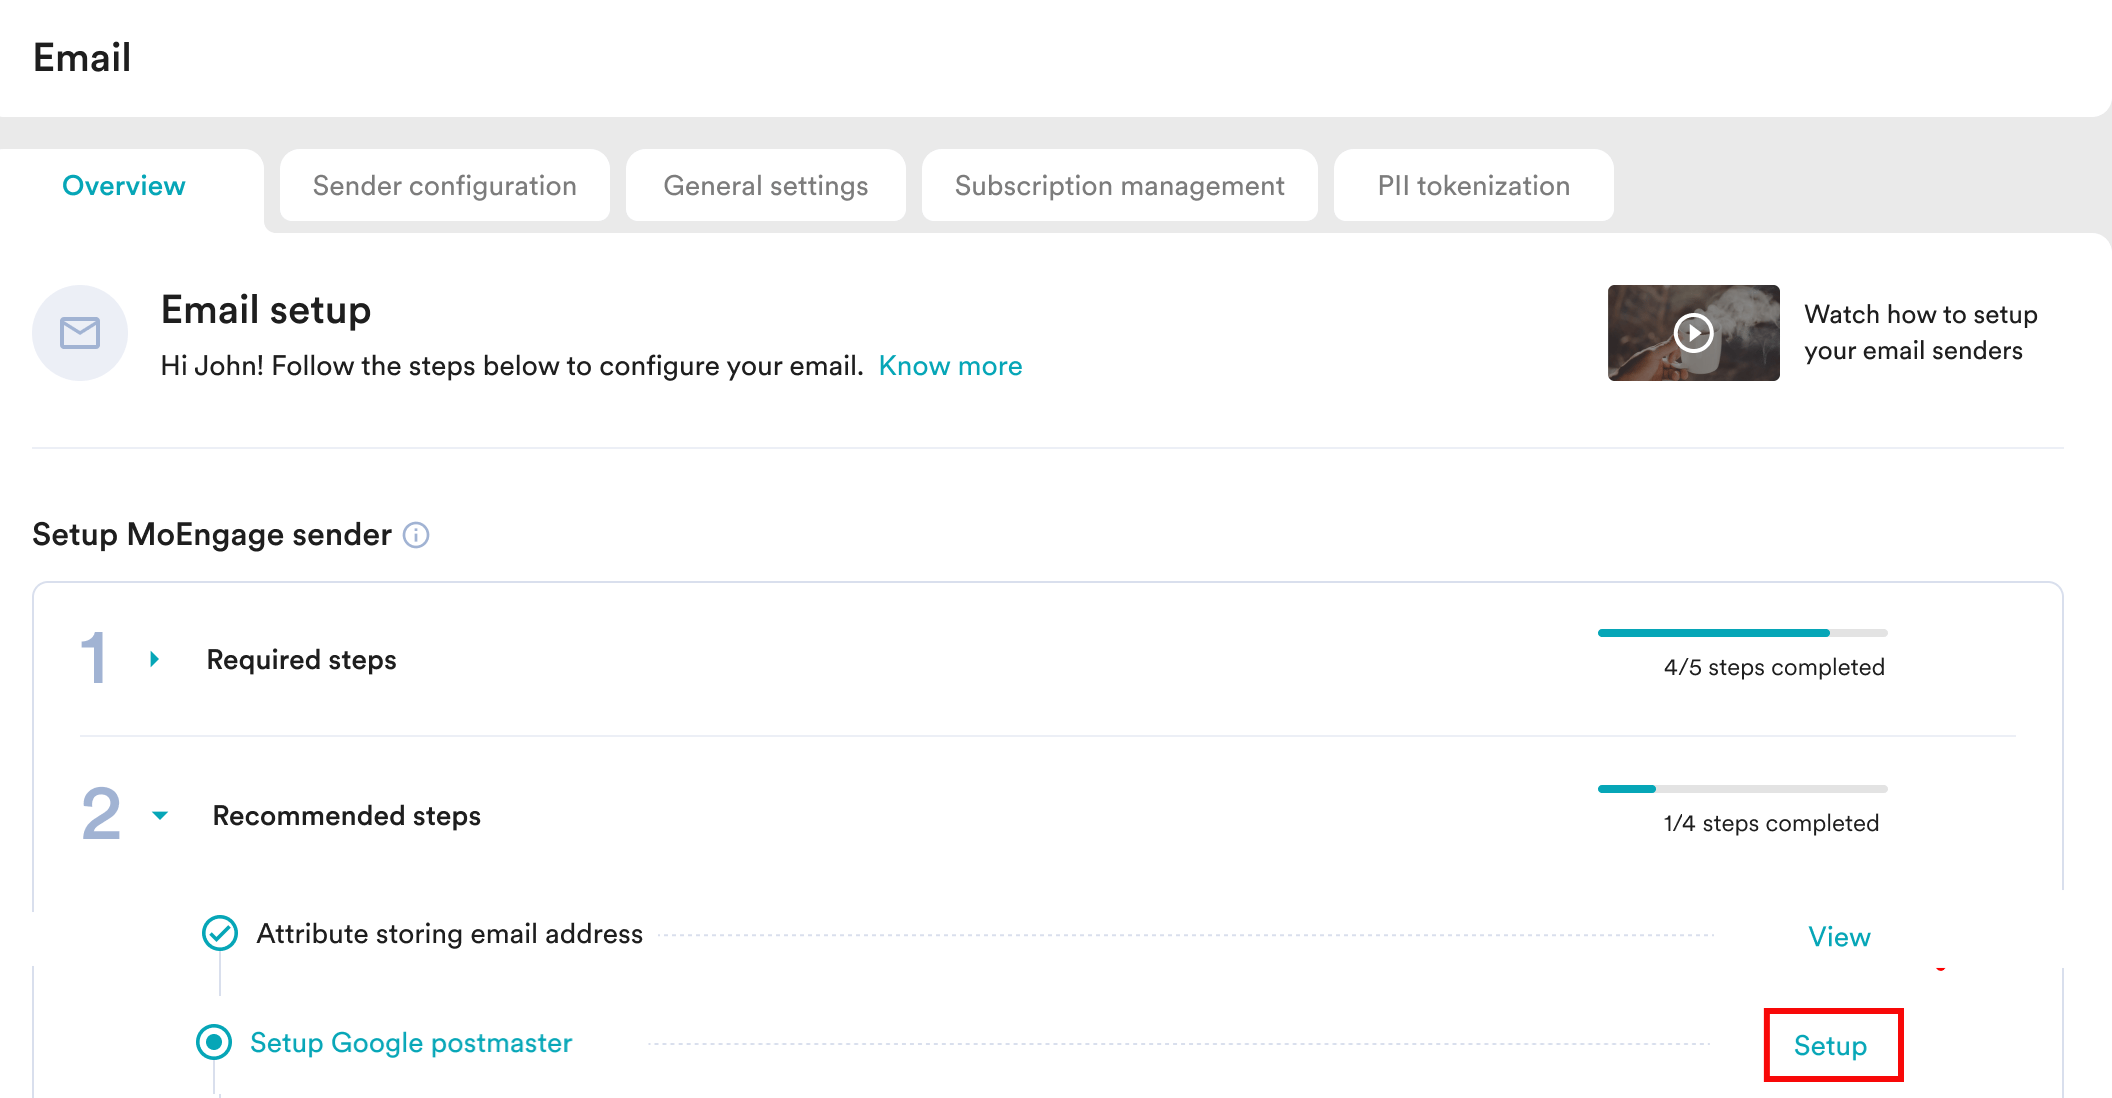 You can also click **Set up Google postmaster** on the **Sender configuration** tab.
  2. On the **Domain details** page, the added senders appear in tabs. Click the sender you want to configure.
3. Expand the **Google postmaster setup** section of that sender.
2. On the **Domain details** page, the added senders appear in tabs. Click the sender you want to configure.
3. Expand the **Google postmaster setup** section of that sender. 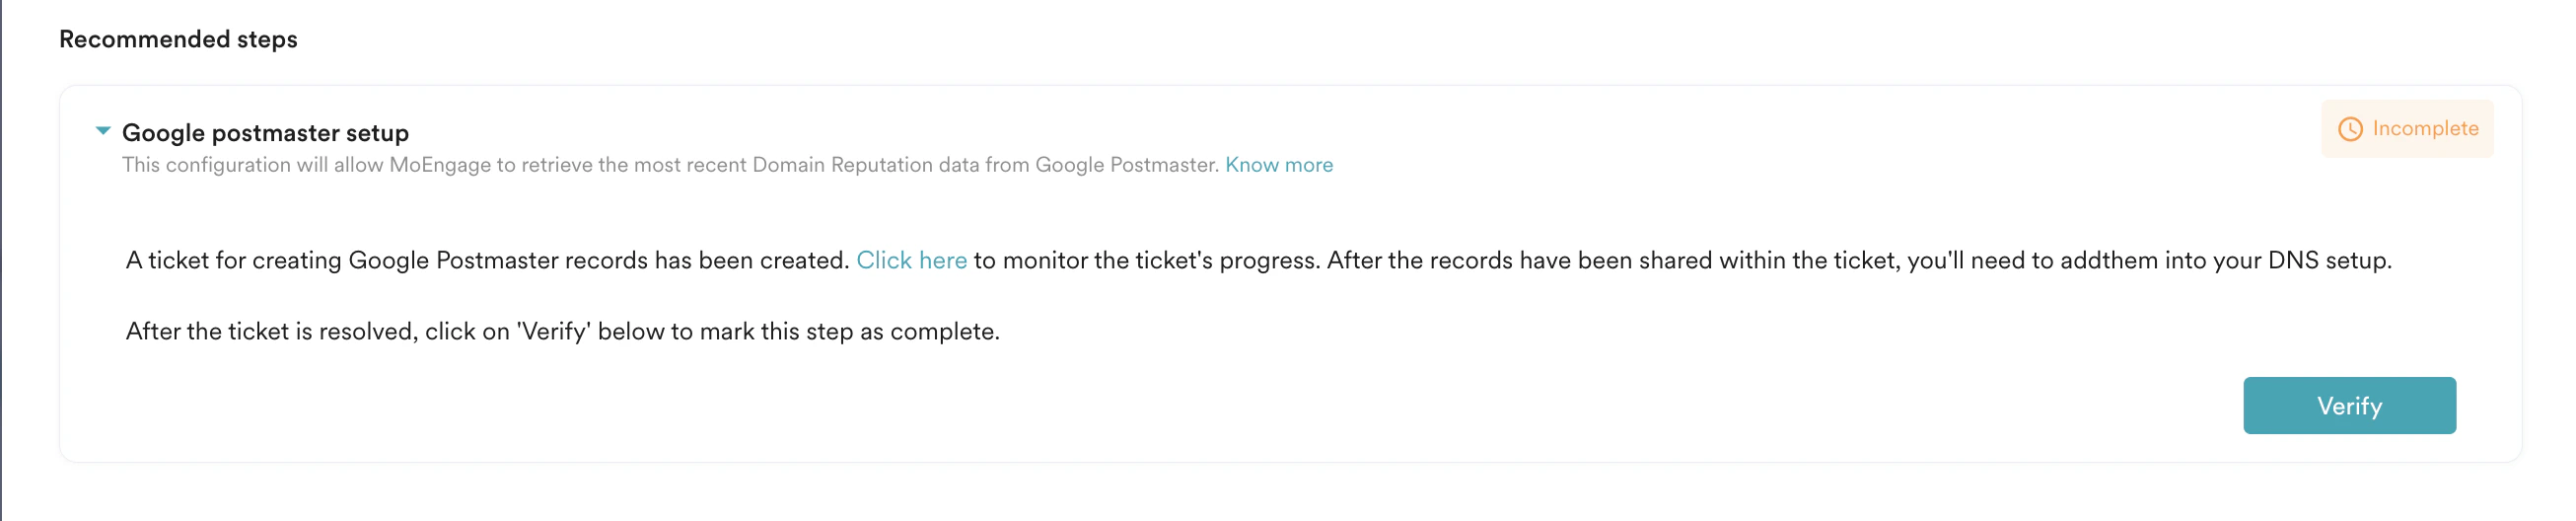 4. After you [add a sender domain](/user-guide/campaigns-and-channels/email/getting-started-with-email/self-service-for-email-onboarding#add-a-sender-domain), MoEngage automatically logs a support ticket on your behalf and generates a ticket number. You can monitor the ticket's progress by clicking the provided hyperlink in the MoEngage UI. After the necessary DNS records are shared within this ticket, you'll need to add them to your DNS setup. The link to this ticket is also present in the PDF format of the DNS record you downloaded.
5. After generating and adding the records to your DNS server, click **Verify** to mark this step as completed. The status changes to **Completed**.
4. After you [add a sender domain](/user-guide/campaigns-and-channels/email/getting-started-with-email/self-service-for-email-onboarding#add-a-sender-domain), MoEngage automatically logs a support ticket on your behalf and generates a ticket number. You can monitor the ticket's progress by clicking the provided hyperlink in the MoEngage UI. After the necessary DNS records are shared within this ticket, you'll need to add them to your DNS setup. The link to this ticket is also present in the PDF format of the DNS record you downloaded.
5. After generating and adding the records to your DNS server, click **Verify** to mark this step as completed. The status changes to **Completed**.  ## Enable Branded Links
This step allows you to create branded links. Configuring branded links ensures consistent branding across all email links. The benefits include:
* All email links reflect your custom domain instead of the unrelated default domain.
* Improves user engagement and experience with the emails.\
For more information, refer to [Configure Custom Domain (Link Branding)](/user-guide/settings/advanced-settings/configure-custom-domain-link-branding)
After setting up the Google postmaster, perform the following steps to enable branded links:
1. On the **Overview** tab, click **Setup** against the **Enable branded links** step.
## Enable Branded Links
This step allows you to create branded links. Configuring branded links ensures consistent branding across all email links. The benefits include:
* All email links reflect your custom domain instead of the unrelated default domain.
* Improves user engagement and experience with the emails.\
For more information, refer to [Configure Custom Domain (Link Branding)](/user-guide/settings/advanced-settings/configure-custom-domain-link-branding)
After setting up the Google postmaster, perform the following steps to enable branded links:
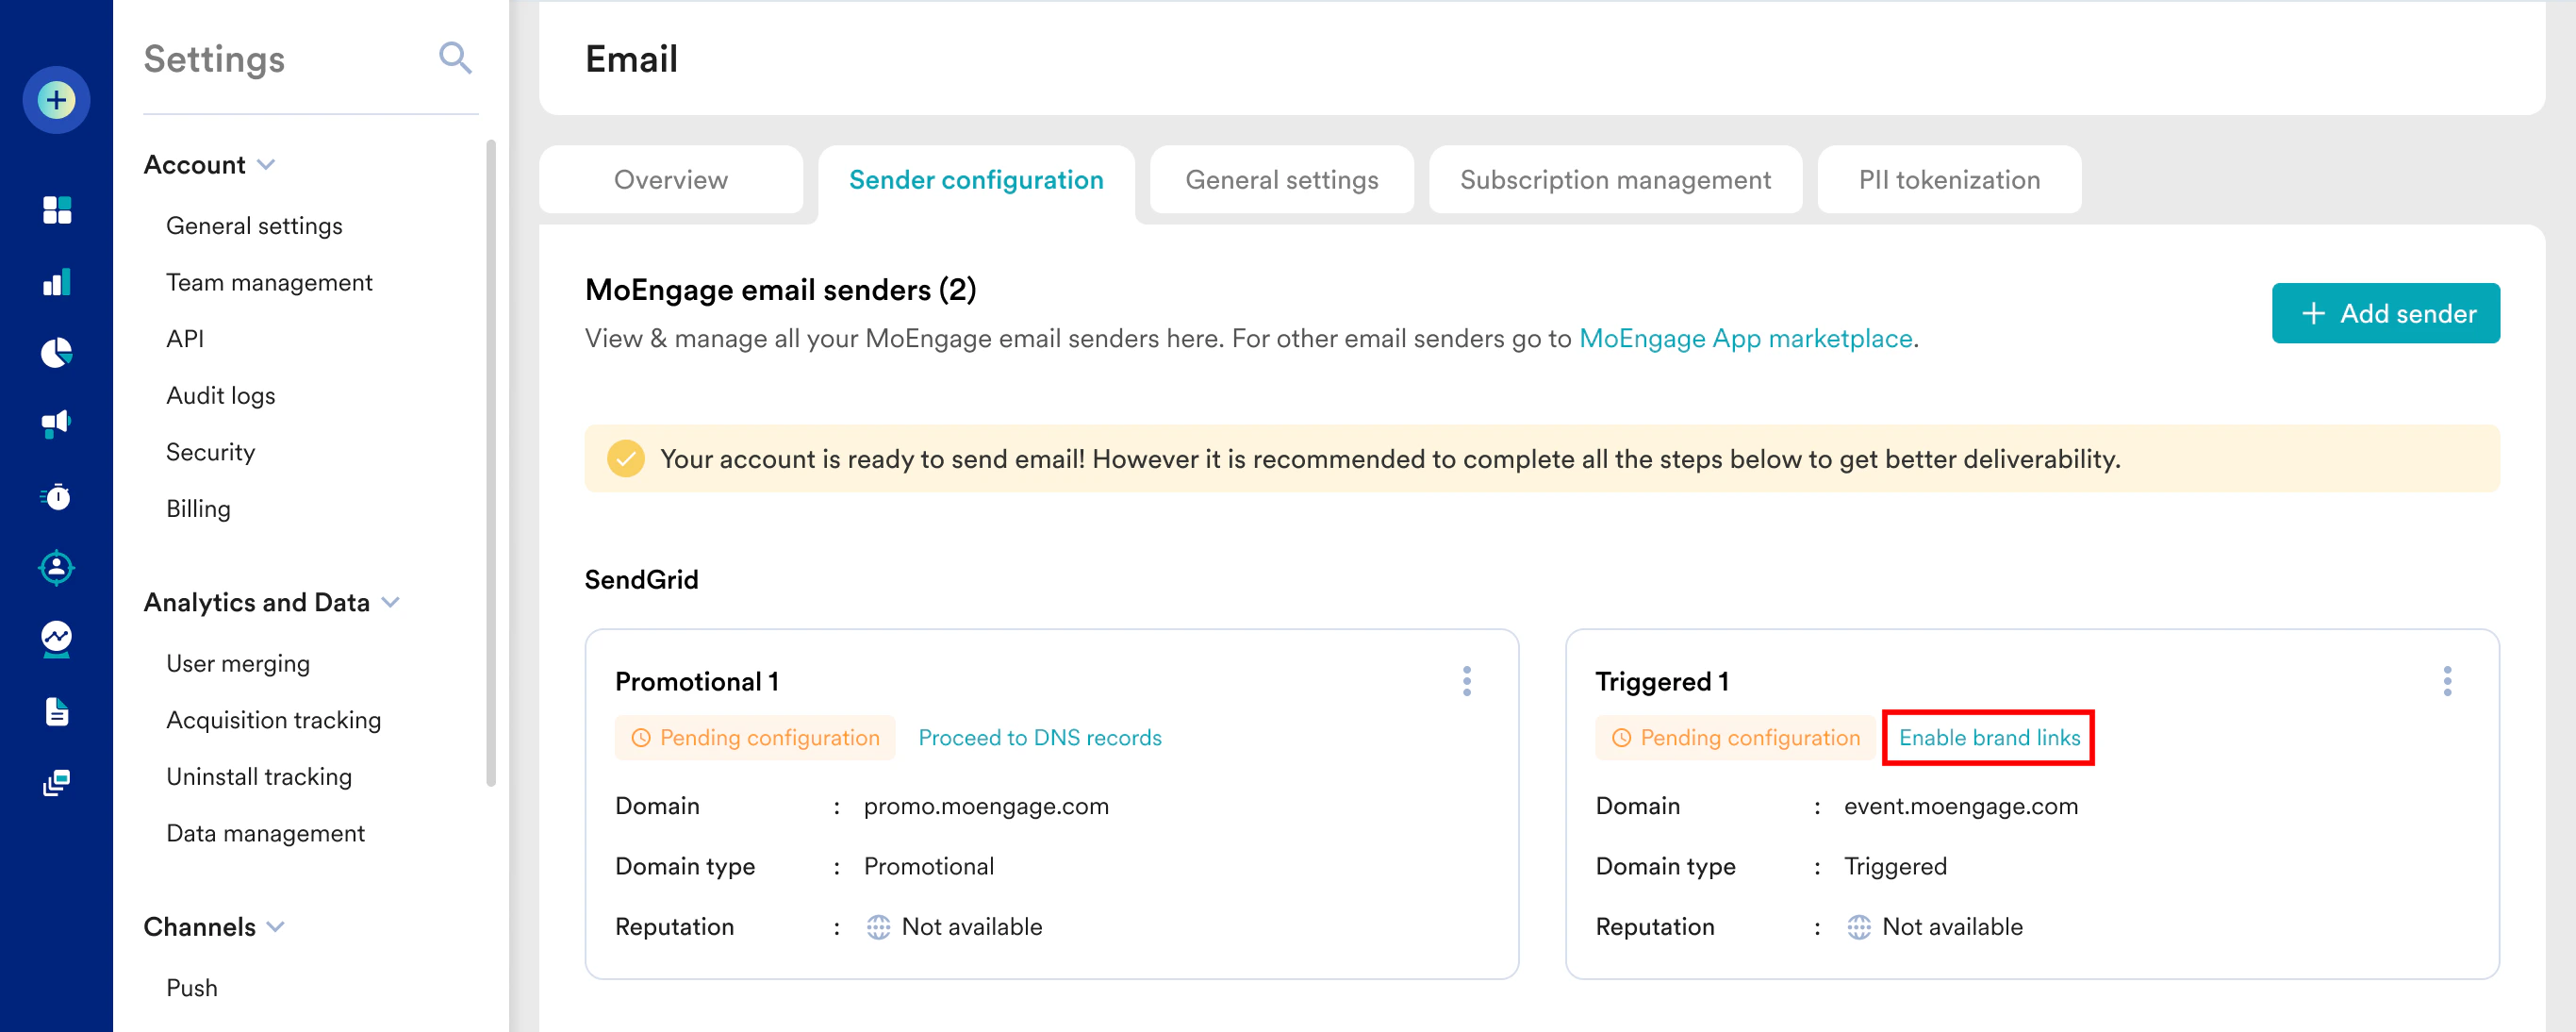
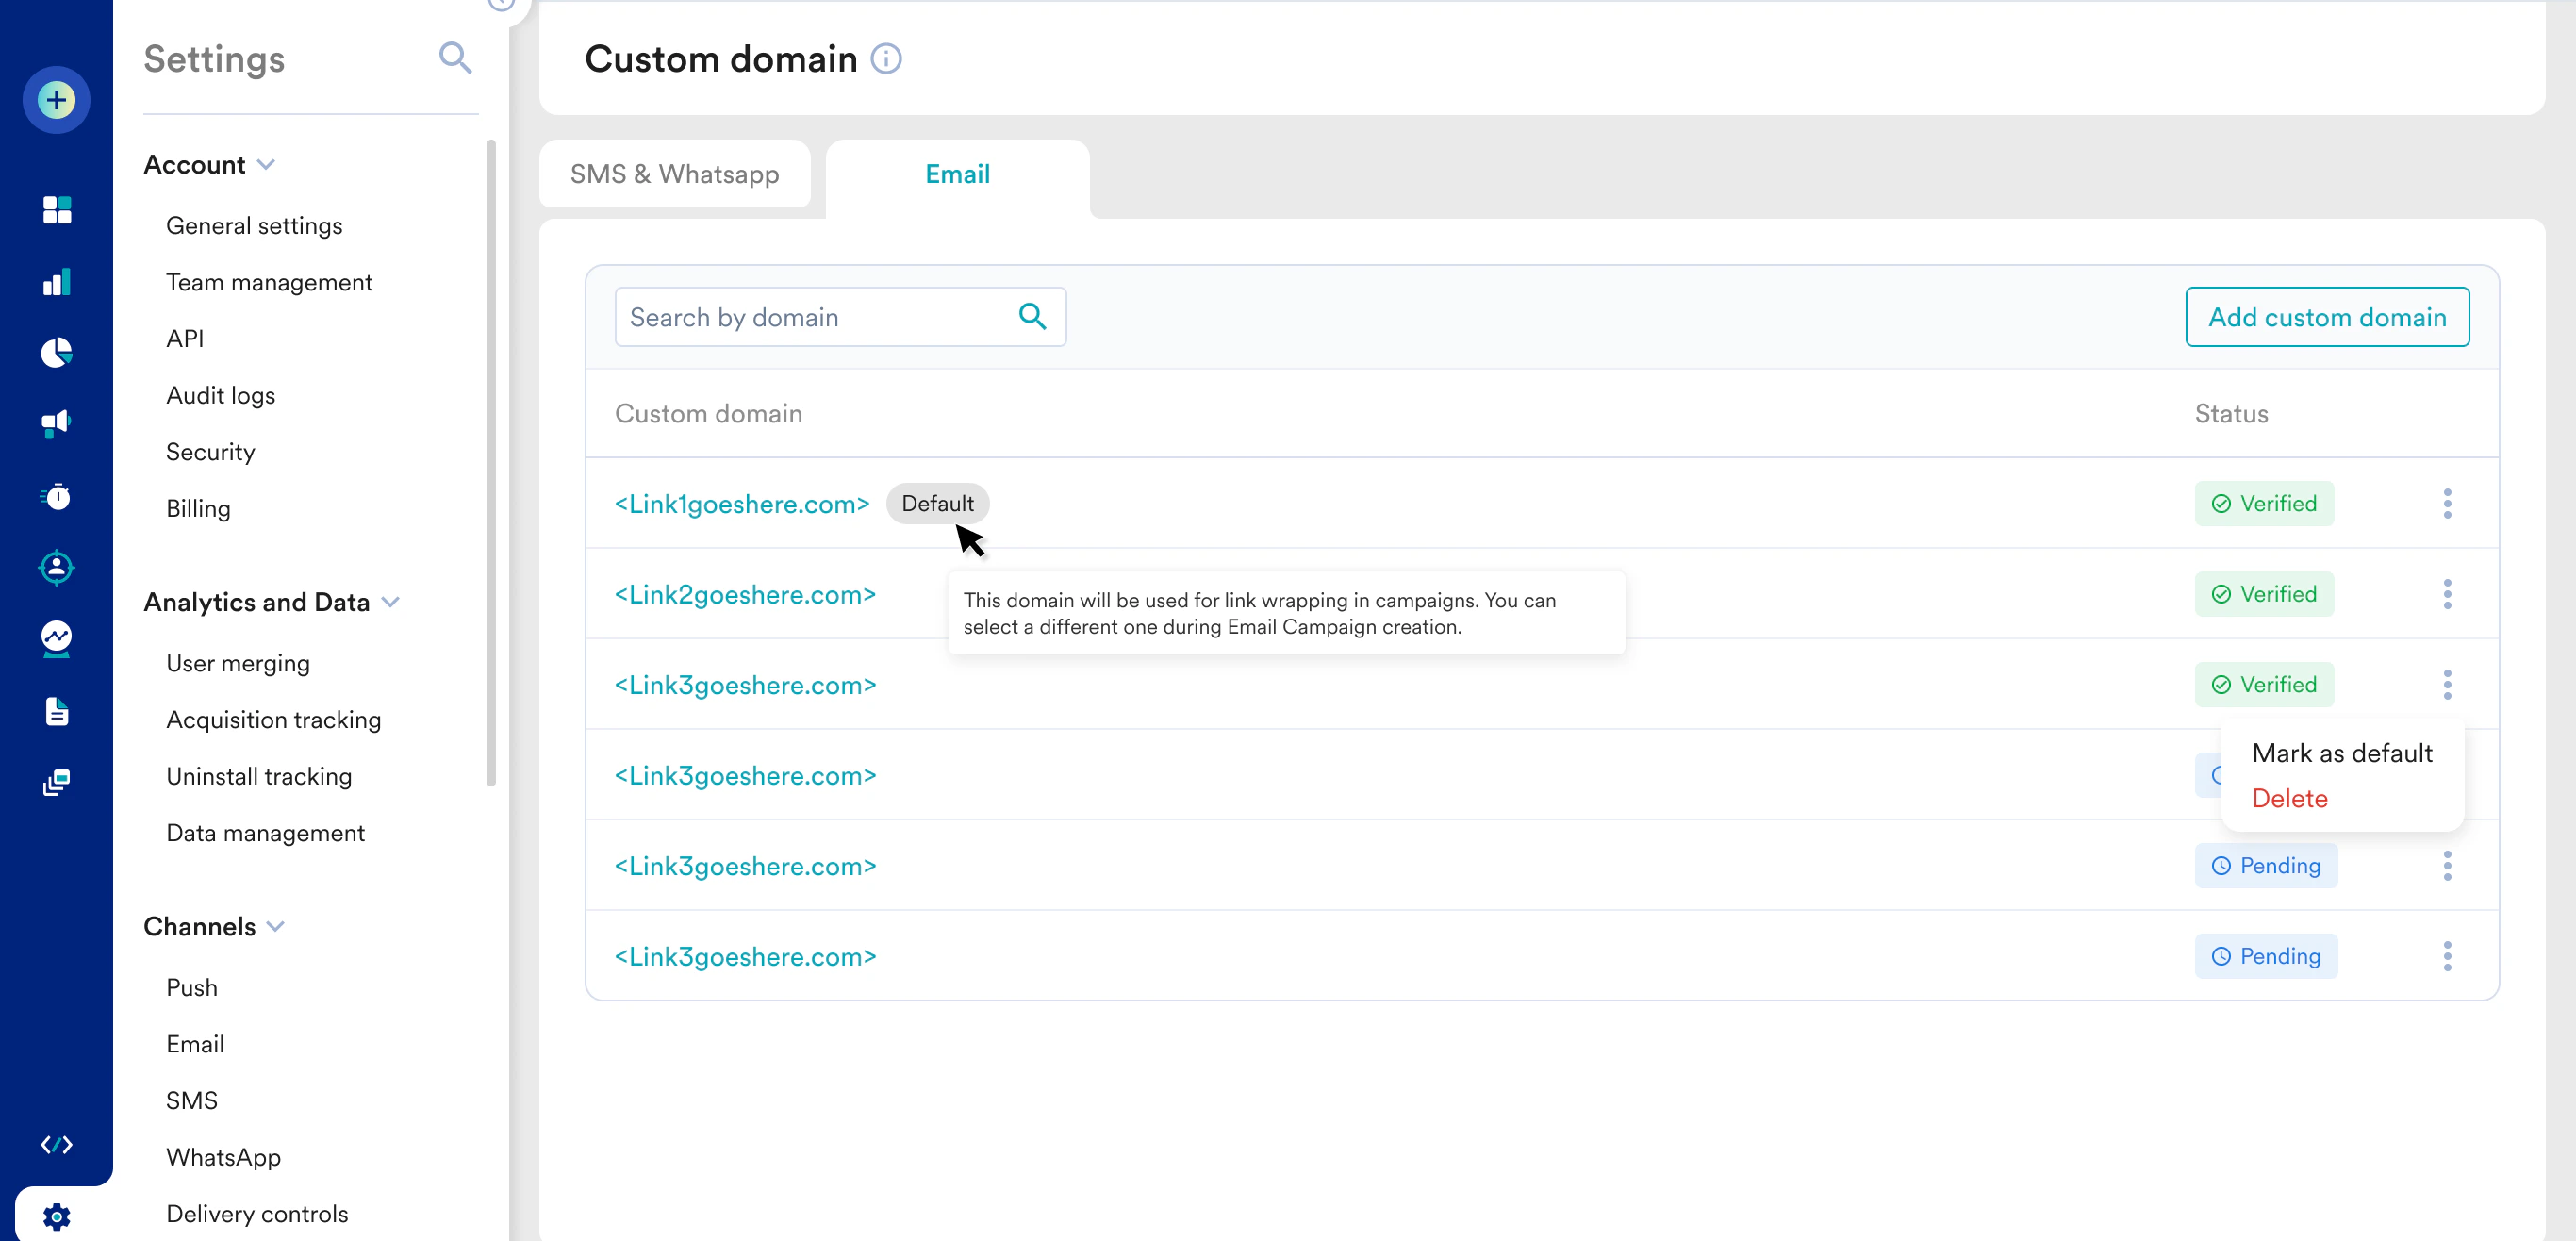
1. On the **Overview** tab, click **Setup** against the **Enable branded links** step. 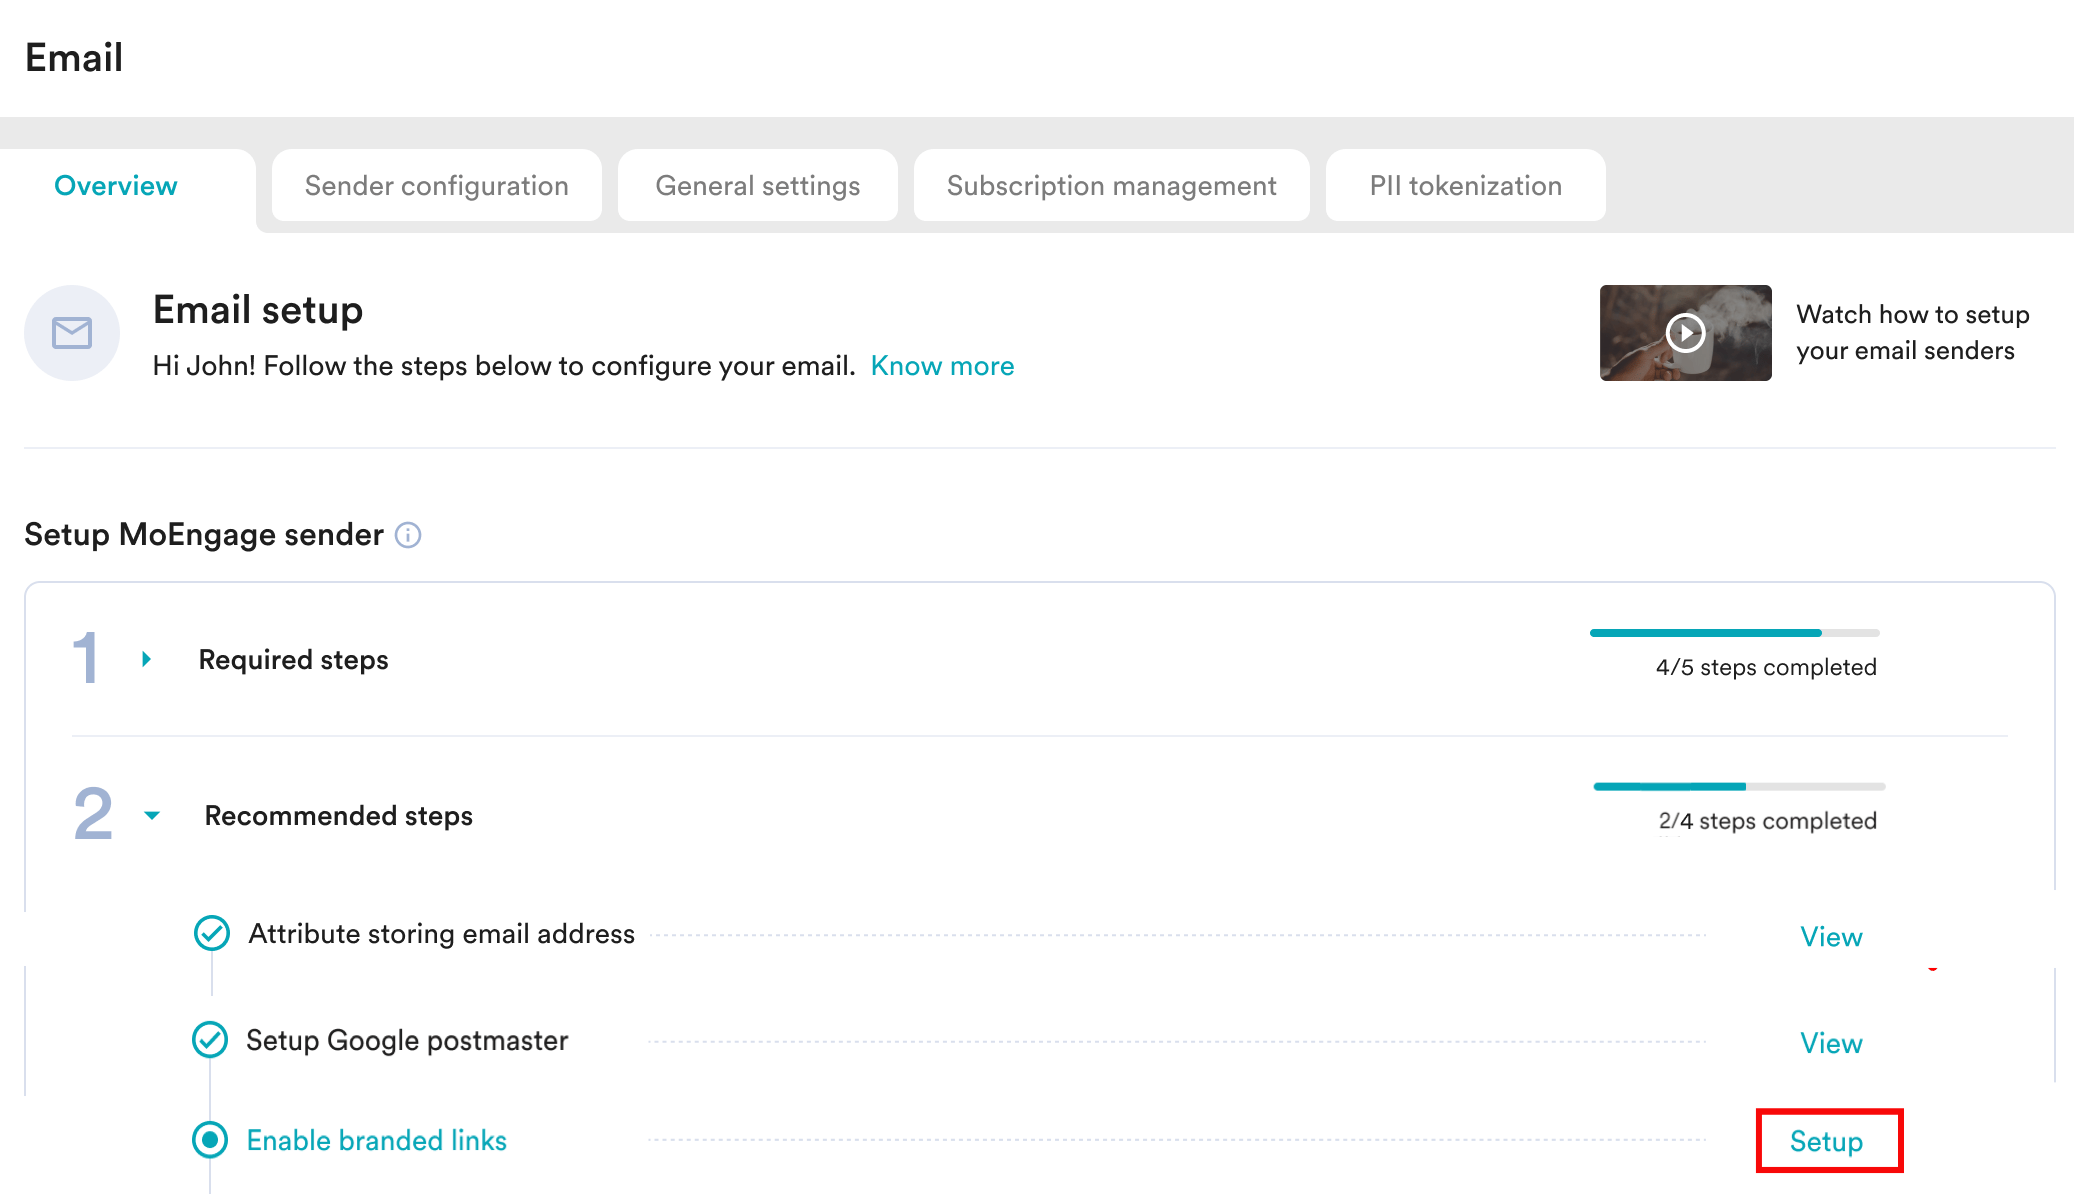 You can also click **Enable brand links** on the **Sender configuration** tab.
  2. On the **Custom Domain** page for Email, you can configure custom domains. After configuration, the status changes to **Completed**. For more information, refer to [Configure Custom Domain](/user-guide/settings/advanced-settings/configure-custom-domain-link-branding).
  ## Add Subscription Categories
Subscription categories allow your users to choose the kind of communication they want to receive from your brand. For more information, refer to [Configure Subscription Categories](/user-guide/campaigns-and-channels/email/getting-started-with-email/configure-subscription-categories).
After enabling the branded links, perform the following steps to add subscription categories:
1. On the **Overview** tab, click **Setup** against the **Add subscription categories** step.
## Add Subscription Categories
Subscription categories allow your users to choose the kind of communication they want to receive from your brand. For more information, refer to [Configure Subscription Categories](/user-guide/campaigns-and-channels/email/getting-started-with-email/configure-subscription-categories).
After enabling the branded links, perform the following steps to add subscription categories:
1. On the **Overview** tab, click **Setup** against the **Add subscription categories** step. 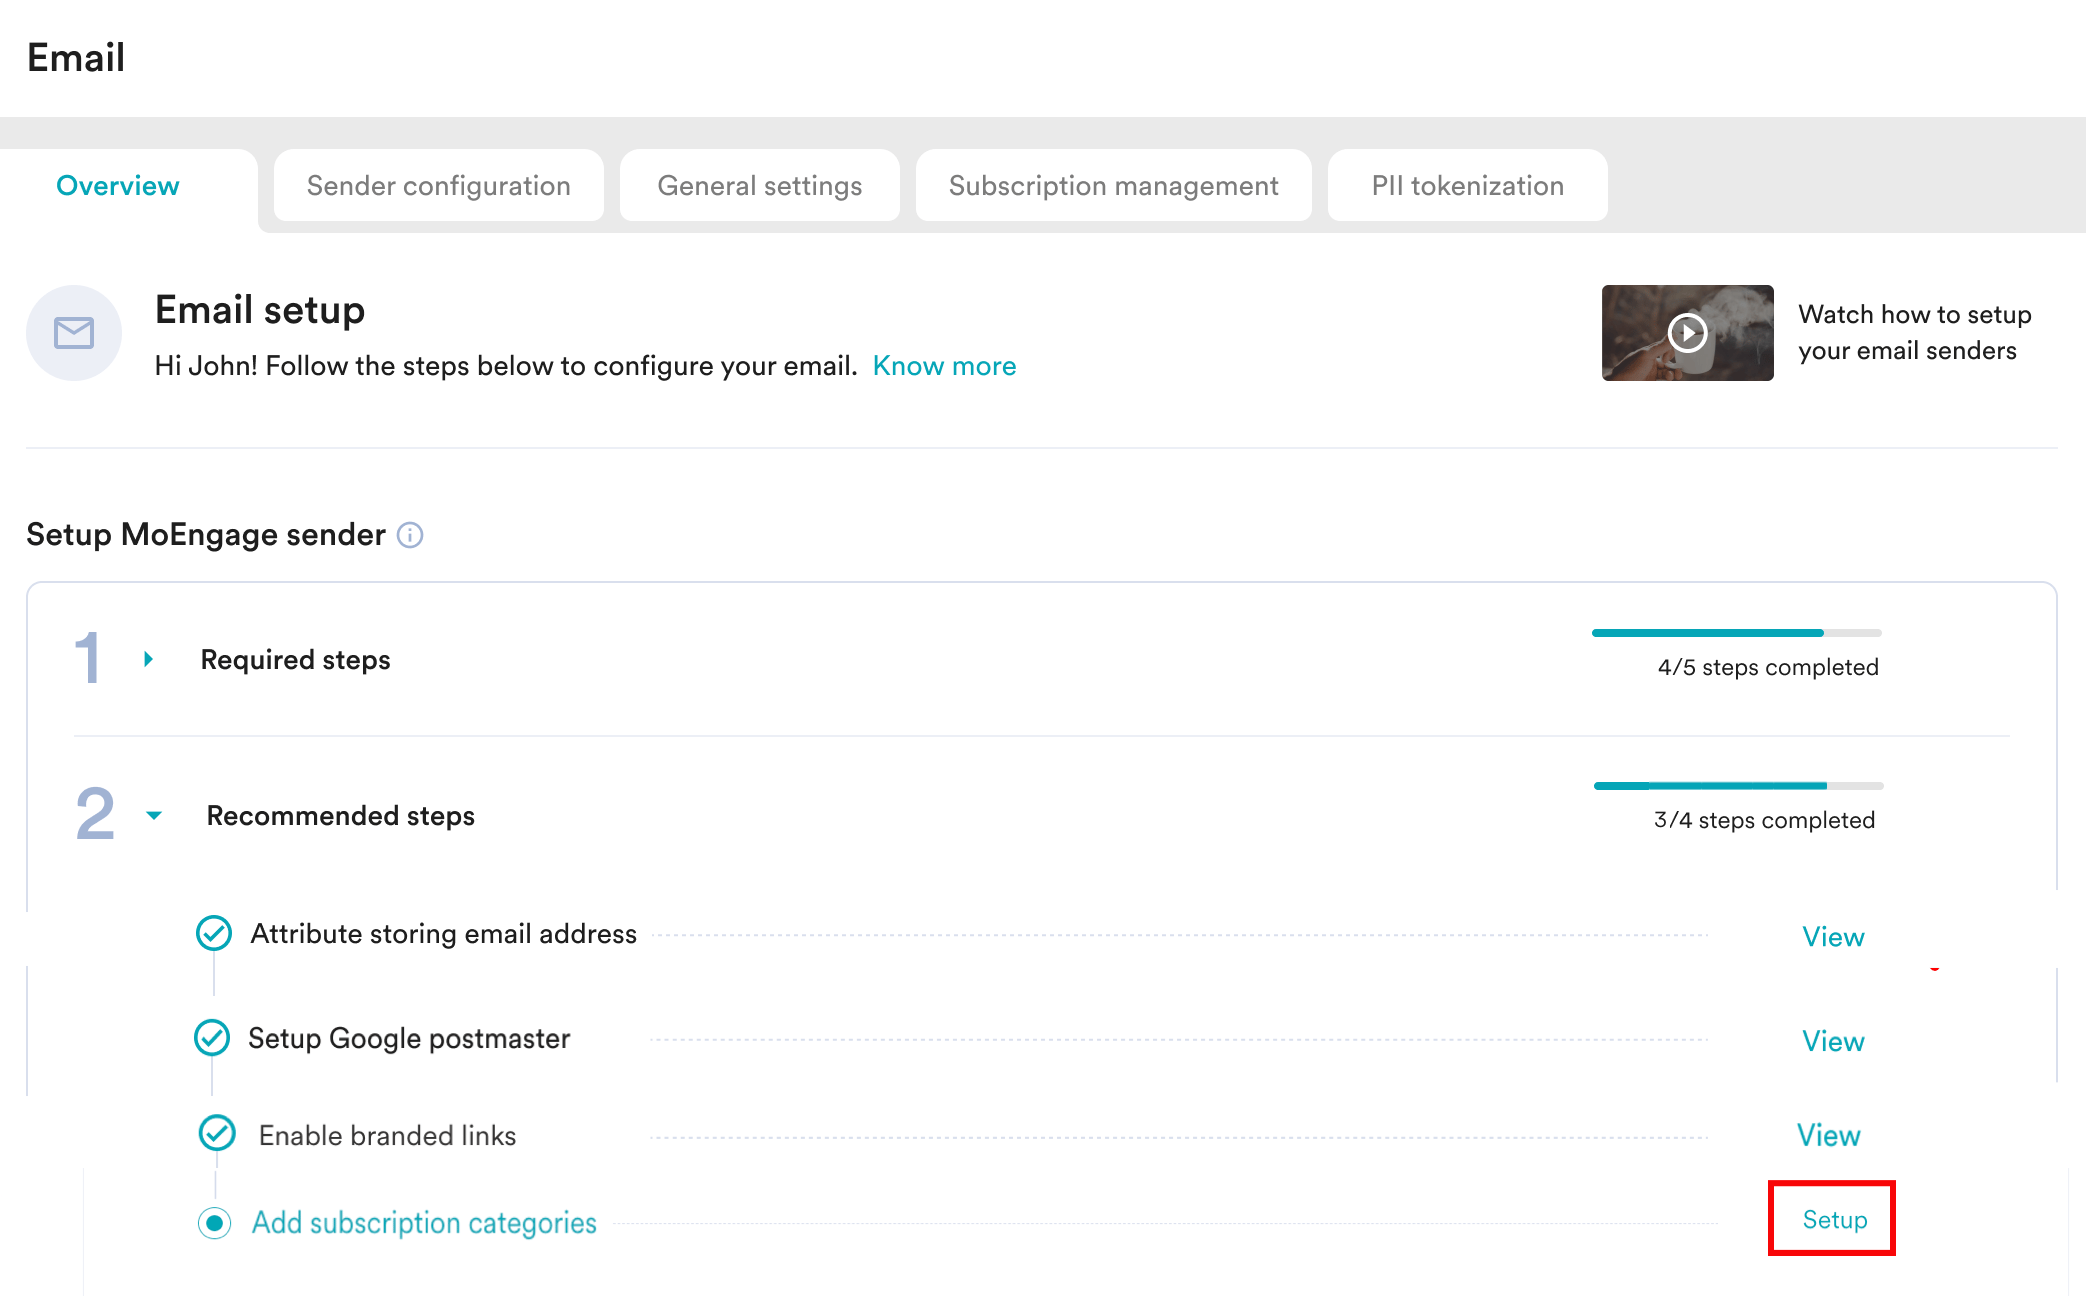 You can also click **Add subscription categories** on the **Sender configuration** tab.
 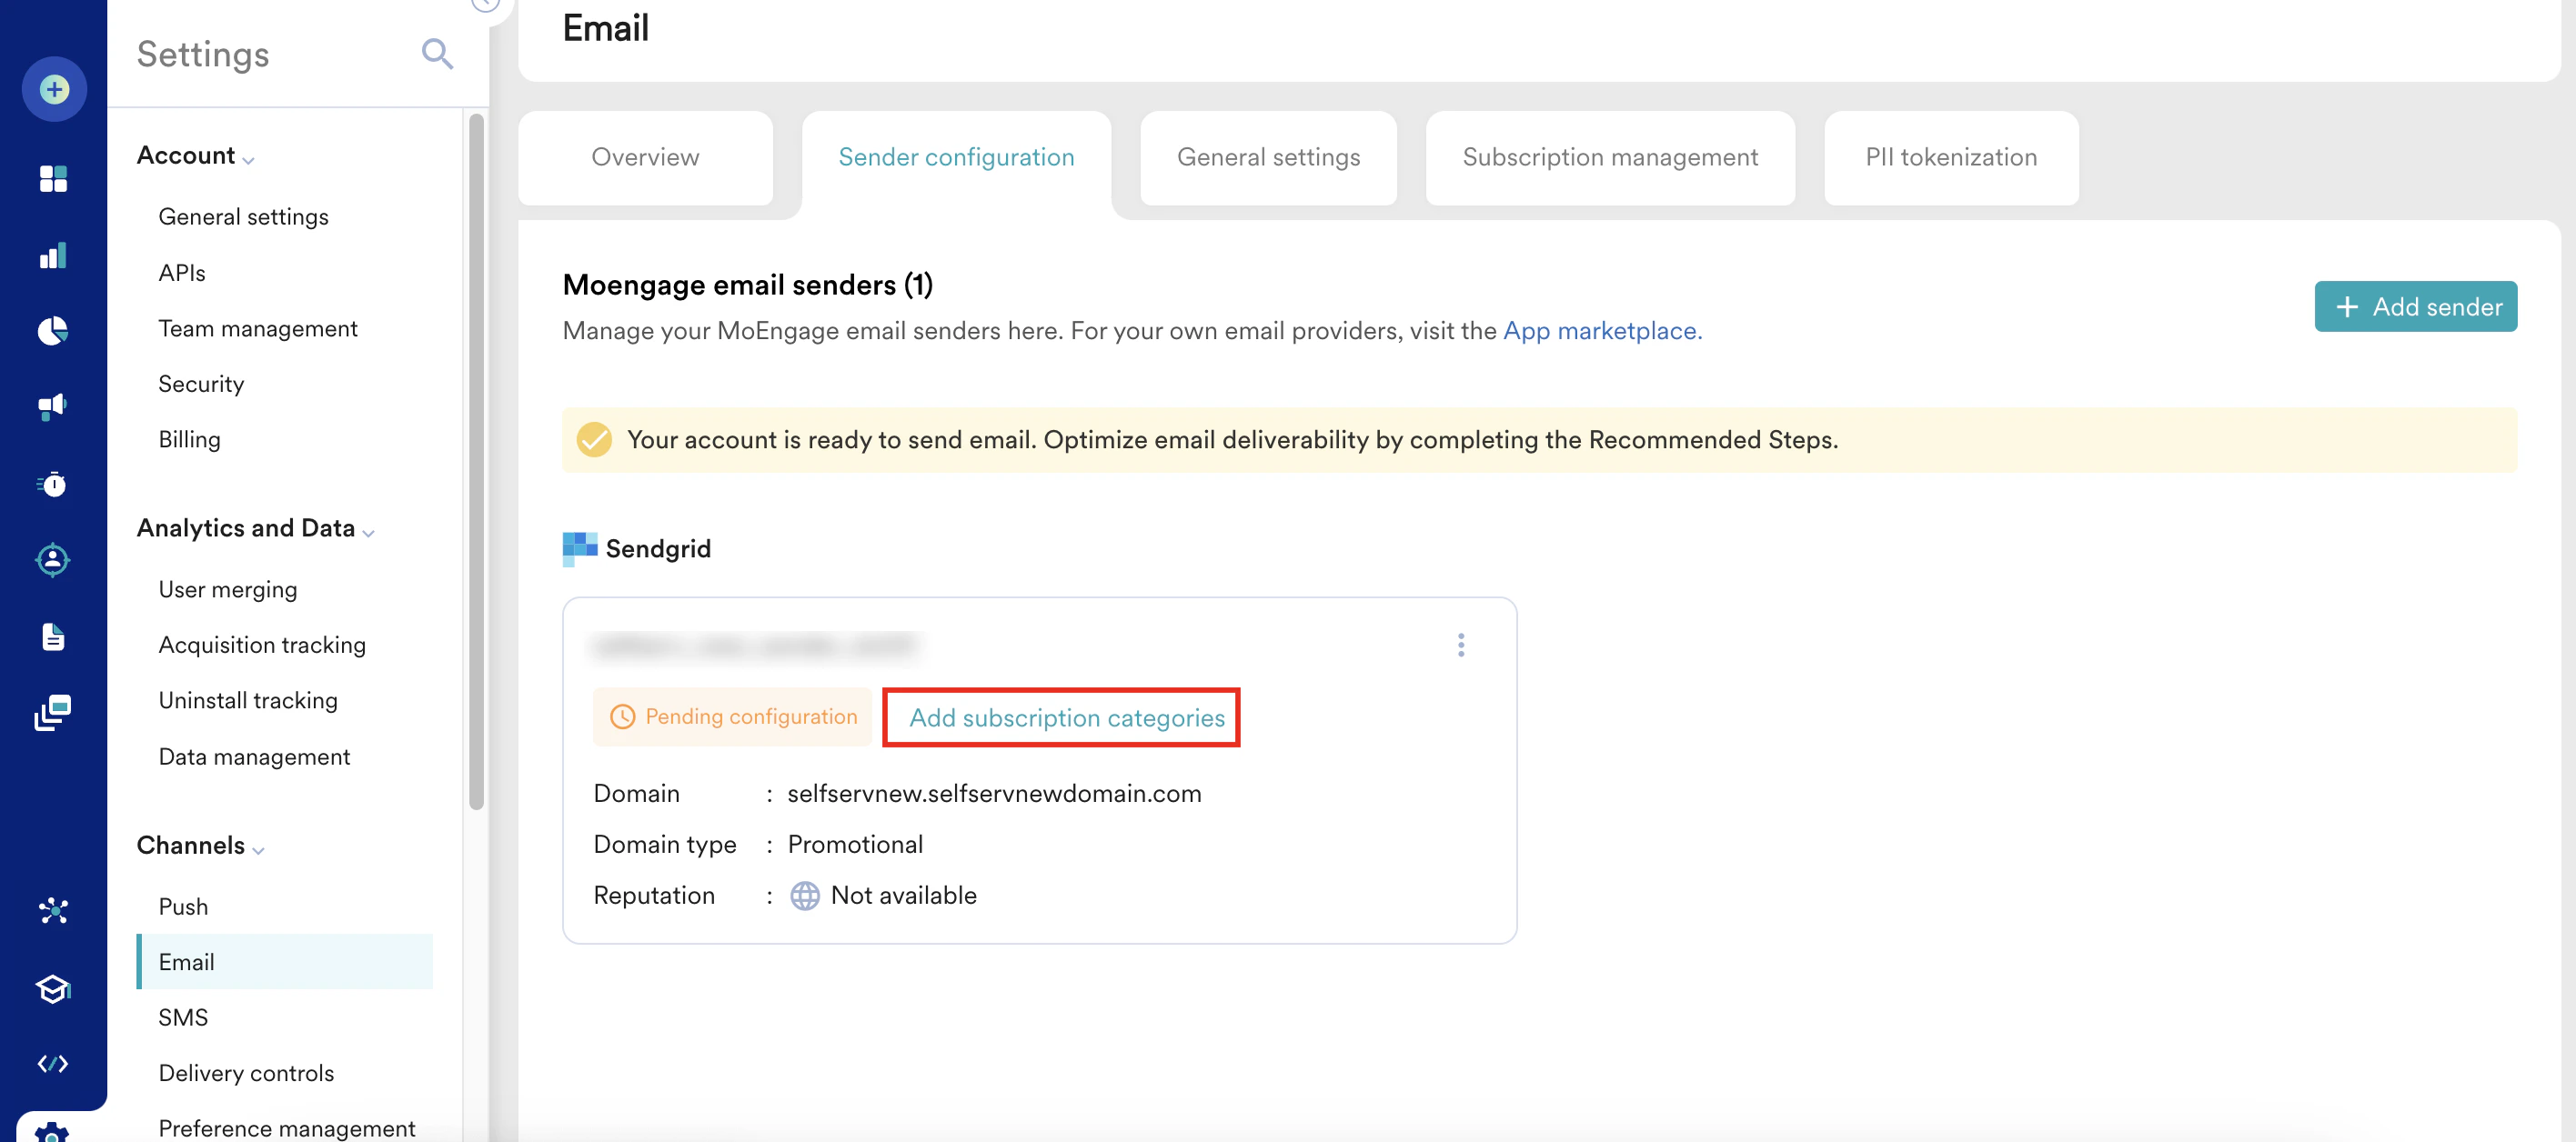 2. On the **Subscription Management** tab, you can configure subscription categories. After configuration, the status changes to **Completed**. For more information, refer to [Configure Subscription Categories](/user-guide/campaigns-and-channels/email/getting-started-with-email/configure-subscription-categories).
## **Manage Email Suppression**
Suppression Management helps you maintain your global email suppression list. This feature allows you to control which users are permanently restricted from receiving emails, ensuring compliance and protecting your sender reputation.
Perform the following steps to manage email suppression:
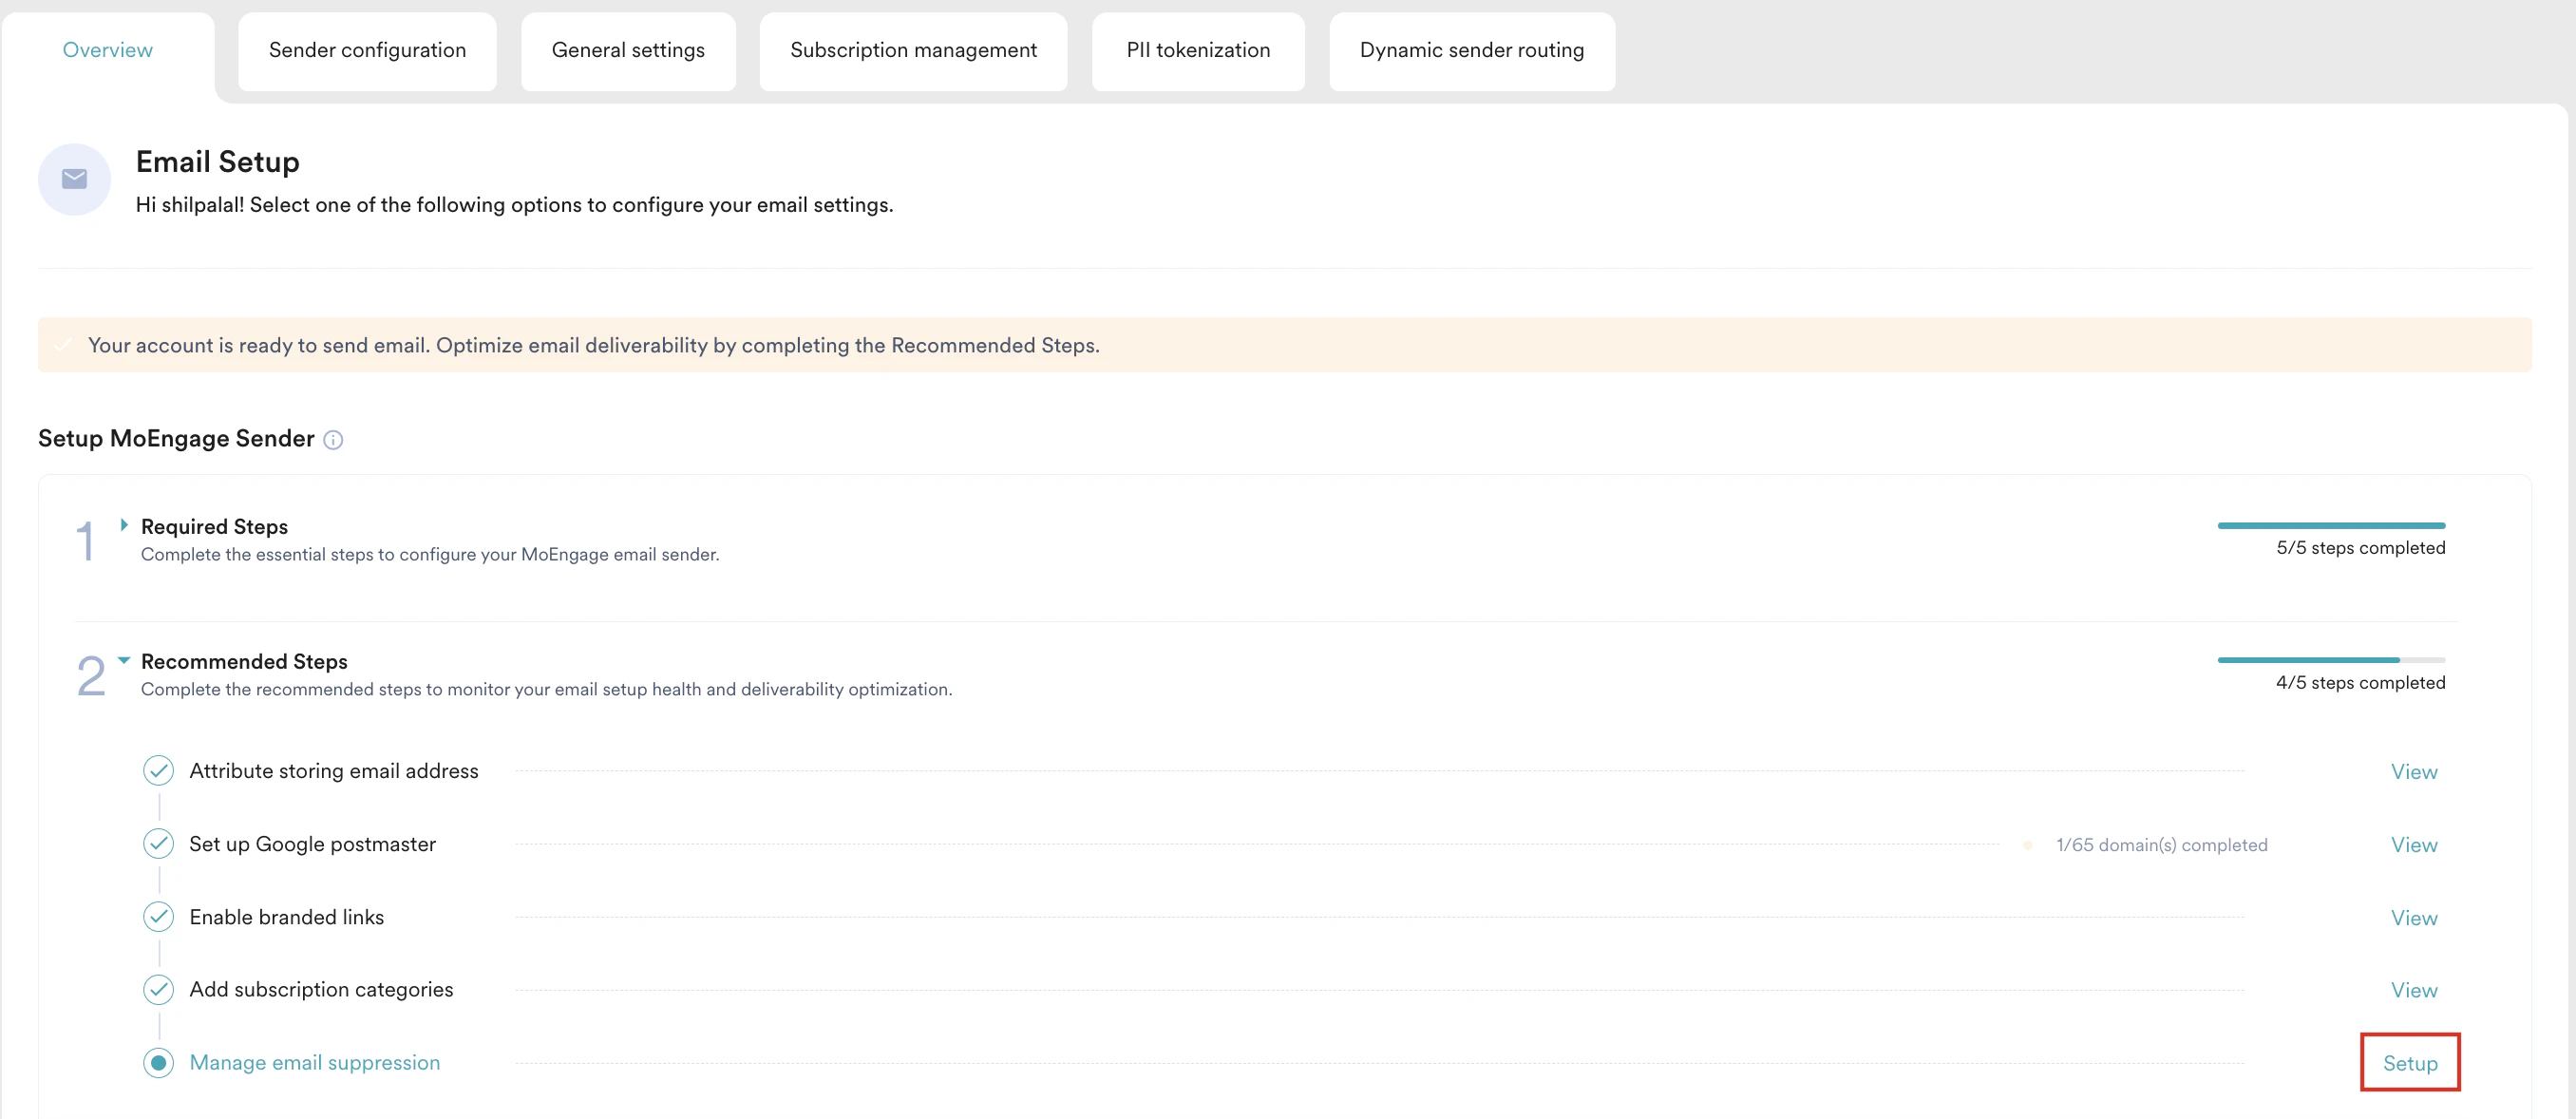
1. On the **Overview** tab, click **Setup** against the **Manage email suppression** step.
2. On the **Subscription Management** tab, you can configure subscription categories. After configuration, the status changes to **Completed**. For more information, refer to [Configure Subscription Categories](/user-guide/campaigns-and-channels/email/getting-started-with-email/configure-subscription-categories).
## **Manage Email Suppression**
Suppression Management helps you maintain your global email suppression list. This feature allows you to control which users are permanently restricted from receiving emails, ensuring compliance and protecting your sender reputation.
Perform the following steps to manage email suppression:
1. On the **Overview** tab, click **Setup** against the **Manage email suppression** step.
 \
\
You can also click **Manage email suppression** on the **Sender configuration** tab.
\
\
You can also click **Manage email suppression** on the **Sender configuration** tab.
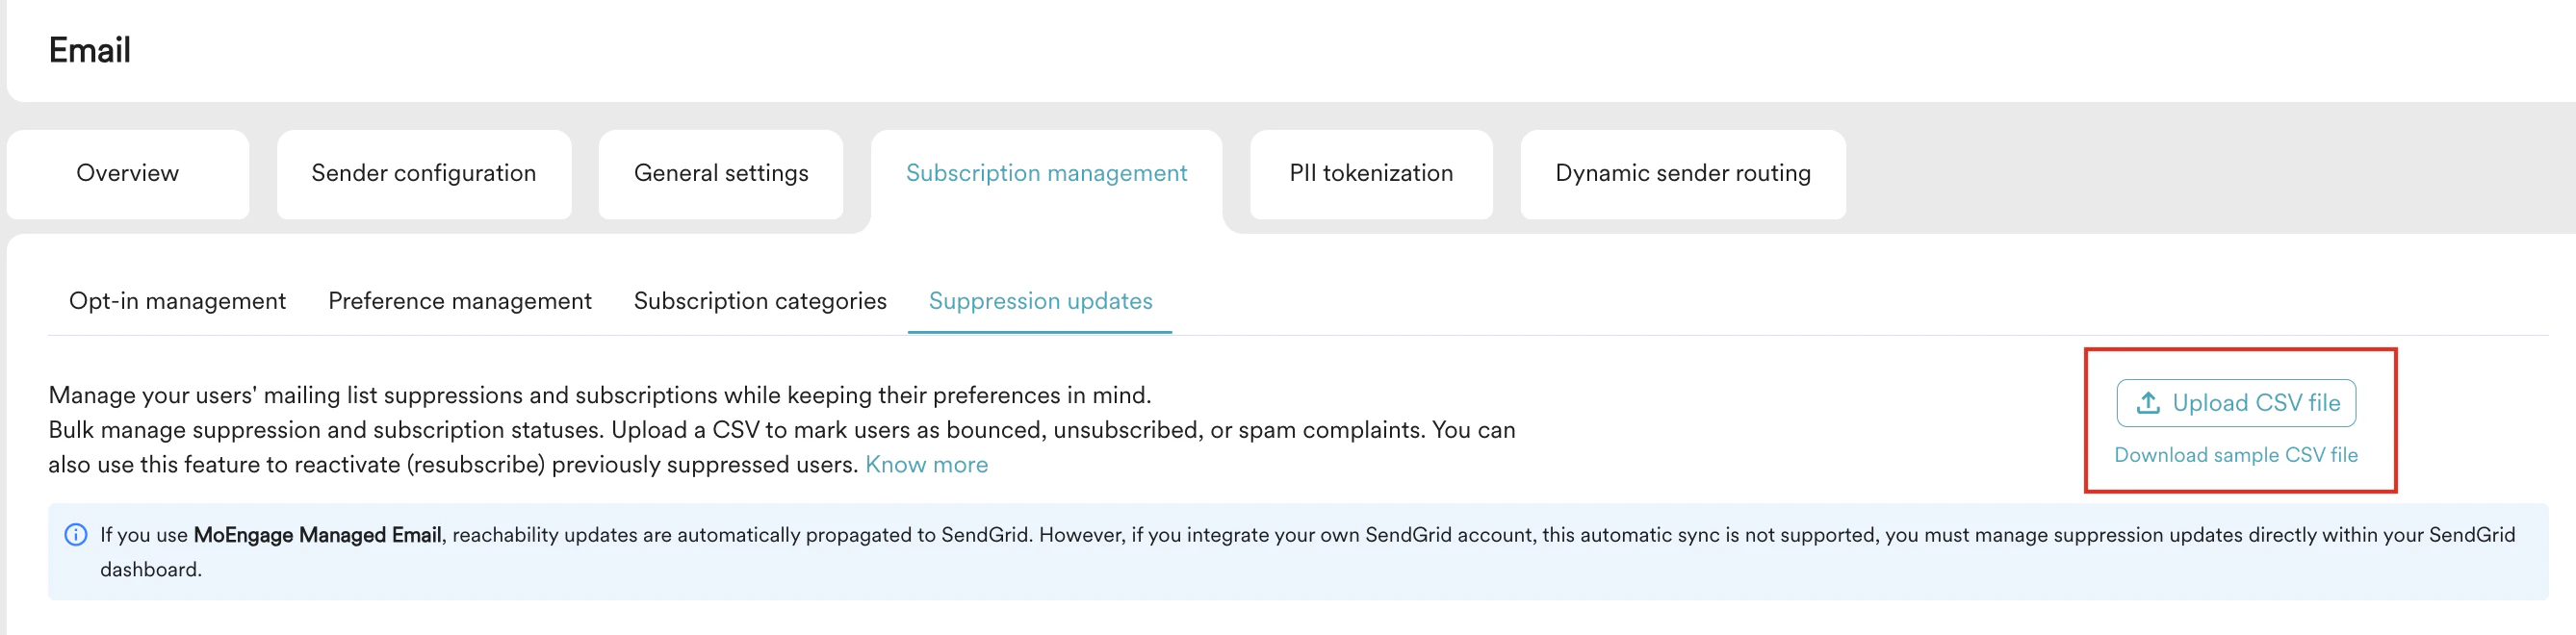
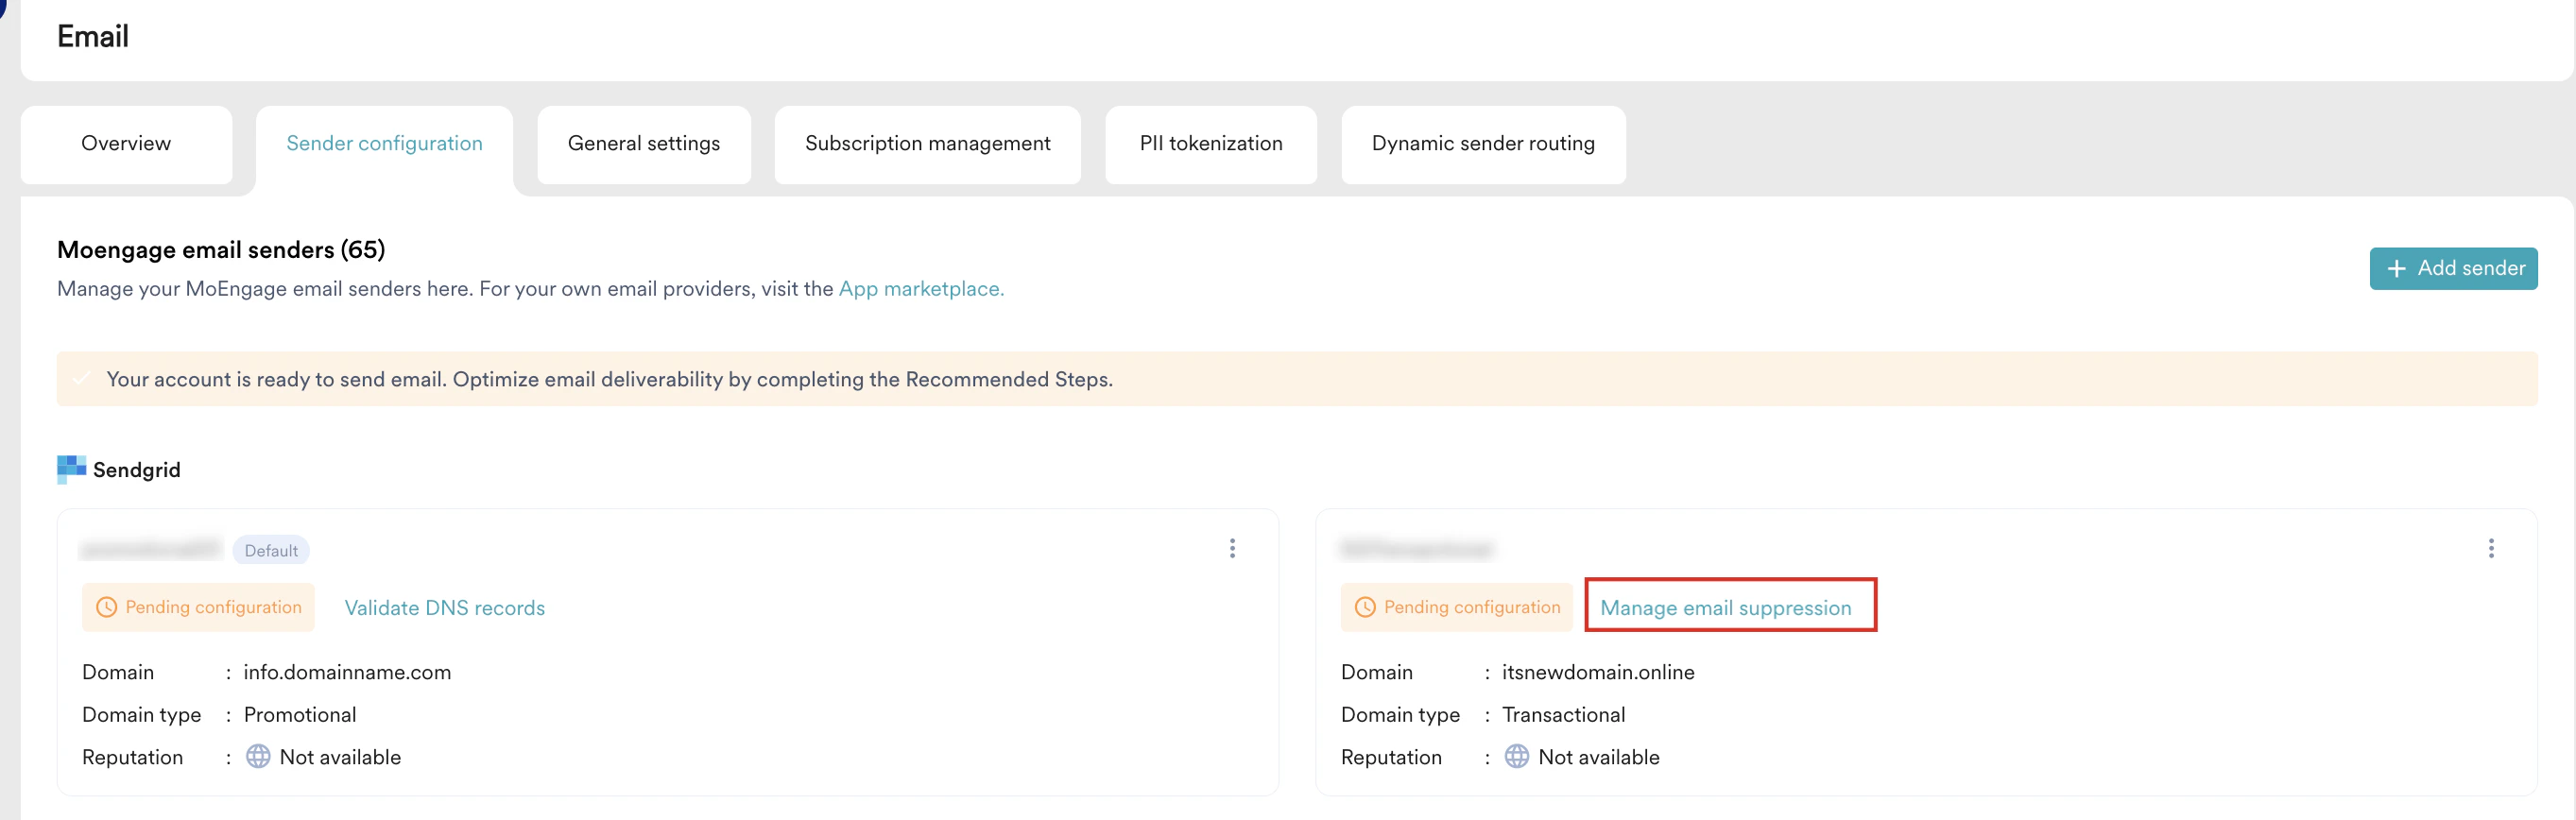 2. The above steps redirect you to the **Suppression updates** tab, under the **Subscription management** tab. Click **Upload CSV file**. While uploading, ensure that the [CSV file requirements](/user-guide/campaigns-and-channels/email/getting-started-with-email/suppression-updates#csv-file-requirements) are met for successful processing.
 3. On the **Update subscriptions** dialog box, upload the **Subscription update file** that contains the list of users who may have bounced, marked your emails as spam, or unsubscribed/opted out in the past. For more information, refer to [Suppression Updates](/user-guide/campaigns-and-channels/email/getting-started-with-email/suppression-updates).
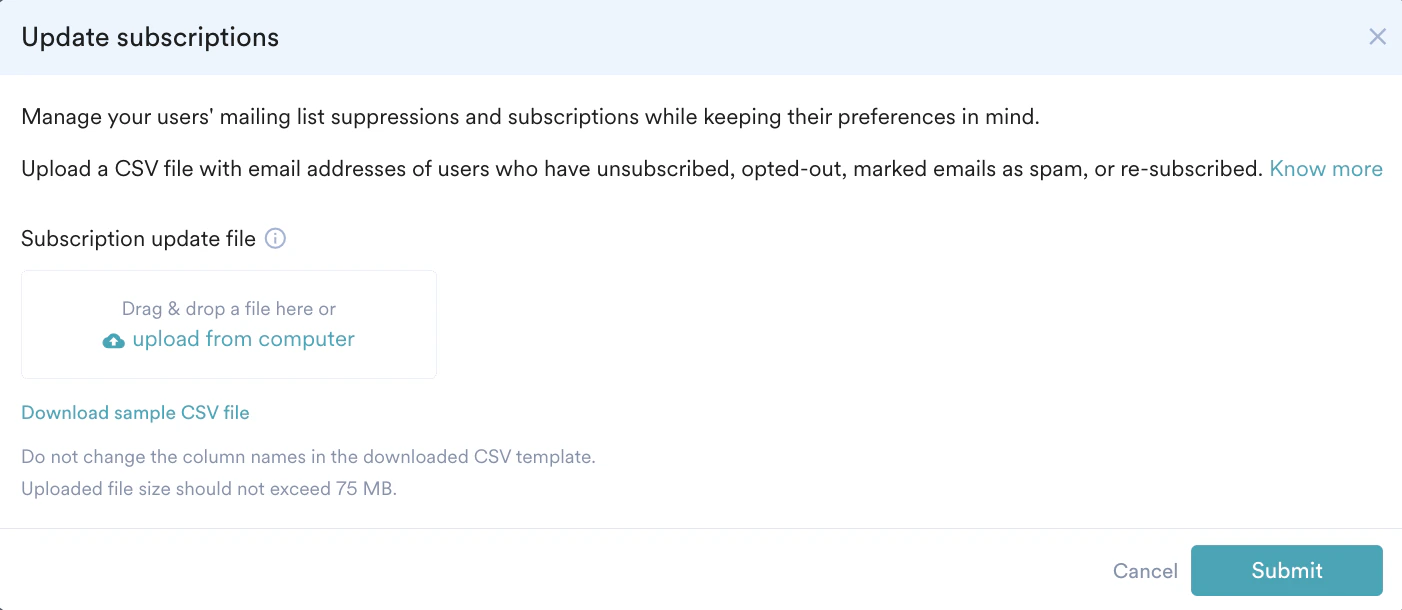 4. Click **Submit**. After submitting, allow a few minutes for MoEngage to process the data. Processing time varies depending on file size.
5. After submitting, the uploaded files are listed in the [Update history](https://moengage-user-guide.mintlify.app/user-guide/campaigns-and-channels/email/getting-started-with-email/configure-email-channel#:~:text=the%20image%20below%3A-,Update%20History,-The%20uploaded%20files) section as shown below:
4. Click **Submit**. After submitting, allow a few minutes for MoEngage to process the data. Processing time varies depending on file size.
5. After submitting, the uploaded files are listed in the [Update history](https://moengage-user-guide.mintlify.app/user-guide/campaigns-and-channels/email/getting-started-with-email/configure-email-channel#:~:text=the%20image%20below%3A-,Update%20History,-The%20uploaded%20files) section as shown below:
 You will also receive an email notification when the file is processed, and the Download icon becomes active. This step is marked as Complete only when the file upload process returns a status of Successful or Partially Successful.
The file remains available for download for 7 days, after which it will be removed.
After configuring both the required and recommended steps, the status of the sender changes to **Configured**.
You will also receive an email notification when the file is processed, and the Download icon becomes active. This step is marked as Complete only when the file upload process returns a status of Successful or Partially Successful.
The file remains available for download for 7 days, after which it will be removed.
After configuring both the required and recommended steps, the status of the sender changes to **Configured**.